

Page 1

INSTRUCTION BOOK
Page 2

IMPORTANT SAFETY
INSTRUCTIONS
Your sewing machine is designed and constructed only for HOUSEHOLD use.
Read all Instructions before using this appliance.
DANGER – To reduce the risk of electric shock:
1. An appliance should never be left unattended when plugged in. Always unplug this appliance from the
electrical outlet immediately after using and before cleaning.
2. Always unplug before relamping. Replace bulb with same type rated 15 Watts.
3. Do not reach for the appliance that has fallen into water. Unplug immediately.
4. Do not place or store appliance where it can fall or be pulled into a tub or sink. Do not place in or drop
into water or other liquid.
WARNING – To reduce the risk of burns, fire, electric shock,or injury to persons.
1. Do not allow to be used as a toy. Close attention is necessary when this appliance is used by or near
children.
2. Use this appliance only for its intended use as described in this manual.
Use only attachments recommended by the manufacturer as contained in this manual.
3. Never operate this appliance if it has a damaged cord or plug, if it is not working properly, if it has been
dropped or damaged, or dropped into water. Return the appliance to the nearest authorized dealer or
service center for examination, repair, electrical or mechanical adjustment.
4. Never operate the appliance with any air opening blocked. Keep ventilation openings of the sewing
machine and foot controller free from accumulation of lint, dust, and loose cloth.
5. Never drop or insert any object into any opening.
6. Do not use outdoors.
7. Do not operate where aerosol (spray) products are being used or where oxygen is being administered.
8. To disconnect, turn all controls to the off (“ 0 ”) position, then remove plug from outlet.
9. Do not unplug by pulling on cord. To unplug, grasp the plug, not the cord.
10. Keep fingers away from all moving parts. Special care is required around the sewing machine needle
and knives.
11. Always use the proper needle plate. The wrong plate can cause the needle to break.
12. Do not use bent needles.
13. Do not pull or push fabric while stitching. It may deflect the needle causing it to break.
14. Switch the sewing machine off (“ 0 ”) when making any adjustment in the needle area, such as
threading needle, changing needle, threading loopers, or changing presser foot, and the like.
15. Always unplug the sewing machine from the electrical outlet when removing covers, lubricating, or
when making any other adjustments mentioned in the instruction manual.
SAVE THESE INSTRUCTIONS
1
Page 3

Do’s and Don’ts
1. Always be aware of the up-and-down movement of the needle and do not turn your attention
away from the machine while it is running.
2. When leaving the sewing machine unattended, the main switch of the machine must be
switched off or the plug must be removed from the socket-outlet.
3. When servicing the sewing machine, or when removing covers or changing lamps, the machine
must be disconnected from the power supply by removing the plug from the socket-outlet.
4. Do not place anything on the foot control, otherwise the machine will start inadvertently, or the
control or motor may burn out.
5. The maximum permissible power for the sewing lamp bulb is 15 watts.
6. When using your sewing machine for the first time, place a piece of waste fabric under the
presser foot and run the machine without thread for a few minutes. Wipe away any oil which
may have appeared.
2
Page 4

TABLE OF CONTENTS
PREPARATION
Names of Parts...................................................4
Standard Accessories ........................................4
Connecting the Machine to the Power Supply
Controlling Sewing Speed .................................5
For Your Safety .................................................. 5
How to turn the Handwheel ............................... 6
Opening and Closing the Side Cover ................6
Opening and Closing the Looper Cover ............ 6
The Position of Thread Guide Bar ...................... 7
Attaching the Spool Holder Cap and Net
Changing Needle................................................ 8
Raising or Lowering the Presser Foot ................ 8
Removing the Presser Foot................................9
Attaching the Presser Foot ................................ 9
Adjustment of Foot Pressure ............................. 9
Adjustment of Stitch Length ............................ 10
Adjustment of Differential Feed Ratio ..............10
To Deactivate the Upper Knife ......................... 11
To Activate the Upper Knife ............................. 11
Adjustment of Cutting Width ............................ 12
Adjustment of Needle Plate Setting Knob ....... 13
Threading the Machine ............................. 14~23
• Threading the Lower Looper .................... 15
• Threading the Upper Looper .................... 18
• Threading the Needle on the Right........... 20
• Threading the Needle on the Left ............. 22
............. 7
TEST STITCHING
...... 5
ROLLED HEMMING, PICOT EDGING AND
NARROW HEMMING
Machine Setting and Thread, Fabric and
Range of the Tension Dial ................................ 31
Thread Tension ................................................32
For Better Results ............................................ 33
DECORATIVE OVEREDGING
Thread and Fabric ............................................ 34
Machine Setting ............................................... 34
GATHERING
Thread and Fabric ............................................ 34
Machine Setting ............................................... 34
PIN TUCKING
Thread and Fabric ............................................ 35
Machine Setting ............................................... 35
Sewing .............................................................. 35
CARE OF YOUR MACHINE
Replacing the Upper Knife ............................... 36
Cleaning Upper Knife Area............................... 36
Replacing the Light Bulb .................................. 37
Cleaning the Feed Dog .................................... 37
Oiling the Machine ........................................... 38
Carrying the Machine ....................................... 38
Troubleshooting ............................................... 39
Starting Sewing ................................................ 24
Finishing Sewing .............................................. 24
Sewing Continuously .......................................24
How to use Guide Lines ................................... 24
Securing Ends ..................................................25
Thread Tension (4 threads) .............................. 26
Threading the Machine (3 threads) .................. 28
Thread Tension (3 threads) .............................. 29
Thread and Needle Chart ................................. 30
OPTIONAL PARTS ........................................ 40
3
Page 5

2
17
1
5
15 16
14
13
12
11
10
PREPARATION
Names of Parts
1 Left needle thread tension dial
2 Right needle thread tension dial
3 Upper looper thread tension dial
4 Lower looper thread tension dial
5 Side cover
6 Looper cover
7 Handwheel
8 Power switch
9 Machine socket
3
4
20
21
22
23
24
27
9
10 Differential feed dial
8
11 Stitch length dial
12 Spool stand
6
7
18
19
25
26
13 Spool holder
14 Spool pin
15 Thread guide bar
16 Thread guide
17 Pressure adjusting screw
18 Presser foot
19 Needle plate setting knob
20 Thread cutter
21 Presser foot lifter
22 Needle plate
23 Upper knife release knob
24 Cutting width adjusting dial
25 Upper looper
26 Lower looper
27 Upper knife
28 Lower knife
28
Standard Accessories
1 Screwdrivers
2 Tweezers
3 Set of needles
123
4
Page 6

Connecting the Machine to the Power Supply
5
Before connecting the machine to the power supply,
make sure the voltage and frequency shown on the
43
machine conform to your electrical power.
2
2
1
1
6
1. Turn off the power switch, and connect the
machine plug to the machine socket.
2. Connect the power supply plug to your power
supply.
3. Turn on the power switch.
1
Power switch
2 Machine plug
3 Machine socket
4 Power supply plug
5 Power supply
6 Speed controller
1
3
Controlling Sewing Speed
Sewing speed can be varied by the speed controller.
The harder you press on the controller, the faster the
machine runs.
Step on the speed controller with the presser foot
lifter up, and practice controlling the speed.
1
1 Speed controller
For Your Safety:
* While in operation, always keep your eye on the
sewing area, and do not touch any moving parts
such as the thread take-up lever, loopers,
handwheel, needle or knives.
* Always disconnect the machine from the power
supply:
— when leaving the machine unattended.
— when attaching or removing parts.
— when threading or cleaning the machine.
* Do not place anything on the foot control,
otherwise the machine will start inadvertently.
5
Page 7
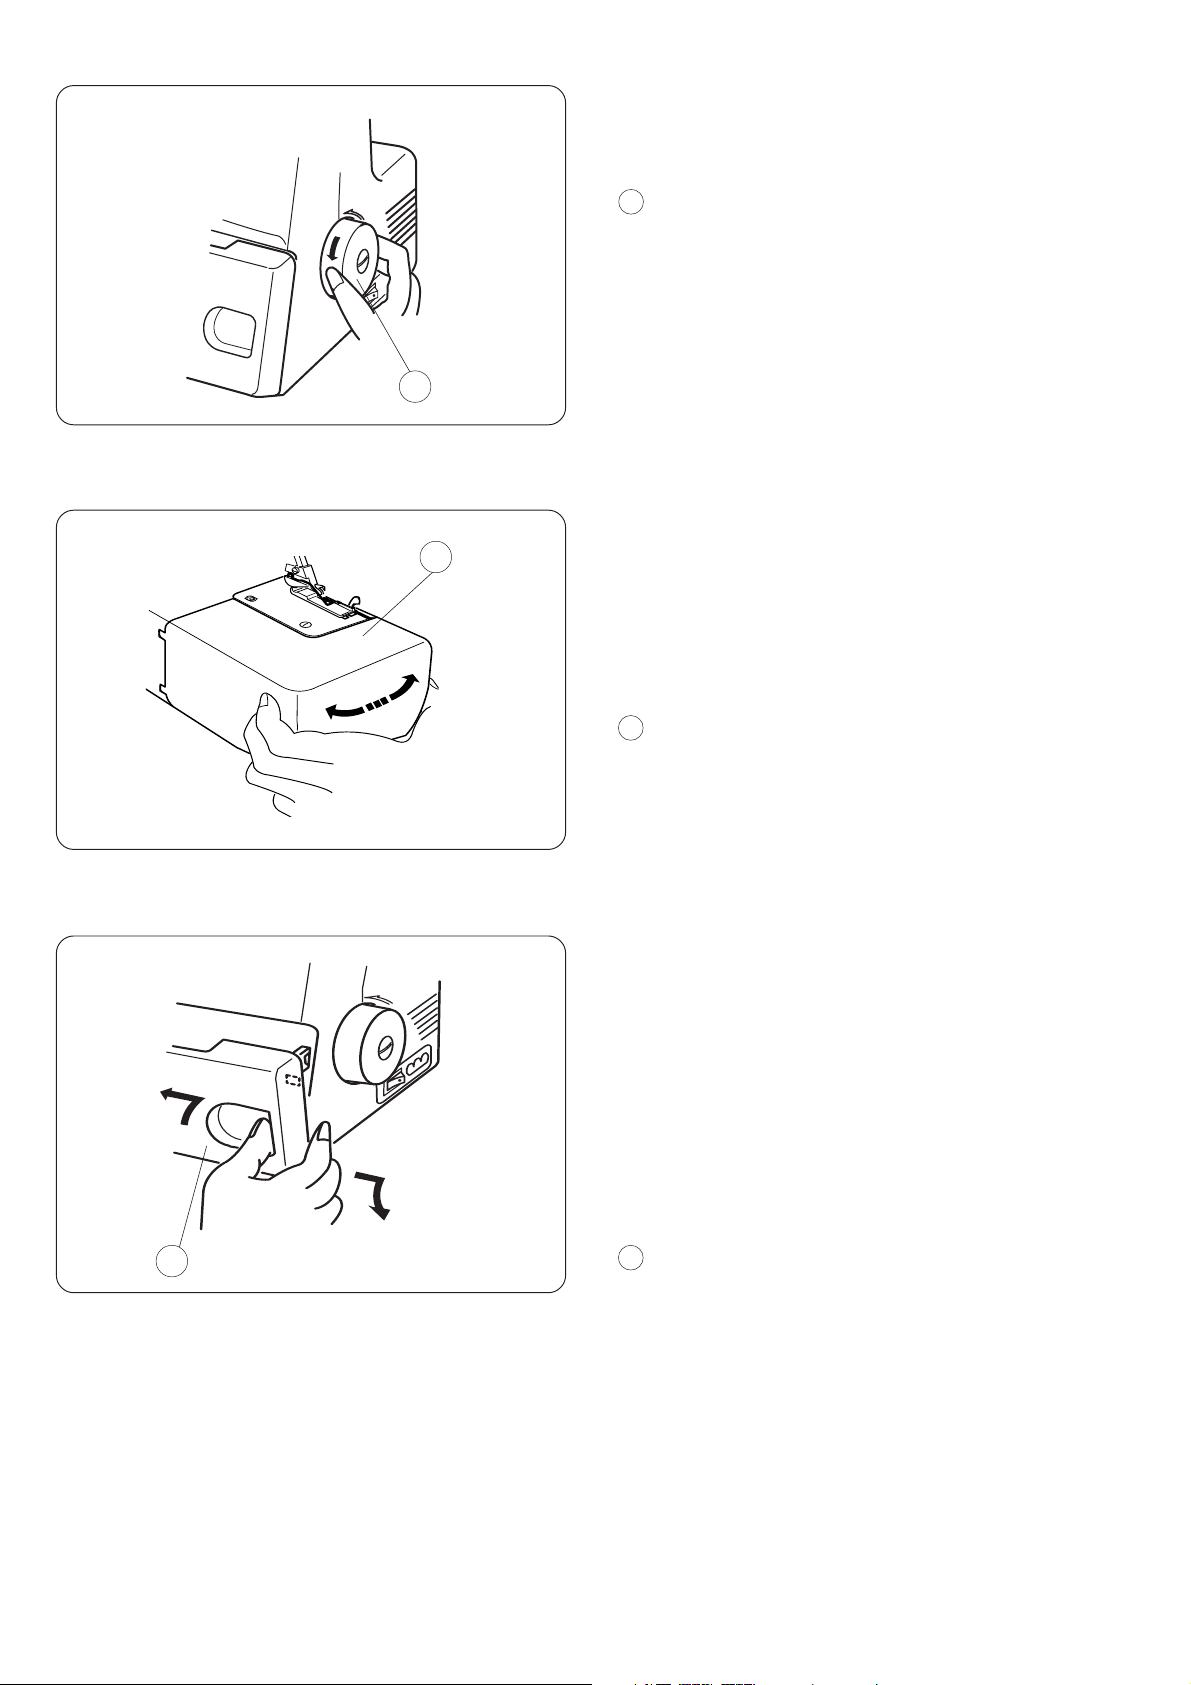
How to turn the Handwheel
Always turn the handwheel toward you (Counterclockwise).
1
Handwheel
1
Opening and Closing the Side Cover
B
A
1
To open:
Push the side cover to the left.
To close:
Push the side cover to the right.
1
Side cover
Opening and Closing the Looper Cover
To open: A
While pushing with the thumb to the right as far as it
will go, pull the looper cover toward you.
To close: B
Lift the looper cover and push it against the
machine.
The looper cover snaps into its position
automatically.
Looper cover
1
6
1
Note:
Always close both side cover and looper cover
when the machine is in use.
Page 8

The Position of Thread Guide Bar
1
2
3
1. Pull the thread guide bar up as far as it will go.
2. Turn the thread guide bar so that the thread
guides are right above the spool pins.
1 Thread guide bar
2 Thread guide
3 Stoppers
4 Spool pin
4
* Make sure to lock the thread guide of guide pole
in the correct position with the two stoppers.
2
1
Attaching the Spool Holder Cap and Net
1
3
4
2
(Optional)
1. When you use a small thread spool, pull out the
spool holder from the spool pin. Then place the
spool with its slit side up, and put the spool
holder cap on top of it.
1 Spool holder
2 Spool pin
3 Spool holder cap
4 Slit
1
2. If the thread slips down from the spool
during threading and/or sewing, put a net on the
spool as illustrated to prevent jamming.
2
* The spool holder cap and net are optional
accessories.
Net
1
2 Spool pin
1
2
7
Page 9

Changing Needle
Turn off the power switch and unplug the machine.
1
2
4
3
4
2
5
1
Raise the needle to its highest position.
Then loosen the left or right needle clamp screw for the
needle you are going to remove.
1
Needle clamp screw on the left
2 Needle clamp screw on the right
* Use HA-1SP #14 Needle or #11.
To attach the needle on the right :
Insert a new needle into the needle clamp with the
flat side to the back until the top of the needle
touches the stopper pin, then tighten the needle
clamp screw on the right.
6
6
To attach the needle on the left :
Insert a new needle into the needle clamp with the
flat side to the back until the top of the needle
touches the edge of the needle bar, then tighten the
needle clamp screw on the left.
* When the needles are set correctly, the left
needle is higher than the right one.
* Use HA-1SP #14 Needle or #11.
1
Needle clamp
2 Needle
3 Needle stopper pin
4 Edge of needle bar
5 Needle clamp screws
6 Flat side to the back
* Do not use any needle which is bent or blunt.
Raising or Lowering the Presser Foot
By raising or lowering the presser foot lifter, the
presser foot goes up or down.
* While in operation, keep the presser foot lowered
1
2
8
except when threading the machine or testrunning without threads.
1
Presser foot
2 Presser foot lifter
Page 10

Removing the Presser Foot
1. Turn off the power switch and unplug the
2
4
3
1
machine.
2. Raise the needle and the presser foot.
3. Press the lever located on the back of the foot
holder. The presser foot will drop off.
1
Needle
2 Presser foot lifter
3 Foot holder
4 Lever
Attaching the Presser Foot
3
2
1
2
1. Turn off the power switch and unplug the
machine.
2. Place the presser foot so that the pin on the foot
lies just under the groove of the foot holder.
3. Lower the foot holder to lock the foot into place.
4. Raise the presser foot lifter to check that the
presser foot is secure.
1
Groove
2 Pin
3 Lever
Adjustment of Foot Pressure
4
1 mm
3
It is not necessary to adjust the presser foot’s
pressure for normal sewing.
When you sew heavy or lightweight fabrics, turn the
adjusting screw:
–– clockwise for heavyweight fabric.
–– counterclockwise for lightweight fabric.
* For normal sewing, set the adjusting screw so
1
that it sits 1mm below the top of the machine.
2
1
To decrease
2 To increase
3 Adjusting screw
4 Top of the machine
9
Page 11

Adjustment of Stitch Length
1
2
To select stitch length, turn the dial.
The larger the number, the longer the stitch.
The stitch length can be adjusted from 1 to 4 mm.
Position “R” is for rolled and narrow hemmings.
1
Stitch length dial
2 Setting mark
Adjustment of Differential Feed Ratio
The differential feed ratio can be altered by turning
the dial.
The number on the dial indicates the ratio between
1
the main and the sub feed motion.
1.0 indicates the neutral position.
1
2
Differential feed dial
2 Setting mark
How to adjust
• If the sewn fabric is stretched, turn the dial
counterclockwise (toward 2.2).
1
• If the sewn fabric is gathered, turn the dial
clockwise (toward 0.5).
Stretched
1
2 Gathered
10
2
Page 12

To Deactivate the Upper Knife
1.
Turn off the power switch and unplug the machine.
2. Open both the looper cover and side cover.
3. Turn the upper knife release knob toward you
while pushing it to the right, then guide the hole
on the upper knife to the pin to lock the upper
1
knife in the down position.
4. Close the looper cover and side cover.
2
Upper knife release knob
1
2 Stopper pin
3 Upper Knife
3
To Activate the Upper Knife
1.
Turn off the power switch and unplug the machine.
2. Open both the looper cover and side cover.
3. Turn the upper knife release knob away from you
while pushing it to the right, then guide the
groove on the upper knife to the pin to lock the
1
upper knife in the up position.
4. Close the looper cover and side cover.
1
Upper knife release knob
2 Stopper pin
2
11
Page 13

Adjustment of Cutting Width
1
When cutting width is too narrow or too wide against
seam width, adjust it as follows.
(B)
1. Turn off the power switch and unplug the
machine.
(A)
2. Open the looper cover and side cover.
3. Set the upper knife to down position
2
4. Turn the cutting width adjusting dial to get
4
2
3
desired position of lower knife.
Cutting width adjusting dial
1
2 Lower knife
3 Standard setting
* The cutting width of this model can be
adjusted approximately 3.0 to 5.0 mm from the
right needle position depending upon your
sewing needs or the fabric being used.
(The cutting width should be adjusted to get
the same results as in drawing 4 .)
2
2
When cutting width is too narrow.
Turn cutting width adjusting dial clockwise (A).
Lower knife will move to right.
When cutting width is too wide.
Turn the cutting width adjusting dial counterclockwise
(B).
Lower knife will move to left.
5. Set the upper knife to up position.
6. Close the looper cover and side cover.
12
Page 14

Adjustment of Needle Plate Setting Knob
(Changing to Standard Serging or Rolled
Hemming)
1
1. Turn off the power switch and unplug the
machine.
2. Open the looper cover and side cover.
3. Deactivate the upper knife.
4. Push the cutting width adjusting dial to the right
as far as it will go, then, move the needle plate
setting knob to the guide line of S (for Standard
2
3
5
4
Serging) or R (for Rolled Hemming).
Release the cutting width adjusting dial to the left
gently.
5. Set the upper knife to up position.
6. Close the looper cover and side cover.
1
Chaining finger
2 Guide line
3 Cutting width adjusting dial
4 Upper knife
5 Needle plate setting knob
(A)
(B)
(A)Standard Serging
* The chaining finger is located beside the needle
plate as shown in diagram (A) for guiding the flat
edge of the fabric for overlock sewing.
1
5
(B)Rolled Hemming
* Pull the needle plate setting knob from “S” to “R”
position, so that the fabric edge will be rolled for
hemming, picot edging and narrow hemming.
1
5
13
Page 15

3
2
4
5
1
6
Threading the Machine
The left illustration shows the completed threading
conditions of four threads.
Lower looper thread
1
2 Upper looper thread
3 Right needle thread
4 Left needle thread
5 Thread guide
6 Thread guide plate
7 Threading chart
The machine is pre-threaded to make threading
easier.
Tie the end of a new thread to one of the pre-set
threads, and pull it to draw the new thread through
the machine, following the steps below.
Turn off the power switch before threading the
*
machine.
1. Pull the threads from the spools and draw them
through the thread guides, then tie the thread
ends together.
2. Raise the presser foot, draw the threads until the
knots are coming out from under the back of the
presser foot.
3. However, stop drawing the needle threads when
the knots reach just before the needle eye.
7
1
2
Cut the knots and thread the needle eye.
4. Before starting sewing, clear the needle threads
from under the presser foot to make sure they are
not caught below the needle plate.
(Draw the needle threads in the direction A)
Then pull out the threads to the back approximately 10 cm (4˝) away from the presser foot.
Lower the presser foot, and you are now ready to
sew.
Thread guide
1
2 Needle
3 Needle thread
4 Presser foot
5 Needle plate
14
A
3
4
5
• For re-threading the machine easily, start from the
lower looper, upper looper, right needle and left
needle threads.
Make sure to clear the needle threads out from
below the needle plate and draw them to the
back and under the presser foot about 10 cm (4˝).
Page 16

• Threading the Lower Looper
Open the looper cover and side cover.
1
Place the spool of thread on the right side spool pin.
* The points to thread for lower looper are marked
in green.
* A convenient threading chart is placed on the
machine body inside the looper cover.
2
3
5
11
4
10
9
6
7
8
1. Draw the thread through the right side thread
1
1
(A) (B)
guide from back to front: (A)
* If the thread is coming out from the thread guide
groove, pass the thread through the thread guide
hole again as shown: (B)
1
Thread guide
2. Pass the thread through the holes on the right side
of the thread guide plate as illustrated.
2
Thread guide plate
2
2
3. Pass the thread through the right side of the
3
looper thread guide, sliding the thread from left to
right.
3
Looper thread guide
3
15
Page 17

4. Insert the thread between tension discs from the
right. Then pull both sides of the thread firmly to
insert it between tension discs.
5. Pass the thread through lower looper thread
guide (1).
Lower looper thread tension dial
4
5
5 Lower looper thread guide (1)
4
4
5
9
6789
(1)
(2)
* Make sure that the thread is between the tension
discs.
(1) Thread
(2) Tension discs
6. Pass the thread through lower looper thread
guide (2).
7. Pass the thread through the looper thread
take-up lever (lower).
8. Pass the thread through lower looper thread
guide (3).
9. Pass the thread through lower looper thread
guide (4).
6
6
8
7
Lower looper thread guide (2)
7 Looper thread take-up lever (lower)
8 Lower looper thread guide (3)
9 Lower looper thread guide (4)
16
10
10
(1)
(2)
(2)
10. Turn the handwheel toward you until the
lower looper comes to the right, and pass the
threader through the hole on lower looper thread
guide (5).
Hook the end of the thread on the threader.
* Looper threader is optional.
* If you don’t have the looper threader, turn the
handwheel towards you until the lower looper
comes to its most left position.
Thread lower looper thread guide (5) from the
left side with a pair of tweezers. Then, turn the
handwheel towards you to move the lower looper
to the right position.
Lower looper thread guide (5)
10
(1) Lower looper thread
(2) Looper threader
Page 18

11. Pull the threader to pass the thread through the
hole of lower looper thread guide (5).
Remove the thread from the threader, and draw
the thread through the hole on the lower looper
10 cm (4˝) or more with a pair of tweezers.
11
(1)
11
(2)
* For threading without the looper threader, draw
the thread from the right side of lower looper
thread guide (5) with a pair of tweezers.
* And draw the thread through the hole on the
lower looper 10 cm (4˝) or more with a pair of
tweezers.
Lower looper
11
(1) Looper threader
(2) Tweezers
NOTE: How to thread woolly nylon/polyester thread.
1
* The illustration at left shows one of the easiest
ways to pass woolly nylon/polyester thread
through the lower looper.
2
Lower looper
1
2 Ordinary thread
3 Woolly nylon/polyester thread
3
17
Page 19

• Threading the Upper Looper
Place a spool of thread on the spool pin second
1
from the right.
* The points to thread for upper looper are marked
in red.
* A convenient threading chart is placed on the
machine body inside the looper cover.
2
3
4
5
9
8
6
7
1. Draw the thread through the thread guide second
from the right from back to front: (A)
* If the thread is coming out from the thread guide
groove, pass the thread through the thread guide
1
1
(A) (B)
hole again as shown: (B)
1
Thread guide
2. Pass the thread through the holes in the second
row from the right of thread guide plate as
illustrated.
2
Thread guide plate
2
2
3. Pass the thread through the left side of looper
thread guide sliding the thread from right to left.
18
3 Looper thread guide
3
3
Page 20

4. Insert the thread between tension discs from the
right. Then pull both sides of thread.
5. Pass the thread through upper looper thread
guide (1)
Upper looper thread tension dial
4
5 Upper looper thread guide (1)
4 5
6 7
5
4
6. Pass the thread through upper looper thread
guide (2).
7. Pass the thread through the looper thread
take-up lever (upper).
6
Upper looper thread guide (2)
7
6
7 Looper thread take-up lever (upper)
8. Pass the thread through upper looper thread
guide (3).
8 9
9
8
1
2
9. Holding the end of the thread with a pair of
tweezers, pass it through the hole on the upper
looper. Pull 10 cm (4˝) or more of thread through
the hole.
Upper looper thread guide (3)
8
9 Upper looper
NOTE:
* When you thread the upper looper only, to avoid
tangled threads pull out both threads over the
needle plate and under the presser foot.
Turn the handwheel toward you until the upper
looper comes to the middle point of its travel, and
unhook the thread of the lower looper from the
upper looper.
Thread the upper looper.
1
Lower looper thread
2 Upper looper
19
Page 21

• Threading the Needle on the Right
1
Place the spool of thread on the spool pin second from
the left.
* The points to thread for needle on the right are
marked in blue.
* A convenient threading chart is placed on the
machine body inside the looper cover.
2
5
6
4
3
7
8
1. Draw the thread through the thread guide second
from the left from back to front: (A)
1
(A) (B)
* If the thread is coming out from the thread guide
groove, pass the thread through the thread guide
hole again as shown: (B)
Thread guide
1
1
2. Pass the thread through the holes in the second
row from the left of the thread guide plate as
illustrated.
2
Thread guide plate
2
20
2
Page 22

3. Insert the thread between tension discs from the
right. Then pull both sides of thread.
3 Right needle thread tension dial
3
3
4. Turn the handwheel toward you to bring the
5
needle bar to its highest position, then pass the
thread through the right needle thread guide and
the thread take-up lever cover.
Right needle thread guide
4
5 Thread take-up lever cover
4
5 6 7
4
5. Pass the thread through the needle thread guide
6
7
sliding the thread from left to right.
6. Pass it through the needle bar thread guide from
left to right.
7. Thread the right needle from front to back and
pull the thread about 10 cm (4˝) from the eye of
the needle to the back.
6
Needle thread guide
7 Needle bar thread guide
8 Right needle
8
21
Page 23

• Threading the Needle on the Left
1
Place the spool of thread on the left side spool pin.
* The points to thread for needle on the left are
marked in orange.
* A convenient threading chart is placed on the
machine body inside the looper cover.
2
4
3
5
6
7
1. Draw the thread through the thread guide on the
left from back to front: (A)
1
* If the thread is coming out from the thread guide
groove, pass the thread through the thread guide
hole again as shown: (B)
Thread guide
1
1
(A)
(B)
2. Pass the thread through the holes on the left of
thread guide plate as illustrated.
2
Thread guide plate
2
22
2
Page 24

3 4
3. Insert the thread between tension discs from the
right. Then pull both sides of thread.
4. Turn the handwheel toward you to bring the
needle bar to its highest position, then pass the
thread through the thread take-up lever cover.
Left needIe thread tension dial
3
4 Thread take-up lever cover
3
4
5. Pass the thread through the needle thread guide
5
sliding the thread from right to left.
6. Pass it through the needle bar thread guide from
left to right.
6
7. Thread the left needle from front to back and pull
the thread about 10 cm (4˝) from the eye of the
needle to the back.
5 6 7
Needle thread guide
5
6 Needle bar thread guide
7
7 Left needle
– Gently pull all four thread ends towards the
back of the machine.
– Run threads under the presser foot and lower
the presser foot.
– Close side cover and looper cover.
– Turn handwheel toward you to chain off three
or four stitches.
The sewing preparation is now complete.
23
Page 25

1 2
TEST STITCHING
Starting Sewing
1. Insert the fabric under the toe of the foot.
(It is not necessary to raise the foot.)
2. Turn the handwheel gently toward you a couple
of turns and check the thread chain. Then start
sewing slowly. The fabric will be automatically fed.
Guide the fabric in the desired direction.
* For heavyweight fabric, raise the presser foot
and insert the fabric in front of the knife.
Then lower the foot and start to sew while guiding
the fabric.
Finishing Sewing
1. When stitching is completed, continue to run the
machine slowly to produce a thread chain for
about 12 cm (5´´) while pulling the thread chain
slightly to the back.
1
2. Cut the threads with the thread cutter as
illustrated, leaving about 5 cm (2´´) thread chain
from the end of the fabric.
1 Thread cutter
1
* The thread cutter becomes blunt as loose threads
build up. Remove the loose threads collected in
the thread cutter.
2
Sewing Continuously
Insert the next fabric under the toe of the foot, then
start sewing. It is not necessary to raise the presser
foot for ordinary fabric.
* For heavyweight fabric, raise the presser foot
and insert the fabric in front of the knife.
Then lower the foot and start to sew while guiding
the fabric.
24
How to use Guide Lines
On the top of the looper cover are guide lines
indicating the distance from the needle position.
Please use them as sewing guides.
Mark L indicates the distance from the left needle.
Mark R indicates the distance from the right needle.
The distance between center of guide line and
needle position is 5/8 inch.
Page 26

A
C
B
Securing Ends
To avoid unravelling, it is necessary to leave a
thread chain about 5 cm (2´´) long at the beginning
and at the end of a seam. To secure the beginning
and end of a seam choose one of the following
methods.
At the beginning
A. Separate the end of the threads and knot them.
B. Thread the chain through a large eyed needle,
and weave the chain through the overlock
stitches on the fabric.
C. Cut the chain at the edge of the fabric. Then
apply a small amount of seam sealant (Fray
Check
threads.
D. 1. Before putting your fabric in the machine, sew
2. Put your fabric on the machine. Then serge a
3. Raise the presser foot and bring the thread
4. Place the thread chain between the presser
5. After sewing about 2.5 cm (1´´), move the chain
TM
or Fray-No-More
a thread chain about 5 cm (2´´) long behind the
needle.
few stitches and stop.
chain to the left, around and under the presser
foot.
foot and upper knife, holding it in position as
you lower the presser foot to sew.
to the right and under the upper knife, cutting
the chain as you sew.
TM
) on the end of the
D
At the end of a seam
* You can use the same methods as “At the
beginning” to secure the end of a seam except
“D” or you can use the methods shown below.
1. Serge one stitch off the end of a seam.
2. Raise the needle and presser foot, and gently pull
1
2 3
the threads off the chaining finger.
3. Turn the fabric over so that the under side is up.
4. Serge about 2.5 cm (1˝) over stitching and angle
off the fabric.
4
25
Page 27

1
2
4
3
7
3
4
5
6
910
7
8
2
1
0
9
8
5
6
Thread Tension (4 threads)
Correct tension
The illustration at left shows sewing results with
correct tension settings. However, adjusting the
thread tension may be required depending upon the
type of fabric and thread being used.
1
Wrong side of fabric
2 Right side of fabric
3 Right needle thread
4 Left needle thread
5 Upper looper thread
6 Lower looper thread
Thread tension adjustment
* Set all four thread tension dials at “3”.
Then sew, and check the thread tensions.
If the tension balance on the test piece is not satisfactory, you can adjust the thread tension with the
tension balance dial.
7 Thread tension dial
8 Setting mark
9 Loosen
10Tighten
Left needle thread tension is too loose
The illustration shows sewing results when the left
1
3
4
5
6
7
4
8
3
2
1
0
9
2
4
1
5
0
6
9
7
8
11
3
4
2
3
5
6
5
6
7
8
3
2
1
0
9
2
4
1
5
0
6
9
7
8
needle thread tension is too loose.
Remedy:
Tighten the left needle thread tension.
11Left needle thread tension dial
Right needle thread tension is too loose
The illustration shows sewing results when the right
needle thread tension is too loose.
1
3
4
5
6
7
8
4
2
5
3
2
1
9
2
4
0
0
6
9
7
8
1
5
Remedy:
Tighten the right needle thread tension.
12
12
3
2
4
5
6
7
8
3
2
4
1
0
9
1
5
0
6
9
7
8
Right needle thread tension dial
3
6
26
Page 28

Looper thread tension is out of balance (1)
The illustration shows sewing results when the lower
looper thread tension is too tight and/or upper looper
1
5
6
3
4
5
6
7
8
3
2
1
9
2
4
1
5
0
0
6
9
7
8
thread tension is too loose.
Remedy:
Loosen lower looper thread tension and/or tighten
upper looper thread tension.
4
Wrong side of fabric
1
3
4
5
6
7
2
8
13
3
1
3
2
4
1
5
0
6
9
7
8
3
2
4
5
2
5
4
3
6
6
13
7
8
3
2
1
0
9
4
5
6
14
2
1
0
9
7
8
2 Right side of fabric
3 Right needle thread
4 Left needle thread
5 Upper looper thread
6 Lower looper thread
13 Upper looper thread tension dial
14 Lower looper thread tension dial
Looper thread tension is out of balance (2)
The illustration shows sewing results when the upper
looper thread tension is too tight and/or lower looper
thread tension is too loose.
Remedy:
3
2
4
1
5
0
6
9
7
8
3
2
4
1
0
9
1
5
0
6
9
7
8
Loosen upper looper thread tension and/or tighten
lower looper thread tension.
Upper looper thread tension dial
13
14 Lower looper thread tension dial
14
27
Page 29

Threading the Machine (3 threads)
Using the needle on the right only
(for regular three-thread serging)
Turn off the power switch and unplug the machine.
Remove the needle and the thread on the left. Then
2
retighten the needle clamp screw on the left to
prevent losing the screw.
Needle on the right
1
2 Needle clamp screw on the left
1
Using the needle on the left only
(for wide three-thread serging)
Turn off the power switch and unplug the machine.
Remove the needle and the thread on the right.
Then retighten the needle clamp screw on the right
to prevent losing the screw.
Needle on the left
1
2
2 Needle clamp screw on the right
1
28
Page 30

Thread Tension (3 threads)
Correct tension
4
The illustration at left shows sewing results with
correct tension settings. However, adjusting the
1
5
thread tension may be required depending on the
type of fabric and thread being used.
Wrong side of fabric
1
2 Right side of fabric
3 Right or left needle thread
2
4 Upper looper thread
5 Lower looper thread
3
Thread tension adjustment
* Set all three thread tension dials at “3”.
6
3
2
4
1
5
0
6
9
7
8
8
7
9
Then sew, and check the tension balance.
If the tension balance on the test piece is not
satisfactory, you can adjust the thread tension
with thread tension dial.
Thread tension dial
6
7 Setting mark
8 Loosen
9 Tighten
1
3
2
5
3
4
5
6
7
8
3
2
9
2
4
1
0
1
5
0
6
9
7
8
10 11
3
4
5
6
7
8
3
2
1
9
2
4
1
5
0
0
6
9
7
8
4
Needle thread tension is too loose
The illustration shows sewing results when the
needle thread tension is too loose.
Remedy:
Tighten needle thread tension.
10 Left needle thread tension dial
11 Right needle thread tension dial
Looper thread tension is out of balance (1)
5
1
4
The illustration shows sewing results when the lower
3
4
5
6
7
8
3
2
1
9
2
4
1
5
0
0
6
9
7
8
looper thread tension is too tight and/or upper looper
thread tension is too loose.
Remedy:
3
4
5
2
3
6
12
7
8
3
2
1
0
9
2
4
1
5
0
6
9
7
8
13
Loosen lower looper thread tension and/or tighten
upper looper thread tension.
12 Upper looper thread tension dial
13 Lower looper thread tension dial
Looper thread tension is out of balance (2)
1
2
34
The illustration shows sewing results when the upper
3
4
5
6
7
3
2
1
9
8
2
4
1
5
0
0
6
9
7
8
looper thread tension is too tight and/or lower looper
thread tension is too loose.
Remedy:
3
4
5
6
5
7
12
3
2
1
9
8
2
4
1
5
0
0
6
9
7
8
13
Loosen upper looper thread tension and/or tighten
lower looper thread tension.
12 Upper looper thread tension dial
13 Lower looper thread tension dial
29
Page 31

Thread and Needle Chart
Type of fabric Type of thread
Lightweight
Mediumweight Cotton,
Heavyweight
Organdy,
Georgette,
Lawn, Crepe
de chine,
Lining.
Linen, Satin,
Ordinary
fabric.
Tweed,
Coating,
Denim,
Doeskin,
Thick fabric.
Cotton: No. 80 – 100
Silk: No. 80 – 100
Synthetic: No. 80 – 100
Cotton: No. 60 – 100
Silk: No. 50 – 100
Synthetic: No. 60 – 100
Cotton: No. 50 – 60
Silk: No. 50 – 60
Synthetic: No. 50 – 60
Needle
HA-1 SP
No. 11
HA-1 SP
No. 11 – 14
HA-1 SP
No. 14
Stitch length Differential
feed ratio
0.5 – 1.02.0 – 3.0
2.5 – 3.5
3.0 – 4.0
1.0
1.0
Knitte dfabric.Knits
* Refer to page 20 for adjusting the stitch length and differential feed ratio.
NOTE: Your overlock uses standard sewing needles (HA-1 SP, No.11, No.14).
Cotton: No. 60 – 80
Synthetic: No. 60 – 90
Woolly nylon (For looper
thread)
Woolly polyester (For looper
thread)
HA-1 SP
No. 11 – 14
2.5 – 4.0
1.0 – 2.2
30
Page 32

ROLLED HEMMING, PICOT EDGING AND NARROW HEMMING
8
3
4
5
6
7
9
0
1
2
8
3
4
5
6
7
9
0
1
2
8
3
4
5
6
7
9
0
1
2
8
3
4
5
6
7
9
0
1
2
Machine Setting and Thread, Fabric and Range of
the Tension Dial
The setting of tension dials may vary depending on the type
and thickness of fabric and thread being sewn.
Stitch
Length
Differential
Feed Ratio
Needle Plate
Setting Knob
Needle
Needle
Thread
Rolled Hemming
(R)
(1.0)
Picot Edging Narrow Hemming
(3 ~ 4)
(1.0)
(R)
(R)
Using the needle on the right: HA-1 SP No. 11
Synthetic: No. 80 ~ 100
(R)
(1.0)
(R)
Upper and
Lower Looper
Threads
Fabric
Standard
Setting of
Tension
Dials
Correct
Thread
Tension
Woolly nylon,
Woolly polyester
Synthetic: No. 80 ~100
Synthetic : No. 60 ~ 100
Silk : No. 50 ~ 100
Woolly nylon,
Woolly polyester
Synthetic: No. 80 ~100
Lightweight fabric such as Organdy, Crepe de chine, Lawn and Georgette
3
2
4
1
5
0
6
9
7
8
Needle thread
tension (L)
Upper looper
thread tension
Wrong side
of fabric
Lower looper
thread
Right side
of fabric
Needle thread
4
3
5
2
6
1
7
0
8
9
Needle thread
tension (R)
3
2
4
1
5
0
6
9
7
8
Lower looper
thread tension
8
9
0
7
6
1
2
5
4
3
Upper
looper
thread
3
2
4
1
5
0
6
9
7
8
Needle thread
tension (L)
Upper looper
thread tension
Wrong side
of fabric
Lower looper
thread
Right side
of fabric
Needle thread
4
3
5
2
6
1
7
0
8
9
Needle thread
tension (R)
3
2
4
1
5
0
6
9
7
8
7
6
8
5
9
4
0
3
1
2
Lower looper
thread tension
Upper
looper
thread
Needle thread
tension (L)
Upper looper
thread tension
Wrong side
of fabric
Lower looper
thread
Right side
of fabric
Needle thread
Needle thread
tension (R)
Lower looper
thread tension
Upper
looper
thread
31
Page 33

Thread Tension
For rolled hemming and picot edging
1
5
2
Correct tension
The illustration at left shows sewing results with
correct tension settings.
Adjusting the thread tension may be required depending on the type of fabric and thread being used.
Wrong side of fabric
1
2 Right side of fabric
3 Right needle thread
4 Upper looper thread
5 Lower looper thread
3
4
Thread tension adjustment
1. Set the tension dial as shown on page 60.
2. Sew and check the tensions.
3. If the tension balance on the test piece is not
satisfactory, you can adjust the thread tension
1
3
3
4
5
6
7
8
4
5
2
4
2
1
9
3
5
2
6
0
1
7
0
8
9
6
3
2
4
5
6
7
8
7
6
8
1
0
9
5
9
4
0
3
1
2
with thread tension dial.
Needle thread tension is too loose
The illustration shows the sewing results when the
right needle thread tension is too loose.
Remedy:
Tighten the right needle thread tension.
Right needle thread tension dial
6
Upper looper thread tension is too loose
The illustration shows the sewing results when the
1
3
4
5
6
7
8
4
2
1
9
3
5
2
6
0
1
7
0
8
9
upper looper thread tension is too loose.
Remedy:
Tighten the upper looper thread tension.
32
Upper looper thread tension dial
7
3
2
5
2
4
3
4
5
6
7
8
7
7
6
8
1
0
9
5
9
4
0
3
1
2
Looper thread tension is out of balance
The illustration shows sewing results when the upper
1
3
5
4
5
6
7
8
4
2
1
0
9
3
5
2
6
1
7
0
8
9
looper thread tension is too tight and/or lower looper
thread tension is too loose.
Remedy:
Loosen upper looper thread tension and/or tighten
2
4
3
3
4
5
6
7
8
78
7
2
1
0
9
6
8
5
9
4
0
3
1
2
lower looper thread tension.
Upper looper thread tension dial
7
8 Lower looper thread tension dial
Page 34

For Better Results
Rolled hemming
Pull the end of thread chain to the back lightly in the
beginning and end of sewing.
2
Fabric
1
2 Thread chain
1
Picot edging
Pull the fabric lightly to the back while sewing.
1
Fabric
1
For narrow hemming
Correct tension
1
5
2
3
4
The illustration at left shows sewing results with
correct tension settings.
1
Wrong side of fabric
2 Right side of fabric
3 Right needle thread
4 Upper looper thread
5 Lower looper thread
* Refer to pages 58 for the adjustment.
33
Page 35

DECORATIVE OVEREDGING
* Refer to pages 24, 25, 29 for thread tension
balance adjustment.
HA-1 SP No. 14
1
* For the best results, pull the thread chain to the
back lightly at the beginning and end of sewing.
Overedging
1
Thread and Fabric
Fabric
Medium
to
Heavy
Fabric
Needle threads
Upper looper thread
Lower looper thread
Thread
Synthetic : No. 60~80
Silk : No. 50~80
Buttonhole twist
Light weight wool yarn
Synthetic : No. 60~80
Silk : No. 50~80
Machine Setting
1 Needle plate setting knob
1
GATHERING
* Refer to pages 24, 25, 29 for thread tension
balance adjustment.
1 Gathering
1
Thread and Fabric
Fabric
Light to
Medium
Woven
Fabric
Needle threads
Upper looper thread
Lower looper thread
Machine Setting
1 Needle plate setting knob
Thread
Synthetic : No. 60~80
Silk : No. 50~80
Synthetic : No. 60~80
Silk : No. 50~80
HA-1 SP No. 11
or 14
1
34
Page 36

PIN TUCKING
HA-1 SP No.11 or No.14
2
1
tension balance adjustment.
1 Pin tucking
Thread and Fabric
* Refer to page 29 (Narrow Hemming) for thread
Fabric
Light to
Medium
Fabric
Needle thread on the
right
Upper looper thread
Lower looper thread
Thread
Synthetic : No. 60~80
Silk : No. 50~80
Synthetic : No. 60~100
Silk : No. 50~100
Machine Setting
1 Remove the needle on the left-hand side
2 Needle plate setting knob
1
Sewing
Remove the needle on the left-hand side.
Deactivate the upper knife.
Sew the folded edge while guiding along the guide
line.
Guide line
1
1
Open the fold flat and press the pin tucks to one
side.
* Activate the upper knife.
35
Page 37

CARE OF YOUR MACHINE
Replacing the Upper Knife
To remove:
1.
Turn off the power switch and unplug the machine.
4
2
2. Open the looper cover and side cover.
3. Deactivate the upper knife.
4. Remove the hexagonal bolt, and remove the
upper knife.
3
0.8 ~ 1.5 mm (3/64˝)
4
2
3
1 Upper knife
1
1
2 Hexagonal bolt
3 Stopper pin
4 Lower knife
To attach:
1. Insert new upper knife into the groove of knife
holder and stopper pin, then tighten the
hexagonal bolt slightly.
2. Turn the upper knife holder to cutting position.
3. Turn the handwheel toward you until the upper
knife comes to its lowest position.
Loosen the hexagonal bolt, and adjust the
position of the upper knife so that the edge of the
upper knife overlaps 0.8 to 1.5 mm (3/64´´) from
the edge of lower knife as illustrated.
Then tighten the hexagonal bolt firmly.
4. Close the looper cover and side cover.
Cleaning Upper Knife Area
1.
Turn off the power switch and unplug the machine.
2. Open the looper cover.
Remove the waste pieces to the front with a lint
brush or waste scraps.
* You may use a vacuum cleaner to clean the upper
knife area or feed dog.
* The lower knife will last over one year in normal
use. However, if you run over a pin or a hard
object, it may be required to replace both upper
and lower knives at the same time.
36
Page 38

Replacing the Light Bulb
1.
Turn off the power switch and unplug the machine.
2. Loosen the face plate set screw, and remove the
face plate.
Face plate
1
2
2 Set screw
1
To remove:
Push and twist to the left.
To attach:
3
Push and twist to the right.
Reattach the face plate, and retighten the face plate
set screw.
1 2 3 4
Light bulb
5
4
3
4 To remove
5 To attach
Note:
* The machine is designed to use a 15 WATT
maximum light bulb.
* The light bulb will be HOT. Protect your fingers
when you handle it.
Cleaning the Feed Dog
1. Turn off the power switch and unplug the
1
2
machine.
2. Open the looper cover and side cover.
3. Remove the needles and presser foot.
4. Remove the needle plate set screw, and remove
the needle plate.
Needle plate
1
2 Needle plate set screw
5 6
5. Brush out the lint around the feed dogs to the
front by using the lint brush or use a vacuum
cleaner.
6. Reattach the needle plate, presser foot and
1
needles.
Close the looper cover and side cover.
Feed dog
1
37
Page 39

Oiling the Machine
Apply a few drops of fine quality sewing machine oil
to the parts indicated with arrows.
It is recommended to apply oil once a week in
normal use, once in ten hours in continuous use.
* Open the side cover and apply oil.
* Open the looper cover and apply oil.
Carrying the Machine
Put your fingers into the hole on the back side of the
machine as illustrated.
38
Page 40

Troubleshooting
Condition
The fabric is not
being fed
smoothly.
The needle
breaks.
The thread
breaks.
Skipped stitches
The seam is not
sewn neatly.
Cause
1. The feed dog is packed with lint.
2. The presser foot has been raised.
3. Pressure of the foot is too weak.
1. The needle is incorrectly inserted.
2. The needle is bent or blunt.
3. The fabric is forcedly pulled.
1. The machine is not correctly threaded.
2. The needle or looper thread tension is too tight.
3. The needle is incorrectly inserted.
4. The needle is bent or blunt.
1. The needle is bent or blunt.
2. The machine is not correctly threaded.
3. The needle is incorrectly inserted.
1. The needle and/or looper thread tensions are
not correctly adjusted.
2. The machine is not correctly threaded.
3. The needle and/or the thread are not suitable
for the fabric being sewn.
4. The thread is not between the tension discs.
Reference
See page 37.
Lower the presser foot.
See page 9
See page 8.
See page 8.
Pull the fabric lightly.
See pages 14 ~ 23 and 28.
See pages 26 ~ 27 and 29, 32.
See page 8.
See page 8.
See page 8.
See pages 14 ~ 23 and 28.
See page 8.
See pages 26 ~ 27 and 29, 32.
See pages 14 ~ 23 and 28.
See pages 30, 31, 34 and 35.
See pages 10, 19, 21 and 23.
Seam
puckering.
The machine
does
not operate.
The fabric is not
cut neatly.
1. The needle or looper thread tension is too tight.
2. The machine is not correctly threaded.
3. The differential feed dial is not correctly
adjusted.
1. The machine has not been plugged in firmly.
2. The power switch is turned off.
1. The position of the upper knife is not adjusted
properly.
2. The upper knife is dull.
See pages 26 ~ 27 and 29, 32.
See pages 14 ~ 23 and 28.
See page 10.
See page 5.
See page 5.
See page 36.
Replace the upper knife.
(See page 36.)
39
Page 41

OPTIONAL PARTS
16
2
7
8
Blind stitch foot
1
Taping foot with
2
tape reel
Cording foot (1)
3
Cording foot (2)
4
Beading
attachment
5
Gathering
6
attachment
Elastic gathering
attachment
7
Cloth guide
8
Use to blind stitch a cuff or
a skirt.
Use for sewing tape on a
shoulder or armpit line to
protect from stretching or
to decorate.
Works well with the taping
foot or the cording foot.
Use to sew decorative
cording.
Use to sew decorative
cording.
Use for decorating cloth,
wide cord decoration,
cording, etc.
Use when sewing sleeves,
cuffs, collars, etc.
Use for elastic taping,
decorative taping, etc.
Use to help you create a
constant-width seam allowance and when doing flatlock and pintuck sewing.
39
10
4
5
11
12
Piping foot (1/8˝)
9
Piping foot (3/16˝)
10
Needle threader
11
Gathering foot
12
1 200-203-104
2 200-204-208
3 200-207-108
4 200-208-109
5 200-214-108
6 200-217-101
7 200-218-102
8 200-216-100
9 200-219-103
10 200-220-107
11 200-254-605
12 200-248-101
Use to pipe the edge of a
sewing article to decorate
or strengthen.
For easy threading and
changing needle.
Use to sew sleeves, yokes,
frills, etc.
40
Page 42

792-800-244 (E)
Printed in Taiwan
 Loading...