

Page 1

CUSTOMER SUPPORT
EUROPE
Belgique/Belgium + 49 (0)8031 2651 72
Czech Republic + 420 800 522 722
Denmark + 45 45 75 99 92
Deutschland + 49 (0)8031 2651 72
España + 34 916 398 064
France + 33 (0) 130 589 075
Italia + 39 02 5832 8253
Luxemborg + 49 (0)8031 2651 72
Nederland + 49 (0)8031 2651 72
Norge + 47 32 22 74 70
Poland + 48 12 254 40 15
Russia 8-10-8002-7701012
South Africa + 27(0)11 844 9912
Suomi + 358 204 85 6040
Sverige + 46 (0)8 693 09 00
Turkey + 90 212 454 60 00 (1181)
United Kingdom + 44 (0)1784 220 172
Österreich + 49 (0)8031 2651 72
MIDDLE EAST/AFRICA
E-mail Support: jabrasupport.mea@jabra.com
© 2012 GN Netcom A/S. All rights reserved. Jabra® is a registered trademark of GN Netcom A/S. All
other trademarks included herein are the property of their respective owners. The Bluetooth® word
mark and logos are owned by the Bluetooth SIG, Inc. and any use of such marks by GN Netcom A/S is
under license. (Design and specifications subject to change without notice).
ASIA
Australia 1-800-636-086
Bangladesh support.asia@gn.com
China 400-120-1282
Hong Kong 800-969-546
India 000-800-852-1185
Indonesia 001-803-852-7664
Japan +81 (0) 3 -3242-8572
Korea 02-2275-1300 (distributor)
Malaysia 1800-812-160
New Zealand 0800-770-114
Pakistan support.asia@gn.com
Philippines ETPI 1800-765-7022
Philippines PLDT 1800-1855-0144
Singapore 800-8523-794
Sri Lanka support.asia@gn.com
Taiwan 0080-185-6659
Thailand 001-800-852-6446
Vietnam support.asia@gn.com
USA & CANADA
Canada 1- 866-697-8757
USA 1- 866-697-8757
Jabra PRO™ 9450
Jabra PRO™ 9450 Flex
Jabra PRO™ 9450 Duo
MADE IN CHINA
TYPE: 9400HS/BS
REGISTER YOUR JABRA AT JABRA.COM/REGISTER – FOR NEWS, SUPPORT AND COMPETITIONS
PATENTS AND DESIGN REGISTRATION PENDING INTERNATIONAL
www.jabra.com
81-03555 C
Quick Start Guide
www.jabra.com
Page 2
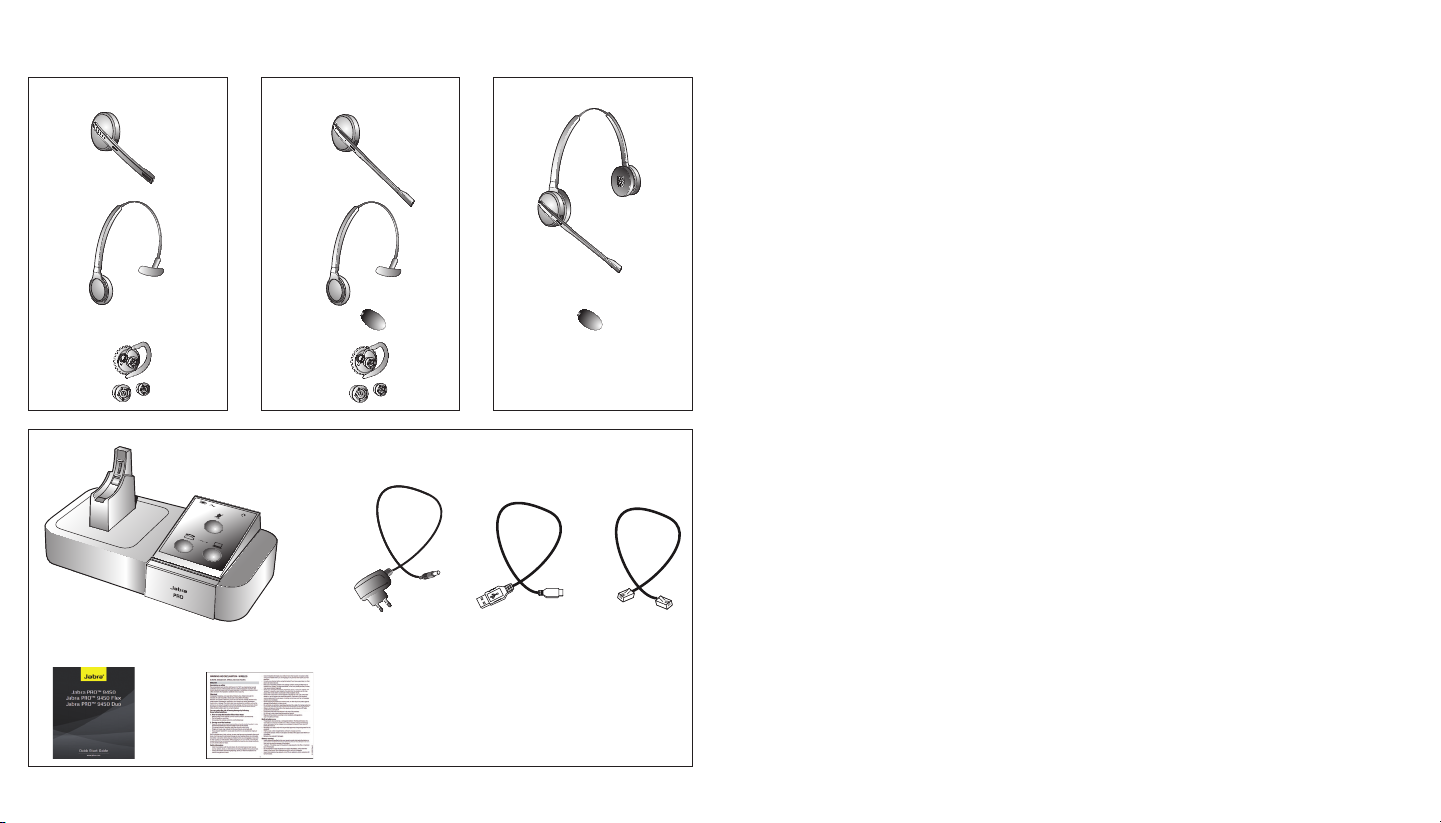
PACKAGE CONTENTS
Jabra PRO™ 9450 Flex Jabra PRO™ 9450 DuoJabra PRO™ 9450
Page 3
LANGUAGES
ENGLISH / US 2
FRANÇAIS / FR 10
DEUTSCH / DE 18
ESPAÑOL / ES 26
繁體中文 / CHT 34
日本語 / JP 42
BEFORE YOU START!
Select your preferred method for connecting and conguring your Jabra PRO 9450
FR: Sélectionnez votre méthode favorite pour connecter et
congurer votre Jabra PRO 9450
DE: Wählen Sie Ihre bevorzugte Anschluss- und
Kongurationsmethode für Ihr Jabra PRO 9450
ES: Seleccione su método preferido para conectar y congurar su
Jabra PRO 9450
Setup
Interactive Setup Wizard
www.jabra.com
CHT: 選擇您連接和配置 Jabra PRO 9450 的首選方法
JP: Jabra PRO 9450 の接続と設定に使用する方法を選択し
てくだ さい
Quick Start Guide
Page 4
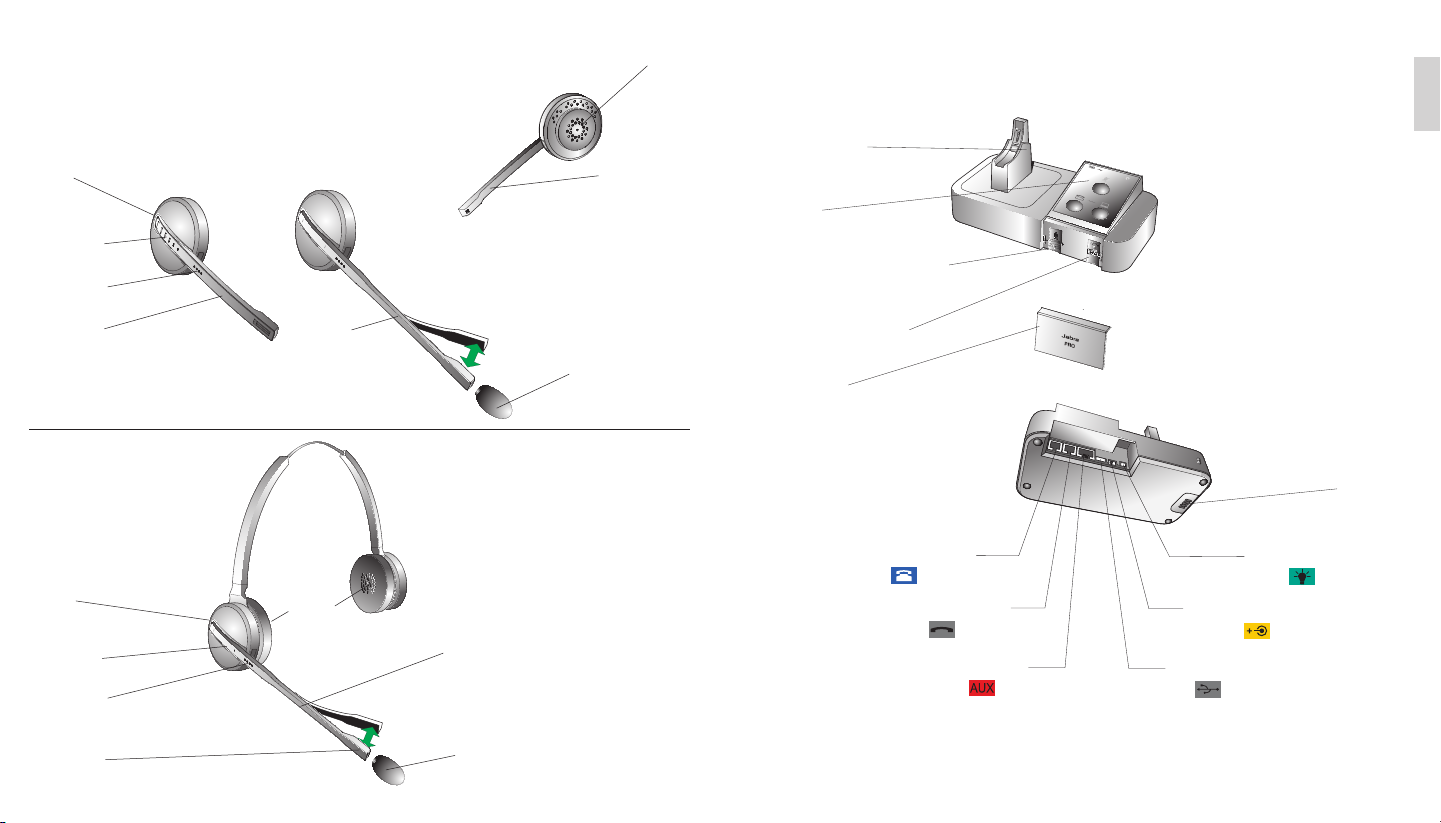
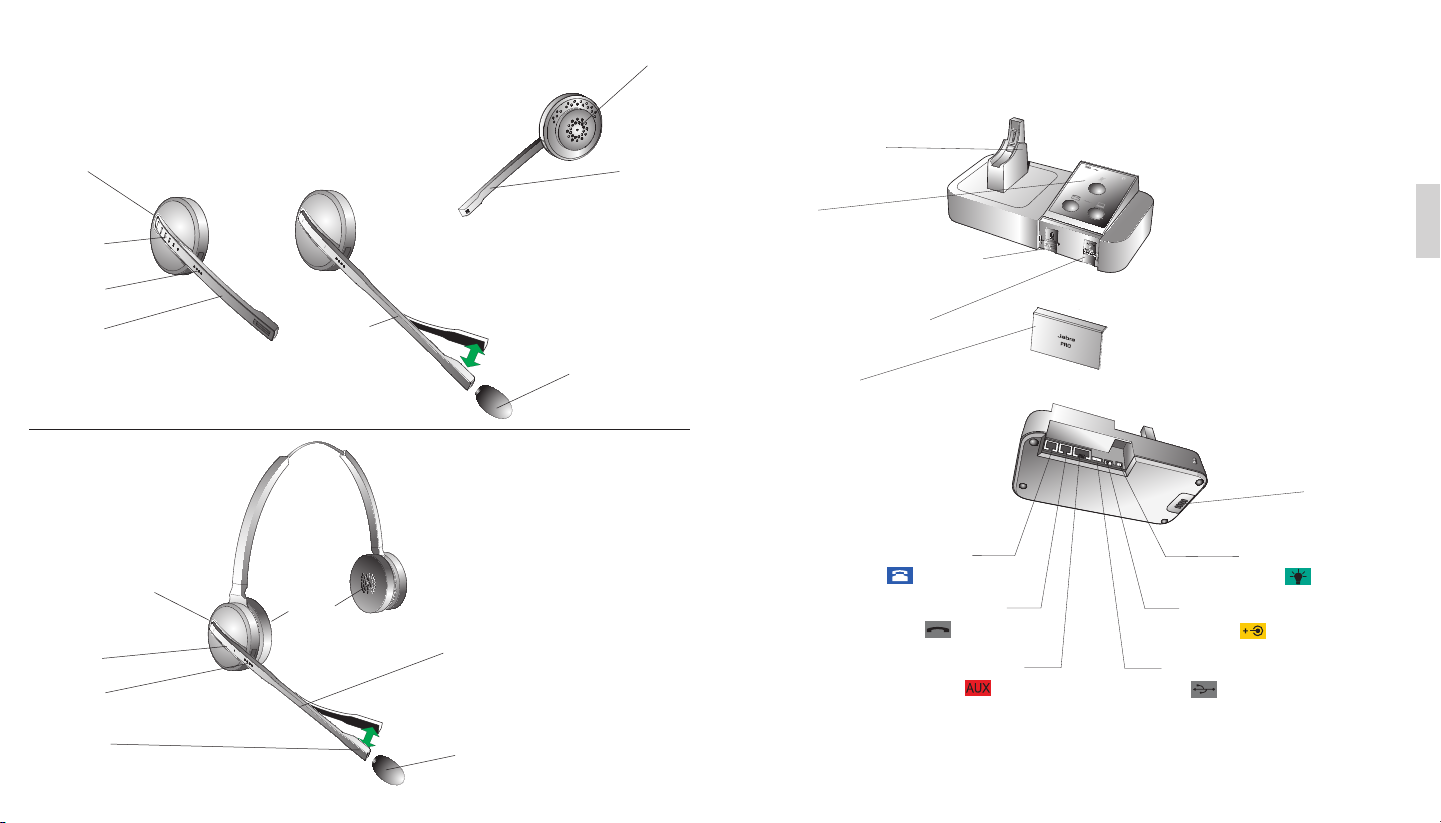
JABRA PRO 9450 HEADSET
Jabra PRO™ 9450
Multi-function
button
Jabra PRO™ 9450 Flex
Speaker
Noice-cancelling
Microphone
JABRA PRO 9450 BASE
US
Headset Cradle
Keypad
Touch panel
LED indicator
Microphone
boom-arm
(9450)
Jabra PRO™ 9450 Duo
Multi-function
Button
Touch Panel
LED Indicator
Noise-cancelling
Microphone
Flexible
Microphone
Boom Arm
(9450)
Speaker
Flexible Microphone
Boom Arm
Microphone Foam
Microphone Foam
Microphone Volume Control
Clear Dial Tone Switch
Front Panel
Telephone Port
Handset Port
AUX Port USB Port
32
Speaker
Busy-light
Indicator Port
Power Adapter Port
Page 5
Setup
PLEASE GO TO: www.jabra.com/setup
SETUP
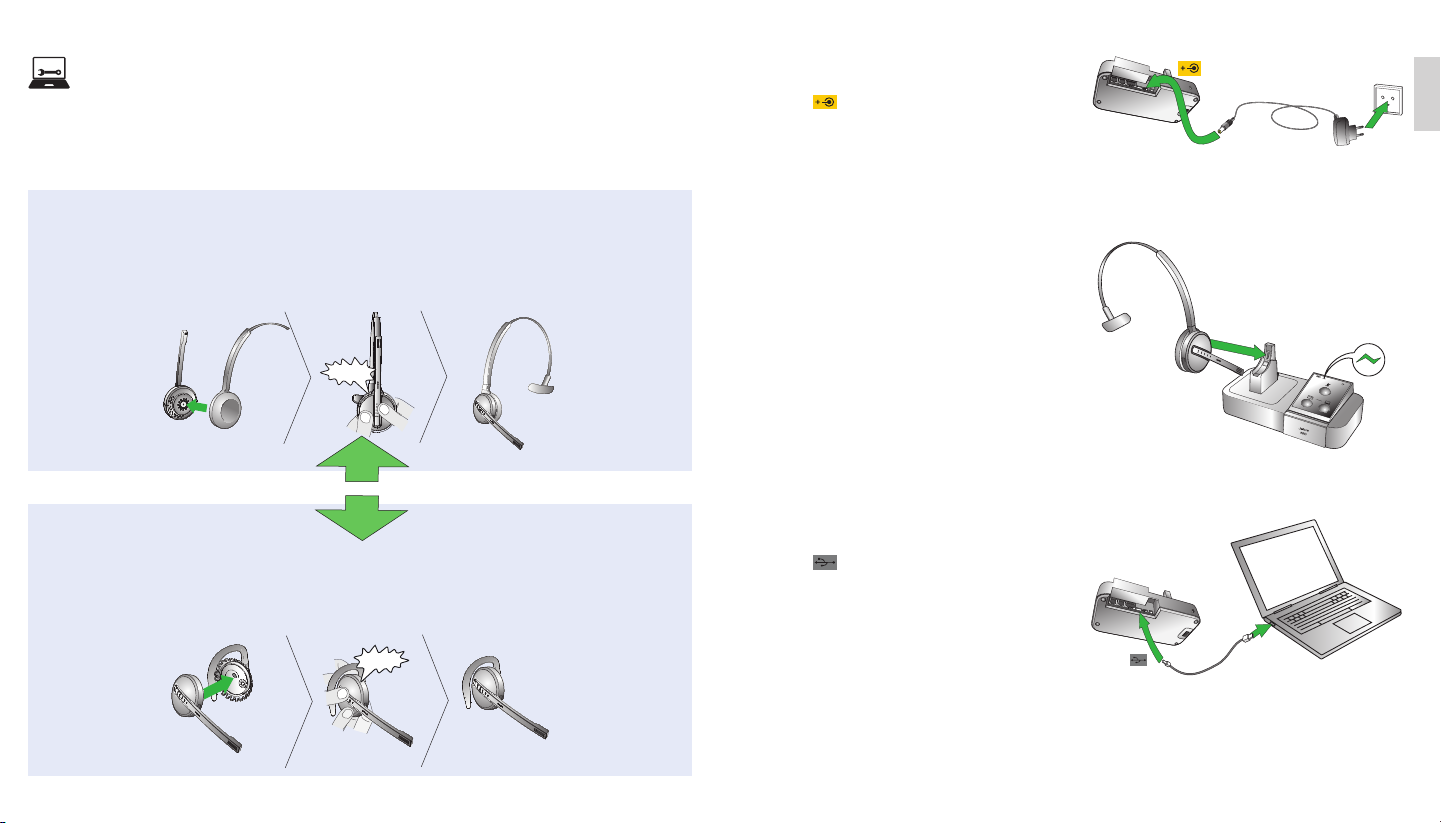
STEP 1: ASSEMBLE THE HEADSET
Attaching the headband
1. Align the headset and the headband wearing-style attachment, as illustrated, and press firmly together until
they click into place (snap-to-click).
2. Rotate the microphone boom arm for left or right ear use.
3. Adjust the length of the headband to t snug against the head.
CLICK
or
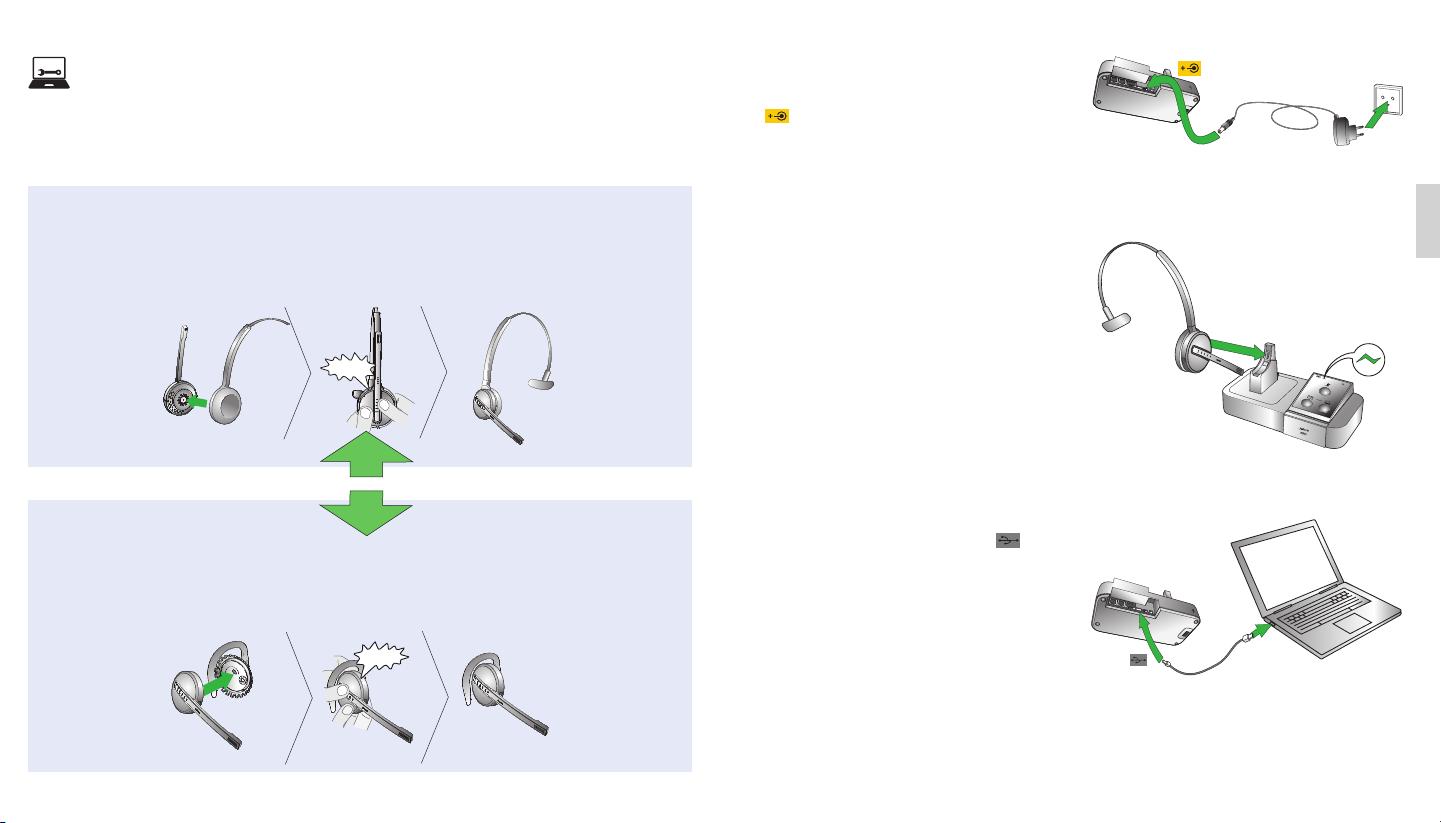
STEP 2: CONNECT TO POWER
1. Plug the supplied power adapter into the port
marked on the base.
2. Connect the power adapter to the mains power
socket.
STEP 3: DOCK THE HEADSET
Dock the headset. When docked correctly the
headset battery will begin charging, if needed.
Charge for 20 minutes or until battery indicator is
steady green. Keep the headset docked during
setup.
US
or
Attaching the earhook
1. Assemble the earhook wearing-style attachment for left or right ear use. If necessary, remove the earbud
and replace with another size for best fit.
2. Align the headset and the earhook wearing-style attachment, as illustrated, and press firmly together until
they click into place (snap-to-click).
3. Shape the earhook to fit snug around the ear
CLICK
STEP 4: CONNECT TO PC
1. Plug the supplied USB cable into the port
marked on the base.
2. Connect the USB cable to any free USB slot on
the PC.
54
Page 6
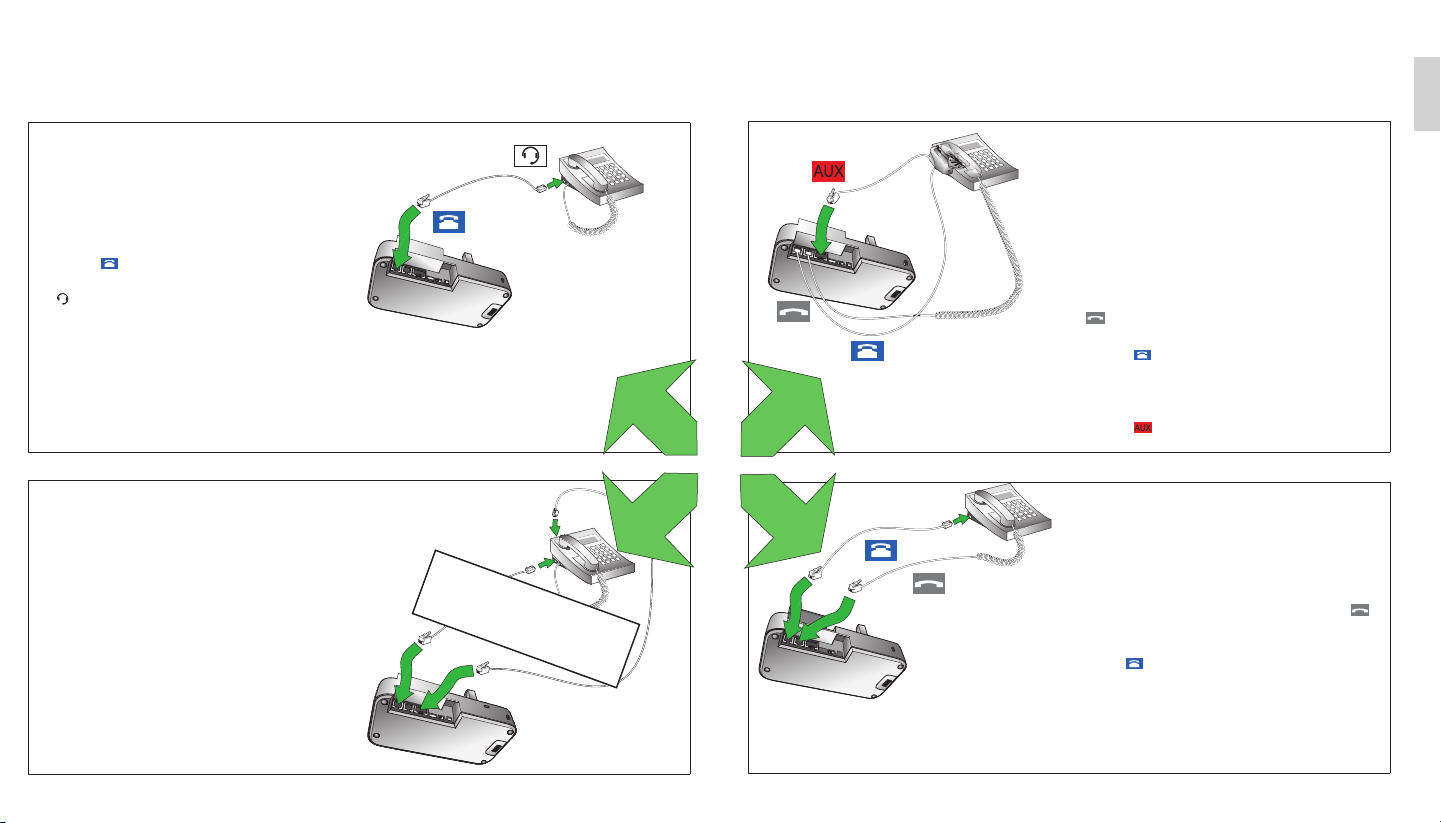
STEP 5: SELECT AND CONNECT TO A DESK PHONE
Connecting to a desk phone will vary depending on the type of desk phone used.
Select only one of the following four options:
OPTION 1
Desk phone with headset port
This type of desk phone has a dedicated headset
port (usually at the back of the phone). These
phones typically have a button on the front panel for
switching between handset and headset.
1. Plug the supplied telephone cable into the port
marked on the base.
2. Connect the telephone cable to the headset port
on the desk phone.
or
or
OPTION 3
Desk phone with Jabra GN1000 remote hand-
set lifter
The Jabra GN1000 remote handset lifter manually
lifts the desk phone handset to make or answer
a call. For mounting instructions refer to
documentation supplied with the Jabra GN1000.
1. On the desk phone, unplug the handset cable
from the phone body.
2. Connect the handset cable to the port marked
on the base.
3. Plug the supplied telephone cable into the port
marked
4. Connect the telephone cable into the handset
port on the desk phone.
5. Connect the Jabra GN1000 cable into the port
marked
on the base.
on the base.
US
OPTION 2
Desk phone with Jabra LINK
A Jabra LINK adapter enables an incoming call to be
answered or ended by the headset multi-function
button.
Contact your local Jabra dealer to purchase a Jabra
LINK adapter for your specic desk phone.
1. Connect the Jabra LINK adapter as shown in
adapter documentation supplied with the Jabra
LINK. On some phones the telephone cable will
also need to be connected.
2. Call your connected desk phone using another
phone to enable the Jabra LINK adapter. Wait 10
seconds before answering the phone.
Refer to Jabra LINK
documentation
or
or
OPTION 4
Desk phone without headset port
This desk phone does not have a dedicated headset
port.
1. On the desk phone, unplug the handset cable from
the phone body.
2. Connect the handset cable to the port marked
on the base.
3. Plug the supplied telephone cable into the port
marked on the base.
4. Connect the telephone cable into the handset port
on the desk phone.
76
Page 7
STEP 6: CONFIGURE THE SOUND
Desk phone sound
1 Ensure the headset is docked, and then press and hold the desk phone button
on the base keypad until the desk phone icon changes to .
2 Remove the front panel of the Jabra PRO 9450, as illustrated.
3 Put on the headset. The desk phone icon will change to . If the icon does
not change, tap the desk phone button on the base keypad.
4 Press the headset button on the desk phone, or lift the desk phone handset,
to get a dial tone.
5 Make a test call. Dial a friend or colleagues phone number using the desk
phone.
6 Check your speaking volume. If the listener says your speaking volume is
too quiet or too loud, adjust the microphone volume control on the base, as
illustrated. Ensure the listener does not adjust their own volume.
7 When nished, end the call and return the front panel of the Jabra PRO 9450
IMPORTANT
Having sound problems?
If you cannot hear anything, or the sound is distorted, during
the desk phone call, try rotating the clear dial tone switch from
A-G until the sound is optimal. For further details see section 3.1
Conguring for Desk Phones, in the user manual.
PC (softphone) sound
1 Download and install Jabra PC Suite from jabra.com/setup.
2 Open your PC phone software (softphone) and set the Jabra PRO 9450 as speaker and microphone in the
softphone’s audio conguration settings.
3 Ensure the headset is docked, and then press and hold the softphone button on the base keypad until the
softphone icon changes to .
4 Make a test call. Put on the headset, and dial a friend or colleague´s phone number using the softphone
software. The softphone icon will change to .
5 When nished, end the call.
YOU HAVE NOW SUCCESSFULLY CONNECTED YOUR JABRA PRO 9450
HEADSET AND BASE KEYPAD INFORMATION
Headset
Answer/end calls (tap)
Base keypad
Mute/un-mute (double-tap)
Volume up/down (slide)
Battery charging
Full battery
Low battery
Very low battery
Headset docked
Unknown headset
docked
Headset and base
pairing
Muted
US
Current target phone
Phone ringing
Phone on call
Phone on hold
Phone unplugged
Group call
Audio link between
headset and base is
active
Unable to connect to
headset
98
Page 8
SCHÉMAS DU MICRO-CASQUE JABRA PRO 9450
Haut-parleur
SCHÉMAS DU SOCLE DU JABRA PRO 9450
Jabra PRO™ 9450
Bouton multifonction
Pavé tactile
Témoin LED
Bras articulé
du microphone
(9450)
Jabra PRO™ 9450 Duo
Bouton multifonction
Pavé tactile
Témoin LED
Jabra PRO™ 9450 Flex
Bras articulé
souple du
microphone
(9450)
Haut-
parleur
Bras articulé souple
du microphone
Mousse du
microphone
Microphone
anti-bruit
Support d’oreillette
Clavier
Contrôle du volume du microphone
Interrupteur de la tonalité
d’appel nette
Panneau avant
Port du téléphone
Port du combiné
FR
Haut-parleur
Indicateur
«en ligne»
Port de l’adaptateur secteur
Port AUX Port USB
Microphone
anti-bruit
Mousse du
microphone
10 11
Page 9
Setup
VEUILLEZ ALLER À: www.jabra.com/setup
CONFIGURATION
ÉTAPE 1 : ASSEMBLEZ LE MICRO-CASQUE
ÉTAPE 2 : CONNEXION À L’ALIMENTATION
SECTEUR
1. Branchez l’adaptateur secteur fourni sur le port
du socle.
2. Connectez l’adaptateur secteur à la prise murale.
Fixation du serre-tête
1. Alignez l’oreillette et le port du serre-tête, comme l’indique l’illustration, et pressez doucement sur les deux
éléments jusqu’à ce qu’ils s’enclenchent correctement (le fermoir se clique).
2. Faites pivoter le bras articulé du microphone pour utiliser l’oreille gauche ou droite selon le besoin.
3. Réglez la longueur du serre-tête pour qu’il s’adapte à la tête.
CLIC
ou
ou
Fixation du contour d’oreille
1. Assemblez la fixation de port d’oreillette du contour d’oreille pour l’utiliser sur l’oreille gauche ou droite. Si nécessaire,
retirez l’embout d’écouteur et remplacez-le par un embout d’une autre taille pour qu’il s’ajuste correctement.
2. Alignez l’oreillette et la fixation de port d’oreillette du contour d’oreille, comme l’indique l’illustration, et pressez
doucement sur les deux éléments jusqu’à ce qu’ils s’enclenchent correctement (le fermoir se clique).
3. Fixez le contour d’oreille pour qu’il s’adapte à l’oreille.
CLIC
12 13
FR
ÉTAPE 3 : CONNEXION DE L’OREILLETTE DANS
LA BASE
Connectez l’oreillette dans la base. Une fois l’oreillette
correctement connectée, la batterie commence à se
charger, si nécessaire.
Chargez l’appareil pendant 20minutes ou jusqu’à ce
que le voyant d’état de la batterie devienne vert xe.
Laissez l’oreillette sur son support pendant la
conguration.
ÉTAPE 4 : CONNEXION À L’ORDINATEUR
1. Branchez le câble USB fourni sur le port
du socle.
2. Connectez le câble USB à un connecteur USB
disponible de l’ordinateur.
Page 10

ÉTAPE 5 : SÉLECTIONNEZ ET CONNECTEZ À UN TÉLÉPHONE FIXE
La connexion à un téléphone fixe varie en fonction du type de téléphone fixe utilisé.
Sélectionnez une seule des quatre options suivantes :
OPTION 1
Connexion à un téléphone xe avec port
d’oreillette
ce type de téléphone xe est muni d’un port dédié
à l’oreillette (généralement à l’arrière du téléphone).
Généralement, ces téléphones ont une touche située
sur le panneau avant qui permet de commuter la
conversation entre le combiné et l’oreillette.
1. Branchez le câble de téléphone fourni sur le port
du socle.
2. Connectez le câble du téléphone au port de
l’oreillette du téléphone xe.
ou
ou
OPTION 3
Téléphone xe avec le levier de décroché à
distanceGN1000
Le levier de décroché à distanceGN1000 décroche
manuellement le téléphone xe pour passer ou
répondre à un appel. Reportez-vous à la documentation
fournie avec le levier de décroché à distanceGN1000
pour obtenir des instructions sur la connexion.
1. Sur le téléphone xe, débranchez le câble de
l’oreillette du corps du téléphone.
2. Connectez le câble de l’oreillette au port du socle.
3. Branchez le câble de téléphone fourni dans le port
du socle.
4. Connectez le câble de téléphone dans le port de
l’oreillette du téléphone xe.
5. Connectez le câble GN1000 Jarba dans le port du
socle.
FR
OPTION 2
Connexion à un téléphone xe avec Jabra LINK
Un adaptateur Jabra LINK permet de répondre à un
appel entrant ou d’y mettre n à l’aide du bouton
multifonction de l’oreillette.
Contactez votre revendeur Jabra pour acheter un
adaptateur Jabra LINK convenant à votre téléphone
xe particulier.
1. Connectez l’adaptateur Jabra LINK comme indiqué
dans la documentation fournie avec le Jabra LINK.
Sur certains téléphones, le câble de téléphone
devra également être connecté.
2. Appelez votre téléphone xe connecté avec
un autre téléphone an d’activer l’adaptateur
JabraLINK. Attendez 10 secondes avant de
répondre autéléphone.
OPTION 4
Connexion à un téléphone xe sans port
d’oreillette
Ce téléphone xe n’a pas de port dédié pour
l’oreillette.
1. Sur le téléphone xe, débranchez le câble du
2. Connectez le câble du combiné au port du
3. Branchez le câble de téléphone fourni sur le port
4. Connectez le câble de téléphone au port du
Reportez-vous à la
documentation Jabra LINK
ou
ou
14 15
combiné du corps du téléphone.
socle.
du socle.
combiné du téléphone xe.
Page 11

ÉTAPE 6 : EFFECTUER UN APPEL TEST
Appel test depuis un téléphone xe
1 Vériez que l’oreillette est connectée dans la base, puis eectuez un appui prolongé
sur la touche de téléphone xe située sur le clavier du socle jusqu’à ce que l’icône
du téléphone xe prenne l’aspect suivant: .
2 Retirez le panneau avant de la Jabra PRO 9450, comme l’indique l’illustration.
3 Mettez l’oreillette. L’icône du téléphone xe change et prend l’aspect suivant: .
Si l’icône ne change pas, appuyez sur la touche de téléphone xe située sur le clavier
du socle.
4 Appuyez sur la touche de l’oreillette située sur le téléphone xe ou décrochez le
combiné du téléphone xe pour obtenir une tonalité d’appel.
5 Eectuez un appel test. Composez le numéro de téléphone d’un ami ou d’un
collègue à l’aide du téléphone xe.
6 Vériez le volume sonore. Si votre interlocuteur dit que le volume est trop faible ou
trop fort, réglez le volume du microphone sur le socle, comme l’indique
l’illustration. Veillez à ce que l’interlocuteur ne règle pas le volume de son côté.
7 Lorsque vous avez terminé, terminez l’appel et revenez au panneau avant de la
Jabra PRO 9450.
INFORMATIONS RELATIVES À L’OREILLETTE ET AU CLAVIER DU SOCLE
Oreillette
Prendre/terminer les appels (appuyer)
Activer/désactiver le volume (appuyer deux fois)
Augmentation/diminution du volume (coulisser)
FR
IMPORTANT
Des problèmes de son ?
Si, lors d’un appel sur un téléphone xe, vous n’entendez rien
ou si le son est déformé, essayez de tourner le commutateur
de tonalité de A à G jusqu’à ce que le son soit optimal. Voir la
section3.1 «Conguration pour les téléphones xes» dans le
manuel de l’utilisateur, pour plus de détails.
Appel test depuis l’ordinateur (logiciel de téléphonie)
1 Téléchargez et installez Jabra PC Suite depuis jabra.com/setup.
2 Lancez votre logiciel de téléphonie et dénissez le micro-casque Jabra PRO9450 en tant que haut-parleur et
microphone dans les paramètres de conguration audio du logiciel de téléphonie.
3 Vériez que l’oreillette est connectée dans la base, puis eectuez un appui prolongé sur la touche du logiciel de
téléphonie située sur le clavier du socle jusqu’à ce que l’icône du logiciel de téléphonie prenne l’aspect suivant:
.
4 Eectuez un appel test. Mettez l’oreillette et composez le numéro de téléphone d’un ami ou d’un collègue à
l’aide du logiciel de téléphonie. L’icône du logiciel de téléphonie prend l’aspect suivant: .
5 Lorsque vous avez ni, terminez l’appel.
VOUS AVEZ MAINTENANT CORRECTEMENT CONNECTÉ VOTREJABRAPRO9450
16 17
Clavier du socle
Chargement de la
batterie
Batterie chargée
Batterie faible
Batterie très faible
Oreillette sur le socle
Oreillette sur le socle
inconnue
Appairage de l’oreillette
et du socle
Silencieux
Téléphone cible actuel
Sonnerie du téléphone
Téléphone en cours
d’appel
Téléphone en attente
Téléphone débranché
Appel groupé
Le canal audio entre
l’oreillette et le socle
est actif
Impossible d’établir la
connexion à l’oreillette
Page 12

DARSTELLUNG DES JABRA PRO 9450 HEADSETS
Lautsprecher
JABRA PRO 9450 BASISSTATION
Jabra PRO™ 9450
Multifunktionstaste
Touchpanel
LED-Anzeige
Mikrofonarm
(9450)
Jabra PRO™ 9450 Duo
Multifunktionstaste
Touchpanel
LED-Anzeige
Jabra PRO™ 9450 Flex
Flexibler
Mikrofonarm
(9450)
Lautsprecher
Geräuschunterdrückung
Flexibler Mikrofonarm
Mikrofon mit
Headset-Halterung
Tastenfeld
Mikrofon-Lautstärkeregelung
Umschalter für Freizeichen
Blende Vorderseite
Telefonkabelanschluss
Höreranschluss
DE
Lautsprecher
Anschluss für
Besetztzeichen-LED
Netzteilanschluss
AUX-Anschluss USB-Anschluss
Mikrofon mit
Geräuschunterdrückung
MikrofonSchaumstoabdeckung
18 19
Page 13

Setup
BITTE GEHEN SIE ZU: www.jabra.com/setup
KONFIGURATION
SCHRITT 1: AUSWÄHLEN DER TRAGEFORM UND VORBEREITEN DES HEADSETS
Überkopfbügel befestigen
1. Richten Sie Headset und Überkopfbügel wie abgebildet aus und drücken Sie sie fest zusammen, bis sie mit
einem Klicken einrasten.
2. Drehen Sie den Mikrofonarm wie zur Nutzung des Headsets am linken oder rechten Ohr erforderlich.
3. Passen Sie die Länge des Überkopfbügels an, so dass dieser bequem an Ihrem Kopf anliegt.
KLICKEN
oder
SCHRITT 2: ANSCHLUSS AN DIE
STROMVERSORGUNG
1. Stecken Sie das mitgelieferte Netzteil in
den mit dem Symbol markierten
Stromversorgungsbuchse an der Basisstation.
2. Stecken Sie das Netzteil in eine Wandsteckdose.
SCHRITT 3: VERBINDEN DES HEADSETS
Setzen Sie das Headset in die dafür vorgesehene
Halterung. Ist das Headset korrekt verbunden, wird
der Akku aufgeladen, falls dies erforderlich ist.
Laden Sie das Headset für 20 Minuten bzw. bis die
Akkuanzeige dauerhaft grün leuchtet. Das Headset
muss während der Konguration eingesetzt
bleiben.
DE
oder
Ohrbügel befestigen
1. Montieren Sie den Ohrbügel wie zur Nutzung am linken oder rechten Ohr erforderlich. Bei Bedarf können
Sie den Ohrstöpsel entfernen und durch eine andere Größe ersetzen.
2. Richten Sie Headset und Ohrbügel wie abgebildet aus und drücken Sie sie zusammen, bis sie mit einem
Klicken einrasten.
3. Formen Sie den Ohrbügel, so dass dieser bequem an Ihrem Ohr sitzt.
KLICKEN
20 21
SCHRITT 4: ANSCHLIESSEN AN EINEN
COMPUTER
1. Stecken Sie das mitgelieferte USB-Kabel in den
mit dem Symbol markierten Anschluss der
Basisstation.
2. Verbinden Sie das USB-Kabel mit einem freien
USB-Anschluss des Computers.
Page 14

SCHRITT 5: AUSWÄHLEN UND ANSCHLIESSEN AN EIN TISCHTELEFON
Die Vorgehensweise zum Anschließen hängt vom Typ des Tischtelefons ab.
Wählen Sie eine der folgenden vier Optionen:
Option 1
Anschluss an ein Tischtelefon mit
Headsetanschluss
Tischtelefone dieses Typs besitzen einen gesonderten
Anschluss für ein Headset (in der Regel auf der
Geräterückseite). Diese Telefone besitzen meist auch
eine Taste auf der Vorderseite, mit der zwischen
Headset und Hörer umgeschaltet werden kann.
1. Stecken Sie das mitgelieferte Telefonkabel in den
mit dem Symbol markierten Anschluss an der
Basisstation.
2. Verbinden Sie das andere Ende des Telefonkabels
mit dem Headsetanschluss Ihres Tischtelefons.
oder
oder
Option 3
Tischtelefon mit GN1000-Hörer-Lifter
Ein GN1000-Hörer-Lifter hebt den Hörer des
Tischtelefons mechanisch ab, um einen Anruf zu
tätigen oder entgegenzunehmen. Spezische
Informationen zum Anschluss eines GN1000-HörerLifters entnehmen Sie bitte der Dokumentation im
Lieferumfang des Jabra GN1000.
1. Ziehen Sie den Stecker des Hörerkabels aus
dem Anschluss Ihres Tischtelefons.
2. Stecken Sie das Hörerkabel in den mit dem
Symbol
Basisstation.
3. Stecken Sie das mitgelieferte Telefonkabel in
den mit dem Symbol
an der Basisstation.
4. Verbinden Sie das Ende des Jabra GN1000Kabels mit der AUX-Buchse der Jabra
Basisstation.
markierten Anschluss an der
markierten Anschluss
DE
Option 2
Anschluss an ein Tischtelefon mit elektronischer
Rufannahme
Mit Hilfe der elektronischen Rufannahme (EHS) können eingehende Anrufe mit der Multifunktionstaste
des Headsets angenommen oder beendet werden.
Wenden Sie sich an Ihren Jabra-Händler, um einen
Adapter zur elektronischen Rufannahme zu erwerben.
1. Schließen Sie den Jabra LINK-Adapter gemäß der im
Lieferumfang des JABRA LINKs enthaltenen Adapterdokumentation an. Bei einigen Telefonen muss
zudem das Telefonkabel angeschlossen werden.
2. Rufen Sie Ihr angeschlossenes Tischtelefon
mit einem anderen Telefon an, um den Jabra
LINK-Adapter z u aktivieren. Warten Sie mit dem
Abnehmen 10 Sekunden.
Option 4
Tischtelefon ohne Headsetanschluss
Telefone dieses Typs besitzen keinen gesonderten
Anschluss für ein Headset.
1. Ziehen Sie den Stecker des Hörerkabels aus dem
2. Stecken Sie das Hörerkabel in den mit dem
3. Stecken Sie das mitgelieferte Telefonkabel in den
4. Verbinden Sie das andere Ende des Telefonkabels
Siehe die Jabra LINK-
Dokumentation
oder
oder
22 23
Anschluss Ihres Tischtelefons.
Symbol markierten Anschluss an der
Basisstation.
mit dem Symbol markierten Anschluss an der
Basisstation.
mit dem Höreranschluss Ihres Tischtelefons.
Page 15

SCHRITT 6: TESTANRUF
Testanruf über ein Tischtelefon
1 Vergewissern Sie sich, dass das Headset angedockt ist. Halten Sie dann die
Tischtelefontaste des Tastenfeldes der Basisstation gedrückt, bis sich das
Tischtelefonsymbol in ändert.
2 Entfernen Sie wie abgebildet die Blende auf der Vorderseite der Jabra PRO 9450-
Basisstation.
3 Setzen Sie das Headset auf. Das Tischtelefonsymbol ändert sich in . Ändert sich das
Symbol nicht, tippen Sie auf die Tischtelefontaste des Tastenfeldes auf der Basisstation.
4 Drücken Sie die Headsettaste des Tischtelefons oder heben Sie den Hörer des
Tischtelefons ab, um ein Freizeichen zu erhalten.
5 Tätigen Sie einen Testanruf. Wählen Sie am Tischtelefon die Rufnummer eines
Bekannten oder Kollegen.
6 Prüfen Sie Ihre Mikrofonlautstärke. Meldet Ihr Gesprächspartner, dass Ihre Stimme
zu leise oder zu laut ist, passen Sie die Mikrofonlautstärke an der Basisstation
entsprechend der Abbildung an. Bitten Sie die angerufene Person, während des Tests
die Lautstärke am eigenen Telefon nicht zu verändern.
7 Wenn Sie fertig sind, beenden Sie den Anruf und setzen Sie die Blende wieder in die
Basisstation ein.
WICHTIG
Haben Sie Klangprobleme?
Falls Sie bei einem Anruf über ein Tischtelefon keinen Ton hören
oder der Klang verzerrt ist, versuchen Sie, den Umschalter für ein
klares Freizeichen von A bis G zu bewegen, bis der Klang optimal
ist. Weitere Informationen nden Sie in Abschnitt 3.1. „Anschließen
an ein Tischtelefon“ im Benutzerhandbuch.
Testanruf über einen Computer (Softphone)
1 Laden Sie die Jabra PC Suite von jabra.com/setup herunter und installieren Sie sie
2 Starten Sie die Telefonsoftware (Softphone) auf Ihrem PC, und richten Sie das Jabra PRO 9450 in den
Kongurationseinstellungen als Lautsprecher und als Mikrofon ein.
3 Vergewissern Sie sich, dass das Headset angedockt ist. Halten Sie dann die Softphonetaste auf dem
Tastenfeld der Basisstation gedrückt, bis sich das Softphonesymbol in ändert.
4 Tätigen Sie einen Testanruf. Setzen Sie das Headset auf und wählen Sie über
die Softphoneanwendung die Rufnummer eines Bekannten oder Kollegen.
Das Softphonesymbol ändert sich in .
5 Wenn Sie fertig sind, beenden Sie den Anruf.
IHR JABRA PRO 9450 IST JETZT ANGESCHLOSSEN
INFORMATIONEN ZUM HEADSET UND ZUM TASTENFELD
AUF DER BASISSTATION
Headset
Entgegennehmen/Beenden von Gesprächen
(Tippen)
Tastenfeld auf der Basisstation
Stummschalten/Stummschaltung beenden
(doppelt tippen)
Lauter/Leiser (Schieben)
Akku wird geladen
Akku vollständig geladen
Akku schwach
Akku sehr schwach
Headset angedockt
Unbekanntes Headset
angedockt
Headset und Basisstation
gekoppelt
Stummschaltung aktiv
Aktuelles Zieltelefon
Telefon und Softphone
klingeln
Telefon aktiv
Telefon wird gehalten
Kein Telefon
angeschlossen
Gruppenanruf
Audioverbindung
zwischen Basisstation
und Headset aktiv
Keine Verbindung zum
Headset
DE
24 25
Page 16

DIAGRAMAS DEL AURICULAR JABRA PRO 9450
Altavoz
DIAGRAMAS DE LA BASE JABRA PRO 9450
Jabra PRO™ 9450
Botón multifunción
Panel táctil
Indicador LED
Brazo articulado
del micrófono
(9450)
Jabra PRO™ 9450 Duo
Botón multifunción
Panel táctil
Indicador LED
Jabra PRO™ 9450 Flex
Brazo articulado
exible del
micrófono (9450)
Altavoz
Espuma del micrófono
Brazo articulado exible
del micrófono
Micrófono con
reducción
de ruidos
Soporte para el auricular
Teclado
Control de volumen del micrófono
Conmutador de tono de marcación
Panel frontal
Puerto para teléfono
Puerto para microteléfono
Puerto AUX Puerto USB
Altavoz
Puerto de indicador
luminoso de ocupado
Puerto para adaptador de alimentación
ES
Micrófono con
reducción de ruidos
Espuma del micrófono
26 27
Page 17

Setup
VAYA A: www.jabra.com/setup
CONFIGURACIÓN
PASO 1: SELECCIONE Y PREPARE EL AURICULAR
Montaje de la diadema para la cabeza
1. Alinee el auricular y la diadema para la cabeza, tal como se ve en la ilustración, y presione con fuerza hasta
que encajen correctamente (oirá un clic).
2. Gire el brazo articulado del micrófono según sea necesario para usarlo en la oreja izquierda o derecha.
3. Ajuste la longitud de la diadema para que se adapte cómodamente a su cabeza.
CLIC
o bien
Montaje del gancho para la oreja
1. Monte el gancho para usarlo en la oreja derecha o en la izquierda. Si es necesario, saque el audífono y
sustitúyalo por otro tamaño que se ajuste mejor.
2. Alinee el auricular y el gancho para la oreja, tal como se ve en la ilustración, y presione con fuerza hasta que
encajen correctamente (oirá un clic).
3. Moldee el gancho para que quede bien ajustado a la oreja.
o bien
PASO 2: CONEXIÓN A LA RED ELÉCTRICA
1. Enchufe el adaptador de alimentación suministrado
al puerto de la base con la marca .
2. Conecte el adaptador de alimentación al enchufe
de la red eléctrica.
PASO 3: COLOCACIÓN DEL AURICULAR EN EL
SOPORTE
Coloque el auricular en el soporte. Cuando esté
correctamente acoplado, la batería del auricular se
empezará a cargar si es necesario.
Cargue durante 20 minutos o hasta que el indicador
de batería muestre una luz verde ja. Mantenga el
auricular en la base durante la conguración.
ES
PASO 4: CONEXIÓN A UN PC
1. Conecte el cable USB suministrado al puerto de la
base con la marca .
2. Conecte el cable USB a cualquier puerto USB libre
del PC.
CLIC
28 29
Page 18

PASO 5: SELECCIONAR Y CONECTAR A UN TELÉFONO DE ESCRITORIO
La conexión a un teléfono de escritorio puede variar dependiendo del tipo de teléfono de escritorio utilizado.
Seleccione una de las cuatro opciones siguientes:
OPCIÓN 1
Teléfono de escritorio con puerto para auriculares
Este tipo de teléfonos cuenta con un puerto dedicado
para auriculares (suele estar en la parte posterior
del teléfono). Estos teléfonos suelen disponer de
un botón en el panel frontal para cambiar entre el
auricular y el microteléfono.
1. Enchufe el cable telefónico suministrado al puerto
de la base con la marca .
2. Conecte el cable telefónico al puerto para
auriculares del teléfono de escritorio.
o bien
o bien
OPCIÓN 3
Teléfono de escritorio con descolgador remoto
de microteléfono GN1000
1. En el teléfono de escritorio, desconecte el cable
del microteléfono del cuerpo del teléfono.
2. Conecte el cable del microteléfono al puerto
marcado como
3. Conecte el cable del teléfono en el puerto marcado como
4. Conecte el cable del teléfono en el puerto del
microteléfono del teléfono de escritorio.
5. Conecte el cable de Jabra GN1000 en el puerto
marcado como
en la base.
en la base.
en la base.
OPCIÓN 2
Teléfono de escritorio con Jabra LINK
El adaptador Jabra LINK permite responder a una
llamada entrante o nalizarla mediante el botón
multifunción del auricular.
Póngase en contacto con su distribuidor Jabra para
adquirir un adaptador Jabra LINK para su modelo de
teléfono.
1. Conecte el adaptador Jabra LINK según lo indicado
en la documentación del adaptador que se
suministra con su Jabra LINK. En algunos teléfonos
tendrá que conectar también el cable del teléfono.
2. Llame desde otro teléfono para activar el
adaptador Jabra LINK. Espere diez segundos antes
de responder.
OPCIÓN 4
Teléfono de escritorio sin puerto para auriculares
Este teléfono no dispone de un puerto para
auriculares.
El descolgador remoto de microteléfono GN1000
descuelga manualmente el microteléfono del aparato
receptor para hacer una llamada o responderla. Consulte la documentación suministrada con el descolgador
remoto de microteléfono GN1000 para ver las instrucciones de conexión.
1. Desconecte el cable que conecta el microteléfono al
2. Conecte el cable del microteléfono al puerto de la
3. Enchufe el cable telefónico suministrado al puerto
4. Conecte el cable telefónico al puerto del
Consulte la documentación
de Jabra LINK
o bien
o bien
30 31
ES
cuerpo del teléfono.
base con la marca .
de la base con la marca .
microteléfono del teléfono de escritorio.
Page 19

PASO 6: CONFIGURE EL SONIDO
Llamada de prueba desde un teléfono de escritorio
1 Asegúrese de que el auricular está acoplado y, a continuación, mantenga pulsado
el botón de teléfono de escritorio del teclado de la base hasta que el icono de
teléfono de escritorio cambie a .
2 Quite el panel frontal del Jabra PRO 9450, tal como muestra la ilustración.
3 Colóquese el auricular. El icono del teléfono de escritorio cambiará a . Si el icono
no cambia, pulse el botón de teléfono de escritorio en el teclado de la base.
4 Pulse el botón de auricular en el teléfono de escritorio, o descuelgue el
microteléfono del teléfono de escritorio, para obtener el tono de marcación.
5 Haga una llamada de prueba. Marque el teléfono de un amigo o un colega
usando el teléfono de escritorio.
6 Compruebe el volumen de su micrófono. Si su interlocutor dice que el volumen
al hablar es demasiado bajo o demasiado alto, ajuste el volumen del micrófono
con el control situado en la base, como muestra la ilustración. Asegúrese de que el
receptor de la llamada no ajusta su propio volumen.
7 Al terminar, nalice la llamada y vuelva a colocar el panel frontal del Jabra PRO 9450.
IMPORTANTE
¿Tiene problemas de sonido?
Si no escucha nada o si el sonido está distorsionado durante
la llamada del teléfono de escritorio, pruebe a girar el botón
de tono de marcación de A a G hasta obtener un sonido
óptimo. Para obtener más información, consulte la sección 3.1
Conguración para teléfonos de escritorio, en el manual de
usuario.
Llamada de prueba desde el PC (softphone)
1 Descargue e instale Jabra PC Suite de jabra.com/setup.
2 Abra el software de teléfono de su PC (softphone) y seleccione Jabra PRO 9450 como altavoz y micrófono en
la conguración de audio del softphone.
3 Asegúrese de que el auricular está acoplado y, a continuación, mantenga pulsado el botón de softphone del teclado
de la base hasta que el icono de softphone cambie a .
4 Haga una llamada de prueba. Colóquese el auricular y marque el número de teléfono de un colega o un
amigo usando el software de softphone. El icono de softphone cambiará a .
5 Al terminar, nalice la llamada.
YA HA CONECTADO CON ÉXITO SU JABRA PRO 9450
INFORMACIÓN SOBRE EL AURICULAR Y EL TECLADO DE LA BASE
Auricular
Responder/terminar llamadas (tocar)
Teclado de la base
Silenciar/activar (tocar dos veces)
Aumentar/reducir el volumen (deslizar)
Carga de batería
Batería llena
Batería baja
Batería muy baja
Teléfono en la base
Auricular desconocido
en la base
Sincronización de
auricular y base
En silencio
Teléfono designado
actual
Teléfono sonando
Teléfono en llamada
Teléfono en espera
Teléfono desenchufado
Llamada de grupo
La conexión de audio
entre la base y el
auricular está activa
No se puede conectar
al auricular
ES
32 33
Page 20

JABRA PRO 9450 耳機圖
揚聲器
JABRA PRO 9450 BASE
Jabra PRO™ 9450
多功能按鈕
輕觸屏
LED 指示燈
麥克風延伸臂
(9450)
Jabra PRO™ 9450 Duo
多功能按鈕
輕觸屏
LED 指示燈
Jabra PRO™ 9450 Flex
柔性
麥克風
延伸臂
(9450)
揚聲器
帶噪音消除功能的麥克風
柔性麥克風延伸臂
麥克風泡沫塑膠
耳機座
鍵盤
麥克風音量控制
清晰撥號音開關
前面板
電話插孔
話筒插孔
AUX 插孔 USB 插孔
忙線燈指示器插孔
電源變壓器插孔
揚聲器
CHT
帶噪音消除功能的麥克風
麥克風泡沫塑膠
3534
Page 21

Setup
请转至: www.jabra.com/setup
安裝
步驟 1:準備耳機
組合頭帶
1. 對準耳機與頭帶附件(如圖所示),然後按緊直到附件卡緊入位(按至「喀嚓」一聲)。
2. 視乎需要,旋轉麥克風延伸臂以便用於左耳或右耳。
3. 調節頭帶的長度,使它緊貼環繞您的頭部。
卡扣
或
或
步驟 2:連接電源
1. 將隨附的電源變壓器插入基座上標示為
的插孔。
2. 將電源變壓器連接至主電源插座。
步驟 3:把耳機放在基座上
把耳機放在基座上。當耳機妥當放在耳機座上後,
耳機電池將會開始進行充電(如有需要)。
充電 20 分鐘或是等至電池指示燈一直亮綠燈。
設定期間,請保持耳機放在基座上。
組合耳勾
1. 組合耳勾附件,供左耳或右耳使用。如有需要,可取下耳塞並以尺寸最合適的耳塞替換。
2. 對準耳機與耳勾附件(如圖所示),然後按緊直到附件卡緊入位(按至「喀嚓」一聲)。
3. 調整耳勾形狀,令其緊貼您的耳朵。
卡扣
步驟 4:連接電腦
1. 將隨附的 USB 纜線插入基座上標示為 的
插孔。
2. 連接 USB 纜線到電腦的任何可用 USB 插孔。
CHT
3736
Page 22

步驟 5:選擇並連接至座檯電話
連接至座檯電話的方式,視座檯電話的類型而定。
請選擇以下四個選項其中之一:
選項一
帶耳機插孔的座檯電話
這類座檯電話備有專用的耳機插孔(通常位於電話
背面)。這些電話通常在前面板上設有一個按鈕,
用於在話筒及耳機之間切換。
1. 將隨附的電話纜線插入基座上標示為 的
插孔。
2. 將電話纜線連接到座檯電話的耳機插孔 。
或
或
選項三
帶 Jabra GN1000 遙距話筒推桿的座檯電話
Jabra GN1000 遙距話筒推桿可讓您手動提起話
筒,以接聽來電或撥打電話。有關連接說明,
請參閱 Jabra GN1000 遙距話筒推桿隨附的說
明文件。
1. 在座檯電話上,從電話機身拔除話筒的纜
線。
2. 將話筒纜線連接到基座上標示為
孔。
3. 將隨附的電話纜線插入基座上標示為
插孔。
4. 將電話纜線連接到座檯電話的話筒插孔。
5. 將 Jabra GN1000 纜線連接到基座上標示為
的插孔
的插
的
選項二
帶Jabra LINK的座檯電話
Jabra LINK 適配器讓您可以透過耳機的多功能
按鈕,接聽或結束來電。
如需購買Jabra LINK適配器,請聯絡您本地的
Jabra 經銷商。
1. 按照 Jabra LINK 隨附的適配器文檔中的圖示連
接 Jabra LINK。在一些電話上,還會需要連接
話筒纜線。
2. 使用另一個電話呼叫您已連接的座檯電話,以
啟用 Jabra LINK 適配器。接聽電話之前請等待
10 秒鐘。
請參閱 Jabra LINK
文檔
或
或
選項四
不帶耳機插孔的座檯電話
這類座檯電話並沒有專用的耳機插孔。
1. 在座檯電話上,從電話機身拔除話筒的纜線。
2. 將話筒纜線連接到基座上標示為 的插孔。
3. 將隨附的電話纜線插入基座上標示為 的
插孔。
4. 將電話纜線連接到座檯電話的話筒插孔。
3938
CHT
Page 23

步驟 6:配置聲音
座檯電話聲音
1 確認泊入耳機後,按住基座鍵盤的座檯電話按鈕,直到座檯電話圖示變為
耳機和基座鍵盤資訊
耳機
。
2 取下 Jabra PRO 9450 基座的前面板,如圖所示。
3 戴上耳機。座檯電話圖示將變為 。如圖示沒有變更,輕按基座鍵盤的座檯
電話按鈕。
4 按下座檯電話的耳機按鈕或拿起座檯電話話筒,以取得撥號音。
5 撥打電話以作測試。使用座檯電話撥打朋友或同事的電話號碼。
6 檢查您的說話音量。如果對方認為您的說話音量過大或過小調節基座上麥克風
音量控制,如圖所示。確保對方未調節音量。
7 完成後,結束通話並裝回 Jabra PRO 9450 的前面板。
重要事項
存在聲音問題?
如果您在座檯電話呼叫期間沒有聽見聲音或是聲音扭曲,
請將清晰撥號音開關從 A 轉動至 G,直到您聽見最佳的聲
音。有關詳情,請參見使用者手冊的「3.1 座檯電話設定」
一節。
電腦聲音(軟體式電話)
1 從 jabra.com/setup 下載並安裝 Jabra PC Suite(Jabra 電腦套件)。
2 開啟電腦電話軟件(軟體式電話),於軟體式電話的音頻組態設定部分將
Jabra PRO 9450 設定為揚聲器及麥克風。
3 確認泊入耳機後,按住基座鍵盤的軟體式電話按鈕,直到軟體式電話圖示變
為 。
4 撥打電話以作測試。戴上耳機,使用軟體式電話撥打朋友或同事的電話號
碼。軟體式電話圖示將變為 。
5 完成後,結束通話。
現在您即完成連接 JABRA PRO 9450
接聽/結束通話(按一下)
基座鍵盤
靜音/解除靜音(按兩下)
音量增加/減小(滑動)
電池正在充電
完全充電
電力不足
電量極低
已泊入耳機
已泊入不明的耳機 群組通話
耳機及基座配對
靜音 無法連接至耳機
目前的目標電話
電話正在響鈴
電話通話中
通話保留中
已拔下電話纜線
已啟用耳機與基座之
間的音頻連結
CHT
4140
Page 24

JABRA PRO 9450 ヘッドセット
スピーカー
JABRA PRO 9450 ベース
Jabra PRO™ 9450
多機能
ボタン
タッチ センサー
LED インジケータ
マイク
ブームアーム
(9450)
Jabra PRO™ 9450 Duo
多機能
ボタン
タッチ センサー
LED インジケータ
Jabra PRO™ 9450 Flex
フレキシブ ル
マイク
ブームアーム
(9450)
スピーカー
フレキシブルマイク
ブームアーム
ノイズキャンセリング
マイク
マイクフォー ム
ヘ ッドセ ットクレ ー ド ル
キ ー パッド
マイク音 量コントロ ール
発信音調節スイッチ
フロントパネル
電話ポート
ヘ ッドセ ットポ ー ト
スピーカー
通話 中ライト
インジケータポート
電源アダプターポート
AUX ポート USB ポート
ノイズキャンセリングマイク
マイクフォー ム
JP
4342
Page 25

Setup
PLEASE GO TO: www.jabra.com/setup
セ ットア ップ
ステップ 1: ヘッドセットの組み立て
ヘッドセットの取り付 け
1. ヘッド セットとヘッドバンドの 装着スタイルアタッチメントを図のように合 わせ、カチッと音がして固定され
るまで押し付 けます。
2. 左耳または右耳での使用に合わせてマイクのブームアームを回します。
3. 頭にぴったり当たるようにヘッドバンドの長さを調整します。
カチッ
または
ステップ 2: 電源への接続
1. 付属の電源アダプターをベースの が示され
ているポートに差し込みします。
2. 電源アダプターを電源ソケットに接続します。
ステップ 3: ヘッド セットのドッキング
ヘッドセットをドッキングしま す。正しくドッキング
されると、充電が必要な場合は、ヘッドセットバッ
テリーが充電を開始します。
20 分間またはバッテリーインジケータが緑色に点
灯するまで充電します。セ ットア ップ 中 は ヘ ッド セット
をドッキングしたままにしま す。
イヤーフックの取り付 け
または
1. 左耳または右耳での使用に合わせてイヤーフックの装着スタイルアタッチメントを組み立てます。必要に
応じてイヤーバッドを取り外して、最適なサイズのものに交換します。
2. ヘッド セットとイヤーフックの装着スタイル アタッチメントを図のように合わ せ、カ チッと音 がして固定され
るまで押し付 けます。
3. イヤーフックが耳に快適にフィットする形にします。
カチッ
ステップ 4: PC への接続
1. 付属の USB ケーブルをベースの
が示されているポートに差し込みます。
2. USB ケーブルを PC の空いている
USB ポートに接続します。
JP
4544
Page 26

ステップ 5: デスクホンの選択と接続
デスクホンへの接続は、使用するデスクホンの種類によって異なります。
次の 4 つのオプションから 1 つを選択します。
オプ ション 1
ヘッドセットポートのあるデスクホン
この種類のデスクホンには、専用のヘッドセットポー
トがあります(通常は電話の背面)。通常、受話器とヘ
ッドセット間を切り換えるためのボタンがフロントパ
ネルにあります。
1. 付属の電話ケーブルをベースの が示されてい
るポートに差し込みます。
2. 電話ケーブルをデスクホンのヘッドセットポート
に接続します。
または または
オプ ション 3
Jabra GN1000 リモートハンドセットリフターを使用す
る場合
Jabra GN1000 リモートハンドセットリフターはデスクホ
ンの受話器を手動で持ち上げたり、通話に応答したりし
ます。取り付け方法については、Jabra GN1000 に付属の
マニュアルを参照してくだ さい。
1. デスクホンの電話本体から受話器のケーブルを外し
ます。
2. 受話器のケーブルをベースの
ートに 接続します。
3. 付属の電話ケーブルをベースの
ポートに差し込みます。
4. 電話ケーブルをデスクホンの受話器ポートに接続し
ます。
5. Jabra GN1000 ケーブルをベースの
るポートに接続します。
が示されているポ
が示されている
が示されてい
オプ ション 2
Jabra LINK (EHSアダプタ)対応のデスクホン
Jabra LINK アダプターを使用すると、ヘッドセットの
多機能ボタンで着信に応答したり、通話を終了した
り で き ま す 。
特定のデスクホン用の Jabra LINK アダプターの購
入については、最寄の Jabra 販売店にお問い合わ
せください。
1. Jabra LINK に付属のアダプターマニュアルを参
照して Jabra LINK アダプターを接続します。電話
によっては電話ケーブルを接続する必要もありま
す。
2. 別の電話から、接続しているデスクホンに電話
し、Jabra LINK アダプターを有効にします。10 秒
間待ってから電話に応答します。
Jabra LINK の
マニュアルを参照
または または
オプ ション 4
ヘッドセットポートのないデスクホン
このデスクホンには専用のヘッドセットポートがあ
りません。
1. デスクホンの電話本体から受話器のケーブルを外
します。
2. 受話器のケーブルをベースの が示されている
ポートに接続します。
3. 付属の電話ケーブルをベースの が示されてい
るポートに差し込みます。
4. 電話ケーブルをデスクホンの受話器ポートに接続
します。
JP
4746
Page 27

ステップ 7: サウンドの設定
デスクホンのサウンド
1 ヘッドセットがドッキングしていることを確 認し、デ スクホンアイコンが
に変わるまで、ベースのキーパッドでデスクホンボタンを押し続けます。
2 図のように Jabra PRO 9450 のフロントパネルを取り外します。
3 ヘッドセットを 装着します。デスクホン のアイコンが に 変わります。アイコ
ンが変わらない場合、ベースキーパッドのデスクホンボタンをタップします。
4 デスクホンのヘッドセットボタンを押すか、デスクホンの受話器を持ち上げ、
発信音を鳴らします。
5 通話をテストします。デスクホンで友人または同僚のデスクホンにダイヤル
します。
6 話している音量を確認します。相手に聞こえる通話音量が大きすぎるか、小
さすぎる場合、図のようにベースのマイク音量コントロールを調整します。相
手側では音量を調整しないようにします。
7 調整できたら、通話を終了して Jabra PRO 9450 のフロントパネルを戻します。
重要
サウ ンドに 問 題?
デスクホンで通話中に音が何も聞こえない場合や、音が歪んで
聞こえる場合、最適なサウンドが得られるまで発信音調節スイ
ッチを A から G に回します。詳細については、ユーザーマニュ
アルのセクション 3.1「デスクホンの設定」を参照してください。
PC(ソフトホン)のサウンド
1 jabra.com/setup から Jabra PC Suite をダウンロードしてインストールします。
2 PC ホンソフトウェア(ソフトホン)を開き、ソフトホンの音声設定でJabra PRO 9450 をスピーカーとマイク
に設定します。
3 ヘッドセットがドッキングしていることを確 認し、ソフトホンアイコンが に変わるまで、ベースの キーパッド
でソフトホンボタンを押し続けます。
4 通話をテストします。ヘッドセットを装着して、ソフトホンソフトウェアで友人または同僚の電話番号にダイ
ヤルします。ソフトホンのアイコンが に変わります。
5 完了したら、通話を終了します。
JABRA PRO 9450 に正しく接続できました
ヘッドセットとベースキーパッドの情報
ヘ ッド セット
通話の応答/終了(タップ)
ベ ー スキ ー パ ッド
ミュート/ミュート解除(ダブルタップ)
音量の上げ下げ(スライド)
バッテリー 充電 中
フル充電
低バ ッテリー
まもな くバ ッテリー
切れ
ヘッドセットドッキン
グ状態
不明ヘッドセットがド
ッキング
ヘッドセットとベ ース
の ペアリング
ミュート済 み
現在のターゲット
電話機
電話着信中
通話中の電話
保留中の電話
電話未接続
グループ通話
ヘッドセットとベ ース
間 のオ ーディオリンク
が有効
ヘ ッド セット に 接
続不可
JP
4948
 Loading...