


Jabra PC Suite
User’s Guide
©2008, Jabra A/S

Contents
1. JABRA PC SUITE OVERVIEW .....................................................................................................3
Elements of the Jabra PC Suite ..............................................................................................3
System Requirements .............................................................................................................4
2. INSTALLING JABRA PC SUITE ....................................................................................................5
3. USING SOFTPHONES WITH YOUR JABRA HEADSET ....................................................................8
Using Skype .............................................................................................................................8
Using Cisco IP Communicator ................................................................................................9
Using Microsoft Office Communicator ................................................................................. 10
Using Other Types of Softphones and Audio Programs .................................................... 11
4. THE JABRA DEVICE SERVICE .................................................................................................. 12
Running and Using the Device Service............................................................................... 12
Purpose of the Device Service .......................................................................................................12
Running the Device Service ...........................................................................................................12
The Jabra Icon in the Notification Area ............................................................................... 12
The Device Service Settings Window.................................................................................. 13
Setting the Target Softphone ............................................................................................... 15
Connecting Applications to the Device Service .................................................................. 16
Viewing the Known Devices List .......................................................................................... 17
Device Service Preferences ................................................................................................. 18
5. THE JABRA CONTROL CENTER ............................................................................................... 19
Running and Using the Jabra Control Center ..................................................................... 19
Purpose of the Control Center.......................................................................................................19
Running the Control Center...........................................................................................................19
The Control Center Window ................................................................................................. 19
6. THE JABRA DEVICE FIRMWARE UPDATER ............................................................................... 21
Introduction to the Firmware Updater .................................................................................. 21
Running the Firmware Updater............................................................................................ 21
7. THE JABRA SKYPE INTERFACE ............................................................................................... 24
Running and Using the Skype Interface.............................................................................. 24
Purpose of the Skype Interface ......................................................................................................24
Running the Skype Interface ..........................................................................................................24
The Skype Interface Window ............................................................................................... 25
Configuring Skype to Accept the Jabra Connection ........................................................... 26
8. USING JABRA DEVICES WITH ANY WINDOWS PROGRAM......................................................... 28
A. JABRA A335W SETTING S IN THE CONTROL CENTER............................................................... 30
Control Center Buttons for Jabra A335w ............................................................................ 30
The Settings Tab for Jabra A335w ...................................................................................... 31
The Advanced Tab for Jabra A335w ................................................................................... 32
The Headset Tab for Jabra A335w...................................................................................... 33
Jabra PC Suite User’s Guide 2

Chapter 1: Jabra PC Suite Ov erv iew
Elements of the Jabra PC Suite
1. Jabra PC Suite Overview
Elements of the Jabra PC Suite
The Jabra PC Suite is a collection of PC programs that enable you to configure
your Jabra solution, update its firmware and control the way your headset will
work together with your PC softphones and other audio programs.
The Jabra PC Suite includes the following programs:
• Jabra Device Service
This simple program runs in the background and monitors your USB ports for
Jabra devices. It enables the Jabra Control Center and softphone interfaces to
interact with Jabra devices. While the Device Service is running, you will see a
Jabra icon in the Windows notification area (close to the clock in the bottomright corner of your screen); right click the icon to set preferences and access
links to other Jabra programs. You must have this service running in order to
use any of those programs together with your Jabra device.
• Jabra Control Center
This program enables you to configure your Jabra headset from your computer
and to configure the interaction between your headset and your softphone
programs.
• Jabra Device Firmware Updater
This program enables you to update the firmware of your Jabra devices.
Firmware is a type of software that runs inside many types of electronic
devices, managing their various internal processes. Occasionally, Jabra may
release updates that can improve performance or add new functionality to your
Jabra product. You can find these updates on the Jabra web site and may
receive e-mail about firmware updates if you register your devices with Jabra
(which we recommend).
• Jabra Skype Interface
This is a simple background program that manages the connection between
your headset solution and the Skype softphone program. Among other things,
it enables you to answer a Skype call using the controls on your headset.
• Jabra Cisco IP Communicator Interface
This is a library (DLL) that is added to your Cisco IP Communicator
installation if it is present when you install Jabra PC Suite. It enables you to
control Cisco IP Communicator from your headset, but is otherwise invisible
and does not require you to manually run or configure it. If you install Cisco IP
Communicator after installing Jabra PC Suite, then reinstall the PC Suite to get
the Cisco driver.
Jabra PC Suite User’s Guide 3

Chapter 1: Jabra PC Suite Ov erv iew
System Requi rement s
System Requirements
To run the Jabra PC Suite, your computer must meet or exceed the following
requirements:
• Operating System: Microsoft Windows 2000 SP4 or later; Microsoft
Windows XP with Service Pack 2 or later; or Microsoft Windows Vista (all
variants). 64-bit versions of Windows are not supported.
• Hardware: A USB connection must be available and a Jabra device must be
connected to it.
Jabra PC Suite supports the following softphone solutions:
• Skype: version 3.2 or above
• Cisco IP Communicator: version 2.0.1.1 or above
• Microsoft Office Communicator 2007
• Other softphones: All softphones will recognize your Jabra headset as a
standard Windows sound card with sound-in and sound-out features. However,
you will not be able to control these phones from the Jabra headset (i.e., you
will need to use the softphone user interface to place and answer calls).
Note: Jabra is constantly evaluating the softphone market to see which new
programs should be supported with a dedicated driver, as listed above for Skype,
Microsoft and Cisco. Contact your Jabra representative or see the Jabra web site
for the latest news on softphone driver development.
Jabra PC Suite User’s Guide 4
Chapter 2: Ins t allin g Jabra PC Suit e
System Requi rement s
2. Installing Jabra PC Suite
To install Jabra PC Suite on your computer:
1. If are using the Cisco IP Communicator softphone program, then install that
program first. (If you add this program later, you can simply re-run the Jabra
PC Suite setup wizard to install the Jabra driver for Cisco.)
2. If an older version of Jabra PC Suite is already installed on your PC, then
please close the Jabra Device Service if it is running.
3. Insert the CD-ROM that came with your Jabra product or download the Jabra
PC Suite installer from www.jabra.com.
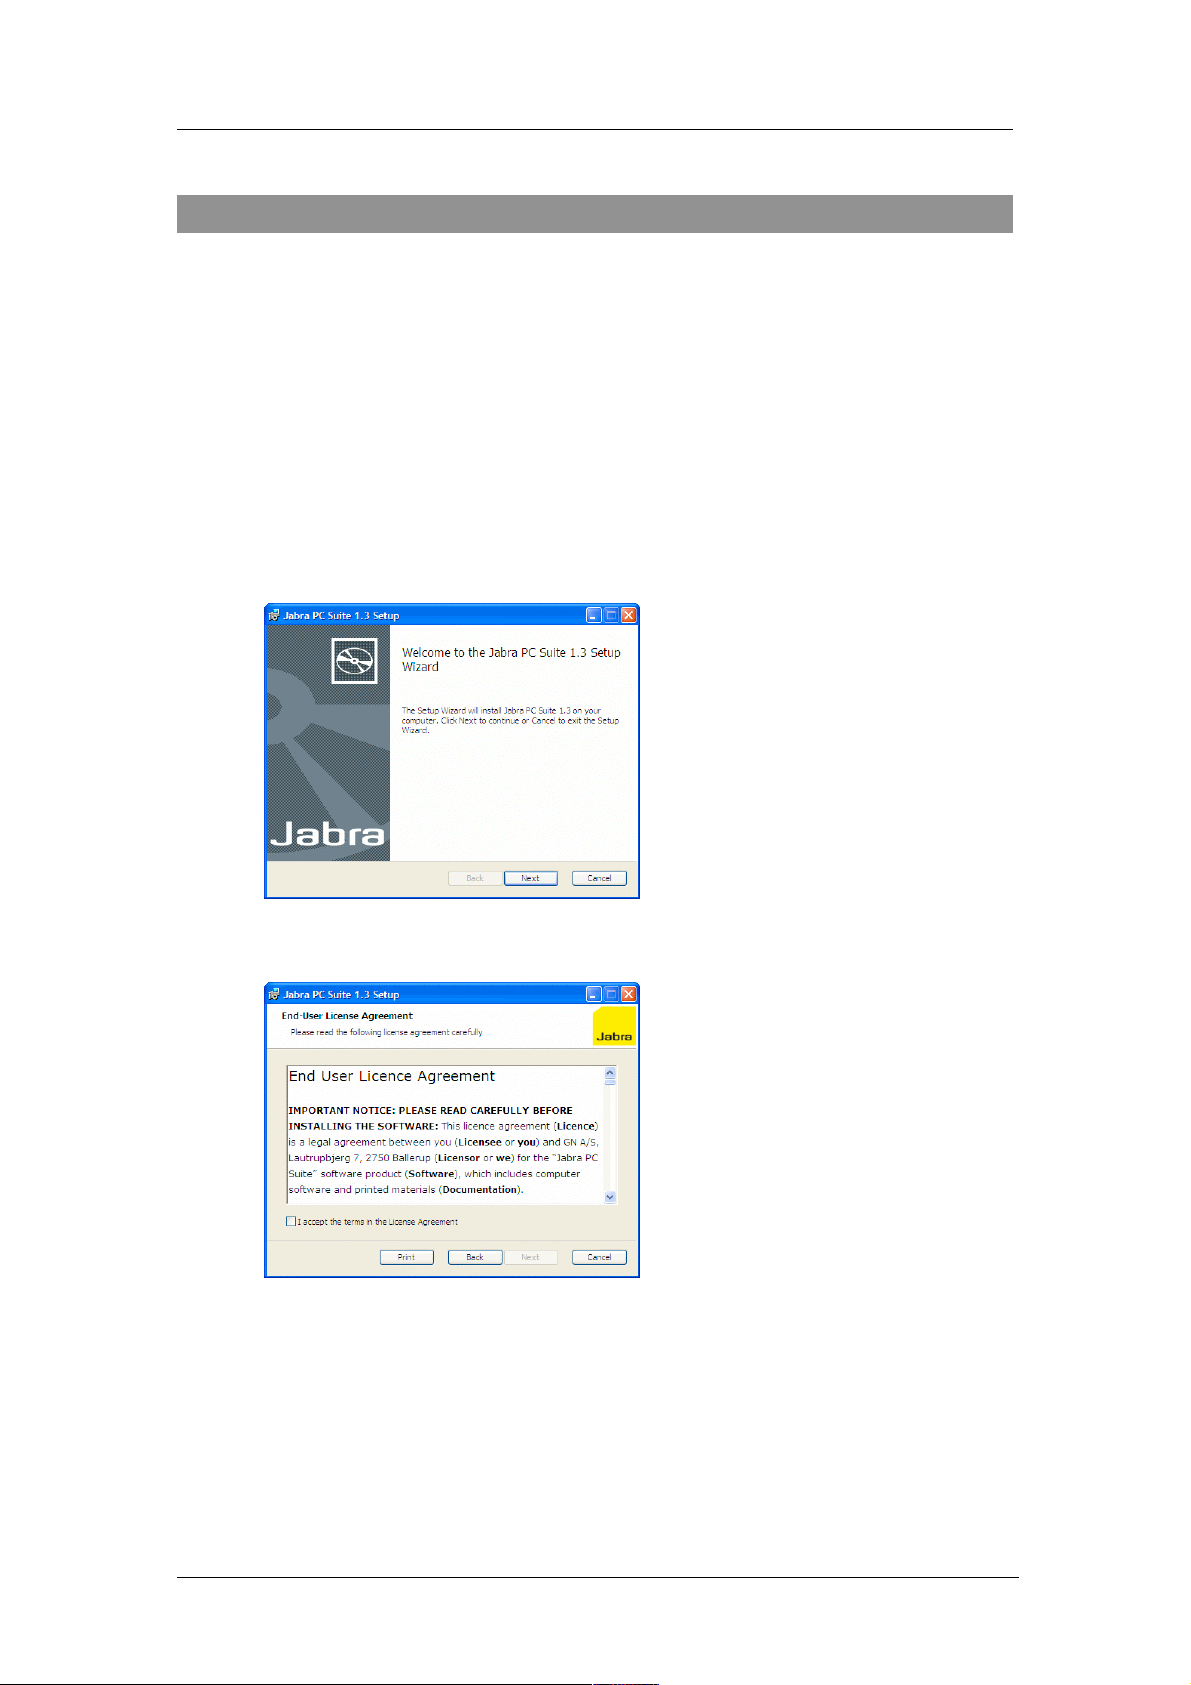
4. Double click on the
5. The installation wizard launches, starting with a
JabraPcSuiteSetup.exe file.
Welcome screen.
There are no settings here, so just read the text and click on Next.
6. The End-User License Agreement page opens.
Read the license agreement carefully. If you agree with its terms, then mark
the I accept… check box and click on Next. You can also Print the agreement
from here if you like.
Jabra PC Suite User’s Guide 5
Chapter 2: Ins t allin g Jabra PC Suit e
System Requi rement s
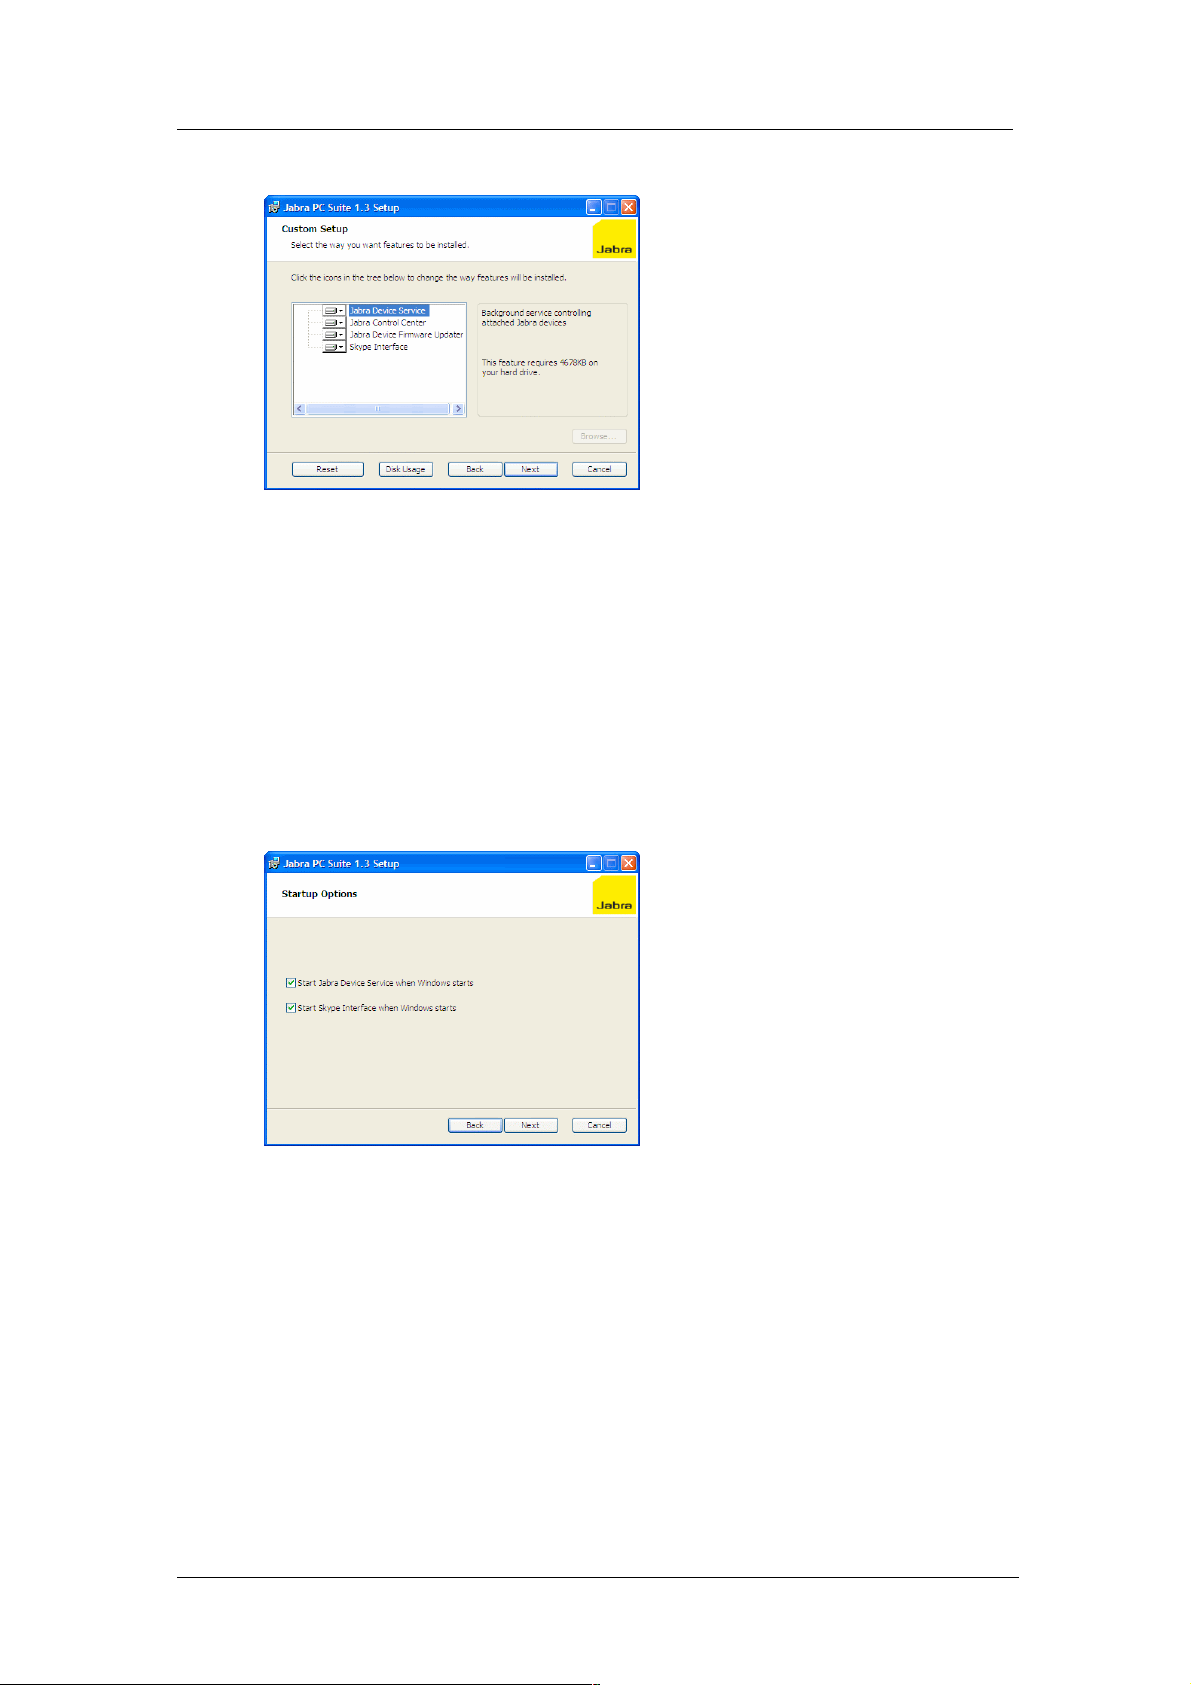
7. The Custom Setup page opens.
The Jabra PC Suite includes either four or five programs, all of which will be
installed by default. (The fifth program, the Cisco IP Communicator
Interface, is made available only if the Cisco softphone is already installed
on your system.) We recommend that you install all of the listed programs,
though you might exclude the Skype Interface and/or the Cisco IP
Communicator Interface if you are sure you will never use these. To remove
a program, click on the hard-disk icon next to the target name to open a menu
that you can use to exclude that program. Buttons at the bottom of this page
also enable you to see how much disk space will be used and to reset the
page to its default settings. Click on Next when you are done making settings
here.
8. The St artup Options page opens.
The setup program is able to create shortcuts in your Windows start-up folder
that will launch the Jabra Device Service and/or Skype Interface at startup.
Set these as follows:
o Start Jabra Device Service…: This program runs in the background and
enables advanced control functionality for your softphones and headset.
We recommend that you leave this box marked if you will often use a
softphone with your headset. See also “Running and Using the Device
Service” on page 12 for details about this program.
o Start Skype Interface…: Leave this box marked if you intend to use
Skype with your Jabra headset. See also “Running and Using the Skype
Interface” on page 24 for more information about this program.
Click on Next when you are done.
Jabra PC Suite User’s Guide 6
Chapter 2: Ins t allin g Jabra PC Suit e
System Requi rement s
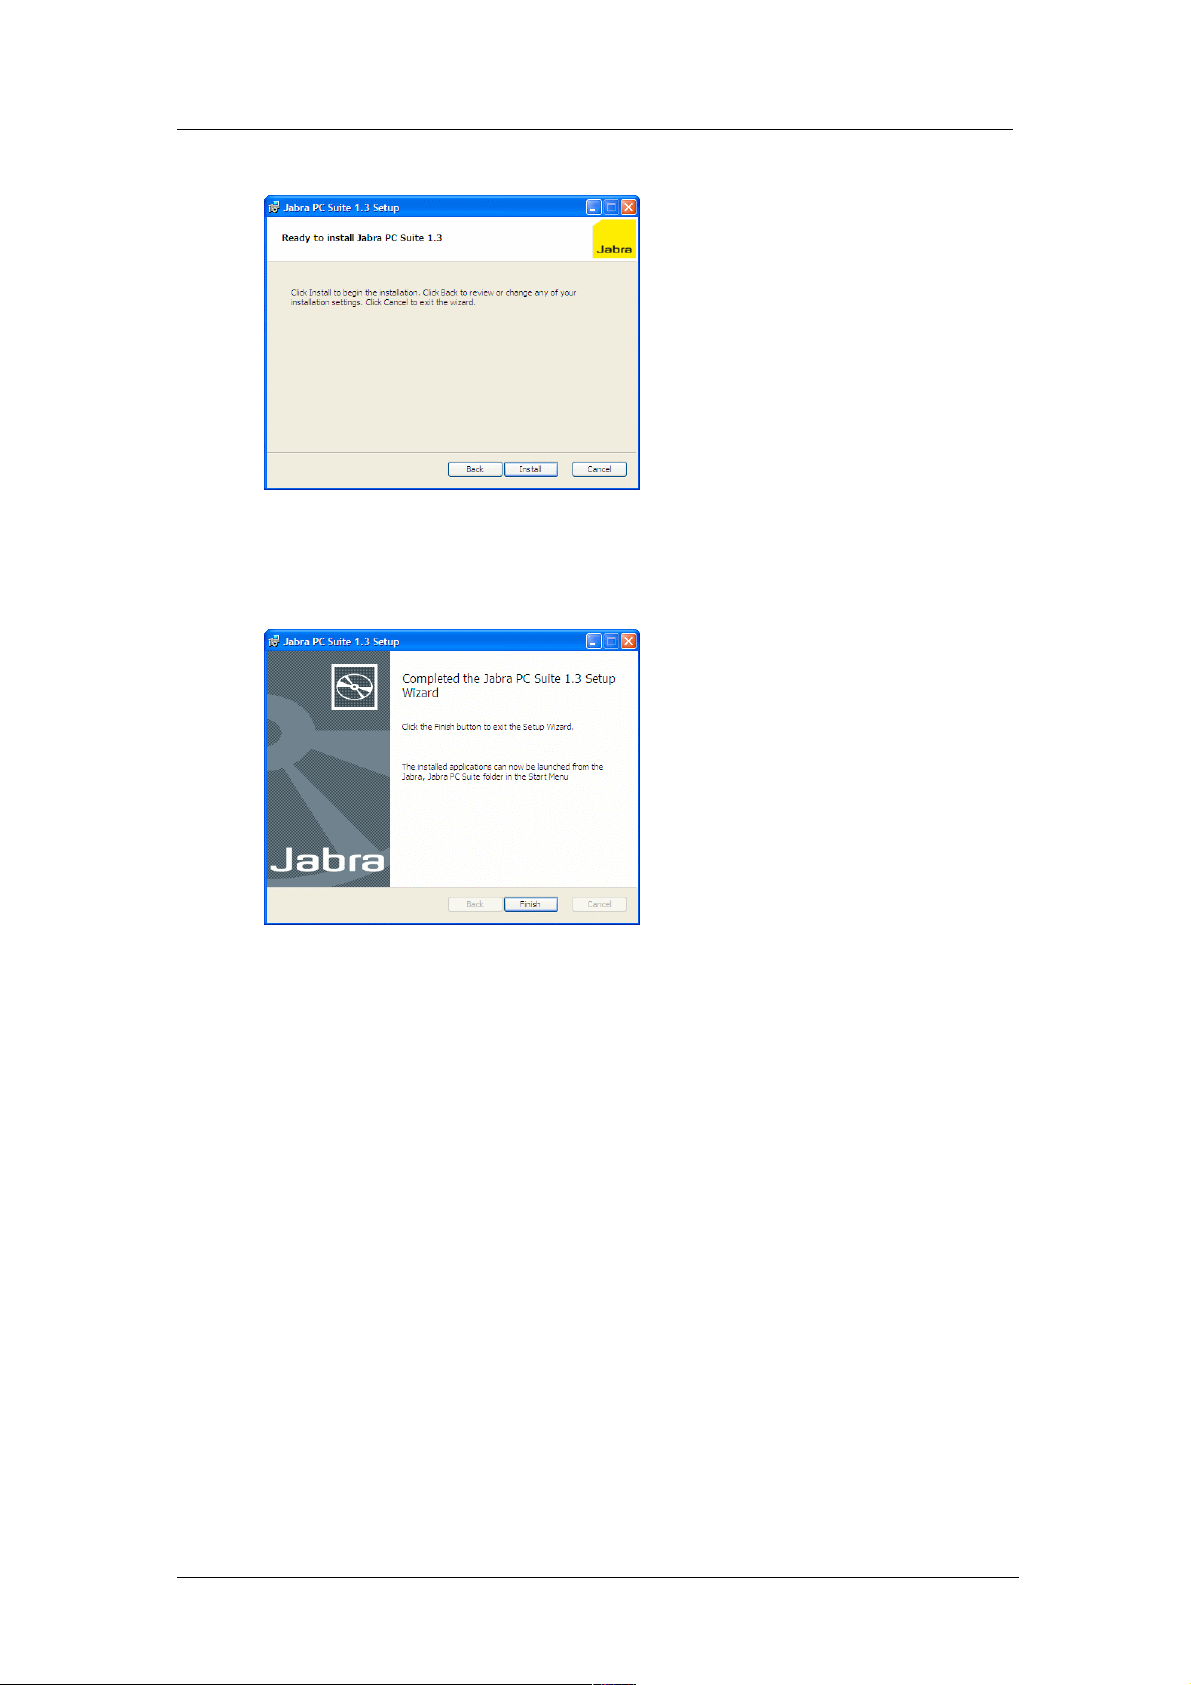
9. The Ready to Install page opens.
You are now finished setting your installation options. Click on Install to
install the software.
10. A progress bar is shown to track your installation. When installation is
complete, the Completed… page opens.
Click on Finish to close the setup program and start using your new software.
Jabra PC Suite User’s Guide 7

Chapter 3: Using Softphones with Your Jabra Headset
Using Skype
3. Using Softphones with Your Jabra Headset
The Jabra PC Suite has two primary functions: configuring your headset and
providing a feature-rich softphone integration that includes remote call control
from the headset.
Basic softphone functionality is provided via Windows and plug-and-play, which
results in your headset appearing as a standard PC sound card with sound-in and
sound-out abilities. However, other elements of the Jabra PC Suite will enable
you to control your softphone from your headset’s buttons. Features include the
ability to answer incoming calls, place calls on hold, switch between held calls
and more. The exact set of features that are supported vary slightly between
softphone types, as outlined in the table below and elaborated in the sub-sections
that follow. The available features will also depend on the Jabra product you are
using with your softphone.
Function Skype Cisco IP
Communicator
Accept incoming cal l
End call
Mute microphone
Place call on hold
Resume call on hold
Redial
Microsoft Office
Communicator
Using Skype
Skype is a well known and widely used softphone solution. It is free to download
and use, though some advanced services (such as the ability to dial out to
traditional phone numbers) cost extra. It has a relatively long history, providing a
large set of features and automation controls with which Jabra can interact.
See "System Requirements” on page 4 for Skype version requirements.
To best use your headset together with Skype, the following should be installed
and running on your PC:
• Jabra Device Service
This simple program establishes a link between your Jabra headset and Jabra
softphone interfaces, enabling you to control your softphone from your
headset. We recommend that you configure Windows to run this program at
start up if you often use your headset together with any type softphone. See
also “Running and Using the Device Service” on page 12.
• Jabra Skype driver
Like the Jabra Device Service, this is a simple program that runs in the
background to enable commands from your headset to be passed to the
softphone. We recommend that you configure Windows to run this program at
Jabra PC Suite User’s Guide 8

Chapter 3: Using Softphones with Your Jabra Headset
Using Cisco IP Communicator
start up if you often use your headset together with Skype. See also “Running
and Using the Skype Interface” on page 24.
Once the above software is installed and running, you will be able to control the
following features of Skype using your standard Jabra headset controls:
• Accept incoming call
• End call
• Mute microphone
• Place call on hold
• Resume call on hold
• Redial last outgoing number
The headset controls for invoking each of the above features of your softphone
work in exactly the same way as they do for your mobile or desk phone. See also
your Jabra headset reference manual for details about how to invoke each of these
functions.
For more information about running the Skype Interface and using Skype
together with your headset, please see "Running and Using the Skype Interface”
on page 24 See also your Skype documentation.
Using Cisco IP Communicator
Cisco IP Communicator makes the many features of Cisco's line of IP-based desk
phones available on your PC.
See "System Requirements” on page 4 for Cisco version requirements.
To best use your headset together with Cisco IP Communicator, the following
should be installed and running on your PC:
• Jabra Device Service
This simple program establishes a link between your Jabra headset and Jabra
softphone interfaces, enabling you to control your softphone from your
headset. We recommend that you configure Windows to run this program at
start up if you often use your headset together with any softphone. See also
“Running and Using the Device Service” on page 12.
• Jabra Cisco IP Communicator Interface
This is a plug-in (DLL) for Cisco IP Communicator. Once installed, it will
always be available to the softphone. See also the note below for more
information about installing this driver.
Once the Jabra interface is installed, you will be able to control the following
features of Cisco IP Communicator using your Jabra headset:
• Accept incoming call
• End call
• Mute microphone
• Redial last outgoing number
Jabra PC Suite User’s Guide 9

Chapter 3: Using Softphones with Your Jabra Headset
Using Microsoft Office Communicator
The headset controls for invoking each of the above features of your softphone
work in exactly the same way as they do for your mobile or desk phone. See also
your Jabra headset reference manual for details about how to invoke each of these
functions.
Note: Make sure that your Jabra device is selected as both Headset and Handset
in the Audio Tuning Wizard of Cisco IP Communicator.
See also your Cisco IP Communicator documentation for complete details.
Note: The Jabra interface for Cisco IP Communicator will only be installed if the
Cisco program is already present on your computer when you run the Jabra setup
program. If you installed the Cisco program after installing Jabra, then you must
run the Jabra setup program again to install the Cisco driver. Look also for a readme file and/or see also your Jabra headset reference manual for details about
running the Jabra setup program.
Using Microsoft Office Communicator
Microsoft Office Communicator does not require a dedicated driver to work with
Jabra products. For the same reason, you do not need to run the Jabra Device
Service in order to send commands from your headset to the softphone. However,
you will still use the Jabra Device Service whenever you want to configure your
headset using the Jabra Control Center.
See "System Requirements” on page 4 for Microsoft version requirements.
You are able to control the following features of Microsoft Office Communicator
using your standard Jabra headset controls:
• Accept incoming call
• End call
• Mute microphone
The headset controls for invoking each of the above features of your softphone
work in exactly the same way as they do for your mobile or desk phone. See also
Jabra PC Suite User’s Guide 10

Chapter 3: Using Softphones with Your Jabra Headset
Using Other Types of Softphones and Audio Program s
your Jabra headset reference manual for details about how to invoke each of these
functions.
Using Other Types of Softphones and Audio Programs
Even if you use a softphone that is not mentioned above, then you will still be
able to use your headset together with your software. In this case, your headset
will work just like a passive PC plug-and-play sound card with sound-in and
sound-out features. This is probably how your softphone documentation describes
the expected operating environment in its documentation.
There are two possible exceptions that may enable headset-based control of your
softphone:
• If your softphone operates the headset using the USB human interface device
standard, as Microsoft Office Communicator does, then your softphone may
support the same types of features described above for Office Communicator.
• Jabra is constantly evaluating the softphone market to see which new programs
should be supported with a dedicated driver, as described above for Skype and
Cisco. Contact your Jabra representative or see the Jabra web site for the latest
news on softphone driver development.
See also “Using Jabra Devices with Any Windows Program” on page 28.
Jabra PC Suite User’s Guide 11

Chapter 4: The Jabra Device Service
Running an d Using the Device Service
4. The Jabra Device Service
Running and Using the Device Service
Purpose of the Device Service
The Jabra Device Service is a simple program that runs in the background,
monitors your USB ports for Jabra devices and provides a link between your
Jabra device and various types of PC applications. It enables the Jabra Control
Center and Jabra softphone interfaces to interact with Jabra headsets.
Running the Device Service
When you install the Jabra PC Suite, you are presented with the option of running
the Device Service and/or Skype Interface automatically each time you start
Windows. If you selected one or both of these options, then the installer created
shortcuts to these programs in your Windows Startup folder. In this case, you will
never need to think about starting the Device Service—it will always be
available. However, if you only occasionally use your headset with your
computer, then you might choose to keep the Device Service turned off by default
and start it manually only when you need it.
• To run the Device Service Manually, click on the Windows
Start menu and
select All Programs > Jabra > Jabra PC Suite > Jabra Device Service.
• To run the Device Service automatically on startup, or to stop doing so, add or
remove a shortcut for it in your Windows Startup folder. One way to get to this
folder is to right-click on the Start menu and choose Open All Users from the
context menu. This opens a standard Windows Explorer window. Navigate
from there down to Programs\Startup sub-folder (the full path is
something like: C:\Documents and Settings\All Users\Start
Menu\Programs\Startup
). Add or remove shortcuts here as needed. See
also a Windows reference for more information about how to work with
shortcuts and the Startup folder.
• To quit the Device Service, use the context menu of the Jabra icon in the
Windows Notification Area or the menu command of the Device Service
settings window (see below).
The Jabra Icon in the Notification Area
While the Device Service is running, you will be able to see a Jabra icon in the
Windows Notification Area (close to the clock in the bottom-right corner of your
screen); right click here to set preferences and access links to other Jabra
programs.
Jabra PC Suite User’s Guide 12

Chapter 4: The Jabra Device Service
The Device Service Settings Window
Figure 1: The Jabra icon in the Windows Notification Area
If you think that the Device Service is running but you cannot see the icon, then
Windows may be hiding it. Click on the small left-pointing arrow at the left side
of the Notification Area to view all available icons, which should include the
Jabra icon. If the icon is still not visible, then the service is not running; launch it
from the Start menu and/or add it to your Startup folder as described above.
The Jabra icon enables you to open a settings window for the service and also
enables you to quit the service. To view these options, right-click on the icon in
the Notification Area to open its context menu.
Figure 2: The Jabra Device Service context menu
The following commands are available here:
• Jabra Control Center: Opens the Control Center, which you can use to set
various options on your Jabra device. See “The Jabra Control Center” on page
19 for details about this program. You can also activate the Jabra Control
Center menu item by double-clicking on the Jabra icon (which is why it is
shown in bold type).
• Jabra Device Service: Opens the settings window for the Device Service (see
below).
• Exit: Quits the Device Service. This will remove the Jabra icon from your
Notification Area and terminate the Jabra Control Center and Jabra softphone
interfaces. You can run the Device Service again at any time by selecting its
icon from the Windows Start-button menu, as described above.
The Device Service Settings Window
The Jabra Device Service window enables you to set options for the Device
Service. You can open this window at any time when the Device Service is
running by using the Jabra icon in the Windows Notification area, as described
above.
Jabra PC Suite User’s Guide 13

Chapter 4: The Jabra Device Service
The Device Service Settings Window
Figure 3: The Jabra Device Service settings window
The window is divided into three areas: menu bar (top), settings tabs (middle) and
button area (bottom).
The following commands are available from the menu bar:
• File > Exit: Quits the Device Service, closing the settings window and
removing the Jabra icon from the Windows Notification Area. This has the
same effect as selecting the Exit command available from the Jabra icon
context menu, as described above.
• Help > Check for Updates: Checks with the Jabra web site to see if a new
version of the PC Suite is available. If there is, you will be provided with
instructions about how to obtain and install it.
• Help > About Jabra Device Service: Opens a window with version and
copyright information about the Device Service.
The following settings tabs are provided in the middle of the window; click on a
tab title to view its settings:
• Target Softphone: if you sometimes run more than one softphone program,
then use the settings here to choose which one will receive the commands
issued from your headset (such as when you press a button to initiate a call).
• Applications: shows a list of applications that are currently connected to the
Jabra Device Service.
• Devices: shows a list of attached Jabra devices and which Jabra devices are
supported by the Device Service.
• Preferences: provides settings that control a few options about the way your
Jabra solution will work on your PC.
The following buttons are provided in the area at the bottom of the window:
• Refresh: Updates the information shown in the Jabra Device Service window.
Click here if you have changed something (such as connected a new headset or
installed a new softphone application) while the window was open.
• OK: Applies any changes you made to settings in the window and closes the
window. However, the Device Service will continue running in the background
and displaying the Jabra icon in your Windows Notification Area.
• Close: Discards any new settings you have made and closes the Jabra Device
Service settings window. If you have any unapplied settings, you will be asked
Jabra PC Suite User’s Guide 14

Chapter 4: The Jabra Device Service
Setting the Target Softphone
if you would like to save them. The Device Service itself does not quit, so it
will continue running in the background. This is the same as clicking on the
close button in the upper-right corner of the window.
• Apply: Applies any changes you made to settings in the window and keeps the
window open. This button is grayed out when there are no new settings to
apply.
Setting the Target Softphone
If you sometimes run more than one softphone program, then you need to decide
which of these programs should normally receive the commands issued from
your headset (such as when you press a button to initiate a call).
To view a list of available softphones and select one as the default, make sure that
the Jabra Device Service is running and then open its settings window from the
Notification Area icon. Click on the Target Softphone tab if it is not currently
shown.
Figure 4: The Target Softphone tab of the Jabra Device Service settings window
The Target Softphone tab shows a list of available softphone programs.
Note: The list here shows only those softphone programs that are known to the
Jabra PC Suite and were installed when you ran the PC Suite setup program. If
you have installed a new supported softphone since installing the PC Suite, then
re-install the PC Suite if you would like to see that program here.
The following information is shown about each listed program:
• Softphone: the name of a given softphone application
• Configured: A check is shown in this column to mark which of the available
softphones is currently configured as the target for commands from your
headset.
• Current: A check is shown in this column to mark which of the available
softphones is currently the target softphone. The current target will always be
the softphone that is, or last was, engaged in a call. Until you have had an
active call (after Device Service has started) the current target will be set to the
configured target.
Jabra PC Suite User’s Guide 15

Chapter 4: The Jabra Device Service
Connecting Applications to the Dev ice Ser v i c e
If you would like to change the currently configured target:
1. Click on the Configure button. This opens a simple dialog window with a
single drop-down list.
2. Select your preferred target from the drop-down list. If you prefer not to have
a target, then select the “None” entry (see the note below for details about
why you might do this).
3. Click on
now show a check mark in its
OK to close the configuration window. Your new selection should
Configured column on the Default Softphone
tab.
Connecting Applications to the Device Service
The main purpose of the Device Service is to act as a conduit through which
applications running on your PC can communicate with your headset and interact
with its advanced features (and vice-versa). Use the
Applications tab of the Jabra
Device Service settings window to see a list of applications that are currently
connected to the service
To view a list of connected applications, make sure that the Jabra Device Service
is running and open its settings window from the Notification Area icon. Then
click on the Applications tab.
Figure 5: The Applications tab of the Jabra Device Service settings window
The Applications tab provides a table that lists information about the connected
applications using the following columns:
• Name: the name of a given connected application
• Version: the software version number reported by the application
• Type: the type of application (e.g., "Softphone")
• Open Devices: shows the name of the physical Jabra device to which the
Device Service has an open connection for each listed application.
Jabra PC Suite User’s Guide 16

Chapter 4: The Jabra Device Service
Viewing the Known Devices List
• Locked Devices: when an application has locked a Jabra device (e.g., when you
are on a call), then no other application will be able to access that device. This
column lists the Jabra device to which each listed application has locked access
(if any).
There is one row for each application connected to the Device Service.
Click on Refresh if you have started a new application since you opened this
window and would like to see that application listed here.
Viewing the Known Devices List
Use the Devices tab of the Device Service settings window to view a list of
devices that are currently connected to your PC and a list of all devices that are
supported by the installed version of the Device Service. You can also read the
supported firmware versions and the current firmware version of attached
devices.
Note: The Device Service is only able to connect to those Jabra devices for which
it is specifically designed. If you have a new Jabra headset, then you may need to
update your Jabra PC Suite to support it (use the Help > Check for Updates menu
command to check for availability). Jabra devices that are connected to your PC
but are not supported by your current version of the Device Service are listed as
unknown.
To view a list of connected and known devices, make sure that the Jabra Device
Service is running, open its settings window from the Notification Area icon and
click on the Devices tab.
Figure 6: The Devices tab of the Jabra Device Service settings window
Click on Refresh if you have connected a new device since you opened this
window and would like to see that device listed here.
Jabra PC Suite User’s Guide 17

Device Service Preferences
Chapter 4: The Jabra Device Service
Device Service Preferences
Use the
Preferences tab of the Device Service settings window to control a few
aspects of the way your Jabra solution will work on your PC.
To view and set the available options, make sure that the Jabra Device Service is
running, open its settings window from the Notification Area icon and click on
the Preferences tab.
Figure 7: The Preferences tab of the Jabra Device Service settings window
In the current version, there is just one option here: Pause media player when a
call is initia t e d
. Use this option if you often listen to Windows Media Player in
between phone calls. When this box is marked, then the Device Service will
automatically pause your media player whenever you place or receive a call using
your softphone. When you are done talking, however, Media Player will not be
started again automatically; use your mouse to begin playing music again if
desired.
Jabra PC Suite User’s Guide 18

Chapter 5: The Jabra Control Center
Running an d Using the Jabra Control Center
5. The Jabra Control Center
Running and Using the Jabra Control Center
Purpose of the Control Center
The Jabra Control Center enables you to view status information and make
settings for the Jabra headset currently connected to your PC. The settings
provided will depend on which Jabra devices are currently connected.
Running the Control Center
To run the Control Center, double-click on the Jabra icon in the Notification
Area, or click on the Windows Start menu and select All Programs > J a b ra >
Jabra PC Suite > Jabra Control Center
.
Unlike the Device Service or Skype Interface, there is no reason to run the
Control Center in the background. Run it only when you need to view or make
settings and then quit it when you are done.
The Control Center Window
The Jabra Control Center window is shown whenever the Control Center is
running. All Control Center features are available from here.
Figure 8: The Jabra Control Center window as it appears when a JabraA335w Bluetooth dongle
is connected; the settings you see will depend on which Jabra devices you are using
The Control Center window is divided into three areas: menu bar (top), device list
(left-middle) and settings area (right-middle).
The following commands are available from the menu bar:
File > Exit: Quits the Control Center, discarding any new settings that you have
•
not applied.
Jabra PC Suite User’s Guide 19

Chapter 5: The Jabra Control Center
The Control Center Window
• Help > Check for Updates: Checks with the Jabra web site to see if a new
version of the PC Suite is available. If there is, you will be provided with
instructions about how to obtain and install it.
• Help > About Jabra Control Center: Opens a window with version and
copyright information about the Control Center.
To view the collection of settings available for a connected device, select a target
device in the left column of the
Jabra Control Center window. The associated
settings are then shown in the right column of the window. The settings shown
here will depend on the current device.
Depending on which type of Jabra device you are using, the settings provided by
the Control Center may be fairly simple or rather complex. For simple devices,
the settings should be self-explanatory, but for more complex devices you will be
able to get more help from the documentation included with your device and/or
from the Jabra support web site.
Note: A full description of all Control Center settings provided for the Jabra
A335w Bluetooth Dongle is given in Appendix A on page 30. See that appendix
if you are using a Jabra A335w or if you would like to see an example of how the
Control Center works with a specific Jabra device. Most Jabra devices provide
many fewer settings than the A335w.
Jabra PC Suite User’s Guide 20

Chapter 6: The Jabra Device Firmware Updater
Introduction to the Fir m ware Updater
6. The Jabra Device Firmware Updater
Introduction to the Firmware Updater
Firmware is a type of software that runs inside many types of electronic devices,
managing their various internal processes. Occasionally, Jabra may release
updates that can improve performance or add new functionality to your Jabra
product. You can find these updates on the Jabra web site and may receive e-mail
about firmware updates if you register your devices with Jabra (which we
recommend).
The Firmware Updater program provides a wizard that guides you through the
steps required to update your Jabra device. It is a standalone application that can
be deployed on its own if needed—though it is bundled with the Jabra PC Suite,
it does not depend on the Device Service or other Jabra PC Suite components.
Running the Firmware Updater
To run the Jabra Firmware Updater:
1. Obtain the required firmware update and save it on your computer or on a
network share visible from your computer. The firmware update is delivered
either as a DFU file or as a ZIP file that contains a DFU file; the Jabra
Firmware Updater accepts only DFU files so you may have to unzip the
downloaded file.
2. Make sure that your Jabra device is turned on and connected to your PC.
o Make sure that all the Jabra elements of your solution are connected
and receiving power.
o Make sure your Jabra devices are connected directly to your PC, not
through a USB hub, which shares a single PC USB port with several
USB devices.
3. Start the Jabra Firmware Updater by clicking on the Windows Start menu
and select All Programs > Jabra > Jabra PC Suite > Jabra Device Firmware
Updater
. The wizard launches.
Jabra PC Suite User’s Guide 21

Chapter 6: The Jabra Device Firmware Updater
Running the Firmware Updater
4. On the first page of the Firmware Updater, you must identify the device you
wish to update. Select the model number of your Jabra device from the dropdown list provided. Then click on
Next.
5. Page 2 of the Jabra Firmware Updater opens.
Click on the Browse button to locate the firmware-update file that you
received or downloaded from Jabra. Then click on Next.
6. Page 3 of the Jabra Firmware Updater opens.
The Firmware Updater now switches your Jabra device into Device
Firmware Upgrade (DFU) mode. In this mode the device appears as a new
USB device to Windows and a special DFU driver is required.
If this is the first time you have placed your Jabra device in DFU mode on
the current USB port, Windows will need to install a DFU driver for it. In
this case, you will see the standard Windows Found New Hardware Wizard.
Work through this wizard as usual, leaving all selections at their default
settings. If the wizard is unable to find the driver automatically, then tell it to
look for the driver in the location reported on page 3 of the Jabra Firmware
Updater.
If the DFU driver has already been installed for your Jabra device (probably
because you have run the Jabra Firmware Updater before), then you will not
see the Found New Hardware Wizard. This is normal.
After you have finished working with the Windows Found New Hardware
Wizard (or if the wizard did not launch because it was not needed), click on
Next on page 3 of the Jabra Firmware Updater.
Jabra PC Suite User’s Guide 22

Chapter 6: The Jabra Device Firmware Updater
Running the Firmware Updater
7. A pop-up dialog now tells you that the Firmware Updater is ready to update
your Jabra device.
As the window says, it is vital that you do not disconnect your Jabra device
or lose power on the device or your computer during the update. The process
will take about a minute or two. If you are sure that such events are very
unlikely during this time, then click on
OK to apply the update.
8. Page 4 of the Jabra Firmware Updater opens.
The Firmware Updater now applies the update, showing a progress bar and
status messages as it works. We recommend that you do not do anything with
your headset or computer during this time. When it is done, you will see a
message telling you so and the Finish button will activate. Your Jabra
firmware is now updated. Click on Finish to close the Updater.
Jabra PC Suite User’s Guide 23

Chapter 7: The Jabra Skype Interface
Running an d Using the Skype Interface
7. The Jabra Skype Interface
Running and Using the Skype Interface
Purpose of the Skype Interface
The Jabra Skype Interface is a simple program that runs in the background and
manages communication between the Jabra Device Service and the Skype
softphone application. It enables you to control many advanced Skype features
using the controls of your Jabra headset solution.
See also “Using Skype” on page 8 for more information about the Jabra Skype
Interface and the features supported by this solution. See “System Requirements”
on page 4 for version requirements.
Running the Skype Interface
When you install the Jabra PC Suite, you are presented with the option of running
the Device Service and/or Skype Interface automatically each time you start
Windows. If you selected one or both of these options, then the installer created
shortcuts to these programs in your Windows Startup folder. In this case, you will
never need to think about starting these programs—they will always be available.
However, if you only occasionally use your headset with your computer, or only
occasionally use Skype, then you might choose to keep one or both of these
turned off by default and start them manually only when you need them.
• To run the Skype Interface Manually, simply click on the Windows Start menu
and select All Programs > Jabra > Jabra PC Suite > Jabra Skype Interface. This
will launch the program and display its user interface.
• To run the Skype Interface automatically on startup, or to stop doing so, add or
remove a shortcut for it in your Windows Startup folder. One way to get to
this folder is to right-click on the Start menu and choose Open All Users from
the context menu. This opens a standard Windows Explorer window. Navigate
from there down to Programs\Startup sub-folder (the full path is
something like: C:\Documents and Setti ngs\All Users\Start
Menu\Programs\Startup
). Add or remove shortcuts here as needed. Note
that you will probably prefer to run the Skype Interface in the background,
with its interface window hidden; to do this, edit the Properties of the Skype
Interface shortcut in the Startup folder and add the “/nogui” switch to the
Target field (for example, “"C:\Program Files\Jabra\Jabra PC
Suite\ Sk yp eI nt er fa ce .e xe " /n og ui
”). See also a Windows reference
for more information about how to work with shortcuts and the Startup
folder.
• To quit the Skype Interface, use menu command of the Skype Interface
window (see below).
Jabra PC Suite User’s Guide 24

Chapter 7: The Jabra Skype Interface
The Skype Interface Window
IMPORTANT: The Jabra Skype Interface requires that the Jabra Device Service
also be running, or else it will not be able to communicate with your headset. You
can run this program from the Start menu or by including a shortcut to it your
Startup folder using techniques similar to those outlined above for the Skype
Interface. See also “Running and Using the Device Service” on page 12.
The Skype Interface Window
By default, the Jabra PC Suite installer configures your computer to run the
Skype Interface in the background each time you start your computer. In this
case, you will not usually see the Skype Interface window even though the
program is running. (See also “Running the Skype Interface”, above, for details
about how to add, remove and configure the Skype Interface in your computer’s
Startup folder.)
To view the Skype Interface window (and, incidentally, start the Skype Interface
program if it is not already running), click on the Windows Start button and select
All Programs > Jabra > Jabra PC Suite > Jabra Skype Interface. The window then
opens.
Figure 9: The Jabra Skype Interface window
The Jabra Skype Interface window displays status information and enables you to
set a few options. It is divided into two areas: menu bar (top) and information
display (bottom).
The following commands are available from the menu bar:
• File > Exit: Quits the Skype Interface, thereby disabling headset-based control
of Skype features. (Click on the close button in the upper right corner to hide
the window but keep the Skype Interface running in the background.)
• Configuration > Control Skype Presence: When your Skype contacts are using
Skype, they can see your status (e.g., online, not available, away, etc.). If you
would like your status to be changed to match your headset actions, then place
a check for this menu item (select the item to toggle the check mark). Your
Skype status will then reflect whether you are on the phone, when your headset
is turned off, etc. Clear this mark to disable the feature.
• Configuration > Trace: This feature generates a log file and saves it on your
desktop. It stores debug information. Usually you should keep this disabled
unless instructed by Jabra technical support. The menu shows a check mark to
indicate the status of this setting (marked means enabled). Select the menu
entry to toggle the mark.
Help > About Jabra Skype Interface: Opens a window with version and
•
copyright information about the Skype Interface.
Jabra PC Suite User’s Guide 25

Chapter 7: The Jabra Skype Interface
Configuring Skype to Accept the Jabra Connection
The following information is shown in the main area of the window:
• Skype: Shows the current status of the connection between the Jabra Skype
Interface and the Skype program. If the connection is down, then check to
make sure Skype is running and that it is configured to accept a connection for
the Jabra Skype Interface.
• Device: Shows the current status of the connection to the Device Service and
the name of the headset to which the Skype Interface is connected. If the
connection is down, then make sure you are running the Jabra Device Service
and that your Jabra device is connected to your PC and powered on.
Note: To close the Skype Interface window without quitting the program itself
(recommended if you will continue to use Skype), click on the close button in the
upper right corner of the window.
Configuring Skype to Accept the Jabra Connection
The first time you run the Jabra Skype Interface together with Skype itself, Skype
will notify you that an external program is trying to connect to Skype and ask you
to approve the connection. You should, of course, approve it. If you do not, then
Jabra will not be able to connect to Skype.
If you would like to check whether Skype is accepting the Jabra connection, or
change the connection setting, then open your Skype Options window. The exact
procedure for doing this is probably different for each version of Skype, so you
need to check your Skype documentation for complete details. Below is an
overview of how to do this with Skype 3.8:
1. Run Skype and choose Tools > Options from its menu bar.
2. The Skype Options window opens. Click on the Advanced item in the left
column and then on the Advanced Settings sub-item (which may already be
selected by default).
Jabra PC Suite User’s Guide 26

Chapter 7: The Jabra Skype Interface
Configur ing Skype to Accept the Jabra Connection
3. Click on the Manage other programs’ access to Skype link at the bottom of
the main area of the Skype Options window.
4. The
Manage API Access Control window opens.
This window lists all of the programs that already have tried to access Skype.
For each of them, it shows whether the connection is allowed and what the
current status of the connection is. If Jabra is not listed, then you have
probably not yet run the Jabra Skype Interface at the same time as Skype
itself. Click on Change to change the allow status (e.g., if you accidentally
did not allow Jabra to access Skype).
5. When you are done inspecting or adjusting the access control settings, click
on OK to keep the setting and then on Save in the Skype Options window to
store them.
Jabra PC Suite User’s Guide 27

Chapter 8: Using Jabra Devices with Any Windows Pr ogram
Configur ing Skype to Accept the Jabra Connection
8. Using Jabra Devices with Any Windows Program
Jabra headsets, hubs and dongles connect to your PC via USB. Windows will
usually recognize your Jabra device automatically, identifying it as a USB audio
device that provides both a speaker and microphone (plug-and-play). As a result,
most third-party programs, including nearly all softphones and music players,
will likewise be able to see your headset via this standard Windows mechanism
even if a dedicated Jabra driver is not yet available for your program.
Note: To use a wireless Jabra headset as a sound card, you may need to open its
audio link. When the audio link is open, all sound from your computer will be
sent to the headset, enabling you to listen to music, voice mail, etc. (By default,
wireless Jabra headsets will only open an audio link when you are making a call.)
To manually open or close the audio link, run the Jabra Control Center and look
for an option or command named something like Open Audio Link and Close
Audi o Link. The exact name and location of this control may vary between Jabra
models. See also “The Jabra Control Center” on page 19 for details about running
and using the Control Center.
You can view the audio devices currently available to Windows using the
Windows Sounds and Audio Devices control panel. You can also use this control
panel to select an active device from among those that are available. When you
connect your Jabra headset to your computer, it will usually be recognized
automatically and will further more become the currently selected device. If you
remove the headset connection, then Windows will revert to the last audio device
you were using (e.g., your computer's built-in speakers and microphone). If you
are having trouble using your headset with your Windows programs, then the first
thing you should do is to check the Windows control panel to confirm that your
device is recognized and selected.
To work with the control panel, do the following:
1. Click on the Windows Start button and select the Control Panel icon. Then,
from the Control Panel window or sub-menu (depending on how you have
configured Windows), open the Sounds and Audio Devices control panel.
Jabra PC Suite User’s Guide 28

Chapter 8: Using Jabra Devices with Any Windows Program
Configur ing Skype to Accept the Jabra Connection
2. Go to the Audio tab of the Sounds and Audio Devices control panel to view
the currently active Sound pl ayback and Sound recording devices.
o If your headset is shown as the current setting for each of these two
drop-down lists, then Windows and all Windows programs will send
and receive sound to/from your headset by default (which is probably
what you want).
o If your headset is not shown as the current setting for these two drop-
down lists, then try to change the setting. If your Jabra device is also
not shown as an available option in these two lists, then check your
cabling and make sure your Jabra device is turned on.
See also your Windows documentation or online help for complete details about
how to work with the S ounds and Audio Devices control panel.
Many softphone applications (and other programs) provide settings similar to
those shown above for Windows. These settings will typically default to tracking
the Windows settings, but you may also be able to override Windows for
individual programs and/or modify the Windows setting itself via the program
settings. Please see your softphone documentation for complete details about
these.
Note: Jabra is constantly evaluating the softphone market to see which new
programs should be supported with a dedicated driver, such as currently exist for
Skype, Microsoft and Cisco. Contact your Jabra representative or see the Jabra
web site for the latest news on softphone driver development.
Jabra PC Suite User’s Guide 29

Appendix A: Jabra A335w Settings in the Control Center
Control Center Buttons for Jabra A335w
A. Jabra A335w Settings in the Control Center
The Jabra Control Center enables you to configure any of several Jabra products.
Most of them provide just a few, very simple settings. However, the Jabra A335w
Bluetooth Dongle is significantly more complex. This appendix explains how to
use all of the settings provided by the Jabra A335w.
See “The Jabra Control Center” on page 19 for a general discussion about how to
run and use the Jabra Control Center. Read this appendix for specific details
about the Control Center settings provided for the Jabra A335w.
Control Center Buttons for Jabra A335w
When you have selected a Jabra A335w dongle in the Control Center, the settings
area includes several tabs, which are detailed in the subsequent sections. In
addition to these tabs, several standard buttons are provided at the bottom of the
window; these are described here.
Figure 10: The Jabra Control Center window as it appears when a JabraA335w Bluetooth dongle
is connected.
The following buttons are provided together with each tab of A335w settings:
• Sound Control Panel: Opens the standard Windows Sounds and Audio Devices
control panel, which enables you to control which sound devices (including
Jabra) will be used by Windows itself and other Windows programs. See also
“Using Jabra Devices with Any Windows Program” on page 28 for more
information about this control panel.
• Refresh: Updates the information shown in the Jabra Control Center window.
Click here if you have changed something (such as connected a new headset)
while the window was open.
• OK: Applies any changes you made to settings in the window and closes the
Control Center.
Jabra PC Suite User’s Guide 30

Appendix A: Jabra A335w Settings in the Control Center
The Settings Tab for Jabra A335w
• Close: Discards any new settings you have made and closes the Jabra Control
Center window. This is the same as clicking on the close button in the upperright corner of the window.
• Apply: Applies any changes you made to settings in the Control Center and
keeps the Control Center open. This button is grayed out when there are no
new settings to apply.
The Settings Tab for Jabra A335w
Figure 11: The Settings tab for the JabraA335w Bluetooth dongle in Jabra Control Center
When you have selected a Jabra A335w dongle in the Control Center, the
following controls are provided by the Settings tab in the right-hand column of
the window:
• Send button events on Jabra softp hone interface: This box controls which type
of USB events to send to the PC when you initiate a call with the multifunction on your headset. Mark this box to send proprietary events understood
by Jabra softphone interfaces (Skype or Cisco IP Communicator). Clear this
box to send standard events understood by e.g. Microsoft Office
Communicator.
• Use softphone’s ring tone: This box controls which type of ringtone you will
hear when somebody calls you over a softphone. Mark this box to hear the
ringtone generated by your softphone. Clear this box to use the ringtone
generated by your Jabra headset.
• Open audio lin k: Click on this button to open an audio link from the dongle to
your headset. All Windows sounds will then be audible in the headset. Use this
if you would like to listen to music or other audio when you are not in a call.
• Close audio link: Click on this button to close the audio link described above.
The link will still be opened automatically whenever you make or receive a
call using a softphone and then closed again when you hang up.
Jabra PC Suite User’s Guide 31

Appendix A: Jabra A335w Settings in the Control Center
The Advanced Tab for Jabra A335w
The Advanced Tab for Jabra A335w
Figure 12:The Advanced tab for the JabraA335w Bluetooth dongle in Jabra Control Center
When you have selected a Jabra A335w dongle in the Control Center, the
following controls are provided by the Advanced tab in the right-hand column of
the window:
• Connect headset : Click this button to make the dongle attempt to connect to
the headset. Note that your headset and dongle must already have been paired
via Bluetooth at least once in order for this to work.
• Disconnect head set: If you would like to force the dongle to disconnect from
the headset then click this button. You might do this if you want to switch to a
different headset.
• Enter pairing mode: Click this button to put the dongle into Bluetooth pairing
mode. In this mode, the dongle will start listening for a nearby headset that is
also in pairing mode; if one is found then it will try to pair with it. You can
also use the button on your dongle to put it into pairing mode. See also your
Jabra A335w manual for details about Bluetooth pairing.
• Clear pairing list: The dongle holds a list of up to 8 Bluetooth IDs for the
various headsets with which it has been paired. It will only be able to connect
to a headset that is already on this list. If no headset is connected and you use
the Connect headset button above, the dongle will connect to the first headset
it finds from its pairing list. If you are having trouble with your dongle
connecting to the wrong headset, then you can clear the pairing list by clicking
here and then pairing only your preferred headset with the dongle.
Jabra PC Suite User’s Guide 32

Appendix A: Jabra A335w Settings in the Control Center
The Headset Tab for Jabra A335w
The Headset Tab for Jabra A335w
Figure 13:The Headset tab for the JabraA335w Bluetooth dongle in Jabra Control Center
The Headset tab appears only when your Jabra A335w dongle is connected to a
Jabra headset that supports wideband audio.
Wideband audio provides a wider frequency of sounds than standard telephone
audio does, making people easier to understand and making music sound better.
However, this can also reduce the range of your headset or, in some situations,
introduce extra noise. You may therefore want to experiment to find out which
setting works best for you. Mark the Wideband audio check box to enable this
feature; clear this box to disable it.
Note: Wideband audio cannot be changed while an audio link is open.
Jabra PC Suite User’s Guide 33
 Loading...