

Page 1

Jabra PRO™ 930
Quick Start Guide
www.jabra.com
Page 2

CUSTOMER SUPPORT
EUROPE
Belgique/Belgium + 49 (0)8031 2651 72
Czech Republic + 420 800 522 722
Danmark +45 45 75 99 92
Deutschland + 49 (0)8031 2651 72
Espzaña +34 916 398 064
France + 33 (0) 130 589 075
Italia +39 02 5832 8253
Luxembourg + 49 (0)8031 2651 72,
Nederland + 49 (0)8031 2651 72
Norge + 47 32 22 74 70
Österreich + 49 (0)8031 2651 72
Poland + 48 12 254-40-15
Russia 8-10-8002-7701012
Suomi + 358 204 85 6040
Sverige + 46 (0)8 693 09 00
Turkey +90 212 454 60 00
United Kingdom + 44 (0)1784 220 172
MIDDLE EAST/AFRICA
E-mail Support: support.emea@gn.com
USA & CANADA
Canada 1-866-697-8757
USA 1-866-697-8757
WEB
www.jabra.com (for the latest support information and
online User Manuals).
ASIA
Australia 1-800-636-086
China 400-99-808-33
Hong Kong 800-969-546
India 000-800-852-1185
Indonesia 001-803-852-7664
Japan 813-3242-8572
Malaysia 1800-812-160
New Zealand 0800-770-114
Philippines 1800-765-7022 (ETPI)
1800-1855-0144 (PLDT)
Singapore 800-8523-794
Taiwan 0080-185-6659
Thailand 001-800-852-6446
For more languages refer to the manuals on
www.jabra.com
GN Netcom A/S
Lautrupbjerg 7
DK-2750 Ballerup
Denmark
Page 3

Page 4
LANGUAGES
ENGLISH / US 2
FRANÇAIS / FR 8
DEUTSCH / DE 14
ESPAÑOL / ES 20
繁體中文 / CHT 26
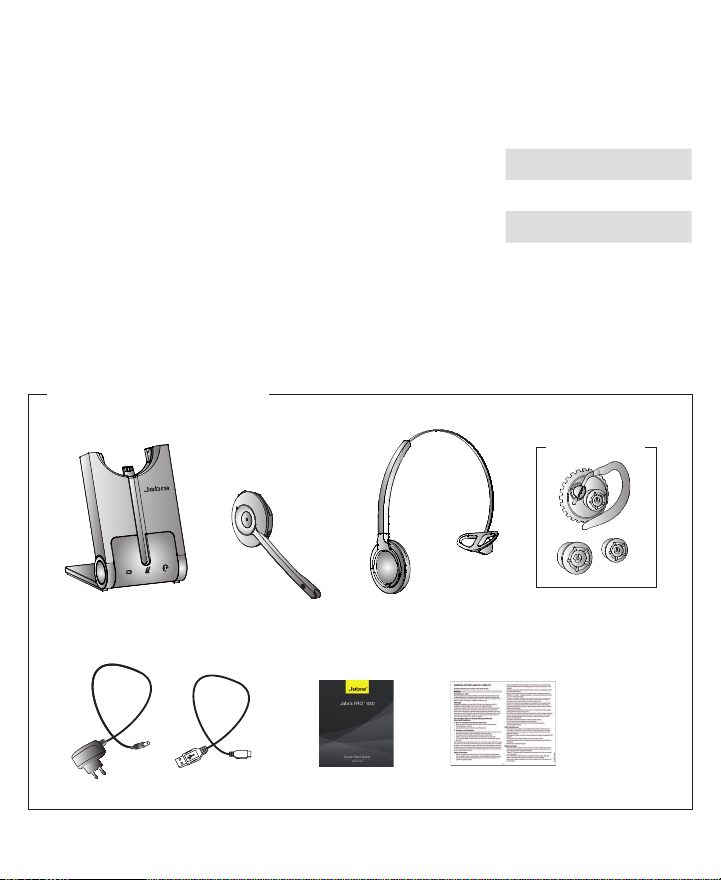
PACKAGE CONTENTS
Optional accessories
Page 5
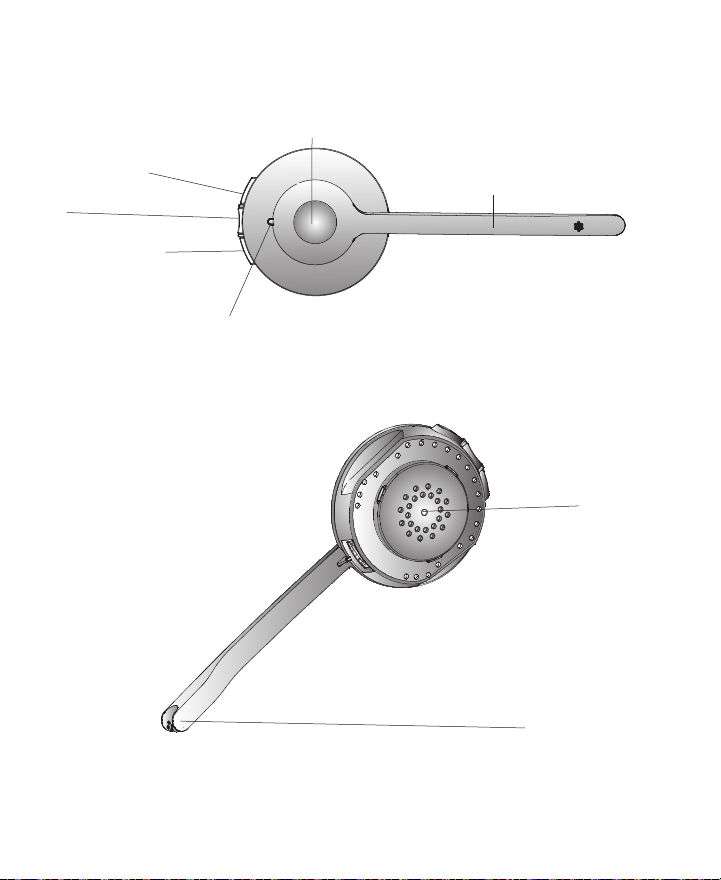
JABRA PRO 930 HEADSET
Multi-function buttton
Speaker volume up
Mute
Speaker volume down
Microphone boom arm
LED indicator
Speaker
Noise-cancelling
microphone
2
Page 6
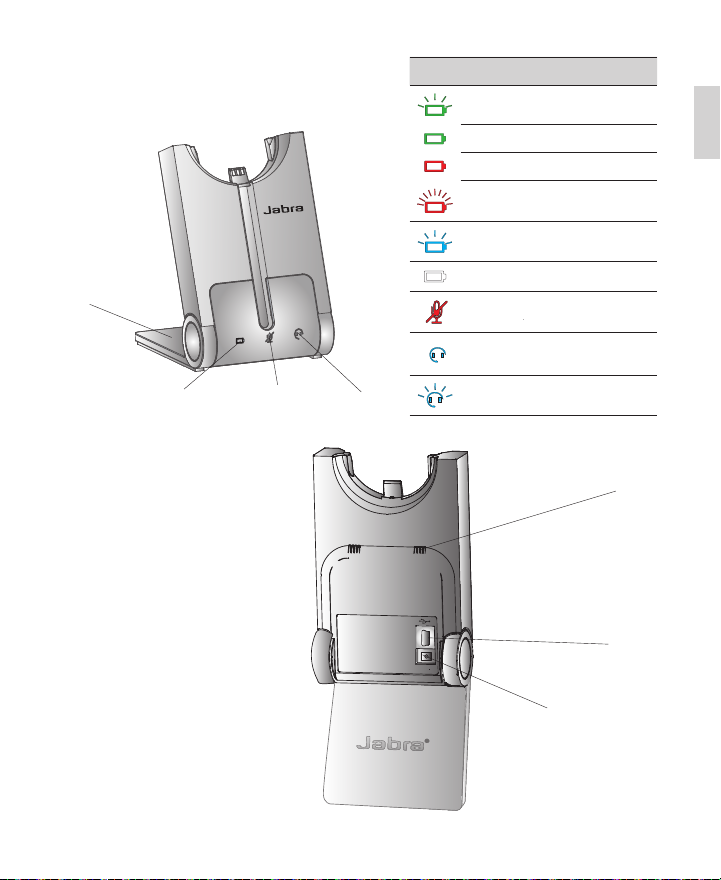
JABRA PRO 930 BASE
1
Icon Event
Battery charging (slow ash)
Full battery
Low battery
Very low battery (fast ash)
Sleep mode (slow ash)
US
Foldable base
stand
Battery indicator
Mute indicator
Audio link
indicator
3
Unknown battery status
Microphone muted
Active audio link between
headset and base
Searching for headset
Speaker
USB port
Power adapter port
Page 7
SETUP
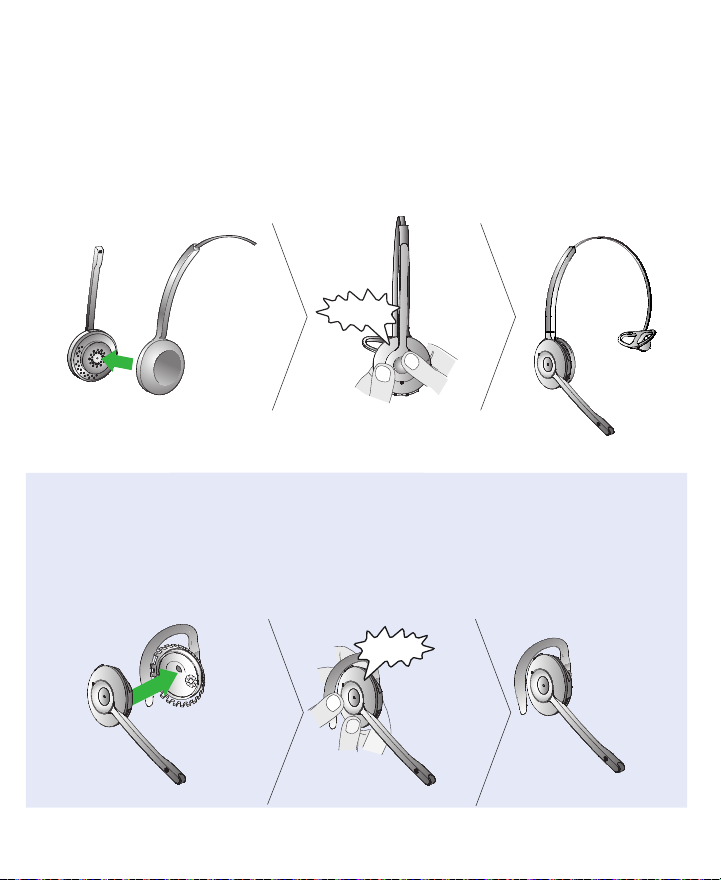
STEP 1: ATTACH THE HEADBAND
1. Align the headset and the headband wearing-style attachment, as illustrated, and press firmly together until
they click into place (snap-to-click).
2. Rotate the microphone boom arm for left or right ear use.
3. Adjust the length of the headband to fit snug against the head.
CLICK
OPTIONAL ACCESSORIES
Attaching the earhook (not supplied in all regions)
1. Assemble the earhook wearing-style attachment for left or right ear use. If necessary, remove the earbud
and replace with another size for best t.
2. Align the headset and the earhook wearing-style attachment, as illustrated, and press firmly together until
they click into place (snap-to-click).
3. Shape the earhook to t snug around the ear.
4
CLICK
Page 8
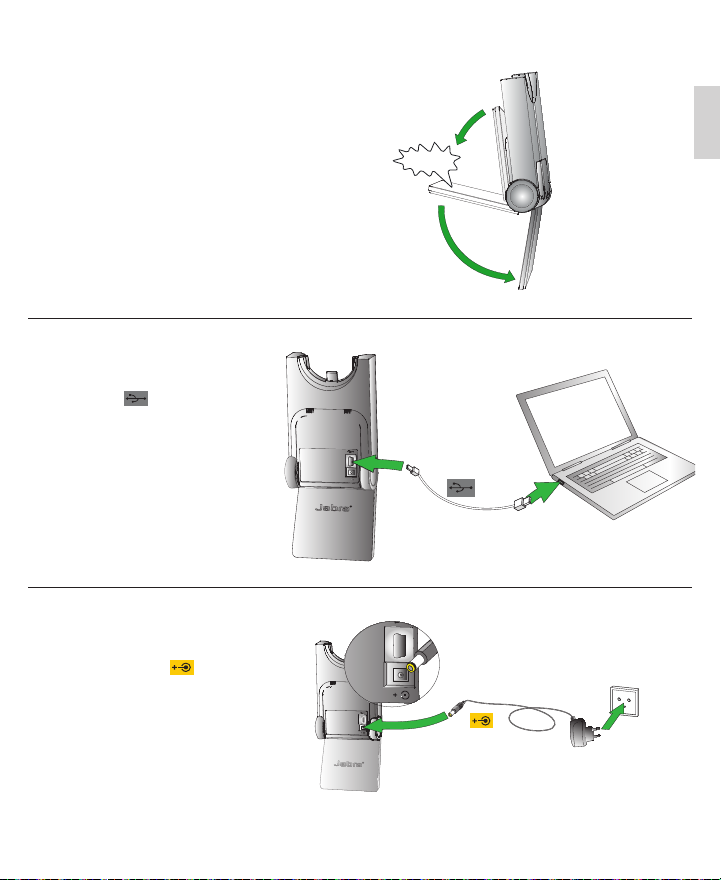
STEP 2: UNFOLD THE BASE
The Jabra PRO base stand can be
folded into three positions: open,
closed, and standing position.
STEP 3: CONNECT TO PC
1. Plug the supplied USB cable into the
port marked on the base.
2. Connect the USB cable to any free
USB slot on the PC.
3. Install Jabra PC Suite software from
www.jabra.com/pcsuite
STEP 4: CONNECT TO POWER
1. Plug the supplied power adapter
into the port marked on the
base.
2. Connect the power adapter to the
mains power socket.
US
CLICK
5
Page 9
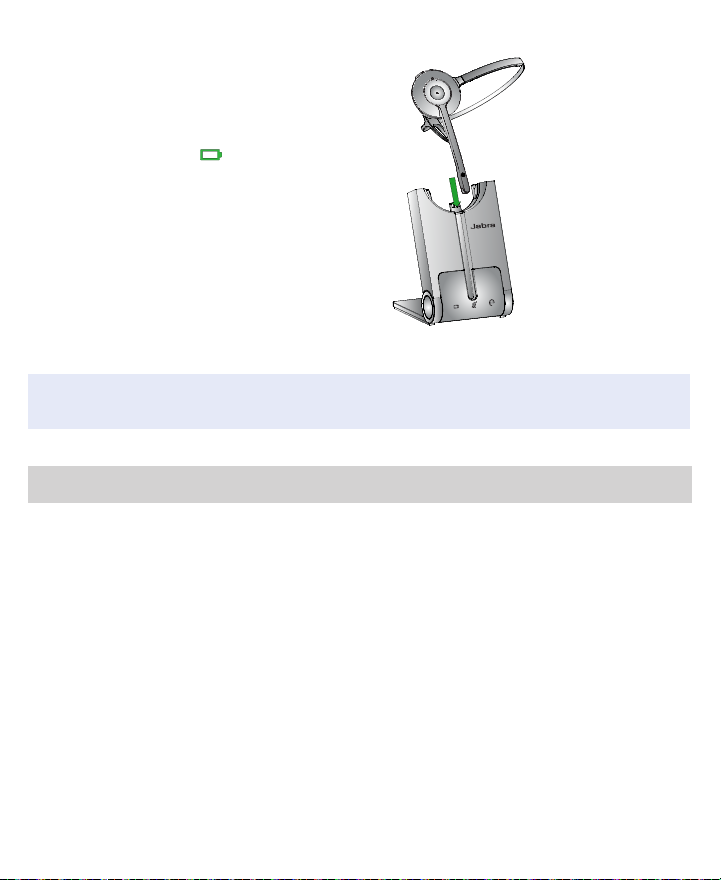
STEP 5: DOCK THE HEADSET
Dock the headset. When docked
correctly the headset battery will begin
charging, if needed.
Charge for 20 minutes or until the
battery indicator on the base is
steady green.
IMPORTANT
Set the Jabra PRO 930 as speaker and microphone in the softphone audio settings.
YOU HAVE NOW SUCCESSFULLY CONNECTED YOUR JABRA PRO 930
DID YOU KNOW?
The Jabra PRO 930 has advanced settings that you can quickly and easily congure yourself. Refer to section 7.6 in
the User Manual to learn how.
6
Page 10

US
7
Page 11

MICRO-CASQUE JABRA PRO 930
Bouton multifonction
Bouton d’augmentation
du volume
Bouton Muet
Bouton de réduction
du volume
Bras articulé du microphone
Voyant lumineux
Haut-parleur
Microphone
anti-bruit
8
Page 12

BASE DU JABRA PRO 930
1
Support de
base pliable
Voyant d’état
de la batterie
Voyant d’activation/
de désactivation
du microphone
Voyant de
liaison audio
Icône Événement
Batterie en charge
(clignotement lent)
Batterie chargée
Batterie faible
Batterie très faible
(clignotement rapide)
Mode veille (clignotement lent)
État de la batterie inconnu
Microphone désactivé
Liaison audio active entre le
micro-casque et la base
Recherche du micro-casque en
cours
FR
Haut-parleur
Port USB
Port de
l’adaptateur
secteur
9
Page 13

CONFIGURATION
ÉTAPE 1: FIXATION DU SERRE-TÊTE
1. Alignez le micro-casque et la fixation de port d’oreillette du serre-tête, comme l’indique l’illustration, et pressez
doucement sur les deux éléments jusqu’à ce qu’ils s’enclenchent correctement (vous entendez un clic).
2. Faites pivoter le bras articulé du microphone pour utiliser l’oreille gauche ou droite selon le besoin.
3. Réglez la longueur du serre-tête pour qu’il s’adapte à la tête.
CLIC
ACCESSOIRES EN OPTION
Fixation du contour d’oreille (le contour d’oreille n’est pas fourni dans toutes les régions)
1. Assemblez la xation de port d’oreillette du contour d’oreille de manière à l’utiliser sur l’oreille gauche ou droite. Si
nécessaire, retirez l’embout d ’écouteur et remplacez-le par un embout d’une autre taille pour qu’il s’ajuste correctement.
2. Alignez le micro-casque et la fixation de port d’oreillette du contour d’oreille, comme l’indique l’illustration,
et pressez doucement sur les deux éléments jusqu’à ce qu’ils s’enclenchent correctement (vous entendez un clic).
3. Ajustez le contour d’oreille pour qu’il s’adapte à l’oreille.
CLIC
10
Page 14

ÉTAPE 2: OUVERTURE
DE LA BASE
Le support de la base Jabra PRO
possède trois positions : ouverte,
fermée et entrouverte.
ÉTAPE 3 : RACCORDEMENT
AUPC
1. Branchez le câble USB fourni sur le
port repéré sur la base.
2. Branchez le câble USB sur un port
USB libre du PC.
3. Installez le logiciel Jabra PC Suite
à partir du site web
www.jabra.com/pcsuite
ÉTAPE 4 : RACCORDEMENT
AU SECTEUR
1. Branchez l’adaptateur électrique
fourni sur le port repéré de la
base.
2. Branchez l’adaptateur électrique
sur la prise secteur.
CLIC
FR
11
Page 15

ÉTAPE 5 : INSERTION DU MICROCASQUE DANS LE SUPPORT
Insérez le micro-casque dans son
support. Une fois le micro-casque
correctement inséré, la batterie
commence à se charger, si nécessaire.
Chargez pendant 20 minutes ou jusqu’à
ce que le voyant d’état de la batterie de
la base soit vert xe.
IMPORTANT
Dénissez le Jabra PRO 930 en tant que haut-parleur et microphone dans les paramètres audio du logiciel
de téléphonie.
VOUS AVEZ MAINTENANT CORRECTEMENT CONNECTÉ VOTRE JABRAPRO930.
LE SAVIEZ-VOUS ?
Le Jabra PRO 930 est doté de paramètres avancés que vous pouvez congurer vous-même rapidement et
facilement. Référez-vous à la section 7.6 du Manuel d’utilisation pour connaître la marche à suivre.
12
Page 16

13
FR
Page 17

JABRA PRO 930 HEADSETS
Multifunktionstaste
Lautsprecher lauter
Stummschaltung
Lautsprecher leiser
Mikrofonarm
LED-Anzeige
Lautsprecher
Mikrofon mit
Geräuschunterdrückung
14
Page 18

JABRA PRO 930 BASISSTATION
1
Faltbare
Basisstation
Stummschaltungsanzeige AudioverbindungsanzeigeAkkuanzeige
Symbol Ereignis
Akku wird geladen
(blinktlangsam)
Akku voll
Akkuladestand niedrig
Akkuladestand sehr niedrig
(blinkt schnell)
Ruhemodus (blinktlangsam)
Akkuladestand unbekannt
Mikrofon stummgeschaltet
Audioverbindung zwischen
Headset und Basisstation aktiv
Suche nach Headset
durchführen
DE
Lautsprecher
USB-Anschluss
15
Netzteilanschluss
Page 19

SETUP (EINRICHTUNG)
SCHRITT1: BEFESTIGEN DES ÜBERKOPFBÜGELS
1. Richten Sie Headset und Überkopfbügel wie abgebildet aus und drücken Sie sie fest zusammen, bis sie mit
einem Klicken einrasten.
2. Drehen Sie den Mikrofonarm wie zur Nutzung des Headsets am linken oder rechten Ohr erforderlich.
3. Passen Sie die Länge des Überkopfbügels an, so dass dieser bequem an Ihrem Kopf anliegt.
KLICK
OPTIONALES ZUBEHÖR
Ohrbügel befestigen (nicht in allen Regionen im Lieferumfang enthalten)
1. Montieren Sie den Ohrbügel wie zur Nutzung am linken oder rechten Ohr erforderlich. Bei Bedarf können
Sie den Ohrstöpsel entfernen und durch eine andere Größe ersetzen.
2. Richten Sie Headset und Ohrbügel wie abgebildet aus und drücken Sie sie zusammen, bis sie mit einem
Klicken einrasten.
3. Formen Sie den Ohrbügel so, dass er bequem an Ihrem Ohr sitzt.
16
KLICK
Page 20

SCHRITT2: AUFKLAPPEN DER
BASISSTATION
Die Jabra PRO-Basisstation kann in
drei Positionen aufgeklappt sein,
oen, geschlossen und stehend.
SCHRITT 3: ANSCHLUSS AN
EINEN COMPUTER
1. Stecken Sie das mitgelieferte
USB-Kabel in den mit dem Symbol
markierten Anschluss an der
Basisstation
2. Verbinden Sie das USB-Kabel mit
einem freien USB-Anschluss am
Computer
3. Navigieren Sie zu
www.jabra.com/pcsuite und
installieren Sie die Jabra PC SuiteSoftware.
SCHRITT 4: ANSCHLUSS
AN DIE NETZSTROMVERSORGUNG
1. Stecken Sie das mitgelieferte
Netzteil in die mit dem
Symbol markierte
Stromversorgungsbuchse an der
Basisstation
2. Schließen Sie das Netzteil an eine
Steckdose an
KLICK
DE
17
Page 21

SCHRITT 5: ANDOCKEN DES
HEADSETS
Führen Sie das Headset in den
Ladeschacht ein. Ist das Headset korrekt
angedockt, wird der Akku nach Bedarf
geladen.
Laden Sie das Headset 20 Minuten lang
bzw. bis die Akkuanzeige an der
Basisstation dauerhaft grün leuchtet.
WICHTIG
Legen Sie in den Einstellungen der Softphone-Anwendung das Jabra PRO 930 als Lautsprecher und als
Mikrofon fest.
IHR JABRA PRO 930 IST JETZT ANGESCHLOSSEN.
HÄTTEN SIE ES GEWUSST?
Das Jabra PRO 930 verfügt über fortschrittliche Einstellungen, mit denen Sie Ihr Telefon schnell und mühelos
kongurieren können. Wie dies geht, erfahren Sie in Abschnitt 7.6 des Benutzerhandbuchs.
18
Page 22

19
DE
Page 23

AURICULAR JABRA PRO 930
Botón multifunción
Subir volumen
del altavoz
Activar el modo
de silencio
Bajar volumen del altavoz
Brazo articulado
del micrófono
Indicador LED
Altavoz
Micrófono
con reducción
de ruidos
20
Page 24

BASE JABRA PRO 930
1
Soporte de la
base plegable
Icono Evento
Batería cargándose
(parpadeo lento)
Batería con carga completa
Batería baja
Batería muy baja
(parpadeo rápido)
Modo de inactividad
(parpadeo lento)
Estado de batería desconocido
Micrófono en silencio
Conexión de audio activa
entre el auricular y la base
Búsqueda del auricular
Indicador
de batería
Indicador
de silencio
Indicador de con-
exión de audio
Altavoz
ES
Puerto USB
Puerto para
adaptador de
alimentación
21
Page 25

CONFIGURACIÓN
PASO 1: COLOCACIÓN DEL AURICULAR
1. Alinee el auricular y la diadema para la cabeza, tal como se ve en la ilustración, y presione con fuerza hasta
que encajen correctamente (oirá un clic).
2. Gire el brazo articulado del micrófono según sea necesario para usarlo en la oreja izquierda o derecha.
3. Ajuste la longitud de la diadema para que se adapte cómodamente a su cabeza.
CLIC
ACCESORIOS OPCIONALES
Colocación del gancho para la oreja (no se incluye en todas las regiones)
1. Monte el gancho para usarlo en la oreja derecha o en la izquierda. Si es necesario, saque el audífono
y sustitúyalo por otro tamaño que se ajuste mejor.
2. Alinee el auricular y el gancho para la oreja, tal como se ve en la ilustración, y presione con fuerza hasta
que encajen correctamente (oirá un clic).
3. Moldee el gancho para que quede bien ajustado a la oreja.
CLIC
22
Page 26

PASO 2: DESPLIEGUE LA BASE
La base de Jabra PRO se puede plegar
en tres posiciones: abierta, cerrada
y de pie.
PASO 3: CONEXIÓN AL PC
1. Conecte el cable USB suministrado en
el puerto de la base marcado con el
símbolo .
2. Conecte el cable USB a cualquier
puerto USB libre del PC.
3. Instale el software Jabra PC Suite
desde www.jabra.com/pcsuite
PASO 4: CONEXIÓN A LA
REDELÉCTRICA
1. Enchufe el adaptador de
alimentación suministrado al
puerto de la base con la
marca .
2. Conecte el adaptador de
alimentación al enchufe de la
redeléctrica.
CLIC
ES
23
Page 27

PASO 5: ACOPLAMIENTO DEL
AURICULAR
Acople el auricular en la base. cuando
esté correctamente acoplado, la batería
del auricular se empezará a cargar si es
necesario.
Cargue durante 20 minutos o hasta que
el indicador de batería de la base
muestre una luz verde ja.
IMPORTANTE
Congure el Jabra PRO 930 como altavoz y micrófono en la conguración de audio del softphone.
YA HA CONECTADO CON ÉXITO SU JABRA PRO 930
¿LO SABÍA?
Jabra PRO 930 cuenta con ajustes avanzados que puede congurar rápida y fácilmente. Consulte la sección 7.6 del
manual del usuario.
24
Page 28

25
ES
Page 29

JABRA PRO 930 耳機
多功能按鈕
調高揚聲器音量
靜音
調低揚聲器音量
LED 指示燈
麥克風延伸臂
揚聲器
帶噪音消除
功能的麥克風
26
Page 30

JABRA PRO 930 基座
1
可摺疊式
基座架
圖示 事件
電池正在充電(慢速閃爍)
完全充電
電力不足
電量極低(快速閃爍)
睡眠模式(慢速閃爍)
不明的電池狀態
麥克風已靜音
耳機與基座之間存在音頻連結
正在搜尋耳機
靜音指示燈 音頻連結指示燈電池指示燈
揚聲器
USB 插孔
27
電源變壓器插孔
CHT
Page 31

安裝
步驟 1:組合頭帶
1. 對準耳機與頭帶附件(如圖所示),然後按緊直到附件卡緊入位(聽到卡嗒聲)。
2. 視乎需要,旋轉麥克風延伸臂以便用於左耳或右耳。
3. 調節頭帶的長度,使它緊貼環繞您的頭部。
卡嗒聲
可選配件
組合耳勾(並非在所有地區提供)
1. 組合耳勾附件,供左耳或右耳使用。如有需要,可取下耳塞並以尺寸最合適的耳塞替換。
2. 對準耳機與耳勾附件(如圖所示),然後按緊直到附件卡緊入位(聽到卡嗒聲)。
3. 調整耳勾形狀,令其緊貼您的耳朵。
卡嗒聲
28
Page 32

步驟 2:拉開基座
Jabra PRO 基座架有三種摺疊方式:
敞開、閉合及直立位置。
步驟 3: 連接至個人電腦
1. 將隨附的 USB 纜線插入基座上標示
為 的插孔。
USB 纜線到電腦上的任何可用
2. 連接
USB 插孔。
3. 從 www.jabra.com/pcsuite
Jabra PC Suite
軟體。
上安裝
步驟 4: 連接電源
1. 將隨附的電源變壓器插入基座上
標示為 的插孔。
2. 將電源變壓器連接至主電源插
座。
卡嗒聲
CHT
29
Page 33

步驟 5: 把耳機放在基座上
摺疊方式:敞開、閉合及直立位置。
把耳機放在基座上。當耳機妥當放在
耳機座上後,耳機電池將會開始進行
充電(如有需要)。
充電 20 分鐘或是等至基座上的電池指
示燈 一直亮綠燈。
重要事項
於軟體式電話的音頻設定中將 Jabra PRO 930 設定為揚聲器及麥克風。
現在您即完成連接 JABRA PRO 930
您知道嗎?
Jabra PRO 930 具有進階設定,您自己可以快速便捷的配置。請參閱使用者手冊中的第 7.6
節內容瞭解詳情。
30
Page 34

31
CHT
Page 35

MЛ05
© 2011 GN Netcom A/S. All rights reserved. Jabra® is a registered
trademark of GN Netcom A/S. All other trademarks included herein
are the property of their respective owners.
(Design and specifications subject to change without notice).
MADE IN CHINA
Type: WHB003
DESIGN REGISTRATION PENDING INTERNATIONAL
REGISTER YOUR JABRA AT JABRA.COM/REGISTER – FOR NEWS, SUPPORT AND COMPETITIONS
www.jabra.com
81-03324 F
 Loading...