

Page 1
Jabra PRO™ 920Jabra PRO™ 920
User Manual
User Manual
www.jabra.com
www.jabra.com
Page 2

CONTENTS
1. WELCOME ..................................................................................................4
2. PRODUCT OVERVIEW ........................................................................... 5
2.1 PACKAGE CONTENTS ..........................................................................................................................5
2.2 HEADSET OVERVIEW ........................................................................................................................... 6
2.3 HEADSET ATTACHmENTS ................................................................................................................7
2.4 BASE OVERVIEW ..................................................................................................................................... 9
2.5 OPTIONAL ACCESSORIES ..............................................................................................................10
3. CONNECTING TO A DESK PHONE ................................................. 11
3.1 FOLDABLE BASE STAND ................................................................................................................. 11
3.2 CONNECT TO DESK PHONE .........................................................................................................12
3.3 CONNECT POWER SUPPLY TO BASE ...................................................................................... 14
3.4 DOCK THE HEADSET ........................................................................................................................14
4. CONFIGURING THE DESK PHONE AUDIO .................................. 15
4.1 SET A CLEAR DIAL TONE ................................................................................................................ 15
4.2 SET THE mICROPHONE VOLUmE .............................................................................................16
5. JABRA PRO 920 FEATURES .............................................................. 17
5.1 HEADSET mULTI-FUNCTION BUTTON ................................................................................. 17
5.2 HEADSET SPEAKER VOLUmE BUTTONS .............................................................................. 17
5.3 HEADSET mUTE BUTTON .............................................................................................................. 18
english
5.4 HEADSET LED INDICATOR ............................................................................................................ 18
5.5 HEADSET AUDIO INDICATORS ..................................................................................................19
5.6 BASE VISUAL INDICATORS ............................................................................................................ 20
6. CALL MANAGEMENT ......................................................................... 21
6.1 mAKING CALLS, ANSWERING CALLS AND ENDING CALLS ................................... 21
6.2 SWITCHING BETWEEN PHONE AND HEADSET .............................................................. 22
6.3 CONFERENCE CALL WITH mULTIPLE HEADSETS .......................................................... 22
2
Page 3

7. ADVANCED JABRA PRO 920 FEATURES ..................................... 23
7.1 SAFETONE™ AUDIO PROTECTION .......................................................................................... 23
7.2 WIRELESS RANGE................................................................................................................................23
7.3 CHANGE RINGTONE .........................................................................................................................23
7.4 POWER mANAGEmENT ..................................................................................................................23
7.5 REmOTE CALL CONTROL ..............................................................................................................24
7.6 HOW TO CHANGE THE ADVANCED SETTINGS ............................................................... 24
7.7 HOW TO RESET ADVANCED SETTINGS ................................................................................ 26
7.8 COPY SETTINGS TO mULTIPLE jABRA PRO 920 BASES .............................................27
7.9 FORCED PAIRING (PAIRING A NEW PRImARY HEADSET) ......................................... 27
7.10 UPDATE FIRmWARE AND HEADSET SETTINGS (SERVICE CABLE) ...................... 27
8. SUPPORT ................................................................................................. 28
8.1 FAQS AND TROUBLESHOOTING ...............................................................................................28
9. TECHNICAL SPECIFICATIONS ......................................................... 30
9.1 jABRA PRO 920 HEADSET ............................................................................................................. 30
9.2 HEADSET BATTERY ............................................................................................................................ 31
9.3 mATERIALS AND ALLERGIES ....................................................................................................... 31
9.4 jABRA PRO 920 BASE ....................................................................................................................... 32
9.5 PRODUCT DISPOSAL ....................................................................................................................... 32
9.6 CERTIFICATIONS AND SAFETY APPROVALS ..................................................................... 32
english
3
Page 4
1. WELCOmE
Congratulations on purchasing your new Jabra PRO 920. We are sure you will
enjoy its wide range of features, and nd the headset comfortable to wear and
easy to use.
Jabra PRO 920 headset features
• Wideband audio for exceptional sound quality.
• Volume and mute controls.
• Intuitive headset multi-function button for easy call handling.
• LED and audio indicators.
• Advanced hearing protection with SafeTone™.
• Noise-cancelling microphone.
• Auto sleep mode for energy conservation.
• Headband and earhook wearing-styles (earhook not supplied in all regions).
Jabra PRO 920 base features
• Headset recharge docking cradle.
• Visual call status indicators.
• Battery indicators.
• Voice-prompted conguration.
• Port for Jabra LINK adapter and GN1000 remote handset lifter.
english
4
Page 5
2. PRODUCT OVERVIEW
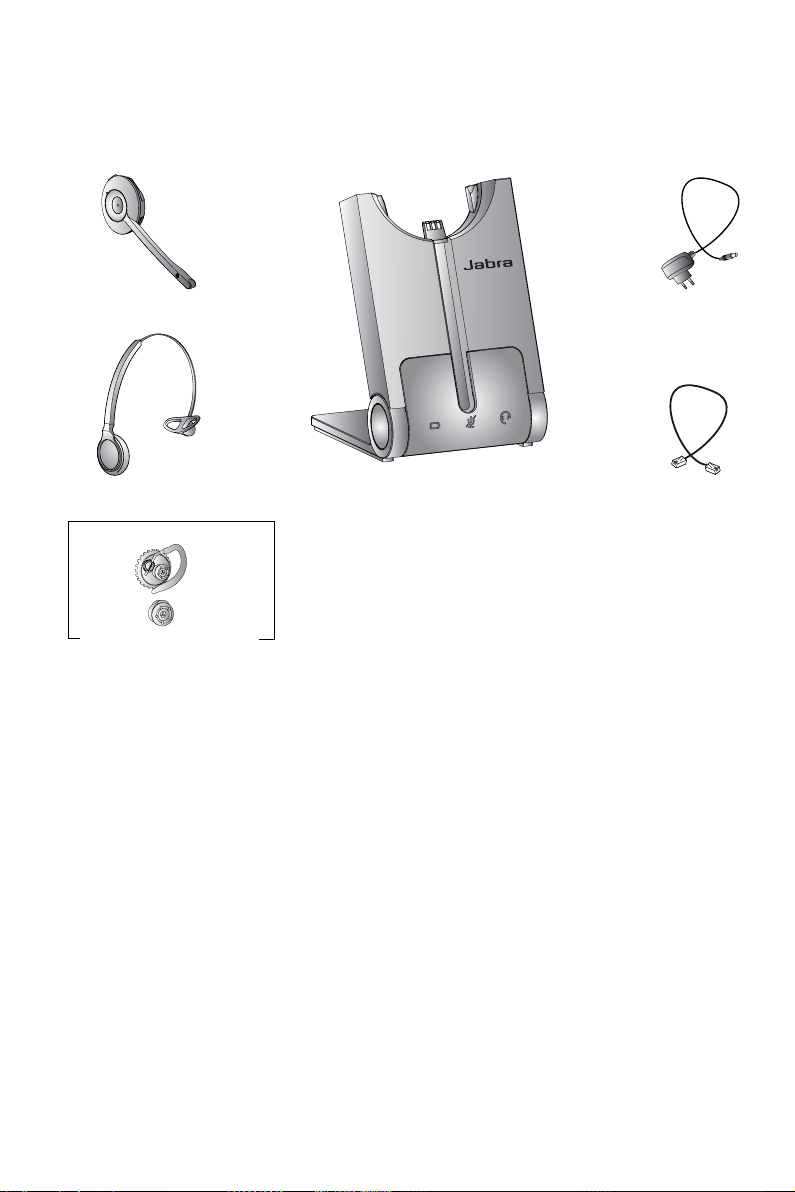
2.1 PACKAGE CONTENTS
english
Headset
Headband attachment
Earhook attachment
(not supplied in all regions)
Base
Power adapter
Telephone cable
5
Page 6
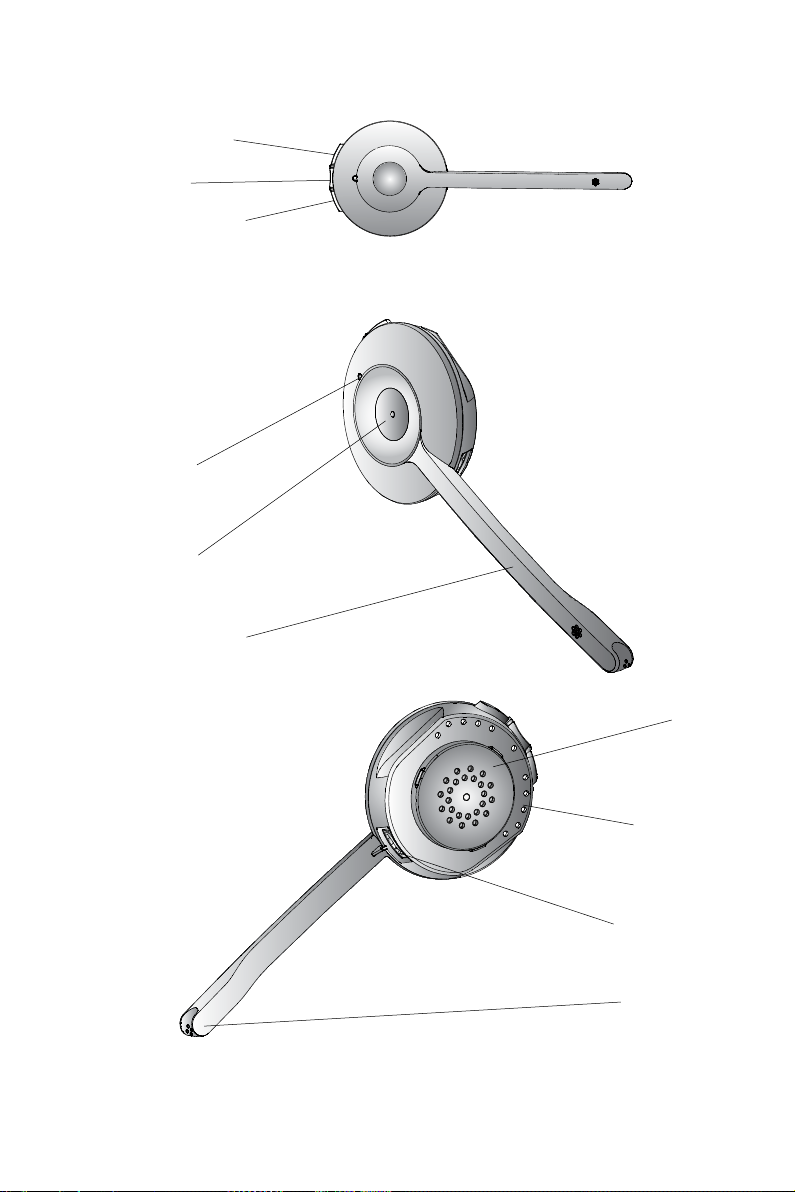
2.2 HEADSET OVERVIEW
Speaker volume up
button
Mute button
Speaker volume down
button
LED indicator
Multi-function
button
Microphone boom arm
english
Speaker
Mount for
wearing-style
attachments
Recharge contact
Noise-cancelling
microphone
6
Page 7
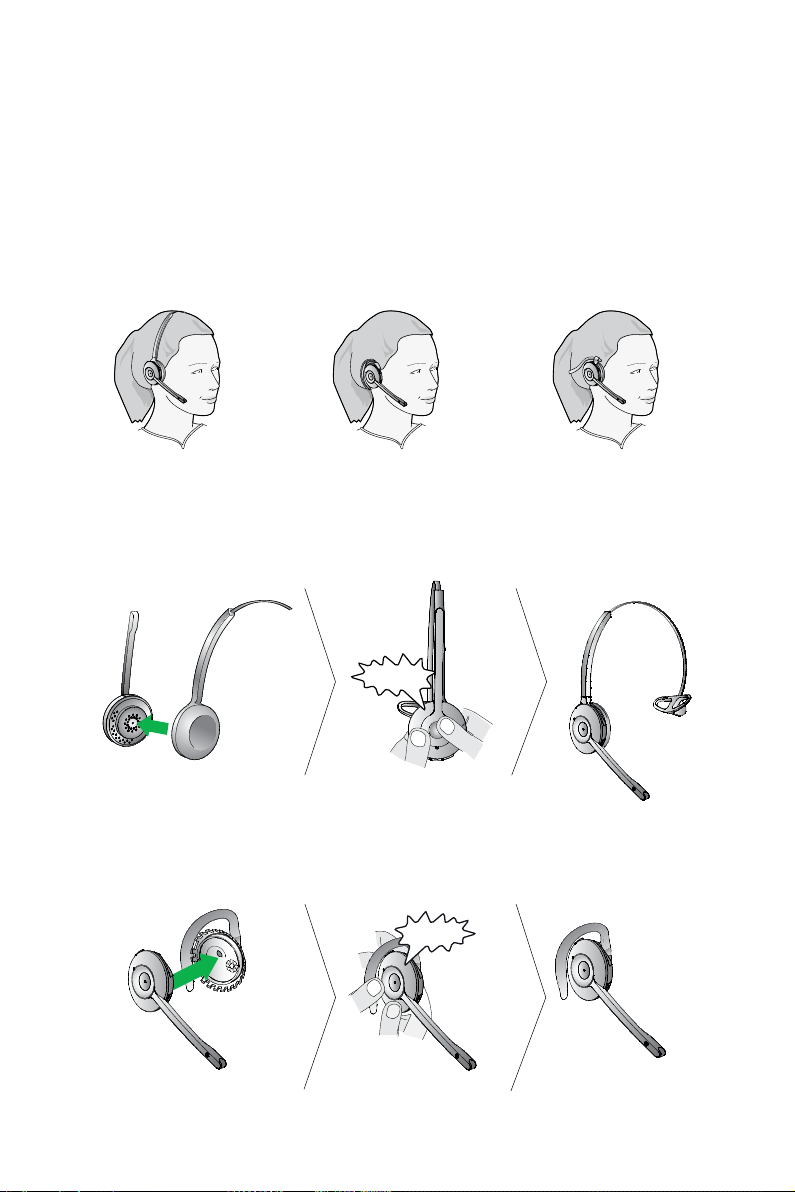
2.3 HEADSET ATTACHmENTS
The Jabra PRO 920 headset can be worn in three dierent wearing-styles:
headband, ear hook or neckband. The headband and earhook attachments
(earhook not supplied in all regions) are included with the Jabra PRO 920. The
neckband attachment can be purchased separately.
All wearing-styles are interchangeable and can be worn on either the left or
right ear.
Regardless of wearing-style, position the microphone as close to the mouth as
possible for maximum noise-cancelling eect.
Attaching the headband
english
CLICK
Attaching the earhook (earhook not supplied in all regions)
CLICK
7
Page 8

Attaching the neckband (optional accessory)
CLICK
english
R
L
8
Page 9
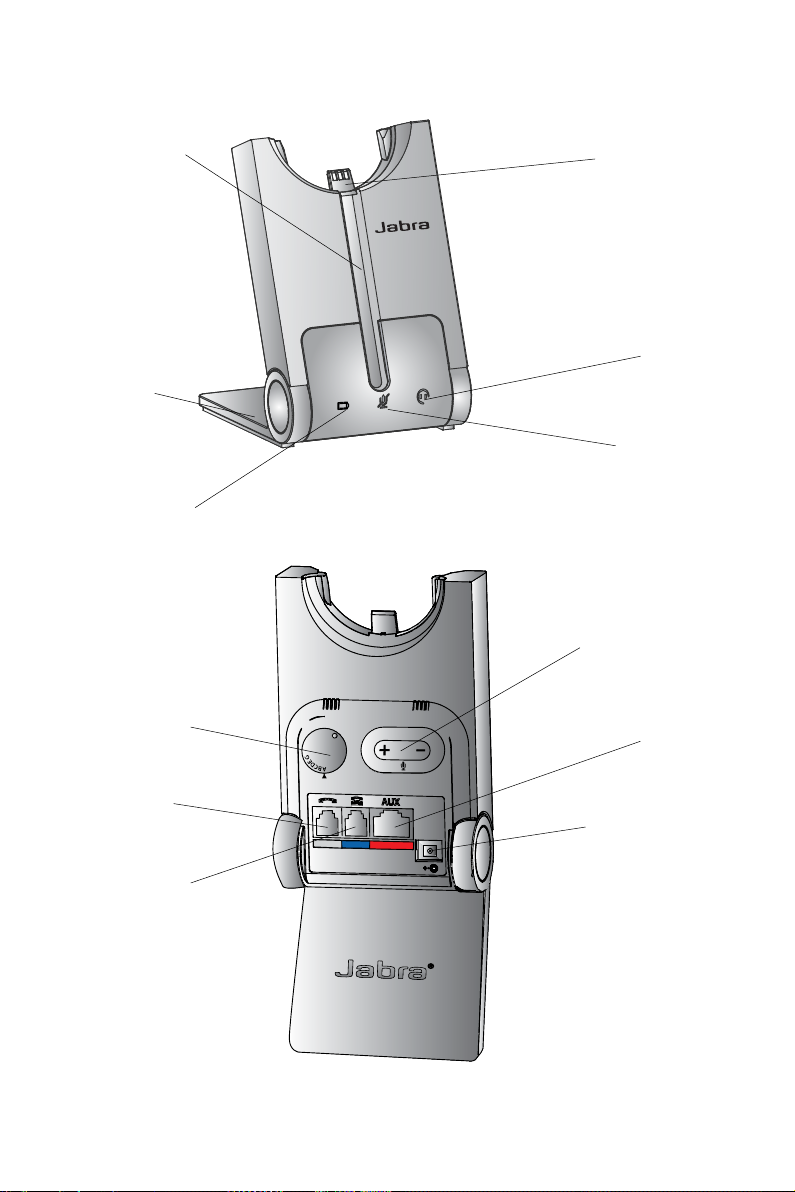
2.4 BASE OVERVIEW
Headset cradle
Foldable
base stand
Battery indicator
Clear Dial Tone
switch
Headset recharge
contact
1
Audio link
indicator
Mute indicator
Microphone volume
controls
AUX port
english
Handset port
Telephone port
Power adapter port
9
Page 10
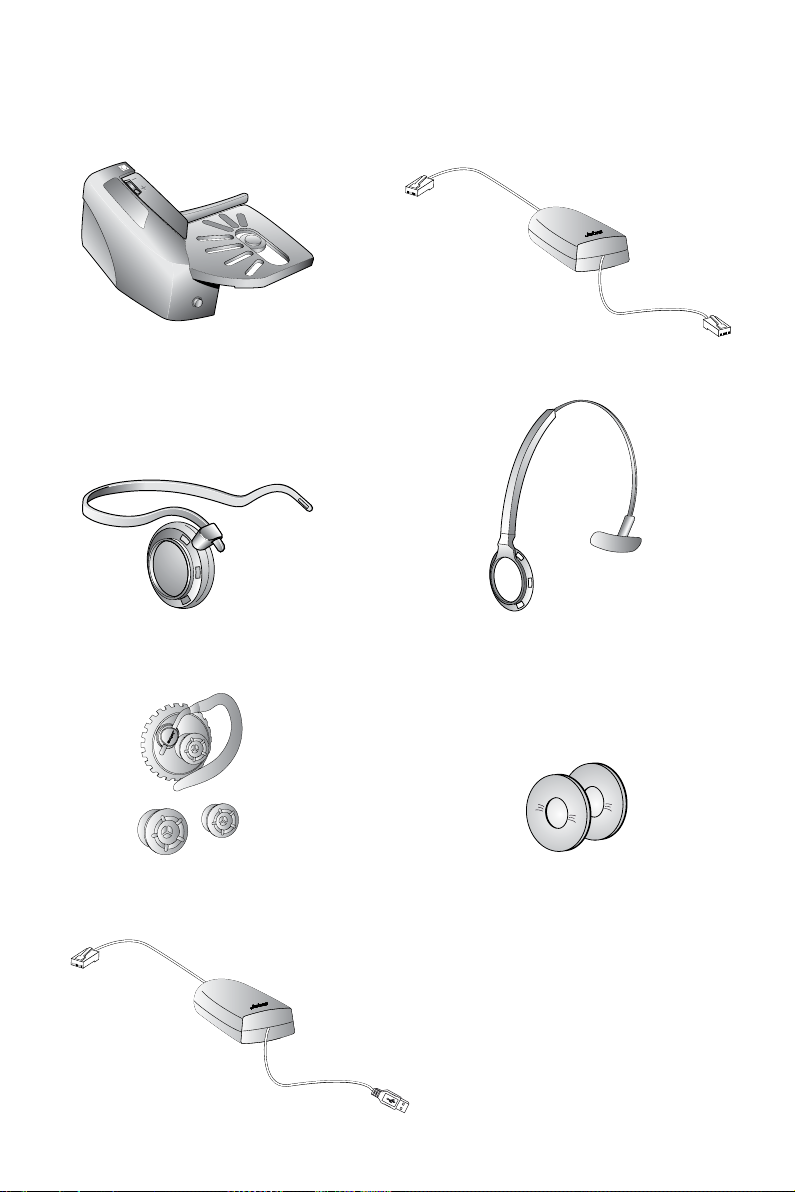
2.5 OPTIONAL ACCESSORIES
The following Jabra PRO accessories are available separately. Visit jabra.com for
full accessory overview.
english
Jabra GN1000
Neckband
attachment
Replacement earhook, with earbuds
Electronic hookswitch adapter
(actual product may vary from illustration)
Replacement headband attachment
Replacement ear cushions
Service cable
10
Page 11

3. CONNECTING TO A DESK PHONE
3.1 FOLDABLE BASE STAND
The Jabra PRO 920 base stand can be folded into three positions: open, closed
and standing position, as illustrated.
CLICK
english
11
Page 12

3.2 CONNECT TO DESK PHONE
OPTION 1
Desk Phone with Headset Port
This type of desk phone has a
dedicated headset port (usually
at the back of the phone). These
phones typically have a button
on the front panel for switching
between handset and headset.
1. Plug the supplied telephone
cable into the port marked
on the base.
2. Connect the telephone cable to
the headset port
phone.
OPTION 2
Desk Phone with Jabra Link
A Jabra Link adapter enables an
incoming call to be answered
or ended by the headset multifunction button.
Contact your local Jabra dealer to
purchase a Jabra Link adapter for
your specic desk phone.
1. Connect the Jabra Link
adapter as shown in adapter
documentation supplied with
the Jabra Link. On some phones
the telephone cable will also
need to be connected.
2. Call your connected desk phone
using another phone to enable
the Jabra Link adapter. Wait 10
seconds before answering the
phone.
on the desk
Refer to Jabra Link
documentation
or
or
english
or
or
OPTION 3
Desk Phone with GN1000
The GN1000 remote handset
lifter manually lifts the desk
phone handset to make or answer
a call. For mounting instructions
refer to documentation supplied
with the GN1000.
1. On the desk phone, unplug
the handset cable from the
phone body.
2. Connect the handset cable
to the port marked
base.
3. Plug the supplied telephone cable into the port marked
4. Connect the telephone cable into the handset port on the desk
phone.
5. Connect the GN1000 cable into the port marked
OPTION 4
Desk Phone without
Headset Port
This desk phone does not have a
dedicated headset port.
1. On the desk phone, unplug
the handset cable from the
phone body.
2. Connect the handset cable
to the port marked
base.
3. Plug the supplied telephone
cable into the port marked
on the base.
4. Connect the telephone cable
into the handset port on the
desk phone.
on the base.
on the
on the base.
on the
english
12
13
Page 13

3.3 CONNECT POWER SUPPLY TO BASE
1. Plug the power adapter into the port marked on the base.
2. Connect the power adapter to the mains power socket.
3.4 DOCK THE HEADSET
Dock the headset with the base
english
Dock the headset. When docked correctly the headset battery will begin
charging, if needed. Charge for 20 minutes or until the battery indicator on the
base is steady green.
14
Page 14

4. CONFIGURING THE DESK PHONE AUDIO
Due to the large range of desk phone brands/models available, a clear dial
tone must be set before rst-time use of the Jabra PRO 920. Setting the clear
dial tone will enable the Jabra PRO 920 to function correctly with your specic
desk phone. Additionally it is also important to set the microphone volume for
optimal sound quality.
4.1 SET A CLEAR DIAL TONE
1. Put on the headset.
2. Press the headset button on the
desk phone, or lift the desk phone
handset.
3. Locate the clear dial tone switch on
the back of the Jabra PRO 920 base,
as illustrated, and while listening
in the headset for a clear dial tone,
rotate the switch from A to G.
4. Determine the best switch position.
The dial tone should be strong,
clear and undistorted.
5. When the clear dial tone is set,
press the headset button on the
desk phone, or return the desk
phone handset to the receiver.
CLICK
english
15
Page 15

4.2 SET THE mICROPHONE VOLUmE
1. Put on the headset.
2. Get a dial tone by pressing the
headset button on the desk
phone, or by lifting the desk phone
handset.
3. Make a test call. Call a friend or
colleague to test your speaking
volume. Ensure the listener does
not adjust their own volume.
4. Adjust the microphone volume
using the microphone + / - volume
buttons, as illustrated, if your
speaking volume is too loud or too
quiet for the listener.
5. When the microphone volume is
set, end the call.
Note: To reset the microphone
volume to the factory default setting,
make a call and then press and hold
both microphone + / - volume buttons
until a tone is played, and then release
the volume buttons.
english
16
Page 16

5. jABRA PRO 920 FEATURES
5.1 HEADSET mULTI-FUNCTION BUTTON
The multi-function button can answer calls and end calls using a combination
of taps, double-taps or presses.
Multi-function button
english
Function Tap
Answer incoming call
End current call
Reject incoming call
Put current call on hold, and
accept incoming call
(not supported by all phones)
Power on
Power o
Double-
tap
5.2 HEADSET SPEAKER VOLUmE BUTTONS
The speaker volume buttons adjust the headset speaker volume.
Speaker volume
buttons
Press
(hold 1-3
seconds)
(5 secs)
17
Page 17

5.3 HEADSET mUTE BUTTON
The mute button mutes or un-mutes the headset microphone.
Mute button
5.4 HEADSET LED INDICATOR
The LED indicator indicates call status.
Led indicator
english
Headset state
Connected
Not connected
Active call
Incoming call Settings copying
Power on Settings copied
Power o
Pairing Firmware updating
LED sample
(click to view)
Headset state
Headset docked in
base
Headset docked in
charger
Headset docked in
unknown base
Settings cannot be
copied
LED sample
(click to view)
18
Page 18

5.5 HEADSET AUDIO INDICATORS
The headset plays a variety of voice announcements and audio tones to
indicate headset status and actions.
Audio tone
Power on Microphone muted
Power o Call ended
Button tap Battery low
Audio Sample
(click to listen)
Audio tone
Audio sample
(click to listen)
english
Button doubletap
Button press Conference end
Maximum
speaker volume
reached
Minimum
speaker volume
reached
Conference start
Out of range
Incoming call
accepted
19
Page 19

5.6 BASE VISUAL INDICATORS
1
The Jabra PRO 920 base has three LEDs to indicate battery, call status and
events.
Icon Event
Battery charging (slow
ash)
Full battery
Medium battery
Low battery
Very low battery (fast
ash)
Sleep mode (slow ash)
Unknown battery status
Microphone muted
Active audio link between
headset and base
Searching for headset
english
20
Page 20

6. CALL mANAGEmENT
6.1 mAKING CALLS, ANSWERING CALLS AND ENDING CALLS
Make
call
Answer
call
End
call
Phone with
headset port
1. Tap the headset
button on the
desk phone.
2. Lift headset from
docking cradle, or
tap the multifunction button.
3. Dial number using
desk phone.
1. Lift headset from
docking cradle, or
tap the multifunction button.
2. Lift desk phone
handset and set
aside.
Tap the headset
button on the desk
phone.
Phone with Jabra
Link, or GN1000
1. Lift headset from
docking cradle,
or
tap the multifunction button.
2. Dial number
using desk
phone.
Lift headset from
docking cradle, or
tap the multifunction button.
Dock the headset,
or tap the multifunction button.
Phone without
headset port
1. Lift headset from
docking cradle, or
tap the multifunction button.
2. Lift desk phone
handset and set
aside .
3. Dial number using
desk phone.
1. Lift headset from
docking cradle, or
tap the multifunction button.
2. Lift desk phone
handset and set
aside.
1. Dock the headset,
or
tap the multifunction button.
2. Return desk
phone handset to
receiver.
english
21
Page 21

6.2 SWITCHING BETWEEN PHONE AND HEADSET
Switch from desk phone to headset
1. Lift headset from docking cradle.
2. Do not return desk phone handset to receiver, as this will hang up the call.
Switch from headset to desk phone (without Jabra Link or GN1000)
1. Lift desk phone handset.
2. Dock headset, or tap the multi-function button.
Switch from headset to desk phone (with Jabra Link or GN1000)
1. Lift desk phone handset.
2. Refer to specic desk phone documentation. In some cases a button must be
pressed on the desk phone, while in others the switch from handset to desk
phone will be automatic.
6.3 CONFERENCE CALL WITH mULTIPLE HEADSETS
The Jabra PRO 920 is able to pair with four headsets in total for conferencing:
one primary and three secondary headsets.
Connect secondary headset
1. While the primary headset is undocked and on a call, dock the secondary
headset with the base hosting the call. When the headsets are successfully
paired, a double-tone will sound in the primary headset.
2. Tap the multi-function button on the primary headset to accept the
secondary headset. The audio is now shared between headsets.
Ending, or leaving, the conference
The primary headset user can end the conference by hanging up on the call.
The call is ended for all headsets.
Guests can leave the conference by tapping the multi-function on their
headset, or by docking the headset with the base. The conference call is still
active for the other headset(s).
english
22
Page 22

7. ADVANCED jABRA PRO 920 FEATURES
7.1 SAFETONE™ AUDIO PROTECTION
SafeTone™ provides eective hearing protection against potential risks, such
as acoustic shock and noise exposure. SafeTone™ consists of two components,
PeakStop™ and IntelliTone™ and can be set using the Jabra PRO 920 headset
(see Section 7.6).
PeakStop™ acoustic shock protection
PeakStop™ automatically suppresses sounds over 118dB(A), protecting hearing
from acoustic shock.
IntelliTone™ noise exposure protection
IntelliTone™ oers protection against acoustic shock and noise exposure over
85dB(A), corresponding to up to 8 hours of daily talk.
7.2 WIRELESS RANGE
The Jabra PRO 920 supports a maximum wireless range of up to 120 meters.
Physical obstructions and electromagnetic interference may shorten this
range. The wireless range can be adjusted to prevent interference with other
wireless devices (see Section 7.6).
Headset sound quality may deteriorate the further the headset is from the
base, and may improve the closer the headset is to the base. When the headset
is completely out of range, a unique tone will be played in the headset every
few seconds.
If the headset is on a call when moved out of range, the audio will be lost;
however the call will remain active at the base for 120 seconds. To restore audio
to the call, move the headset into range of the base.
If the headset remains out of range of the base for more than an hour, the
headset will power down to conserve battery.
english
7.3 CHANGE RINGTONE
The Jabra PRO 920 has 5 ringtones to select from. The ringtones will only play
in the headset. To change ringtone see section 7.6.
7.4 POWER mANAGEmENT
The Jabra PRO 920 provides several built-in power management features for
conserving energy.
Auto sleep mode
Auto sleep mode can be enabled using the Jabra PRO 920 base (see Section
7.6). Auto sleep mode is o by default. When enabled, the Jabra PRO 920 will
automatically enter sleep mode after 8 hours of inactivity, as indicated by the
23
Page 23

battery indicator slow ashing blue. Sleep mode will end when docking or
undocking the headset.
Automatic headset power o
After 60 minutes of no link between headset and base, the headset will
automatically power o. To power the headset on, tap the multi-function
button.
7.5 REmOTE CALL CONTROL
Remote call control (or hookswitch) is the control mechanism used to answer
or end a call on a desk phone. To enable the Jabra PRO 920 headset to answer
or end calls, the desk phone will need to have a Jabra Link or a GN1000
installed.
Electronic Hookswitch (EHS)
An electronic hookswitch is a feature on some desk phones that enables calls
to be answered or ended by the headset multi-function button. To use this
feature an electronic hookswitch adapter (e.g. Jabra Link) needs to be
connected between the desk phone and the Jabra PRO 920 base. To purchase a
Jabra Link contact your supplier, or visit www.jabra.com.
GN1000
A GN1000 manually lifts the handset from the desk phone receiver to
automatically place or answer a call. To purchase the Jabra GN1000 remote
handset lifter contact your supplier, or visit www.jabra.com.
english
7.6 HOW TO CHANGE THE ADVANCED SETTINGS
Seven advanced settings can be congured using the base. Voice prompts
indicate the current setting and value. The seven settings are:
•Mute reminder tone.
•Ringtone.
•Audio protection.
•Wireless range.
•Auto sleep mode.
•Remote call control.
•Wideband audio.
24
Page 24

1 Start setup mode
• Put on the headset.
• Simultaneously press and hold both headset
volume buttons until the voice prompt says
“Setup” and then release the buttons.
2 Setup mode
• The headset buttons are used to cycle through the settings and values.
• The base lights
selected.
,or voice prompts are used to indicate which setting and value is currently
Start
setup
Settings Values
SETUP
english
Cycle
through
settings
Base
light
ash x1
ash x2
ash x3
ash x4
Voice
prompt
Setting
Mute reminder
tone
Ringtone
Audio
protection
Wireless range
Cycle
through
values
Base
light
Voice
prompt
Value
On (default)
O
Ringtone 1
(default)
Ringtone 2
Ringtone 3
Ringtone 4
Ringtone 5
Peakstop (default)
Peakstop and
Intellitone
Normal range
(default)
Low range
Very low range
ash x5
Auto sleep
mode
O (default)
On
25
Page 25

ash x6
Remote call
control
(some phones
may not be
auto-detected,
and will need
to be manually
congured)
(Default)
GN1000/RHL/none
Jabra IQ
DHSG
MSH
Optipoint
english
Auto-detect
ash x7
3 End setup mode
When nished, simultaneously press and hold
both headset volume buttons until the voice
prompt says “Goodbye” and then release the
buttons.
The base will restart and update the settings,
indicated by the white battery icon
base.
Wideband
audio
End
setup
on the
7.7 HOW TO RESET ADVANCED SETTINGS
•Put on the headset.
•Simultaneously press and hold the
mute button and both headset
volume buttons until the voice
prompt says “Factory default” and
then release the buttons.
The base will restart and reset the
settings, indicated by the white
battery icon
on the base.
Reset
settings
O (default)
On
GOODBYE
FACTORY
DEFAULT
7.8 COPY SETTINGS TO mULTIPLE jABRA PRO 920 BASES
Jabra PRO 920 settings can be manually copied onto other Jabra PRO 920
bases.
1. Dock the headset in the base.
2. Press and hold the headset mute button until the headset LED ashes, and
then release. When the settings have successfully copied, the headset LED
will turn solid white.
26
Page 26

3. Undock the headset and dock in the new base to copy the settings to the
new base. The headset LED will ash 5 times to indicate the settings are
being copied, and then will turn solid white when successfully copied to the
new base.
4. To copy the settings to multiple bases, repeat step 3.
5. When nished copying settings, redock the headset with the original base
(primary base), or press and hold the headset mute button until the headset
LED ashes and then release.
7.9 FORCED PAIRING (PAIRING A NEW PRImARY HEADSET)
It is possible to force the Jabra PRO 920 to pair with a new headset, even when
it is currently paired with another headset.
1. Dock the new headset in the base.
2. Press the multi-function for 1-2 seconds. The headset LED will begin to ash.
Forced pairing will take between 10 seconds - 2 minutes.
3. When paired successfully, the battery indicator will turn green (or red if the
headset battery is low).
7.10 UPDATE FIRmWARE AND HEADSET SETTINGS (SERVICE CABLE)
It is possible to update the Jabra PRO 920 rmware and headset settings (via
Jabra Control Center) by connecting the Jabra PRO 920 to a PC using the
service cable (optional accessory).
1. Disconnect the Jabra PRO 920 from power.
2. Connect the Jabra PRO 920 to any available USB port on the PC using the
service cable (optional accessory).
3. Connect the Jabra PRO 920 to power, and wait for the headset indicator to
turn green.
When connected successfully the Jabra 920 base is put into rmware update
mode. It is now possible to update rmware and congure headset settings
using Jabra Control Center (a component of Jabra PC Suite). Jabra PC Suite can
be downloaded from www.jabra.com/setup.
NOTE: To exit rmware update mode, disconnect the service cable and unplug
the Jabra PRO 920 from power to reboot.
english
27
Page 27

8. SUPPORT
8.1 FAQS AND TROUBLESHOOTING
Q How do I pair my headset with the Jabra PRO 920 base?
A Dock the headset with the base to initiate pairing. Pairing will occur
automatically, unless the base is currently linked with a primary headset (a
headset already paired with the base). Alternatively you can force pair a new
primary headset, if there is currently a primary headset already paired with
the base.
Q Can I pair my headset directly with a third-party DECT phone, or base?
A No. The headset can only be paired with a Jabra PRO 920 base.
Q Why doesn’t my headset work with my desk phone?
A Check the following:
• Ensure the headset battery is charged. The keypad battery icon will be
blinking green when charging, or solid green when charged.
• Ensure the headset is in range of the base. The range is up to 120 m,
depending on environment.
• Ensure the headset and base are paired. To initiate pairing, dock the
headset.
Q Why does nothing happen when I try to use my desk phone?
A Ensure the base is powered on, and check there is a dial tone. Lift the desk
phone handset, or press the headset button on the desk phone, to get a dial
tone. If there is no dial tone, double-check all cables have been correctly
connected.
Q The person I am calling cannot hear me. Why?
A The clear dial tone or microphone volume settings might be incorrectly set.
Read Section 3 and 4 of this manual.
english
Q Why am I getting a buzzing sound in my headset?
A Assuming the device has been set up correctly, the desk phone may not
be fully immune to the radio signals the headset uses. To overcome this
problem, move the headset base at least 30 cm away from the desk phone.
Q When I try to make a call on my desk phone, the GN1000 RHL lifts, but
the call is not connected.
A Ensure the base is connected to the desk phone handset port, and not the
desk phone headset port. The GN1000 should not be connected to the
headset port.
28
Page 28

Q Is it possible to automate calling and answering on my desk phone
without using a handset lifter?
A Yes, if the desk phone has an electronic hookswitch feature. Check your
supplier for compatibility with your phone, and/or consult the support
section on www.jabra.com.
Q Why does my desk phone’s electronic hookswitch not work with my
headset?
A Please check your specic desk phone documentation for electronic
hookswitch compatibility and conguration settings. Alternatively visit
www.jabra.com.
Q What is the range on the Jabra PRO 920?
A Jabra PRO 920 supports a maximum range of up to 120 m (base to headset).
Range varies according to the environment in which the headset is used.
Q Can I make a conference call using multiple headsets?
A Yes, the Jabra PRO 920 is able to pair with four headsets in total: one primary
and three secondary headsets . Please see section 6.3 of this manual for
more information.
Q Can I turn the headset o to save power when I’m away from the base?
A Yes. Press and hold the headset multi-function button on the headset for ve
seconds to power the headset o. To power the headset back on, dock the
headset with the base, or tap the multi-function button.
Q What is the talk time for a Jabra PRO 920 headset?
A Up to 8 hours talk time.
english
Q My headband/earhook/neckband is broken. How do I purchase another
one?
A Contact your local Jabra supplier.
29
Page 29

9. TECHNICAL SPECIFICATIONS
9.1 jABRA PRO 920 HEADSET
Operating environment:
0˚C to +40˚C; Up to 95% RH non-condensing.
Call control:
Multi-function button support for answer call, end call, reject call, docking
operations also answer and end calls.
Volume control and microphone mute:
Button controls on headset.
Visual indicator:
LED indicates call status, pairing status and other events.
Audio indicators:
Tones indicate incoming calls, low battery, volume level, microphone muting
and other events.
Sound quality:
DSP noise reduction; echo cancellation; tone control; wideband and narrowband
audio.
Recharge:
While docked in the Jabra PRO 920 base.
Wireless standard:
(CAT - iq) European DECT and U.S. DECT.
DECT range:
For European DECT; up to 120 meters from Jabra PRO 920 base to headset.
For U.S. DECT; up to 350 feet from Jabra PRO 920 base to headset.
DECT frequencies:
US DECT: 1.92 - 1.93 GHz.
EU DECT: 1.88 - 1.90 GHz.
Wearing-styles:
Headband, and earhook (earhook not supplied in all regions). Neckband is
available as an accessory.
Microphone boom arm style:
Midi.
Speaker(s):
Wideband speaker.
Microphone:
Noise-cancelling microphone.
english
30
Page 30

9.2 HEADSET BATTERY
Battery type:
Lithium Ion-polymer.
Battery capacity:
295 mA/h, typical.
Battery talk time:
Up to 8 hours.
Battery lifetime:
Minimum 1000 charge cycles.
Battery standby time:
At least 36 hours.
Operating temperature range:
-20˚C to +60˚C.
The headset features a temperature-dependant charging algorithm that
prevents the battery from being charged during extreme temperatures (below
0˚ and above 45˚C).
Battery charge time:
20% charge in less than 20 minutes.
50% charge in less than 45 minutes.
Full charge in less than 3 hours.
Battery shelf life:
Headset battery holds charge for 6 months in the o state, before recharge is
required.
english
9.3 mATERIALS AND ALLERGIES
The headband attachment is made of stainless steel and does not have a
nickel-coated surface. Nickel release from the headband is 0.02 g/cm2/week,
which is below the 0.50 g/cm2/week limit established by EU Directive 94/27/
EF. The stainless steel alloy was tested for nickel release in accordance with the
European standard EN 1811:1998.
Other wearing-style attachments are made of plastic and contain no known
allergens. The ear cushions do not contain vinyl. The products contain no nickel,
chrome or natural rubber that can come into contact with users’ skin.
31
Page 31

9.4 jABRA PRO 920 BASE
The Jabra PRO 920 base meets the following specications.
Dimensions:
118 mm x 76 mm x 29 mm.
Wireless standard:
(CAT - iq) European DECT and U.S. DECT.
Operating environment:
-0˚C to +40˚C; Up to 95% RH non-condensing.
Recharge cradle:
Fits supplied Jabra PRO 900 series headset.
Desk Phone connections:
RJ-11 for handset, RJ-11 for phone body (or headset port), RJ-45 for AUX (for
Jabra Link or GN1000 handset lifter).
Clear Dial Tone switch and microphone volume switch:
Electromechanical switches. Clear dial tone switch and microphone volume
level set manually.
Electronic hookswitch standards:
GN1000, Jabra IQ, DHSG and MSH, and other Jabra DHSG adapters. Each EHS
requires additional cabling and/or equipment available separately. GN1000 is
supported by default and requires no additional conguration.
9.5 PRODUCT DISPOSAL
Please dispose of the headset according to local regulations and recycle when
possible. Do not dispose as household waste. Do not dispose of the headset in
a re as the battery may explode. Batteries may also explode if damaged.
english
9.6 CERTIFICATIONS AND SAFETY APPROVALS
CE
This product is CE marked according to the provisions of the R & TTE Directive
(99/5/EC). Hereby, GN declares that this product is in compliance with the
essential requirements and other relevant provisions of Directive 1999/5/EC.
For further information, please consult http://www.jabra.com.
Within the EU, this device is intended for use in Austria, Belgium, Cyprus,
Czech Republic, Denmark, Estonia, Finland, France, Germany, Greece, Hungary,
Ireland, Italy, Latvia, Lithuania, Luxembourg, Malta, Poland, Portugal, Slovakia,
Slovenia, Spain, Sweden, The Netherlands, United Kingdom, and within EFTA in
Iceland, Norway and Switzerland.
32
Page 32

FCC
This device complies with part 15 of the FCC Rules. Operation is subject to the
following two conditions: (1) This device may not cause harmful interference,
and (2) this device must accept any interference received, including
interference that may cause undesired operation.
Users are not permitted to make changes or modify the device in any way.
Changes or modications not expressly approved by Jabra will void the user’s
authority to operate the equipment.
This equipment has been tested and found to comply with the limits for a Class
B digital device, pursuant to part 15 of the FCC Rules. These limits are designed
to provide reasonable protection against harmful interference in a residential
installation. This equipment generates, uses and can radiate radio frequency
energy and, if not installed and used in accordance with the instructions, may
cause harmful interference to radio communications. However, there is no
guarantee that interference will not occur in a particular installation. If this
equipment does cause harmful interference to radio or television reception,
which can be determined by turning the equipment o and on, the user is
encouraged to try to correct the interference by one or more of the following
measures:
• Reorient or relocate the receiving antenna.
• Increase the separation between the equipment and receiver.
• Connect the equipment into an outlet on a circuit dierent from that to
which the receiver is connected.
• Consult the dealer or an experienced radio/TV technician for help.
The user must place the base 8” (20 cm) or more from any personnel in order to
comply with FCC RF exposure requirements.
Industry Canada
Operation is subject to the following two conditions: (1) This device may not
cause interference and (2) This device must accept any interference, including
interference that may cause undesired operation of the device. The term “IC:”
before the certication/registration number only signies that registration
was performed based on a Declaration of Conformity indicating that Industry
Canada technical specications were met. It does not imply that Industry
Canada approved the equipment.
Patents and design registration pending international
english
33
Page 33

english
© 2013 GN Netcom A/S. All rights reserved. Jabra® is a registered
trademark of GN Netcom A/S. All other trademarks included herein are
the property of their respective owners. (Design and specications subject
to change without notice).
MADE IN CHINA
Type: WHB003
www.jabra.com
32-00696 F
34
 Loading...