


ITV Ice Makers NDP55, NG75, NG85, NG95, NG135 Operator’s Manual
...ALFA / GALA
USER MANUAL NG MACHINES
MANUAL DEL USUARIO MÁQUINAS NG
MANUEL DE L’ UTILISATEUR NG MACHINES
ICE CUBE MAKERS / UNDERCOUNTER MODELS
MÁQUINAS DE HIELO EN CUBITOS / MODELOS COMPACTOS MACHINES A GLAÇONS / MODELES COMPACTES
NDP55
NG75
NG85
NG95
NG135
NG175
NG265
NG355
USER MANUAL NG MACHINES: ALFA / GALA
Ice Cube Makers - Self Contained Models
MANUAL DEL USUARIO MÁQUINAS NG: ALFA / GALA
Máquinas de Hielo en Cubitos - Modelos Compactos
MANUEL DE L’ UTILISATEUR NG MACHINES: ALFA / GALA
Machines a Glaçons en Cube - Bac Stockage Incorporé
ALFA / GALA
USER MANUAL NG MACHINES
MANUAL DEL USUARIO MÁQUINAS NG
MANUEL DE L’ UTILISATEUR NG MACHINES
INDEX
ARNING |
2 |
RECEPTION OF THE MACHINE |
2 |
INSTALLATION |
3 |
START-UP |
6 |
MAINTENANCE AND CLEANING PROCEDURES |
7 |
ÍNDICE
ADVERTENCIAS |
10 |
RECEPCIÓN DE LA MÁQUINA |
10 |
INSTALACIÓN |
11 |
PUESTA EN MARCHA |
14 |
INSTRUCCIONES DE MANTENIMIENTO Y LIMPIEZA |
15 |
INDEX
ATTENTION |
18 |
RECEPTION DE L’APPAREIL |
18 |
INSTALLATION |
19 |
MISE EN MARCHE |
22 |
INSTRUCTIONS POUR L’ENTRETIEN ET LE NETTOYAGE |
23 |
USER MANUAL NG
THIS MANUAL IS PART OF THE PRODUCT. READ IT CAREFULLY IN ORDER TO USE AND MAINTAIN THE EQUIPMENT CORRECTLY.
IT IS IMPORTANT TO KEEP IT FOR FUTURE TROUBLESHOOTING AND REFERENCE.
Warning
The installation of this equipment should be done by the Technical Assistance Service department. The socket should always be placed on an accessible location.
ALWAYS disconnect the power supply from the machine BEFORE any cleaning or maintenance service.
Any change needed on the electrical installation for the appropriate connection of the machine, should be exclusively performed by qualified and certified professional personnel.
Any use by the ice maker not intended to produce ice, using drinking water, is considered inappropriate.
It is extremely dangerous to modify or to intend to modify this machine, and shall make any type warranty void.
This appliance is not intended for used by persons (including children) with reduced physical, sensory or mental capabilities, or lack of experience and knowledge, unless they have been given supervision or instruction concerning use of the appliance by a person responsible for their safety.
Children should be monitored to assure that they should not play near the equipment. This machine is not intended to be used outdoors nor exposed to the rain.
Connect the equipment to the drinking water network.
The machine should be connected using the power cable supplied with the equipment. The connection is not intended for fixed cabling.
IT IS MANDATORY TO GROUND THE EQUIPMENT. To avoid possible discharges on individuals or damages to the equipment, the machine should be grounded pursuant local and/or national regulations as the case may be. THE MANUFACTURER SHALL BE HELD HARMLESS IN CASE OF DAMAGES ARISING DUE TO THE LACK OF THE GROUND INSTALLATION.
In order to assure the proper operation and efficiency of this equipment, it is of paramount importance to follow the recommendations of the manufacturer, SPECIALLY THOSE RELATED TO CLEANING AND MAINTENANCE OPERATIONS, which should be performed mostly by qualified personnel only.
CAUTION:
Do not try to perform repairs. The intervention of non-qualified personnel, besides of being dangerous, could result in serious malfunctioning. In case of damages, contact your distributor. We recommend always using original replacement and spare parts.
Perform all discharge and recovery of materials or waste according the national regulations in force.
Reception of the Machine
Inspect the outside packing. In case of damages, MAKE THE CORRESPONDING CLAIM TO THE CARRIER.
To confirm the existence of damages, UNPACK THE MACHINE IN THE PRESENCE OF THE CARRIER and state any damage on the equipment on the delivery document or on a separate instrument.
2
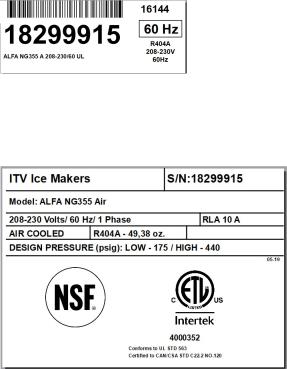
Always state the machine number and model. This number is printed on three locations:
(1) Packing: On the outside, it contains a label with the manufacturing number.
(2)Exterior of the Equipment: At the rear side of the equipment, there appears a label with the same characteristics as the previous one.
(3)Nameplate: At the back of the machine.
Check that in interior of the machine the installation kit is complete and comprises:
•Ice scoop, four legs and manual.
•Warranty and serial number.
CAUTION: All packing elements (plastic bags, carton boxes and wood pallets) should be kept outside the reach of children, as they are a source of potential hazard.
Installation
THIS ICE MAKER IS NOT DESIGNED FOR OUTDOOR OPERATION.
An incorrect installation of the equipment may cause damages to individuals, animals or other materials, being the manufacturer not responsible for such damages.
CAUTION:
The NG machines are designed to operate at room temperature between 41ºF (5ºC) and 109.40ºF (43ºC). There may be some difficulties in icecube removal under the minimum temperatures. Above the maximum temperature, the life of the compressor is shortened and the production is substantially lower.
3

USER MANUAL NG
The NG machines with air-cooler condenser take the air through the front section, and drive it off through the lateral, back and also front louvers due to their new oblique condenser structure and placement.
Do not place anything over the maker or in facing the front louver.
In case the front louver is not enough, the exit is either total or partially obstructed or due to its placement it will receive hot air from another device, we recommend, in case it is not possible to change the location of the machine, to install a water condenser unit.
IT IS IMPORTANT THAT THE WATER PIPING DO NOT PASS BY OR NEAR SOURCES OF HEAT IN ORDER NOT TO LOSE ICE PRODUCTION.
MINIMUM DISTANCE TO OBSTACLES
Side View |
>10cm / >4” |
|
|
>75cm / >29” |
>10cm / >4” |
* There’s no minimum distance to obstacles in the sides of the machine
CONNECTION DIAGRAM
>10cm |
>4” |
Plug |
Socket |
Tap |
Water connection hose |
Discharge hose |
Thread the support legs to the base of the machine in the housing set to such end and regulate the height as to have the equipment perfectly leveled.
4

(1) Water and Drainage
Water quality has a remarkable influence on the appearance, hardness and flavor of the ice as well as, in the machines condensed by water, on the life of the condenser.
(2)Connections to the Water Network
Use a flexible food grade pipe.
Pressure should be established between 14 and 85 psi (1 and 6 Bar / 0.1 and 0.6 Mpa). If pressures overpass such values, install the necessary corrective devices.
ATTENTION: The machine shall be plumbed according to applicable Federal State and local regulations.
(3)Connection to Drainage
Drainage should be located below the level of the machine, at 5.91 inches (150 mm) minimum.
It is convenient to use a 1.18 in inside diameter pipe (30 mm) with a minimum gradient of 1.18 in (3 cm) per meter (see figure).
CORRECT |
INCORRECT |
Descending |
Ascending |
|
INCORRECT |
(4) Electrical Connection
IT IS MANDATORY TO GROUND THE EQUIPMENT: To avoid possible discharges on individuals or damages to the equipment, the machine should be grounded pursuant local and/or national regulations as the case may be.
THE MANUFACTURER SHALL BE HELD HARMLESS IN CASE OF DAMAGES ARISING DUE TO THE LACK OF THE GROUND INSTALLATION.
The machine is supplied with a 6 feet length cable. In case the supply cable is damaged, it should be replaced by a cable or a special kit to be furnished by the manufacturer or post-sale service. Such replacement should be performed by qualified technical service only.
The machine should be placed to allow a minimum space between the back and the wall in order to guarantee an easy and a risk free access to the plug.
Safeguard the socket. It is convenient to install adequate switches and fuses.
Voltage and tension are indicated on the nameplate. Variation on voltage above the 10% stated on the nameplate could result on damages or prevent the machine from start-up.
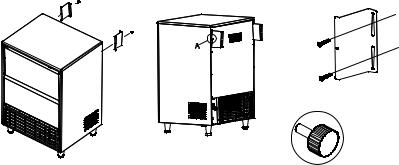
(5) Safety Brackets (not necessary for models NDP55 and NG95).
1)Level the machine with adjustable feet.
2)Assembly the two brackets symmetrically using the milled screws (A) . fig 1,2 . Tighten by hand.
3)Fit the brackets to the wall with two screws for each one.
5
USER MANUAL NG
For cleaning or maintenance purposes just remove by hand the two milled screws to release machine from brackets. Remember to secure machine again after operation.
Fig.1 |
Fig.2 |
Fig.3 |
|
|
to the wall |
|
|
A |
A
Start-Up
(1) Previous Checkup
a)Is the machine leveled?
b)Voltage and frequency are the same as those on the nameplate?
c)Are the discharges connected and operating?
d)If air condensed: Is the air circulation and its temperature appropriate?
|
|
ROOM |
WATER |
|
|
|
|
|
MAXIMUM |
109º F / 43º C |
95º F / 35ºC |
|
|
|
|
|
MINIMUM |
41º F / 5º C |
41º F / 5ºC |
|
|
|
|
e) Is water pressure appropriate? |
|
|
|
|
|
|
|
|
MINIMUM |
14 psi (1 Bar / 0.1 Mpa) |
|
|
|
|
|
|
MAXIMUM |
85 psi (6 Bar / 0.6 Mpa) |
|
|
|
|
|
NOTE: In case input water pressure is higher that 85 psi (6 bar / 0.6 Mpa), install a pressure regulator.
(2) Start-Up
Once the installation instructions are followed (ventilation, site conditions, temperatures, water quality, etc.), proceed as follows:
1)Open the water inlet. Verify the no existence of leakages.
2)Open the door and remove the protection elements that are inserted on the shield.
3)Connect the machine to the electrical network.
4)Push the (blue) switch placed ound on the front side.
5)Verify that there are no vibrations or frictions on the elements.
6)Verify that the shield moves freely.
7)Verify that the nozzles send the water to the evaporator on the right direction (even spread).
8)After 10 minutes, verify that the water container has no leakages through the maximum level overflow pipe.
9)Verify that after the final cycle, the frost around the aspiration pipe is at 0.78 in (20 mm) of the compressor.
The technical installer shall invoice traveling expenses, labour cost hours and materials used.
6
Maintenance and Cleaning Procedures
CAUTION: Instruct the user about maintenance, informing that maintenance and cleaning operation as well as damages due to the lack of such operations are not included in the warranty.
If a good maintenance is performed, the machine will continue producing a good quality of ice and will be free of damages.
Maintenance and cleaning intervals will depend on the conditions of the site and water quality. CAUTION: At least, one revision and cleaning should be performed every six months.
On dusty environments, it might be necessary to clean the condenser on a monthly basis. CAUTION: Unit should always be disconnected during maintenance/cleaning procedures.
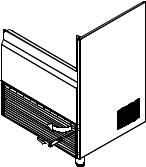
FRONT GRID REMOVAL
To access condensing unit remove front grid by pressing the two clips placed at right side.
CLEANING THE CONDENSER
(1) Air Condenser
1)Disconnect machine.
2)Close water faucet.
3)Clean condenser using a vacuum cleaner, brush or low pressure air.
(2)Water Condenser
1) Disconnect machine.
2) Close water faucet.
3) Disconnect water entry/exit from condenser.
4) Prepare a solution of 50% phosphoric acid in distilled water.
5) Distribute solution through condenser. (Solution is more effective at 35°-40°C).
WARNING! DO NOT USE HYDROCHLORIC ACID
(3)Evaporator / Water Deposit
1)Disconnect machine.
2)Remove overflow pipe to empty water reservoir. Replace pipe.
3)Prepare a solution of an appropriate product for the cleaning of ice machines (lime). Do not use hydrochloric acid. We recommend the use of Scale-Kleen (Everpure) prepared according to the manufacture’s instructions.
4)Fill water reservoir. Open compressor switch placed down top cover and Switch on the machine in order to run water pump. Let solution stand for 20 minutes
7
 Loading...