

ITV Ice Makers BIN S300, BIN S400, BIN S500, BIN S750, BIN S900 Installation Manual
...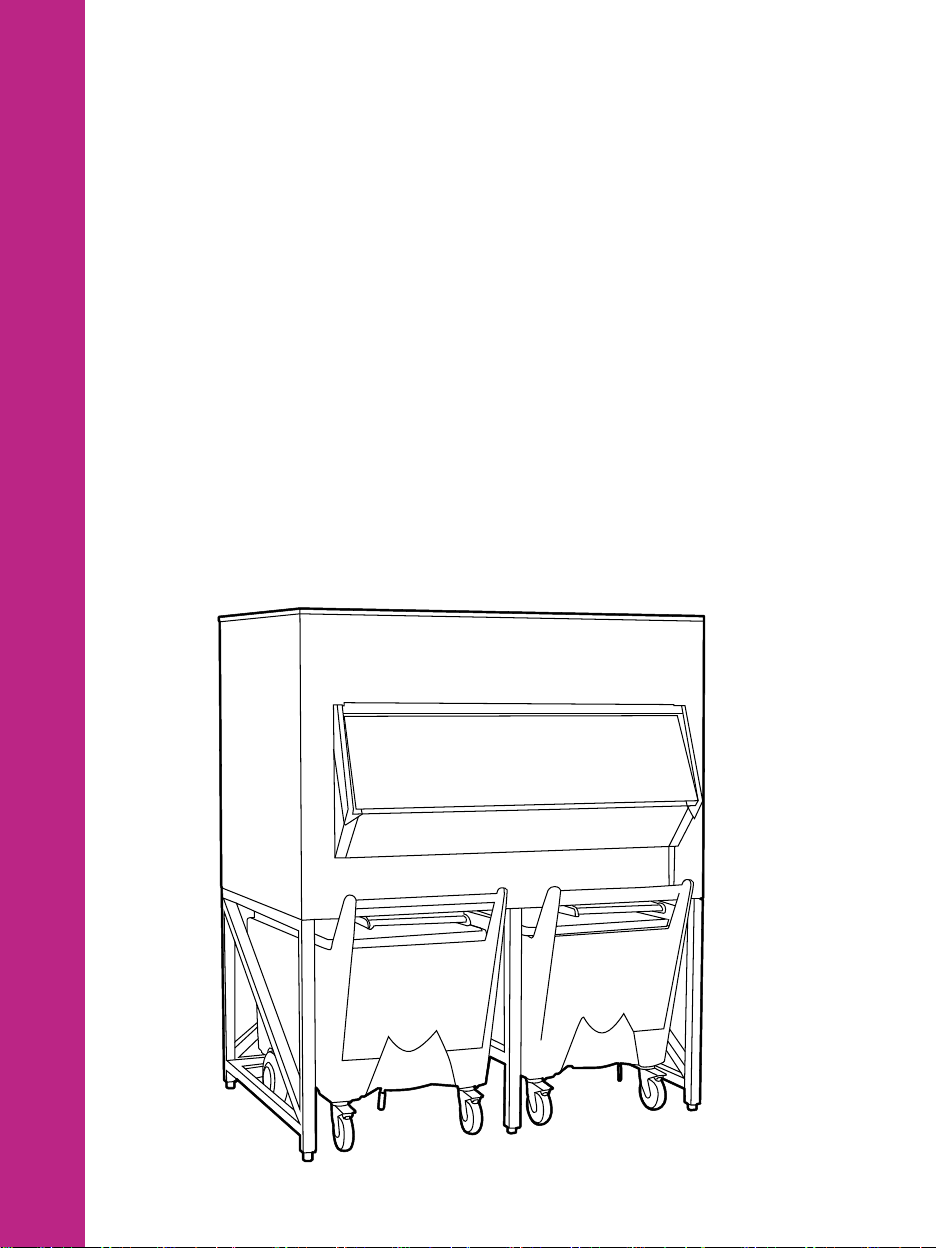
ICE STORAGE BIN
WITH CART
USER MANUAL
EN
ES
FR
DE
PO
IT

TABLE OF CONTENTS
1| INTRODUCTION
1.1 Warnings
2| RECEIPT OF THE MACHINE
3| INSTALLATION
3.1 Unpacking
4| START-UP
4.1 Levelling the ice storage bin
4.2 Drain connection
4.3 Ice paddle holder assembly
5| OPERATION
5.1 Position the cart
5.2 Break and position the ice
5.3 Load the ice
5.4 Transport the ice
5.5 Ice removal
5.6 Water removal
6| MAINTENANCE AND CLEANING
6.1 Maintenance
6.2 Cleaning and maintenance of the ice storage bin interior
6.3 Cleaning of carts
6.4 Cleaning of stainless steel parts (body and gates)
EN
THIS MANUAL IS PART OF THE PRODUCT. READ IT CAREFULLY IN ORDER
TO USE AND MAINTAIN THE EQUIPMENT CORRECTLY. IT IS IMPORTANT TO
KEEP IT FOR FUTURE TROUBLESHOOTING AND REFERENCE.
English_ICE STORAGE BIN WITH CART_01

1| INTRODUCTION
2| RECEIPT OF THE MACHINE
This document describes the installation procedure for the ice storage bin in order to eortlessly
store and dispense ice.
The instructions in this manual are applicable for the carts models.
These storage units are compatible with our ice makers and are suitable for all types of ice. The
purpose of ice storage bins with carts is to store the ice produced to satisfy the establishment’s
needs easily and ergonomically for users.
Carts have been integrated to improve and make the transport of ice easier. They make it possible
for users to transport ice to the desired location comfortably and with minimal eort.
1.1 WARNINGS
- Before installing and operating the machine, please read this manual carefully and follow the
instructions herein to ensure proper installation and smooth operation.
- It is important to keep this manual for future reference.
- Any use of the product which is not for the storage and transport of ice will be considered as
inappropriate.
- Modifying or attempting to modify this product, apart from voiding the warranty, is extremely
dangerous.
- To ensure the eciency and proper operation of this product, it is vital to follow the instructions
in this manual, particularly with regard to maintenance and cleaning.
- Do not attempt to repair it yourself. Any work by unqualied persons, apart from being
dangerous, can result in damage to the product. In case of a malfunction, contact your
distributor. It is advisable to always demand original spare parts.
- The machine should not be used in the open air or exposed to the rain.
- This product is not designed for use by persons (including children) with impaired physical,
sensory or mental capacities, or who lack experience or knowledge, except if they have had
supervision or instruction in the use of the device from a person responsible for their safety.
Children should be supervised to ensure that they do not play with the device.
Visually inspect packaging before removing it. In case you see any damage, make the pertinent
report to the transport company.
To check whether the machine has been damaged, UNPACK IT IN THE PRESENCE OF THE
HAULIER and make a record—on the delivery receipt or on a separate document—of any damage
that the machine may have suered. Since 1 May 1998, the company has complied with European
regulations on the management of Packaging and Packaging Waste.
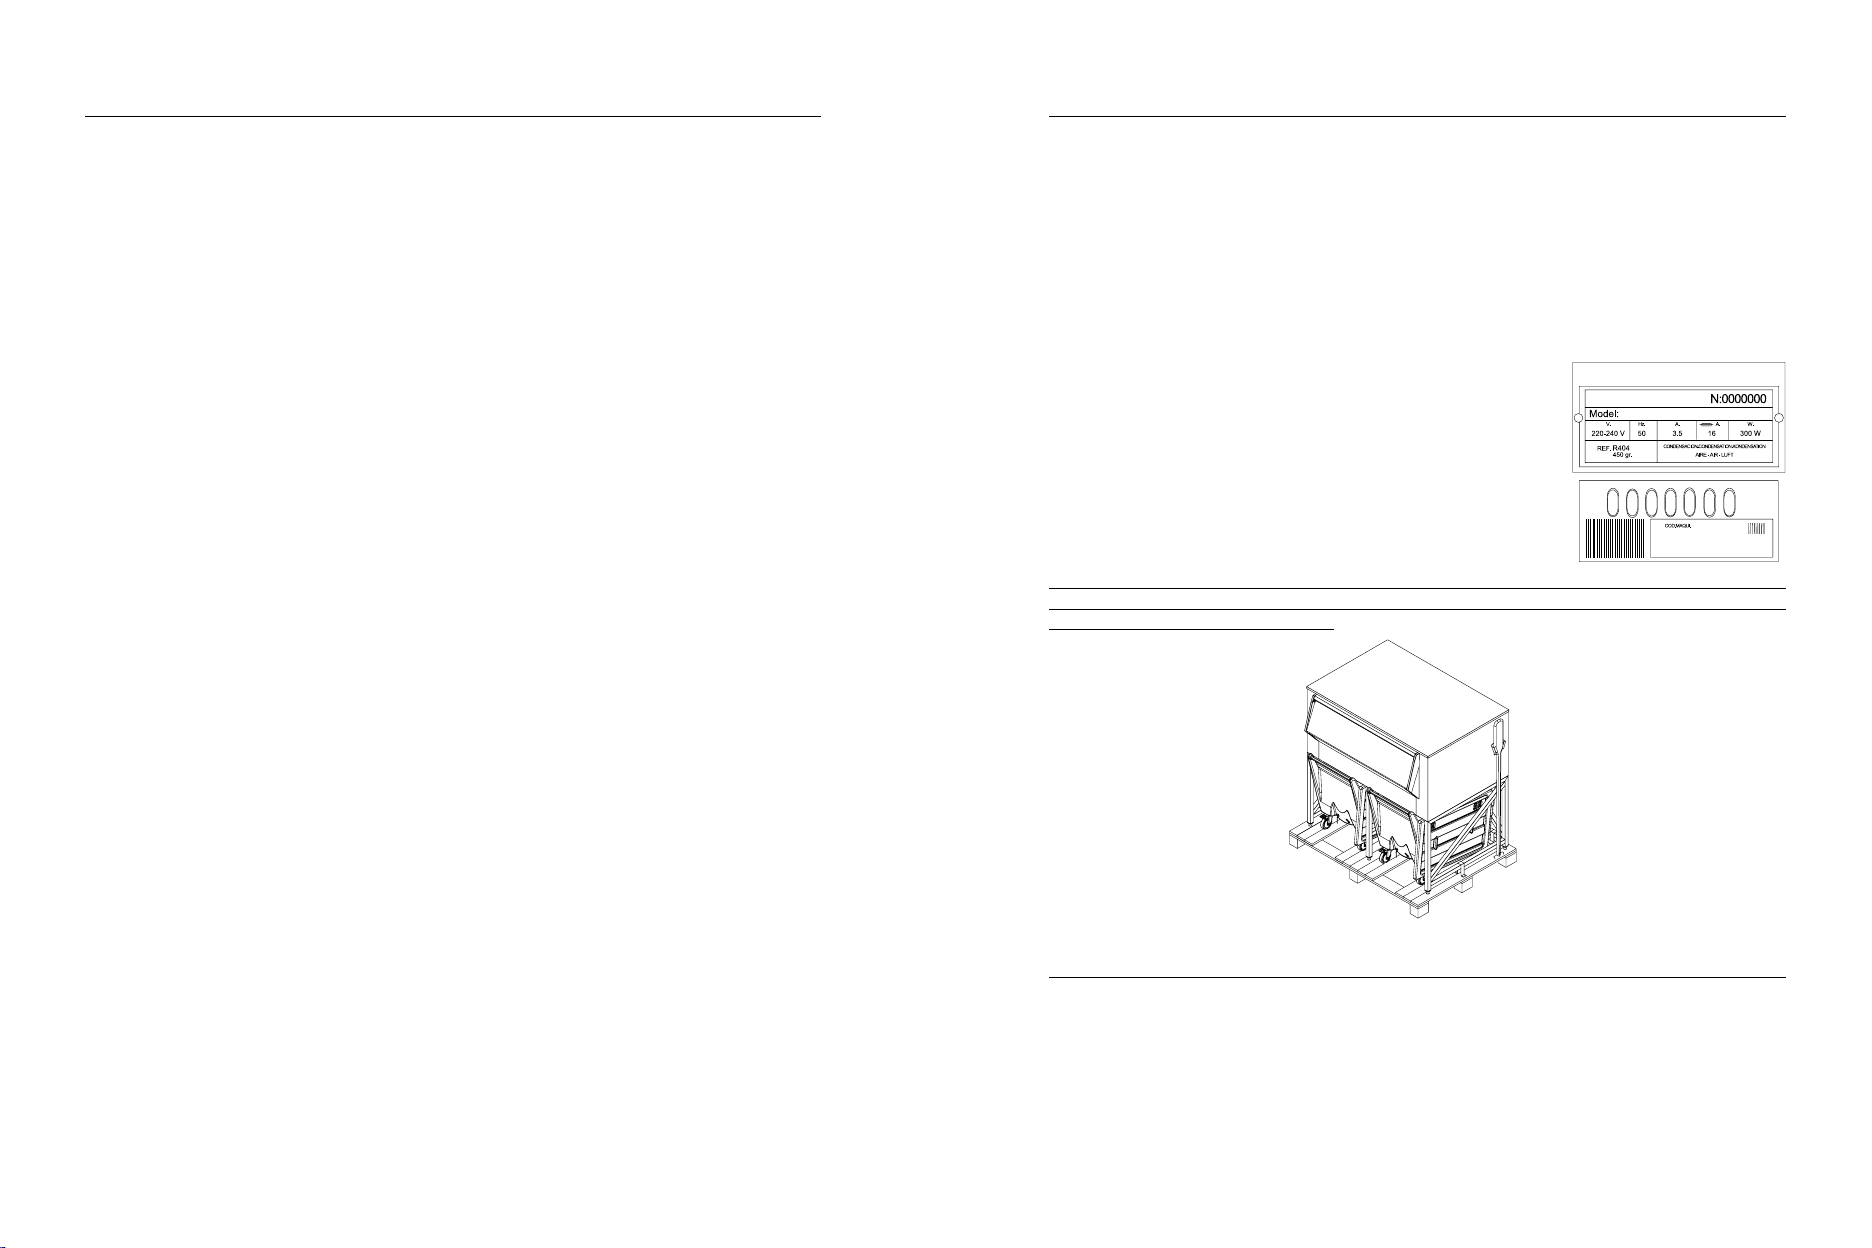
It is important to always record the machine and model number. This number is marked in three
places:
Packaging
There is an external label with the manufacturer’s serial number.
Exterior of the machine
On the back, on a label that is identical to the front.
Name plate
CAUTION: THE PACKAGING ITEMS (plastic bags, cardboard boxes and wooden pallets),
MUST NOT BE LEFT WITHIN REACH OF CHILDREN AS THEY ARE A POTENTIAL SOURCE
OF DANGER.
3| INSTALLATION
3.1 UNPACKING
To unpack the product, it is advisable to follow the steps below:
1. Cut away the plastic packaging.
2. Remove the corner protectors. To do this, cut the straps holding them and take out the ice
paddle found on top of the carts.
English_ICE STORAGE BIN WITH CART_02 English_ICE STORAGE BIN WITH CART_03
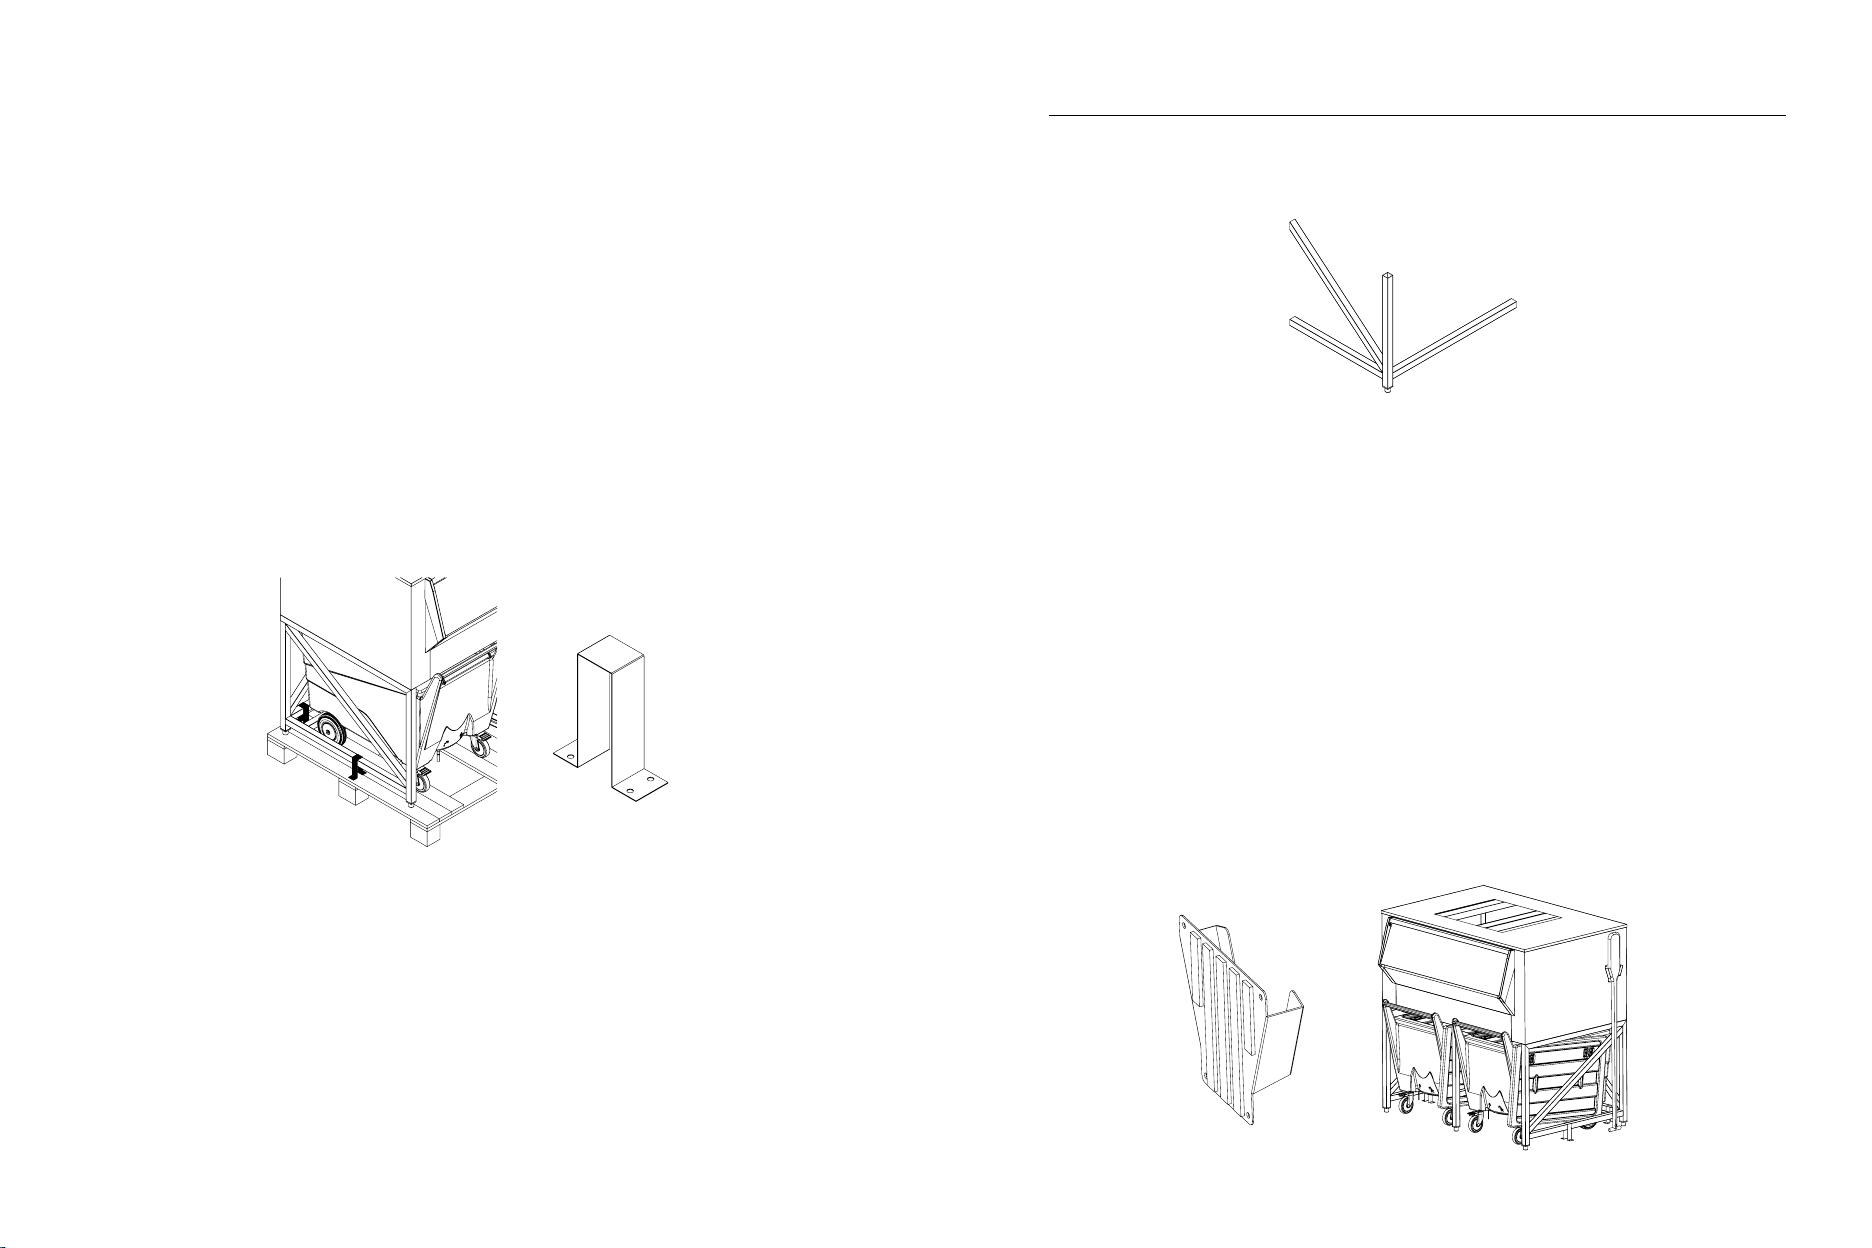
3. Cut the adhesive strips holding the carts, and take out the carts from under the ice storage
bin. The wheels of the cart should have been previously unlocked.
4. Open the lids of the carts and check that there are two bags inside with items within them.
4| START-UP
4.1 LEVELLING THE ICE STORAGE BIN
To level the ice storage bin, use the adjustable legs.
Note: The legs should not exceed a total height of 54 mm.
Note: The items that should be inside the bags are: two ice scoops to get ice, a drain hose
and this manual.
5. Remove the fasteners securing the ice storage bin to the pallet. There is one on each side
and two at the back.
6. Move the ice storage bin o the pallet and put it in its place.
7. Remove the protective plastic lm adhesive from the sheet metal.
Once unpacked, check that all items are present:
- Ice storage bin
- Two carts
- One large ice paddle and two small ice scoops
- Ice paddle holder
- Drain hose
4.2 DRAIN CONNECTION
The connection for the drain hose of the ice storage bin is found at the bottom of the back. The drain
hose found inside the cart should be connected to it.
Place the bent end onto the connection at the bottom of the ice storage bin by force-tting. The
other part will go to an outside drain.
4.3 ICE PADDLE HOLDER ASSE
English_ICE STORAGE BIN WITH CART_04 English_ICE STORAGE BIN WITH CART_05

To attach the ice paddle holder, follow the instructions below:
1. Clean the area where the ice paddle holder will be placed thoroughly. Afterwards, dry this
area properly.
2. Remove the liner from the adhesive tape.
3. Position it in the desired location and press rly.
5| OPERATION
Ice is accumulated inside the ice storage bin, where it is stored until it is taken out. Removal is done
by following the steps below:
Then, place the lid on the side of the ice storage bin as shown below.
1. Position the cart.
2. Break the ice.
3. Load the ice into the cart.
4. Transport the ice.
5. Ice removal.
6. Water removal.
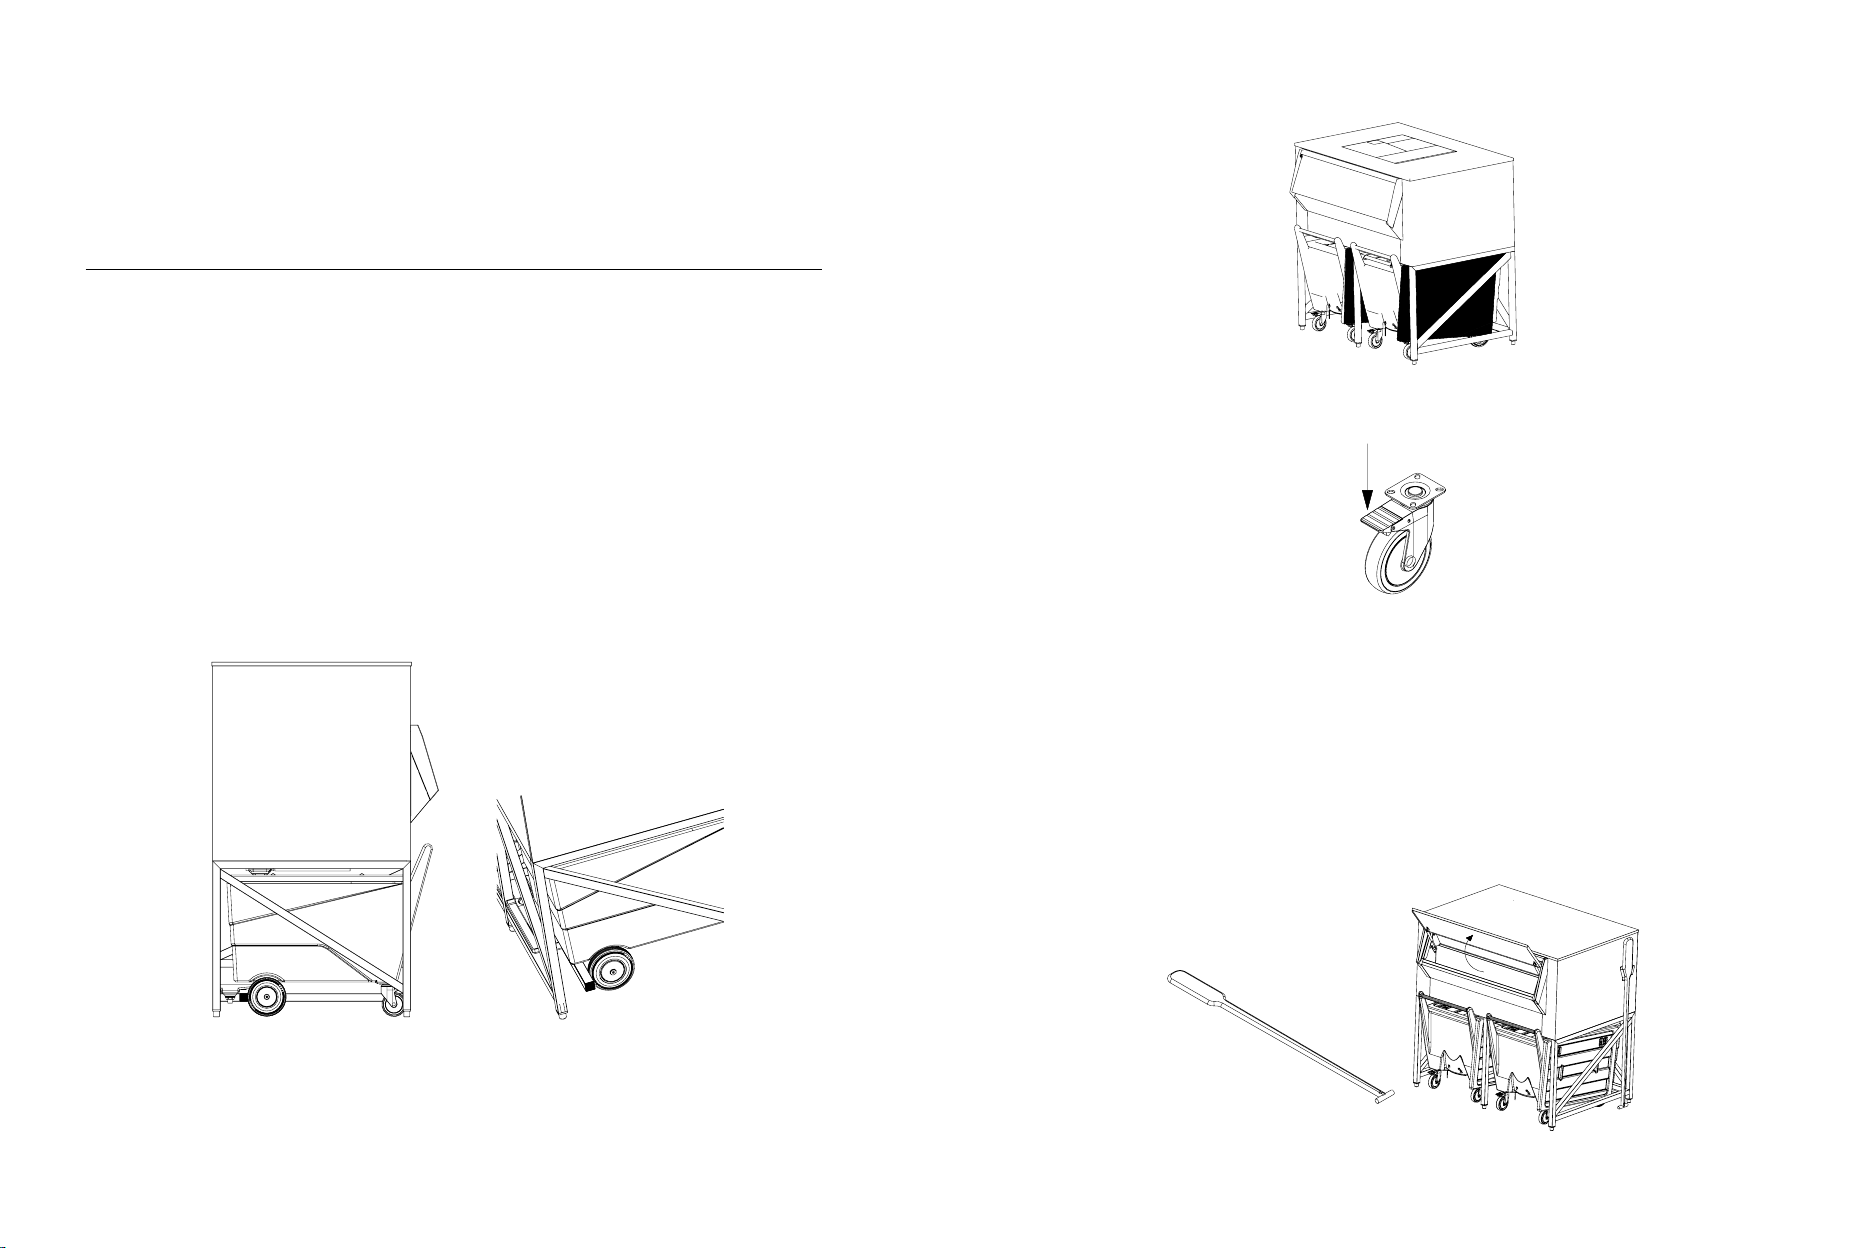
5.1 POSITION THE CART
First, check that the lid has been taken o from the cart.
With the lid o, place the cart under the ice storage bin. Check that the cart is pushed all the way to
the very end. Its front wheels should touch a tube as shown in the gure.
Immediately after, lock the wheels of the cart. To do this, lower the levers on the rear wheels of the
cart. Use your foot to press the levers down.
5.2 BREAK AND POSITION THE ICE
If the ice has been stored for a long time and it becomes compressed, it will be necessary to break
the ice. If there is a small amount of ice left, it will be necessary to position the ice at the door.
1. Break the ice
When the ice has been stored for a certain time, it is possible that it may clump together.
Hit the ice with the ice paddle to shake it loose.
2. Position the ice
When there is only a little ice, it is possible that it is not located at the gate, which means that
when the gate opens, not all the ice will fall out.
Use the long ice paddle to move the ice to the desired location, so that all of it will fall out.
To do this, it is necessary to lift the door in front of the ice storage bin.
English_ICE STORAGE BIN WITH CART_06 English_ICE STORAGE BIN WITH CART_07

5.3 LOAD THE ICE
Once the cart has been placed under the ice storage bin properly, pull the handle of the gate
towards you as far as it will go.
Once the handle has been pulled out as far as possible, ip it up and lean it against the ice storage
bin. The ice will immediately fall into the cart.
Once the cart is full enough, place the gate back in its original position, cutting o access for the ice.
To do this, lower the handle and push the gate back inside as far as it will go.
5.4 TRANSPORT THE ICE
First, we have to close the drain of the cart by pressing the handle that is in the bottom. Then, we
have to remove the brakes on the wheels, lifting them with your foot. In addition, it is necessary to
close o the drain on the cart which is found at the bottom of it, to keep water from leaking out while
the cart is moving.
Pull the cart handle and take out the cart from under the ice storage bin.
buckets that came with the ice storage bin.
5.6 WATER REMOVAL
The cart has a drain to evacuate the water which comes from the ice melt in the cart, to better
preserve the ice.
To empty the cart, it is advisable to place it under the ice storage bin.
Once in place, there is a manual valve at the bottom of the cart. Open this valve to let the water ow
out. The water will go to the lower drain tray of the ice storage bin.
It is recommended to leave the handle in “open” position, i.e., with the drain connected, when ever
the cart is under the bin.
6| MAINTENANCE AND CLEANING
CAUTION: MAINTENANCE AND CLEANING, AS WELL AS MALFUNCTIONS THAT RESULT
FROM NOT CARRYING THEM OUT, ARE NOT COVERED BY THE WARRANTY.
Maintenance and cleaning intervals depend on the conditions of the premises where the machine
is installed, water quality and time of use.
6.1 MAINTENANCE
- To maintain proper hygiene, this ice storage bin needs to be cleaned quarterly both
externally and internally, including the underside of the cover of the bin.
- The cover of the bin has a detachable front part that enables its removal to facilitate access
for interior cleaning.
Place the lid on the cart, to better preserve the ice during transport.
With the lid on, the cart is ready to transport the ice.
5.5 ICE REMOVAL
Once the cart has been placed in the desired location, the ice is taken out using the ice scoop or
English_ICE STORAGE BIN WITH CART_08 English_ICE STORAGE BIN WITH CART_09
- Rinse afterwards with plenty of water. A pressure hose is recommended.
- If maintenance is not performed periodically, a signicant amount of dirt can accumulate in
the bin and even start to cause corrosion.
6.2 CLEANING AND MAINTENANCE OF THE ICE STORAGE BIN INTERIOR
- The ice storage bin interior should be cleaned and disinfected before use, and it should be
cleaned regularly while in use.
- The ice storage bin interior is tted with polyethylene-lined walls, which should be cleaned
and disinfected periodically using a product suitable for food-contact areas.

6.3 CLEANING OF CARTS
ÍNDICE
ES
- The cart interior should be cleaned and disinfected using an approved cleaning product, and
it should be cleaned regularly while in use.
6.4 CLEANING OF STAINLESS STEEL PARTS (BODY AND GATES)
- Stainless steel surfaces can be cleaned using a special stainless steel cleaner.
- Remove the protective plastic lm adhesive for stainless steel equipment immediately. If left
in place, the plastic will crack over time and products and grease—which are damaging to
stainless steel—will accumulate.
- Do not use abrasive cleaners or metal scourers that are NOT SUITABLE for stainless steel.
- When using special stainless steel cleaners, always follow the manufacturer’s instructions,
and rinse o the treated area with plenty of water and dry it o properly.
CLEANING TIPS:
- Keep the ice paddle clean and in good condition to prevent contamination of the ice.
- Do not use metal or abrasive scourers.
- Follow the direction of the polish lines (if any). Making circles with the scourer could damage
the appearance of the surface.
- The formation of limescale, salt or grease deposits, among others, can also cause corrosion.
- Clean regularly. It is easier to remove stains before they dry out. They can attack stainless
steel.
- Keep the use of metal scourers to a minimum and make the use of cloths on glossy surfaces
mandatory.
PRODUCTS THAT MUST NOT COME INTO CONTACT WITH STAINLESS STEEL:
1| INTRODUCCIÓN
1.1 Advertencias
2| RECEPCOIÓN DE LA MÁQUINA
3| INSTALACIÓN
3.1 Desembalaje
4| PUESTA EN MARCHA
4.1 Nivelar el silo
4.2 Conexión del desagüe
4.3 Montaje del soporte para la pala
5| FUNCIONAMIENTO
5.1 Posicionar el carro
5.2 Romper el hielo
5.3 Cargar el hielo en el carro
5.4 Transporte del hielo
5.5 Extracción del hielo
5.6 Extracción del agua
6| MANTENIMIENTO Y LIMPIEZA
6.1 Mantenimiento
6.2 Limpieza y mantenimiento del interior del silo
6.3 Limpieza de los carros
6.4 Limpieza de las partes de acero inoxidable (carrocería y tajaderas)
ESTE MANUAL FORMA PARTE DEL PRODUCTO. LEA DETENIDAMENTE ESTE
DOCUMENTO PARA UN CORRECTO USO Y MANTENIMIENTO DEL EQUIPO.
ES IMPORTANTE SU CONSERVACIÓN PARA POSIBLES CONSULTAS
POSTERIORES.
- Concentrated and/or hot bleach.
- Concentrated or hot disinfectants.
- Hydrochloric acid (descaling of tiles) despite being diluted or cold.
- Steel brushes or metal scourers, particularly those made of stainless steel.
- Any other product that attacks steel or the plastic of the interior.
Español_SILO CON CARRO_11English_ICE STORAGE BIN WITH CART_10
1| INTRODUCCIÓN
2| RECEPCIÓN DE LA MÁQUINA
En el presente documento se describirá el proceso de instalación del silo para el almacenamiento
de hielo y reparto sin esfuerzo.
Los modelos que cumplen con las instrucciones de este manual son los silos con carro.
Estos almacenes son compatibles con nuestras máquinas de hielo, y sirven para todo tipo de hielo.
La misión del silo con carros es almacenar la producción de hielo para satisfacer la necesidad del
local de una forma fácil y ergonómica para los usuarios.
Para mejorar y facilitar el transporte de hielo, se han incorporado carros. Esto hace que el usuario
pueda transportar con comodidad y con el mínimo esfuerzo el hielo hasta el lugar deseado.
1.1 ADVERTENCIAS
- Antes de su instalación y funcionamiento lea y siga detalladamente el manual para asegurarse
una correcta instalación y buen funcionamiento.
- Es importante la conservación del documento para posibles consultas posteriores.
- Cualquier utilización del producto que no sea para almacén y transporte de hielo será
considerada como inadecuado.
- Modicar o tratar de modicar este producto, además de anular cualquier tipo de garantía, es
extremadamente peligroso.
- Para garantizar la eciencia de este producto y su correcto funcionamiento, es imprescindible
ceñirse a las indicaciones del manual, sobre todo en lo que concierne a las operaciones de
mantenimiento y limpieza.
- No tratar de repararlo por uno mismo. La intervención de personas no cualicadas, además
de ser peligrosa, pueda causar desperfectos al producto. En caso de avería, contactar con
su distribuidor. Se recomienda exigir siempre repuestos originales.
- No debe ser utilizado al aire libre ni expuesto a la lluvia.
- Este producto no está destinado para ser utilizado por personas (incluidos niños) cuyas
capacidades físicas, sensoriales o mentales estén reducidas, o carezcan de experiencia o
conocimiento, salvo si han tenido supervisión o instrucciones relativas al uso del aparato
por una persona responsable de su seguridad. Los niños deberían ser supervisados para
asegurar que no juegan con el aparato.
Inspeccionar visualmente el embalaje antes de quitarlo, en caso de apreciar cualquier desperfecto
realizar la oportuna reclamación a la agencia de transporte.
Desembalar la máquina en PRESENCIA DEL TRANSPORTISTA, si se aprecia el mínimo daño en
el producto, hay que noticarlo en el documento de recepción del producto y comunicar el daño
al servicio técnico (SERVICE) de la compañía. Además, en el documento de recepción, o en un
escrito aparte, dejar constancia de los daños que pueda tener el producto.
Importante hacer constar siempre el número de la máquina y modelo. Este número está impreso
en tres lugares:
Embalaje
Exteriormente lleva una etiqueta con el número de fabricación.
Exterior aparato
En la parte trasera, en una etiqueta igual a la anterio.
Placa de características
ATENCIÓN: TODOS LOS ELEMENTOS DEL EMBALAJE (bolsas de plástico, cajas de cartón
y palets de madera), NO DEBEN SER DEJADOS AL ALCANCE DE LOS NIÑOS POR SER UNA
POTENCIAL FUENTE DE PELIGRO.
3| INSTALACIÓN
3.1 DESEMBALAJE
Para desembalar el producto se recomienda seguir los siguientes pasos:
1. Cortar los plásticos de embalaje.
2. Quitar las cantoneras de protección, para ello corte las cintas que las sujetan y quitar la
pala de la parte superior de los carros.
Español_SILO CON CARRO_12 Español_SILO CON CARRO_13

3. Cortar las cintas adhesivas que sujetan los carros, y retirar los carros de debajo del silo,
anteriormente, desbloquear las ruedas del carro.
4. Abrir las tapas de los carros y comprobar que existen dos bolsas en el interior con
componentes dentro.
4| PUESTA EN MARCHA
4.1 NIVELAR EL SILO
Para nivelar el silo se utilizan las patas regulables.
Nota: Las patas no deben sobrepasar una altura total de 54mm.
Nota: Los componentes que deben estar en las bolsas son: dos palas para extraer el hielo,
un tubo de desagüe y este manual.
5. Quitar sujeción del silo con el pallet. Hay uno en cada uno de los laterales y dos en la parte
trasera.
6. Desplazar el silo fuera del pallet y colocarlo en su lugar.
7. Quitar las protecciones de las chapas.
Una vez desembalado, comprobar que existen todos los componentes:
- Silo
- Dos carros
- Una pala grande y dos pequeñas
- Soporte de la pala
- Tubo desagüe
4.2 CONEXIÓN DEL DESAGÜE
En la parte inferior trasera del silo se encuentra la conexión del tubo de desagüe del silo. En ella
hay que conectar el tubo que desagüe que había dentro de un carro.
Colocar la parte acodada en la conexión del inferior del silo a presión. La otra parte irá a un
desagüe exterior.
4.3 MONTAJE SOPORTE PALA
Español_SILO CON CARRO_14 Español_SILO CON CARRO_15
Para jar el soporte de la pala se han de seguir las siguientes instrucciones:
1. Limpiar bien la zona donde va a ser colocada la pala, posteriormente secar esta zona.
2. Retirar el protector de la cinta adhesiva.
3. Posicionar en la zona deseada y presionar.
5| FUNCIONAMIENTO
El hielo se acumula en el silo, donde permanecerá almacenado hasta que se produzca la extracción.
La extracción se realiza siguiendo la siguiente secuencia:
1. Posicionar el carro.
2. Romper el hielo.
3. Cargar el hielo en el carro.
4. Transporte del hielo.
5. Extracción del hielo.
6. Extracción del agua.
5.1 POSICIONAR EL CARRO
Primeramente, se comprueba que en el carro esté la tapa quitada.
Posteriormente, colocar la tapa en el lateral del silo como se muestra en la siguiente gura.
Acto seguido, bloquear las ruedas del carro. Para ello, hay que bajar las palancas de las ruedas
traseras del carro, utilizar los pies para bajar las palancas.
Con la tapa quitada, colocar el carrito debajo del silo. Comprobar que el carro hace tope con el
fondo. Las ruedas delanteras tocarán con un tubo como se muestra en la imagen.
5.2 ROMPER Y POSICIONAR EL HIELO
Este paso no tiene por qué ser necesario. Sí que lo es en caso de que el hielo esté acumulado
durante un tiempo. O en caso de quedar poca cantidad de hielo, será necesario posicionar el hielo
en la compuerta.
1. Romper el hielo
Cuando el hielo se encuentra cierto tiempo acumulado, es posible que el hielo se apelmace.
2. Posicionar el hielo
Colocar el hielo en la tajadera. Cuando quede poco hielo puede que este no esté situado
en la tajadera, esto que cuando se abra la tajadera no caería todo el hielo. Para que caiga
todo se utiliza la pala larga ubicando el hielo en la zona deseada.
Para estas dos acciones, es necesario subir la puerta del frente del silo.
Español_SILO CON CARRO_16 Español_SILO CON CARRO_17
 Loading...