

Page 1
BACK TO FRONT PAGE
ISUZU KB P190 2007
ISUZU
KB P190
MY 2007
WORKSHOP
REPAIR MANUAL
MAIN INDEX
CONTENTS
GE
NERAL INFORMATION 0
HEATING AND VENTILATION
FRAME AND CAB
STEERING
WHEELS AND TYRES
AXLE
BRAKES
ENGINE
TRANSMISSION
BODY
RESTRAINTS 9
CAB 10
2
SUSPENSION
1
3
4
5
6
7
8
SECURITY 11
Page 2

BACK TO MAIN INDEX
ISUZU KB P190 2007
TO MODEL INDEX
SECTION 0
GENERAL INFORMATION 0-1
GENERAL INFORMATION
TABLE OF CONTENTS
PAGE
Section 0A General Informantion ...........................................................................................3
Section 0B Maintainance and Lubrication...............................................................................19
Page 3

BACK TO CHAPTER INDEX
ISUZU KB P190 2007
TO MODEL INDEX
GENERAL INFORMATION 0A-1
SECTION 0A
GENERAL INFORMATION
TABLE OF CONTENTS
General Repair Instructions ........................................................................................... 0A- 2
Notes on the Format of this Manual............................................................................... 0A- 3
Identification.................................................................................................................... 0A- 6
Lifting Instructions.......................................................................................................... 0A- 7
Conversion Table ............................................................................................................ 0A- 9
PAGE
Page 4

BACK TO CHAPTER INDEX
0A-2 GENERAL INFORMATION
1. Park the vehicle on level ground and chock the front or rear wheels before lifting the vehicle.
2. Raise the vehicle with a jack set against the axle or the frame.
3. Support the vehicle on chassis stands.
4. Use covers on the vehicle body, seats, and floor to prevent damage and/or contamination.
5. Disconnect the grounding cable from the battery before performing service operations.
This will prevent cable damage or burning due to short circuiting.
6. Handle brake fluid and antifreeze solution with great care.
Spilling these liquids on painted surfaces will damage the paint.
7. The use of the proper tool(s) and special tool(s) where specified is essential to efficient, reliable, and safe
service operations.
8. Always use genuine ISUZU replacement parts.
9. Discard used cotter pins, gaskets, O-rings, oil seals, lock washers, and self-locking nuts at disassembly.
Normal function of these parts cannot be guaranteed if they are reused.
10. Prepare new cotter pins, gaskets, O-rings, oil seals, lock washers, and self-locking nuts for installation.
11. Keep the disassembled parts neatly in groups.
This will facilitate smooth and correct reassembly.
12. Keep fixing nuts and bolts separate.
Fixing nuts and bolts vary in hardness and design according to installation position.
13. Clean all parts before inspection or reassembly.
14. Clean the oil ports and other openings with compressed air to make certain that they are free from dirt and
obstructions.
15. Lubricate the rotating and sliding faces of all moving parts with oil or grease before installation.
16. Use the recommended liquid gasket to prevent leakage.
17. Carefully observe all nut and bolt torque specifications.
18. When rem oving or replacing parts that r equire refriger ant to the discharged f rom the air conditioning system, be
sure to use the Vehicle Refrigerant Recovery and Recycling Equipment (VRRRE) to recover and recycle R134a,
to promote the aim of the protection of the ozone layer covering the earth.
19. Check and recheck your work. No service operation is complete until you have done this.
ISUZU KB P190 2007
TO MODEL INDEX
GENERAL REPAIR INSTRUCTIONS
Page 5
BACK TO CHAPTER INDEX
1. Find the applicable section by referring to the index at the front of the Workshop Manual binder.
2. The following technical service information is included in this Section:
• Identification
• Maintenance schedules
• Recommended Iubricants
• Recommended fuels
• Oil viscosity charts
3. Individual sections of this Workshop Manual are divided into the following categories:
• Main data and specifications
• Torque specifications
• Recommended liquid gasket
• Loctite application procedure
• Servicing
• Removal and installation
• Disassembly
• Inspection and repair
• Reassembly
• Troubleshooting
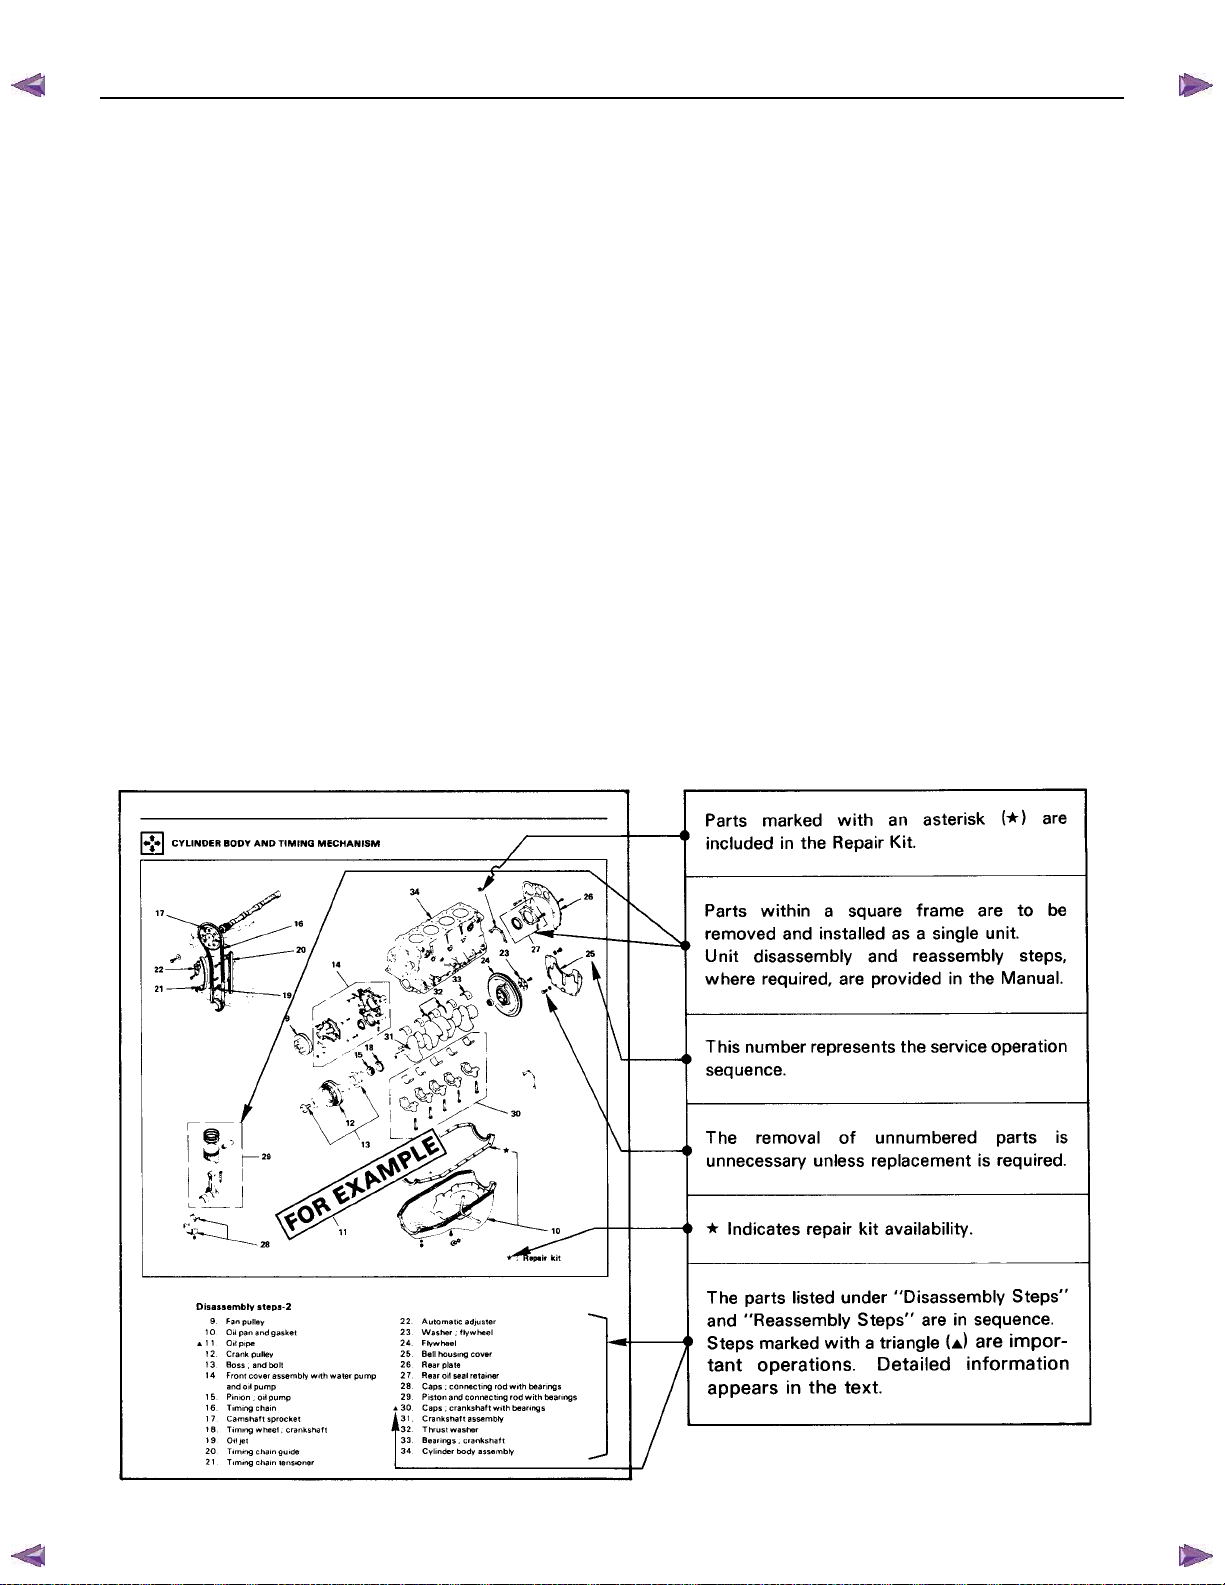
4. Each "Major Components" page of this Workshop Manual has an exploded view of the applicable area.
A brief explanation of the notation used follows:
ISUZU KB P190 2007
TO MODEL INDEX
GENERAL INFORMATION 0A-3
NOTES ON THE FORMAT OF THIS MANUAL
Page 6
BACK TO CHAPTER INDEX
0A-4 GENERAL INFORMATION
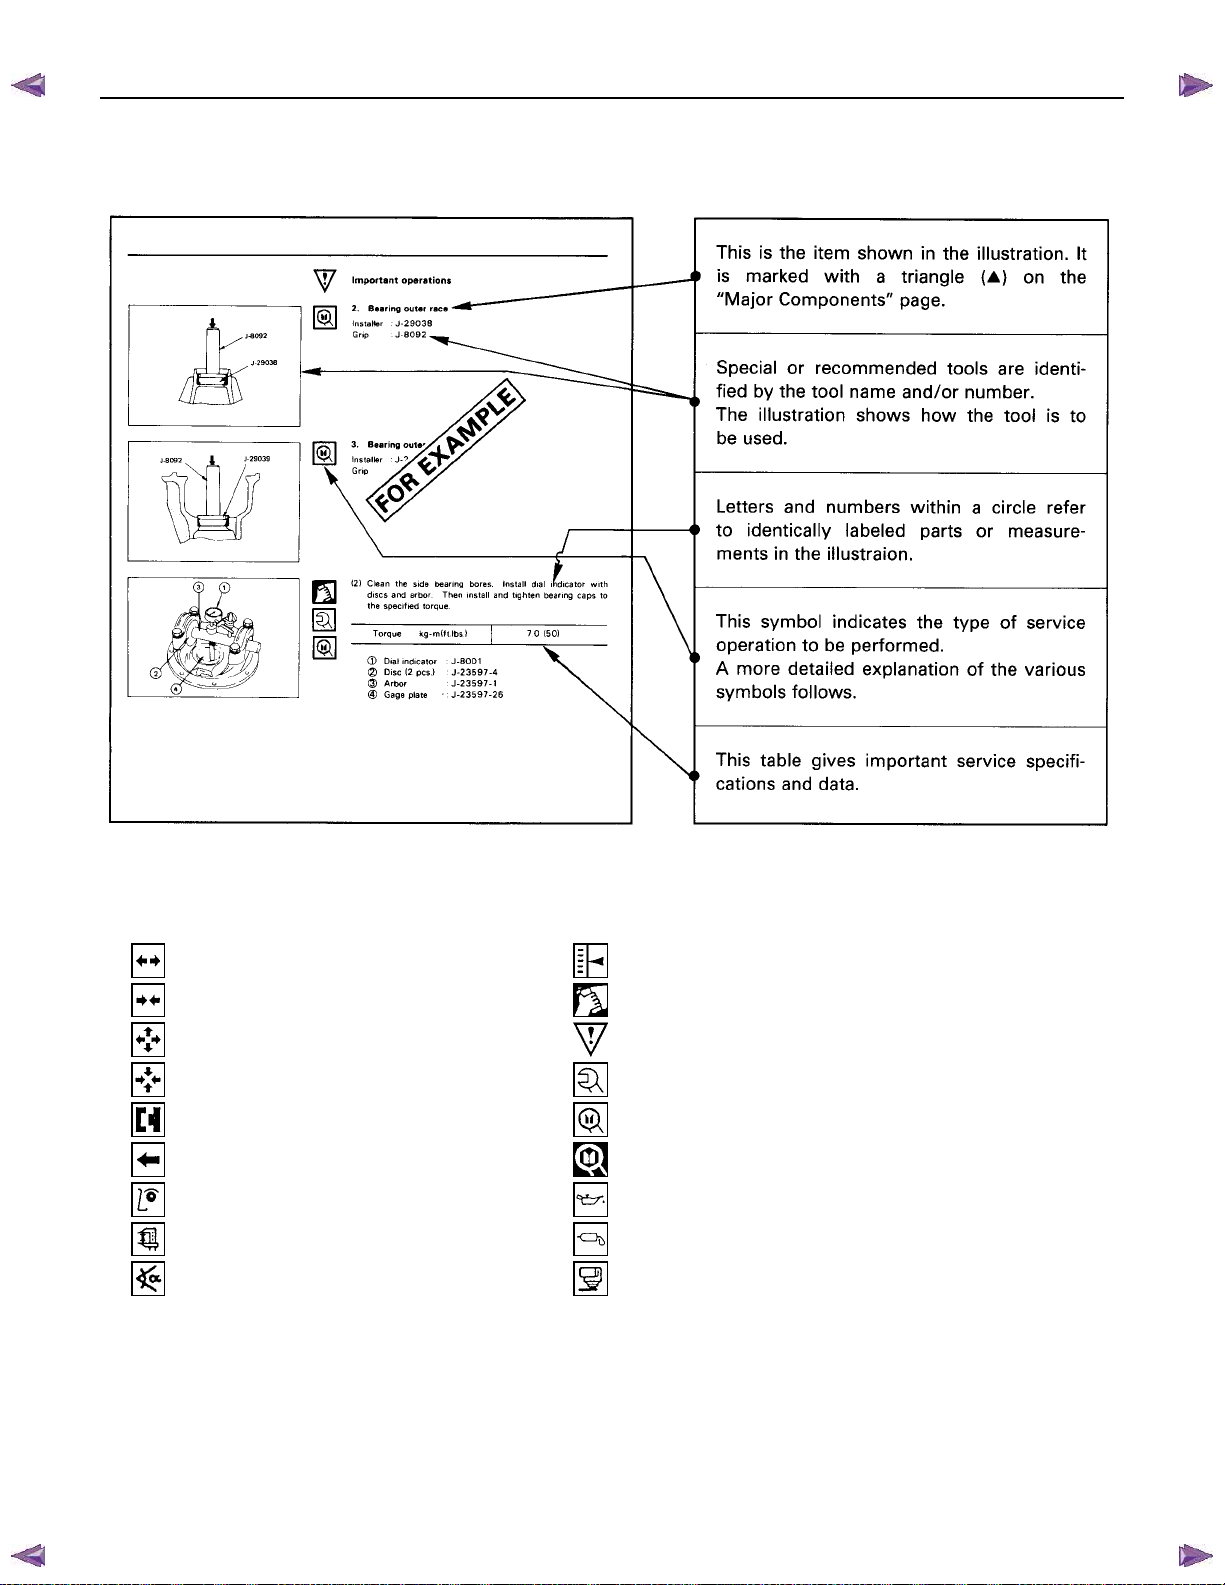
5. Below is a sample of the Workshop Manual text following the " Major Components " page.
A brief explanation of the notation used follows:
ISUZU KB P190 2007
TO MODEL INDEX
6. The following symbols appear throughout the Workshop Manual.
They tell you at a glance the type of service operation to perform.
........
Removal
........
Installation
........
Disassembly
........
Reassembly
........
Alignment
........
Directional indication
........
Inspection
........
Measurement
........ Torque angle method
........
Adjustment
........
Cleaning
........
Important operation requiring extra care
........
Specified torque
........
ISUZU special tool(s) required or recommended
........
Other special tool(s) required or recommended
........
Lubrication (Oil)
........
Lubrication (Grease)
........
Liquid gasket application
Page 7

BACK TO CHAPTER INDEX
7. Measurement criteria are defined by the terms "standard" and "limit".
A measurement falling within the "standard" range indicates that the applicable part or parts are serviceable.
"Limit" is an absolute value.
A measurement falling outside the "limit" indicates that the applicable part or parts must be repaired or replaced.
8. Components and parts are listed in the singular form throughout the Workshop Manual.
9. The following directional criteria are used throughout the Workshop Manual:
Front:
The cooling fan side of the engine.
Right:
The right-hand side of the engine viewed from the flywheel.
Left:
The left-hand side of the engine viewed from the flywheel.
Rear:
The flywheel side of the engine.
Cylinder numbers are counted from the front of the engine towards the rear.
The engine's rotation is clockwise viewed from the front of the engine.
ISUZU KB P190 2007
TO MODEL INDEX
GENERAL INFORMATION 0A-5
Page 8
BACK TO CHAPTER INDEX
0A-6 GENERAL INFORMATION
ISUZU KB P190 2007
TO MODEL INDEX
IDENTIFICATION
RTW50ASH000201
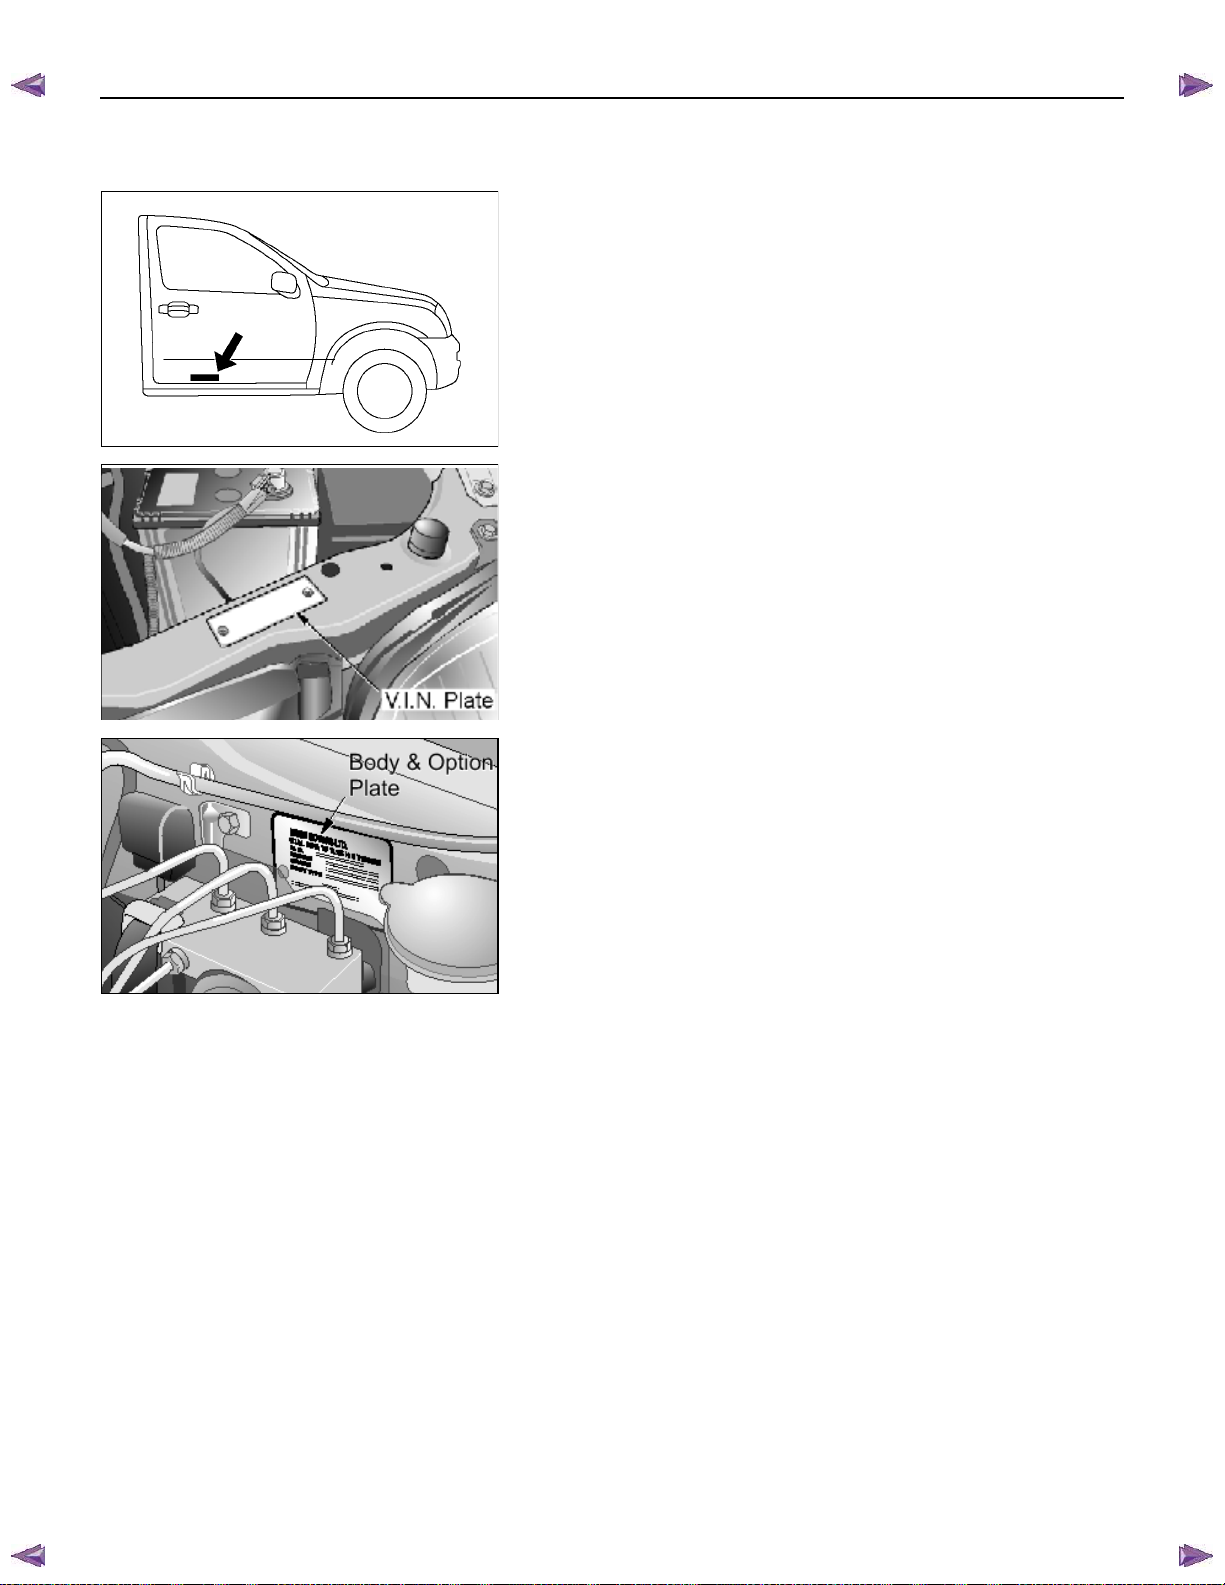
CHASSIS NUMBER
The chassis number is stamped on the right-hand side of the
chassis side member under the right door.
VEHICLE IDENTIFICATION PLATE
The vehicle identification plate is attached to the upper face of
the radiator sill in the engine compartment.
BODY AND OPTION IDENTIFICATION
PLATE
The body and option plate shows body style, body serial
number, paint and trim colour combination, paint number,
engine transmissions, axle ratio options and built date. The
built date is defined as 'the date of manufacture' by the
calendar month and year in which the body shell and power
train sub-assemblies are co-joined or moved from the
production line.
Page 9
BACK TO CHAPTER INDEX
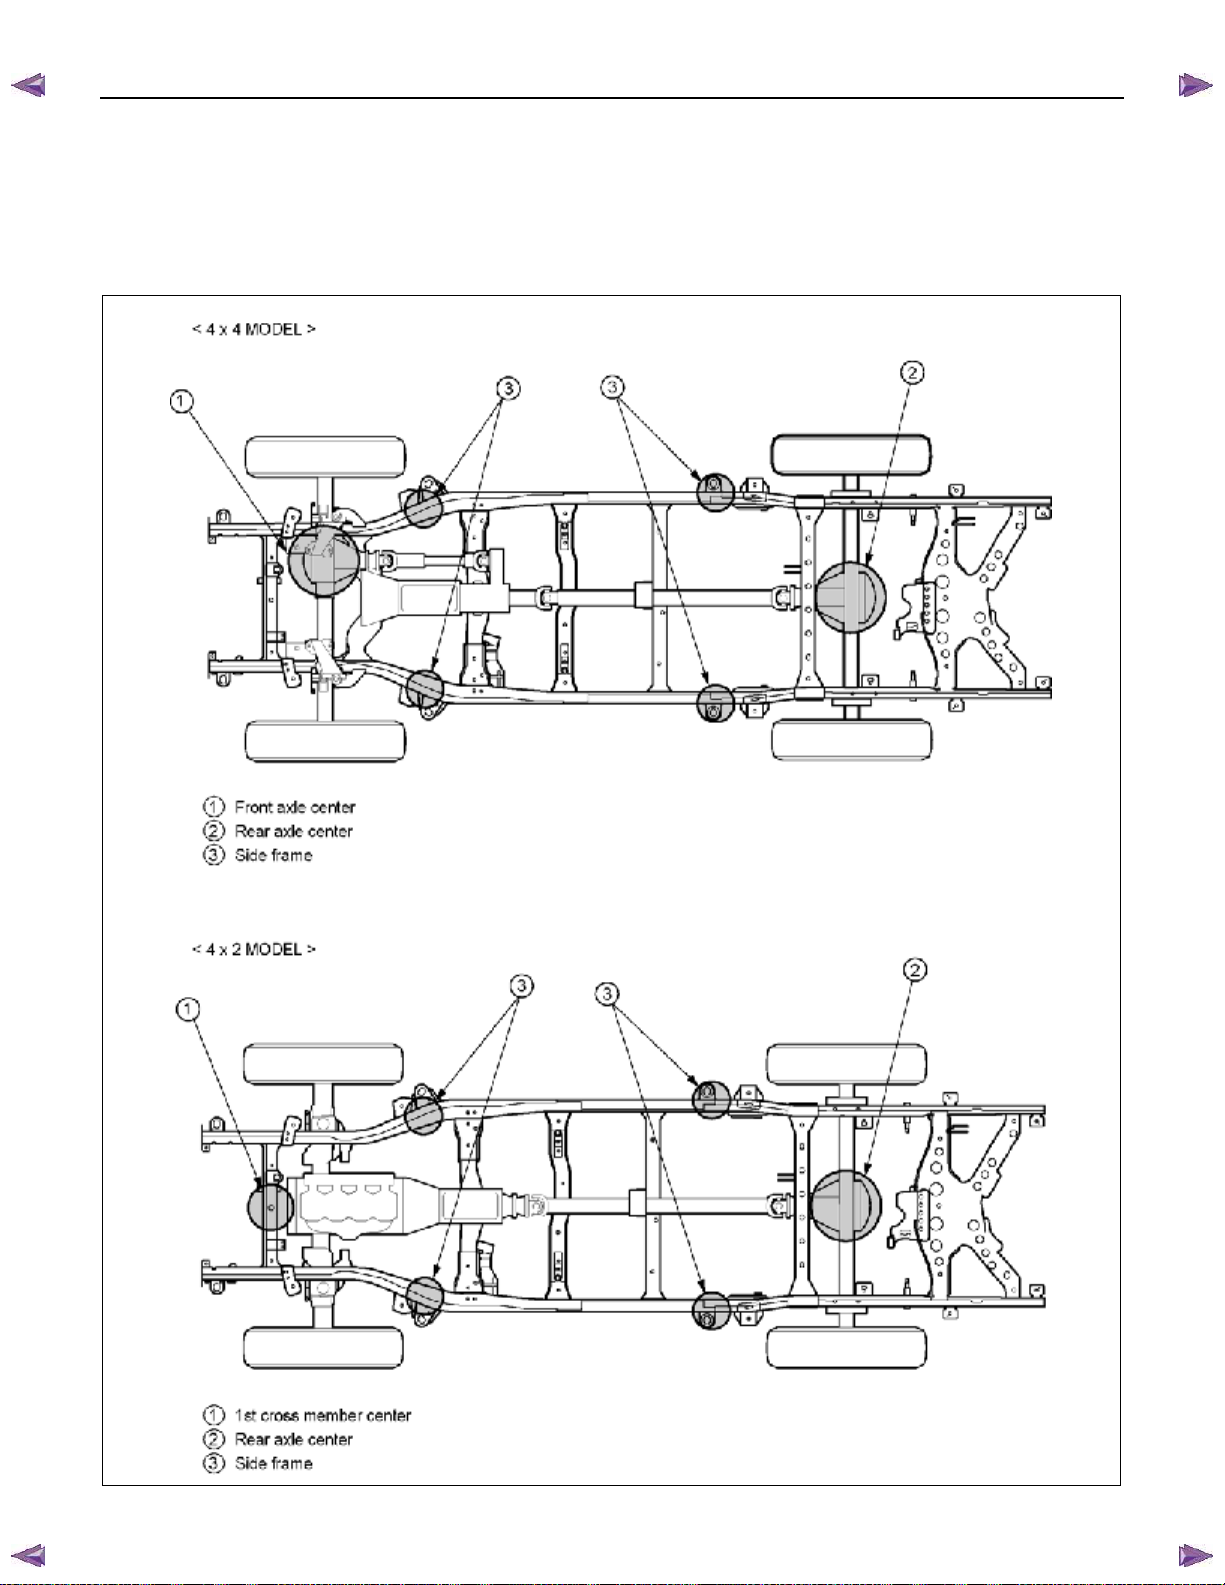
If a lifting device other than the original jack is used, it is most important that the device be applied only to the
correct lifting points. (See the illustration.) Raising the vehicle from any other point may result in serious damage.
Lifting Points and Supportable Point-Locations
ISUZU KB P190 2007
TO MODEL INDEX
GENERAL INFORMATION 0A-7
LIFTING INSTRUCTIONS
RTW50AXF000201
Page 10
BACK TO CHAPTER INDEX
0A-8 GENERAL INFORMATION
ISUZU KB P190 2007
TO MODEL INDEX
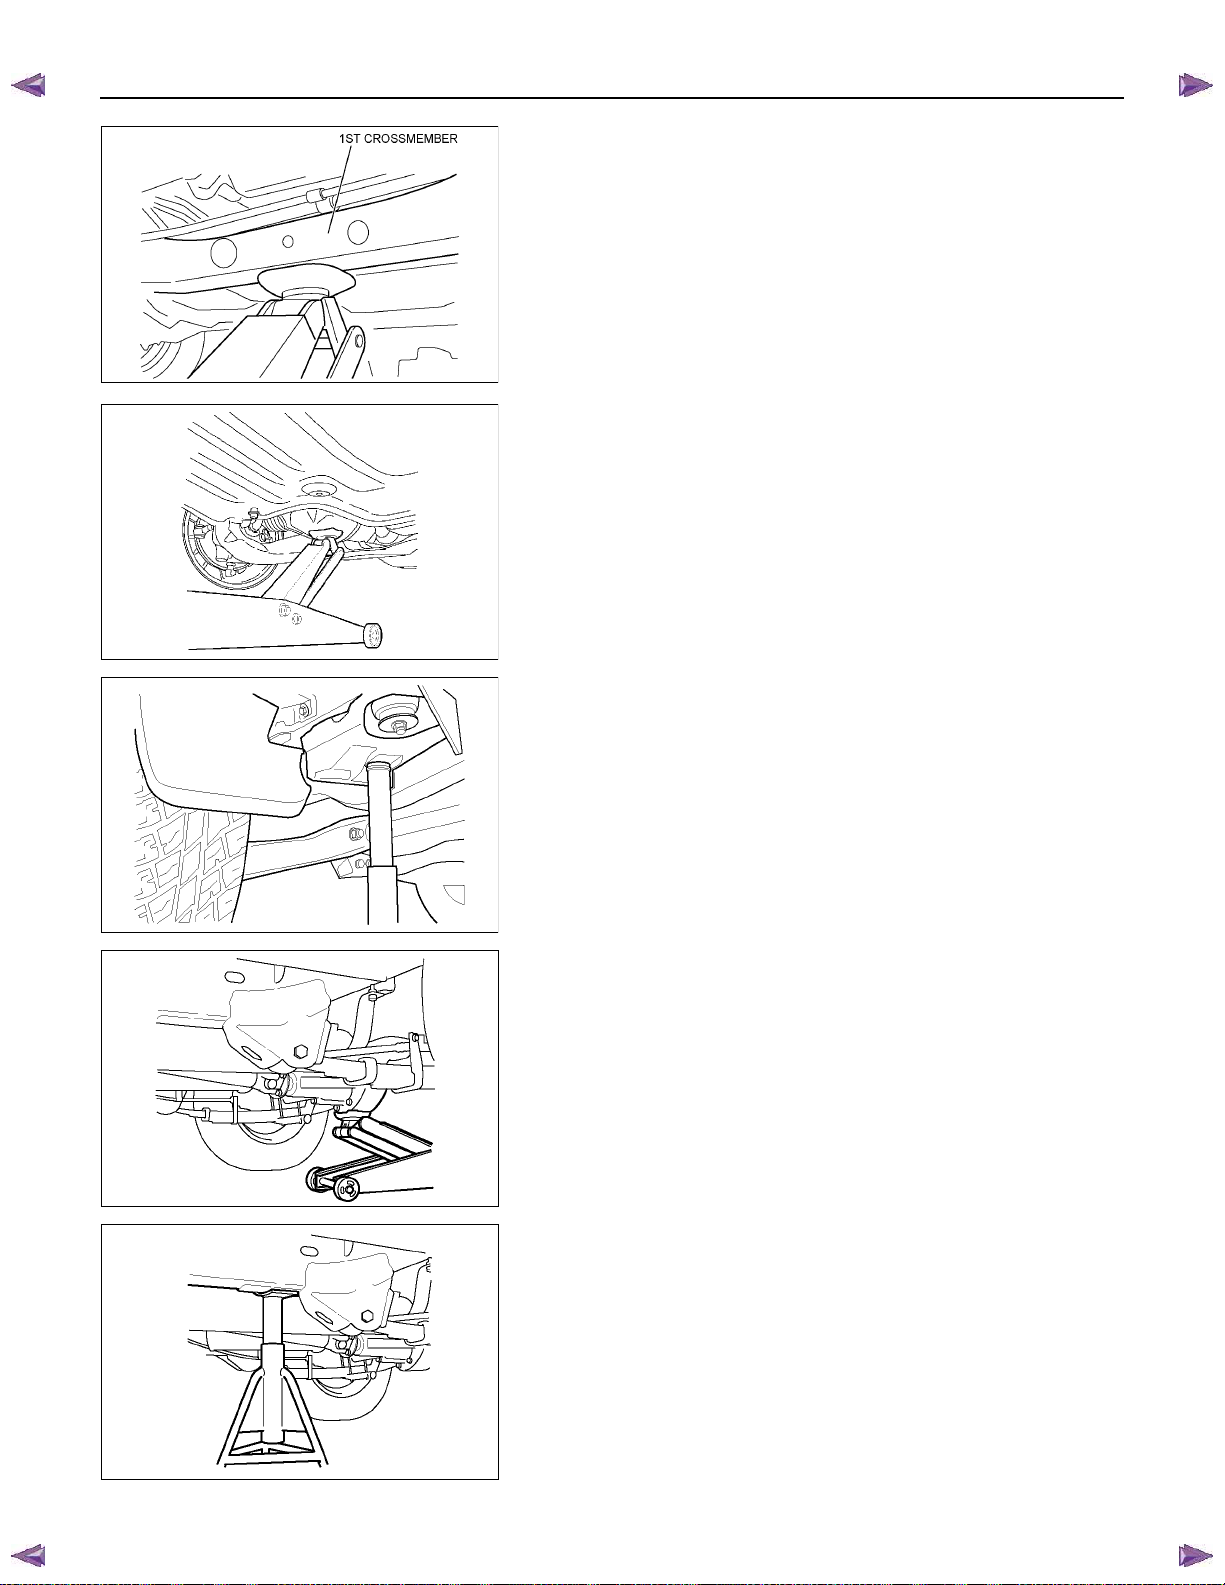
LIFTING POINT; FRONT
4××××2 model
• When using floor jack, lift the center of 1st cross member.
RUW50ASH000101
RTW60ASH000101
4××××4 model
• When using floor jack, lift the center of front axle case.
SUPPORTABLE POINT; FRONT
• Position the chassis stands at the bottom of the frame side
member, backward of front wheel.
RTW60ASH000201
LIFTING POINT; REAR
• When using floor jack, lift the center of rear axle case.
RTW30ASH000101
SUPPORTABLE POINT; REAR
• Position the chassis stands at the bottom of the frame side
member, forward of the rear wheel.
RTW30ASH000201
Page 11
BACK TO CHAPTER INDEX
Length .............................................................................................................................. 0A-10
Area .................................................................................................................................. 0A-11
Volume ............................................................................................................................. 0A-12
Mass ................................................................................................................................. 0A-13
Pressure........................................................................................................................... 0A-14
ISUZU KB P190 2007
TO MODEL INDEX
GENERAL INFORMATION 0A-9
CONVERSION TABLE
TABLE OF CONTENTS
PAGE
Torque .............................................................................................................................. 0A-15
Temperature..................................................................................................................... 0A-16
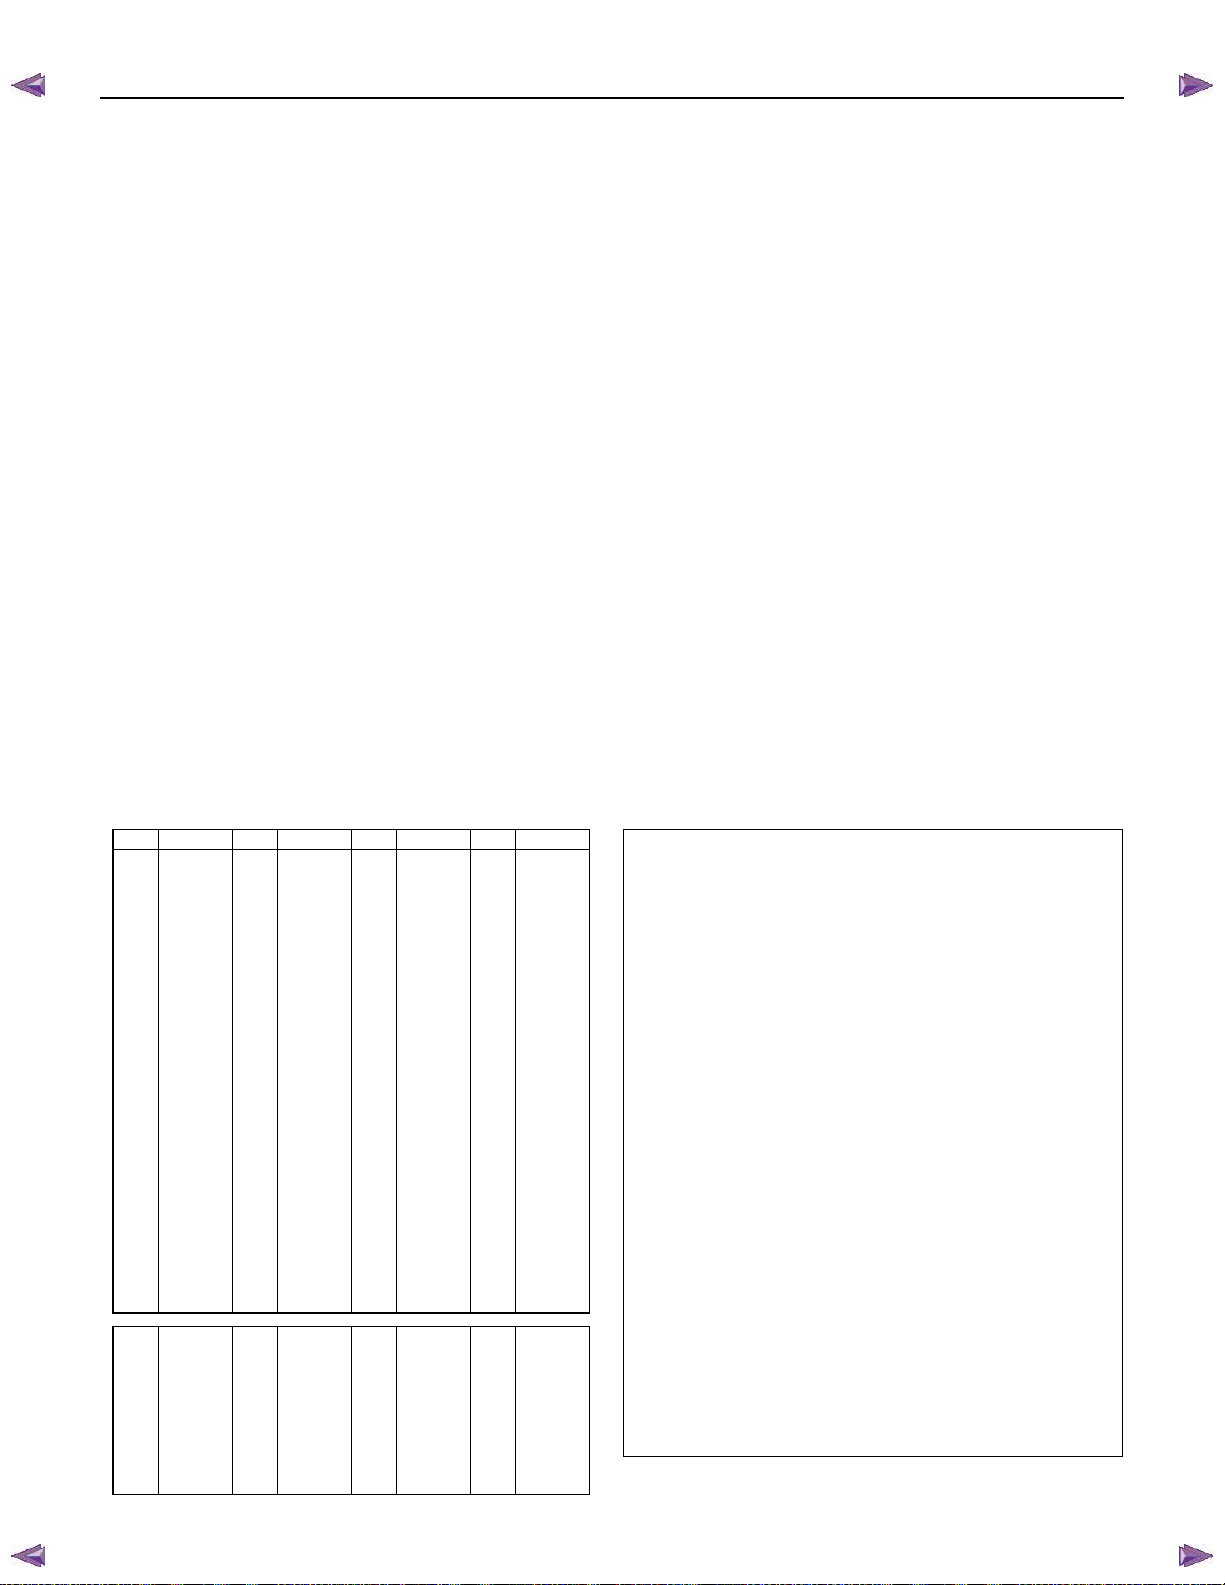
LENGTH
MILLIMETERS TO INCHES
mm in. mm in. mm in. mm in.
1 0.0394 26 1.0236 51 2.0079 76 2.9921
2 0.0787 27 1.0630 52 2.0472 77 3.0315
3 0.1181 28 1.1024 53 2.0866 78 3.0709
4 0.1575 29 1.1417 54 2.1260 79 3.1102
5 0.1969 30 1.1811 55 2.1654 80 3.1496
6 0.2362 31 1.2205 56 2.2047 81 3.1890
7 0.2756 32 1.2598 57 2.2441 82 3.2283
8 0.3150 33 1.2992 58 2.2835 83 3.2677
9 0.3543 34 1.3386 59 2.3228 84 3.3071
10 0.3937 35 1.3780 60 2.3622 85 3.3465
11 0.4331 36 1.4173 61 2.4016 86 3.3858
12 0.4724 37 1.4567 62 2.4409 87 3.4252
13 0.5118 38 1.4961 63 2.4803 88 3.4646
14 0.5512 39 1.5354 64 2.5197 89 3.5039
15 0.5906 40 1.5748 65 2.5591 90 3.5433
16 0.6299 41 1.6142 66 2.5984 91 3.5827
17 0.6693 42 1.6535 67 2.6378 92 3.6220
18 0.7087 43 1.6929 68 2.6772 93 3.6614
19 0.7480 44 1.7323 69 2.7165 94 3.7008
20 0.7874 45 1.7717 70 2.7559 95 3.7402
21 0.8268 46 1.8110 71 2.7953 96 3.7795
22 0.8661 47 1.8504 72 2.8346 97 3.8189
23 0.9055 48 1.8898 73 2.8740 98 3.8583
24 0.9449 49 1.9291 74 2.9134 99 3.8976
25 0.9843 50 1.9685 75 2.9528 100 3.9370
101 3.9764 111 4.3701 121 4.7638 131 5.1575
102 4.0157 112 4.4094 122 4.8031 132 5.1968
103 4.0551 113 4.4488 123 4.8425 133 5.2362
104 4.0945 114 4.4882 124 4.8819 134 5.2756
105 4.1339 115 4.5276 125 4.9213 135 5.3150
106 4.1732 116 4.5669 126 4.9606 136 5.3543
107 4.2126 117 4.6063 127 5.0000 137 5.3937
108 4.2520 118 4.6457 128 5.0394 138 5.4331
109 4.2913 119 4.6850 129 5.0787 139 5.4724
1/16
1/8
3/16
1/4
5/16
3/8
7/16
1/2
INCHES TO MILLIMETERS
in. mm in. mm
1/64 0.3969
1/32 0.7938 17/32
3/64 1.1906
5/64 1.9844
3/32 2.3813 19/32
7/64 2.7781
9/64 3.5719
5/32 3.9688 21/32
11/64 4.3656
13/64 5.1594
7/32 5.5563 23/32
15/64 5.9531
17/64 6.7469
9/32 7.1438 25/32
19/64 7.5406
21/64 8.3344
11/32 8.7313 27/32
23/64 9.1281
25/64 9.9219
13/32 10.3188 29/32
27/64 10.7156
29/64 11.5094
15/32 11.9063 31/32
31/64 12.3031
1.5875 9/16
3.1750 5/8
4.7625 11/16
6.3500 3/4
7.9375 13/16
9.5250 7/8
11.1125 15/16
12.7000 1
33/64 13.0969
35/64 13.8906
37/64 14.6844
39/64 15.4781
41/64 16.2719
43/64 17.0656
45/64 17.8594
47/64 18.6531
49/64 19.4469
51/64 20.2406
53/64 21.0344
55/64 21.8281
57/64 22.6219
59/64 23.4156
61/64 24.2094
63/64 25.0031
13.4938
14.2875
15.0813
15.8750
16.6688
17.4625
18.2563
19.0500
19.8438
20.6375
21.4313
22.2250
23.0188
23.8125
24.6063
25.4000
Page 12
BACK TO CHAPTER INDEX
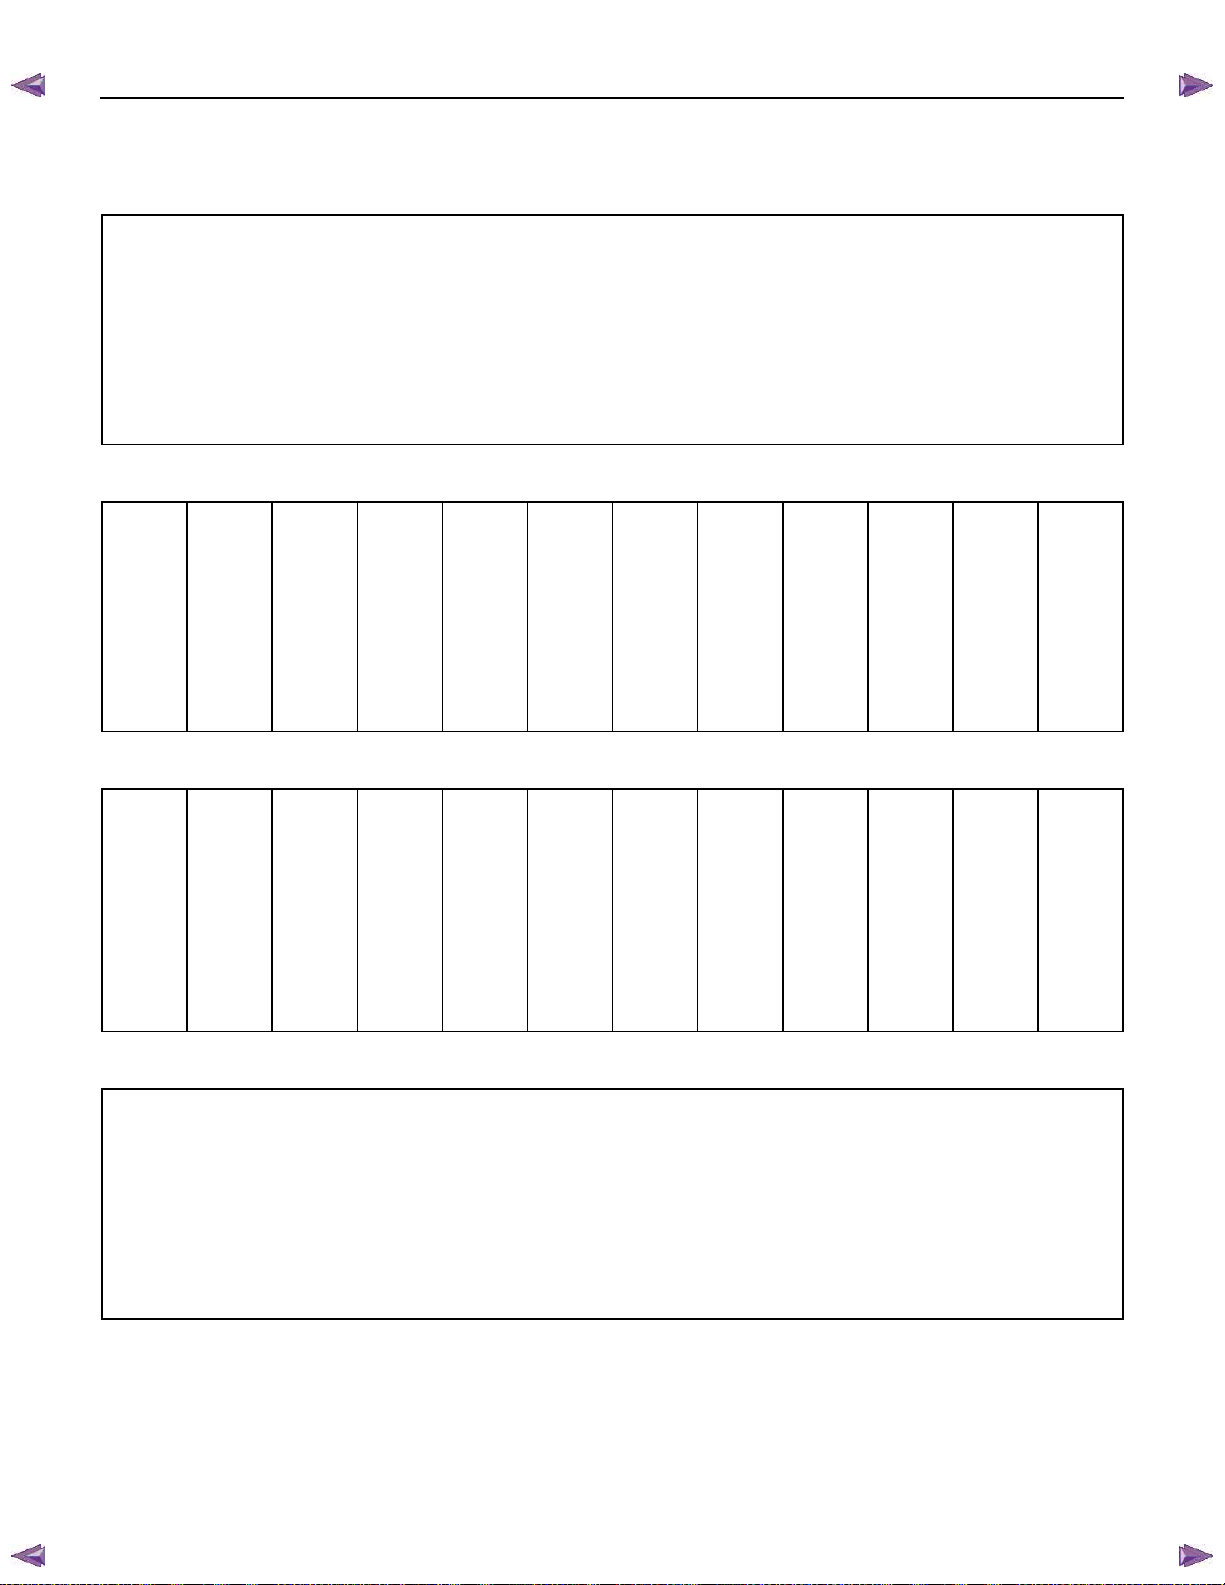
0A-10 GENERAL INFORMATION
ft. 0 1 2 3 4 5 6 7 8 9 ft.
m m m m m m m m m m
- 0.305 0.610 0.914 1.219 1.524 1.829 2.134 2.438 2.743 10 3.048 3.353 3.658 3.962 4.267 4.572 4.877 5.182 5.486 5.791 10
20 6.096 6.401 6.706 7.010 7.315 7.620 7.925 8.230 8.534 8.839 20
30 9.144 9.449 9.754 10.058 10.363 10.668 10.973 11.278 11.582 11.887 30
40 12.192 12.497 12.802 13.106 13.411 13.716 14.021 14.326 14.630 14.935 40
50 15.240 15.545 15.850 16.154 16.459 16.764 17.069 17.374 17.678 17.983 50
60 18.288 18.593 18.898 19.202 19.507 19.812 20.117 20.422 20.726 21.031 60
70 21.336 21.641 21.946 22.250 22.555 22.860 23.165 23.470 23.774 24.079 70
80 24.384 24.689 24.994 25.298 25.603 25.908 26.213 26.518 26.822 27.127 80
90 27.432 27.737 28.042 28.346 28.651 28.956 29.261 29.566 29.870 30.175 90
100 30.480 30.785 31.090 31.394 31.699 32.004 32.309 32.614 32.918 33.223 100
m 0 1 2 3 4 5 6 7 8 9 m
ft. ft. ft. ft. ft. ft. ft. ft. ft. ft.
- 3.2808 6.5617 9.8425 13.1234 16.4042 19.6850 22.9659 26.2467 29.5276 10 32.8084 36.0892 39.3701 42.6509 45.9318 49.2126 52.4934 55.7743 59.0551 62.3360 10
20 65.6168 68.8976 72.1785 75.4593 78.7402 82.0210 85.3018 88.5827 91.8635 95.1444 20
30 98.4252 101.7060 104.9869 108.2677 111.5486 114.8294 118.1102 121.3911 124.6719 127.9528 30
40 131.2336 134.5144 137.7953 141.0761 144.3570 147.6378 150.9186 154.1995 175.4803 160.7612 40
50 164.0420 167.3228 170.6037 173.8845 177.1654 180.4462 183.7270 187.0079 190.2887 193.5696 50
60 196.8504 200.1312 203.4121 206.6929 209.9738 213.2546 216.5354 219.8163 223.0971 226.3780 60
70 229.6588 232.9396 236.2205 239.5013 242.7822 246.0630 249.3438 252.6247 255.9055 259.1864 70
80 262.4672 265.7480 269.0289 272.3097 275.5906 278.8714 282.1522 285.4331 288.7139 291.9948 80
90 295.2756 298.5564 301.8373 305.1181 308.3990 311.6798 314.9606 318.2415 321.5223 324.8032 90
100 328.0840 331.3648 334.6457 337.9265 341.2074 344.4882 347.7690 351.0499 354.3307 357.6116 100
miles 0 1 2 3 4 5 6 7 8 9 miles
10 16.093 17.703 19.312 20.921 22.531 24.140 25.750 27.359 28.968 30.578 10
20 32.187 33.796 35.406 37.015 38.624 40.234 41.843 43.452 45.062 46.671 20
30 48.280 49.890 51.499 53.108 54.718 56.327 57.936 59.546 61.155 62.764 30
40 64.374 65.983 67.592 69.202 70.811 72.420 74.030 75.639 77.249 78.858 40
50 80.467 82.077 83.686 85.295 86.905 88.514 90.123 91.733 93.342 94.951 50
60 96.561 98.170 99.779 101.389 103.000 104.607 106.217 107.826 109.435 111.045 60
70 112.654 114.263 115.873 117.482 119.091 120.700 122.310 123.919 125.529 127.138 70
80 128.748 130.357 131.966 133.576 135.185 136.794 138.404 140.013 141.622 143.232 80
90 144.841 146.450 148.060 149.669 151.278 152.888 154.497 156.106 157.716 159.325 90
100 160.934 162.544 164.153 165.762 167.372 168.981 170.590 172.200 173.809 175.418 100
km km km km km km km km km km
km 0 1 2 3 4 5 6 7 8 9 km
miles miles miles miles miles miles miles miles miles miles
- 0.621 1.243 1.864 2.485 3.107 3.728 4.350 4.971 5.592 10 6.214 6.835 7.456 8.078 8.699 9.321 9.942 10.563 11.185 11.806 10
20 12.427 13.049 13.670 14.292 14.913 15.534 16.156 16.777 17.398 18.020 20
30 18.641 19.262 19.884 20.505 21.127 21.748 22.370 22.990 23.612 24.233 30
40 24.855 25.476 26.098 26.719 27.340 27.962 28.583 29.204 29.826 30.447 40
50 31.065 31.690 32.311 32.933 33.554 34.175 34.797 35.418 36.039 36.661 50
60 37.282 37.904 38.525 39.146 39.768 40.389 41.010 41.632 42.253 42.875 60
70 43.496 44.117 44.739 45.360 45.981 46.603 47.224 47.845 48.467 49.088 70
80 49.711 50.331 50.952 51.574 52.195 52.816 53.438 54.059 54.681 55.302 80
90 55.923 56.545 57.166 57.187 58.409 59.030 59.652 60.273 60.894 61.516 90
100 62.137 62.758 63.390 64.001 64.622 65.244 65.865 66.487 67.108 67.729 100
ISUZU KB P190 2007
TO MODEL INDEX
FEET TO METERS
METERS TO FEET
MILES TO KILOMETERS
1.609 3.219 4.828 6.437 8.047 9.656 11.265 12.875 14.484 -
KILOMETERS TO MILES
Page 13
BACK TO CHAPTER INDEX
in2 0 1 2 3 4 5 6 7 8 9 in2
cm2 cm2 cm2 cm2 cm2 cm2 cm2 cm2 cm2 cm2
- 6.452 12.903 19.355 25.806 32.258 38.710 45.161 51.613 58.064 10 64.516 70.968 77.419 83.871 90.322 96.774 103.226 109.677 116.129 122.580 10
20 129.032 135.484 141.935 148.387 154.838 161.290 167.742 174.193 180.645 187.096 20
30 193.548 200.000 206.451 212.903 219.354 225.806 232.258 238.709 245.161 251.612 30
40 258.064 264.516 270.967 277.419 283.870 290.322 296.774 303.225 309.677 316.128 40
50 322.580 329.032 335.483 341.935 348.386 354.838 361.290 367.741 374.193 380.644 50
60 387.096 393.548 399.999 406.451 412.902 419.354 425.806 432.257 438.709 445.160 60
70 451.612 458.064 464.515 470.967 477.418 483.870 490.322 496.773 503.225 509.676 70
80 516.128 522.580 529.031 535.483 541.934 548.386 554.838 561.289 567.741 574.192 80
90 580.644 587.096 593.547 599.999 606.450 612.902 619.354 625.805 632.257 638.708 90
100 645.160 651.612 658.063 664.515 670.966 677.418 683.870 690.312 696.773 703.224 100
cm2 0 1 2 3 4 5 6 7 8 9 cm2
in2 in2 in2 in2 in2 in2 in2 in2 in2 in2
- 0.155 0.310 0.465 0.620 0.775 0.930 1.085 1.240 1.395 10 1.550 1.705 1.860 2.015 2.170 2.325 2.480 2.635 2.790 2.945 10
20 3.100 3.255 3.410 3.565 3.720 3.875 4.030 4.185 4.340 4.495 20
30 4.650 4.805 4.960 5.115 5.270 5.425 5.580 5.735 5.890 6.045 30
40 6.200 6.355 6.510 6.665 6.820 6.975 7.130 7.285 7.440 7.595 40
50 7.750 7.905 8.060 8.215 8.370 8.525 8.680 8.835 8.990 9.145 50
60 9.300 9.455 9.610 9.765 9.920 10.075 10.230 10.385 10.540 10.695 60
70 10.850 11.005 11.160 11.315 11.470 11.625 11.780 11.935 12.090 12.245 70
80 12.400 12.555 12.710 12.865 13.020 13.175 13.330 13.485 13.640 13.795 80
90 13.950 14.105 14.260 14.415 14.570 14.725 14.880 15.035 15.190 15.345 90
100 15.500 15.655 15.810 15.965 16.120 16.275 16.430 16.583 16.740 16.895 100
in3 0 1 2 3 4 5 6 7 8 9 in3
cm3(cc) cm3(cc) cm3(cc) cm3(cc) cm3(cc) cm3(cc) cm3(cc) cm3(cc) cm3(cc) cm3(cc)
- 16.387 32.774 49.161 65.548 81.935 98.322 114.709 131.097 147.484 10 163.871 180.258 196.645 213.032 229.419 245.806 262.193 278.580 294.967 311.354 10
20 327.741 344.128 360.515 376.902 393.290 209.677 426.064 442.451 458.838 475.225 20
30 491.612 507.999 524.386 540.773 557.160 573.547 589.934 606.321 622.708 639.095 30
40 655.483 671.870 688.257 704.644 721.031 737.418 753.805 770.192 786.579 802.966 40
50 819.353 835.740 852.127 868.514 884.901 901.289 917.676 934.063 950.450 966.837 50
60 983.224 999.611 1015.998 1032.385 1048.772 1065.159 1081.546 1097.933 1114.320 1130.707 60
70 1147.094 1163.482 1179.869 1196.256 1212.643 1229.030 1245.417 1261.804 1278.191 1294.578 70
80 1310.965 1327.352 1343.739 1360.126 1376.513 1392.900 1409.288 1425.675 1442.062 1458.449 80
90 1474.836 1491.223 1507.610 1523.997 1540.384 1156.771 1573.158 1589.545 1605.932 1622.319 90
100 1638.706 1655.093 1671.481 1687.868 1704.255 1720.642 1737.029 1753.416 1769.803 1786.190 100
cm3(cc) 0 1 2 3 4 5 6 7 8 9 cm3(cc)
in3 in3 in3 in3 in3 in3 in3 in3 in3 in3
- 0.0610 0.1220 0.1831 0.2441 0.3051 0.3661 0.4272 0.4882 0.5492 10 0.6102 0.6713 0.7323 0.7933 0.8543 0.9153 0.9764 1.0374 1.0984 1.1594 10
20 1.2205 1.2815 1.3425 1.4035 1.4646 1.5256 1.5866 1.6476 1.7086 1.7697 20
30 1.8307 1.8917 1.9527 2.0138 2.0748 2.1358 2.1968 2.2579 2.1389 2.3799 30
40 2.4409 2.5020 2.5630 2.6240 2.6850 2.7460 2.8071 2.8681 2.9291 2.9901 40
50 3.0512 3.1122 3.1732 3.2342 3.2952 3.3563 3.4173 3.4783 3.5393 3.6004 50
60 3.6614 3.7224 3.7834 3.8444 3.9055 3.9665 4.0275 4.0885 4.1496 4.2106 60
70 4.2716 4.3326 4.3937 4.4547 4.5157 4.5767 4.6377 4.6988 4.7598 4.8208 70
80 4.8818 4.9429 5.0039 5.0649 5.1259 5.1870 5.2480 5.3090 5.3700 5.4310 80
90 5.4921 5.5531 5.6141 5.6751 5.7362 5.7972 5.8582 5.9192 5.9803 6.0413 90
100 6.1023 6.1633 6.2243 6.2854 6.3464 6.4074 6.4684 6.5295 6.5905 6.6515 100
ISUZU KB P190 2007
TO MODEL INDEX
GENERAL INFORMATION 0A-11
AREA
SQUARE INCHES TO SQUARE CENTIMETERS
SQUARE CENTIMETERS TO SQUARE INCHES
VOLUME
CUBIC INCHES TO CUBIC CENTIMETERS
CUBIC CENTIMETERS TO CUBIC INCHES
Page 14
BACK TO CHAPTER INDEX
0A-12 GENERAL INFORMATION
U.S. gal. 0 1 2 3 4 5 6 7 8 9 U.S. gal.
liters liters liters liters liters liters liters liters liters liters
- 3.7854 7.5709 11.3563 15.1417 18.9271 22.7126 26.4980 30.2834 34.0633 10 37.8543 41.6397 45.4251 49.2105 52.9960 56.7814 60.5668 64.3523 68.1377 71.9231 10
20 75.7085 79.4940 83.2794 87.0648 90.8502 94.6357 98.4211 102.2065 105.9920 109.7774 20
30 113.5629 117.3482 121.1337 124.9191 128.7045 132.4901 136.2754 140.0608 143.8462 147.6316 30
40 141.4171 155.2025 158.9879 162.7734 166.5588 170.3442 174.1296 177.9151 181.7005 185.4859 40
50 189.2713 193.0568 196.8422 200.6276 204.4131 208.1985 211.9839 215.7693 219.5548 223.3402 50
60 227.1256 230.9110 234.6965 238.4819 242.2673 246.0527 249.8382 253.6236 257.4090 261.1945 60
70 264.9799 268.7653 272.5507 276.3362 280.1216 283.9070 287.6924 291.4779 295.2633 299.0487 70
80 302.8342 306.6196 310.4050 314.1904 317.9759 321.7613 325.5467 329.3321 333.1176 336.9030 80
90 340.6884 344.4738 348.2593 352.0447 355.8301 359.6156 363.4010 367.1864 370.9718 374.7573 90
100 378.5427 382.3281 386.1135 389.8990 393.6844 397.4698 401.2553 405.0407 408.8261 412.6115 100
liters 0 1 2 3 4 5 6 7 8 9 liters
gal. gal. gal. gal. gal. gal. gal. gal. gal. gal.
- 0.2642 0.5283 0.7925 1.0567 1.3209 1.5850 1.8492 2.1134 2.3775 10 2.6417 2.9059 3.1701 3.4342 3.6984 3.9626 4.2268 4.4909 4.7551 5.0193 10
20 5.2834 5.5476 5.8118 6.0760 6.3401 6.6043 6.8685 7.1326 7.3968 7.6610 20
30 7.9252 8.1893 8.4535 8.7117 8.9818 9.2460 9.5102 9.7743 10.0385 10.3027 30
40 10.5669 10.8311 11.0952 11.3594 11.6236 11.8877 12.1519 12.4161 12.6803 12.9444 40
50 13.2086 13.4728 13.7369 14.0011 14.2653 14.5295 14.7936 15.0578 15.3220 15.5861 50
60 15.8503 16.1145 16.3787 16.6428 16.9070 17.1711 17.4354 17.6995 17.9637 18.2279 60
70 18.4920 18.7562 19.0204 19.2846 19.5487 19.8129 20.0771 20.3412 20.6054 20.8696 70
80 21.1338 21.3979 21.6621 21.9263 22.1904 22.4546 22.7188 22.9830 23.2471 23.5113 80
90 23.7755 24.0397 24.3038 24.5680 24.8322 25.0963 25.3605 25.6247 25.8889 26.1530 90
100 26.4172 26.6814 26.9455 27.2097 27.4739 27.7381 28.0022 28.2664 28.5306 28.7947 100
Imp gal. 0 1 2 3 4 5 6 7 8 9 Imp gal.
liters liters liters liters liters liters liters liters liters liters
- 4.5459 9.0918 13.6377 18.1836 22.7295 27.2754 31.8213 36.3672 40.9131 10 45.4590 50.0049 54.5508 59.0967 63.6426 68.1885 72.7344 77.2803 81.8262 86.3721 10
20 90.9180 95.4639 100.0098 104.5557 109.1016 113.6475 118.1934 122.7393 127.2852 131.8311 20
30 136.3770 140.9229 145.4688 150.0147 154.5606 159.1065 163.6524 168.1983 172.7442 177.2901 30
40 181.8360 186.3819 190.9278 195.4737 200.0196 204.5655 209.1114 213.6573 218.2032 222.7491 40
50 227.2950 231.8409 236.3868 240.9327 245.4786 250.0245 254.5704 259.1163 263.6622 268.2081 50
60 272.7540 277.2999 281.8458 286.3917 290.9376 295.4835 300.0294 304.5753 309.1212 313.6671 60
70 318.2130 322.7589 327.3048 331.8507 336.8966 340.9425 345.4884 350.0343 354.5802 359.1261 70
80 363.6720 368.2179 372.7638 377.3097 381.8556 386.4015 390.9474 395.4933 400.0392 404.5851 80
90 409.1310 413.6769 418.2228 422.7687 427.3146 431.8605 436.4064 440.9523 445.4982 450.0441 90
100 454.5900 459.1359 463.6818 468.2277 472.7736 477.3195 481.8654 486.4113 490.9572 495.5031 100
liters 0 1 2 3 4 5 6 7 8 9 liters
gal. gal. gal. gal. gal. gal. gal. gal. gal. gal.
- 0.2200 0.4400 0.6599 0.8799 1.0999 1.3199 1.5399 1.7598 1.9798 10 2.1998 2.4198 2.6398 2.8597 3.0797 3.2997 3.5197 3.7397 3.9596 4.1796 10
20 4.3996 4.6196 4.8396 5.0595 5.2795 5.4995 5.7195 5.9395 6.1594 6.3794 20
30 6.5994 6.8194 7.0394 7.2593 7.4793 7.6993 7.9193 8.1393 8.3592 8.5792 30
40 8.7992 9.0192 9.2392 9.4591 9.6791 9.8991 10.1191 10.3391 10.5590 10.7790 40
50 10.9990 11.2190 11.4390 11.6590 11.8789 12.0989 12.3189 12.5389 12.7588 12.9788 50
60 13.1988 13.4188 13.6388 13.8587 14.0787 14.2987 14.5187 14.7387 14.9586 15.1786 60
70 15.3986 15.6186 15.8386 16.0585 16.2785 16.4985 16.7185 16.9385 17.1584 17.3784 70
80 17.5984 17.8184 18.0384 18.2583 18.4783 18.6983 18.9183 19.1383 19.3582 19.5782 80
90 19.7982 20.0182 20.2382 20.4581 20.6781 20.8981 21.1181 21.3381 21.5580 21.7780 90
100 21.9980 22.2180 22.4380 22.6579 22.8779 23.0979 23.3179 23.5379 23.7578 23.9778 100
ISUZU KB P190 2007
TO MODEL INDEX
GALLONS (U.S.) TO LITERS
LITERS TO GALLONS (U.S.)
GALLONS (IMP.) TO LITERS
LITERS TO GALLONS (IMP.)
Page 15
BACK TO CHAPTER INDEX
lbs. 0 1 2 3 4 5 6 7 8 9 lbs.
kg kg kg kg kg kg kg kg kg kg
- 0.454 0.907 1.361 1.814 2.268 2.722 3.175 3.629 4.082 10 4.536 4.990 5.443 5.897 6.350 6.804 7.257 7.711 8.165 8.618 10
20 9.072 9.525 9.979 10.433 10.886 11.340 11.793 12.247 12.701 13.154 20
30 13.608 14.061 14.515 14.969 15.422 15.876 16.329 16.783 17.237 17.690 30
40 18.144 18.597 19.051 19.504 19.958 20.412 20.865 21.319 21.772 22.226 40
50 22.680 23.133 23.587 24.040 24.494 24.948 25.401 25.855 26.308 26.762 50
60 27.216 27.669 28.123 28.576 29.030 29.484 29.937 30.391 30.844 31.298 60
70 31.751 32.205 32.659 33.112 33.566 34.019 34.473 34.927 35.380 35.834 70
80 36.287 36.741 37.195 37.648 38.102 38.555 39.009 39.463 39.916 40.370 80
90 40.823 41.277 41.731 42.184 42.638 43.091 43.545 43.998 44.452 44.906 90
100 45.359 45.813 46.266 46.720 47.174 47.627 47.081 48.534 48.988 49.442 100
kg 0 1 2 3 4 5 6 7 8 9 kg
lbs. lbs. lbs. lbs. lbs. lbs. lbs. lbs. lbs. lbs.
- 2.205 4.409 6.614 8.818 11.023 13.228 15.432 17.637 19.842 10 22.046 24.251 26.455 28.660 30.865 33.069 35.274 37.479 39.683 41.888 10
20 44.092 46.297 48.502 50.706 52.911 55.116 57.320 59.525 61.729 63.934 20
30 66.139 68.343 70.548 72.753 74.957 77.162 79.366 81.571 83.776 85.980 30
40 88.185 90.390 92.594 94.799 97.003 99.208 101.413 103.617 105.822 108.026 40
50 110.231 112.436 114.640 16.845 119.050 121.254 123.459 125.633 127.868 130.073 50
60 132.277 134.482 136.687 138.891 141.096 143.300 145.505 147.710 149.914 152.119 60
70 154.324 156.528 158.732 160.937 163.142 165.347 167.551 169.756 171.961 174.165 70
80 176.370 178.574 180.780 182.984 185.188 187.393 189.597 191.802 194.007 196.211 80
90 198.416 200.621 202.825 205.030 207.234 209.439 211.644 213.848 216.053 218.258 90
100 220.462 222.667 224.871 227.076 229.281 231.485 233.690 235.895 238.099 240.304 100
kg 0 1 2 3 4 5 6 7 8 9 kg
N N N N N N N N N N
- - 9.81 19.61 29.42 39.23 49.03 58.84 68.65 78.45 88.26 10 98.07 107.87 117.68 127.49 137.29 147.10 156.91 166.71 176.52 186.33 10
20 196.13 205.94 215.75 225.55 235.36 245.17 254.97 264.78 274.59 284.39 20
30 294.20 304.01 313.81 323.62 333.43 343.23 353.04 362.85 372.65 382.46 30
40 392.27 402.07 411.88 421.69 431.49 441.30 451.11 460.91 470.72 480.53 40
50 490.33 500.14 509.95 519.75 529.56 539.37 549.17 558.98 568.79 578.59 50
60 558.40 598.21 608.01 617.82 627.63 637.43 647.24 657.05 666.85 676.66 60
70 686.47 696.27 706.08 715.89 725.69 735.50 745.31 755.11 764.92 774.73 70
80 784.53 794.34 804.15 813.95 823.76 833.57 843.37 853.18 862.99 872.79 80
90 882.60 892.41 902.21 912.02 921.83 931.63 941.44 951.25 961.05 970.86 90
100 980.67 990.47 1000.28 1010.08 1019.89 1029.70 1039.50 1049.31 1059.12 1068.92 100
N 0 10 20 30 40 50 60 70 80 90 kg
kg kg kg kg kg kg kg kg kg kg N
- - 1.020 2.039 3.059 4.079 5.099 6.118 7.138 8.158 9.177
10 10.197 11.217 12.237 13.256 14.276 15.296 16.316 17.335 18.355 19.375 10
20 20.394 21.414 22.434 23.453 24.473 25.493 26.513 27.532 28.552 29.572 20
30 30.592 31.611 32.631 33.651 34.670 35.690 36.710 37.730 38.749 39.769 30
40 40.789 41.809 42.828 43.848 44.868 45.887 46.907 47.927 48.947 49.966 40
50 50.986 52.006 53.025 54.045 55.065 56.085 57.104 58.124 59.144 60.163 50
60 61.183 62.203 63.223 64.242 65.262 66.282 67.302 68.321 69.341 70.361 60
70 71.380 72.400 73.420 74.440 75.459 76.479 77.499 78.518 79.538 80.558 70
80 81.578 82.597 83.617 84.637 85.656 86.676 87.696 88.716 89.735 90.755 80
90 91.775 92.795 93.814 94.834 95.854 96.873 97.893 98.913 99.933 100.952 90
100 101.972 102.992 104.011 105.031 106.051 107.071 108.090 109.110 110.130 111.149 100
ISUZU KB P190 2007
TO MODEL INDEX
GENERAL INFORMATION 0A-13
MASS
POUNDS TO KILOGRAMS
KILOGRAMS TO POUNDS
KILOGRAMS TO NEWTONS
NEWTONS TO KILOGRAMS
Page 16
BACK TO CHAPTER INDEX
0A-14 GENERAL INFORMATION
POUNDS PER SQUARE INCH TO KILOGRAMS PER SQUARE CENTIMETER
lb/in2 0 1 2 3 4 5 6 7 8 9 lb/in2
(psi) kg/cm2 kg/cm2 kg/cm2 kg/cm2 kg/cm2 kg/cm2 kg/cm2 kg/cm2 kg/cm2 kg/cm2 (psi)
- 0.0703 0.1406 0.2109 0.2812 0.3515 0.4218 0.4921 0.5625 0.6328 10 0.7031 0.7734 0.8437 0.9140 0.9843 1.0546 1.1249 1.1952 1.2655 1.3358 10
20 1.4061 1.4764 1.5468 1.6171 1.6874 1.7577 1.8280 1.8983 1.9686 2.0389 20
30 2.1092 2.1795 2.2498 2.3201 2.3904 2.4607 2.5311 2.6014 2.6717 2.7420 30
40 2.8123 2.8826 2.9529 3.0232 3.0935 3.1638 3.2341 3.3044 3.3747 3.4450 40
50 3.5154 3.5857 3.6560 3.7263 3.7966 3.8669 3.9372 4.0075 4.0778 4.1481 50
60 4.2184 4.2887 4.3590 4.4293 4.4996 4.5700 4.6403 4.7106 4.7809 4.8512 60
70 4.9215 4.9918 5.0621 5.1324 5.2027 5.2730 5.3433 5.4136 5.4839 5.5543 70
80 5.6246 5.6947 5.7652 5.8355 5.9058 5.9761 6.0464 6.1167 6.1870 6.2573 80
90 6.3276 6.3979 6.4682 6.5386 6.6089 6.6792 6.7495 6.8198 6.8901 6.9604 90
100 7.0307 7.1010 7.1713 7.2416 7.3119 7.3822 7.4525 7.5228 7.5932 7.6635 100
KILOGRAMS PER SQUARE CENTIMETER TO POUNDS PER SQUARE INCH
kg/cm2 0 1 2 3 4 5 6 7 8 9 kg/cm2
lb/in2(psi) lb/in2(psi) lb/in2(psi) lb/in2(psi) lb/in2(psi) lb/in2(psi) lb/in2(psi) lb/in2(psi) lb/in2(psi) lb/in2(psi)
- 14.22 28.45 42.67 56.89 71.12 85.34 99.56 113.78 128.01 10 142.23 156.45 170.68 184.90 199.12 213.35 227.57 241.79 256.01 270.24 10
20 284.46 298.6 312.91 327.13 341.35 355.58 369.80 384.02 398.24 412.47 20
30 426.69 440.91 455.14 469.36 483.58 497.81 512.03 526.25 540.47 554.70 30
40 568.92 583.14 597.37 611.59 625.81 640.04 654.26 668.48 682.70 696.93 40
50 711.16 725.37 739.60 753.82 768.04 782.27 795.49 810.71 824.93 839.16 50
60 853.38 867.60 881.83 896.05 910.27 924.50 938.72 952.94 967.16 981.39 60
70 995.61 1009.83 102406 1038.28 1052.50 1066.73 1080.95 1095.17 1109.39 1123.62 70
80 1137.84 1152.06 1166.27 1180.51 1194.73 1208.96 1223.18 1237.40 1251.62 1265.85 80
90 1280.07 1294.20 1308.52 1322.74 1336.96 1351.19 1365.41 1379.63 1393.85 1408.08 90
100 1422.30 1436.52 1450.75 1464.97 1479.19 1493.42 1507.64 1521.86 1536.08 1550.31 100
kg/cm2 0 1 2 3 4 5 6 7 8 9 kg/cm2
KPa KPa KPa KPa KPa KPa KPa KPa KPa KPa
- - 98.1 196.1 294.2 392.3 490.3 588.4 686.5 784.5 882.6 10 980.7 1078.7 1176.8 1274.9 1372.9 1471.0 1569.1 1667.1 1765.2 1863.3 10
20 1961.3 2059.4 2157.5 2255.5 2353.6 2451.7 2549.7 2647.8 2745.9 2843.9 20
30 2942.0 3040.1 3138.1 3236.2 3334.3 3432.3 3530.4 3628.5 3726.5 3824.6 30
40 3922.7 4020.7 4118.8 4216.9 4314.9 4413.0 4511.1 4609.1 4707.2 4805.3 40
50 4903.3 5001.4 5099.5 5197.5 5295.6 5393.7 5491.7 5589.8 5687.9 5785.9 50
60 5584.0 5982.1 6080.1 6178.2 6276.3 6374.3 6472.4 6570.5 6668.5 6766.6 60
70 6864.7 6962.7 7060.8 7158.9 7256.9 7355.0 7453.1 7551.1 7649.2 7747.3 70
80 7845.3 7943.4 8041.5 8139.5 8237.6 8335.7 8433.7 8531.8 8629.9 8727.9 80
90 8826.0 8924.1 9022.1 9120.2 9218.3 9316.3 9414.4 9512.5 9610.5 9708.6 90
100 9806.7 9904.7 10002.8 10100.8 10198.9 10297.0 10395.0 10493.1 10591.2 10689.2 100
KPa 0 100 200 300 400 500 600 700 800 900 KPa
kg/cm2 kg/cm2 kg/cm2 kg/cm2 kg/cm2 kg/cm2 kg/cm2 kg/cm2 kg/cm2 kg/cm2
- - 1.020 2.039 3.059 4.079 5.099 6.118 7.138 8.158 9.177 1000 10.197 11.217 12.237 13.256 14.276 15.296 16.316 17.335 18.355 19.375 1000
2000 20.394 21.414 22.434 23.453 24.473 25.493 26.513 27.532 28.552 29.572 2000
3000 30.592 31.611 32.631 33.651 34.670 35.690 36.710 37.730 38.749 39.769 3000
4000 40.789 41.809 42.828 743.848 44.868 45.887 46.907 47.927 48.947 49.966 4000
5000 50.986 52.006 53.025 54.045 55.065 56.085 57.104 58.124 59.144 60.163 5000
6000 61.183 62.203 63.223 64.242 65.262 66.282 67.302 68.321 69.341 70.361 6000
7000 71.380 72.400 73.420 74.440 75.459 76.479 77.499 78.518 79.538 80.558 7000
8000 81.578 82.597 83.617 84.637 85.656 86.676 87.696 88.716 89.735 90.755 8000
9000 91.775 92.794 93.814 94.834 95.854 96.873 97.893 98.913 99.933 100.952 9000
10000 101.972 102.992 104.011 105.031 106.051 107.071 108.090 109.110 110.130 111.149 10000
ISUZU KB P190 2007
TO MODEL INDEX
PRESSURE
KILOGRAMS PER SQUARE CENTIMETER TO KILO-PASCALS
KILO-PASCALS TO KILOGRAMS PER SQUARE CENTIMETER
Page 17
BACK TO CHAPTER INDEX
ft. lbs. 0 1 2 3 4 5 6 7 8 9 ft. lbs.
kg-m kg-m kg-m kg-m kg-m kg-m kg-m kg-m kg-m kg-m
- 0.138 0.277 0.415 0.553 0.691 0.830 0.968 1.106 1.244 10 1.383 1.521 1.659 1.797 1.936 2.074 2.212 2.350 2.489 2.627 10
20 2.765 2.903 3.042 3.180 3.318 3.456 3.595 3.733 3.871 4.009 20
30 4.148 4.286 4.424 4.562 4.700 4.839 4.977 5.115 5.253 5.392 30
40 5.530 5.668 5.807 5.945 6.083 6.221 6.360 6.498 6.636 6.774 40
50 6.913 7.051 7.189 7.328 7.466 7.604 7.742 7.881 8.019 8.157 50
60 8.295 8.434 8.572 8.710 8.848 8.987 9.125 9.263 9.401 9.540 60
70 9.678 9.816 9.954 10.093 10.231 10.369 10.507 10.646 10.784 10.922 70
80 11.060 11.199 11.337 11.475 11.613 11.752 11.890 12.028 12.166 12.305 80
90 12.442 12.581 12.719 12.858 12.996 13.134 13.272 13.410 13.549 13.687 90
100 13.826 13.964 14.102 14.240 14.379 14.517 14.655 14.793 14.932 15.070 100
kg-m 0 1 2 3 4 5 6 7 8 9 kg-m
ft. lbs. ft. lbs. ft. lbs. ft. lbs. ft. lbs. ft. lbs. ft. lbs. ft. lbs. ft. lbs. ft. lbs.
- 7.23 14.47 21.70 28.93 36.17 43.40 50.63 57.86 65.10 10 72.33 79.56 86.80 94.03 101.26 108.50 115.73 122.96 130.19 137.43 10
20 144.66 151.89 159.13 166.36 173.59 180.83 188.06 195.29 202.52 209.76 20
30 217.00 224.22 231.46 238.69 245.92 253.16 260.39 267.62 274.85 282.09 30
40 289.32 296.55 303.79 311.02 318.25 325.49 332.72 339.95 347.18 354.42 40
50 361.65 368.88 376.12 383.35 390.58 397.82 405.05 412.28 419.51 426.75 50
60 433.98 441.21 448.45 455.68 462.91 470.15 477.38 484.61 491.84 499.08 60
70 506.31 513.54 520.78 528.01 535.24 542.48 549.71 556.94 564.17 571.41 70
80 578.64 585.87 593.11 600.34 607.57 614.81 622.04 629.27 636.50 643.74 80
90 650.97 658.20 665.44 672.67 679.90 687.14 694.37 701.60 708.83 716.07 90
100 723.30 730.53 737.77 745.00 752.23 759.47 766.70 773.93 781.16 788.40 100
kg-m 0 1 2 3 4 5 6 7 8 9 kg-m
N-m N-m N-m N-m N-m N-m N-m N-m N-m N-m
- - 9.81 19.61 29.42 39.23 49.03 58.84 68.65 78.45 88.26 10 98.07 107.87 117.68 127.49 137.29 147.10 156.91 166.71 176.52 186.33 10
20 196.13 205.94 215.75 225.55 235.36 245.17 254.97 264.78 274.59 284.39 20
30 294.20 304.01 313.81 323.62 333.43 343.23 353.04 362.85 372.65 382.46 30
40 392.27 402.07 411.88 421.69 431.49 441.30 451.11 460.91 470.72 480.53 40
50 490.33 500.14 509.95 519.75 529.56 539.37 549.17 558.98 568.79 578.59 50
60 588.40 589.21 608.01 617.82 627.63 637.43 647.24 657.05 666.85 676.66 60
70 686.47 696.27 706.08 715.89 725.69 735.50 745.31 755.11 764.92 774.73 70
80 784.53 794.34 804.15 813.95 823.76 833.57 843.37 853.18 862.99 872.79 80
90 882.60 892.41 902.21 912.02 921.83 931.63 941.44 951.25 961.05 970.86 90
100 980.67 990.47 1000.28 1010.08 1019.89 1029.70 1039.50 1049.31 1059.12 1068.92 100
N-m 0 10 20 30 40 50 60 70 80 90 N-m
kg-m kg-m kg-m kg-m kg-m kg-m kg-m kg-m kg-m kg-m
- - 1.020 2.039 3.059 4.079 5.099 6.118 7.138 8.158 9.177 100 10.197 11.217 12.236 13.256 14.276 15.296 16.315 17.335 18.355 19.374 100
200 20.394 21.414 22.433 23.453 24.473 25.493 26.512 27.532 28.552 29.571 200
300 30.591 31.611 32.630 33.650 34.670 35.690 36.710 37.729 38.749 39.768 300
400 40.789 41.808 42.827 43.847 44.867 45.887 46.906 47.926 48.946 49.965 400
500 50.986 52.005 53.024 54.044 55.064 56.084 57.103 58.123 59.143 60.162 500
600 61.183 62.202 63.221 64.241 65.261 66.281 67.300 68.320 69.340 70.359 600
700 71.380 72.399 73.418 74.438 75.485 76.478 77.497 78.517 79.537 80.556 700
800 81.577 82.596 83.615 84.635 85.655 86.675 87.694 88.714 89.734 90.753 800
900 91.774 92.793 93.812 94.832 95.852 96.872 97.891 98.911 99.931 100.950 900
1000 101.972 102.990 104.009 105.029 106.049 107.069 108.088 109.108 110.128 111.147 1000
ISUZU KB P190 2007
TO MODEL INDEX
GENERAL INFORMATION 0A-15
TORQUE
FOOT POUNDS TO KILOGRAM METERS
KILOGRAM METERS TO FOOT POUNDS
KILOGRAM METERS TO NEWTON METERS
NEWTON METERS TO KILOGRAM METERS
Page 18
BACK TO CHAPTER INDEX
0A-16 GENERAL INFORMATION
°
F
-60 -51.1 -2 -18.9 56 13.3 114 45.6 172 77.8 230 110.0 288 142.2 346 174.4
-58 -50 0 -17.8 58 14.4 116 46.7 147 78.9 232 111.1 290 143.3 348 175.6
-56 -48.9 2 -16.7 60 15.6 118 47.8 176 80.0 234 112.2 292 144.4 350 176.7
-54 -47.8 4 -15.6 62 16.7 120 48.9 178 81.1 236 113.3 294 145.6 352 177.8
-52 -46.7 6 -14.4 64 17.8 122 50.0 180 82.2 238 114.4 296 146.7 354 178.9
-50 -45.6 8 -13.3 66 18.9 124 51.1 182 83.3 240 115.6 298 147.8 356 180.0
-48 -44.4 10 -12.2 68 20.0 126 52.2 184 84.4 242 116.7 300 148.9 358 181.1
-46 -43.3 12 -11.1 70 21.1 128 53.3 186 85.6 244 117.8 302 150.0 360 182.2
-44 -42.2 14 -10.0 72 22.2 130 54.4 188 86.7 246 118.9 304 151.1 362 183.3
-42 -41.1 16 -8.9 74 23.3 132 55.6 190 87.8 248 120.0 306 152.2 364 184.4
-40 -40.0 18 -7.8 76 24.9 134 56.7 192 88.9 250 121.1 308 153.3 366 185.6
-38 -38.9 20 -3.7 78 25.6 136 57.8 194 90.0 252 122.2 310 154.4 368 186.7
-36 37.8 22 -5.6 80 26.7 138 58.9 196 91.1 254 123.3 312 155.6 370 187.8
-34 36.7 24 -4.4 82 27.8 140 60.0 198 92.2 256 124.4 314 156.7 372 188.9
-32 -35.6 26 -3.3 84 28.9 142 61.1 200 93.3 258 125.6 316 157.8 374 190.0
-30 -34.4 28 -2.2 86 30.0 144 62.2 202 94.4 260 126.7 318 158.9 376 191.1
-28 -33.3 30 -1.1 88 31.1 146 63.3 204 95.6 262 127.8 320 160.0 378 192.2
-26 -32.2 32 -0 90 32.2 148 64.4 206 96.7 264 128.9 322 161.1 380 193.3
-24 -31.1 34 1.1 92 33.3 150 65.6 208 97.8 266 130.0 324 162.2 382 194.4
-22 -30.0 36 2.2 94 34.4 152 66.7 210 98.9 268 131.1 326 163.3 384 195.6
-20 -28.9 38 3.3 96 35.6 154 67.8 212 100.0 270 132.2 328 164.4 386 196.7
-18 -27.8 40 4.4 98 36.7 156 68.9 214 101.1 272 133.3 330 165.6 388 197.8
-16 -26.7 42 5.6 100 37.8 158 70.0 216 102.2 274 134.4 332 166.7 390 198.9
-14 -25.6 44 6.7 102 38.9 160 71.1 218 103.3 276 135.6 334 167.8 382 200.0
-12 -24.4 46 7.8 104 40.0 162 72.2 220 104.4 278 136.7 336 168.9 400 204.4
-10 -23.3 48 8.9 106 41.1 164 73.3 222 105.6 280 137.8 338 170.0 410 210.0
-8 -22.2 50 10.0 108 42.2 166 74.4 224 106.7 282 138.9 340 171.1 420 215.6
-6 -21.1 52 11.1 110 43.3 168 75.6 226 107.8 284 140.0 342 172.2 430 221.1
-4 -20.0 54 12.2 112 44.4 170 76.7 228 108.9 286 141.1 344 173.3 440 226.7
°
C
°
C
°
F
°
-50 -58.0 -18 -0.4 14 57.2 46 114.8 78 172.4 110 230.0 142 287.6 174 345.2
-49 -56.2 -17 1.4 15 59.0 47 116.6 79 174.2 111 231.8 143 289.4 175 347.0
-48 -54.4 -16 3.2 16 60.8 48 118.4 80 176.0 112 233.6 144 291.2 176 348.8
-47 -52.6 -15 5.0 17 62.6 49 120.2 81 177.8 113 235.4 145 293.0 177 350.6
-46 -50.8 -14 6.8 18 64.4 50 122.0 82 179.6 114 237.2 146 294.8 178 352.4
-45 -49.0 -13 8.6 19 66.2 51 123.8 83 181.4 115 239.0 147 296.6 179 354.2
-44 -47.2 -12 10.4 20 68.0 52 125.6 84 183.2 116 240.8 148 298.4 180 356.0
-43 -45.4 -11 12.2 21 69.8 53 127.4 85 185.0 117 242.6 149 300.2 181 357.8
-42 -43.6 -10 14.0 22 71.6 54 129.2 86 186.8 118 244.4 150 302.0 182 359.6
-41 -41.8 -9 15.8 23 73.4 55 131.0 87 188.6 119 246.2 151 303.8 183 361.4
-40 -40.0 -8 17.6 24 75.2 56 132.8 88 190.4 120 248.0 152 305.6 184 363.2
-39 -38.2 -7 19.4 25 77.0 57 134.6 89 192.2 121 249.8 153 307.4 185 365.0
-38 -36.4 -6 21.2 26 78.8 58 136.4 90 194.0 122 251.6 154 309.2 186 366.8
-37 -34.6 -5 23.0 27 80.6 59 138.2 91 195.8 123 253.4 155 311.0 187 368.6
-36 -32.8 -4 24.8 28 82.4 60 140.0 92 197.6 124 255.2 156 312.8 188 370.4
-35 -31.0 -3 26.6 29 84.2 61 141.8 93 199.4 125 257.0 157 314.6 189 372.2
-34 -29.2 -2 28.4 30 86.0 62 143.6 94 201.2 126 258.8 158 316.4 190 374.0
-33 -27.4 -1 30.2 31 87.8 63 145.4 95 203.0 127 260.6 159 318.2 191 375.8
-32 -25.6 0 32.0 32 89.6 64 147.2 96 204.8 128 262.4 160 320.0 192 377.6
-31 -23.8 1 33.8 33 91.4 65 149.0 97 206.6 129 264.2 161 321.8 193 379.4
-30 -22.0 2 35.6 34 93.2 66 150.8 98 208.4 130 266.0 162 323.6 194 381.2
-29 -20.2 3 37.4 35 95.0 67 152.6 99 210.2 131 267.8 163 325.4 195 383.0
-28 -18.4 4 39.2 36 96.8 68 154.4 100 212.0 132 269.6 164 327.2 196 384.8
-27 -16.6 5 41.0 37 98.6 69 156.2 101 213.8 133 271.4 165 329.0 197 386.6
-26 -14.8 6 42.8 38 100.4 70 158.0 102 215.6 134 273.2 166 330.8 198 388.4
-25 -13.0 7 44.6 39 102.2 71 159.8 103 217.4 135 275.0 167 332.6 199 390.2
-24 -1.2 8 46.4 40 104.0 72 161.6 104 219.2 136 276.8 168 334.4 200 392.0
-23 -9.4 9 48.2 41 105.8 73 163.4 105 221.0 137 278.6 169 336.4 210 410.0
-22 -7.6 10 50.0 42 107.6 74 165.2 106 222.8 138 280.4 170 338.0 220 428.0
-21 -5.8 11 51.8 43 109.4 75 167.0 107 224.6 139 282.2 171 339.8 230 446.0
-20 -4.4 12 53.6 44 111.2 76 168.8 108 226.4 140 284.0 172 341.6 240 464.0
-19 -2.2 13 55.4 45 113.0 77 170.6 109 228.2 141 285.8 173 343.4 250 482.0
C
ISUZU KB P190 2007
TO MODEL INDEX
TEMPERATURE
FAHRENHEIT TO CENTIGRADE
°
F
°
C
°
F
°
C
°
F
°
C
°
F
°
C
°
F
°
C
°
F
°
C
°
F
°
C
CENTIGRADE TO FAHRENHEIT
°
F
°
C
°
F
°
C
°
F
°
C
°
F
°
C
°
F
°
C
°
F
°
C
°
F
Page 19

BACK TO CHAPTER INDEX
Maintenance Schedule (For GENERAL EXPORT)......................................................... 0B- 2
Maintenance Schedule (For EUROPE)........................................................................... 0B- 5
Severe Conditions Maintenance Schedule (For GENERAL EXPORT)........................ 0B- 9
Severe Conditions Maintenance Schedule (For EUROPE).......................................... 0B-10
Recommended Fluids and Lubricants (For GENERAL EXPORT)............................... 0B-11
ISUZU KB P190 2007
TO MODEL INDEX
MAINTENANCE AND LUBRICATION 0B-1
SECTION 0B
MAINTENANCE AND LUBRICATION
TABLE OF CONTENTS
PAGE
Recommended Fluids and Lubricants (For EUROPE) ................................................. 0B-13
Oil Viscosity Chart........................................................................................................... 0B-14
Page 20

BACK TO CHAPTER INDEX
0B-2 MAINTENANCE AND LUBRICATION
MAINTENANCE SCHEDULE (For GENERAL EXPORT)
Items followed by an asterisk (*) require more frequent maintenance if the vehicle is driven under severe conditions.
Replace the fuel filter (**Mark) when the fuel filter indicator light is lit.
Refer to "SEVERE CONDITIONS MAINTENANCE SCHEDULE."
I : Inspect and correct or replace as necessary A : Adjust
R : Replace or change T : Tighten to specified torque L : Lubricate
SERVICE INTERVAL: × 1,000 km 5 10 15 20 25 30 35 40 45 50 55 60 65 70 75 80 85 90 95 100
(Use odometer reading × 1,000 miles 3 6 9 12 15 18 21 24 27 30 33 36 39 42 45 48 51 54 57 60
or months whichever
comes first)
ENGINE
Idling speed and acceleration
(GASOLINE) I I - I - I - I - I - I - I - I - I - I
* Air cleaner element
(GASOLINE) - I - I - I - R - I - I - I - R - I - I
* Engine oil (HFV6) - - R - - R - - R - - R - - R - - R - (C24SE) Replace every 12,000km
(4JH1-TC, 4JJ1 (Standard Output),
4JJ1 (High Output))
(4JA1-T) R R R R R R R R R R R R R R R R R R R R
* Engine oil filter (HFV6) - - R - - R - - R - - R - - R - - R - (C24SE) Replace every 12,000km
(4JH1-TC, 4JA1-T) - R - R - R - R - R - R - R - R - R - R
(4JJ1 (Standard Output),
4JJ1 (High Output))
Oil leakage and contamination
(GASOLINE) - I - I - I - I - I - I - I - I - I - I
Fuel leakage I I - I - I - I - I - I - I - I - I - I
Fuel tank - - - I - - - I - - - I - - - I - - - I
O2 Sensor (C24SE) Replace every 160,000km
(HFV6)
Valve clearances (6VE1) Check and adjust if noisy
(4JH1-TC, 4JA1-T) A - - A - - - A - - - A - - - A - - - A
(4JJ1 (Standard Output),
4JJ1 (High Output))
Spark plugs (C24SE) (for leaded fuel
use)
Spark plugs (C24SE) (for unleaded
fuel use)
Spark plugs (HFV6) Replace every 120,000km
Spark plug wire - - - - - - - - - - - - - - - - - - - I
Fuel filter (GASOLINE) - - - R - - - R - - - R - - - R - - - R
(4JH1-TC, 4JA1-T) - - R - - R - - R - - R - - R - - R - ** (4JJ1 (Standard Output),
4JJ1 (High Output))
Fuel pump in fuel tank
(4JJ1 (Standard Output),
4JJ1 (High Output))
Engine / Accessory drive belt
(HFV6) Replace every 100,000km
Fan belt tension and damage
* Exhaust system I I - I - I - I - I - I - I - I - I - I
Engine coolant concentration (HFV6) - I - I - I - I - I - I - I - I - I - R
Engine coolant
(4JJ1 (Standard Output),
4JJ1 (High Output))
Cooling system for water leakage - I - I - I - I - I - I - I - I - I - I
All hoses and pipes in engine
compartment for clogs or damage
Timing belt (C24SE) - - - - - - - - - - - - - - - I - - - Replace every 120,000km
Timing belt (6VE1) Replace every 160,000km
ISUZU KB P190 2007
TO MODEL INDEX
or months
(DIESEL) I I I I I I I I I I I I I I I I I I I I
(DIESEL) I I I I I I I R I I I I I I I R I I I I
(DIESEL) I I I I I I I I I I I I I I I I I I I I
(C24SE)
(DIESEL)
(C24SE) - I - I - I - I - R - I - I - I - I - R
(DESEL) - I - I - I - I - I - I - I - I - I - I
6 12 18 24 30 36 42 48 54 60 66 72 78 84 90 96 102 108 114 120
- R - R - R - R - R - R - R - R - R - R
- - - R - - - R - - - R - - - R - - - R
MIL diagnostic Indicates O
- - - - - - - A - - - - - - - A - - - -
- R - R - R - R - R - R - R - R - R - R
- - - - - R - - - - - R - - - - - R - -
Replace the fuel filter when the fuel filter indicator light is lit.
- - - - - - - I - - - - - - - I - - - -
- - - - - - - - - I - - - - - - - - - I
I I I I I I I I I I I I I I I I I I I I
Change every 2 years
- I - I - I - I - I - I - I - I - I - I
2
Sensor
Page 21

BACK TO CHAPTER INDEX
I : Inspect and correct or replace as necessary A : Adjust
R : Replace or change T : Tighten to specified torque L : Lubricate
SERVICE INTERVAL: × 1,000 km 5 10 15 20 25 30 35 40 45 50 55 60 65 70 75 80 85 90 95 100
(Use odometer reading × 1,000 miles 3 6 9 12 15 18 21 24 27 30 33 36 39 42 45 48 51 54 57 60
or months whichever
comes first)
CLUTCH
Clutch fluid I I - I - I - I - I - I - I - I - I - I
Clutch pedal travel and free play I I - I - I - I - I - I - I - I - I - I
TRANSMISSION OR TRANSMISSION
WITH TRANSFER CASE
* Automatic transmission fluid (HFV6)
(4JH1-TC, 4JJ1 (Standard Output),
4JJ1 (High Output))
* Transfer case oil - - - I - - - I - - - I - - - I - - - I
* Manual transmission fluid - R - I - - - R - - - I - - - R - - - I
Oil leakage I I I I I I I I I I I I I I I I I I I I
Gear control mechanism for
looseness
PROPELLER SHAFT
Loose connections - I - I - I - I - I - I - I - I - I - I
* Universal joints and splines for wear
Universal joints and sliding sleeve
(4WD)
FRONT AND REAR AXLE
* Differential gear oil (Front and rear) - R - I - - - R - - - I - - - R - - - I
Oil leakage I I I I I I I I I I I I I I I I I I I I
Shift on the fly system gear oil I - - I - - - I - - - I - - - I - - - I
Front axle shaft boot for damage - - - I - - - I - - - I - - - I - - - I
Axle shafts for distortion or damage - - - I - - - I - - - I - - - I - - - I
Axle case for distortion or damage - - - I - - - I - - - I - - - I - - - I
STEERING
Power steering fluid I I I I I I I R I I I I I I I R I I I I
Oil leakage I I I I I I I I I I I I I I I I I I I I
* Steering system for looseness or
damage
Power steering hose - I - I - I - I - I - I - I - R - I - I
Steering wheel play I I I I I I I I I I I I I I I I I I I I
Steering function I I I I I I I I I I I I I I I I I I I I
Right and left turning radius - - - I - - - I - - - I - - - I - - - I
Wheel alignment - - - I - - - I - - - I - - - I - - - I
Joint ball for oil leakage or damage - I - I - I - I - I - I - I - I - I - I
Joint ball rubber boot for damage - I - I - I - I - I - I - I - I - I - I
SERVICE BRAKES
Brake fluid - - - I - - - I - - - I - - - I - - - I
Brake system for fluid leakage I I I I I I I I I I I I I I I I I I I I
Brake function I I I I I I I I I I I I I I I I I I I I
* Rear brake lining and drum wear - I - I - I - I - I - I - I - I - I - I
* Front disc brake pads and discs wear - I - I - I - I - I - I - I - I - I - I
Brake pedal travel and free play I I I I I I I I I I I I I I I I I I I I
Pipes and hoses loose connections
or damage
or months
ISUZU KB P190 2007
TO MODEL INDEX
MAINTENANCE AND LUBRICATION 0B-3
6 12 18 24 30 36 42 48 54 60 66 72 78 84 90 96 102 108 114 120
- - I - - I - - I - - I - - I - - I - R
- - - I - - - I - - - I - - - I - - - I
- - - I - - - I - - - I - - - I - - - I
I - I - I - I - I - I - I - I - I - I
-
- L - L - L - L - L - L - L - L - L - L
- I - I - I - I - I - I - I - I - I - I
I I - I - I - I - I - I - I - I - I - I
Page 22

BACK TO CHAPTER INDEX
0B-4 MAINTENANCE AND LUBRICATION
I : Inspect and correct or replace as necessary A : Adjust
R : Replace or change T : Tighten to specified torque L : Lubricate
SERVICE INTERVAL: × 1,000 km 5 10 15 20 25 30 35 40 45 50 55 60 65 70 75 80 85 90 95 100
(Use odometer reading × 1,000 miles 3 6 9 12 15 18 21 24 27 30 33 36 39 42 45 48 51 54 57 60
or months whichever
comes first)
PARKING BRAKE
Parking brake function I I I I I I I I I I I I I I I I I I I I
Parking brake lever travel I I I I I I I I I I I I I I I I I I I I
Cables for looseness or damage
and guide for damage
Ratchet for wear or damage - I - I - I - I - I - I - I - I - I - I
SUSPENSION
Leaf / Coil / Torsion bar springs for
damage
Mount for looseness or damage I I - I - I - I - I - I - I - I - I - I
Shock absorbers for oil leakage - I - I - I - I - I - I - I - I - I - I
Shock absorber mount for looseness - I - I - I - I - I - I - I - I - I - I
Rubber bushes of suspension for
wear or damage
Spring action for loss of balance
due to weakening
Joint ball rubber boot for damage - I - I - I - I - I - I - I - I - I - I
WHEELS
Wheel nuts T T - T - T - T - T - T - T - T - T - T
Wheel disc for damage I I - I - I - I - I - I - I - I - I - I
Front hub bearing grease - - - - - R - - - - - R - - - - - R - Front and rear hub bearing for
looseness
Tire pressure and damage I I - I - I - I - I - I - I - I - I - I
Tire rotation (Rotate as required)
OTHERS
Bolts and nuts on chassis and body I I - I - I - I - I - I - I - I - I - I
Lube front free – wheeling hubs - - - - - L - - - - - L - - - - - L - -
or months
ISUZU KB P190 2007
TO MODEL INDEX
6 12 18 24 30 36 42 48 54 60 66 72 78 84 90 96 102 108 114 120
I I I I I I I I I I I I I I I I I I I I
I I - I - I - I - I - I - I - I - I - I
- I - I - I - I - I - I - I - I - I - I
- - - I - - - I - - - I - - - I - - - I
- I - I - I - I - I - I - I - I - I - I
Page 23

BACK TO CHAPTER INDEX
MAINTENANCE SCHEDULE (For EUROPE)
Items followed by an asterisk (*) require more frequent maintenance if the vehicle is driven under severe conditions.
Replace the fuel filter (**Mark) when the fuel filter indicator light is lit.
Refer to "SEVERE CONDITIONS MAINTENANCE SCHEDULE."
Diesel Engine model (ACEA B2 specification engine oil)
I : Inspect and correct or replace as necessary A : Adjust
R : Replace or change T : Tighten to specified torque L : Lubricate
SERVICE INTERVAL: × 1,000 km
(Use odometer reading or × 1,000 miles
months whichever comes
first)
DIESEL ENGINE
* Engine oil - R - R - R - R - R - R - R - R - R - R
* Engine oil filter - - - R - - - R - - - R - - - R - - - R
Oil leakage and contamination I I I I I I I I I I I I I I I I I I I I
Idling speed and acceleration I I I I I I I I I I I I I I I I I I I I
Fan belt tension and damage I I I I I I I I I I I I I I I I I I I I
Exhaust system I I - I - I - I - I - I - I - I - I - I
All hoses and pipes in engine
compartment for clog of damage
Valve clearance - - - A - - - A - - - A - - - A - - - A
* Air cleaner element I I I I I I I R I I I I I I I R I I I I
** Fuel filter Replace the fuel filter when the fuel filter indicator light is lit.
Engine coolant concentration - I - I - I - I - I - I - I - I - I - I
Cooling system for water leakage - I - I - I - I - I - I - I - I - I - I
CLUTCH
Clutch fluid I I - I - I - I - I - I - I - I - I - I
Clutch pedal travel and play I I - I - I - I - I - I - I - I - I - I
TRANSMISSION OR TRANSMISSION
WITH TRANSFER CASE
* Manual transmission with fluid - R - I - - - R - - - I - - - R - - - I
* Transfer case oil (MT) - - - I - - - I - - - I - - - I - - - I
Oil leakage I I I I I I I I I I I I I I I I I I I I
Gear control mechanism for
looseness
* Automatic transmission fluid - - - I - - - I - - - I - - - I - - - I
* Transfer case oil (AT) - - - I - - - - - - - I - - - - - - - I
PROPELLER SHAFT
Loose connections - I - I - I - I - I - I - I - I - I - I
* Universal joints and splines for wear - I - I - I - I - I - I - I - I - I - I
Universal joints and sliding sleeve
(4WD)
FRONT AND REAR AXLE
* Differential gear oil (Front and rear) - R - I - - - R - - - I - - - R - - - I
Oil leakage I I I I I I I I I I I I I I I I I I I I
Shift on the fly system gear oil I - - I - - - I - - - I - - - I - - - I
Front axle shaft boot for damage
Axle case for distortion or damage - - - I - - - I - - - I - - - I - - - I
Axle shafts for distortion or damage - - - I - - - I - - - I - - - I - - - I
or months
ISUZU KB P190 2007
TO MODEL INDEX
MAINTENANCE AND LUBRICATION 0B-5
5 10 15 20 25 30 35 40 45 50 55 60 65 70 75 80 85 90 95 100
3 6 9 12 15 18 21 24 27 30 33 36 39 42 45 48 51 54 57 60
6 12 18 24 30 36 42 48 54 60 66 72 78 84 90 96 102 108 114 120
- I I I I I I I I I I I I I I I I I I I
- - - I - - - I - - - I - - - I - - - I
- L - L - L - L - L - L - L - L - L - L
- - - I - - - I - - - I - - - I - - - I
Page 24

BACK TO CHAPTER INDEX
0B-6 MAINTENANCE AND LUBRICATION
I : Inspect and correct or replace as necessary A : Adjust
R : Replace or change T : Tighten to specified torque L : Lubricate
SERVICE INTERVAL: × 1,000 km
(Use odometer reading or × 1,000 miles
months whichever comes
first)
STEERING
Power steering fluid I I I I I I I R I I I I I I I R I I I I
Oil leakage I I I I I I I I I I I I I I I I I I I I
* Steering system for looseness or
damage
Power steering hose - I - I - I - I - I - I - I - R - I - I
Steering wheel play I I I I I I I I I I I I I I I I I I I I
Steering function I I I I I I I I I I I I I I I I I I I I
Right and left turning radius - - - I - - - I - - - I - - - I - - - I
Wheel alignment - - - I - - - I - - - I - - - I - - - I
Joint ball for oil leakage or damage
Joint ball rubber boot for damage
SERVICE BRAKES
Brake fluid
Brake system for fluid leakage
Brake function
* Front disc brake pads and discs wear
* Rear brake lining and drum wear
Brake pedal travel and play
Pipes and hoses for loose
connections or damage
PARKING BRAKE
Parking brake function
Parking brake lever travel
Cables for looseness or damage and
guide for damage
Ratchet for wear or damage
SUSPENSION
Leaf/Coil/Torsion bar springs for
damage
Mount for looseness or damage
Shock absorbers for oil leakage
Shock absorbers mount for
looseness
Rubber bushes of suspension wear
or damage
Spring action for loss of balance due
to weakening
Joint ball rubber boot for damage
WHEELS
Wheel nuts T T - T - T - T - T - T - T - T - T - T
Wheel disc for damage I I - I - I - I - I - I - I - I - I - I
Front hub bearing grease
Front and rear hub bearings for
looseness
Tire pressure and damage I I - I - I - I - I - I - I - I - I - I
Tire rotation Rotate as required
OTHERS
Bolts and nuts on chassis and body I I - I - I - I - I - I - I - I - I - I
Lube front free - wheeling hubs - - - - - L - - - - - L - - - - - L - -
or months
ISUZU KB P190 2007
TO MODEL INDEX
5 10 15 20 25 30 35 40 45 50 55 60 65 70 75 80 85 90 95 100
3 6 9 12 15 18 21 24 27 30 33 36 39 42 45 48 51 54 57 60
6 12 18 24 30 36 42 48 54 60 66 72 78 84 90 96 102 108 114 120
- I - I - I - I - I - I - I - I - I - I
- I - I - I - I - I - I - I - I - I - I
- I - I - I - I - I - I - I - I - I - I
- - - I - - - I - - - I - - - I - - - I
I I I I I I I I I I I I I I I I I I I I
I I I I I I I I I I I I I I I I I I I I
- I - I - I - I - I - I - I - I - I - I
- I - I - I - I - I - I - I - I - I - I
I I I I I I I I I I I I I I I I I I I I
I I - I - I - I - I - I - I - I - I - I
I I I I I I I I I I I I I I I I I I I I
I I I I I I I I I I I I I I I I I I I I
I I I I I I I I I I I I I I I I I I I I
- I - I - I - I - I - I - I - I - I - I
I I - I - I - I - I - I - I - I - I - I
I I - I - I - I - I - I - I - I - I - I
- I - I - I - I - I - I - I - I - I - I
- I - I - I - I - I - I - I - I - I - I
- I - I - I - I - I - I - I - I - I - I
- - - I - - - I - - - I - - - I - - - I
- I - I - I - I - I - I - I - I - I - I
- - - - - R - - - - - R - - - - - R - -
- I - I - I - I - I - I - I - I - I - I
Page 25

BACK TO CHAPTER INDEX
Diesel Engine model (Engine oil that meet or exceeds ACEA B3 specification)
I : Inspect and correct or replace as necessary A : Adjust
R : Replace or change T : Tighten to specified torque L : Lubricate
SERVICE INTERVAL: × 1,000 km
(Use odometer reading or × 1,000 miles
months whichever comes
first)
DIESEL ENGINE
* Engine oil - - - R - - - R - - - R - - - R - - - R
*
Engine oil filter
Oil leakage and contamination I I I I I I I I I I I I I I I I I I I I
Idling speed and acceleration I I I I I I I I I I I I I I I I I I I I
Fan belt tension and damage I I I I I I I I I I I I I I I I I I I I
Exhaust system I I - I - I - I - I - I - I - I - I - I
All hoses and pipes in engine
compartment for clog of damage
Valve clearance - - - A - - - A - - - A - - - A - - - A
* Air cleaner element I I I I I I I R I I I I I I I R I I I I
** Fuel filter Replace the fuel filter when the fuel filter indicator light is lit.
Engine coolant concentration - - - I - - - I - - - I - - - I - - - I
Cooling system for water leakage - - - I - - - I - - - I - - - I - - - I
CLUTCH
Clutch fluid I I - I - I - I - I - I - I - I - I - I
Clutch pedal travel and play I I - I - I - I - I - I - I - I - I - I
TRANSMISSION OR TRANSMISSION
WITH TRANSFER CASE
* Manual transmission with fluid - - - R - - - I - - - R - - - I - - - I
* Transfer case oil (MT) - - - R - - - I - - - R - - - I - - - I
Oil leakage - - - I - - - I - - - I - - - I - - - I
Gear control mechanism for
looseness
* Automatic transmission fluid - - - I - - - I - - - I - - - I - - - I
* Transfer case oil (AT) - - - R - - - I - - - R - - - I - - - R
PROPELLER SHAFT
Loose connections - I - I - I - I - I - I - I - I - I - I
* Universal joints and splines for wear - I - I - I - I - I - I - I - I - I - I
Universal joints and sliding sleeve
(4WD)
FRONT AND REAR AXLE
* Differential gear oil (Front and rear) - R - I - - - R - - - I - - - R - - - I
Oil leakage I I I I I I I I I I I I I I I I I I I I
Shift on the fly system gear oil I - - I - - - I - - - I - - - I - - - I
Front axle shaft boot for damage - - - I - - - I - - - I - - - I - - - I
Axle case for distortion or damage - - - I - - - I - - - I - - - I - - - I
Axle shafts for distortion or damage - - - I - - - I - - - I - - - I - - - I
STEERING
Power steering fluid I I I I I I I R I I I I I I I R I I I I
Oil leakage I I I I I I I I I I I I I I I I I I I I
* Steering system for looseness or
damage
Power steering hose - I - I - I - I - I - I - I - R - I - I
Steering wheel play I I I I I I I I I I I I I I I I I I I I
Steering function I I I I I I I I I I I I I I I I I I I I
Right and left turning radius - - - I - - - I - - - I - - - I - - - I
Wheel alignment - - - I - - - I - - - I - - - I - - - I
Joint ball for oil leakage or damage - I - I - I - I - I - I - I - I - I - I
Joint ball rubber boot for damage - I - I - I - I - I - I - I - I - I - I
or months
ISUZU KB P190 2007
TO MODEL INDEX
MAINTENANCE AND LUBRICATION 0B-7
5 10 15 20 25 30 35 40 45 50 55 60 65 70 75 80 85 90 95 100
3 6 9 12 15 18 21 24 27 30 33 36 39 42 45 48 51 54 57 60
6 12 18 24 30 36 42 48 54 60 66 72 78 84 90 96 102 108 114 120
- - - R - - - R - - - R - - - R - - - R
- - - I - - - I - - - I - - - I - - - I
- - - - - - - - - - - I - - - - - - - -
- L - L - L - L - L - L - L - L - L - L
- I - I - I - I - I - I - I - I - I - I
Page 26

BACK TO CHAPTER INDEX
0B-8 MAINTENANCE AND LUBRICATION
I : Inspect and correct or replace as necessary A : Adjust
R : Replace or change T : Tighten to specified torque L : Lubricate
SERVICE INTERVAL: × 1,000 km
(Use odometer reading or × 1,000 miles
months whichever comes
first)
SERVICE BRAKES
Brake fluid - - - I - - - I - - - I - - - I - - - I
Brake system for fluid leakage I I I I I I I I I I I I I I I I I I I I
Brake function I I I I I I I I I I I I I I I I I I I I
* Front disc brake pads and discs wear - I - I - I - I - I - I - I - I - I - I
* Rear brake lining and drum wear - I - I - I - I - I - I - I - I - I - I
Brake pedal travel and play I I I I I I I I I I I I I I I I I I I I
Pipes and hoses for loose
connections or damage
PARKING BRAKE
Parking brake function I I I I I I I I I I I I I I I I I I I I
Parking brake lever travel I I I I I I I I I I I I I I I I I I I I
Cables for looseness or damage and
guide for damage
Ratchet for wear or damage - I - I - I - I - I - I - I - I - I - I
SUSPENSION
Leaf/Coil/Torsion bar springs for
damage
Mount for looseness or damage I I - I - I - I - I - I - I - I - I - I
Shock absorbers for oil leakage - I - I - I - I - I - I - I - I - I - I
Shock absorbers mount for
looseness
Rubber bushes of suspension wear
or damage
Spring action for loss of balance due
to weakening
Joint ball rubber boot for damage - I - I - I - I - I - I - I - I - I - I
WHEELS
Wheel nuts T T - T - T - T - T - T - T - T - T - T
Wheel disc for damage I I - I - I - I - I - I - I - I - I - I
Front hub bearing grease - - - - - R - - - - - R - - - - - R - -
Front and rear hub bearings for
looseness
Tire pressure and damage I I - I - I - I - I - I - I - I - I - I
Tire rotation (Rotate as required)
OTHERS
Bolts and nuts on chassis and body - - - I - - - I - - - I - - - I - - - I
Lube front free - wheeling hubs - - - - - - - L - - - - - - - L - - - -
or months
ISUZU KB P190 2007
TO MODEL INDEX
5 10 15 20 25 30 35 40 45 50 55 60 65 70 75 80 85 90 95 100
3 6 9 12 15 18 21 24 27 30 33 36 39 42 45 48 51 54 57 60
6 12 18 24 30 36 42 48 54 60 66 72 78 84 90 96 102 108 114 120
I I - I - I - I - I - I - I - I - I - I
I I I I I I I I I I I I I I I I I I I I
I I - I - I - I - I - I - I - I - I - I
- I - I - I - I - I - I - I - I - I - I
- I - I - I - I - I - I - I - I - - - I
- - - I - - - I - - - I - - - I - I - I
- I - I - I - I - I - I - I - I - I - I
Page 27
BACK TO CHAPTER INDEX
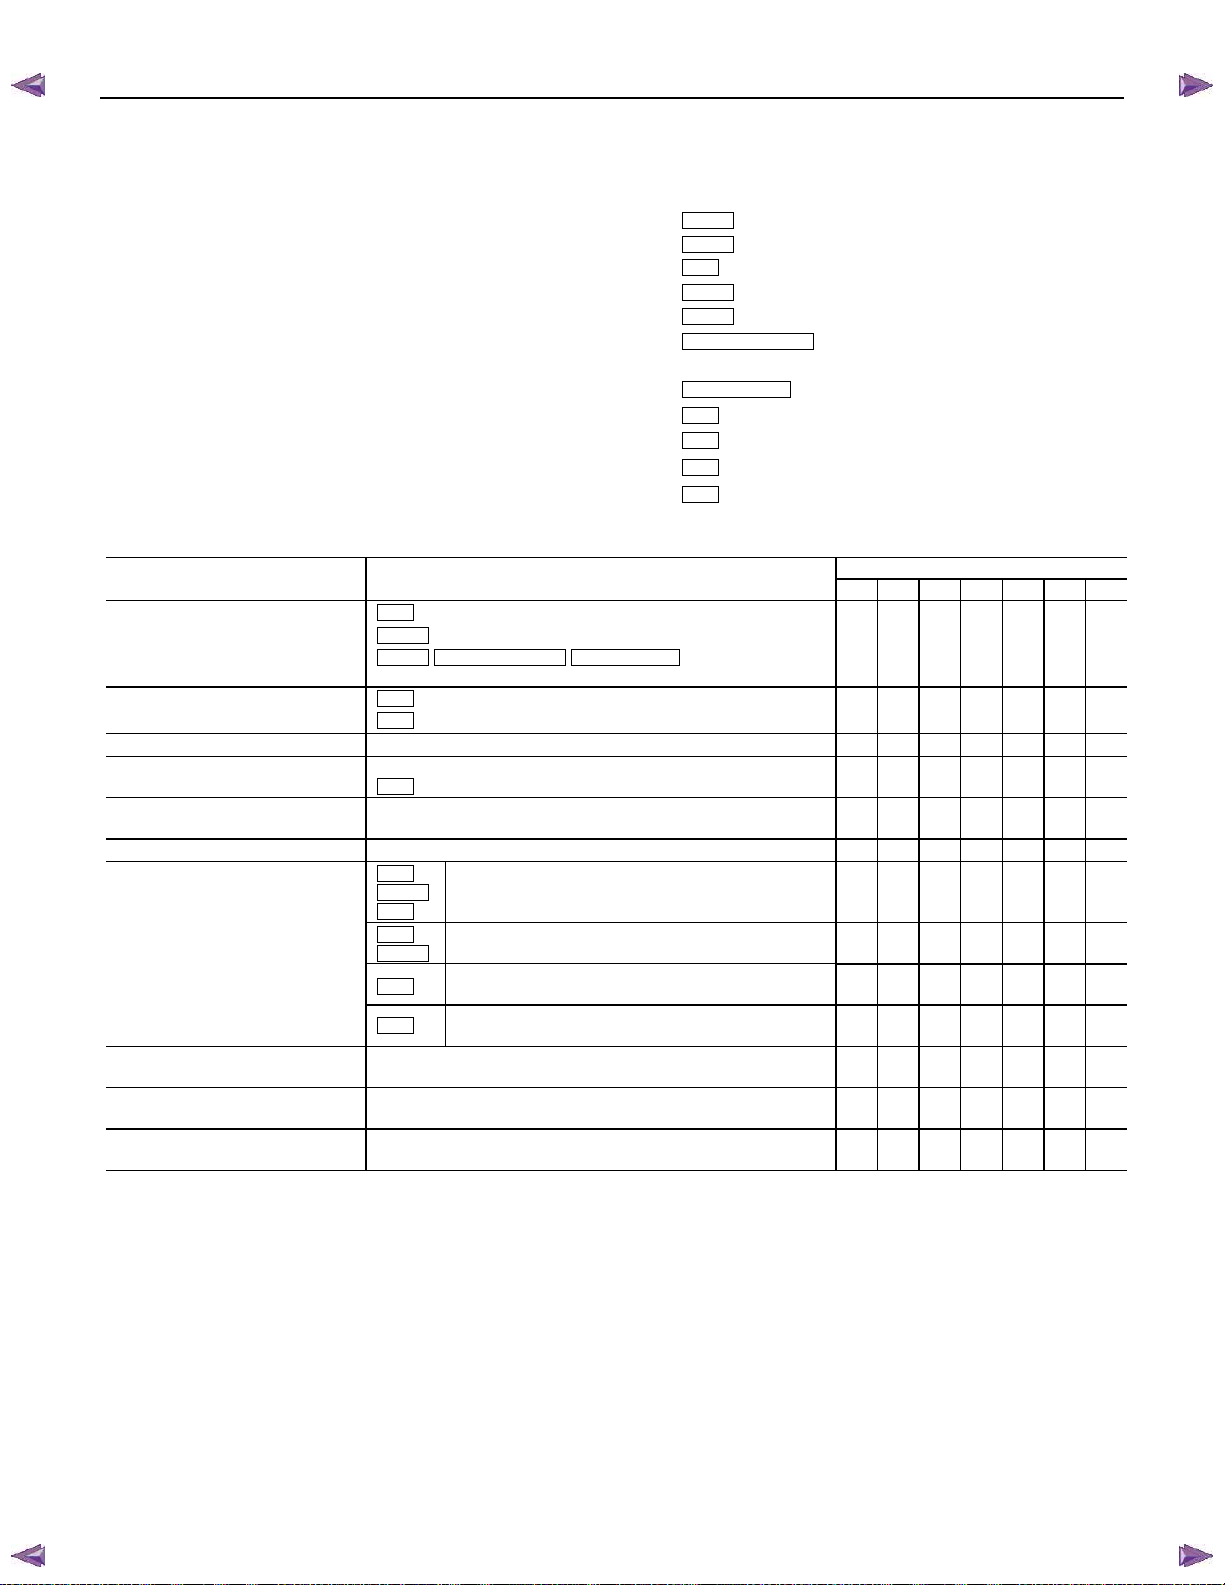
SEVERE CONDITIONS MAINTENANCE SCHEDULE (For GENERAL EXPORT)
Severe driving conditions
A : Repeated short trips
B : Driving on rough roads
C : Driving on dusty roads
D : Driving in extremely cold weather and/or on salted roads
E : Towing trailer or climbing mountain frequently
F : Operation in high ambient temperature conditions
4JJ1 Standard Output Diesel engine
Condition
A B C D E F A+D
Engine oil
Engine oil filter
Exhaust pipes and mounting Inspect ever y 5,000 km (3,000 miles)
Air cleaner element Replace every 20, 000 km (12,000 miles)
Steering system f or looseness
or damage
Universal joints and sleeves Inspect f or wear and lubricate every 5,000 km (3,000 miles)
Transmission or transmission
with transfer case oil
Differential oil Change every 20,000 km (12,000 miles)
Front brake pads and discs
wear
Rear brake lining and drum
wear
C24SE
HFV6
G
: Gasoline engine
4JA1-T
4JH1-TC
4JJ1 (Standard Output)
4JJ1 (High Output)
D
MT
:
AT
:
4WD
:
IntervalItem
G
: Change every 5,000 km (3,000 miles) or 3 month
4JA1-T
: Change every 2,500 km (1,500 miles)
4JH1-TC 4JJ1 (Standard Output) 4JJ1 (High Output)
Change every 5,000 km (3,000 miles)
G
: Replace every 5,000 km (3,000 miles) or 3 month
D
: Replace every 5,000 km (3,000 miles)
D
: Inspect every 2, 500 km (1,500 miles)
:
Inspect every 5,000 km (3,000 miles)
MT
C24SE
D
MT
HFV6
AT
4WD
Change every 20,000 km (12,000 miles)
after changing at ini tial 10,000 km (6,000 miles)
Change every 40,000 km (24,000 miles)
Transmission:
Change every 20,000 km (12,000 miles)
Transfer:
Change every 20,000 km (12,000 miles)
after changing at ini tial 10,000 km (6,000 miles)
Inspect every 5,000 km (3,000 miles)
Inspect every 5,000 km (3,000 miles)
ISUZU KB P190 2007
TO MODEL INDEX
MAINTENANCE AND LUBRICATION 0B-9
: C24SE Gasoline engine
: HFV6 Gasoline engine
: 4JA1-T Diesel engine
: 4JH1-TC Diesel engine
:
: 4JJ1 High Output Diesel engine
: Diesel engine
Manual transmission
Automatic transmission
Four wheel drive
● ●
●
● ●
●
● ● ●
●
●
● ● ●
● ● ●
●
●
●
●
●
●
●
●
●
Page 28
BACK TO CHAPTER INDEX
0B-10 MAINTENANCE AND LUBRICATION
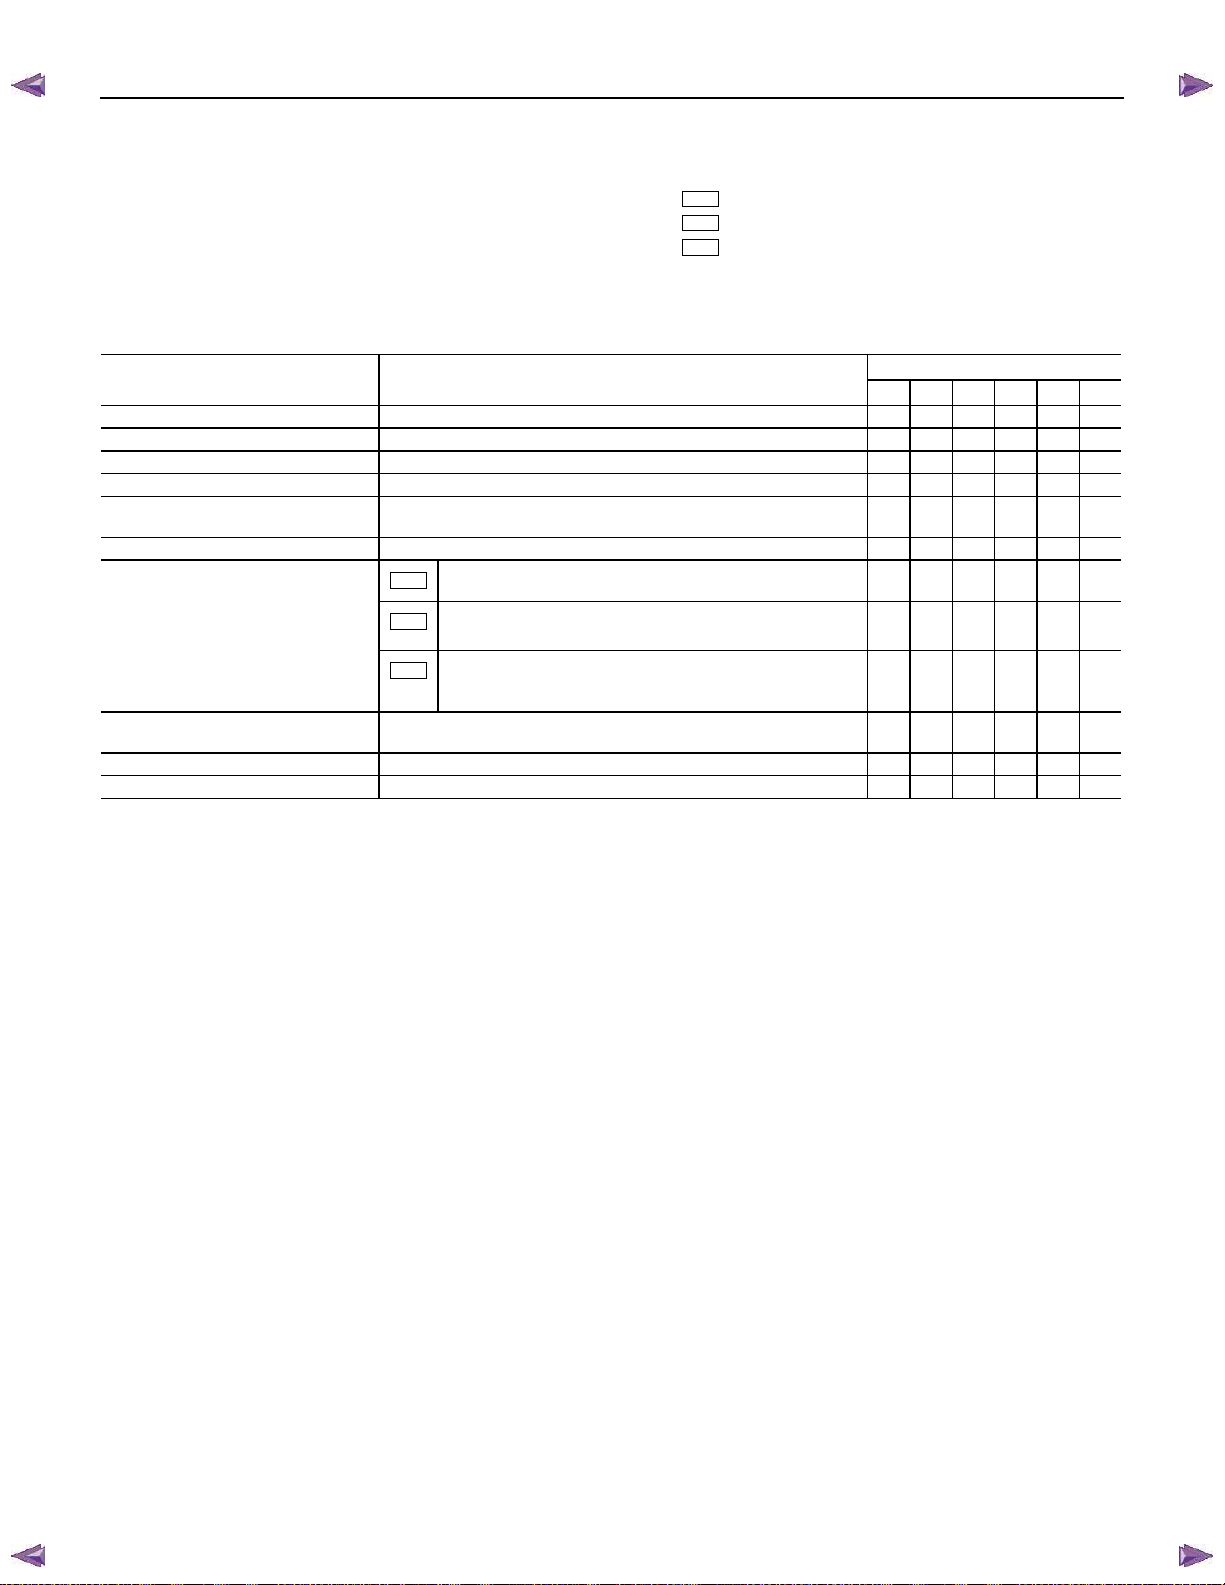
SEVERE CONDITIONS MAINTENANCE SCHEDULE (For EUROPE)
Severe driving conditions
A: Repeated short trips
B: Driving on rough roads
C: Driving on dusty roads
D: Driving in extremely cold weather and/or on salted roads
E: Towing trailer or climbing mountein frequently
Item Interval
Engine oil Change every 5,000 km (3,000 miles)
Engine oil filter Replace every 5,000 km (3,000 miles)
Exhaust pipes and mounting I nspect every 10,000 km (6,000 miles)
Air cleaner element Replace every 20,000 km (12,000 miles)
Steering system f or looseness or
damage
Universal joints and sleeves Inspect for wear and l ubricate every 10,000 km (6,000 miles)
Transmission or transmission
with transfer case oil
Differential oil Change every 20,000 km (12,000 miles)
Front brake pads and discs wear Inspect every 5,000 km (3,000 miles )
Rear brake lining and drum wear Inspect every 5,000 km (3,000 mil es)
MT
: Manual transmission
AT
: Automatic transmission
4WD
: Four wheel drive
Inspect every 5,000 km (3,000 miles)
Change every 30,000 km (18,000 miles)
MT
after changing at ini tial 10,000 km (6,000 miles)
Transmission:
AT
Inspection every 20,000 km (12,000 miles)
Transfer:
4WD
Change every 30,000 km (18,000 miles)
After changing at ini tial 10,000 km (6,000 miles)
after changing at ini tial 10,000 km (6,000 miles)
ISUZU KB P190 2007
TO MODEL INDEX
Condition
A
B C D E A+D
●
●
● ●
●
● ● ●
● ● ●
● ● ●
●
●
● ●
●
●
●
●
●
● ●
Page 29
BACK TO CHAPTER INDEX
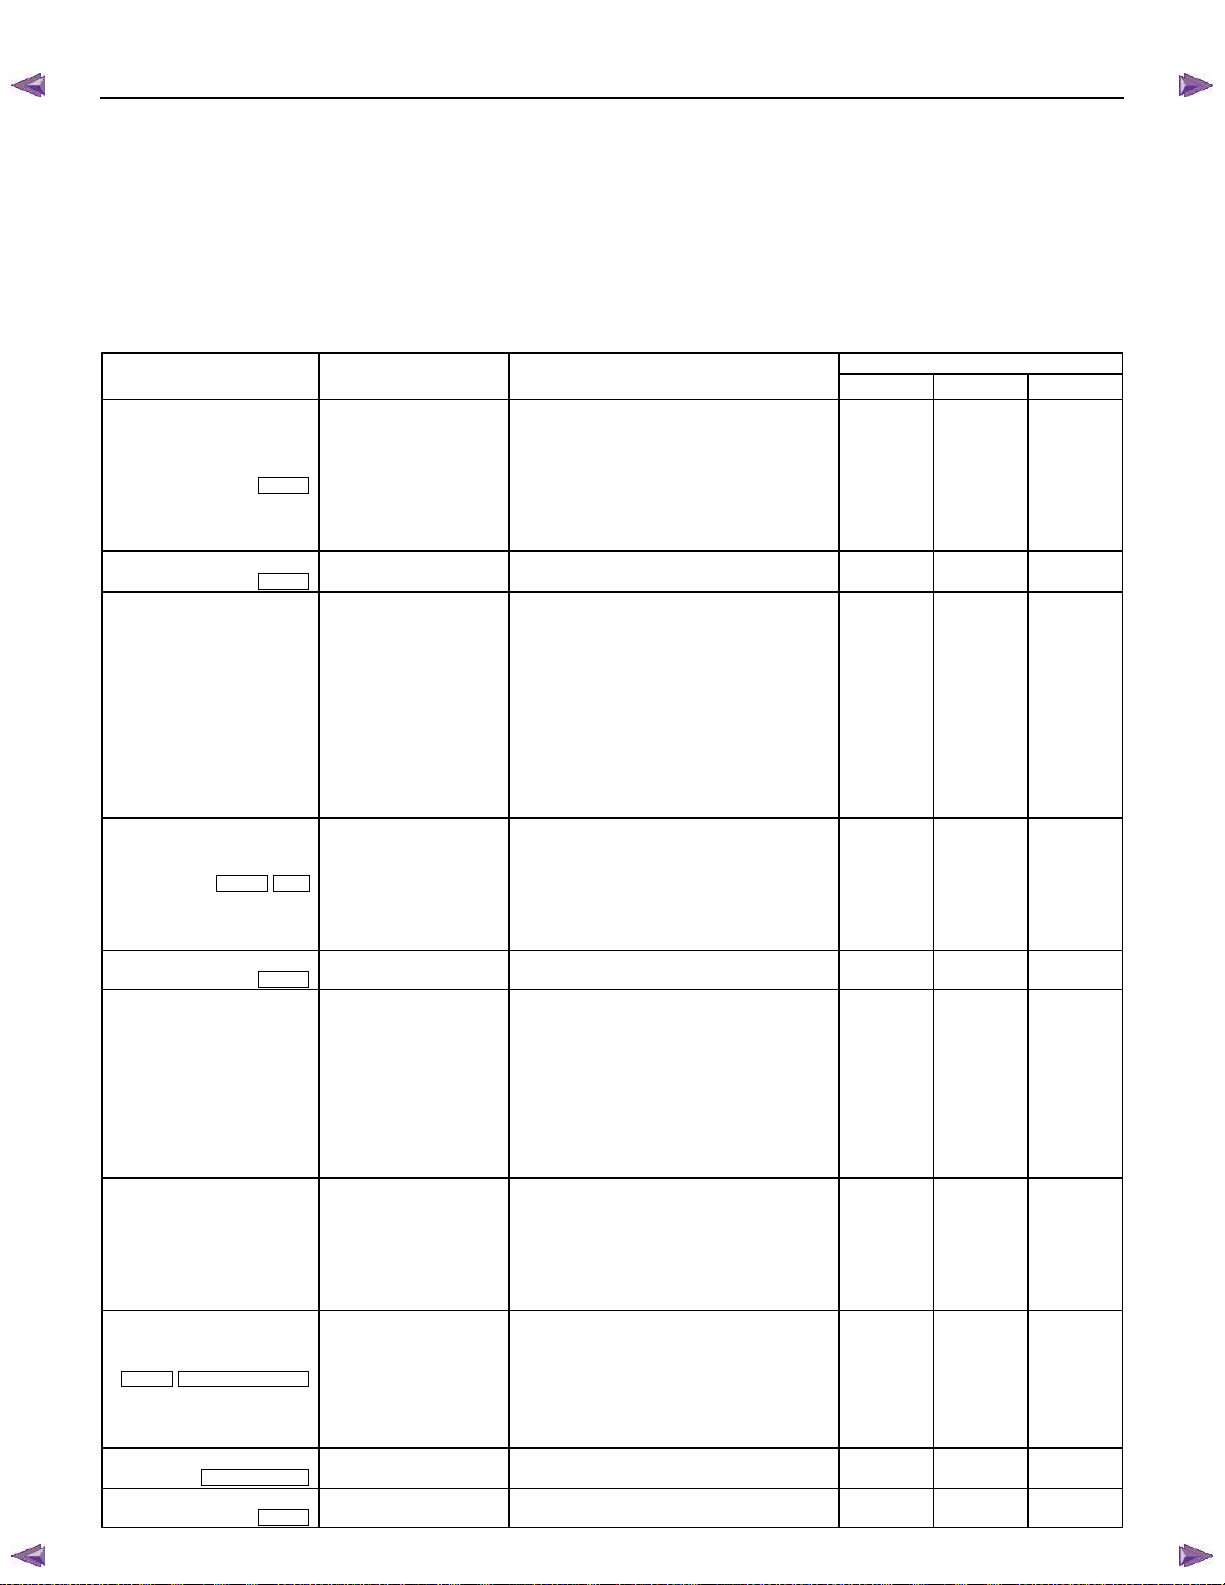
Recommended Fluids and Lubricants (For GENERAL EXPORT)
In order to obtain maximum performance and longest service life from your ISUZU vehicles, it is very important to
select and use correctly the best lubricants and diesel fuels.
When lubricating, be sure to use ISUZU genuine lubricants or recommended lubricants listed below, according to
the maintenance schedule for each vehicle model.
The lubrication intervals in the maintenance schedule and coverage and period of new vehicle warranty are based
on the use of ISUZU genuine lubricants or recommended lubricants listed in the chart, which will serve as a guide
for selecting lubricants of the correct brand name.
GRADE
LUBRICATION MAKE BRAND/TYPE
Gasoline engine
crankcase
Gasoline engine
crankcase
Diesel engine crankcase
Manual transmission
Transfer case
Manual transmission
Differential
Shift on the fly system
(GL-5 only)
Differential
(Limited Slip Differential)
Automatic transmission
4JH1-TC 4JJ1 (Standard Output)
Power steering
Automatic transmission
Automatic transmission
C24SE D
4JJ1 (High Output)
C24SE
HFV6
HFV6
HFV6
ISUZU GENUINE
ISUZU GENUINE
CALTEX
SHELL
ELF
TOTAL
CASTROL
BP
CALTEX
ISUZU GENUINE
ISUZU GENUINE
ISUZU GENUINE
CALTEX/CHEVRON
CALTEX/CHEVRON
SHELL
SHELL
ELF
TOTAL
CASTROL
CASTROL
BP
ISUZU GENUINE
CALTEX/CHEVRON
SHELL
ELF
TOTAL
CASTROL
BP
MOBIL
ISUZU GENUINE
ISUZU GENUINE
CALTEX
SHELL
ELF
TOTAL
CASTROL
CASTROL
BP
BP
ISUZU GENUINE
CALTEX
SELL
ELF
TOTAL
CASTROL
BP
ISUZU GENUINE
CALTEX/TEXACO
SHELL
ELF
TOTAL
CASTROL
BP
EXXON M OBIL
BESCO RACING ACE TYPE SJ (5W-30)
BESCO MULTI ACE (7.5W-30)
HAVOLINE FORMULA (15W-40, 10W-30, 20W-50)
HELIX PLUS (15W-50)
SUPER SPORTI S (15W-40)
QUARTZ 5000 (15W-40, 20W-50)
GTX-7 (15W-40)
VISCO 3000 (15W-40)
10W-30
HAVOLINE FORMULA (10W-30)
BESCO MULTI-Z TYPE CF-4 (10W-30)
BESCO MULTI-Z SUV (5W-30)
BESCO S-3 (10W, 20W, 30, 40)
DELO CXJ (15W-40, 20W-50, 40)
DELO 400 MULTIGRADE (15W -40)
RIMULA X (15W-40)
RIMULA D (15W-40, 30, 40)
PERFO 3F (15W-40)
RUBIA XT (15W-40)
RX SUPER PLUS (15W-40)
TECTION J PLUS (15W-40)
BP VANELLUS C6 (15W-40)
BESCO GEAR OIL TRANSAXLE (5W-30)
DELO 400 MULTIGRADE (15W -40)
HELIX PLUS (15W-50)
SUPER SPORTI (15W-40)
QUARTZ 5000 (15W-40, 20W-50)
RX SUPER PLUS (15W-40)
BP VANELLUS C6 (15W-40)
75W-90
MOBIL XHP (75W-90)
BESCO GEAR OIL SH (80W-90, 90, 140)
BESCO SHIFT ON THE FLY (75W-90)
THURBAN GL-5 EP (80W -90, 85W-140)
SPIRAX A (140)
TRANSELF TYPE B (80W-90, 85W-140)
TRANSMISSION TM (80W-90, 85W-140)
EPX90 (90)
DYNA DRIVE (80W-90)
ENERGEAR HYPO (90)
ENERGEAR EP (80W-90)
BESCO GEAR OIL LSD (140)
GEAR OIL LSD (90)
SPIRAX A LS 90 (90)
TRANSELF TYPE BLS (90)
TRANSMISSION DA (85W-90)
HYPOY LSX (90)
ENERGEAR LS-M (90)
BESCO ATF III
TEXAMATIC 1888 (DEXRON III)
SHELL DONAX TG (DEXRON III)
ELFMATIC G3 (DEXRON III)
TOTAL FLUID AT42 (DEXRON III)
TQ DEXRON III (DEXRON III)
AUTORAN DX3 (DEXRON III)
MOBIL ATF 3309
DEXRON III
ISUZU KB P190 2007
MAINTENANCE AND LUBRICATION 0B-11
API ACEA JASO
SJ
SG
SL
SJ/CF
SG
SJ/CF
SG/SH
SG/SH
SL
SL
CF-4
CD
CD
CD/CF
CD/CE/CF/CI-4
CH-4
CD/CF
CF-4/CE
CF-4
CH-4
CH-4
CH-4
SG
CD/CE/CF/CI-4
SJ/CF
SG/CD
SJ/CF
CD/CE/CF
CD/CE/CF
GL-3
GL-5
GL-5
GL-5
GL-5
GL-5
GL-5
GL-5
GL-5
GL-5
GL-5
GL-5
GL-5
GL-5
GL-5
GL-5
GL-5
GL-5
A3/B3
A2/B2
E3/E5
E3
B2/E2
E2
E3
E3/B3
E3
E3/E5
A3/B3
A2/B2
TO MODEL INDEX
DH-1
DH-1
DH-1
DH-1
DH-1
Page 30
BACK TO CHAPTER INDEX
0B-12 MAINTENANCE AND LUBRICATION
GRADE
LUBRICATION MAKE BRAND/TYPE
Grease fitting
(Multi purpose gr ease)
Propeller shaft sliding yoke
Universal joint
(Multi purpose gr ease
containing molybdenum
disulfide)
Engine cooling syst em
NOTE:
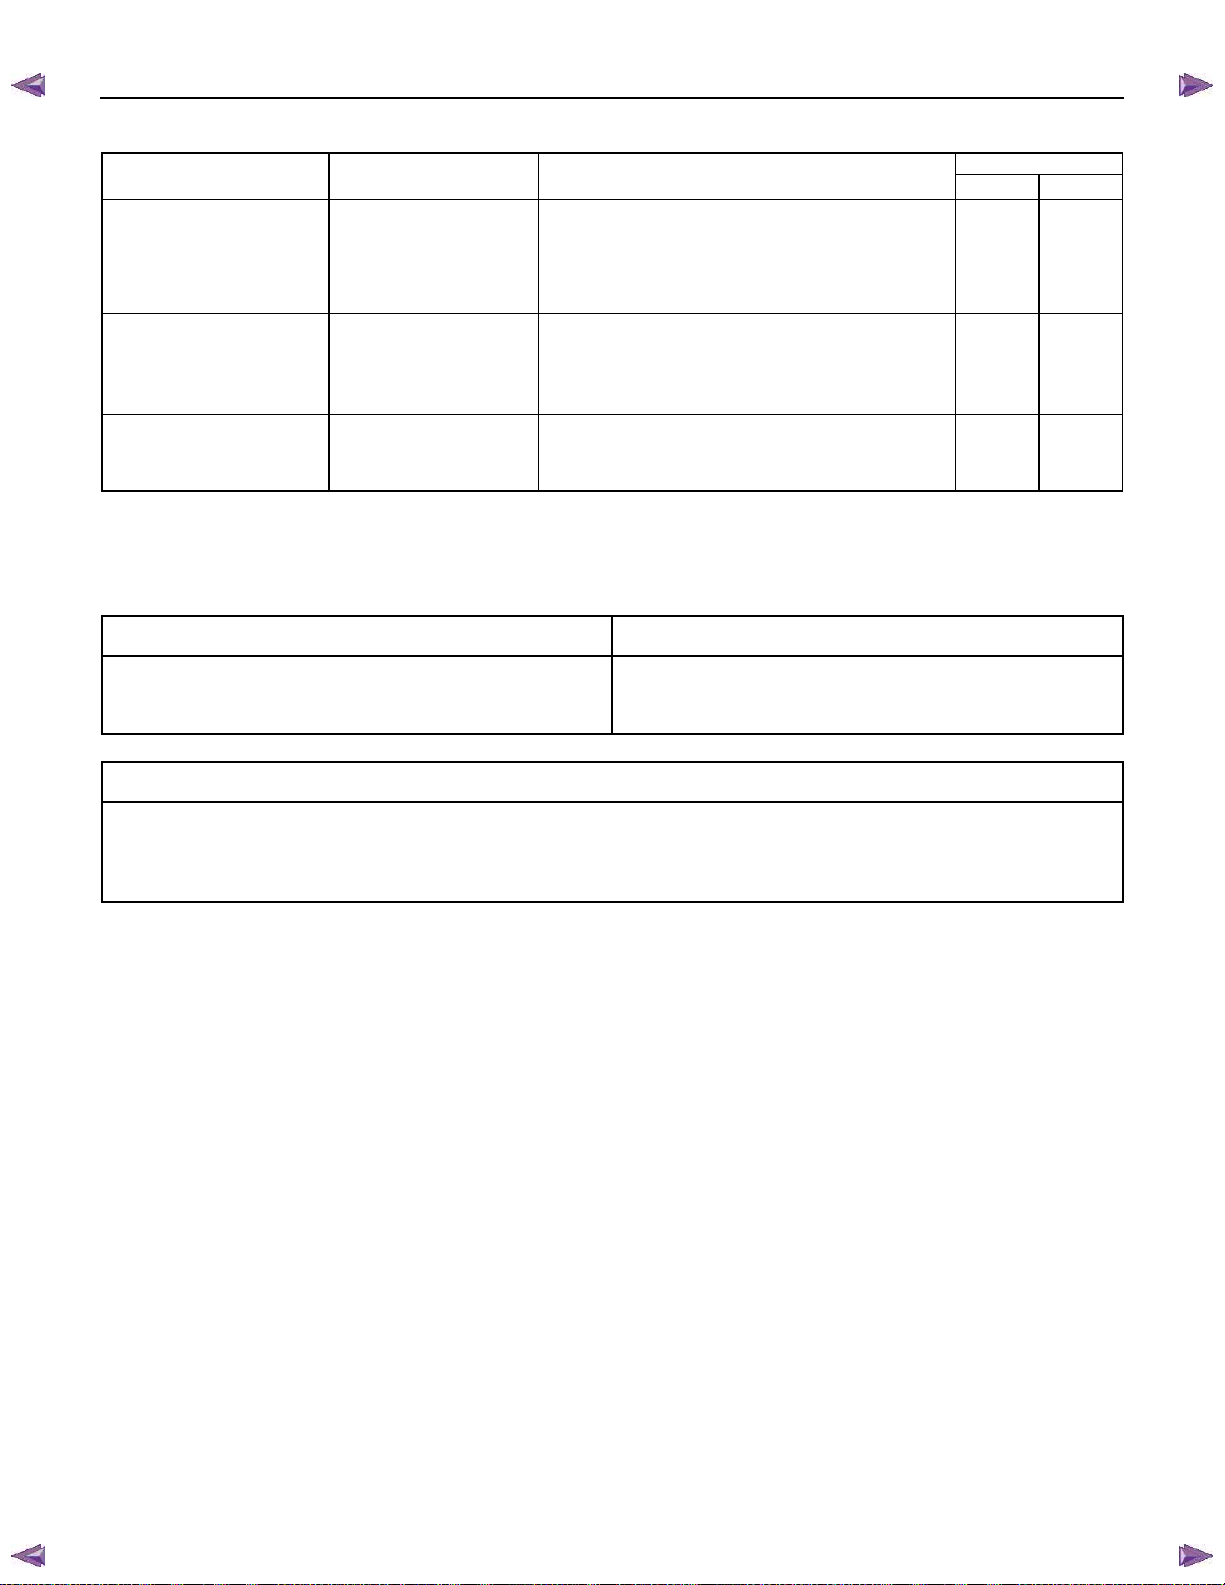
* If GL-5 Limited Slip Differential Lubricant is not available, use GL-5 Lubricant mixed with 1 bottle (118ml) of Limited
Slip Differential Lubricant additive (Parts No. 8-01052-358-0) or equivalent.
ISUZU KB P190 2007
TO MODEL INDEX
API ACEA
ISUZU GENUINE
CALTEX/TEXACO
SHELL
TOTAL
CASTROL
BP
ISUZU GENUINE
CALTEX
SHELL
TOTAL
ISUZU GENUINE
CALTEX/TEXACO/
CHEVRON
FLUID TYPE
BESCO L-2 GREASE (No. 2), L-3 GREASE (No. 3)
STARPLEX-2 (No. 2)
RETINAX LX2 (No. 2)
MULTIS EP2, EP3 (No. 2, No. 3)
LM GREASE (No. 2, No. 3)
ENERGREASE LS (No.2, No3)
ONE LUBER MO GREASE
MOLYTEX GREASE EP2 (No.2)
RETINAX HDX2 (No.2)
TOTAL MULTIS MS2 (No.2, No.3)
BESCO LLC SUPER TYPE E
EXTENDED LIFE COOLANT
HAVOLINE XLC
DELO XLC
Clutch and brake fluid reservoir
Besco brake fluid (For light duty)
Hydraulic brake fluid SAE J1703
FMVSS 116 DOT.3 grade
DIESEL FUEL/APPLICABLE STANDARD
JIS (JAPANESE INDUSTRIAL STANDARD) Based on K2204 GAS OIL
DIN (DEUTSCHE INDUSTRIE NORMEN) Based on EN590 : 1997
SAE (SOCIETY OF AUTOMOTIVE ENGINEERS) Based on SAE J-313C
BS (BRITISH STANDARD) Based on BS EN590 : 1997
NOTE:
Use the applicable standard or equivalent for diesel fuels.
Page 31
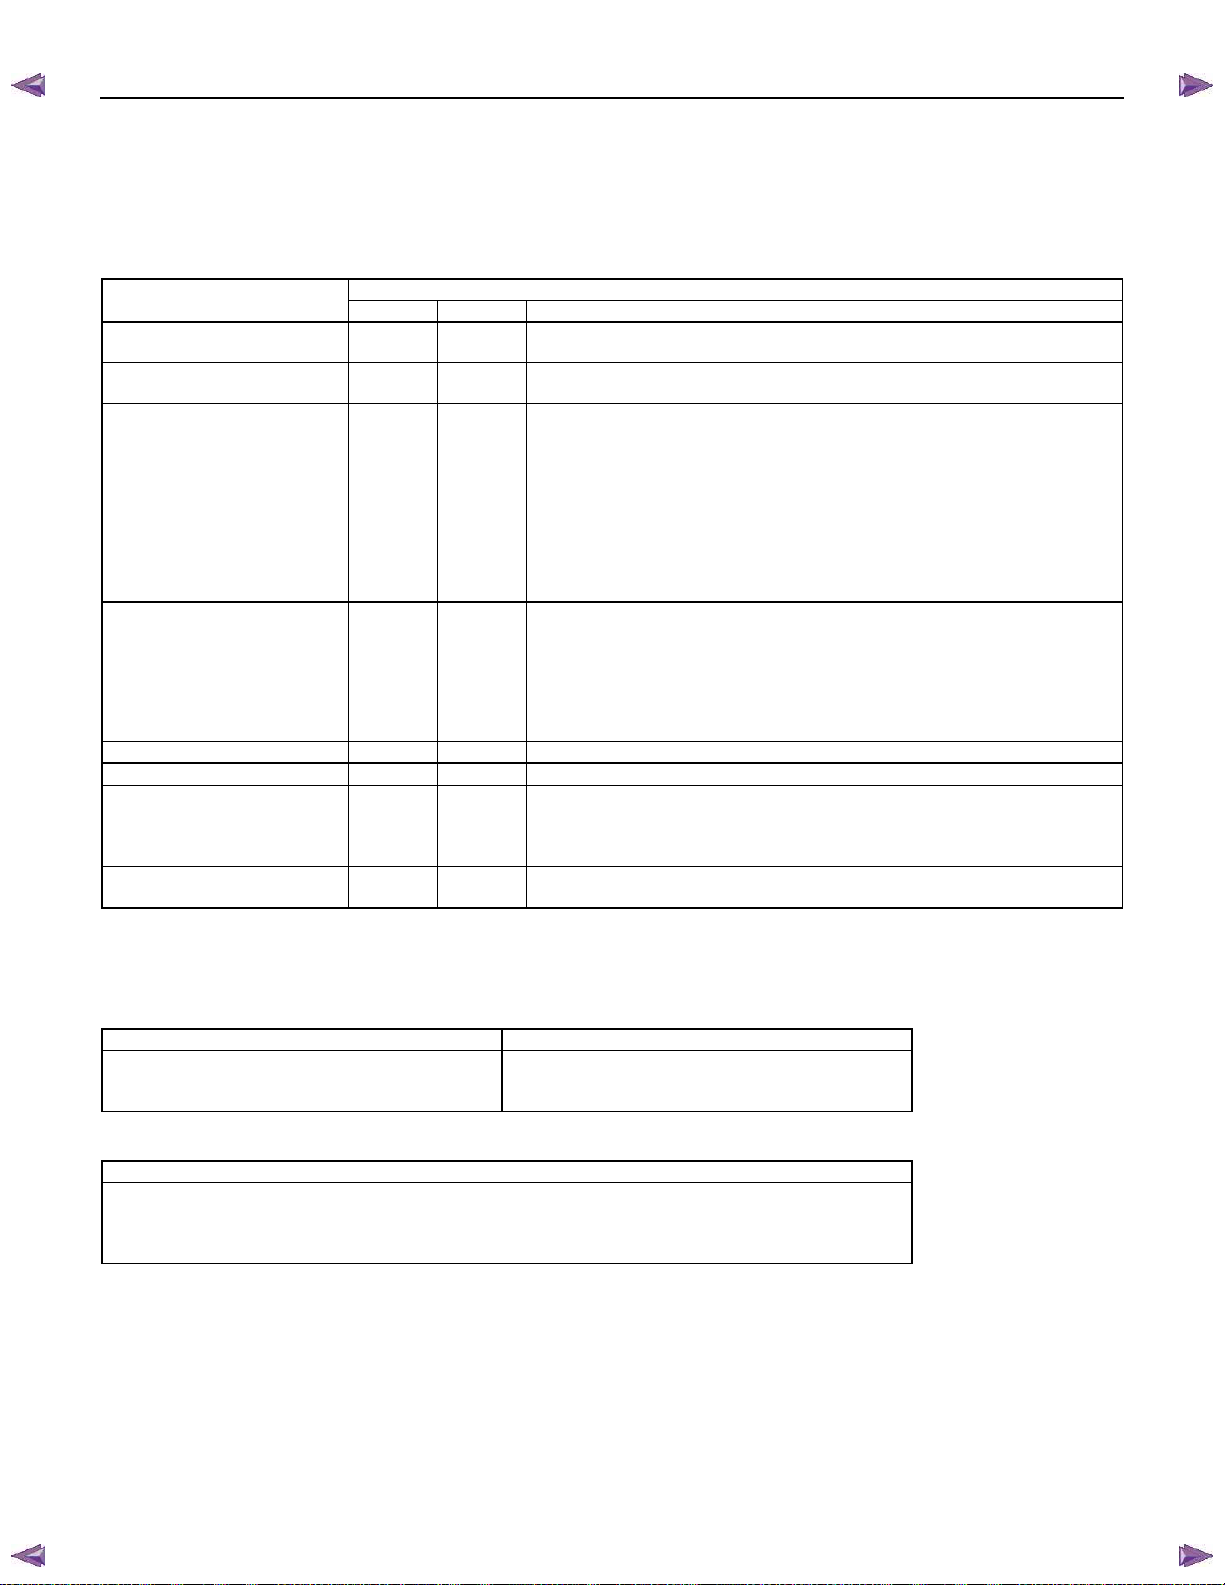
BACK TO CHAPTER INDEX
ISUZU KB P190 2007
TO MODEL INDEX
MAINTENANCE AND LUBRICATION 0B-13
RECOMMENDED FLUIDS AND LUBRICANTS (For EUROPE)
In order to obtain maximum performance and longest service life from your ISUZU vehicles, it is very important to
select and use correctly the best lubricants and diesel fuels.
When lubricating, be sure to use ISUZU genuine lubricants or recommended lubricants listed below, according to
the maintenance schedule for each vehicle model.
LUBRICATION/FLUID GRADE
API ACEA OTHER
Diesel engine crankcase B2/B3
Manual transmission
Transfer case
Differential
Shift on the fly system
(GL-5 only)
Differential
(Limited Slip Differential)
(GL-5 only)
Automatic transmission
Power steering
Propeller shaft sliding yoke
Universal joint
(General purpose grease in
Molybdenum)
Engine cooling syst em
B2/B3
GL-5
GL-5
NLGI #2 or #3
Good qualit y ethylene glycol antifreeze or GM spec .
E2/E3
E2/E3
BESCO GEAR OIL SH (80W-90, 90, 140) (ISUZU GENUINE)
BESCO SHIFT ON THE FLY (75W-90) (ISUZU GENUINE)
THURBAN GL-5 EP (80W-90, 85W-140) (CALTEX)
SPIRAX A (140) (SHELL)
TRANSELF TYPE B (80W-90, 85W-140) (ELF)
TRANSMISSION TM (80W-90, 85W-140) (TOTAL)
EPX90 (90)(CASTROL)
DYNA DRIVE (80W-90) (CASTROL)
ENERGEAR HYPO (90) (BP)
ENERGEAR EP (80W-90) (BP)
BESCO GEAR OIL LSD (140) (ISUZU GENUINE)
GEAR OIL LSD (90) (CALTEX)
SPIRAX A LS 90 (90) (SHELL)
TRANSELF TYPE BLS (90) (ELF)
TRANSMISSION DA (85W- 90) (TOTAL)
HYPOY LSX (90) (CASTROL)
ENERGEAR LS-M (90) (BP)
MOBIL ATF 3309
DEXRON III
multi purpose type gr ease
containing molybdenum disulfide
6033-M or equivalent
NOTE:
* If GL-5 Limited Slip Differential Lubricant is not available, use GL-5 Lubricant mixed with 1 bottle (118ml) of Limited
Slip Differential Lubricant additive (Parts No. 8-01052-358-0) or equivalent.
Clutch and brake fluid reservoir
FLUID TYPE
Besco brake fluid (For light duty)
Hydraulic brake fluid SAE J1703
FMVSS 116 DOT.3 grade
DIESEL FUEL/APPLICABLE STANDARD
JIS (JAPANESE INDUSTRIAL STANDARD)
DIN (DEUTSCHE INDUSTRIE NORMEN)
SAE (SOCIETY OF AUTOMOTIVE ENGINEERS)
BS (BRITISH STANDARD)
Based on K2204 GAS OIL
Based on EN590: 1997L
Based on SAE J-313C
Based on BS EN590: 1997
NOTE:
Use the applicable standard or equivalent for diesel fuels.
Page 32
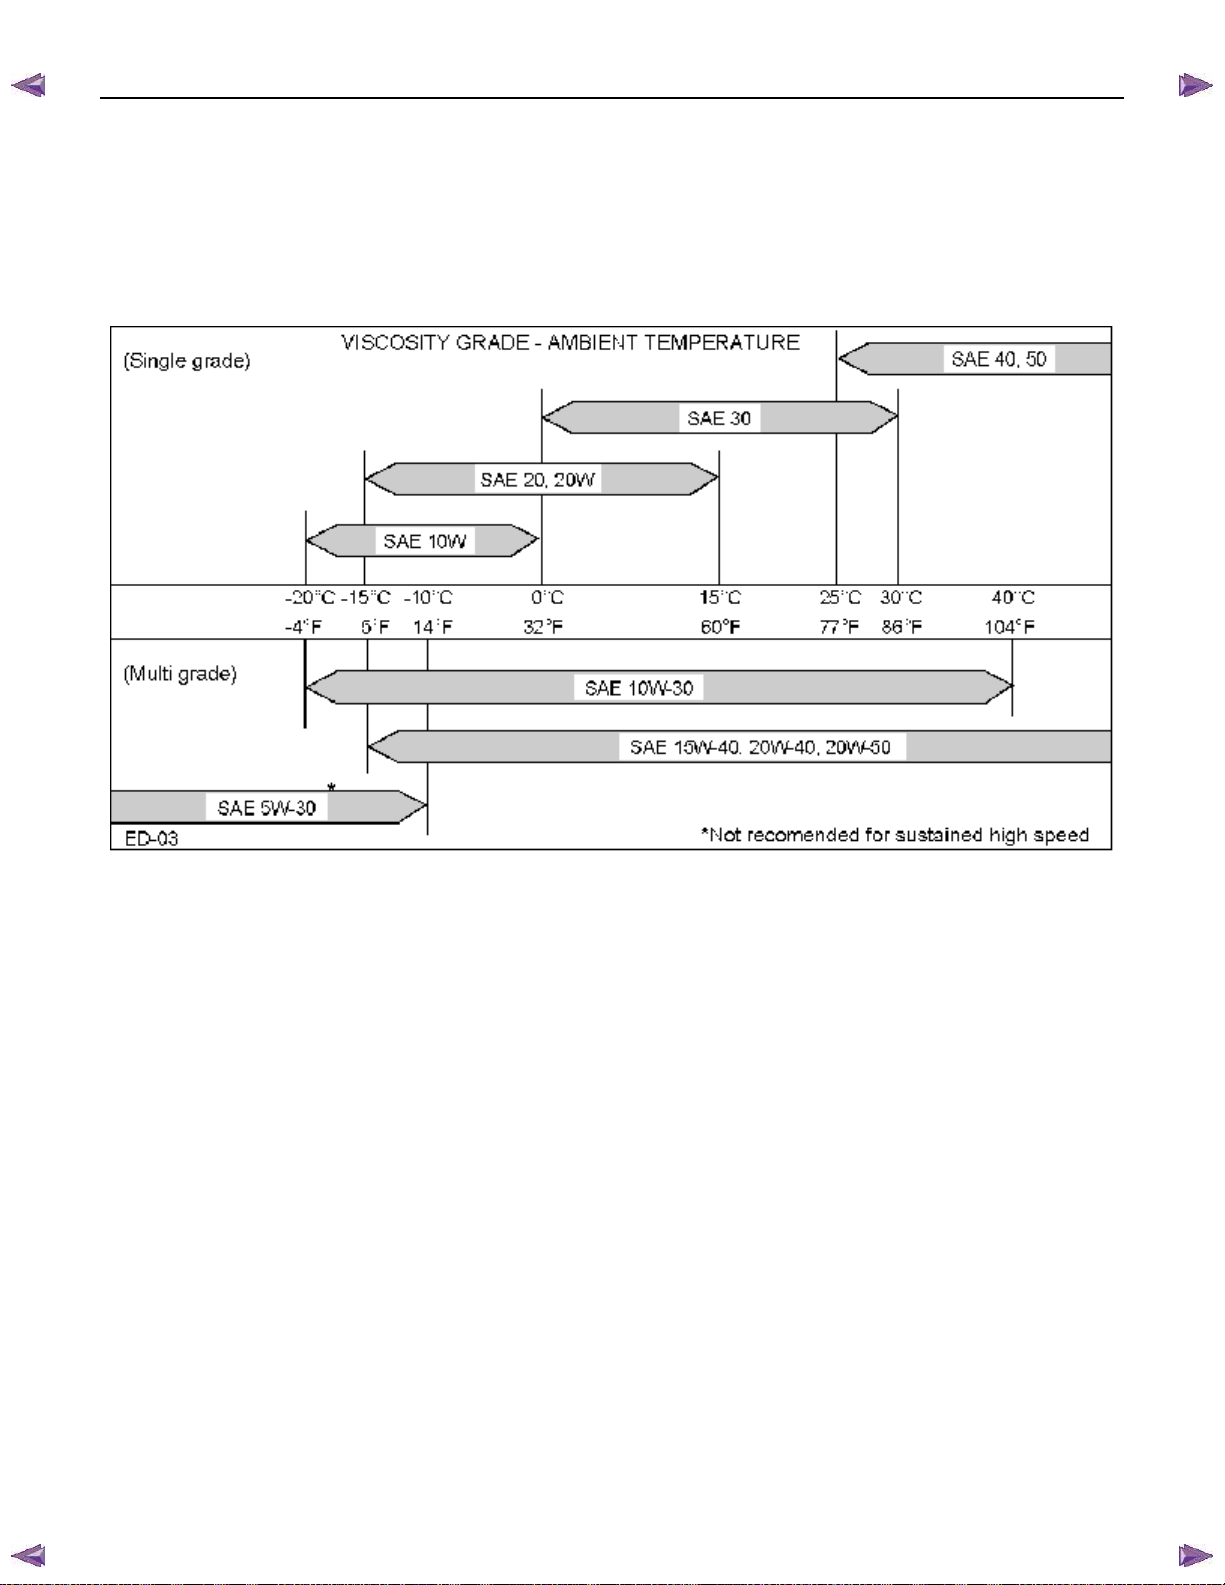
BACK TO CHAPTER INDEX
0B-14 MAINTENANCE AND LUBRICATION
Lubricants should be carefully selected according to the lubrication chart. It is also important to select the viscosity
of lubricants according to the ambient temperature by referring to the following table.
ISUZU KB P190 2007
TO MODEL INDEX
OIL VISCOSITY CHART
OIL VISCOSITY CHART FOR DIESEL ENGINE
APPLY DIESEL ENGINE OIL
RTA7Z0SF000101
Page 33
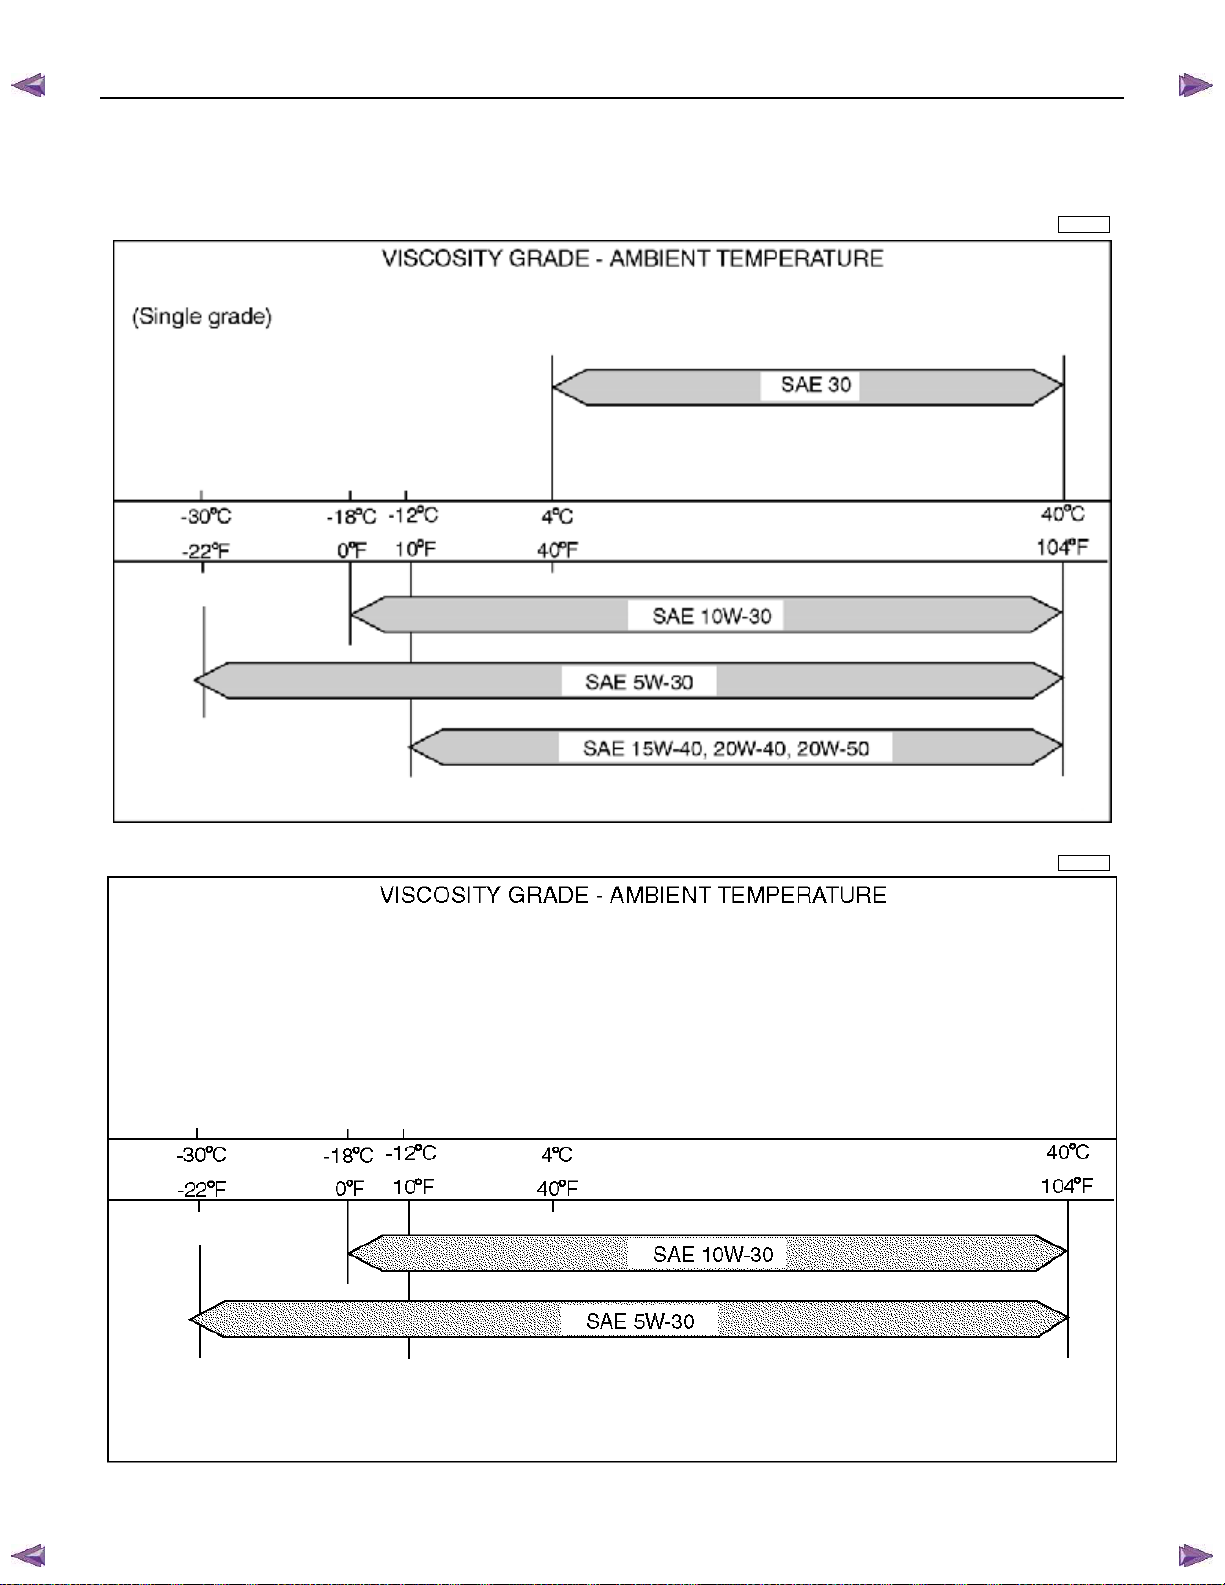
BACK TO CHAPTER INDEX
MAINTENANCE AND LUBRICATION 0B-15
OIL VISCOSITY CHART FOR GASOLINE ENGINE
APPLY GASOLINE ENGINE OIL
ISUZU KB P190 2007
TO MODEL INDEX
C24SE
(Multi grade)
HFV6
Page 34
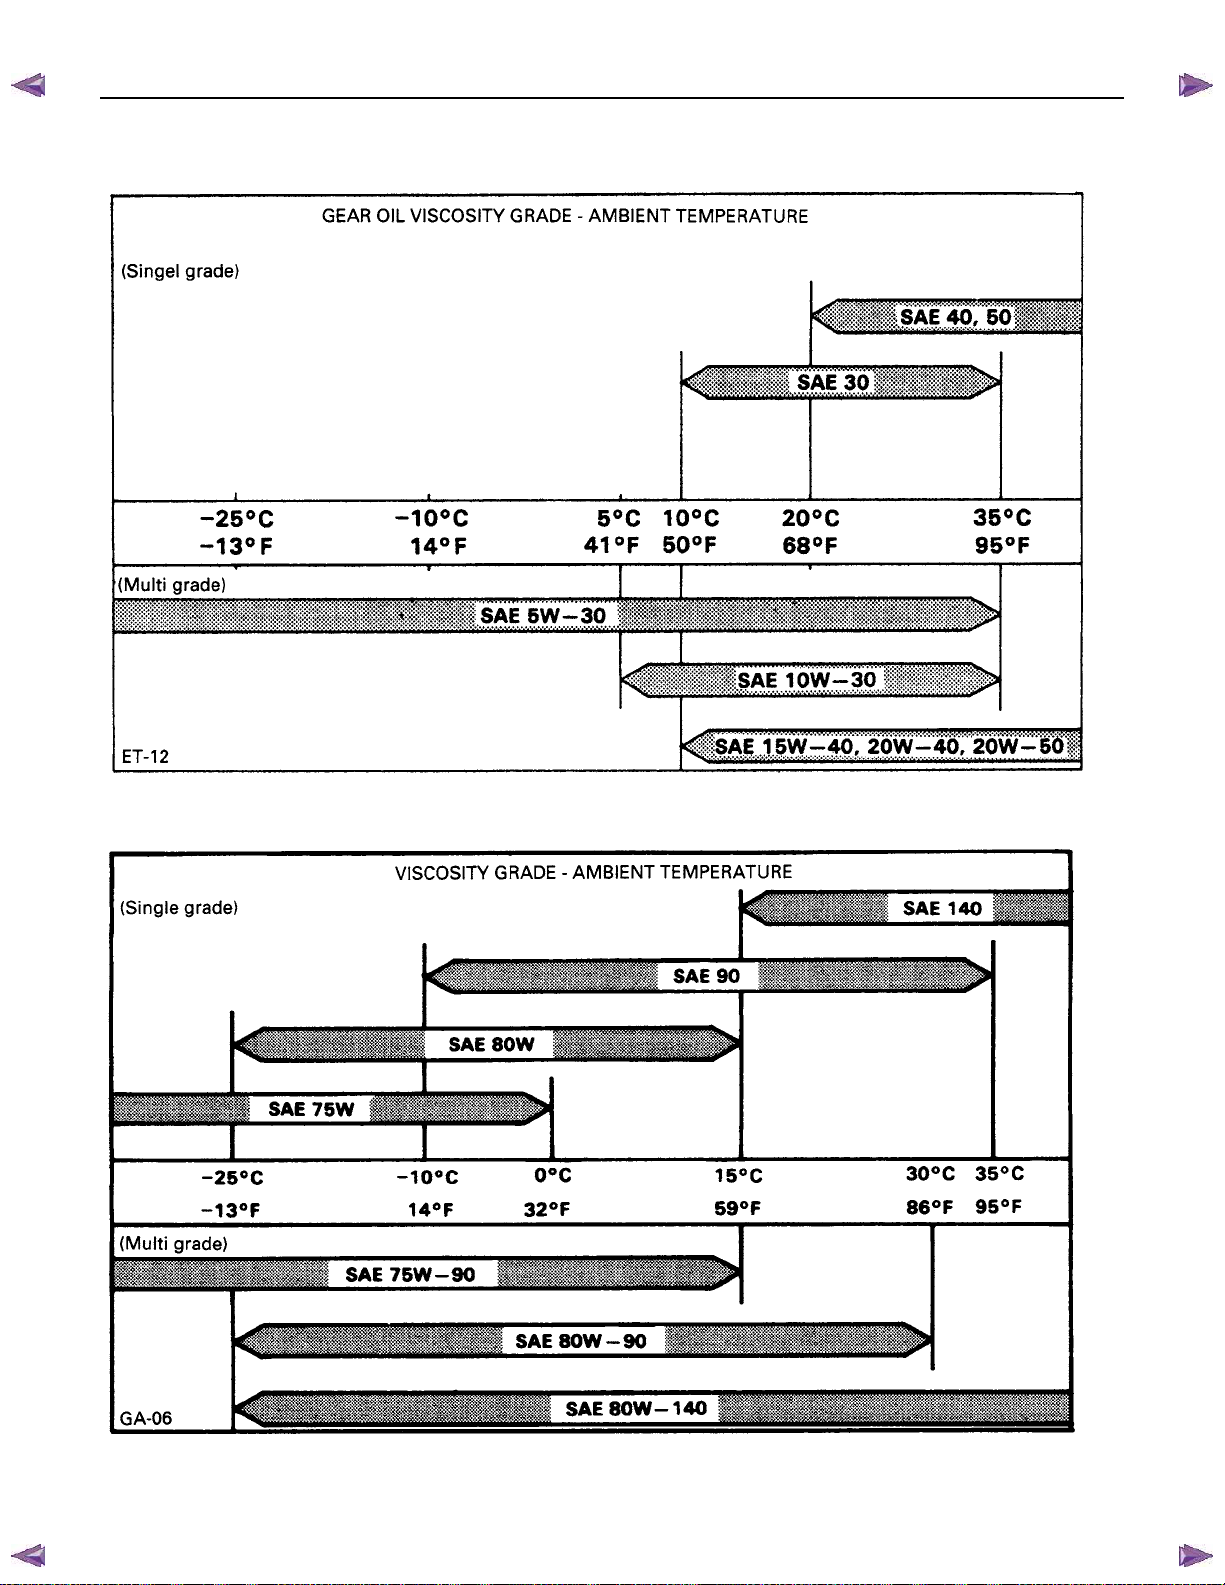
BACK TO CHAPTER INDEX
0B-16 MAINTENANCE AND LUBRICATION
ISUZU KB P190 2007
TO MODEL INDEX
OIL VISCOSITY CHART FOR TRANSMISSION CASE
OIL VISCOSITY CHART FOR FRONT AXLE AND REAR AXLE
Page 35

BACK TO MAIN INDEX
General Description ........................................................................................................ 1- 3
Main Data and Specifications......................................................................................... 1- 21
Special Parts Fixing Nuts and Bolts.............................................................................. 1- 23
On-Vehicle Service.......................................................................................................... 1- 30
Precautions For Replacement or repair of air conditioning parts.......................... 1- 30
ISUZU KB P190 2007
TO MODEL INDEX
HEATER A ND AIR CONDITIONING 1-1
SECTION 1
HEATER AND AIR CONDITIONING
TABLE OF CONTENTS
PAGE
Condenser........................................................................................................................ 1- 40
Removal and Installation (4JH1-TC, 4JJ1-TC Standard Output)............................. 1- 40
Removal and Installation
(4JJ1-TC High Output, 4JK1-TC High Output, 4JA1-T) ........................................ 1- 41
Removal and Installation (C24SE)............................................................................. 1- 42
Condenser Fan Motor ..................................................................................................... 1- 43
Removal and Installation............................................................................................ 1- 43
Receiver/drier .................................................................................................................. 1- 44
Removal and Installation............................................................................................ 1- 44
Compressor ..................................................................................................................... 1- 45
Removal and Installation (4JA1-T, 4JH1-TC)............................................................ 1- 45
Removal and Installation
(4JJ1-TC Standard Output, 4JJ1-TC High Output, 4JK1-TC High Output)......... 1- 47
Removal and Installation (C24SE)............................................................................. 1- 49
Disassembly................................................................................................................ 1- 55
Reassembly................................................................................................................. 1- 57
Heater Unit ....................................................................................................................... 1- 59
Removal and Installation............................................................................................ 1- 59
Disassembly and Reassembly................................................................................... 1- 61
Vent Unit (Without Heater) ............................................................................................. 1- 62
Removal and Installation............................................................................................ 1- 62
Disassembly and Reassembly................................................................................... 1- 64
Page 36

BACK TO CHAPTER INDEX
1-2 HEATER A ND AIR CONDITIONING
Evaporator (With A/C) ..................................................................................................... 1- 65
Removal and Installation............................................................................................ 1- 65
Disassembly and Reassembly................................................................................... 1- 66
Duct (Without A/C)........................................................................................................... 1- 68
Removal and Installation............................................................................................ 1- 68
Disassembly and Reassembly................................................................................... 1- 69
Blower Unit Assembly..................................................................................................... 1- 70
Removal and Installation............................................................................................ 1- 70
Disassembly and Reassembly................................................................................... 1- 72
Defroster Nozzle and Vent Duct..................................................................................... 1- 73
ISUZU KB P190 2007
TO MODEL INDEX
PAGE
Removal and Installation............................................................................................ 1- 73
Rear Heater Duct ............................................................................................................. 1- 74
Removal and Installation............................................................................................ 1- 74
Control Lever Assembly................................................................................................. 1- 75
Removal and Installation............................................................................................ 1- 75
Control Panel Illumination Bulb..................................................................................... 1- 79
Removal and Installation............................................................................................ 1- 79
Inspection and Repair ................................................................................................ 1- 81
Troubleshooting.............................................................................................................. 1- 85
Special Service Tool........................................................................................................ 1-119
Page 37
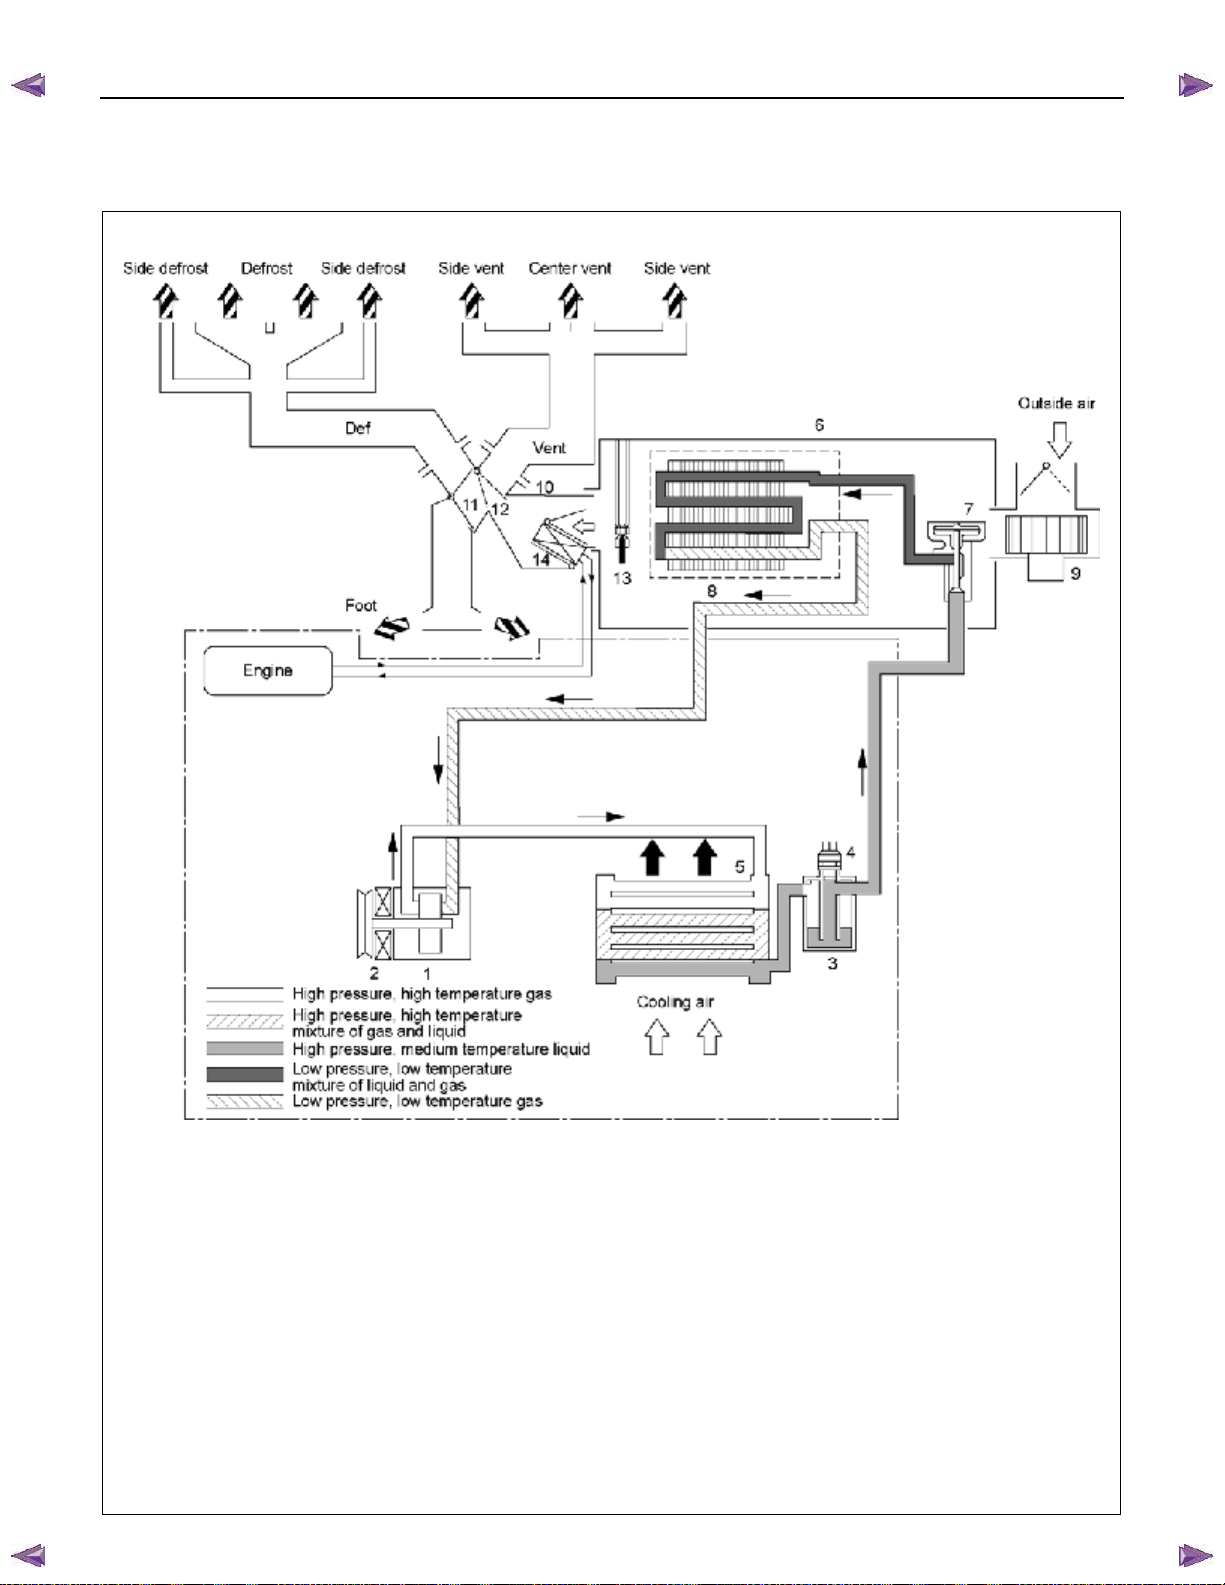
BACK TO CHAPTER INDEX
COOLING SYSTEM
ISUZU KB P190 2007
TO MODEL INDEX
HEATER A ND AIR CONDITIONING 1-3
GENERAL DESCRIPTION
1.
2.
3.
4.
5.
6.
7.
Compressor 8.
Magnetic clutch 9.
Receiver/Drier 10.
Triple pressure switch 11.
Condenser 12.
Evaporator assembly 13.
Expansion valve 14.
Evaporator core
Blower motor
Heater unit
Mode (DEF/FOOT) control door
Mode (VENT) control door
Electronic thermostat
Heater core
RTW610LF000101
Page 38
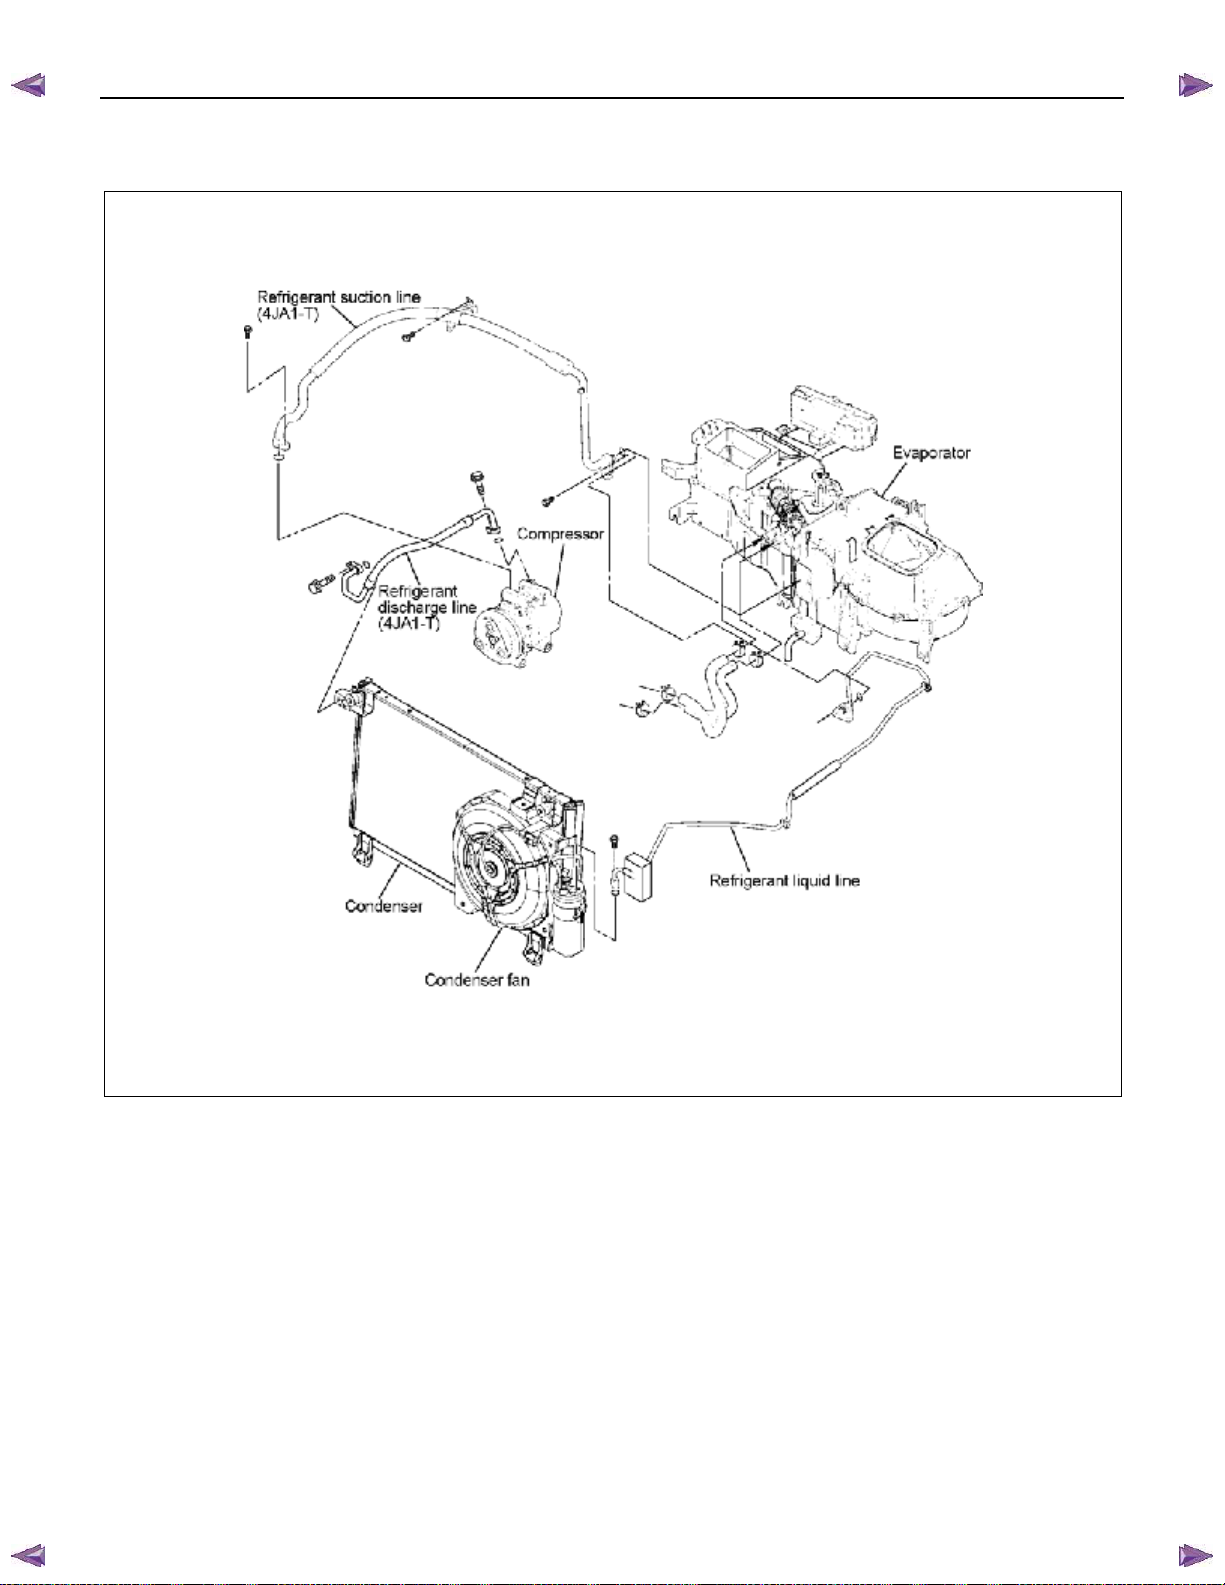
BACK TO CHAPTER INDEX
1-4 HEATER A ND AIR CONDITIONING
COMPONENTS (CHASSIS SIDE)
(4JA1-T RHD MODEL)
ISUZU KB P190 2007
TO MODEL INDEX
RTW710LF001901
Page 39
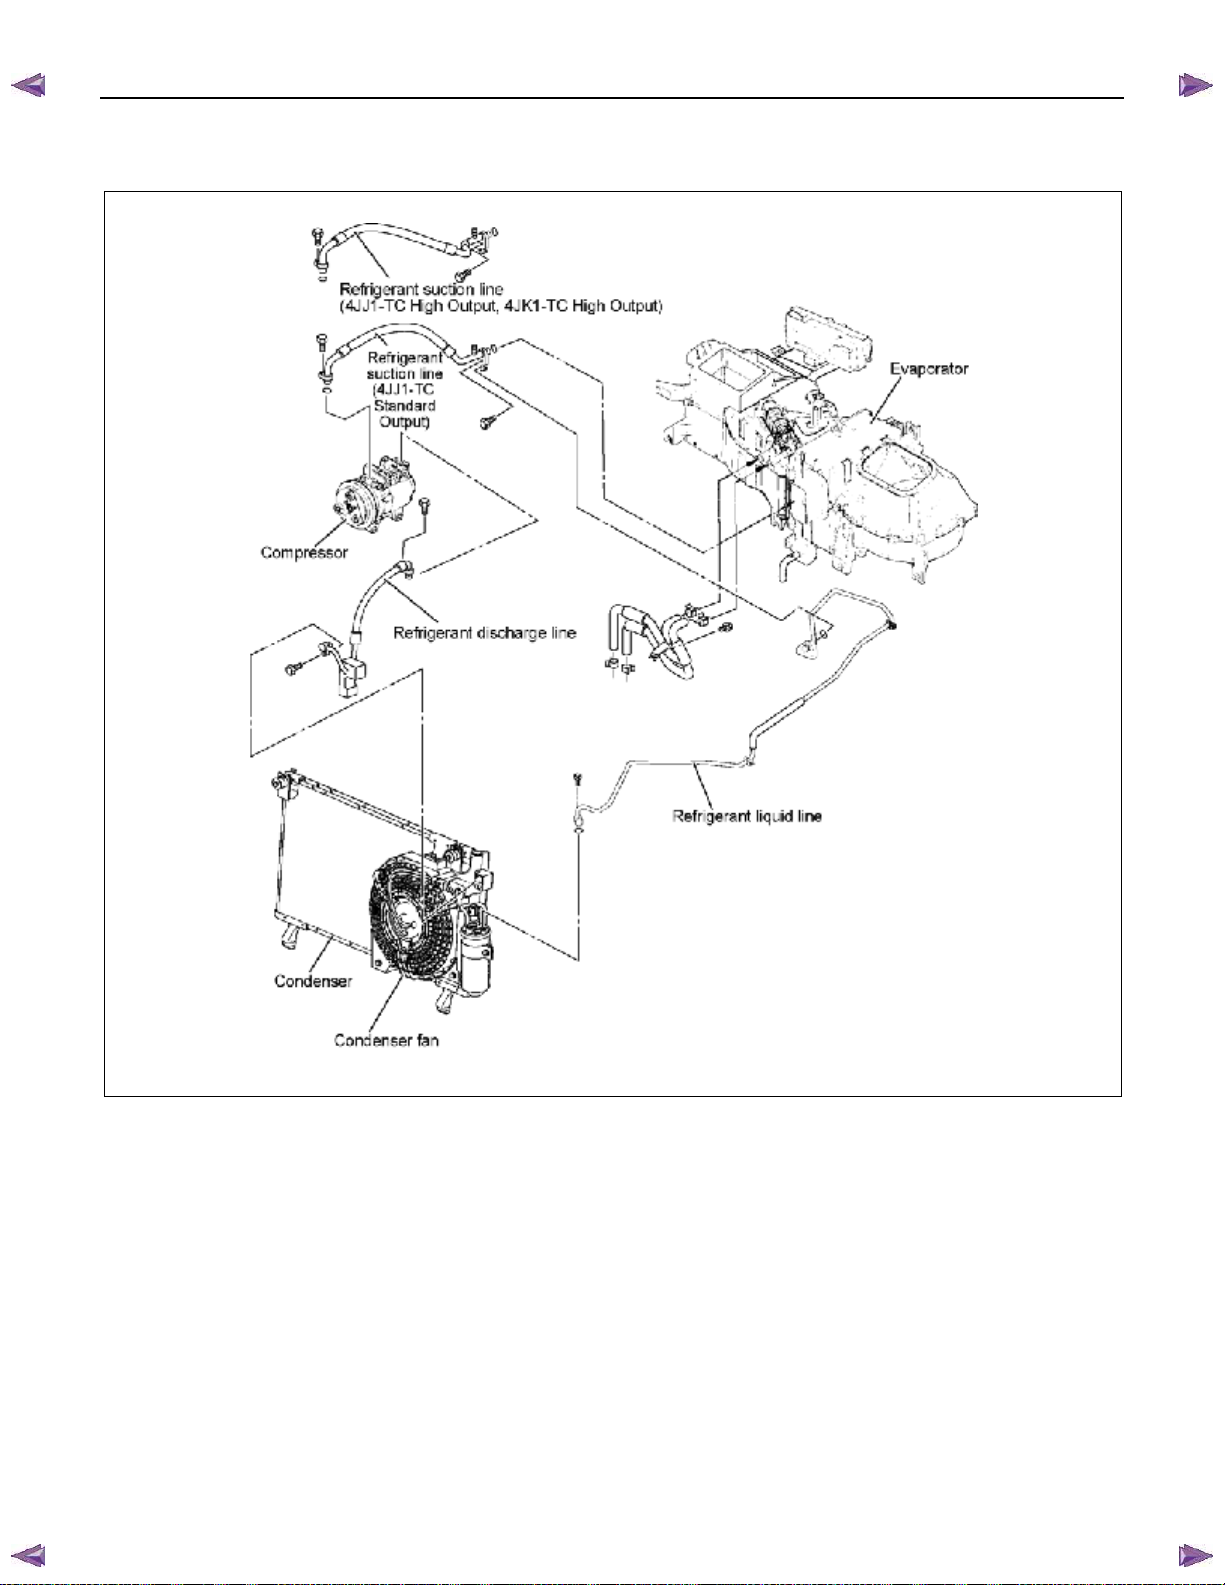
BACK TO CHAPTER INDEX
(4JJ1-TC Standard Output, 4JJ1-TC High Output, 4JK1-TC High Output RHD MODEL)
ISUZU KB P190 2007
TO MODEL INDEX
HEATER A ND AIR CONDITIONING 1-5
RTW710LF002001
Page 40
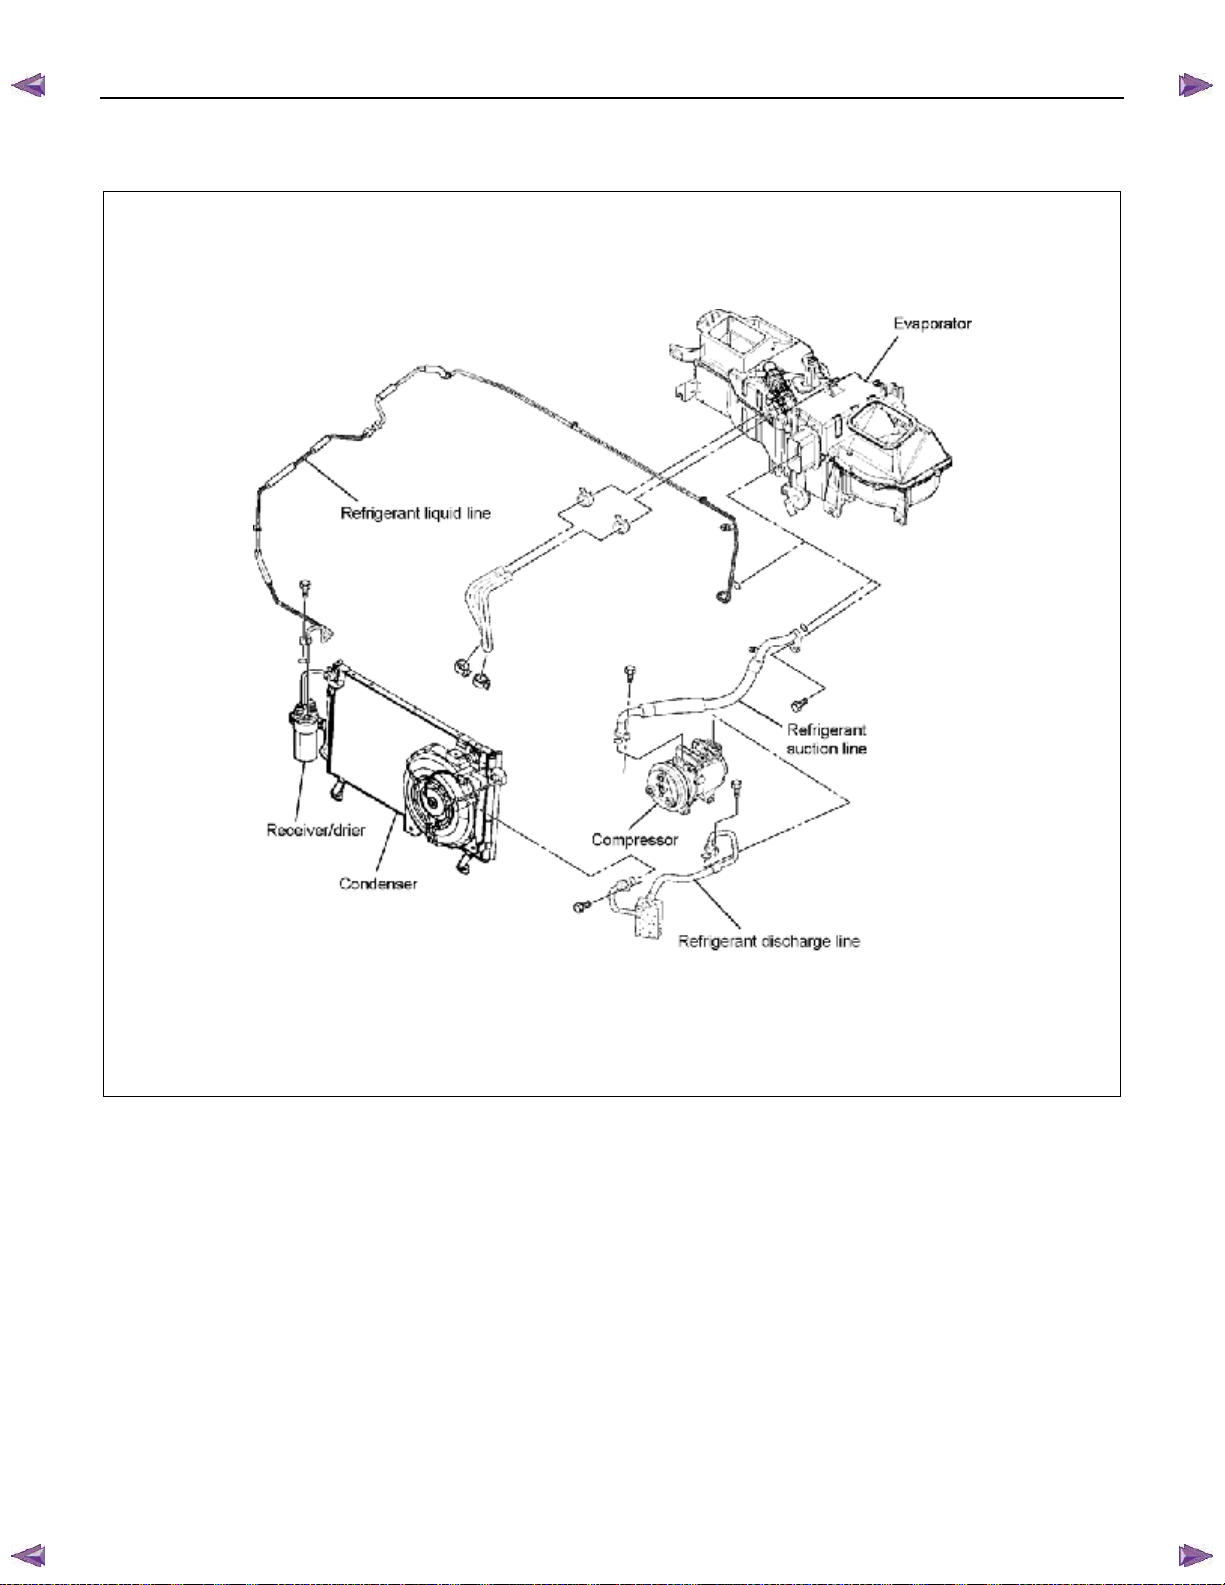
BACK TO CHAPTER INDEX
1-6 HEATER A ND AIR CONDITIONING
(C24SE RHD MODEL)
ISUZU KB P190 2007
TO MODEL INDEX
RTW710LF002101
Page 41
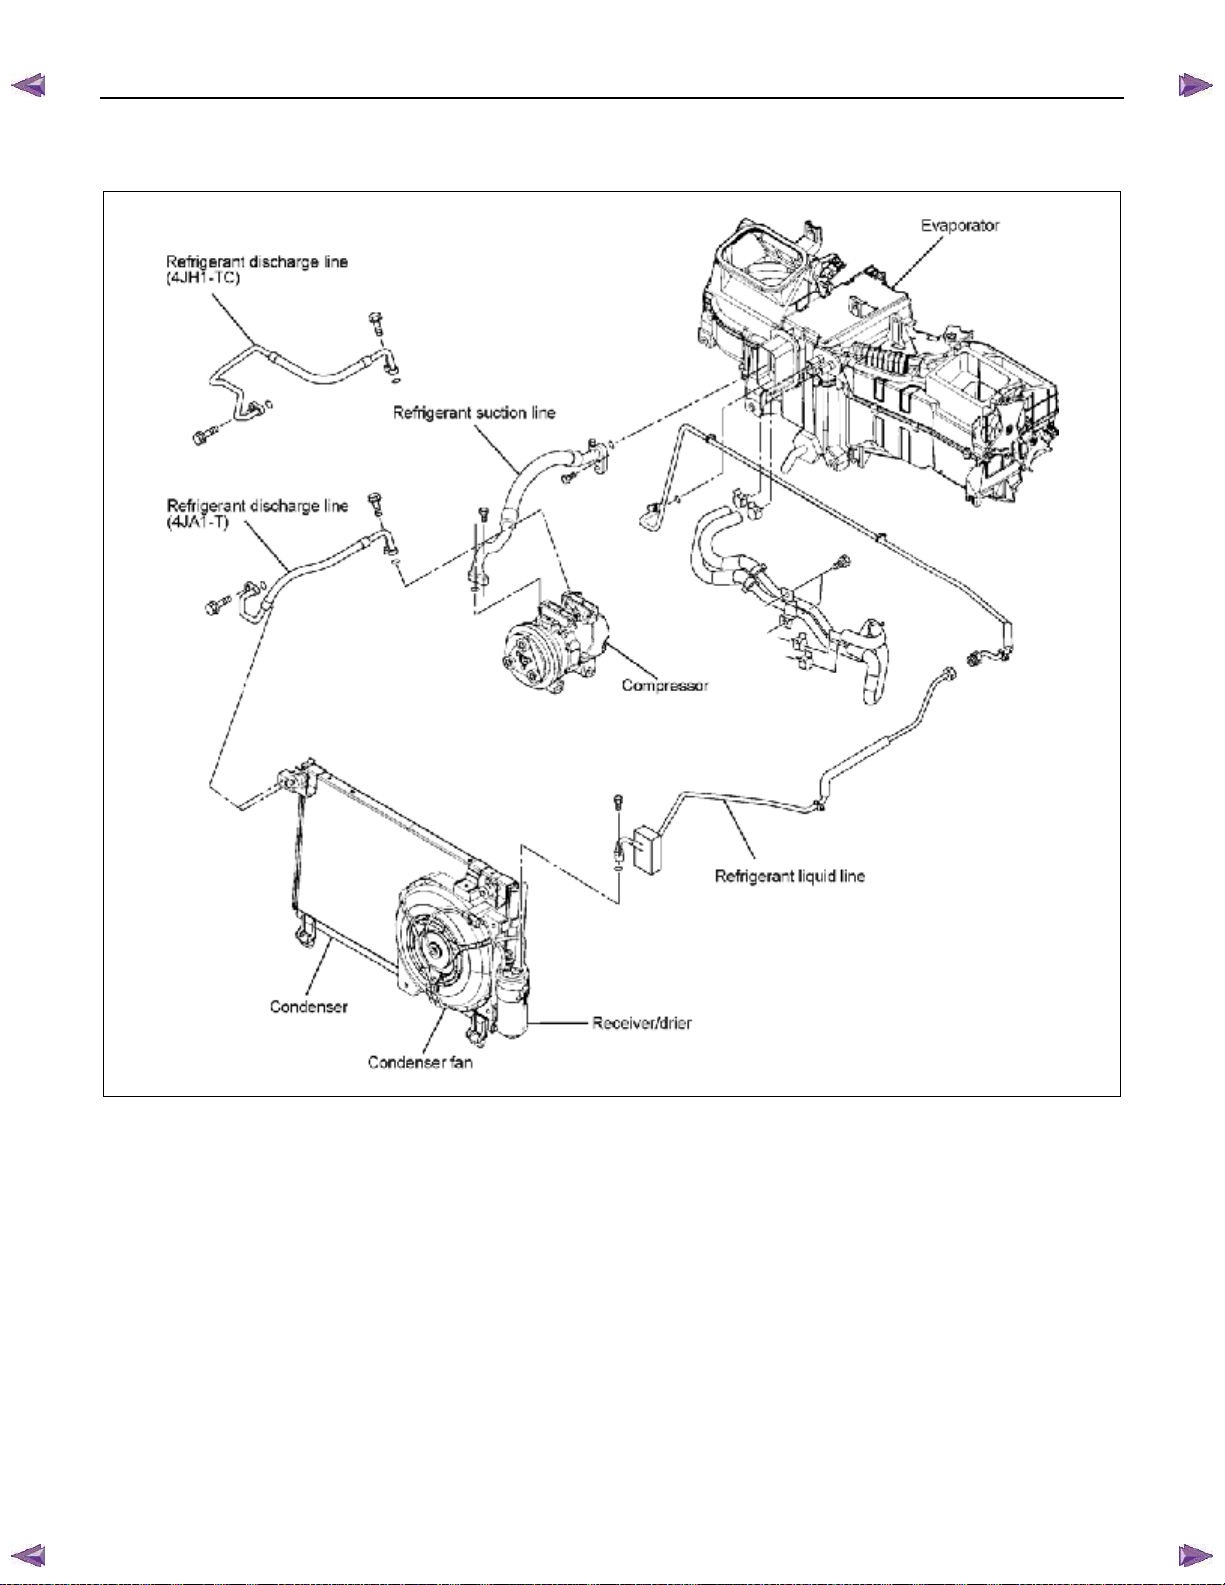
BACK TO CHAPTER INDEX
(4JA1-T, 4JH1-TC LHD MODEL)
ISUZU KB P190 2007
TO MODEL INDEX
HEATER A ND AIR CONDITIONING 1-7
RTW710LF002201
Page 42
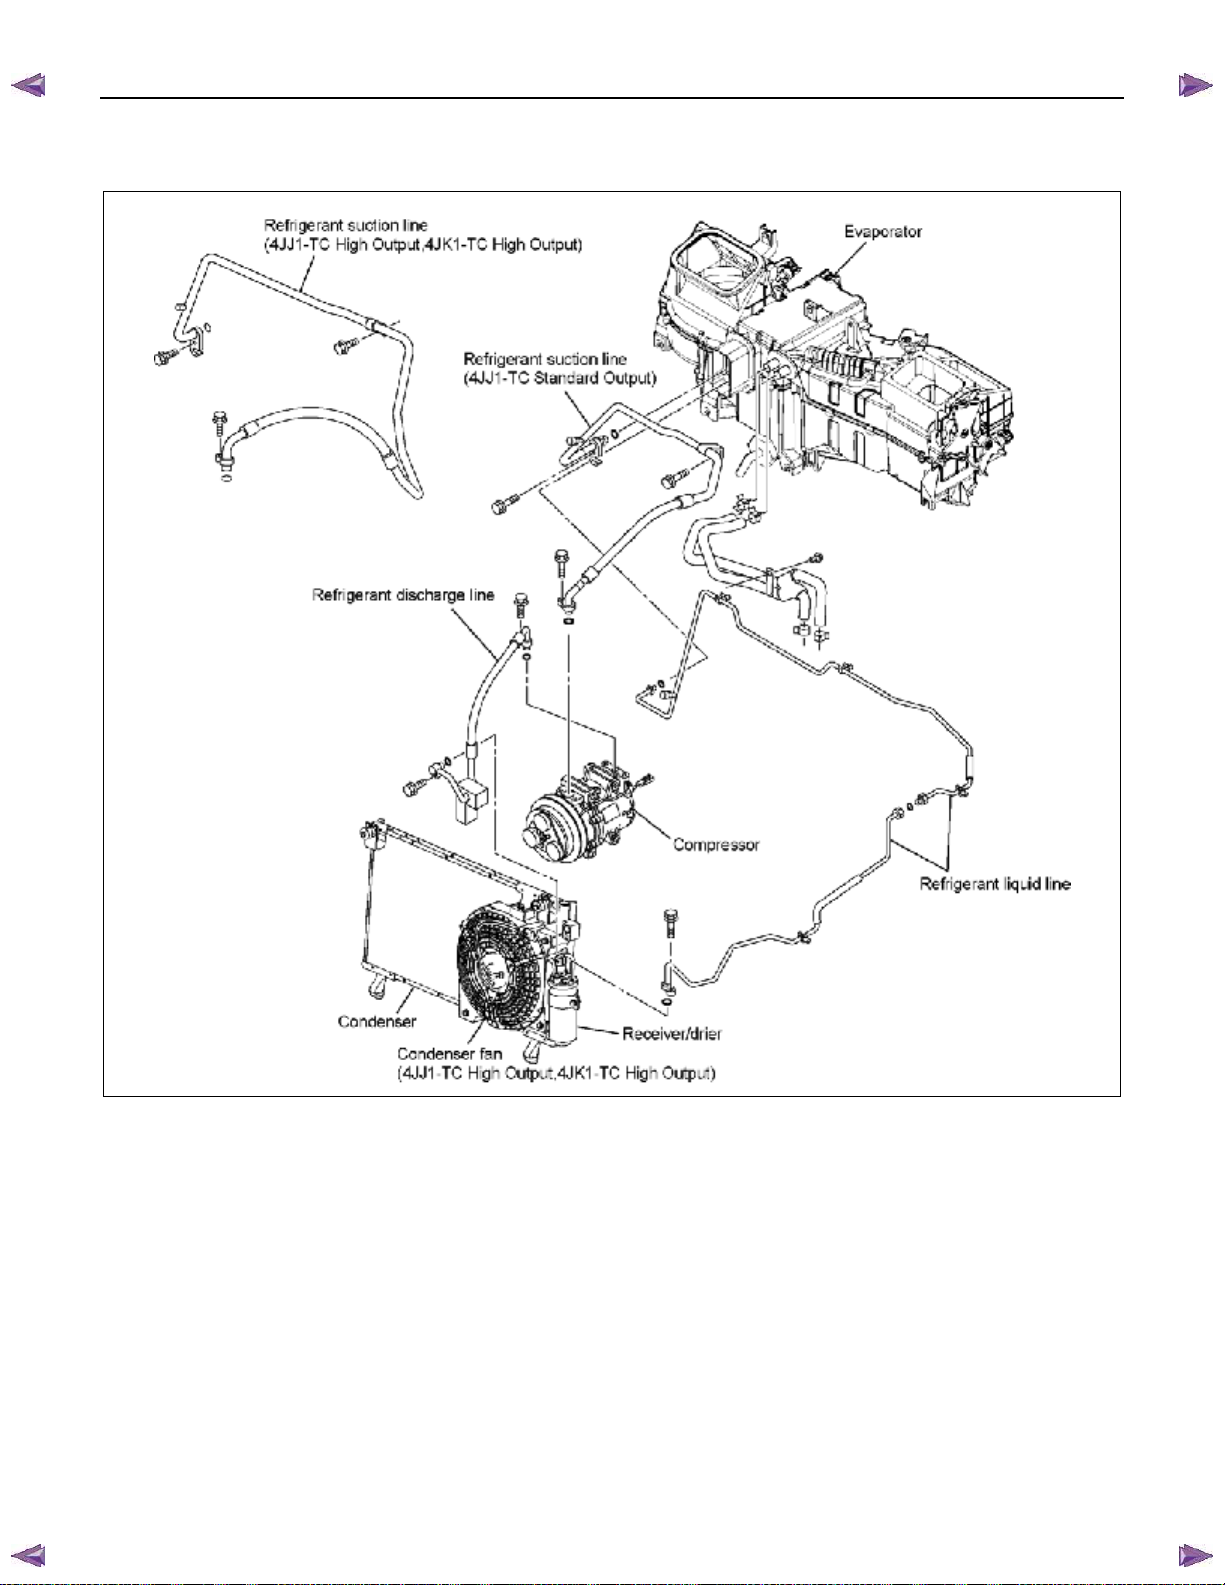
BACK TO CHAPTER INDEX
1-8 HEATER A ND AIR CONDITIONING
(4JJ1-TC Standard Output, 4JJ1-TC High Output, 4JK1-TC High Output LHD MODEL)
ISUZU KB P190 2007
TO MODEL INDEX
RTW710LF002301
Page 43
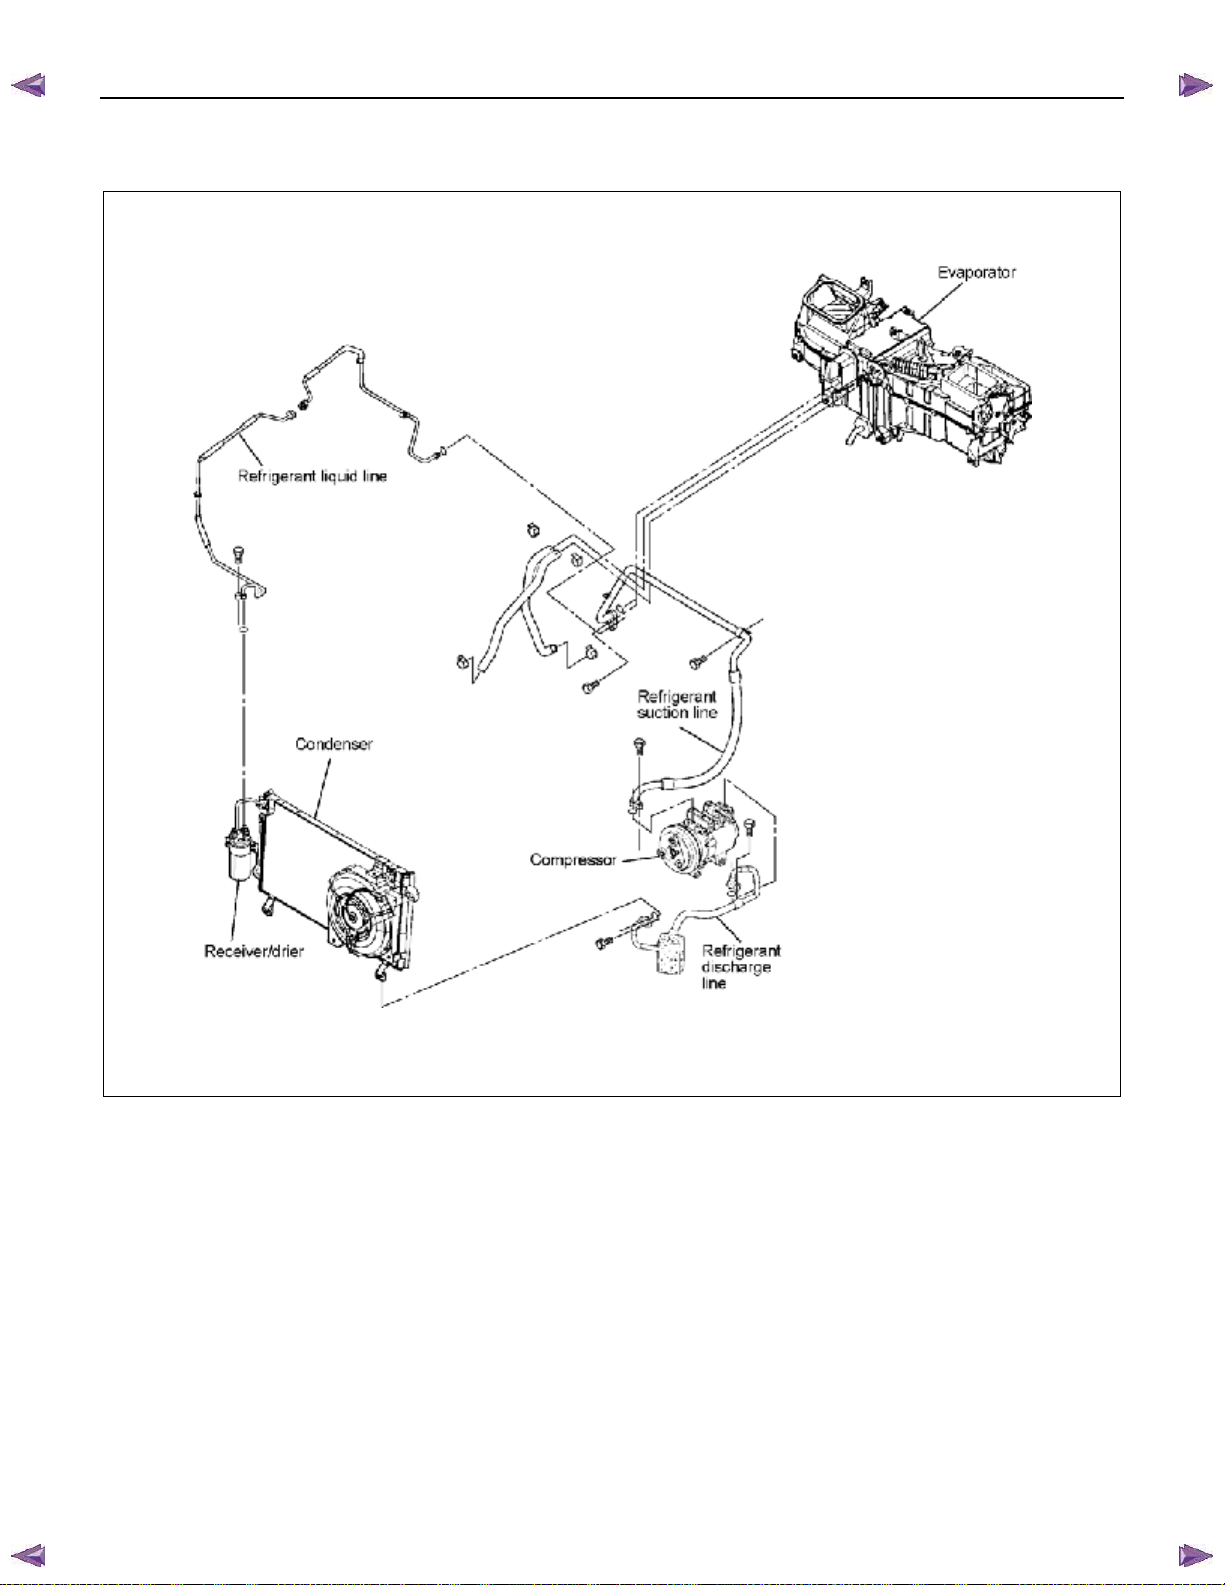
BACK TO CHAPTER INDEX
(C24SE LHD MODEL)
ISUZU KB P190 2007
TO MODEL INDEX
HEATER A ND AIR CONDITIONING 1-9
RTW710LF002401
Page 44
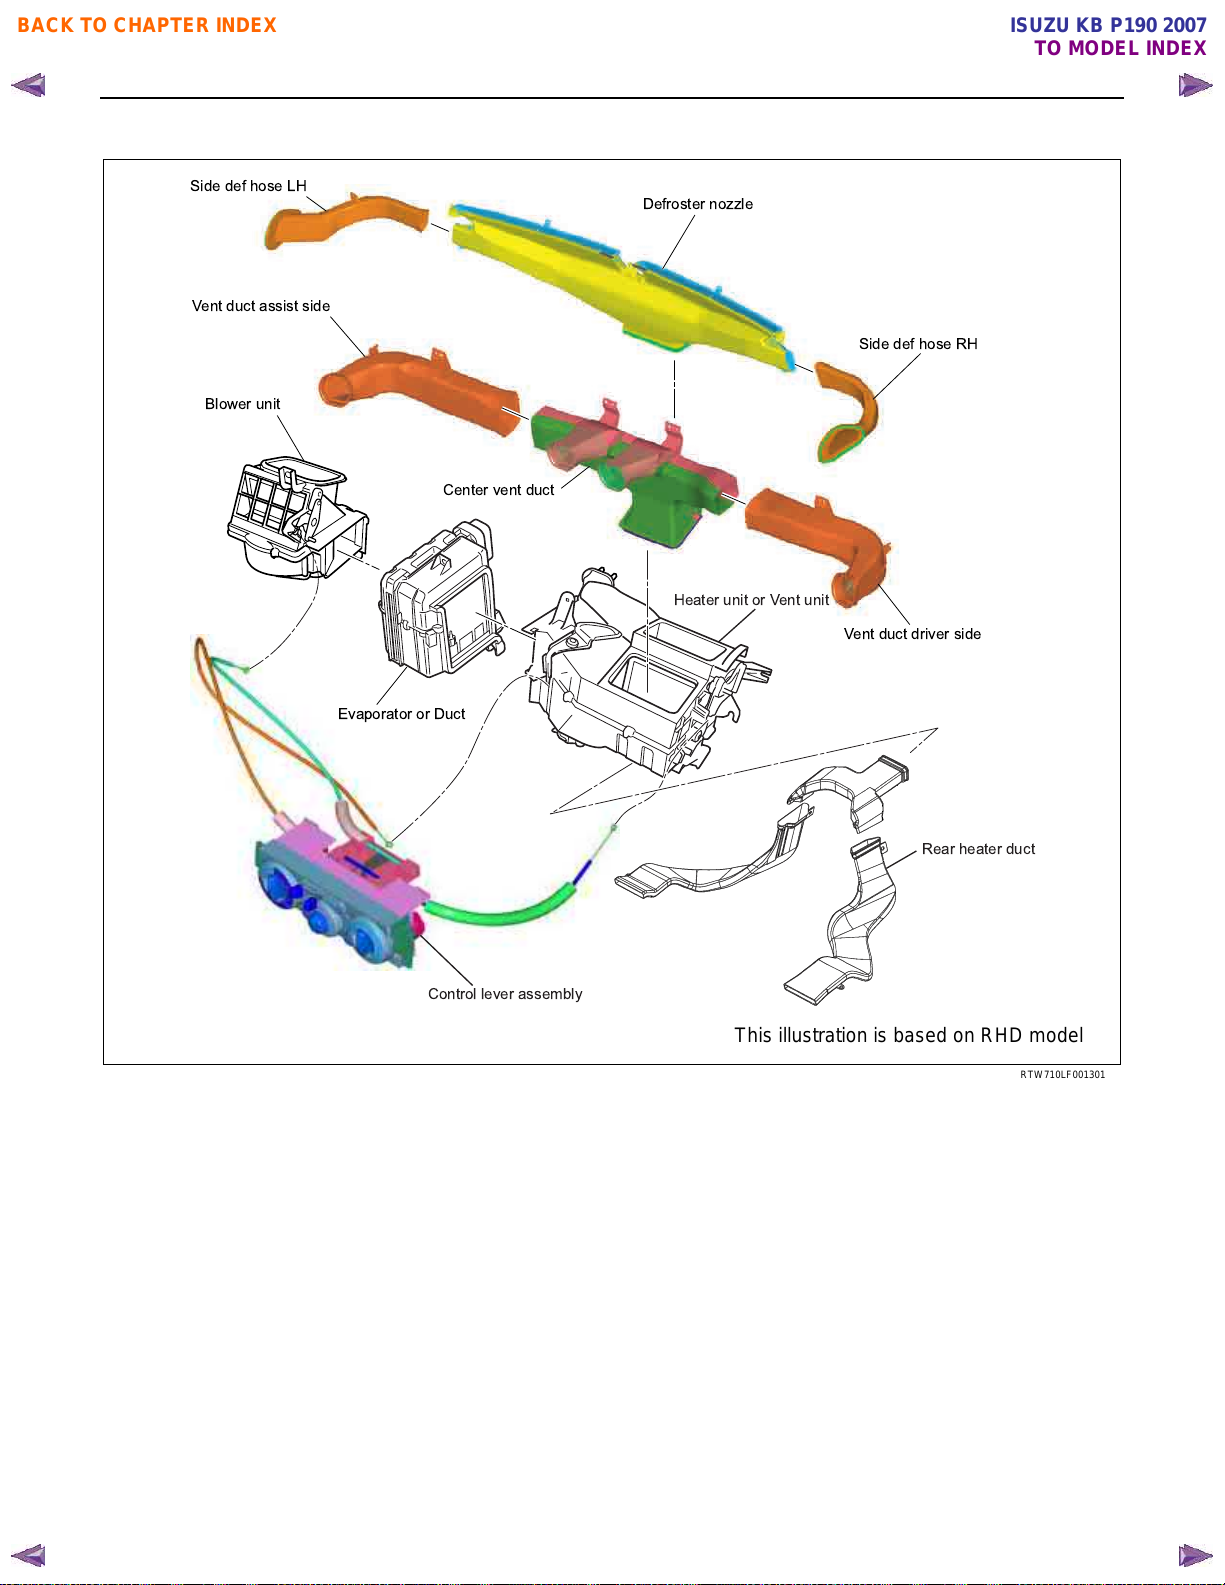
BACK TO CHAPTER INDEX
1-10 HEATER A ND AIR CONDITIONING
COMPONENTS (INSIDE CAB)
Side def hose LH
Vent duct assist side
Blower unit
ISUZU KB P190 2007
TO MODEL INDEX
Defroster nozzle
Side def hose RH
Center vent duct
Heater unit or Vent unit
Vent duct driver side
Evaporator or Duct
Rear heater duct
Control lever assembly
This illustration is based on RHD model
RTW710LF001301
Page 45
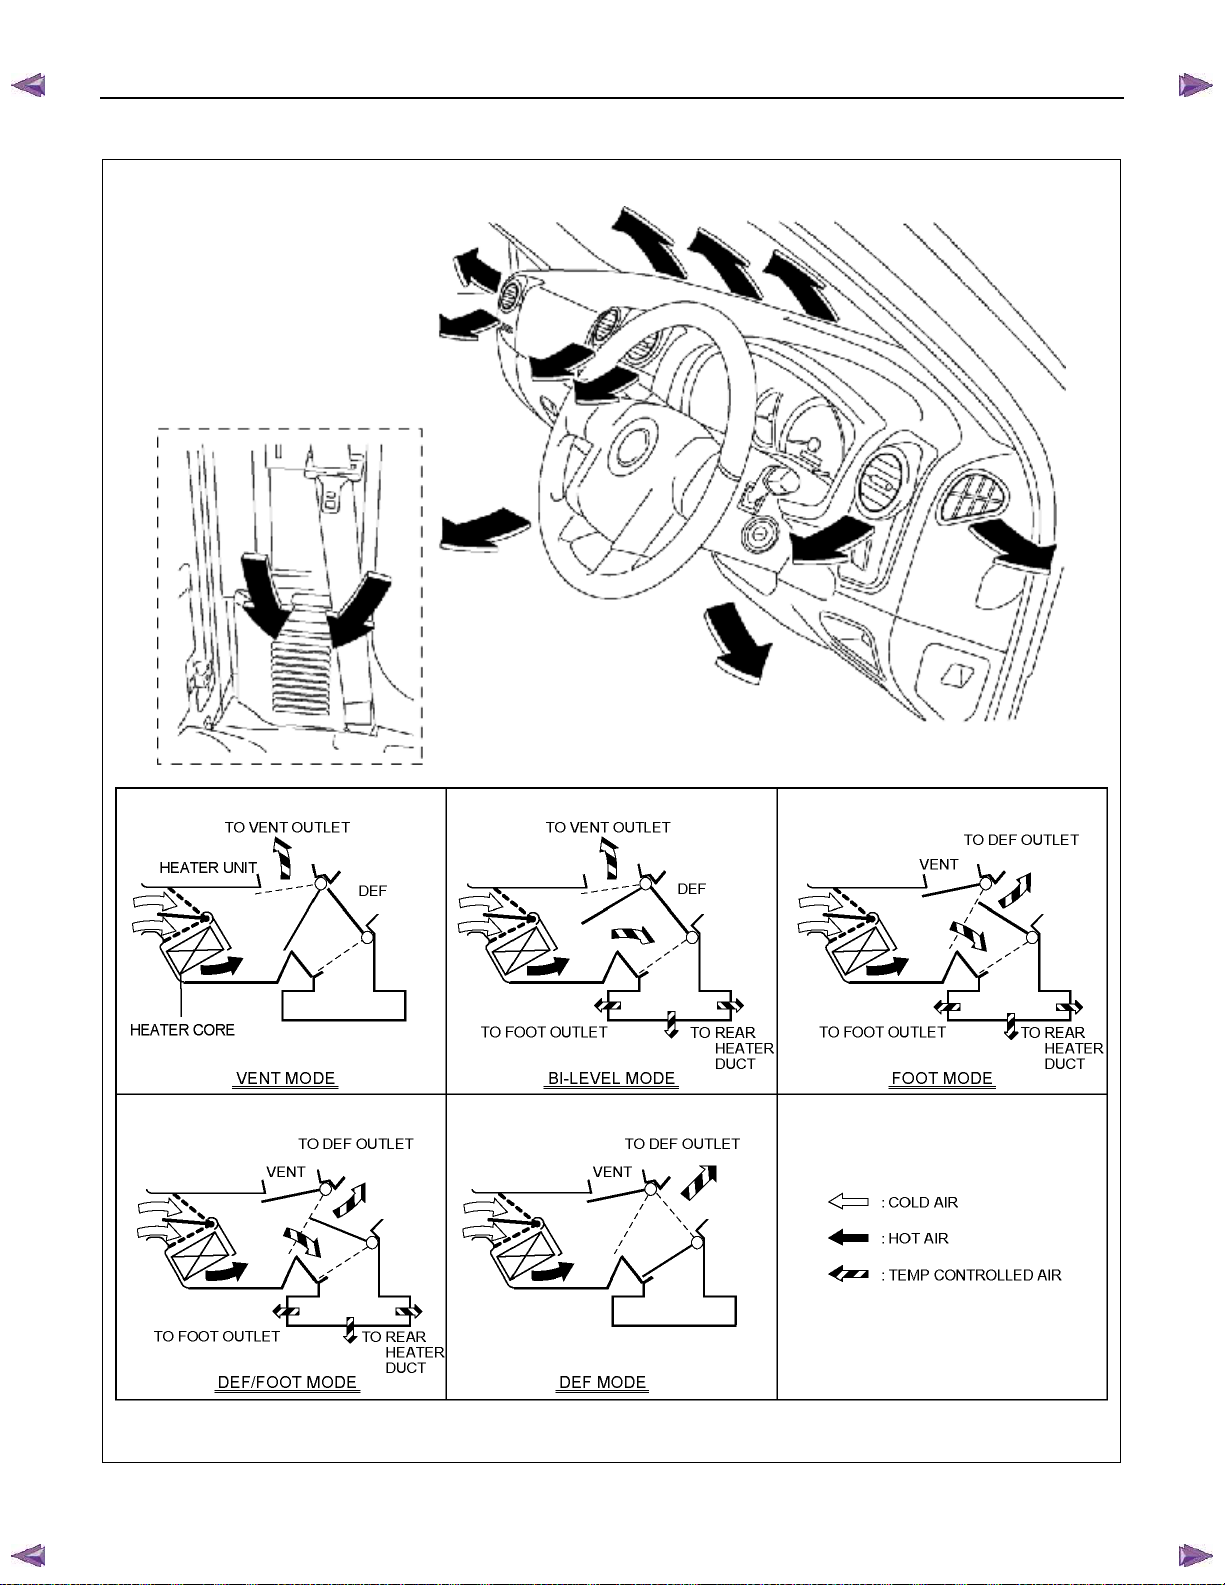
BACK TO CHAPTER INDEX
VENTILATION
ISUZU KB P190 2007
TO MODEL INDEX
HEATER A ND AIR CONDITIONING 1-11
This illustration is based on RHD model
RTW710MF000601 & RT W410MF000301
Page 46
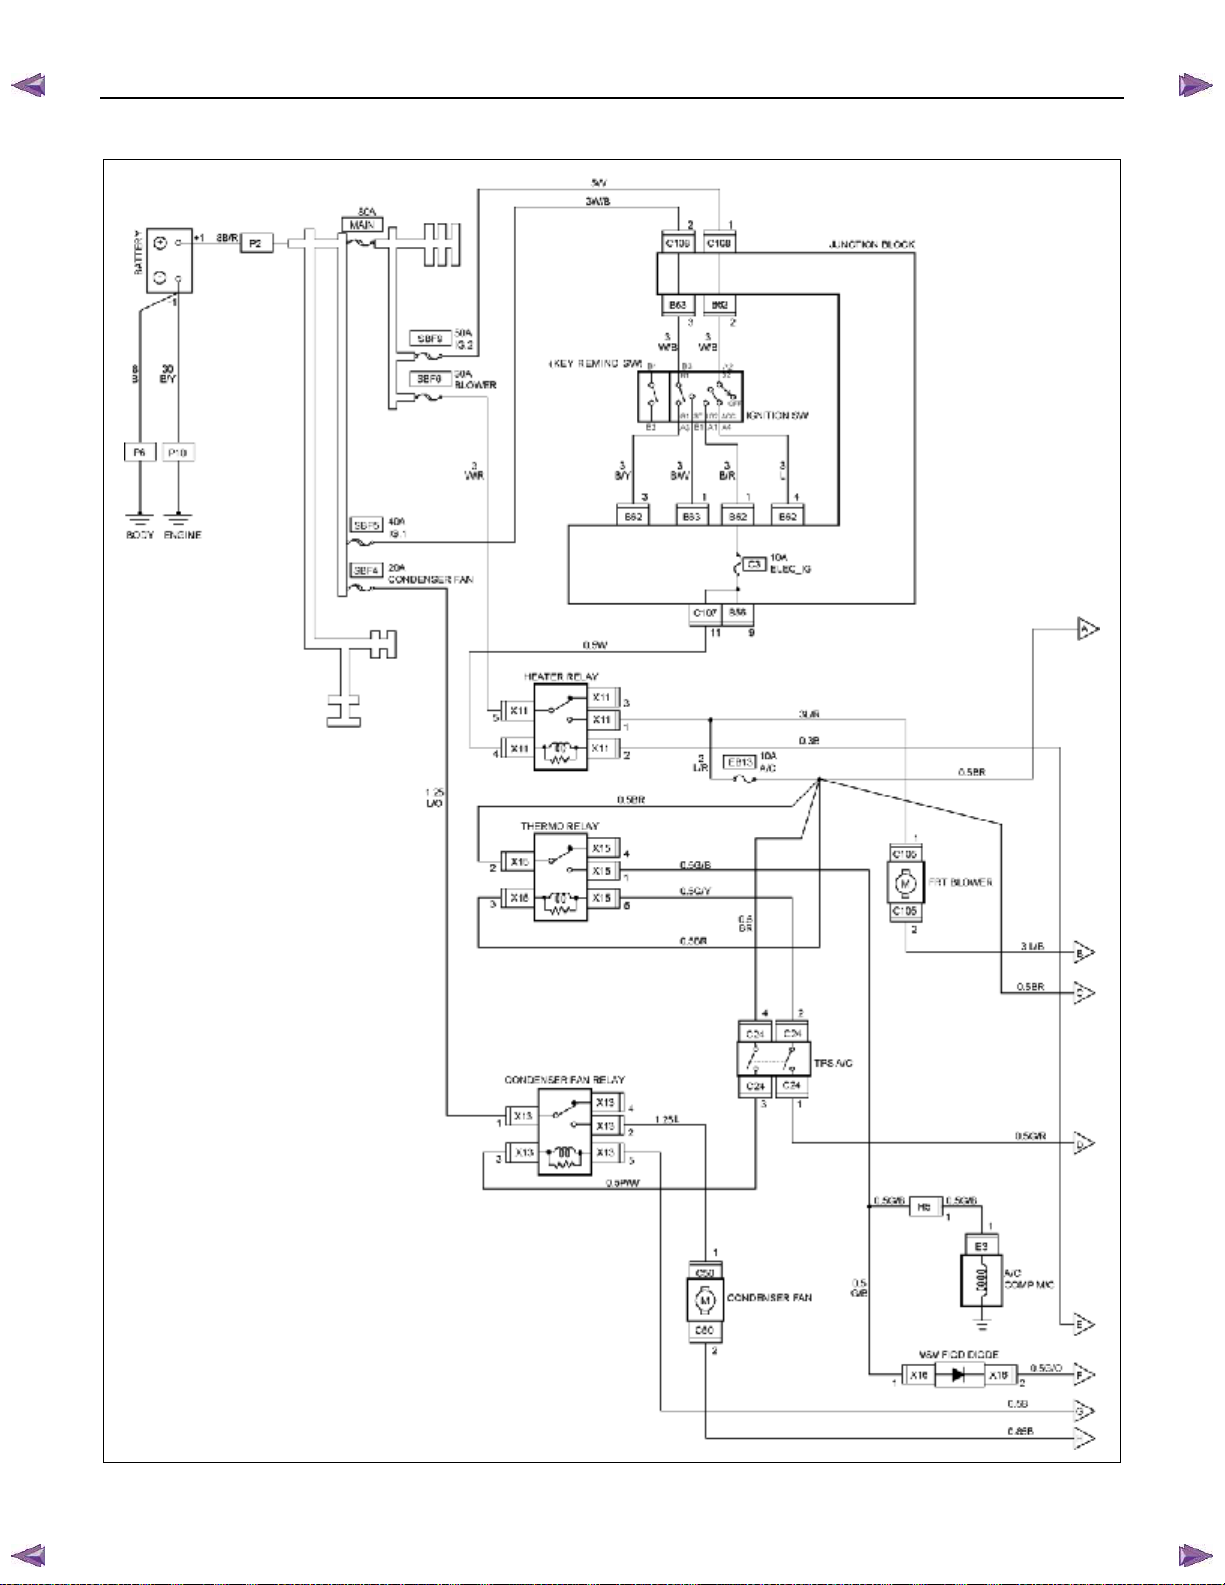
BACK TO CHAPTER INDEX
1-12 HEATER A ND AIR CONDITIONING
WIRING DIAGRAM (4JA1-T)
ISUZU KB P190 2007
TO MODEL INDEX
RTW78AXF008201
Page 47
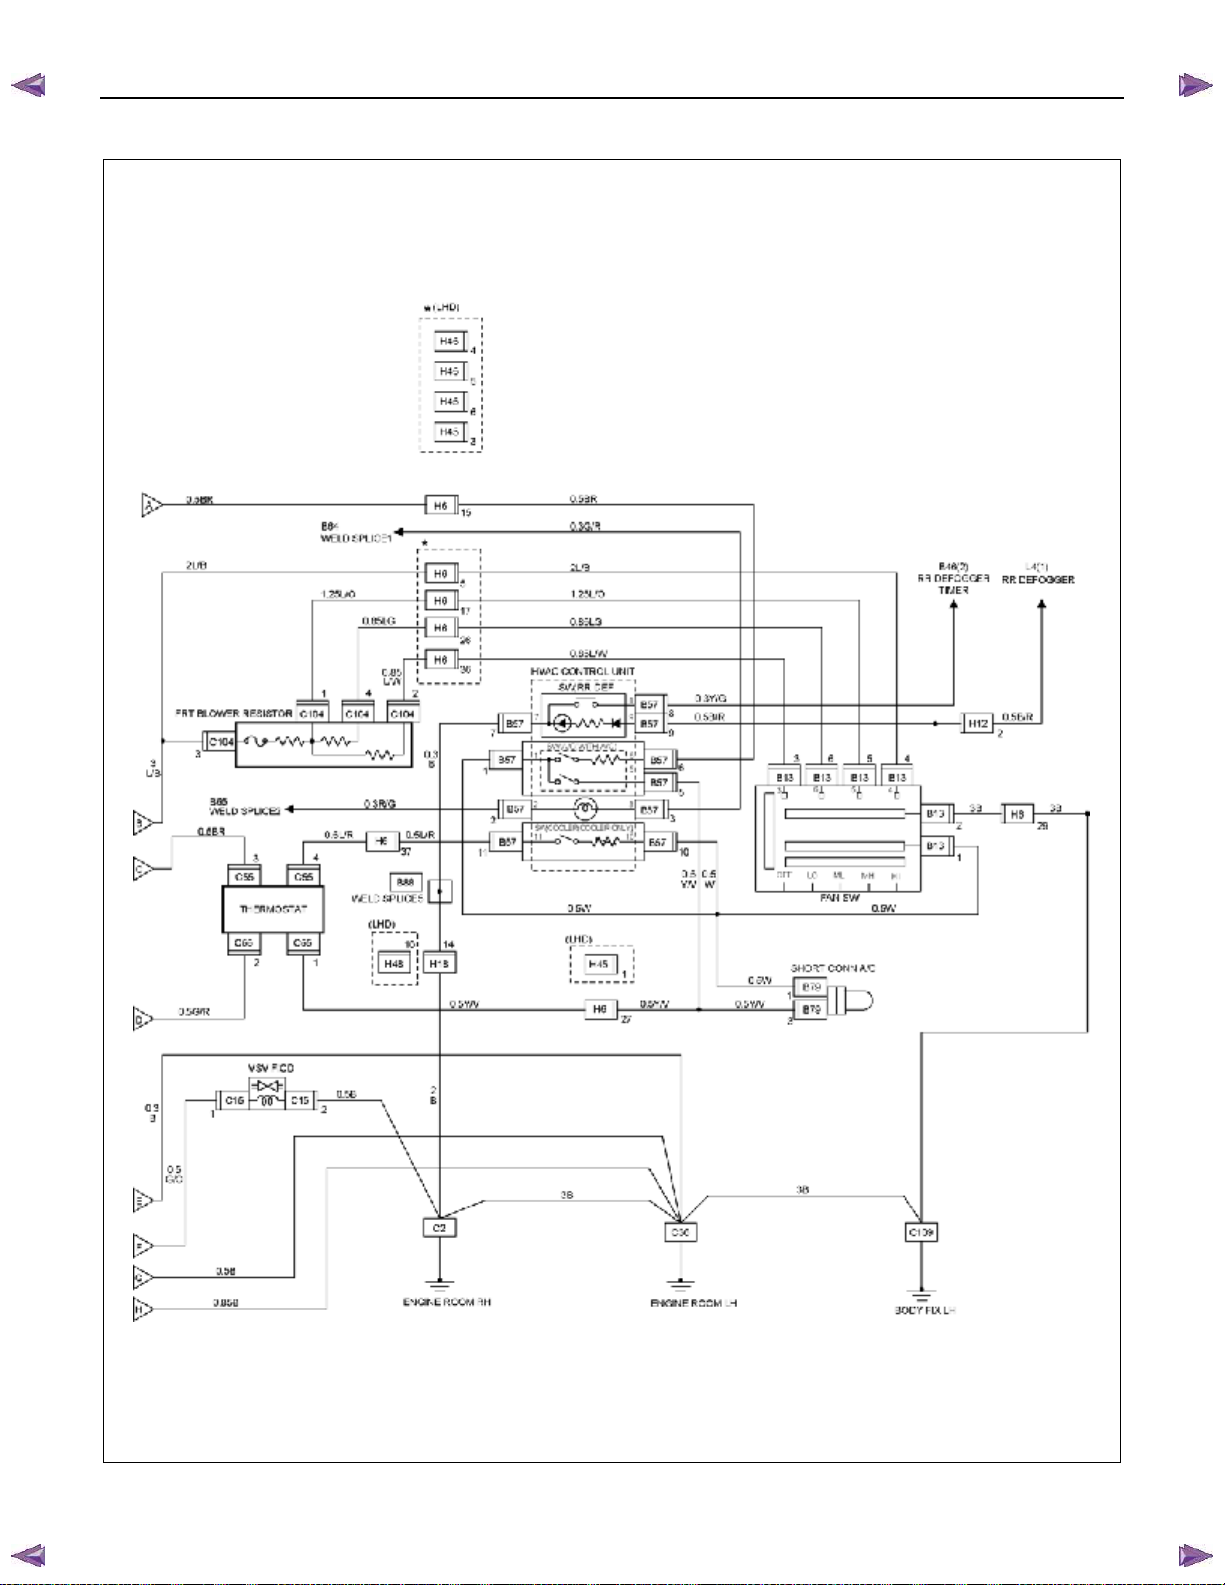
BACK TO CHAPTER INDEX
ISUZU KB P190 2007
TO MODEL INDEX
HEATER A ND AIR CONDITIONING 1-13
RTW78AXF008301
Page 48
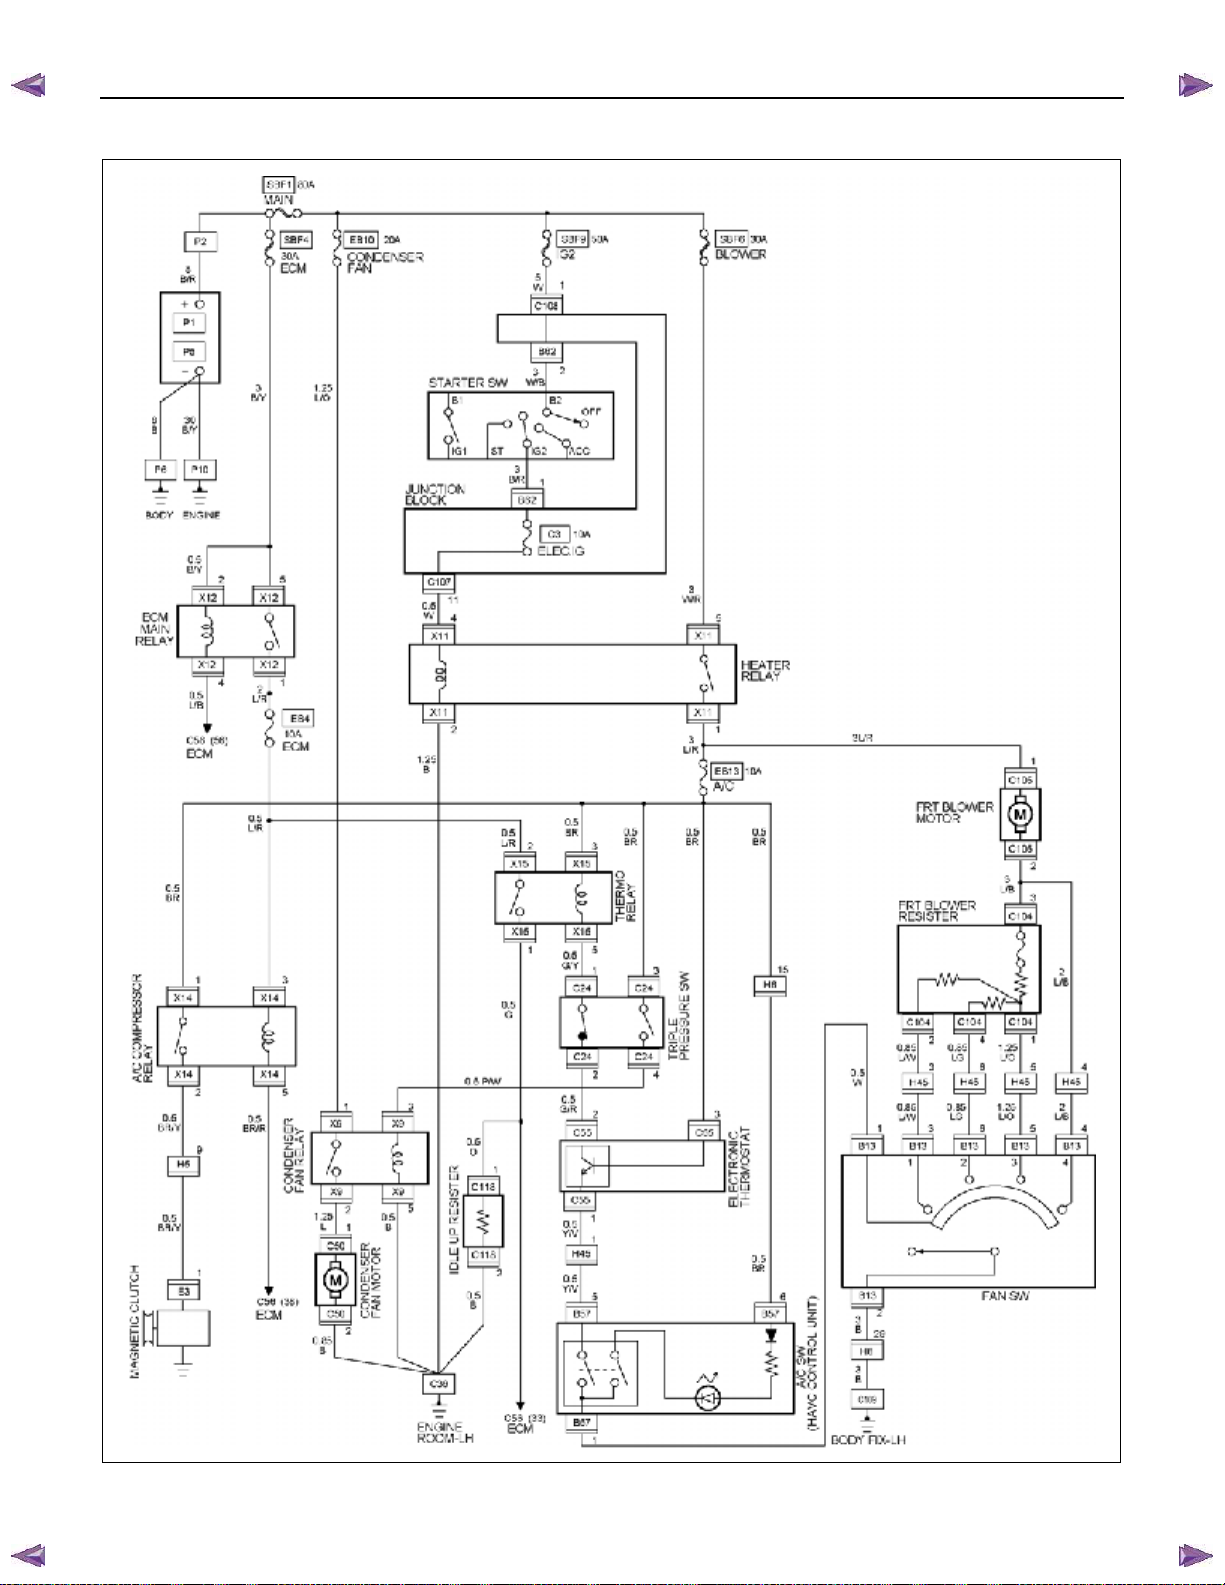
BACK TO CHAPTER INDEX
1-14 HEATER A ND AIR CONDITIONING
(4JH1-TC)
ISUZU KB P190 2007
TO MODEL INDEX
RTW78AXF007901
Page 49
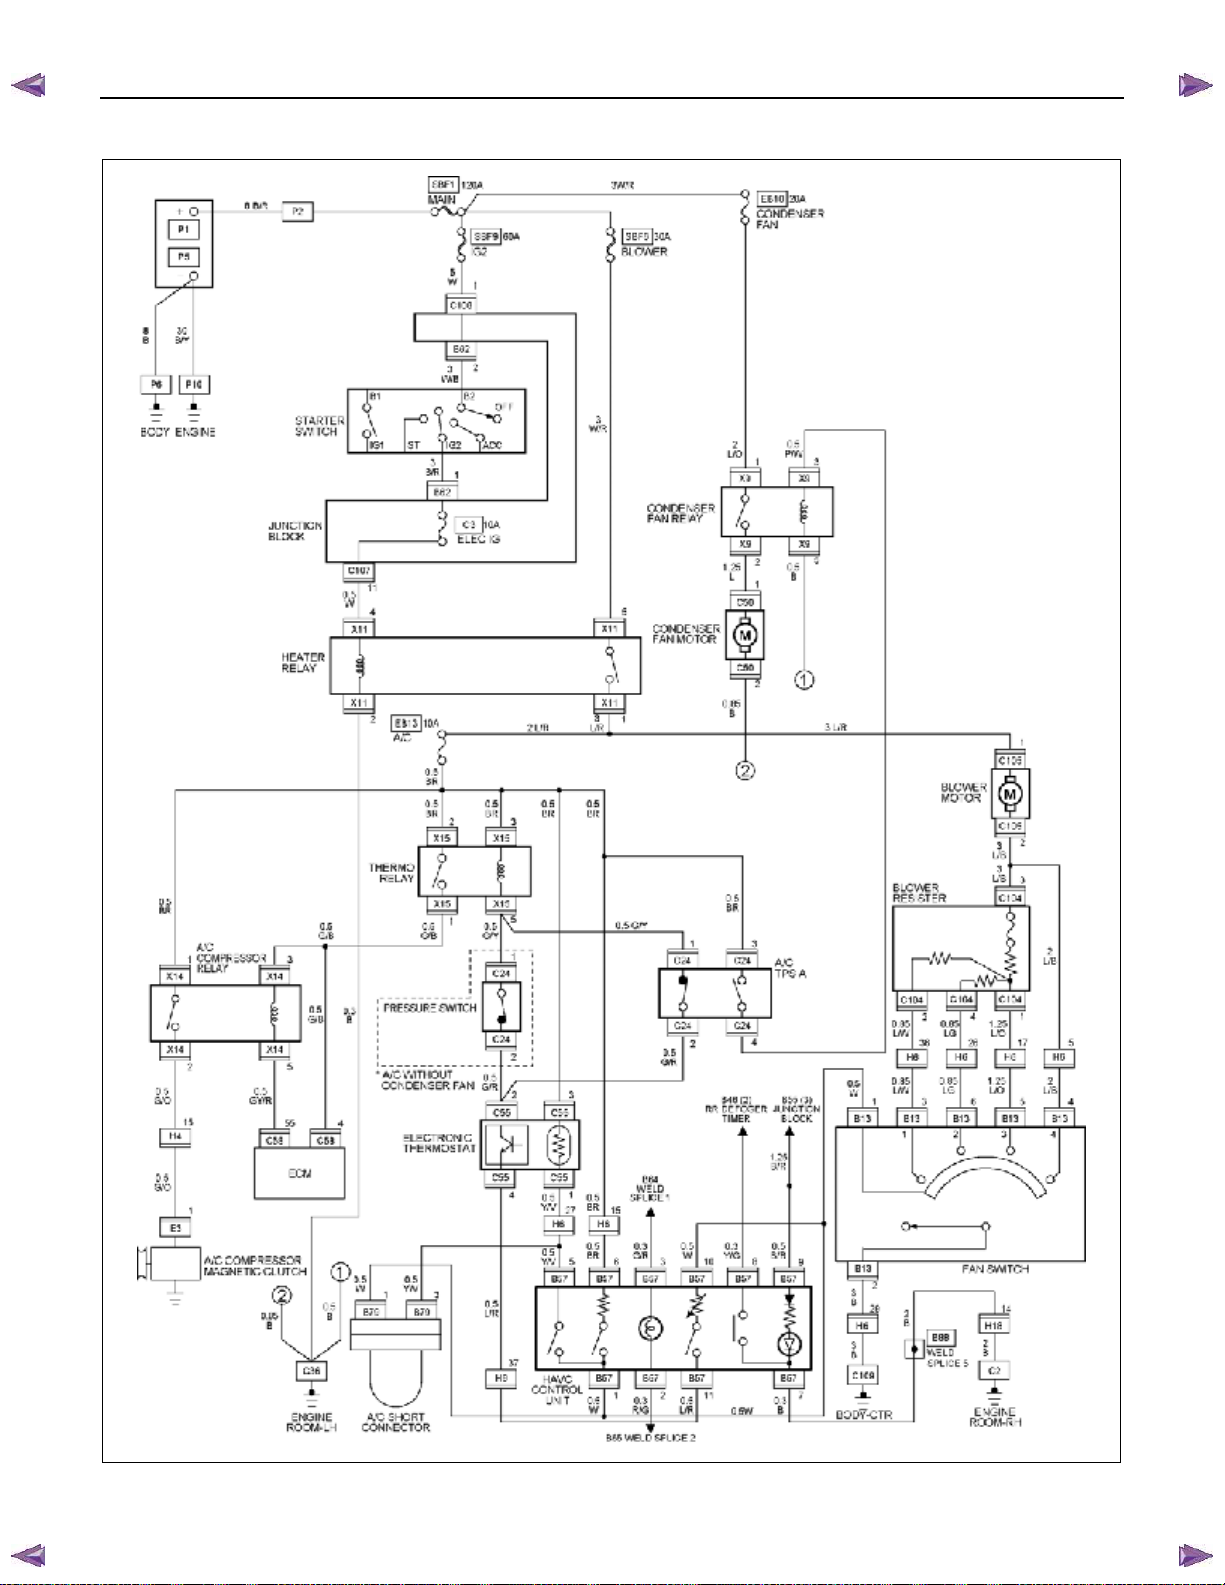
BACK TO CHAPTER INDEX
(4JJ1-TC Standard Output, 4JJ1-TC High Output, 4JK1-TC High Output RHD MODEL)
ISUZU KB P190 2007
TO MODEL INDEX
HEATER A ND AIR CONDITIONING 1-15
RTW78AXF012101
Page 50
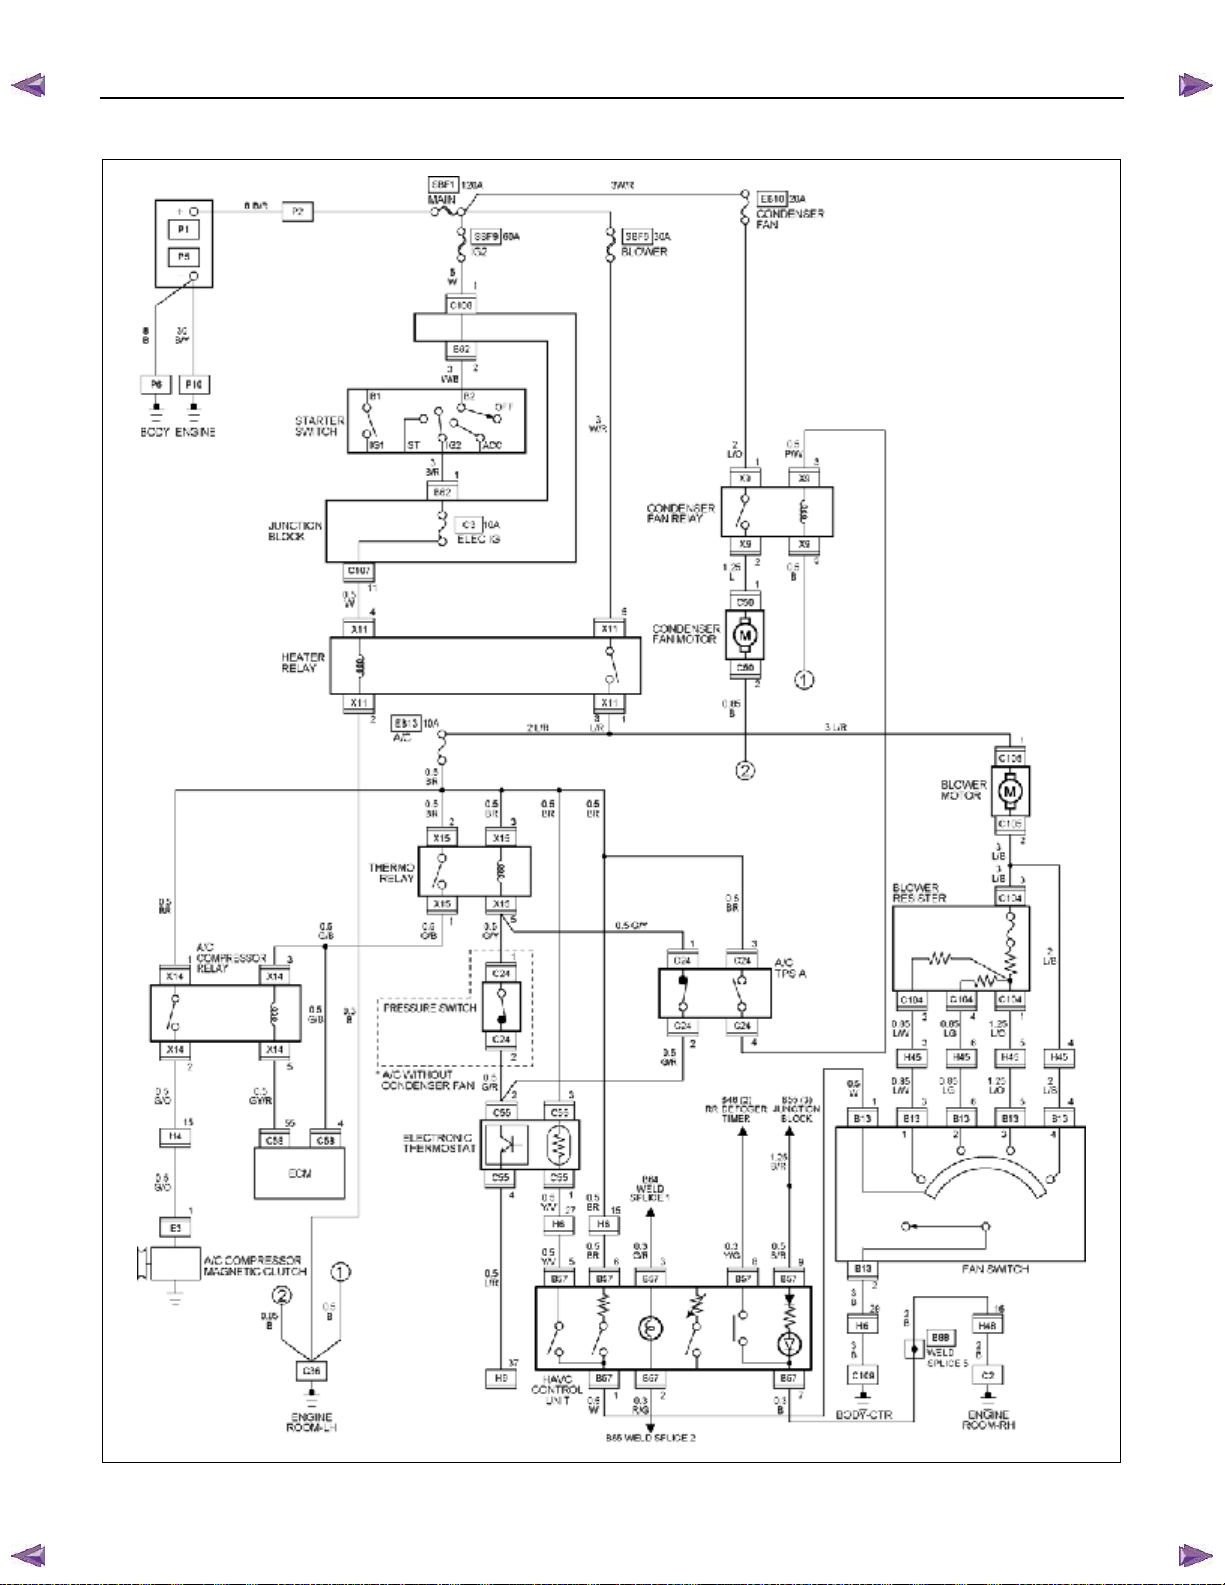
BACK TO CHAPTER INDEX
1-16 HEATER A ND AIR CONDITIONING
(4JJ1-TC Standard Output, 4JJ1-TC High Output, 4JK1-TC High Output LHD MODEL)
ISUZU KB P190 2007
TO MODEL INDEX
RTW78AXF028001
Page 51
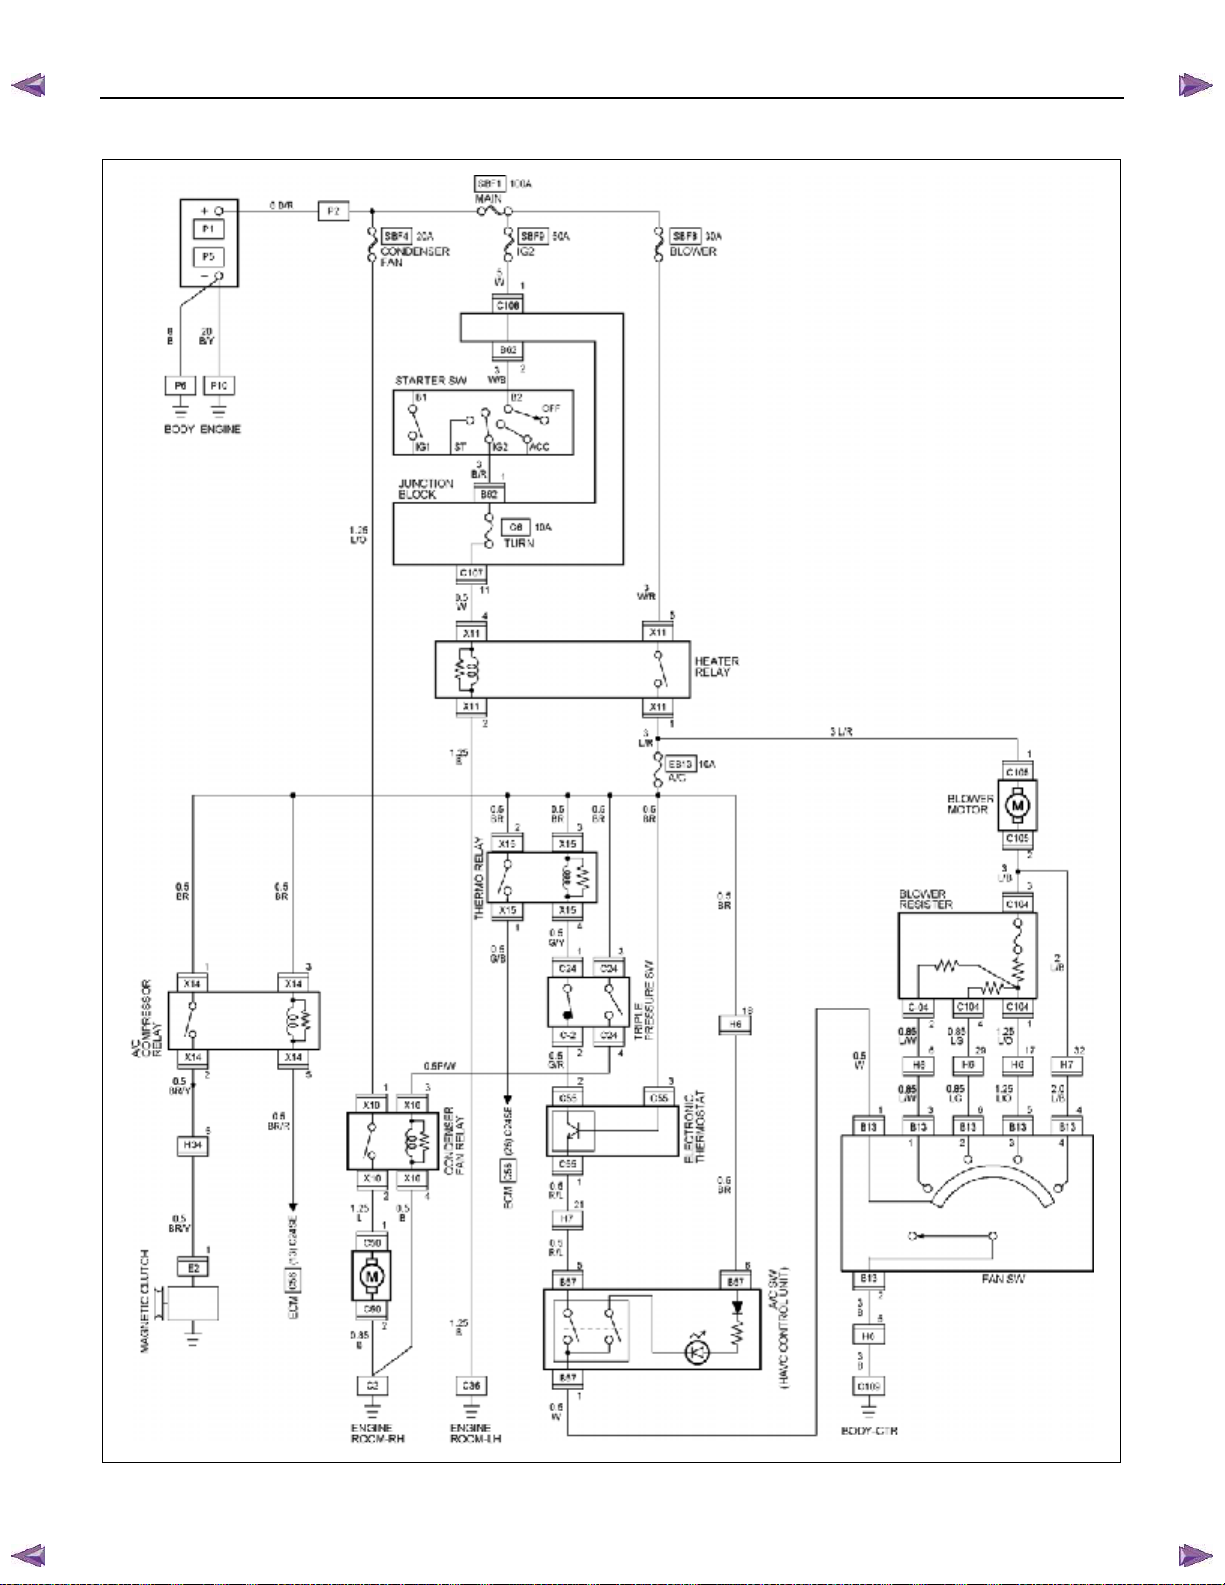
BACK TO CHAPTER INDEX
C24SE (A/C WITH HEATER)
ISUZU KB P190 2007
TO MODEL INDEX
HEATER A ND AIR CONDITIONING 1-17
RTW780XF013701
Page 52
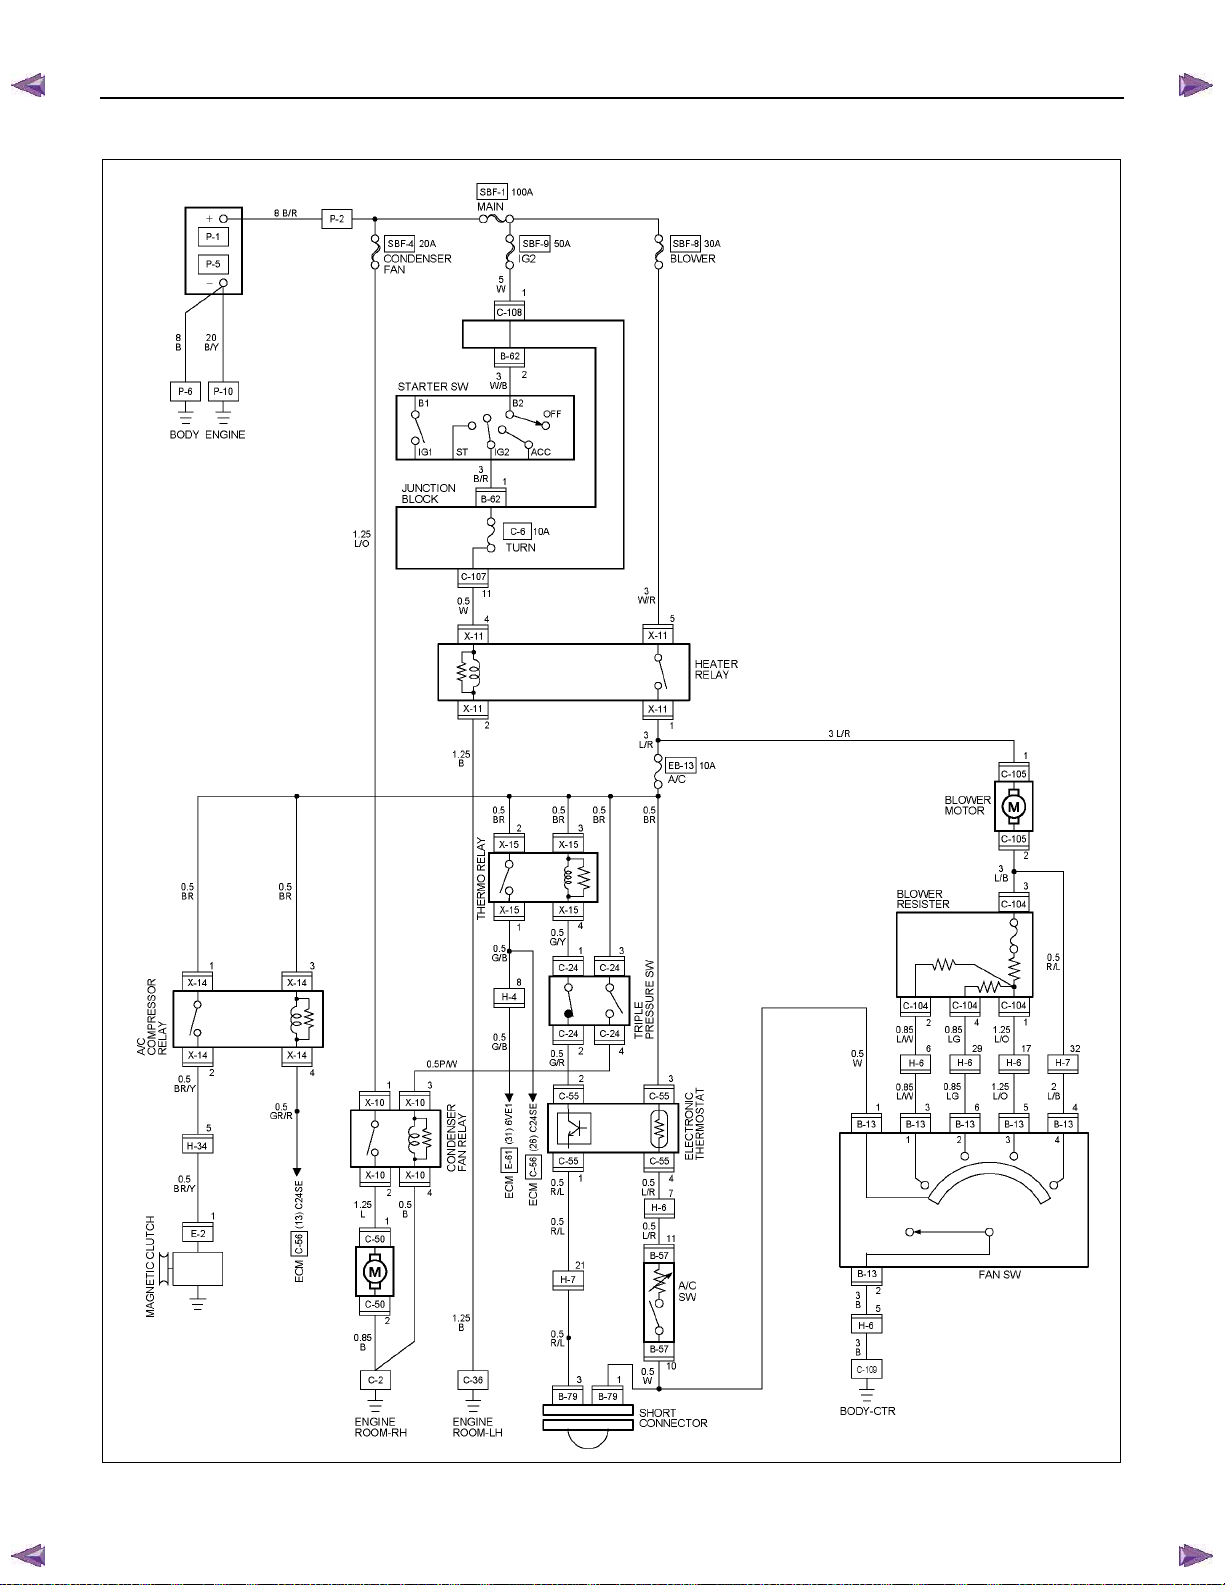
BACK TO CHAPTER INDEX
1-18 HEATER A ND AIR CONDITIONING
C24SE (COOLER WITHOUT HEATER)
ISUZU KB P190 2007
TO MODEL INDEX
RTW680XF012401
Page 53
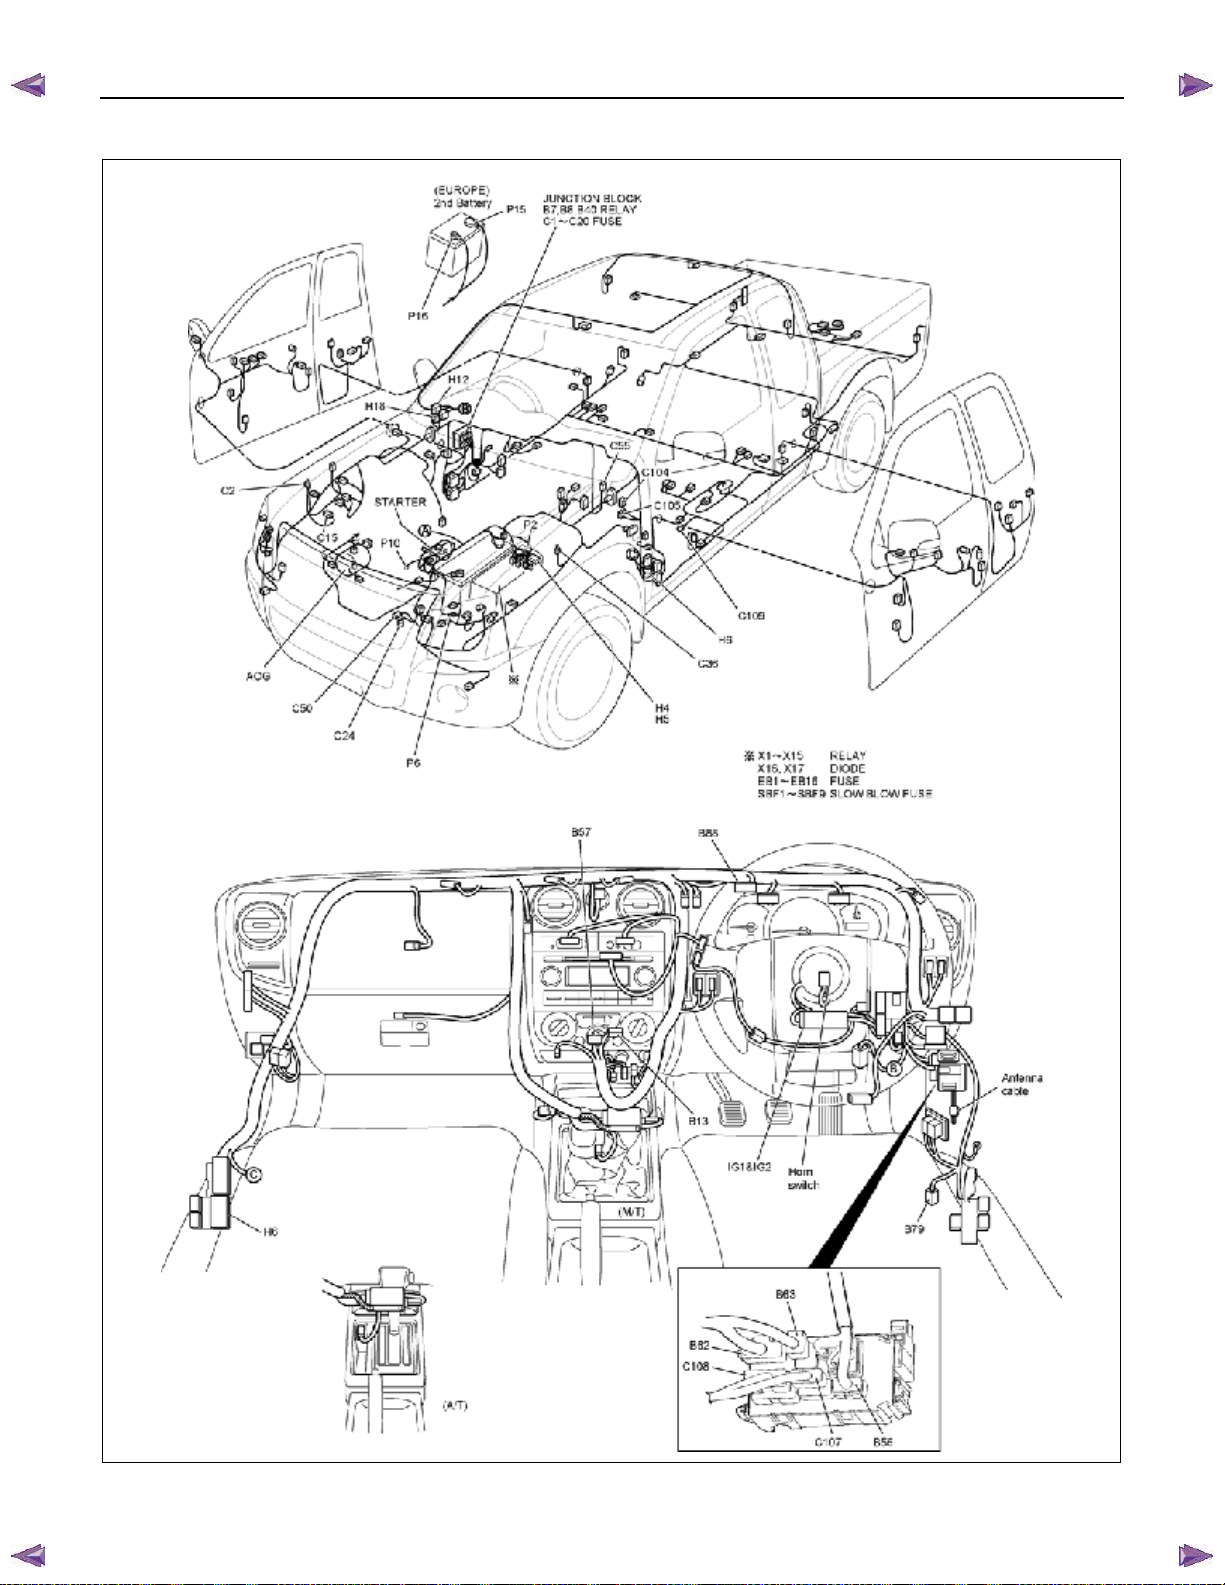
BACK TO CHAPTER INDEX
CONNECTOR LOCATION (RHD MODEL)
ISUZU KB P190 2007
TO MODEL INDEX
HEATER A ND AIR CONDITIONING 1-19
RTW78AXF039101&RTW78AXF045301
Page 54
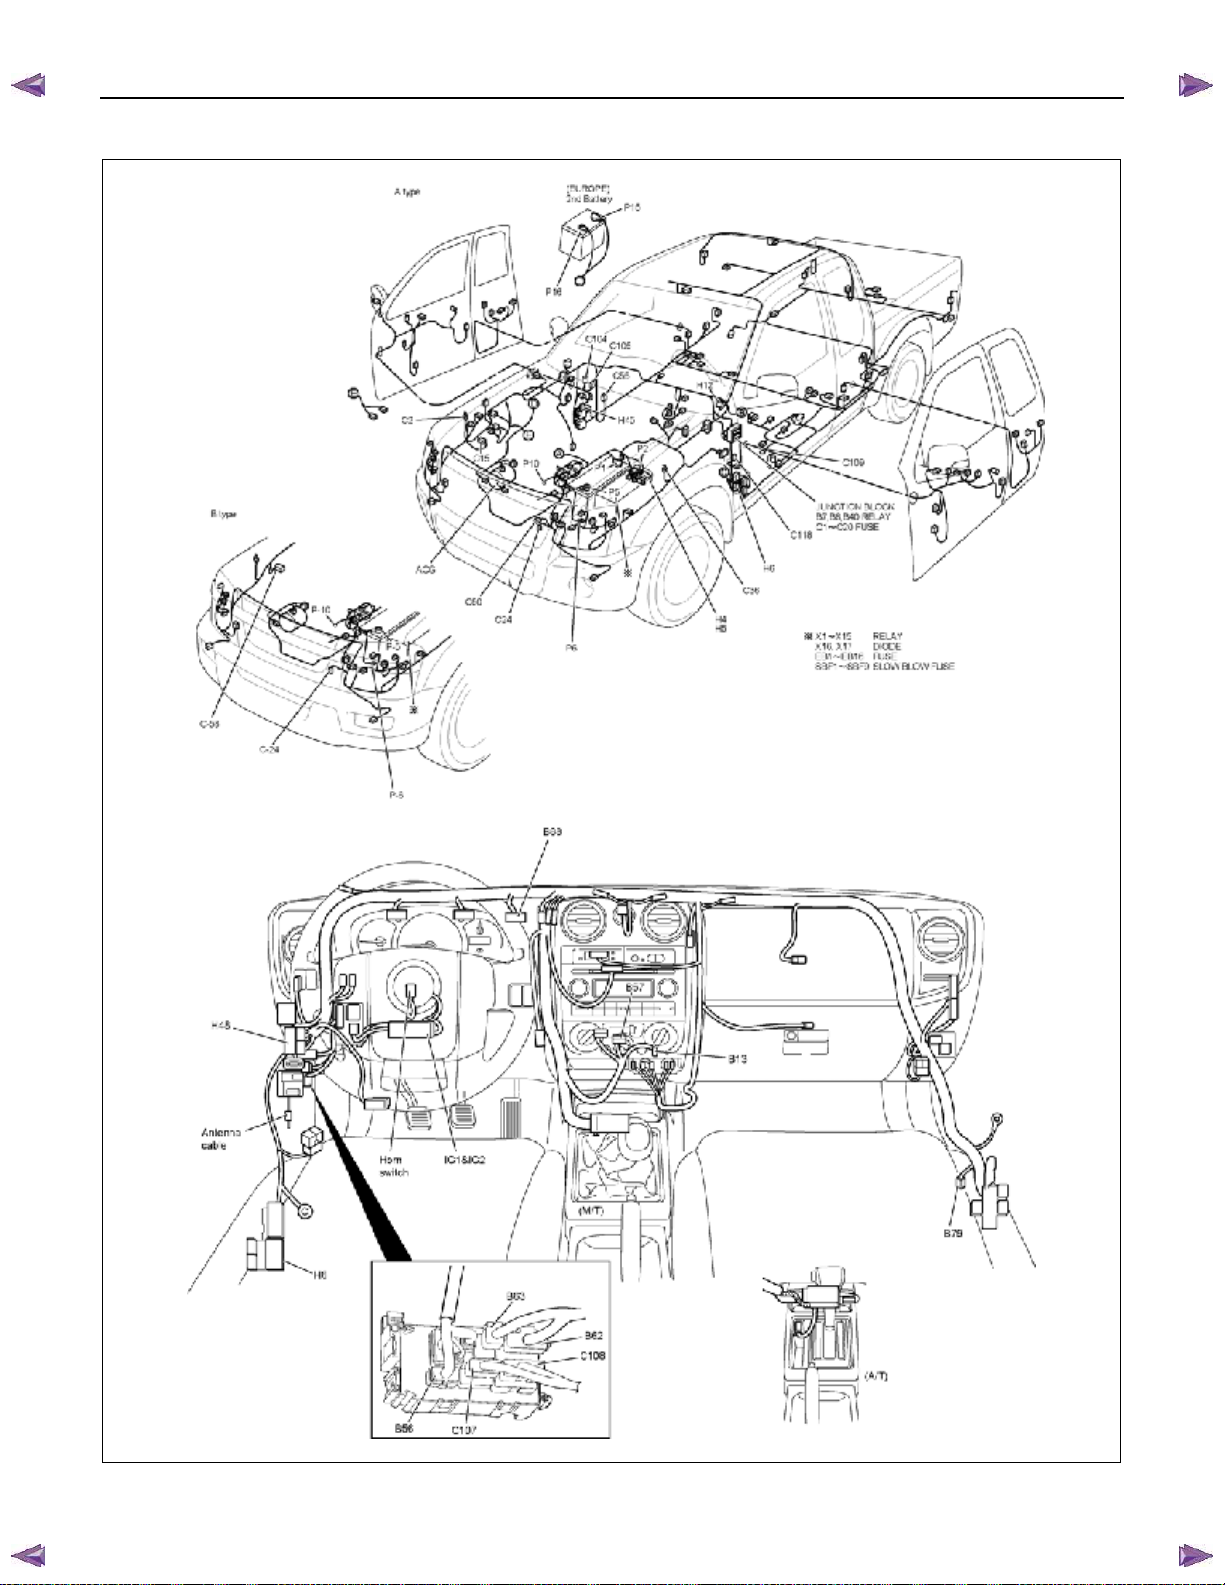
BACK TO CHAPTER INDEX
1-20 HEATER A ND AIR CONDITIONING
(LHD MODEL)
ISUZU KB P190 2007
TO MODEL INDEX
RTW78AXF039201&RTW78AXF045401
Page 55

BACK TO CHAPTER INDEX
COMPRESSOR
Model CR-14
Type 5 Vane rotary type
Displacement cm3 (lmp fl oz) 144 (4.03)
Oil type DH-PR
Oil capacity cm3 (lmp fl oz) 180 (5.07)
Magnetic clutch mm (in) Type: Dry single disc dia. 109 (4.3)
HEATING UNIT (VENT UNIT)
Type Reheat air mix
Core dimension mm (in) (L×H×W) 180 (7.09) × 182.3 (7.18) × 27 (1.06)
Capacity (kcal/h) 4200
BLOWER UNIT
Type Sirocco fan type
COOLING UNIT
Type Fin and tube evaporator
Evaporator element dimensions mm (in) (L×H×W) 222 (8.74) × 213 (8.39) × 56 (2.2)
Air volume / Heat absorption m3/H / W
• Expansion Valve type External pressure equalizer type
• Thermo Switch type (Cooler) Variable electronic thermostat
• Maximum Cool position °C (°F) OFF 3±0.5 (37.4±0.9)
• Minimum Cool position °C (°F)
• Thermo Switch type (A/C) °C (°F) Fixed electronic thermostat
CONDENSER
Type Aluminum louvered fins
Capacity kW (kcal/h)
ISUZU KB P190 2007
TO MODEL INDEX
HEATER A ND AIR CONDITIONING 1-21
MAIN DATA AND SPECIFICATIONS
300/3440
500/5140
DIFF 1.5±0.5 (34.7±0.9)
OFF 11.6±2 (52.9±3.6)
DIFF 2.9±2 (37.2±3.6)
OFF 3 ± 0.5 (37.4 ± 0.9)
DIFF 1.5 ± 0.5 (34.7 ± 0.9)
• 4JA1-T, 4JH1-TC, C24SE
14 (12300)
• 4JJ1-TC (Standard Output),
4JJ1- TC (High Output),
4JK1-TC (High Output),
17 (14620)
Page 56

BACK TO CHAPTER INDEX
1-22 HEATER A ND AIR CONDITIONING
ISUZU KB P190 2007
TO MODEL INDEX
RECEIVER/DRIER
Capacity cc (cu in)
Assembly includes sight glass
and pressure sensitive device
kPa (kg/cm
kPa (kg/cm
kPa (kg/cm
kPa (kg/cm
2
/psi)
2
/psi)
2
/psi)
2
/psi)
(Dual pressure switch)
• Low pressure control
OFF: 177±26 (1.8±0.25/26±4)
ON: 186±30 (1.9±0.3/27±4)
• High pressure control
OFF: 2746±196 (28±2/398±28)
ON: 588±196 (6±2/85±28)
kPa (kg/cm
kPa (kg/cm
kPa (kg/cm
kPa (kg/cm
kPa (kg/cm
kPa (kg/cm
2
/psi)
2
/psi)
2
/psi)
2
/psi)
2
/psi)
2
/psi)
(Triple pressure switch)
• Low pressure control
OFF: 177±26 (1.8±0.25/26±4)
ON: 186±30 (1.9±0.3/27±4)
• Medium pressure control
OFF: 1128±118 (11.5±1.2/164±17)
ON: 1521±88 (15.5±0.9/220±13)
• High pressure control
OFF: 2746±196 (28±2/398±28)
ON: 588±196 (6±2/85±28)
ELECTRIC FAN
Fan Dia
Motor Power (w)
REFRIGERANT
Type
Capacity kg (lbs)
IDLE SPEED-UP CONTROL
Idle speed controlled by solenoid switch (4JA1-T only)
• 4JA1-T, 4JH1-TC, C24SE
• 4JJ1-TC (Standard Output),
4JJ1-TC (High Output),
4JK1-TC (High Output)
0.65 (1.43)
250 (15.3)
∅
250
90
HFC-134a
0.72 (1.59)
Page 57
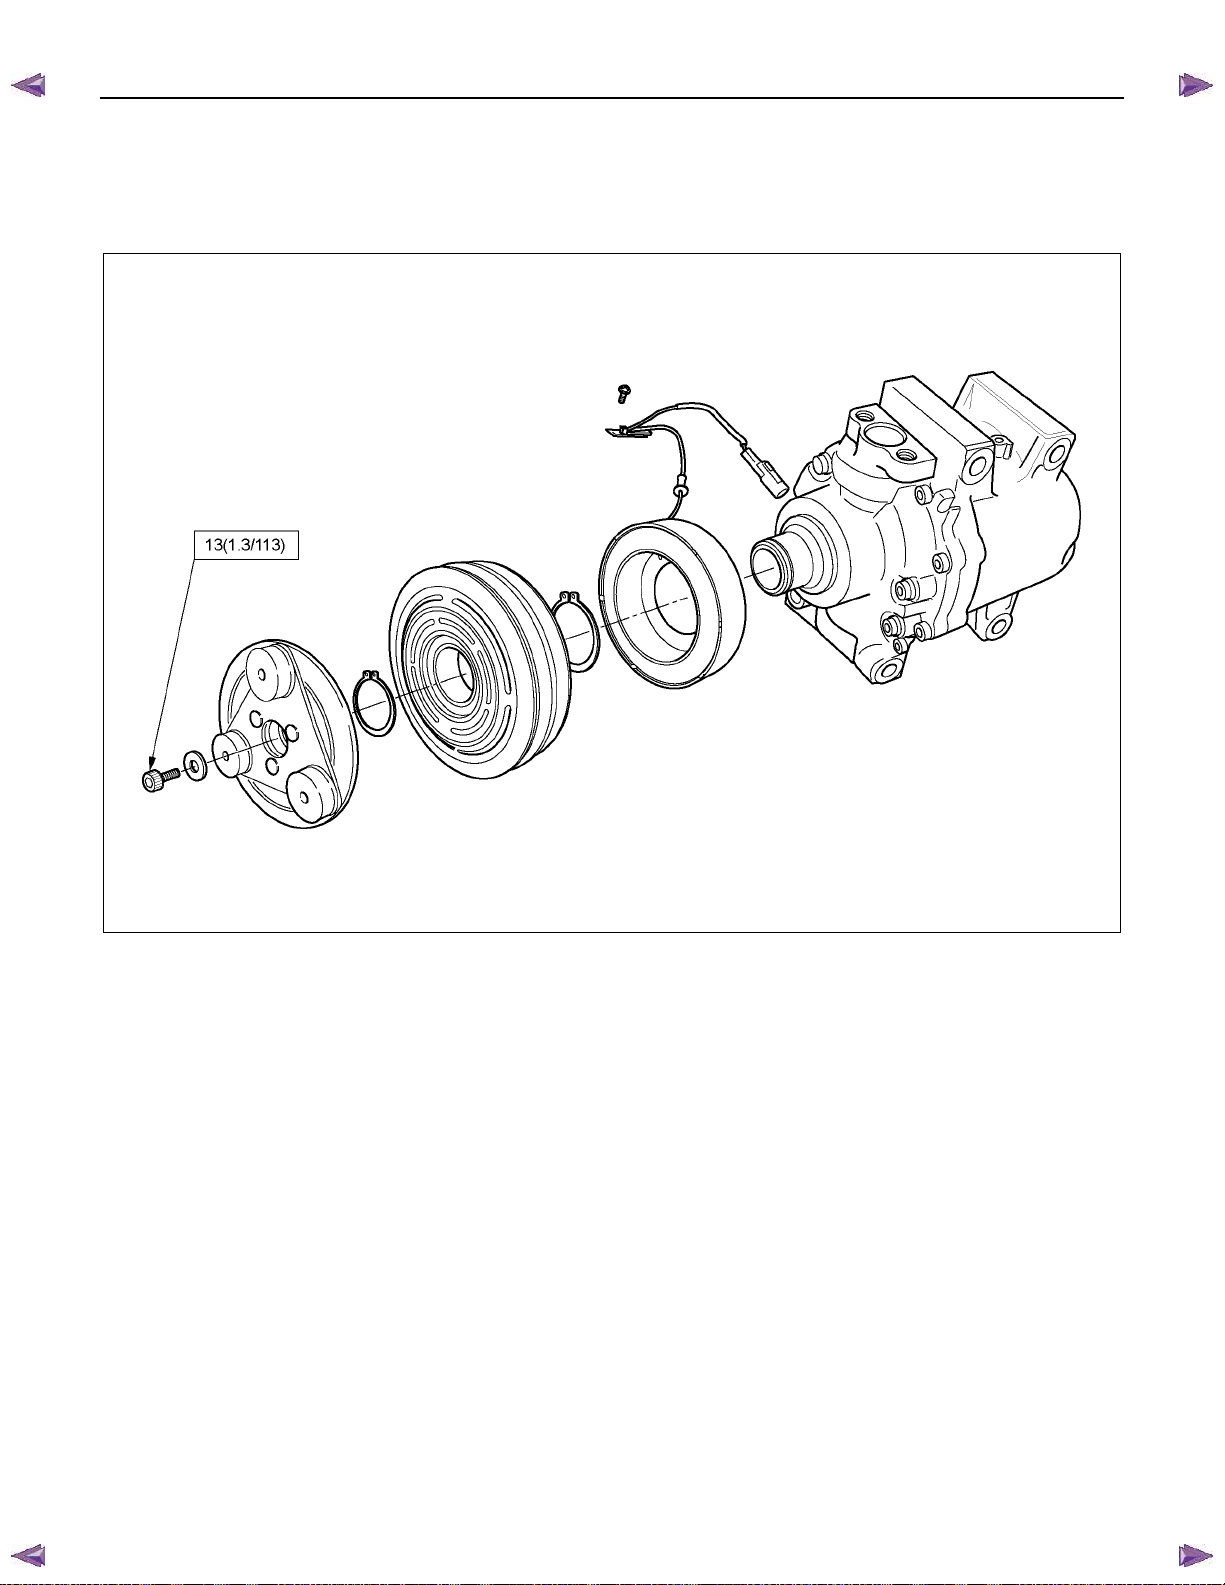
BACK TO CHAPTER INDEX
FIXING TORQUE
(COMPRESSOR ASSEMBLY)
ISUZU KB P190 2007
TO MODEL INDEX
HEATER A ND AIR CONDITIONING 1-23
SPECIAL PARTS FIXING NUTS AND BOLTS
N⋅⋅⋅⋅m (kgf⋅⋅⋅⋅m/lb⋅⋅⋅⋅in)
RTW510MF000501
Page 58
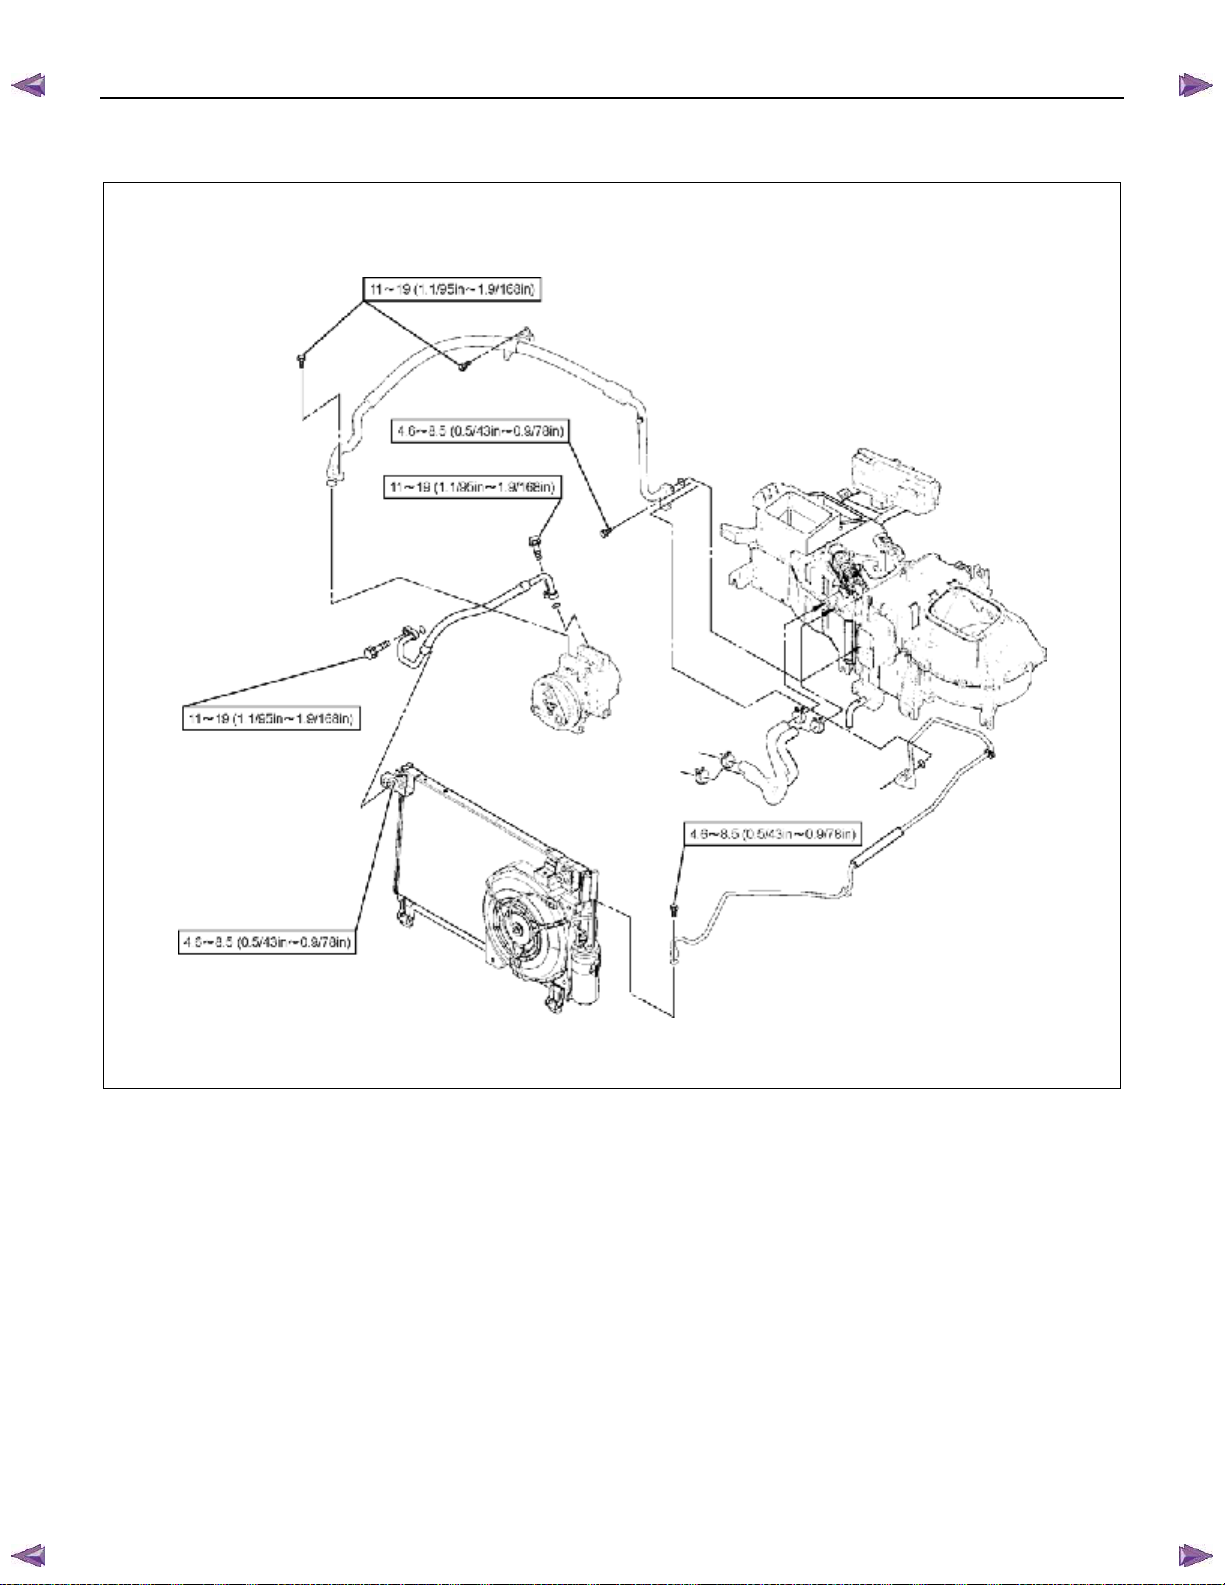
BACK TO CHAPTER INDEX
1-24 HEATER A ND AIR CONDITIONING
(4JA1-T RHD MODEL)
ISUZU KB P190 2007
TO MODEL INDEX
N⋅⋅⋅⋅m (kgf⋅⋅⋅⋅m/lb⋅⋅⋅⋅in)
RTW710LF003301
Page 59
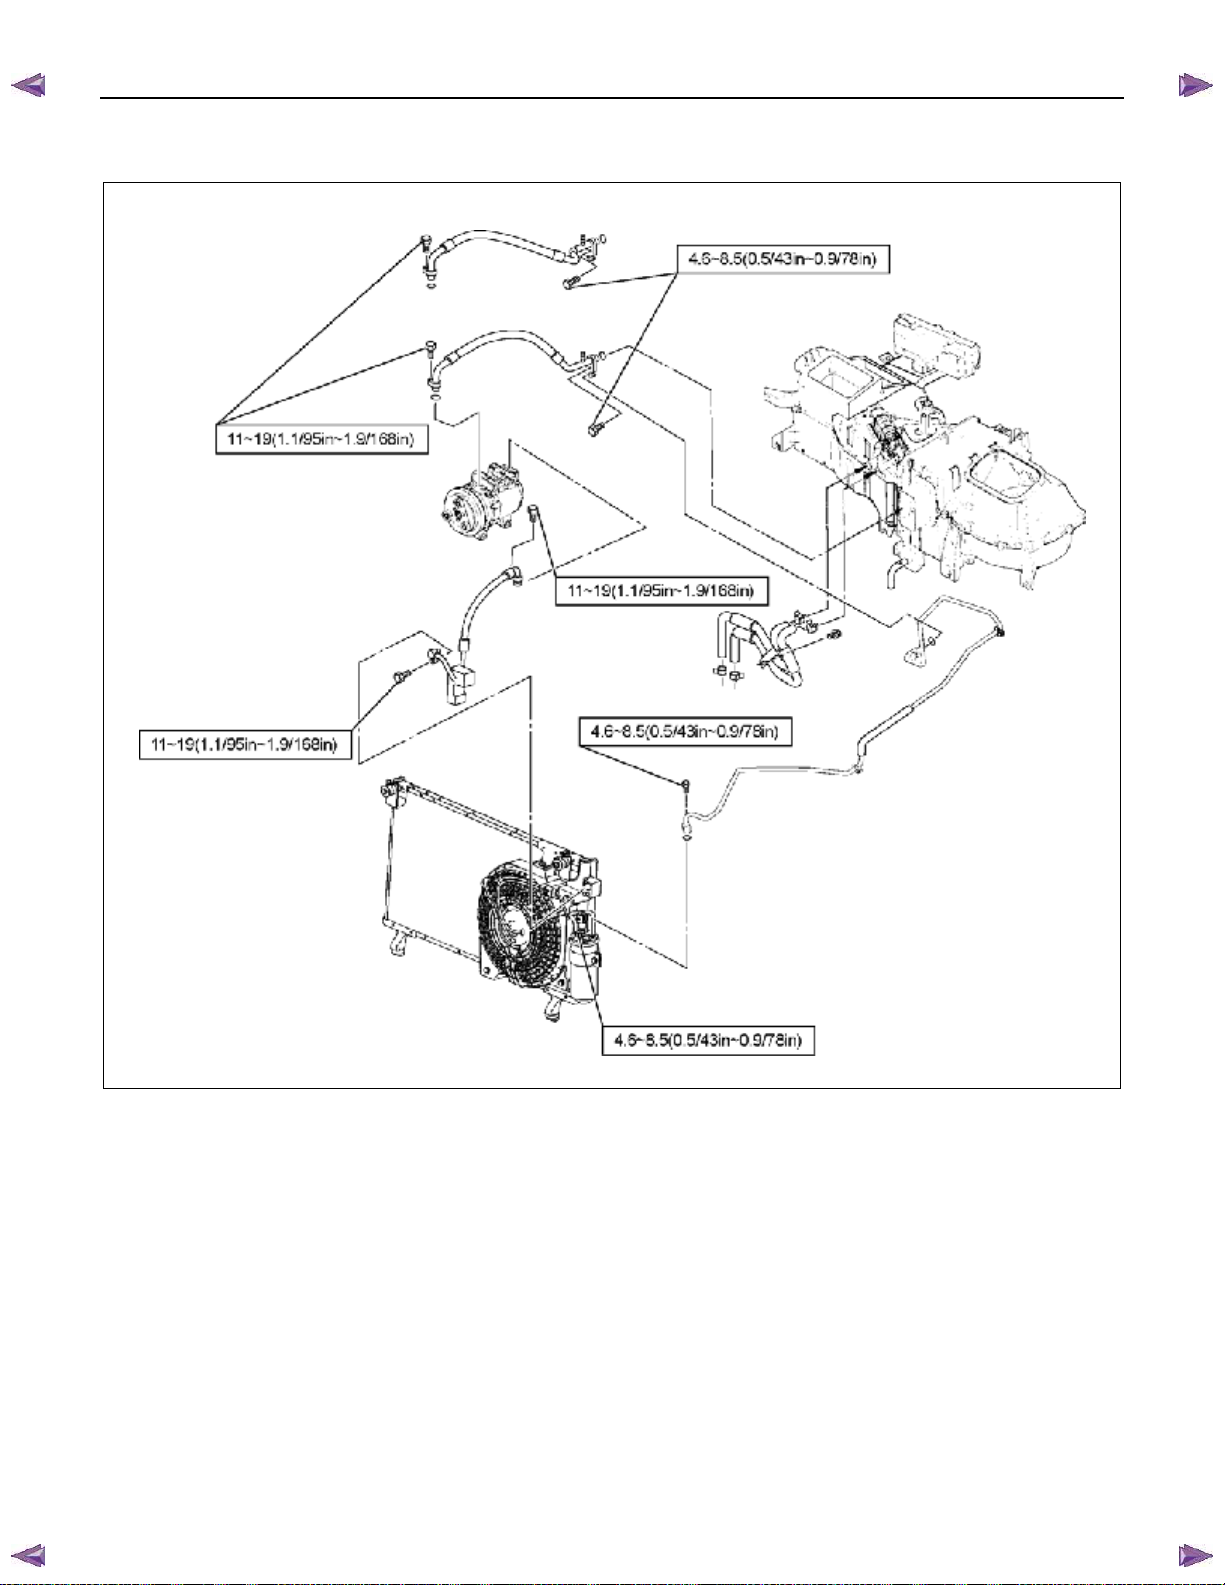
BACK TO CHAPTER INDEX
(4JJ1-TC Standard Output, 4JJ1-TC High Output, 4JK1-TC High Output RHD MODEL)
ISUZU KB P190 2007
TO MODEL INDEX
HEATER A ND AIR CONDITIONING 1-25
N⋅⋅⋅⋅m (kgf⋅⋅⋅⋅m/lb⋅⋅⋅⋅in)
RTW710LF003401
Page 60
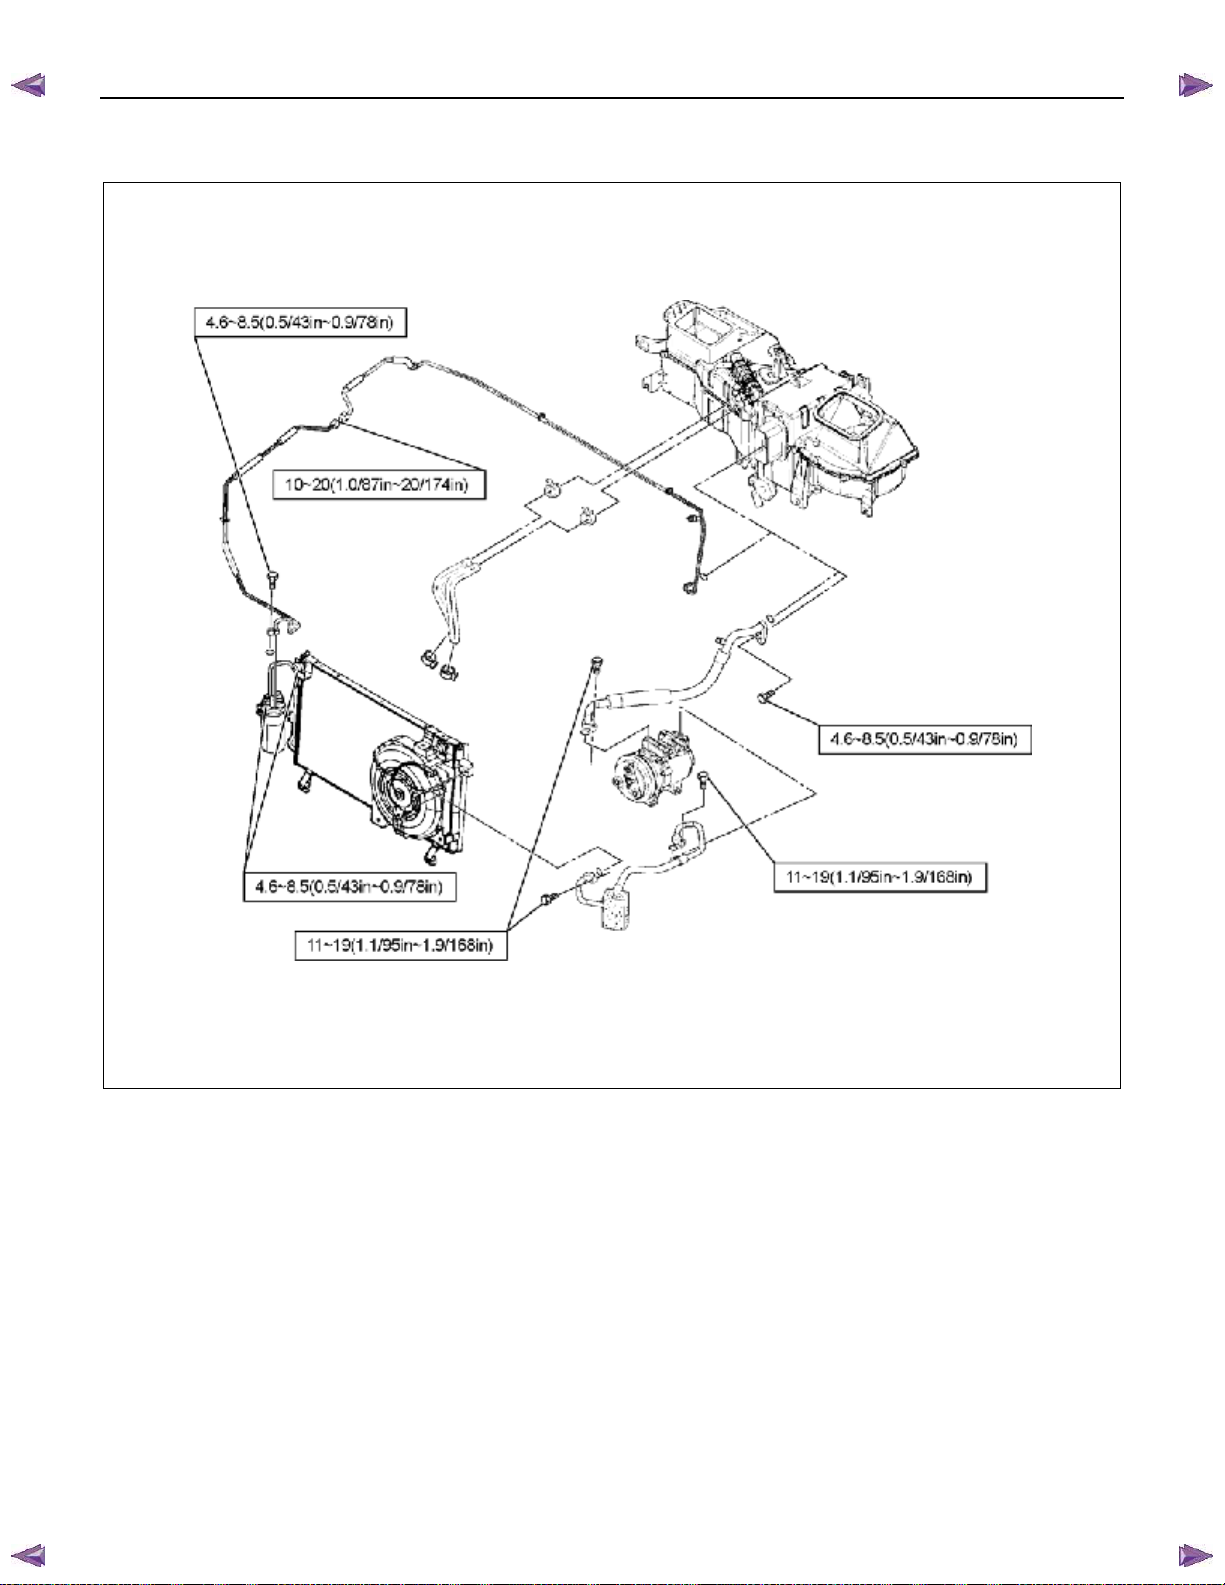
BACK TO CHAPTER INDEX
1-26 HEATER A ND AIR CONDITIONING
(C24SE RHD MODEL)
ISUZU KB P190 2007
TO MODEL INDEX
N⋅⋅⋅⋅m (kgf⋅⋅⋅⋅m/lb⋅⋅⋅⋅in)
RTW710LF003501
Page 61
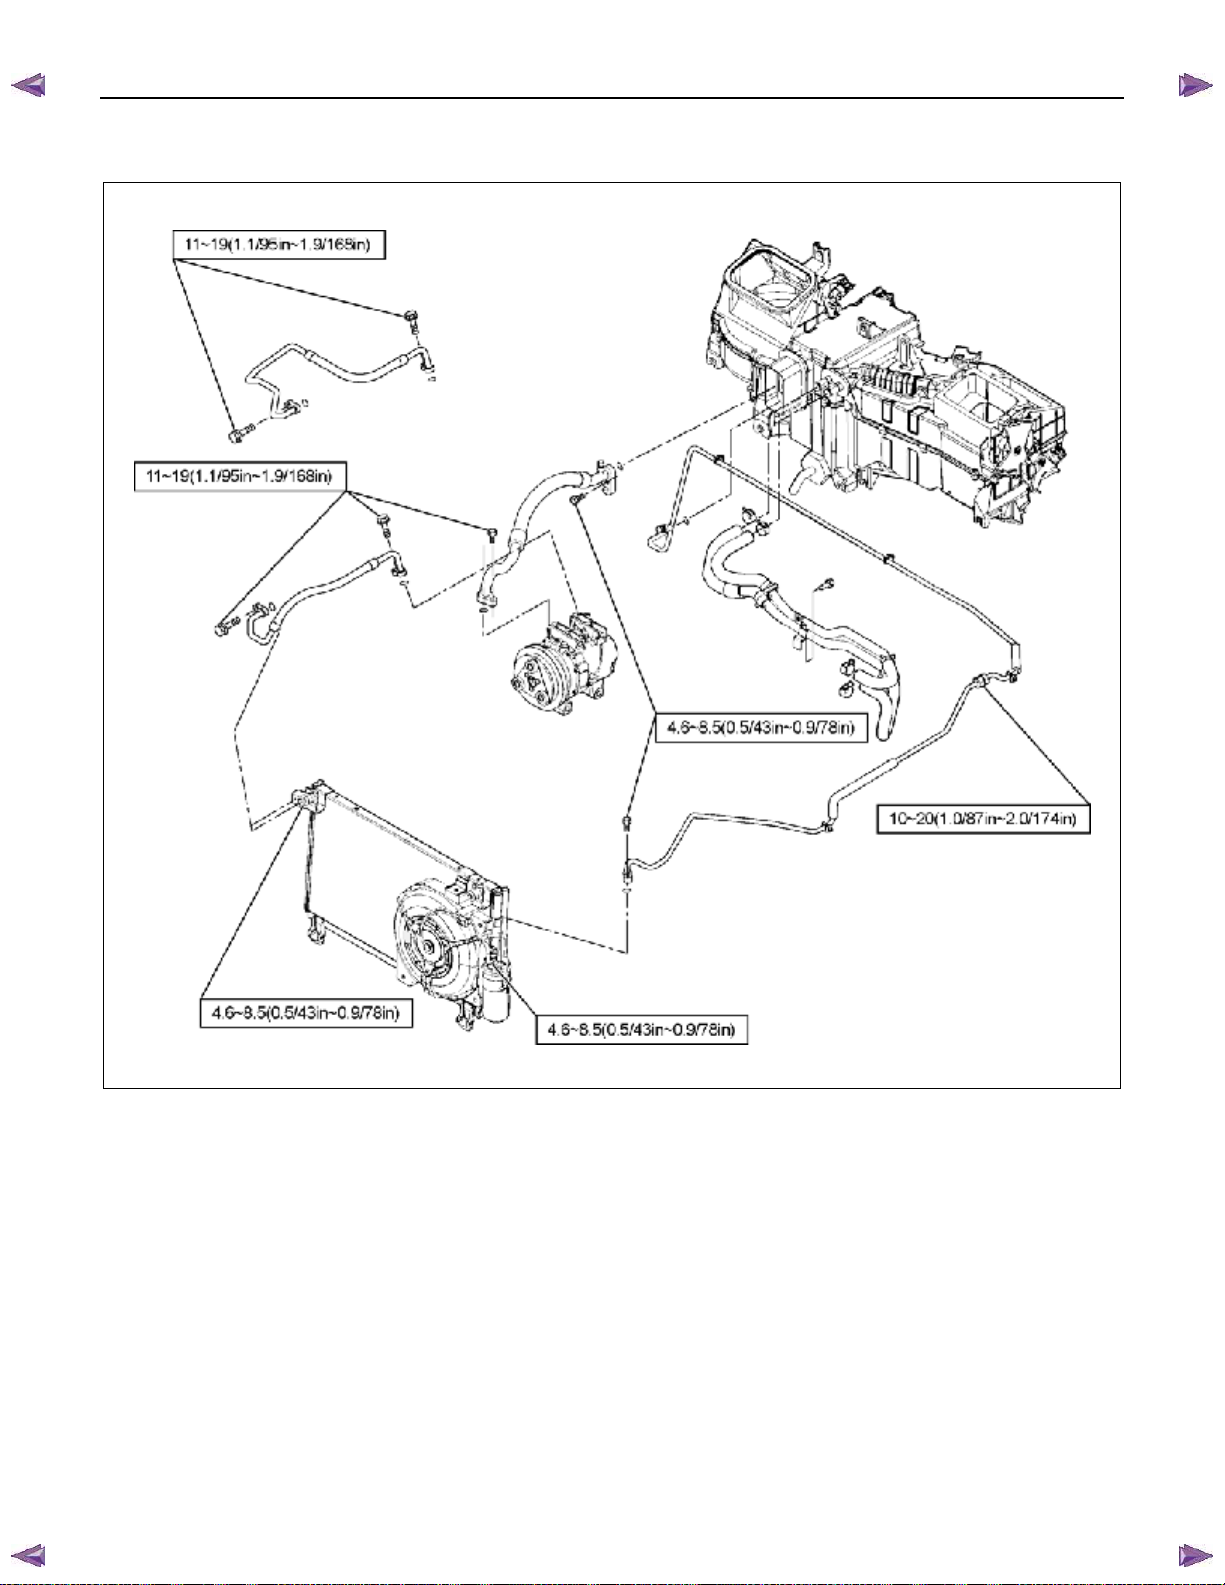
BACK TO CHAPTER INDEX
(4JA1-T, 4JH1-TC LHD MODEL)
ISUZU KB P190 2007
TO MODEL INDEX
HEATER A ND AIR CONDITIONING 1-27
N⋅⋅⋅⋅m (kgf⋅⋅⋅⋅m/lb⋅⋅⋅⋅in)
RTW710LF003601
Page 62
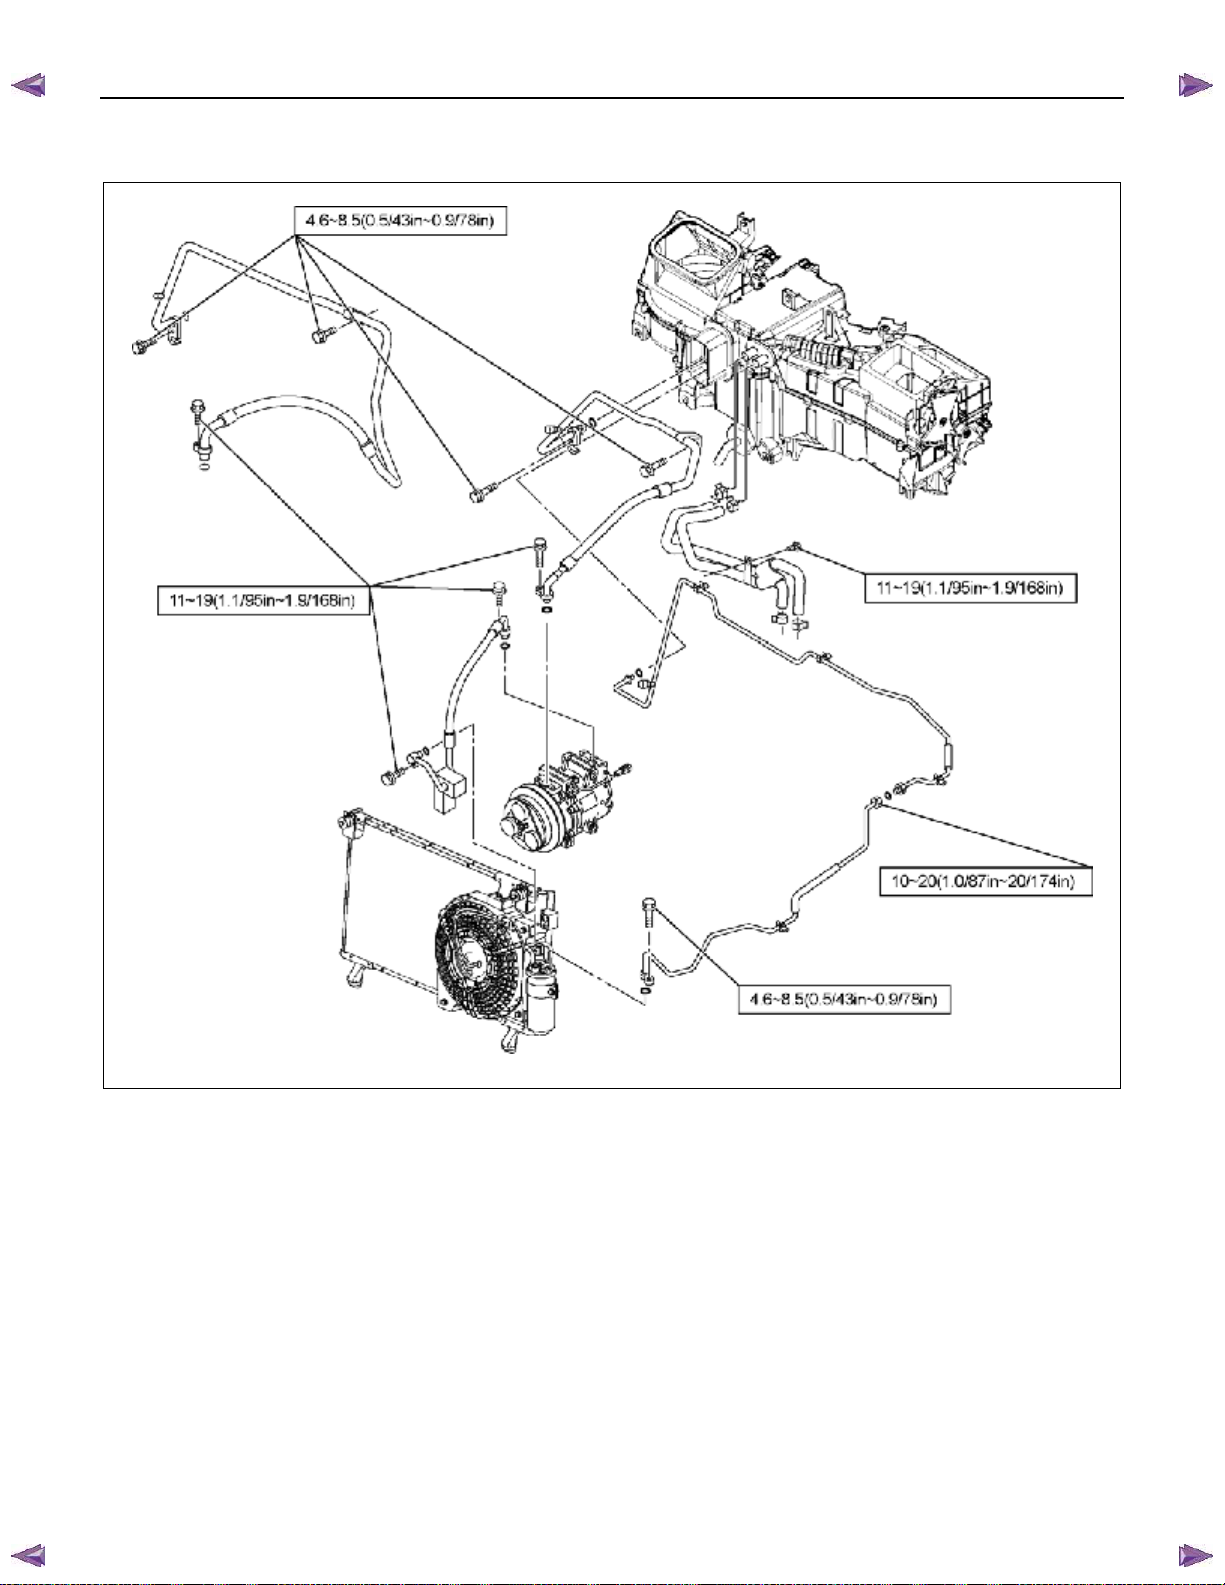
BACK TO CHAPTER INDEX
1-28 HEATER A ND AIR CONDITIONING
(4JJ1-TC Standard Output, 4JJ1-TC High Output, 4JK1-TC High Output LHD MODEL)
ISUZU KB P190 2007
TO MODEL INDEX
N⋅⋅⋅⋅m (kgf⋅⋅⋅⋅m/lb⋅⋅⋅⋅in)
RTW710LF003701
Page 63
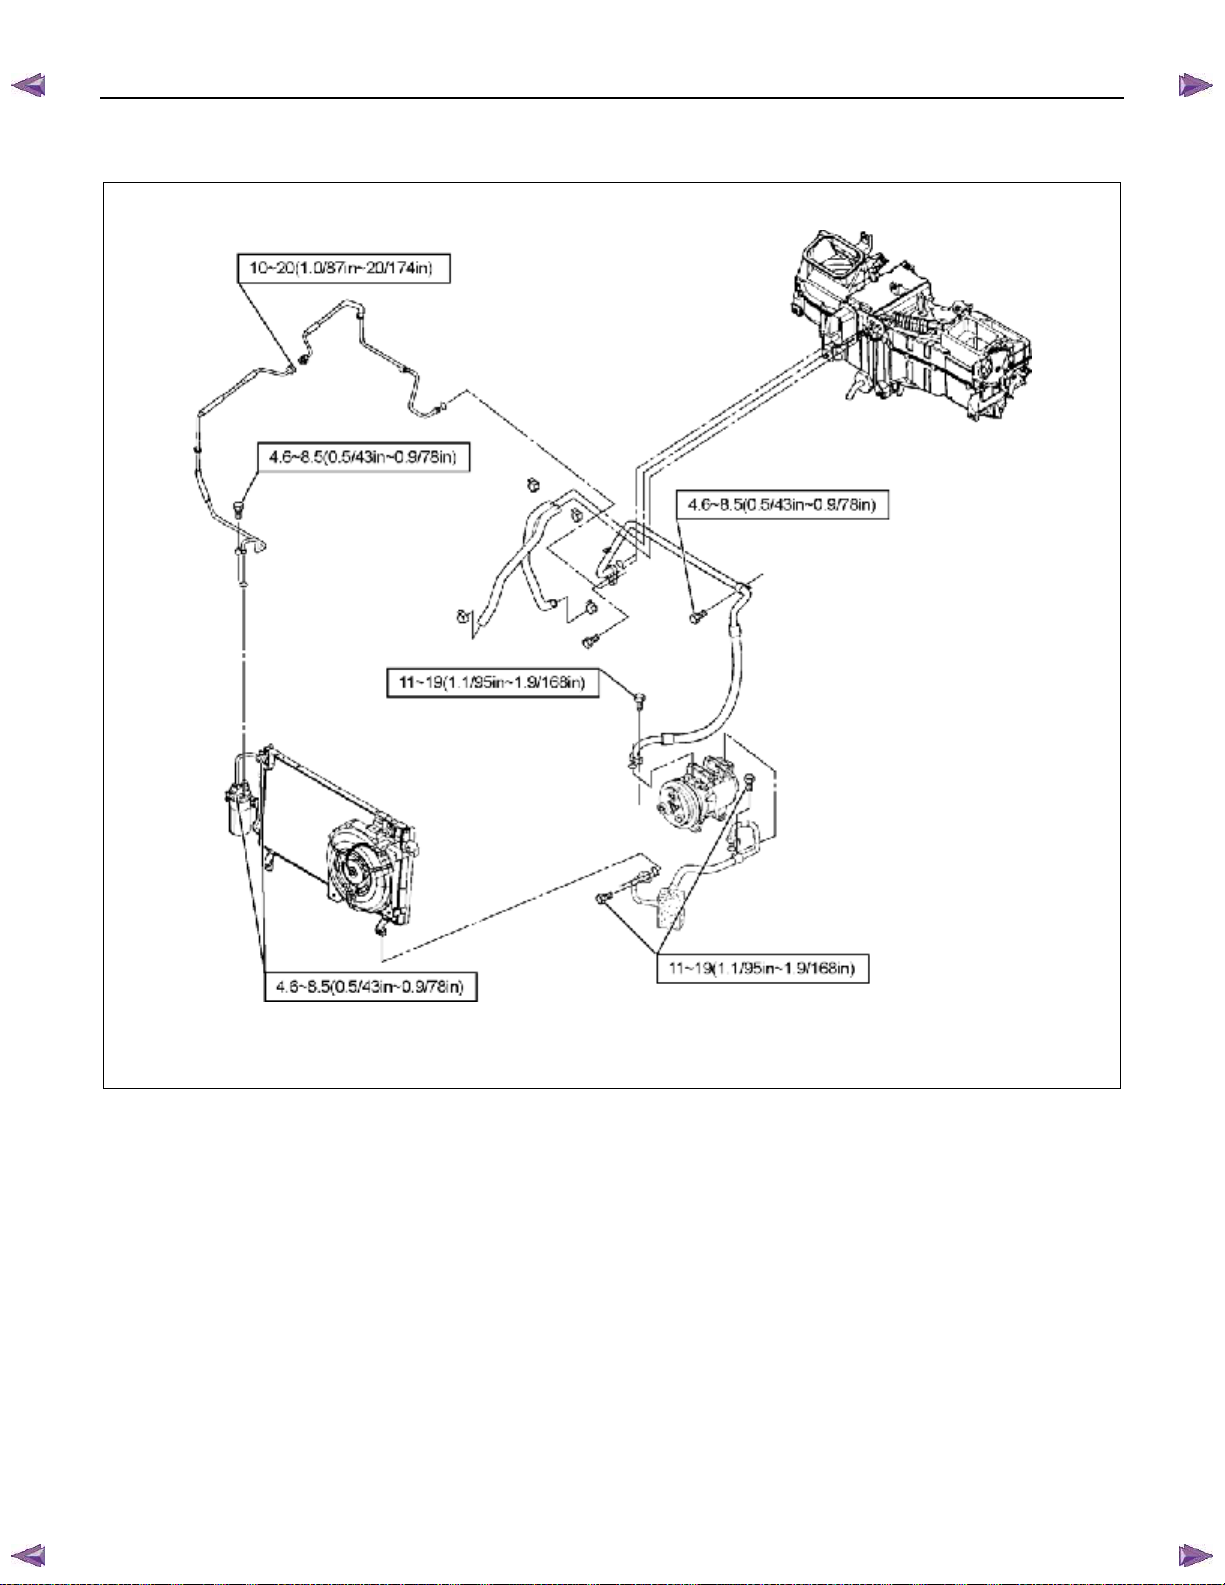
BACK TO CHAPTER INDEX
(C24SE LHD MODEL)
ISUZU KB P190 2007
TO MODEL INDEX
HEATER A ND AIR CONDITIONING 1-29
N⋅⋅⋅⋅m (kgf⋅⋅⋅⋅m/lb⋅⋅⋅⋅in)
RTW710LF003801
Page 64
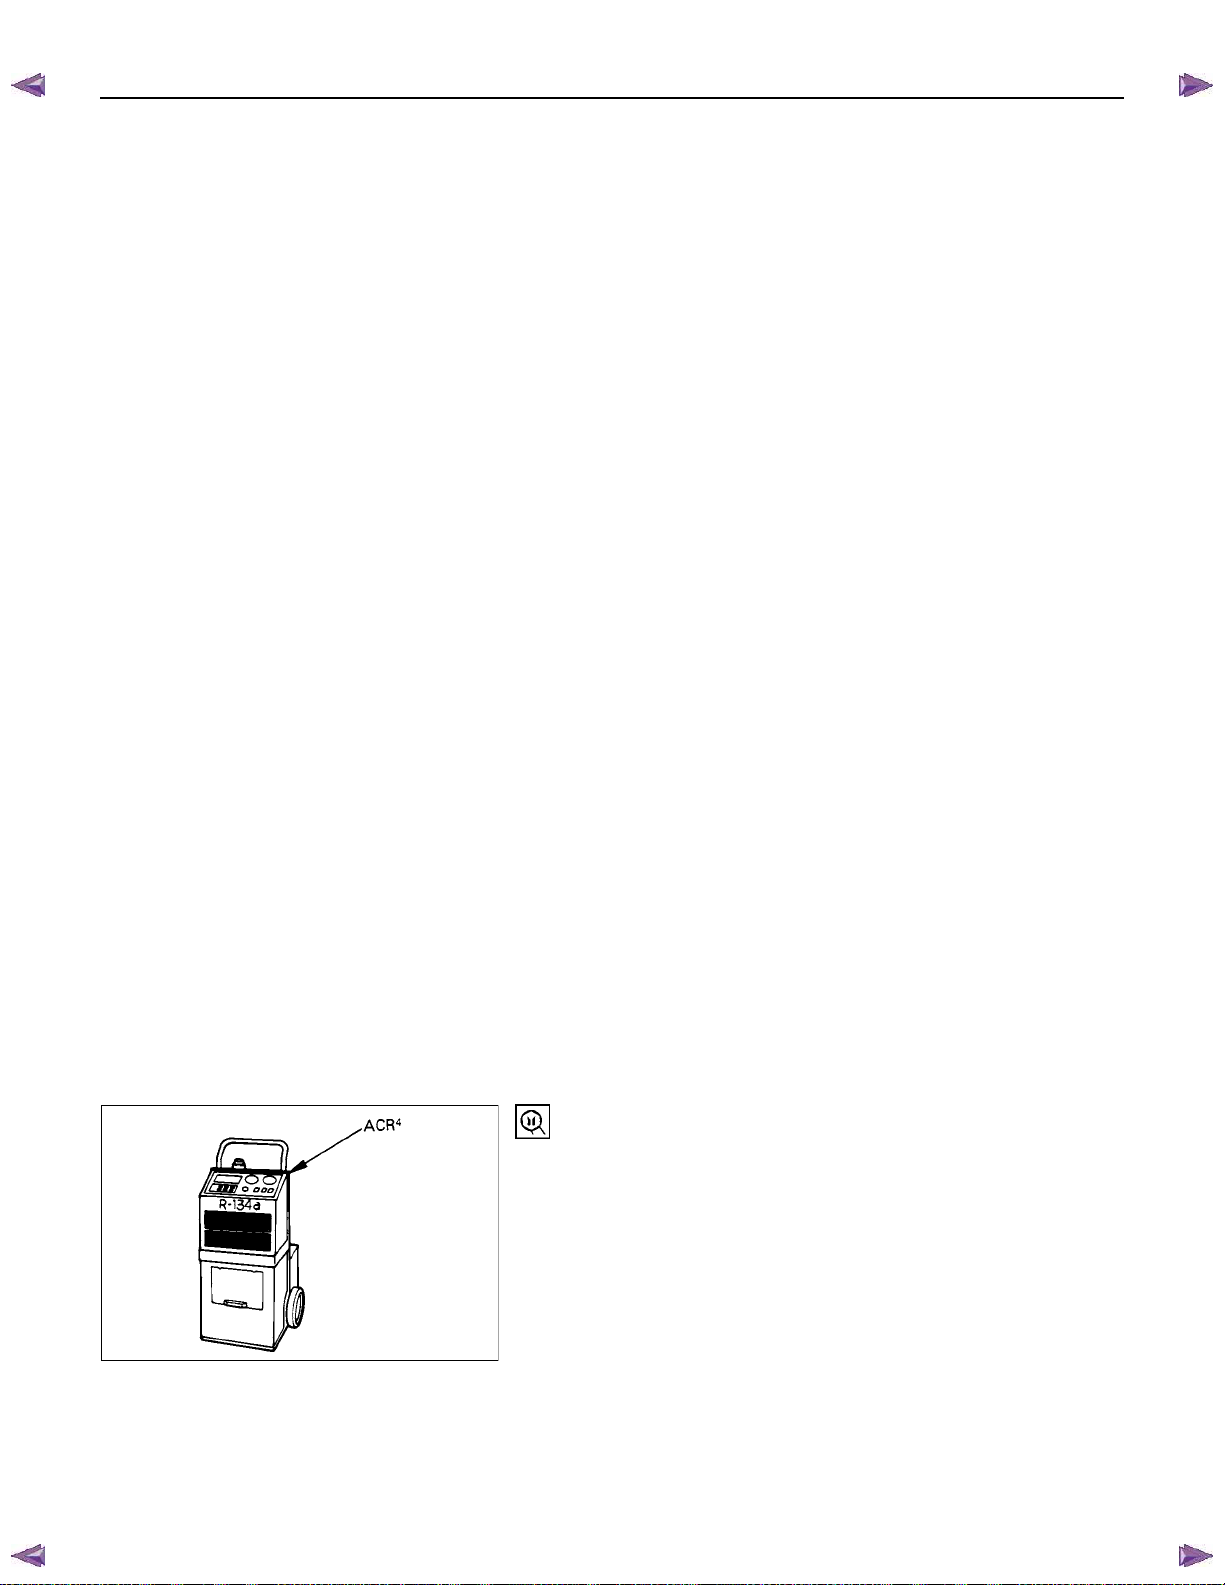
A
A
BACK TO CHAPTER INDEX
1-30 HEATER A ND AIR CONDITIONING
ISUZU KB P190 2007
TO MODEL INDEX
ON-VEHICLE SERVICE
PRECAUTIONS FOR REPLACEMENT OR
REPAIR OF AIR CONDITIONING PARTS
There are certain procedures, practices and precautions that
should be followed when servicing air conditioning systems:
• Keep your work area clean.
• Always wear safety goggle and protective gloves when
working on refrigerant systems.
• Beware of the danger of carbon monoxide fumes caused by
running the engine.
• Beware of discharged refrigerant in enclosed or improperly
ventilated garages.
lways disconnect the negative battery cable and discharge
•
and recover the refrigerant whenever repairing the air
conditioning system.
• When discharging and recovering the refrigerant, do not
allow refrigerant to discharge too fast; it will draw
compressor oil out of the system.
• Keep moisture and contaminants out of the system. When
disconnecting or removing any lines or parts, use plugs or
caps to close the fittings immediately.
Never remove the caps or plugs until the lines or parts are
reconnected or installed.
• When disconnecting or reconnecting the lines, use two
wrenches to support the line fitting, to prevent from twisting
or other damage.
• Always install new O-rings whenever a connection is
disassembled.
• Before connecting any hoses or lines, apply new specified
compressor oil to the O-rings.
• When removing and replacing any parts which require
discharging the refrigerant circuit, the operations described
in this section must be performed in the following sequence:
4
1) Using the ACR
Recycling/Recharging/System) or equivalent to
(HFC-134a Refrigerant Recovery/
thoroughly discharge and recover the refrigerant.
4
ACR
ACR
(115V 60Hz) : 5-8840-0629-0 (J-39500-A)
4
(220-240V 50/60Hz)
: 5-8840-0630-0 (J-39500-220A)
4
ACR
(220-240V 50/60Hz Australian model)
: 5-8840-0631-0 (J-39500-220ANZ)
2) Remove and replace the defective part.
fter evacuation, charge the air conditioning system and
3)
check for leaks.
Page 65
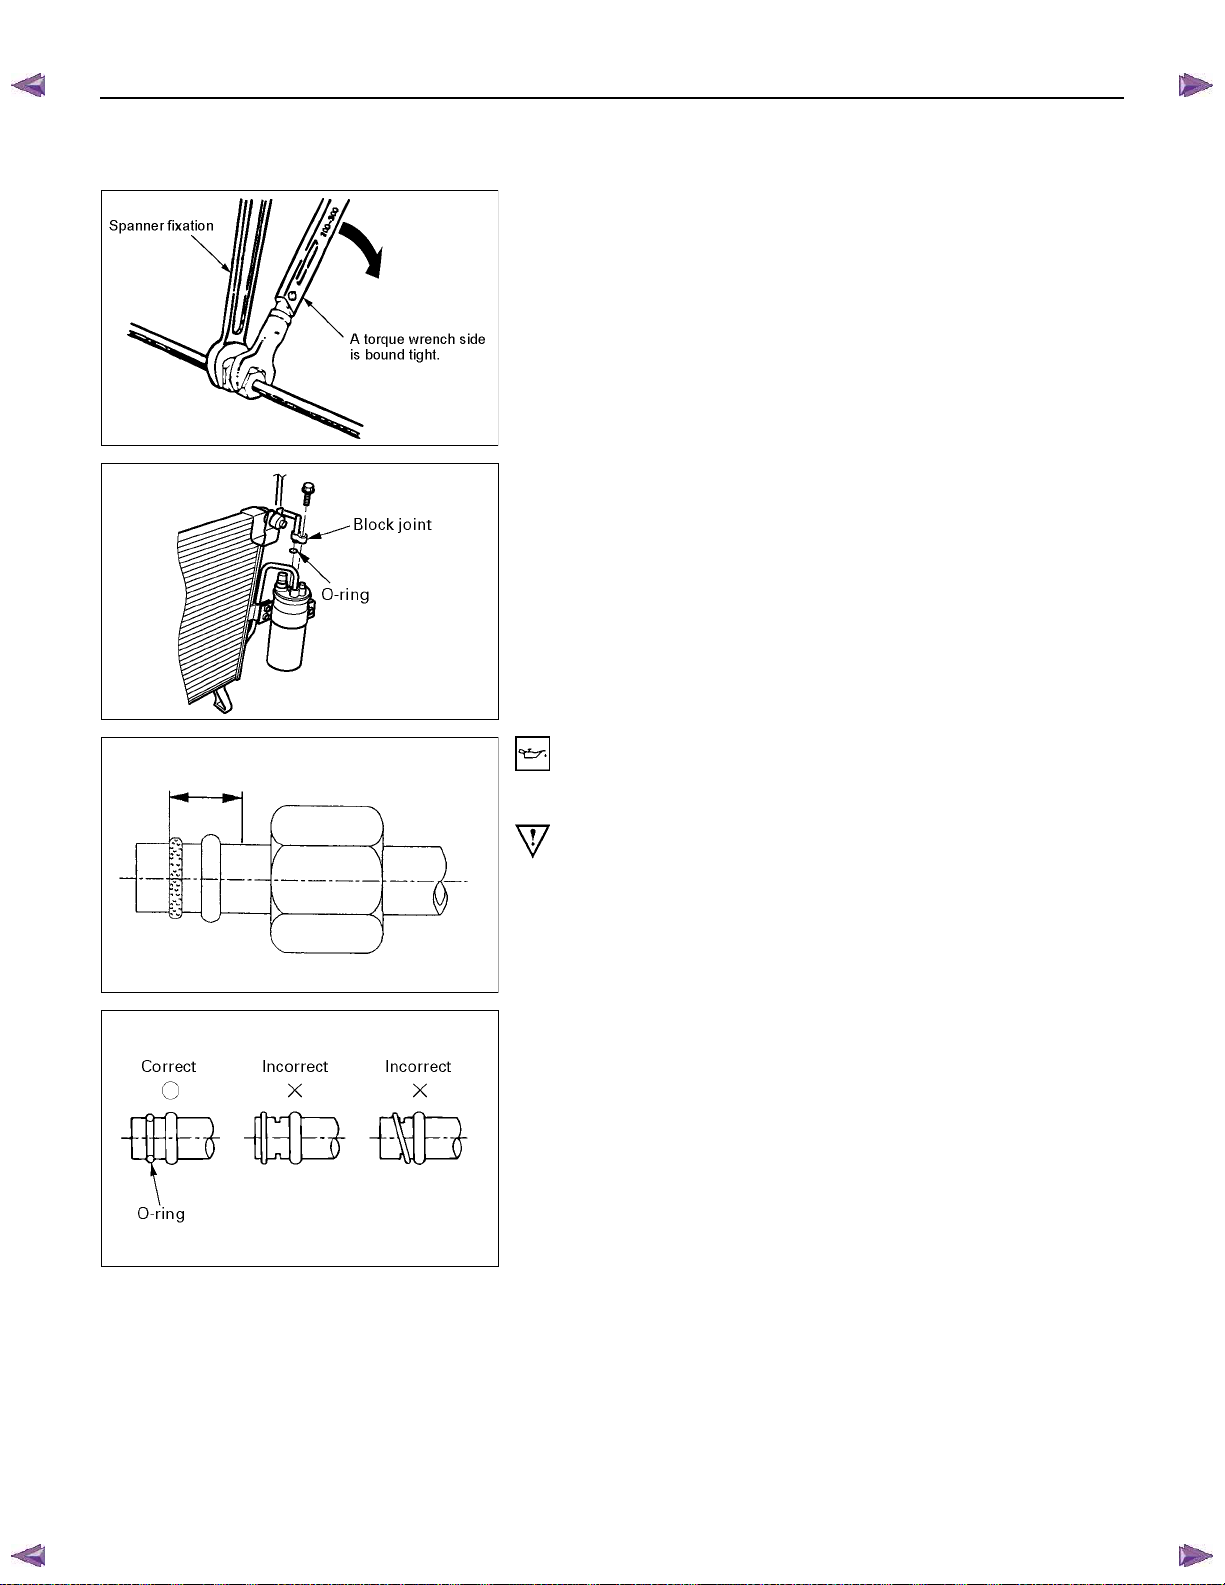
BACK TO CHAPTER INDEX
ISUZU KB P190 2007
TO MODEL INDEX
HEATER A ND AIR CONDITIONING 1-31
REPAIR OF REFRIGERANT LEAKS
Refrigerant Line Connections
Install new O-ring, if required. When disconnecting or
connecting lines, use two wrenches to prevent the connecting
portion from twisting or becoming damaged.
RTW410SH000101
When connecting the refrigerant line at the block joint, securely
insert the projecting portion of the joint portion into the
connecting hole on the unit side and secure with a bolt.
Apply specified compressor oil to the O-rings prior to
connecting.
CAUTION:
Compressor (PAG) oil to be used varies according to
compressor model. Be sure to apply oil specified for the
model of compressor.
O-rings must be closely aligned with raised portion of
refrigerant line.
Page 66
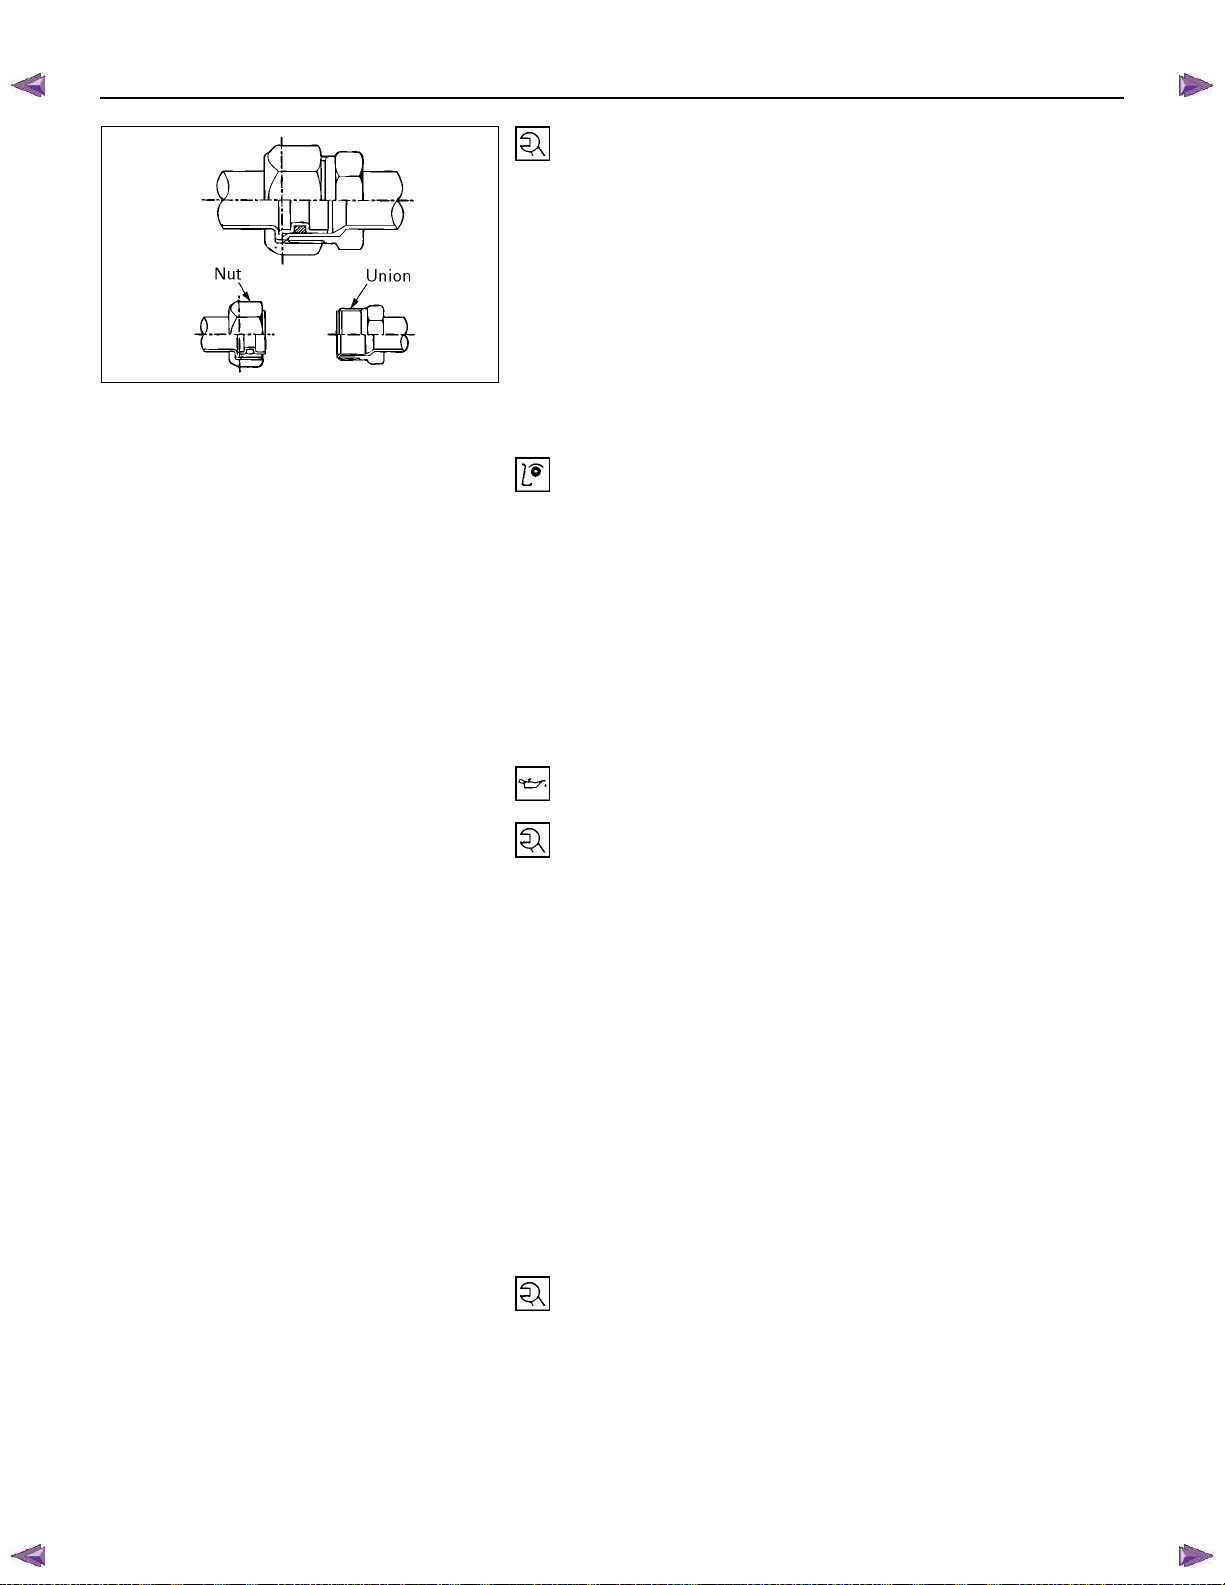
BACK TO CHAPTER INDEX
1-32 HEATER A ND AIR CONDITIONING
ISUZU KB P190 2007
TO MODEL INDEX
Insert nut into union. First tighten nut by hand as much as
possible. Then, tighten nut to specified torque.
(Refer to "Special Parts Fixing Nuts and Bolts" in this section)
LEAK AT REFRIGERANT LINE
CONNECTIONS
1) Check the torque on the refrigerant line fitting and, if too
loose, tighten to the specified torque.
• Use two wrenches to prevent twisting and damage to the
Line.
• Do not over tighten.
2) Perform a leak test on the refrigerant line fitting.
3) If the leak is still present, discharge and recover the
refrigerant from the system.
4) Replace the O-rings.
• O-rings cannot be reused. Always replace with new
ones.
• Be sure to apply specified compressor oil to the new O-
rings.
5) Retighten the refrigerant line fitting to the specified torque.
• Use two wrenches to prevent twisting and damage to the
line.
6) Evacuate, charge and retest the system.
LEAK IN THE HOSE
If the compressor inlet or outlet hose is leaking, the entire hose
must be replaced. Refrigerant hose must not be cut or spliced
for repair.
1) Locate the leak.
2) Discharge and recover the refrigerant.
3) Remove the hose assembly.
• Cap the open connections at once.
4) Connect the new hose assembly.
• Use two wrenches to prevent twisting or damage to the
hose fitting.
• Tighten the hose fitting to the specified torque.
5) Evacuate, charge and test the system.
COMPRESSOR LEAKS
If leaks are located around the compressor shaft seal or shell,
replace or repair the compressor.
Page 67
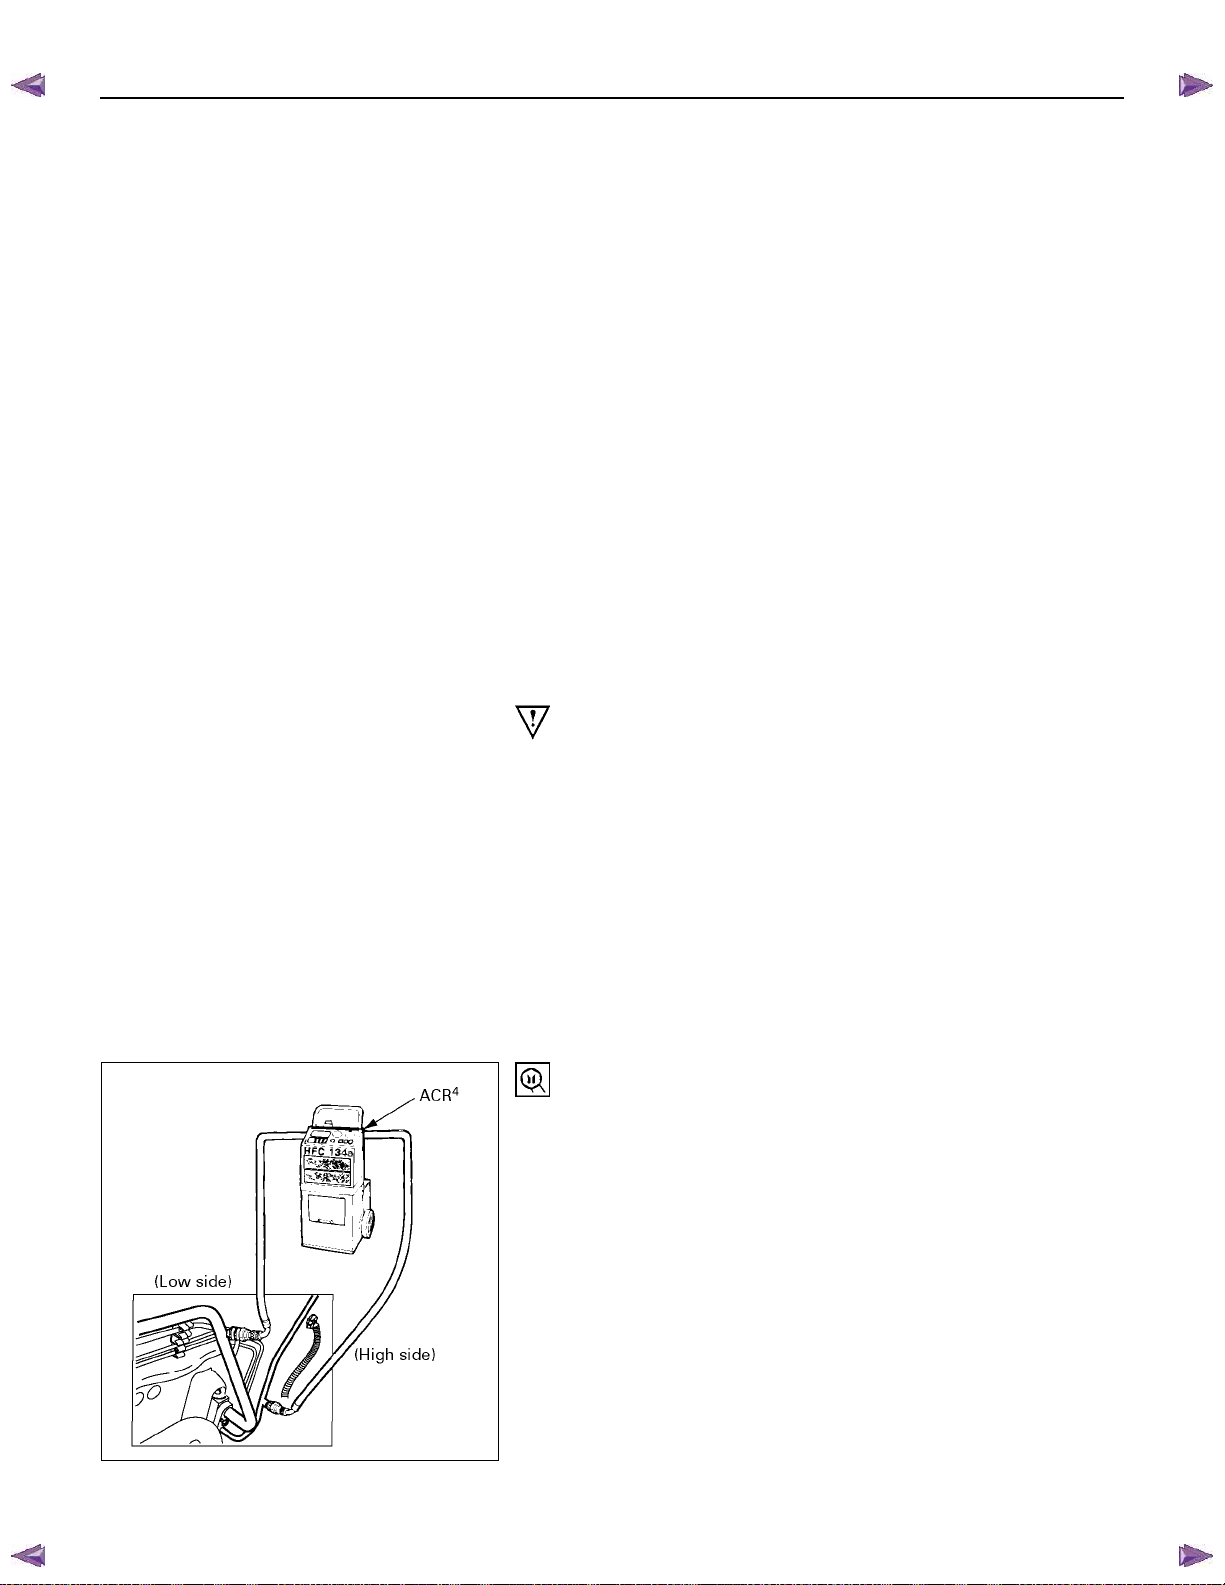
BACK TO CHAPTER INDEX
ISUZU KB P190 2007
TO MODEL INDEX
HEATER A ND AIR CONDITIONING 1-33
RECOVERY, RECYCLING, EVACUATION
AND CHARGING
Handling Refrigerant-134a (HFC-134a)
Air conditioning systems contain HFC-134a.
This is a chemical mixture, which requires special handling
procedures to avoid personal injury.
• Always wear safety goggles and protective gloves.
• Always work in a well-ventilated area. Do not weld or steam
clean on or near any vehicle-installed air conditioning lines
or components.
• If HFC-134a should come in contact with any part of the
body, flush the exposed area with cold water and
immediately seek medical help.
• If it is necessary to transport or carry any container of HFC134a in a vehicle, do not carry it in the passenger
compartment.
• If it is necessary to fill a small HFC-134a container from a
large one, never fill the container completely. Space should
always be allowed above the liquid for expansion.
• Keep HFC-134a containers stored below 40°C (104°F).
WARNING
•
• SHOULD HFC-134a CONTACT YOUR EYE(S), CONSULT
••
A DOCTOR IMMEDIATELY.
•
• DO NOT RUB THE AFFECTED EYE(S). INSTEAD,
••
SPLASH QUANTITIES OF FRESH COLD WATER OVER
THE AFFECTED AREA TO GRADUALLY RAISE THE
TEMPERATURE OF THE REFRIGERANT ABOVE THE
FREEZING POINT.
•
• OBTAIN PROPER MEDICAL TREATMENT AS SOON AS
••
POSSIBLE. SHOULD THE HFC-134a TOUCH THE SKIN,
THE INJURY MUST BE TREATED THE SAME AS SKIN
WHICH HAS BEEN FROSTBITTEN OR FROZEN.
REFRIGERANT RECOVERY
The refrigerant must be discharged and recovered by using
4
(HFC-134a Refrigerant Recovery/Recycling/Recharging/
ACR
System) or equivalent before removing or installing air
conditioning parts.
4
(115V 60Hz) :5-8840-0629-0 (J-39500-A)
ACR
4
(220-240V 50/60Hz)
ACR
: 5-8840-0630-0 (J-39500-220A)
4
(220-240V 50/60Hz Australian model)
ACR
F06R300012
: 5-8840-0631-0 (J-39500-220ANZ)
1) Connect the high and low charging hoses of the ACR
equivalent) as shown.
4
2) Recover the refrigerant by following the ACR
Manufacturer's Instructions.
3) When a part is removed, put a cap or a plug on the
connecting portion so that dust, dirt or moisture cannot get
into it.
4
(or
Page 68
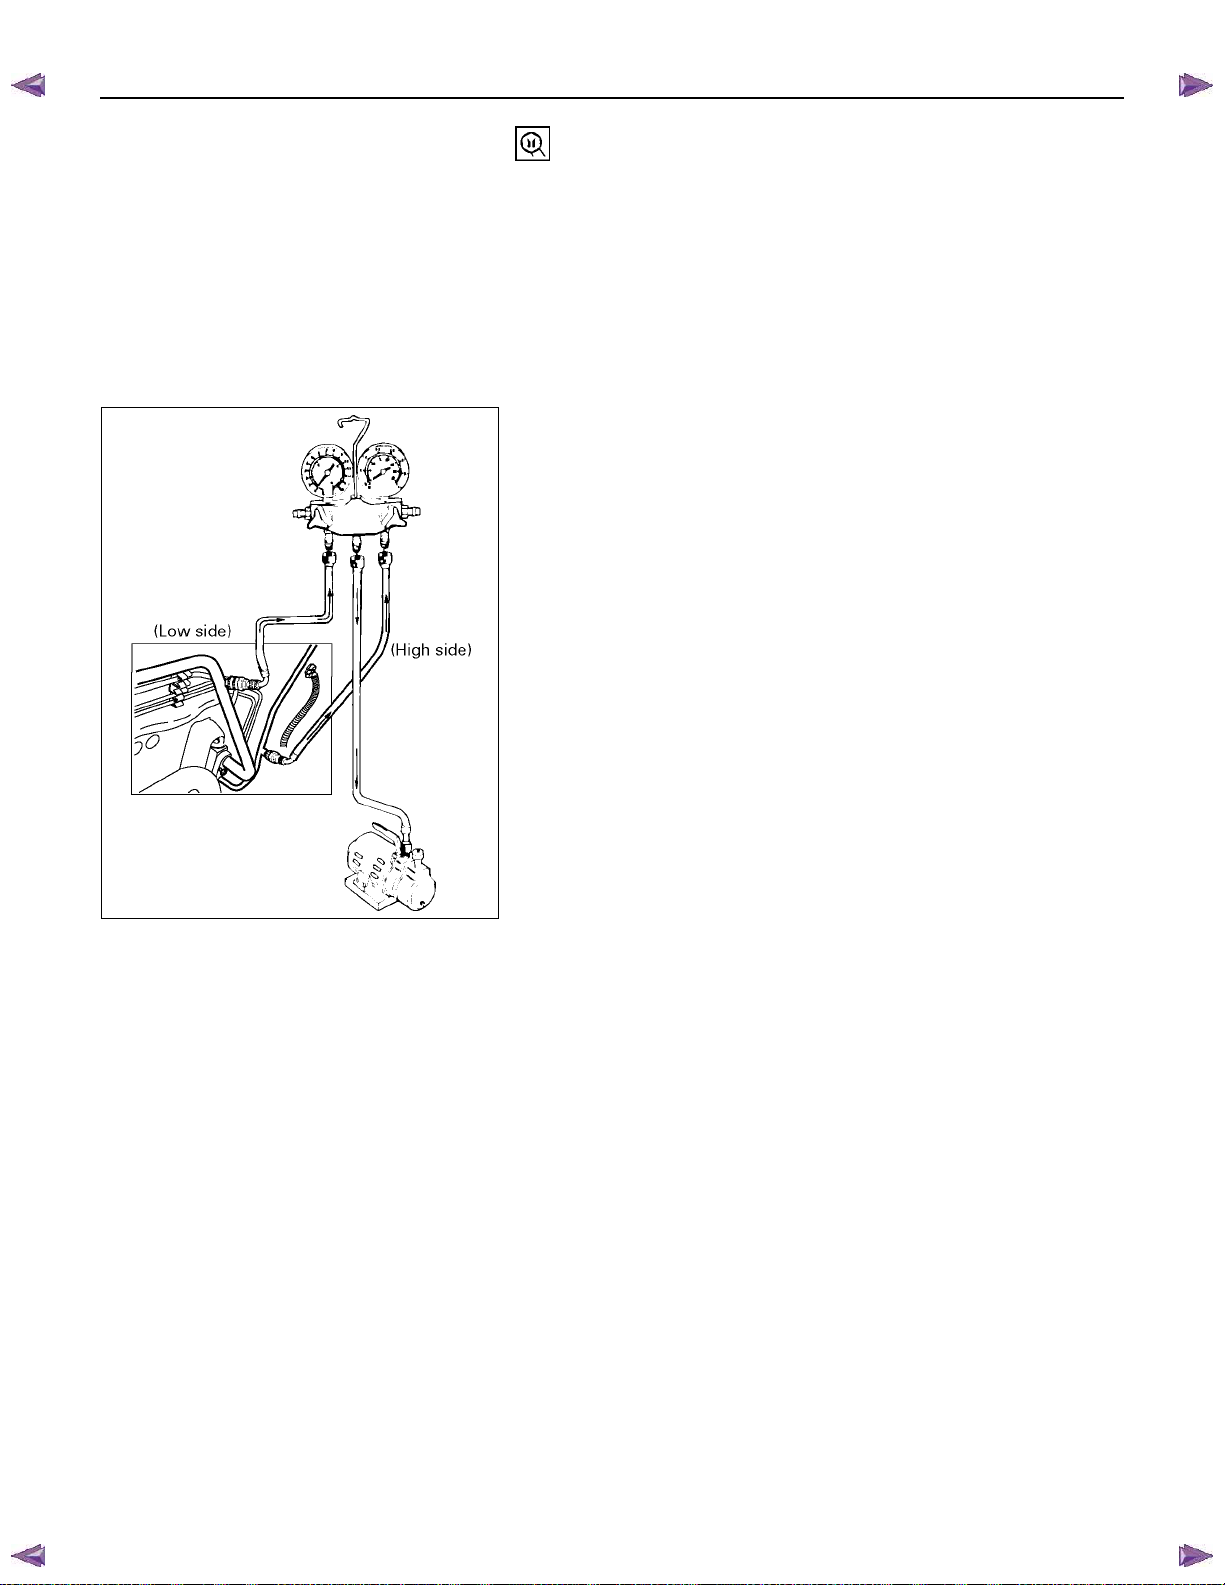
A
BACK TO CHAPTER INDEX
1-34 HEATER A ND AIR CONDITIONING
ISUZU KB P190 2007
TO MODEL INDEX
REFRIGERANT RECYCLING
Recycle the refrigerant recovered by ACR4 or equivalent.
For the details of the actual operation, follow the steps in the
4
Manufacturer's Instructions.
ACR
4
(115V 60Hz) :5-8840-0629-0 (J-39500-A)
ACR
4
(220-240V 50/60Hz)
ACR
: 5-8840-0630-0 (J-39500-220A)
4
(220-240V 50/60Hz Australian model)
ACR
: 5-8840-0631-0 (J-39500-220ANZ)
EVACUATION OF THE REFRIGERANT
SYSTEM
NOTE:
Explained below is a method using a vacuum pump. Refer
to the ACR
when evacuating the system with ACR
4
(or equivalent) Manufacturer's Instructions
4
(or equivalent).
ir and moisture in the refrigerant will cause problems in the air
conditioning system.
Therefore, before charging the refrigerant, be sure to evacuate
air and moisture thoroughly from the system.
1) Connect the gauge manifold.
•
• High-pressure valve (HI) - Discharge-side
••
•
• Low-pressure valve (LOW) - Suction-side
••
2) Discharge and recover the refrigerant.
3) Connect the center hose of the gauge manifold set to the
vacuum pump inlet.
4) Operate the vacuum pump, open shutoff valve and then
F06R300014
open both hand valves.
5) When the low-pressure gauge indicates approx. 100kPa
(750 mmHg/30 inHg), continue the evacuation for 5 minutes
or more.
6) Close both hand valves and stop the vacuum pump.
7) Check to ensure that the pressure does not change after 10
minutes or more.
•
• If the pressure changes, check the system for leaks.
••
•
• If leaks occur, retighten the refrigerant line connections
••
and repeat the evacuation steps.
8) If no leaks are found, again operate the vacuum pump for
20 minutes or more. After confirming that the gauge
manifold pressure is at 100 kPa (750 mmHg/30 inHg), close
both hand valves.
9) Close positive shutoff valve.
Stop the vacuum pump and disconnect the center hose
from the vacuum pump.
Page 69
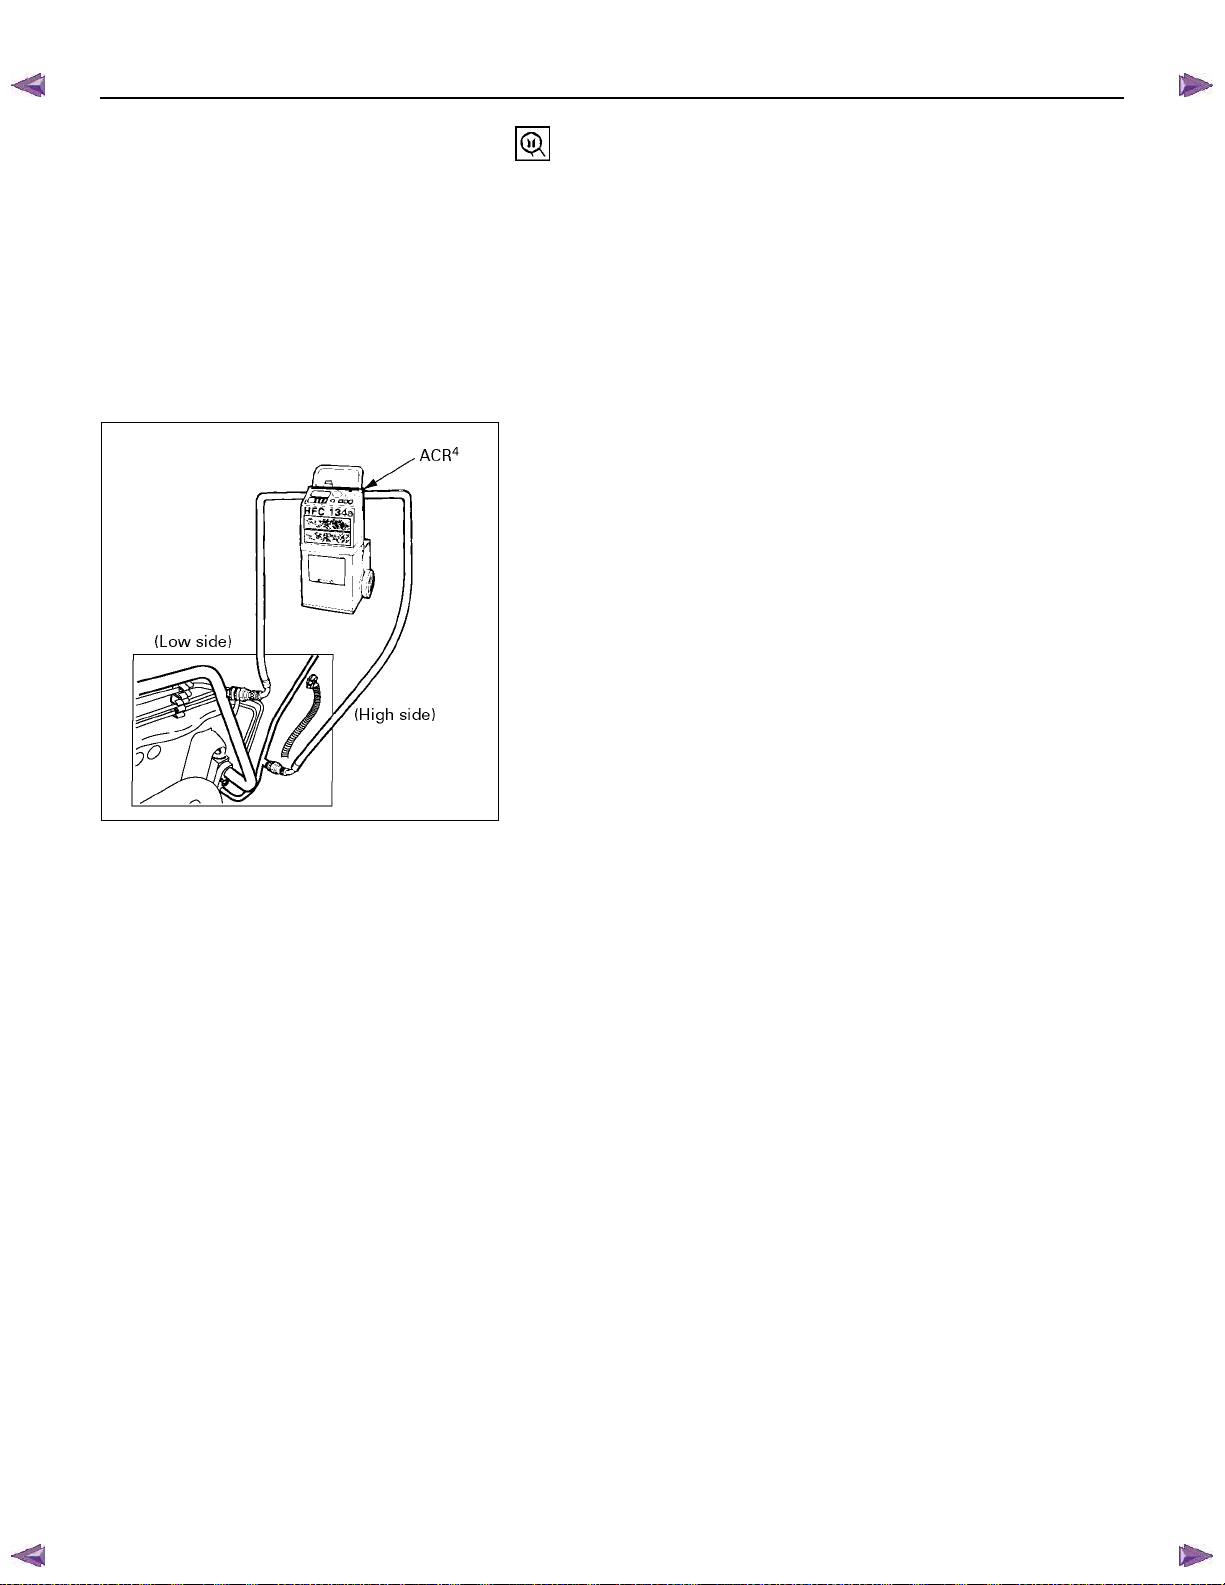
BACK TO CHAPTER INDEX
ISUZU KB P190 2007
TO MODEL INDEX
HEATER A ND AIR CONDITIONING 1-35
CHARGING THE REFRIGERANT SYSTEM
There are various methods of charging refrigerant into the air
conditioning system.
These include using the ACR
4
(HFC-134a Refrigerant
Recovery/ Recycling/Recharging/System) or equivalent and
direct charging with a manifold gauge charging station.
4
(115V 60Hz) : 5-8840-0629-0 (J-39500-A)
ACR
4
(220-240V 50/60Hz)
ACR
: 5-8840-0630-0 (J-39500-220A)
4
(220-240V 50/60Hz Australian model)
ACR
: 5-8840-0631-0 (J-39500-220ANZ)
Charging procedure
•
• ACR4 (or equivalent) method
••
For the charging of refrigerant recovered by ACR
4
, follow the
Manufacturer's Instruction.
F06R300012
Page 70
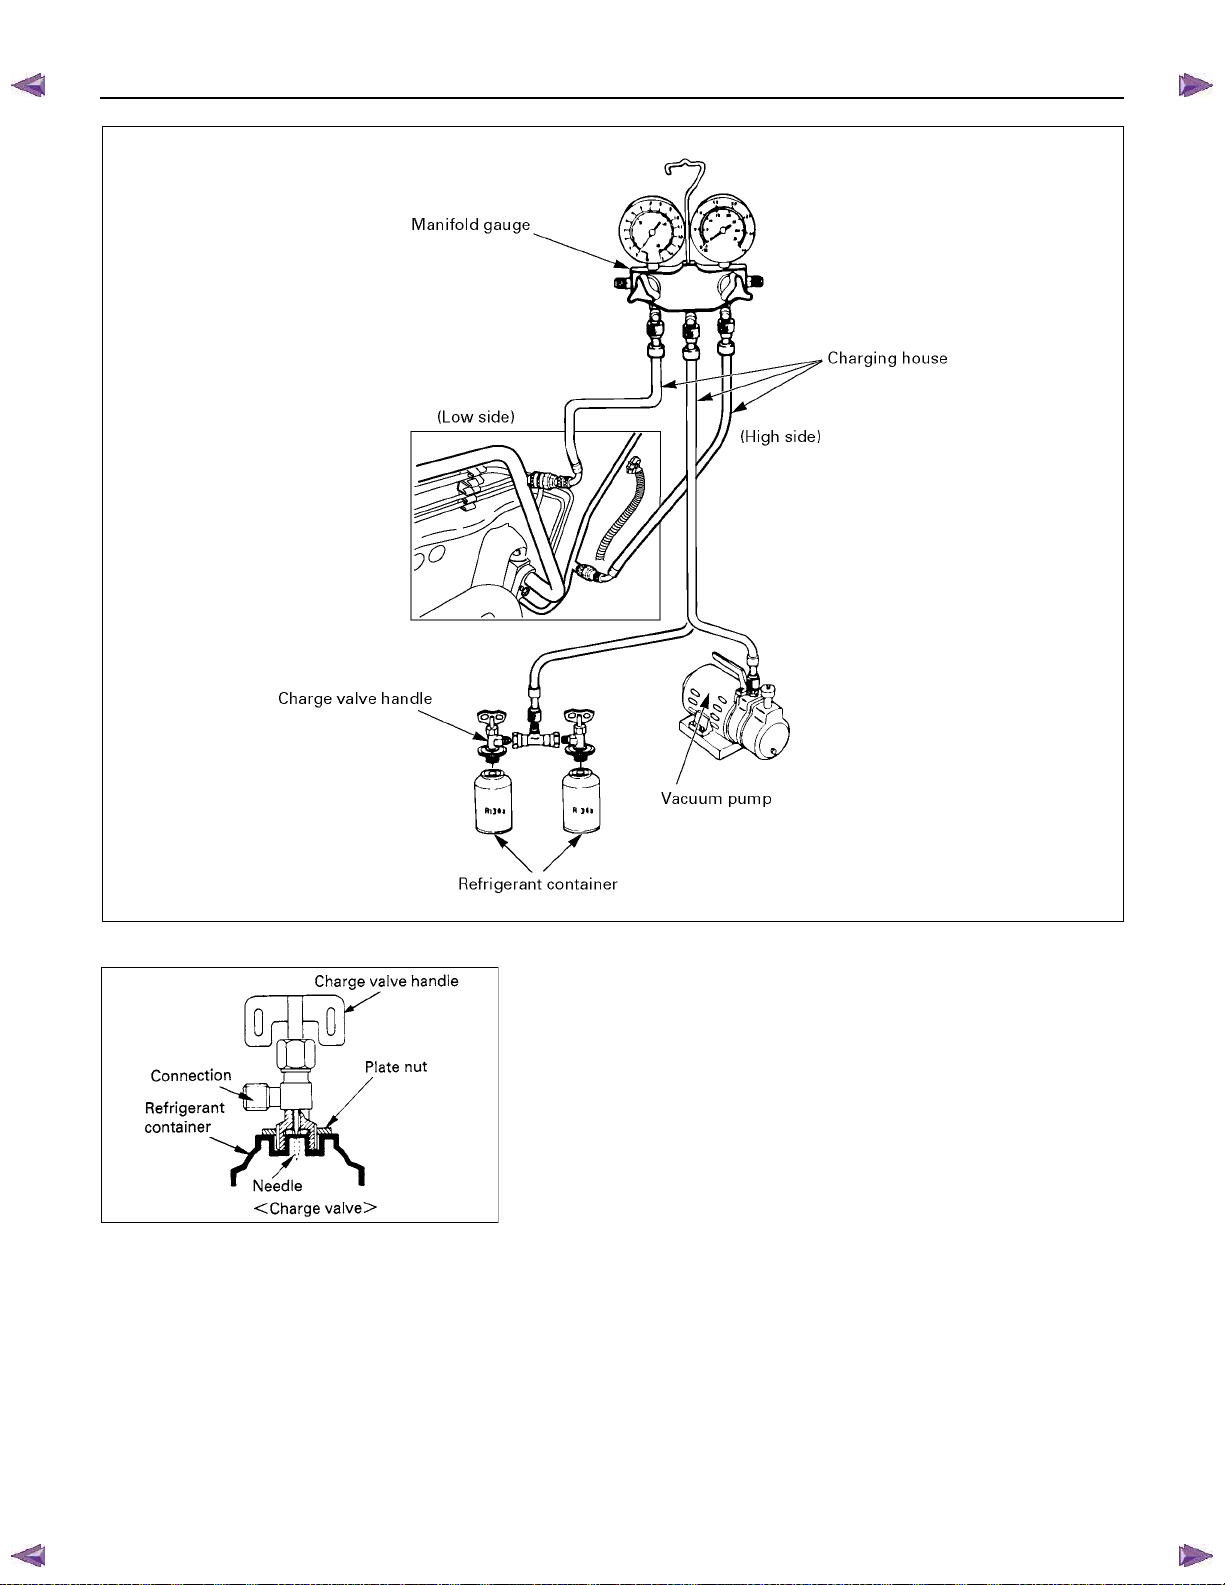
BACK TO CHAPTER INDEX
1-36 HEATER A ND AIR CONDITIONING
ISUZU KB P190 2007
TO MODEL INDEX
F06R300013
•
• Direct charging with a manifold gauge char ging
••
station method.
Handling the charging valve handle when installing refrigerant
container.
1) Before attaching the charge valve to the refrigerant
container, turn the charge valve handle counterclockwise
until the needle is fully retracted.
2) Turn the plate nut counterclockwise until it reaches its
highest position relative to the charge valve.
3) Install the charge valve onto the refrigerant container.
4) Turn the plate nut clockwise and connect the center hose of
the manifold gauge to the charge valve.
5) Tighten the plate nut sufficiently by hand. Then turn the
charge valve handle clockwise to lower the needle and bore
a hole in the refrigerant container.
6) Turn the charge valve handle counterclockwise to raise the
needle. The refrigerant in the refrigerant container is
charged into the air conditioning system by the operation of
the manifold gauge.
•
• Be absolutely sure not to reuse the emptied
••
Page 71

BACK TO CHAPTER INDEX
HEATER A ND AIR CONDITIONING 1-37
refrigerant container.
1) Make sure the evacuation process is correctly completed.
2) Connect the center-hose of the manifold gauge to the
refrigerant container.
•
• Turn the charge valve handle counterclockwise to purge
••
to the charging line and purge any air exiting in the
center-hose of the manifold gauge.
3) Open the low-pressure hand valve and charge the
refrigerant about 200 g (0.44 lbs.).
•
• Make sure the high-pressure hand valve is closed.
••
•
• Avoid charging the refrigerant by turning the refrigerant
••
container upside down.
4) Close the low-pressure hand valve of the manifold gauge.
•
• Check to ensure that the degree of pressure does not
••
change.
5) Check the refrigerant leaks by using a HFC-134a leak
detector.
•
• If a leak occurs, repair the leak connection, and start all
••
over again from the first step of evacuation.
6) If no leaks are found, open the low-pressure hand valve of
the manifold gauge. Then continue charging refrigerant to
the system.
•
• When charging the system becomes difficult:
••
(1) Run the engine at Idling and close the all vehicle
doors.
(2) A/C switch is "ON".
(3) Set the fan control knob (fan switch) to its highest
position.
(4) Set air source selector lever to “RECIRC”
WARNING
BE ABSOLUTELY SURE NOT TO OPEN THE HIGHPRESSURE HAND VALVE. SHOULD THE HIGHPRESSURE HAND VALVE BE OPENED, THE HIGHPRESSURE REFRIGERANT GAS WOULD FLOW
BACKWARD, AND THIS MAY CAUSE THE REFRIGERANT
CONTAINER TO BURST.
7) When the refrigerant container is emptied, use the following
procedure to replace it with a new refrigerant container.
(1) Close the low-pressure hand valve.
(2) Raise the needle upward and remove the charge valve.
(3) Reinstall the charge valve to the new refrigerant
container.
(4) Purge any air existing in the center hose of the manifold
gauge.
ISUZU KB P190 2007
TO MODEL INDEX
Page 72

BACK TO CHAPTER INDEX
1-38 HEATER A ND AIR CONDITIONING
ISUZU KB P190 2007
TO MODEL INDEX
8) Charge the system to the specified amount and then close
the low-pressure hand valve.
Refrigerant Amount g(lbs)
4JA1-T, 4JH1-TC, C24SE 720 (1.59)
4JJ1-TC (Standard Output)
4JJ1-TC (High Output)
4JK1-TC (High Output)
650 (1.43)
9) Check for refrigerant leaks by using a HFC-134a leak
detector.
• A fully charged system is indicated by the sight glass on
the receiver/drier being free of any bubbles (Refer to
"Reading Sight Glass").
• Check the high and low pressure value of the manifold
gauge. (Refer to “CHECKING REFRIGERANT SYSTEM
WITH MAINFOLD GAUGE” in SERVICE
INFORMATION.)
Immediately after charging refrigerant, both high and low
pressures are slightly high and to the left of the gauge, but they
settle down to the guide pressure valves as shown below:
• Ambient temperature; 30∼35°C (86∼95°F)
• Guide pressure
High-pressure side;
2
Approx. 1373∼1670 kPa (14∼17 kg/cm
/ 199∼242 psi)
Low-pressure side;
2
Approx. 127∼245 kPa (1.3∼2.5 kg/cm
/ 18∼36 psi)
10) Close the low pressure hand valve and charge valve of the
refrigerant container.
11) Stop the air conditioning and the engine.
12) Disconnect the high and low pressure hoses from the
manifold gauge fittings.
Page 73
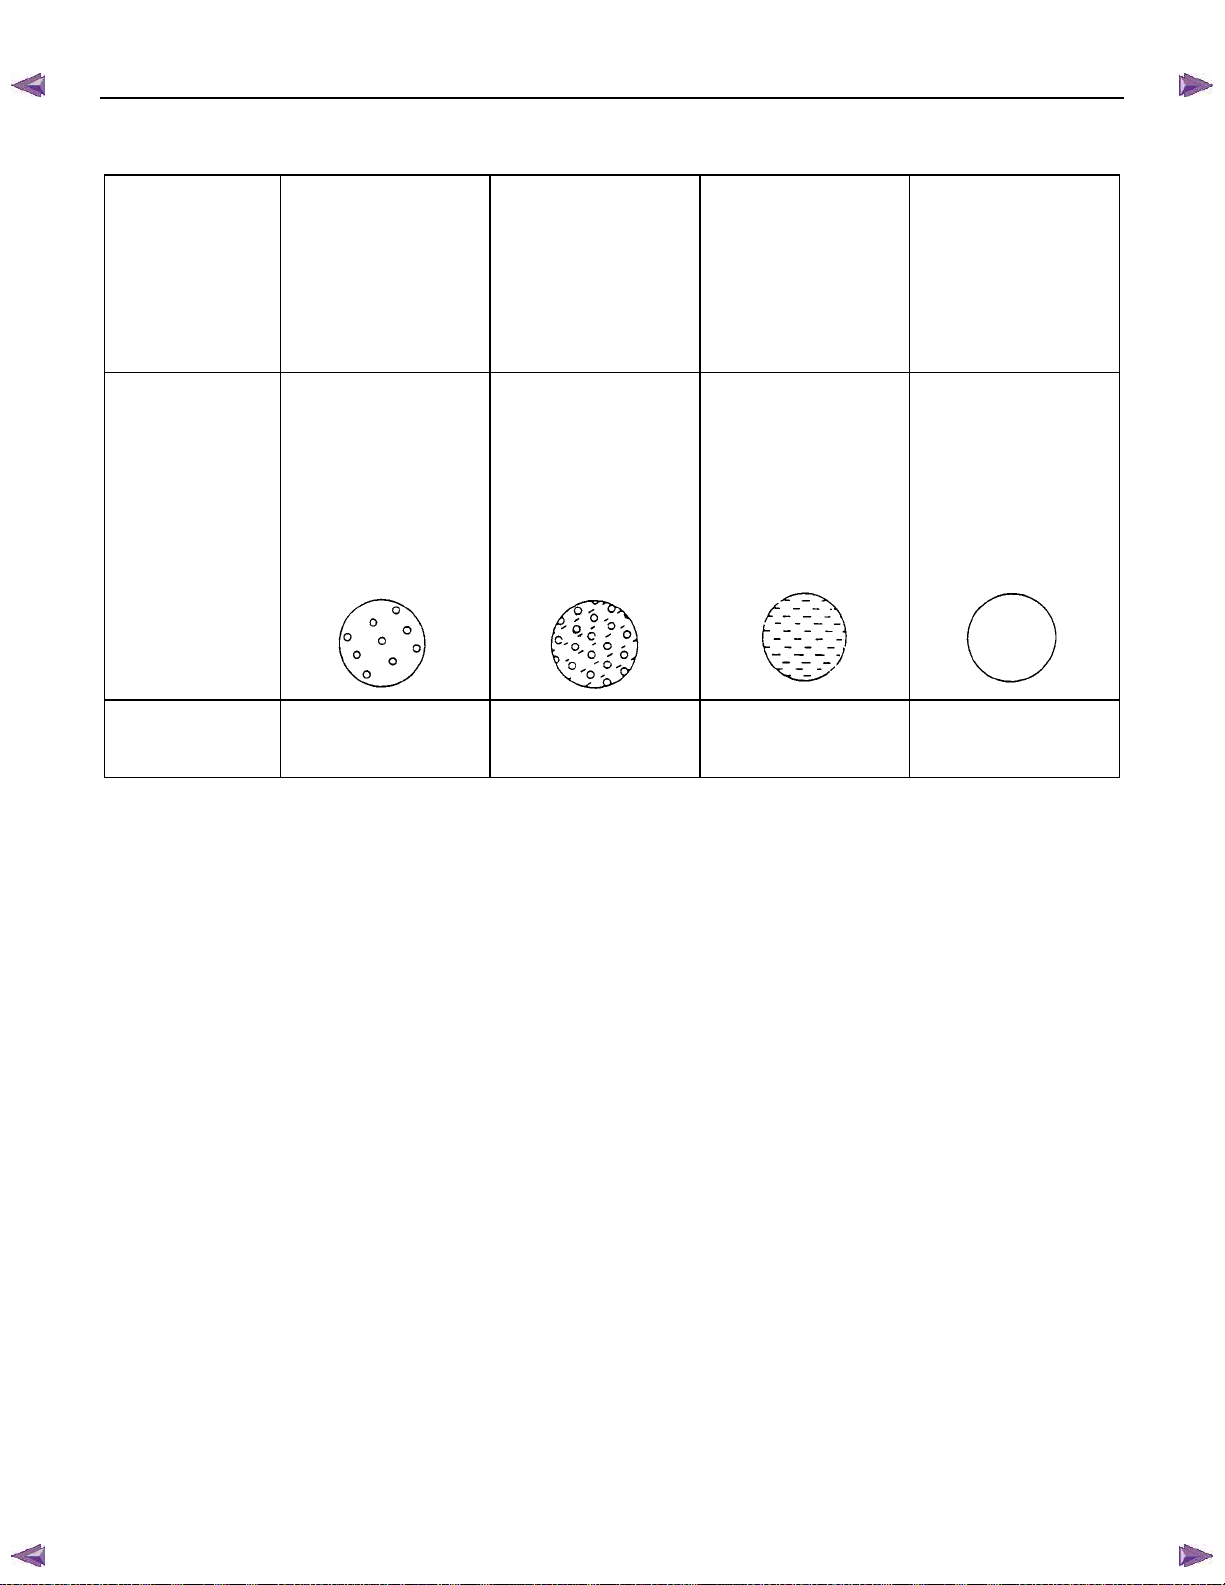
BACK TO CHAPTER INDEX
High and low
pressure pipe
temperature
Sight glass
condition
The high pressure
pipe is hot and the
low pressure pipe
is cold. There is a
distinct difference
in temperature
between them.
Almost transparent.
A flow of bubbles
can be seen, but
they disappear
when the throttle is
opened.
Reading Sight Glass
The high pressure
pipe is warm and
the low pressure
pipe is cool. There
is no great
difference in
temperature
between them.
A flow of bubbles
always can be
seen. It appears
sometimes
transparent, and
some times frothy.
ISUZU KB P190 2007
TO MODEL INDEX
HEATER A ND AIR CONDITIONING 1-39
There is little
difference in
temperature
between the high
pressure pipe and
the low pressure
pipe.
The high pressure
pipe is hot and the
low pressure pipe
is slightly warm.
There is a
difference in
temperature
between them.
Something like fog
faintly can be seen.
Even at idle with
the fan at "HI" (with
the window fully
open), the bubbles
cannot be seen.
Air conditioning
cycle condition
OK
NG
(Not enough
refrigerant)
NG
(Almost no
refrigerant)
NG
(Too much
refrigerant)
The sight glass provides accurate diagnosis only under the following conditions.
If the vehicle can be tested under these conditions, check the sight glass appearance and compare to the chart.
* Engine speed Idling
* A/C switch "ON"
* Blower fan operating at highest speed
* Air source selector lever at "RECIRC"
* Temperature control knob at coldest position
* Ambient temperature below 35°C (95°F) and humidity below 70% (See NOTE 1)
2
* High side pressure less than 1470 kPa (15 kg/cm
/ 213 psi) (See NOTE 2)
NOTE 1
If the vehicle cannot be moved to a testing location that meets these specifications, then the sight glass cannot be
used for diagnosis. You must discharge and recover the refrigerant, then recharge the system with the specified
amount of refrigerant. Then continue checking the system performance.
NOTE 2
If the high side pressure is greater than stated, the sight glass cannot be used for diagnosis. You must discharge
and recover the refrigerant, then recharge the system with the specified amount of refrigerant. Then continue
checking system performance.
Page 74
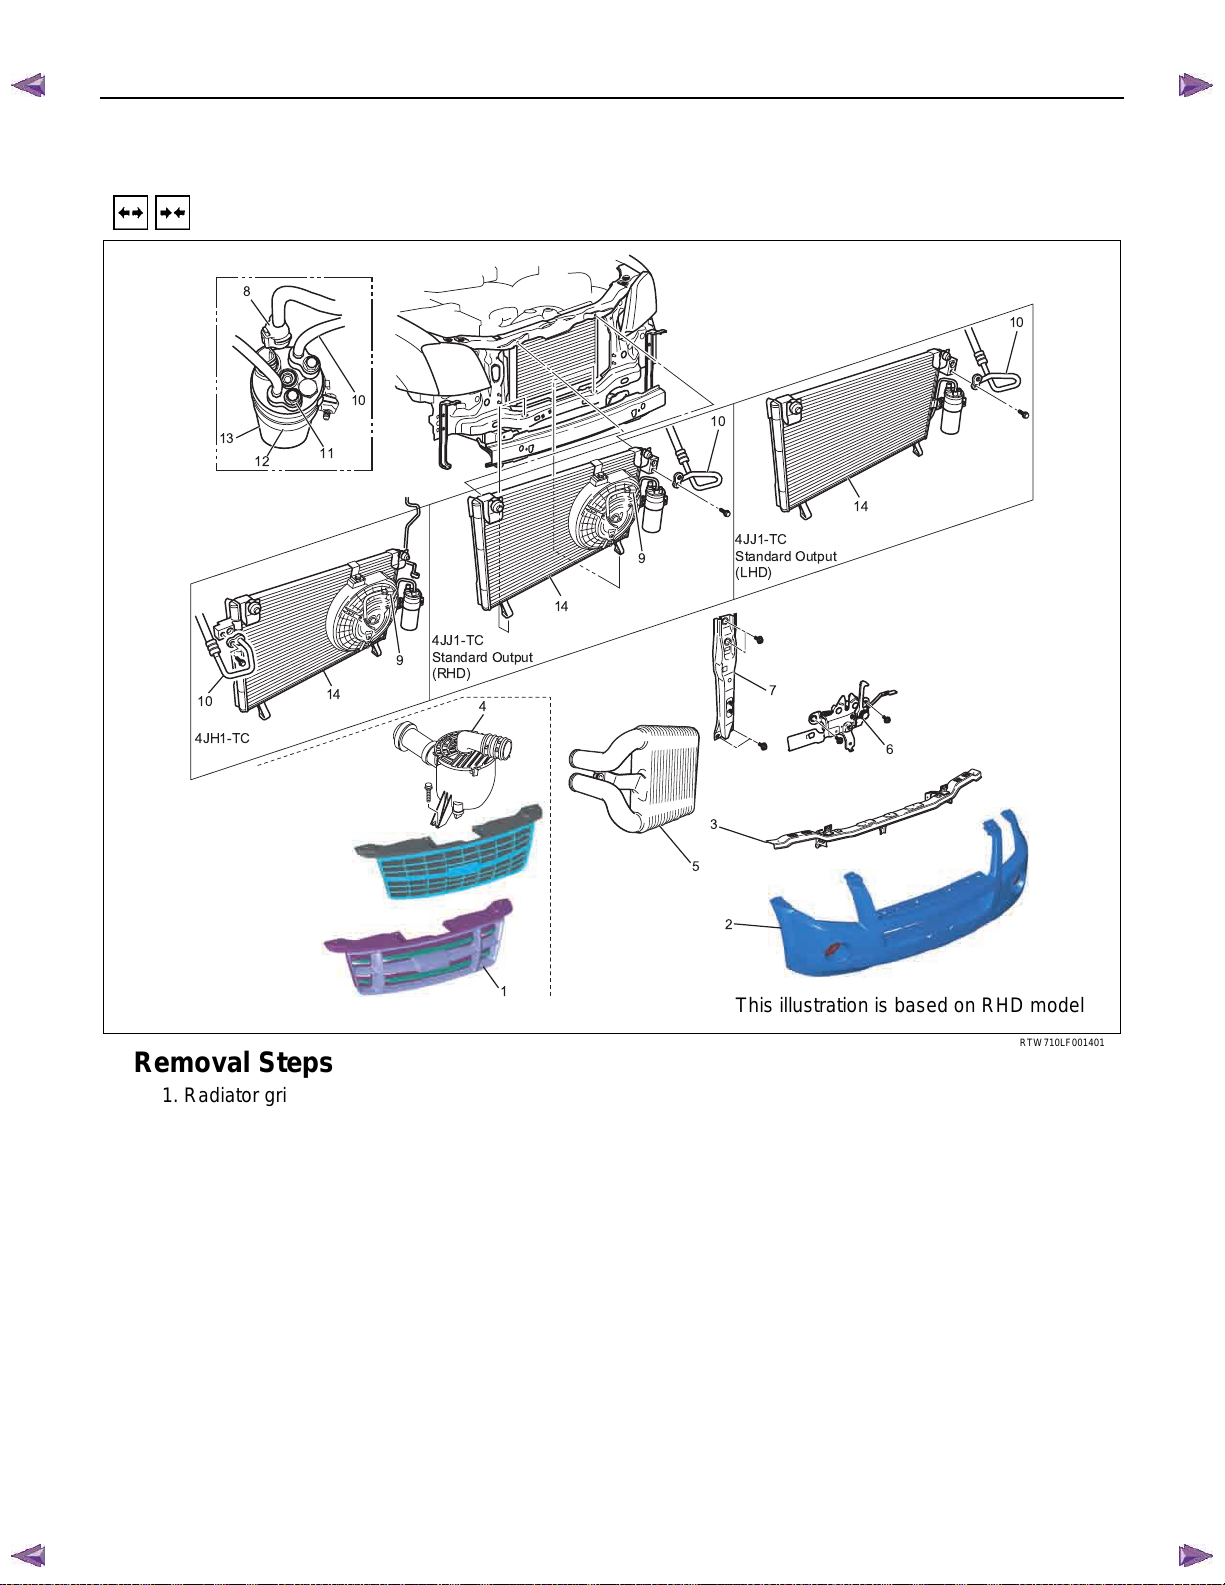
BACK TO CHAPTER INDEX
1-40 HEATER A ND AIR CONDITIONING
REMOVAL AND INSTALLATION (4JH1-TC, 4JJ1-TC Standard Output)
8
13
12
ISUZU KB P190 2007
TO MODEL INDEX
CONDENSER
10
10
10
11
14
4JJ1-TC
9
14
Standard Output
(LHD)
4JJ1-TC
Standard Output
9
(RHD)
10
4JH1-TC
14
Removal Steps
1. Radiator grille
2. Front bumper fascia
• Refer to SECTION 2A “FRONT
BUMPER”
3. Front bumper impact support assembly
• Refer to SECTION 2A “FRONT
BUMPER”
4. Air cleaner assembly
5. Inter cooler
• Refer to SECTION 6A “INTER COOLER”
6. Engine hood lock
7. Engine hood front end stay
8. Pressure switch connector
9. Condenser fan connector
10. Refrigerant line
11. Refrigerant line
12. Receiver/drier bracket
13. Receiver/drier
14. Condenser assembly
4
5
1
Installation Steps
7
6
3
2
This illustration is based on RHD model
RTW710LF001401
14. Condenser assembly
13. Receiver/drier
12. Receiver/drier bracket
11. Refrigerant line
10. Refrigerant line
9. Condenser fan connector
8. Pressure switch connector
7. Engine hood front end stay
6. Engine hood lock
5. Inter cooler
• Refer to SECTION 6A “INTER COOLER”
4. Air cleaner assembly
3. Front bumper impact support assembly
• Refer to SECTION 2A “FRONT
BUMPER”
2. Front bumper fascia
• Refer to SECTION 2A “FRONT
BUMPER”
1. Radiator grille
Page 75
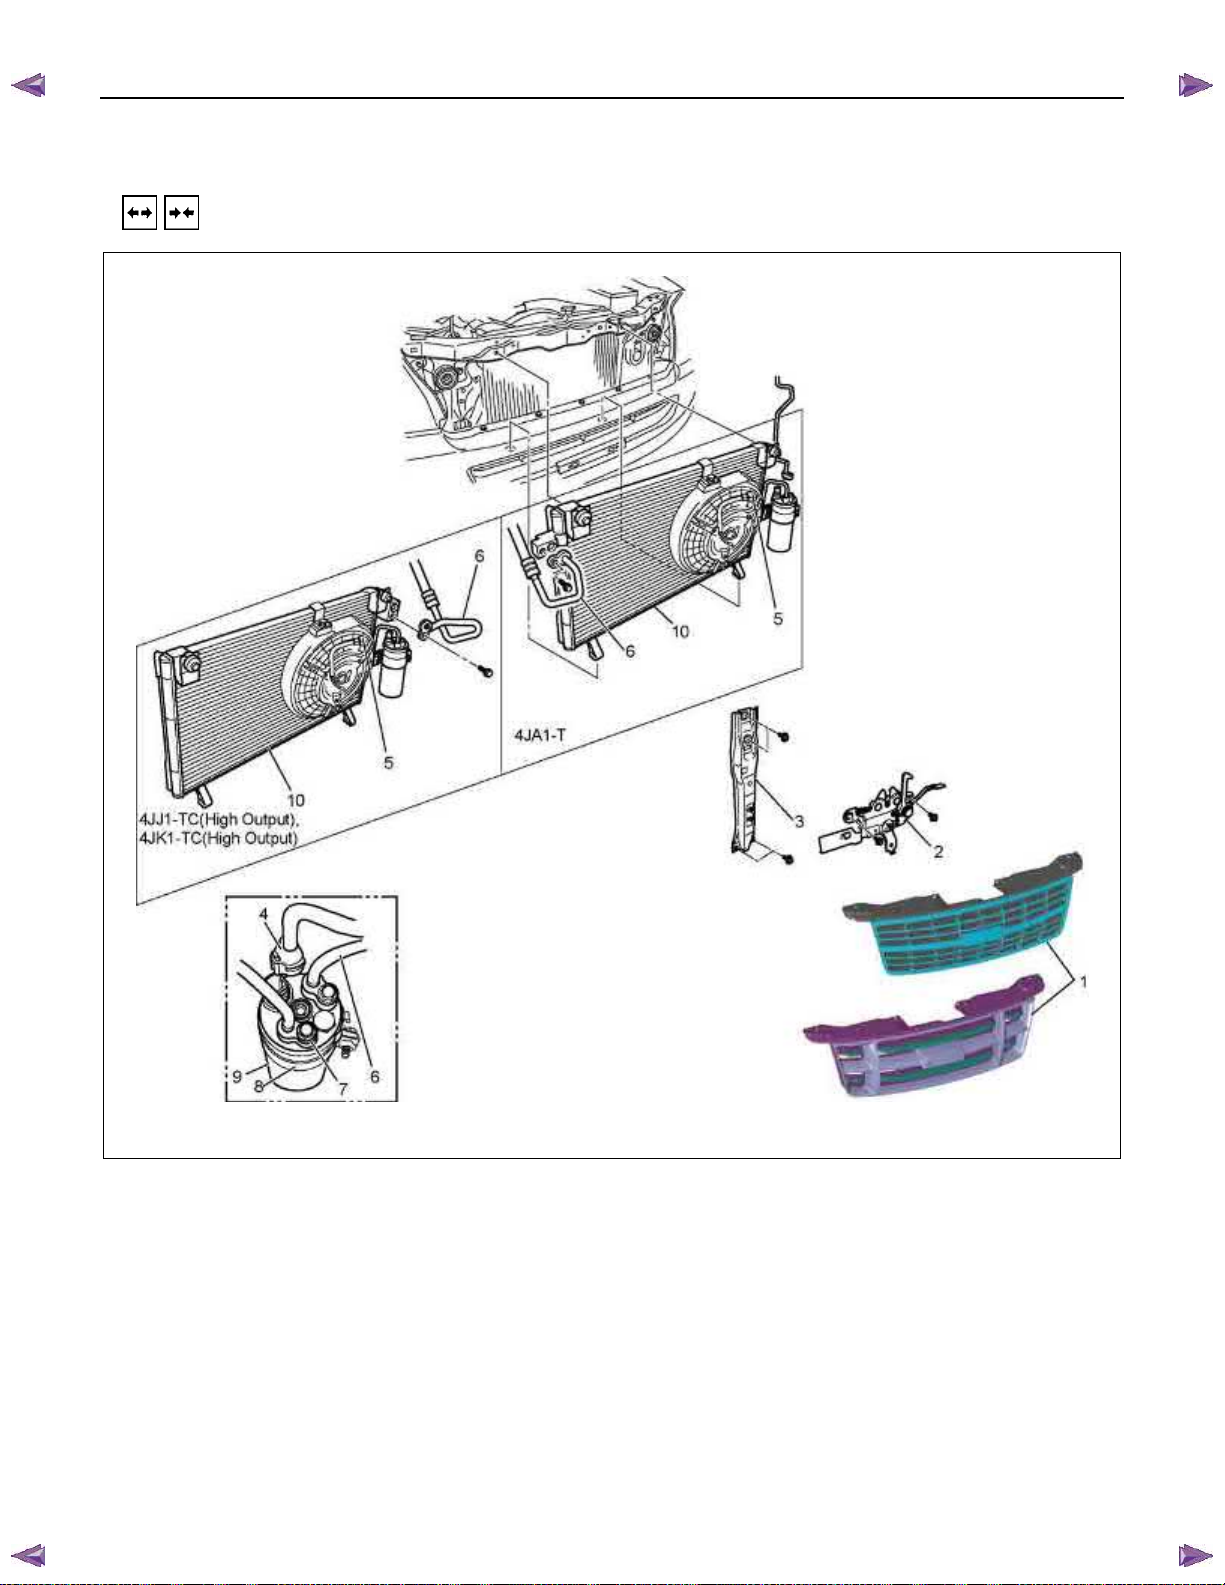
BACK TO CHAPTER INDEX
REMOVAL AND INSTALLATION (4JJ1-TC High Output, 4JK1-TC High Output, 4JA1- T)
ISUZU KB P190 2007
TO MODEL INDEX
HEATER A ND AIR CONDITIONING 1-41
Removal Steps
1. Radiator grille
2. Engine hood lock
3. Engine hood front end stay
4. Pressure switch connector
5. Condenser fan connector
6. Refrigerant line
7. Refrigerant line
8. Receiver/drier bracket
9. Receiver/drier
10. Condenser assembly
Installation Steps
10. Condenser assembly
9. Receiver/drier
8. Receiver/drier bracket
7. Refrigerant line
6. Refrigerant line
5. Condenser fan connector
4. Pressure switch connector
3. Engine hood front end stay
2. Engine hood lock
1. Radiator grille
This illustration is based on RHD model
RTW710LF001501
Page 76
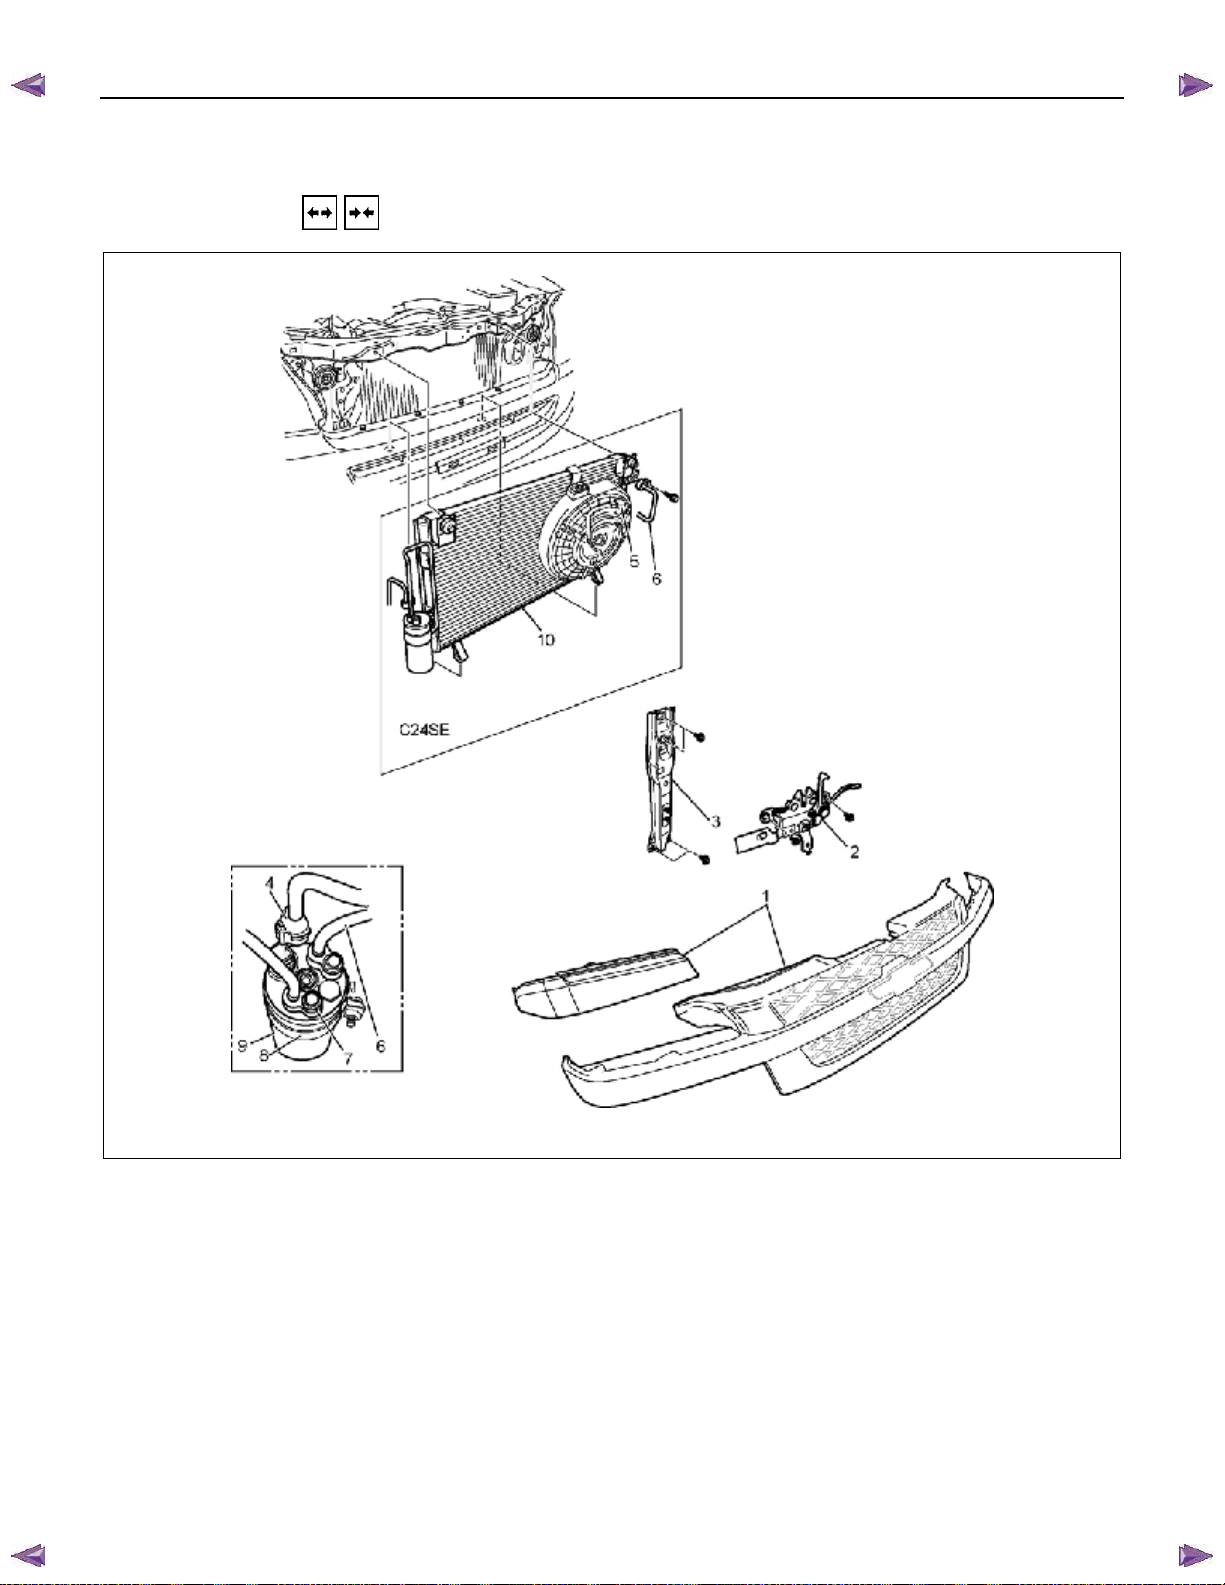
BACK TO CHAPTER INDEX
1-42 HEATER A ND AIR CONDITIONING
REMOVAL AND INSTALLATION (C24SE)
ISUZU KB P190 2007
TO MODEL INDEX
Removal Steps
1. Radiator grille
2. Engine hood lock
3. Engine hood front end stay
4. Triple pressure switch connector
5. Condenser fan connector
6. Refrigerant line
7. Refrigerant line
8. Receiver/drier bracket
9. Receiver/drier
10. Condenser assembly
Installation Steps
10. Condenser assembly
9. Receiver/drier
8. Receiver/drier bracket
7. Refrigerant line
6. Refrigerant line
5. Condenser fan connector
4. Pressure switch connector
3. Engine hood front end stay
2. Engine hood lock
1. Radiator grille
This illustration is based on RHD model
RTW710LF004101
Page 77
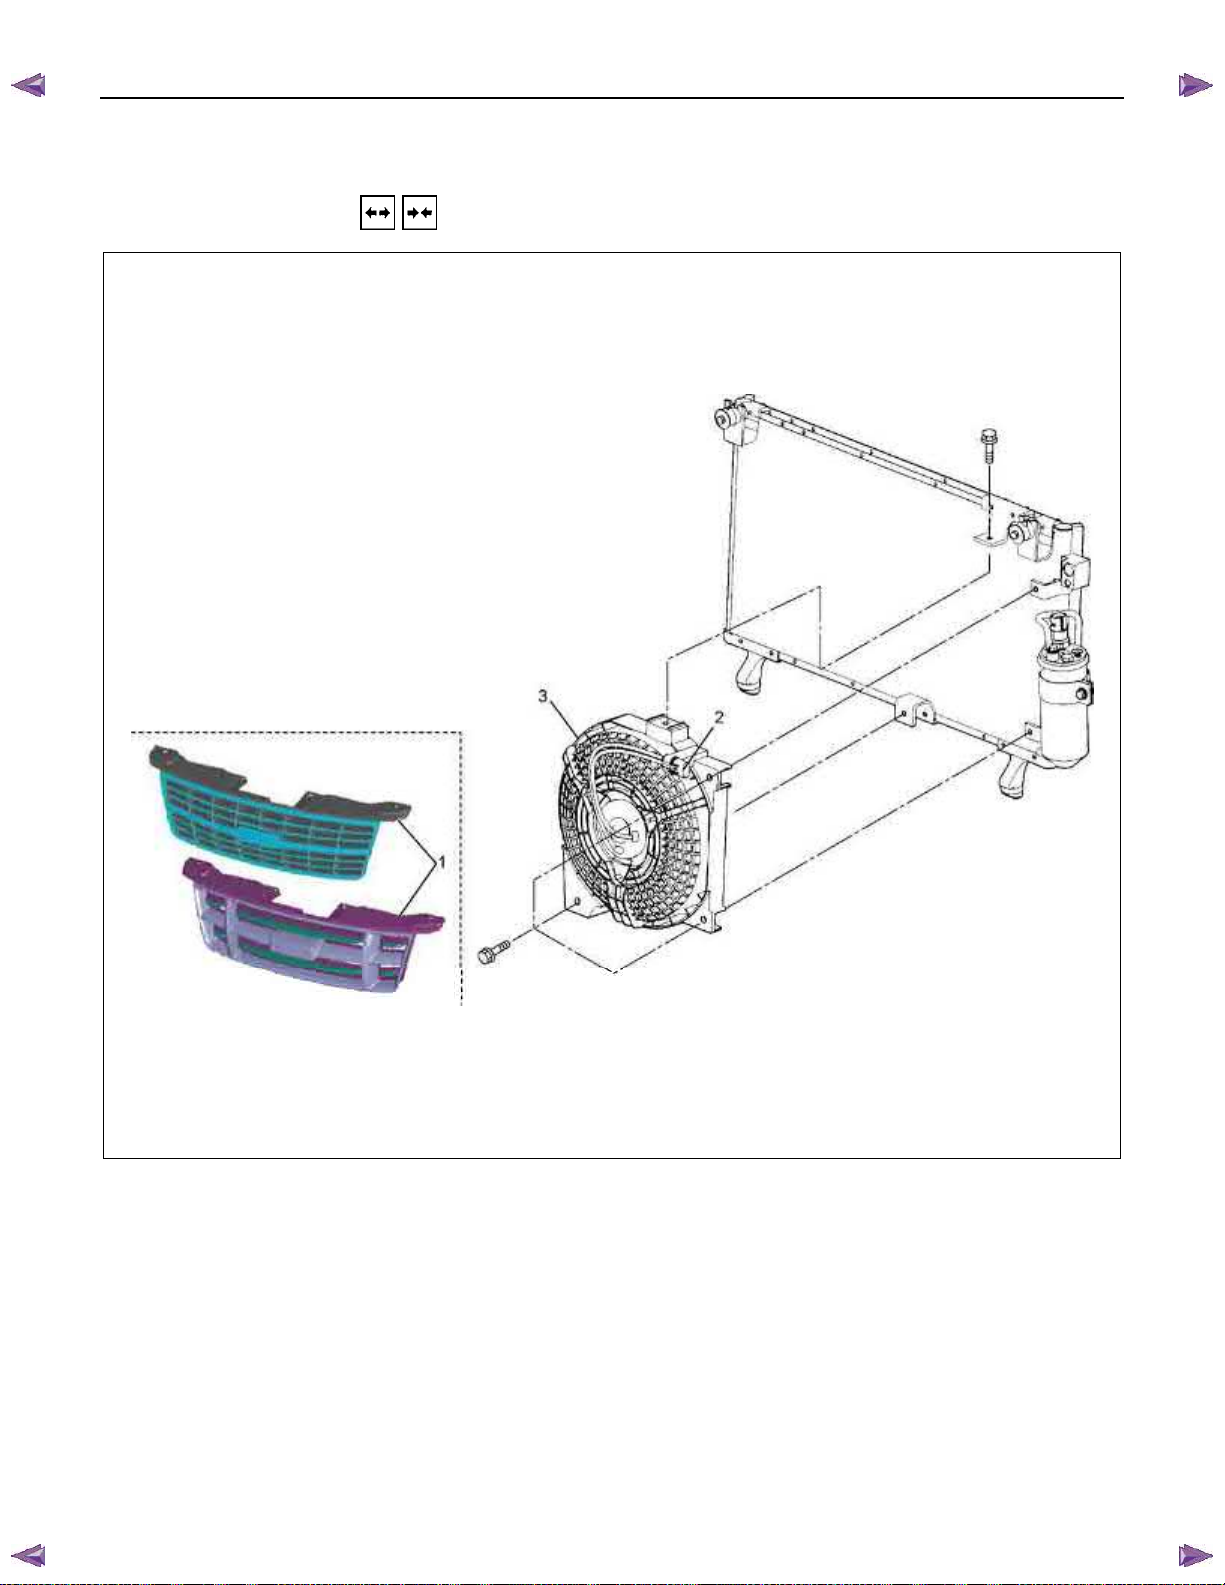
BACK TO CHAPTER INDEX
HEATER A ND AIR CONDITIONING 1-43
CONDENSER FAN MOTOR
REMOVAL AND INSTALLATION
ISUZU KB P190 2007
TO MODEL INDEX
RTW710MF000701
Removal Steps
1. Radiator grille
2. Fan connector
3. Condenser fan motor
Installation Steps
3. Condenser fan motor
2. Fan connector
1. Radiator grille
Page 78
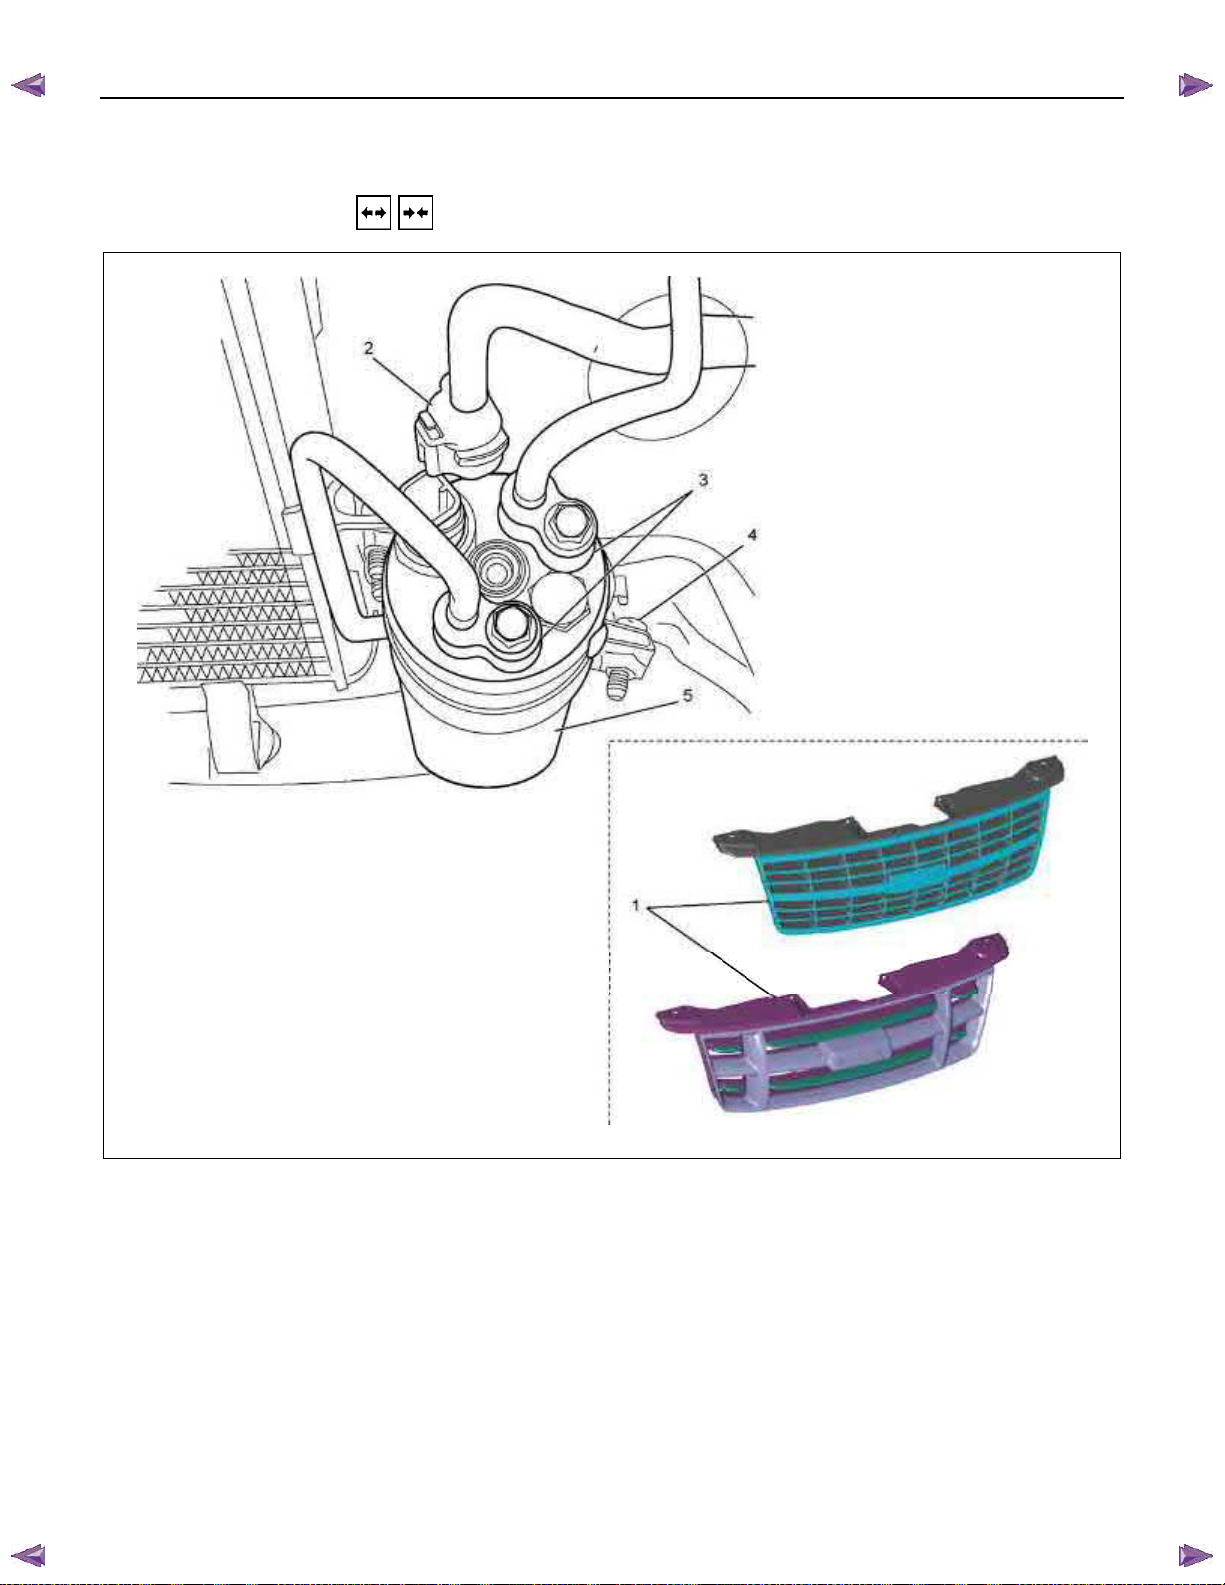
BACK TO CHAPTER INDEX
1-44 HEATER A ND AIR CONDITIONING
RECEIVER / DRIER
REMOVAL AND INSTALLATION
ISUZU KB P190 2007
TO MODEL INDEX
RTW710LF000801
Removal Steps
1. Radiator grille
2. Pressure switch connector
3. Refrigerant line
4. Bracket bolt
5. Receiver/drier
Installation Steps
5. Receiver/drier
4. Bracket bolt
3. Refrigerant line
2. Pressure switch connector
1. Radiator grille
Page 79
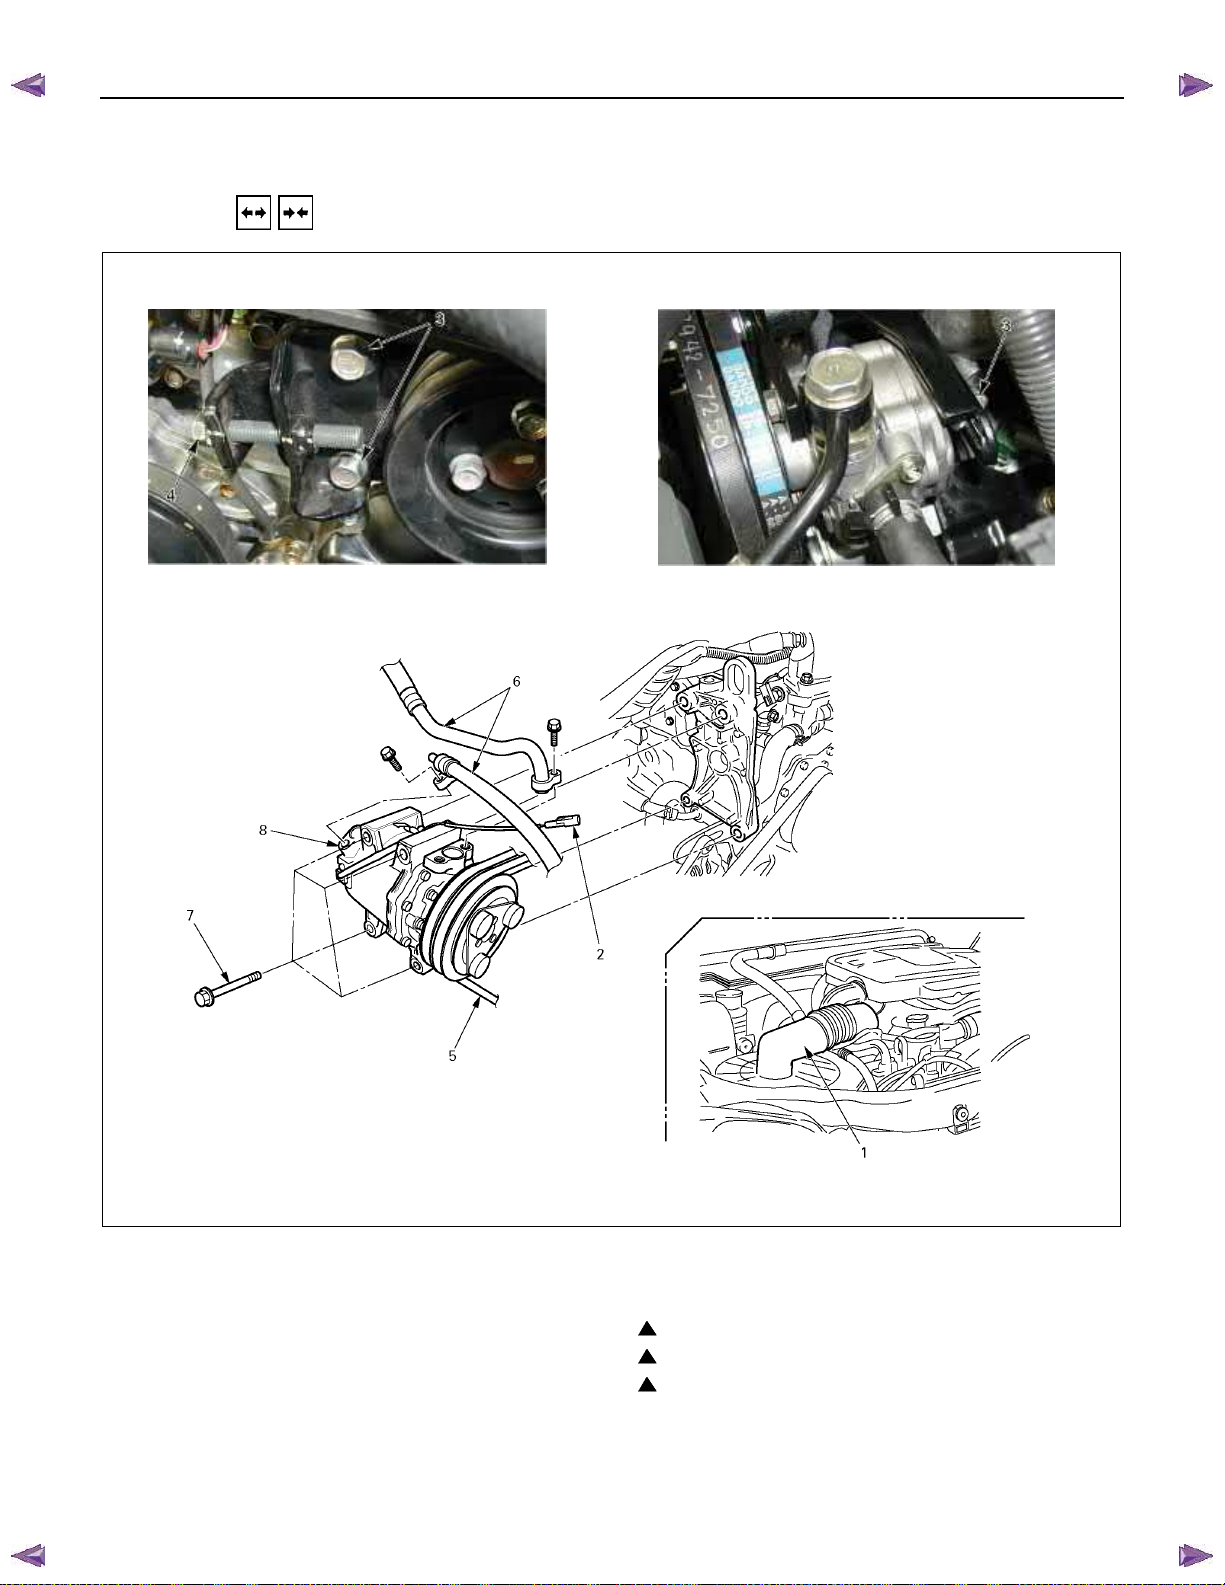
BACK TO CHAPTER INDEX
HEATER A ND AIR CONDITIONING 1-45
COMPRESSOR
REMOVAL AND INSTALLATION (4JA1-T, 4JH1-TC)
ISUZU KB P190 2007
TO MODEL INDEX
Removal Steps
1. Air duct
2. Magnetic clutch harness connector
3. Lock nut
4. Tension adjustment bolt
5. Drive belt
6. Refrigerant line
7. Bolt; compressor to bracket
8. Compressor assembly
Installation Steps
8. Compressor assembly
7. Bolt; compressor to bracket
6. Refrigerant line
5. Drive belt
4. Tension adjustment bolt
3. Lock nut
2. Magnetic clutch harness connector
1. Air duct
852R300006
Page 80
BACK TO CHAPTER INDEX
1-46 HEATER A ND AIR CONDITIONING
ISUZU KB P190 2007
TO MODEL INDEX
Important Operations - Installation
7. Bolt; Compressor to Bracket
6. Refrigerant Line
5. Drive Belt
Refer to SECTION 6A “COOLING SYSTEM”.
Torque 44 (4.5/33)
Torque 11∼19 (1.1/95∼1.9/168)
N⋅m (kgf⋅m/lb⋅ft)
N⋅m (kgf⋅m/lb⋅in)
Page 81
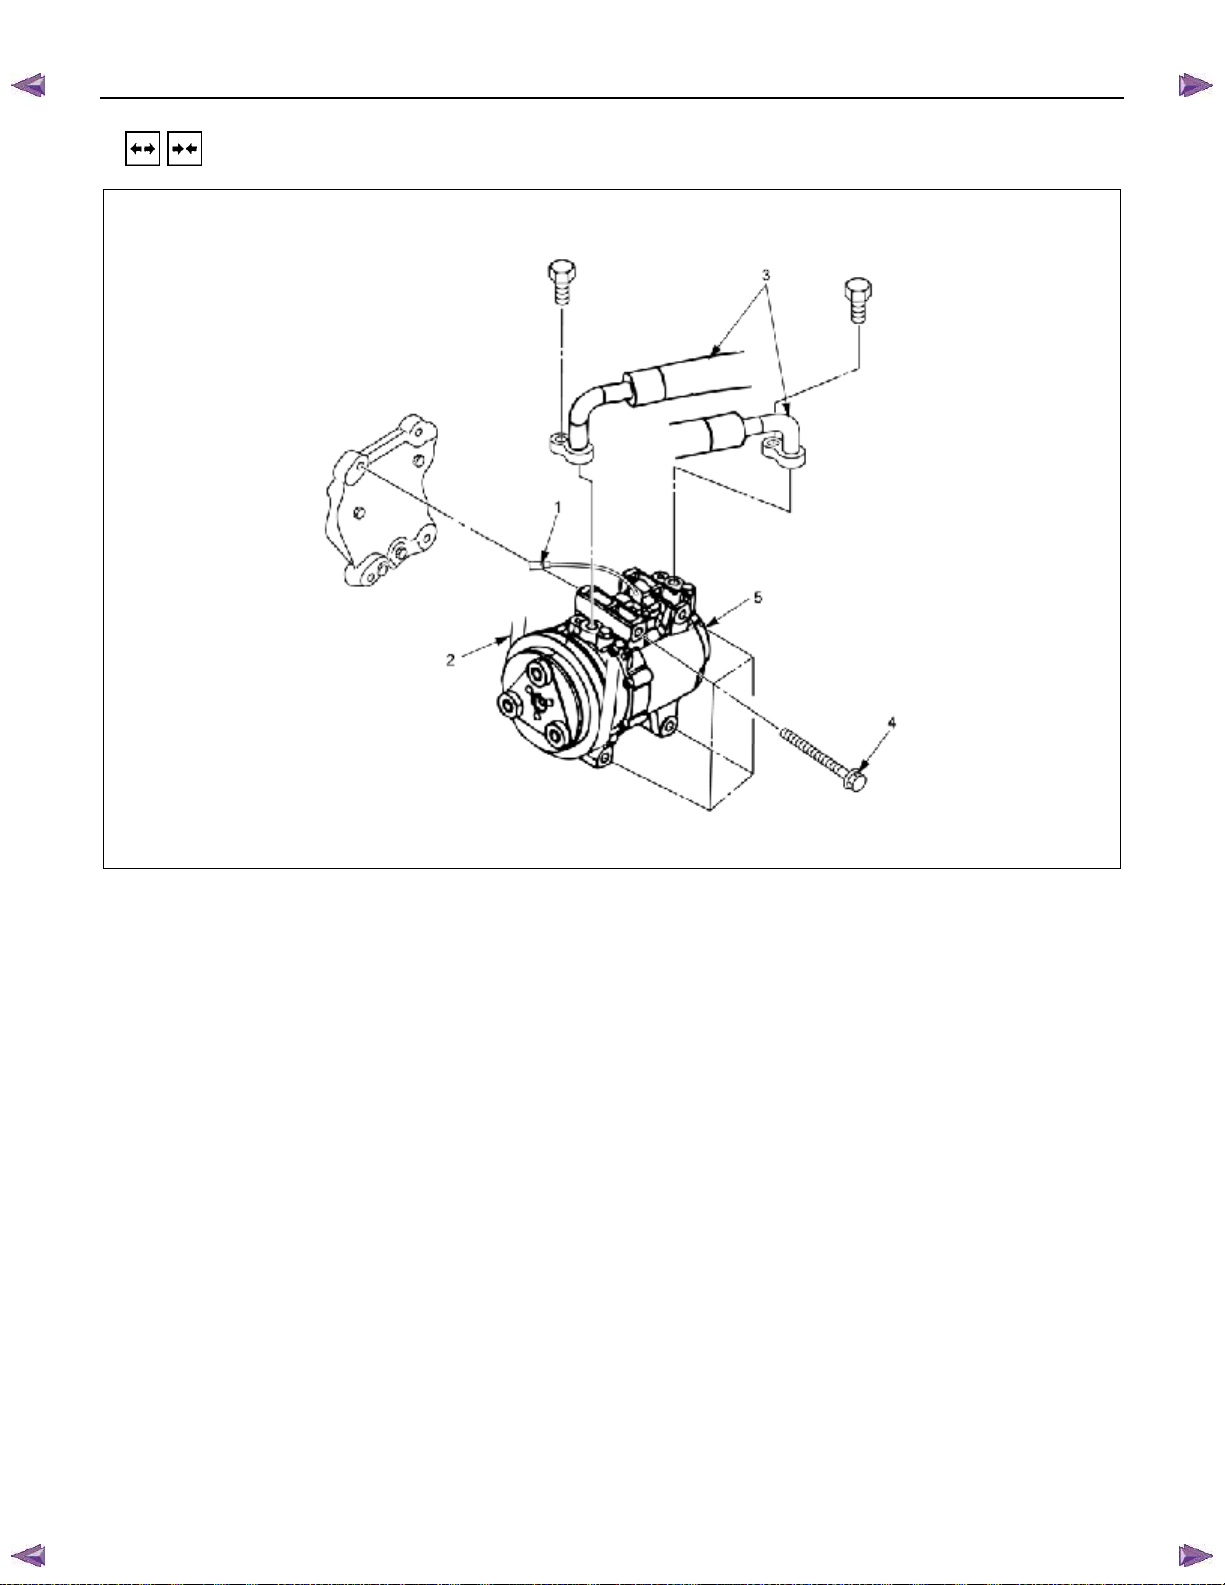
BACK TO CHAPTER INDEX
REMOVAL AND INSTALLATION (4JJ1-TC Standard Output, 4JJ1-TC High Output, 4JK1-TC High Output)
ISUZU KB P190 2007
TO MODEL INDEX
HEATER A ND AIR CONDITIONING 1-47
RTW510MF000201
Removal Steps
1. Magnetic clutch harness connector
2. Drive belt
3. Refrigerant line
4. Bolt; compressor to bracket
5. Compressor assembly
Installation Steps
5. Compressor assembly
▲ 4. Bolt; compressor to bracket
▲ 3. Refrigerant line
▲ 2. Drive belt
1. Magnetic clutch harness connector
Page 82
BACK TO CHAPTER INDEX
1-48 HEATER A ND AIR CONDITIONING
ISUZU KB P190 2007
TO MODEL INDEX
Important Operations - Installation
4. Bolt; Compressor to Bracket
3. Refrigerant Line
2. Drive Belt
Refer to SECTION 6A “INTAKE MANIFOLD”.
Torque 44 (4.5/33)
Torque 11∼19 (1.1/95∼1.9/168)
N⋅m (kgf⋅m/lb⋅ft)
N⋅m (kgf⋅m/lb⋅in)
Page 83
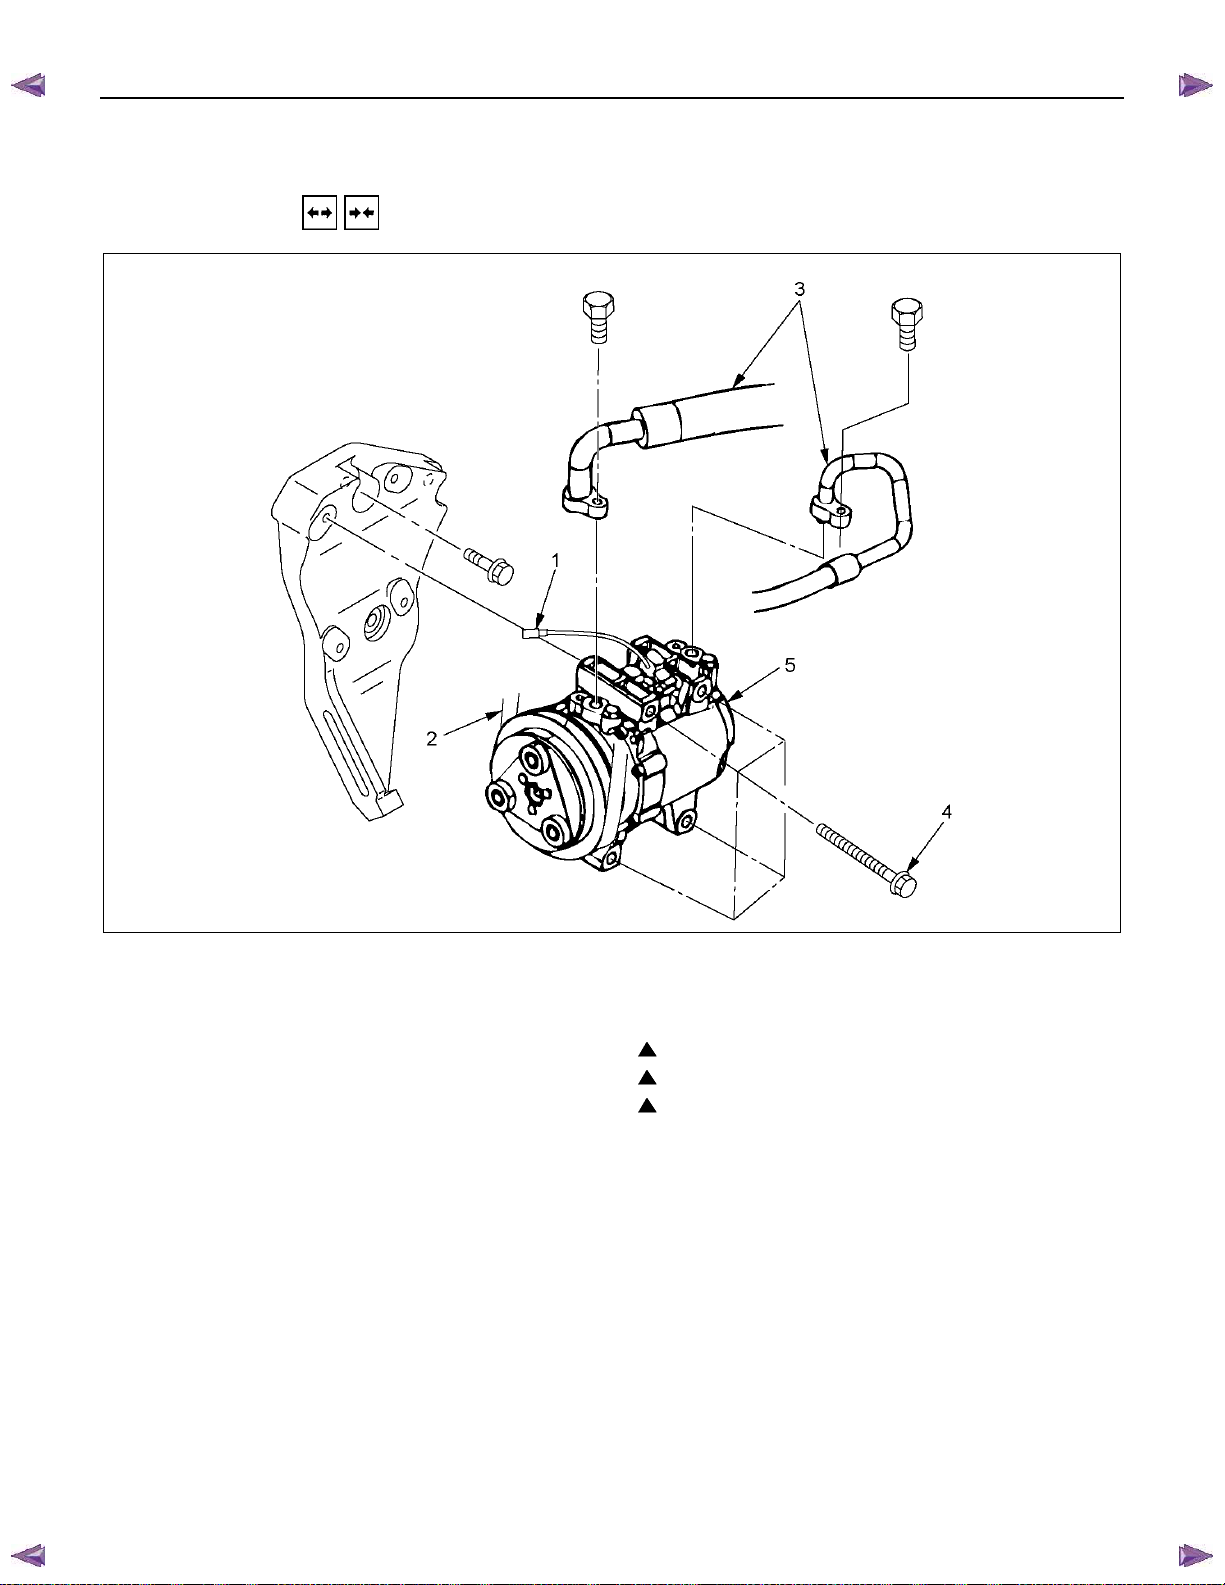
BACK TO CHAPTER INDEX
HEATER A ND AIR CONDITIONING 1-49
REMOVAL AND INSTALLATION (C24SE)
ISUZU KB P190 2007
TO MODEL INDEX
RTW310MF000401
Removal Steps
1. Magnetic clutch harness connector
2. Drive belt
3. Refrigerant line
4. Bolt; compressor to bracket
5. Compressor assembly
Installation Steps
5. Compressor assembly
4. Bolt; compressor to bracket
3. Refrigerant line
2. Drive belt
1. Magnetic clutch harness connector
Page 84
BACK TO CHAPTER INDEX
1-50 HEATER A ND AIR CONDITIONING
ISUZU KB P190 2007
TO MODEL INDEX
Important Operations - Installation
4. Bolt; Compressor to Bracket
N⋅m (kgf⋅m/lb⋅ft)
3. Refrigerant Line
2. Drive Belt
Refer to SECTION 6A “V-BELT TENSION OF
ALTERNATER”.
Torque 44 (4.5/33)
N⋅m (kgf⋅m/lb⋅in)
Torque 11∼19 (1.1/95∼1.9/168)
Page 85

BACK TO CHAPTER INDEX
ISUZU KB P190 2007
TO MODEL INDEX
HEATER A ND AIR CONDITIONING 1-51
GENERAL REPAIR PROCEDURE
OIL SPECIFICATION
• The HFC-134a system requires a synthetic (PAG)
compressor oil.
• Compressor (PAG) oil varies according to compressor
model. Be sure to use oil specified for the model of
compressor.
Specified Compressor Oil
HANDLING OF OIL
• The oil should be free from moisture, dust, metal powder,
etc.
• Do not mix with other oil.
• The water content in the oil increases when exposed to the
air. After use, seal oil from air immediately.
• The compressor oil must be stored in steel containers, not
in plastic containers.
DH-PR
COMPRESSOR OIL CHECK
The Oil used to lubricate the compressor is circulating with the
refrigerant.
Whenever replacing any component of the system or a large
amount of gas leakage occurs, add oil to maintain the original
amount of. oil.
Oil Capacity
Capacity total in
system
Compressor
(Service parts)
charging amount
CR-14 180 cm
CR-14 180 cm
3
(5.07 lmp fl oz)
3
(5.07 lmp fl oz)
Page 86
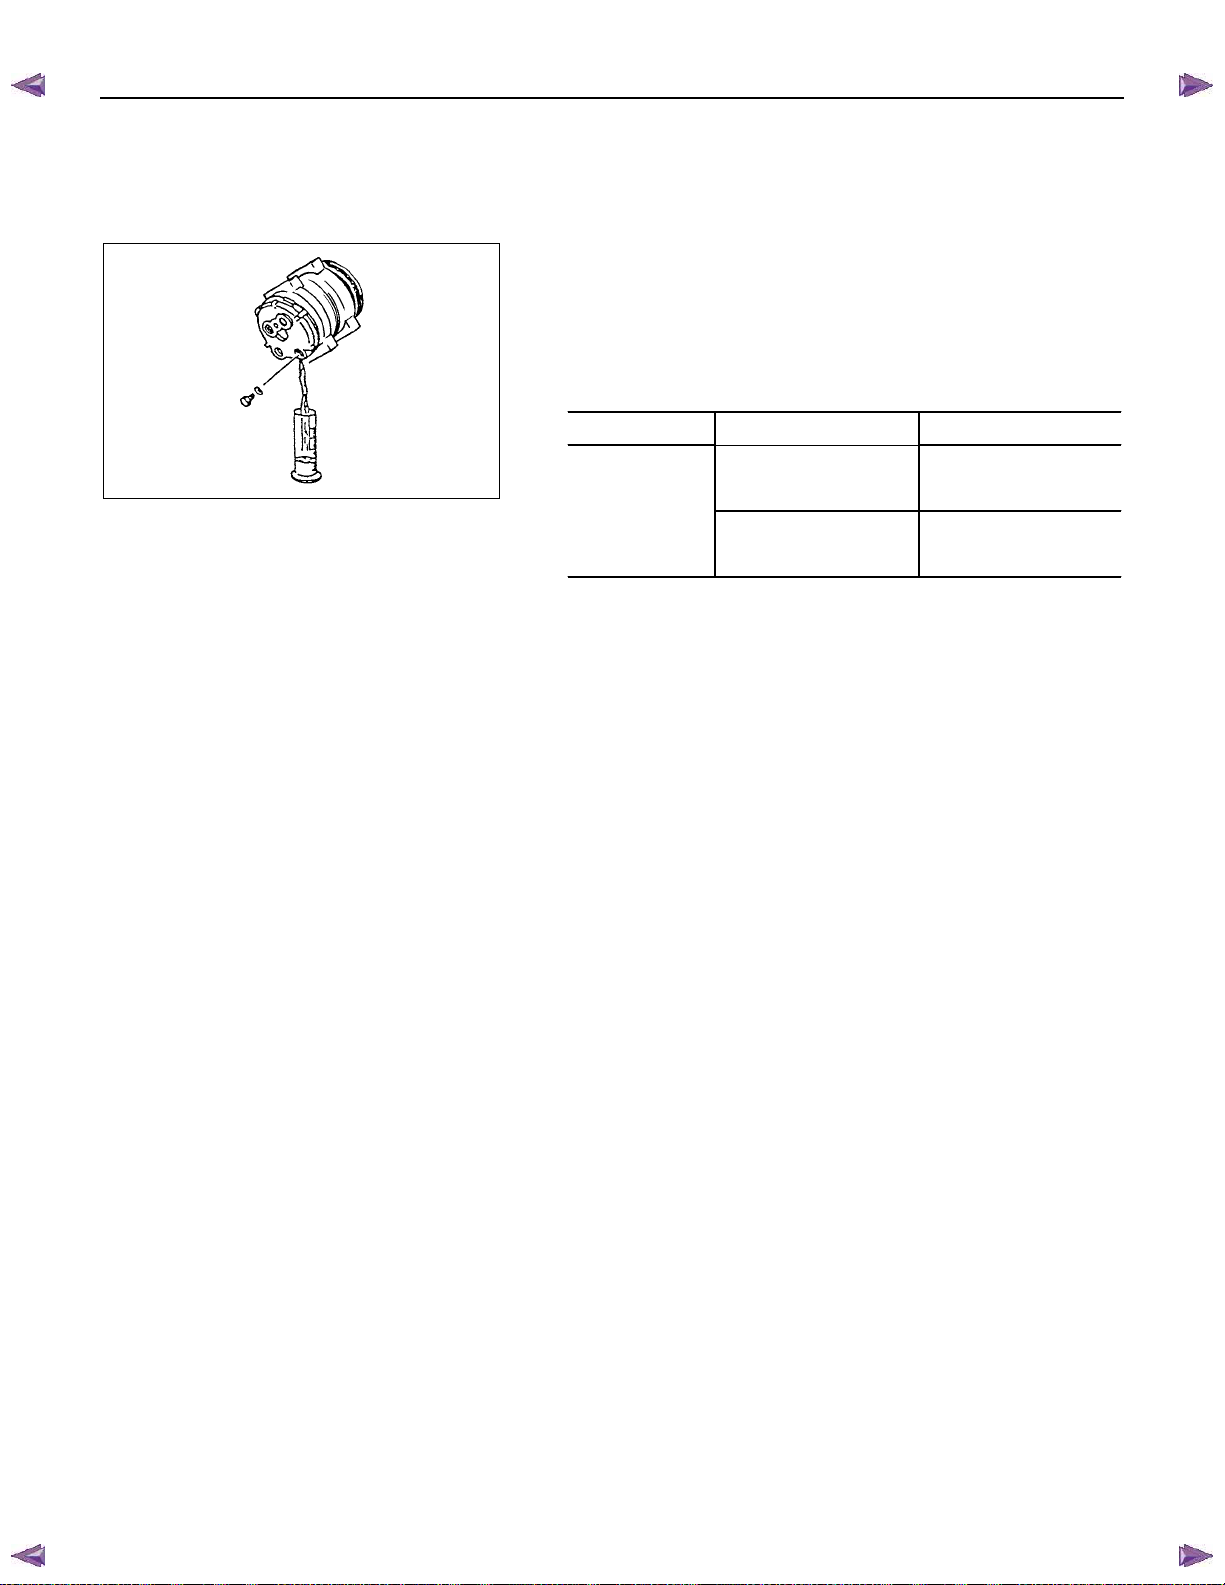
BACK TO CHAPTER INDEX
1-52 HEATER A ND AIR CONDITIONING
ISUZU KB P190 2007
TO MODEL INDEX
Checking and Adjusting for Used Compressor
(1) Perform Oil return operation.
(Refer to "Oil Return Operation" in this section.)
(2) Discharge refrigerant and remove the compressor.
(3) Drain the compressor oil and measure the extracted oil with
a measuring cylinder.
(4) Check the compressor oil for contamination.
(Refer to "Contamination of Compressor Oil" in this
section.)
(5) Adjust oil level following the procedure below.
Type Collected Amount Charging Amount
more than 90 cm3
CR-14
(2.53 lmp fl oz)
less than 90 cm3
(2.53 lmp fl oz)
same as collected
amount
90 cm3
(2.53 lmp fl oz)
(6) Install the compressor, then evacuate, charge and perform
oil return operation.
(7) Check system operation.
When it is impossible to perform oil return operation, the
compressor oil should be checked in the following order:
(1) Discharge refrigerant and remove the compressor.
(2) Drain the compressor oil and measure the extracted oil with
a measuring cylinder.
(3) Check the oil for contamination.
3
(4) If more than 90 cm
(2.53 lmp fl oz) for CR-14 type is
extracted from the compressor, supply same amount of oil
to the compressor to be installed.
3
If the amount of oil extracted is less than 90 cm
(2.53 lmp
fl oz) for CR-14 type recheck the compressor oil in the
following order:
3
(5) Supply 90 cm
(2.53 lmp fl oz) for CR-14 type oil to the
compressor and install it onto the vehicle.
(6) Perform oil return operation.
(7) Remove the compressor and recheck the amount of oil.
(8) Adjust the compressor oil.
Page 87
BACK TO CHAPTER INDEX
ISUZU KB P190 2007
TO MODEL INDEX
HEATER A ND AIR CONDITIONING 1-53
Checking and Adjusting for Compressor
Replacement
180 cm3 (5.07 lmp fl oz) of oil is charged in compressor
(service parts). So it is necessary to drain the proper amount
of oil from the new compressor.
1) Perform oil return operation.
2) Discharge refrigerant and remove the compressor.
3) Drain the compressor oil and measure the extracted oil.
4) Check the compressor oil for contamination.
5) Adjust oil level as required.
Amount of oil drained
From used compressor
less than
3
90 cm
(2.53 lmp fl oz)
more than
3
90 cm
(2.53 lmp fl oz)
6) Evacuate, charge and perform oil return operation.
7) Check system operation.
Draining amount of oil
From new compressor
Some as drained
amount
3
90 cm
(2.53 lmp fl oz)
CONTAMINATION OF COMPRESSOR OIL
Unlike engine oil, no cleaning agent is added to the
compressor oil. Even is the compressor runs for a long period
of time (approximately 1 season), the oil never becomes
contaminated as long as there is nothing wrong with the
compressor or its method of use.
Inspect the extracted oil for any of the following
conditions:
• The capacity of the oil has increased.
• The oil has changed color to red.
• Foreign substances, metal powder, etc., are present in the
oil.
If any of these conditions exists, compressor oil is
contaminated. Whenever contaminated compressor oil is
discovered, the receiver/drier must be replaced.
Page 88
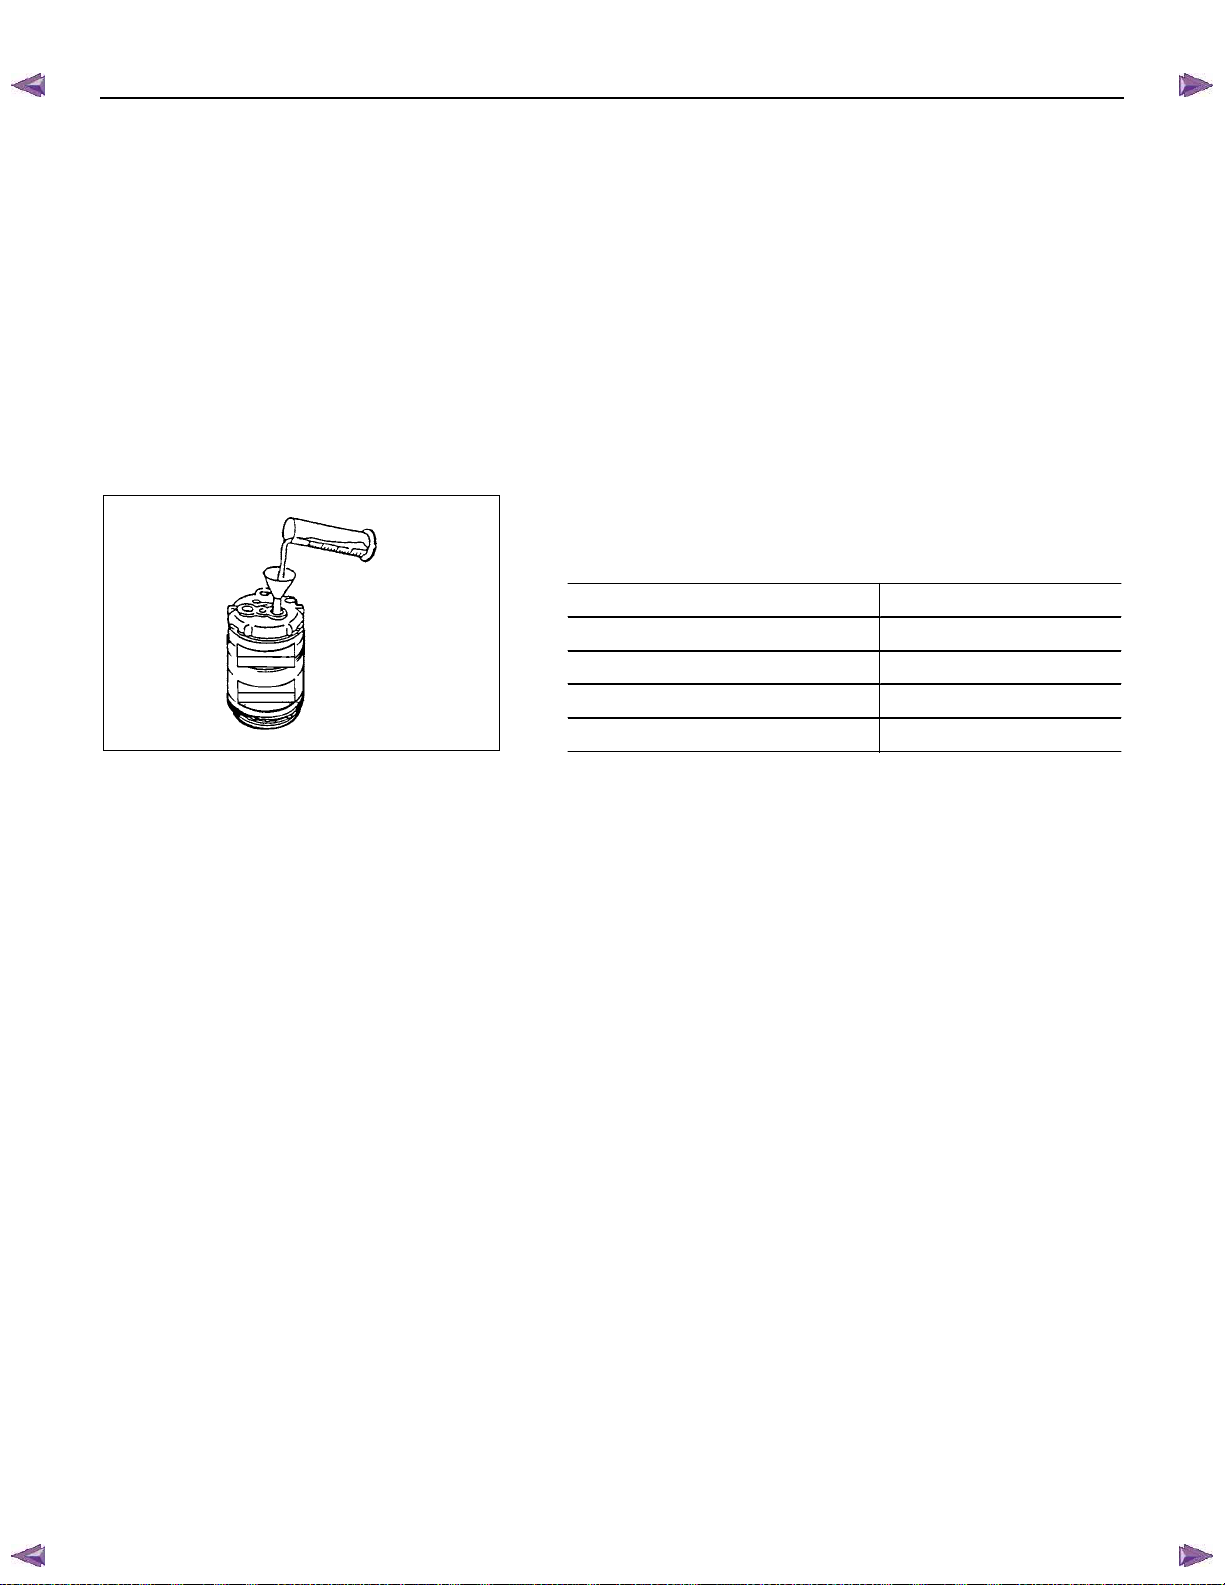
BACK TO CHAPTER INDEX
1-54 HEATER A ND AIR CONDITIONING
ISUZU KB P190 2007
TO MODEL INDEX
OIL RETURN OPERATION
There is close affinity between the oil and the refrigerant.
During normal operation, part of the oil recirculates with the
refrigerant in the system.
When checking the amount of oil in the system, or replacing
any component of the system, the compressor must be run in
advance for oil return operation. The procedure is as follows:
1) Open the all doors and engine hood.
2) Start the engine and A/C switch is "ON" and Set the fan
control knob at its highest position.
3) Run the compressor for more than 20 minutes between
800 and 1,000 rpm in order to operate the system.
4) Stop the engine.
REPLACEMENT OF COMPONENT PARTS
When replacing system component parts, supply the following
amount of oil to the component parts to be installed.
Component parts to be installed Amount of oil
Evaporator 50 cm3 (1.41 lmp fl oz)
Condenser 30 cm3 (0.84 lmp fl oz)
Receiver/drier 30 cm3 (0.84 lmp fl oz)
Refrigerant line (One piece) 10 cm3 (0.28 lmp fl oz)
Refrigeration oil must be replenished if more than two parts
are removed at the same time. After installing these
components, check compressor oil.
Page 89
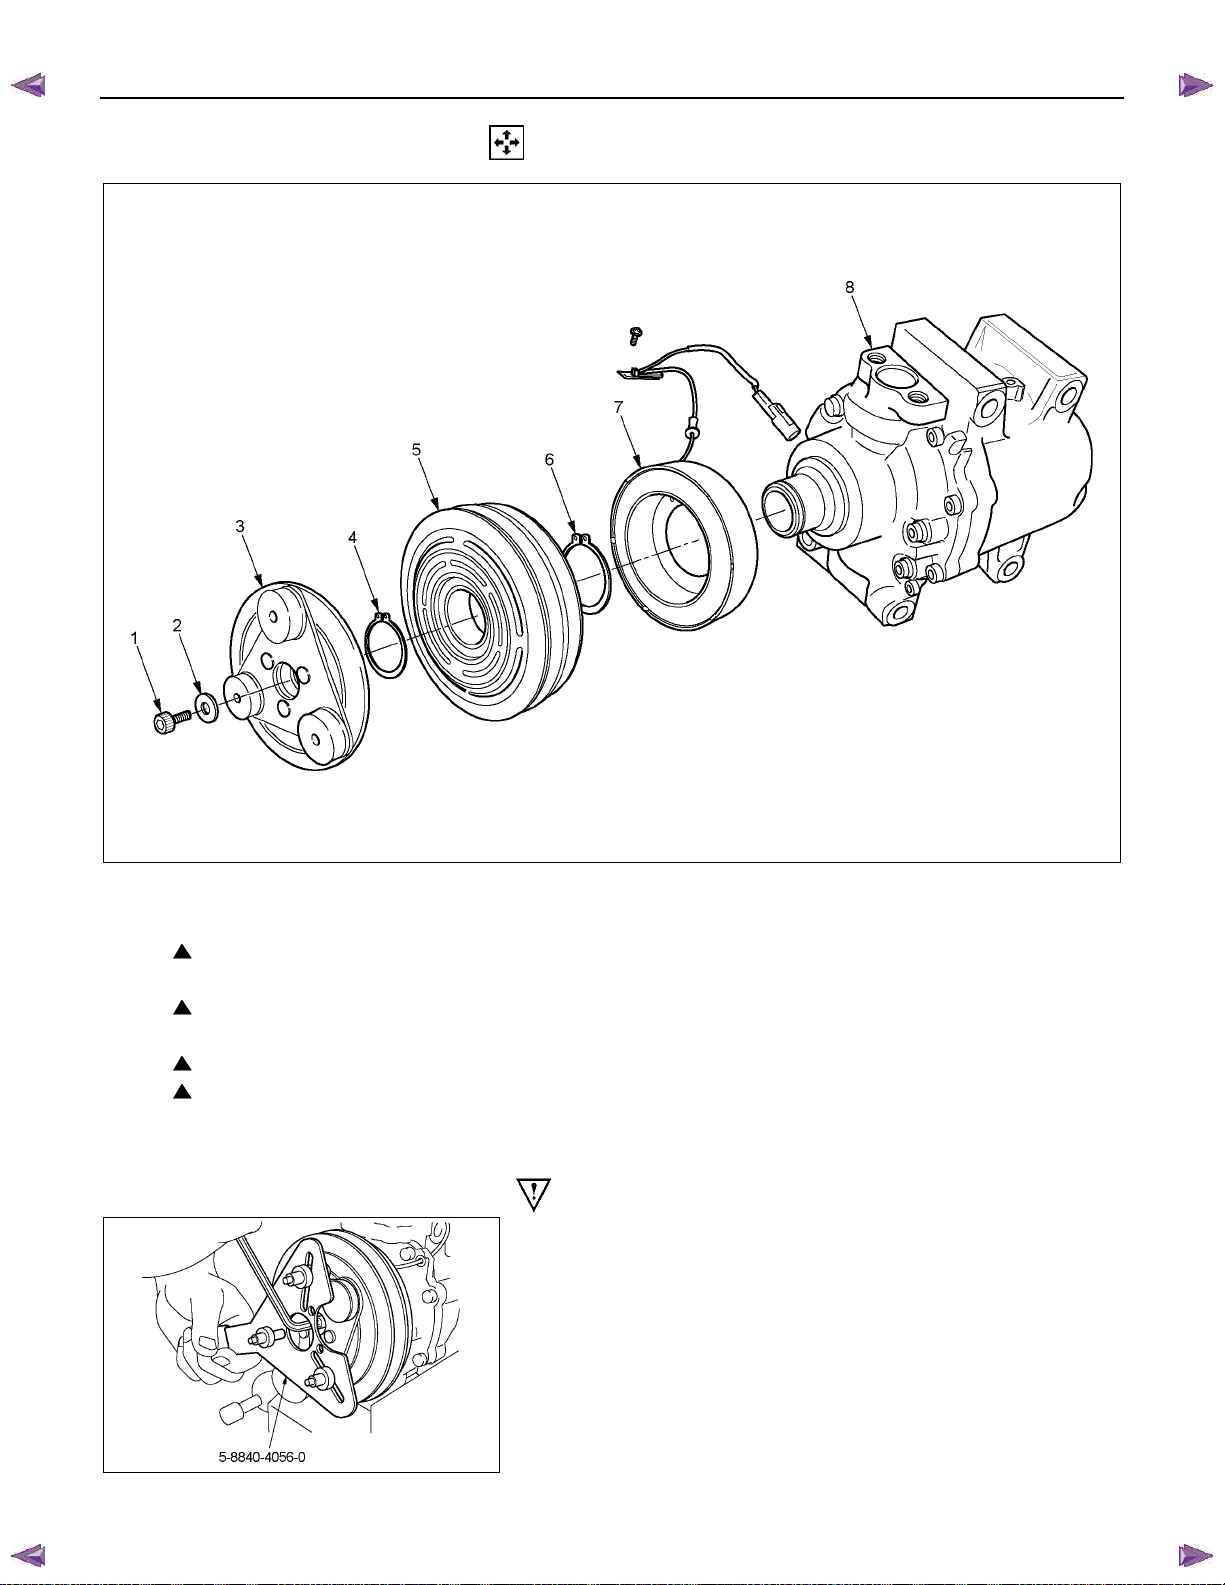
BACK TO CHAPTER INDEX
DISASSEMBLY
ISUZU KB P190 2007
TO MODEL INDEX
HEATER A ND AIR CONDITIONING 1-55
This illustration is based on the 4J engine model
RTW510MF000301
Disassembly Steps
1. Drive plate bolt
2. Plain washer
3. Drive plate
4. Snap ring
5. Pulley assembly
6. Snap ring
7. Field coil
8. Compressor
Important Operations - Disassembly
1. Drive Plate Bolt
Using drive plate holder to prevent the drive plate from
rotating, then remove the bolt.
Drive Plate Holder: 5-8840-4056-0 (J-37872)
RTW510SH000701
Page 90
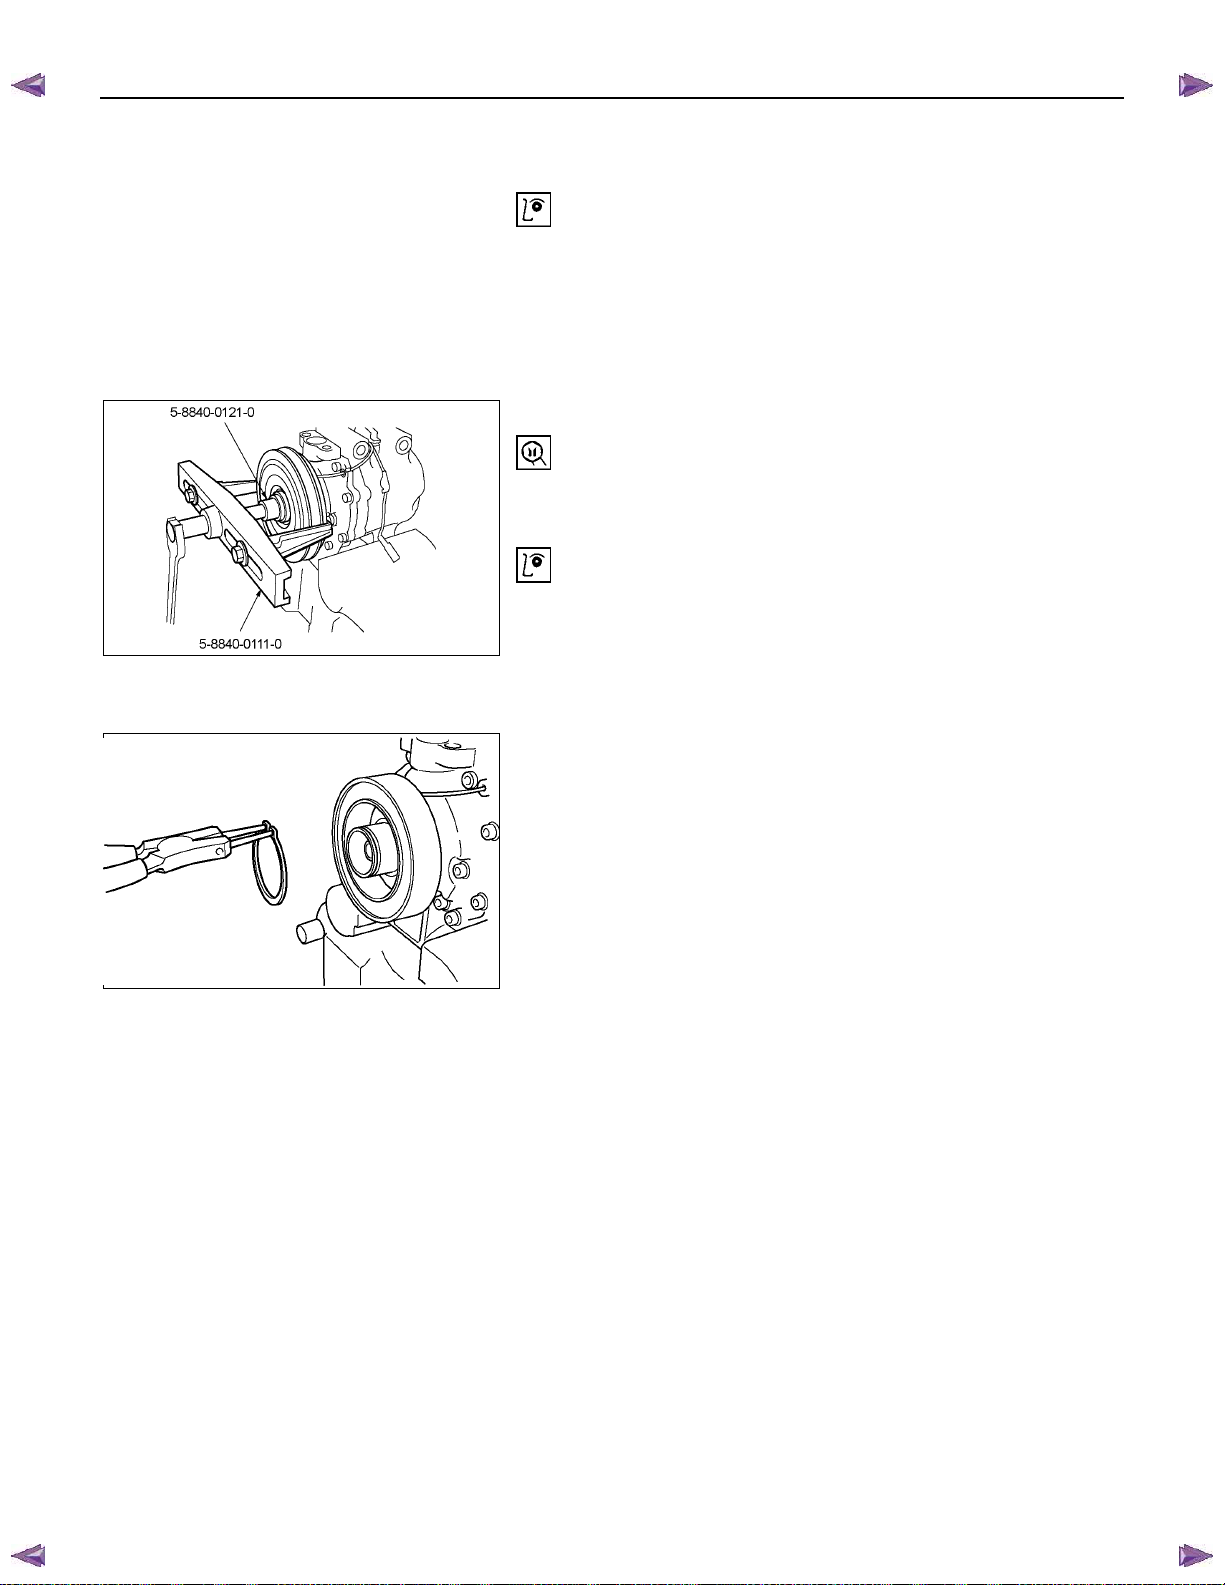
BACK TO CHAPTER INDEX
1-56 HEATER A ND AIR CONDITIONING
3. Drive Plate
Remove the drive plate.
If the frictional surface shows signs of damage due to
excessive heat, the drive plate and pulley should be
replaced.
ISUZU KB P190 2007
TO MODEL INDEX
5. Pulley Assembly
Using pulley puller pilot and pulley puller to remove the
pulley assembly.
Pulley Puller Pilot: 5-8840-0121-0 (J-33943)
Pulley Puller: 5-8840-0111-0 (J-8433)
Check the appearance of the pulley assembly. If the
frictional surface of the pulley shows signs of excessive
grooving due to slippage, both the pulley and drive plate
RTW510SH000801
should be replaced. The frictional surfaces of the pulley
assembly should be cleaned with a suitable solvent before
reinstallation.
6. Snap ring
Using snap ring pliers to remove the snap ring.
RTW510SH000901
Page 91
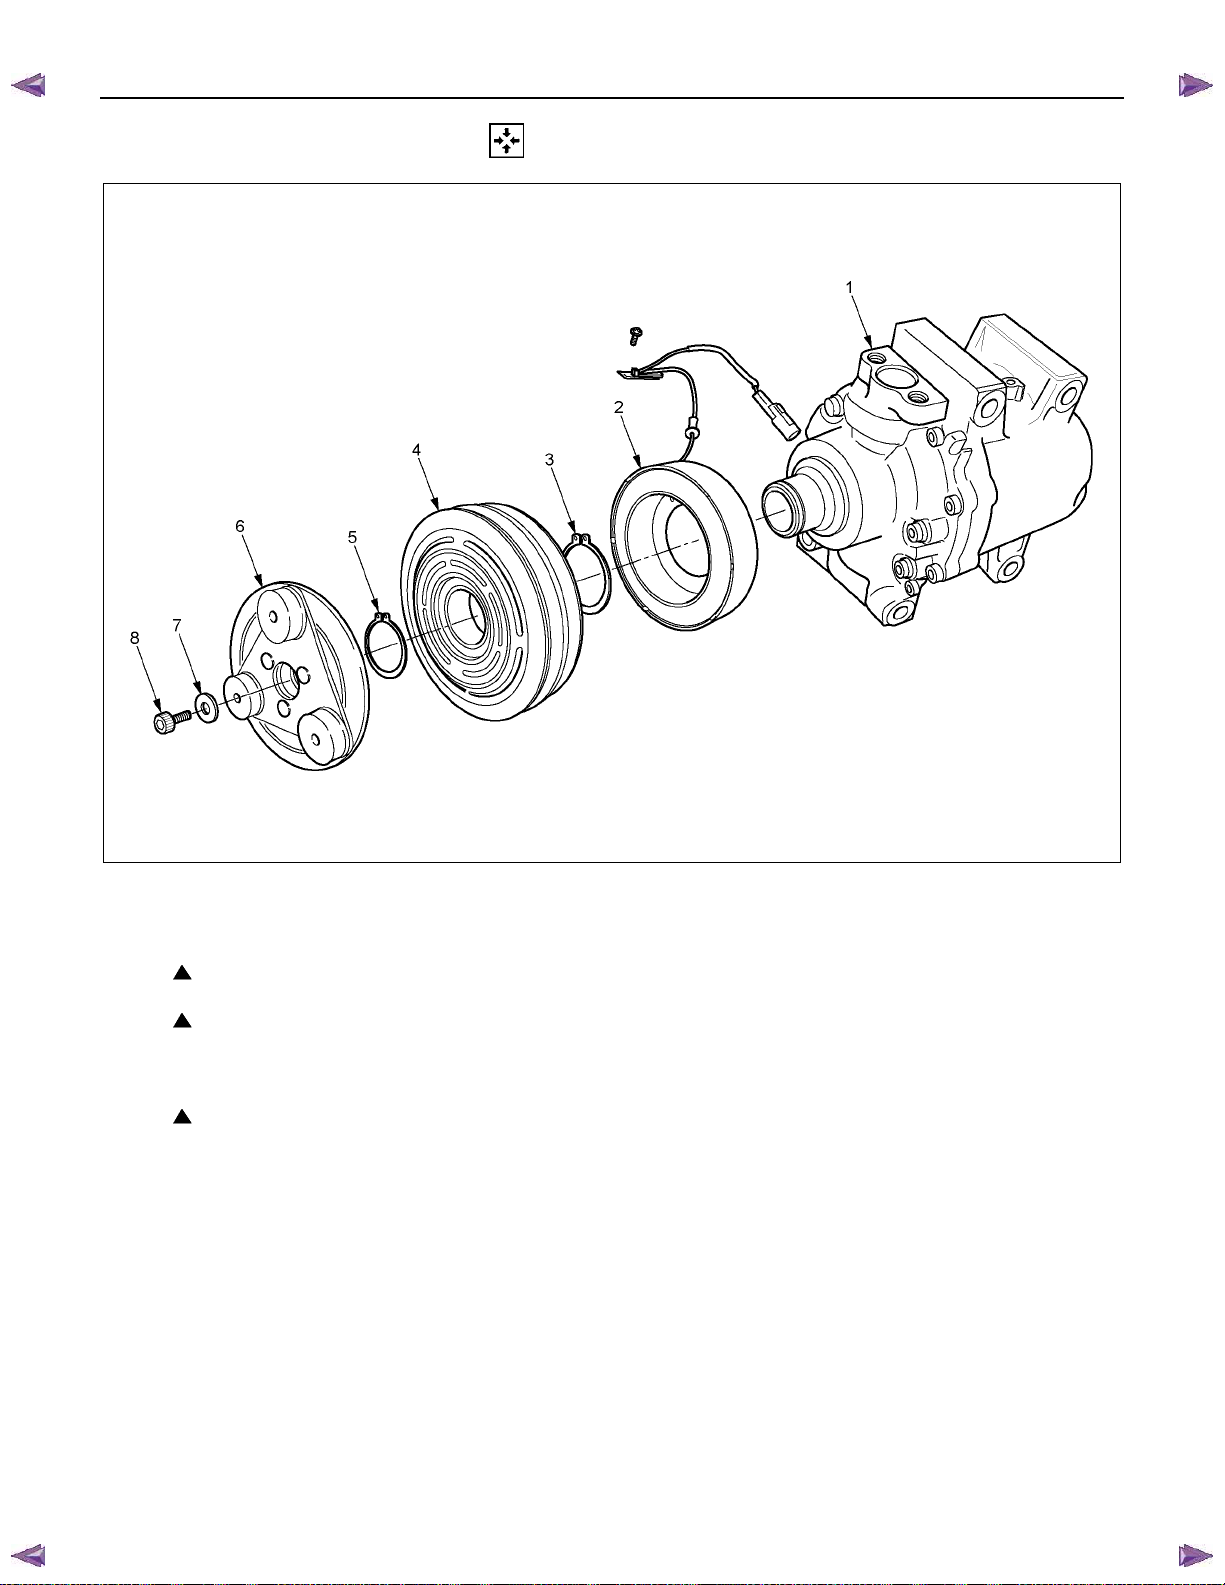
BACK TO CHAPTER INDEX
ISUZU KB P190 2007
TO MODEL INDEX
HEATER A ND AIR CONDITIONING 1-57
REASSEMBLY
Reassembly Steps
1. Compressor
2. Field coil
3. Snap ring
4. Pulley assembly
2. Snap ring
3. Drive plate
7. Plain washer
8. Drive prate bolt
This illustration is based on the 4J engine model
RTW510MF000401
Page 92
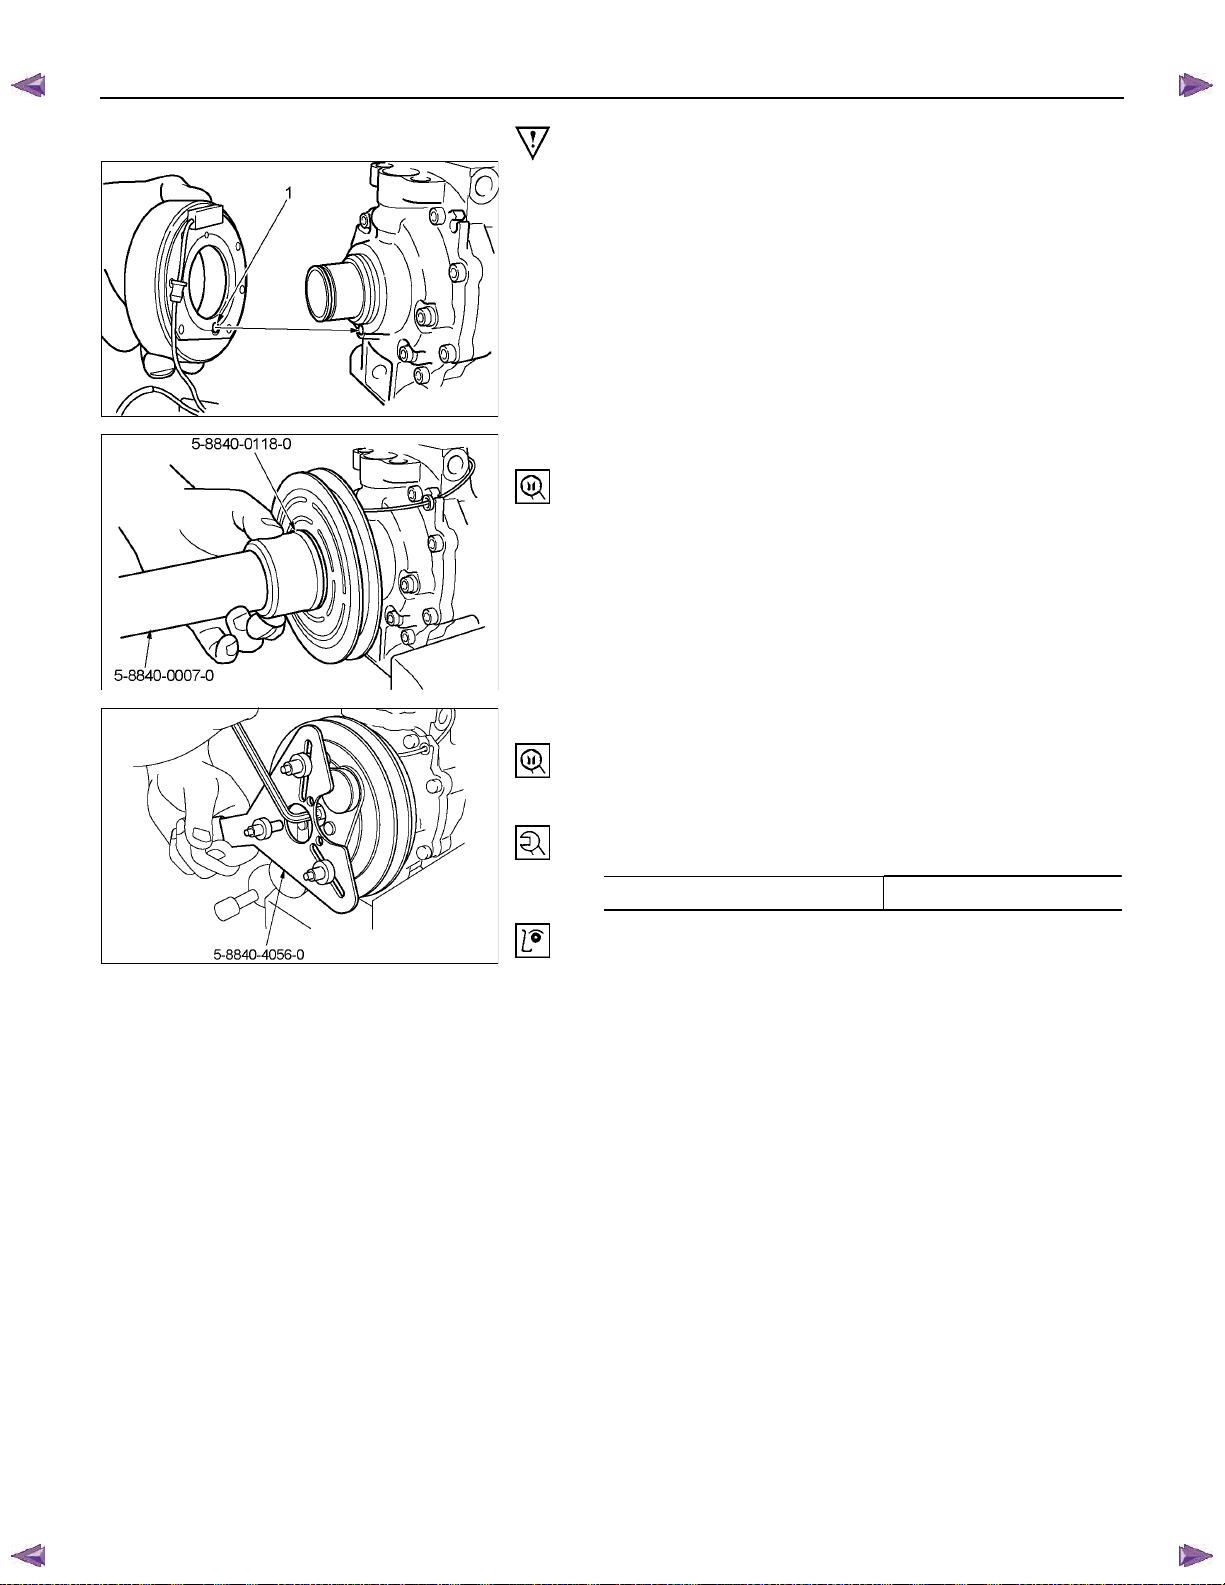
BACK TO CHAPTER INDEX
1-58 HEATER A ND AIR CONDITIONING
ISUZU KB P190 2007
TO MODEL INDEX
Important Operations - Reassembly
2. Field Coil
Installation field coil.
• Align the located portion (1) of the clutch coil and
compressor.
RTW510SH001001
4. Pulley Assembly
Using pulley installer and drive handle to install the pulley
assembly.
Pulley Installer: 5-8840-0118-0 (J-33940)
Drive Handle: 5-8840-0007-0 (J-8092)
RTW510SH001101
8. Drive Plate Bolt
Using drive plate holder to prevent the drive plate from
rotating.
Drive Plate Holder: 5-8840-4056-0 (J-37872)
Tighten the bolt to the specified torque.
N⋅m (kgf⋅m/Ib⋅in)
Torque 13 (1.3/113)
After tightening the bolt, check to be sure the pulley rotates
RTW510SH000701
smoothly.
Page 93
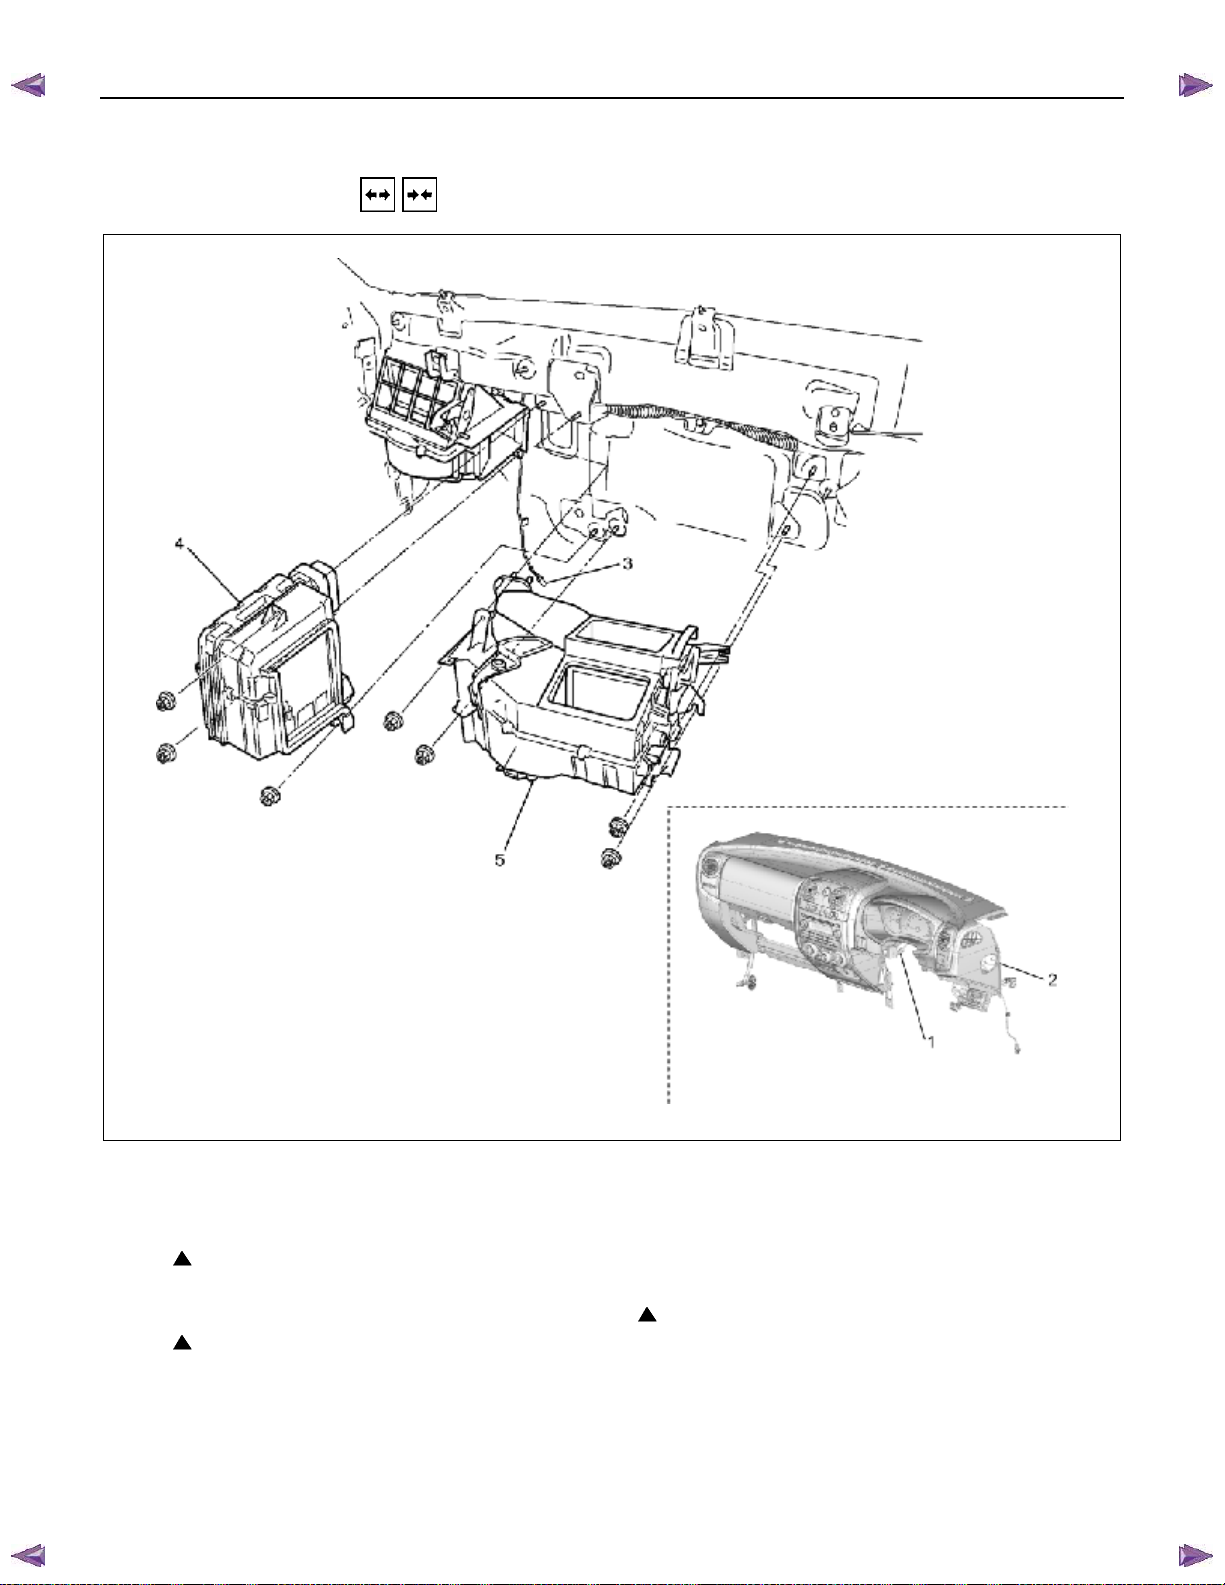
BACK TO CHAPTER INDEX
HEATER A ND AIR CONDITIONING 1-59
HEATER UNIT
REMOVAL AND INSTALLATION
ISUZU KB P190 2007
TO MODEL INDEX
This illustration is based on RHD model
Removal Steps
1. Control cable
2. Instrument panel assembly and cross
beam
3. Electronic thermostat connector
4. Evaporator or duct
5. Heater unit
Installation steps
5. Heater unit
4. Evaporator or duct
3. Electronic thermostat connector
2. Instrument panel assembly and cross
beam
1. Control cable
RTW710LF001601
Page 94

BACK TO CHAPTER INDEX
1-60 HEATER A ND AIR CONDITIONING
ISUZU KB P190 2007
TO MODEL INDEX
Important Operations – Removal
2. Instrument Panel Assembly and Cross Beam.
Refer to SECTION 10 “INSTRUMENT PANEL”.
4. Evaporator or Duct
Refer to “EVAPORATOR” or “DUCT” in this section.
Important Operation - Installation
2. Instrument Panel Assembly and Cross Beam
Adjust the heater control cables.
Refer to "CONTROL LEVER ASSEMBLY" in this section.
Page 95
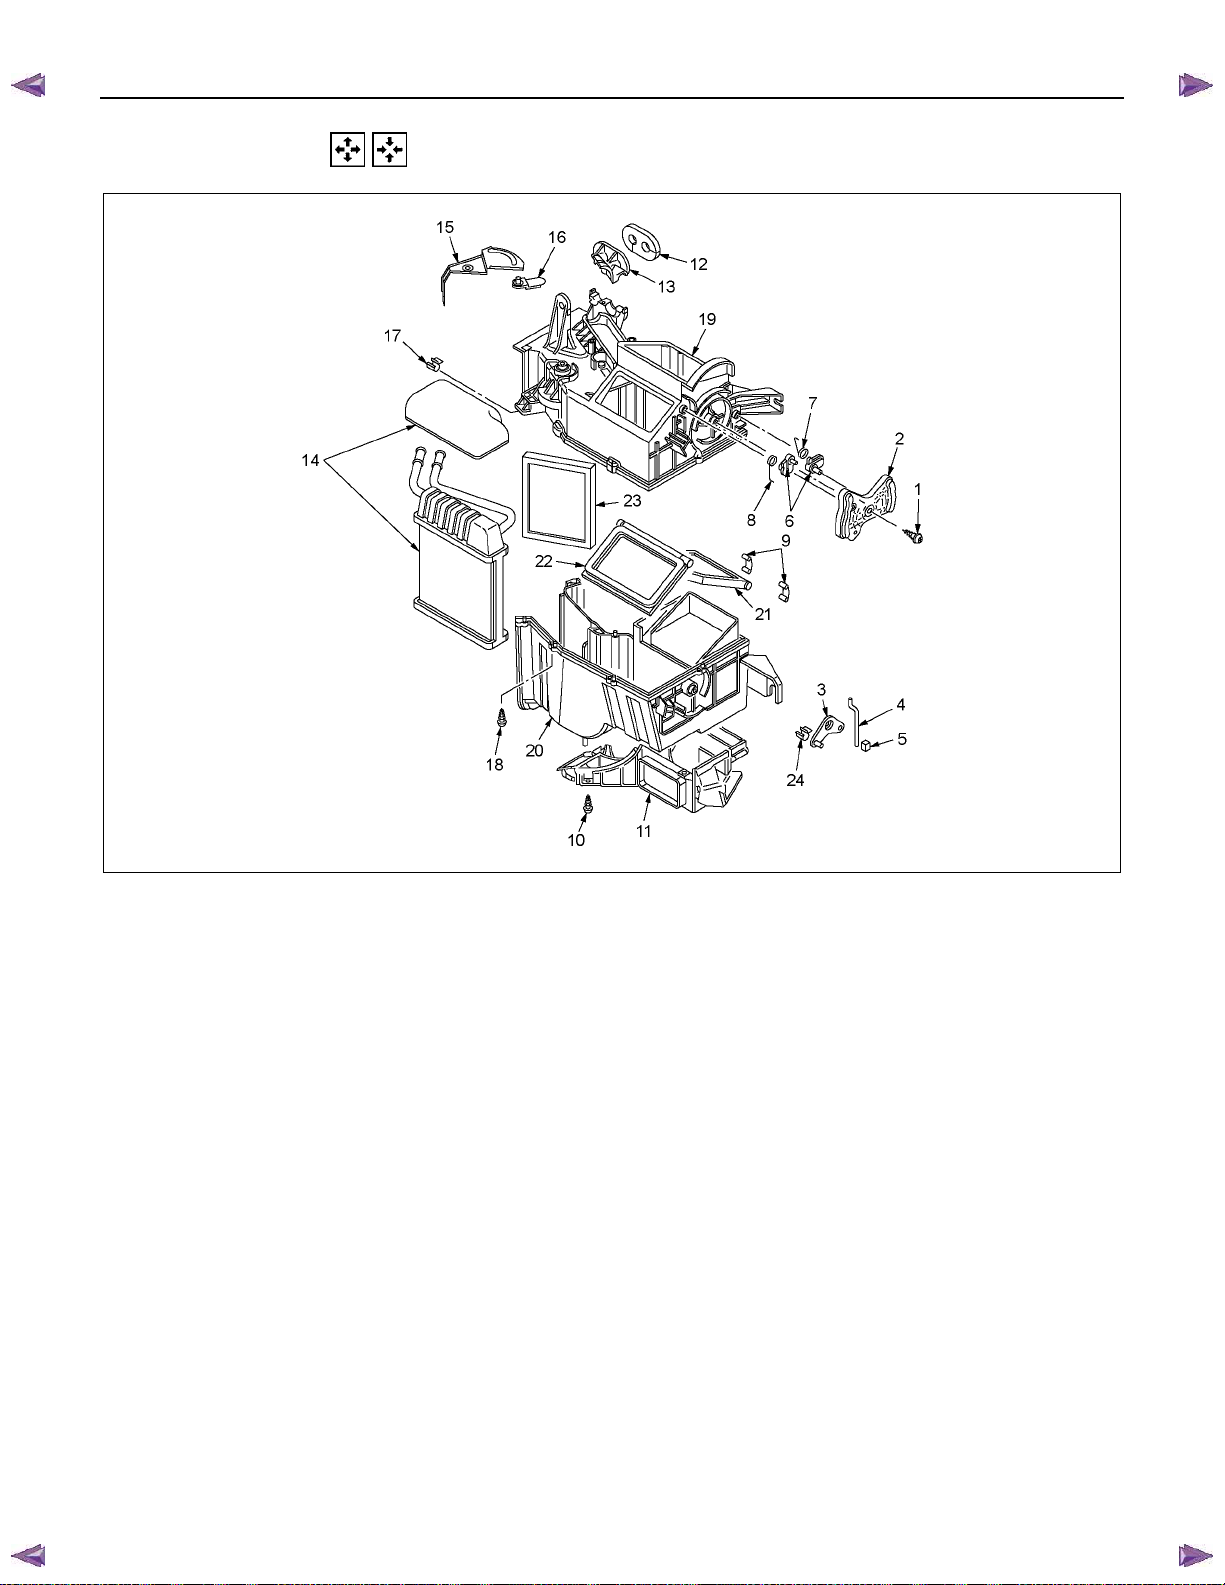
BACK TO CHAPTER INDEX
HEATER A ND AIR CONDITIONING 1-61
DISASSEMBLY AND REASSEMBLY
ISUZU KB P190 2007
TO MODEL INDEX
Disassembly Steps
1. Attaching screw
2. Main link-side
3. Sub link-side
4. Mode rod
5. Holder rod
6. Mode lever
7. DEF/FOOT-spring
8. VENT-spring
9. Heater box clip
10. Attaching screws
11. Foot duct
12. FOD H/Pipes seal
13. Heater core clamp
14. Heater core
15. Mix lever (2)
16. Mix lever (1)
17. Control cable clamp
18. Attaching screws
19. Upper case
20. Lower case
21. DEF/FOOT door
22. VENT door
23. Mix door
24. Control cable clamp
This illustration is based on RHD model
Reassembly Steps
24. Control cable clamp
23. Mix door
22. VENT door
21. DEF/FOOT door
20. Lower case
19. Upper case
18. Attaching screws
17. Control cable clamp
16. Mix lever (1)
15. Mix lever (2)
14. Heater core
13. Heater core clamp
12. FOD H/Pipes seal
11. Foot duct
10. Attaching screws
9. Heater box clip
8. VENT-spring
7. DEF/FOOT-spring
6. Mode lever
5. Holder rod
4. Mode rod
3. Sub link-side
2. Main link-side
1. Attaching screw
RTW310LF001401
Page 96
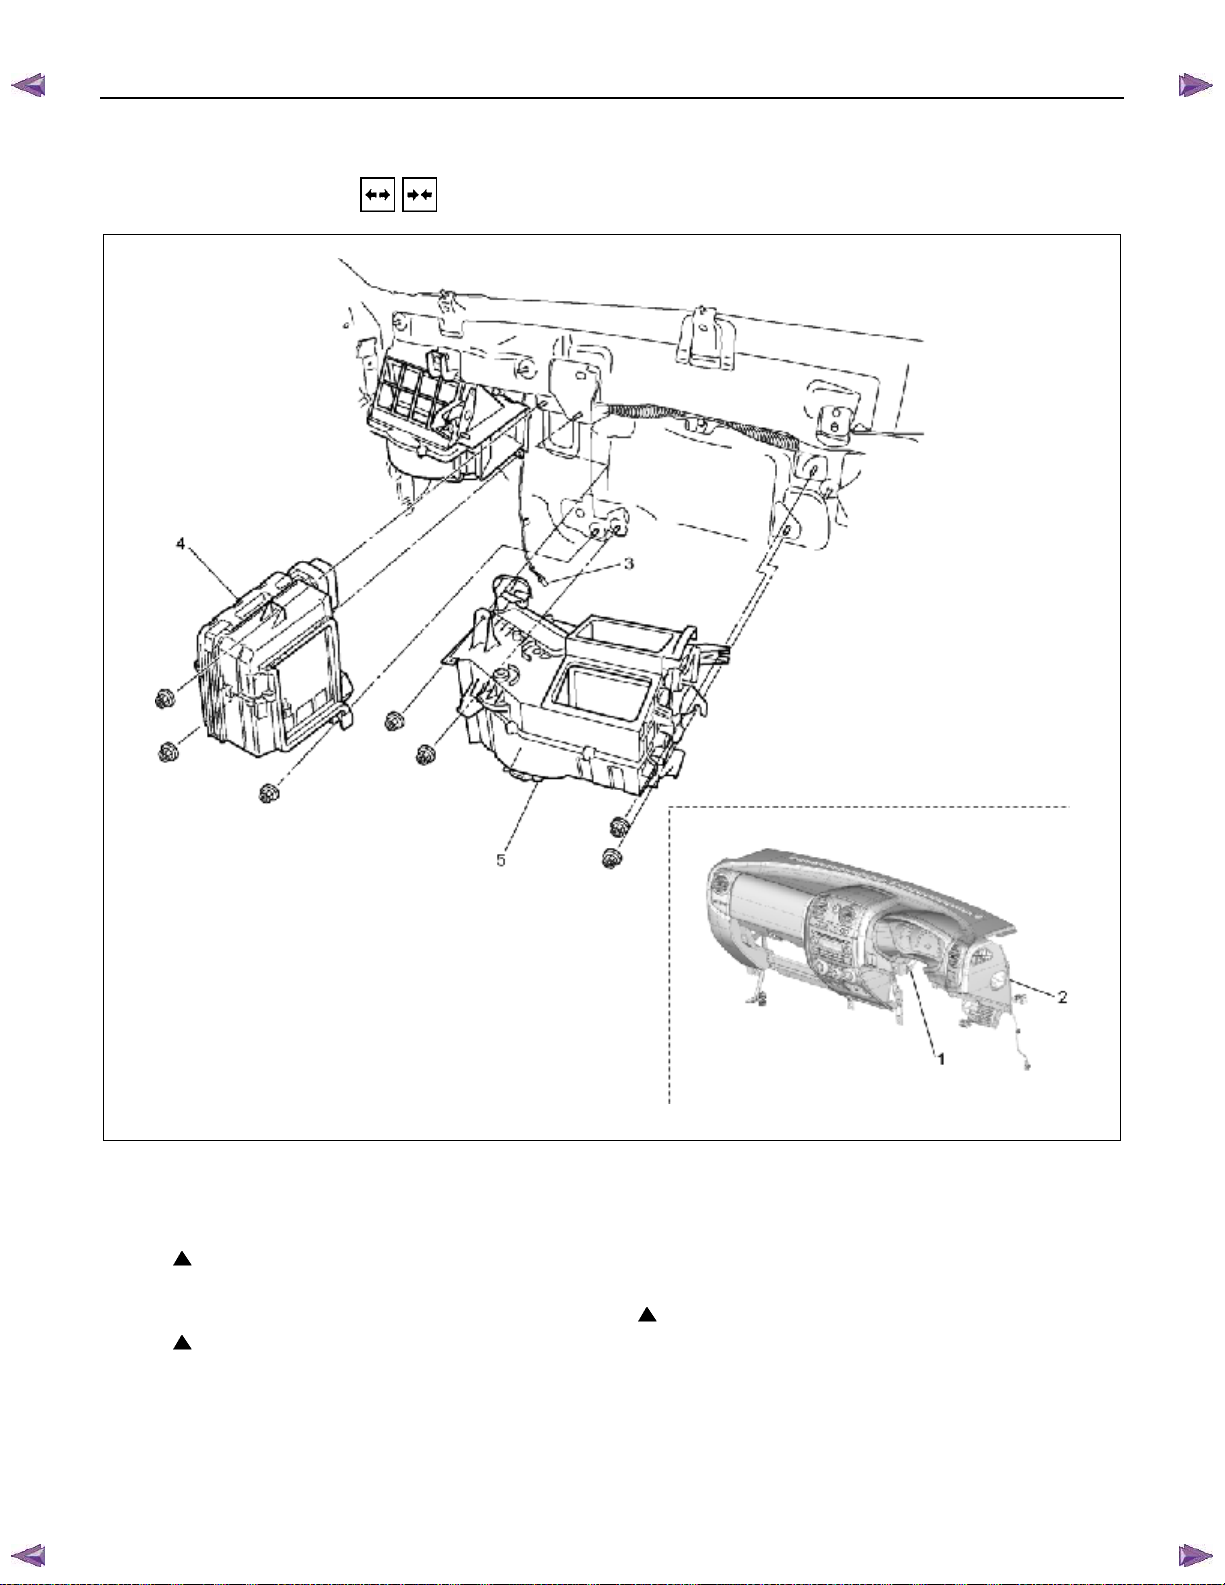
BACK TO CHAPTER INDEX
1-62 HEATER A ND AIR CONDITIONING
VENT UNIT (WITHOUT HEATER)
REMOVAL AND INSTALLATION
ISUZU KB P190 2007
TO MODEL INDEX
This illustration is based on RHD model
Removal Steps
1. Control cable
2. Instrument panel assembly and cross
beam
3. Electronic thermostat connector
4. Evaporator or duct
5. Vent unit
Installation steps
5. Vent unit
4. Evaporator or duct
3. Electronic thermostat connector
2. Instrument panel assembly and cross
beam
1. Control cable
RTW710LF002801
Page 97

BACK TO CHAPTER INDEX
ISUZU KB P190 2007
TO MODEL INDEX
HEATER A ND AIR CONDITIONING 1-63
Important Operations - Removal
2. Instrument Panel Assembly and Cross Beam.
Refer to SECTION 10 “INSTRUMENT PANEL”.
4. Evaporator or Duct
Refer to “EVAPORATOR” or “DUCT” in this section.
Important Operation - Installation
2. Instrument Panel Assembly and Cross Beam
Adjust the heater control cables.
Refer to “CONTROL LEVER ASSEMBLY” in this section.
Page 98
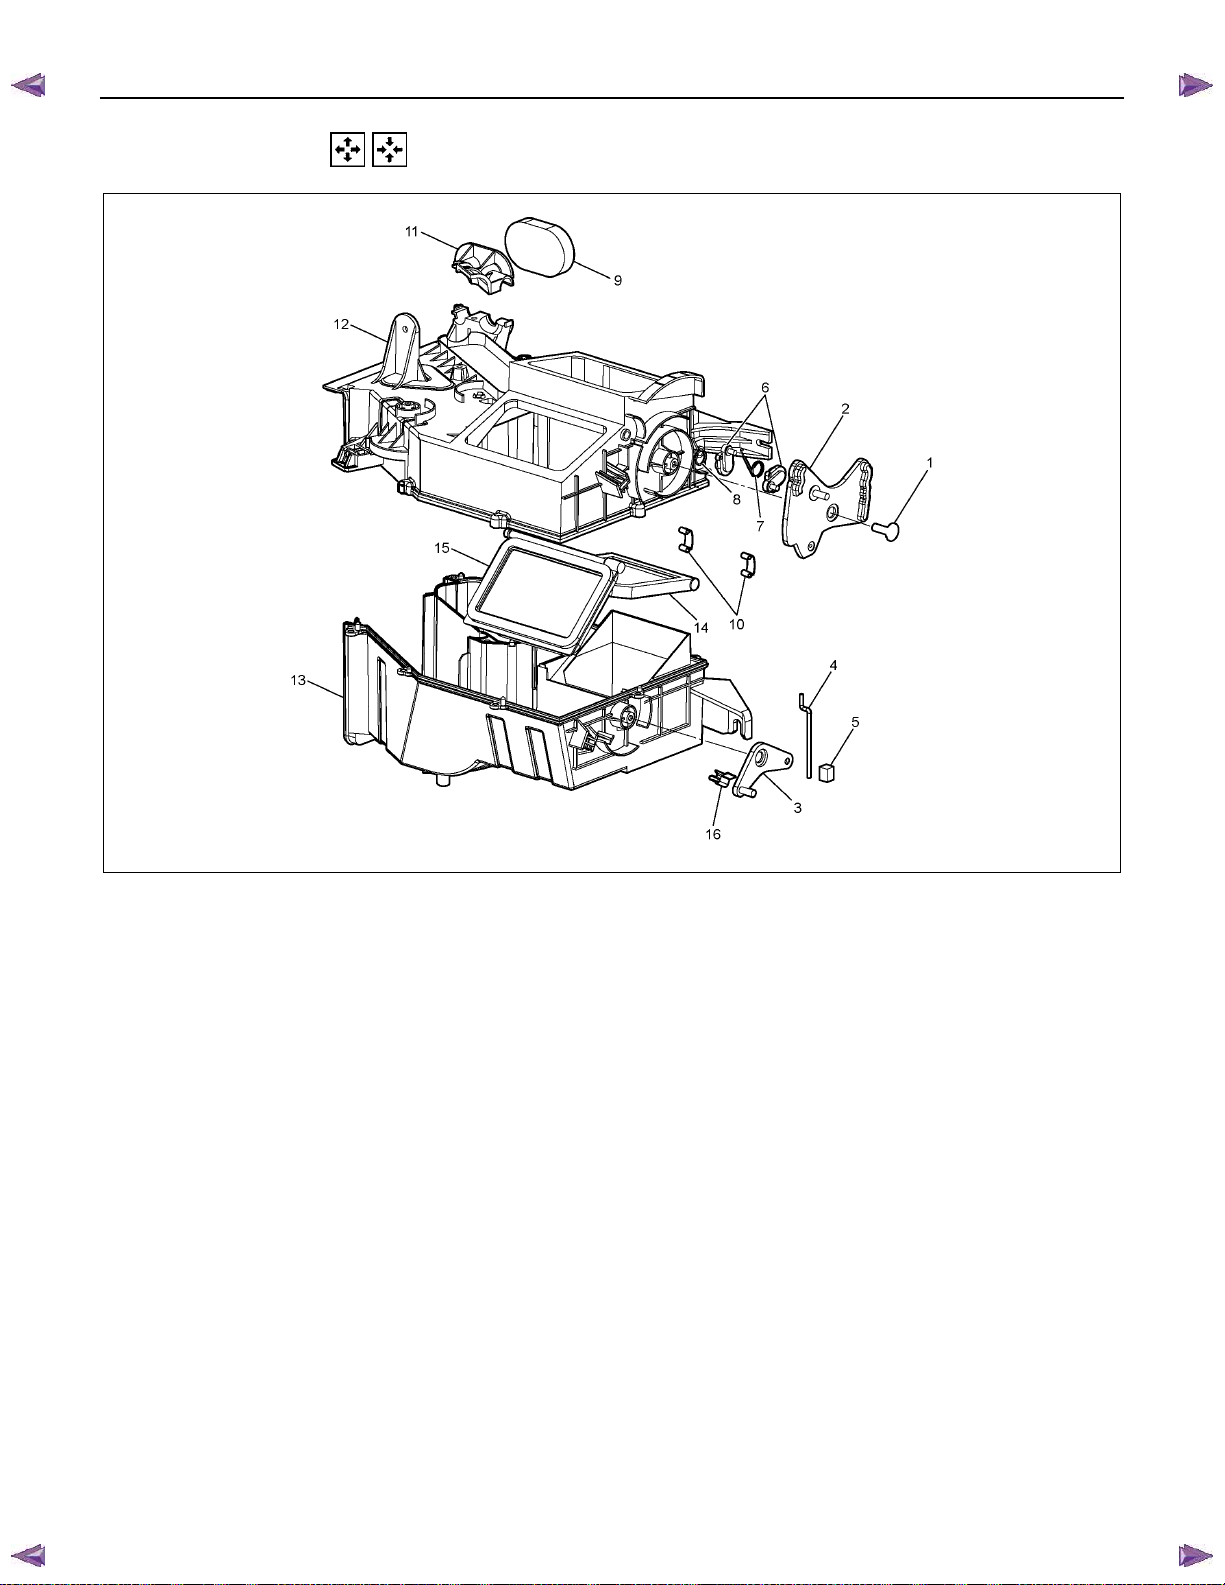
BACK TO CHAPTER INDEX
1-64 HEATER A ND AIR CONDITIONING
DISASSEMBLY AND REASSEMBLY
ISUZU KB P190 2007
TO MODEL INDEX
This illustration is based on RHD model
Disassembly Steps
1. Attaching screw
2. Main link-side
3. Sub link-side
4. Mode rod
5. Holder rod
6. Mode lever
7. DEF/FOOT-spring
8. VENT-spring
9. FOD H/pipes seal
10. Heater box clip
11. Heater core clamp
12. Upper case
13. Lower case
14. DEF/FOOT door
15. VENT door
16. Control cable clamp
Reassembly Steps
16. Control cable clamp
15. VENT door
14. DEF/FOOT door
13. Lower case
12. Upper case
11. Heater core clamp
10. Heater box clip
9. FOD H/pipes seal
8. VENT-spring
7. DEF/FOOT-spring
6. Mode lever
5. Holder rod
4. Mode rod
3. Sub link-side
2. Main link-side
1. Attaching screw
RTW610LF000701
Page 99
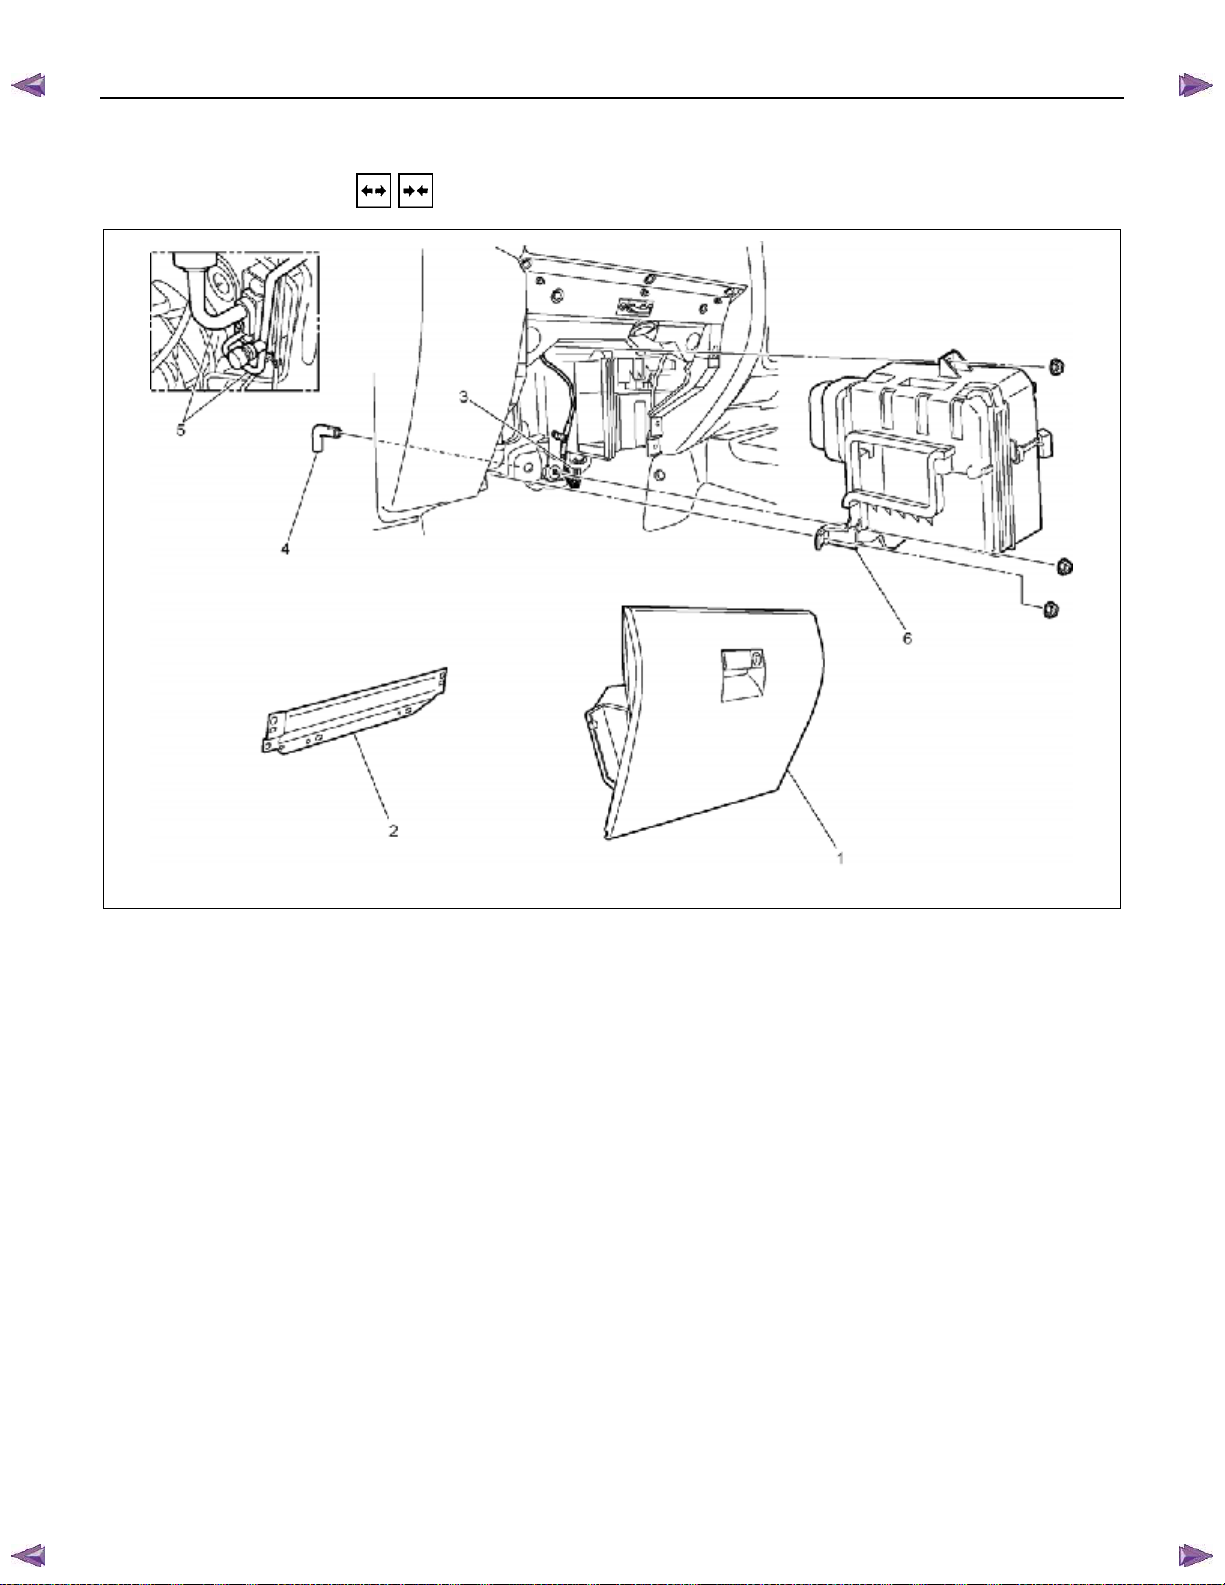
BACK TO CHAPTER INDEX
HEATER A ND AIR CONDITIONING 1-65
EVAPORATOR (WITH A/C)
REMOVAL AND INSTALLATION
ISUZU KB P190 2007
TO MODEL INDEX
This illustration is based on RHD model
Removal Steps
1. Glove box
2. Passenger lower bracket
3. Electronic thermostat connector
4. Drain hose
5. Refrigerant line
6. Evaporator assembly
Installation Steps
6. Evaporator assembly
5. Refrigerant line
4. Drain hose
3. Electronic thermostat connector
2. Passenger lower bracket
1. Glove box
RTW710LF003001
Page 100
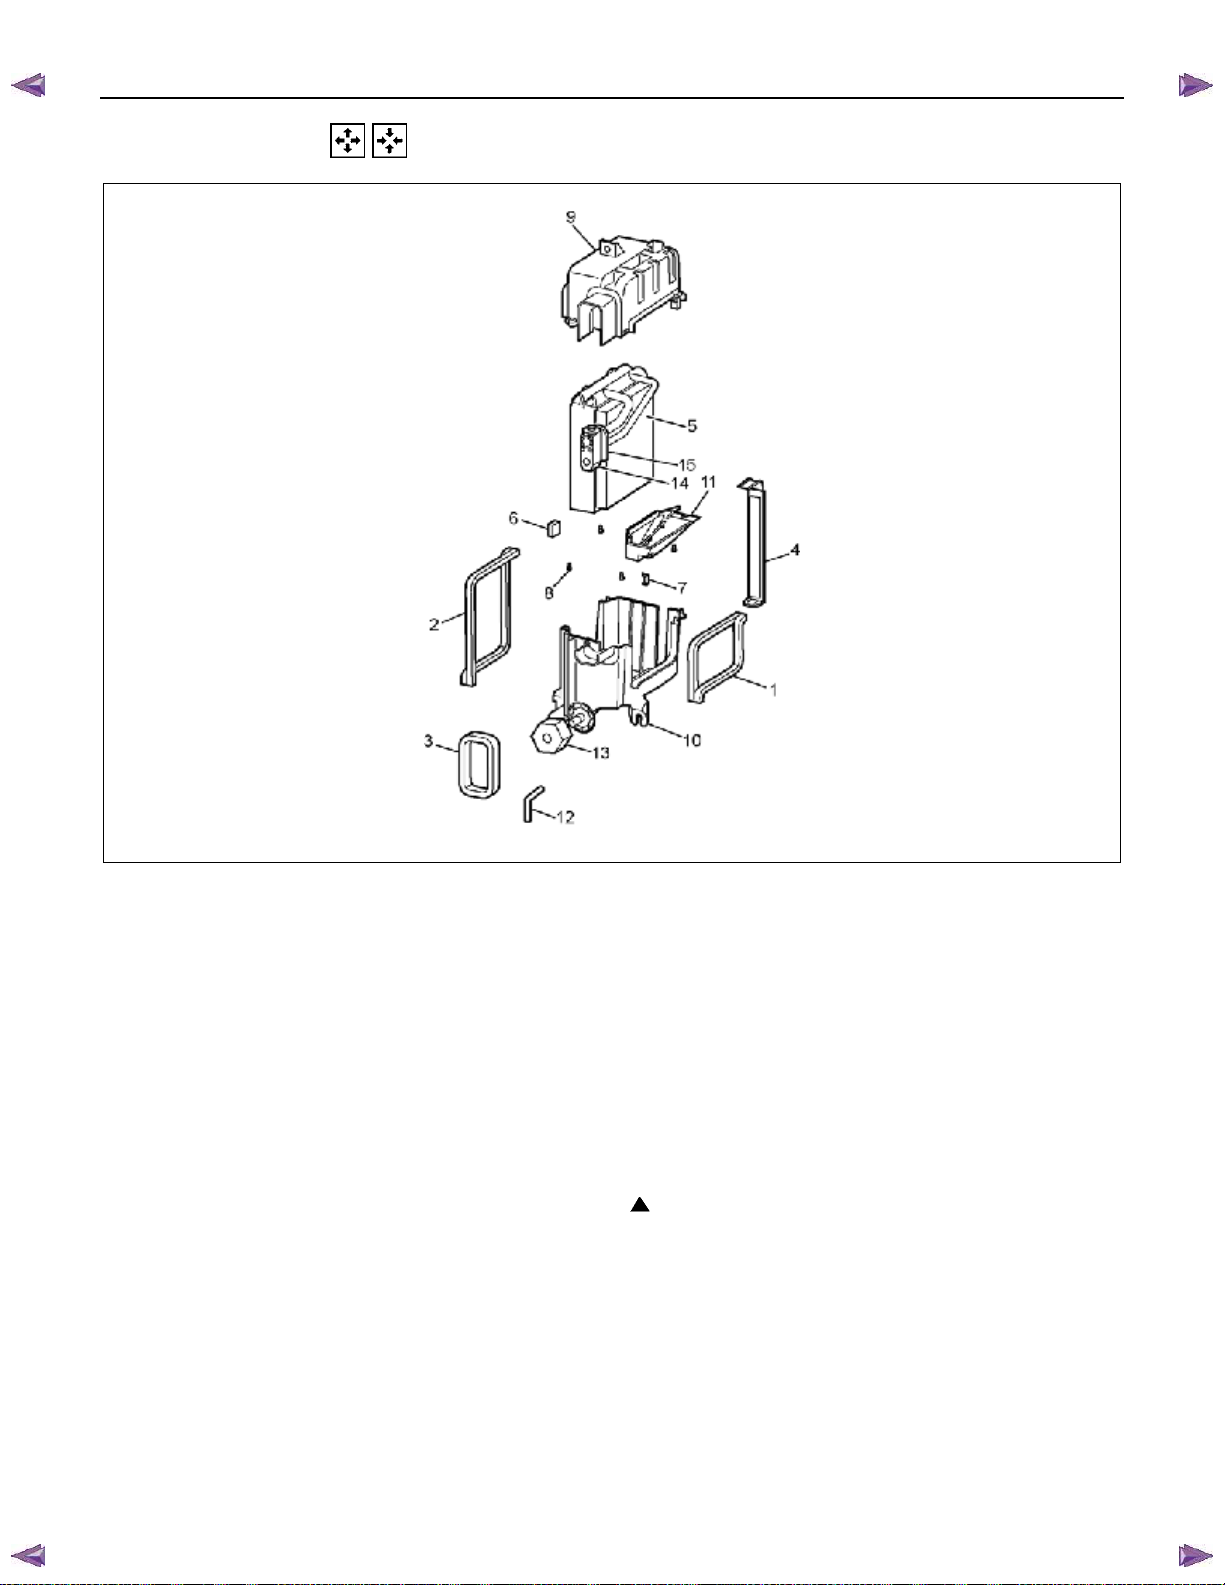
BACK TO CHAPTER INDEX
1-66 HEATER A ND AIR CONDITIONING
DISASSEMBLY AND REASSEMBLY
ISUZU KB P190 2007
TO MODEL INDEX
This illustration is based on RHD model
RTW710MF000901
Disassembly Steps
1. Packing cooler outlet
2. Packing cooler inlet
3. Seal FOD cooler
4. Filter cover assembly
5. Air filter
6. Electronic thermostat
7. Clip heater
8. Attaching screws
9. Case : cooler upper
10. Case : cooler lower
11. Insulator : case lower
12. Drain hose
13. Packing drain
14. Evaporator assembly W/Expansion valve
15. Grommet : A/C pipe
Reassembly Steps
15. Grommet : A/C pipe
14. Evaporator assembly W/Expansion valve
13. Packing drain
12. Drain hose
11. Insulator : case lower
10. Case : cooler lower
9. Case : cooler upper
8. Attaching screws
7. Clip heater
6. Electronic thermostat
5. Air filter
4. Filter cover assembly
3. Seal FOD cooler
2. Packing cooler inlet
1. Packing cooler outlet
 Loading...