


Please make sure you remember your PIN (password), without it there is no way to access the data on the drive.
If you are having difficulty using your datAshur PRO2 please contact our support team by email - support@istorage-uk.com or by phone on +44 (0) 20 8991 6260.
1.v2 Manual User ®2PRO datAshur iStorage
www.istorage-uk.com |
#1 |
|
|

iStorage datAshur PRO2® User Manual v2.1
Copyright © iStorage, Inc 2019. All rights reserved.
Windows is a registered trademark of Microsoft Corporation.
All other trademarks and copyrights referred to are the property of their respective owners.
Distribution of modified versions of this document is prohibited without the explicit permission of the copyright holder.
Distribution of the work or derivative work in any standard (paper) book form for commercial purposes is prohibited unless prior permission is obtained from the copyright holder.
DOCUMENTATION IS PROVIDED AS IS AND ALL EXPRESS OR IMPLIED CONDITIONS, REPRESENTATIONS AND WARRANTIES, INCLUDING ANY IMPLIED WARRANTY OF MERCHANTABILITY, FITNESS FOR A PARTICULAR
PURPOSE OR NON-INFRINGEMENT, ARE DISCLAIMED, EXCEPT TO THE EXTENT THAT SUCH DISCLAIMERS ARE HELD TO BE LEGALLY INVALID
All trademarks and brand names are the property of their respective owners
Trade Agreements Act (TAA) Compliant
#2 |
www.istorage-uk.com |
|
|

|
Table of Contents |
|
Introduction ........................................................................................................................................................................................... |
4 |
|
Box contents .......................................................................................................................................................................................... |
4 |
|
1. |
LED indicators and their actions ..................................................................................................................................................... |
5 |
2. |
Battery and LED States .................................................................................................................................................................... |
5 |
3. |
First Time Use................................................................................................................................................................................. |
6 |
4. |
Unlocking datAshur PRO2 with the Admin PIN ................................................................................................................................ |
7 |
5. |
To Enter Admin Mode ..................................................................................................................................................................... |
8 |
6. |
To Exit Admin Mode ....................................................................................................................................................................... |
8 |
7. |
Changing the Admin PIN ................................................................................................................................................................ |
9 |
8. |
Setting a User PIN Policy ................................................................................................................................................................ |
10 |
9. |
How to delete the User PIN Policy .................................................................................................................................................. |
11 |
10. |
How to check the User PIN Policy ................................................................................................................................................... |
12 |
11. |
Adding a New User PIN in Admin Mode.......................................................................................................................................... |
13 |
12. |
Changing the User PIN in Admin Mode........................................................................................................................................... |
14 |
13. |
Deleting the User PIN in Admin Mode ............................................................................................................................................ |
14 |
14. |
How to Unlock datAshur PRO2 with User PIN ................................................................................................................................. |
15 |
15. |
Changing the User PIN in User Mode ............................................................................................................................................. |
15 |
16. |
Creating a One-Time User Recovery PIN ........................................................................................................................................ |
16 |
17. |
Deleting the One-Time User Recovery PIN ...................................................................................................................................... |
16 |
18. |
Activating Recovery Mode and Creating New User PIN .................................................................................................................. |
17 |
19. |
Set User Read-Only in Admin Mode ............................................................................................................................................... |
18 |
20. |
Enable User Read/Write in Admin Mode ......................................................................................................................................... |
18 |
21. |
Set Global Read-Only in Admin Mode ............................................................................................................................................ |
19 |
22. |
Enable Global Read/Write in Admin Mode ...................................................................................................................................... |
19 |
23. |
How to configure a Self-Destruct PIN ............................................................................................................................................. |
20 |
24. |
How to delete the Self-Destruct PIN ................................................................................................................................................ |
21 |
25. |
How to Unlock with the Self-Destruct PIN ....................................................................................................................................... |
21 |
26. |
How to Configure an Admin PIN after a Brute Force attack or Reset ............................................................................................... |
22 |
27. |
Setting the Unattended Auto-Lock Clock ........................................................................................................................................ |
22 |
28. |
Turn off the Unattended Auto-Lock Clock ....................................................................................................................................... |
23 |
29. |
How to check the Unattended Auto-Lock Clock............................................................................................................................... |
24 |
30. |
Set Read-Only in User Mode .......................................................................................................................................................... |
24 |
31. |
Enable Read/Write in User Mode .................................................................................................................................................... |
25 |
32. |
Brute Force Hack Defence Mechanism ............................................................................................................................................ |
25 |
33. |
How to set the User PIN Brute Force Limitation .............................................................................................................................. |
26 |
34. |
How to check the User PIN Brute Force Limitation .......................................................................................................................... |
27 |
35. |
How to perform a complete reset ................................................................................................................................................... |
28 |
36. |
How to configure datAshur PRO2 as Bootable ................................................................................................................................. |
28 |
37. |
How to disable the datAshur PRO2 Bootable feature ........................................................................................................................ |
29 |
38. |
How to check the Bootable setting .................................................................................................................................................. |
29 |
39. |
How to configure the Drive as Removable or Local Disk ................................................................................................................. |
30 |
40. |
How to check whether the Drive is Removable or Local Disk .......................................................................................................... |
31 |
41. |
Formatting the datAshur PRO2 for Windows .................................................................................................................................. |
32 |
42. |
datAshur PRO2 Setup for Mac OS .................................................................................................................................................. |
34 |
43. |
datAshur PRO2 Setup for Linux (Ubuntu 18.04 LTS) ...................................................................................................................... |
36 |
44. |
Hibernating, Suspending or Logging off from the Operating System ............................................................................................. |
39 |
45. |
How to check Firmware in Admin Mode ......................................................................................................................................... |
39 |
46. |
How to check Firmware in User Mode ............................................................................................................................................ |
40 |
47. |
Technical Support ........................................................................................................................................................................... |
41 |
48. |
Warranty and RMA information ....................................................................................................................................................... |
41 |
1.v2 Manual User ®2PRO datAshur iStorage
www.istorage-uk.com |
#3 |
|
|

Introduction
Note: The datAshur PRO2 rechargeable battery is not fully charged, we recommend the battery be charged prior to first use. Please plug in the datAshur PRO2 to a powered USB port for 30-60 minutes to fully charge the battery.
Thank you for purchasing the iStorage datAshur® PRO2, an ultra-secure and easy to use, hardware encrypted USB 3.2 Gen 1 PIN authenticated flash drive with capacities up to 512GB and rising.
The datAshur PRO2 incorporates a rechargeable battery allowing the user to enter a 7-15 digit PIN (Personal Identification Number) onto the on-board keypad to unlock the drive before connecting to a USB port. To lock the drive and encrypt all data, simply eject the datAshur PRO2 from the host computer and the entire contents of the drive will be encrypted (full disk encryption) using military grade AES-XTS 256-bit hardware encryption. If the drive is lost or stolen and an incorrect PIN is entered 10 consecutive times (default setting), the datAshur PRO2 defence mechanism will be triggered to protect against unathorised access.
The datAshur PRO2 can be configured with both User and Admin PINs and can also be programmed to include a ‘User Recovery PIN’ making it perfect for corporate and government deployment. As the datAshur PRO2 is unlocked via the on-board keypad and not a host computer, it is not vulnerable to software/hardware based key-loggers or brute force attacks.
One of the unique and underlying security features of the GDPR compliant datAshur PRO2 is the dedicated hardware based secure microprocessor (Common Criteria EAL4+ ready), which employs built-in physical protection mechanisms designed to defend against external tamper, bypass attacks and fault injections. Unlike other solutions, the datAshur PRO2 reacts to an automated attack by entering the deadlock frozen state, which renders all such attacks as useless. In plain and simple terms, without the PIN there’s no way in!
iStorage datAshur PRO2® User Manual v2.1
Box Contents
•iStorage datAshur PRO2
•Extruded Aluminium Sleeve
•QSG - Quick Start Guide
#4 |
www.istorage-uk.com |
|
|

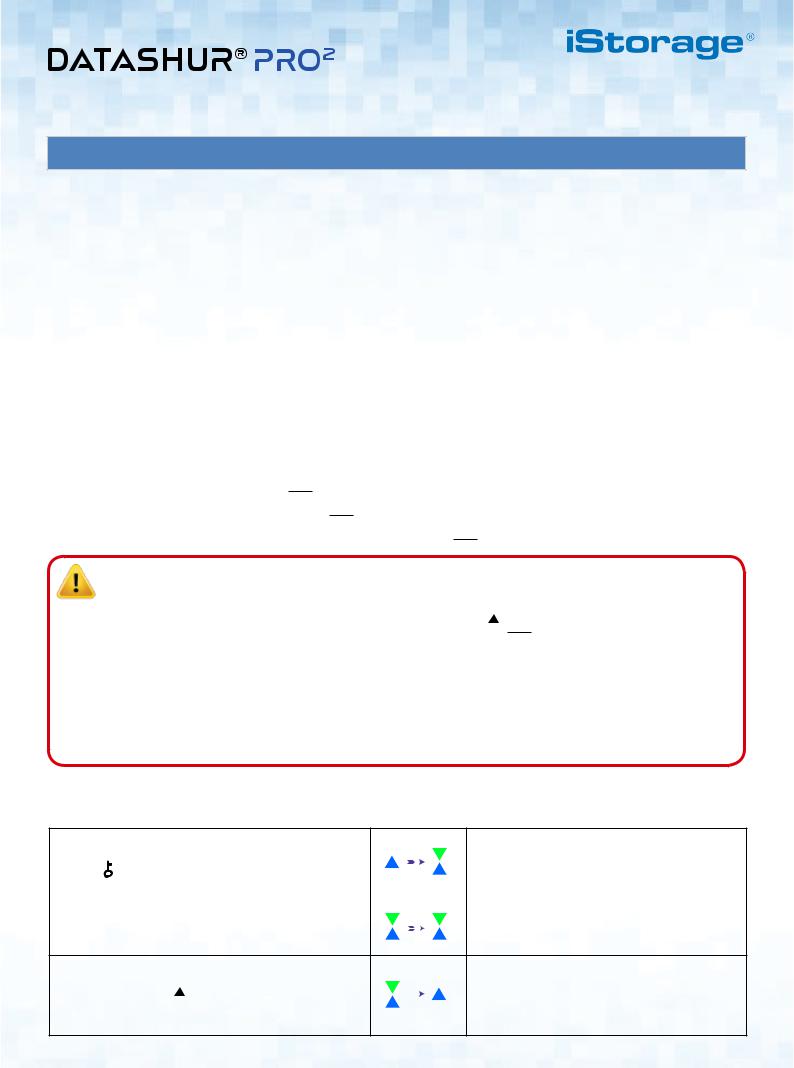
1. LED indicators and their actions
LED LED State |
Description |
LED |
LED State |
Description |
|||
|
|
|
|
|
|
RED, GREEN and |
|
|
|
|
|
|
|
|
|
|
|
RED Solid |
Locked device (in either |
|
BLUE Blinking |
Waiting for User PIN entry |
|
|
|
|
|
||||
|
|
|
|
Standby or Reset states) |
|
|
|
|
|
|
|
|
|
|
|
|
|
|
|
|
|
|
|
|
|
|
|
|
|
GREEN and BLUE |
|
|
|
RED - Fade Out |
Device Turning off to the |
|
Blinking together |
Waiting for Admin PIN entry |
|
|
|
|
|
Idle State |
|
|
|
|
|
|
|
|
|
|
|
|
|
|
|
|
|
|
|
|
|
GREEN Blinking |
Unlocked device as Admin |
|
GREEN and BLUE |
|
|
|
|
|
Blinking alternately |
Authentication in progress |
|||
|
|
|
|
(not connected to USB port) |
|
|
|
|
|
|
|
|
|
|
|
|
|
|
|
|
|
|
|
|
|
GREEN Solid |
Unlocked device as User |
|
BLUE blinking every |
Battery starts charging after 30 |
|
|
|
(not connected to USB port) or |
|
5 seconds |
seconds when device is locked |
||
|
|
|
|
|
|||
|
|
|
|
device in User mode |
|
|
and connected to a USB port |
|
|
BLUE Solid |
Device in Admin mode |
|
|
|
|
|
|
|
|
|
|
|
|
|
|
|
|
|
|
|
|
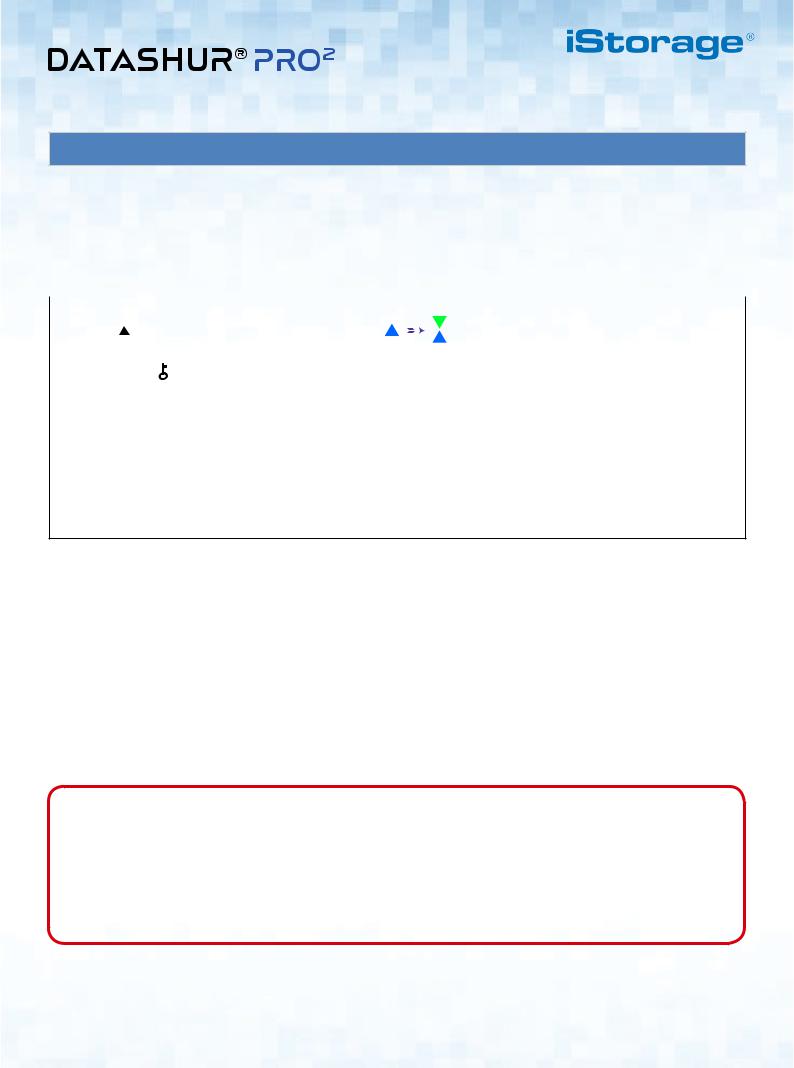
2. Battery and LED States
Note: The normal function of the datAshur PRO2 may be disturbed by strong Electro-Magnetic Interference. If so, simply power cycle the product (power off then power on) to resume normal operation. If normal operation does not resume, please use the product in a different location.
Low Battery Sensor
The datAshur PRO2 incorporates voltage detection circuitry that monitors the battery output when the device is powered on. When battery output drops to 3.3V or below, the RED LED flashes three times and fades out. At this point, the User should connect the datAshur PRO2 to a powered USB port and charge for 15-30minutes. Once recharged, the datAshur PRO2 will resume normal function.
To wake from Idle State
Idle state is defined as when datAshur PRO2 is not being used and all LEDs are off.
To wake datAshur PRO2 from the idle state do the following.
Press and hold down the SHIFT ( |
|
) |
|
|
|
RED, GREEN and BLUE LEDs blink once in sequence then the |
|
|
|
|
|||
button for one second or connect the device |
|
|
|
GREEN LED blinks twice and finally switches to a solid RED |
||
|
|
|
||||
to a powered USB port |
|
|
|
LED indicating the device is in Standby State |
||
|
|
|
|
|
|
|
To enter Idle State
To force datAshur PRO2 to enter Idle State, execute either of the following operations:
•If the device is connected to a USB port, disconnect it.
•If the device is not connected to a USB port, press and hold down the SHIFT (  ) button for a second until the LED turns solid RED and fades out to the Idle State (off).
1.v2 Manual User ®2PRO datAshur iStorage
www.istorage-uk.com |
#5 |
|
|
iStorage datAshur PRO2® User Manual v2.1
Note: When datAshur PRO2 is unlocked and not connected to a USB port and no operations are performed within 30 seconds, the device will enter Idle State automatically. The LED turns to solid RED and then fades out to the idle state.
When datAshur PRO2 is connected to a USB port, the SHIFT (  ) button does not function.
When connected to a powered USB port, a locked datAshur PRO2 will start charging after 30 seconds, indicated by the BLUE LED blinking every 5 seconds.
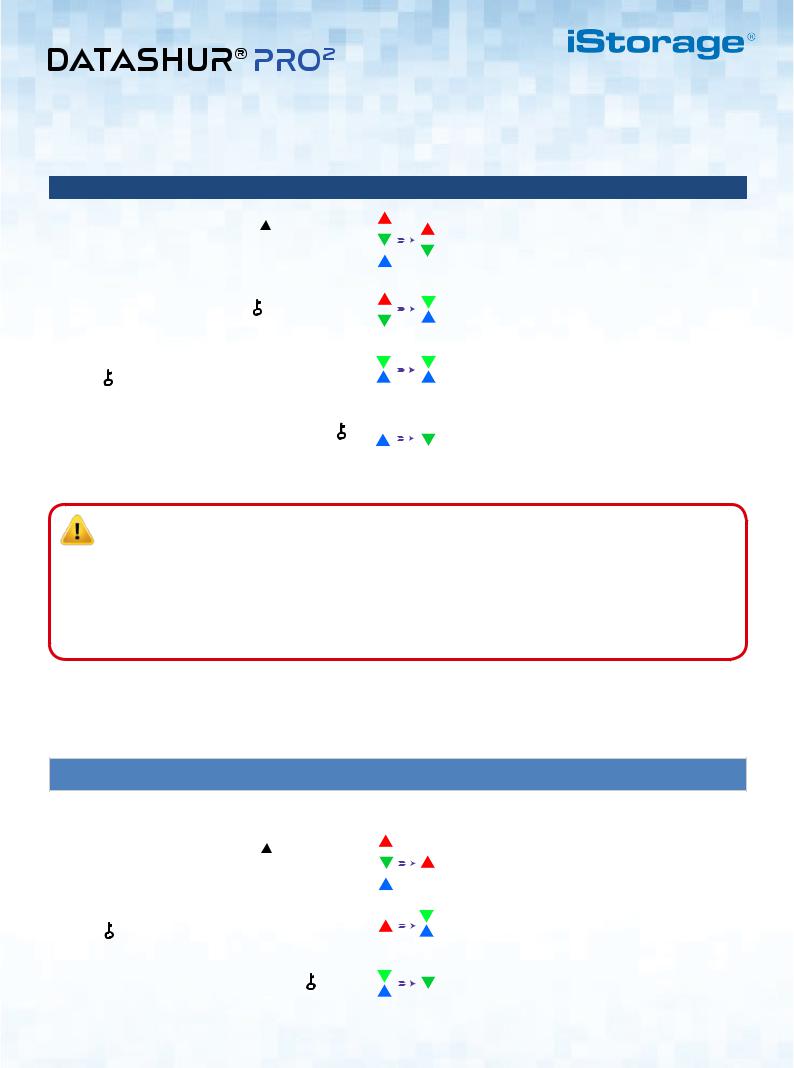
Power-on States
After the device wakes from Idle State, it will enter one of the following states shown in the table below.
Power-on State |
LED indication |
Encryption |
Admin |
Description |
|
Key |
PIN |
||||
Standby |
RED Solid |
|
|
Waiting for Admin or User PIN entry |
|
Reset |
RED Solid |
|
|
Waiting for configuration of an Admin PIN |
|
Low Battery Level |
RED Blinks 3 |
|
|
Charge on a powered USB port for 15-30 minutes |
|
Times |
|||||
|
|
|
|
||
Initial Shipment |
RED and GREEN |
|
|
Waiting for configuration of an Admin PIN |
|
State |
Solid |
|
|
|
3. First Time Use
datAshur PRO2 is supplied in the ‘Initial Shipment State’ with no pre-set Admin PIN. A 7-15 digit Admin PIN must be configured before the drive can be used. Once an Admin PIN has been successfully configured, it is then not possible to switch the drive back to the ‘Initial Shipment State’.
PIN Requirements:
•Must be between 7-15 digits in length
•Must not contain only repetitive numbers, e.g. (3-3-3-3-3-3-3)
•Must not contain only consecutive numbers, e.g. (1-2-3-4-5-6-7), (7-8-9-0-1-2-3-4), (7-6-5-4-3-2-1)
Password Tip: You can configure a memorable word, name, phrase or any other Alphanumerical PIN combination by simply pressing the button with the corresponding letters on it.
Examples of these types of Alphanumerical PINs are:
• |
For “Password” press the following buttons: |
|
|
7 (pqrs) 2 (abc) 7 (pqrs) 7 (pqrs) 9 (wxyz) |
6 (mno) 7 (pqrs) 3 (def) |
• |
For “iStorage” press the following buttons: |
|
|
4 (ghi) 7 (pqrs) 8 (tuv) 6 (mno) 7 (pqrs) 2 |
(abc) 4 (ghi) 3 (def) |
Using this method, long and easy to remember PINs can be configured.
#6 |
www.istorage-uk.com |
|
|
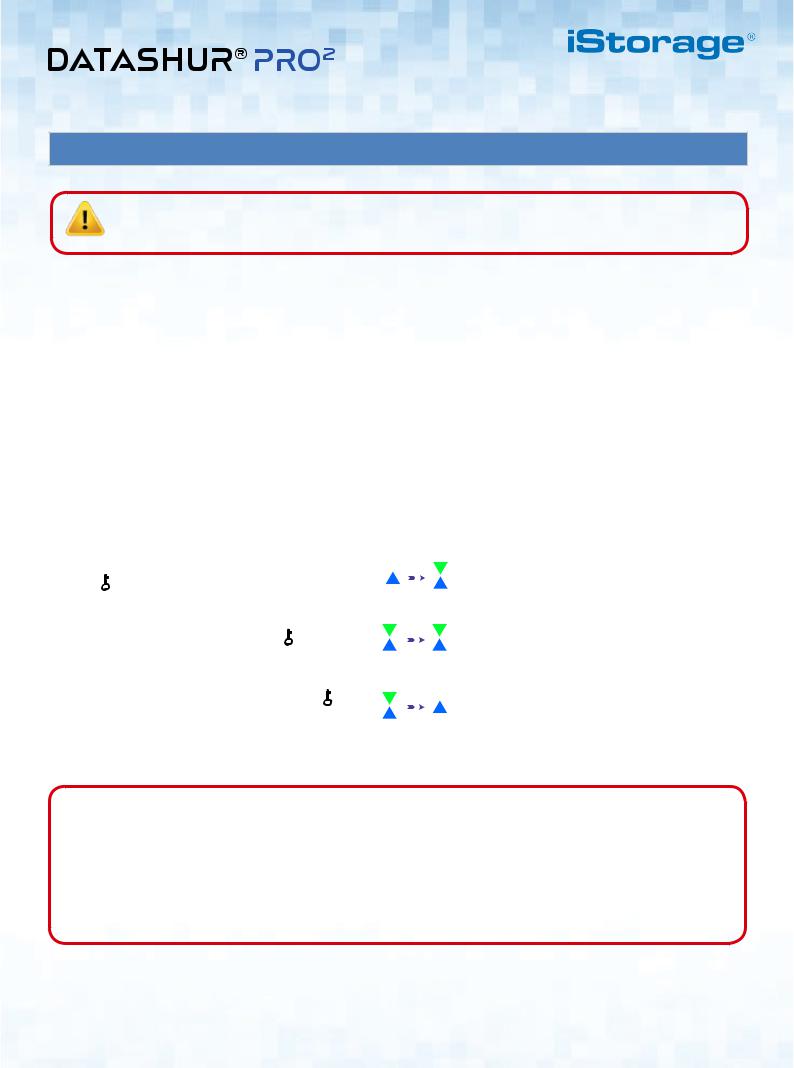
To configure an Admin PIN and unlock the datAshur PRO2 for the first time, please follow the simple steps in the table below.
Instructions - First Time Use |
|
|
LED |
LED State |
|||
|
|
|
|
|
|
|
RED, GREEN and BLUE LEDs blink once in |
1. |
Press and hold down the SHIFT ( |
|
) button |
|
|
|
sequence then the GREEN LED blinks twice and |
|
|
|
|
||||
|
for one second |
|
|
|
|
|
finally switches to solid RED and GREEN LEDs |
|
|
|
|
|
|
||
|
|
|
|
|
|
|
indicating the drive is in the Initial Shipment State |
2. |
Press and hold down both KEY ( |
) + 1 buttons |
|
|
|
LEDs turn to blinking GREEN and solid BLUE |
|
|
|
|
|||||
|
|
|
|
|
|
|
|
3. |
Enter New Admin PIN and press the |
|
|
|
Blinking GREEN and solid BLUE LEDs switch to |
||
|
|
|
a GREEN blink then back to Blinking GREEN and |
||||
|
KEY ( ) button once |
|
|
|
|
|
|
|
|
|
|
|
|
solid BLUE LEDs |
|
|
|
|
|
|
|
|
|
|
|
|
|
|
|
|
BLUE LED rapidly blinks then switches to a solid |
4. |
Re-enter New Admin PIN and press the KEY ( ) |
|
|
|
BLUE LED and finally to a blinking GREEN LED |
||
|
button again |
|
|
|
|
|
indicating the Admin PIN has been successfully |
|
|
|
|
|
|
|
configured and drive unlocked |
Note: Once datAshur PRO2 has been successfully unlocked, the GREEN LED will remain blinking for 30 seconds only, during which time the datAshur PRO2 needs to be connected to a powered USB port. It can be locked down immediately (if not connected to a USB port) by pressing and holding down the SHIFT (  ) button for a second or by clicking the ‘Safely Remove Hardware/Eject’ icon within your operating system when connected to a USB port.
When the datAshur PRO2 is unlocked and connected to a USB port, it will not accept further instructions via the keypad.
Locking datAshur PRO2
To lock the drive, safely eject the datAshur PRO2 from your host operating system and unplug from the USB port. If data is being written to the drive, unplugging the datAshur PRO2 will result in incomplete data transfer and possible data corruption.
4. Unlocking datAshur PRO2 with the Admin PIN
To unlock the datAshur PRO2 with the Admin PIN, please follow the simple steps in the table below.
|
|
|
|
|
|
|
RED, GREEN and BLUE LEDs blink once in |
1. |
Press and hold down the SHIFT ( |
|
) button |
|
|
|
sequence then the GREEN LED blinks twice and |
|
|
|
|
||||
|
for one second |
|
|
|
finally switches to a solid RED LED indicating the |
||
|
|
|
|
|
|
|
drive is in Standby State |
2. |
In Standby State (solid RED LED) press the |
|
|
|
GREEN and BLUE LEDs blink together |
||
|
KEY ( ) button once |
|
|
|
|||
|
|
|
|
||||
|
|
|
|
|
|||
3. |
With the GREEN and BLUE LEDs blinking together, |
|
|
|
GREEN and BLUE LEDs will alternately blink |
||
|
|
|
several times and then to a solid BLUE LED |
||||
|
enter the Admin PIN and press the KEY ( ) button |
|
|
|
|||
|
|
|
|
and changing to a blinking GREEN LED indicating |
|||
|
again |
|
|
|
|||
|
|
|
|
the drive has been successfully unlocked as Admin |
|||
|
|
|
|
|
|
|
|
1.v2 Manual User ®2PRO datAshur iStorage
www.istorage-uk.com |
#7 |
|
|
Note: Once datAshur PRO2 has been successfully unlocked, the GREEN LED will remain blinking for 30 seconds only, during which time the datAshur PRO2 needs to be connected to a powered USB port. It can be locked down immediately (if not connected to a USB port) by pressing and holding down the SHIFT (  ) button for a second or by clicking the ‘Safely Remove Hardware/Eject’ icon within your operating system when connected to a USB port.
When the datAshur PRO2 is unlocked and connected to a USB port, it will not accept further instructions via the keypad.
5.To Enter Admin Mode
To Enter Admin Mode, do the following.
|
|
|
|
|
|
|
RED, GREEN and BLUE LEDs blink once in |
1. |
Press and hold down the SHIFT ( |
|
) button |
|
|
|
sequence then the GREEN LED blinks twice and |
|
|
|
|
||||
|
for one second |
|
|
|
finally switches to a solid RED LED indicating the |
||
|
|
|
|
||||
|
|
|
|
|
|
|
device is in Standby State |
2. |
In Standby State (solid RED LED) press the |
|
|
|
GREEN and BLUE LEDs blink together |
||
|
KEY ( ) button once |
|
|
|
|||
|
|
|
|
||||
|
|
|
|
|
|||
3. |
With the GREEN and BLUE LEDs blinking together, |
|
|
|
GREEN and BLUE LEDs will alternately blink |
||
|
|
|
several times and then to a solid BLUE LED |
||||
|
enter the Admin PIN and press the KEY ( ) button |
|
|
|
|||
|
|
|
|
changing to a blinking GREEN LED indicating the |
|||
|
again |
|
|
|
|||
|
|
|
|
device is unlocked |
|||
|
|
|
|
|
|
|
|
4. |
Press the KEY ( ) button Three times |
|
|
|
Blinking GREEN LED will change to a solid BLUE |
||
|
|
|
LED indicating the device is in Admin mode |
||||
|
within 2 seconds (KEY ( ) x 3) |
|
|
|
|||
|
|
|
|
|
|||
iStorage datAshur PRO2® User Manual v2.1
6.To Exit Admin Mode
When the datAshur PRO2 is in Admin Mode, the BLUE LED will remain on and solid for 30 seconds only, during which time the drive can accept instructions via the keypad allowing it to be configured with a host of security features. If no key event happens within 30 seconds, the datAshur PRO2 will exit Admin mode automatically - the solid BLUE LED switches to a solid RED LED which then fades out to the Idle state (all LEDs off).
To immediately exit Admin Mode (solid BLUE LED), press and hold down the SHIFT ( ) button for a second - the solid BLUE LED switches to a solid RED LED which then fades out to the Idle state. To access the drive contents (data), the datAshur PRO2 must first be in the idle state (all LEDs off) before an Admin/User PIN can be entered.
#8 |
www.istorage-uk.com |
|
|
7.Changing the Admin PIN
PIN Requirements:
•Must be between 7-15 digits in length
•Must not contain only repetitive numbers, e.g. (3-3-3-3-3-3-3)
•Must not contain only consecutive numbers, e.g. (1-2-3-4-5-6-7), (7-8-9-0-1-2-3-4), (7-6-5-4-3-2-1)
Password Tip: You can configure a memorable word, name, phrase or any other Alphanumerical PIN combination by simply pressing the button with the corresponding letters on it.
Examples of these types of Alphanumerical PINs are:
• |
For “Password” press the following buttons: |
|
|
7 (pqrs) 2 (abc) 7 (pqrs) 7 (pqrs) 9 (wxyz) |
6 (mno) 7 (pqrs) 3 (def) |
• |
For “iStorage” press the following buttons: |
|
|
4 (ghi) 7 (pqrs) 8 (tuv) 6 (mno) 7 (pqrs) 2 |
(abc) 4 (ghi) 3 (def) |
Using this method, long and easy to remember PINs can be configured.
To change the Admin PIN, first enter the “Admin Mode” as described in section 5. Once the drive is in Admin Mode (solid BLUE LED) proceed with the following steps.
1. |
In Admin mode press and hold down both |
|
|
|
|
Solid BLUE LED will change to blinking GREEN |
|
the KEY ( ) + 2 buttons |
|
|
|
|
and solid BLUE LEDs |
|
|
|
|
|
||
|
|
|
|
|
|
|
2. |
Enter NEW Admin PIN and press KEY ( |
) |
|
|
|
Blinking GREEN and solid BLUE LEDs will |
|
|
|
switch to a single GREEN LED blink and then |
|||
|
button |
|
|
|
|
|
|
|
|
|
|
||
|
|
|
|
|
back to blinking GREEN and solid BLUE LEDs |
|
|
|
|
|
|
|
|
3. |
Re-enter the NEW Admin PIN and press |
|
|
|
|
Blinking GREEN and solid BLUE LEDs change |
|
|
|
|
to a rapidly blinking BLUE LED and finally to a |
||
|
KEY ( ) button |
|
|
|
|
solid BLUE LED indicating the Admin PIN has |
|
|
|
|
|
|
been successfully changed |
Note: When the datAshur PRO2 is in Admin Mode, the BLUE LED will remain on and solid for 30 seconds only, during which time the drive can accept instructions via the keypad allowing it to be configured with a host of security features. If no key event happens within 30 seconds, the datAshur PRO2 will exit Admin mode automatically - the solid BLUE LED switches to a solid RED LED which then fades out to the Idle state (all LEDs off).
To immediately exit Admin Mode (solid BLUE LED), press and hold down the SHIFT (  ) button for a second - the solid BLUE LED switches to a solid RED LED which then fades out to the Idle state. To access the drive contents (data), the datAshur PRO2 must first be in the idle state (all LEDs off) before an Admin/User PIN can be entered.
1.v2 Manual User ®2PRO datAshur iStorage
www.istorage-uk.com |
#9 |
|
|
iStorage datAshur PRO2® User Manual v2.1
8.Setting a User PIN Policy
The Administrator can set a restriction policy for the User PIN. This policy includes setting the minimum length of the PIN (from 7 to 15 digits), as well as requiring or not the input of one or more 'Special Characters'. The “Special Character” functions as both the 'SHIFT (  ) + digit' buttons pressed down together.
To set a User PIN Policy (restrictions), you will need to enter 3 digits, for instance '091', the first two digits (09) indicate the minimum PIN length (in this case, 9) and the last digit (1) denotes that one or more 'Special Characters' must be used, in other words 'SHIFT (  ) + digit'. In the same way, a User PIN Policy can be set without the need of a 'Special Character', for instance '120', the first two digits (12) indicate the minimum PIN length (in this case,12) and the last digit (0) meaning no Special Character is required.
Once the Administrator has set the User PIN Policy, for instance '091', a new User PIN will need to be configured - see section 11, ‘Adding a New User PIN in Admin Mode’. If the Administrator configures the User PIN as '247688314' with the use of a 'Special Character' (SHIFT (  ) + digit pressed down together), this can be placed anywhere along your 7-15 digit PIN during the process of creating the User PIN as shown in the examples below.
A.'SHIFT (  ) + 2', '4', '7', '6', '8', '8', '3', '1', '4',
B.'2', '4', 'SHIFT (  ) + 7', '6', '8', '8', '3', '1', '4',
C.'2', '4', '7', '6', '8', '8', '3', '1', 'SHIFT (  ) + 4',
Note:
•If a ‘Special Character’ was used during the configuration of the User PIN, for instance, example ‘B’ above,
then the drive can only be unlocked by entering the PIN with the ‘Special Character’ entered precisely in the order configured, as per example ‘B’ above - (‘2’, ‘4’, ‘SHIFT (  ) + 7’, ‘6’, ‘8’, ‘8’, ‘3’, ‘1’, ‘4’).
•More than one ‘Special Character’ can be used and placed along your 7-15 digit PIN.
•Users are able to change their PIN but are forced to comply with the set ‘User PIN Policy’ (restrictions), if and when applicable.
•Setting a new User PIN Policy will automatically delete the User PIN if one exists.
•This policy does not apply to the ‘Self-Destruct PIN’. The complexity setting for the Self-Destruct PIN and Admin PIN is always 7-15 digits, with no special character required.
To set a User PIN Policy, first enter the “Admin Mode” as described in section 5. Once the drive is in Admin Mode (solid BLUE LED) proceed with the following steps.
1. |
In Admin mode, press and hold down both |
|
Solid BLUE LED will change to blinking GREEN |
|
|
KEY ( ) + 7 buttons |
|
|
and BLUE LEDs |
|
|
|
|
|
2. |
Enter your 3 digits, remember the first two digits |
|
Blinking GREEN and BLUE LEDs will continue |
|
|
denote minimum PIN length and last digit (0 or 1) |
|
||
|
|
to blink |
||
|
|
|||
|
whether or not a special character has been used. |
|
||
|
|
|
||
Blinking GREEN and BLUE LEDs will change to
a solid GREEN LED and finally to a solid BLUE 3. Press the SHIFT (  ) button once
  LED indicating the User PIN Policy has been
successfully set.
#10 |
www.istorage-uk.com |
|
|
Note: When the datAshur PRO2 is in Admin Mode, the BLUE LED will remain on and solid for 30 seconds only, during which time the drive can accept instructions via the keypad allowing it to be configured with a host of security features. If no key event happens within 30 seconds, the datAshur PRO2 will exit Admin mode automatically - the solid BLUE LED switches to a solid RED LED which then fades out to the Idle state (all LEDs off).
To immediately exit Admin Mode (solid BLUE LED), press and hold down the SHIFT (  ) button for a second - the solid BLUE LED switches to a solid RED LED which then fades out to the Idle state. To access the drive contents (data), the datAshur PRO2 must first be in the idle state (all LEDs off) before an Admin/User PIN can be entered.
9. How to delete the User PIN Policy
To delete the User PIN Policy, first enter the “Admin Mode” as described in section 5. Once the drive is in Admin Mode (solid BLUE LED) proceed with the following steps.
1. |
In Admin mode, press and hold down both |
|
|
|
Solid BLUE LED will change to blinking GREEN |
||
|
KEY ( ) + 7 buttons |
|
|
|
and BLUE LEDs |
||
|
|
|
|
|
|
|
|
|
|
|
|
|
|
|
Blinking GREEN and BLUE LEDs will change to |
2. |
Enter 070 and press SHIFT ( |
|
) button once |
|
|
|
a solid GREEN LED and finally to a solid BLUE |
|
|
|
|
LED indicating the User PIN Policy has been |
|||
|
|
|
|
||||
|
|
|
|
|
|
|
|
|
|
|
|
|
|
|
successfully deleted |
Note: When the datAshur PRO2 is in Admin Mode, the BLUE LED will remain on and solid for 30 seconds only, during which time the drive can accept instructions via the keypad allowing it to be configured with a host of security features. If no key event happens within 30 seconds, the datAshur PRO2 will exit Admin mode automatically - the solid BLUE LED switches to a solid RED LED which then fades out to the Idle state (all LEDs off).
To immediately exit Admin Mode (solid BLUE LED), press and hold down the SHIFT (  ) button for a second - the solid BLUE LED switches to a solid RED LED which then fades out to the Idle state. To access the drive contents (data), the datAshur PRO2 must first be in the idle state (all LEDs off) before an Admin/User PIN can be entered.
1.v2 Manual User ®2PRO datAshur iStorage
www.istorage-uk.com |
#11 |
|
|
10. How to check the User PIN Policy
The Administrator is able to check the User PIN Policy and can identify the minimum PIN length restriction and whether or not the use of a Special Character has been set by noting the LED sequence as described below.
To check the User PIN Policy, first enter the “Admin Mode” as described in section 5. Once the drive is in Admin Mode (solid BLUE LED) proceed with the following steps.
1. |
In Admin mode press and hold down both |
|
|
|
Solid BLUE LED will change to blinking GREEN |
||
|
SHIFT ( |
|
) + 7 buttons |
|
|
|
and BLUE LEDs |
|
|
|
|
|
|||
|
|
|
|
|
|||
|
|
|
|
|
|
|
|
2. |
Press the KEY ( ) button and the following happens; |
|
|
|
|
||
a.All LED’s (RED, GREEN & BLUE) become solid for 1 second.
b.A RED LED blink equates to ten (10) units of a PIN.
c.Every GREEN LED blink equates to a single (1) unit of a PIN
d.A BLUE blink indicates that a 'Special Character' was used.
e.All LED’s (RED, GREEN & BLUE) become solid for 1 second.
f.LEDs return to solid BLUE
The table below describes the LED behaviour whilst checking the User PIN Policy, for instance if you have set a 12 digit User PIN with the use of a Special Character (121), the RED LED will blink once (1) and the GREEN LED will blink twice (2) followed by a single (1) BLUE LED blink indicating that a Special Character must be used.
PIN Description |
3 digit Setup |
RED |
GREEN |
BLUE |
12 digit PIN with use of a Special Character |
121 |
1 Blink |
2 Blinks |
1 Blink |
12 digit PIN with NO Special Character used |
120 |
1 Blink |
2 Blinks |
0 |
9 digit PIN with use of a Special Character |
091 |
0 |
9 Blinks |
1 Blink |
9 digit PIN with NO Special Character used |
090 |
0 |
9 Blinks |
0 |
iStorage datAshur PRO2® User Manual v2.1
Note: When the datAshur PRO2 is in Admin Mode, the BLUE LED will remain on and solid for 30 seconds only, during which time the drive can accept instructions via the keypad allowing it to be configured with a host of security features. If no key event happens within 30 seconds, the datAshur PRO2 will exit Admin mode automatically - the solid BLUE LED switches to a solid RED LED which then fades out to the Idle state (all LEDs off).
To immediately exit Admin Mode (solid BLUE LED), press and hold down the SHIFT ( ) button for a second - the solid BLUE LED switches to a solid RED LED which then fades out to the Idle state. To access the drive contents (data), the datAshur PRO2 must first be in the idle state (all LEDs off) before an Admin/User PIN can be entered.
#12 |
www.istorage-uk.com |
|
|
11.Adding a New User PIN in Admin Mode
Important: The creation of a new User PIN must comply with the ‘User PIN Policy’ if one has been configured as described in section 8, which imposes a minimum PIN length and whether a ‘Special Character’ has been used. Refer to section 10 to check the user PIN restrictions.
PIN requirements:
•Must be between 7-15 digits in length
•Must not contain only repetitive numbers, e.g. (3-3-3-3-3-3-3)
•Must not contain only consecutive numbers, e.g. (1-2-3-4-5-6-7), (7-8-9-0-1-2-3-4), (7-6-5-4-3-2-1)
•The SHIFT (  ) button can be used for additional PIN combinations - e.g. SHIFT (
  ) + 1 is a different value than just 1. See section 8, ‘Setting a User PIN Policy’.
To add a New User PIN, first enter “Admin Mode” as described in section 5. Once the drive is in Admin Mode (solid BLUE LED) proceed with the following steps.
1. |
In Admin mode press and hold down both |
|
|
|
Solid BLUE LED will change to blinking GREEN |
|
KEY ( ) + 3 buttons |
|
|
|
and solid BLUE LEDs |
|
|
|
|
||
|
|
|
|
|
|
|
|
|
|
|
Blinking GREEN and solid BLUE LEDs will |
2. |
Enter New User PIN and press KEY ( ) button |
|
|
|
switch to a single GREEN LED blink and then |
|
|
|
|||
|
|
|
|
|
back to blinking GREEN and solid BLUE LEDs |
|
|
|
|
|
Blinking GREEN and solid BLUE LEDs change |
3. |
Re-enter the New User PIN and press KEY ( ) |
|
|
|
to a rapidly blinking GREEN LED and finally to a |
|
button again |
|
|
|
solid BLUE LED indicating a New User PIN has |
|
|
|
|
|
been successfully configured |
Note: When the datAshur PRO2 is in Admin Mode, the BLUE LED will remain on and solid for 30 seconds only, during which time the drive can accept instructions via the keypad allowing it to be configured with a host of security features. If no key event happens within 30 seconds, the datAshur PRO2 will exit Admin mode automatically - the solid BLUE LED switches to a solid RED LED which then fades out to the Idle state (all LEDs off).
To immediately exit Admin Mode (solid BLUE LED), press and hold down the SHIFT (  ) button for a second - the solid BLUE LED switches to a solid RED LED which then fades out to the Idle state. To access the drive contents (data), the datAshur PRO2 must first be in the idle state (all LEDs off) before an Admin/User PIN can be entered.
1.v2 Manual User ®2PRO datAshur iStorage
www.istorage-uk.com |
#13 |
|
|
 Loading...