


IS-DA2-256-500-B
English: QUICK START GUIDE ................................................ 2
Deutsch: SCHNELLSTARTANLEITUNG ....................................6
Français: GUIDE DE DÉMARRAGE RAPIDE ............................ 10
Español: GUÍA DE INICIO RÁPIDO .........................................15
Italiano: GUIDA DI AVVIO RAPIDO ....................................... 20

English
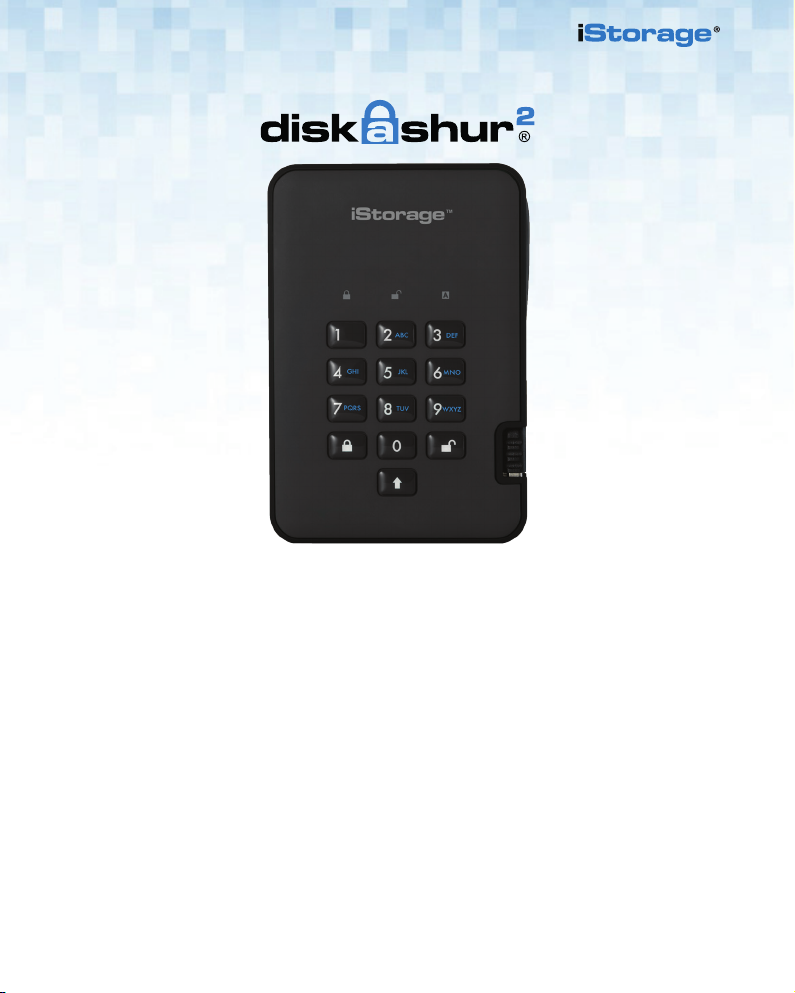
diskAshur
2
Quick Start Guide
iStorage provides the following helpful resources:
• website: www.istorage-uk.com • email: support@istorage-uk.com • Telephone: +44 (0) 20 8991-6260
iStorage Technical Support Specialists are available from 9:00 a.m to 5:30 p.m GMT, Mon- Fri.
2 2
Quick Start Guide
Thank you for purchasing the iStorage diskAshur2. Your diskAshur2 is preformatted in NTFS and shipped with a
default Admin PIN of 11223344 and although it can be used straight out of the box with the default Admin PIN, for
security reasons, we highly recommend that a new Admin PIN be created immediately by following the instructions
under the heading ‘Changing the Admin PIN’.
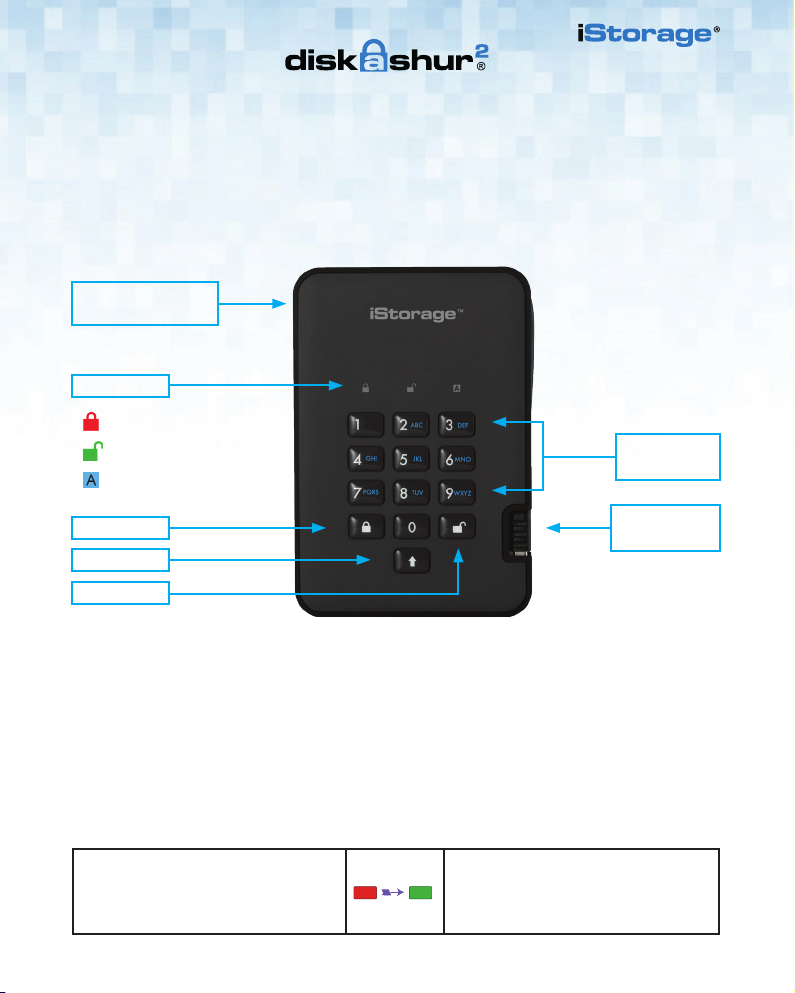
DESK LOCK
SLOT CONNECTION
LED LIGHTS
- Standby State/Locked
- User Mode/Unlocked
- Admin Mode
Alphanumeric
Keypad
LOCK
Integrated
USB 3.1 Cable
SHIFT
UNLOCK
First Time Use
2
Your diskAshur
plug into a powered USB port. The LEDs will go through 3 test stages, blinking in sequence RED, GREEN and BLUE,
followed by two GREEN blinks and then to RED (Standby State) on a successful test. Any test failure will force the
diskAshur2 to securely reset itself and automatically resume the self-test without affecting the security characteristics
or any data stored on the drive.
To unlock the diskAshur2 for the first time with the default Admin PIN, insert the integrated USB 3.1 cable to a
powered USB port and follow the instructions in the table below.
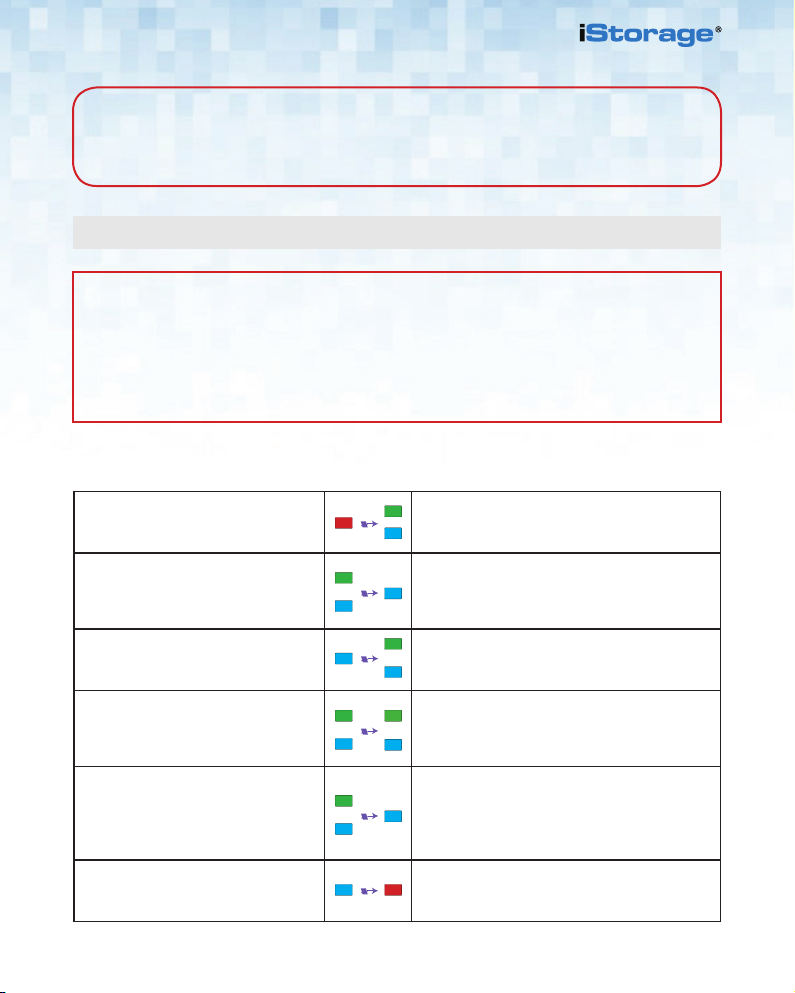
1. In Standby State (solid RED LED), enter
the default Admin PIN ‘11223344’ and then
press the ‘UNLOCK’ button.
undergoes a rapid self-test to verify all security components are working properly each time you
GREEN and BLUE LEDs will alternately blink
several times and then to a solid BLUE LED
changing to a blinking GREEN and finally to a
solid GREEN LED.
3
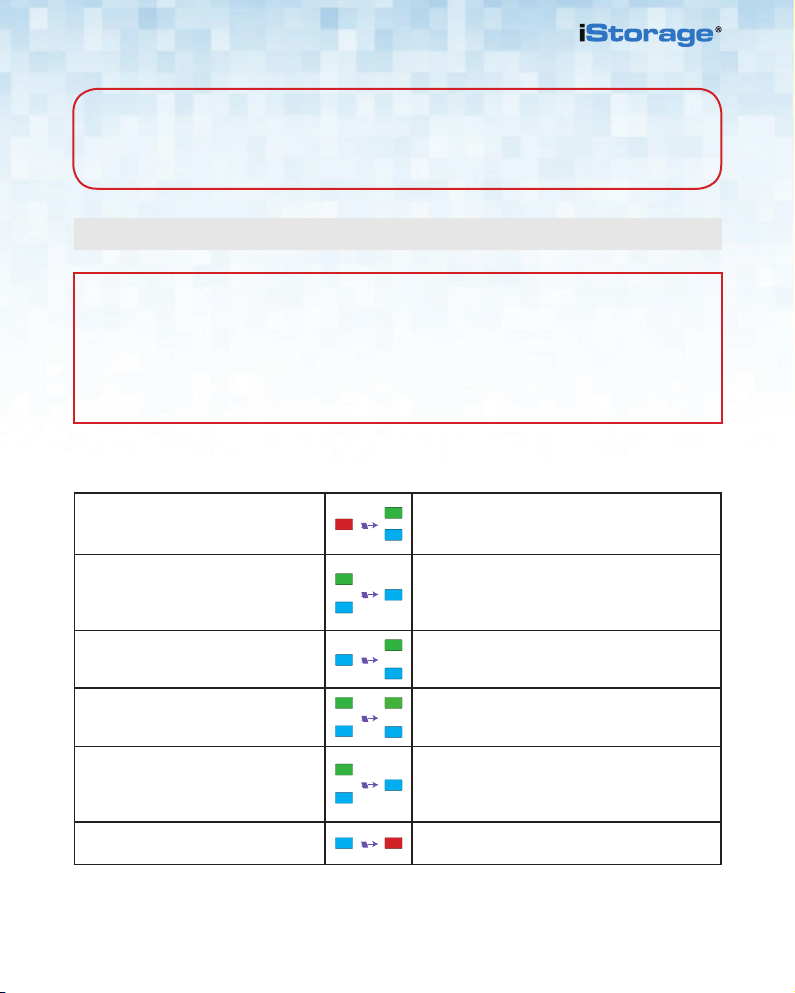
Note: Once the diskAshur2 has been successfully unlocked, the GREEN LED will remain on
and in a solid state. It can be locked down immediately by pressing the ‘LOCK’ button once or by
(strongly recommended) clicking the ‘Safely Remove Hardware/Eject’ icon within your
operating system.
Changing the Admin PIN
PIN Requirement
• PINs must be a minimum length of 7 and maximum 15 digits.
• Cannot contain all sequenital numbers (2345678 or 9876543).
• Cannot contain all repeating numbers (1111111).
• The SHIFT key can be used for additional combinations (e.g. SHIFT+1 is a separate
value to just 1).
To change the Admin PIN to your own unique 7-15 digit PIN, follow the steps below.
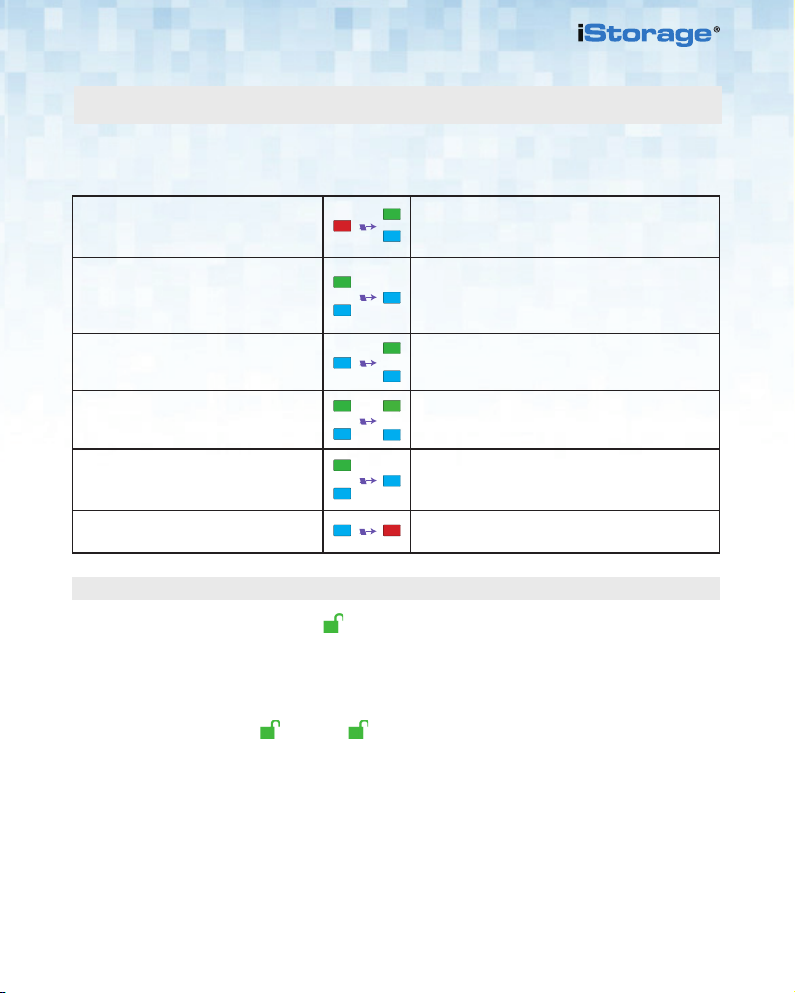
1. In Standby State (solid RED LED),
press and hold down both the ‘UNLOCK
and number ’1’ buttons.
2. Enter your Admin PIN (default
‘11223344’) and press the ‘UNLOCK’
button.
3. In Admin mode (solid BLUE LED), press
and hold down ‘UNLOCK + 2’ buttons.
4. Enter your NEW Admin PIN and press
‘UNLOCK’ button.
5. Re-enter your NEW Admin PIN and
press ‘UNLOCK’ button.
6. To exit Admin Mode press the ‘LOCK’
button.
Solid RED LED will change to blinking GREEN and
BLUE LEDs
GREEN and BLUE LEDs blink rapidly together for a
few seconds then to a solid GREEN and finally a solid
BLUE LED indictaing the diskAshur
Mode’.
Solid BLUE LED will change to blinking GREEN and
solid BLUE LEDs.
Blinking GREEN and solid BLUE LEDs will switch to
a single GREEN LED blink and then back to blinking
GREEN and solid BLUE LEDs.
Blinking GREEN and solid BLUE LEDs change
to a rapidly blinking BLUE LED and finally to a
solid BLUE LEDindicating the Admin PIN has been
successfully changed.
Solid RED LED indicates the drive is locked and in
the standby state.
2
is in ‘Admin
4 4
Adding a New User PIN in addition to the Admin PIN
In addition to the Admin PIN, the diskAshur2 can be configured with an independent User PIN.
To create a new User PIN follow the steps below.
1. In Standby State (solid RED LED),
press and hold down both the ‘UNLOCK
and number ’1’ buttons.
2. Enter your Admin PIN (default
‘11223344’) and press the
‘UNLOCK’ button.
3. In Admin mode (solid BLUE LED), press
and hold down ‘UNLOCK + 3’ buttons.
4. Enter your NEW User PIN and press
‘UNLOCK’ button.
5. Re-enter your NEW User PIN and press
‘UNLOCK’ button.
6. To exit Admin Mode press the ‘LOCK’
button.
Solid RED LED will change to blinking GREEN and
BLUE LEDs.
GREEN and BLUE LEDs blink rapidly together for a
few seconds then to a solid GREEN and finally a solid
BLUE LED indictaing the diskAshur
Mode’.
Solid BLUE LED will change to blinking GREEN and
solid BLUE LEDs.
Blinking GREEN and solid BLUE LEDs will switch to
a single GREEN LED blink and then back to blinking
GREEN and solid BLUE LEDs.
GREEN LED rapidly blinks for a few seconds then
changes to a solid BLUE LED indicating the User PIN
has been successfully created.
Solid RED LED indicates the drive is locked and in
the standby state.
2
is in ‘Admin
Unlocking with either the Admin or User PIN
Unlock with Admin PIN ( PIN + )
1. To unlock the diskAshur2 as Admin, enter your Admin PIN and then press the ‘UNLOCK’ button.
GREEN and BLUE LEDs will alternately blink several times and finally changing to a solid GREEN LED
indicating the drive is unlocked and ready to use as Admin.
Unlock with User PIN ( + PIN + )
2. To unlock the diskAshur2 as the User, press the ‘UNLOCK’ button, all LEDs will blink on and off, then
enter your User PIN and press the ‘UNLOCK’ button again. GREEN and BLUE LEDs will alternately blink
several times and finally changing to a solid GREEN LED indicating the drive is unlocked and ready to
use as the User.
For more features and detailed instructions please refer to the user manual pre-loaded on your new diskAshur2 and
also available on our website.
5

Deutsch
diskAshur
SCHNELLSTARTANLEITUNG
2
iStorage bietet die folgenden nützlichen Ressourcen:
• website: www.istorage-uk.com • email: support@istorage-uk.com • Telefon: +44 (0) 20 8991-6260
Die Technical Support-Spezialisten von iStorage sind Montag bis Freitag von 9:00 bis 17:30 Uhr GMT erreichbar.
6 6

SCHNELLSTARTANLEITUNG
Vielen Dank, dass Sie sich für die iStorage diskAshur2 entschieden haben. Ihre diskAshur2 ist in NTFS vorformatiert
und wird mit der standardmäßigen Admin-PIN 11223344 ausgeliefert. Obwohl die Festplatte direkt mit der standardmäßigen Admin-PIN verwendet werden kann, empfehlen wird aus Sicherheitsgründen dringend die umgehende
Erstellung einer neuen Admin-PIN. Befolgen Sie dabei die Anweisungen unter „Ändern der Admin-PIN“.
Anschluss für
Kensington-Schloss
ENTSPERREN
LED-ANZEIGEN
- Standby-Zustand/Gesperrt
- Benutzermodus/Entsperrt
- Admin-Modus
Alphanumerisches
Ziffernfeld
SPERREN
Integriertes
USB 3.1-Kabel
SHIFT-TASTE
ENTSPERREN
Erstmalige Verwendung
Ihre diskAshur
ordnungsgemäß funktionieren, wenn Sie die Festplatte an einen mit Strom versorgten USB-Port anschließen. Die
LEDs durchlaufen 3 Testphasen. Sie leuchten bei einem erfolgreichen Test nacheinander ROT, GRÜN und BLAU,
dann zweimal GRÜN und dann ROT (Standby-Zustand). Ein fehlerhafter Test führt dazu, dass die diskAshur2 sich
sicher selbst zurücksetzt und den Selbsttest automatisch wieder aufnimmt, ohne die Sicherheitsmerkmale oder die
auf der Festplatte gespeicherten Daten zu beeinträchtigen.
Um die diskAshur2 zum ersten Mal mit der standardmäßigen Admin-PIN zu entsperren, schließen Sie das integrierte
USB 3.1-Kabel an einen mit Strom versorgten USB-Port an, und befolgen Sie die Anweisungen in der Tabelle unten.
1. Geben Sie im Standby-Zustand (ROTE
LED leuchtet) die standardmäßige Admin-PIN
11223344 ein, und drücken Sie dann die
Taste ENTSPERREN.
2
durchläuft einen schnellen Selbsttest, um zu prüfen, ob alle Sicherheitskomponenten
Die GRÜNE und BLAUE LED blinken
abwechselnd mehrere Male. Anschließend
sollte die Anzeige wie folgt sein: BLAUE LED
leuchtet, GRÜNE LED blinkt, GRÜNE LED
leuchtet.
7
Hinweis: Nachdem die diskAshur2 erfolgreich entsperrt wurde, leuchtet die GRÜNE LED weiter.
Die Festplatte kann umgehende gesperrt werden, indem Sie einmal die Taste SPERREN drücken
oder (dringend empfohlen) auf das Symbol „Hardware sicher entfernen/Auswerfen“ Ihres
Betriebssystems klicken.
Ändern der Admin-PIN
PIN – Anforderungen
• PINs müssen mindestens 7 Ziffern und dürfen maximal 15 Ziffern aufweisen.
• Sie dürfen nicht nur aufeinanderfolgende Ziffern enthalten (2345678 oder 9876543).
• Sie dürfen nicht nur sequenzielle Ziffern enthalten (1111111).
• Die SHIFT-Taste kann für zusätzliche Kombinationen verwendet werden (z. B. SHIFT+1 ist ein
separater Wert zu 1).
Um die Admin-PIN in Ihre eigene einzigartige 7- bis 15-stellige PIN zu ändern, befolgen Sie die
Schritte unten.
1. Halten Sie im Standby-Zustand (ROTE
LED leuchtet) die Tasten „ENTSPERREN
und Zahl 1“ gedrückt.
2. Geben Sie die standardmäßige
Admin-PIN 11223344 ein, und drücken
Sie die Taste ENTSPERREN.
3. Halten Sie im Admin-Modus (BLAUE
LED leuchtet) die Tasten ENTSPERREN
und 2 gedrückt.
4. Geben Sie Ihre NEUE Admin-PIN ein,
und drücken Sie die Taste ENTSPERREN.
5. Geben Sie Ihre NEUE Admin-PIN erneut
ein, und drücken Sie die Taste
ENTSPERREN.
6. Um den Admin-Modus zu verlassen,
drücken Sie die Taste SPERREN.
Statt der ROT leuchtenden LED werden eine
blinkende GRÜNE und BLAUE LED angezeigt.
Die GRÜNE und BLAUE LED blinken einige
Sekunden schnell. Anschließend leuchtet die GRÜNE
LED und dann die BLAUE LED. Dies gibt an, dass
sich die diskAshur
Statt der BLAU leuchtenden LED wird eine
blinkende GRÜNE LED und eine leuchtende BLAUE
LED angezeigt.
Statt der blinkenden GRÜNEN LED und der
leuchtenden BLAUEN LED wird einzelne blinkende
GRÜNE LED und dann wieder eine blinkende GRÜNE
LED und eine leuchtende BLAUE LED angezeigt.
Statt der blinkenden GRÜNEN und leuchtenden
BLAUEN LED wird eine schnell blinkende BLAUE
LED und dann eine leuchtende BLAUE LED
angezeigt. Dies gibt an, dass die Admin-PIN
erfolgreich geändert wurde.
Eine leuchtende ROTE LED gibt an, dass die
Festplatte gesperrt ist und sich im Standby-Zustand
befindet.
2
im Admin-Modus befindet.
8 8
 Loading...