

Page 1
iRobot and Roomba are trademarks of iRobot Corporation.
© 2002-2003 iRobot Corporation.
All rights reserved.
Patents Pending.
Made & Printed in China.
To order extra Battery Packs, Virtual Wall Units,
Replacement Filters or the Rapid Charger, contact your
nearest Roomba retailer, or visit www.RoombaVac.com for
online purchase options and additional purchase information.
Contents
Important Safety Instructions.......................2
Introducing Your Roomba FloorVac ...............3
Getting Started.................................................4
• Unpacking the Box .......................................................... 4
• FloorVac Description ....................................................... 5
• Installing the Battery Pack .............................................. 6
• Removing the Battery Pack .............................................. 6
• Charging the Battery Pack ............................................... 6
• Battery Life Indicator ....................................................... 7
Using Your Roomba...........................................7
• Setting Up the Room for Cleaning.................................... 7
• Starting and Stopping Roomba ....................................... 8
• Room Confinement (Using Your Virtual Wall Unit) ........... 9
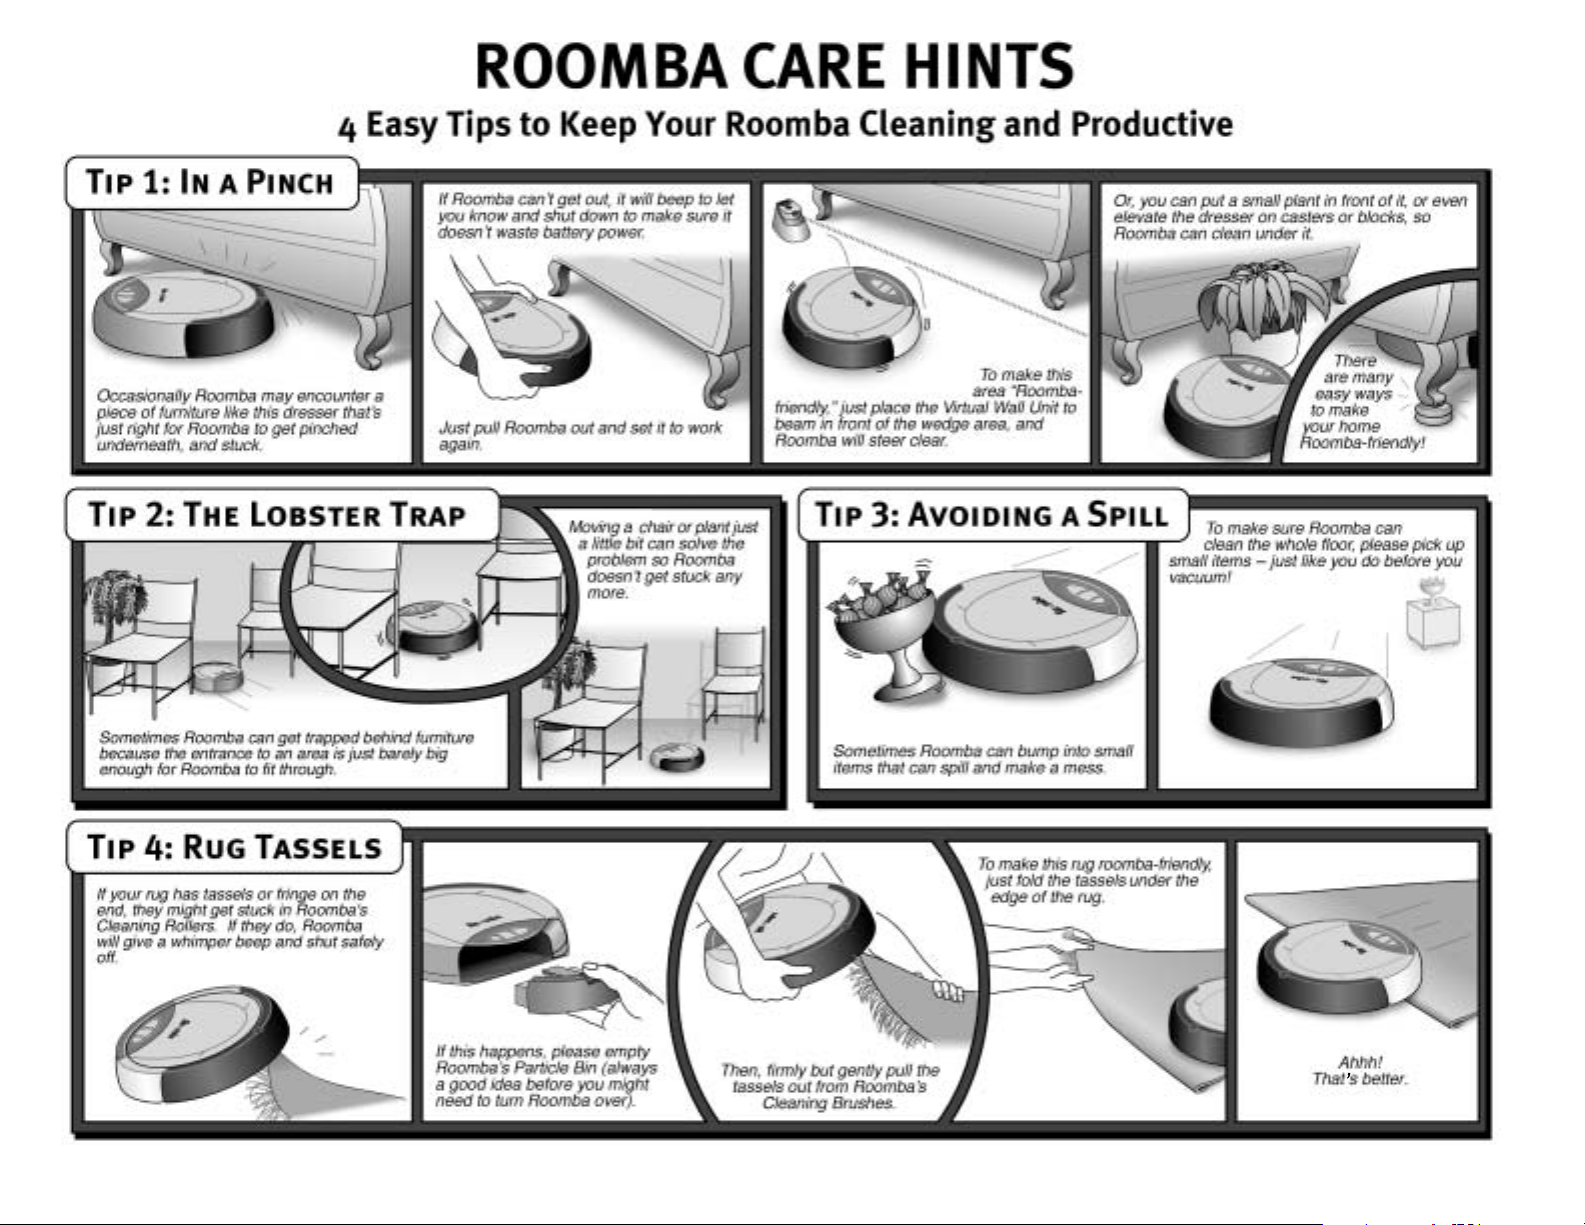
• Roomba Care Hints ......................................................... 12
Caring for Your Roomba..................................9
• Emptying the Particle Bin ................................................ 10
•Replacing the Air Filter .................................................... 11
• Cleaning the Vacuum Inlet ............................................... 11
• Cleaning the Main Brushes ............................................... 14
• Reinstalling the Main Brushes ......................................... 15
• Maintaining the Edge-Cleaning Side Brush...................... 15
Reference Information....................................16
• Troubleshooting Tips ...................................................... 16
• Frequently Asked Questions ........................................... 18
• Contacting Customer Support ......................................... 19
• Limited Warranty.............................................................. 21
Before using your Roomba, thoroughly read the safety instructions.
M
TMT
www.RoombaVac.com
M
TMT
Page 2
2
Important Safety Instructions
CAUTION: TO REDUCE THE RISK OF ELECTRIC SHOCK, DO NOT REMOVE COVER OF ROOMBA, THE BATTERY
PACK OR THE BATTERY CHARGER. NO USER-SERVICEABLE PARTS INSIDE. REFER SERVICING TO QUALIFIED
SERVICE PERSONNEL.
CHARGE USING STANDARD US (120V AC) OUTLET ONLY.
Always be careful when using your Roomba. To reduce the risk of injury or damage, keep these
safety precautions in mind when setting up, using and maintaining your equipment.
GENERAL
•Read all safety and operating instructions before operating Roomba.
•Retain the safety and operating instructions for future reference.
• Heed all warnings on Roomba, Battery Pack, Battery Charger and Owner’s Manual.
•Follow all operating and use instructions.
• Do not attempt to service Roomba yourself. Refer all non-routine servicing to
qualified service personnel.
ROOMBA USE
• This is an indoor device only.
• Do not use Roomba on wet surfaces or where contact with or immersion in water
is a possibility.
• Before using this device, pick up objects like clothing, loose papers, pull cords for blinds
or curtains, power cords, and any fragile objects. If the device passes over a power
cord and drags it around, there is a chance an object could tumble off a table or shelf.
•Roomba is not a toy. Do not sit or stand on this device. Small children and pets
should be supervised if Roomba is in use.
•Keep loose clothing, hair, fingers, feet and all parts of the body away from
Brushes and moving parts.
• Do not use this device to pick up anything that is burning or smoking, such as
cigarettes, matches, or hot ashes.
• Do not use this device to pick up flammable or combustible liquids such as gasoline.
• Do not use this device without the Particle Bin in place. See page 9 for proper
installation of the Particle Bin.
• If the room to be cleaned contains a balcony, a physical barrier should be used to
prevent access to the balcony and ensure safe operation.
•Always remove the Battery Pack before long-term storage or transportation.
ROOMBA BATTERY PACK AND CHARGING
• Operate your Roomba only from the type of power source indicated on the marking label.
If you are not sure of the type of power supplied to your home, consult your appliance
dealer or local power company.
•Charge using standard US (120V AC) outlet only. Product may not be used with any type
of power converter. Any such use will immediately void the Warranty.
• Use only a Battery Charger supplied by the manufacturer to recharge this device.
• Do not use a Battery Charger with a damaged cord or plug.
•Charge indoors only.
• Never handle Plug, Power Cord or Battery Charger with wet hands.
•Always remove Battery Pack and disconnect Roomba from Battery Charger before
cleaning Roomba.
Introducing Your Roomba FloorVac
Congratulations! You are now the owner of the award-winning Roomba™ Intelligent
FloorVac.
Your Roomba FloorVac is an automated floor-cleaning device that helps keep your
floors clean between periodic deep cleanings, without needing to be pushed or followed
around. With a vacuum and agitator brush design, this device diligently cleans common
household floor surfaces including hardwood, linoleum, tile and low- to medium-pile
carpets, with little or no human supervision.
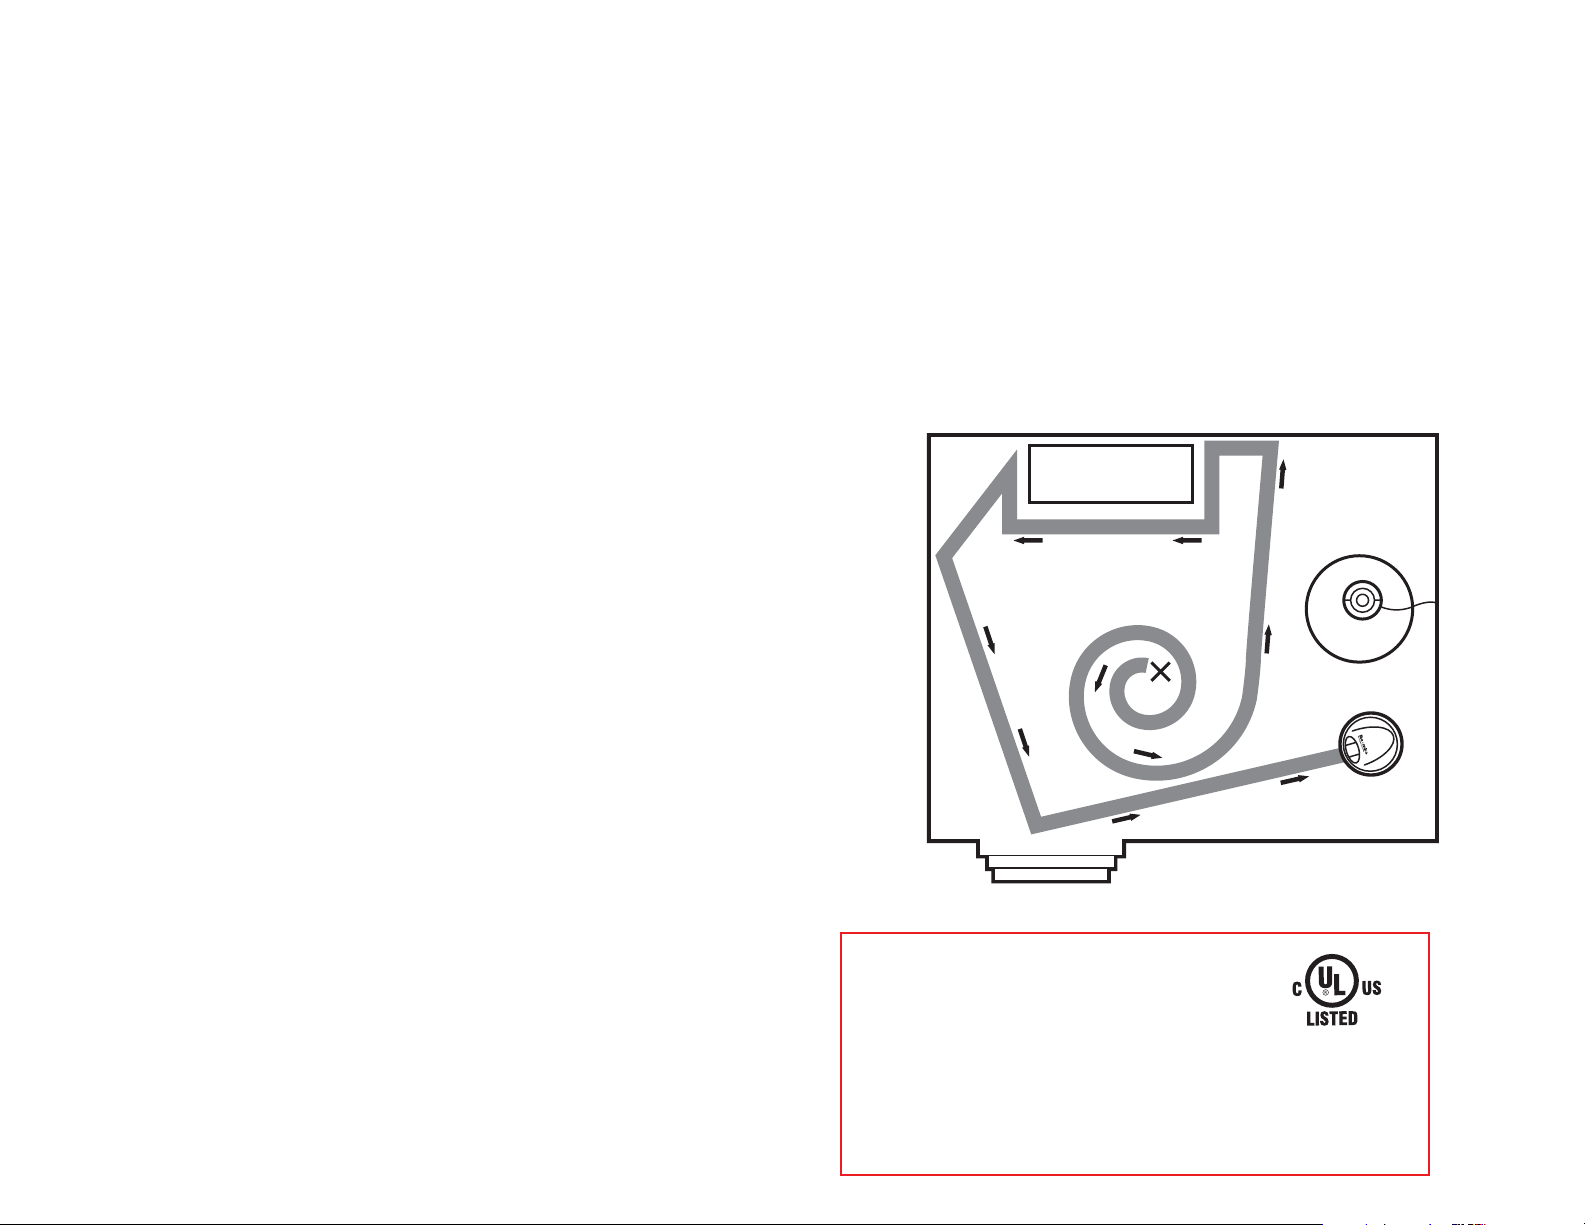
When Roomba starts cleaning it travels around the floor in a spiral pattern (see Figure 1,
below). Its Non-Marring Bumper will contact a wall, or it may try to find a wall after
spiraling for a while. Roomba follows the wall for a short period of time, using its
Spinning Side Brush to move debris away from the wall and into the Vacuum’s path.
After cleaning along a portion of the wall or other object, Roomba criss-crosses the room
in straight lines. Roomba repeats this cleaning pattern until its cleaning time has elapsed.
This pattern is designed to provide maximum coverage of the room.
Figure 1: A typical Roomba cleaning pattern.
Roomba Standard Charger
UL Approved
Class 2 Transformer
Input: 120VAC 60Hz 0.3A
Output: 24VDC 500mA
This device complies with Part 15 of the FCC rules.
Operation is subject to the following conditions:
(1) this device may not cause harmful interference, and
(2) this device must accept any interference received, including interference
that may cause undesired operation.
3
Sofa
Lamp
Ta ble
Start
Stairs
Page 3
5
Figure 3b: Roomba Bottom
View – Cleaning Side Up.
Figure 3a: Roomba Top View.
4
Getting Started
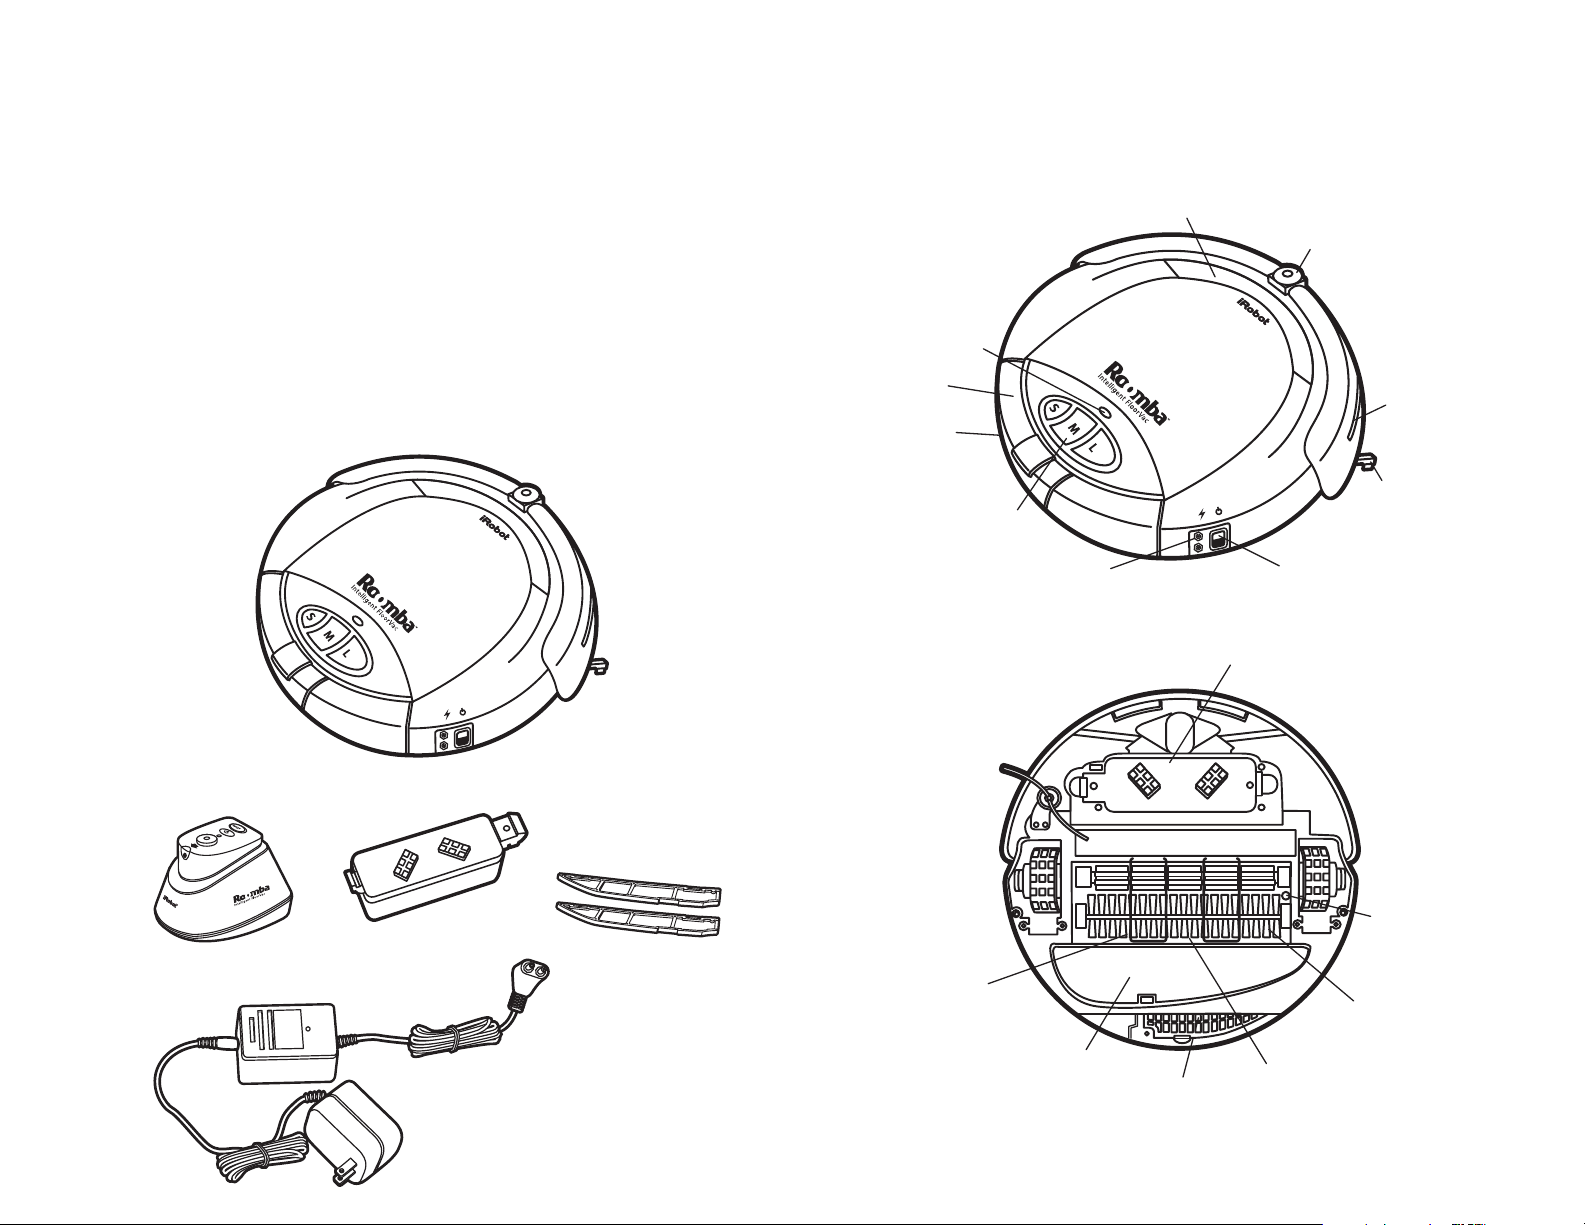
Unpacking the Box
Remove the contents of the Roomba box. You will have a Roomba Intelligent FloorVac
packed for shipping, and a styrofoam box containing the following:
1. Rechargeable NiMH Battery Pack
2. Battery Charger with AC Adapter (2 pieces)
3. Virtual Wall Unit – requires two (2) D-size batteries (not included)
4. Two (2) Replacement Filters
5. Owner’s Manual (the document you’re reading)
6. Insert sheet entitled “Roomba Care Hints” (not shown in Figure 2)
Remove your Roomba from its protective plastic bag and turn it upside down, so the
wheels are facing up. You will notice a protective cardboard sheath enclosing the
Edge-Cleaning Side Brush. Carefully disengage the cardboard sheath from the black,
flexible Side Brush, being careful to protect the side brush from damage. Turn your
Roomba back over.
Once you have unpacked your Roomba, check to make sure that you have all the
parts shown here:
Figure 2: Contents of package.
FloorVac Description
Your Roomba was designed and engineered using the latest technology and includes the
following special features:
TMT
M
•Battery Life
Indicator
•Removable
Particle Bin
•Filter Door
located on
underside of
Particle Bin
(not viewable from top)
•Room Size
Selector
Buttons
•Battery Charger Socket
•Easy To Grab Handle
•Main Power Switch
•Room Confinement Sensor
TMT
M
•Wall Following
Adjustment
•Edge-Cleaning
Side Brush
•Rechargeable NiMH Battery Pack
Roomba Intelligent FloorVac
•Brush
Release
Screw
•Agitator Brushes
Pick Up Large
Debris
Virtual Wall Unit
Rechargeable NiMH
Battery Pack
Two Replacement Filters
•Wire Guards
•Vacuum Inlet Lid
•Filter Door
•Vacuum Picks Up
Fine Debris
Battery Charger with AC Adapter (two pieces)
Page 4
Battery Life Indicator
The Battery Life Indicator is functional only when Roomba’s Main Power Switch is turned on.
Turn Roomba’s Main Power Switch on to activate the Battery Life Indicator. The Indicator
will flash green in stand-by mode (battery power is not sensed) until a Room Size Button
is pressed to start Roomba in a cleaning cycle (see Starting Roomba on Page 7). Once
Roomba starts cleaning, the Battery Life indicator stops flashing, and displays battery
life according to the following chart.
Note that no light is
illuminated on Roomba
when it is charging.
BATTERY LIFE NOTES:
1. Roomba can run between about 60 minutes (on medium pile carpet) to about 90
minutes (on hard floor surfaces) on one full charge. In other words, Roomba can
clean 2-3 medium-sized rooms on a single charge.
2. If cared for properly, the rechargeable Battery Pack should last for a long time.
Like all rechargeable batteries, eventually the Battery Pack will wear out and
should be replaced. When this happens, the Battery Pack may be disposed of in
the regular trash.
3. Additional Battery Packs may be purchased, and a Rapid Charger that charges
a battery in about two and a half hours is available as of February 2003. Contact your
nearest Roomba retailer or visit www.RoombaVac.com for online purchase options
and more purchase information.
6
Installing the Battery Pack
1. Turn Roomba’s Main Power Switch to the Off position.
2. If you have used Roomba before, make sure that the Particle Bin is empty, then
place Roomba upside down (with Cleaning Brushes showing) on a flat surface.
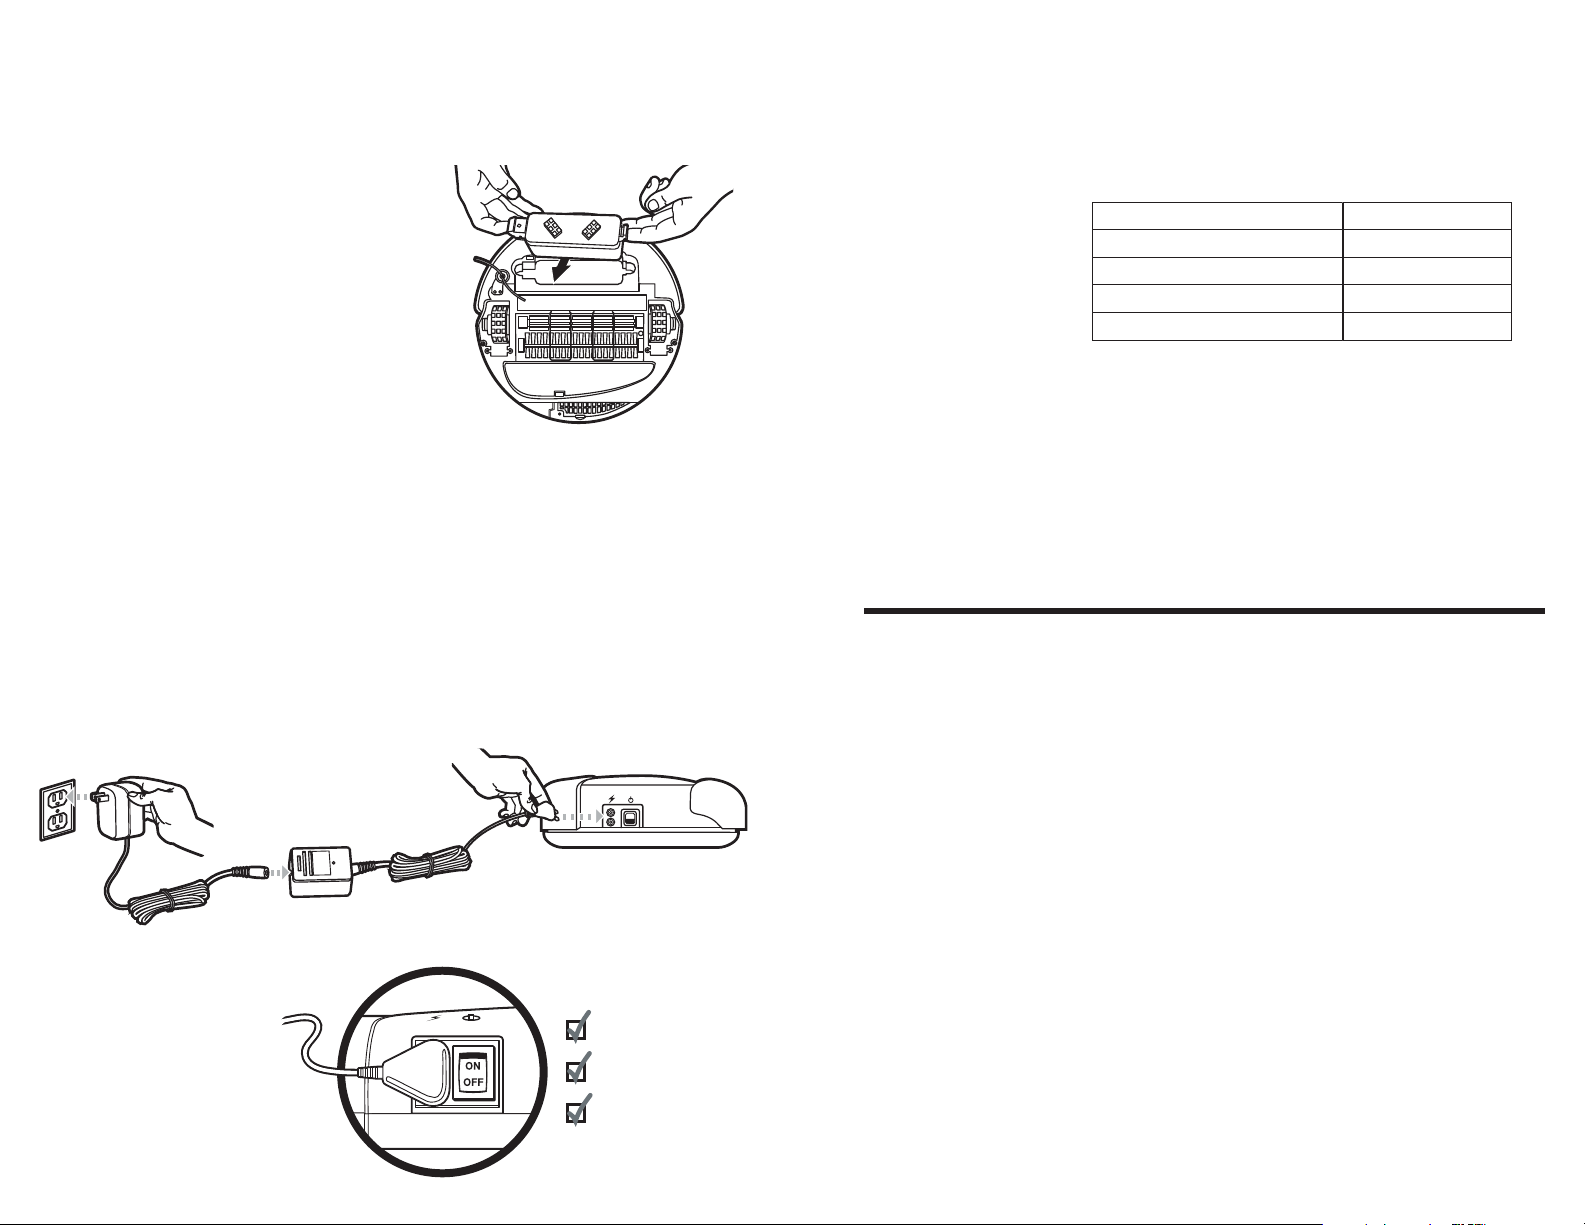
3. Guide the Battery Pack into the Battery Compartment using your index fingers as
shown in Figure 4.
4. The Battery Pack will click into place
when properly seated in Roomba.
5. Additional Battery Packs may be purchased.
Please visit www.RoombaVac.com to
purchase online, or for a list of retailers.
Removing the Battery Pack
1. Repeat Steps 1 and 2 from above.
2. Place your index fingers under the Guide
Tabs on the Battery Pack, then pull upward
to release the Battery Pack.
Charging the Battery Pack
Please note that before first use of Roomba,
you must charge the Battery Pack.
1. Turn Main Power Switch to the Off position. Make sure that the Battery Pack is
inserted in Roomba (see Installing the Battery Pack, above).
2. Connect the Battery Charger to the Battery Charger AC Adapter, and insert the Battery
Charger’s Charge Plug into Roomba’s Battery Charger Socket as shown in Figure 5a.
Please note that the Charge Plug will only fully insert into the socket in the proper
orientation, as shown in figure 5b.
3. The Charge Indicator Light on the Battery Charger should illuminate. If this fails to
occur, remove and reinstall the Battery Pack. Note that no light is illuminated on
Roomba itself when it is charging.
4. The Charge Indicator Light will turn off when the Battery Pack is fully charged
(approximately twelve hours for a fully discharged Battery Pack).
Figure 5a: The Battery Charger is
connected to the Battery Charger AC
Adapter, and then inserted into
Roomba’s Charge Socket.
Using Your Roomba
Setting Up the Room for Cleaning
1. For optimal cleaning performance, clear your floor of objects just as you would
before using a regular vacuum cleaner. Do not leave the following items on the floor:
clothing, loose papers, pull cords for blinds or curtains, power cords, or any fragile
items. In addition, because Roomba contacts walls, furniture and other objects as it
cleans, please remove any items that may be pushed and knocked over by light
contact from Roomba.
Avoid using Roomba on carpets with tassels or fringe edges.
Not recommended for use on shag or deep-pile carpets.
2. Roomba is designed to clean one room at a time. Confine Roomba to the room you
want cleaned by closing all doors and use the Virtual Wall Unit to block all open door
ways. See page 9 for instructions on using the Virtual Wall Unit.
Observe Roomba the first time it cleans a room to confirm it does not get
wedged under or stuck on top of uneven surfaces.
Roomba automatically senses stairs and turns away from them. However, if
the room to be cleaned contains a balcony, a physical barrier should be used
to prevent access to the ledge and ensure safe operation.
7
Figure 4: Installing
Roomba’s Battery Pack.
Figure 5b: The Charge Plug only
inserts completely into Roomba’s
Charge Socket in the orientation
shown. Press firmly to fully seat
Charge Plug.
Color of Battery Life Indicator Battery Status
Green Fully Charged
Amber Partially Charged
Red
Flashing Red Fully Discharged
Almost Discharged
Plug easily pushes
all the way in
No metal
prongs exposed
Plug clicks in
Page 5
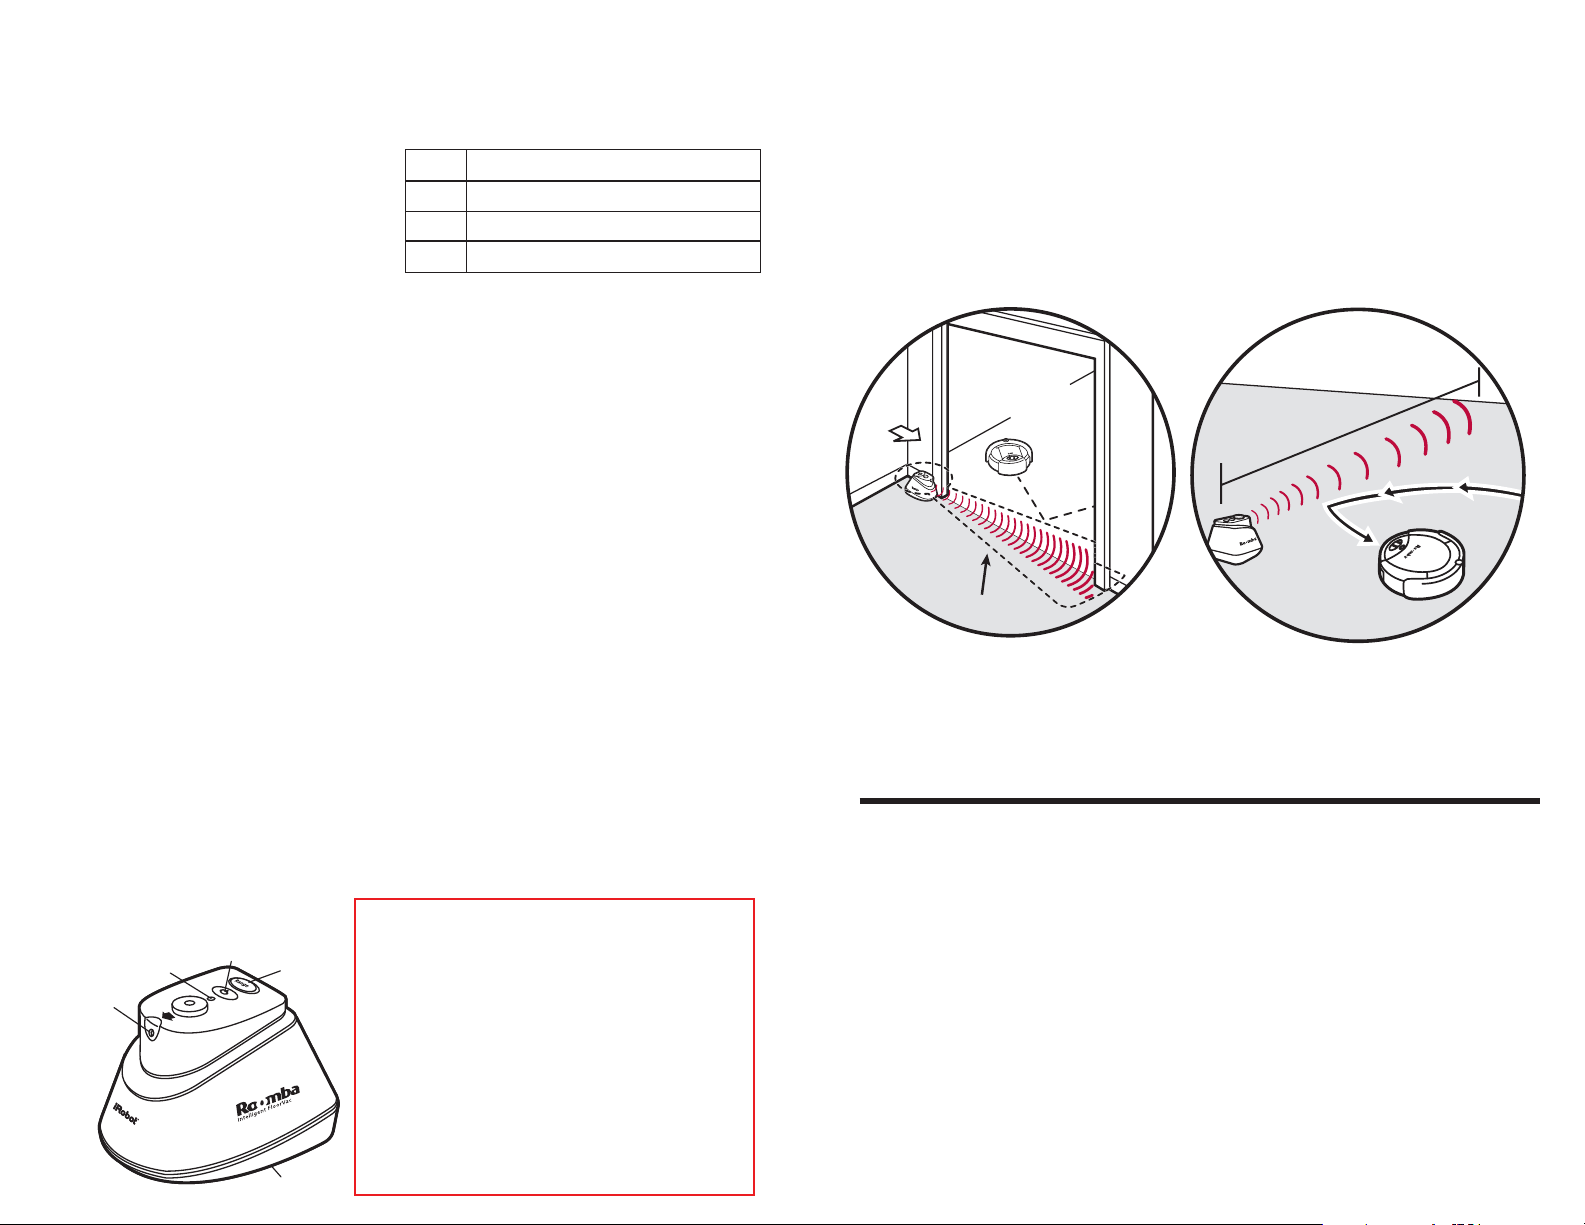
To Operate Virtual Wall Unit
1. Press the Virtual Wall Unit’s Power Button to turn the unit on. The Power Light will
illuminate.
2. Move the Range Selector Switch to the room opening size you are blocking.
The range numbers shown are in feet.
3. Place the Virtual Wall Unit on the floor at either edge of the doorway or by the wall.
Make sure that the Unit’s Beam Emitter points across the opening to ensure Roomba
does not cross the invisible beam.
4. The Virtual Wall Unit automatically turns off after an hour, or you can press the Unit’s
Power Button again to turn off.
Additional Virtual Wall Units can be used to block off other sections of a room,
additional doorways etc. Contact your nearest Roomba retailer for availability, or visit
www. RoombaVac.com for online purchase options, and for more purchase information.
Caring for Your Roomba
Your Roomba requires very little maintenance; however, before each use, you should
empty Roomba’s Particle Bin (2 steps). The Vacuum Inlet (see Figure 3b) and Cleaning
Brushes must also be removed and checked after every 10 floor cleanings – and,
if necessary, cleaned.
If there is pet hair or long hair in your home, you may need to remove hair and
other debris from the Cleaning brushes more frequently. If so, check the
Cleaning Brushes (including their ends, or axles) every five floor cleanings to
prevent build-up of hair, which can degrade cleaning performance. The Cleaning
Brush axles cannot be checked without removing the brushes from Roomba.
Note: Caring for the Cleaning Brushes involves completely removing them
(see instructions on pages 14-15) to examine and clean the Brush Axles, as
well as the Brushes themselves.
Starting Roomba
1. Always empty the Particle Bin before use (a simple two-step process; see
Emptying the Particle Bin on Page 10).
2. Place Roomba on the floor in the middle of an open area in the room.
3. Turn on the Main Power Switch, located on the right side of the device (see Figure 3a).
4. Select your room size according to the chart.
Press the S, M, or L Button (these are the
Room Size Buttons).
Roomba will play a short start up tune and then
start cleaning. Note: Powering up Roomba off the
ground may prevent the unit from operating until you
place it on the ground, turn the power off, then on again.
5. Once you start Roomba, you only need to supervise it the first time it cleans a room.
Identify areas where it gets stuck, then move problem objects out of the room or modify
them or block them with the Virtual Wall Unit provided. Please refer to the
illustration entitled “Roomba Care Hints” on Pages 12-13, as well as Troubleshooting
Tips on Page 16 to help identify and easily fix problem areas. After this first use, there is
no need to supervise the device unless you are operating it around small children or pets.
6. When Roomba is finished cleaning it will stop and play a cheerful tone sequence. It will
flash its buttons and periodically beep for five minutes to remind you that it is done,
then turn itself off.
Stopping Roomba
Roomba’s cleaning cycle can either be paused or stopped at any time.
1. To pause Roomba while it is cleaning, simply pick it up by its handle. The Room Size
Button previously selected will flash. To unpause Roomba and continue the current
cleaning cycle, simply press the flashing Room Size Button.
2. To stop Roomba and clear the current cleaning cycle, press any one of the Room Size
Buttons while it is cleaning, or turn Roomba’s Power Switch off and on again. Roomba is
now ready to start a fresh cleaning cycle. Press your choice of Room Size Button to start
cleaning (making sure the Particle Bin is empty).
Room Confinement (Using Your Virtual Wall Unit)
The Virtual Wall Unit keeps Roomba in the room or area you want cleaned. It blocks 13+foot-wide open doorways. Use the Virtual Wall Unit to block open doorways or clean one
portion of a large room.
Battery Installation of the Virtual Wall Unit
1. Open the Battery Door located on the bottom of the unit by first loosening the screw.
2. Insert 2 new “D” size alkaline batteries (not included) by following the “+” and “-”symbols.
3. Replace the
Battery Door and
tighten the screw.
98
Up to 13+ ft.
Roomba
bouncing
off beam
Shape of beam
Figure 6b: To block an opening, place the Virtual Wall Unit on the floor with
the Beam Emitter aimed across the opening. For best results, place the Virtual
Wall Unit next to doorway (as shown). Point arrow across open doorway.
Caution:
To ensure proper function and avoid battery leakage:
1. Do not mix old and new batteries.
2. Do not mix alkaline, standard or rechargeable batteries.
3. Batteries should be installed by an adult.
4. Non-rechargeable batteries are not to be recharged.
5. Rechargeable batteries are to be removed from
the product before being charged.
6. Only batteries of the same or equivalent type as
recommended are to be used.
7. Batteries are to be inserted with the correct polarity.
8. Exhausted or dead batteries are to be removed from
the product.
9. The supply terminals are not to be short circuited.
10.Always use alkaline batteries.
11. Remove batteries before storing.
Figure 6a: Close-up of
the Virtual Wall Unit.
Select For Rooms Measuring Approximately
s 10' x 12'
m 14' x 16'
l 15' x 20'
•Beam
Emitter
•Power
Light
•Power Button
•Range
Selector
Switch
•Battery Door
Page 6
Replacing the Air Filter
The Air Filter (located underneath Roomba's Particle Bin) needs to be replaced if it
becomes punctured or if you notice a decline in the cleaning performance of Roomba.
Two spare Replacement Filters are included with Roomba; additional Replacement
Filters are available for purchase in packs of three. Visit www.RoombaVac.com for
more purchase information, or contact your nearest Roomba retailer for availability.
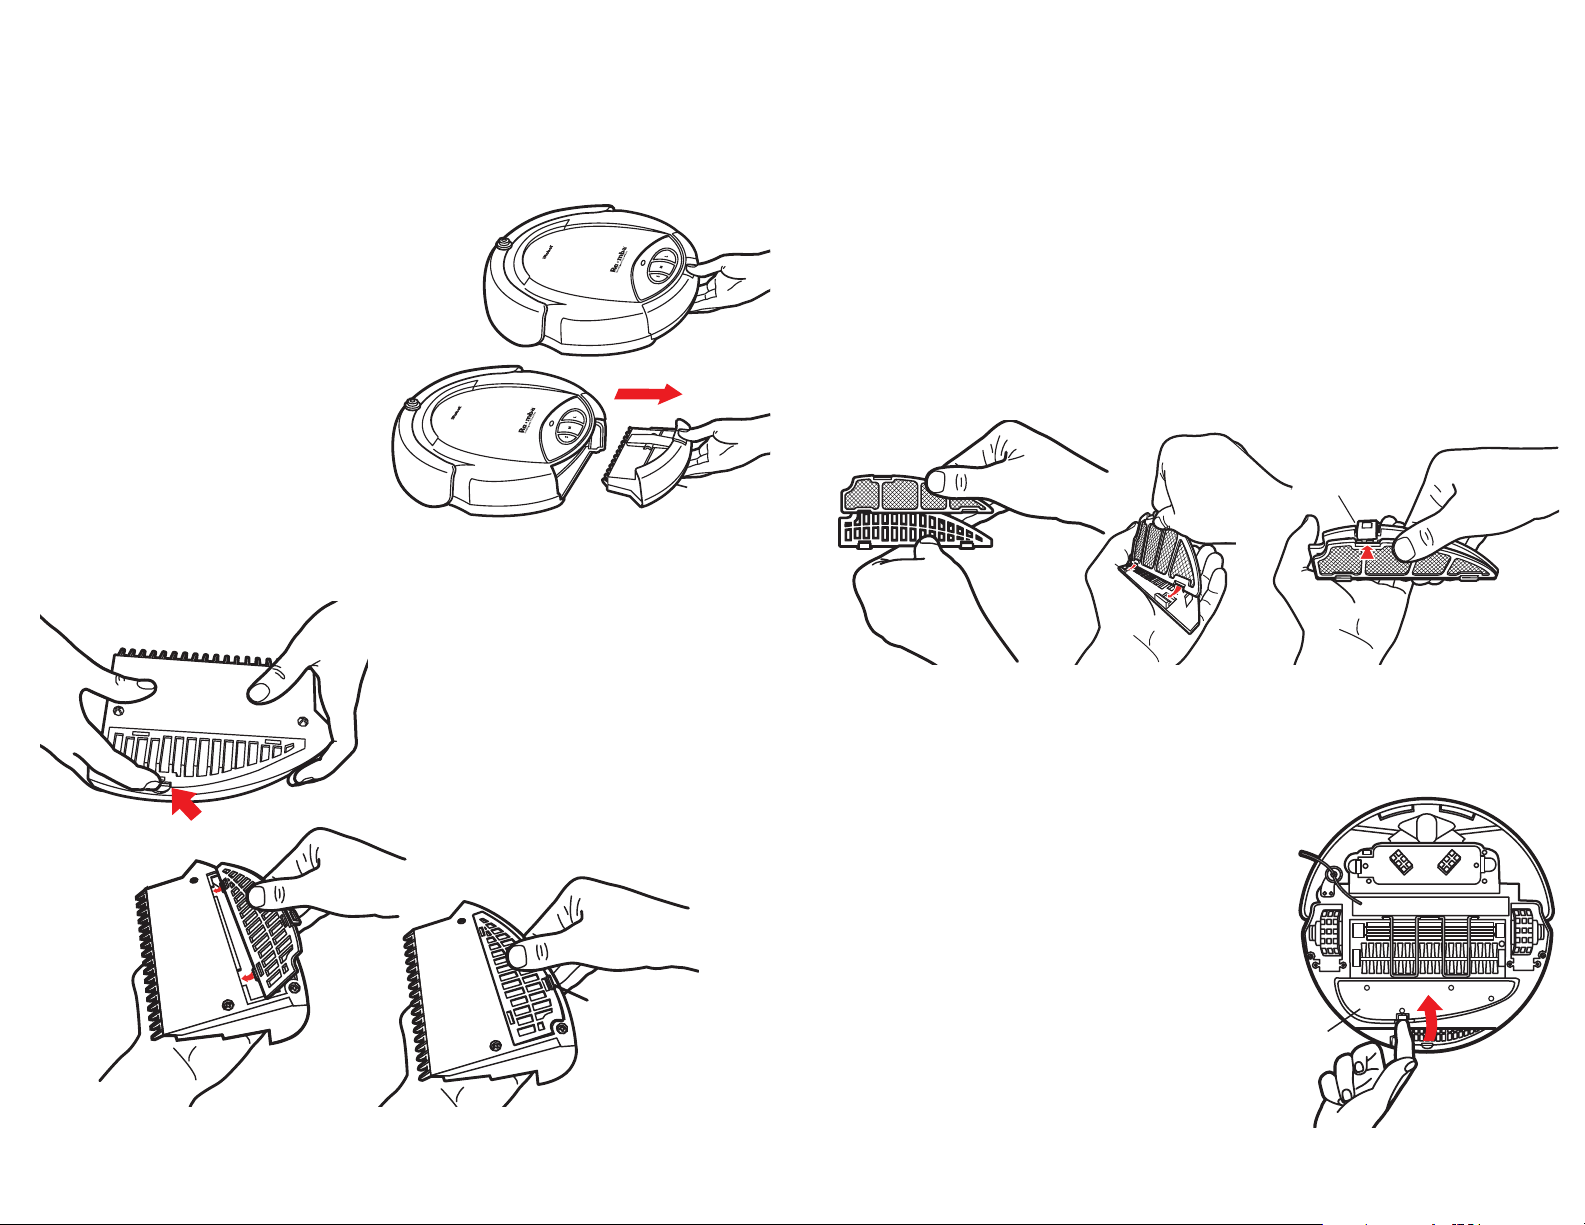
1. Turn Roomba’s Main Power Switch to the Off position.
2. Press down on the Particle Bin’s Release Tab while simultaneously pulling
the Particle Bin straight back (see Figure 7a-b).
3. Flip the Particle Bin over to access the Filter Door.
4. Release the small Tab on the Filter Door and pull the Filter Door upward. See Figure 8.
5. Unclip the old Air Filter from the Filter Door Frame (Figure 10a).
6. Slide the new Air Filter into the grooves on the Filter Door Frame (Figure 10b).
7. Click the new Filter into the Filter Door Frame as shown in Figure 10c.
8. To reinstall the Filter Door, slide the Filter Door into place (Figure 9a).
The Filter Door will click when it reattaches itself to the Particle Bin (Figure 9b).
Cleaning the Vacuum Inlet
Over time, debris will accumulate in the Vacuum Inlet.
Empty the Vacuum Inlet every 10 floor cleanings at minimum
to keep air flowing through it, especially if you notice a
decline in Roomba’s cleaning performance.
1. Turn Roomba’s Main Power Switch to the Off
position.
2. Place Roomba upside down (cleaning surface
up) on a flat surface.
3. Insert finger into the Release Tab of the Vacuum Inlet
Lid and pull upward to remove the Lid (Figure 11).
4. Shake the debris into a trash receptacle.
5. Turn the Vacuum Impeller, the fan-shaped
mechanism on the left side of the Vacuum Inlet,
with your finger to make sure that it spins freely.
6. Replace the Vacuum Inlet Lid, pressing down on all
four white circles on the Lid to ensure complete re-installation.
Emptying the Particle Bin
Emptying Roomba’s Particle Bin is a two-step process.
Be sure to empty the Particle Bin before each use.
Step 1: Emptying the Main Bin
1. Turn Roomba’s Main Power Switch to the Off position.
2. Press down on the Particle Bin’s Release Tab while simultaneously
pulling the Particle Bin straight back. (Figure 7a-b).
3. Empty the Particle Bin into a trash receptacle.
Step 2: Emptying the Particle Bin’s Filter Chamber
1. Flip the Particle Bin over to access the Filter Door.
2. Release the small Tab on the Filter Door and
pull the Filter Door upward (Figure 8).
3. Empty debris from the Filter Chamber
into a trash receptacle.
4. To reinstall the Filter Door, slide the
Filter Door into place (Figure 9a).
The Filter Door will click when it
reattaches itself to the Particle Bin
(Figure 9b).
5. To reinstall the Particle Bin, slide it
back into Roomba. The Particle Bin
will click when it is properly seated.
Vacuum Inlet Lid
Figure 11: Removing
the Vacuum Inlet Lid.
1110
Figure 8: Accessing the Filter Chamber.
Open the Filter Door on the bottom of the
Par ticle Bin by releasing the small Tab on
the Filter Door as shown and pulling the Tab
upward. Clean the debris from this chamber
each time you empty the Particle Bin.
Figure 7a-b: Emptying Roomba’s Particle Bin.
Press the Release Tab (Figure 7a) and Pull the
Par ticle Bin Out (Figure 7b). The Filter Door is
on the underside of the Particle Bin.
NOTE: Always carry Roomba by its handle and never tilt it
forward, as debris may spill out of the particle bin.
CLICK!
Figure 9a-b: Reinstalling the Filter Door.
Glide the Filter Door into grooves (Figure
9a), and snap the Filter Door into place
(Figure 9b).
Figure 10a-c: Snap out old filter from Filter Door Frame (Figure 10a). Slide new
Filter into grooves on Filter Door Frame (Figure 10b). Snap new Filter into Filter
Door Frame as shown (Figure 10c).
Filter Door
CLICK!
Page 7
12
13
Page 8
1514
Cleaning the Main Brushes
It is important that you regularly remove and clean the Brushes of your Roomba. Debris
can accumulate around the Brushes and the brush ends, or axles, causing a decrease in
cleaning ability and potentially damaging the unit.
In most households it’s a good idea to clean the Brushes after every ten floor cleanings.
In houses with pets or long hair, clean the Brushes after every five floor cleanings. Note that
the Cleaning Brush axles cannot be checked without removing the Brushes from Roomba. It
is a simple process that you will master quickly with a little practice.
1. Turn Roomba’s Main Power Switch off and place Roomba upside down
(cleaning surface up) on a flat surface, with the Front Bumper facing away from you.
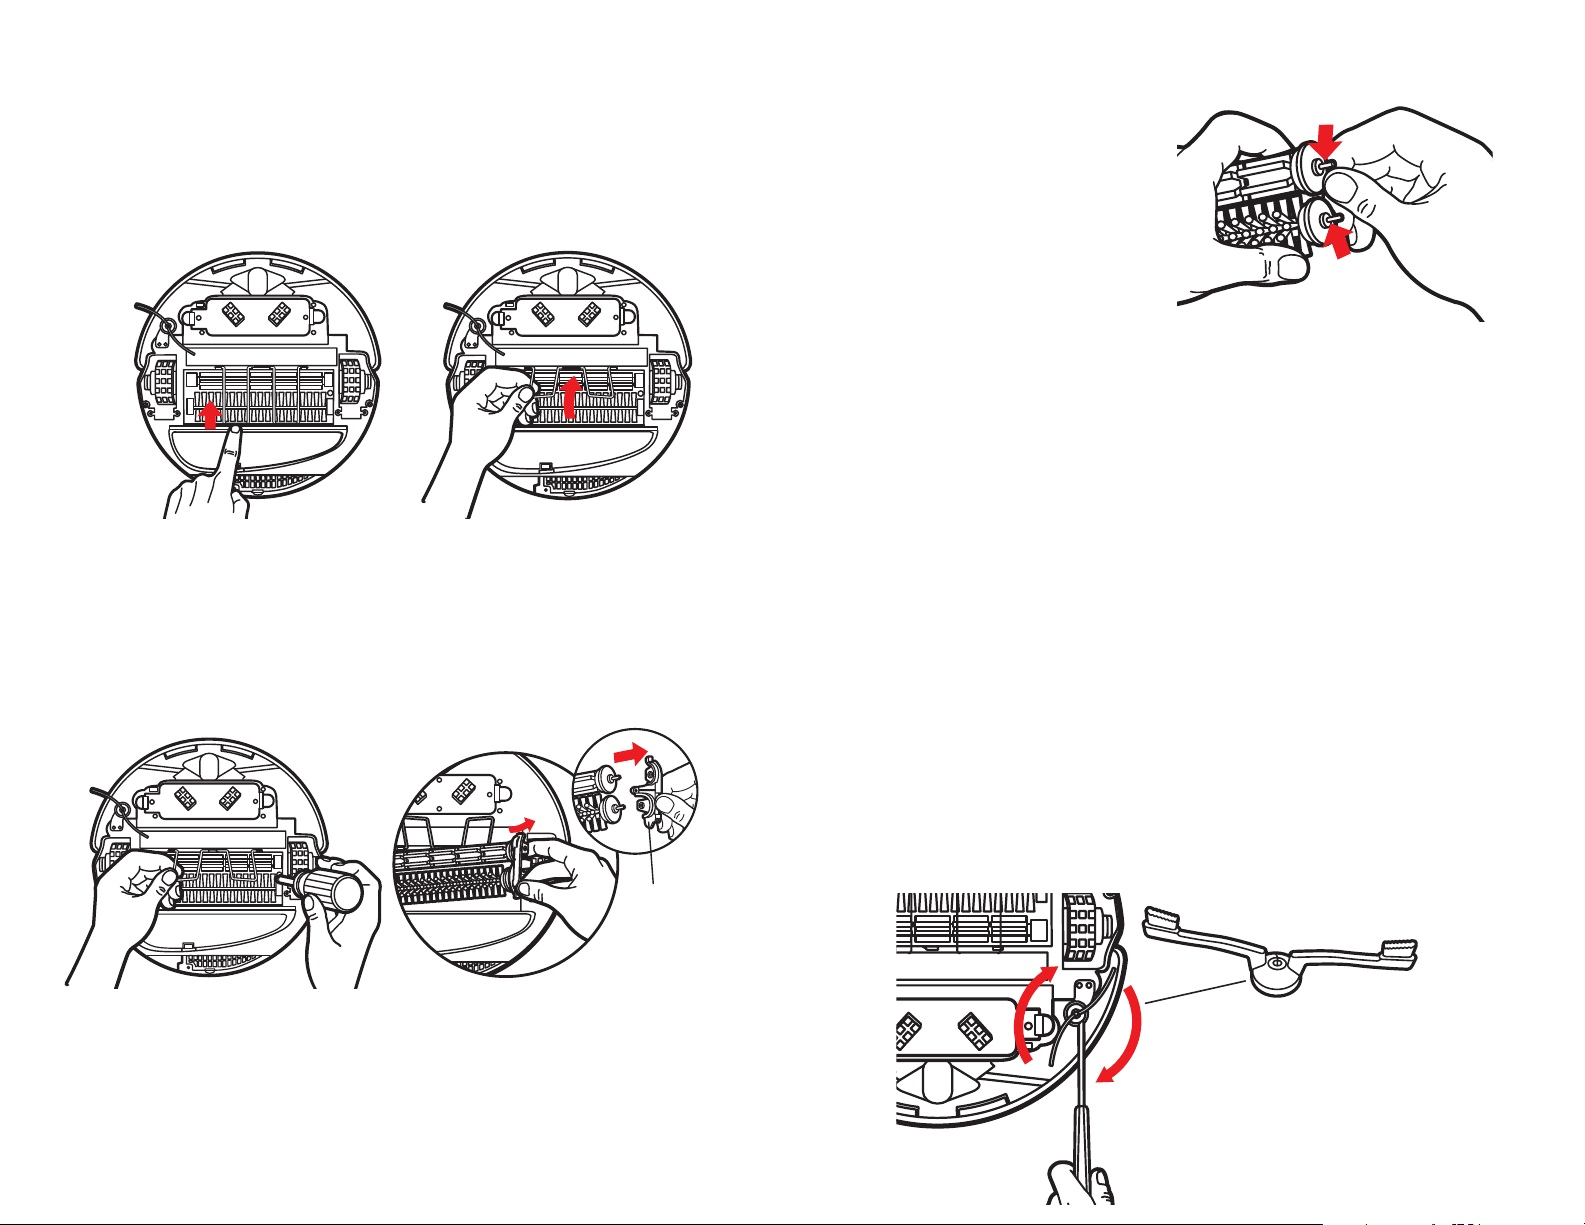
2. Unlatch the Wire Guards that cover the Brushes by pushing the Release Tab backward
(see Figure 12a). Pull the rear of the hinged Wire Guards up and out of their slots, and
then swing them up toward the front of the device (Figure 12b).
3. Unscrew the screw located on the right side of the Self-Adjusting Cleaning Deck with a
Phillips-head screwdriver (Figure 12c). Remove the screw and pull up the Brush Coupler
(see inset in Figure 12d), the component that holds the Brushes in place on the right side
of the unit. The Brushes will come up with the Brush Coupler.
Figure 12a-b: Unlatch the Wire Guards by pushing each of the two Release Tabs
forward (away from you) while pushing down on the Wire Guards to elongate them,
swinging the Wire Guards up and over the tabs. Once the Wire Guard has been freed
from both Release Tabs, it can be swung up and away, exposing the Brushes.
r
4. Pull the Brush Coupler off the end of the Brushes, then pull the Brushes to the
right and up, free of the device (Figure 12d).
5. Clean any hair or other debris off the
Brushes.
6. Clean any debris from around the
Brush ends, or axles (Figure 13).
Reassembling the Brushes
1. Put the Self-Adjusting Cleaning Deck back together by inserting the square ends of
the two Brushes into the square sockets in the Cleaning Deck.
2. Insert the other ends of the Brushes into the small holes in the Brush Coupler.
3. Lower the Brush Coupler into its slot and screw in the screw.
4. Swing the Wire Guards back in place and snap them down into their slots.
Maintaining the Edge-Cleaning Side Brush
Periodically check the Edge-Cleaning Side Brush by spinning it to ensure debris has
not built up underneath it. If it seems to be obstructed, remove and clean the
Edge-Cleaning Side Brush.
1. Turn Roomba off and empty the Particle Bin. Turn Roomba over so the cleaning
surface is up. Place it on a flat surface.
2. Turn the Edge-Cleaning Side Brush so the Screw Head can be accessed (see Figure 14).
Point the screw head towards Roomba’s bumper, as shown in the image.
3. Using a small Phillips-head screwdriver, unscrew the holding screw.
Place the screw aside.
4. Pull the Side Brush up and off of Roomba.
5. Clean out any hair or other debris that may have been caught under the Brush
or on the Side Brush Shaft.
6. Push the Side Brush back onto the Side Brush Shaft. Screw the holding screw securely
into the Edge-Cleaning Side Brush, being careful not to over tighten.
Figure 12c-d: Remove the screw on the Self-Adjusting Cleaning Deck and pull out
the plastic Brush Coupler and the two Brushes.
Figure 13: Clean and remove any debris
built up or wound around the ends and
metal axles of both Brushes.
Figure 14: Unscrew the holding screw on
the Spinning Side Brush as shown to remove it.
Brush Couple
• Side Brush
Page 9

16
Roomba Battery Pack will not charge
1. Ensure that the AC Adapter is plugged into a working outlet. Try several outlets to be sure.
2. Ensure that the AC Adapter is fully plugged into the Charger. No metal (or almost none)
should be visible once the plug is fully inserted. See Charging the Battery Pack on
Page 6 for more tips on proper insertion.
3. Ensure that the Charge Plug is fully inserted into Roomba. The Charge Plug will only fit
completely into the socket in the proper orientation (see Figure 5b).
4. Ensure that the Battery Pack is properly inserted. To be sure, remove it, inspect the
contacts both in the Battery Pack and in Roomba to make sure that they are not blocked
by dirt, and reinsert the Battery Pack. It should click into place on each side.
5. The Charge Indicator Light on the charger should illuminate. If it does not illuminate
check all the connections. The Charge Indicator Light will turn off when the Battery Pack
is fully charged.
Note that no lights will illuminate on Roomba during charging.
My Roomba moves too close to or far from my walls
1. If the Spinning Side Brush does not clean close enough to the wall, use a pen to push the
Adjustment Tab toward the rear of the Bumper (see Figure 15). This will make Roomba
follow closer to walls.
2. If the Spinning Side Brush is bumping into the wall, use a pen to push the Adjustment Tab
toward the center of the Bumper. This will make Roomba follow further away from walls.
I can’t find the answer to my question in the Manual.
1. Additional Troubleshooting Tips may be found by visiting the Support section of
www.Roombavac.com.
2. Send email to roomba-support@irobot.com, or call the toll-free Customer Support Line
at 1-877-855-8593.
Reference Information
Troubleshooting Tips
My Roomba turns on, beeps and shuts off
1. Make sure Roomba is fully charged and the Battery Pack is properly seated.
2. If Roomba is charged, then empty the Particle Bin (see Emptying the Particle Bin on
Page 10) and follow the instructions for removing and cleaning the Main Brushes (see
Cleaning the Main Brushes on Page 14). Pay special attention to the Brush ends, or axles.
My Roomba is not working or there has been a decrease in the cleaning performance.
1. Ensure that the Battery Pack is properly seated and charged.
2. Check that the Particle Bin, Filter Chamber, and Vacuum Inlet are empty, and that the
Vacuum Impeller, the fan-shaped mechanism on the left side of the Vacuum Inlet, spins
freely (see the entire section entitled Caring for Your Roomba, beginning on Page 9).
3. While you are examining the Filter Chamber, check the Air Filter (attached to the Filter
Door) to make sure it is not clogged or damaged.
4. Remove and examine the Brushes and their ends (axles) to make sure that there is
nothing wound around the Brushes (see Cleaning the Main Brushes on Page 14 as well as
Maintaining the Edge-Cleaning Side Brush on Page 15). Also check to see there is nothing
wound around the Wheels or Wheel Axles.
My Roomba Gets Stuck
Your Roomba may occasionally get stuck, especially in rooms that it has not cleaned before.
If it does get stuck, Roomba will try to free itself by turning in different directions. If it
cannot free itself Roomba will flash its Room Size Buttons and periodically beep for five
minutes to let you know it is stuck, before shutting off to conserve power.
Your Roomba might get stuck for several reasons.
1. It is wedged or pinned between or under narrowly spaced objects.
2. A cord, string, rug fringe or carpet tassel is wound around its Brushes or Wheels.
3. One of the Wheels is no longer in contact with the ground.
4. Roomba bumps into objects and repositions them in such a way that an exit path
no longer exists.
Move or block any object that Roomba gets stuck on or under. Please refer to the
illustration entitled “Roomba Care Hints” on Pages 12-13 to help identify and easily fix these
problem areas.
Once the problem areas have been amended, begin a new cleaning cycle by turning
the Main Power Switch off then on again. Select your room size to start cleaning by pressing
the S, M, or L Room Size Button.
Part of my Roomba has broken
Please call Roomba Customer Support at 1-877-855-8593.
My Virtual Wall Unit is not working
1. Check that new batteries are installed.
2. Make sure the Beam Emitter is pointed across the opening you want to block (see Figure 6b).
3. If that does not work, turn the Virtual Wall Unit’s Range Selector Switch up to the
maximum setting for large openings.
4. Some large openings require that more than one Virtual Wall Unit be used. Purchase
extra Virtual Wall Units by going to your nearest Roomba retailer, or visiting
www.RoombaVac.com for online purchase options, and for more purchase information.
T
M
TMT
M
Figure 15: Using a pen to
adjust how close or far away
Roomba will follow walls.
17
Page 10

1918
Q: Where can I purchase additional Battery Packs?
A: You can purchase additional Battery Packs by contacting your nearest Roomba
retailer, or by visiting www.RoombaVac.com for online purchase options and
more purchase information.
Q: How does the Virtual Wall Unit work?
A: The Virtual Wall Unit is used to block open doorways and confine Roomba in a room.
The Unit can also be used to divide a large room and force Roomba to clean just one
side of the room. The Virtual Wall Unit sends a harmless, invisible beam across the
opening, confining Roomba to the area where you want it.
Q: Where can I purchase additional Virtual Wall Units?
A: You can purchase additional Virtual Wall Units by contacting your nearest Roomba
retailer, or by visiting www.RoombaVac.com for online purchase options and more
purchase information.
Q: Will the Particle Bin need to be emptied? Does the Filter need to be cleaned?
How often?
A: Debris from the Particle Bin (which includes the Air Filter) should be emptied after
each use. See Caring for Your Roomba on Page 9 for more information.
Q: How can I get extra Replacement Filters?
A: The Filter needs to be replaced if it becomes punctured or if you notice a decline in
the cleaning performance of Roomba. Two spare Replacement Filters are included with
Roomba; additional Replacement Filters are available for purchase in packs of three.
Visit www.RoombaVac.com for more purchase information, or contact your nearest
Roomba retailer for availability.
Q: Will Roomba clean all floor surfaces?
A: Roomba cleans hardwood, linoleum, tile, and low- to medium-pile rugs. The device is
not designed to operate on deep-pile carpets or carpets with tassels or fringe.
Q: Do I need to change the floor adjustment when changing floor surfaces?
A: Roomba’s Self-Adjusting Cleaning Head automatically traverses uneven floor
transitions as it cleans carpet, hardwood, linoleum, and tile.
Q: Will Roomba sweep water from the floor?
A: No, Roomba should not be used to pick up any liquid including water.
Q: Will Roomba fall down stairs or into a step-down room?
A: Roomba automatically senses stairs and turns away from them. However, if the room
to be cleaned contains a balcony, a physical barrier should be used to prevent access to
the balcony and ensure safe operation.
Q: If Roomba gets stuck, what should I do?
A: Help Roomba get unstuck, then press the flashing Room Size Button to restart the
Cleaning Cycle. Please refer to the illustration entitled “Roomba Care Hints” on Pages
12-13, as well as Troubleshooting Tips on Page 16 for more information.
Frequently Asked Questions
Q: Why doesn’t my Roomba clean my floor in straight lines?
A: Roomba uses an algorithm-based cleaning pattern to clean your home most
efficiently. When Roomba starts cleaning it travels around the floor in a spiral pattern
(see Figure 1 on Page 3). Its Non-Marring Bumper will contact a wall, or it may try to
find a wall after spiraling for a while. Roomba follows the wall for a short period of time,
utilizing its Spinning Side Brush to move particles away from the wall and into the
Vacuum’s path. After cleaning along a portion of the wall or other object, Roomba
criss-crosses the room in straight lines. Roomba repeats this cleaning pattern until its
cleaning time has elapsed. This sophisticated navigation ensures that Roomba will clean
your whole room as thoroughly as possible.
Q: Are pets and children safe around Roomba?
A: Roomba has been designed with a number of safety features, including
automatically shutting off when it is picked up or gets stuck. Children and pets should
always be supervised around Roomba for optimum safety and cleaning performance.
Q: Does Roomba clean corners and along the walls?
A: Roomba has a Spinning Side Brush that cleans next to walls, most corners and
other tough to reach places.
Q: Will it go under kickboards, beds, and furniture?
A: Roomba has been designed to fit under the kickboards in your kitchen. If your bed
or furniture is more than 4” off the floor, Roomba will happily clean underneath.
Q: What powers Roomba?
A: Roomba is powered by a NiMH Rechargeable Battery Pack.
Q: How much suction power does Roomba have?
A: Roomba uses a unique, three-stage cleaning system. Two counter-rotating Brushes
sweep up larger particles, while a small, extremely efficient vacuum sucks up the smaller
particles. The Spinning Side Brush sweeps debris from corners and edges of the room into
Roomba’s main cleaning path. This allows Roomba to get impressive cleaning performance
using only 30 Watts, much less power than is required by traditional upright vacuums.
Q: How long will the Battery Pack’s charge last?
A: The life of a fully-charged Battery Pack is dependent on the floor surface to be
cleaned. A single charge can last from about 60 minutes (on medium pile carpet) to
about 90 minutes (on hard floor surfaces).
Q: How many rooms will Roomba clean before the Battery Pack needs to be recharged?
A: It depends on the floor surface to be cleaned. For typical operation, Roomba cleans
three 14’ x 16’ medium-size rooms.
Q: How long does it take to recharge the Battery Pack?
A: The Battery Charger that comes with Roomba takes up to 12 hours to recharge the
Battery Pack. As of February 2003, you can also purchase the Rapid Charger accessory that
recharges the Battery Pack within about two and a half hours. Contact your nearest
Roomba retailer for availability, or visit www.RoombaVac.com for online purchase options
and more purchase information.
Page 11

2120
Q: Is Roomba safe to use when I leave my home?
A: Roomba can operate unattended, so long as small children and pets are not present
to interfere with Roomba’s operation, and loose objects have been picked up.
Q: Does Roomba pick up pet hair?
A: Roomba picks up pet hair very effectively from carpet as well as hard surfaces. As
with most vacuums, if pet hair is an issue in your house you may need to empty the
Particle Bin and clean the Brushes more frequently to reduce the chance of clogging.
Removing and cleaning the Main Brushes after every five room cleaning is recommended in these cases. See Page 9 for instructions on Caring for Your Roomba.
HELPFUL HINT: If there is a lot of pet hair in the room (such as the first time Roomba
cleans the room), the Cleaning Head will pick up a large amount of it. If the room is
medium or large, you may want to use the "small room" setting a few times, enabling
Roomba to stop cleaning after a short period of time so you can remove the collected
pet hair. Upon completion of this process, you should be able to run Roomba on larger
room settings (i.e. for longer cleaning periods), with a reduced chance of clogging from
pet hair.
Q: Do you offer spare parts?
A: Certain spare parts are available for U.S. customers only. Please contact us with your
request. Email us at roomba-support@irobot.com or call toll-free 1-877-855-8593.
Q: How can I find out more about Roomba?
A: The Roomba website, www.RoombaVac.com, is full of detailed information about
the Roomba Intelligent FloorVac. You can also go to the Roomba User’s Forum to chat
with other Roomba users about their experience. To join the forum, go to:
http://groups.yahoo.com/group/roomba-users/join
Contacting Customer Support
If you cannot find the answer to your question in this Manual or on the
www.RoombaVac.com website, please send email to roomba-support@irobot.com, or
call our toll-free Customer Support Line at 1-877-855-8593.
Limited Warranty to Original Purchaser
This Roomba brand product, as supplied and distributed by iRobot Corporation, and delivered
new, in the original carton to the original customer purchaser, is warranted by iRobot Corporation
against manufacturing defects in materials and workmanship for the qualifying limited warranty
period as follows:
NINETY (90) DAYS LABOR AND PARTS
This limited warranty begins on the original date of purchase, and is valid only on
products purchased and used in the United States, and does not include installation,
removal or reinstallation. Warranty repairs must be performed by iRobot Corporation’s
authorized service center. To receive warranty service, the original dated bill of sale
must be presented upon request as proof of purchase to iRobot Corporation’s
authorized service center. To obtain warranty service, support, or other information,
please visit our website at www.RoombaVac.com. If you do not have web access,
please call 1-877-855-8593.
iRobot Corporation will repair or replace this product, at our option and at no charge
with new or reconditioned parts, if found to be defective during the limited warranty
period specified above. To request service, the purchaser must contact iRobot
Corporation for problem determination and service procedures. iRobot Corporation
does not warrant uninterrupted or error-free operation of the product. All replaced
parts and products become the property of iRobot Corporation and must be returned
to iRobot. Replacement parts and products assume the remaining original warranty, or
sixty (60) days, whichever is longer.
This limited warranty covers manufacturing defects in materials and workmanship
encountered in normal, and, except to the extent otherwise expressly provided in this
statement, non-commercial use of this product and shall not apply to the following,
including, but not limited to: damage which occurs in shipment; applications and uses
for which this product was not intended; failures or problems which are caused by
products or equipment not supplied by iRobot Corporation; accidents, misuse, abuse,
neglect, misapplication, fire, water, lightning or other acts of nature; incorrect electrical line voltage, fluctuations or surges; damage caused by improper installation; product alteration or modification; improper or unauthorized repair; exterior finish or cosmetic damage; failure to follow operating instructions, customer adjustments, maintenance and environmental instructions that are covered and prescribed in the instruction book; use of non-iRobot or unauthorized parts, supplies, accessories or equipment which damage this product or result in service problems; failures or problems
due to incompatibility with other equipment.
THERE ARE NO EXPRESS WARRANTIES OTHER THAN THOSE LISTED AND DESCRIBED
ABOVE, AND NO WARRANTIES WHETHER EXPRESS OR IMPLIED, INCLUDING, BUT NOT
LIMITED TO, ANY IMPLIED WARRANTIES OF MERCHANTABILITY OR FITNESS FOR A
PART ICULAR PURPOSE, SHALL APPLY AFTER THE EXPRESS WARRANTY PERIOD STATED
Continued on next page…
Page 12

Additional Virtual Wall Unit
Roomba Accessories
Rapid Charger
Recharges Battery Pack in about 2.5 hours!
(Available February 2003)
Part #02004
Keep charged Battery Packs ready to go!
Part #02002
Close off extra large openings, or close off
more than one opening at a time!
Part #02003
Extra Battery Pack
Replacement Filter 3-Pack
Part #02005
The Following Accessories are available for purchase. Contact your
nearest Roomba retailer for availability, or visit www. RoombaVac.com
for online purchase options and more purchase information.
2322
ABOVE, AND NO OTHER EXPRESS WARRANTY OR GUARANTEE GIVEN BY ANY PERSON,
FIRM OR CORPORATION WITH RESPECT TO THIS PRODUCT SHALL BE BINDING ON
IROBOT CORPORATION. IROBOT CORPORATION SHALL NOT BE LIABLE FOR LOSS OF
REVENUE OR PROFITS, FAILURE TO REALIZE SAVINGS OR OTHER BENEFITS, OR ANY
OTHER SPECIAL, INCIDENTAL OR CONSEQUENTIAL DAMAGES CAUSED BY THE USE,
MISUSE OR INABILITY TO USE THIS PRODUCT, REGARDLESS OF THE LEGAL THEORY
ON WHICH THE CLAIM IS BASED, AND EVEN IF IROBOT HAS BEEN ADVISED OF THE
POSSIBILITY OF SUCH DAMAGES. NOR SHALL RECOVERY OF ANY KIND AGAINST
IROBOT CORPORATION BE GREATER IN AMOUNT THAN THE PURCHASE PRICE OF THE
PRODUCT SOLD BY IROBOT CORPORATION AND CAUSING THE ALLEGED DAMAGE.
WITHOUT LIMITING THE FOREGOING, PURCHASER ASSUMES ALL RISK AND LIABILITY
FOR LOSS, DAMAGE OR INJURY TO PURCHASER AND PURCHASER’S PROPERTY AND TO
OTHERS AND THEIR PROPERTY ARISING OUT OF THE USE, MISUSE OR INABILITY TO
USE THIS PRODUCT SOLD BY IROBOT CORPORATION NOT CAUSED DIRECTLY BY THE
GROSS NEGLIGENCE OF IROBOT CORPORATION. THIS LIMITED WARRANTY SHALL NOT
EXTEND TO ANYONE OTH ER THAN THE ORIGINAL PURCHASER OF THIS PRODUCT, IS
NONTRANSFERABLE AND STATES YOUR EXCLUSIVE REMEDY.
Some states do not allow limitations on how long an implied warranty lasts, or the
exclusion or limitation of incidental or consequential damages, so the above limitations
or exclusions may not apply to you. This warranty gives you specific legal rights and you
may also have other rights which vary from state to state.
Page 13

Roomba Pro
Roomba Pro Elite
iRobot and Roomba are trademarks of iRob ot Corporation.
© 2002,2003 iRobot Corporat ion.
All rights reserved.
Paten t s Pendin g .
Made & Pr i nt e d in China.
To or der extra Batteries,Virtual W all Units,Replacement Filters
or the Rapi d C har ger,contact your ne ares t Roomba retailer,
or visi t w w w.RoombaVac.com for online purchase options
and additional purchase information.
M
TMT
Part # 8786 (R1B-1)
Owner’s Manual
Before using your Roomba,thoroughly read the safety instructions.
M
T
Page 14
Important Safety Instruc t ions
CAUTION: TO REDUCE THE RISK OF ELECTRIC SHOCK, DO NOT REMOVE COVER OF ROOMBA, ITS
BATTERY OR THE CHARGER AC ADAPTER. NO USER-SERVICEABLE PARTS INSIDE. REFER SERVICING TO
QUALIFIED SERVICE PERSONNEL. CHARGE USING STANDARD US (120V AC) OUTLET ONLY.
Always be careful when using your Roomba. To reduce the risk of injury or damage, keep these safety
precautions in mind when setting up, using and maintaining your equipment.
General
• Read all safety and operating instructions before operating Roomba.
• Retain the safety and operating inst ruc tions for future reference.
• Heed all warnings on Roomba,Battery,Charger AC Adapter and in Owner’s Manual.
• Follow all operating and use instructions.
• Do not attempt to service Roomba yourself.Refer all non-routine servicing to qualified service personnel.
Roomba Use
• Roomba is an indoor device only.
• Do not use Roomba on wet surface s or w h ere cont act wit h or i m me rsi on i n wate r i s a p oss ibi l i t y.
• Before using this appliance,pick up objects like clothing, loose papers,pull cords for bl inds or curtains,power cords,and
any fragile objects.If the device passes over a power cord and drags it around, t here is a chance an object could tumble off
a table or shelf.
• Roomba is not a toy.Do not sit or stand on th is de vice.Smal l chi l dren an d p e ts shou ld b e sup e rvised if Roomba is in use.
• Keep loose clothing,hair, fingers,feet and all parts of the body away from Brushes and mov ing par ts.
• Do not use this device to pick up any thing that is burn i ng or s mok ing, such as cigarettes,matches,or hot ashes.
• Do not use this device to pick up flammable or combust ible liquids such as gasoline.
• Do not use this device without the Par t icle Bin in place.See page 16 for proper installation of the Particle Bin.
• Ifthe room to be cleaned contains a balcony,a physic al barrier should be used to prevent access to th e b a lcony and en sure
safe operation.
• Always remove the Batter y before long-term storage or transportation.
Roomba Battery and Charging
• Operate your Roomba only from the type of power source indicated on the marking label.If you are not sure of the type
of power suppl i e d to yo ur home,consult your appliance dealer or local power company.
• Charge using standard US (120V AC) outlet only.Product may not be used with any t y pe of power conver ter. Any such
use will immediately void the Warrant y.(Note:If you live outside the U.S.,compatible versions of Roomba are available
in many countr ies.Check local retailers for availability.)
• Use only the Charger AC Adapter or Rapid Charger supplied by the manufacturer to recharge this device.
• Do not use a Charger AC Adapter w ith a damaged cord or plug.
• Charge indoors only.
• Never handle Charger AC Adapter with wet hands.
• Always remove the Batter y and disconnect Roomba from the Charger AC Adapter before cleaning Roomba.
M
TMT
Owner’s Manual
Contents
Important Safety Instructions
Introducing Your Roomba Pro FloorVac
Getting Started
• Unpacking the Box
• FloorVac Description
• Installing the Battery
• Removing the Battery
• Charging the Battery
- The Battery Indicator Light
Using Your Roomba
• Preparing the Ro om for Cleaning
• Starting Roomba
• Pausing and Stopping Roomba
- Pausing Roomba in a Cleaning Cycle
- Spot Cleaning while Paused
- Un-Pausing Roomba
- Stopping Roomba
• The Vir tual Wall Units
- Virtual Wall Unit Battery Installation
- Using the Virtual Wall Unit
• The Roomba Remote (included wit h Roomba Pro Elite)
- Roomba Remote Battery Instal lat ion
- Using the Roomba Remote
- Using the Roomba Remote with Roomba P ro
• The Wall Mount Unit (Roomba Pro Elite only)
- Installing the Wall Moun t Unit
- Using the Wall Mount Unit
Caring for Roomba
• Emptying the Particle Bin
• Replacing the Air Filter
• Cleaning the Main Brushes
- Reassembling the Brushes
• Cleaning the Vacuum Inlet
• Maintaining the Edge-Cleaning Side Brush
• Keeping Ro omba’s Sensors Clean
Reference Information
• Troubleshooting Tips
• Frequently Asked Questions
• Contacting Customer Support
• Limited Warranty to Original Purchaser
Purchasing Roomba Accessories
5
6
7
7
7
8
8
9
10
10
10
10
10
11
11
12
12
12
13
14
14
15
16
16
17
18
19
19
20
20
21
23
25
26
2
4
5
8
16
21
27
2
3
Page 15

Introduci ng t he Ro omba Pro | Pro El ite F lo or Va c
Welcome to the next generation of Roomba i nn ovat ion a nd convenie n ce. The new Room b a Pro a n d Ro omb a Pro E l ite
Robotic F l oorVacs have all the g reat features ofthe original Roomba,plus many improvements.Roomba Pro and Pro Elite
are easier to use and maintain,and feature new ways to clean what you want,where you want,and when you want —
at the tou ch of a button.
Your Roomba Pro | Pro Elite FloorVac is a hard-working,robotic floor-cleaning appliance that eliminates the need to
push it or foll ow it aroun d. It keep s your hard-surface floors and low- to medium-pile carpets barefoot clean with a
unique three-stage cleaning process.Roomba effectively cleans most common household floor surfaces with little or no
huma n su p e rv i s i on.
Getting Started
Unpacking the Box
Remove t h e conte nt s of the box,and unpack all items from the Styrofoam packing material.
You will have a Roomba Pro | Pro Elite Robotic FloorVac packed for shipping,as well as the follow ing:
1. Rechargeable NiMH Battery (packed inside your Roomba)
2. Charger A C Adapter
3. Two (2) Vir tual Wa ll Units — each unit requires two (2) D-size batteries (not included)
4. Two (2) Replacement Filters
5. Owner’s Manual (the document you’re reading)
6. Quick Start Guide,Letter from the CEO of iRobot,and Warranty Registration Postcard (not shown in Figure 3)
SOFA
LAMP
TABLE
START
STAIRS
Figure 1:A typical Roomba clea nin g patter n.
Roomba Standard Charger
UL Approved
Class 2 Transformer
Input: 120VAC 60Hz 0.3A
Output: 24VDC 500mA
This device complies with Part 15 of the FCC rules.
Operation is subject to the following conditions:
(1) this device may not cause harmful interference, and
(2) this device must accept any interference received, including interference
that may cause undesired operation.
How Roomba cleans a room
When Roomba s t a rts a typical cleaning cycle it
first travels around the floor in a spiral pattern
(see Figure 1).Its Non-Mar r ing Bumper will contact
a wall,or it may try to find a wall after spiraling for
a while.Roomba fol lows the wall for a short per i o d
of time , using it s spinning, Edge-Cleaning Side Brush
to move debris away from the wall and into the
Vacuum’s path. After cleaning a long a por t ion of the
wall or oth e r o bj ect,Roomb a crisscrosses the room in
straight lines.For most ofRoomba’s cleaning cycles,
Roomb a re peat s t his clea ni ng patter n unti l its clean ing
time has elapsed,prov iding maximum coverage
of the room . I n n ew Sp ot C leaning mode (new in
Pro and Pro Elite),Roomba cleans a 3-foot-diameter
area using a slow,high-efficiency spiral pattern.This
pattern allows Ro omba to focus intense cleaning over a
soiled area.In new MAX Cleaning mode (Pro Elite or
Remote),Roomba excels at cleaning multiple rooms,or
an extra large area — at the touch of a single button.
Roomb a Pro Elite als o c ontain s :
7. Roomba Remote — requires two (2) AA-size batteries
(not included)
8. Wall Mount Unit
9. Five (5) wa ll anchors for installing the Wall Mount Unit
10. Five (5) screws for screwing into wal l anchors or directly into
wood,for installing the Wall Mount Unit
11. Five (5) rubber screw hole plugs for finishing the Wall Mount Unit.
Remove yo u r Roomb a from its protective plastic bag and turn it upside
down,so the whee ls are facing up.You w i ll notice a prote c t ive cardboard
sheath enclosing t he Edg e-Cleaning Side Brush (see Figure 2).Carefully
disengage the cardboard sheath and twist ties from the black,flexible
Side Brush,being careful to protect the Side Br ush from damage.Turn
your Roomb a back over.
Figure 2: Care ful ly remove t h e
protective c a rdb oa rd s he ath
and twist ties packed around
the Spinning Side Brush.
Once you have unpacked your Roomba,c h e c k t o make s u re tha t you have all t h e par t s shown he re :
Figure 3: Contents of package
for Room ba P ro.
Roomba Pro
Intelligent FloorVac
TMTMT
M
Rechargeable NiMH
Roomba Battery
Two Replacement Filters
Charger
AC Adapter
2 Virtual Wall Units 2 Virtual Wall Units
for Room ba P ro E l ite .
TMTMT
M
Roomba Pro Elite
Intelligent FloorVac
Two Replacement Filters
Charger AC Adapter
Roomba Remote
Rechargeable NiMH
Roomba Battery
Wall Mount Unit
4 5
Page 16

FloorVac Description
TMT
M
•Removable
Particle Bin
•Battery Indicator
•Easy To Grab Handle
•Battery Charger Socket
•Edge-Cleaning
Side Brush
•Wall Following
Adjustment
•Beam Receiver
•Room Size
Selector
Buttons
•Filter Door
located on
underside of
Particle Bin
(not viewable from top)
•Main Power Button
•Spot Cleaning Button
•Max Cleaning Button
•Edge-Cleaning
Side Brush
•Rechargeable NiMH Battery
•Main Cleaning Brushes
Pick Up Large Debris
•Brush Release Screw
•Squeegee Vacuum
Picks Up Fine Debris
•Vacuum Inlet Lid
•Filter Door
•Wire Guards
Your Roomba was designed and engineered using the latest technology and includes the following special features:
Figure 4a: Roomba Pro
and Pro Elite top views.
Room ba Pro
Installing the Battery
1. Place Roomba upside down (with Cleaning Brushes
showing ) on a f l at , p a dd ed su r f a ce su ch a s on a towe l
or blanket .
2. Ifyou are using Roomba for the first time,remove
the Battery from the Battery Compartment,and
remove the pro t e cti ve p l a s tic b a g from a ro u n d the
Battery.Remove any packing material left inside the
Battery Compartment or on the Batter y itself.
3. Guide the Battery into the Battery Compartment
using your index fingers as shown in Figure 5,and
press both si de s of the Battery down firmly.
4. The Battery will click flat into place on b oth sides
when properly installed in Roomba.
5. Additional Batteries and a Rapid Charger can be
purchased.Pleas e visit www.RoombaVac.com to
purchase online,and for more purchas e informat i o n .
Figure 5: Installing Roomba’s Battery. B e sur e to
press the Battery firm ly down on both sides.
Removing the Battery
1. Place Roomba upside down on a flat, padded su r f a ce .
2. Place your index fingers under the Guide Tabs on the Battery.First pull upward on the side of the Battery nearest the
Spinni ng S id e Br u sh . Then pull the other side of the Battery up and out to remove Battery.If the Battery fails to come
free of Roomba,simply press down on the Battery to snap into place,and try again.
Figure 4b: Roomba Pro | Pro Elite
bottom view – cleaning side up.
6
Room ba Pro Elite
Charging the Battery
Please note that before first use of Roomba, you must charge the Battery. Roomba’s built-in charger takes 12
hours to fully charge the Battery.
1. Insert the Charge Plug on the Charger AC Adapter into Roomba’s Charger Socket,and plug the other end of the Charger
AC Adapter into a standard U.S.electr ical outlet (120 Volts AC) as shown in Figure 6.
2. The Battery Indicator Light (beneath the Battery Icon on Roomba’s cont rol panel) should slowly pulse yellow.Ifthis fails
to occur,remove and re install the Battery,check the plug connections and/or the elec trical outlet.
3. The Battery Indicator Light will turn off after about 12 hours,with the Battery fully charged
Figure 6: The Charger AC Adapter is inserted
into Roomba’s Charge Socket as shown. The
other end i s p lug ge d i nto an e le c t r i c a l o u t let.
•Charge Plug
.
•Charge Socket
7
Page 17

The Battery Indicator Light
When Ro om b a i s in op e r ation, the Battery Indicator Light shows the charge level of the Battery according to the chart in
Figure 7 :
Color of Battery Indicator Battery Status
Pulsing Amber Charging
Green
Figure 7: Understanding the
status of the Battery from
the Battery Indicator Light.
Amber
Red
Flashing Red Fully Discharged
TMTMTM
BATTERY NOTES:
1. Roomba can clean 2-3 medium-sized rooms on a single charge.Roomba will run between about 60 minutes
(on medium-pile carpet) to about 90 minutes (on hard floor surfaces) on one full charge.
2. Ifcared for properly,the rechargeable Nickel-Metal Hydride (NiMH) Battery should last for a long time.Like all
recha r g e a b l e batte ries , event u a lly t h e Battery w il l wear out and should be replaced.The Battery may be disposed of in
the regular trash.
3. You can purchase additional Batteries,as well as a Rapid Charger that charges a Roomba Battery in about two and a
half hours.Contact your nearest Roomba retailer or v isit www.RoombaVac.com for online purchase options and more
purchase in for m at ion .
Charged
Partially Charged
Almost Fully Discharged
TMTMTM
Starting Roomba
1. Always empty both sides ofthe Particle Bin be fore u s e (a si mple process; see Empty i ng t h e Par ticle Bi n on p age 16).
2. Place Roomba on the floor in the middle of an open area in the room.Ifcleaning multiple rooms with the MAX
Cleaning Cycle,begin cleaning in the most central room.
3. Press the green Power Button on top of Roomba to turn it on.
4. Select the cleaning cycle you want according to the chart in Figure 8,and press the corresponding Cleaning Cycle
Button to s t art.Roomba will play a short start-up tune and start the cleaning cycle.
Note: If yo u wa nt t o c l e a n a sm a ll area up to 3 feet wide,where there is extra dirt or where something dry has spilled,place
Roomb a in th e cente r of the area to be cleaned and select the Spot Button.Roomba will intensively clean this area.Repeat
as necessary.
5. You only need to super v ise Ro o m b a t h e fir s t time i t c l eans a room.Identify areas whe re it gets stuck,then move
problem obje cts off t h e f l o or or out of the room ,mo d i fy the m or b lo c k t h em with t he Virtua l Wall Unit provided.
Please refer to the
page 21 ofthis manual to help identify and easily fix problem areas.After this first use,there should be no need to
super v i s e Ro omb a unless you are operating it around small children or pets.
6. When Roomba is finished cleaning in all cleaning c ycles except MAX Clea ning , it will stop and play a cheerf u l tu ne.
The MAX Cleaning Cycle enables Roomba to clean for the maximum amount oftime,until its batteries are fully discharged; consequently,when Roomba fi nishe s a MAX Cleaning Cycle,it will stop and play its “Battery Low”tune.In all
cases,all of Roomba’s Cleaning Cycle Buttons will glow green,and Roomba will periodically beep for five minutes to
remi n d you that it's done,then turn itself off to conserve power.
Figure 8: Select t he Roomba cleani ng cycle that is right for the job.
Roomb a Care Hi n t s on t he b a ck cover of t h e Q u ic k St a rt Guid e , as well a s Troubl es ho oting Tips on
Using Your Roomba
Preparing the Room for Cleaning
1. Clear your floor of objects just as you would before using a regular vacuum cleaner:clothing,loose papers,pull cords
for blind s or c urtains , power cords,and sm a l l or f r agile items.Because Roomba gently contacts walls,furniture and
other objects a s it cle ans ,pleas e remove any items that may be knocked over by lig ht contact from Roomba.
Avoid using Roomba on carpets with long tassels or fringe edges. It may become stuck on long fringe. See the
Quick Start Guide for tips. Not recommended for use on shag or deep-pile carpets.
2. Roomba’s S,M and L Room Size Buttons are designed to clean one room at a time (see Figure 8).The MAX Cleaning
setting (Pro Elite/Roomba Remote only) is designed to clean an extra large room or multiple room s, but may be us e d
to clean on e ro om i ntens ively.Con fi n e Ro omba to t he area you want c l e aned by closing a ll do ors and use the Virtual
Wall Unit to block all open doorways.See
Observe Roomba the first time it cleans a room to make sure it doesn’t get wedged under or stuck on top
of uneven surfaces. Roomba automatically senses stairs and turns away from them. However, if the room to
be cleaned contains a balcony, a physical barrier should be used to prevent access to the ledge and ensure
safe operation.
TheVirtual Wall Unitson page 11.
8 9
PRESS THIS
BUTTON
Spot 1-23’ diameter concentrated spot cleaning
S
M
L
MAX (Roomba
Pro Elite and
Remote only)
FOR THE FOLLOWING MISSION
Single room, about 10’ x 12’
Single room, about 14’ x 16’
Single room, about 15’ x 20’
Open floorplan (20’ x 30’) OR
Extra large room OR
Intensive single room cleaning
APPROXIMATE # OF
MINUTES TO COMPLETION
15-25
25-35
34-45
Up to 60-90
Page 18

Range
4-7
0-3 8+
Pausing and Stopping Roomba
Roomb a c a n be pau sed t e mp orari l y du ring a cleaning cycle,then set back on the cleaning cycle where it left off.Roomba
may also be stopped at any time,at which point it will clear the current cleaning cycle to prepare for another.
Pausing Roomba in a Cleaning Cycle
To temporarily pause Roomba while it’s in a cleaning cycle simply pick it up by its handle,or press any button on Roomba
except the Power Button.The button corresponding to the cleaning cycle that Roomba has t e mp o r a rily paused will flash.
(Note:If you are using the Roomba Remote,please see additional information in
that Roomba will shut itself off,clearing its current cleaning cycle,if it is lef t p aused for m ore t h an five minutes.
Spot Cleaning during a Cleaning Cycle
Roomb a can c l e an a spot one or more times while it is paused in the middle of a cleaning cycle,then continue the cleaning
cycle afterward. To Spot Clean during a cleaning cycle,do the following:
1. Pause Ro omba.
2. Press the Sp ot Button.Roomba will play its brief“Spot Cleaning”tune,then start clean ing a 3-fo ot-w ide area.
3. After Roomba completes the Spot Cleaning Cycle (1-2 minutes),it will play it’s “Done Spot Cleani n g”tune,and go back
to being p ause d.
Un-Pausing Roomba
To un-pause Roomba and continue it’s cleaning cycle,press any button on Roomba except the Power or Spot Button.
Roomba w ill p l ay i ts brief “Bac k to the Clean ing Cycle”tune a nd st ar t cle ani ng again where it left offin its cleaning cycle.
Stopping Roomba
To turn Roomba off, pres s t he Po w er B u tto n.
The Roomba Remote on page 12.) Note
The V irtual Wall Uni ts
The Vir tual Wall Unit keeps Roomb a i n t he ro om or a rea you wa nt cl e an e d. It uses an invisible beam oflight to block
13+ foot-wide open doorways or to close off other large areas.Use th e Virtual Wall Unit to block open doorways or clean
one por t i on of a l ar ge room.Multiple Virtual Wall Units can be used to block off multiple doorways or open areas,or extrawide openings.The Roomba Pro and Pro Elite both come with two Virtual Wall Units.
Virtual Wall Unit Battery Installation
1. Open the Battery Door located on the bottom of each
unit by first loosening the screw (see Figure 9).
2. Insert 2 new “D”size alkaline batteries (not included)
in each unit by following the “+”and “-”symbols.
3. Replace the Batter y Do or and tighten the screw.
Range Selector Switch
Power Button
Power Light
Figure 9: Insert 2 “D”-size
alkaline batteries in the
bottom ofeach Virtual
Wal l Unit.
"D"SIZE/LR20
1.5V
1.5V
"D"SIZE/LR20
Hint: If Roomba is m oving,you c a n press a ny but ton or l ift Roomba up to paus e it first before turning Roomba off.
To stop Roomba in order to start a new cleaning cycle,do one of the following:
1. Press the Power Button twice to turn Ro omba off then on again.Roomba is now ready to start a fresh cleaning c ycle.
Empty both sides ofthe Particle Bin,then press a desired Cleaning Cycle Button to start cleaning.
2. To start Roomba cleaning on a new cleaning cycle quickly,press and hold the desired new cleaning cycle button while
it’s cleani ng ,unti l you hear Roomba play its “Star t Up”tune and start the new cleaning cycle.
10
Beam Emitter
Figure 10a: Close -up of the Virtual Wall Unit.
Battery Door
11
CAUTION:
To ensure prope r f u n c tion an d avoid
battery leakage:
1. Always use alkaline batteries.
2. Do not mix old and new batteries.
3. Do not mix alkaline,standard or
recha r g e a b l e batte ries .
4. Batteries should be installed by an adult.
5. Non-rechargeable batteries are not to
be recharged.
6. Rechargeable batteries are to be removed
from the product before being charged.
7. Only batteries ofthe same or equivalent
type as recommended are to be used.
8. Batteries are to be inserted with the
correct po larity.
9. Exhausted or dead batteries are to b e
removed from the produc t .
10. The supply terminals are not to be
short ci rcu ite d.
11. Remove batteries before storing.
Page 19

Using the Virtual Wall Unit
Up to 13+ ft.
Roomba
bouncing
off beam
Shape of beam
1. Press the Vir tual Wall Unit’s Power Button to turn it on (see Figure 10A.The Power Light on the Virtual Wall Unit
will glow green.
2. Move the Range Selector Switch to the room opening size you are blocking.The range numbers shown are in feet.
3. Place the Virtual Wall Unit on the floor at either edge of the doorway or by the wall.Make sure that the Unit’s Beam
Emitter points across the opening to ensure Roomba does not cross the invisible beam.
4. The Virtual Wal l Unit automatically turns off after about two hours,or you can press the Unit’s Power Button to turn
it off.
Tip: Re m e mber t o tur n on the Virt ual Wa ll Unit each time you start a new cleaning cycle,to prevent the Virtual Wall Unit
from shutting down before Roomba ha s fin ishe d it’s cleaning cycle.
Figure 10b: To block an opening,place the
Virtual Wall Unit on the floor with the
Beam Emitter aimed across the opening. For
best results,place t h e Virtual Wall Unit next
to the d oorway (as shown). Point the arrow
on top of the unit across the open doorway.
Addition al Virtua l Wall Uni ts may be purchased.Contact your nearest Roomba retailer for availability, or visit
www.RoombaVac.com for online purchase opt ions,and for more purchase information.
The Roomba Remote(included with Roomba Pro Elite)
The Roomba Remote allows you to perform a variety offunc tions
with Roomba, some of w h ic h ca n’t be per f or me d w i t hout t he Room ba
Remote . The Ro o mba Remote enables you to turn your Roomba on
and off,dr ive Roomba to specific areas to be cleaned,select and pause
cleaning cycles including Spot and Max Cle ani ng mo des — a l l w ith out bendin g dow n to pu sh a si ng le but ton.
The Roomba Remote is included with Roomba Pro Elite, but is
compatible with Roomba Pro ( see
with Roomba Proon page 14).The Roomba Remote may be purchased
separately;visit www.RoombaVac.com for online purchase options,
and for more purchase informat ion .
compatible with t he origi na l ( si lve r-colored) Roomb a m odel .
Roomba Remote Battery Installation
1. Open the Battery Door located on the bottom of the Roomba
Remote by press i n g its Re l ease Tab (Figure 11) and swinging the Battery Door up and out ofRemote.
2. Insert 2 new “AA”size alkaline batteries (not included) by follow ing the “+”and “-”symbols.
3. Replace the Battery Door by sliding it into the grooves on the Remote,and swinging the door closed until the Release
Tab clicks back into place..
Usi ng the Ro omba Remote
Note: the Roomba Remote is not
Figure 11: Push the Release Tab in on
the Battery Door to open,and insert 2
“AA” Alk aline Batteries (not included)
in the Roomba Remote.
Battery
Door
Release
Tab
Using the Roomba Remote
Your Roomba Remote is designed to be extremely easy to use.Point the Roomba Remote at Roomba Pro | Pro Elite from up
to 20 feet away.Below are some impor tant functions of the Remote:
Figure 12: Controls on t he
Room ba Rem o te .
Roomba
Power Button
Room Size
Cleaning
Buttons
Spot Cleaning
Button
MAX Cleaning
Button
Control Pad:
Drive Straight
Control Pad:
Arc to Left
Control Pad:
Turn in Place
Counterclockwise
Pause Button
Beam Emitter
P
Remote
Remote
Indicator Light
TMT
M
Roomba Remote Notes:
• Virtual Wall Units and the Roomba Remote:If you drive Ro o mba Pro | Pro Elite into the beam of a Virtual Wall,
Roomb a wil l be e p, b ut become blinded to commands from the Remote .Th e Ro omb a Rem ote a nd t he Virtual Wall Unit
both use Infrared beams,and Roomba’s beam receiver can only pick up one beam at a time.For safety reasons,the
Virtual Wall Unit’s beams al w a ys ta ke precedence over the Roomba Remote.In this case,to continue using the Remote,
you w ill need to either pick up Roomba, tur n o f f the Vir t u al Wall Un it , or wai t u nt il the Virt ual Wall Uni t autom a tic ally
powers down af ter two hours.
• Driving Roomba toward walls or staircases: If yo u d rive Ro om b a into a wall or too close to the top ofa staircase,it
will stop and beep ifyou try to go forward.Press the left or rig ht side of the Control Pad to turn Roomba in place until
Roomb a is po i nting away from the obstacle.Roomba will now drive forward. It is a good idea to avoid driving Roomba
near staircases using the Remote.
1. Powering Roomba Up and Down Remotely: Press t h e Power
Button on t h e Re mo te . If Roomba was off it will turn on with a beep,and
its Batter y Indicator Light will glow.Press the Power Button again to turn
Roomb a of f . Note: the Power Button on the Roomba Remote only turns
Roomba Pro | Pro E l i te on an d of f . Li ke most othe r re m o t e s , the Roomba
Remote requ i re s no power sw itch of its own .
2. Drive Roomba to the Dirt: Turn R oomba on, and use th e Rem ote’s
Control Pad (see Figure 12) to drive Roomba where you want it to clean.
Roomba cl e ans a s you d rive it. To reverse direction,use the Control Pad
to turn in place clo ckwise or counter-clo ckwise,then drive straight once
Roomb a is po i nt e d in the desired direction.
3. Starting, Pausing and Stopping a Cleaning Cycle: To start
Roomb a Pro | Pro Elite cle a n i n g with the Remote,either place Roomba in
the middle ofthe room or drive it to the middle of the room (see #2
above).Press the Cleaning Cycl e B u tton o n the Re mote and Roomba wi ll
begin cleaning.The Roomba Remote’s Cleaning Cycle Buttons work much
as they do on Roomba Pro | Pro Elit e . See
Starting Roomba on p ag e 9 a s
well a s Pausing and Stopping Ro omb a on p age 10.
4. Spot Cleaning with the Remote: To drive Roomba to a specific area
to be cleane d such a s spi l le d plant s oil or kitty litter,drive Roomba to the
dirt (see #2 above).Once it’s in the middle of the soiled area,push the
Spot Cle an i ng but ton an d let Roomba go to work.
5. Spot Cleaning with the Remote During a Cleaning Cycle: You
can also use the Roomba Remote to interrupt a cleaning cycle and drive
Roomb a t o an are a that needs intensive cleaning.Pointing the Remote at
Roomb a , push t h e red Pause button on the Remote to pause the cur rent
cleaning cycle,and dr ive Roomba to the new area (see # 2 above).Once
you ar e finished Spot Cleaning,press any Cleaning Cycle Button except the
Spot Button to u n -pause Roomba and c ontinue the p aused cleani ng cycle.
12
13
Page 20

10"
10"
• Keeping tabs on Roomba’s state: The Roomba Remote has all the same buttons as on Roomba Pro | Pro Elite,but
its buttons do not light up as they do on Roomba to help keep you informed ofRoomba’s state.Always look at Roomba
to determine it’s state.
• The Pause Button: The red Pause Button on the Roomba Remote may be pressed dur ing any cleaning cycle to Pause
Roomb a . This b u t t on may be thought of as a “panic button”:it only pauses Roomba.Once Roomb a i s p au se d , a dd it i ona l
presses of t h i s button have no effect.
Tip: Can’t find Roomba once it’s finished its work? Point the Roomba Remote in the general direction that you think
Roomb a may be hiding.Press the Power Button on the Roomba Remote over and over.If Ro o m b a can “see”the Re m o t e ,
it will b e ep to start up.
Using the Roomba Remote with Roomba Pro
The Roomba Remote is designed for use with Roomba Pro Elite ,but i s a ls o comp at i bl e w i t h Room b a Pro.As a n a dd e d
benefit for Roomba Pro owners,all of the features of Roomba Pro Elite are available to Roomba Pro users,including MAX
Cleaning mode. However,this feature works slightly differently with Roomba Pro,as described below.
• Starting MAX Cleaning with Roomba Pro: If Roomba Pro i s o f f,turn it on (see Feature #1 in Usin g the Roomba
Remote on p ag e 13), and press the MAX Button on the Roomba Remote.Roomba will play its “Starting a Cleaning Cycle”
tune and begin a MAX cleaning cycle.Roomba typically lets you k now what Cleaning Cycle it’s in by illuminating the correspon ding C l eaning Cycle Button.Sin ce Roomba Pro does not have a MAX Cleaning Cycle Button,no Cleaning Cycle
Button is i l lu m i nat ed w h i l e Ro omb a Pro i s i n a MAX C l e a ning Cycl e .
• Pausing MAX Cleaning with Roomba Pro: Once in MAX Cleaning Cycle,you can pause the cleaning cycle in a
variety of ways — pressing the red Pause Button or any Cleaning Cycle Button on the Remote,picking Roomba Pro up or
pressing any Clean i ng Cycle Button on Roomba Pro.When Roomba is paused,it ty pically lets you know what Cleaning
Cycle is paused by flas hin g the c o rre sponding Cleaning Cycle Button.Since Roomba Pro does not have a MAX Cleaning
Cycle But t o n,n o Cleaning Cycle Button is flashing while Roomba Pro is paused during a MAX Cleaning Cycle.In this
case,Roomba Pro’s control panel may look a bit confusing. Here’s how to tell that Roomba is paused in a MAX Cleaning
Cycle: I f non e of the Cle aning Cycle buttons are illuminated,and the Battery Indicator Light is not flashing red,then
Roomb a is paused in a MAX Cleaning Cycle.
Beyond these two instances,the Roomba Remote will operate the same way it does with Roomba Pro Elite.
The Wall Mount Unit (Roomba Pro Elite only)
The Wall Mount Unit included with Roomba Pro Elite gives you a convenient,compact storage solution for Roomba.The
Wall M ount Unit easily mounts to a variety of wall surfaces,and is designed to provide easy access to empty the Part icl e
Bin and ch arg e Room ba w h ile stored.All the hardware needed to mount the unit are included with Roomba Pro Elite.The
Wall M ount Unit fits all Roomba and Roomba Pro models,and is available as an accessory.Visit www.RoombaVac.com for
online purchase opt ions,and for more purchase i n f ormation .
Installing the Wall Mount Unit
To install the Wall Mount Unit you will need a drill,a 1/4”drill bit or 1/8”drill bit (see below to determine which is best for
your n eeds),a hammer,a pencil,and a #2 Phillips Screwdriver.
1. Remove all protective packing material from around the Wall Mount Unit.
2. Determine a suitable location for the Wall Mount Unit.Be sure
to leave at least 10”of clearance above the Wall Mount Unit
(beneath any shelving,for instance) to lift your Roomba i n a n d
out comforta bly.Al so, l eave 10”of clearance below the Wall Mount
Unit to empty R oo mb a’s P articl e Bin w h i l e stowe d (Figure 13a).
If pos si b l e , find a l o catio n n e a r e n o u gh to an electrical outlet for
the Charger AC Adapter to reach the Wall Mount Unit.
Note:
Roomb a fits s n u gly in the Wall Mount Unit.It may require some
force to lif t Ro omb a out.Be sure to position Roomba i n a locati on
where you have plent y of leverage.
3. Using a pencil,mark the locations of the holes to be drilled on the
wall ( Fi g ure 13c).
4. Remove the Wall Mount Unit and drill the five pilot holes in the
wall. Use a 1/4”drill bit to use the included wall anchors (best for
drywall or plaster),or an 1/8”drill bit if using just the included
screws without wall anchors (best for wood).If using the wall
anchors,hammer the wall anchors into the holes until they are
flush with the wall surface (Fig ure 13d).
5. Affix the Wall Mount Unit to the wall by screwing in the included
screws with a #2 Phillips screwdriver (Figure 14a).
6. Insert the rubber screw hole plugs into the screw holes to finish
installation (Figure 14b).
7. Press the Charger AC Adapter’s cord into the Charge Cord Pincer on
the bottom right side of the Wal l Mount Unit as shown,and plug
the Charger AC Adapter into a standard U.S.electrical outlet.
Using the Wall Mount Unit
Roomb a may be store d a nd ch a rg ed in the Wall Mount Unit as needed
in between floor cleanings.To lift Roomba in and out of the Wal l Mount
Unit , firm ly gra sp Ro omba’s h and le in one hand and use the other hand
to steady Roomba.Alter natively,you can grasp Roomba securely with
both hands (Fig ure 16).
Figure 13a-d (Pro Elite only):
Preparing to mount the Wall
Mount Unit. Hold up the Wal l
Mount Unit as shown on the
wall where you want to s tor e
Roomba, lea ving enough clear ance above and below the Unit
(Figure 13a).Using a pencil,mark
the locations ofthe holes to
be drilled on the wall (Figure
13c).R emove the Wal l Mount
Uni t a nd drill the five pilot
holes in the wal l. Hammer the
wall anchors into the holes
(Figure 13d).
Figure 14a-b (P ro Elite only): Securing
the Wall Mount Unit.Affix the Wall
Mount Unit to the wall by screwing in
the included screws with a #2 Phillips
screwdriver (Fig ure 14a). Insert the
rubber sc r ew h ole plug s in t o th e
screw holes to finish installation
(Figure 14b).
Figure 15 (Pro Elite only):Trap a few
inches of the Charger AC Adapter’s
cord in the Charge Cord Pincer on the
bottom right side ofthe Wall Mount
Uni t for eas y c harg in g whe n Roomba
is stowed away.
14
15
Page 21

CLICK!
CLICK!
Note: Ro o mba fi t s snugly in th e Wa ll Mount Unit,so it may require some force and a little practice to lift Ro omba out easily.
TMTMTMT
M
T
M
Filter Door
To empty Roomba while stored in the Wall Mount Unit (Figure 17),simply follow the instruct ions for Empty i ng t h e Par ticle
Bin on this pa ge . To charge Roomba in the Wall Mount Unit, si mply plug the Charge Plug i nto Roomba’s Charge So cket. B e
sure to remove the C h a r ge Plug from Ro omb a before lif ting Roomb a i n a n d out .
Important: The Wall Mount Unit is for Roomba only. It will not support additional weight.
5. To reinstall the Par t icle Bin,slide it back into Ro omba.
The Particle Bin will click when it is properly seated.
NOTE: Always car ry Roomba by its handle and never tilt it
forward,as de br i s m ay spi l l out of the particle bin.
TMT
M
Figure 16 (Pro Elite
only):Grasp Roomba
with two hands to lift
Room ba in and o ut of
the Wall Mount Unit.
Figure 17 (Pro E lite on ly):
Emptying Roomba’s Particle
Bin while mounted.When
stowed,Roomba’s Handle w i l l
extend to help lift Roomba
out for next use.
Caring for Your Ro omba
Your Roomba requires a few simple maintenance steps:
• The Particle Bin. Before each use,you should empty both sides of Roomba’s Particle Bin (this page).
• The Main Cleaning Brushes must a l s o be removed , checke d and cleaned after every ten floor cleanings — every five
floor cleanings if pet hair or long hair are issues in your home.
Main Brushes may result in poor performance or malfunction.
remov i n g the m (pag e 18) to examine and clean the Brush Axles,as well as the Brushes themselves.
• The Vacuum Inlet Lid should perio d ic a l ly be checked for debris under the clear lid,and cleaned as needed (page 19).
• The Four Sensor Areas underneath the Front Bumper should be checked periodically,and dusted off as needed (page 20).
Emptying the Particle Bin
Emptying Roomba’s Particle Bin is a two-step process.Be sure to
empty both sides ofthe Particle Bin before each use.
Step 1: Emptying the Main Bin (the back side)
1. IfRoomba is on,press the green Power Button to turn it off.
2. Press dow n on the Particle Bin’s Release Tab and keep it
depressed while pull ing the Particle Bin straight back
(Figure 18a-b).
3. Empty the Particle Bin into a trash receptacle.
Note: Failure to regularly remove and clean the
Caring for the Clean ing Br ushes i nvolves completely
Repla c i n g t h e Air Filter
The Air Filter (located in the Filter Door underneath
Roomb a’s Parti c l e Bin) needs to be replaced if it becomes
punctured or i f you not ice a de cli ne i n t he cleaning performance of Roomba.Two spare Replacement Fi lters are included
with Roomba;additional Replacement Filters are available
for purchase in packs of three.Visit www.RoombaVac.com
for more purchase informat i on,or cont act your nea rest
Roomb a retaile r for av a ilab i lit y.
1. If Roomba’s power is on,turn it off.
2. Remove the Particle bin.(see Figure 18a-b).
3. Flip the Particle Bin over to access the Filter Door.
4. Release the small Tab on the Filter Door and pull the
Filter D o or upward (Figure 19).
5. Unclip the old Air Filter from the Filter Door Frame
(Figure 21a).
6. Slide the new Air Filter into the grooves on the Filter
Door Frame (Figure 21b).
7. Click the new Filter into the Filter Door Frame as show n
in Figure 21c.
8. To reinstall the Filter Door,slide the Filter Door into
place (Figure 20a).The Filter Door will click when it
reattaches itself to the Particle Bin (Figure 20b).
Figure 19:Accessing the Filter Chamber.Open the
Filter Door on the bottom of t he Particle Bin by
releasi ng the s m all Tab on the Fi lter Door as
shown and pul l i ng t he Tab upward.Clean the
debris from this chamber each time you empty
the Particle Bin.
Figure 20a-b: Reinstalling the Filter Door.Glide
the Filter Door into grooves (Figure 20a), and
snap the Filter Door into pl ace ( Figure 20b).
Step 2: Emptying the Particle Bin’s Filter Chamber
(the bottom side)
1. Flip the Particle Bin over to access the Filter Door.
2. Release the small Tab on the Filter Door and pull the
Filter D o or upward (Figure 19).
3. Empty debris from the Filter Chamber into a trash
receptacle.If necessary,gently brush li nt or ot h er de br i s
from the interior of the ai r f i lte r.
4. To reinstall,slide the Filter Door into place (Figure 20a).
The Filter Door will click when it reattaches itself to the Particle Bin (Figure 20b).
Figure 18a-b:Emptying Roomba’s Particle Bin.
Press the Release Tab (Figure 18a) and Pull the
Par ticle Bin out (Figure 18b).The Filter Door is
on the underside of the Particle Bin.
16
Figure 21a-c: Snap out old filter from Filter Door
Frame ( Fi gure 21a).Slide new Filter into gro oves
on Filter Door Frame (Figure 21b).Snap new Filter
into Filter Do or Frame as shown (Figure 21c).
17
Page 22

Vacuum
Inlet Lid
Cleaning the
Mai n Br u s he s
It i s im port ant tha t you re gularly remove and clean the
Main C le a n i n g Br u s he s of your Roomba.Debris can
accumulate around the Brushes and the Brush ends,or
axles,causing a decrease in cleaning ability and potentially damaging the unit.If the Main Brushes are not
cleaned regularly your Roomba may seriously malfunction.
In most households it’s a good idea to clean the Main
Cleaning Brushes after every ten floor cleanings. In
houses with pets or long hair,clean the Brushes after
every five floor cleanings.The Main Cleaning Brush
axles cannot be checked without removing the
Brushes f rom Ro omb a . It is a si mp le pro ce ss t h at
you w ill mast er quickly with a little practice.
1. IfRoomba’s power is on, tur n it off.Empty the
Par tic l e Bin an d place Roomba upside down
(cleaning surface up) on a flat, padded surface
such as a towe l , with the Front Bumper facing
away f ro m yo u .
2. Unlatch the Wire Guards that cover the Main
Cleaning Brushes from the two Release Tabs
(Figure 22):Push down on the Wire Guards to
flatten and elongate them,and pull the front edge
of the Wire Guard (the edge nearest you) toward
you to sw i n g it u p and over both Release Tabs to
expose Brushes.(see Figure 23a-b).
3. Using a Phillips-head screwdriver,completely
loosen the screw in the Brush Coupler,the component that holds the Brushes in place on the right
side of the unit(Figure 23 c) .Note that th e s crew
will not come all the way out of the Brush Coupler
so you cannot lose it. Pull up the Brush Coupler
(see inset in Figure 23d.) The Main Cleaning
Brushes will come up with the Brush Coupler.
4. Pull the Brush Coupler of f the en d of t h e Brushes ,
then pull the Brushes to the r ight and up,out of
Roomb a (Figure 23d).
5. Clean any hair or other debr is off the Brushes.
6. Completely clean any debris from around the
Brush Axles (Figure 2
4).
Figure 22: The Wir e
Wire Guard
Release Tab
Figure 23a-b: Unlatch the Wire G uards from t h e two
Release Tabs by pushing down on the Wire Guards
to flatten a nd e l on gate them , a nd pu lling t h e f ront
edge of the Wire Guard toward you to s wing it u p
and over each Release Tab.Once the Wire Guards have
been freed from the Release Tabs,they can be swung
up and away,exp osi ng t he Main Cleaning Brushes.
Figure 23c-d: Completely lo osen the screw on the
Self-Adjusting Cleaning Deck with a #2 Phillips
screwdriver,then pull out the plastic Brush
Coupler and the two Main Cleaning Brushes. If
there is a thumbscrew on the Brush Coupler,you may
be able to loosen the screw by turning the thumbscrew with your fingers.
Guards properly
installed under the
two Release Tabs.
Figure 24: C lean a nd
remove any debris
built up o r wou n d
around the ends and
metal axles ofboth
Cleaning Brushes.
Reassembling the Brushes
1. Put the Self-Adjusting Cleaning Deck back together by inserting the square ends of the two Brushes into the square
sockets in the Cleaning Deck.
2. Insert the other ends ofthe Brushes into the small holes in the Brush Coupler.
3. Lower the Br ush Coupler into its slot and screw it into place.
4. Swing the Wire Guards back in place and snap them down into their slots in front ofthe Release Tabs.
Cleaning the Vacuum Inlet
Over time,debris will accumulate in the Vacuum Inlet.Empty
the Vacuum Inlet every 10 floor cleanings or so to keep air
flowing freely,especially ifyou notice a decline in Roomba’s
cleaning performance.
1. If Roomba is on,tu r n it of f a n d e mpt y the Part icle Bin.
2. Place Roomba upside down (cleaning surface up) on a
flat,padded surface with the front Bumper facing away
from you.
3. Press in the white rectangular Release Tab on the
Vacuum Inlet Lid to release the latch (Figure 25a),and
pull upward to remove the Lid .
4. Shake the debris into a trash receptacle.
5. Turn the Vacuum Impeller,the fan-shaped mechanism
on the l eft side of the Vacuum Inlet,with your finger to
make sure that it spins freely (Figure 25b).
6. Guide the hinge tabs on the Vacuum Inlet Lid back into
their holes (Figure 25c),and press in and down on the
white rectangular Release Tab to snap the Lid securely
back in place.
Vacuum Impeller
Figure 25b: M ake sure t he Vacuum Impeller
is free of debris and can spi n freely.
Figure 25a: R emovin g t he Vacuum Inlet Lid.
Figure 25c: R einstallin g t he Vacuum Inlet Lid.
18
19
Page 23

Maintaining the
Side Brush
Refe re n c e I n fo rm ati o n
Edge-Cleaning Side Brush
Period ical ly c he ck the E dge-Cleaning Side Brush by
spinning it to ensu re debris has not built up underneath it.
If it s e e m s t o b e o b s t ruc ted,remove and clean the EdgeCleaning Side Brush as follows:
1. IfRoomba is on,turn it off and empty the Particl e
Bin.Turn Roomba over so the cleaning surface is up.
Place it on a flat,padded surface.
2. Turn the Edge-Cleaning Side Brush so the Screw Head
can be accessed (see Figure 26).Point the screw head
towards Roomba’s Front Bumper,a s shown b el ow.
3. Using a small Phillips-head screwdriver,unscrew the
holding screw.
4. Pull the Edge-Cleaning Side Brush up and offof
Roomba.
5. Clean out any hair or other debris that may have
been caught under the Side Brush or on the Side
Brush S h aft.
6. Push the Side Brush back onto the Side Brush Shaft.
Screw the holding screw securely into the EdgeCleaning Side Brush,being careful not to over-tig hten.
Ke e ping Roomba ’s
Sensors Clean
Occasionally,lint or other debris will collect in Roomba’s
key s e n sor ar eas,which may cause Roomba to exhibit
unexpected movement behavior.If this happens,clean
these areas as follows:
1. IfRoomba is on,turn it off and empty the Particl e
Bin.Turn Roomba over so the cleaning surface is up.
Place it on a flat,padded surface.
2. Using a cotton swab,check and clean out any lint or
other de br i s f rom the four recessed sensor areas
located under the Front Bumper (Figure 27).
Figure 26: Unscrew
the holding screw
on the Spinning
Side Brush as
shown to remove
the brush.
Sensor Areas
Figure 27: Ma ke sure that all four recessed
sensor areas under the front bumper are
kept free of dust and d e bris.
Troubleshooting Tips
My Roomba turns on, beeps and shuts off.
Roomb a’s Main Cl e a n i n g B r ush axles may be clogged with hair or other debris.
1. Make sure Roomba is fully charged and the Battery is properly seated.
2. IfRoomba is charged,then empty the Particle Bin (see Emptyi ng t h e Par ticle Bi n on p age 16) and follow the instruc-
tions for removing and cleaning the Main Brushes (see
the Brush ends,or axles.
My Roomba is not working or there has been a decrease in the cleaning performance.
1. Ensure that the Battery is properly seated and charged.
2. Check that the Part icle Bin (including the Filter Chamber) and Vacuum Inlet are empty,and that the Vacuum Impeller,
(the fan-shaped mechanism on the left side ofthe Vacuum Inlet) spins freely.(See the entire section entitled
Your Roomba Pro,beginning on page 16 for more infor mation.)
3. While you are examining the Filter Chamber,check the Air Filter (attached to the Filter Door) to make sure it is not
clogged or dama ged.
4. Remove and examine all Brushes and their axles to make sure there is no t h ing wou n d a ro u n d t h e m ( s e e
Main Brus hes on p age 18 as well as Maintaining the Edge-Cleaning Side Bru sh on pa ge 20).Also check to see there is
nothing wound around the Wheels or Wheel Axles.
My Roomba Gets Stuck.
Your Roomba may occasionally get stuck,especially in rooms that it has not cleaned before.If it does get stuck,Roomba
will try to free itselfby turning in different directions. If it cannot free itself,Roomba will pause its cleaning cycle,flash its
Room S i z e Butt on s a n d be e p periodical ly for five minutes to let you know it’s stuck,before shutting off to conserve power.
Your Roomba might get stuck for several reasons:
1. It is wedged or pinned between or under narrowly spaced objects.
2. A cord, str ing,long rug fringe or carpet tassel is wound around its Brushes or Wheels.
3. One ofthe Wheels is no longer in contact with the ground.
4. Roomba bumps into objects and repositions them in such a way that an exit path no longer exists.
Move or b l ock a ny objec t th at Roomba gets stuck on or under.See the illustration entitled “Roomba Care Hints”on the
back cover of the Quick Start Guide to help identify and easily fix these problem areas.Once the problem areas have been
fixed,press the flashing Cleaning Cycle Button to continue Roomba’s clean ing cycle.If you wish to beg in a new clean ing
cycle,press Roomba’s Power Button to turn it off,then turn it on again. Make sure the Particle Bin is empty and select the
desired Cleaning Cycle Button to start a new cleaning cycle
My Roomba Remote doesn’t work.
1. Make sure the Roomba Remote has new batteries.
2. Make sure that Roomba is operational by turning it on and off with the Main Power Button on Room ba . If Roomba
won’t turn on , check that Roomba’s Battery is charged and completely installed.
2. Check that Ro omba’s Beam Receiver (see Fi g ure 3 A ) is clean by wiping it w ith a s oft ,dry cloth.Clea n t he Roomba
Remote’s tra n s m i t ter area ( on t he f ront end of the Remote) by w iping it w ith a sof t, dry cloth .
3. Make sure you are close enough to Roomba for the Remote to work.Tr y pointing the Roomba Remote at your Roomba
from less than 20 feet away,press the Power Button on the Roomba Remote and wait to hear Roomba’s St ar t- Up beep .
Ensure you are pointing the correct end at Roomba.
Cleaning the Main Bru shes on pa ge 1 8 ). Pay spec i a l atte nt ion to
Caring for
Cleaning the
20
21
Page 24

Part of my Roomba has broken.
Please call Roomba Customer Support at 1-877-855-8593.
My Virtual Wall Unit is not working.
1. Check that new batteries are installed,and that the unit is turned on.
2. Make sure the Beam Emitter is pointed across the opening you want to block.
3. If that does not work,tur n the Virtual Wall Unit’s Range Selector Sw itch up to the maximum setting for large openings.
4. Some very large openings require that more than one Virtual Wall Unit be used. You can purchase additional Virtual
Wall Units b y going to your nearest Roomba retailer,or visiting www.RoombaVac.com for online purchase options,and
for more purchase informat i on.
Frequently Asked Questions
Q: Why doesn’t my Roomba clean my floor in straight lines?
A: Roomba uses an algor ithm-based cleaning pattern to clean your home most efficiently.For all clean ing cycles except
Spot Cle an i ng,when Room b a s t arts cleani ng it t ravels around the floor in a spiral pattern (see Figure 1 on page 4).Its
Non- M a rr i ng Bumper will c o ntact a wall,or it may try to find a wall after spiraling for a while.Roomba follows the
wall for a sh or t p e r i o d of t i m e ,u si ng it s spinning,Edge-Cleaning Side Brush to move part icles away from the wa ll and
into the Vacuum’s path.After cleaning along a por t ion of the wall or other object,Roomba criss-crosses the room in
straight lines.Roomba repeats this cleaning pattern until its cleaning time has elapsed.This sophisticated navigation
ensures that Roomba will clean your whol e ro om a s t horoughly as possible.
Roomba Battery will not charge.
1. Ensure that the Charger AC Adapter is plugged into a working outlet.Tr y several outlets to be sure.
2. Make sure that the Charger AC Adapter is fully plugged into Roomba.No metal should be visible once the plug is fully
inserted.See
Charging the Battery on page 7.
3. Check that the Batter y is properly inserted.To be sure,remove it,inspect the contacts on the Batter y and in Roomba to
make sure they are not blocked by dirt,then reinsert the Battery.It should click into place on each side.
4. The Battery Indicator Light on Roomba (under the Battery Icon) should pulse yellow.If it does not glow at all,check all
the connections.The Battery Indicator Light will turn off when the Battery is fully charged.
My Roomba moves too close to or far from my walls.
1. Ifthe Edge-Cleaning Side Brush does not clean close
enough to the wall,use a pen to push the Adjustment
TMT
M
T
M
Tab toward the r ear of the Bumper (see Figure 28).
This will make Roomba follow closer to wal ls .
2. Ifthe Edge-Cleaning Side Brush is bumping into the
wall, use a pen to push the Adjustment Tab toward the
center of the Bumper.This wi ll make Ro om b a f ollow
further away from walls.
My Roomba Pro Elite doesn’t clean for long in MAX Cleaning mode.
Figure 28: Using a pen to adjust how cl ose
or far away Roomba will follow walls.
MAX Cleaning Cycle enables Roomba to clean until its batteries are f ully discharged.If t he battery is part ially discharged
when starting a MAX Cleaning Cycle,Roomba w i ll not clean for as long as it would on a fu ll charge.
1. Make sure the battery is fully charged.
2. Check that both sides of the Particle Bin are empty before you start Roomba.
I can’t find the answer to my question in the Manual.
1. Additional Troubleshooting Tips may be found by visiting the Support section ofwww.Roombavac.com.
2. Send email to roomba-support@irobot.com,or call the toll-free Customer Support Line at 1-877-855-8593.
Q: Are pets and children safe around Roomba?
A: Roomba has been designed with a number of safety features,including automatically shutting offwhen it is picked up
or gets stuck .Chi ld ren an d p ets should always be supervised around Roomba for optimum safety and cleaning performance.
Q: Does Roomba clean corners and along the walls?
A: Roomba has a spinning,Edge-Cleaning Side Brush that cleans next to walls,most corners and other tough-to-reach
places.
Q: Will it go under kickboards,beds, and fur niture?
A: Roomba has been designed to fit under the kickboards in your k itchen.If your bed or other furniture is more than 4”
off the f l o or,Roomba w i l l happily clean underneath.
Q: What powers Roomba?
A: Roomba is powered by a NiMH Re c h a r g e a b l e Bat ter y.
Q: How much suction power does Roomba have?
A: Roomba uses a unique, three-stage cleaning system.The spinning,E dge-Cleaning Side Brush sweeps debr is from cor-
ners and edges ofthe room into Roomba’s main cleaning path.Two counter-rotating Cleaning Brushes sweep up larger
particles,while a small,extremely efficient squeegee vacuum suck s up t he s ma l l e r par ticles.This allows Roomba to get
impressive cleaning performance using only 30 Watts,much less power than is required by traditional upright vacuums.
Q: How long wi ll the Battery’s charge last?
A: The life ofa fully-charged Battery depends on the floor surface to be cleaned.A sing le charge c an last from about 60
minutes (on medium pile carpet) to about 90 minutes (on hard floor surfaces).
Q: How many rooms will Roo mba cl e a n bef ore the Battery needs to be recharged?
A: It depends on the floor surface to be cleaned.For typical operation,Roomba cleans three 14’x 16’medium-size rooms.
22
Q: How long does it take to recharge the Batter y?
A: The built-in battery charger and Charger AC Adapter that comes with Ro omba takes up to 12 hours to recharge
the Battery.The optional Rapid Charger accessory recharges a Battery in about two and a halfhours.Contact your
nearest Roomba retailer for availability,or visit www.Ro ombaVac.com for online purchase options and more
purchase in for m at ion .
23
Page 25

Q: Where can I purchase additional Batteries?
A: You can purchase addit ional Batteries by contacting your nearest Roomba retailer,or by visiting www.RoombaVac.com
for online purchase options and more purch a se in f o r mati on.
Q: Will Roomba fall down stairs or into a step-down room?
A: Roomba automatically senses stairs and turns away from them.However,if the room to b e cleane d contains a ba lcony,
a physical barrier should be used to prevent access to the balcony and ensure safe operation.
Q. How is the or i ginal Ro omb a d i f fere nt f rom Room ba Pro a nd Pro E l i te ?
A: All three models use the same breakthrough cleaning technology.Roomba Pro features the new Spot Cleaning cycle,
which enables you to clean 3-foot-wide areas intensively in 1-2 minutes.Roomba Pro also comes with a second Virtual
Wall Unit. Roomba Pro Elite featu res Sp ot C le aning as well as the new MAX Cleaning Cycle,which allows Roomba to
clean an open floor plan,a very large room,or multiple rooms by cleaning for up to 90 minutes,much longer than it
does on the L Cleaning Cycle.The Pro Elite also comes with a Wall Mount Unit for convenient mounting and storage,as
well a s a s e co nd Virt u a l Wa ll Unit.Roomba Pro Elite also comes with the Roomba Remote (see
page 12).
Q: How does the Virtual Wa ll Unit work?
A: The Virtual Wall Unit is used to block open doorways and confine Roomba in a ro o m . The Unit c a n also be used to
divide a large room and force Roomba to clean just one side ofthe room.The Virt ual Wall Unit sends a harmless,
invisible beam across the opening,confining Roomba to the area where you want it.
Q: Where can I purchase additional Vir tual Wall Units?
A: You can purchase additional Virtual Wall Units by contacting yo u r n eares t Roomba retailer,or by visiting
www.RoombaVac.com for online purchase options and m ore pu rc h a se in f o r mati on.
Q: Does the Particle Bin need to be emptied? Does the Filter need to be cleaned? How often?
A: Debris from both sides of the Particle Bin (which includes the Air Filter) should be empt ied after each use.See
for Your Roomba Pro on page 16 for more information.
Q: How can I get ext ra Replacement Air Filters?
A: The Air Filter needs to be replaced if it becomes punctured or ifyou notice a decline in the cleaning perfor mance of
Roomb a . Two spare Re pl acement Filters are included w ith Roomba; additional Replacement Filters are available for
purchase in p ack s of three.Visit www.RoombaVac.com for more purchase information,or contact your nearest
Roomb a retaile r for av a ilab i lit y.
The Roomba Remote on
Caring
Q: IfRoomba gets stuck,what should I do?
A: Help Roomba get unstuck,then press the flashing Room Size Button to continue Roomba’s cleaning cycle.Please refer
to the il lust r ati on entitled “Roomba Care Hints”on the back cover of the Qu ic k Start Guide,as well as
on page 21 for more information.
Tips
Q: Is Roomba safe to use when I leave my home?
A: Roomba can operate unattended,so long as small children and pets are not present to interfere with Roomba’s
operation, and loose objects have been picked up.
Q: Does Roomba pick up pet hair?
A: Roomba picks up pet hair very effectively from carpet as well as hard surfaces. As with most vacuums,if pet hair is an
issue in your house you may need to pay special attention to caring for the appliance.Empty the Particle Bin (page 16)
and remove and clean the Main Cleaning Brushes (page 18) more f requently to reduce the chance ofclogging.
Remov i n g a n d cle ani ng t he Main Br ushes af ter every five room cleaning is recommended in thes e ca ses .
Tip: If there i s a l ot of pet hair in the room (such as the first time Roomba cleans the room),the Cleaning Head will
pick up a great dea l of it .If the room is medium-sized or larger,you may want to use the “S”(Small Room) setting a
few tim es , a l low i ng Ro omb a to stop clean ing af ter a shor t p er io d of t ime so you can remove the collec ted pe t hair.
Upo n comp le ti on of t h is pro ce ss , you shou ld be able to r un Roomba on longer clean ing cycles (for longer cleaning
periods),with a reduced chance ofclogging from pet hair.
Q: When I turn on Roomba,t he Battery Indicator Light is green,but quickly turns to red.Why is that?
A: Even when they are nearly completely drained,most batteries tend to recover their charge a small amount after they
are rested.In this cas e, Roomba’s Battery needs to be recharged.
Q: Do you offer spare parts?
A: Please contact us with your request.Email us at roomba-support@irobot.com or call toll-free 1-877-855-8593.
Troubleshooting
Q: Will Roomba clean all floor surfaces?
A: Roomba is great at cleaning hard floor surfaces including hardwood,linoleum,laminate,and ti le.Roomba is quite
good at cleaning low- to me dium-pile carpet as well.Roomba is not designed to op erate on deep-pile or shag carpets,
or rugs with long tassels or fringe.
Q: Do I need to change the floor adjustment when changi ng flo or surf aces?
A: No,Roomba’s Self-Adjusting Cleaning Head automat ically adjusts to different floor surfaces as it cleans carpet,hard-
wood,linoleum,and tile.
Q: Will Roomba sweep water f rom the floor?
A: No, Roomba should not be used to pick up any liquid including water.
24
Q: How can I find out more about Roomba?
A: The Roomba website,www.Ro ombaVac.com,is full of detailed information about the Ro omba Robotic FloorVac.You
can also go to the Roomba User’s Forum to chat with other Roomba users about their experience.To join the forum,
go to: htt p: //groups.yahoo.com/group/roomba-users/join
Contacting Customer Support
Ifyou cannot find the answer to your question in this Manual or on the www.RoombaVac.com website,please send email
to roomba-support@irobot.com,or call our toll-free Customer Support Line at 1-877-855-8593.
25
Page 26

Limited Warranty to Original Purchaser
This Roomba brand product,as supplied and distributed by iRobot Corporation,and delivered new, in the original car ton to the original
customer purchaser, is warranted by iRobot Corporation par against manufactur ing defects in materials and workmanship for the qualifying limited warranty period as follows:
ONE HUNDRED EIGHTY (180) DAYS LABOR AND PARTS
Roomba Accessories
The following accessor ies are available for purchase.Contact your nearest Roomba retailer for availability,or visit
www.RoombaVac.com for online purchase options and m ore pu rc h a se informati on.
This limited warranty begins on the original date of purchase,and is valid only on products purchased and used in the United States,
and does not include installation,removal or reinstallation.Warranty repairs must be performed by iRobot Corporation’s authorized
service center. To receive warranty service,the original dated bill ofsale must be presented upon request as pro of of purchase to iRobot
Corporation’s authorized service center. To obtain warranty service, suppor t , or ot he r i nformation , please v isit our web site at
www.RoombaVac.com.If you do not have web access,please call 1-877-855-8593.
iRobot Corporation will repair or replace this product,at our option and at no charge with new or reconditioned parts,iffound to be
defective during the limited warranty period specified above.To re quest serv ice,the purchaser must contac t iRobot Corporation for
problem dete r m in at i on a n d service procedures. iRobot Corporation does not warrant uninterrupted or error-free operation ofthe product.All replaced par ts and products become the property of iRobot Corporation and must be returned to iRobot.Replacement parts and
products as su me t he re maining original warranty,or sixty (60) days,whichever is longer.
This limited warranty covers manufacturing defects in materials and workmanship encountered in normal,and,except to the extent otherwise expressly provided in this statement,non-commercial use ofthis product and shall not apply to the following,including,but not
limited to:damage which occurs in shipment; applications and uses for which this product was not intended;failures or problems which
are caused by products or equipment not supplied by iRobot Corporation;accidents,misuse,abuse,neglect,misapplication,fire,water,
lightning or other acts ofnature;incorrect electrical line voltage,fluctuations or surges;damage caused by improper installation; product
alteration or modification;improper or unauthorized rep air ; exterior finish or cosmetic damage;failure to follow operating instructions,
customer adjustments,maintenance and environmental instructions that are covered and prescr ibed in the instruction book; use of
non-iRobot or unauthor ized par ts, supplies,acce ss or i es or e qu ipme nt w h ich d a ma ge t hi s product or result i n s ervice probl em s; failures
or problems du e to i n comp at ibil it y w ith other equipment.
THERE ARE NO EXPRESS WARRANTIES OTHER THAN THOSE LISTED AND DESCRIBED ABOVE,AND NO WARRANTIES
WHETHER EXPRESS OR IMPLIED,INCLUDING,BUT NOT LIMITED TO,ANY IMPLIED WARRANTIES OF MERCHANTABILITY OR
FITNESS FOR A PARTICULAR PURPOSE,SHALL APPLY AFTER THE EXPRESS WARRANTY PERIOD STATED ABOVE,AND NO
OTHER EXPRESS WARRANTY OR GUARANTEE GIVEN BY ANY PERSON,FIRM OR CORPORATION WITH RESPECT TO THIS PRODUCT SHALL BE BINDING ON IROB OT CORPORATION.IROBOT CORPORATION SHALL NOT BE LIABLE FOR LOSS OF REVENUE OR
PROFITS,FAILURE TO REALIZE SAVINGS OR OTHER BENEFITS,OR ANY OTHER SPECIAL,INCIDENTAL OR CONSEQUENTIAL
DAMAGES CAUSED BY THE USE, MISUSE OR INABILITY TO USE THIS PRODUCT,REGARDLESS OF THE LEGAL THEORY ON
WHICH THE CLAIM IS BASED,AND EVEN IF IROBOT HAS BEEN ADVISED OF THE POSSIBILITY OF SUCH DAMAGES.NOR SHALL
RECOVERY OF ANY KIND AGAINST IROBOT CORPORATION BE GREATER IN AMOUNT THAN THE PURCHASE PRICE OF THE
PRODUCT SOLD BY I ROBOT C ORP OR ATION AND CAUSING THE ALLEGED DAMAGE.
Rapid Charger
Recharges Battery in about 2.5 hours!
Part #02004
Extra Battery
Keep charged Batteries ready to go!
Part #02002
Additional Vir tu al Wall Unit
Close off extra large openings, or close off
more than one opening at a time!
Part #02003
WITHOUT LIMITING THE FOREGOING,PURCHASER ASSUMES ALL RISK AND LIABILIT Y FOR LOSS,DAMAGE OR INJURY TO
PURCHASER AND PURCHASER’S PROPERTY AND TO OTHERS AND THEIR PROPERTY ARISING OUT OF THE USE,MISUSE OR
INABILITY TO USE THIS PRODUCT SOLD BY IROBOT CORPORATION NOT CAUSED DIRECTLY BY THE GROSS NEGLIGENCE OF
IROBOT CORPORATION.THIS LIMITED WARRANTY SHALL NOT EXTEND TO ANYONE OTHER THAN THE ORIGINAL PURCHASER
OF THIS PRODUCT,IS NONTRANSFERABLE AND STATES YOUR EXCLUSIVE REMEDY.
Some states do not allow limitations on how long an implied warranty lasts,or t he exclu si on or limitation of incidental or consequential
damages,so the above limitations or exclusions may not apply to you.This warranty gives you specific legal rights and you may also have
other rights w hich vary from state to state.
26 27
Replacement Filter 3-Pack
Part #02005
 Loading...