

Page 1
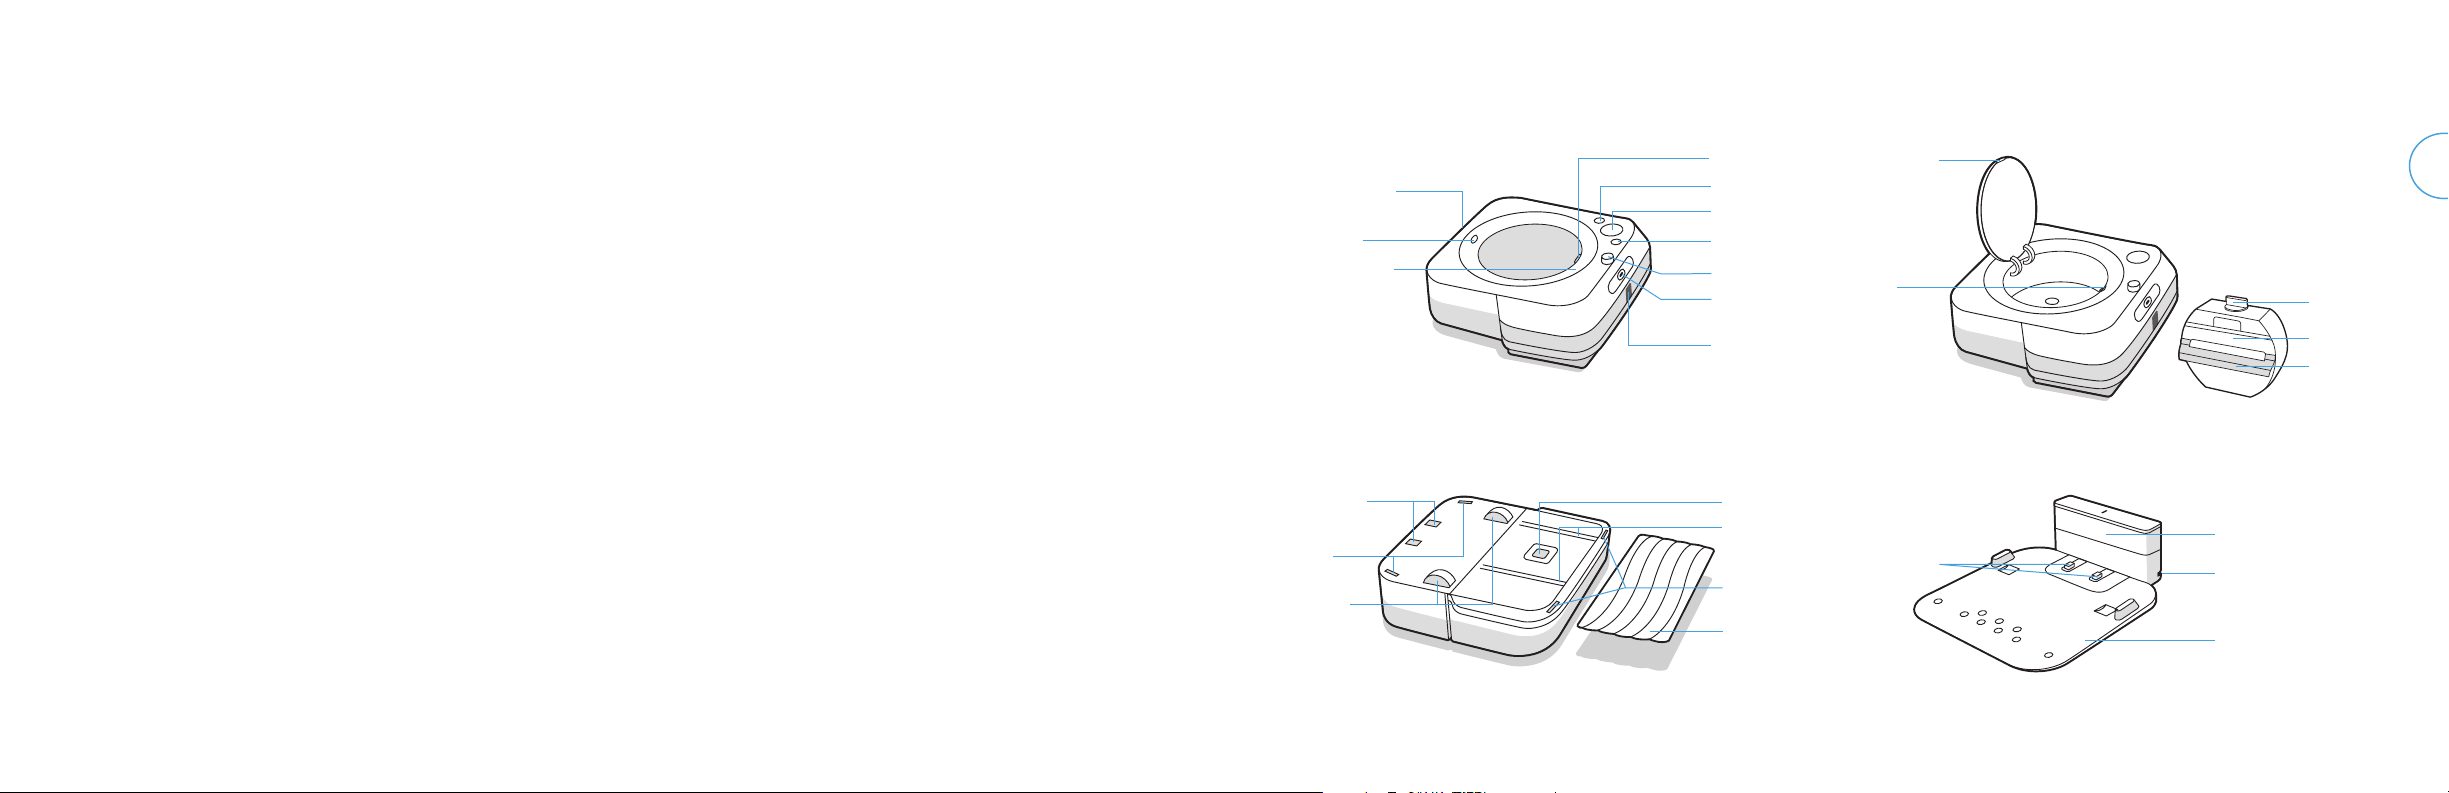
About your Braava jet® m6 Robot Mop
Top View
Rear Docking
Sensor
Camera
Easy-Carrying
Handle
Bottom View
Charging
Contacts
Cli
Sensors
Wheels
Lid Latch
HOME Button
CLEAN Button
SPOT Clean Button
RCON Sensor
Precision Jet Spray
Nozzle
Pad Ejection
Button
Pad Reader
Pad Tracks
Cli Sensors
Cleaning Pad
Accessing the Tank
Lid Latch
Lid
Opening
Home Base Charging Station
Charging
Contacts
EN
Tank Cap
Tank
Folding Tank
Handle
IR Sensor
Window
Cord
Storage
Removable
Drip Tray
Check the Safety Guide to ensure safe operation of your Braava jet® m6
Braava jet® m6 Owner’s Guide ii
Page 2
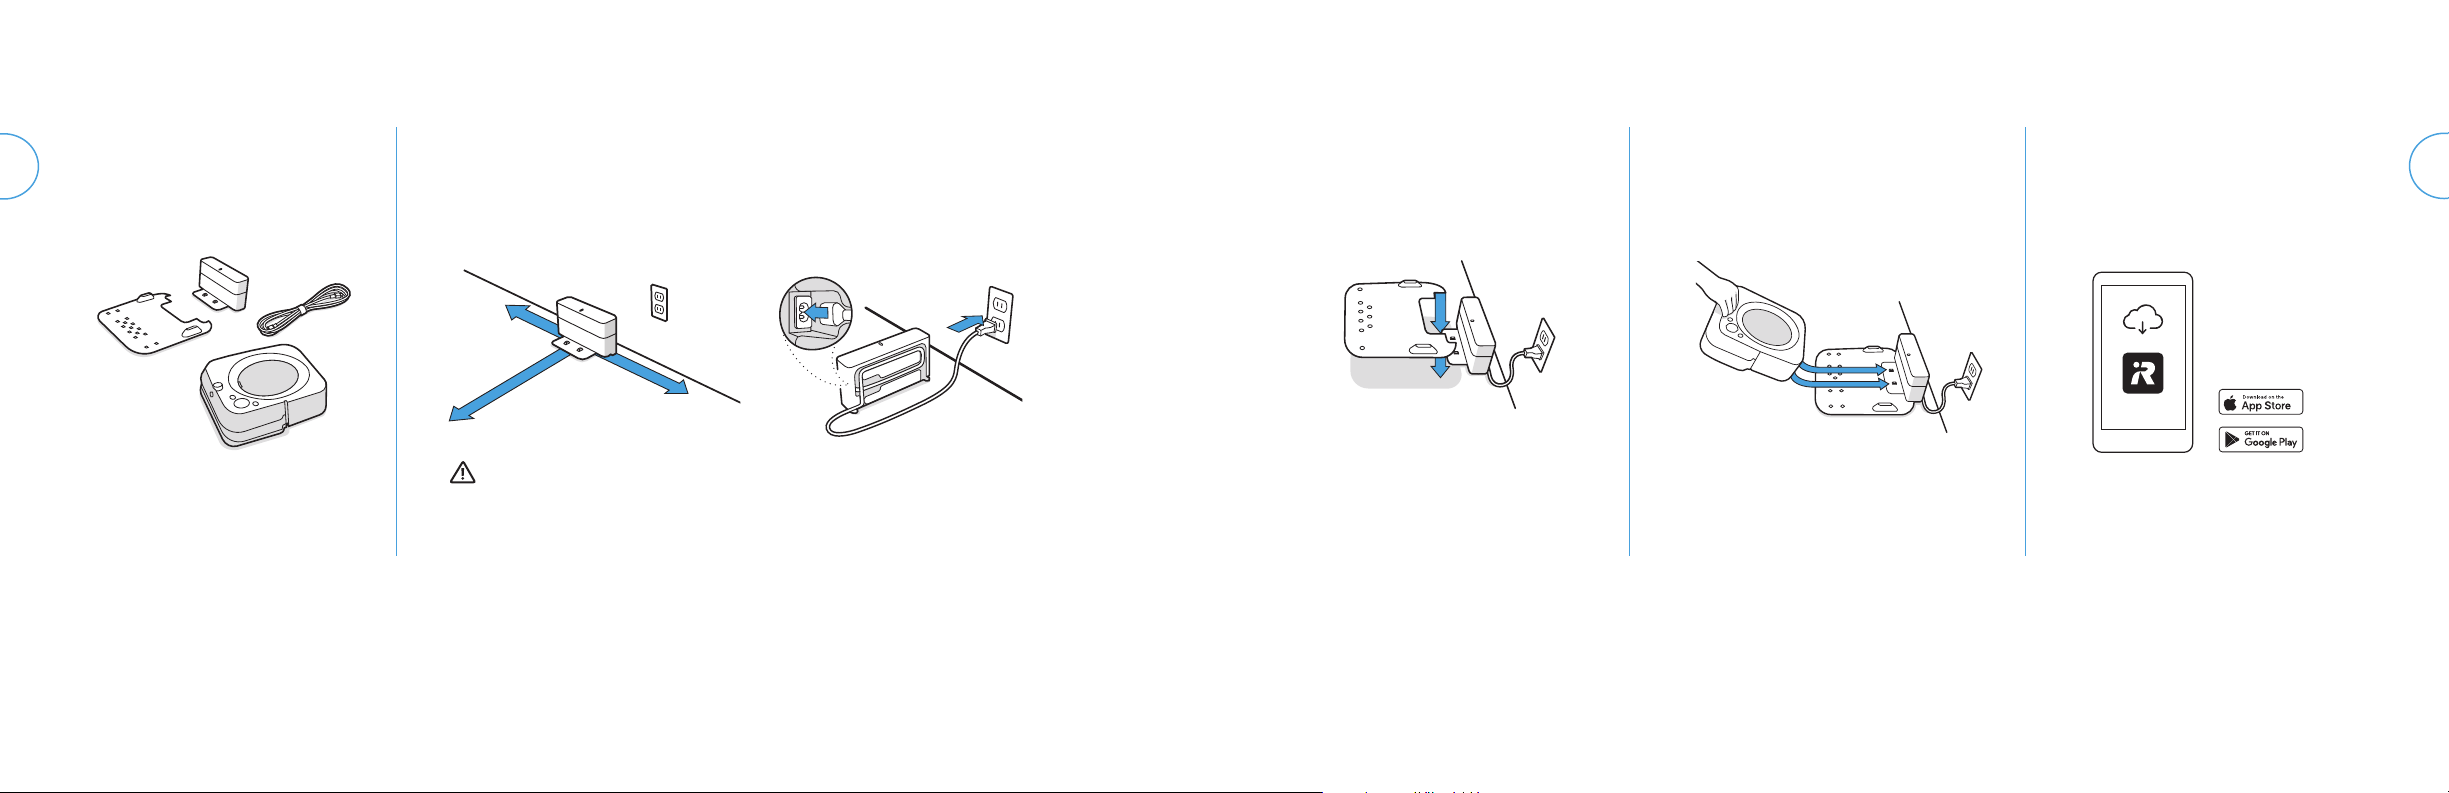
Getting started
Get ready
1
To start, you’ll need your robot,
charging station, drip tray, and
power cable.
Position the charging station and plug it in
2 3 4 5
Choose an area near a plug socket
with good Wi-Fi coverage.
1.5 ft/0.5 m
1.2m
4 ft/1.5 m
1.5 ft/0.5 m
WARNING: To prevent the risk of your robot falling down stairs, ensure that the charging
station is placed at least 4 feet (1.2 metres) away from the top of your stairs.
Plug the power cable into the
charging station, and then into
the wall.
Attach the drip tray Wake up your robot Connect and update
Place the drip tray onto the front of the
charging station.
Slide your robot onto the charging
station contacts to activate the battery.
The light ring will light up after a few
minutes and a sound will let you know
it’s awake.
Connect your robot to the iRobot
HOME App to allow remote control,
cleaning customisation, and to keep
your robot’s software up to date.
iRobot HOME
ENEN
3 For more information, visit global.irobot.com
Braava jet® m6 Owner’s Guide 4
Page 3

EN
6 capfuls
per tank
Retail: Full size
(Sold separately)
Attach a cleaning pad
6
Slide a wet mopping or dry sweeping pad
onto the underside of the robot.
Detach an existing cleaning pad by pressing
the button on the front of the robot.
Fill the tank
7
Remove the tank from the robot. Add Braava jet® Hard Floor
Cleaning Solution (if using).
Then fill it to the top with water.
EN
Cleaning pad types
Wet Mopping Pads
Single-Use Wet Mopping Pad Washable Wet Mopping Pad
(Microfibre)
5 For more information, visit global.irobot.com
Dry Sweeping Pads
Single-Use Dry Sweeping Pad Washable Dry Sweeping Pad
(Microfibre)
Cleaning Solution
When wet mopping, you may add Braava jet®
Hard Floor Cleaning Solution to the tank before
adding water. This product is a concentrate
that is suitable for all well-sealed hard floors.
Important: Braava jet® Hard Floor Cleaning
Solution is the only solution that can be
safely used in your robot mop. Please do not
use other cleaning solutions.
Sample size
(Included in box)
1/2 bottle
per tank
2 fl oz
59 mL
Retail: Full size
(Sold separately)
6 capfuls
per tank
Braava jet® m6 Owner’s Guide 6
13 fl oz
385 mL
Page 4

Using Your Braava jet® m6 Robot Mop
Cleaning
Use your robot frequently to maintain well-conditioned floors.
• Your robot will automatically explore and clean your home, moving
in a methodical manner across the floor, with some overlap from one
pass to the next to ensure that every spot on the floor is cleaned three
times. If you are looking for either a quicker or a deeper clean than this
default setting, or if you want to adjust the amount of water sprayed,
you can change your cleaning preferences from the iRobot HOME App.
• Your robot will return to the charging station at the end of a cleaning
job, whenever it needs to recharge, or when the tank needs to be
refilled.
Note: If the word ‘CLEAN’ is pulsing while charging, your robot is in the
middle of a cleaning job and will automatically resume where it left o
oncerecharged.
• To send the robot back to its charging station, tap (home). A blue
light ring pattern will indicate that the robot is seeking the charging
station. This feature will only work if your robot started the job from the
charging station.
• When the robot senses that its tank needs to be filled, the light ring
indicator will illuminate in a red sweeping motion towards the lid latch.
Just Press CLEAN
Tap to Start/Pause/Resume
Hold for 3 seconds to end a job
and put the robot to sleep
Hold for 10 seconds to reboot
• Clean smaller designated areas (3.3 ft2/1 m2) by placing your
robot in the middle of the bottom of the space you’d like to focus
on. Tap (spot clean) to start cleaning.
Tips for Optimising Performance
• Your robot works best when used with the iRobot HOME App.
• For optimal mopping performance, we recommend that you
vacuum first to pick up large dirt and debris before running
Braava jet®.
• Your robot will only run with Braava jet® m Series pads, which are
made specifically for Braava jet® m Series robots.
• Use a new pad for each cleaning job, and do not pre-wet the
pads prior to use.
• Keep your charging station plugged in and the area around it
clear of clutter.
• You can use a Dual Mode Virtual Wall® Barrier to help keep your
robot in places that you want to have cleaned, and out of the
ones you don’t. (Sold separately)
• Within the iRobot HOME App, you can adjust cleaning
preferences to modify cleaning power, speed, and coverage.
Charging
• Slide your robot onto the charging station contacts to activate
the battery.
Note: Your robot comes with a partial charge, but we recommend that
you charge the robot for 3 hours prior to starting the first cleaning job.
• The light ring indicator will show the current charging status.
Thiswill turn o after 1 minute to save power, but can be
shown again if you press CLEAN. This can also been seen in
theiRobotHOME App.
Light Ring While Charging
Solid: fully charged
Pulsing: charging
• Your robot uses a small amount of power whenever it is on the
charging station. You can put the robot in a further-reduced
powerstate when not in use. For instructions and more details on
this Reduced Power Standby Mode, refer to the iRobot HOME App.
• For long-term storage, turn o your robot by removing it from the
charging station and holding down (home) for 10 seconds.
Store your robot in a cool, dry place.
Lithium Ion Battery
For the best results, only use the iRobot Lithium Ion Battery that comes
with your Braava jet® m6.
WARNING: Lithium ion batteries and products that contain lithium ion
batteries are subject to stringent transportation regulations. If you need to
send this product (with the battery included) for ser vice, travel, or any other
reason, you MUST follow these delivery instructions.
• The robot MUST be turned o before shipping.
• Turn o the power by removing the robot from the charging station and
holding down (home) for 10 seconds. All indicators will turn o.
• Package the product in its original packaging.
• Ship via ground transportation only (no air shipping).
• If you need further assistance, contact our Customer Care team.
Troubleshooting
• Your robot will tell you something
is wrong by playing an audio alert
and turning the light ring indicator
red. Press CLEAN for details.
Further support and instructional
videos are available in the iRobot
HOME App.
• After 90 minutes of inactivity o the
charging station, your robot will
automatically end its cleaning job.
Red Light
Ring
Low battery. Please charge.
ENEN
7 For more information, visit global.irobot.com
Braava jet® m6 Owner’s Guide 8
Page 5

Care and Maintenance
Cleaning the Sensors and Pad
Reader
Clean the sensors on the
bottom of your robot with
adamp cloth.
Cleaning the Wheels
Pull o any visible debris or hair that
gathers around the wheels.
Cleaning the Body of the Robot
Wipe clean with a damp cloth.
Cleaning the Tank
If you notice an odour from the tank
Remove the tank from your
1
robot mop.
Fill the tank with warm water.
2
Do not use boiling water.
Close the cap and lightly shake
3
the tank.
Cleaning the Drip Tray
Remove the robot from the charging
1
station.
Separate the drip tray by lifting it up
2
o the charging station.
Clean the drip tray with a damp cloth or
3
with warm water in the sink.
Caring for Washable Cleaning Pads
Note: You can clean your washable pads in two
ways: either by hand washing or in a washing
machine.
Hand Washing
Thoroughly wash the pad with warm water.
ENEN
Dry thoroughly before reattaching the
4
drip tray to the charging station.
Important: Do not spray cleaning
solution or water onto the sensors or
sensor openings.
9 For more information, visit global.irobot.com
Rinse the tank and repeat as
4
necessary.
Put your robot mop back onto the
5
charging station.
Machine Washing
Wash using the warm cycle, then air dry.
Do not tumble dry. Do not wash with delicates.
Braava jet® m6 Owner’s Guide 10
Page 6

iRobot Customer Care
Regulatory Information
Regulatory Model: RMA-Y1
The iRobot Corporation hereby declares that this
USA & Canada
If you have questions or comments about your Braava jet® robot mop,
please contact iRobot before contacting a retailer.
You can start by visiting www.irobot.com for support tips, frequently
asked questions, and information about accessories. This information
can also be found in the iRobot HOME App. If you need further
assistance, call our Customer Care team at (877) 855-8593.
iRobot Customer Care Hours
• Monday to Friday, 9AM–9PM Eastern Time
• Saturday and Sunday 9AM–6PM Eastern Time
radio equipment device is in compliance with the EU
Radio Equipment Directive 2014/53/EU and the RoHS
Directive 2011/65/EU. The full text of the EU Declaration of
Conformity is available at the following internet address:
www.irobot.com/compliance.
This device incorporates the Harpoon radio module model
AXE-Y1. Harpoon is a dual-band radio which operates in
the WLAN 2.4 GHz and WLAN 5 GHz bands.
• The 2.4 GHz band is limited to operate between
2400MHz and 2483 MHz with a maximum EIRP
outputpower of 17.56 dBm (57 mW) at 2472 MHz.
• The 5 GHz band is limited to operate between 5150 MHz
and 5725 MHz with a maximum EIRP output power of
18.23 dBm (66.52 mW) at 5700 MHz.
Outside USA & Canada
Visit www.global.irobot.com to:
• Learn more about iRobot in your country.
• Get hints and tips to improve your Braava jet® robot mop’s
performance.
• Get answers to questions.
• Contact your local support centre.
©2019 iRobot Corporation, 8 Crosby Drive, Bedford, MA 01730 USA. All rights reser ved.
iRobot, Braava jet, and Virtual Wall are registered trademarks of iRobot Corporation, in the
UnitedStates and other countries. App Store is a trademark of Apple, Inc., registered in the U.S.
andother countries. Google Play is a trademark of Google, Inc. Wi-Fi and the Wi-Fi logo are
11 For more information, visit global.irobot.com
registered trademarks of Wi-Fi Alliance.
Instructions for Disposal of Waste Electrical & Electronic
Equipment:
This symbol on the product indicates that the appliance
must not be disposed of with unsorted common municipal
waste. As the end-user, it is your responsibility to dispose
of the end-of-life appliance in an environmentally sensitive
manner as follows:
(1) returning it to the distributor/dealer from whom you
purchased the product; or
(2) depositing it in a designated collection point.
Disposing of this product correctly will help save valuable
resources and prevent any potential negative eects on
human health and the environment, which could otherwise
arise from inappropriate waste handling. Please contact
your local authority for further details or your nearest
designated collection point. Penalties may be applicable
for incorrect disposal of this waste, in accordance with your
national legislation. More information may be found at the
following source: http://ec.europa.eu/environment/waste/
weee/index_en.htm
Braava jet® m6 Owner’s Guide 12
WC#: 4641045
ENEN
 Loading...