

Page 1

Owner’s Guide
Page 2
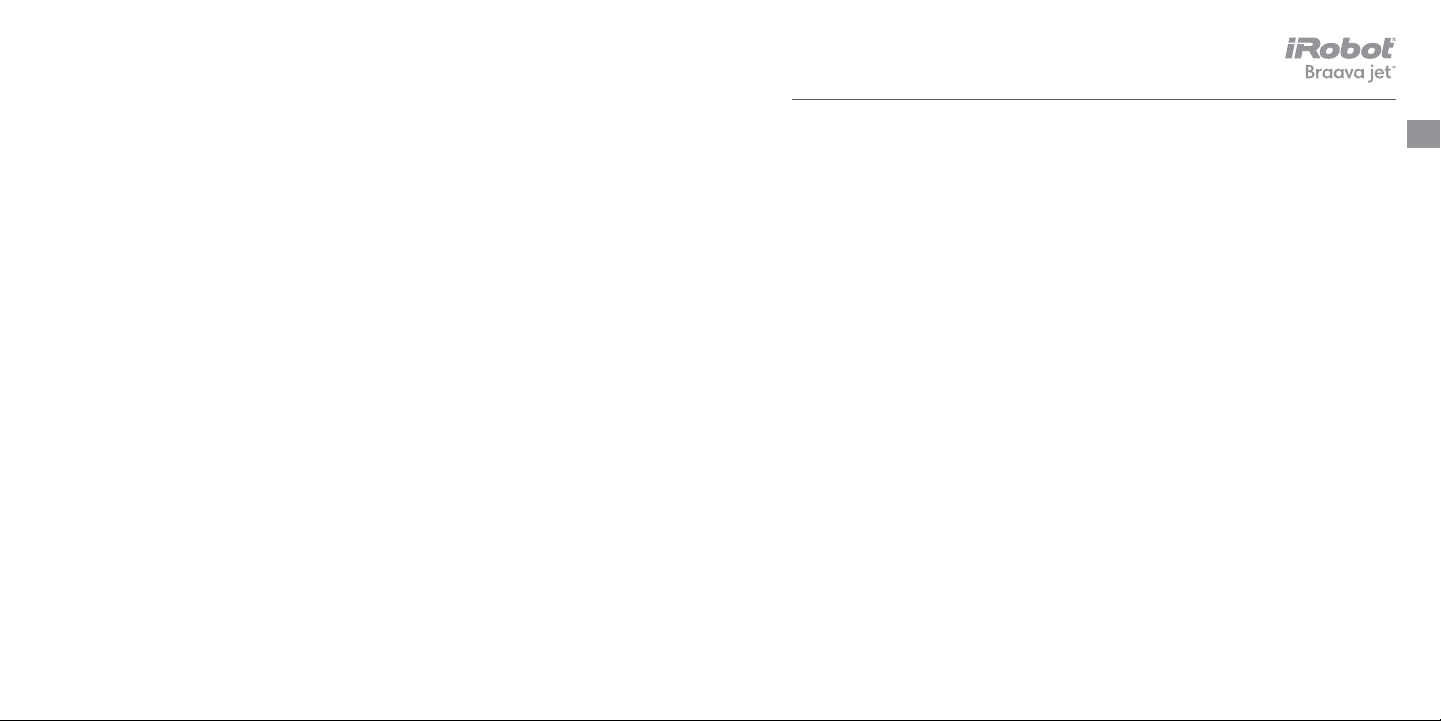
Table of Contents
What’s In the Box
Robot Anatomy
Setup Guide
Choosing the Right Braava jet™ Pad
How iRobot Braava jet Cleans
Tips for Best Performance
Troubleshooting
Regular Robot Care
Safety and Compliance Information
Braava jet™ Owner’s Guide 1
2
4
8
18
20
28
30
32
38
EN
Page 3

What’s In the Box
EN
• iRobot Braava jet™ Robot
• Lithium Ion Battery
• Battery Charger
• iRobot Braava jet Cleaning Pads (type and
quantity of cleaning pads may vary by model)
• (2) Wet Mopping Pads (Blue)
• (2) Damp Sweeping Pads (Orange)
• (2) Dry Sweeping Pads (White)
2 For Customer Care go to www.irobot.com/support
EN
Pad and battery quantities may vary by model
Braava jet™ Owner’s Guide 3
Page 4
Robot Anatomy
EN
Handle
CLEAN
Button
Precision
Jet Spray
Nozzle
Braava jet
Cleaning
Pad
4 For Customer Care go to www.irobot.com/support
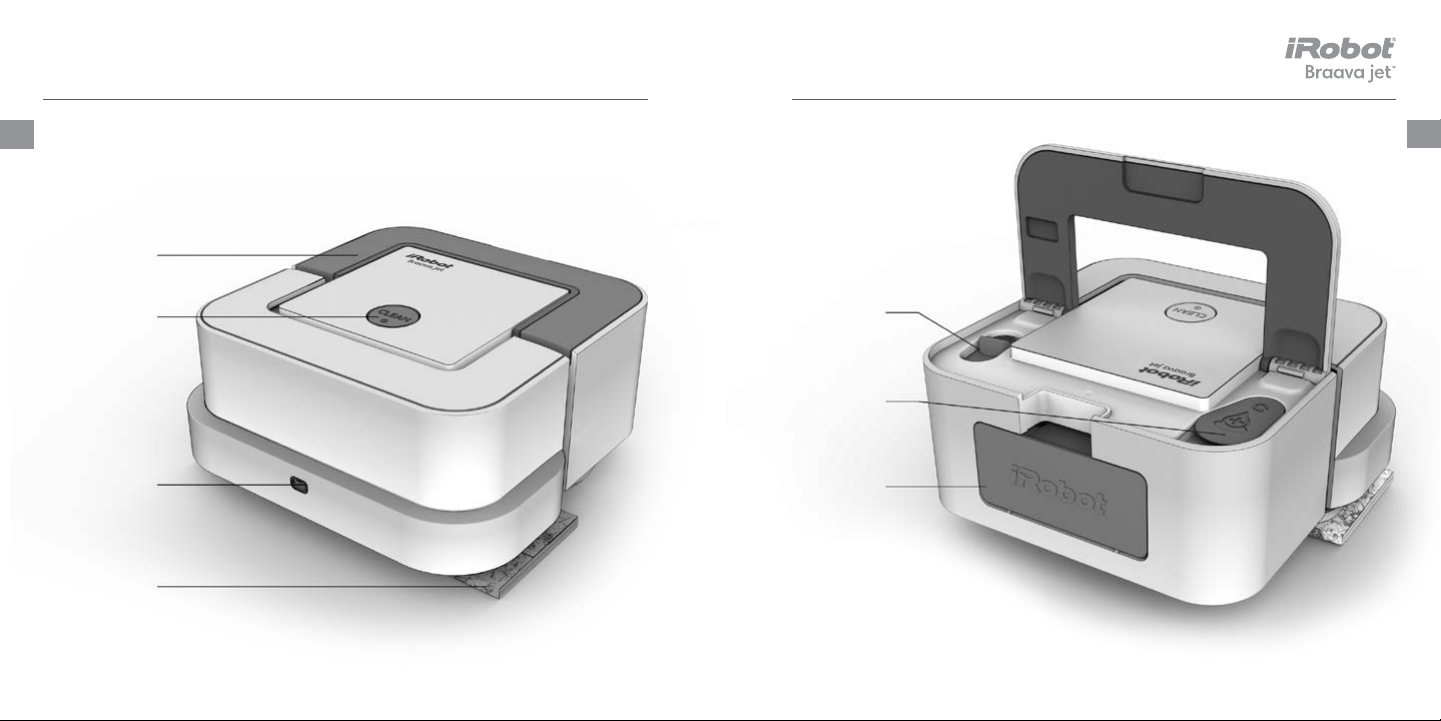
Top View - BackTop View - Front
EN
Pad Eject
Button
Tank Cap
Battery
Braava jet™ Owner’s Guide 5
Page 5

Robot Anatomy
EN
Front Cli Sensors
Pad Reader
Pad Tracks
Wheels
Rear Cli Sensors
6 For Customer Care go to www.irobot.com/support
iRobot Braava jet Cleaning PadsBottom View
Wet Mopping
(Blue)
Damp Sweeping
(Orange)
Dry Sweeping
(White)
Washable Wet
Mopping (Blue)
(Included with select
models. Also available for
purchase as an accessory.)
Braava jet™ Owner’s Guide 7
EN
Page 6

Setup Guide
EN
Follow these simple steps to get started with your
Braava jet™ Mopping Robot.
1
Charge & Insert the Battery
• Remove the battery and put it in the battery charger.
• The indicator light will blink amber while the battery is charging. The light will
switch to solid green when the battery is fully charged.
• The wall charger automatically goes into low-power mode when the battery is
fully charged to maintain the life of the battery and limit power usage.
• The battery will fully charge within 2 hours.
• Insert the fully charged battery into the robot.
Battery Tip #1: For best results in
rooms with a lot of furniture fully
charge the battery for 2 hours
before using the robot.
Battery Tip #2: iRobot also oers
additional batteries and chargers
as accessories for purchase, so
you can always have a charged
battery ready to go.
8 For Customer Care go to www.irobot.com/support
EN
Charge Insert
Braava jet™ Owner’s Guide 9
Page 7

Setup Guide
EN
2
Select a Braava jet Cleaning Pad
• Choose a cleaning pad that matches how you want to clean your floor.
• Your robot comes with a sample pack of Wet Mopping, Damp Sweeping,
and Dry Sweeping Braava jet cleaning pads.
• Braava jet will automatically recognize the pad and adjust its
cleaning behavior based on the pad you choose.
Cleaning Tip: Before using a Wet
Mopping or Damp Sweeping
pad, use a Dry Sweeping pad or
vacuum to clean loose debris.
10 For Customer Care go to www.irobot.com/support
Wet
Mopping
(Blue)
Damp
Sweeping
(Orange)
Dry
Sweeping
(White)
Washable
Wet Mopping
(Blue)
(Included with select models.
Also available for purchase
as an accessory.)
Braava jet™ Owner’s Guide 11
Pad Type
Cleaning Motion and Wetness Level
Cleaning Agent
Cleaning Agent
EN
Page 8

Setup Guide
EN
3
Slide in a Cleaning Pad
• Slide a Braava jet pad into the track on the bottom of the robot until
it clicks into place.
• You can attach a Braava jet pad from either side of the robot.
12 For Customer Care go to www.irobot.com/support
4
Fill the Robot with Water
• Fill the robot if you choose Wet Mop or Damp Sweep.
• Lift the robot handle to find the tank cap and lift and swivel it open.
• Slowly fill the tank to the top with warm water.
• Turn the cap back and close. Lower the robot handle before
starting the robot.
• Do not use any other cleaning solution with your robot other than water.
Cleaning Tip: For
easier filling, tilt the
robot downward and
fill slowly with water.
Note: If you are using
a Dry Sweeping Pad,
skip to Step 5.
Braava jet™ Owner’s Guide 13
EN
Page 9

Setup Guide
EN
5
Just Press CLEAN
• Place your robot in the lower left corner of the area you want to clean,
about a foot away from any walls.
• Press CLEAN once to wake up the robot. Press CLEAN again to start the
cleaning cycle.
• The robot will clean up to 150 ft
2
while mopping, and up to 200 ft2 while
damp or dry sweeping.*
• Braava jet will finish by cleaning the edges and perimeters of your
room, furniture and toilets.
Cleaning Tip: When it has
finished cleaning, Braava jet
returns to where it started
and powers o.
*Tested in iRobot’s Home Test
Lab on hard floors.
14 For Customer Care go to www.irobot.com/support
See How iRobot Braava jet Cleans section for more details on placement
and cleaning pattern behavior.
Braava jet™ Owner’s Guide 15
EN
Page 10

Setup Guide
EN
6
Eject the Cleaning Pad and Prepare iRobot Braava jet
for Next Use
• To eject the cleaning pad without touching the dirt, lift the handle and
pull back on the Pad Eject Button. Disposable cleaning pads can be dropped
directly into the trash and Washable Cleaning Pads (sold separately) can be
dropped into the laundry bin.
• Remove the battery and put it in the wall charger so it
can charge for the next cleaning.
• Empty the water tank before storing the robot.
• Braava jet can be stored wheels-down or on its side with the battery
side down.
16 For Customer Care go to www.irobot.com/support
EN
Braava jet™ Owner’s Guide 17
Page 11

Choosing the Right Braava jet™ Pad
EN
Choose the right cleaning pad
for your cleaning needs.
Wet
Mopping
(Blue)
Damp
Sweeping
(Orange)
Dry
Sweeping
(White)
Washable
Wet Mopping
(Blue)
(Included with select models. Also
available for purchase as an accessory.)
18 For Customer Care go to www.irobot.com/support
OVERVIEW
Pad Type Cleaning Motion and Wetness Level
Cleaning Agent
Cleaning Agent
RECOMMENDED FOR
Scent
*Tested on dried coee and soda.
DustFresh
Hair
Dirt
Braava jet™ Owner’s Guide 19
Stains*
EN
Page 12

How iRobot Braava jet™ Cleans
EN
Braava jet is designed to intelligently navigate and clean
typical kitchens and bathrooms each time it runs, up to
150 ft
2
while wet mopping and up to 200 ft2 while damp
and dry sweeping.*
Where to Place the Robot in a Room
Place the robot in the lower left of the area you want it to clean.
The robot will systematically clean the area to the right and in front of where
it started.
• The robot will start by cleaning to the right until it encounters a wall
or other barrier.
• When the robot has cleaned as far as it can to the right, the robot will
continue to the area in front and to the right of where it started.
• The robot will stop cleaning and will return to where it started once it has cleaned
an entire enclosed space or has cleaned up to 150 ft
2
200 ft
while damp and dry sweeping.
*Tested in iRobot’s Home Test Lab
on hard floors in damp/dry mode.
20 For Customer Care go to www.irobot.com/support
2
while wet mopping or up to
EN
Braava jet™ Owner’s Guide 21
Page 13

How iRobot Braava jet™ Cleans
EN
22 For Customer Care go to www.irobot.com/support
EN
Braava jet™ Owner’s Guide 23
Page 14

How iRobot Braava jet™ Cleans
EN
• Braava jet does not spray furniture or walls. Before the robot sprays, it will back up to
ensure it’s only spraying a portion of the floor it knows is clear.
• As Braava jet finds edges, chair legs, and other obstacles, it will clean around them
and then return to its original path and resume cleaning.
• After Braava jet has cleaned the entire space, it finishes the job by cleaning along
edges, walls, furniture, and other obstacles a second time.
• Once Braava jet finishes its cleaning job, it returns to where it started, plays
a tone so you know it’s done, and powers o.
• Braava jet creates a new map every time it cleans.
24 For Customer Care go to www.irobot.com/support
iRobot Braava jet adjusts its cleaning pattern based on the
cleaning pad you choose.
• When you attach a Braava jet Wet Mopping Pad or Washable Wet Mopping Pad
(blue), Braava jet mops your floors with triple-pass coverage, moving similarly
to how you would mop yourself. The robot drives forward a short distance to one
side, backs up slightly, then moves forward to the other side. It alternates to the
left and right as it progresses through the room, providing triple-pass coverage
of each section of your floor.
• With a Braava jet Damp Sweeping Pad (orange), Braava jet cleans your floors
with gentle yet thorough double-pass cleaning. It first drives forward a short distance and then backs up in a straight line, continuing this back and forth pattern
as it cleans the area.
• When you attach a Braava jet Dry Sweeping Pad (white), Braava jet swiftly
moves forward in a straight line for single-pass coverage of the area.
Braava jet™ Owner’s Guide 25
EN
Page 15

How iRobot Braava jet™ Cleans
EN
Creating an Invisible Barrier
®
You can create an invisible barrier with the Virtual Wall
Mode so that the robot
will avoid cleaning part of a room or a dierent floor type.
• Begin with the robot powered o. When placing the robot, note that the invisible line
will be created in line with the back of the robot.
• To activate Virtual Wall Mode, start with a powered-o robot and press and hold the
CLEAN button until two blue lines appear on the top of the robot. The blue lines will
indicate that the Virtual Wall Mode has been activated.
• Once in Virtual Wall Mode, the robot will mark an invisible boundary in its internal
map, extending out to each side (see illustration). As the robot cleans your floor, it
will not go beyond the invisible line.
• Once the robot is in place, just press CLEAN to start the job.
• Virtual Wall Mode will turn o automatically when the robot completes its job. To
manually clear a Virtual Wall Mode cleaning cycle and turn o the robot, press
and hold the CLEAN button until all indicators turn o.
Cleaning Tip: You can also use
Virtual Wall Mode to divide a
larger room into smaller areas
to help Braava jet clean more
eciently.
26 For Customer Care go to www.irobot.com/support
EN
Braava jet™ Owner’s Guide 27
Page 16

Tips for Best Performance
EN
General Cleaning Tips
• For best results, use a Dry Sweeping Pad or vacuum to pick up dirt and dust
before running your robot with a Wet Mopping or Damp Sweeping Pad.
• To pause your robot during a cleaning cycle, press the CLEAN button.
To resume the cleaning cycle, press the CLEAN button again.
• Do not pick up and move your robot while it is cleaning – the robot will
end its cleaning run if you do.
• Always fill Braava jet to the top with water and check for any air
bubbles before closing the tank cap.
• Only use water inside your robot. Cleaning solutions, even natural ones, can
clog the spray nozzle and break down the materials inside the robot.
• Your robot will only run with Braava jet Pads, which are specifically made
for the robot.
• Braava jet cleans best on smooth hard surfaces and may not perform as well on
uneven tiles, heavily waxed floors or rough surfaces like slate or brick which may
snag the cleaning pads.
28 For Customer Care go to www.irobot.com/support
EN
Braava jet™ Owner’s Guide 29
Page 17

Troubleshooting
EN
Braava jet will tell you something is wrong by alerting you
with sounds and lights. If the problem is not resolved,
learn more online at www.irobot.com/support or contact
Customer Service at (877) 855-8593.
Repeating Error Messages
If your robot remains on after an error occurs, press the bumper toward the body
of the robot once to repeat the message. If your robot has turned o after an
error occurs, press CLEAN to turn it on. If the error is ongoing, the robot will repeat
the message. Visit www.irobot.com/support to view a complete error table.
Rebooting Instructions
For some errors, rebooting Braava jet may resolve the problem. To reboot Braava jet,
press and hold CLEAN for 10 seconds until you hear an audible tone. Take out the
battery and insert it again. Press CLEAN again to turn the robot back on.
30 For Customer Care go to www.irobot.com/support
Precision Jet Spray Troubleshooting
If the robot is not spraying or is spraying unevenly and you have checked that the
tank has enough water and can hear the pump running, contact Customer Service
at (877) 855-8593.
Water Level Troubleshooting
If you encounter problems with the amount of water Braava jet uses on your
floors in wet mopping or damp sweeping modes, contact Customer Service at
(877) 855-8593.
Braava jet™ Owner’s Guide 31
EN
Page 18

Regular Robot Care
EN
Follow these tips to keep your iRobot Braava jet
running at peak performance.
Cleaning the Cli Sensors and Pad Reader
Clean the sensors on the bottom of your robot with a damp cloth.
Front Cli Sensors
Pad Reader
Rear Cli Sensors
32 For Customer Care go to www.irobot.com/support
Cleaning the Wheels
Pull o any visible debris or hair that gathers around the wheels.
Wheels
Braava jet™ Owner’s Guide 33
EN
Page 19

Regular Robot Care
EN
Cleaning the Body of the Robot
Use a damp cloth to lightly wipe o any dirt on its body or bumper.
34 For Customer Care go to www.irobot.com/support
Cleaning the Precision Jet Spray Nozzle
Wipe clean with a damp cloth.
Precision Jet
Spray Nozzle
Braava jet™ Owner’s Guide 35
EN
Page 20

Regular Robot Care
EN
Cleaning the Tank
If you notice an odor in the tank, fill the tank with hot tap water.
Do not use boiling water. Close the cap and lightly shake the robot. Rinse the
tank and repeat. Allow the tank to dry with the cap open before using your robot.
36 For Customer Care go to www.irobot.com/support
Caring for Washable Cleaning Pads (sold separately)
After using washable cleaning pads to clean, hand washing and air drying is
recommended for regular maintenance. The cleaning pad can be washed up to
50 times* before replacing. If using a washing machine, wash on warm cycle and air
dry. Do not wash with delicates.
*Tested in washing machine. Do not wash with delicates.
Braava jet™ Owner’s Guide 37
EN
Page 21

Safety and Compliance Information
EN
THIS APPLIANCE CAN BE USED BY CHILDREN AGED FROM 8
YEARS AND ABOVE AND PERSONS WITH REDUCED PHYSICAL,
SENSORY OR MENTAL CAPABILITIES OR LACK OF EXPERIENCE
AND KNOWLEDGE IF THEY HAVE BEEN GIVEN SUPERVISION OR
INSTRUCTION CONCERNING USE OF THE APPLIANCE IN A SAFE
WAY AND UNDERSTAND THE HAZARDS INVOLVED. CHILDREN
SHALL NOT PLAY WITH THE APPLIANCE. CLEANING AND USER
MAINTENANCE SHALL NOT BE MADE BY CHILDREN WITHOUT
SUPERVISION.
CAUTION: DO NOT EXPOSE THE ELECTRONICS OF BRAAVA JET,
ITS BATTERY, OR ITS BATTERY CHARGER. THERE ARE NO USERSERVICEABLE PARTS INSIDE. REFER SERVICING TO QUALIFIED
SERVICE PERSONNEL. PLEASE ENSURE VOLTAGE RATING
FOR ENCLOSED BATTERY CHARGER MATCHES STANDARD
OUTLET VOLTAGE.
To reduce the risk of injury or damage, keep these
safety precautions in mind when setting up, using,
and maintaining your robot:
General Safety Instructions
• Retain the safety and operating instructions for future reference.
• Read all safety and operating instructions before operating your robot.
• Heed all warnings on your robot, battery, battery charger, and in the
owner’s guide.
• Follow all operating and use instructions.
• Be aware that floors may be slippery after wet cleaning with Braava jet.
• Braava jet operates quietly. Take care when walking in the area the robot is
cleaning to avoid stepping on it and tripping.
• Refer all non-routine servicing to iRobot.
Braava jet™ Owner’s Guide 3938 For Customer Care go to www.irobot.com/support
EN
Page 22

Safety and Compliance Information
EN
40 For Customer Care go to www.irobot.com/support
The symbol on the product or its packaging indicates:
Do not dispose of electrical appliances as unsorted municipal waste,
use separate collection facilities. Contact your local authority for
information regarding the collection systems available. If electrical
appliances are disposed of in landfills or dumps, hazardous substances
can leak into the groundwater and get into the food chain, damaging your health and well-being. When replacing old batteries, please
contact your local or regional waste authority for more information on
collection, reuse and recycling programs.
Use Restrictions
• Your robot is for indoor use on hard surface floors only.
• Your robot is not a toy. Do not sit or stand on this device. Small children and pets
should be supervised when your robot is operating.
• Braava jet has electrical parts. Do not submerge it in water. Clean with a cloth
dampened with water only.
• Do not use this device to pick up anything that is burning or smoking.
• Do not use this device to pick up large debris, bleach, paint, or other chemicals.
• Before using Braava jet, remove fragile objects from the cleaning area,
including objects on furniture that can fall if the furniture is pushed or bumped.
• Move any power cords as well as cords for blinds and curtains out of the way to
reduce the risk of objects being pulled down.
• If the room to be cleaned contains a balcony, a physical barrier should be used to
prevent access to the balcony and ensure safe operation.
• Make sure a cleaning pad is attached for safe operation.
• When wet cleaning, do not use Braava jet in areas where wetness can damage
unfinished or unsealed floors or delicate carpeting or rugs.
• Operate and store your robot in room temperature environments only.
• Children should be supervised to ensure they do not play with the robot. Cleaning
and maintenance should not be performed by children without supervision.
• Do not place anything on top of your robot.
• Do not operate the robot in areas with exposed electrical outlets in the floor.
Braava jet™ Owner’s Guide 41
EN
Page 23

Safety and Compliance Information
EN
Battery and Charging
• Before every use, check the battery pack for any sign of damage or leakage.
Do not charge damaged or leaking battery packs.
• Charge indoors only.
• Only use the included battery charger to charge the iRobot Braava jet battery.
• Charge using a standard outlet only. Product may not be used with any type of
power converter. Use of other power converters will immediately void the warranty.
• Please ensure voltage rating for enclosed battery charger matches standard
outlet voltage.
• Never handle the battery charger with wet hands.
• Only use rechargeable battery packs with the correct specifications supplied with
your robot by iRobot (model number 4446040).
• For replacement battery pack, visit www.irobot.com.
• Always charge and remove the battery from your robot before long-term storage or
transportation.
• Always remove battery pack before cleaning your robot.
• Keep battery pack clean and dry. Wipe the cell or battery terminals with a clean dry
cloth if they become dirty.
42 For Customer Care go to www.irobot.com/support
• Do not crush, dismantle or shred battery packs.
• Do not subject cells or batteries to mechanical shock.
• Do not heat the battery pack or place the battery pack near any heat source.
• Do not store in direct sunlight.
• Do not incinerate the battery pack.
• Do not short-circuit the battery pack.
• Do not submerge the battery pack in any liquid.
• The battery pack must be removed from the robot before disposal.
• When disposing of the battery pack, contact your local or regional waste authority
for more information on collection, reuse and recycling programs.
• In the event of cell leaking, do not allow the liquid to come in contact with the skin
or eyes. If contact has been made, wash the aected area with copious amounts
of water and seek medical advice.
• If you need to ship your Braava jet™ lithium ion battery for any reason, contact
Customer Care for shipping instructions and appropriate labels. Never ship a
leaking or physically damaged lithium ion battery.
Braava jet™ Owner’s Guide 43
EN
Page 24

Safety and Compliance Information
EN
For EU Declaration of Conformity information,
visit www.irobot.com/compliance.
FCC Compliance Information:
• This device complies with part 15 of the FCC Rules. Operation is subject to the
following two conditions: (1) This device may not cause harmful interference, and (2)
this device must accept any interference received, including interference that may
cause undesired operation.
• This device complies with Industry Canada license-exempt RSS standard(s).
Operation is subject to the following two conditions: 1) This device may not cause
interference, and 2) this device must accept any interference, including interference
that may cause undesired operation of the device.
• Changes or modifications not expressly approved by iRobot Corporation could
void the user’s authority to operate the equipment.
44 For Customer Care go to www.irobot.com/support
• This equipment has been tested and found to comply with the limits for a Class
B digital device, pursuant to part 15 of the FCC Rules as well as ICES-003 Rules.
These limits are designed to provide reasonable protection against harmful
interference in a residential installation. This equipment generates, uses and can
radiate radio frequency energy and, if not installed and used in accordance
with the instructions, may cause harmful interference to radio communications.
However, there is no guarantee that interference to radio communication will not
occur in a particular installation. If this equipment does cause harmful
interference to radio or television reception, which can be determined by turning
the equipment o and on, the user is encouraged to try to correct the interference
by one or more of the following measures:
- Reorient or relocate the receiving antenna.
- Increase the separation between the equipment and receiver.
- Connect the equipment into an outlet on a circuit dierent from that to which
the receiver is connected.
- Consult the dealer or an experienced radio/TV technician for help.
• Under Industry Canada regulations, this radio transmitter may only operate using
an antenna of a type and maximum (or lesser) gain approved for the transmitter
by Industry Canada. To reduce potential radio interference to other users, the
antenna type and its gain should be so chosen that the equivalent
isotropically radiated power (e.i.r.p.) is not more than the necessary for
successful communication.
Braava jet™ Owner’s Guide 45
EN
Page 25

©2016 iRobot Corporation, 8 Crosby Drive, Bedford, MA 01730 USA. All rights
reserved. iRobot and Virtual Wall are registered trademarks of iRobot Corporation.
Braava jet is a trademark of iRobot Corporation.
WC: 4491844 v3
 Loading...