

Page 1

VIDEO 2 GO
DIGITAL VIDEO CONVERSION SYSTEM
QUICKSTART GUIDE
::: ENGLISH ( 2 – 10 ) :::
MANUAL DE INICIO RÁPIDO
::: ESPAÑOL ( 11 – 19 ) :::
GUIDE D’UTILISATION RAPIDE
::: FRANÇAIS ( 20 – 28 ) :::
::: ITALIANO ( 29 – 37 ) :::
::: DEUTSCH ( 38 – 46 ) :::
::: NEDERLANDS ( 47 – 55 ) :::
GUIDA RAPIDA
KURZANLEITUNG
SNELSTARGIDS
Page 2

BOX CONTENTS
• VIDEO 2 GO
• Multi-cable
• 7" (17cm) USB extension cable
• 2 CDs:
o Drivers (PC and Mac) and VideoGlide software (Mac)
o Cyberlink software (PC only)
• Quickstart Guide
• Safety Instructions & Warranty Information Booklet
DRIVER & SOFTWARE INSTALLATION
Before beginning, make sure your computer meets these system requirements:
• Microsoft Windows XP/Vista/7 or Apple Mac OSX 10.4 above
• Pentium-IV 2GHz or higher (recommended)
• 512 MB RAM or above (recommended)
• Graphics card (must support DirectX)
• Sound card (AC97-compatible sound card)
• 1GB free hard drive space
• CD-ROM drive (for software installation)
• One available USB 2.0 port (preferably on the rear panel of your computer)
THIS DEVICE COMPLIES WITH PART 15 OF THE FCC RULES. OPERATION IS SUBJECT TO THE FOLLOWING
TWO CONDITIONS: (1) THIS DEVICE MAY NOT CAUSE HARMFUL INTERFERENCE, AND (2) THIS DEVICE MUST
ACCEPT ANY INTERFERENCE RECEIVED, INCLUDING INTERFERENCE THAT MAY CAUSE UNDESIRED
OPERATION.
2
Page 3

WINDOWS
1. Connect the device.
2. Insert the Drivers and VideoGlide Software CD into your computer's CD drive.
3. Install the drivers.
4. Install DirectX (recommended).
5. Install Adobe Reader (recommended).
6. Eject the drivers CD and insert the Cyberlink Software CD into your computer's CD drive.
7. Install the software.
Before doing anything else, use the included USB extension cable to connect VIDEO 2 GO to a free
USB2.0 port on your computer. (We recommend connecting it to a port on the rear panel of your
computer.)
You may see several dialog boxes in the corner of the screen, indicating the computer has detected
VIDEO 2 GO is connected. In some cases, you may see a message resembling an error message
– this is normal. Click "OK" (if necessary) and proceed to Step 2.
On the window that appears after you insert the CD, click "Install PC Drivers." Follow the on-
screen instructions that appear to complete the installation.
If this window does not automatically appear, double-click "My Computer" then double-click the
"VIDEO 2 GO" CD. The window should appear. (If the window still does not appear, right-click the
"VIDEO 2 GO" CD and select "Explore." Once the CD's contents are shown, double-click the
"Driver" folder, double-click the "2860" folder, then double-click "Setup.exe.")
If the latest version of DirectX is not already installed on your computer, we recommend installing it
for better video performance. To do this, click "Install Microsoft DirectX" on the main window.
Follow the on-screen instructions that appear to complete the installation.
If Adobe Reader (or Adobe Acrobat) is not already installed on your computer, we recommend
installing it to allow you to read the manual (the .PDF file) on the included CD. To install Adobe
Reader, click "Install Adobe Reader" on the main window. Follow the on-screen instructions that
appear to complete the installation.
On the window that appears after you insert the CD, click "Install PowerProducer" or "Install
PowerDirector" to install either software program. After installing one program, you will return to
the main screen where you can choose to install the other program, as well. Follow the on-screen
instructions that appear to complete the installation.
If this window does not automatically appear, double-click "My Computer" then double-click the
"VIDEO 2 GO" CD. The window should appear. If the window still does not appear, right-click the
"VIDEO 2 GO" CD and select "Explore." Once the CD's contents are shown, double-click the
"Driver" folder, double-click the "2860" folder, then double-click "Setup.exe."
3
Page 4

8. Begin!
MAC
1. Connect the device.
2. Insert the Drivers and VideoGlide Software CD into your computer's CD drive.
3. Install the drivers and software.
4. Begin!
You can eject the CD and begin using VIDEO 2 GO
and the software you installed. You can find the
software by going to Start Menu f All Programs f
Cyberlink PowerProducer or PowerDirector. (You
may also double-click the shortcut icon on your
computer's Desktop, if you created one during
installation.)
Before doing anything else, use the included USB extension cable to connect VIDEO 2 GO to a free
USB2.0 port on your computer. (We recommend connecting it to a port on the rear panel of your
computer.)
On the window that appears after you insert the CD, click "Install VideoGlide Mac Drivers and
Software." Follow the on-screen instructions that appear to complete the installation. You will need
to restart your computer afterward to complete this process. (If this window does not automatically
appear, double-click the "VIDEO 2 GO" CD on the Desktop and the window should appear.)
You may now eject the CD and begin using VIDEO 2 GO and the software you installed. You can
find the software by going to Applications f VideoGlide f VideoGlide Capture.
The first time you open VideoGlide, you will be asked to enter a serial number into the "Serial
Number" field. Find the number on the sleeve of the VideoGlide CD and enter it then click "OK."
After installing VideoGlide, you can also use VIDEO 2 GO in any program on your Mac that uses
QuickTime video digitizers. This includes QuickTime, iMovie, Final Cut, and many others. For a
complete list, visit http://www.echofx.com/applications.html.
Note: Sometimes, the software will
ask if you want to upgrade after you
open it. This is optional but not
required.
4
Page 5

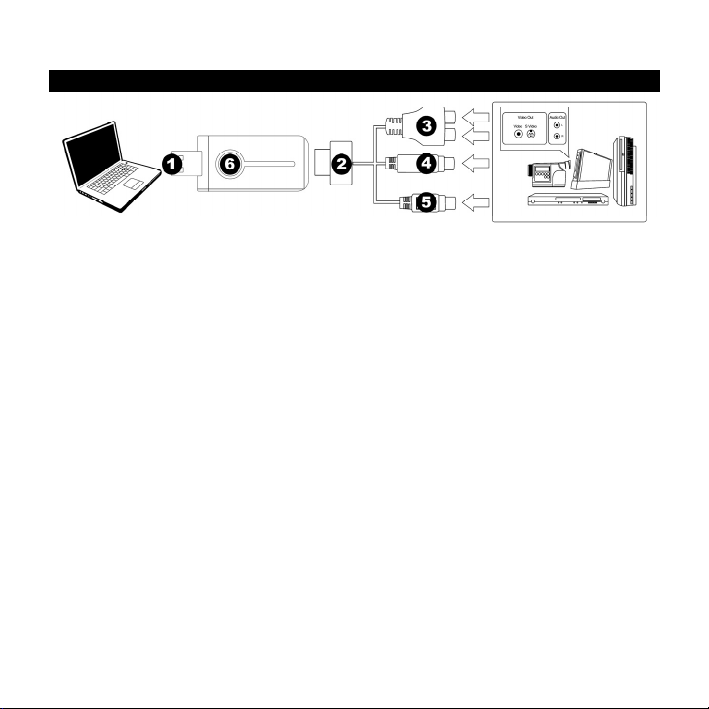
OVERVIEW
COMPUTER VIDEO PLAYBACK DEVICE
1. USB CONNECTOR – Connect this end of VIDEO 2 GO to the included USB extension cable then connect
the extension cable to an available USB 2.0 port on your computer (preferably a port on the rear panel).
2. MULTI-CABLE CONNECTOR – Connect this end of your included multi-cable into VIDEO 2 GO. The
multi-cable will be connected to your playback device.
3. AUDIO INPUTS – Use standard RCA cables to connect these left and right audio inputs to the left and
right audio outputs of your playback device. Be sure to match the colors properly – red to red, white to
white.
4. COMPOSITE VIDEO INPUT – Use a standard composite video cable to connect this input to the
composite video output of your playback device. (If your playback device has an S-Video output, you may
connect that to the S-VIDEO INPUT instead.)
5. S-VIDEO INPUT – Use a standard S-Video cable to connect this input to the S-Video output of your
playback device. (Generally, S-Video connections are of a better quality than composite video, so we
recommend using this one if your playback device has an S-Video output.)
6. SNAPSHOT BUTTON – As your video is playing in your software, you can press this button on VIDEO 2
GO to capture a screenshot of the current frame. (This is useful for using as a thumbnail/screenshot when
posting your video online.) See the SNAPSHOT BUTTON section for instructions on how to do this for the
software you are using.
5
Page 6

GET STARTED!
PowerProducer (PC; recommended for beginning users)
1. Connect VIDEO 2 GO to your playback device and to your
computer (as shown in the OVERVIEW).
2. Open PowerProducer. You can find the software by going to
Start Menu f All Programs f Cyberlink PowerProducer.
(You may also double-click the shortcut icon on your computer's Desktop, if you created one during
installation.)
3. Select the "Produce Movie Disc" option.
4. Select your medium: (1) your disc type, (2) your recording format, (3) your disc capacity, and (4, if
available) your playback aspect ratio. (Note: Most of the time, these settings will already be set to the best
possible option.)
5. In the left-hand part of the window, click "Video" under the "Capture" section. The software will
automatically detect your video device.
6. Start recording by clicking the red "Record" button. Play your video source (digital camera, TV, DVD
player, etc.). The duration of your recording will be shown in the counter under "Capture Information" on
the left-hand side of the window.
7. When you are done capturing your video, click the "Stop" button. The video will appear in the "timeline" at
the bottom of the window.
8. To capture additional videos, cue up the videos on your playback device and repeat Steps 6-7. Otherwise,
click "Next."
9. Insert your disc into your computer's CD-burning drive.
10. Click the "Next" button.
11. Enter a title for your disc in the "Disc Volume Label" field.
12. Enter the number of copies you want to burn.
13. Click the "Burn" button to burn a disc of your video(s).
Note: Sometimes, the software will
ask if you want to upgrade after you
open it. This is optional but not
required.
Note: For more in-depth information
about using PowerProducer, click the
"?" icon at the top of the screen to
access the software's help file.
6
Page 7

PowerDirector (PC; recommended for advanced users)
1. Connect VIDEO 2 GO to your playback device and to your
computer (as shown in the OVERVIEW).
2. Open PowerDirector. You can find the software by going to
Start Menu f All Programs f Cyberlink PowerDirector.
(You may also double-click the shortcut icon on your
computer's Desktop, if you created one during installation.)
3. Click the "Capture" tab in the upper left-hand corner of the
screen. The software will automatically detect your video
device.
4. Start recording by clicking the red "Record" button. Play your
video source (digital camera, TV, DVD player, etc.).
5. When you are done capturing your video, click the "Stop"
button.
6. Enter the title of your video in the "Captured File Name" field
in the window that appears and click "OK." The video will
appear in the "Captured Content" at the bottom of the window.
• If you want to create a CD, click the "Create Disc" tab. Use the buttons underneath the "Content"
tab to add the videos you want on your CD, then click "Burn" to burn the disc.
• If you want to save a video in a popular format (such as a portable MPEG-4 for PSP, iPod™, or
iPhone™), click the "Produce" tab and select the proper format.
• If you want to upload a video to YouTube™ or Facebook™, click the "Produce" tab then click the
"YouTube" or "Facebook" tab near the top of the window.
iPhone and iPod are trademarks of Apple Inc., registered in the U.S. and other countries.
Facebook is a registered trademark of Facebook, Inc.
Note: Sometimes, the software will
ask if you want to upgrade after you
open it. This is optional but not
required.
Note: For more in-depth information
about using PowerDirector, press F1
on your keyboard or click the
"director's chair" icon button in the
upper left-hand corner of the screen,
and go to "Help" then "PowerDirector
Help" to access the software's help
file.
YouTube is a trademark of YouTube, LLC.
7
Page 8

VideoGlide Capture (Mac)
1. Connect VIDEO 2 GO to your playback device and to your
computer (as shown in the OVERVIEW).
2. Open VideoGlide Capture. You can find the software by
going to Applications f VideoGlide f VideoGlide Capture.
3. The first time you open VideoGlide, you will be asked to enter
a serial number into the "Serial Number" field. Find the
number on the sleeve of the VideoGlide CD and enter it then
click "OK."
4. VideoGlide Capture is now open. Click "Digitizers" in the top
menu and select "VideoGlide."
5. Click "Record" in the top menu and select "Sound Settings." In the window that appears, click the
"Source" tab and select "USB 2861 Device" from the list below it. Also, make sure the menu next to
"Speaker" is set to "On." Click "OK" when you are done.
6. Start recording by clicking "Record" in the top menu and selecting "Record." * (You can also press
"Command" + "R.") Play your video source (digital camera, TV, DVD player, etc.).
7. When you are done capturing your video, click anywhere inside the box at the center of the screen. If you
want to watch your captured video immediately, click the "Open" button to open it in QuickTime. To return
to the main screen, click "OK."
8. For more information on using VideoGlide Capture, please refer to the VideoGlide "Read Me" file by going
to Applications f VideoGlide f VideoGlide Capture f "VideoGlide ReadMe.rtfd."
VideoGlide Exporter (Mac)
This software is useful for exporting your videos into other formats for viewing on an iPhone, iPod, etc.
1. Open VideoGlide Capture by going to Applications f VideoGlide f VideoGlide Exporter.
2. Click the "File" menu and select "Open."
3. Select the file you want to export. A video player will open with the current format and size shown at the
bottom of the player.
4. Click the "File" menu and select "Export."
5. Enter the desired name of your file and select the destination where you want to save it.
6. Click the "Export" drop-down menu and select the format you want.
7. Click "OK" to export.
8. For more information on using VideoGlide Exporter, please refer to the VideoGlide "Read Me" file by going
to Applications f VideoGlide f VideoGlide Capture f "VideoGlide ReadMe.rtfd" and referring to the
"Using VideoGlide Exporter" section.
* Note: In some cases, depending on
your computer's operating system,
your video's picture in VideoGlide may
appear "jerky" or "stalled." This will
not affect your video, though; it is
actually capturing it properly. If this
occurs, though, we recommend using
QuickTime for more fluid video
monitoring. See the QuickTime
instructions below for details.
8
Page 9

QuickTime (Mac)
1. Connect VIDEO 2 GO to your playback device and to your
computer (as shown in the OVERVIEW).
2. In order to use VIDEO 2 GO with QuickTime, you must first
register your VideoGlide Capture software. Open VideoGlide
Capture by going to Applications f VideoGlide f
VideoGlide Capture.
3. You will be asked to enter a serial number into the "Serial
Number" field. Find the number on the sleeve of the
VideoGlide CD and enter it then click "OK."
4. After entering the serial number and VideoGlide Capture opens successfully, you may close it.
5. If you are using Snow Leopard (Mac OS X 10.6), set QuickTime to open in 32-bit mode before beginning.
To do this, go to your Applications folder, right-click "QuickTime" and select "Get Info," check the "Open
in 32-bit mode" box in the window that appears, then close the window.
6. Open QuickTime, click the "File" menu and select "New Movie Recording."
7. If you see a downward-pointing triangle to the right of the "record" button, click it to open a drop-down
menu. If you do not see the triangle, click the "QuickTime Player" menu at the top of the screen and
select "Preferences."
8. In the drop-down menu, make sure that the proper "Camera" setting is selected ("Composite" or "S-
Video," depending on which connector you are using) and that "USB 2861 Device" is selected as the
"Microphone." (Also, make sure the volume slider on the left-hand side of the window is turned up.)
9. Start recording by clicking the red "record" button at the bottom of the screen. Play your video source
(digital camera, TV, DVD player, etc.).
10. When you are done capturing your video, click the "stop" button. Your captured video will automatically
open in the QuickTime player. To save it, go to "File" and select "Save" (or "Save As" to save it with a
different name, but save it as a "self-contained" movie).
Note: If your Mac is running an older
OS (e.g., 10.4), your version of
QuickTime may not have the option to
record and save movie files. If this is
the case, we recommend upgrading to
QuickTime Pro to access these
features.
9
Page 10

SNAPSHOT BUTTON
The circular button on VIDEO 2 GO can be used to capture an image of the current frame of your video. This is
useful for using as a thumbnail/screenshot when posting your video online. Follow the steps below to use the
SNAPSHOT BUTTON with the appropriate software:
PowerDirector (PC)
1. Open PowerDirector.
2. Click "Capture From TV Signal" (the TV-with-antenna icon, third from the left).
3. When you see the frame you want to capture, click the SNAPSHOT BUTTON on VIDEO 2 GO.
4. A window will appear where you can enter the file name of the image. After doing this, click "OK."
You should now see the image with the name you entered in the pane on the right.
5. Repeat Steps 2-4 anytime you want to capture a snapshot of your video. (You can do this as many
VideoGlide (Mac)
times as you want for any video.)
1. Open VideoGlide Capture.
2. When you see the frame you want to capture, click the SNAPSHOT BUTTON on VIDEO 2 GO.
3. A window will appear where you can enter the file name of the image. You can also click the drop-
down menu to select where on your computer you want to save the snapshot. After doing this, click
"OK."
4. Repeat Steps 2-3 anytime you want to capture a snapshot of your video. (You can do this as many
times as you want for any video.)
Note: By default, the images will be captures as .pct files. To select a different picture format (e.g.,
JPEG, BMP, PNG, etc.), click the "Snapshot" menu at the top of the screen then select "Snapshot
Settings…" Click the "Destination Format" drop-down menu to select the format you want.
10
Page 11

CONTENIDO DE LA CAJA
• VIDEO 2 GO
• Cable múltiple
• Cable de extensión USB de 17 cm (7”)
• 2 CD:
• Guía de inicio rápido
• Folleto de instrucciones de seguridad e información sobre la garantía
INSTALACIÓN DEL DRIVER Y EL SOFTWARE
Antes de comenzar, asegúrese de que su computadora cumpla estos requisitos de sistema:
• Microsoft Windows XP/Vista/7 o Apple Mac OSX 10.4 o superior
• Pentium-IV 2GHz o superior (recomendado)
• 512 MB de RAM o más (recomendado)
• Tarjeta gráfica (debe soportar DirectX)
• Tarjeta de sonido (compatible con AC97)
• 1 GB de espacio libre en disco duro
• Lector de CD-ROM (para la instalación del software)
• Un puerto USB 2.0 disponible (preferiblemente en el panel trasero de la computadora)
o Drivers (PC y Mac) y software VideoGlide (Mac)
o Software Cyberlink (sólo PC)
11
Page 12

WINDOWS
1. Conecte el dispositivo.
2. Inserte el CD de los drivers y el software VideoGlide en el lector de CD de la computadora.
3. Instale los drivers.
4. Instale DirectX (recomendado).
5. Instale Adobe Reader (recomendado).
6. Expulse el CD de los drivers e inserte el CD del software VideoGlide en el lector de CD de la
7. Instale el software.
Antes de hacer nada más, use el cable de extensión USB incluido para conectar el VIDEO 2 GO a
un puerto USB2.0 libre de la computadora. (Recomendamos conectarlo a un puerto del panel
trasero de la computadora.)
Es posible que vea varios cuadros de diálogo en la esquina de la pantalla, que le indican que la
computadora detectó que está conectado el VIDEO 2 GO. En algunos casos, puede ver un
mensaje que parece de error —es normal. Haga clic en "OK" (Aceptar) (si fuera necesario) y
continúe con el paso 2.
En la ventana que aparece después de insertar el CD, haga clic en "Install PC Drivers." Siga las
instrucciones que aparecen en la pantalla para terminar la instalación.
Si esta ventana no aparece automáticamente, haga doble clic en "My Computer" (Mi PC) y luego
en el CD de "VIDEO 2 GO". Debe aparecer la ventana. (Si la ventana sigue sin aparecer, haga
doble clic en el CD de "VIDEO 2 GO" y seleccione "Explore" (Explorar)). Una vez que aparezca el
contenido del CD, haga doble clic en la carpeta "Driver", en la carpeta "2860" y finalmente en
"Setup.exe.")
Si en su computadora no está instalada la última versión de DirectX, recomendamos instalarla para
lograr un mejor funcionamiento del video. Para hacerlo, haga clic en "Install Microsoft DirectX" en
la ventana principal. Siga las instrucciones que aparecen en la pantalla para terminar la instalación.
Si no tiene instalado Adobe Reader (o Adobe Acrobat) en la computadora, recomendamos
instalarlo para que pueda leer el manual (el archivo .PDF) en el CD incluido. Para instalar Adobe
Reader, haga clic en "Install Adobe Reader" en la ventana principal. Siga las instrucciones que
aparecen en la pantalla para terminar la instalación.
computadora.
En la ventana que aparece después de que insertó el CD, haga clic en "Install PowerProducer" o
"Install PowerDirector" para instalar uno de estos programas. Después de instalar un programa,
volverá a la pantalla principal donde puede elegir también instalar el otro. Siga las instrucciones
que aparecen en la pantalla para terminar la instalación.
Si esta ventana no aparece automáticamente, haga doble clic en "My Computer" (Mi PC) y luego
en el CD de "VIDEO 2 GO". Debe aparecer la ventana. (Si la ventana sigue sin aparecer, haga
doble clic en el CD de "VIDEO 2 GO" y seleccione "Explore" (Explorar)). Una vez que aparezca el
contenido del CD, haga doble clic en la carpeta "Driver", en la carpeta "2860" y finalmente en
"Setup.exe.")
12
Page 13

8. ¡Comience!
MAC
1. Conecte el dispositivo.
2. Inserte el CD de los drivers y el software VideoGlide en el lector de CD de la computadora.
3. Instale primero los drivers y el software
4. ¡Comience!
Puede expulsar el CD y comenzar a usar VIDEO 2 GO
y el software que instaló. Puede encontrar el software
yendo al menú Start (Inicio) f All Programs (Todos
los programas) f Cyberlink PowerProducer o
PowerDirector. (También puede hacer doble clic en
el icono del acceso directo del escritorio de la
computadora, si creó uno durante la instalación.)
Antes de hacer nada más, use el cable de extensión USB incluido para conectar el VIDEO 2 GO a
un puerto USB2.0 libre de la computadora. (Recomendamos conectarlo a un puerto del panel
trasero de la computadora.)
En la ventana que aparece después de insertar el CD, haga clic en "Install VideoGlide Mac
Drivers and Software". Siga las instrucciones que aparecen en la pantalla para terminar la
instalación. Es necesario que reinicie la computadora después de terminar el proceso. (Si esta
ventana no aparece automáticamente, haga doble clic en el CD "VIDEO 2 GO" del escritorio para
que aparezca.)
Puede expulsar el CD y comenzar a usar VIDEO 2 GO y el software que instaló. Puede encontrar
el software yendo a Applications (Aplicaciones) f VideoGlide f VideoGlide Capture.
La primera vez que abra VideoGlide, se le solicitará que ingrese un número de serie en el campo
"Serial Number". Busque el número en la funda del CD de VideoGlide, ingréselo y haga clic en
"OK."
Después de instalar VideoGlide, puede usar también VIDEO 2 GO en cualquier programa de su
Mac que use los digitalizadores de video QuickTime. Estos son QuickTime, iMovie, Final Cut y
muchos otros. Para obtener una lista completa, visite http://www.echofx.com/applications.html
Nota: Algunas veces, el software le
preguntará si desea actualizarlo
después de abrirlo. Esto es opcional
pero no obligatorio.
.
13
Page 14
VISTA GENERAL
COMPUTADORA
1. CONECTOR USB – Conecte este extremo del VIDEO 2 GO al cable de extensión USB incluido y luego
conecte dicho cable a un puerto USB 2.0 disponible de la computadora (preferiblemente un puerto del
panel trasero).
2. CONECTOR MULTICABLES – Conecte este extremo de su cable múltiple incluido en el VIDEO 2 GO. El
cable múltiple se conecta a su dispositivo de reproducción.
3. ENTRADAS DE AUDIO – Use cables RCA estándar para conectar estas entradas de audio izquierda y
derecha a las salidas de audio izquierda y derecha de su dispositivo de reproducción. Asegúrese de que
los colores coincidan correctamente —rojo con rojo y blanco con blanco.
4. ENTRADA DE VIDEO COMPUESTO – Use un cable de video compuesto estándar para conectar esta
entrada a la salida de video compuesto de su dispositivo de reproducción. (Si el dispositivo de
reproducción tiene una salida de S-Video, puede conectarla en cambio a la ENTRADA S-VIDEO.)
5. ENTRADA DE S-VIDEO – Use un cable de S-Video compuesto estándar para conectar esta entrada a la
salida de S-Video de su dispositivo de reproducción. (Generalmente, las conexiones de S-Video son de
mejor calidad que las de video compuesto, de modo que recomendamos usarlas si el dispositivo de
reproducción cuenta con una salida de S-Video.)
6. BOTÓN DE INSTANTÁNEA – Como su video se reproduce en el software, puede pulsar este botón del
VIDEO 2 GO para capturar una instantánea del cuadro que se ve en ese momento. (Esto resulta útil para
usar como miniatura o instantánea de pantalla cuando publica su video en Internet.) Consulte en la
sección BOTÓN DE INSTANTÁNEA las instrucciones para hacerlo con el software que está usando.
DISPOSITIVO DE
REPRODUCCIÓN DE VIDEO
14
Page 15

PARA COMENZAR
PowerProducer (PC; recomendado para usuarios principiantes)
1. Conecte el VIDEO 2 GO al dispositivo de reproducción y a la
computadora (como se muestra en la VISTA GENERAL).
2. Abra PowerProducer. Puede encontrar el software yendo al
menú Start (Inicio) f All Programs (Todos los programas) f
Cyberlink PowerProducer. (También puede hacer doble clic
en el icono del acceso directo del escritorio de la computadora, si creó uno durante la instalación.)
3. Seleccione el icono "Produce Movie Disc" (Producir disco de película).
4. Seleccione su medio: (1) tipo de disco, (2) formato de grabación, (3) capacidad del disco y (4, si la conoce)
la relación de aspecto de su reproducción. (Nota: La mayoría de las veces, estos parámetros ya están
configurados a la mejor opción posible.)
5. En la parte izquierda de la ventana, haga clic en "Video" bajo la sección "Capture" (Capturar). El software
detecta automáticamente su dispositivo de video.
6. Comience a grabar haciendo clic en el botón rojo "Record". Reproduzca con su fuente de video (cámara
digital, televisor, reproductor de DVD, etc.). La duración de la grabación aparece en el contador de
"Capture Information" (Información de la captura) del lado izquierdo de la ventana.
7. Cuando termine de capturar su video, haga clic en el botón "Stop" (Parar). El video aparece en la “línea
de tiempo” del pie de la ventana.
8. Para capturar videos adicionales, búsquelos en su dispositivo de reproducción y repita los pasos 6 y 7.De
lo contrario, haga clic en "Next" (Siguiente).
9. Inserte su disco en la unidad de grabado de CD/DVD de la
computadora.
10. Haga clic en el botón "Next".
11. Ingrese el título de su disco en el campo "Disc Volume
Label" (Etiqueta del volumen del disco).
12. Ingrese la cantidad de copias que desea quemar (grabar).
13. Haga clic en el botón "Burn" para quemar un disco con sus videos.
Nota: Algunas veces, el software le
preguntará si desea actualizarlo
después de abrirlo. Esto es opcional
pero no obligatorio.
Nota: Para obtener información más
detallada acerca del uso de
PowerProducer, haga clic en el icono
"?" de la parte superior de la pantalla
para acceder al archivo de ayuda del
software.
15
Page 16

PowerDirector (PC; recomendado para usuarios avanzados)
1. Conecte el VIDEO 2 GO al dispositivo de reproducción y a la
computadora (como se muestra en la VISTA GENERAL).
2. Abra PowerDirector. Puede encontrar el software yendo al
menú Start (Inicio) f All Programs (Todos los programas) f
Cyberlink PowerDirector. (También puede hacer doble clic
en el icono del acceso directo del escritorio de la
computadora, si creó uno durante la instalación.)
3. Haga clic en la pestaña “Capture" (Capturar) en la esquina
izquierda superior de la pantalla. El software detecta
automáticamente su dispositivo de video.
4. Comience a grabar haciendo clic en el botón rojo "Record".
Reproduzca con su fuente de video (cámara digital, televisor,
reproductor de DVD, etc.).
5. Cuando termine de capturar su video, haga clic en el botón
"Stop" (Parar).
6. Ingrese el título de su video en el campo "Captured File Name" (Nombre del archivo capturado) de la
ventana que aparece y haga clic en "OK." El video aparece en “Captured Content” (Contenido capturado)
al pie de la ventana.
• Si desea crear un CD, haga clic en la pestaña "Create Disc". Use los botones que están debajo de
la pestaña "Content" para agregar a su CD los videos que desea y luego haga clic en "Burn" para
quemar el disco.
• Si desea guardar un video en un formato popular (como MPEG-4 para PSP portátil, iPod™ o
iPhone™), haga clic en la pestaña "Produce" (Producir) y seleccione el formato apropiado.
• Si desea subir un video a YouTube™ o Facebook™, haga clic en la pestaña "Produce" y luego en
la pestaña "YouTube" o "Facebook" cerca de la parte superior de la ventana.
* iTunes e iPod son marcas registradas de Apple, Inc., registradas en EE.UU. y otros países.
YouTube es una marca registrada de YouTube, LLC.
Facebook es una marca registrada de Facebook, Inc.
Nota: Algunas veces, el software le
preguntará si desea actualizarlo
después de abrirlo. Esto es opcional
pero no obligatorio.
Nota: Para obtener información más
detallada acerca del uso de
PowerDirector, pulse F1 en su teclado
o haga clic en el botón con el icono de
la "silla del director" de la esquina
superior izquierda de la pantalla y
vaya a "Help" y luego "PowerDirector
Help" para acceder al archivo de
ayuda del software.
16
Page 17

VideoGlide Capture (Mac)
1. Conecte el VIDEO 2 GO al dispositivo de reproducción y a la
computadora (como se muestra en la VISTA GENERAL).
2. Abra VideoGlide Capture. Puede encontrar el software yendo
a Applications (Aplicaciones) f VideoGlide f VideoGlide
Capture.
3. La primera vez que abra VideoGlide, se le solicitará que
ingrese un número de serie en el campo "Serial Number".
Busque el número en la funda del CD de VideoGlide,
ingréselo y haga clic en "OK."
4. De esta forma, se abre VideoGlide Capture. Haga clic en
"Digitizers" (Digitalizadores) en el menú superior y
seleccione "VideoGlide".
5. Haga clic en "Record" (Grabar) en el menú superior y seleccione "Sound Settings" (Ajustes de sonido).
En la ventana que aparece, haga clic en la pestaña "Source" (Fuente) y seleccione "USB 2861 Device"
(Dispositivo USB 2861) en la lista de abajo. Asimismo, asegúrese de que el menú que está junto a
"Speaker" (Altavoz) está en "On" (Encendido). Haga clic en "OK" cuando termine.
6. Comience a grabar haciendo clic en "Record" en el menú superior y seleccionando "Record". * (También
puede pulsar “Command” + “R”). Reproduzca con su fuente de video (cámara digital, televisor, reproductor
de DVD, etc.).
7. Cuando termine de capturar su video, haga clic en cualquier parte del cuadro del centro de la pantalla. Si
desea ver el video capturado inmediatamente, haga clic en el botón "Open" (Abrir) para abrirlo en
QuickTime. Para volver a la pantalla principal, haga clic en "OK".
8. Para más información sobre el uso de VideoGlide Capture, consulte el archivo "Read Me" (Léame) de
VideoGlide yendo a Applications f VideoGlide f VideoGlide Capture f "VideoGlide ReadMe.rtfd."
VideoGlide Exporter (Mac)
Este software es útil para exportar sus videos a otros formatos para verlos en un iPhone, iPod, etc.
1. Abra VideoGlide Exporter yendo a Applications f VideoGlide f VideoGlide Exporter.
2. Haga clic en el menú "File" (Archivo) y seleccione "Open".
3. Seleccione el archivo que desea exportar. Se abre un reproductor de video con el tamaño y formato
actuales mostrados en la parte inferior del mismo.
4. Haga clic en el menú "File" y seleccione "Export" (Exportar).
5. Ingrese el nombre deseado de su archivo y seleccione el destino donde desea guardarlo.
6. Haga clic en el menú desplegable "Export" y seleccione el formato que desea.
7. Haga clic en "OK" (Aceptar) para exportarlo.
8. Para más información sobre el uso de VideoGlide Exporter, consulte el archivo "Read Me" (Léame) de
VideoGlide yendo a Applications f VideoGlide f VideoGlide Capture f "VideoGlide ReadMe.rtfd" y
consultando la sección “Using VideoGlide Exporter".
17
*Nota: En algunos casos, según sea
el sistema operativo de su
computadora, la imagen de su video
en VideoGlide puede aparecer
"inestable" o "atascada". Esto no
afecta a su video, en realidad se está
capturando correctamente. Si esto
ocurre, no obstante, recomendamos
usar QuickTime para un monitoreo
más fluido del video. Consulte los
detalles más abajo, en las
instrucciones de QuickTime.
Page 18

QuickTime (Mac)
1. Conecte el VIDEO 2 GO al dispositivo de reproducción y a la
computadora (como se muestra en la VISTA GENERAL).
2. Para usar VIDEO 2 GO con QuickTime, debe registrar
primero su software VideoGlide Capture. Abra VideoGlide
Capture yendo a Applications f VideoGlide f VideoGlide
Capture.
3. Se le solicitará que ingrese un número de serie en el campo
"Serial Number". Busque el número en la funda del CD de
VideoGlide, ingréselo y haga clic en "OK."
4. Después de ingresar el número de serie y que VideoGlide
Capture se abra exitosamente, puede cerrarlo.
5. Si va a usar Snow Leopard (Mac OS X 10.6), configure QuickTime para abrirse en el modo de 32 bits
antes de comenzar. Para hacerlo, vaya a su carpeta Applications (Aplicaciones), haga doble clic en
"QuickTime" y seleccione "Get Info" (Obtener información), marque la casilla "Open in 32-bit mode"
(Abrir en modo de 32 bits) en la ventana que aparece y luego cierre la ventana.
6. Abra QuickTime, haga clic en el menú "File" y seleccione "New Movie Recording" (Grabación de película
nueva).
7. Si ve un triángulo con la punta para abajo a la derecha del botón "grabar", haga clic en el mismo para abrir
un menú desplegable. Si no ve el triángulo, haga clic en el menú "QuickTime Player" (Reproductor de
QuickTime) de la parte superior de la pantalla y seleccione "Preferences" (Preferencias).
8. En el menú desplegable, asegúrese de que esté seleccionado el ajuste "Camera" (Cámara) correcto
("Composite" (Compuesto) o "S-Video", según el conector que esté usando) y que esté seleccionado
"USB 2861 Device" como "Microphone" (Micrófono). (Asimismo, asegúrese de que el cursor de volumen
de la izquierda de la pantalla esté subido.)
9. Comience a grabar haciendo clic en el botón rojo "grabar" del pie de la pantalla. Reproduzca con su
fuente de video (cámara digital, televisor, reproductor de DVD, etc.).
10. Cuando termine de capturar su video, haga clic en el botón "parar". El video que capturó se abre
automáticamente en el reproductor de QuickTime. Para guardarlo, vaya a "File" y seleccione "Save"
(Guardar) (o "Save As" (Guardar como) para guardarlo con un nombre diferente, pero guárdelo como
película "autocontenida").
Nota: Si en su Mac se está
ejecutando un sistema operativo
antiguo (como el 10.4), su versión de
QuickTime puede no contar con la
opción de grabar y guardar archivos
de películas. En este caso,
recomendamos actualizarse a
QuickTime Pro para acceder a estas
funciones.
18
Page 19

BOTÓN DE INSTANTÁNEA
El botón circular del VIDEO 2 GO se puede usar para capturar una imagen del cuadro de video que se ve en ese
momento. (Esto resulta útil para usar como miniatura o instantánea de pantalla cuando publica su video en
Internet.) Siga los pasos que se indican a continuación para usar el BOTÓN DE INSTANTÁNEA con el software
apropiado:
PowerDirector (PC)
1. Abra PowerDirector.
2. Haga clic en "Capture From TV Signal" (Capturar desde la señal de TV) (el icono del televisor con
antena, el tercero desde la izquierda).
3. Cuando vea el cuadro que desea capturar, haga clic en el BOTÓN DE INSTANTÁNEA del VIDEO 2
GO.
4. Aparece una ventana en la que puede ingresar el nombre de archivo de la imagen. Después de
hacerlo, haga clic en "OK". Debe ver ahora la imagen con el nombre que ingresó en el panel de la
derecha.
5. Repita los pasos 2 a 4 toda vez que desee capturar una instantánea de su video. (Puede hacerlo
VideoGlide (Mac)
cuantas veces quiera en cualquier video.)
1. Abra VideoGlide Capture.
2. Cuando vea el cuadro que desea capturar, haga clic en el BOTÓN DE INSTANTÁNEA del VIDEO 2
GO.
3. Aparece una ventana en la que puede ingresar el nombre de archivo de la imagen. También puede
hacer clic en el menú desplegable para seleccionar el lugar de su computadora donde desea
guardar la instantánea. Después de hacerlo, haga clic en "OK".
4. Repita los pasos 2 y 3 toda vez que desee capturar una instantánea de su video. (Puede hacerlo
cuantas veces quiera en cualquier video.)
Nota: Por defecto, las imágenes se capturan como archivos .pct. Para seleccionar un formato de
imagen diferente (como JPEG, BMP, PNG, etc.), haga clic en el menú "Snapshot" (Instantánea) de
la parte superior de la pantalla, luego seleccione "Snapshot Settings…" (Ajustes de instantánea).
Haga clic en el menú desplegable "Destination Format" (Formato de destino) para seleccionar el
formato que desea.
19
Page 20

CONTENU DE LA BOÎTE
• VIDEO 2 GO
• Multi-câble
• Câble de prolongation USB de 7 po (17 cm)
• 2 CD-ROM :
o Pilotes (PC et Mac) et logiciels VideoGlide (Mac)
o Logiciels Cyberlink (PC seulement)
• Guide d’utilisation simplifié
• Consignes de sécurité et informations concernant la garantie
INSTALLATION DU LOGICIEL ET DES PILOTES
Avant de commencer, veuillez vous assurer que votre ordinateur dispose de la configuration système
requise suivante :
• Microsoft Windows XP/Vista/7 ou Apple Mac OSX version 10.4 ou ultérieure
• Pentium IV 2 GHz ou supérieur (recommandé)
• 512 Mo de mémoire vive (RAM) ou plus (recommandé)
• Carte graphique (doit prendre en charge DirectX)
• Carte son (compatibilité AC97)
• 1 Go Mo d’espace disque libre
• Lecteur CD-ROM (pour l’installation du logiciel)
• 1 port USB 2.0 disponible (de préférence sur le panneau arrière de l’ordinateur.)
20
Page 21

WINDOWS
1. Raccordez l’appareil.
2. Insérez le CD-ROM des pilotes/logiciel VideoGlide dans le lecteur CD-ROM de votre ordinateur.
3. Installez les pilotes.
4. Installez DirectX (recommandé).
5. Installez Adobe Reader (recommandé).
6. Éjectez le CD-ROM d'installation des pilotes et insérez le CD-ROM du logiciel VideoGlide dans le
7. Installez le logiciel.
Avant toute chose, utilisez le câble de prolongation USB inclus pour brancher le VIDEO 2 GO à un
port USB 2.0 de votre ordinateur. (Nous vous recommandons de le brancher à un port USB sur le
panneau arrière de l’ordinateur.)
Il se peut que quelques boîtes de dialogue s'affichent indiquant que l’ordinateur a détecté le VIDEO
2 GO. Dans certains cas, il se peut qu’un message d’erreur s’affiche – ceci est normal. Cliquez
« OK » si cela est requis, puis procédez à l’étape 2.
Sur la fenêtre qui s’affiche une fois le CD-ROM inséré, cliquez sur « Installer les pilotes ». Suivez
les instructions à l’écran pour compléter l’installation.
Si aucune fenêtre ne s'ouvre, double-cliquez sur « Poste de travail », puis double-cliquez sur le
CD-ROM « VIDEO 2 GO ». La fenêtre devrait s’afficher. (Si la fenêtre ne s'ouvre toujours pas,
double-cliquez sur le CD-ROM « VIDEO 2 GO » puis sélectionnez « Explorer ».) Une fois le
contenu du CD-ROM affiché, double-cliquez sur le dossier « Driver », puis double-cliquez sur le
dossier « 2860 » et double-cliquez sur « Setup.exe ».
Si la dernière version de DirectX n’est pas déjà installée sur votre ordinateur, nous vous
recommandons de l’installer afin d’obtenir une meilleure qualité vidéo. Cliquez sur « Install
Microsoft DirectX » à partir de la fenêtre principale. Suivez les instructions à l’écran pour compléter
l’installation.
Si Adobe Reader (ou Adobe Acrobat) n’est pas déjà installé sur votre ordinateur, nous vous
recommandons de l’installer afin de pouvoir lire le guide d’utilisation (fichier .PDF) inclus sur le
CD-ROM. Pour installer Adobe Reader, cliquez sur « Install Adobe Reader » à partir de la fenêtre
principale. Suivez les instructions à l’écran pour compléter l’installation.
lecteur CD de votre ordinateur.
Sur la fenêtre qui s’affiche une fois le CD-ROM inséré, cliquez sur « Install PowerProducer » ou
sur « Install PowerDirector » selon lequel des deux logiciels vous désirez installer. Une fois le
premier logiciel installé, la fenêtre principale s'affiche vous permettant d'installer le deuxième logiciel
si vous le désirez. Suivez les instructions à l’écran pour compléter l’installation.
Si aucune fenêtre ne s'ouvre, double-cliquez sur « Poste de travail », puis double-cliquez sur le
CD-ROM « VIDEO 2 GO ». La fenêtre devrait s’afficher. Si la fenêtre ne s'ouvre toujours pas,
double-cliquez sur le CD-ROM « VIDEO 2 GO » puis sélectionnez « Explorer ». Une fois le contenu
du CD-ROM affiché, double-cliquez sur le dossier « Driver », puis double-cliquez sur le dossier
« 2860 » et double-cliquez sur « Setup.exe ».
21
Page 22

8. Vous pouvez maintenant utiliser le VIDEO 2 GO.
MAC
1. Raccordez l’appareil.
2. Insérez le CD-ROM des pilotes et du logiciel VideoGlide dans le lecteur CD-ROM de votre
3. Installez les pilotes et le logiciel.
4. Vous pouvez maintenant utiliser le VIDEO 2 GO.
Vous pouvez éjecter le CD-ROM et utiliser le VIDEO 2
GO et le logiciel que vous avez installé. Vous trouverez
le logiciel en cliquant sur Démarrer f Tous les
programmes f Cyberlink PowerProducer ou
PowerDirector. Vous pouvez également l’ouvrir en
double-cliquant l'icône sur le bureau de votre ordinateur si vous avez créé un raccourci durant
l’installation.
Avant toute chose, utilisez le câble de prolongation USB inclus pour brancher le VIDEO 2 GO à un
port USB 2.0 de votre ordinateur. (Nous vous recommandons de le brancher à un port USB sur le
panneau arrière de l’ordinateur.)
ordinateur.
Sur la fenêtre qui s’affiche une fois le CD-ROM inséré, cliquez sur « Install VideoGlide Mac
Drivers and Software ». Suivez les instructions à l’écran pour compléter l’installation. Une fois
l’installation complétée, vous devez redémarrer l’ordinateur pour compléter le processus
d’installation. Si aucune fenêtre ne s'ouvre, double-cliquez sur le CD-ROM « VIDEO 2 GO » sur le
bureau et la fenêtre devrait s’afficher.
Vous pouvez éjecter le CD-ROM et utiliser le VIDEO 2 GO et le logiciel que vous avez installé. Vous
trouverez l’application dans le dossier Applications f VideoGlide f VideoGlide Capture.
La première fois que vous ouvrez VideoGlide, vous serez invité à entrer le numéro de série dans le
champ « Serial Number ». Vous trouverez le numéro sur l'enveloppe du CD-ROM VideoGlide,
saisissez-le dans le champ, puis cliquez sur « OK ».
Une fois VideoGlide installé, vous pouvez utiliser VIDEO 2 GO à partir de n’importe quelle
application sur votre Mac qui utilise des numériseurs vidéo QuickTime, telles que QuickTime,
iMovie, Final Cut et plusieurs autres. Visitez le site http://www.echofx.com/applications.html pour
une liste complète des applications.
Remarque : À l’occasion, il se peut
que le logiciel vous invite à faire la
mise à niveau. Ceci est facultatif, ce
n’est pas requis.
22
Page 23

VUE D’ENSEMBLE
ORDINATEUR PÉRIPHÉRIQUE DE LECTURE
1. CONNECTEUR USB – Branchez le câble de prolongation USB inclus pour brancher le VIDEO 2 GO à un
port USB 2 de votre ordinateur, préférablement sur le panneau arrière.
2. CONNECTEUR MULTI-CÂBLE – Branchez ce connecteur du multi-câble dans le VIDEO 2 GO. Le multicâble doit être branché au périphérique de lecture.
3. ENTRÉES AUDIO – Utilisez des câbles RCA standards pour brancher les entrées gauche et droite aux
sorties gauche et droite de l’appareil de visionnement. Assurez-vous que les couleurs correspondent aux
entrées (rouge/rouge et blanc/blanc).
4. ENTRÉE VIDÉO COMPOSITE – Utilisez un câble composite vidéo standard pour brancher cette entrée à
la sortie composite vidéo du périphérique de lecture. (Si votre le périphérique de lecture dispose d’une
sortie S-Video, vous pouvez la raccorder à l’entrée S-Video au lieu d'utiliser l'entrée vidéo composite.)
5. ENTRÉE S-VIDÉO - Utilisez un câble S-Video standard pour brancher cette entrée à la sortie S-Vidéo du
périphérique de lecture. (Généralement, les connexions S-Video sont offrent une meilleure qualité vidéo
que les connexions composites vidéo, c'est pourquoi nous recommandons d'utiliser cette entrée S-Video si
votre périphérique de lecture dispose d’une sortie S-Video.)
6. TOUCHE SNAPSHOT – Lorsque vous visionnez la vidéo à partir du logiciel, vous pouvez appuyer la
touche SNAPSHOT du VIDEO 2 GO pour capture l’image en cours. (Ceci vous permet d'utiliser l'image
comme vignette lorsque vous publiez votre vidéo sur le Web.) Reportez-vous à la section TOUCHE
SNAPSHOT du logiciel que vous utilisez pour les instructions.
23
Page 24

MISE EN ROUTE
PowerProducer (PC; recommandé pour les débutants)
1. Branchez le VIDEO 2 GO au périphérique de lecture et à
votre ordinateur (comme indiqué dans la section VUE
D’ENSEMBLE).
2. Lancer l’application PowerProducer. Vous trouverez le logiciel
en cliquant sur Démarrer f Tous les programmes f
Cyberlink PowerProducer. Vous pouvez également l'ouvrir en double-cliquant l'icône sur le bureau de
votre ordinateur si vous avez créé un raccourci durant l’installation.
3. Sélectionnez l’option « Produire Disque Film ».
4. Sélectionnez le média : (1) format vidéo, (2) format d’enregistrement vidéo, (3) capacité de disque et (4, si
disponible) ratio d’affichage. (Remarque : Dans la plupart des cas, ces paramètres seront déjà réglés
selon la meilleure option possible.)
5. Dans la sous-fenêtre gauche, cliquez sur « Vidéo » sous l’option « Capture » de la fenêtre Contenu. Le
logiciel devrait détecter automatiquement votre périphérique de lecture.
6. Lancez l’enregistrement en cliquant sur la touche d’enregistrement. Faites jouer votre source vidéo
(caméra numérique, téléviseur, lecteur DVD, etc.). La durée de l’enregistrement sera affichée par le
compteur dans la barre-outil sous l’image vidéo dans la partie supérieure à gauche de la fenêtre.
7. Lorsque vous avez terminé la capture de la vidéo, cliquez sur la touche d’arrêt. La vidéo devrait s’afficher
dans la section contenu dans le bas de la fenêtre.
8. Pour capturer d’autres vidéos, chargez-les sur le périphérique de lecture et répétez les étapes 6 et 7.
Autrement, cliquez sur « Suivant ».
9. Insérez un CD dans le graveur de CD de votre
ordinateur.Cliquez sur « Suivant ».
10. Entrez le titre du CD dans le champ « Nom du volume du
disque ».
11. Entrez le nombre de copies que vous désirez graver.
12. Cliquez sur « Graver » afin de lancer la gravure de la vidéo.
Remarque : À l’occasion, il se peut
que le logiciel vous invite à faire la
mise à niveau. Ceci est facultatif, ce
n’est pas requis.
Remarque : Pour de plus amples
informations sur l’utilisation de
PowerProducer, cliquez sur « ? »
dans le haut de la fenêtre afin
d’accéder au fichier d’aide.
24
Page 25

PowerDirector (PC; recommandé pour les utilisateurs avertis)
1. Branchez le VIDEO 2 GO à l’appareil de visionnement et à
votre ordinateur (comme indiqué dans la section VUE
D’ENSEMBLE).
2. Lancer l’application PowerDirector. Vous trouverez le logiciel
en cliquant sur Démarrer f Tous les programmes f
Cyberlink PowerDirector. Vous pouvez également l'ouvrir en
double-cliquant l'icône sur le bureau de votre ordinateur si
vous avez créé un raccourci durant l’installation.
3. Cliquez sur l’onglet « Capture » situé dans le coin supérieur
gauche de l’écran. Le logiciel devrait détecter
automatiquement votre périphérique de lecture.
4. Lancez l’enregistrement en cliquant sur le bouton
d’enregistrement. Faites jouer votre source vidéo (caméra
numérique, téléviseur, lecteur DVD, etc.).
5. Lorsque vous avez terminé avec la capture de la vidéo,
cliquez sur le bouton d’arrêt.
6. Entrez le nom de la vidéo dans le champ « Nom du fichier capturé » de la fenêtre qui s’ouvre et cliquez
sur « OK ». La vidéo devrait s’afficher dans la fenêtre du contenu dans le bas de la fenêtre.
• Si vous désirez créer un CD, cliquez sur l’onglet « Créer un disque ». Utilisez les boutons sous l'onglet
« Contenu du disque » afin d’ajouter d’autres vidéos à mettre sur le CD, puis cliquez sur « Graver » afin
de graver un CD.
• Si vous désirez sauvegarder la vidéo dans un format populaire (tel que MPEG-4 pour PSP, iPodMC ou
iPhoneMC), cliquez sur l’onglet « Produire » et sélectionnez le format désiré.
• Si vous désirez téléverser la vidéo sur YouTubeMC ou FacebookMC, cliquez sur l’onglet « Produire » et
sélectionnez l’onglet « YouTube » ou « Facebook » dans le haut de la fenêtre.
iPhone et iPod sont des marques de commerce déposées de Apple, inc., enregistrée aux États-Unis et dans d'autres pays.
Facebook est une marque de commerce déposée de Facebook, inc.
Remarque : À l’occasion, il se peut
que le logiciel vous invite à faire la
mise à niveau. Ceci est facultatif, ce
n’est pas requis.
Remarque : Pour de plus amples
informations sur l’utilisation de
PowerDirector, cliquez sur la touche
F1 de votre clavier ou sur l’icône de la
chaise du directeur dans le coin
gauche de la fenêtre, et cliquez sur
« Aide », puis sur « Aide pour
PowerDirector » afin d’accéder au
fichier d’aide du logiciel.
YouTube est une marque de commerce de YouTube, LLC.
25
Page 26

VideoGlide Capture (Mac)
1. Branchez le VIDEO 2 GO au périphérique de lecture et à
votre ordinateur (comme indiqué dans la section VUE
D’ENSEMBLE).
2. Lancez l’application VideoGlide Capture. Vous trouverez
l’application dans le dossier Applications f VideoGlide f
VideoGlide Capture.
3. La première fois que vous ouvrez VideoGlide, vous serez
invité à entrer le numéro de série dans le champ « Serial
Number ». Vous trouverez le numéro sur l'enveloppe du CDROM VideoGlide, saisissez-le dans le champ, puis cliquez sur
« OK ».
4. L’application VideoGlide Capture est maintenant ouverte.
Cliquez sur « Digitizers » dans le menu supérieur et
sélectionnez « VideoGlide ».
5. Cliquez sur « Record » dans le menu supérieur et
sélectionnez « Sound Settings ». Dans la nouvelle fenêtre, cliquez sur l’onglet « Source » et sélectionnez
« USB 2861 Device » de la liste. Assurez-vous également que le menu près de « Speaker » est réglé sur
« On ». Lorsque vous avez terminé, cliquez sur « OK ».
6. Lancez l’enregistrement en cliquant sur « Record » du menu supérieur et en sélectionnant « Record ». *
(Vous pouvez également cliquer sur les touches « Commande » + « R ».) Faites jouer votre source vidéo
(caméra numérique, téléviseur, lecteur DVD, etc.).
7. Lorsque vous avez terminé avec la capture, cliquez n’importe où à l’intérieur de la boîte dans le centre de
l’écran. SI vous désirez visionner immédiatement la vidéo capturée, cliquez sur « Open » afin de le
visionner avec QuickTime. Pour retourner à la fenêtre principale, cliquez sur « OK ».
8. Pour de plus amples informations sur l’utilisation de VideoGlide Capture, veuillez vous reporter au fichier
« Read Me » en cliquant sur Applications f VideoGlide f VideoGlide Capture f VideoGlide
ReadMe.rtfd.
VideoGlide Exporter (Mac)
Ce logiciel permet d’exporter vos vidéos en formats différents afin de les visionner sur un iPhone, iPod, etc.
1. Lancez l’application en cliquant sur Applications f VideoGlide f VideoGlide Exporter.
2. Cliquez le menu « Fichier » et sélectionnez « Ouvrir ».
3. Sélectionnez le fichier que vous désirez exporter. Une application multimédia devrait s’ouvrir indiquant le
format et la taille du fichier dans le bas de l’application.
4. Cliquez le menu « Fichier » et sélectionnez « Exporter ».
5. Nommez le fichier et sélectionnez l'emplacement de sauvegarde.
6. Cliquez le menu déroulant « Exporter » et sélectionnez le format désiré.
7. Cliquez sur « OK » pour exporter.
8. Pour de plus amples informations sur l’utilisation de VideoGlide Exporter, veuillez vous reporter au fichier
« Read Me » en cliquant sur Applications f VideoGlide f VideoGlide Exporter f VideoGlide
ReadMe.rtfd.
26
* Remarque : Dans certains cas,
selon le système d’exploitation de
votre ordinateur, il se peut que la
capture d’image de votre vidéo puisse
paraître un peu saccadée ou
« gelée ». Ceci n’affectera en rien
votre vidéo, la capture se fait
correctement. Si cela se produit, nous
vous recommandons d’utiliser
QuickTime afin d’optimiser le
monitorage vidéo. Consultez les
instructions QuickTime pour plus de
détails.
Page 27

QuickTime (Mac)
1. Branchez le VIDEO 2 GO au périphérique de lecture et à
votre ordinateur (comme indiqué dans la section VUE
D’ENSEMBLE).
2. Afin de pouvoir utiliser VIDEO 2 GO avec QuickTime, vous
devez d’abord enregistrer votre copie du logiciel VideoGlide
Capture. Lancez l’application VideoGlide Capture en cliquant
sur Applications f VideoGlide f VideoGlide Capture.
3. Vous serez invité à entrer le numéro de série dans le champ
« Serial Number ». Vous trouverez le numéro sur l'enveloppe
du CD-ROM VideoGlide, saisissez-le dans le champ, puis
cliquez sur « OK ».
4. Une fois que vous avez entré le numéro de série et que l’application VideoGlide Capture s’ouvre
correctement, vous pouvez la refermer.
5. Si vous utilisez Snow Leopard (Mac OS X 10.6), configurez d’abord QuickTime de manière à ce qu’il
s’ouvre en version 32 bits. Cliquez sur le dossier Applications, faites un clic droit sur « QuickTime »,
sélectionnez « Lire les informations » et cochez l’option « Ouvrir en mode 32 bits », puis fermez la
fenêtre.
6. Lancez QuickTime, cliquez sur le menu « Fichier » et sélectionnez « Nouvel enregistrement vidéo ».
7. Si vous voyez un triangle pointant vers le bas à droite du bouton d'enregistrement, cliquez-le afin d'ouvrir
un menu déroulant. Si vous ne voyez pas de triangle, cliquez sur le menu « QuickTime Player »dans le
haut de l’écran et sélectionnez « Préférences ».
8. À partir du menu déroulant, assurez-vous que les paramètres « Caméra » sont adéquats (« Composite »
ou « S-Video », selon le connecteur que vous utilisé) et que « USB 2861 Device » est sélectionné comme
« Microphone ». (Veuillez également vous assurer que le potentiomètre à gauche sur la fenêtre est
élevé.)
9. Lancez l’enregistrement en cliquant sur le bouton d’enregistrement dans le bas de la fenêtre. Faites jouer
votre source vidéo (caméra numérique, téléviseur, lecteur DVD, etc.).
10. Lorsque vous avez terminé avec l’enregistrement, cliquez sur la touche d’arrêt. La vidéo capturée devrait
s’afficher automatiquement dans QuickTime player. Pour la sauvegarder, cliquez sur « Fichier » et
sélectionnez « Enregistrer » (ou « Enregistrer sous » pour modifier le nom du fichier, sans modifier la
vidéo).
Remarque : Si votre ordinateur Mac
utilise un système d’exploitation plus
âgé (p. ex., 10.4), il se peut que votre
version QuickTime ne dispose pas
d’options d’enregistrement des fichiers
vidéo. Si tel est le cas, nous vous
recommandons de faire la mise à
niveau à QuickTime Pro afin de
pouvoir utiliser ces fonctions.
27
Page 28

TOUCHE SNAPSHOT
La touche circulaire sur VIDEO 2 GO permet de capturer l’image en cours de la vidéo. Ceci vous permet d'utiliser
l'image comme vignette lorsque vous publiez votre vidéo sur le Web. Suivez les étapes ci-dessous pour utiliser la
touche SNAPSHOT selon le logiciel utilisé :
PowerDirector (PC)
1. Lancer l’application PowerDirector.
2. Cliquez sur « Capture à partir d’un signal TV » (l’icône d’un téléviseur avec antenne, troisième de
gauche).
3. Lorsque vous voyez l’image que vous désirez capturer, cliquez sur la touche SNAPSHOT du VIDEO
2 GO.
4. Une fenêtre devrait s’ouvrir afin d'entrer le nom de fichier de l'image. Une fois que vous avez
terminé, cliquez sur « OK ». L’image ainsi que le nom du fichier devraient apparaître dans la sous-
fenêtre de droite.
5. Lorsque vous désirez capturer une image de la vidéo, répétez les étapes 2 et 4. (Vous pouvez le
VideoGlide (Mac)
faire autant de fois que vous le désirez peu importe la vidéo.)
1. Lancez l’application VideoGlide Capture.
2. Lorsque vous voyez l’image que vous désirez capturer, cliquez sur la touche SNAPSHOT du VIDEO
2 GO.
3. Une fenêtre devrait s’ouvrir afin d'entrer le nom de fichier de l'image. Vous pouvez également
cliquer sur le menu déroulant pour sélectionner l’emplacement de sauvegarde de l’image capturée.
Une fois que vous avez terminé, cliquez sur « OK ».
4. Lorsque vous désirez capturer une image de la vidéo, répétez les étapes 2 et 3. (Vous pouvez le
faire autant de fois que vous le désirez peu importe la vidéo.)
Remarque : Par défaut, les images capturées seront sauvegardées en format .pct. Si vous désirez
sélectionner un format différent (p. ex., JPEG, BMP, PNG, etc.), cliquez sur le menu « Snapshot »
dans le haut de la fenêtre et sélectionnez « Snapshot Settings…». Cliquez ensuite sur le menu
déroulant « Destination Format » afin de sélectionner le format désiré.
28
Page 29

CONTENUTI DELLA CONFEZIONE
• VIDEO 2 GO
• Cavo multiplo
• Prolunga USB da 17 cm
• 2 CD:
o Driver (PC e Mac) e software VideoGlide (Mac)
o Software Cyberlink (solo per PC)
• Guida rapida
• Istruzioni di sicurezza e garanzia
INSTALLAZIONE DRIVER E SOFTWARE
Prima di iniziare, assicurarsi che il computer rispetti i seguenti requisiti di sistema:
• Microsoft Windows XP/Vista/7 o Apple Mac OSX 10.4 o superiore
• Pentium-IV 2 GHz o superiore (consigliato)
• 512 MB RAM o superiore (consigliato)
• Scheda video (deve supportare DirectX)
• Scheda audio (compatibile con AC97)
• 1GB di spazio libero su disco fisso
• Lettore di CD-ROM (per l'installazione del software)
• Una porta USB 2.0 disponibile (preferibilmente presente sul pannello posteriore del computer)
29
Page 30

WINDOWS
1. Collegare il dispositivo.
2. Inserire il CD recante i driver ed il software VideoGlide nel lettore CD del computer.
3. Installare i driver.
4. Installazione DirectX (consigliato).
5. Installazione Adobe Reader (consigliato).
6. Estrarre il CD recante i driver e inserire il CD recante il software Cyberlink nel lettore CD del
7. Installare il software.
Prima di fare qualsiasi altra cosa, servirsi della prolunga USB in dotazione per collegare il VIDEO 2
GO ad una porta USB2.0 libera sul computer. (Si consiglia di collegarlo ad una porta sul pannello
posteriore del computer.)
Diverse finestre di dialogo possono comparire nell'angolo dello schermo a indicare che il computer
ha percepito che il VIDEO 2 GO è collegato. In alcuni casi può comparire un messaggio che
sembra un messaggio di errore: è normale. Cliccare su "OK" (se necessario) e passare alla Fase 2.
Nella finestra che appare dopo aver inserito il CD, cliccare su "Install PC Drivers" (installa driver
per PC). Seguire le istruzioni su schermo per completare l’installazione.
Se questa finestra non compare automaticamente, fare doppio clic su "Risorse del computer" e
quindi sul CD "VIDEO 2 GO". La finestra dovrebbe apparire. (Se la finestra ancora non appare, fare
clic col tasto destro del mouse sul CD "VIDEO 2 GO" e selezionare "Esplora." Una volta che
compaiono i contenuti del CD, fare doppio clic sulla cartella "Driver", fare doppio clic sulla cartella
"2860" e quindi su "Setup.exe.")
Se l'ultima versione della DirectX non è ancora installata sul computer, si raccomanda di installarla
per ottenere migliori prestazioni video. Per farlo, cliccare su "Install Microsoft DirectX" (installa
Microsoft DirectX) nella finestra principale. Seguire le istruzioni su schermo per completare
l’installazione.
Se Adobe Reader (o Adobe Acrobat) non è ancora presente sul computer, si raccomanda di
installarlo per poter leggere il manuale (il file .PDF) presente nel CD in dotazione. Per farlo, cliccare
su "Install Adobe Reader" (installa Adobe Reader) nella finestra principale. Seguire le istruzioni su
schermo per completare l’installazione.
computer.
Nella finestra che compare dopo aver inserito il CD, cliccare su "Install PowerProducer" (Installa
PowerProducer) o "Install PowerDirector" (Installa PowerProducer) per installare uno dei due
programmi software. Dopo aver installato un programma, si torna alla schermata principale, dove è
possibile scegliere di installare anche l'altro programma. Seguire le istruzioni su schermo per
completare l’installazione.
Se questa finestra non compare automaticamente, fare doppio clic su "Risorse del computer" e
quindi sul CD "VIDEO 2 GO". La finestra dovrebbe apparire. Se la finestra ancora non appare, fare
clic col tasto destro del mouse sul CD "VIDEO 2 GO" e selezionare "Esplora". Una volta che
compaiono i contenuti del CD, fare doppio clic sulla cartella "Driver", fare doppio clic sulla cartella
"2860" e quindi su "Setup.exe".
30
Page 31

8. Cominciamo!
MAC
1. Collegare il dispositivo.
2. Inserire il CD recante i driver ed il software VideoGlide nel lettore CD del computer.
3. Installare i driver e il software.
4. Cominciamo!
Si può ora espellere il CD e iniziare a utilizzare il
VIDEO 2 GO ed il software installato. Il software può
essere reperito recandosi su Start Menu f Tutti i
programmi f Cyberlink PowerProducer o
PowerDirector. (Si può anche fare doppio clic
sull'icona di scelta rapida presente sul Desktop del
computer se ne è stata creata una durante l'installazione.)
Prima di fare qualsiasi altra cosa, servirsi della prolunga USB in dotazione per collegare il VIDEO 2
GO ad una porta USB2.0 libera sul computer. (Si consiglia di collegarlo ad una porta sul pannello
posteriore del computer.)
Nella finestra che appare dopo aver inserito il CD, cliccare su "Install VideoGlide Mac Drivers and
Software" (installa driver e software VideoGlide per Mac). Seguire le istruzioni su schermo per
completare l’installazione. Per completare il processo, occorrerà riavviare il computer. (Se questa
finestra non compare automaticamente, fare doppio clic sul CD "VIDEO 2 GO" sul Desktop e la
finestra dovrebbe apparire.)
Si può ora espellere il CD e iniziare a utilizzare il VIDEO 2 GO ed il software installato. Si può
trovare il software recandosi su Applicazioni f VideoGlide f VideoGlide Capture.
La prima volta che si apre il VideoGlide, verrà chiesto di inserire un numero di serie nel campo
"Serial Number" (numero di serie). Il numero di serie è presente sulla custodia del CD VideoGlide;
inserirlo e cliccare su "OK".
Dopo aver installato il VideoGlide, si può anche utilizzare il VIDEO 2 GO in qualsiasi programma
Mac che impieghi video ritocco QuickTime. Ciò include QuickTime, iMovie, Final Cut e molti altri.
Per un elenco completo, recarsi alla pagina http://www.echofx.com/applications.html.
Nota bene: Talvolta il software
chiederà se si desidera effettuarne
l'aggiornamento dopo averlo aperto.
Questo è opzionale, non richiesto.
31
Page 32

PANORAMICA
COMPUTER
1. CONNETTORE USB – Collegare questo capo del VIDEO 2 GO alla prolunga USB in dotazione, quindi
collegare la prolunga ad una porta USB 2.0 disponibile del computer (preferiblmente una porta presente
sul pannello posteriore).
2. CONNETTORE MULTI-CAVO – Collegare questo capo del cavo multiplo in dotazione al VIDEO 2 GO. Il
cavo multiplo sarà collegato al dispositivo di riproduzione.
3. INGRESSI AUDIO – Servirsi di cavi RCA standard per collegare questi ingressi audio alle uscite sinbistra
e destra del dispositivo di riproduzione. Assicurarsi di abbinare i colori nel modo giusto: rosso con rosso e
bianco con bianco.
4. INGRESSO VIDEO COMPOSITO – Servirsi di un cavo standard video composito per collegare questo
ingresso all'uscita video composita del dispositivo di riproduzione. (se invece quest'ultimo è dotato di
un'uscita S-Video, è possibile collegarla all'INGRESSO S-VIDEO.)
5. INGRESSO S-VIDEO – Servirsi di un cavo standard S-Video per collegare questo ingresso all'uscita SVideo del dispositivo di riproduzione. (Solitamente i collegamenti S-Vieo sono di qualità migliore rispetto a
quelli video compositi, quindi consigliamo di servirsi di questi se il dispositivo di riproduzione è dotato di
un'uscita S-Video.)
6. TASTO SNAPSHOT – Mentre il video viene riprodotto nel software, è possibile premere questo tasto sul
VIDEO 2 GO per acquisire una screenshot del fotogramma corrente. (Questo è utile come
segnalibro/screenshot per quando si pubblica il video online.) Si veda il paragrafo dedicato al TASTO
SNAPSHOT per maggiori istruzioni su come farlo con il software in uso.
DISPOSITIVO DI
RIPRODUZIONE VIDEO
32
Page 33

PRIMI PASSI
PowerProducer (PC; consigliato per i principianti)
1. Collegare il VIDEO 2 GO al dispositivo di riproduzione ed al
computer (come illustrato nel paragrafo PANORAMICA).
2. Aprire il PowerProducer. Il software può essere reperito
recandosi su Start f Tutti i programmi f Cyberlink
PowerProducer . (Si può anche fare doppio clic sull'icona di
scelta rapida presente sul Desktop del computer se ne è stata creata una durante l'installazione.)
3. Selezionare l'opzione "Produce Movie Disc" (produci disco video).
4. Selezionare il mezzo: (1) il tipo di disco, (2) il formato di registrazione, (3) la capacità del disco e (4, se
disponibile) la frequenza di riproduzione. (Nota bene: il più delle volte, tali configurazioni saranno già
impostate sull'opzione migliore.)
5. Nel lato sinistro della finestra, cliccare su "Video" nella sezione "Capture" (acquisisci). Il software
individuerà automaticamente il dispositivo video.
6. Iniziare la registrazione cliccando sul tasto rosso "Record" (registra). Riprodurre la sorgente video
(videocamera digitale, lettore DVD, ecc.). La durata della registrazione sarà illustrata nel contatore sotto
"Capture Information" (acquisizione informazioni) sul lato sinistro della finestra.
7. Una volta finito di acquisire il video, cliccare sul tasto "Stop". Il video apparirà nella "timeline" in fondo alla
finestra.
8. Per acquisire ulteriori video, effettuare il cueing dei video nel dispositivo di riproduzione e ripetere le fasi 6-
7. Altrimenti, cliccare su "Next".
9. Inserire il CD nel masterizzatore di CD del computer.
10. Cliccare sul tasto "Next".
11. Inserire un titolo per il disco nel campo "Disc Volume Label"
(etichetta disco).
12. Inserire il numero di copie che si desidera masterizzare.
13. Cliccare il tasto "Burn" per masterizzare un disco con i video
desiderati.
Nota bene: Talvolta il software
chiederà se si desidera effettuarne
l'aggiornamento dopo averlo aperto.
Questo è opzionale, non richiesto.
Nota bene: Per informazioni più
approfondite sull'uso del
PowerProducer, cliccare sull'icona
"?" in cima allo schermo per
accedere al file di aiuto del
software.
33
Page 34

PowerDirector (PC; consigliato per utenti esperti)
1. Collegare il VIDEO 2 GO al dispositivo di riproduzione ed al
computer (come illustrato nel paragrafo PANORAMICA).
2. Aprire il PowerDirector. Il software può essere reperito
recandosi su Start f Tutti i programmi f Cyberlink
PowerDirector . (Si può anche fare doppio clic sull'icona di
scelta rapida presente sul Desktop del computer se ne è stata
creata una durante l'installazione.)
3. Cliccare sulla scheda "Capture" (acquisisci) nell'angolo
superiore sinistro dello schermo. Il software individuerà
automaticamente il dispositivo video.
4. Iniziare la registrazione cliccando sul tasto rosso "Record"
(registra). Riprodurre la sorgente video (videocamera digitale,
lettore DVD, ecc.).
5. Una volta finito di acquisire il video, cliccare sul tasto "Stop".
6. Inserire il titolo del video nel campo "Captured File Name"
(nome file acquisito) nella finestra che appare e cliccare su
"OK". Il video apparirà in "contenuti acquisiti" in fondo alla finestra.
• Se si desidera creare un CD, cliccare sulla scheda "Create Disc". Servirsi dei tasti al di sotto della
scheda "Content" (contenuto) per aggiungere i video che si desidera sul CD, quindi cliccare su
"Burn" (masterizza) per masterizzare il disco.
• Se si desidera salvare un video in un formato popolare (ad es. MPEG-4 portatile per PSP, iPod™, o
iPhone™), cliccare sulla scheda "Produce" (produci) e selezionare il giusto formato.
• Se si desidera caricare un video su YouTube™ o Facebook™, cliccare sulla scheda "Produce"
(produci), quindi sulla scheda "YouTube" o "Facebook" vicino alla parte superiore della finestra.
iPhone e iPod sono marchi di fabbrica di Apple, Inc., registrati negli Stati Uniti e in altri Paesi.
Facebook® è un marchio registrato di Facebook, Inc.
Nota bene: Talvolta il software
chiederà se si desidera effettuarne
l'aggiornamento dopo averlo aperto.
Questo è opzionale, non richiesto.
Nota bene: Per informazioni più
approfondite sull'uso del
PowerDirector, premere F1 sulla
tastiera e cliccare sull'icona della
"sedia da regista" presente nell'angolo
superiore sinistro dello schermo e
recarsi su "Help" quindi
"PowerDirector Help" per accedere
al file di aiuto del software.
YouTube è un marchio registrato di YouTube, LLC.
34
Page 35

VideoGlide Capture (Mac)
1. Collegare il VIDEO 2 GO al dispositivo di riproduzione ed al
computer (come illustrato nel paragrafo PANORAMICA).
2. Aprire VideoGlide Capture. Si può trovare il software
recandosi su Applicazioni f VideoGlide f VideoGlide
Capture.
3. La prima volta che si apre il VideoGlide, verrà chiesto di
inserire un numero di serie nel campo "Serial Number"
(numero di serie). Il numero di serie è presente sulla custodia
del CD VideoGlide; inserirlo e cliccare su "OK".
4. VideoGlide Capture è ora aperto. Cliccare su "Digitizers" nel
menu superiore e selezionare "VideoGlide."
5. Cliccare su "Record" nel menu superiore e selezionare
"Sound Settings" (configurazioni audio). Nella finestra che
compare, cliccare sulla scheda "Source" (fonte) e selezionare "USB 2861 Device" (dispositivo USB 2861)
al di sotto di essa. Inoltre, assicurarsi che il menu di fianco a "Speaker" (altoparlante) sia su "On".
Cliccare su "OK" una volta finito.
6. Iniziare a registrare cliccando su "Record" nel menu superiore e selezionando "Record". * (Si può anche
premere "Command" + R".) Riprodurre la sorgente video (videocamera digitale, lettore DVD, ecc.).
7. Una volta finito di acquisire il video, cliccare in qualsiasi punto all'interno della casella al centro dello
schermo. Se si desidera guardare immediatamente il video acquisito, cliccare sul tasto "Open" (apri) per
aprirlo in QuickTime. Per tornare alla schermata principale, cliccare su "OK".
8. Per maggiori informazioni sull'uso del VideoGlide Capture, fare riferimento al file VideoGlide "Read Me"
recandosi su Applicazioni f VideoGlide f VideoGlide Capture f "VideoGlide ReadMe.rtfd."
VideoGlide Exporter (Mac)
Questo software è utile per esportare i video in altri formati per la visione su un iPhone, iPod, ecc.
1. Aprire il VideoGlide Exporter recandosi su Applicazioni f VideoGlide f VideoGlide Exporter.
2. Cliccare sul menu "File" e selezionare "Open".
3. Selezionare il file che si desidera esportare. Un lettore video player si aprirà nel formato attuale e nelle
dimensioni illustrate in fondo al lettore.
4. Cliccare sul menu "File" e selezionare "Export".
5. Inserire il nome desiderato per il file e selezionare la destinazione in cui si desidera salvarlo.
6. Cliccare il menu a discesa "Export" (esporta) e selezionare il formato desiderato.
7. Cliccare su "OK" per esportare il file.
8. Per maggiori informazioni sull'uso del VideoGlide Exporter, fare riferimento al file VideoGlide "Read Me"
recandosi su Applicazioni f VideoGlide f VideoGlide Capturef "VideoGlide ReadMe.rtfd" e fare
riferimento alla sezione "Using VideoGlide Exporter" (utilizzo del VideoGlide Exporter).
35
*Nota bene: In alcuni casi, a seconda
del sistema operativo del computer,
l'immagine del video in VideoGlide
può apparire "mossa" o "in stallo".
Questo tuttavia non influirà
negativamente sul video: in realtà lo
sta acquisendo in maniera corretta.
Se ciò avviene, tuttavia, si consiglia di
utilizzare QuickTime per un
monitoraggio video più fluido. Si
vedano le istruzioni di QuickTime
seguenti per maggiori dettagli.
Page 36

QuickTime (Mac)
1. Collegare il VIDEO 2 GO al dispositivo di riproduzione ed al
computer (come illustrato nel paragrafo PANORAMICA).
2. Per utilizzare il VIDEO 2 GO con QuickTime, bisogna prima
registrare il software VideoGlide Capture. Aprire il VideoGlide
Capture recandosi su Applicazioni f VideoGlide f
VideoGlide Capture.
3. Verrà richiesto di inserire un numero di serie nel campo
"Serial Number" (numero di serie). Il numero di serie è
presente sulla custodia del CD VideoGlide; inserirlo e cliccare
su "OK".
4. Dopo aver inserito il numero di serie e dopo che il VideoGlide Capture si apre, è possibile chiuderlo.
5. Se si utilizza Snow Leopard (Mac OS X 10.6), prima di iniziare impostare QuickTime in modo che si apra a
32 bit. Per farlo, recarsi sulla cartella Applicazioni , fare clic col tasto destro su "QuickTime" e
selezionare "Get Info", spuntare la casella "Open in 32-bit mode" (apri in modalità a 32 bit che appare,
quindi chiudere la finestra.
6. Aprire QuickTime, cliccare sul menu "File" e selezionare "New Movie Recording".
7. Se viene visualizzato un triangolo rivolto verso il basso a destra del tasto "record" (registra), cliccarvi sopra
per aprire un menu a discesa. Se il triangolo non compare, cliccare sul menu "QuickTime Player" in cima
allo schermo e selezionare "Preferences".
8. Nel menu a discesa, assicurarsi che sia selezionata la giusta configurazione della "Camera"
("Composite" o "S-Video," a seconda del connettore in uso) e che "USB 2861 Device" (dispositivo USB
2861) sia selezionato come "Microphone" (microfono). (Inoltre, assicurarsi che il cursore del volume
presente sul lato sinistro della finestra sia alzato.)
9. Iniziare a registrare cliccando sul tasto "record" (registra) in fondo allo schermo. Riprodurre la sorgente
video (videocamera digitale, lettore DVD, ecc.).
10. Una volta finito di acquisire il video, cliccare sul tasto "stop". Il video acquisito si aprirà automaticamente
nel lettore QuickTime. Per salvarlo, recarsi su "File" e selezionare "Save" (salva) (o "Save As" (salva con
nome) per salvarlo con un nome diverso, ma salvarlo come filmato "indipendente").
Nota bene: Se sul Mac è presente un
sistema operativo più vecchio (ad es.,
10.4), la versione di QuickTime
presente potrebbe non avere l'opzione
di registrare e salvare filmati. In
questo caso, si consiglia di aggiornare
il programma a QuickTime Pro per
avere accesso a tali funzioni.
36
Page 37

TASTO SNAPSHOT
Il tasto circolare sul VIDEO 2 GO può essere utilizzato per acquisire un'immagine del fotogramma corrente del
video. Questo è utile come segnalibro/screenshot per quando si pubblica il video online. Procedere come segue
per utilizzare il TASTO SNAPSHOT con il giusto software:
PowerDirector (PC)
1. Aprire il PowerDirector.
2. Cliccare su "Capture From TV Signal" (acquisisci da segnale TV) (l'icona della TV con antenna,
terza da sinistra).
3. Quando si visualizza il fotogramma che si desidera acquisire, cliccare sul TASTO SNAPSHOT sul
VIDEO 2 GO.
4. Comparirà una finestra in cui è possibile inserire il nome del file dell'immagine. Quindi cliccare su
"OK". Ora si dovrebbe visualizzare l'immagine con il nome inserito nel pannello a destra.
5. Ripetere le fasi 2-4 ogni volta in cui si desidera acquisire una snapshot del video. (questo può
VideoGlide (Mac)
essere fatto tutte le volte che si desidera per qualsiasi video.)
1. Aprire VideoGlide Capture.
2. Quando si visualizza il fotogramma che si desidera acquisire, cliccare sul TASTO SNAPSHOT sul
VIDEO 2 GO.
3. Comparirà una finestra in cui è possibile inserire il nome del file dell'immagine. Si può anche
cliccare sul menu a discesa per selezionare dove si desidera salvare la snapshot. Quindi cliccare
su "OK".
4. Ripetere le fasi 2-3 ogni volta in cui si desidera acquisire una snapshot del video. (questo può
essere fatto tutte le volte che si desidera per qualsiasi video.)
Nota bene: In via predefinita, le immagini saranno acquisite come file .pct. Per selezionare un
formato immagine diverso (ad es., JPEG, BMP, PNG, ecc.), cliccare sul menu "Snapshot" in cima
allo schermo, quindi selezionare "Snapshot Settings…" (configurazioni snapshot). Cliccare sul
menu a discesa "Destination Format" (formato di destinazione) per selezionare il formato
desiderato.
37
Page 38

SCHACHTELINHALT
• VIDEO 2 GO
• Multi-Kabel
• 7" (17cm) USB-Verlängerungskabel
• 2 CDs:
o Treiber (für PC und Mac) und VideoGlide Software (Mac)
o Cyberlink-Software (nur PC)
• Schnellstart-Anleitung
• Sicherheitshinweise und Garantieinformationen
TREIBER & SOFTWARE-INSTALLATION
Bevor Sie beginnen, vergewissern Sie sich, dass Ihr Computer folgende Systemvoraussetzungen erfüllt:
• Microsoft Windows XP/Vista/7 oder Apple Mac OSX 10.4 oder höher
• Pentium-IV 2 GHz oder höher (empfohlen)
• 512 MB RAM oder mehr (empfohlen)
• Grafikkarte (muss DirectX unterstützen)
• Soundkarte (AC97-kompatible Soundkarte)
• 1 GB freier Festplattenspeicher
• CD-ROM-Laufwerk (für die Software-Installation)
• Ein freier USB 2.0-Anschluss (vorzugsweise auf der Rückseite des Computers)
38
Page 39

WINDOWS
1. Schließen Sie das Gerät an.
2. Legen Sie die Treiber- und VideoGlide Software-CD in das CD-Laufwerk Ihres Computers ein.
3. Installieren Sie die Treiber.
4. Installieren Sie DirectX (empfohlen).
5. Installieren Sie Adobe Reader (empfohlen).
6. Entfernen Sie die Treiber-CD und legen Sie die Cyberlink Software-CD in das CD-Laufwerk Ihres
7. Installieren Sie die Software.
Noch bevor Sie irgendetwas anderes tun, verwenden Sie zuallererst das mitgelieferte USBVerlängerungskabel, um VIDEO 2 GO an einen freien USB2.0-Anschluss Ihres Computers
anzuschließen. (Wir empfehlen Ihnen das Gerät mit einem Anschluss an der Rückseite Ihres
Computers zu verbinden.)
Es kann sein, dass mehrere Dialogfelder in einer Bildschirmecke aufscheinen, die anzeigen, dass
der Computer die Verbindung mit VIDEO 2 GO erkannt hat. In einigen Fällen kann es sein, dass
Sie eine Meldung sehen, die einer Fehlermeldung ähnelt - das ist jedoch normal. Klicken Sie auf
"OK" (falls nötig) und fahren Sie mit Schritt 2 fort.
Klicken Sie im Fenster, das nach dem Einlegen der CD erscheint, auf "PC-Treiber installieren."
Befolgen Sie die Anweisungen auf dem Bildschirm, um die Installation abzuschließen.
Wenn dieses Fenster nicht automatisch aufscheint, doppelklicken Sie erst auf „Mein Computer“
und anschließend auf die „VIDEO 2 GO“-CD. Das Fenster sollte nun angezeigt werden. (Wenn das
Fenster immer noch nicht angezeigt wird, rechtsklicken Sie auf die „VIDEO 2 GO“-CD und wählen
"Explorer". Sobald die Inhalte der CD angezeigt werden, doppelklicken Sie auf den Ordner
"Treiber", auf den Ordner "2860" und danach auf "Setup.exe".)
Wenn die neueste DirectX-Version nicht bereits auf Ihrem Computer installiert ist, empfehlen wir
Ihnen sie zu installieren, um eine bessere Video-Performance zu erreichen. Um dies zu tun, klicken
Sie im Hauptfenster auf "Microsoft DirectX installieren". Befolgen Sie die Anweisungen auf dem
Bildschirm, um die Installation abzuschließen.
Wir empfehlen Ihnen Adobe Reader (oder Adobe Acrobat) zu installieren, falls diese Anwendung
nicht bereits auf Ihrem Computer installiert ist, damit Sie das Handbuch (die PDF-Datei) auf der
mitgelieferten CD lesen können. Um den Adobe Reader zu installieren, klicken Sie im Hauptfenster
auf "Adobe Reader installieren". Befolgen Sie die Anweisungen auf dem Bildschirm, um die
Installation abzuschließen.
Computers ein.
Klicken Sie im Fenster, das nach dem Einlegen der CD erscheint, auf "PowerProducer
installieren" oder "PowerDirector installieren", um eines dieser Software-Programme zu
installieren. Nach der Installation des Programms, gelangen Sie zurück zum Hauptbildschirm, wo
Sie bei Bedarf auch das andere Programm installieren können. Befolgen Sie die Anweisungen auf
dem Bildschirm, um die Installation abzuschließen.
39
Page 40

Wenn dieses Fenster nicht automatisch aufscheint, doppelklicken Sie erst auf „Mein Computer“
und anschließend auf die „VIDEO 2 GO“-CD. Das Fenster sollte nun angezeigt werden. Wenn das
Fenster immer noch nicht angezeigt wird, rechtsklicken Sie auf die „VIDEO 2 GO“-CD und wählen
"Explorer". Sobald die Inhalte der CD angezeigt werden, doppelklicken Sie auf den Ordner
8. Los geht’s!
MAC
1. Schließen Sie das Gerät an.
2. Legen Sie die Treiber- und VideoGlide Software-CD in das CD-Laufwerk Ihres Computers ein.
3. Installieren Sie die Treiber und die Software.
4. Los geht’s!
"Treiber", auf den Ordner "2860" und danach auf "Setup.exe".
Sie können die CD entfernen und damit beginnen
VIDEO 2 GO und die installierte Software zu
verwenden. Sie finden die Software, indem Sie Start-
Menü f Alle Programme f CyberLink
PowerProducer oder PowerDirector wählen. (Sie
können auch auf das entsprechende Symbol auf Ihrem
Desktop doppelklicken, falls Sie während der Installation eine Desktop-Verknüpfung erstellt haben.)
Noch bevor Sie irgendetwas anderes tun, verwenden Sie zuallererst das mitgelieferte USBVerlängerungskabel, um VIDEO 2 GO an einen freien USB2.0-Anschluss Ihres Computers
anzuschließen. (Wir empfehlen Ihnen das Gerät mit einem Anschluss an der Rückseite Ihres
Computers zu verbinden.)
Klicken Sie im Fenster, das nach dem Einlegen der CD erscheint, auf "VideoGlide Mac Treiber
und Software installieren." Befolgen Sie die Anweisungen auf dem Bildschirm, um die Installation
abzuschließen. Sie müssen anschließend Ihren Computer neu starten, um diesen Prozess
abzuschließen. (Wenn dieses Fenster nicht automatisch aufscheint, doppelklicken Sie auf die
„VIDEO 2 GO“-CD am Desktop – das Fenster sollte nun aufscheinen.)
Sie können die CD entfernen und damit beginnen VIDEO 2 GO und die installierte Software zu
verwenden. Sie finden die Software, indem Sie Applikationen f VideoGlide f VideoGlide
Capture wählen.
Wenn Sie VideoGlide das erste Mal öffnen, werden Sie aufgefordert, eine Seriennummer in das
Feld "Seriennummer" einzugeben. Suchen Sie die Nummer auf der VideoGlide CD-Hülle, geben
Sie sie ein und klicken danach auf "OK".
Nachdem Sie VideoGlide installiert haben, können Sie VIDEO 2 GO in jedem beliebigen Programm
auf Ihrem Mac verwenden, das QuickTime-Video-Digitizer verwendet. Dies schließt QuickTime,
iMovie, Final Cut und viele andere mit ein. Eine vollständige Liste finden Sie unter
http://www.echofx.com/applications.html
Hinweis: Manchmal wird Sie die
Software nach dem Öffnen fragen, ob
Sie aktualisieren möchten. Dies ist
optional und nicht zwingend
erforderlich.
40
Page 41

ÜBERSICHT
COMPUTER VIDEOWIEDERGABE-GERÄT
1. USB-ANSCHLUSS - Schließen Sie dieses Ende des VIDEO 2 GO an das mitgelieferte USBVerlängerungskabel an und schließen Sie das Verlängerungskabel an einen freien USB 2.0-Anschluss
Ihres Computers an (vorzugsweise an einen Anschluss auf der Rückseite).
2. MULTI-KABELANSCHLUSS - Verbinden Sie dieses Ende Ihres mitgelieferten Multi-Kabels mit VIDEO 2
GO. Das Multi-Kabel wird an Ihr Wiedergabe-Gerät angeschlossen.
3. AUDIO-EINGÄNGE - Verwenden Sie Standard-Cinch-Kabel, um diese linken und rechten Audio-Eingänge
mit den linken und rechten Audio-Ausgängen Ihres Wiedergabe-Geräts zu verbinden. Achten Sie darauf,
dass die Farben übereinstimmen - rot zu rot, weiß zu weiß.
4. COMPOSITE-VIDEO-EINGANG - Verwenden Sie ein Standard-Composite-Video-Kabel, um diesen
Eingang mit dem Composite-Video-Ausgang Ihres Wiedergabe-Geräts zu verbinden. (Wenn Ihr
Wiedergabe-Gerät einen S-Video-Ausgang besitzt, können Sie diesen stattdessen mit dem S-VIDEOEINGANG verbinden.)
5. S-VIDEO-EINGANG - Verwenden Sie ein Standard-S-Video-Kabel, um diesen Eingang mit dem S-VideoAusgang Ihres Wiedergabe-Geräts zu verbinden. (In der Regel sind S-Video-Verbindungen von besserer
Qualität als Composite-Video, daher empfehlen wir Ihnen diese zu verwenden, wenn Ihr WiedergabeGerät über einen S-Video-Ausgang verfügt.)
6. SCHNAPPSCHUSS-TASTE – Während der Wiedergabe Ihres Video in der Software können Sie diese
Taste auf dem VIDEO 2 GO Gerät drücken, um einen Screenshot des aktuellen Bildes zu erfassen. (Dies
kann als Miniaturansicht /Screenshot bei bei Veröffentlichung Ihres Videos im Internet nützlich sein.)
Schlagen Sie im Abschnitt SCHNAPPSCHUSS-TASTE nach, um weitere Anweisungen zu erhalten, wie
Sie dies in der von Ihnen verwendeten Software bewerkstelligen können.
41
Page 42

g
ERSTE SCHRITTE
PowerProducer (PC - für Neueinsteiger empfohlen)
1. Verbinden Sie VIDEO 2 GO mit Ihrem Wiedergabe-Gerät und
Ihrem Computer (wie in der ÜBERSICHT beschrieben).
2. Öffnen Sie PowerProducer. Sie finden die Software, indem
Sie Start-Menü f Alle Programme f CyberLink
PowerProducer wählen. (Sie können auch auf das
entsprechende Symbol auf Ihrem Desktop doppelklicken, falls
Sie während der Installation eine Desktop-Verknüpfung erstellt haben.)
3. Wählen Sie die Option "Movie-Disk erstellen".
4. Wählen Sie ein Medium: (1) Ihren CD-Typus, (2) Ihr Aufnahme-Format, (3) Ihre Disk-Kapazität, und (4) falls vorhanden - Ihr Seitenverhältnis bei der Wiedergabe. (Anmerkung: Meistens wurden diese
Einstellungen bereits mit den idealen Optionen vorgenommen.)
5. Klicken Sie im linken Teil des Fensters auf "Video" unter dem Abschnitt "Erfassen". Die Software erkennt
das Videogerät automatisch.
6. Starten Sie die Aufnahme, indem Sie die rote "Aufnahme"-Taste betätigen. Geben Sie Ihre Videoquelle
wieder (Digitalkamera, TV, DVD-Player etc.). Die Dauer der Aufnahme wird im Zähler auf der linken Seite
des Fensters unter "Aufnahme-Informationen“ angezeigt.
7. Wenn Sie mit dem Erfassen Ihres Videos fertig sind, klicken Sie auf die Taste "Stopp". Das Video wird in
der „Zeitleiste“ am unteren Rand des Fensters angezeigt.
8. Zur Erfassung weiterer Videos, reihen Sie die Videos auf Ihrem Wiedergabe-Gerät auf und wiederholen
Sie die Schritte 6-7. Andernfalls klicken Sie auf "Weiter".
9. Legen Sie Ihre CD in das CD-Laufwerk ein, mit dem Sie CDs
brennen können.
10. Klicken Sie auf "Weiter".
11. Geben Sie einen Titel für Ihre Disk in das Feld "Disk-Etikett"
ein.
12. Geben Sie die Anzahl der Kopien an, die Sie brennen
möchten.
13. Klicken Sie auf die Schaltfläche "Brennen", um eine Disk Ihres/r Video(s) zu brennen.
Hinweis: Manchmal wird Sie die
Software nach dem Öffnen fragen, ob
Sie aktualisieren möchten. Dies ist
optional und nicht zwingend
erforderlich.
Hinweis: Für weitere ausführliche
Informationen zur Verwendung des
PowerProducer, klicken Sie auf das
"?"-Symbol am oberen Rand des
Bildschirms, um zur Hilfe-Datei der
Software zu
elangen.
42
Page 43

g
PowerDirector (PC; für fortgeschrittene Benutzer empfohlen)
1. Verbinden Sie VIDEO 2 GO mit Ihrem Wiedergabe-Gerät
und Ihrem Computer (wie in der ÜBERSICHT beschrieben).
2. Öffnen Sie PowerDirector. Sie finden die Software, indem
Sie Start-Menü f Alle Programme f Cyberlink
PowerDirector wählen. (Sie können auch auf das
entsprechende Symbol auf Ihrem Desktop doppelklicken,
falls Sie während der Installation eine Desktop-Verknüpfung
erstellt haben.)
3. Klicken Sie auf die Registerkarte "Erfassen" in der oberen
linken Ecke des Bildschirms. Die Software erkennt das
Videogerät automatisch.
4. Starten Sie die Aufnahme, indem Sie die rote "Aufnahme"-
Taste betätigen. Geben Sie Ihre Videoquelle wieder
(Digitalkamera, TV, DVD-Player etc.).
5. Wenn Sie mit dem Erfassen Ihres Videos fertig sind, klicken
Sie auf die Taste "Stopp".
6. Im angezeigten Fenster geben Sie nun den Titel Ihres Videos im Feld "Name der erfassten Datei" ein und
klicken Sie auf "OK". Das Video wird im Bereich „Erfasste Inhalte“ am unteren Rand des Fensters
angezeigt.
• Wenn Sie eine CD erstellen möchten, klicken Sie auf die Schaltfläche "Disk erstellen". Verwenden Sie die
Schlatflächen unterhalb der Registerkarte "Inhalte", um die Videos hinzuzufügen, die Sie auf die CD
brennen möchten, und klicken Sie dann auf "Brennen".
• Wenn Sie ein Video in einem gängigen Format (z.B. dem MPEG-4-Format für tragbare Geräte wie PSP,
iPod™ oder iPhone™) speichern möchten, klicken Sie auf die Registerkarte "Erstellen" und wählen das
entsprechende Format.
• Wenn Sie ein Video auf YouTube™ oder Facebook™ laden möchten, klicken Sie auf die Registerkarte
"Erstellen" und anschließend auf die Registerkarten "YouTube" oder "Facebook" am oberen Rand des
Fensters.
iPhone und iPod sind Marken der Apple Inc. und in den USA und anderen Ländern eingetragen.
Facebook ist eine eingetragene Marke der Facebook, Inc.
Hinweis: Manchmal wird Sie die
Software nach dem Öffnen fragen, ob
Sie aktualisieren möchten. Dies ist
optional und nicht zwingend
erforderlich.
Hinweis: Für weitere ausführliche
Informationen zur Verwendung des
PowerDirector, drücken Sie F1 auf
Ihrer Tastatur oder klicken Sie auf das
"Regiestuhl"-Symbol am oberen linken
Bildschirmrand, und wählen „Hilfe“
und dann „PowerDirector Hilfe“, um
zur Hilfe-Datei der Software zu
elangen.
YouTube ist eine Marke der YouTube, LLC.
43
Page 44

VideoGlide Capture (Mac)
1. Verbinden Sie VIDEO 2 GO mit Ihrem WiedergabeGerät und Ihrem Computer (wie in der ÜBERSICHT
beschrieben).
2. Öffnen Sie VideoGlide Capture. Sie finden die
Software, indem Sie Applikationen f VideoGlide
f VideoGlide Capture wählen.
3. Wenn Sie VideoGlide das erste Mal öffnen, werden
Sie aufgefordert, eine Seriennummer in das Feld
"Seriennummer" einzugeben. Suchen Sie die
Nummer auf der VideoGlide CD-Hülle, geben Sie
sie ein und klicken danach auf "OK".
4. VideoGlide Capture ist nun geöffnet. Klicken Sie auf "Digitizer" im oberen Menü und wählen Sie
"VideoGlide."
5. Klicken Sie auf "Aufnahme" im oberen Menü und wählen Sie "Sound-Einstellungen." Im nun
angezeigten Fenster klicken Sie auf die Registerkarte "Quelle" und wählen Sie aus der Liste darunter
"USB 2861 Gerät". Stellen Sie außerdem sicher, dass das Menü neben "Lautsprecher" auf "Ein" steht.
Klicken Sie auf "OK", wenn Sie fertig sind.
6. Starten Sie die Aufnahme, indem Sie auf "Aufnahme" im oberen Menü klicken und "Aufnahme" wählen. *
(Sie können auch die Tasten "Befehl" + "R" drücken) Geben Sie Ihre Videoquelle wieder (Digitalkamera,
TV, DVD-Player etc.).
7. Wenn Sie mit dem Erfassen Ihres Videos fertig sind, klicken Sie auf eine beliebige Stelle innerhalb der Box
in der Mitte des Bildschirms. Wollen Sie Ihr aufgenommenes Video sofort ansehen, klicken Sie auf die
Schaltfläche "Öffnen", um es in QuickTime zu öffnen. Klicken Sie auf "OK", um wieder zum
Hauptbildschirm zu gelangen.
8. Für weitere Informationen über die Verwendung von VideoGlide Capture, lesen Sie bitte die VideoGlide
„Liesmich“-Datei, indem Sie Applikationen f VideoGlide f VideoGlide Capture f "VideoGlide
ReadMe.rtfd" wählen.
VideoGlide Exporter (Mac)
Diese Software dient dem Export Ihrer Videos auf andere Formate, um sie auf einem iPhone, iPod etc.
wiederzugeben.
1. Öffnen Sie VideoGlide Exporter, indem Sie Applikationen f VideoGlide f VideoGlide Exporter wählen.
2. Klicken Sie auf das Menü "Datei" und wählen Sie "Öffnen".
3. Wählen Sie die Datei aus, die Sie exportieren möchten. Ein Video-Player mit aktuellem Format und
Größe öffnet sich und wird im unteren Teil des Players angezeigt.
4. Klicken Sie auf das Menü "Datei" und wählen Sie "Exportieren".
5. Geben Sie den gewünschten Namen Ihrer Datei ein und wählen Sie den gewünschten Speicherort.
6. Klicken Sie auf das Auswahlmenü "Exportieren" und wählen Sie das gewünschte Format.
7. Klicken Sie auf "OK", um zu exportieren.
8. Für weitere Informationen über die Verwendung von VideoGlide Exporter, lesen Sie bitte die VideoGlide
„Liesmich“-Datei, indem Sie Applikationen f VideoGlide f VideoGlide Capture f "VideoGlide
ReadMe.rtfd" wählen und im Abschnitt „Verwendung des VideoGlide Exporter“ nachschlagen.
* Hinweis: In einigen Fällen - je nach
Betriebssystem Ihres Computers – kann es sein,
dass Ihr Video in VideoGlide "ruckelig" oder "ins
Stocken geraten" wirkt. Dies wirkt sich jedoch
nicht auf das Video aus – das Video selbst wird
korrekt erfasst. Wenn dies geschieht,
empfehlen wir Ihnen trotzdem QuickTime zu
verwenden, um eine flüssige Ansicht zu
ermöglichen. Siehe unten angegebene
-
44
Page 45

QuickTime (Mac)
1. Verbinden Sie VIDEO 2 GO mit Ihrem Wiedergabe-Gerät und
Ihrem Computer (wie in der ÜBERSICHT beschrieben).
2. Um VIDEO 2 GO mit QuickTime nutzen zu können, müssen
Sie zuerst die VideoGlide Capture-Software registrieren.
Öffnen Sie VideoGlide Capture, indem Sie Applikationen f
VideoGlide f VideoGlide Capture wählen.
3. Sie werden aufgefordert, eine Seriennummer im Feld
"Seriennummer" einzugeben. Suchen Sie die Nummer auf
der VideoGlide CD-Hülle, geben Sie sie ein und klicken
danach auf "OK".
4. Nach Eingabe der Seriennummer und nachdem VideoGlide Capture erfolgreich geöffnet werden konnte,
können Sie es wieder schließen.
5. Wenn Sie Snow Leopard (Mac OS X 10.6) verwenden, setzen Sie QuickTime in den 32-Bit-Modus bevor
Sie beginnen. Um dies zu tun, öffnen Sie den Ordner "Applikationen", klicken mit der rechten Maustaste
auf "QuickTime", wählen "Information" und haken das Kontrollkästchen "Im 32-Bit-Modus öffnen" im nun
angezeigten Fenster an und schließen das Fenster danach.
6. Öffnen Sie QuickTime, klicken Sie auf das Menü "Datei" und wählen Sie "Neuen Film aufnehmen."
7. Wenn Sie ein nach unten zeigendes Dreieck rechts neben der "Aufnahme"-Taste sehen, klicken Sie es,
um ein Auswahlmenü zu öffnen. Wenn Sie kein Dreieck sehen, klicken Sie auf das "QuickTime Player"Menü am oberen Bildschirmrand und wählen Sie "Einstellungen".
8. Stellen Sie im Auswahlmenü sicher, dass die richtige "Kamera"-Einstellung ausgewählt wurde
("Composite" oder "S-Video“, je nachdem, welchen Anschluss Sie verwenden) und dass das "USB 2861
Gerät" als "Mikrofon“ ausgewählt wurde. (Stellen Sie außerdem sicher, dass der Lautstärkeregler auf der
linken Seite des Fensters aufgedreht ist.)
9. Starten Sie die Aufnahme, indem Sie die rote "Aufnahme"-Taste im unteren Teil des Bildschirms betätigen.
Geben Sie Ihre Videoquelle wieder (Digitalkamera, TV, DVD-Player etc.).
10. Wenn Sie mit dem Erfassen Ihres Videos fertig sind, klicken Sie auf die Taste "Stopp". Das
aufgenommene Video wird automatisch im QuickTime-Player geöffnet. Um es zu speichern, wählen Sie
"Datei" und "Speichern" (Bzw. "Speichern unter", um es unter einem anderen Namen zu speichern.
Speichern Sie die Datei jedoch als "eigenständigen" Film).
Hinweis: Wenn Ihr Mac auf einem
älteren Betriebssystem läuft (z.B.
10.4), kann es sein, dass Ihre
QuickTime-Version keine Filmdateien
erfassen und speichern kann. Wenn
dies der Fall ist, empfehlen wir eine
Aktualisierung auf QuickTime Pro, um
diese Funktionen nutzen zu können.
45
Page 46

SCHNAPPSCHUSS-TASTE
Mit der runden Taste am VIDEO 2 GO kann ein Schnappschuss vom aktuellen Frame Ihres Videos erfasst
werden. Dies kann als Miniaturansicht /Screenshot bei bei Veröffentlichung Ihres Videos im Internet nützlich sein.
Folgen Sie den unten angeführten Schritten, um die SCHNAPPSCHUSS-TASTE mit der entsprechenden
Software zu verwenden:
PowerDirector (PC)
1. Öffnen Sie PowerDirector.
2. Klicken Sie auf "Über TV-Signal erfassen" (das dritte Symbol von links: „TV-Gerät mit Antenne“).
3. Wenn Sie den Frame sehen, den Sie aufnehmen möchten, klicken Sie auf die SCHNAPPSCHUSS-
TASTE des VIDEO 2 GO.
4. Nun erscheint ein Fenster, in das Sie den Dateinamen des Bildes eintragen können. Nachdem Sie
das getan haben, klicken Sie auf "OK". Sie sollten nun das Bild mit dem von Ihnen eingegebenen
Namen in der Leiste auf der rechten Seite sehen.
5. Wann immer Sie einen Schnappschuss von Ihrem Video aufnehmen möchten, wiederholen Sie
VideoGlide (Mac)
einfach die Schritte 2-4. (Sie können dies mit jedem Video so oft tun, wie Sie möchten).
1. Öffnen Sie VideoGlide Capture.
2. Wenn Sie den Frame sehen, den Sie aufnehmen möchten, klicken Sie auf die SCHNAPPSCHUSS-
TASTE des VIDEO 2 GO.
3. Nun erscheint ein Fenster, in das Sie den Dateinamen des Bildes eintragen können. Sie können
auch auf das Auswahlmenü klicken, um den Speicherort für den Schnappschuss auszuwählen.
Nachdem Sie das getan haben, klicken Sie auf "OK".
4. Wann immer Sie einen Schnappschuss von Ihrem Video aufnehmen möchten, wiederholen Sie
einfach die Schritte 2-3. (Sie können dies mit jedem Video so oft tun, wie Sie möchten).
Hinweis: Standardmäßig werden die Bilder als .pct-Dateien erfasst. So wählen Sie ein anderes
Bildformat (z.B. JPEG, BMP, PNG etc.): Klicken Sie auf das "Schnappschuss"-Menü am oberen
Bildschirmrand und wählen Sie dann "Schnappschuss-Einstellungen ...". Klicken Sie auf das
Auswahlmenü "Zielformat", um das gewünschte Format auswählen zu können.
46
Page 47

INHOUD VERPAKKING
• VIDEO 2 GO
• Multikabel
• 17 cm USB extensiekabel
• 2 CD’s:
o Drivers (PC en Mac) en VideoGlide software (Mac)
o Cyberlink software (alleen PC)
• Snelstart Handleiding
• Veiligheidsinstructies & Garantie Infobrochure
DRIVER & SOFTWARE INSTALLATIE
Alvorens te beginnen, verzeker uzelf ervan, dat uw computer aan deze systeemeisen voldoet.
• Microsoft Windows XP/Vista/7 of Apple Mac OSX 104. en hoger
• Pentium-IV 2 GHz of hoger (aanbevolen)
• 512 MB RAM of hoger (aanbevolen)
• Graphics card (moet DirectX ondersteunen)
• Geluidskaart (AC97-compatibele geluidskaart)
• 1 GB vrije ruimte op de harde schijf
• CD-ROM drive (voor software installatie)
• Een beschikbare USB 2.0 poort (bij voorkeur aan de achterkant van uw computer)
47
Page 48

WINDOWS
1. Het toestel koppelen.
2. Plaats de Drivers en VideoGlide Software CD in uw computerdrive.
3. Installeer de drivers.
4. Installeer DirectX (aanbevolen).
5. Installeer Adobe Reader (aanbevolen).
6. Ejecteer de Drivers CD en plaats de Cyberlink Software CD in uw computerdrive.
7. Installeer de software.
Vóórdat u verder gaat, gebruikt u eerst de bijgevoegde USB extensiekabel om de VIDEO 2 GO aan
een vrije USB2.0 poort van uw computer te koppelen. (We adviseren om deze met een poort te
verbinden aan de achterkant van uw computer.)
U zult diverse dialoogvensters onderaan het scherm, die aangeven of de computer de VIDEO 2 GO
heeft ontdekt en verbonden. In sommige gevallen, zult u een waarschuwing zien dat op een
foutmelding lijkt – dit is normaal. Klik “OK” (indien nodig) en ga verder met Stap 2.
Op het venster dat verschijnt na het invoegen van de CD, klikt u op “Install PC Drivers”. Volg de
instructies die op het scherm verschijnen om de installatie te voltooien.
Als dit venster niet automatisch verschijnt, dubbelklik op “My Computer” en dubbelklik dan op de
“VIDEO 2 GO” CD. Het venster zou nu moeten verschijnen. (Indien het venster nog steeds niet
verschijnt, rechterklik op de “VIDEO 2 GO” CD en selecteer “Explore”. Zodra de inhoud van de CD
verschijnt, dubbelklik dan op de “Driver” map, dubbelklik op de “2860” map, en dubbelklik op
“Setup.exe.”)
Indien de laatste DirectX versie nog niet op uw computer is geïnstalleerd, adviseren wij u om dit
alsnog te doen voor een betere videoprestatie. Dit kunt u doen, door op “Install Microsoft DirectX”
te klikken in het hoofdvenster. Volg de instructies die op het scherm verschijnen om de installatie te
voltooien.
Als Adobe Reader (of Adobe Acrobat) nog niet op uw computer is geïnstalleerd, adviseren wij om dit
alsnog te doen, zodat u de bijgevoegde handleiding (het .PDF bestand) van de CD kan lezen. Om
Adobe Reader te installeren, klikt u op “Install Adobe Reader" in het hoofdvenster. Volg de
instructies die op het scherm verschijnen om de installatie te voltooien.
In het venster dat verschijnt na het plaatsen van de CD, klikt u op “Install PowerProducer” of
“Install PowerDirector" om één van beide software programma's te installeren. Na het installeren
van het programma, gaat u terug naar het hoofdscherm waar u tevens het andere programma kunt
installeren. Volg de instructies die op het scherm verschijnen om de installatie te voltooien.
Als dit venster niet automatisch verschijnt, dubbelklik op “My Computer” en dubbelklik dan op de
“VIDEO 2 GO” CD. Het venster zou nu moeten verschijnen. (Indien het venster nog steeds niet
verschijnt, rechterklik op de “VIDEO 2 GO” CD en selecteer “Explore”. Zodra de inhoud van de CD
verschijnt, dubbelklik dan op de “Driver” map, dubbelklik op de “2860” map, en dubbelklik op
“Setup.exe.”)
48
Page 49

8. Begin!
MAC
1. Het toestel koppelen.
2. Plaats de Drivers en VideoGlide Software CD in uw computerdrive.
3. Installeer de drivers en software.
4. Begin!
U kunt nu de CD ejecteren en VIDEO 2 GO gebruiken
met de geïnstalleerde software. U zult de software
vinden via: Start Menu f Alle Programma’s f
Cyberlink PowerProducer of PowerDirector. (U kunt
ook op de snelkoppeling dubbelklikken op het
bureaublad van uw computer, indien u deze tijdens de
installatie heeft gecreëerd.)
Vóórdat u verder gaat, gebruikt u eerst de bijgevoegde USB extensiekabel om de VIDEO 2 GO aan
een vrije USB2.0 poort van uw computer te koppelen. (We adviseren om deze met een poort te
verbinden aan de achterkant van uw computer.)
Op het venster dat verschijnt na het plaatsen van de CD, klikt u op “Install VideoGlide Mac Drivers
and Software”. Volg de instructies die op het scherm verschijnen om de installatie te voltooien. U
zult de computer moeten herstarten na het voltooien van dit proces. Indien dit venster niet
automatisch verschijnt, dubbelklik dan op de “VIDEO 2 GO” CD van het bureaublad en het venster
zou alsnog moeten verschijnen.)
U kunt nu de CD ejecteren en VIDEO 2 GO gebruiken met de geïnstalleerde software. U kunt de
software terugvinden via: Applicaties f VideoGlide f VideoGlide Capture.
Als u VideoGlide voor het eerst opent, zal u gevraagd worden om een serienummer in te vullen in
het “Serial Number” veld. U vindt het nummer op de hoes van de VideoGlide CD, voer deze in en
klik op “OK”.
Na het installeren van VideoGlide, kunt u ook VIDEO 2 GO gebruiken in elk ander programma op
uw Mac that QuickTime video digitizers gebruikt. Dit zijn o.a.: QuikTime, iMovie, Final Cut, en vele
anderen. Voor een compleet overzicht, zie http://www.echofx.com/applications.html
Opmerking: Soms zal de software
vragen of u wilt upgraden na deze te
hebben geopend. Dit is optioneel,
maar geen vereiste.
.
49
Page 50

OVERZICHT
COMPUTER VIDEO PLAYBACK TOESTEL
1. USB CONNECTOR – Verbind dit uiteinde van de VIDEO 2 GO met de bijgevoegde USB extensiekabel en
steek dan de extensiekabel in een vrije USB 2.0 poort van uw computer (bij voorkeur een poort aan de
achterkant).
2. MULTI-CABLE CONNECTOR – Steek deze d.m.v. de bijgevoegde multikabel in VIDEO 2 GO. De
multikabel wordt gekoppeld aan uw playbacktoestel.
3. AUDIO INPUTS – Gebruik standaard RCA-kabels om de linker- en rechter audio inputs te verbinden met
de linker- en rechter audio outputs van uw playbacktoestel. Zorg dat de juiste kleuren met elkaar worden
verbonden - rood met rood, wit met wit.
4. COMPOSITE VIDEO INPUT – Gebruik een standaard composiet videokabel om deze in de composite
video output van uw playbacktoestel te steken. (Indien uw playbacktoestel een S-Video output heeft, kunt u
deze kabel in de S-VIDEO INPUT steken.)
5. S-VIDEO INPUT – Gebruik een standaard S-videokabel om deze in de S-Video output van uw
playbacktoestel te steken. (Over het algemeen zijn S-Videoverbindingen van betere kwaliteit dan de
composietvideo, dus we adviseren om deze te gebruiken indien uw playbacktoestel een S-Video output
heeft.)
6. SNAPSHOT BUTTON – Als de video zich afspeelt in uw software, kunt u deze knop van VIDEO 2 GO
indrukken om een screenshot van het huidige fragment te maken. (Deze is geschikt voor een
thumbnail/screenshot, wanneer u de video online wilt plaatsen.) Zie de SNAPSHOT BUTTON sectie voor
de instructies en hoe u dit met de software kunt uitvoeren.
50
Page 51

LATEN WE BEGINNEN!
PowerProducer (PC; aanbevolen voor beginnende gebruikers)
1. Verbind VIDEO 2 GO met uw playbacktoestel en met uw
computer (zoals getoond in het OVERZICHT).
2. Open PowerProducer. U zult de software vinden via: Start
Menu f Alle Programma’s f Cyberlink PowerProducer.
(U kunt ook op de snelkoppeling dubbelklikken op het
bureaublad van uw computer, indien u deze tijdens de installatie heeft gecreëerd.)
3. Selecteer de "Produce Movie Disc" optie.
4. Selecteer uw middel: (1) uw CD-type, (2) uw opnameformaat, (3) uw CD-capaciteit, en (4, indien
beschikbaar) de geometrische verhouding van uw playback. (Opmerking: Deze instellingen zullen in de
meeste gevallen al zijn ingesteld op de best mogelijke optie.)
5. Links in het venster, klikt u op “Video” onder de “Capture” sectie. De software zal automatische uw
videotoestel waarnemen.
6. Start met opnemen door op de rode “Record” knop te klikken. Speel uw videobron af (digitale camera, TV,
DVD-speler, etc.). De opnametijd zal worden getoond in de teller onder “Capture Information” links in het
venster.
7. Als u klaarbent met het opnemen van de video, klikt u op “Stop”. De video zal verschijnen in de “timeline”
aan de onderkant van het venster.
8. Om extra videos op te nemen, stelt u de videos achter elkaar op uw playbacktoestel en herhaalt u stappen
6 - 7. Zo niet, klikt u op “Next”.
9. Plaats de CD in de CD-brander van uw computer.
10. Klik op “Next”.
11. Voer een titel in voor uw CD bij “Disc Volume Label”.
12. Voer het aantal kopieën in die uw wilt branden.
13. Klik op “Burn” om een CD van uw video(s) te branden.
Opmerking: Soms zal de software
vragen of u wilt upgraden na deze te
hebben geopend. Dit is optioneel,
maar geen vereiste.
Opmerking: Voor meer
gedetailleerde informatie over de
PowerProducer, klik op de "?" icoon
aan de bovenkant van het scherm om
toegang te krijgen tot de hulpfunctie
51
Page 52

p
PowerDirector (PC; aanbevolen voor geavanceerde gebruikers)
1. Verbind VIDEO 2 GO met uw playbacktoestel en uw computer
(zoals getoond in OVERZICHT).
2. Open de PowerDirector. U zult de software vinden via: Start
Menu f Alle Programma’s f Cyberlink PowerDirector. (U
kunt ook dubbelklikken op de snelkoppeling van het
bureaublad op uw computer, indien u deze tijdens de
installatie heeft gecreëerd.)
3. Klik op de “Capture” tab in de linkerhoek bovenaan het
scherm. De software zal automatische uw videotoestel
waarnemen.
4. Start met opnemen door op de rode “Record” knop te klikken.
Speel uw videobron af (digitale camera, TV, DVD-speler,
etc.).
5. Als u klaar bent met het opnemen van de video, klikt u op
“Stop”.
6. Voer de titel van uw video in bij “Captured File Name” in het venster dat verschijnt en klik op “OK”. De
video zal verschijnen in de “Captured Content” aan de onderkant van het venster.
• Als u een CD wilt creëren, klikt u op de “Create Disc” tab. Gebruik de knoppen onder de “Content”
tab om videos aan uw CD toe te voegen, klik daarna op “Burn” om de CD te branden.
• Als u een video wilt bewaren in een populair formaat (zoals een portable MPEG-4 voor PSP,
iPod™, of iPhone™), klikt u op de “Produce” tab en selecteert u het relevante formaat.
• Als u een video wilt uploaden naar YouTube™ of Facebook™, klikt u op de "Produce" tab en
daarna de "YouTube" of "Facebook" tab vlakbij de bovenkant van het venster.
iPhone en iPod zijn handelsmerken van Apple Inc., geregistreerd in de V.S. en andere landen.
Facebook is een geregistreerd handelsmerk van Facebook, Inc.
Opmerking: Soms zal de software
vragen of u wilt upgraden na deze te
hebben geopend. Dit is optioneel,
maar geen vereiste.
Opmerking: Voor meer
gedetailleerde informative over de
PowerDirector, druk op F1 van uw
toetsenbord of klik op de "director's
chair" icon in de linkerhoek bovenaan
het scherm, en ga naar "Help" daarna
"PowerDirector Help" voor toegang
functie van de software.
tot de hul
YouTube is een handelsmerk van YouTube, LLC.
52
Page 53

VideoGlide Capture (Mac)
1. Verbind VIDEO 2 GO met uw playbacktoestel en uw computer
(zoals getoond in OVERZICHT).
2. Open VideoGlide Capture. U kunt de software terugvinden
via: Applicaties f VideoGlide f VideoGlide Capture.
3. Als u VideoGlide voor het eerst opent, zal u gevraagd worden
om een serienummer in te vullen in het “Serial Number” veld.
U vindt het nummer op de hoes van de VideoGlide CD, vul
deze in en klik op “OK”.
4. VideoGlide Capture is nu geopend. Klik op "Digitizers" in het
bovenste menu en selecteer "VideoGlide."
5. Klik op "Record" in het bovenste menu en selecteer "Sound
Settings." In het venster dat verschijnt, klikt u op de
"Source" tab en selecteert u "USB 2861 Device" uit de lijst. Zorg er tevens voor dat het menu naast
“Speaker” op “On” staat. Klik op “OK” als u klaar bent.
6. Begin met opnemen door op “Record” te klikken in het bovenste menu. * (U kunt ook "Command" + "R."
indrukken). Speel uw videobron af (digitale camera, TV, DVD-speler, etc.).
7. Als u klaar bent met het opnemen van uw video, klik dan ergens in het vakje midden op het scherm. Als u
meteen de opgenomen video wilt bekijken, klikt u op “Open” om deze in QuickTime te openen. Om naar
het hoofdscherm terug te gaan, klik op “OK”.
8. Voor meer informatie over het gebruik van VideoGlide Capture, zie a.u.b. het VideoGlide "Read Me"
bestand via Applicaties f VideoGlide f VideoGlide Capture f "VideoGlide ReadMe.rtfd.”
VideoGlide Exporter (Mac)
Deze software is geschikt voor het exporteren van uw videos naar een ander formaat en deze bijv. met een
iPhone of iPod, etc. te kunnen bekijken.
1. Open VideoGlide Capture via Applications f VideoGlide f VideoGlide Exporter.
2. Klik op het “File” menu en selecteer “Open”.
3. Selecteer het bestand dat u wilt exporteren. Een videospeler zal openen, waarbij het huidige formaat en de
grootte staan onderaan de speler getoond.
4. Klik op het “File” menu en selecteer “Export”.
5. Voer de gewenste naam in van uw bestand en selecteer de locatie waar u deze wilt bewaren.
6. Klik op het “Export” uitrolmenu en selecteer het gewenste formaat.
7. Klik op "OK" om te exporten.
8. Voor meer informatie over het gebruik van VideoGlide Exporter, zie a.u.b. het VideoGlide "Read Me"
bestand via Applicaties f VideoGlide f VideoGlide Capture f "VideoGlide ReadMe.rtfd." en refereer
naar het “Using VideoGlide Exporter” sectie.
*Opmerking: In sommige gevallen,
afhankelijk van uw computersysteem,
kunnen de videoafbeeldingen in
VideoGlide "schokkerig" or "stilstaand"
lijken. Dit zal geen invloed hebben op
uw video; de opname zal juist
verlopen. Indien dit gebeurt, adviseren
we echter om QuickTime te gebruiken
voor betere videocontrole. Zie de
onderstaande QuickTime instructies
53
Page 54

QuickTime (Mac)
1. Verbind VIDEO 2 GO met uw playbacktoestel en uw computer
(zoals getoond in OVERZICHT).
2. Om VIDEO 2 GO met QuickTime te kunnen gebruiken, zult u
eerst uw VideoGlide Capture software moeten registreren.
Open VideoGlide Exporter via Applications f VideoGlide f
VideoGlide Capture.
3. U zult gevraagd worden om een serienummer bij “Serial
Number” in te voeren. U vindt het nummer op de hoes van de
VideoGlide CD, voer deze in en klik op “OK”.
4. Na het invoeren van het serienummer en de VideoGlide Capture heeft zich succesvol geopend, kunt u
deze sluiten.
5. Indien u Snow Leopard (Mac OS X 10.6) gebruikt, stel QuickTime in om te openen in 32-bit mode alvorens
te beginnen. Dit doet u via de Applicaties map, rechterklik op "QuickTime" en selecteer "Get Info,"
controleer de "Open in 32-bit mode" vak in het verschenen venster, daarna sluit u het venster.
6. Open QuickTime, klik op het “File” menu en selecteer “New Movie Recording.”
7. Indien u een triangel in neerwaartse richting ziet, rechts van de "record" knop, klikt u hierop om een
uitrolmenu te openen. Als u geen triangel ziet, klikt u op het “QuickTime Player” menu aan de bovenkant
van het scherm en selecteert u “Preferences”.
8. In het uitrolmenu, zorg ervoor dat de juiste “Camera” instelling is geselecteerd (“Composite” of “S-Video",
afhankelijk van welke connector u gebruikt) en dat “USB 2861 Device” is geselecteerd als “Microphone”.
(Zorg er tevens voor dat de volumeknop aan de linkerkant van het venster omhoog staat.)
9. Start met opnemen door op de rode “Record” knop te klikken aan de onderkant van het scherm. Speel uw
videobron af (digitale camera, TV, DVD-speler, etc.).
10. Als u klaar bent met het opnemen van de video, klikt u op “Stop”. De opgenomen video zal zich
automatisch in de QuickTime player openen. Om te bewaren, ga naar “File” en selecteer “Save” (of "Save
As” om deze onder een andere naam te bewaren, maar op te slaan als een “self-contained” film).
Opmerking: Als uw Mac op een
oudere OS (bv. 104.) werkt, zal uw
QuickTime versie misschien geen
recordoptie hebben of films kunnen
bewaren. In dit geval, adviseren we
naar QuickTime Pro te upgraden om
alsnog deze mogelijkheid te hebben.
54
Page 55

SNAPSHOT KNOP
De ronde knop bij VIDEO 2 GO kan gebruikt worden om een beeld op te nemen van het huidige videofragment.
(Deze is geschikt als thumbnail/screenshot, wanneer u de video online wilt plaatsen.) Volg de onderstaande
stappen om de SNAPSHOT BUTTON te gebruiken met de relevante software:
PowerDirector (PC)
1. Open PowerDirector.
2. Klik op "Capture From TV Signal" (met het TV-antenne icoontje, derde van links).
3. Als u het fragment ziet dat u wilt opnemen, klikt u op de SNAPSHOT BUTTON van VIDEO 2 GO.
4. Een venster zal verschijnen waar u de bestandsnaam van de afbeelding kunt invoeren. Hierna klikt
u op “OK”. U zou nu de afbeelding moeten zien met de ingevoerde naam, rechts in het ruitje.
5. Herhaal stappen 2-4, zodra u een snapshot-opname van uw video wilt maken. (U kunt dit zo vaak
VideoGlide (Mac)
herhalen als gewenst voor iedere video.)
1. Open VideoGlide Capture.
2. Als u het fragment ziet dat u wilt opnemen, klikt u op de SNAPSHOT KNOP van VIDEO 2 GO.
3. Een venster zal verschijnen waar u de bestandsnaam van de afbeelding kunt invoeren. U kunt ook
op het uitrolmenu klikken om te selecteren waar u het snapshot op uw computer wilt bewaren.
Hierna klikt u op “OK”.
4. Herhaal stappen 2-3, zodra u een snapshot-opname van uw video wilt maken. (U kunt dit zo vaak
herhalen als gewenst voor iedere video.)
Opmerking: Als standard (default), zullen de afbeeldingen als .pct bestanden worden opgeslagen.
Om een ander afbeeldingsformaat te selecteren (zoals, JPEG, BMP, PNG, etc.), klikt u op het
"Snapshot" menu bovenaan het scherm en selecteer dan "Snapshot Settings…" Klik op het
"Destination Format" uitrolmenu om het gewenste formaat te selecteren.
55
Page 56

www.ionaudio.com
MANUAL VERSION 1.1
 Loading...