

Page 1

QUICKSTART GUIDE
ENGLISH ( 3 – 4 )
MANUAL DE INICIO RÁPIDO
ESPAÑOL ( 5 – 6 )
GUIDE D’UTILISATION RAPIDE
FRANÇAIS ( 7 – 8 )
GUIDA RAPIDA
ITALIANO ( 9 – 10 )
KURZANLEITUNG
DEUTSCH ( 11 – 12 )
SNELSTARTGIDS
NEDERLANDS ( 13 – 14 )
Page 2

Page 3
QUICKSTART GUIDE (ENGLISH)
o Make sure that the items listed below are included in the box: VERTICAL VINYL, 4 AA batteries, 45 RPM
adapter, Quickstart Guide, Safety Instructions & Warranty Information Booklet
o READ SAFETY INSTRUCTION BOOKLET BEFORE USING THE PRODUCT
o Go to http://www.ionaudio.com
Mounting VERTICAL VINYL on a wall:
hang it from your wall. Do this in the same way you would hang a heavy picture. We recommend screwing you r
mounting screws into the wall studs, which you can locate using a standard stud finder.
Playing a record:
1. Loosen and remove the plastic cap from the turntable's platter by turning it clockwise
2. Place your record on the turntable.
3. Place the plastic cap back on the turntable's platter by screwing it counterclockwise
record in place.
4. Power on the unit by turning the volume knob cloc kwise so it cl icks. (The LED above it will light when th e powe r
is on.)
5. Select the proper playback speed with the 33/45 RPM switch.
6. Remove the arm clip holding the tonearm in place, and place the tonearm on the record. Adjust the volume a s
desired.
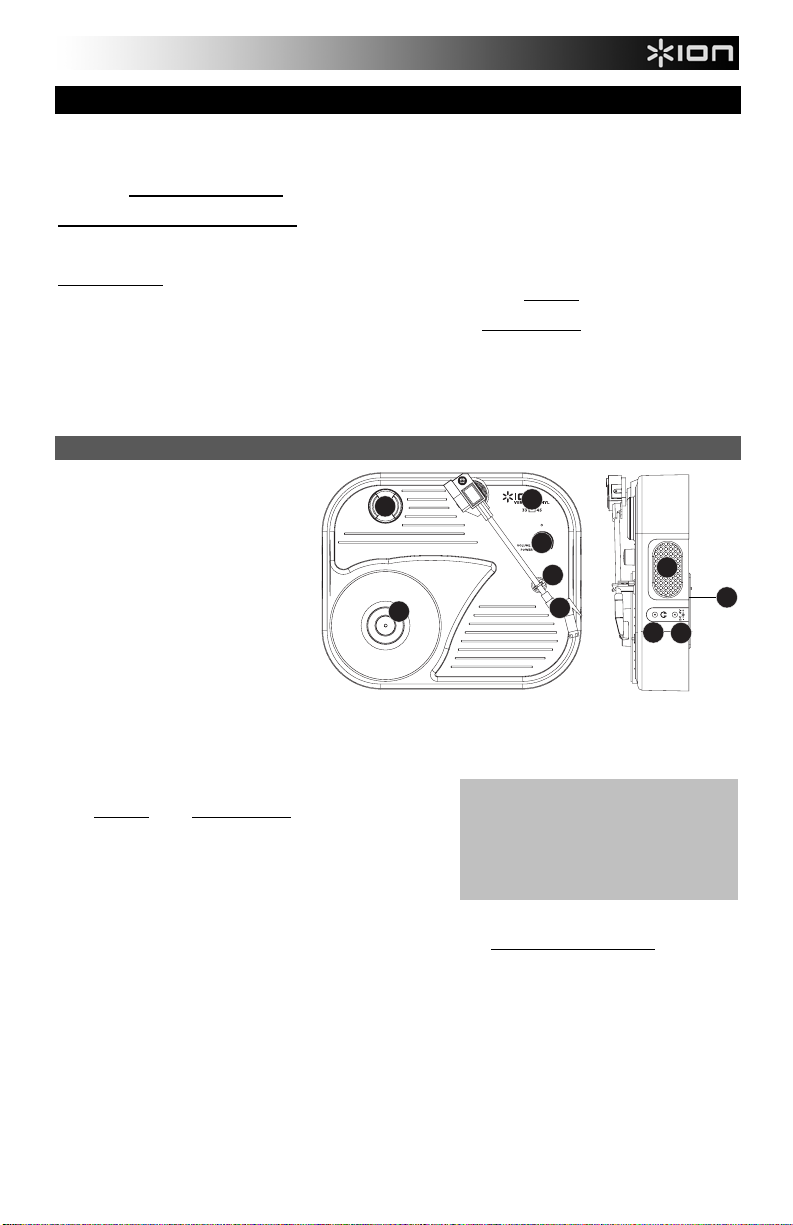
FEATURES
1. BATTERY COMPARTMENT –
Remove the cover and place 4 AA
batteries into this compartment. Be
sure the positive and negative poles
of the batteries are facing the proper
direction.
2. POWER INPUT – If you prefer to
power VERTICAL VINYL via wall
power instead of batteries, you can
connect a 6V DC, 500 mA power
adapter (not included) to this input,
then connect the adapter to a wall
outlet.
3. SPEAKER – The record's audio will
be played through this built-in
speaker.
4. VOLUME/POWER KNOB – To power on VERTICAL VIN YL, turn this knob clockwise until it clicks. When
powered on, use this knob to adjust the volume. To turn off VERTICAL VIN YL, turn this knob counterclock wise
until it clicks.
5. PLATTER – Place your record here, securing it to the
platter with the plastic cap. (Loosen the cap by turning it
clockwise
6. ARM CLIP – This speciall y designed arm clip secures the
tone arm while at rest or when not in use.
7. TONEARM – VERTICAL VINYL comes with a ready to use
pre-balanced TONEARM and cartridge. The TONEARM can
be raised and lowered by hand. Please note that the
TONEARM needs to be moved away from resting position (on the ARM CLIP) for the turntable motor to
activate. When the TONEARM is placed back in its resting position, the turntable motor will deactivate.
Note: You can replace the stylus with the ION iCT05RS, available at www.ionaudio.com/ict05rs
8. 33 / 45 RPM SWITCH – This switch controls the RPM of the turntable platter
9. 45 RPM ADAPTER HOLDER – Holds the included 45 RP M adapter. When not using the adapter, please place
it in this holder.
10. Phones - Connect 1/8" stereo headphones here (not include d). The speaker output stops playing audio once
headphones are connected.
; turn it counterclockwise to tighten it.)
for product registration.
VERTICAL VINYL has two holes on its back panel, which you can use t o
.
, tightening it to secure the
9
8
4
10
3
2
.
6
5
IMPORTANT: Make sure that the slipmat is
always placed on top of the platter while using
the turntable. Failure to use the slipmat may
cause damage to your media as well as damage
to the turntable.
Remove the plastic cartridge cover (needle
cover) before operating the turntable.
7
1
3
Page 4
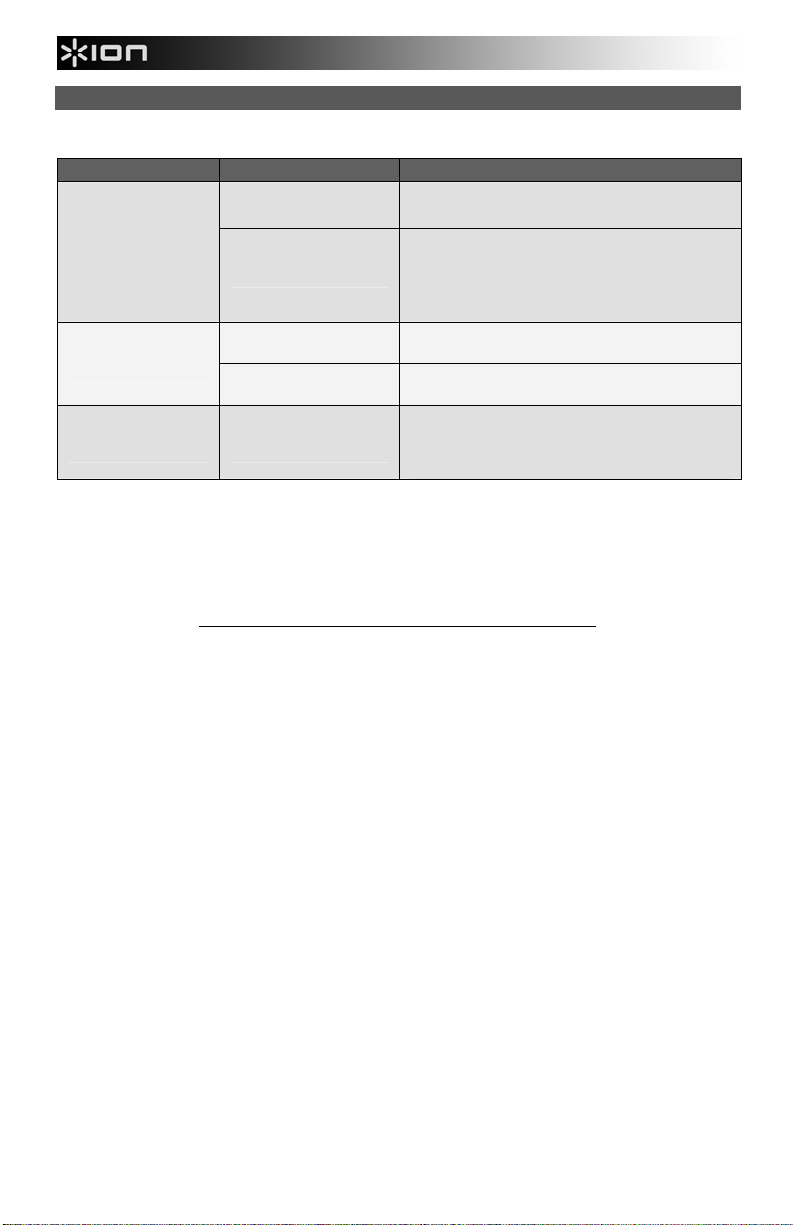
TROUBLESHOOTING
Refer to the following troubleshooting scenarios if you experience difficulty recording your vinyl.
PROBLEM CAUSE SOLUTION
I am not hearing any
audio when I am
recording.
Needle is not on the
record.
Turntable not powered.
Place the needle on the record.
Make sure that the turntable has fresh batteries or
that it is connected to a live power outlet with a 6V
DC, 500 mA power adapter (not included). Also,
make sure the turntable itself is powered on.
I am experiencing
poor sound quality.
My music is playing at
a strange pitch.
Cartridge connection is
not secure.
Vinyl record is dirty or
scratched.
Incorrect speed selected
on the turntable.
Cartridge must be securely connected to the
tonearm whenever you are using the turntable.
Try dusting off and gently wiping the surface of the
record before playing it.
Make sure that you are playing your records at the
speed they were intended to be played. Select
between the two different speeds by pressing
33RPM or 45RPM.
BEFORE RETURNING THE PRODUCT, please contact ION Audio or your
retailer for technical support. Contact information can be found in the Safety
Instruction Booklet included with this product.
www.ionaudio.com/verticalvinyl
4
Page 5

GUÍA DE INICIO RÁPIDO (ESPAÑOL)
o Asegúrese de que todos los elementos abajo indicados estén incluidos en la caja: VERTICAL VINYL, 4
baterías AA, adaptador para 45 RPM, guía de inicio rápido, folleto de información sobre la seguridad y la
garantía
o LEA EL FOLLETO DE INSTRUCCIONES DE SEGURIDAD ANTES DE UTILIZAR EL PRODUCTO.
o Visite http://www.ionaudio.com
Montaje de VERTICAL VINYL en la pared:
pueden usar para colgarlo de la pared. Hágalo de la misma forma que si colgara un cuadro pesado. Recomend amos
atornillar los tornillos de montaje en los montantes de la pared, que puede localizar con un detector de montantes
estándar.
Cómo reproducir un disco:
1. Afloje y retire la tapa plástica del plato del giradiscos girándola en sentido horario.
2. Coloque su disco en el plato.
3. Coloque la tapa plástica nuevamente sobre el pla to enroscándola en sentido antihorario
sujetar el disco en su sitio.
4. Encienda la unidad girando la perilla de volumen en sentido horario hast a que se escuche un clic. (El LED qu e
está arriba de ella se ilumina cuando se enciende el equipo.)
5. Seleccione la velocidad de reproducción apropiada con el conmutador de 33/45 RPM.
6. Retire el clip que sostiene el brazo en su sitio y coloque el brazo sobre el disc o. Ajuste el volumen según sea
necesario.
CARACTERÍSTICAS
1. COMPARTIMIENTO DE LAS PILAS
2. ENT R AD A DE AL IM E NT AC IÓ N – Si
3. ALTAVOZ – El audio del disco se reproduce por este altavoz incorporado.
4. PERILLA DE VOLUMEN/ENCENDIDO – Para encender el VERTICAL VINYL, gire esta perilla en sentido
5. PLATO – Coloque aquí el disco, fiján dolo al plato con la
6. CLIP DEL BRAZO – Este clip diseñado especialmente fija
7. BRAZO DE LECTURA – El VERTICAL VINYL viene con
8. CONMUTADOR DE 33 / 45 RPM – Este conmutador controla las RPM del plato del giradiscos
9. SOPORTE DEL ADAPTADOR DE 45 RPM – Sostiene el adaptador de 45 RPM incluido. C uando no use el
10. Los teléfonos - Unen(Conectan) 1/8 " auriculares estéreos aquí (no incluido). La salida de altavoz(orador) deja
– Retire la tapa y coloque 4 pilas AA
en este compartimiento. Asegúrese
de que los polos positivos y
negativos de las pilas queden
colocados en el sentido correcto.
prefiere alimentar el VERTICAL
VINYL desde un tomacorriente de
pared en lugar de pilas, puede
conectar a esta entrada un
adaptador de alimentación de 6 V
CC, 500 mA (no incluido) y luego
conectar el adaptador al
tomacorriente.
horario hasta que se escuche un clic. Cuando la unidad está encendida, use esta perilla para ajustar el
volumen. Para apagar el VERTICAL VINYL, gire esta perilla en sentido antihorario hasta que se escu che un
clic.
tapa plástica. (Para aflojar la tapa, gírela en sentido
horario. Para apretarla, gírela en sentido antihorario.)
el brazo mientras está en reposo o no se usa.
un BRAZO DE LECTURA y una cápsula previamente
balanceados listos para usar. El BRAZO DE LECTURA se
puede subir y bajar a mano. Tenga en cuenta que es
necesario sacar el BRAZO DE LECTURA de la posición
de reposo (CLIP DEL BRAZO) para que se active el motor de l giradis cos. Cu ando el BR AZO DE LECT URA s e
coloca de nuevo en su posición de reposo, el motor del giradiscos se desactiva.
Nota: Puede reemplazar la púa por la ION iCT05RS, disponible en www.ionaudio.com/ict05rs
adaptador, póngalo en este soporte.
de jugar de audio una vez que los auriculares son unidos(conectados).
para registrar el producto.
El VERTICAL VINYL cuenta con dos orificios en el panel tr asero, que s e
a fin de apretarla para
9
5
IMPORTANTE : Asegúrese de que la
alfombrilla esté siempre colocada sobre el plato
cuando se usa el giradiscos. Si no se usa la
alfombrilla, puede dañarse el medio, así como
el giradiscos.
Retire la cubierta plástica de la cápsula
(cubierta de la púa) antes de hacer funcionar el
giradiscos.
8
4
6
3
7
10
2
.
1
5
Page 6

SOLUCIÓN DE PROBLEMAS
Si experimenta dificultades al grabar sus vinilos, consulte los siguientes escenarios de solución de
problemas.
PROBLEMA CAUSA SOLUCIÓN
No oigo ningún audio
mientras grabo.
Experimento un sonido
de baja calidad.
La música se reproduce
con un pitch extraño.
La púa no está sobre
el disco.
El giradiscos no está
encendido.
La conexión de la
cápsula no es firme.
El disco de vinilo
está sucio o rayado.
Velocidad incorrecta
seleccionada en el
giradiscos.
Coloque la púa sobre el disco.
Asegúrese de que el giradiscos tenga pilas cargadas o
que esté conectado a un tomacorriente con un
adaptador de alimentación de 6 V CC, 500 mA (no
incluido). Además, asegúrese de que el giradiscos
propiamente dicho esté encendido.
La cápsula debe estar conectada firmemente al brazo
toda vez que use el giradiscos.
Pruebe desempolvando y limpiando suavemente la
superficie del disco antes de reproducirlo.
Asegúrese de que esté reproduciendo sus discos a la
velocidad a la que están previstos. Seleccione entre
las dos velocidades diferentes pulsando 33RPM o
45RPM.
ANTES DE DEVOLVER EL PRODUCTO, comuníquese con ION Audio o con su
vendedor minorista para solicitar soporte técnico. La información de contacto
se encuentra en el folleto de instrucciones de seguridad incluido con este
producto.
www.ionaudio.com/verticalvinyl
6
Page 7

GUIDE D’UTILISATION RAPIDE (FRANÇAIS)
o Veuillez vous assurer que les articles s uivants sont dans la boîte: VERTICAL VINYL, 4 piles de format AA,
adaptateur 45 t/min, guide d’utilisation rapide, le livret des c ons ignes d e séc urité et des inf ormatio ns co n cernant
la garantie
o VEUILLEZ LIRE LE LIVRET DES CONSIGNES DE SÉCURITÉ AVANT D'UTILISER LE PRODUIT.
o Allez à http://www.ionaudio.com
Installation murale du VERTICAL VINYL :
que vous puissiez l’installer sur votre mur. Procédez de la même manière que pou r accrocher un tableau lourd. Nous
vous recommandons de visser les vis dans les montants de cloison, que vous pouvez trouver à l’aide d’un détecteu r
de montant standard.
Lecture d’un disque :
1. Desserrez et retirez le capuchon de plastique du plateau en le tournant dans le sens des aiguilles d’une montre.
2. Placez le disque sur le plateau.
3. Replacez le capuchon de plastique sur le plateau en le vissant dans le sens contraire des aiguilles d’une
montre, puis serrez-le afin de maintenir le disque en place.
4. Mettre l’appareil sous tension en tournant le bouton du volume dans le sens des aiguilles d’une montre jusqu’ à
ce qu’un clic se fasse entendre. (La DEL au dessus du bouton s’allume lorsque l’appareil est mis sous tension.)
5. Sélectionnez la vitesse de lecture appropriée à l’aide du sélecteur (33 ou 45 t/min).
6. Retirez le serre-bras du bras de lecture, puis posez le bras de lecture sur le dis que. Ajustez le volume sel on vos
préférences.
CARACTÉRISTIQUES
1. COMPARTIMENT DES PILES –
Retirez le couvercle et insérez 4 piles
de type AA dans le compartiment.
Assurez-vous d'insérer les piles en
respectant les polarités.
2. ENTRÉE D’ALIMENTATION – Si
vous préférez alimenter le
VERTICAL VINYL à partir d’une
prise secteur au lieu de piles, vous
pouvez brancher un adaptateur
d’alimentation 6 V CC, 500 mA (non
inclus) à cette entrée, puis dans la
prise secteur.
3. HAUT-PARLEUR – Le signal audio
provenant du disque se joué par ce
haut-parleur intégré.
4. INTERRUPTEUR DE M ISE EN MARCHE/ARRÊT/VOLUME – Afin de mettre V ERTICAL VINYL sous tension,
tournez ce bouton dans le sens des aiguilles d’une montre jusqu’à ce qu’un clic se fasse entendre. Lorsqu’il est
sous tension, utilisez ce bouton pour régler le volume. Afin de mettre le VERTICAL VINYL hors tension, veuillez
tourner ce bouton dans le sens antihoraire jusqu’à ce qu’un clic se fasse entendre.
5. PLATEAU – Veuillez placer le disque sur ce plateau en le
serrant avec le capuchon en plastique. (Desserrez le capuchon
de plastique en le tournant dans le sens des aiguilles d’une
montre et serrez-le dans le sens contraire des aiguilles d’un e
montre.)
6. SERRE-BRAS – Le serre-bras est conçu spécialement pour
maintenir le bras de lecture en place.
7. BRAS DE LECTURE – Le VERTICAL VINYL est doté d’un bras
de lecture équilibré et d’une cartouche. Le BRAS DE LECTURE
peut être levé. Veuillez noter que le BRAS DE LECTURE doi t
être déplacé du support (sur le SERRE-BRAS) afin que le
moteur de la table tournante soit activé. Lorsque le BRAS DE
LECTURE est à nouveau sur le support, le moteur se désactive.
Remarque : Vous pouvez remplacer le stylus avec le ION iCT05RS disponible au www.ionaudio.com/ict05rs
8. SÉLECTEUR DE VITESSES DE LECTURE 33/45 (t/m in) – Ce sélecteur contrôle nombre de tours/minute du
plateau du tourne-disque
9. EMPLACEMENT DE L’ ADAPTATEUR 45 TR/MIN – Permet de ranger l’adaptateur pour disques 45 tr/min.
Lorsqu’il n’est pas utilisé, veuillez mettre l'adaptateur dans cet emplacement.
10. Les téléphones - Connectent 1/8 "le casque à écouteurs stéréo ici (non inclus). L'orateur(le locuteur) que l a
production arrête de jouer audio une fois le casque à écouteurs est connecté.
pour enregistrer le produit.
Le VERTICAL VINYL dispose de deux trous sur le panneau arrière afin
9
8
4
10
3
2
6
5
IMPORTANT: Assurez-vous que le tapis
est toujours placé sur le plateau lors de
l’utilisation du tourne-disque. À défaut de
respecter cette condition, vous pourriez
endommager le support ainsi que le
tourne-disque.
Assurez-vous de retirer le protègecartouche en plastique (protège-aiguille)
avant de faire fonctionner le tournedisque.
7
7
1
.
Page 8

DÉPANNAGE
Veuillez consulter les scénarios suivants si vous avez des problèmes lors de l’enregistrement de vos vinyles.
PROBLÈME CAUSE SOLUTION
Je n’entends pas de
signal audio lors de
l’enregistrement.
Le son est de
mauvaise qualité.
La musique joue à
une vitesse étrange.
L’aiguille n’est pas déposée sur
le vinyle.
La table tournante n’est pas
branchée.
La cartouche n’est pas fixée
correctement.
Le vinyle est peut-être sale ou
égratigné.
La vitesse sélectionnée sur le
tourne-disque est incorrecte.
Déposez l’aiguille sur le vinyle.
Assurez-vous que les piles du tourne-disque
sont neuves ou qu’il est branché à une prise
secteur avec un adaptateur d’alimentation
6 V CC, 500 mA (non inclus). Assurez-vous
également que le tourne-disque est bien
sous tension.
La cartouche doit être fixée correctement au
bras de lecture.
Essayez de retirer toute poussière ou
marque de doigts en l’essuyant avant de le
remettre sur la table tournante.
Assurez-vous de faire jouer les disques à la
vitesse appropriée. Sélectionnez la vitesse
appropriée, soit 33RPM ou 45RPM.
AVANT DE RETOURNER CE PRODUIT, veuillez contacter ION Audio ou votre
détaillant pour du soutien technique. Toutes les coordonnées se trouvent dans
le livret des consignes de sécurité inclus avec de produit.
www.ionaudio.com/verticalvinyl
8
Page 9

GUIDA RAPIDA (ITALIANO)
o Assicurarsi che gli elementi elencati di seguito siano contenuti nella confezione: Giradischi VERTICAL VIN YL, 4
batterie AA, adattatore 45 giri, guida rapida, libretto di istruzioni di sicurezza e garanzia
o LEGGERE ATTENTAMENTE IL LIBRETTO DI ISTRUZIONI PRIMA DI UTILIZZARE IL PRODOTTO
o Recarsi alla pagina http://www.ionaudio.com
Installazione del VERTICAL VINYL a parete:
posteriore, utilizzabili per l'installazione a parete. Per farlo, basta procedere come se si stesse appendendo un quadr o
pesante. Si raccomanda di avvitare le viti di montaggio nel perno a parete individuabile servendosi di un apposito
dispositivo standard.
Riproduzione di un disco:
1. Allentare e rimuovere il tappo in plastica dal piatto del giradischi girandolo in senso orario
2. Collocare il disco sul giradischi.
3. Collocare nuovamente il tappo in plastica sul piatto d el giradi sc hi a vvitandolo in se n so antiorario
modo da fissare il disco in posizione.
4. Accendere l'apparecchio girano la manopola del volume in senso orario fino a q uando non scatta. (Il LED al di
sopra della manopola si accende quando è accesa l'alimentazione.)
5. Selezionare l'adeguata velocità di riproduzione servendosi dell'interruttore 33/45 GIRI.
6. Rimuovere il fermabraccio che mantiene il braccio in posizione e colloc are quest'ultimo sul disco. Regolare il
volume come desiderato.
CARATTERISTICHE
1. SCOMPARTO BATTERIE –
Rimuovere il coperchio e inserire 4
batterie AA all'interno dello
scomparto. Assicurarsi che i poli
positivo e negativo delle batterie
siano rivolti nella direzione giusta.
2. POWER INPUT – Se si preferisce
alimentare il VERTICAL VINYL
tramite l'alimentazione di rete
anziché a batterie, è possibile
collegare un adattatore di
alimentazione 6V DC, 500 mA (non
in dotazione) a questo ingresso,
quindi collegare quest'ultimo ad una
presa a parete.
3. ALTOPARLANTE – L'audio del disco verrà riprodotto attraverso questo altoparlante incorporato
4. MANOPOLA VOLUM E/POWER – Per accendere il VERTICAL VINYL, girare qu esta manopola in senso orario
fino allo scatto. Una volta acceso l'apparecchio, servirsi di questa manopola per regolare il volume. Per
spegnere il VERTICAL VINYL, girare questa manopola in senso antiorario fino allo scatto.
5. PIATTO – Collocare il disco a questo li vello, fissandolo al piatto
con il coperchio di plastica. (Allentare il tappo girandolo in sen so
orario; girarlo in senso antiorario per stringerlo.)
6. FERMA BRACCIO – questo ferma brac cio dal design speciale
fissa il braccio quando è a riposo o quando non è in uso.
7. BRACCIO – Il VERT ICAL VINYL è dotato di un BRA CCIO e di
una cartuccia pre-bilanciati pronti per l’uso. Il BRACCIO può
essere alzato e abbassato a mano. Va notato che il BRAC CIO
deve essere allontanato dalla posizione di riposo (sul
FERMABRACCIO) affinché il motore del giradischi si attivi.
Quando il BRACCIO viene nuovamente collocato in posizione di
riposo, il motore si disattiva.
Nota bene: si può sostituire la puntina con lo ION iCT05RS, disponibile alla pagina
www.ionaudio.com/ict05rs
8. INTERRUTTORE 33 / 45 GIRI – questo interruttore controlla il numero di giri al minuto del piatto del giradischi
9. SUPPORTO ADATTATORE 45 GIRI – R egge l’incluso adattatore per 45 giri. Quan do l'adattatore non è in uso,
può essere collocato a questo livello.
10. Telefoni - Connetta 1/8" cuffie stereofoni che qui (non incluso) . La produzione di oratore ferma di giocare audi o
una volta le cuffie sono connesse.
.
per la registrazione del prodotto.
il VERTICAL VINYL presenta due fori a livello del suo pannello
.
, stringendolo in
9
8
4
10
3
1
2
6
5
IMPORTANTE: Quando si usa il
giradischi, assicurarsi sempre che il
tappetino sia posto sul piatto. Il mancato
utilizzo del tappetino può provocare danni
al disco, oltre a danneggiare il giradischi
stesso.
Rimuovere il cappuccio della cartuccia
(copripuntina) prima di utilizzare il
giradischi.
7
9
Page 10

RISOLUZIONE DI PROBLEMI
Fare riferimento ai seguenti casi di risoluzione di problemi nel caso in cui si avessero difficoltà a registrare i
vinili.
PROBLEMA CAUSA SOLUZIONE
Non si sente l’audio
mentre registro.
Scarsa qualità sonora.
La puntina non è sul
disco.
Il giradischi non è
alimentato.
Il collegamento della
cartuccia non è ben
fisso.
Il vinile è sporco o
graffiato.
Appoggiare la puntina sul disco.
Assicurarsi che il giradischi disponga di batterie
nuove o che sia collegato ad una presa elettrica
sotto tensione tramite un adattatore 6V DC, 500
mA (non in dotazione). Assicurarsi inoltre che il
giradischi stesso sia acceso.
La cartuccia va fissata saldamente al braccio ogni
volta che si utilizza il giradischi.
Provare a spolverare delicatamente con un panno
la superficie del disco prima di riprodurlo.
La mia musica suona
in una tonalità strana.
Sul giradischi è stata
selezionata la velocità
sbagliata.
Assicurarsi di riprodurre i dischi alla velocità per cui
sono stati creati. Scegliere tra le due diverse
velocità premendo 33RPM o 45RPM (33 o 45 giri).
PRIMA DI RESTITUIRE IL PRODOTTO, si prega di contattare ION Audio o il
vostro rivenditore per ottenere assistenza tecnica. Le informazioni di contatto
sono reperibili nel libretto di istruzioni di sicurezza in dotazione con questo
prodotto.
www.ionaudio.com/verticalvinyl
10
Page 11

p
KURZANLEITUNG (DEUTSCH)
o Überprüfen Sie bitte, dass sich folgende Gegenstände in der Produktverpackung befinden: VERTICAL VINYL, 4
Batterien, Grösse AA, 45 RPM Adapter, Kurzanleitung, Broschüre mit den Sicherheits- und Garantierichtlinien
o LESEN SIE BITTE DIE SICHERHEITSHINWEISE, BEVOR SIE DAS PRODUKT VERWENDEN
o Registrieren Sie Ihr Produkt online auf http://www.ionaudio.com
Wandmontage des VERTICAL VINYL:
Wand aufzuhängen. Hängen Sie das Gerät wie ein schweres Bild auf. Wir empfehlen Ihnen die
Befestigungsschrauben in Wandbalken zu schrauben, die Sie mit einem Standard-Balkensucher finden können.
Abspielen einer Platte:
1. Lösen und entfernen Sie die Kunststoffabdeckung vom Plattenteller des Plattenspielers, indem sie im
Uhrzeigersinn drehen.
2. Legen Sie Ihre Schallplatte auf den Plattenteller.
3. Setzen Sie die Kunststoffabdeckung wieder auf den Plattenteller, indem sie sie gegen den Uhrzeigersinn
anziehen, um die Platte zu fixieren.
4. Schalten Sie das Gerät durch Drehen des Lautstärkereglers im Uhrzeigersinn ein, bis er einrastet. (Die obere
LED leuchtet, wenn das Gerät eingeschaltet ist.)
5. Wählen Sie die richtige Wiedergabe-Geschwindigkeit mit dem 33/45 RPM-Regler.
6. Entfernen Sie den Arm-Clip, der den T onarm hält, und legen Sie den Tonarm auf die Platte. Stellen Sie die
Lautstärke wie gewünscht ein.
VERTICAL VINYL hat zwei Löcher auf der Rückseite, um da s Gerät an der
GERÄTEÜBERSICHT
1. BATTERIEFACH – Entfernen Sie
den Deckel und legen Sie 4 AABatterien in das Fach. Stellen Sie
sicher, dass die positiven und
negativen Pole der Batterien korrekt
ausgerichtet sind.
2. NETZEINGANG – Wenn Sie
VERTICAL VINYL anstelle von
Batterien lieber über ein
Steckernetzteil betreiben möchten,
können Sie hier ein 6V DC, 500 mA
Netzteil (nicht im Lieferumfang
enthalten) anschließen und das
Netzteil dann mit einer Steckdose
verbinden.
3. LAUTSPRECHER – Die Platte wird über diese eingebauten Lautsprecher zu hören sein.
4. LAUTSTÄRKEREGLER / EIN- AUS-SCHALTER – Um VERTICAL VINYL einzuschalten, drehen Sie diesen
Regler im Uhrzeigersinn bis er einrastet. Wenn das Gerät eingeschaltet ist, ver wenden Sie diesen Knopf, um
die Lautstärke einzustellen. Um VERTICAL VINYL abzuschalten, drehen Sie diesen Regler gegen den
Uhrzeigersinn bis er einrastet.
5. PLATTENTELLER – Hier platzieren Sie Ihre
Schallplatte und sichern sie am Plattenteller mit der
Kunststoffabdeckung (Lösen Sie die Abdeckung
durch Drehen im Uhrzeigersinn
gegen dem Uhrzeigersinn
6. ARM CLIP – Dieser speziell entworfene Arm-Clip
sichert den Tonarm während Pausen und bei
Nichtgebrauch.
7. TONARM – Der VERTICAL VINYL wird mit einem betriebsfertigen, ausbalancierten TONARM mit System
ausgeliefert. Der TONARM lässt sich per Hand anheben und absenken. Beachten Sie bitte, dass der
TONARM von der Ablage (siehe TONARM CLIP) bewegt werden muss, damit d er Schallplattenmotor aktiviert
wird. Wird der TONARM zurück auf seine Ablage gelegt, deaktiviert sich der Motor.
Hinweis: Sie können die Nadel mit der ION iCT05RS ersetzen, die hier erhältlich ist:
www.ionaudio.com/ict05rs
8. 33 / 45 RPM SCHALTER – Dieser Schalter steuert die Drehzahl des Plattentellers
9. 45 R PM AD AP TE R AB L AG E – A blage für den beiliegende n 45 RPM Adapter. Lagen Sie den A dapter hier ab,
wenn Sie ihn nicht verwenden.
10. Telefone - Verbinde n 1/8 " Stereokopfhörer hier (nicht eingeschlossen). Die Sprecher-Produktion(SprecherOutput) hört auf, Audio- zu spielen, sobald Kopfhörer verbunden werden.
, drehen Sie sie
, um sie zu fixieren.)
.
9
5
.
8
4
10
3
1
2
6
7
WICHTIG: Achten Sie immer darauf, dass die
Slipmat auf dem Plattenteller liegt, wenn Sie den
Schallplattenspieler verwenden. Anderenfalls
könnten Sie sowohl Ihre Schallplatten, als auch den
Plattenspieler beschädigen.
Bitte entfernen Sie die Nadelabdeckung aus Plastik,
bevor Sie den Plattens
ieler verwenden.
11
Page 12

FEHLERHILFE
Sollten Sie bei der Verwendung Ihres Plattenspielers auf Probleme stoßen, können Sie die folgende
Fehlersuchtabelle verwenden, um eine Lösung zu finden.
PROBLEM URSACHE LÖSUNG
Ich höre bei der
Wiedergabe kein
Audiosignal.
Der Klang, den ich
höre, ist sehr
schlecht.
Meine Musik wird in
der falschen
Tonhöhe abgespielt.
Nadel liegt nicht auf der
Schallplatte.
Plattenspieler hat kein
Strom.
Das System sitzt nicht
richtig.
Die Schallplatte ist
schmutzig oder verkratzt.
Falsche Geschwindigkeit
am Plattenspieler
ausgewählt.
Legen Sie die Nadel auf die Schallplatte auf.
Stellen Sie sicher, dass der Plattenspieler frische
Batterien hat oder dass er mit einer
funktionierenden Steckdose mit dem 6V DC, 500
mA Netzteil (nicht im Lieferumfang enthalten)
verbunden ist. Stellen Sie außerdem sicher, dass
der Plattenspieler auch eingeschaltet ist.
Das Tonabnehmersystem muss fest am Tonarm
sitzen, wenn Sie den Plattenspieler verwenden.
Wischen Sie die Oberfläche der Schallplatte mit
einem antistatischen Tuch vorsichtig ab.
Achten Sie darauf, dass die Schallplatten in der
vorgesehenen Geschwindigkeit abgespielt werden.
Sie können mit den Tasten 33RPM oder 45RPM
zwischen zwei Geschwindigkeiten wählen.
BEVOR SIE DIESES PRODUKT ZURÜCK SENDEN nehmen Sie bitte Kontakt mit
ION Audio oder Ihrem Fachhändler zur Behebung eines Problems auf. Die
Kontaktinformationen finden Sie in der Broschüre mit den
Sicherheitshinweisen, die diesem Produkt beiliegt.
www.ionaudio.com/verticalvinyl
12
Page 13

SNELSTARTGIDS (NEDERLANDS)
o Controleer of onderstaande onderdelen in de doos zitten: VERTICAL VINYL, 4 AA-batterijen, 45 TPM adapter ,
snelstartgids, veiligheids- en garantie-informatie
o LEES DE VEILIGHEIDSINSTRUCTIES VOOR HET PRODUCT GEBRUIKT WORDT
o Bezoek http://www.ionaudio.com
Montage van VERTICAL VINYL op een muur:
hem aan uw muur kan ophangen. Doe dit op dezelfde manie r als voor een zwaar schilderij. Wij raden aan om uw
montageschroeven in de muurprofielen te schroeven, die u kunt vinden met behulp van een standaard
materiaaldetector.
Afspelen van een grammofoonplaat:
1. Maak de plastic dop van de draaitafel los en verwijder hem door rechtsom
2. Plaats uw grammofoonplaat op de draaitafel.
3. Plaats de plastic dop weer op de draaitafel, linksom
hangen.
4. Zet het apparaat aan door de volumeknop rechtsom te draaien tot hij klikt. (Wanneer het apparaat is
ingeschakeld, gaat de LED erboven branden.)
5. Selecteer de juiste afspeelsnelheid met de 33/45-toerenschakelaar.
6. Verwijder de armklem die de toonarm op zijn plaats houdt en plaats de toonar m op de plaat. Stel het gewenste
volume in.
OVERZICHT
1. BATTERIJVAK: Verwijder het deksel
en plaats 4 AA-batterijen in dit
compartiment. Zorg ervoor dat de
positieve en negatieve polen van de
batterijen in de juiste richting wijzen.
2. STROOMINGANG: Als u verkiest om
de VERTICAL VINYL op netstroom
in plaats van batterijen te doen
werken, sluit dan een 6V DC, 500
mA stroomadapter (niet
meegeleverd) aan op deze ingang en
verbind de adapter daarna met een
stroombron.
3. LUIDSPREKER: De muziek op de
plaat wordt afgespeeld via deze
ingebouwde luidspreker.
4. VOLUMEKNOP, AAN/UITKNOP: Draai deze k nop naar rechts tot hij klikt om de VERTICAL VINYL aan te
zetten. Draai deze knop naar links of naar rechts om het luidsprekervolume aan te passen wanneer het
apparaat aanstaat. Draai deze knop naar links tot hij klikt om de VERTICAL VINYL uit te zetten.
5. DRAAITAFEL: Leg uw plaat hierop en bevestig ze op de
draaitafel met de plastic dop. (De dop losmaken door rechtsom
te draaien; de knop vastdraaien door linksom
6. ARMKLEM – Deze speciaal ontworpen armklem zorgt ervoor
dat de toonarm in positie blijft wanneer deze niet wordt gebruikt.
7. TOONARM – De VERTICAL VINYL wordt geleverd met een
direct bruikbare, voorgebalanceerde TOONARM met patroon.
Deze TOONARM kan met de hand worden opgetild en
neergelaten. Vergeet niet dat de TOONARM uit de rustpositie
(op de ARMKLEM) genomen dient te worden voordat de motor
van de draaitafel geactiveerd wordt. Wanneer de TOONARM teruggeplaatst wordt in rustpositie, wordt de
motor van de draaitafel gedeactiveerd.
Opmerking: U kan de naald vervangen door de ION iCT05RS, beschikbaar op www.ionaudio.com/ict05rs
8. 33 / 45 RPM SCHAKELAAR – Deze schakelaar regelt het toerental (RPM) van het plateau van de draaitafel
9. 45 TPM ADAPTERHOUDER – Voor de meegeleverde 45 TPM-adapter. Wanneer de adapter niet gebruikt
wordt, kan deze in de houder worden geplaatst.
10. Telefoons - Connect 1/8 "stereo koptelefoon hier (niet inbegrepen). De spreker output stopplaatsen spelen
audio eenmaal koptelefoon zijn aangesloten.
voor productregistratie.
De VERTICAL VINYL heeft twee gaten aan de achterkant waarmee u
schroevend. Draai de dop goed vast, zodat de plaat blijft
9
te draaien.
8
4
6
5
te draaien.)
BELANGRIJK: Zorg ervoor dat de
slipmat altijd op het plateau ligt bij gebruik
van de draaitafel. Het niet gebruiken van
deze slipmak kan zowel uw media als de
draaitafel beschadigen.
Verwijder het plastic elementkapje
(naaldbescherming) voor gebruik van de
draaitafel.
7
10
3
1
2
.
13
Page 14

PROBLEEMOPLOSSING
Raadpleeg de volgende probleemoplossingen wanneer u moeilijkheden ondervindt bij het opnemen van uw
platen.
PROBLEEM OORZAAK OPLOSSING
Ik hoor geen geluid
wanneer ik aan het
opnemen ben.
De geluidskwaliteit is
slecht.
Mijn muziek speelt af op
een vreemde
toonhoogte
Naald staat niet op de
plaat.
Draaitafel heeft geen
stroom.
Aansluiting van het
element is niet in orde.
Vinyl plaat is vuil of
beschadigd.
Onjuiste snelheid
geselecteerd op de
draaitafel.
Plaats de naald op de plaat.
Zorg ervoor dat de draaitafel nieuwe batterijen
bevat of dat ze is aangesloten op een werkend
stopcontact met behulp van een 6V DC, 500 mA
stroomadapter (niet meegeleverd). Zorg er ook voor
dat de draaitafel zelf is ingeschakeld.
Element dient stevig bevestigd te zijn aan de
toonarm wanneer de draaitafel in gebruik is.
Stof de plaat af en veeg het oppervlak voorzichtig
schoon voordat de plaat afgespeeld wordt.
Zorg ervoor dat u uw platen op dezelfde snelheid
afspeelt als die waarvoor deze bedoeld zijn.
Selecteer één van de twee snelheden door te
drukken op 33RPM of 45RPM.
Voor technische ondersteuning wordt u verzocht VÓÓR RETOURNERING VAN
HET PRODUCT contact te zoeken met ION Audio of uw verkooppunt.
Contactinformatie vindt u in de Veiligheidsinstructies die bij het product
geleverd worden.
www.ionaudio.com/verticalvinyl
14
Page 15

Page 16

www.ionaudio.com
MANUAL VERSION 1.2
 Loading...