

Page 1
QUICKSTART MANUAL
GUÍA DE INICIO RÁPIDO
ESPAÑOL ( 9 – 14 )
GUIDE D'UTILISATION SIMPLIFIÉ
FRANÇAIS ( 15 – 20 )
KURZANLEITUNG
DEUTSCH ( 21 – 26 )
ITALIANO ( 27 – 32 )
SNELSTARTGIDS
NEDERLANDS ( 33 – 38 )
ENGLISH ( 3 – 8 )
GUIDA RAPIDA
Page 2

Page 3
INTRODUCTION
Welcome to U RECORD – the quickest and easiest way to transfer your vinyl records to your
computer. Once you record your vinyl, you can burn music CDs or even load your favorite
records onto portable media players!
The U RECORD system consists of the USB Recorder device and accompanying software for
your computer. If you are a beginner user and are looking for the quickest way to record your
vinyl, you may wish to use our EZ Vinyl Converter (PC) or EZ Audio Converter (Mac) software.
These applications are extremely easy to use and we have included a handy manual (see the
EZ Vinyl/Tape Converter Software Guide) to guide you through all the necessary steps.
Please read this manual for information about the USB Recorder and how to connect it to your
record player and computer. Once you become familiar with the connection procedure and the
features of the device, insert the included CD into your computer’s CD-ROM drive and install
the software application which best suits you. Refer to the software manuals included on the
CD for information on software operation. We sincerely hope that you enjoy this great product!
BOX CONTENTS
Please make sure that the following items were included in the box. Before using this
product, read the Safety and Warranty Information.
• USB Recorder
• USB Cable
• Software CD
• U RECORD Quickstart Manual
3
Page 4

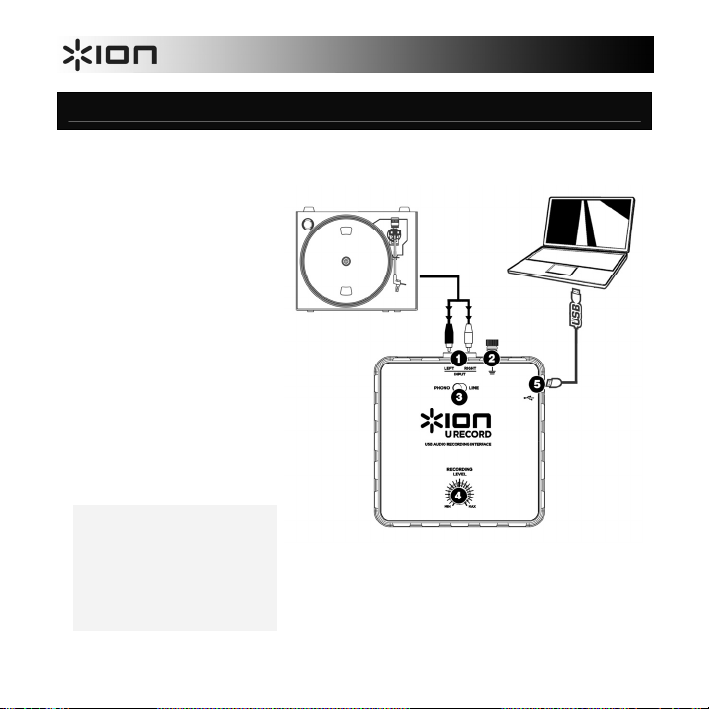
CONNECTION DIAGRAM AND TOP PANEL FEATURES
Please refer to the following list of features:
1. STEREO RCA INPUT –
Connect your record player
to this stereo RCA input.
2. GROUND CONNECTOR – If
your record player features a
grounding wire, please
connect it to this terminal by
loosening the terminal,
inserting your record player’s
grounding wire and then
tightening to secure the
grounding wire to the
terminal. If your record
player has a grounding wire
but it is not connected to the
grounding terminal when
using this product, you may
experience a “buzzing” or
“humming” effect!
Tip: Most old record players will
have a grounding wire which
needs to be connected to the
grounding terminal. Some new
record players have the
grounding wire built into the RCA
connection and, therefore,
nothing needs to be connected to
the grounding terminal.
4
Page 5
3. PHONO | LINE SWITCH – This switch should be set depending on the audio signal being
output from your record player. Most old record players output a weak audio signal, known
as a Phono-level signal, which needs to be amplified in order to be heard. In this case, the
switch should be set to ‘PHONO’. Some modern record players have the ability to output a
louder signal, also known as a Line-level signal. In this case, the switch should be set to
‘LINE’.
Tip: If the audio level is very low when you play your vinyl, it is possible that you are using a Phono-level
record player but have incorrectly set the switch to “LINE” – if this is the case, flip the switch to “PHONO”.
On the other hand, if the audio from your record player sounds extremely loud, distorted and unpleasant, it
is possible that you are using a Line-level record player but have incorrectly set the switch to “PHONO” – if
this is the case, flip the switch to “LINE”.
4. RECORDING LEVEL KNOB – This knob can be used to adjust the volume of the recording.
As you record your vinyl, be careful about recording too loud or “hot” of a signal – this may
result in unpleasant distortion in your recordings. Use this knob to adjust the volume so the
audio level meters in the recording application never hit the red.
Tip: Many songs have quiet introductions which may often be misleading when trying to determine the
optimal recording level. For example, you may have set the recording level so the level meters in the
software never hit the red during the introduction of a song. However, when a loud part of the song begins
playing, the meters start hitting the red and “clipping” the audio signal, resulting in distorted audio. We
recommend that, before you begin the actual recording, you find a loud moment in the music and adjust the
recording level so the meters never go into the red. This will ensure that your entire recording will sound
crisp and clear, without distorting.
5. USB CONNECTION – This is the connection to your computer. Use the included USB cable
to connect this port to an available USB port on your computer. The square side of the cable
should be connected to the USB Recorder, while the flat side of the cable should be
connected to your computer. The USB Recorder is a plug-and-play device so there are no
special drivers or software needed – it should be ready to use as soon as it is plugged into
your computer.
5
Page 6
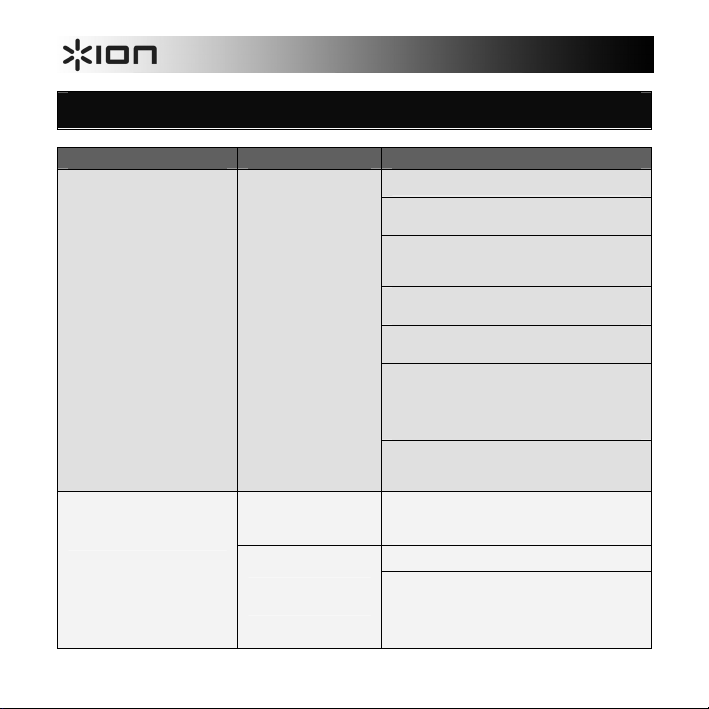
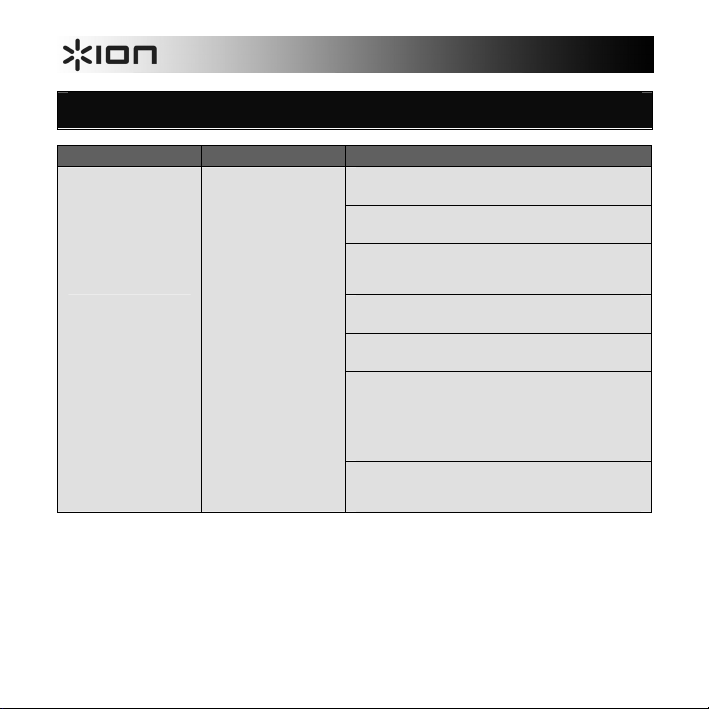
TROUBLESHOOTING
PROBLEM CAUSE SOLUTION
Try an amplifier with an ungrounded plug.
Try an amplifier with a “Ground Lift” switch, and
engage that switch.
Try a “Direct Box” (or “Direct Injection” box) with
ground lift switches between your computer’s
audio output and the amp.
Try plugging your laptop into a different power
outlet.
Run the laptop on batteries (not viable for long
periods of time).
Use a 3-to-2 prong adapter for your laptop’s power
supply so that the laptop ground is not connected
to the mains outlet. Contact your computer
manufacturer for any safety concerns before doing
this.
Plug your laptop into a power outlet which has a
separate ground (like an Earth ground) from the
other audio devices.
If using a Line-level record player, please ensure
that the Phono | Line switch is set to ‘Line’ to
prevent the audio from distorting.
Turn down the Recording Level knob.
In Windows 7, go to Start Menu Control
Panel Hardware and Sound Sound. Click
the Recording tab. Click Properties in the lower
right-hand corner. Click the Levels tab and set the
slider to "4."
I am experiencing a hum or
high-pitched tone when
recording and listening to my
vinyl on my laptop computer.
The audio from the record
player is too loud and distorted.
Certain models of laptop
computers generate
large amounts of ground
noise. This noise can
leak into your USB audio
device and cause noise
in the audio outputs.
The Phono | Line switch
is set incorrectly.
The Recording Level is
set too high.
6
Page 7

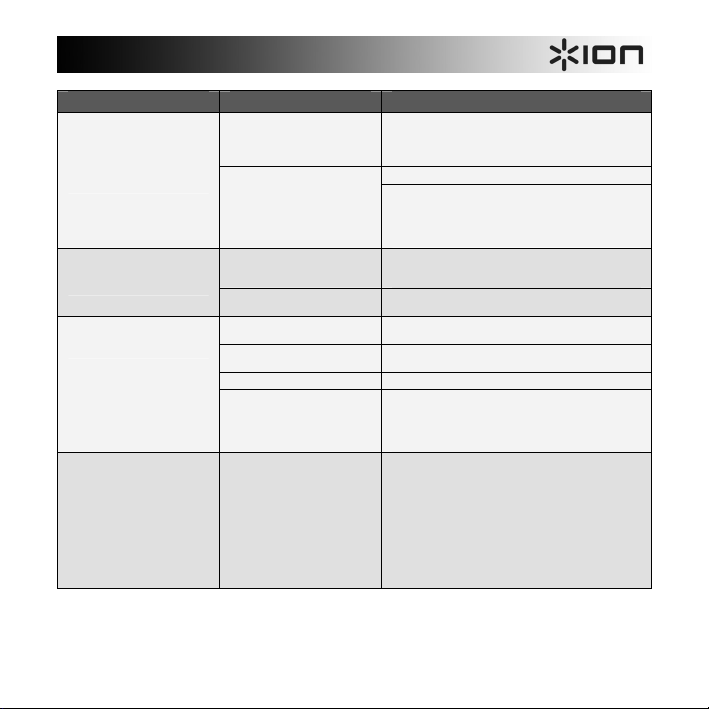
PROBLEM CAUSE SOLUTION
The audio from the record
player is barely audible.
I do not hear any audio when I
play music from my record
player.
On Windows Vista, my
recordings are mono instead of
stereo.
The Phono | Line switch
is set incorrectly.
The Recording Level is
set too low.
The USB Recorder is not
connected to your
computer.
Bad USB computer port.
Bad USB cable. Try using a different USB cable.
Problem is caused by
use of a USB hub.
Recording input
properties in Vista not
set to “stereo”.
If using a Phono-level record player, please ensure
that the Phono | Line switch is set to ‘Phono’.
Turn up the Recording Level knob.
Use the included USB cable to connect the USB
Recorder to your computer’s USB port.
Try connecting the USB Recorder to an alternate
USB port.
Some hubs do not provide sufficient power to
properly power the Express DJ Audio Interface. If
you experience problems when using a hub,
unplug the hub and then connect the audio
interface directly to your computer’s USB port.
In Vista, you may need to manually specify
“stereo” for the recording input.
Go to Start Control Panel Sound (in Classic
View). Then, click on the Recording tab and
highlight the Microphone input (USB Audio
Codec). Click on Properties to bring up the input
settings. Next, click on the Advanced tab and
select “2 channel, 16 bit, 44100 Hz (CD quality)” in
the Default Format pull-down menu. Lastly, click
Apply to accept the settings.
7
Page 8
FREQUENTLY ASKED QUESTIONS
Refer to the following list of frequently asked questions for additional information.
Question: What operating systems is the USB Recorder compatible with?
Answer: The hardware USB Recorder is compatible with Windows XP, Vista, 7, and Mac OS X. The EZ Vinyl
Question: Do I need to install any drivers or special software for the USB Recorder?
Answer: The USB Recorder is class-compliant and is ready to use as soon as it is plugged into your computer’s
Question: Do I need an adapter to power the USB Recorder?
Answer: No, the USB Recorder is powered through the USB connection.
Question: Can I record audio from other devices, such as tape, CD or media players?
Answer: Sure! You can record audio from virtually any source. Simply use the correct cable to connect your device
Question: Can I use other third-party software packages with the USB Recorder?
Answer: We highly recommend that you use the software included on the CD to record your music. However, you
Converter software is compatible with Windows XP and Vista. The EZ Audio Converter software is
compatible with Mac OS X.
USB port. However, you do need to install either of the supplied audio software applications to take
advantage of audio recording.
to the RCA inputs of the USB Recorder. In most cases, you will need to set the Phono | Line switch to
Line.
can use the USB Recorder with almost all applications which allow you to record audio from an external
input. In most software applications, the USB Recorder will be labeled as “USB Audio Codec”. For further
information, please consult the software’s documentation.
CONTACT INFORMATION
Visit the Ion Audio website (www.ionaudio.com) regularly for additional information, news and
updates.
www.ionaudio.com/urecord
www.ionaudio.com/ezvc
8
Page 9
INTRODUCCIÓN
Bienvenido a U RECORD – la manera más rápida y fácil de transferir sus grabaciones en vinilo a su
computadora. Una vez que graba su vinilo, puede quemar CD de música o incluso cargar sus grabaciones
favoritas en reproductores de medios portátiles
El sistema U RECORD consiste en un dispositivo grabador USB (USB Recorder) y el software asociado para
su computadora. Si usted es un usuario principiante y busca la manera más rápida de grabar su vinilo, es
conveniente que use nuestro software EZ Vinyl Converter (PC) o EZ Audio Converter (Mac). Estas
aplicaciones son muy fáciles de usar y hemos incluido un práctico manual (vea la Guía del Software EZ
Vinyl/Tape Converter) para que lo guíe a lo largo de todos los pasos necesarios.
Lea esta manual para obtener información acerca del grabador USB y de cómo conectarlo a su reproductor de
discos y su computadora. Una vez que se familiarice con el procedimiento de conexión y las características
del dispositivo, inserte el CD incluido en la unidad de CD-ROM e instale la aplicación de software que mejor se
adapte a su estilo. Consulte la información sobre la operación del software en los manuales de software
incluidos en el CD. ¡Esperamos sinceramente que disfrute este gran producto!
CONTENIDO DE LA CAJA
Verifique que la caja contenga los siguientes elementos: Antes de usar este producto, lea la Información
sobre la seguridad y la garantía.
• Grabador USB
• Cable USB
• CD de software
• Manual de inicio rápido de U RECORD
9
Page 10
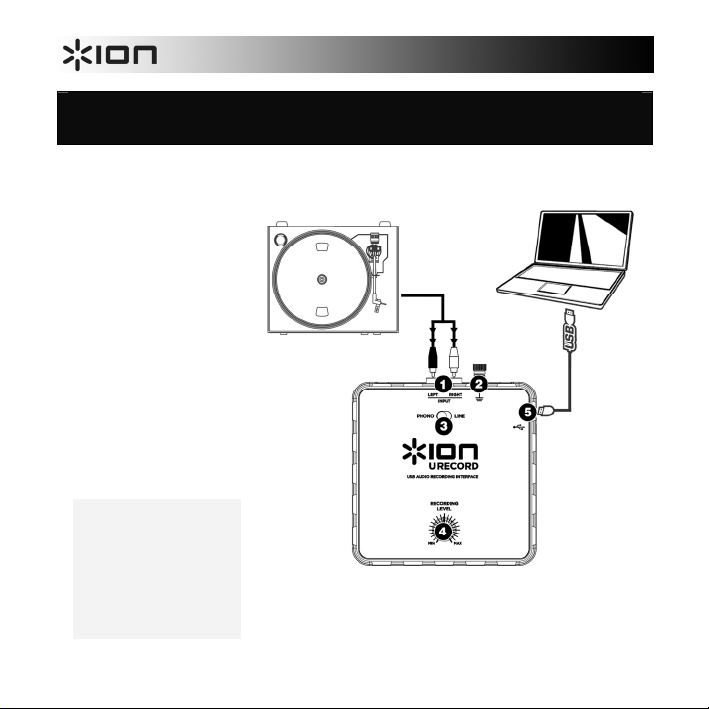
DIAGRAMA DE CONEXIÓN Y CARACTERÍSTICAS DEL
PANEL SUPERIOR
Consulte la lista de características siguiente:
1. ENTRADA RCA ESTÉREO
– Conecte su reproductor
de discos a esta entrada
RCA estéreo.
2. CONECTOR DE TIERRA –
Si su reproductor de discos
tiene un cable de conexión
a tierra, conéctelo a este
terminal aflojándolo,
insertando el cable y
apretándolo nuevamente
para sujetarlo al terminal. Si
su reproductor de discos
tiene un cable de conexión
a tierra pero no se conecta
al terminal de tierra cuando
se usa este producto,
puede experimentar un
efecto de "zumbido".
Consejo: La mayoría de los
reproductores de discos
antiguos tienen un cable de
conexión a tierra que debe
conectarse al terminal de tierra.
Algunos reproductores
modernos tienen el cable de
conexión a tierra incorporado a
la conexión RCA y, por lo tanto,
no es necesario conectar nada
al terminal de tierra.
10
Page 11
3. CONMUTADOR FONO | LÍINEA – Este conmutador debe colocarse en la posición que
corresponda a la señal de audio que sale del reproductor de discos. La mayoría de los
reproductores de discos antiguos entregan una señal de audio débil, conocida como señal de nivel
fonográfico o “fono”, que debe amplificarse para poder ser oída. En este caso, el conmutador se
debe colocar en ‘PHONO’. Algunos reproductores de discos modernos tienen capacidad para
producir una señal más intensa, conocida como señal de nivel de línea. En este caso, el
conmutador se debe colocar en ‘LINE’.
Consejo: Si el nivel del audio es muy bajo cuando reproduce su vinilo, es posible que esté usando un reproductor de
nivel fonográfico pero colocó incorrectamente el conmutador en “LINE” – si éste es el caso, cambie el conmutador a
“PHONO”. En cambio, si el audio de su reproductor de discos suena extremadamente alto, distorsionado y
desagradable, es posible que el reproductor que está usando sea de nivel de línea y que colocó incorrectamente el
conmutador en “PHONO” – si éste es el caso, cambie el conmutador a “LINE”.
4. PERILLA DE NIVEL DE GRABACIÓN – Esta perilla se puede usar para ajustar el volumen de la
grabación. Cuando grabe su vinilo, tenga cuidado de no grabar una señal demasiado alta o
"caliente" —el resultado puede ser una desagradable distorsión en sus grabaciones. Use esta
perilla para ajustar el volumen de modo que los medidores de nivel de audio de la aplicación de
grabación no lleguen nunca a la zona roja.
Consejo: Algunos temas tienen introducciones de bajo volumen que con frecuencia pueden ser engañosas cuando
se trata de determinar el nivel de grabación óptimo. Por ejemplo, usted puede haber ajustado el nivel de grabación
de modo que los medidores del software nunca lleguen al rojo durante la introducción del tema. Sin embargo,
cuando comienza a reproducirse una parte de alto volumen del mismo, los medidores llegan a la zona roja y
"recortan" la señal de audio, produciendo un sonido distorsionado. Recomendamos que, antes de comenzar la
grabación propiamente dicho, busque un momento de alto volumen de la música y ajuste el nivel de grabación de
modo que los medidores nunca lleguen al rojo. De esta forma se asegura de que toda la grabación sonará nítida y
clara, sin distorsión.
5. CONEXIÓN USB – Es la conexión a su computadora. Use el cable USB incluido para conectar
este puerto a un puerto USB disponible en la computadora. El lado cuadrado del cable debe
conectarse al grabador USB, mientras que el lado plano del mismo debe conectarse a la
computadora. El grabador USB es un dispositivo “plug-and-play”, de modo que no necesita drivers
o software especiales —debe estar listo para usar tan pronto se enchufa a la computadora.
11
Page 12
SOLUCIÓN DE PROBLEMAS
PROBLEMA CAUSA SOLUCIÓN
Use un amplificador con un enchufe no conectado a
tierra.
Use un amplificador con interruptor de “levantamiento de
la tierra” y conecte ese interruptor.
Use una “caja directa” (o caja de “inyección directa) con
interruptores de levantamiento de la tierra entre el
dispositivo de audio de la computadora y el amplificador.
Pruebe enchufando su computadora portátil a un
tomacorriente diferente.
Haga funcionar la computadora con baterías (no viable
para largos periodos).
Use un adaptador de 3 a 2 patas para la fuente de
alimentación de su computadora portátil, a fin de que la
conexión a tierra de la computadora no esté conectada al
tomacorriente de la red. Antes de hacerlo, comuníquese
con el fabricante de su computadora para aclarar
cualquier inquietud relativa a la seguridad.
Enchufe su computadora portátil a un tomacorriente que
tenga una conexión a tierra independiente de los demás
dispositivos de audio.
Experimento un zumbido
o tono muy agudo
cuando grabo y escucho
mi vinilo en mi
computadora portátil
(laptop).
Ciertos modelos de
computadoras portátiles
generan una gran
cantidad de ruido. Este
ruido puede entrar en su
dispositivo de audio del
USB y causar ruido en
las salidas de audio.
12
Page 13

PROBLEMA CAUSA SOLUCIÓN
Si usa un reproductor de discos de nivel de línea, asegúrese de
que el conmutador Phono | Line esté en ‘Line’ para evitar que
se distorsione el audio.
Ajuste hacia abajo la perilla Recording Level.
En Windows 7, vaya al menú Start Control Panel
Hardware and Sound Sound (Inicio Panel de control
Hardware y Sonido Sonido). Haga clic en la pestaña
Recording (Grabación), haga clic en Properties (Propiedades)
en la esquina inferior derecha y haga clic en la pestaña Levels
(Niveles) y ajuste el deslizador a "4".
Si usa un reproductor de discos de nivel fonográfico, asegúrese
de que el conmutador Phono | Line esté en ‘Phono’.
Ajuste hacia arriba la perilla Recording Level.
Use el cable USB incluido para conectar el grabador USB al
puerto USB de la computadora.
Pruebe conectando el grabador USB a un pu erto USB
alternativo.
Algunos concentradores no suministran suficiente energía para
alimentar correctamente el grabador USB. Si experimenta
problemas cuando usa un concentrador, desenchufe el
concentrador y conecte el grabador directamente al puerto USB
de la computadora.
En Vista, es posible que sea necesario especificar
manualmente “stereo” para la entrada de grabación.
Vaya a Start Control Panel Sound (Inicio Panel de
Control Sonido) en la vista clásica). Luego, haga clic en la
pestaña Recording (Grabación) y resalte la entrada Microphone
(USB Audio Codec). Haga clic en Properties (Propiedades)
para activar la configuración de la entrada. Luego, haga clic en
la pestaña Advanced (Avanzadas) y seleccione “2 channel, 16
bit, 44100 Hz (CD quality)” (2 canales, 16 bits, 44100 Hz
(calidad de CD)) en el menú desplegable De fault Format
(Formato por defecto). Finalmente, haga clic en Apply (Aplicar)
para aceptar los valores de configuración.
El audio del reproductor de
discos es demasiado
intenso y distorsionado.
El audio del reproductor de
discos es apenas audible.
No oigo ningún audio
cuando reproduzco música
de mi reproductor de
discos.
En Windows Vista, mis
grabaciones son mono en
lugar de estéreo.
El conmutador Phono |
Line está en la posición
incorrecta.
El nivel de grabación está
ajustado a un valor
demasiado alto.
El conmutador Phono |
Line está en la posición
incorrecta.
El nivel de grabación está
ajustado a un valor
demasiado bajo.
El grabador USB no está
conectado a la
computadora.
Puerto USB de la
computadora defectuoso.
Cable USB defectuoso. Pruebe usando un cable USB diferente.
Problema causado por
usar un concentrador (hub)
USB.
Propiedades de entrada de
grabación en Vista no
configuradas a “stereo”
(estéreo).
13
Page 14

PREGUNTAS FRECUENTES
Para información adicional, consulte la lista siguiente de preguntas frecuentes.
Pregunta: ¿Con qué sistemas es compatible el grabador USB?
Respuesta: El grabador USB de hardware es compatible con Windows XP, Vista, 7 y Mac OS X. El software EZ Vinyl
Pregunta: ¿Necesito instalar algún driver o software especial para el grabador USB?
Respuesta: El grabador USB cumple con la clase y está lista para usar tan pronto se enchufa en el puerto USB de la
Pregunta: ¿Necesito un adaptador para alimentar el grabador USB?
Respuesta: No, el grabador USB se alimenta a través de la conexión USB.
Pregunta: ¿Puedo grabar audio proveniente de otros dispositivos, tales como reproductores de cinta, CD o medios?
Respuesta: ¡Seguro! Puede grabar el audio de prácticamente cualquier fuente. Simplemente, use el cable correcto
Pregunta: ¿Puedo usar paquetes de software de terceros con el grabador USB?
Respuesta: Recomendamos especialmente que use el software incluido en el CD para grabar su música. No
Converter, incluido en el CD, sólo es compatible con Windows XP y Vista. El software EZ Audio Converter
es compatible con Mac OS X.
computadora. No obstante, sí necesita instalar una de las aplicaciones de software para audio provistas
para aprovechar la grabación de audio.
para conectar su dispositivo a las entradas RCA del grabador USB. En la mayoría de los casos, es
necesario que coloque el conmutador Phono | Line en Line.
obstante, puede usar el grabador USB con casi todas las aplicaciones que le permiten grabar audio de
una entrada externa. En la mayoría de las aplicaciones de software, el grabador USB aparecerá rotulado
como “USB Audio Codec” (Códec de audio USB). Para más información, consulte la documentación del
software.
INFORMACIÓN DE CONTACTO
Visite regularmente el sitio web de Ion Audio (www.ionaudio.com) para obtener información adicional, noticias
y actualizaciones.
www.ionaudio.com/urecord
www.ionaudio.com/ezvc
14
Page 15

INTRODUCTION
Voici U RECORD – la façon la plus facile et rapide de transférer vos disques vinyle à votre ordinateur. Une fois
votre vinyle enregistré, vous pouvez graver votre musique sur des CD ou même la télécharger sur des lecteurs
multimédia portables.
Le système U RECORD se compose de l’appareil d'enregistrement USB et d'un logiciel pour votre ordinateur.
Si vous êtes un utilisateur débutant et que vous recherchez la façon la plus simple et la plus rapide de
transférer vos disques vinyles, les logiciels EZ Vinyl Converter (PC) et EZ Audio Converter (Mac) sont pour
vous. Ces applications sont extrêmement faciles à utiliser. De plus, nous avons inclus un guide d’utilisation
pratique (voir le guide d’utilisation pour le logiciel EZ Vinyl/Tape Converter) afin de vous guider à travers toutes
les étapes.
Veuillez lire le guide afin d'obtenir de plus amples informations sur l'enregistreur USB et pour savoir comment le
brancher à votre tourne-disque et à votre ordinateur. Une fois que vous vous serez familiarisé avec la
procédure de branchement et les fonctions de l'appareil, insérez le CD dans le lecteur CD de votre ordinateur.
Veuillez consulter les guides d'utilisation sur les CD pour plus d'information sur le fonctionnement des logiciels.
Nous espérons que vous apprécierez ce fabuleux produit.
CONTENUE DE LA BOÎTE
Veuillez vous assurer que les articles suivants étaient dans la boîte. Avant d'utiliser ce produit, veuillez lire
les consignes de sécurité et l'information concernant la garantie.
• Enregistreur USB
• Câble USB
• CD logiciel
• Guide d'utilisation simplifié pour le U RECORD
15
Page 16
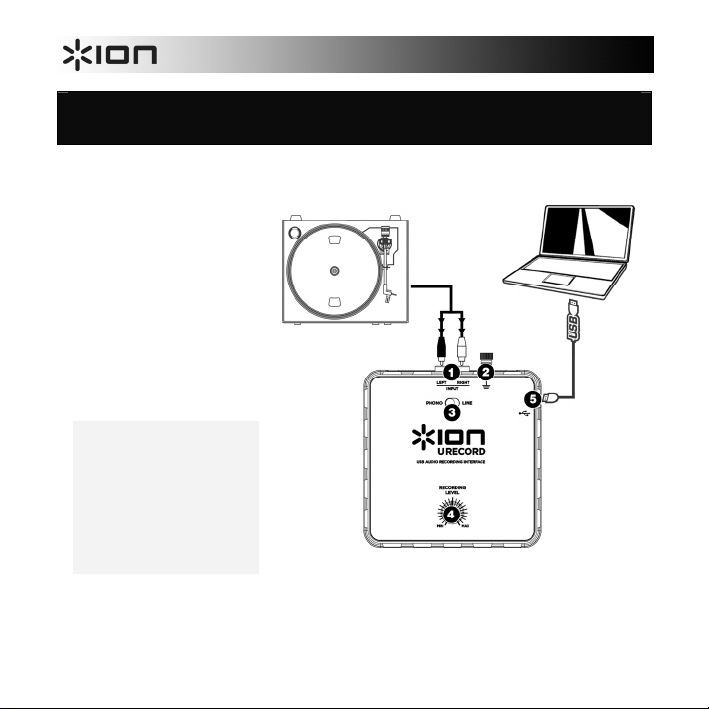
SCHÉMA DE CONNEXION ET CARACTÉRISTIQUES DU
PANNEAU SUPÉRIEUR
Veuillez consulter la liste des caractéristiques suivantes :
1. ENTRÉE RCA STÉRÉO –
Branchez le tourne-disque à cette
entrée RCA stéréo.
2. BORNE DE MISE À LA TERRE
– Si votre tourne-disque est doté
d'un fil de mise à la terre, veuillez
le brancher à cette borne en la
dévissant, en insérant le fil, puis
en revissant la borne. Si votre
tourne-disque est doté d'un fil de
mise à la terre et qu'il n'est pas
relié à la borne de mise à la terre
lorsque vous utilisez ce produit, il
se peut que vous entendiez du
ronflement et le bourdonnement.
Conseil : La plupart des tournedisques fabriqués il y a quelques
années sont dotés d'un fil de
mise à la terre qui doit être relié à
la borne de mise à la terre.
Certains des tourne-disques
fabriqués récemment sont dotés
d'un fil de mise à la terre intégré
à la connexion RCA, et donc,
n'ont pas besoin doit être relié à
la borne de mise à la terre.
16
Page 17
3. COMMUTATEUR PHONO | LINE – This switch should be set depending on the audio signal being output
from your record player. La plupart des tourne-disques moins récents émettent un signal audio faible,
connu sous le nom signal de niveau phono qui doit être amplifié pour être entendu. Dans ce cas, le
commutateur doit être réglé à « PHONO ». Certains des tourne-disques fabriqués récemment ont la
capacité d'émettre un signal plus puissant, connu sous le nom signal niveau ligne. Dans ce cas, le
commutateur doit être réglé à « LINE ».
Conseil : Si le niveau audio est très faible lorsque le vinyle joue, il est possible que vous utilisiez un tournedisque phono et que le commutateur est réglé à « LINE » – si tel est le cas, mettez-le à « PHONO ». Par
contre, si l'audio du tourne-disque est extrêmement fort, déformé et déplaisant, il est possible que le tournedisque soit à niveau ligne et que le commutateur est réglé à « PHONO »– si tel est le cas, mettez-le à
« LINE ».
4. BOUNTON DU NIVEAU D'ENREGISTREMENT –This knob can be used to adjust the volume of the
recording. Lorsque vous enregistrez le disque vinyle, assurez-vous que le son ne soit pas trop fort, car cela
pourrait créer de la distorsion sur l'enregistrement. Utilisez ce bouton pour régler le volume de façon à ce
que les vumètres dans l'application d'enregistrement n'atteignent jamais le rouge.
Conseil : Beaucoup de chansons ont de douces introductions qui peuvent nous induire en erreur lors du
réglage du niveau d'enregistrement. Par exemple, vous pouvez régler le niveau d'enregistrement pour que
les vumètres du logiciel n'atteignent jamais le rouge durant l'introduction d'une chanson. Cependant,
lorsqu'une partie plus puissante de la chanson débute, les vumètres atteignent le rouge et créent de la
distorsion ou de l'écrêtage. Avant de commencer l'enregistrement, nous vous recommandons de trouver un
moment dans la chanson où le signal est puissant et d'ajuster en conséquence les vumètres pour qu'ils
n'atteignent pas le rouge. Ceci permettra de vous assurer que le son de l'enregistrement sera clair et sans
distorsion.
5. CONNEXION USB – Ceci est la connexion pour votre ordinateur. Utilisez le câble USB pour brancher ce
port à un port USB disponible sur votre ordinateur. L'extrémité carrée du câble doit être branchée à
l'enregistreur USB, alors que l'extrémité plate doit être branchée à l'ordinateur. L'enregistreur USB est un
appareil prêt à utilisation, alors aucun pilote spécial ou logiciel n’est requis – il devrait être prêt aussitôt qu'il
est branché à votre ordinateur.
17
Page 18

DÉPANNAGE
PROBLÈME CAUSE SOLUTION
Essayez d'utiliser un amplificateur doté d'une fiche
sans mise à la terre.
Essayez d'utiliser un amplificateur doté d'un
commutateur de mise à la terre, et coupez la mise
à la terre.
Essayez un « boîtier d'adaptation » (ou un
« boîtier d'injection direct ») doté de commutateurs
de mise à la terre entre votre ordinateur et
l'amplificateur.
Essayez de brancher votre portable dans une
prise différente.
Faites fonctionner l’ordinateur portable sur pile
(impratique à long terme).
Utilisez un adaptateur à 3 voies vers 2 voies pour
brancher votre portable pour que la mise à la terre
du portable ne soit pas branchée à la mise à la
terre de la prise des sorties principales. Avant
d’effectuer ceci, veuillez vérifier auprès du
fabricant de votre ordinateur pour toutes questions
concernant la sécurité.
Branchez votre ordinateur portable dans une prise
dotée d’une mise à la terre séparée des autres
appareils audio.
Il y a du ronflement ou un
signal aigu lors de la lecture
et de l'enregistrement de
mon vinyle sur mon
ordinateur.
Certains modèles
d’ordinateurs portables
génèrent de grandes
quantités de bruits de fond.
Ces bruits de fond peuvent
se retrouver sur votre
appareil audio USB et
causer de la distorsion sur le
signal de sortie.
18
Page 19
PROBLÈME CAUSE SOLUTION
Si vous utilisez un tourne-disque à niveau ligne, veuillez
vous assurer que le commutateur Phono | Line est
réglé à « Line » afin de prévenir la distorsion du signal.
Diminuez le niveau d'enregistrement.
En Windows 7, Cliquez sur Démarrer Panneau de
configuration Hardware et Son Son. Cliquez
sur l'onglet Enregistrement, cliquez sur Propriétés dans
le coin inférieur droit et cliquez sur l'onglet Niveaux et
positionnez le curseur à 4.
Si vous utilisez un tourne-disque à niveau phono,
veuillez vous assurer que le commutateur Phono | Line
est réglé à « Phono ».
Augmentez le niveau d'enregistrement.
Utilisez le câble USB pour brancher l'enregistreur USB
au port USB de votre ordinateur.
Essayez de brancher l'enregistreur USB à un autre port
USB de votre ordinateur.
Certains répéteurs USB ne sont pas assez puissants
pour alimenter correctement l'enregistre ur USB. Si
vous éprouvez des difficultés lors de l'utilisation d'un
répétiteur, débranchez-le et branchez l’enregistreur
USB directement au port USB de votre ordinateur.
En Vista, il se peut que vous deviez régler
manuellement l'entrée d'enregistrement à « stéréo ».
Allez à Démarrer Panneau de configuration Son
(mode de visualisation classique). Cliquez ensuite sur
l'onglet Enregistrement et mettez l'entrée Microphone
en surbrillance (USB Audio Codec). Cliquez sur
Propriétés pour voir les paramètres d'entrée. Cliquez
ensuite sur l'onglet Avancé et sélectionnez « 2 canaux,
16 bits, 44100 Hz (qualité CD) » dans le menu
déroulant Format par défaut. Puis, cliquez sur
Appliquer pour confirmer les réglages.
L'audio du tourne-disque est
trop fort et déformé.
L'audio du tourne-disque est à
peine audible.
Je n'entends pas de signal
audio lorsque je fais jouer de la
musique sur mon tournedisque.
En Windows Vista, mes
enregistrements sont mono au
lieu d'être en stéréo.
Le commutateur Phono | Line
est mal réglé.
Le bouton du Recording Level
est réglé trop haut.
Le commutateur Phono | Line
est mal réglé.
Le bouton du Recording Level
est réglé trop bas.
L'enregistreur USB n'est pas
branché à votre ordinateur.
Le port USB de votre
ordinateur est défectueux.
Le câble USB est défectueux. Essayez d'utiliser un autre câble USB.
Problèmes causés par
l’utilisation d’un répéteur USB.
Les paramètres d'entrée pour
l'enregistrement ne sont pas
réglés à « stéréo ».
19
Page 20
FOIRE AUX QUESTIONS
Veuillez consulter la liste des questions les plus souvent posées qui suit pour plus d'information.
Question : Quels sont les systèmes d'exploitation compatibles avec l'enregistreur USB?
Réponse : L'enregistreur USB est conçu pour fonctionner sous les systèmes d'exploitation Windows XP, Vista, 7 et
Question : Ai-je besoin d'installer des pilotes ou des logiciels spéciaux pour que l'enregistreur USB fonctionne?
Réponse : L'enregistreur USB est reconnu et prêt automatiquement une fois qu’il est branché au port USB de
Question : Ai-je besoin d'un adaptateur pour alimenter l'enregistreur USB?
Réponse : Non, l’enregistreur USB est alimenté par le port USB de votre ordinateur à l'aide du câble USB.
Question : Puis-je enregistrer à partir d'autres appareils tels que cassettes, CD ou lecteur multimédia?
Réponse : Absolument! Vous pouvez enregistrer à partir de pratiquement toutes les sources. Branchez simplement
Question : Puis-je utiliser des logiciels tiers avec l'enregistreur USB?
Réponse : Nous vous recommandons fortement d'utiliser les logiciels sur le CD pour l'enregistrement de votre
Mac OS X. Le logiciel EZ Vinyl Converter est conçu pour fonctionner sous les systèmes d'exploitation
Windows XP et Vista. Le logiciel EZ Audio Converter est conçu pour fonctionner sous le système
d'exploitation Mac OS X.
l’ordinateur. Cependant, vous devez installer un des deux logiciels audio fournis avec l'appareil afin
d'enregistrer vos disques.
le câble USB à l'appareil, puis aux entrées RCA de l'enregistreur USB. Dans la plupart des cas, vous
devrez régler le commutateur Phono | Line à « Line ».
musique. Cependant, vous pouvez utiliser presque toutes les applications qui vous permettent
d'enregistrer de l'audio à partir d'une entrée externe. Dans la plupart des applications, l'enregistreur USB
sera étiquetté en tant que « USB Audio Codec ». Pour de plus amples renseignements, veuillez consulter
le guide d’utilisateur du logiciel.
COORDONNÉES
Veuillez visiter le site Web de Ion Audio (www.ionaudio.com) régulièrement afin d'obtenir des informations
supplémentaires, des nouvelles ainsi que des mises à jour.
www.ionaudio.com/urecord
www.ionaudio.com/ezvc
20
Page 21
EINFÜHRUNG
Willkommen beim U RECORD – der schnellsten und unkomplizierten Möglichkeit um Ihre Schallplatten auf den
Computer zu überspielen. Nach der Aufnahme der Schallplatten können Sie Ihre Musik auf CDs brennen oder
Ihre Lieblingsmusik auf einen auf tragbare MP3-Player laden!
Das U-Aufnahmesystem besteht aus einem USB-Aufnahmegerät und der dazugehörigen Software für Ihren
Computer. Falls Sie ein neuer Anwender sind und Ihre Schallplatten auf schnellstmögliche Art aufnehmen
wollen, möchten Sie vielleicht dazu unsere Programme EZ Vinyl Converter (PC) oder EZ Audio Converter
(Mac) verwenden. Diese Anwendungen sind sehr leicht zu verwenden und wir haben auch eine handliche
Anleitung beigelegt (siehe EZ Vinyl/Tape Converter Software Ratgeber), um Sie bei allen notwendigen
Schritten zu beraten.
Lesen Sie bitte diese Anleitung, um alle Einzelheiten Ihres USB Recorders kennen zu lernen und zu erfahren,
wie Sie Ihren Schallplattenspieler mit dem Computer verbinden. Wenn Sie sich mit dem Anschlussvorgang und
den Funktionen des Gerätes vertraut gemacht haben, legen Sie die mitgelieferte CD in das CD-ROM Laufwerk
Ihres Computers und installieren Sie die Software, mit der Sie arbeiten möchten. Beachten Sie bitte die
Softwareanleitungen, die sich auf der CD befinden, wenn Sie weitere Hinweise zur Verwendung der
Aufnahmeprogramme suchen. Wir hoffen, dass Sie beim Aufnehmen Ihrer Schallplatten auf den Computer mit
dem U RECORD System viel Spaß haben werden!
INHALT DER VERPACKUNG
Überprüfen Sie zunächst, dass sich alle nun nachfolgend aufgeführten Gegenstände in der Produktverpackung
befinden. Vor der Verwendung des Produktes sollten Sie die Sicherheits- und Garantieinformationen
lesen.
• USB Recorder
• USB Kabel
• Software CD
• U RECORD Kurzanleitung
21
Page 22

ANSCHLUSSÜBERSICHT UND BEDIENELEMENTE DER
OBERSEITE
Bitte beachten Sie diese Übersicht der Funktionen:
1. STEREO RCA INPUT –
Schließen Sie an diesen RCAStereoeingang Ihren
Schallplattenspieler an.
2. GROUND ANSCHLUSS –
Sollte Ihr Schallplattenspieler
ein Erdungskabel besitzen,
verbinden Sie es mit diesem
Pin, indem Sie die Schraube
ein wenig lösen, das
Kabelende festklemmen und
danach die Schraube wieder
festziehen. Falls bei der
Verwendung dieses Produkts
das Erdungskabel Ihres
Plattenspielers nicht mit dem
Massepin verbunden ist,
könnte es zu Rauschen oder
Brummen kommen!
Tipp: Die meisten älteren
Plattenspieler besitzen ein
Erdungskabel, das mit diesem
Grounding Anschluss verbunden
werden sollte. Manche
Plattenspieler neueren Datums
verfügen über ein im RCA-Kabel
befindliches Erdungskabel und
müssen deshalb nicht gesondert
mit dem Grounding Anschluss
verbunden werden.
22
Page 23

3. PHONO | LINE SCHALTER – Dieser Schalter sollte je nach Art des aufzunehmenden Audiosignals
eingestellt werden. Die meisten älteren Plattenspieler geben ein sehr schwaches Audiosignal ab
(Phonopegel), welches vorverstärkt werden muss, um es hören zu können. In diesem Fall sollte der
Schalter auf ‘PHONO’ stehen. Viele moderne Plattenspieler geben ein lauteres Signal aus
(Linepegel)weshalb Sie dann den Schalter auf ‘LINE’ stellen sollten.
Tipp: Falls das Audiosignal beim Abspielen der Schallplatte sehr leise ist, kann es sein, dass Sie einen
Plattenspieler, der einen Phonopegel ausgibt, verwenden und der Schalter fälschlicherweise auf “LINE”
steht – stellen Sie den Schalter dann einfach auf “PHONO”. Wenn andererseits das Audiosignal extrem laut
und verzerrt ist, kann es sein, dass Sie einen Linepegel-Plattenspieler haben und der Schalter auf “PHONO“
steht – in diesem Fall stellen Sie den Schalter auf “LINE”.
4. RECORDING LEVEL REGLER – Mit diesem Regler bestimmen Sie die Lautstärke Ihrer Aufnahme.
Bei der Aufnahme der Schallplatte sollte Sie vorsichtig mit der Lautstärke umgehen, damit das
Signal nicht zu laut aufgenommen wird. Oft kommt es dabei zu Verzerrungen im Signal. Verwenden
Sie also diesen Regler, damit der Pegel in den Pegelmeteranzeigen der Aufnahmesoftware nicht in
den roten Bereich gelangt.
Tipp: Viele Songs gehen mit einer leisen Einleitung los, die sich zur Bestimmung der Aufnahmelautstärke
nicht gut eignen. Wenn Sie zum Beispiel den Aufnahmepegel so eingestellt haben, dass bei der ruhigen
Einleitung die Aussteuerungsanzeigen der Software den roten Bereich nicht erreichen, passiert es bei den
lauteren Stellen im Song, dass die Aussteuerung im roten Bereich ist und das Audiosignal übersteuert,
wobei es zu unschönen Verzerrungen im Signal kommt. Wir empfehlen deshalb, nach einer kauten Stelle im
Titel zu suchen und nach ihr die Aufnahmelautstärke einzustellen. Dadurch wird gewährleistet, dass die
gesamte Aufnahme einwandfrei und ohne Verzerrungen durchgeführt wird.
5. USB ANSCHLUSS – Das ist der USB-Ausgang zu Ihrem Computer. Verwenden Sie bitte das
mitgelieferte USB Kabel zur Verbindung dieses Ausgangs mit einem freien USB Port an Ihrem
Computer. Die rechteckige Seite des Kabels sollte in den USB Recorder gesteckt werden. Die
Flache Seite des USB Kabels kommt in den USB Port Ihres Computers. Der USB Recorder
funktioniert nach dem Plug-and-Play Prinzip – es müssen keine Treiber installiert werden und das
Gerät sollte sofort nach der Verbindung mit dem Computer einsatzbereit sein.
23
Page 24
FEHLERHILFE
PROBLEM URSACHE LÖSUNG
Verwenden Sie einen Verstärker mit Erdungspin.
Verwenden Sie einen Verstärker mit einem
“Ground Lift” Schalter und aktivieren Sie diesen.
Probieren Sie eine DI-Box mit “Ground Lift“
Schalter zwischen den Ausgängen des
Computers und Ihrem Audioverstärker aus.
Schließen Sie den Computer an eine Steckdose
eines anderen Stromkreises an.
Lassen Sie den Laptop über die Batterien mit
Strom versorgen (beachten Sie dabei die
verminderte Aufnahmezeit).
Schließen Sie Ihr Laptop an eine Steckdose mit
separater Erdung von anderen Audiogeräten an.
Bei der Verwendung eines Plattenspielers mit
Linepegel muss der Phono | Line Schalter auf
‘Line’ stehen, damit das Audiosignal nicht
verzerrt.
Drehen Sie den Recording Level Regler
herunter.
In Windows 7, gehen Sie auf Start Menü
Systemsteuerung Hardware und Sound
Sound. Klicken Sie auf den Reiter Aufnahme.
Kicken Sie Eigenschaften in der rechten unteren
Ecke. Klicken Sie auf den Reiter Pegels und
setzen Sie den Schieberegler bis 4.
Bei der Aufnahme und
der Wiedergabe von
Schallplatten über
meinen Laptop höre
ich Brummen und
einen hochfrequenten
Ton.
Das Audiosignal vom
Plattenspieler ist zu
laut und verzerrt.
Einige Laptops erzeugen
Brummschleifen und
Einstreuungen. Diese
Geräusche können auf Ihr
USB Audiogerät
übertragen werden,
wodurch es zu einem
gestörten USB
Audioausgang kommt.
Der Phono | Line
Schalter steht auf der
falschen Position.
Der Aufnahmepegel
(Recording Level) ist zu
hoch eingestellt.
24
Page 25
PROBLEM URSACHE LÖSUNG
Falls Sie einen Plattenspieler verwenden, der
einen Phonopegel ausgibt, muss der Phono |
Line auf ‘Phono’ stehen.
Drehen Sie den Recording Level Regler
herunter.
Verwenden Sie das mitgelieferte USB Kabel, um
den USB Recorder an den USB Port Ihres
Computers anzuschließen.
Schließen Sie den USB Recorder an einen
anderen USB Port Ihres Computers an.
Einige USB Hubs stellen nicht genügend
Spannung bereit, um den USB Recorder mit
ausreichend Strom versorgen zu können. In
diesem Fall sollten Sie den USB Recorder direkt
mit dem Computer verbinden.
In Vista müssen Sie möglicherweise für den
Aufnahmeeingang den Stereo-Mode manuell
auswählen. Gehen Sie auf Start
Systemsteuerung Sound (in der klassischen
Ansicht). Klicken Sie dann auf den Aufnahme
Tab und wählen Sie den Mikrofon Eingang (USB
Audio Codec) an. Klicken Sie auf Eigenschaften..
Klicken Sie dann auf den Erweitert Tab und
wählen Sie “2 Kanal, 16 Bit, 44100 Hz (CD
Qualität)” im Standardformat Aufklappmenü aus.
Drücken Sie dann auf Übernehmen, um die
Änderung zu bestätigen.
Das Signal des
Plattenspielers kann
gerade so gehört
werden.
Ich höre kein Signal,
wenn ich Musik vom
Plattenspieler
wiedergebe.
Unter Windows Vista
sind meine
Aufnahmen nur in
Mono anstatt in
Stereo.
Der Phono | Line
Schalter steht auf der
falschen Position.
Der Aufnahmepegel
(Recording Level) ist zu
gering.
Der USB Recorder ist
nicht am Computer
abgeschlossen.
Defekter USB Port am
Computer.
Defektes USB Kabel. Probieren Sie ein anderes USB Kabel aus.
Das Problem wird durch
einen verwendeten USB
Hub verursacht.
Aufnahmeeinstellungen in
Vista stehen nicht auf
“Stereo”.
25
Page 26

OFT GESTELLTE FRAGEN
Zusätzliche Informationen zu Ihrem Produkt erhalten Sie beim Lesen der Antworten auf Fragen, die wir oft
gestellt bekommen.
Frage: Mit welchen Computer-Betriebssystemen ist der USB Recorder kompatibel?
Antwort: Die Hardware USB Recorder ist mit Windows XP, Vista, 7 und Mac OS X kompatibel. Die EZ Vinyl Converter
Software ist mit Windows XP und Vista kompatibel. Die EZ Audio Converter Software ist mit Mac OS X
kompatibel.
Frage: Muss ich für den Betrieb des USB Recorders Treiber oder Spezialsoftware auf meinem Computer installieren?
Antwort: Der USB Recorder erfüllt den Class-Compliant Standard und kann sofort nach der Verbindung mit dem USB
Port des Computers verwendet werden. Um Audioaufnahmen durchführen zu können, müssen Sie jedoch die
mitgelieferte Software installieren.
Frage: Benötigt der USB Recorder ein Netzteil?
Antwort: Nein, der USB Recorder wird über die USB Verbindung mit Strom versorgt.
Frage: Kann ich auch Audiosignale von anderen Geräten, wie Kassettendecks, CDs oder MP3-Playern aufnehmen?
Antwort: Sicher! Sie können Audiosignale von fast jeder Quelle aufnehmen. Verbinden Sie die Ausgänge der
Audioquelle mit den RCA Eingängen des USB Recorders. Meistens sollten Sie den Phono | Line Schalter auf
die Line Position stellen.
Frage: Kann ich auch andere Programme mit dem USB Recorder verwenden?
Antwort: Wir empfehlen Ihnen, die auf CD mitgelieferte Software zu verwenden, wenn Sie Ihre Musik aufnehmen
wollen. Sie können aber den USB Recorder mit fast allen Programmen, die Audio von einem externen
Eingang aufnehmen können einsetzen. In diesen Programmen erscheint der USB Recorder als “USB Audio
Codec”. Weitere Informationen erhalten Sie in der Dokumentation des jeweiligen Softwareprogramms.
KONTAKT
Bitte besuchen Sie von Zeit zu Zeit die Ion Audio Webseite (www.ionaudio.de), um Neuigkeiten,
Zusatzinformationen und Produktupdates zu erhalten.
www.ionaudio.com/urecord
www.ionaudio.com/ezvc
26
Page 27

INTRODUZIONE
Benvenuti in U RECORD, il modo più semplice e veloce di trasferire i vostri dischi in vinile al computer.
Una volta registrato il vinile, si possono masterizzare CD musicali o perfino caricare i vostri dischi
preferiti su lettori portatili!
Il sistema U RECORD è composto dal dispositivo USB Recorder e dal software allegato per il
computer. Se siete un utente alle prime armi e state cercando il modo più veloce di registrare i vostri
vinili, la soluzione migliore è l’EZ Vinyl Converter (PC) o l’EZ Audio Converter (Mac). Questi applicativi
sono estremamente facili da usare e abbiamo allegato un comodo manuale (vedi la guida del software
EZ Vinyl/Tape Converter) che vi accompagni lungo tutti i passaggi necessari.
Leggere attentamente il presente manuale per informazioni sull’USB Recorder e su come collegarlo al
giradischi e al computer. Una volta familiarizzato con la procedura di collegamento e con le
caratteristiche del dispositivo, inserire il CD in dotazione nel lettore CD-ROM del computer e installare
l’applicazione software più adatta alle vostre necessità. Fare riferimento ai manuali dei software inclusi
sul CD per maggiori informazioni circa l’uso dei software stessi. Ci auguriamo di cuore che possiate
trarre il meglio da questo fantastico prodotto!
CONTENUTI DELLA CONFEZIONE
Assicurarsi che i seguenti elementi siano presenti nella confezione. Prima di utilizzare il prodotto,
leggere attentamente le informazioni di sicurezza e la garanzia.
• Registratore USB
• Cavo USB
• CD recante il software
• Guida rapida U RECORD
27
Page 28

SCHEMA DEI COLLEGAMENTI E CARATTERISTICHE
DEL PANNELLO SUPERIORE
Si prega di fare riferimento al seguente elenco di caratteristiche:
1. INGRESSO RCA STEREO –
Collegare il giradischi a livello
di questo ingresso RCA stereo.
2. CONNETTORE DI TERRA –
Se il giradischi è dotato di un
cavo di terra, collegarlo a
questo terminale allentandolo,
inserendo il cavo di terra del
giradischi e stringendolo
nuovamente in modo che il
cavo di terra stesso sia ben
fissato al terminale. Se il
giradischi è dotato di un cavo
di terra, ma questo non viene
collegato all‘apposito
terminale, al momento di
utilizzare questo prodotto si
possono verificare effetti di
“brusio” o di “ronzio”!
Suggerimento: la maggior parte
dei vecchi giradischi avrà un cavo
di terra da collegare al terminale
di messa a terra. Alcuni
giradischi di nuova generazione
avranno il cavo di messa a terra
incorporato nel collegamento
RCA, dunque non va collegato
nulla al terminale di messa a
terra.
28
Page 29

3. INTERRUTTORE PHONO | LINE – Questo interruttore va impostato in base al segnale audio
emesso dal giradischi. La maggior parte dei vecchi giradischi emettono un segnale audio debole,
noto come segnale a livello Phono, che deve essere amplificato per poter essere sentito. In questo
caso, l’interruttore va impostato su “PHONO”. Alcuni giradischi moderni sono in grado di emettere
un segnale più forte, noto come segnale a livello di linea. In questo caso, l’interruttore va impostato
su “LINE”.
Suggerimento: se il livello audio è molto basso quando si riproduce il disco, è possibile che si stia
utilizzando un giradischi a livello phono, ma che l’interruttore sia impostato per errore su “LINE”: se questo è
il caso, spostarlo su “PHONO”. Se invece l'audio dovesse suonare estremamente forte, distorto e fastidioso,
è possibile che si stia utilizzando un giradischi a livello di linea, ma che l’interruttore sia impostato per errore
su “PHONO”: se questo è il caso, spostarlo su “LINE”.
4. MANOPOLA RECORDING LEVEL – Utilizzare questa manopola per regolare il volume della
registrazione. Mentre si registra il vinile, prestare attenzione a non registrare un segnale troppo forte
o “caldo”: questo potrebbe provocare spiacevoli distorsioni nelle registrazioni. Servirsi di questa
manopola per regolare il volume in modo che i misuratori audio dell’applicazione di registrazione
non entrino mai nell’area rossa.
Suggerimento: molte canzono presentano introduzioni silenziose che potrebbero essere fuorvianti al
momenti di determinare il livello di registrazione ottimale. Ad esempio, il livello di registrazione può essere
stato impostato in modo da non toccare mai l'area rossa dei misuratori del software durante l'introduzione di
una canzone. Tuttavia, quando una parte di canzone più forte inizia a suonare, i misuratori toccano il rosso
e iniziano a tagliare il segnale audio, e il risultato è un audio distorto. Prima di iniziare la registrazione, si
raccomanda di cercare un punto in cui il livello dell’audio nella canzone è elevato e di regolare il livello di
registrazione su di esso, in modo tale che i misuratori non tocchino mai il rosso. Così facendo, l’intera
registrazione risulterà liscia e chiara, senza distorsioni.
5. PORTA USB – Questo è il collegamento al computer. Servirsi del cavo USB incluso per collegare
questa porta ad una porta USB disponibile sul computer. Il capo squadrato del cavo va collegato
all’USB Recorder, mentre quello piatto va collegato al computer. L’USB Recorder è un dispositivo
plug-and-play, dunque non sono necessari speciali driver o software: è pronto all’uso non appena
viene collegato al computer.
29
Page 30

RISOLUZIONE DI PROBLEMI
PROBLEMA CAUSA SOLUZIONE
Provare un amplificatore con una spina senza
messa a terra.
Provare un amplificatore con un interruttore
“Ground Lift” e inserirlo.
Provare una “Direct Box” (o una “Direct Injection”
box) dotata di interruttore ground lift tra l’uscita
audio del computer e l’amp.
Durante la registrazione
e l’ascolto dei miei vinili
sul mio computer
portatile si verificano
ronzii o un toni acuti.
Alcuni modelli di computer
portatili generano elevate
quantità di rumori di fondo.
Questi possono passare nel
dispositivo audio USB e causare
rumore a livello delle uscite
audio.
Provare a collegare il portatile ad una presa di
alimentazione diversa.
Servirsi del portatile con le batterie (soluzione non
adatta a un uso estensivo).
Servirsi di un adattatore da 3 a 2 denti per
l’alimentazione del portatile, in modo che la messa
a terra del portatile non sia collegata alla presa
dell’alimentazione di rete. Contattare il produttore
del portatile in caso di dubbi relativi alla sicurezza,
prima di fare questo.
Inserire il portatile in una presa di alimentazione
dotata di una messa a terra distinta (quale una
messa a terra a massa) da quella degli altri
dispositivi audio.
30
Page 31

PROBLEMA CAUSA SOLUZIONE
Se si utilizza un giradischi a livello di linea,
assicurarsi che Phono | Line sia impostato su
“Line” per evitare distorsioni dell’audio.
Abbassare la manopola Recording Level.
In Windows 7, recarsi su Start Pannello di
controllo Hardware e Audio Audio.
Cliccare sulla linguetta Registrazione. Cliccare su
Proprietà nell'angolo inferiore destro. Cliccare sulla
linguetta Livelli e impostare il cursore su 4.
Se si utilizza un giradischi a livello phono,
assicurarsi che Phono | Line sia impostato su
“Phono”.
Alzare la manopola Recording Level.
Servirsi del cavo USB in dotazione per collegare
l’USB Recorder alla porta USB del computer.
Provare a collegare l’USB Recorder ad una porta
USB alternativa.
Alcuni hub non forniscono energia sufficiente ad
alimentare correttamente l’USB Recorder. In caso
di problemi durante l’uso di un hub, scollegare
l’hub e collegare l’USB Recorder direttamente alla
porta USB del computer.
In Vista, va specificato “stereo” per l’ingresso di
registrazione. Recarsi su Start Pannello di
controllo Suono (in Visuale Classica). Quindi,
cliccare sulla linguetta Registrazione ed
evidenziare l’ingresso Microfono (USB Audio
Codec). Cliccare su Proprietà per richiamare le
impostazioni di ingresso. Quindi, cliccare sulla
linguetta Avanzate e selezionare “2 canali, 16 bit,
44100 Hz (qualità CD)” nel menu a tendina
Formato predefinito. Infine, cliccare su Applica per
accettare le impostazioni.
L’audio proveniente dal
giradischi è troppo
elevato e distorto.
L’audio proveniente dal
giradischi è a malapena
udibile.
Non si sente alcun audio
quando si riproduce
musica dal giradischi.
Su Windows Vista, le
mie registrazioni sono
mono anziché stereo.
L’interruttore Phono | Line è
impostato in maniera scorretta.
Il livello di registrazione è
configurato eccessivamente
alto.
L’interruttore Phono | Line è
impostato in maniera scorretta.
Il livello di registrazione è
configurato eccessivamente
basso.
L’USB Recorder non è collegato
al computer.
Porta USB del computer non
funzionante.
Cavo USB non funzionante. Provare a utilizzare un cavo USB diverso.
Il problema è causato dall’uso di
un hub USB.
Le proprietà di ingresso di
registrazione in Vista non sono
impostate su “stereo”.
31
Page 32
DOMANDE FREQUENTI (FAQ)
Per ulteriori informazioni, fare riferimento al seguente elenco di domande frequenti:
Domanda: Con quali sistemi operativi è compatibile l’USB Recorder?
Risposta: L’hardware USB Recorder è compatibile con Windows XP, Vista, 7 e Mac OS X. Il software EZ Vinyl
Domanda: Devo installare driver o software particolari per l’USB Recorder?
Risposta: L’USB Recorder è compatibile con il computer ed è pronto all’uso non appena viene collegato alla porta
Domanda: Occorre un adattatore per alimentare l’USB Recorder?
Risposta: No, l’USB Recorder è alimentato tramite la porta USB.
Domanda: Posso registrare audio da altri dispositivi quali lettori di nastri, CD o media?
Risposta: Naturalmente! Si può registrare audio praticamente da qualsiasi fonte. Servirsi del giusto cavo per
Domanda: Posso servirmi di pacchetti software di terzi con l’USB Recorder?
Risposta: Si raccomanda vivamente di servirsi del software incluso nel CD per registrare la propria musica. Tuttavia,
CONTATTI
Recarsi regolarmente sul sito Internet di Ion Audio (www.ionaudio.com) per ottenere maggiori informazioni,
novità e aggiornamenti.
Converter è compatibile con Windows XP e Vista. Il software EZ Audio Converter è compatibile con Mac
OS X.
USB del computer. Tuttavia, dovete installare una delle due applicazioni software audio fornite per
sfruttare la registrazione audio.
collegare il dispositivo agli ingressi RCA dell’USB Recorder. Nella maggior parte dei casi, bisognerà
impostare l’interruttore Phono | Linea su Linea.
si può utilizzare l’USB Recorder con quasi tutti gli applicativi che vi permettono di registrare audio da un
ingresso esterno. Nella maggior parte degli applicativi software, l’USB Recorder verrà etichettato “Codec
Audio USB”. Per ulteriori informazioni, consultare la documentazione del software.
www.ionaudio.com/urecord
www.ionaudio.com/ezvc
32
Page 33
INTRODUCTIE
Welkom bij U RECORD – de snelste en gemakkelijkste manier om uw platen over te zetten
naar uw PC. Nadat de platen opgenomen zijn kunnen muziek-CD's gebrand worden of kunt u
uw favoriete platen op uw draagbare mediaspeler laden!
Het U RECORD-systeem bestaat uit het USB-opnameapparaat (verder: USB-recorder) met
bijbehorende software voor uw PC. Wanneer u een beginnend gebruiker bent en op zoek bent
naar de snelste manier om uw platen op te nemen, kunt u de EZ Vinyl Converter- (voor PC) of
EZ Audio Converter- (voor Mac) software gebruiken. Deze toepassingen zijn zeer
gebruikersvriendelijk en er wordt een praktische handleiding meegeleverd (raadpleeg de EZ
Vinyl/Tape Converter-softwaregids) om u door de benodigde stappen te leiden.
Lees deze handleiding voor informatie over de USB-recorder en het aansluiten ervan op uw
platenspeler en PC. Wanneer u vertrouwd bent met de aansluitprocedure en de mogelijkheden
van het apparaat, plaatst u de bijgeleverde CD in het CD-ROM-station van uw PC en installeert
de softwaretoepassing die het meest geschikt is. Raadpleeg de op de CD meegeleverde
softwarehandleidingen voor informatie over de werking van de software. We hopen dat u zult
genieten van dit fantastische product!
INHOUD VERPAKKING
Controleer of de volgende onderdelen in de verpakking aanwezig zijn. Lees voor het gebruik
van dit product de Veiligheids- en garantie-informatie.
• USB-recorder
• USB-kabel
• Software-CD
• U RECORD Snelstartgids
33
Page 34
AANSLUITDIAGRAM EN FUNCTIES BOVENPANEEL
Raadpleeg de volgende lijst van functies:
1. STEREO RCA-INGANG – Sluit
uw platenspeler aan op deze
RCA-ingang.
2. AARDCONNECTOR – Als uw
platenspeler een aarddraad
heeft, sluit deze dan aan op dit
aansluitpunt door het punt los
te draaien, de aarddraad van
de platenspeler erin te plaatsen
en het aansluitpunt weer aan te
draaien om de aarddraad op
het aansluitpunt te bevestigen.
Als uw platenspeler een
aarddraad heeft die niet aangesloten is op het aansluitpunt
voor aarding bij gebruik van dit
product, kan dit leiden tot een
"zoemend" of "brommend"
effect!
Tip: De meeste oude platenspelers
hebben een aarddraad die
aangesloten moet worden op het
aansluitpunt voor aarding. Sommige
nieuwe platenspelers hebben een in
de RCA-aansluiting ingebouwde
aarddraad, waardoor deze niet
aangesloten hoeft te worden op het
aansluitpunt voor aarding.
34
Page 35
3. SCHAKELAAR PHONO | LINE – Deze schakelaar dient, afhankelijk van het audiosignaal
van uw platenspeler, ingesteld te worden. De meeste oude platenspelers verzorgen een
zwak audiosignaal, bekend als signaal van Phono-niveau, dat versterkt moet worden om gehoord te worden. In dit geval dient de schakelaar ingesteld te worden op "PHONO".
Sommige moderne platenspelers hebben de mogelijkheid een luider signaal te produceren,
dat bekend is als een signaal van Lijnniveau. In dit geval dient de schakelaar ingesteld te
worden op "LINE".
Tip: Wanneer het geluidsniveau laag is bij het afspelen van uw platen, is het mogelijk dat u een platenspeler
van Phono-niveau gebruikt maar dat de schakelaar verkeerd is ingesteld op "LINE" – als dit het geval is,
schakel dan naar "PHONO". Het kan ook zo zijn dat het geluid van uw platenspeler hard en vervormd is en
niet goed klinkt; dan is het mogelijk dat u een platenspeler van LINE-niveau hebt maar dat de schakelaar is
ingesteld op "PHONO" – als dit het geval is, schakel dan naar "LINE".
4. KNOP VOOR OPNAMENIVEAU – Deze knop kan worden gebruikt voor het aanpassen van
het volume van de opname. Wees bij het opnemen van uw platen voorzichtig met het opnemen op een te luid of "hot" signaal – dit kan leiden tot onprettige vervorming in de opnamen.
Gebruik deze knop om het volume aan te passen zodat de meters voor geluidsniveau in de
toepassing voor opname nooit in het rood komen.
Tip: Veel titels hebben een zachte intro die vaak misleidend kan zijn bij het vaststellen van het optimale
opnameniveau. U kunt het opnameniveau bijvoorbeeld zo ingesteld hebben dat de niveaumeters in de
software bij de intro van een liedje niet in het rood komen. Wanneer hierna een luider gedeelte van het
nummer wordt afgespeeld, komen de meters in het rood waarbij het audiosignaal wordt "geknipt", wat leidt
tot vervormd geluid. We raden u aan om, voor het begin van de feitelijke opname, een luid moment in de
muziek op te zoeken en het opnameniveau hierop aan te passen zodat de meters niet in het rood komen.
Hierdoor zal uw gehele opname goed klinken, zonder vervorming.
5. USB-AANSLUITING – Dit is de aansluiting naar uw PC. Gebruik de meegeleverde USB-
kabel om deze poort aan te sluiten op een beschikbare USB-poort op uw PC. Het vierkante
uiteinde van de kabel dient aangesloten te worden op de USB-recorder, het platte uiteinde
van de kabel wordt aangesloten op uw PC. De USB-recorder is een plug-en-play-apparaat,
dus er zijn geen speciale stuurprogramma's of software nodig – het apparaat moet direct na
inpluggen in uw PC klaar zijn voor gebruik.
35
Page 36

PROBLEEMOPLOSSING
PROBLEEM OORZAAK OPLOSSING
Probeer een versterker met ongeaarde stekker.
Probeer een versterker met een "ground-lift"schakelaar, en schakel deze in.
Probeer een "Direct Box" (of "Direct Injection"-box)
met ground-liftschakelaars tussen de audio-output
van de PC en de versterker.
Sluit de laptop aan op een ander stopcontact.
Laat de laptop op de accu werken (niet praktisch
voor langere tijd).
Gebruik een 3-naar-2-polige adapter voor de voeding van de laptop zodat de aarding van de laptop
niet is aangesloten op het elektriciteitsnetwerk.
Neem, voor u dit doet, contact op met de leverancier van uw PC voor veiligheidsaangelegenheden.
Sluit de laptop aan op een stopcontact met
gescheiden aarding van de andere
audioapparatuur.
Bij gebruik van een platenspeler van Line-niveau
dient schakelaar Phono | Line ingesteld te worden
op "Line" om vervorming van geluid te voorkomen.
Draai knop Recording Level naar een lager
niveau.
In Windows 7, gehen Sie auf Start Menü
Systemsteuerung Hardware und Sound
Sound. Klicken Sie auf den Reiter Aufnahme und
wählen Sie USB Audio Codec* als Standardgerät.
Klicken Sie Eigenschaften in der rechten unteren
Ecke. Klicken Sie auf den Reiter Pegels und setzen
Sie den Schieberegler bis 4.
Er is sprake van een brom of hoge
toon bij opnemen van en luisteren
naar platen op een laptop.
Het geluid van de platenspeler is
te hard en vervormd.
Bepaalde modellen
laptops genereren grote
hoeveelheden aardruis.
Deze ruis kan in uw USBgeluidsapparaat lekken en
zo ruis in de audio-output
veroorzaken.
Schakelaar Phono | Line
is niet goed ingesteld.
Recording Level
(Opnameniveau) is te
hoog ingesteld.
36
Page 37

PROBLEEM OORZAAK OPLOSSING
Bij gebruik van een platenspeler van Phone-niveau
dient schakelaar Phono | Line ingesteld te worden
op ‘Phono’.
Draai knop Recording Level naar een hoger
niveau.
Gebruik de meegeleverde USB-kabel voor het
aansluiten van de USB-recorder op de USB-poort
van de PC.
Probeer de USB-recorder op een andere USBpoort aan te sluiten.
Sommige hubs leveren niet voldoende stroom om
de Express DJ audio-interface correct van stroom
te voorzien. Bij problemen met het gebruik van een
hub koppelt u de hub los en sluit de audiointerface direct aan op de USB-poort van de PC.
In Vista kan het nodig zijn handmatig "stereo" te
selecteren voor opnemen.
Ga naar Start Configuratiescherm Geluid
(in Klassieke weergave). Klik dan op tab
Opnemen en kies Microfoon-ingang (USB Audio
Codec). Klik op Eigenschappen om de
ingangsinstellingen te tonen. Klik hierna op tab
Geavanceerd en selecteer “2 kanalen, 16 bit,
44100 Hz (CD-kwaliteit)” in het keuzemenu
Standaard opmaak. Als laatste klikt u op
Toepassen om de instellingen te bevestigen.
Het geluid van de platenspeler
is nauwelijks te horen.
Bij het afspelen van muziek
vanaf de platenspeler is er geen
geluid te horen.
Onder Windows Vista zijn mijn
opnamen mono in plaats van
stereo.
Phono | Line-schakelaar niet goed ingesteld.
Recording Level
(Opnameniveau) te laag
ingesteld.
De USB-recorder is niet
aangesloten op de PC.
Slechte USB-poort PC.
Slechte USB-kabel. Probeer een andere USB-kabel.
Probleem wordt
veroorzaakt door gebruik
van een USB-hub.
Ingangseigenschappen
voor opname onder
Vista zijn niet ingesteld
op “stereo”.
37
Page 38

VEELGESTELDE VRAGEN
Raadpleeg de volgende lijst met veelgestelde vragen voor meer informatie.
Vraag: Met welke besturingssystemen is de USB-recorder compatibel?
Antwoord: De hardware USB-recorder is compatibel met Windows XP, Vista, 7 en Mac OS X. De EZ Vinyl Converter-
Vraag: Is het nodig stuurprogramma's of speciale software te installeren voor de USB-recorder?
Antwoord: De USB-recorder is klasse-compliant en is klaar voor gebruik zodra deze in de USB-poort van uw PC
Vraag: Heb ik een adapter nodig om de USB-recorder van stroom te voorzien?
Antwoord: Nee, de USB-recorder wordt via de USB-aansluiting van stroom voorzien.
Vraag: Kan ik geluid opnemen vanaf andere apparaten, zoals cassettes, CD of mediaspelers?
Antwoord: Absoluut! U kunt geluid opnemen vanaf vrijwel elke bron. Gebruik gewoon de juiste kabel om het apparaat
Vraag: Kan ik andere software gebruiken met de USB-recorder?
Antwoord: We raden u ten zeerste aan de op de CD meegeleverde software te gebruiken voor het opnemen van uw
software is compatibel met Windows XP en Vista. De EZ Audio Converter-software is compatibel met Mac
OS X.
geplugd wordt. U dient echter wel één van de meegeleverde audio-softwaretoepassingen te installeren om
gebruik te kunnen maken van de functionaliteit voor het opnemen van geluid.
aan te sluiten op de RCA-ingangen van de USB-recorder. In de meeste gevallen dient de schakelaar
Phono | Line naar Line geschakeld te worden.
muziek. U kunt de USB-recorder echter gebruiken met vrijwel elke toepassing waarmee u geluid kunt
opnemen vanaf een externe ingang. In de meeste toepassingen zal de USB-recorder aangemerkt worden
als "USB Audio Codec". Voor meer informatie kunt u de documentatie van de software raadplegen.
CONTACTINFORMATIE
Bezoek de website van Ion Audio (www.ionaudio.com) regelmatig voor aanvullende informatie,
nieuws en updates.
www.ionaudio.com/urecord
www.ionaudio.com/ezvc
38
Page 39

Page 40

www.ionaudio.com
MANUAL VERSION 1.6
 Loading...