

Page 1
USB Turntable
(ION TTUSB05)
Quick Start Owner’s Manual (ENGLISH)
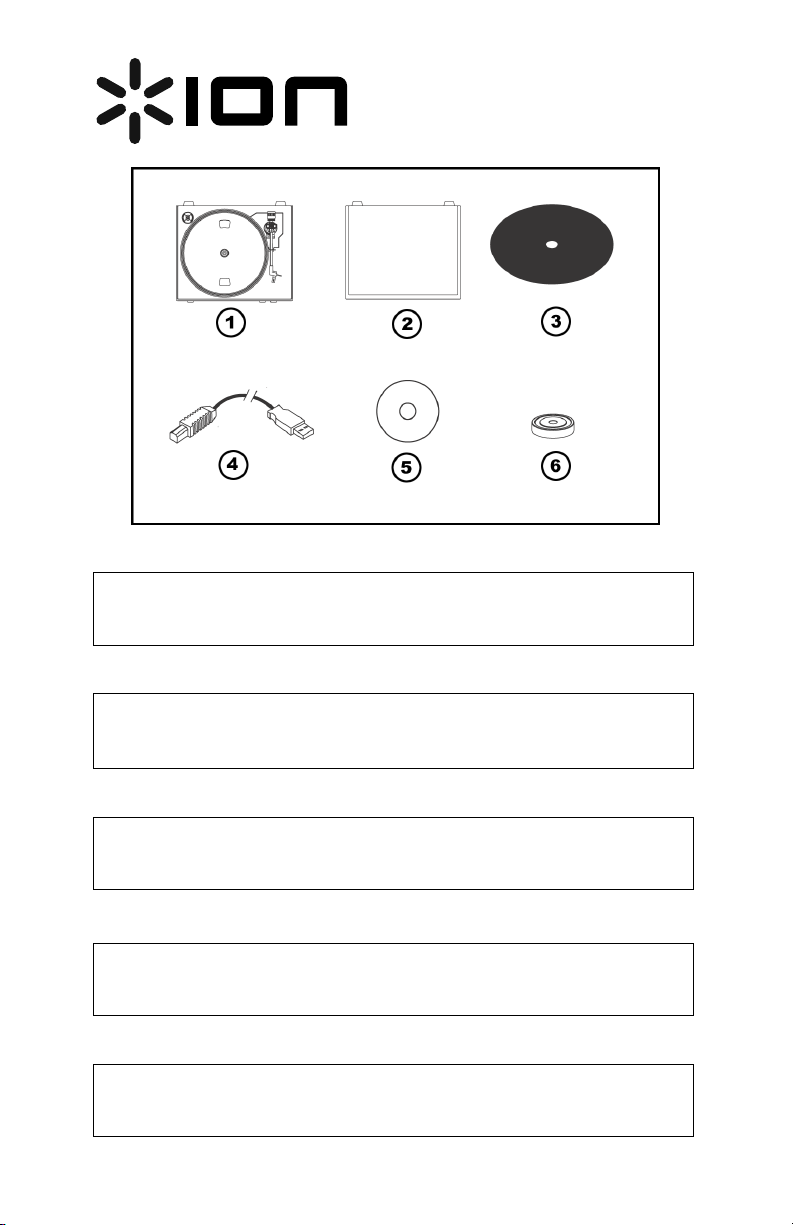
Box Contents:
Manual de inicio rápido para el usuario (ESPAÑOL)
Contenido de la caja:
Kurzbedienungsanleitung
Inhalt der Verpackung:
Guide d’utilisation rapide (FRANÇAIS)
Contenu de la boîte :
Manuale Rapido di Utilizzazione (ITALIANO)
Contenuti della confezione:
1. ION TTUSB05 Turntable
2. Dust Cover
3. Grip Mat
4. USB Cable
5. CD
6. 45RPM Adapter
1. Giradiscos ION TTUSB05
2. Cubierta antipolvo
3. Alfombrilla
4. Cable USB
5. CD
6. Adaptador para 45 RPM
1. ION TTUSB05 Turntable
2. Staubabdeckhaube
3. Matte für den Plattenteller
4. USB Kabel
5. CD
6. 45RPM Adapter
1. Tourne-disque ION TTUSB05
2. Couvercle anti-poussière
3. Tapis
4. Câble USB
5. Disque compact
6. Adaptateur 45 t/min
1. Giradischi ION TTUSB05
2. Coperchio antipolvere
3. Tappetino
4. Cavo USB
5. CD
6. Adattatore 45 giri
(DEUTSCH)
Page 2
o Make sure all items listed on the front of this guide are included in the box.
(ENGLISH) QUICK START GUIDE
o READ SAFETY INSTRUCTION BOOKLET BEFORE USING THE PRODUCT
o Go to http://www.ion-audio.com for product registration.
INTRODUCTION
The USB turntable connects directly to your computer to turn your treasured vinyl recordings into digital
music. We have included two software packages to aid you in converting your vinyl recordings:
EZ Vinyl Converter (PC only) is the quickest and easiest way to turn your recordings into digital
media. EZ Vinyl Converter conveniently saves your recordings in your iTunes library. Novice users
may find this application preferable. We have included a handy Quickstart Guide with step-by-step
instructions on software installation and operation.
Audacity (PC and Mac) is intended for the advanced user. This application allows for advanced audio
editing and processing, such as normalization, noise removal, 78 RPM speed conversion, and
automatic track separation. The Audacity Software Guide can be found on the included CDs – please
refer to this guide as you are working with Audacity.
To install the software: simply insert the included CD into your computer and follow the on-screen
instructions. After you finish converting your vinyl, you can then burn to CD or load onto portable media
devices.
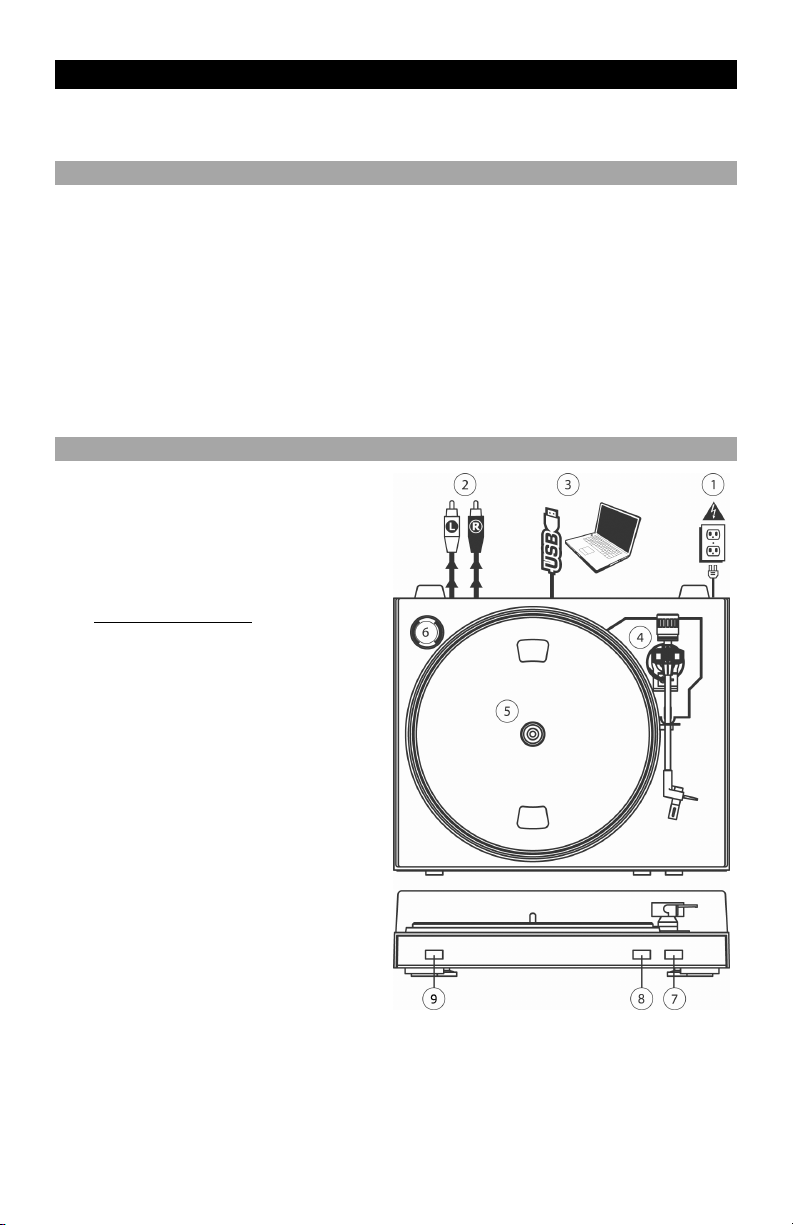
GENERAL CONTROLS
1. Power Cable: This power cable should be
plugged into a wall receptacle AFTER all
audio connections are made.
2. RCA Audio Output Cables: These cables
should be plugged into a CD or Auxiliary
LINE input. This output should be connected
to your receiver, home stereo, or other
speaker system.
IMPORTANT WARNING
are LINE level. Please only connect these
cables to LINE level inputs. You may
damage your receiver if you plug in a
LINE level into a PHONO input.
3. USB Audio Output: Use the included USB
Cable to connect your turntable to your
computer. For transferring your vinyl records
to your computer, we have provided two
different software packages on the included
CD. EZ Vinyl Converter is the easiest and
quickest way to transfer your vinyl records
and should be used if you are a beginner.
Alternatively, if you are an advanced user
you may wish to install and use the Audacity
software, which allows you to take
advantage of advanced audio editing
features, such as audio normalization, noise
removal and automatic track separation.
4. Tonearm: The tonearm can be raised and
lowered by hand, or by pressing the
Raise/Lower button.
5. Platter: Put the record you would like to play
on this platter.
6. 45 RPM Adapter Holder: Holds the included
45 RPM adapter. When not using the adapter, please place it in this holder.
7. Raise/Lower Button: Press this button in to raise the tonearm. To lower the tonearm, press this
button so it is in the out position.
8. Stop: Press this button to stop playback. When this button is pressed, the tonearm will return back to
its original resting position.
9. Speed 33/45 RPM: This button controls the playback speed of the record. Depending on what kind of
record you are playing, you will need to adjust the speed to match the speed of the record (or else the
music might sound too slow or too fast).
: The RCA cables
Page 3

ATTACHING THE DRIVE BELT
The ION TTUSB05
platter is driven by a
rubber drive belt attached
to the turntable motor. In
some rare cases, this belt
may slip off, causing the
turntable platter to stop
spinning. If the turntable
does not begin spinning
when you lower the tonearm, the most likely cause is the belt. Please follow the instructions below in order
to properly re-attach the belt to the motor and the platter.
1. Begin by removing the clip which secures the platter to the center spindle. After you have removed the
clip, remove the platter.
2. Turn the platter upside down. Place the rubber drive belt around the inner bottom ring of the turntable
platter, making sure that the rubber belt is not twisted.
3. Place the platter back onto the center spindle and rotate it so that you can see the motor spindle
through the hole on the platter. Now reach into the hole, pull the rubber drive belt off the inner ring and
install it over the motor spindle, as shown in the illustration. Be careful not to twist the belt during this
step.
4. Lastly, replace the clip onto the center spindle to secure the platter
IMPORTANT
Make sure that the rubber grip mat is always placed on top of the platter while using the turntable. Failure to
use the grip mat may cause damage to your media as well as damage to the turntable.
Remove the plastic cartridge cover (needle cover) before operating the turntable.
CONVERTING YOUR 78RPM VINYL
To convert your 78RPM records, you will need to install and use the Audacity application. This application can be
found on the CD included in the box. Please install Audacity and follow the instructions below to record your
78RPMs. For Audacity troubleshooting, refer to the Audacity Software Guide included on the CD.
Note: When performing high speed dubbing, there is a potential of quality loss with your converted 78RPM music.
1. Connect your turntable to your computer’s USB port.
2. Open Audacity.
3. In Audacity, go to EDIT -> PREFERENCES and set the Recording Device to ‘USB Audio Codec’ – this is your
4. Select your computer’s soundcard as the Playback Device. Note that the device name will vary from computer
5. Lastly, check ‘Software Playthrough’ so you can hear the music through your audio device while recording.
6. You are now ready to record. Press the RECORD button in Audacity to begin recording.
7. Play your 78RPM at 33 or 45RPM.
8. Once you have recorded the desired material, press STOP in Audacity.
9. Click on EDIT menu, then click on SELECT, then click on ALL (shortcut: “CTRL-A”).
10. Click on the EFFECT menu, click on CHANGE SPEED.
11. When the CHANGE SPEED box opens, you will see Standard Vinyl RPM selections. The “from” should be set
12. Click on PREVIEW to hear your recording converted to the correct speed of 78 RPM. Click on OK to finalize
13. Once you are finished, you can save your file by going to FILE -> EXPORT AS WAV. This will save the
14. Pick a destination on your computer, a name for your recording, and click SAVE.
15. The recording can now be found in the location where you saved it in the previous step.
USB turntable (select 2 channels to record in stereo).
to computer but should never be set to ‘Microsoft Sound Mapper’.
to 33 or 45 RPM (depending on the speed you selected on your turntable), and the “to” should be set to 78
RPM.
the conversion to 78 RPM.
recording as a .WAV audio file.
BEFORE RETURNING THE PRODUCT, please contact ION Audio or your retailer for technical support.
Contact information can be found in the Safety Instruction Booklet included with this product.
ION TTUSB05 Owner's Manual V6 - Page 1
Page 4
(ESPAÑOL) MANUAL DE COMIENZO RÁPIDO DEL LECTOR
1. Asegúrese de que todos los artículos incluidos al inicio de este manual están incluidos en la caja.
2. LEA LAS INSTRUCCIONES DEL FOLLETO DE SEGURIDAD ANTES DE UTILIZAR EL PRODUCTO.
3. Visite http://www.ion-audio.com para registrar el producto.
INTRODUCCIÓN
El giradiscos USB se conecta directamente a su computadora para convertir sus valiosos vinilos en música digital.
Hemos incluido dos paquetes de software para ayudarle a convertir sus grabaciones de vinilo:
EZ Vinyl Converter (PC solamente) es la forma más rápida y fácil de convertir las grabaciones en medios
digitales. Este software guarda convenientemente sus grabaciones en la biblioteca de iTunes. Es posible que
los usuarios novicios prefieran esta aplicación. Incluidos una práctica Guía de inicio rápido con instrucciones
paso a paso sobre la instalación y la operación del software.
Audacity (PC y Mac) está dirigido al usuario avanzado. Esta aplicación permite la edición y procesamiento
avanzados de audio, tales como la normalización, la remoción de ruido, la conversión de velocidad de discos
de 78 RPM y la separación automática de pistas. La Guía del software Audacity puede encontrarse en los CD
incluidos —consúltela cuando trabaje con Audacity.
Para instalar el software: inserte simplemente el CD incluido en la computadora y siga las instrucciones de la
pantalla. Después de terminar de convertir su vinilo, puede quemarlo en CD o cargarlo en dispositivos de medios
portátiles.
CONTROLES GENERALES
1. Cable de alimentación: Este cable de
alimentación se debe enchufar a un
tomacorriente en la pared DESPUÉS que se
hagan todas las conexiones de audio.
2. Cables RCA de salida de audio: Estos cables
se deben enchufar a una entrada de CD o de
LÍNEA auxiliar Esta salida se debe conectar a su
receptor, estéreo hogareño u otro sistema de
altavoces.
ADVERTENCIA IMPORTANTE
RCA son para nivel de LÍNEA. Conecte estos
cables sólo a las entradas de nivel de línea
(LINE). Puede dañar el receptor si enchufa un
nivel de línea en una entrada fonográfica.
3. Salida de audio USB: Use el cable USB
incluido para conectar su giradiscos a su
computadora. Para transferir sus discos de vinilo
a la computadora, proporcionamos dos paquetes
de software diferentes en el CD incluido. EZ
Vinyl Converter es la manera más rápida y
sencilla para transferir sus discos de vinilo y los
principiantes deben usar este software. En
cambio, es conveniente que el usuario avanzado
instale y use el software Audacity, que le permite
aprovechar las características avanzadas de
edición de audio, tales como normalización de
audio, remoción de ruido y separación
automática de pistas.
4. Brazo de lectura: El brazo de lectura se puede
subir y bajar a mano o presionando el botón
Subir/Bajar.
5. Plato: Coloque en este plato la grabación que
desea reproducir.
6. Soporte del adaptador para 45 rpm: Puede
colocar aquí el adaptador para 45 cuando no lo
usa.
7. Botón Subir/Bajar: Presione este botón hacia adentro para subir el brazo de lectura. Para bajarlo, presione
este botón de modo que quede en posición hacia afuera.
8. Parar: Pulse este botón para detener la reproducción. Cuando se pulsa este botón, el brazo de lectura vuelve
a su posición de reposo original.
9. Velocidad 33/45 RPM: Este botón controla la velocidad de reproducción de la grabación. Según el tipo de
grabación que reproduzca, necesitará ajustar la velocidad para hacerla coincidir con la velocidad del disco (de
lo contrario, la música puede sonar demasiado lenta o demasiado rápida).
: Los cables
ION TTUSB05 Owner's Manual V6 - Page 2
Page 5

CÓMO COLOCAR LA CORREA DE TRANSMISIÓN
El plato ION TTUSB05 es impulsado por una correa de transmisión de goma conectada al motor de giradiscos. En
algunos casos poco frecuentes, esta correa puede patinar, haciendo que el plato del giradiscos deje de girar. SI el
giradiscos no comienza a girar cuando usted baja el brazo, la causa más probable es la correa.
1. Comience por desmontar la grapa que asegura el plato al eje central. Después de desmontarla, retire el plato.
2. Coloque el plato boca abajo. Instale la correa de transmisión de goma alrededor del aro inferior interno del
plato, asegurándose de que no quede retorcida.
3. Coloque el plato nuevamente en el eje central y gírelo de modo que pueda ver el eje del motor a través del
orificio del plato. Acceda al orificio, tire de la correa para extraerla del aro interno e instálela sobre el eje del
motor, como se muestra en la ilustración. Tenga cuidado de no retorcer la correa durante este paso.
4. Finalmente, vuelva a instalar la grapa en el eje central para sujetar el plato.
CÓMO CONVERTIR SU VINILO DE 78 RPM
Para convertir sus discos de 78 RPM, es necesario que instale la aplicación Audacity. Esta aplicación se puede
encontrar en el CD incluido en la caja. Instale Audacity y siga las instrucciones de más abajo para grabar sus discos
de 78 RPM. Para solucionar los problemas de Audacity, consulte la Guía del software Audacity incluida en el CD.
Nota: al realizar el doblaje de alta velocidad, hay un potencial de la pérdida de la calidad con tu música
convertida 78RPM.
1. Conecte su giradiscos al puerto USB de la computadora.
2. Abra Audacity.
3. En Audacity, vaya a EDIT -> PREFERENCES (Editar > Preferencias) y configure Recording Device
(Dispositivo de grabación) como ‘USB Audio Codec’ (Códec de audio USB) —éste es su giradiscos USB
(seleccione 2 canales para grabar en estéreo).
4. Seleccione la tarjeta de sonido de la computadora como Playback Device (Dispositivo de reproducción).
Tenga en cuenta que el nombre del dispositivo varía según la computadora pero nunca debe configurarse
como ‘Microsoft Sound Mapper’.
5. Por último, marque ‘Software Playthrough’ (Reproducción pasante), de modo que pueda oír la música a través
de su dispositivo de audio mientras la graba.
6. De esta forma, está listo para grabar. Pulse el botón RECORD (Grabar) en Audacity para comenzar la
grabación.
7. Reproduzca su disco de 78 RPM a 33 ó 45 RPM.
8. Una vez que haya grabado el material deseado, pulse STOP (Parar) en Audacity.
9. Haga clic en el menú EDIT, luego en SELECT (Seleccionar) y finalmente en ALL (Todos) (atajo: “CTRL-A”).
10. Haga clic en el menú EFFECT (Efectos) y en CHANGE SPEED (Cambiar velocidad).
11. Cuando se abra el cuadro CHANGE SPEED, verá las seleccione de RPM para vinilos estándar. El campo
“from” (desde) debe configurarse como 33 ó 45 RPM (según la velocidad que haya seleccionado en su
giradiscos) y el “to” (hacia) como 78 RPM.
12. Haga clic en PREVIEW (Vista preliminar) para oír su grabación convertida a la velocidad correcta de 78 RPM.
Haga clic en OK (Aceptar) para finalizar la conversión a 78 RPM.
13. Una vez que termine, puede guardar su archivo yendo a FILE -> EXPORT AS WAV (Archivo > Exportar como
WAV). De esta forma, la grabación se guarda como archivo de audio .WAV.
14. Seleccione un destino en la computadora, un nombre para la grabación y haga clic en SAVE (Guardar).
15. La grabación puede encontrarse ahora en el lugar en que la guardó en el paso anterior.
ION TTUSB05 Owner's Manual V6 - Page 3
Page 6

1. Versichern Sie sich, daß alle im Anfang dieser Anleitung aufgeführten Teile in der Schachtel enthalten sind.
2. LESEN SIE DIE SICHERHEITSBROSCHÜRE BEVOR SIE DAS GERÄT BENUTZEN
3. Um das Produkt zu registrieren, besuchen Sie bitte http://www.ion-audio.com.
EINFÜHRUNG
Der USB Turntable wird direkt mit dem Computer verbunden, um Ihre wertvollen Vinylaufnahmen in digitale Musik
umzuwandeln. Um Ihnen bei der Konvertierung zu helfen, liegen dem Gerät zwei Softwareprogramme bei:
EZ Vinyl Converter (nur PC) ist der schnellste und einfachste Weg zur Digitalisierung Ihrer Schallplatten. EZ
Vinyl Converter speichert Ihre Aufnahmen direkt in Ihrer iTunes Bibliothek. Anwender, die zum ersten Mal
Musik auf dem Computer aufnehmen, werden dieses Programm als völlig ausreichend für ihre Zwecke
empfinden. In einer übersichtlichen Schritt-für-Schritt Kurzanleitung erfahren Sie alles über die Installation und
die Verwendung des Programms.
Audacity (PC und Mac) legen wir dem erfahrenen Anwender ans Herz. Dieses Programm ermöglicht
erweiterte Audiobearbeitungen, wie Normalisierung, Rauschunterdrückung, 78 RPM
Geschwindigkeitskonvertierung, sowie eine automatische Titelunterteilung. Der Audacity Software Guide ist
auf der CD enthalten – lesen Sie diese Anleitung wenn Sie mit Audacity arbeiten.
Zur Softwareinstallation legen Sie einfach die mitgelieferte CD in das CD-ROM Laufwerk Ihres Computers und folgen
den Anweisungen im Bildschirm des Computers. Nach der Aufnahme Ihrer Schallplatten können Sie Ihre Titel auf
CD brennen oder sie auf portable Musik-Player laden.
(DEUTSCH) Schneller Start
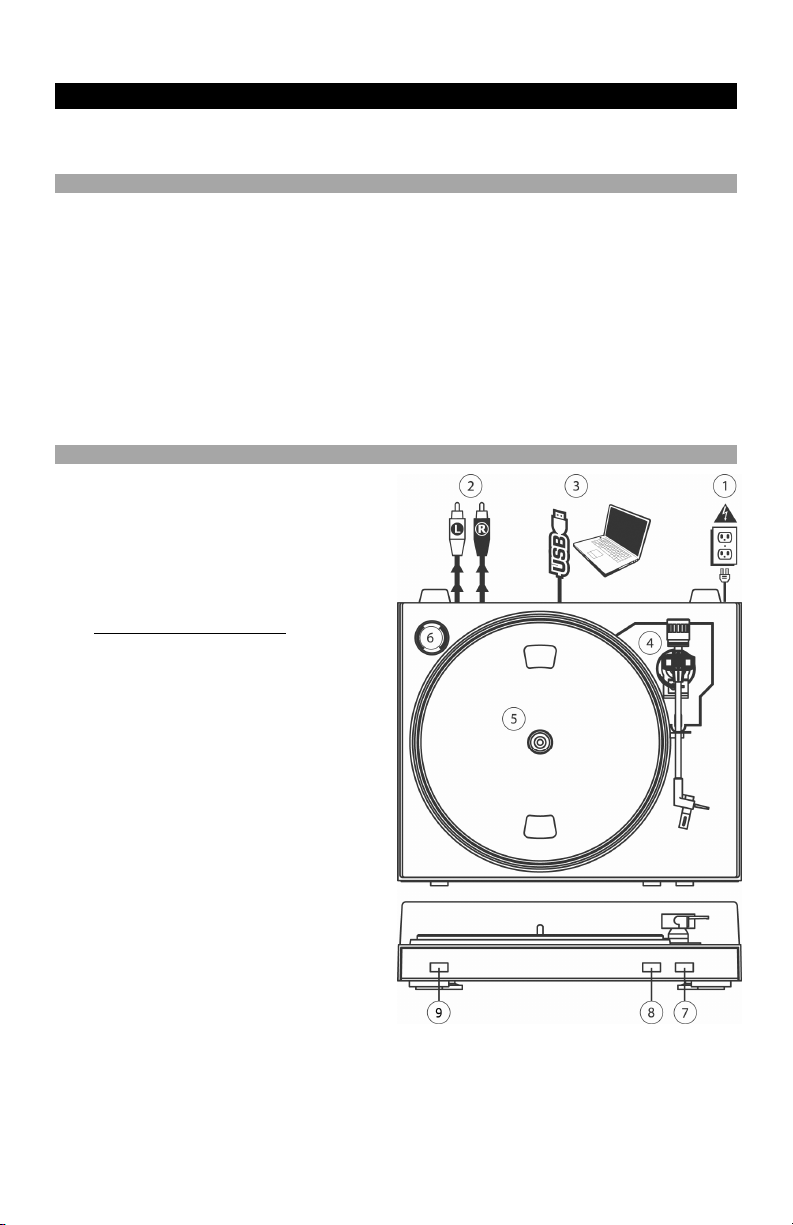
BEDIENELEMENTE
1. Netzkabel: Das Netzkabel sollten Sie erst an
einer Steckdose anschließen, NACHDEM Sie alle
Audioverbindungen hergestellt haben.
2. RCA Audioausgangskabel: Die Kabel schließen
Sie an einen CD- oder Aux LINE-Eingang an, den
Sie an Ihrem Receiver, HiFi-System oder
anderem Verstärkersystem finden.
WICHTIGER HINWEIS
einen LINE Pegel. Schließen Sie diese Kabel
nur an LINE-Pegel Eingänge an. Wenn Sie
einen Linepegel an PHONO-Eingänge
anschließen, könnten Sie Ihren Receiver
beschädigen.
3. USB Audioausgang: Verwenden Sie das
beiliegende USB-Kabel, um Ihren Turntable an
den Computer anzuschließen. Zur Übertragung
der Vinylschallplatten auf Ihren Computer finden
Sie zwei verschiedene Programme auf der
beiliegenden CD. EZ Vinyl Converter ist die
einfachste und schnellste Art, um Ihre
Schallplatten umzuwandeln und eignet sich
hervorragend für Einsteiger. Alternativ können Sie
auch die Audacity Software installieren, die
fortgeschrittene Audiobearbeitungen Ihrer Titel
am Computer, wie Audio Normalisierung,
Rauschentfernung und automatische
Trackaufteilung ermöglicht.
4. Tonarm: Der Tonarm lässt sich entweder mit der
Hand oder mit dem Raise/Lower Taster anheben
und absenken.
5. Plattenteller: Legen Sie hier die Schallplatte, die
Sie abspielen möchten, auf.
6. 45 RPM Adapterhalter: Legen Sie den 45 RPM
Adapter hier ab, wenn Sie ihn nicht benötigen.
7. Raise/Lower Taster: Drücken Sie diesen Taster,
um den Tonarm anzuheben. Um den Tonarm abzusenken, drücken Sie den Button so, dass er heraussteht.
8. Stop: Mit diesem Taster beenden Sie die Wiedergabe. Dabei kehrt der Tonarm in seine Position auf der
Tonarmablage zurück.
9. Speed 33/45 RPM: Mit diesem Taster definieren Sie die Geschwindigkeit, mit der die Schallplatte abgespielt
wird. Je nach aufgelegter Platte, müssen Sie die Abspielgeschwindigkeit ändern, damit die Musik nicht zu
langsam oder zu schnell klingt.
: Die RCA Kabel führen
ION TTUSB05 Owner's Manual V6 - Page 4
Page 7

ANBRINGUNG DES ANTRIEBSRIEMENS
Der ION TTUSB05 Plattenteller wird über einen Gummiriemen angetrieben, der am Motor des Plattenspielers
angebracht ist. In seltenen Fällen kann der Riemen abrutschen, so dass der Plattenteller sich nicht mehr dreht. Wenn
der Plattenspieler sich beim Herunterlassen des Tonarms nicht dreht, ist der wahrscheinlichste Grund hierfür der
Antriebsriemen. Führen Sie bitte die folgenden Schritte aus, um den Riemen wieder ordnungsgemäß an Motor und
Plattenteller zu befestigen.
1. Entfernen Sie zuerst den Clip, mit dem der Plattenteller auf der Zentralnabe arretiert ist. Nehmen Sie
anschließend den Plattenteller ab.
2. Drehen Sie den Plattenteller um. Legen Sie den Antriebsriemen um den inneren unteren Ring des
Plattentellers und vergewissern Sie sich, dass der Gummiring nicht verdreht ist.
3. Legen Sie den Plattenteller wieder auf die Zentralnabe und drehen Sie ihn, bis Sie durch das Loch im
Plattenteller die Motorennabe sehen können. Greifen Sie nun in das Loch, ziehen Sie den Antriebsriemen
vom inneren Ring ab und schieben Sie ihn wie abgebildet über die Motornabe. Achten Sie bei diesem Schritt
darauf, den Riemen nicht zu verdrehen.
4. Befestigen Sie zuletzt den Clip wieder auf der Zentralnabe, um den Plattenteller zu arretieren.
KONVERTIERUNG IHRER 78RPM SCHALLPLATTEN
Zur Konvertierung Ihrer 78RPM Schallplatten sollten Sie die Audacity Software installieren und verwenden. Dieses
Programm befindet sich auf der mitgelieferten CD. Installieren Sie bitte Audacity und folgen Sie den nun folgenden
Anweisungen, damit Sie Ihre 78 RPM Schallplatten konvertieren können. Eine Fehlerhilfe zu Audacity finden Sie im
Audacity Software Guide, den Sie ebenfalls auf der CD finden.
Anmerkung: Wenn Schnellnachsynchronisation durchgeführt wird, gibt es ein Potential des
Qualitätsverlustes mit deiner umgewandelten Musik 78RPM.
1. Verbinden Sie Ihrer Schallplattenspieler mit einem USB-Port Ihres Computers.
2. Starten Sie Audacity.
3. Gehen Sie in Audacity auf BEARBEITEN -> EINSTELLUNGEN und definieren Sie den ‘USB Audio Codec’
(das ist Ihr USB-Plattenspieler) als Aufnahmegerät. Wählen Sie als Spuranzahl 2 - Stereo aus.
4. Geben Sie die Soundkarte Ihres Computers als Wiedergabegerät an. Je nach Computer haben Sie hier
verschiedene Auswahlmöglichkeiten – es sollte aber nie der Eintrag ‘Microsoft Sound Mapper’ gewählt werden.
5. Markieren Sie zuletzt die ‘Software Playthrough’ Option, damit Sie die Musik Ihres Audiogerätes während der
Aufnahme hören können.
6. Nun sind Sie bereit für die Aufnahme. Drücken Sie die RECORD Taste in Audacity zum Start der Aufnahme.
7. Spielen Sie Ihre 78RPM Schallplatte bei 33 oder 45RPM ab.
8. Wenn Sie die gewünschten Titel aufgenommen haben, drücken Sie die STOP Taste in Audacity.
9. Klicken Sie auf BEARBEITEN und wählen Sie unter AUSWÄHLEN -> ALLES (TASTATURBEFEHL: “STRGA”) aus.
10. Wählen im EFFEKT Menü GESCHWINDIGKEIT ÄNDERN aus.
11. Nach dem Öffnen des GESCHWINDIGKEIT ÄNDERN Fensters, sehen Sie die Standard Vinyl RPM
Auswahlmöglichkeiten. Im “Von” Feld sollte die Abspielgeschwindigkeit, mit der Schallplatte auf Ihrem
Plattenspieler wiedergegeben wurde stehen (33 oder 45 RPM). Das “Zu” Feld sollte 78 RPM anzeigen.
12. Klicken Sie PROBEHÖREN Sie sichergehen, dass die Aufnahme korrekt konvertiert wird. Mit OK schließen
Sie den Umwandlungsvorgang auf 78 RPM ab.
13. Nach Beendigung speichern Sie Ihrer Datei, indem Sie auf DATEI -> EXPORTIEREN ALS WAV. Damit
speichern Sie Ihre Aufnahme als .WAV Audiodatei ab.
14. Wählen Sie ein Speicherziel auf Ihrem Computer aus, vergeben Sie einen Namen für Ihre Aufnahme und
klicken Sie auf SPEICHERN.
15. Die Aufnahme finden Sie nun an der von Ihnen angegebenen Position.
ION TTUSB05 Owner's Manual V6 - Page 5
Page 8

1. Vous assurer que tous les articles énumérés au début de ce guide sont inclus dans la boîte.
2. LIRE LE LIVRET D’INSTRUCTION DE SÉCURITÉ AVANT DE FAIRE USAGE DU PRODUIT.
3. Allez à http://www.ion-audio.com pour enregistrer le produit.
INTRODUCTION
Le tourne-disque USB se branche directement à un ordinateur afin de transférer vos précieux vinyles au format
numérique. Nous avons inclus deux logiciels afin de vous aider à convertir votre musique :
Le EZ Vinyl Converter (PC seulement) est la façon la plus rapide et la plus simple de convertir vos
Audacity (PC et Mac) vise l'utilisateur plus expérimenté. Cette application permet d'utiliser des fonctions
Installation du logiciel : Insérez simplement le CD dans le lecteur de votre ordinateur et suivez les instructions à
l'écran. Lorsque vous avez terminé la conversion du vinyle, vous le pouvez graver sur un CD ou le télécharger sur
des lecteurs multimédia portables.
(FRANÇAIS) GUIDE D’INSTALLATION RAPIDE
enregistrements au média numérique. Le EZ Vinyl Converter permet également de sauvegarder vos
enregistrements dans votre bibliothèque iTunes. L'utilisateur débutant préférera peut-être cette application pour
sa simplicité d'utilisation. Nous avons inclus un guide d'utilisation simplifié avec des instructions détaillées sur
l'installation et le fonctionnement du logiciel.
d’édition évoluées, telles que la normalisation, la suppression du bruit, la conversion 78 tr/min et la séparation
automatique des pistes. Le guide d'utilisation pour Audacity se trouve sur les CD inclus, veuillez-vous s'y
référer.
COMMANDES PRINCIPALES
1. Câble d’alimentation : Ce câble d’alimentation
doit être branché dans la prise murale APRÈS
avoir effectué tous les autres branchements.
2. Câbles de sortie RCA stéréo : Ces câbles
doivent être branchés dans l’entrée CD ou ligne
stéréo auxiliaire. Cette sortie doit être branchée à
votre récepteur, chaînes stéréo ou autre système
de sonorisation.
MISE EN GARDE :
niveau ligne (LINE). Veuillez brancher ces
câbles uniquement à des entrées à niveau
ligne (LINE) . Vous pourriez endommager
votre récepteur si vous branchiez un câble
niveau ligne (LINE) dans une entrée PHONO.
3. Sortie audio USB : Branchez la table tournante
à votre ordinateur en utilisant le câble USB fourni.
Pour transférer vos disques vinyle sur votre
ordinateur, nous vous avons fourni deux progiciels
différents sur le CD. Pour les débutants, le EZ
Vinyl Converter est la façon la plus facile et rapide
de transférer leurs disques vinyle. Si vous êtes un
utilisateur expérimenté et que vous désirez utiliser
des fonctions d’édition évoluées, telles que la
normalisation, la suppression du bruit et
séparation automatique des pistes, installez et
utilisez le logiciel facultatif Audacity.
4. Bras de lecture : Le bras de lecture peut être
relevé ou abaissé à la main ou à l’aide du bouton
de levier (Raise/Lower).
5. Plateau : Placez le disque que vous désirez
écouter sur ce plateau.
6. Support pour adaptateur 45 RPM: Vous pouvez
placer l’adaptateur 45 lorsqu’il n’est pas utilisé.
7. Bouton de levier (Raise/Lower) : Enfoncez ce
bouton pour relever le bras de lecture. Appuyez de nouveau sur ce bouton afin qu’il ne soit plus enfoncé.
8. Touche d’arrêt (STOP) : Appuyez sur ce bouton pour interrompre la lecture. Lorsque ce bouton est enfoncé,
le bras de lecture reprendre sa place sur le support.
9. Vitesse de lecture 33/45 t/min : Cette touche permet de modifier la vitesse de lecture. Vous devez ajuster la
vitesse de lecture du tourne-disque en fonction du type de disque que vous désirez écouter, sinon la musique
pourrait être trop rapide ou trop lente.
Les câbles RCA sont à
ION TTUSB05 Owner's Manual V6 - Page 6
Page 9

FIXATION DE LA COURROIE
Le plateau du ION TTUSB05 est entraîné par une à courroie de caoutchouc fixée au moteur du tourne-disque. Dans
certains cas, cette courroie peut glisser et arrêter le plateau du tourne-disque de tourner. Si le tourne-disque ne
commence pas à tourner lorsque vous abaissez le bras de lecture, la courroie en est probablement la cause. Veuillez
suivre les instructions ci-dessous afin de réinstaller correctement la courroie au moteur et au plateau.
1. Commencez par retirer la bague qui fixe le plateau à l'axe central. Après avoir retiré le clip, retirez le
plateau.
2. Tournez le plateau à l'envers. Placez la courroie en caoutchouc autour de l'anneau intérieur inférieur du
plateau en vous assurant que la courroie n'est pas torsadée.
3. Replacez le plateau sur l'axe central et tournez-le pour que vous puissiez voir l'axe du moteur à travers le
trou du plateau. Attrapez la courroie en caoutchouc à travers le trou et retirez-le de l'anneau intérieur
inférieur et installez-le sur l'axe du moteur, tel qu'illustré. Faites attention de ne pas torsader la courroie lors
de cette étape.
4. Puis replacez le clip sur l'axe central afin de fixer le plateau.
CONVERSION DU VINYLE 78 TR/MIN
Pour convertir les disques 78 tr/min, vous devez installer et utiliser l'application Audacity. Cette application se trouve
sur le CD inclus dans la boîte. Veuillez installer Audacity et suivre les indications ci-dessous pour l'enregistrement
des 78 tr/min. Pour toute question concernant Audacity, veuillez consulter son guide d'utilisation inclus sur le CD.
Note: en exécutant le doublage à grande vitesse, il y a un potentiel de la perte de qualité avec votre musique
78RPM convertie.
1. Branchez le tourne-disque au port USB de l'ordinateur.
2. Lancez Audacity.
3. Dans Audacity, allez à EDIT -> PREFERENCES et réglez Recording Device USB Audio Codec « USB Audio
Codec », ceci représente votre tourne-disque (sélectionnez 2 canaux pour enregistrer en stéréo).
4. Sélectionnez la carte de son de votre ordinateur comme appareil de lecture par défaut. Veuillez noter que le
nom de l'appareil peut varier d'un ordinateur à l'autre, mais ne sélectionnez pas « Microsoft Sound Mapper ».
5. Puis, cochez « Software Playthrough » afin de pouvoir écouter la musique à partir de l'appareil audio durant
l'enregistrement.
6. Vous êtes maintenant prêt à enregistrer. Appuyez sur la touche RECORD dans Audacity pour lancer
l’enregistrement.
7. Faites jouer le 78 tr/min à 33 tr/min ou 45 tr/min.
8. Une fois l'enregistrement du matériel désiré terminé, appuyez sur la touche STOP dans Audacity.
9. Cliquez sur le menu EDIT, puis sur SELECT, et ensuite sur ALL (raccourci : « CTRL-A »).
10. Cliquez sur le menu EFFECT et ensuite sur CHANGE SPEED.
11. Lorsque la fenêtre CHANGE SPEED s'ouvre, vous verrez les choix de vitesse pour les vinyles standard. Le
réglage « from » régler à 33 tr/min ou 45 tr/min, selon la vitesse que vous avez sélectionnée, puis « to » à
78 tr/min.
12. Cliquez sur la touche PREVIEW pour entendre l'enregistrement reconverti à la bonne vitesse de 78 tr/min.
Cliquez sur OK pour finaliser la conversion à 78 tr/min.
13. Une fois terminé, vous pouvez sauvegarder le fichier en allant à FILE -> EXPORT AS WAV. Ceci permet de
sauvegarder l'enregistrement en fichier audio .WAV.
14. Sélectionnez un répertoire sur l'ordinateur, nommez le fichier et cliquez sur SAVE.
15. L'enregistrement se trouve dans le répertoire où vous l'avez sauvegardé dans l'étape précédente.
ION TTUSB05 Owner's Manual V6 - Page 7
Page 10

1. Verificate che tutti gli elementi elencati sul frontespizio di questo manuale siano inclusi nella confezione.
2. PRIMA DI UTILIZZARE IL PRODOTTO LEGGETE IL LIBRETTO DELLE ISTRUZIONI DI SICUREZZA.
3. Andate sul sito http://www.ion-audio.com per la registrazione del prodotto.
INTRODUZIONE
Il giradischi USB si collega direttamente al computer per trasformare i tuoi preziosi dischi in vinile in musica digitale.
Per aiutarvi nella conversione dei dischi in vinile, abbiamo incluso due pacchetti software:
EZ Vinyl Converter (PC soltanto) è il modo più facile e veloce di trasformare i tuoi dischi in media digitali. EZ
Vinyl Converter salva comodamente le tue registrazioni nella libreria iTunes. Questa è probabilmente
l’applicazione preferibile per gli utenti alle prime armi. Abbiamo allegato una comoda Guida Rapida con
istruzioni passo passo circa l’installazione e l’uso del software.
Audacity (PC e Mac) è il software destinato agli utenti esperti. Questa applicazione permette modifiche e
processo dell’audio avanzati quali normalizzazione, rimozione dei rumori, conversione a 78 giri e separazione
automatica delle tracce. La Guida per il software Audacity si trova sul CD in dotazione: fare riferimento a
quest’ultima quando si lavora con Audacity.
Per installare il software: inserire nel computer il CD in dotazione e seguire le istruzioni da schermo. Una volta
terminato di convertire il vinile, lo si può masterizzare su un CD o caricare su dispositivi media portatili.
(ITALIANO) MONTAGGIO RAPIDO
COMANDI GENERALI
1. Cavo di alimentazione: il cavo di
alimentazione va inserito in una presa a muro
DOPO aver effettuato tutte le connessioni
audio.
2. Cavi di uscita RCA audio: questi cavi vanno
inseriti in un ingresso CD o LINEA ausiliario.
Questa uscita va collegata ad un ricevitore,
home stereo, o ad altro sistema di altoparlanti.
AVVERTENZA IMPORTANTE
sono a livello di LINEA. Collegare questi
cavi unicamente a ingressi a livello di
LINEA. Collegando un ingresso a livello di
LINEA ad un ingresso PHONO si rischia di
danneggiare il ricevitore.
3. Uscita USB Audio: servirsi del cavo USB in
dotazione per collegare il giradischi al
computer. Per trasferire i dischi in vinile al
computer, sono stati forniti due diversi
pacchetti software nel CD in dotazione. L’EZ
Vinyl Converter è il modo più semplice e
veloce di trasferire i dischi in vinile e va
preferibilmente utilizzato dai principianti.
Alternativamente, se siete un utente esperto, si
può installare e utilizzare il software Audacity,
che permette di approfittare di funzioni di
editing audio avanzato quali la
normalizzazione dell’audio, la rimozione dei
rumori e la separazione automatica della
traccia.
4. Braccio: il braccio può essere alzato e
abbassato manualmente oppure premendo il
tasto Raise/Lower (Alza/Abbassa).
5. Piatto: porre qui il disco che si desidera
riprodurre .
6. Supporto per l’adattatore 45 giri:
posizionare qui l’adattatore 45 giri quando non
è in uso.
7. Tasto Raise/Lower (Alza/Abbassa): premere questo tasto per alzare il braccio. Per abbassare il braccio,
premere il tasto in modo da portarlo su out.
8. Stop: premere questo tasto per interrompere la riproduzione. Premendo questo tasto, il braccio tornerà nella
sua posizione originale di riposo.
9. Velocità 33/45 giri: questo tasto controlla la velocità di riproduzione del disco. A seconda del tipo di disco che
si sta riproducendo, sarà necessario impostare la velocità in modo tale che corrisponda a quella del disco (in
caso contrario, la musica potrebbe suonare troppo lenta o troppo veloce).
: i cavi RCA
ION TTUSB05 Owner's Manual V6 - Page 8
Page 11

COLLEGAMENTO DELLA CINGHIA DI TRASMISSIONE
Il piatto dell’ION TTUSB05 è guidato da una cinghia di trasmissione in gomma collegata al motore del giradischi. In
alcuni rari casi, la cinghia potrebbe scivolare fuori dal suo alloggiamento: in questo caso, il piatto del giradischi smette
di girare. Se il giradischi non inizia a girare quando si abbassa il braccio, la causa più probabile è la cinghia. Seguire
le istruzioni di cui sotto per ricollegare correttamente la cinghia al motore e al piatto.
1. Iniziare rimuovendo la clip che fissa il piatto all’asse centrale. Dopo aver rimosso la clip, rimuovere il piatto.
2. Voltare il piatto. Porre la cinghia in gomma attorno all’anello interno inferiore del piatto del giradischi,
assicurandosi che non sia torta.
3. Riposizionare il piatto sull’asse centrale e farlo ruotare in modo che si veda l’asse motore attraverso il foro
sul piatto stesso. Ora, attraverso il foro, tirare la cinghia di trasmissione in gomma dall’anello interno e
installarla sull’asse motore, come mostrato nell’illustrazione. Fare attenzione a non torcere la cinghia
durante questa fase.
4. Infine, riposizionare la clip sull’asse centrale per fissare il piatto.
CONVERSIONE DEI VINILI A 78 GIRI
Per convertire i vostri dischi a 78 giri, sarà necessario installare e utilizzare l’applicazione Audacity. Questa si trova
sul CD contenuto nella
confezione. Installare Audacity e seguire le istruzioni di cui sotto per registrare i vostri 78 giri. Per la risoluzione di
eventuali problemi con Audacity fare riferimento alla relativa Guida inclusa nel CD.
Nota: Nell'effettuare doppiatura ad alta velocità, ci è un potenziale di perdita di qualità con la vostra musica
convertita 78RPM.
1. Collegare il giradischi alla porta USB del computer.
2. Lanciare Audacity.
3. In Audacity, recarsi su EDIT -> PREFERENCES (Modifica – Opzioni) e impostare il dispositivo di
registrazione su ‘USB Audio Codec’: questo è il vostro giradischi USB (selezionare 2 canali per registrare in
stereo).
4. Selezionare la scheda audio del computer come Playback Device (dispositivo di riproduzione). Il nome del
dispositivo varierà da computer a computer, ma non deve mai essere impostato su ‘Microsoft Sound Mapper’.
5. Infine, spuntare “Software Playthrough” in modo da poter ascoltare la musica tramite il dispositivo audio mentre
si registra.
6. Si è ora pronti a registrare. Premere il pulsante RECORD in Audacity per avviare la registrazione.
7. Riprodurre i dischi a 78 giri a 33 o 45 giri.
8. Una volta registrato il materiale desiderato, premere STOP in Audacity.
9. Cliccare sul menu EDIT, quindi su SELECT, e infine su ALL (scorciatoia: “CTRL-A”).
10. Cliccare sul menu EFFECT (effetti), quindi su CHANGE SPEED (modifica velocità).
11. Quando si apre la finestra CHANGE SPEED, si vedranno le opzioni del numero di giri dei vinili standard. Il
valore “from” (da) va impostato su 33 o 45 giri (a seconda della velocità impostata sul giradischi), e il valore “to”
(a) va impostato su 78 giri.
12. Cliccare su PREVIEW (anteprima) per ascoltare la registrazione convertita alla giusta velocità di 78 giri.
Cliccare su OK per finalizzare la conversione a 78 giri.
13. Una volta terminato, si può salvare il file recandosi su FILE -> EXPORT AS WAV. Questo comando salverà la
registrazione sotto forma di file audio in formato .WAV.
14. Scegliere una destinazione sul computer, un nome per la registrazione e cliccare su SAVE (salva).
15. Le registrazioni possono ora essere trovate nella cartella in cui sono state registrate durante il passaggio
precedente.
ION TTUSB05 Owner's Manual V6 - Page 9
Page 12

Specifications (ION TTUSB05)
Manual Version: 6.0
Computer Requirements:
Part List:
Turntable Weight: 5.3 lbs
Product Dimensions: 13-3/8” x 16-1/2” x 4-5/6”
Motor: Belt Drive
Speed: 33 1/3 RPM or 45 RPM operation
Outputs: RCA (LINE), USB Audio.
PC
· Windows 98SE, 2000, ME, XP, Vista
· 500 MHz Pentium class processor or better
· QuickTime 7.1.6 or later
· 256MB RAM (minimum)
· 250MB available Hard Drive space (minimum)
· One available USB1.1 port or higher
· CD-ROM drive or better
· Windows-compatible sound card
Mac
· OS X 10.3.9 or later or OS X 10.4.7 or later
· 500MHz G3 processor or better
· QuickTime 6.5.2 or later
· 256MB RAM (minimum)
· 250MB available Hard Drive space (minimum)
· One available USB1.1 port or higher
· CD-ROM drive or better
· Mac-compatible sound card
o ION TTUSB05 Turntable
o Grip mat
o RCA Cable connected
o Drive belt attached to platter
o USB Cable Included
o 45 RPM Adapter Included
o Software CD (MAC/PC)
o Quick Start Guide
ION Audio, LLC
Tel: (U.S.) 401.658.3743
Email: support@ion-audio.com
ION TTUSB05 Owner's Manual V6 - Page 10
 Loading...