

Page 1

TOTAL PA™ GLOW MAX
Quickstart Guide English ( 3 – 11 )
Guía del usuario Español ( 12 – 21 )
Guide d’utilisation Français ( 22 – 31 )
Appendix English ( 32 )
Page 2

2
Page 3

User Guide (English)
Introduction
Thank you for purchasing the Total PA
important to us as it is to you. That’s why we design our products with one thing in mind—
to make your life more fun and more convenient.
Box Contents
Total PA
Power Cable (5 ft. / 150 cm)
Microphone with cable (15 ft. / 450 cm)
Remote Control
Speaker Stand
Quickstart Guide
™
Glow Max
Support
For the latest information about this product (documentation, technical specifications,
system requirements, compatibility information, etc.) and product registration, visit
ionaudio.com.
For additional product support, visit ionaudio.com/support.
Speaker Stand Installation
1. Extend the speaker stand tripod legs on a flat, stable surface. Fully extend the legs until
the plastic bracket is stopped by the bumps on the center pole. Insert the lower pin
directly above the lower adjustment knob and tighten the lower adjustment knob.
2. Raise the mounting pole up to the appropriate height needed and tighten the side
adjustment knob. When raising the mounting pole, make sure the end with the upward
pointing arrow is on the top.
3. Insert the upper pin into the upper pin-hole so the mounting pole stays at your set
height, and tighten the side adjustment knob.
4. On Total PA
blocking the opening.
5. Line up the Total PA
on the pole.
6. Tighten the mounting knob clockwise on Total PA
Note: Remove Total PA™ Glow Max prior to moving the stand for maximum safety.
™
Glow Max, adjust the bottom knob counter-clockwise so the screw is not
™
Glow Max mounting hole with the speaker stand pole and place
™
Glow Max. At ION, your entertainment is as
™
Glow Max.
3
Page 4

Setup
1. Make sure all items listed in the Box Contents are included in the box. Look in the box
under the foam sheet for the power cable and microphone.
2. Read the Safety & Warranty Manual before using the product.
3. Study the Connection Diagram.
4. Make sure all input devices (such as microphones, CD players, or digital media players) are
turned off with their volume settings set to “zero.”
5. Connect all devices as shown in the Connection Diagram.
6. Switch everything on in the following order:
a. Audio input devices (e.g. microphones, instruments, CD players)
b. Total PA™ Glow Max
7. When you are finished using Total PA™ Glow Max, switch everything off in the following
order:
a. Total PA™ Glow Max
b. Audio input devices
Connection Diagram
Items not listed under the Box Contents are sold separately.
USB drive (16 GB limit and
only MP3
files supported)
Smartphone
Microphones
SD Card
(16 GB limit and only
MP3
PRESETS
LINK
files supported)
Smartphone
MIC IN 2 XLR IN MIX OUTMIC IN 1
Power
Tablet
4
Page 5
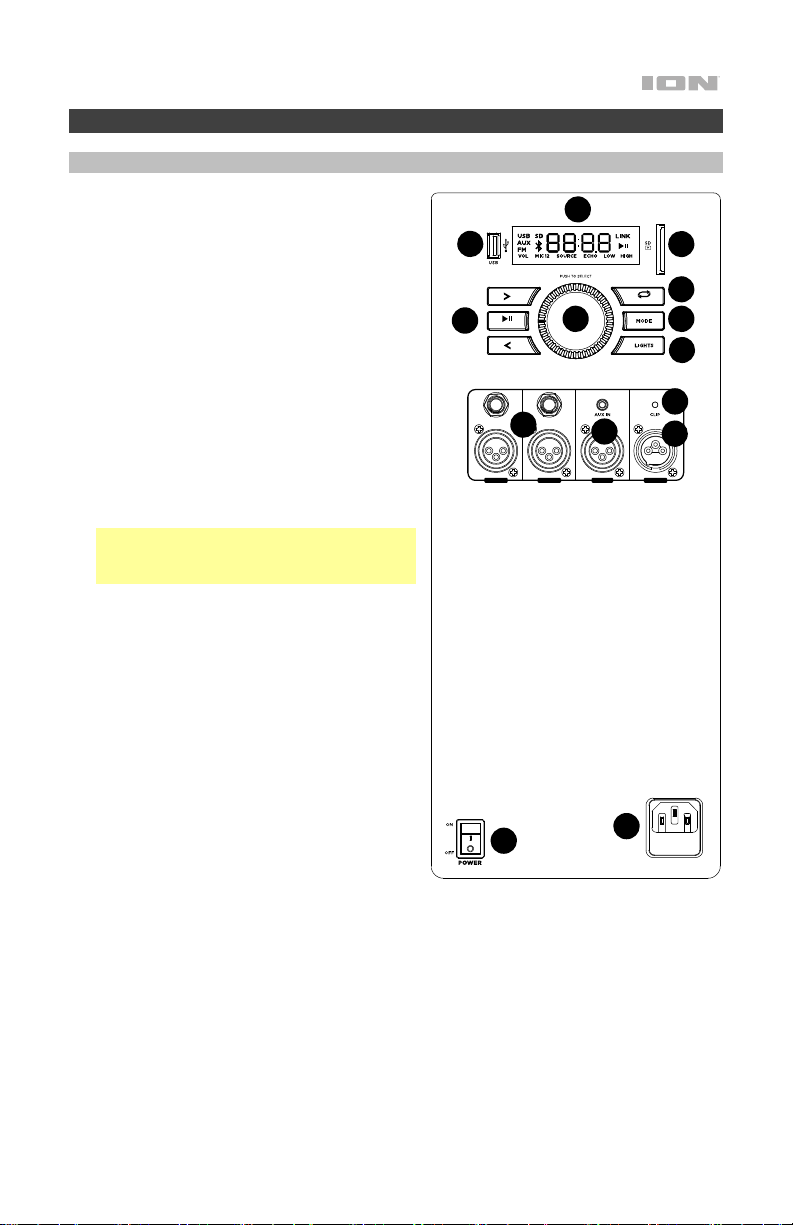
Features
Rear Panel
1. Media Panel Buttons: Controls for the
USB/SD, FM radio, and Bluetooth
sources. These controls include mode
selection and music playback options. See
Media Panel for more information.
2. USB Port: Connect your USB flash drive
here to play music. You can also use this
port for charging the USB device, such as a
tablet or smartphone. To charge a device
that is streaming music via Bluetooth,
pause the music first and then wait for it to
reconnect after the USB cable is inserted.
3. SD Card Slot: Insert your SD card here to
play music.
4. Display: This screen shows information
relevant to Total PA
operation.
Note: The Display comes with a plastic
protector on it. Remove this for optimal
viewing.
5. Mic Inputs (1/4”/6.35 mm & XLR): Connect
a microphone or mic-level source to these
inputs.
6. Aux Inputs (1/8” & XLR): These inputs can
be used to connect a CD player, MP3
player, or other audio source.
7. Mix Out (XLR): Connect this output to a
speaker, mixer, or recorder.
8. Control Knob: Turn this knob to adjust the
main volume (overall output) of the
loudspeaker. Push this knob to select and
make adjustments to the mic 1 volume, the
mic 2 volume, source volume (radio, USB,
SD, Bluetooth signal, and aux input), echo
effect, high EQ, and low EQ. The volume of
Total PA
Bluetooth device volume. For the best
sound quality, set your input source volume
to 100% and use the Source and Main
Volume control of the speaker to adjust the
volume.
9. Repeat/Link: In USB or SD mode, press this button to repeat a single track, folder, or
all tracks. Press and hold this button to start stereo linking to another compatible ION
speaker (see ionaudio.com for a list of compatible speakers).
10. Mode: Press this button to select the audio source to use: USB, SD, FM radio, Aux
(available to select when the USB port and SD card slot are empty), or Bluetooth.
™
Glow Max does not affect your
™
Glow Max’s current
®
audio
1
2
PRESETS
1
1
14
1
4
1
3
9
LINK
8
10
12
11
1
5
1
6
MIC IN 2 XLR IN MIX OUTMIC IN 1
1
7
13
5
Page 6

11. Clip LED: The Clip LED will flash red if the signal from the input jacks or Media Panel
audio source is clipping (distortion from an overly loud signal). If this happens,
decrease the setting of the Main Volume knob or the volume for the Aux/Mic Input (if
a loud device is plugged into either).
12. Light Mode Button: Press this button to toggle between one of these five modes for
the lights on the front panel.
• Color Cycle: The lights slowly glow and cycle through colors. This is the default
mode when Total PA
™
Glow Max is first powered on. Press and hold the light mode
button to freeze the lights on one color. Press and release the button to unfreeze.
• Beat Sync: The lights flash and change colors according to the tempo of the music
playing on the speaker. For the best lighting effect, you may need to adjust the
volume of your device, the source volume, and/or the main volume.
• Color Wheel: The lights rotate in a wheel of all colors.
• Color Beat Sync: The lights rotate in a wheel of all colors and change direction and
speed according to the tempo of the music playing on the speaker. For the best
lighting effect, you may need to adjust the volume of your device, the source
volume, and/or the main volume.
• Off: The lights turn off.
13. Power Cable Input (IEC): Insert the included power cable here to charge the unit.
14. Power Switch: Flip this switch to toggle the speaker’s power on or off.
Note: Total PA™ Glow Max will power off after 15 minutes with no audio playing.
6
Page 7

Media Panel
Use the following buttons on the Media Panel to control the USB/SD, FM Radio, and
Bluetooth audio sources.
Mode: Press this button to switch the audio source between USB/SD, FM radio, Aux
(available to select when the USB port and SD card slot are empty) and Bluetooth. The
default mode when powering on Total PA
only selectable if a USB drive or SD card is plugged into Total PA
Mode button will toggle between Bluetooth, Aux, and FM radio only.
Note: Your USB drive or SD card cannot be more than 16 GB and it must contain playable
files in order for its data to appear properly in the Display. It can have MP3 files. When you
connect a USB drive or SD card with playable files, Total PA™ Glow Max will order the files
alphabetically by folder on the root directory and then by track name in the folder.
Play/Pause: When USB/SD is selected as the audio source, press this button to
play/pause the currently selected track. Double press this button to stop playback and
return to the beginning of the track list.
When Bluetooth is selected as the audio source, press this button to play/pause the
currently selected track or press and hold this button to turn voice prompts on/off.
Repeat: Press this button to cycle through the five repeat/shuffle options:
• Play the USB/SD folder’s tracks in order with repeat/shuffle off (OFF).
• Play the tracks in random order (Rd0).
• Play the current USB/SD track on repeat (ONE).
• Play all the tracks on the USB drive or SD card on repeat (ALL).
• Play the current folder’s tracklist on repeat (F0d). The folder used is based on what
song is playing when it is activated. For instance, if a song playing is on the root level,
selecting F0d will repeat only songs at the root level. If a song is in folder “A”, then
only songs in folder “A” will be repeated.
Previous: When USB/SD or Bluetooth is selected as the audio source, press this button to
go to the previous track in the playlist.
Next: When USB/SD or Bluetooth is selected as the audio source, press this button to go
to the next track in the playlist.
Note: In some apps on Bluetooth devices, pressing the < (Previous) or > (Next) buttons
may change the playlist or music genre rather than the track.
™
Glow Max is Bluetooth. The USB/SD mode is
™
Glow Max; otherwise, the
7
Page 8

Remote Control
Stop: Stops the media panel source from playing.
Mode: Selects the media panel source: Aux, USB, SD, FM radio, or Bluetooth.
Mute: Silences the music playback on media panel sources. Press Mute again to un-mute
the music playback.
Prev: Goes to the previous USB or SD card track. When listening to Bluetooth sources,
pressing Prev in some apps may go to another playlist or music genre. When listening to
the FM radio, press the Prev button to tune the radio station down.
Next: Advances to the next USB or SD card track. When listening to Bluetooth sources,
pressing Next in some apps may go to another playlist or music genre. When listening to
the FM radio, press the Next button to tune the radio station up.
Play/Pause: Plays or pauses the USB, SD, or Bluetooth media panel source. Files are
played from the USB or SD source first by alphabetical order of what is on the root level,
then alphabetical by folder, and then alphabetical by the track name. In Radio Mode,
double press the Play/Pause button to toggle through radio presets.
Vol –: Decreases the Main Volume.
Vol +: Increases the Main Volume.
EQ: Press this button to toggle through EQ presets (the preset name will be shown on the
display).
100+: Jumps ahead by 100 tracks.
200+: Jumps ahead by 200 tracks.
Number Keys: Provides track selection for USB and SD card sources.
Operation
Using the Control Knob
The Control Knob defaults to controlling the Main Volume for all channels. Press the
Control Knob to toggle through different functions: Mic Channel, Source, Echo effect level,
and EQ.
• Press the Control Knob to select the Mic channel 1 or 2. Rotate the Control Knob to
raise or lower the volume of the Mic input independently of the other channels.
• Press the Control Knob again to select Source. Rotate the Control Knob to raise or
lower the volume of the Aux/BT/USB/Radio signal independently of the Mic channels.
• Press the Control Knob again to control the Echo effect level for the Mic channel.
• Press the Control Knob again to select Low EQ adjustment. Rotate the Control Knob
to raise or lower the low frequencies on all channels.
• Press the Control Knob again to select High EQ adjustment. Rotate the Control Knob
to raise or lower the high frequencies on all channels.
• Press the Control Knob again to return to Main Volume adjustment.
If there is no activity on the Control Knob for 5 seconds, the function will go back to Main
Volume.
8
Page 9

Pairing with a Bluetooth Device
1. Power on the Total PA
will automatically enter Bluetooth pairing mode.
2. Navigate to your device’s Bluetooth setup screen, find Total PA Glow Max, and
connect. Do not connect to Total PA Glow Max_BLE; this is reserved exclusively for
connecting to the ION Sound XP
display will flash and you will hear “Connected”.
Note: If you experience trouble in connecting, select “Forget this Device” on your
Bluetooth device and try to connect again.
3. To disconnect, turn off Bluetooth from your device’s Bluetooth settings.
Linking Two Compatible Speakers (Stereo-Link 2.0™):
1. Power on both Total PA
sure they are in Bluetooth pairing mode and not connected to a device.
2. Press and hold the Repeat/Link button on one speaker (the primary speaker which
will control both) to enter Stereo Link mode. Once a link has been established, the
word LINK will appear on both speaker displays.
3. Connect to the primary speaker via Bluetooth.
To disconnect, double press the Repeat/Link button.
Note: The speakers should be within 100’ (33.3 m) of each other to properly link.
Note: Total PA™ Glow Max is not compatible with previous ION PA models. To link to a
previous model, use an XLR cable (not included) and link from the newer PA to the
previous one via the XLR Out on Total PA™ Glow Max and the XLR Aux In on the previous
model.
SD/USB Mode
Press the Mode button to toggle through to select SD or USB mode. Total PA™ Glow Max
will automatically play the first compatible file. Files are played in alphabetical order of
what is on the root level, then alphabetical by folder, and then alphabetical by track name.
Media playback will stop when all media has been played on the SD card or USB drive.
Press and hold the Next and Previous buttons to fast forward or rewind within the song.
Note: The SD card or USB drive must have playable files for it to appear on the media
panel’s display. If there is no USB drive or SD card inserted into the media panel, press
and release the Mode button will toggle through Bluetooth and radio.
Repeat settings (abbreviations will show on the display):
• ALL: Repeat all of the tracks in the folder.
• FOLd: Repeat all of the tracks in the folder.
• OnE: Repeat the current playing USB track.
• rAn: Shuffle the track order.
™
Glow Max by flipping the on/off switch. Total PA™ Glow Max
™
app. When connected, the Bluetooth icon on the
™
Glow Max speakers by flipping their on/off switches. Make
9
Page 10

App Control
IMPORTANT: To ensure the best possible experience with the app, use the most
current Android OS or iOS on your device.
Follow these steps to download the free app on your device:
1. Open the Apple App Store or Google Play on your device. Then, search for the ION
Sound XP app.
2. Follow the on-screen instructions to download and install the app. Once
downloaded, the ION Sound XP app will appear on your device's home screen.
3. Connect your device to Total PA
Bluetooth Device to learn how to do this.
4. Open the ION Sound XP
TM
Bluetooth and Location Services.
5. Tap to select Add A Product on the screen. The app will scan and find Total PA
Max.
If you are having issues connecting, tap Help with setting up? for additional tips.
™
6. Select the Total PA
Glow Max icon to go to the next screen, where you can use the
app to control various functions of the speaker such as:
• Radio: Play the radio, change stations, and edit presets.
• EQ: Adjust the speaker's equalization, and enable or disable Bass Boost.
• Volume: Adjust the speaker volume and microphone volume.
• Voice Prompts: Enable or disable the voice prompts.
• Support: Visit ionaudio.com, contact Technical Support, and view Warranty
information and Frequently Asked Questions.
™
Glow Max via Bluetooth. See the Pairing with a
app. If prompted, allow the app to access your device's
™
Glow
10
Page 11

Troubleshooting
If the sound is distorted: Try lowering the volume control of your sound source, musical
instrument, or microphone. Also, try to reduce the overall volume of Total PA™ Glow Max using
the Main Volume knob.
If there is too much bass: Try adjusting the tone or EQ control on your sound source to lower
the bass level. This will allow you to play the music louder before clipping (distortion) occurs.
If there is a high-pitched whistling noise when using microphones: This is probably
feedback. Point the microphone away from the speaker.
If you can’t hear the microphone over the music volume: Turn down the music volume from
your source.
The Display shows “NONE”: If a USB drive or SD card is already properly inserted, make sure it
contains playable files (MP3 files).
If you cannot connect your audio device to Total PA™ Glow Max via Bluetooth:
• Have your audio device (e.g., smartphone or tablet) and Total PA™ Glow Max as close
together as possible while trying to connect. Make sure both the audio device and Total
PA™ Glow Max are unobstructed by walls, furniture, etc.
• Reset the Bluetooth connection on Total PA™ Glow Max to disconnect Total PA™ Glow Max
from any other audio device and restart the search process. If this does not work right
away, power off Total PA™ Glow Max and then power it back on. See Pairing with a
Bluetooth Device for more information.
• Reset the Bluetooth connection on your audio device by turning Bluetooth off and back on.
You can find this under the Bluetooth menu in the Settings for your phone or other audio
device.
If this does not work, and you have connected to Total PA™ Glow Max before, find Total
PA™ Glow Max in the list of available or previously connected devices in your audio
device's Bluetooth menu, tap the "gear" or “i” icon located next to it and then select
Unpair or Forget. Turn Total PA™ Glow Max off and back on and try pairing again once it
reappears in your available devices list.
Note: If Total PA™ Glow Max has been paired to another audio device recently that is still
within range, you may need to repeat this process with that audio device to fully
disconnect.
If you experience audio dropouts while playing music from a Bluetooth device, this may be
happening because your unit is trying to link to another speaker. This can occur if you power off
a speaker that was linked to your unit or if you have just turned on your unit and it is in StereoLink mode. To stop the audio dropouts, exit Stereo-Link mode by double-pressing the
Repeat/Link button. Alternatively, you can wait for your unit to link to another speaker if there is
one within range.
If you would like to stop your speaker from automatically linking when you power it on,
make sure you double-press the Repeat/Link button to exit Stereo-Link mode before you
power it off.
11
Page 12

Guía del usuario (Español)
Introducción
Gracias por comprar el Total PA
importante para nosotros como para usted. Por eso es que diseñamos nuestros
productos con una sola cosa en mente—hacer que su vida sea más divertida y cómoda.
Contenido de la caja
Total PA
Micrófono con cable (15 pies / 450 cm)
Cable de alimentación (5 pies / 150 cm)
Control remoto
Soporte de altavoz
Guía de inicio rápido
™
Resplandor Máximo
Soporte
Para obtener la información más reciente acerca de este producto (documentación,
especificaciones técnicas, requisitos de sistema, información de compatibilidad, etc.) y
registrarlo, visite ionaudio.com.
Para obtener soporte adicional del producto, visite ionaudio.com/support.
Instalación del soporte de altavoz
1. Extienda las patas del trípode del soporte del altavoz sobre una superficie plana y
estable. Extienda las patas completamente hasta que el soporte plástico haga tope con
las protuberancias del poste central. Inserte el pasador inferior directamente por encima
de la perilla de ajuste inferior y luego apriete dicha perilla.
2. Extienda el poste de montaje hasta la altura necesaria y apriete la perilla de ajuste del
costado. Al elevar el poste de montaje, asegúrese de que el extremo que tiene la flecha
apuntando hacia arriba quede del lado de arriba.
3. Inserte la clavija superior en el orificio superior de manera que el poste de montaje
permanezca a la altura necesaria y apriete la perilla de ajuste del costado.
4. En el Total PA
agujas del reloj de manera tal que el tornillo no bloquee la apertura.
5. Alinee el orificio de montaje del Total PA
del altavoz y colóquelo en el poste.
6. Apriete la perilla de montaje en el Total PA
agujas del reloj.
Nota: Retire el Total PA™ Resplandor Máximo antes de mover el soporte para mayor
seguridad.
™
Resplandor Máximo, ajuste la perilla inferior en el sentido contrario a las
™
Resplandor Máximo. En ION, su entretenimiento es tan
™
Resplandor Máximo con el poste del soporte
™
Resplandor Máximo en el sentido de las
12
Page 13

Instalación
1. Asegúrese de que todos los artículos indicados en Contenido de la caja estén incluidos en ella.
Localice el cable de alimentación y el micrófono en la caja bajo la hoja de espuma de poliestireno.
2. Lea el Manual sobre la seguridad y garantía antes de utilizar el producto.
3. Estudie el Diagrama de conexión.
4. Asegúrese de que todos los dispositivos de entrada (tales como micrófonos y reproductores de
CD o reproductores de otros medios digitales) estén apagados y con sus ajustes de volumen en
“cero”.
5. Conecte todos los dispositivos como se muestra en el diagrama de conexión.
6. Encienda todo en el siguiente orden:
a. Dispositivos de entrada de audio (por ejemplo, micrófonos, instrumentos, reproductores de
CD)
b. Total PA
7. Cuando haya terminado usar el Total PA
a. Total PA
b. Dispositivo de entrada de audio
Diagrama de conexión
Los elementos que no se enumeran en Contenido de la caja se venden por separado.
Unidad flash USB
(límite de 16 GB y
solo se admiten archivos MP3)
™
Resplandor Máximo
™
Resplandor Máximo
™
Resplandor Máximo, apague todo en el siguiente orden:
Tarjeta SD
(límite de 16 GB y
solo se admiten archivos MP3)
Teléfono
inteligente
(smartphone)
Micrófonos
Tableta
PRESETS
LINK
Teléfono
inteligente
(smartphone)
MIC IN 2 XLR IN MIX OUTMIC IN 1
Alimentación
13
Page 14

Características
Panel trasero
1. Botones del panel de medios: Controles
para las fuentes de audio USB/SD, radio
FM y Bluetooth
selección del modo y opciones para
reproducción de la música. Consulte en
Panel de medios a continuación las
descripciones de los controles.
2. Puerto USB: Conecte su unidad flash
USB para reproducir música. También
puede utilizar este puerto para cargar un
dispositivo USB, como una tableta o un
teléfono inteligente. Para cargar un
dispositivo que está transmitiendo
música por Bluetooth, primero ponga en
pausa la música y luego espere a que se
reconecte tras insertar el cable USB.
3. Ranura para tarjeta SD: Inserte su
tarjeta SD aquí.
4. Pantalla: esta pantalla muestra
información relevante para la operación
actual de Total PA
Consulte la Guía del usuario completa
para obtener más información.
Nota: La pantalla viene con un protector
de plástico adherido. Quítelo para
visualizar el LCD de manera óptima.
5. Entradas micrófono (6,35 mm y XLR):
Conecte un micrófono o una fuente de
nivel de micrófono a estas entradas.
6. Entradas auxiliar (3,5 mm / 1/8 pulg y
XLR): estas entradas se pueden usar
para conectar un reproductor de CD,
reproductor de MP3 u otra fuente de
audio.
7. Salida de mezcla (XLR): Conecte esta
salida a un altavoz, mezclador o
grabador.
8. Perilla de control: Gire esta perilla para
ajustar el volumen principal (salida general) del altavoz. Presione esta perilla para
seleccionar y realizar ajustes en el volumen del micrófono 1, el volumen del micrófono
2, el volumen de la fuente (radio, USB, SD, señal Bluetooth y entrada auxiliar), el efecto
de eco, el EQ alto y el EQ bajo. El volumen del Total PA
afecta el volumen de su dispositivo Bluetooth. Para lograr la mejor calidad de sonido,
ajuste del volumen de su fuente de entrada al 100% y utilice el control de fuente y
volumen principal del altavoz para ajustar el volumen.
14
®
. Estos controles incluyen
™
Resplandor Máximo.
1
2
PRESETS
1
1
14
1
4
LINK
8
1
5
MIC IN 2 XLR IN MIX OUTMIC IN 1
™
1
6
13
Resplandor Máximo no
10
12
11
1
7
1
3
9
Page 15

9. Repetir / Vincular: en modo USB o SD, presione este botón para repetir una sola
pista, carpeta o todas las pistas. Mantenga pulsado este botón para iniciar el enlace
estéreo a otro altavoz ION compatible (consulte ionaudio.com para obtener una lista
de altavoces compatibles).
10. Modo: Presione este botón para seleccionar la fuente de audio a usar: USB, SD, radio
FM, Aux (disponible para seleccionar cuando el puerto USB y la ranura para tarjeta SD
están vacíos) o Bluetooth.
11. LED de recorte ("clip"): El LED de recorte destella con luz roja si la señal de las
entradas o de la fuente del panel de medios se está recortando (distorsión causada
por una señal demasiado alta). Si esto ocurre, disminuya el ajuste de la Main Volume
(volumen principal) para la entrada Aux/Mic (si se conecta un dispositivo de
volumen elevado en cualquiera de ellos).
12. Botón de modo de luz: Presione este botón para alternar entre uno de estos cinco
modos para las luces del panel frontal.
• Color Cycle (Ciclo de color): Las luces brillan suavemente y cambian de un color
a otro. Este es el modo predeterminado la primera vez que se enciende el Total
™
PA
Resplandor Máximo. Mantenga pulsado el botón de modo para congelar las
luces en un color. Pulse y suelte este botón alternar los colores.
• Beat Sync (sincronizado con el ritmo): La luz parpadea y cambia de color en
función del ritmo de la música que se reproduce por el altavoz. Para obtener el
mejor efecto de iluminación, es posible que deba ajustar el volumen de su
dispositivo, el volumen de la fuente y el volumen principal.
• Color Wheel (Rueda de colores): Las luces giran en una rueda de todos los
colores.
• Color Beat Sync: las luces giran en una rueda de todos los colores y cambian de
dirección y velocidad de acuerdo con el tempo de la música que se reproduce en
el altavoz. Para obtener el mejor efecto de iluminación, es posible que deba ajustar
el volumen de su dispositivo, el volumen de la fuente y el volumen principal.
• Off: Las luces se apagan.
13. Entrada del cable de corriente (IEC): Inserte aquí el cable de corriente incluido para
cargar la unidad.
14. Interruptor de encendido/apagado: Mueva este interruptor para encender o apagar
el altavoz.
Nota: Total PA™ Resplandor Máximo se apagará tras 15 minutos si no se reproduce
audio.
15
Page 16

Panel de medios
Utilice los siguientes botones del panel de medios para controlar las fuentes de audio
USB/SD, radio FM y Bluetooth.
Modo: Pulse este botón para conmutar la fuente de audio entre USB/SD, radio FM, Aux
(disponible para seleccionar cuando el puerto USB y la ranura de la tarjeta SD están vacíos),
y Bluetooth. El modo predeterminado al encender el Total PA
Bluetooth. El modo USB/SD solo es seleccionable si hay una unidad de memoria USB o
tarjeta SD insertada en el Total PA
™
Resplandor Máximo; de lo contrario, el botón Mode
(modo) conmutará solo entre Bluetooth, Aux, y radio FM.
Nota: Su unidad de memoria USB o tarjeta SD no puede superar los 16 Gb de capacidad
y debe contener archivos reproducibles para que sus datos aparezcan correctamente en
la pantalla. Pueden almacenar archivos MP3. Cuando conecte una unidad de memoria
USB o tarjeta SD con archivos reproducibles, el Total PA™ Resplandor Máximo ordenará
los archivos alfabéticamente por carpeta en el directorio raíz y luego por el nombre de la
pista en la carpeta.
Reproducción/Pausa: Cuando seleccione USB/SD como la fuente de audio, pulse este
botón para reproducir/poner en pausa la pista actualmente seleccionada. Presione dos
veces este botón para detener la reproducción y volver al principio de la lista de pistas.
Cuando seleccione Bluetooth como la fuente de audio, pulse este botón para
reproducir/poner en pausa la pista actualmente seleccionada o manténgalo pulsado para
activar o desactivar las indicaciones de voz.
Repetir: Pulsado este botón para alternar entre las cinco opciones de repetir/aleatorio:
• Reproducir las pistas de la carpeta USB/SD en orden con repetición/reproducción
aleatoria desactivado (OFF).
• Reproducir las pistas en orden aleatorio (Rd0).
• Reproducir la pista USB/SD actual con repetición (ONE).
• Reproducir todas las pistas en la unidad flash USB drive o tarjeta SD con repetición
(ALL).
• Reproducir la lista de pistas de la carpeta actual con repetición (F0d). La carpeta
utilizada se basa en la canción que se está reproduciendo cuando se activa. Por
ejemplo, si la reproducción de una canción está en el nivel raíz, al seleccionar F0d
solo se repetirán las canciones en el nivel raíz. Si una canción está en la carpeta "A",
solo se repetirán las canciones en la carpeta "A".
Anterior: Cuando se seleccione USB/SD o Bluetooth como la fuente de audio, pulse este
botón para pasar a la pista anterior en la lista de reproducción.
Siguiente: Cuando se seleccione USB/SD o Bluetooth como la fuente de audio, pulse
este botón para pasar a la siguiente pista en la lista de reproducción.
Nota: En algunas aplicaciones de dispositivos Bluetooth, al pulsar los botones <
(Previous) o > (Next) es posible que se cambie la lista de reproducción o género musical
en lugar de la pista.
™
Resplandor Máximo es
16
Page 17

Control remoto
Detener: Detiene la reproducción de la fuente del panel de medios.
Modo: Selecciona la fuente del panel de medios: Aux, USB, SD, Bluetooth o radio FM.
Silenciar: Silencia la reproducción de música de las fuentes del panel de medios.
Presione Mute nuevamente para anular el silencio de la reproducción de música.
Anterior: Retrocede a la pista anterior del USB o tarjeta SD. Al escuchar de fuentes
Bluetooth, pulsar Anterior en algunas aplicaciones puede hacer que vaya a otra lista de
reproducción o género musical. Cuando escuche la radio FM, presione el botón Prev para
sintonizar la estación de radio.
Siguiente: Avanza a la pista siguiente del USB o tarjeta SD. Al escuchar de fuentes
Bluetooth, pulsar Siguiente en algunas aplicaciones puede hacer que vaya a otra lista de
reproducción o género musical. Cuando escuche la radio FM, presione el botón Siguiente
para sintonizar la estación de radio.
Reproducción/Pausa: Reproduce/hace pausa en la fuente de USB, SD o Bluetooth del
Media Panel. Los archivos se reproducen desde la fuente USB o SD primero
alfabéticamente según el contenido de la raíz, luego alfabéticamente según la carpeta y
luego alfabéticamente según el nombre de la pista. En el modo de radio, presione dos
veces el botón Reproducir / Pausa para alternar entre las presintonías de radio.
Volumen –: Disminuye el Main Volume (volumen principal).
Volumen +: Aumenta el Main Volume (volumen principal).
Ecualizador: Presione este botón para alternar entre los preajustes de EQ (el nombre del
preajuste se mostrará en la pantalla).
100+: Saltar 100 pistas hacia adelante.
200+: Saltar 200 pistas hacia adelante.
Teclas numéricas: Permite la selección de canales para estaciones de radio FM y la
selección de pistas para fuentes de tarjeta SD/USB.
17
Page 18

Funcionamiento
Uso de la perilla de control
La perilla de control controla por defecto el volumen principal para todos los canales. Pulse la
perilla de control para alternar entre las diferentes funciones: Canal de micrófono, fuente, nivel
del efecto de eco y ecualizador.
• Pulse la perilla de control para seleccionar el canal de micrófono 1 o 2. Gire la perilla de
control para subir o bajar el volumen de la entrada de micrófono independientemente de
los otros canales.
• Pulse la perilla de control nuevamente para seleccionar la fuente. Gire la perilla de control
para subir o bajar el volumen de la señal Aux/BT/USB/Radio independientemente de los
otros canales.
• Pulse la perilla de control nuevamente para controlar el nivel del efecto de eco para el
canal de micrófono.
• Pulse la perilla de control nuevamente para seleccionar el ajuste de ecualización de graves.
Gire la perilla de control para subir o bajar las frecuencias bajas de todos los canales.
• Pulse la perilla de control nuevamente para seleccionar el ajuste de ecualización de
agudos. Gire la perilla de control para subir o bajar las frecuencias altas de todos los
canales.
• Pulse la perilla de control nuevamente para volver al ajuste del volumen principal.
Si no hay ninguna actividad proveniente de la perilla de control durante 5 segundos, la función
regresará al volumen principal.
18
Page 19

Cómo aparear un dispositivo de Bluetooth
1. Encienda el Total PA™ Resplandor Máximo girando el interruptor de encendido /
apagado. El Total PA
™
Resplandor Máximo entrará automáticamente al modo de
apareamiento de Bluetooth.
2. Navegue a la pantalla de configuración Bluetooth de su dispositivo, busque Total PA
Glow Max, y conéctelo. No conecte al Total PA Glow Max_BLE. Una vez establecida
la conexión, el icono de Bluetooth en la pantalla parpadeará y escuchará el mensaje
"Connected".
Nota: Si tiene problemas para conectarse, seleccione "Forget this Device" (Olvidar
este dispositivo) en su dispositivo Bluetooth e intente conectarse nuevamente.
3. Para desconectarse, desactive Bluetooth de la configuración de Bluetooth de su
dispositivo.
Vinculación de dos altavoces compatibles (Stereo-Link 2.0™):
™
1. Encienda ambos altavoces Total PA
Resplandor Máximo encendiendo y apagando
los interruptores. Asegúrese de que estén en modo de emparejamiento Bluetooth y no
estén conectados a un dispositivo.
2. Mantenga presionado el botón Repeat / Link en un altavoz (el altavoz principal que
controlará ambos) para ingresar al modo Stereo Link. Una vez que se ha establecido
un enlace, la palabra LINK aparecerá en ambas pantallas de altavoces.
3. Conéctese al altavoz principal mediante Bluetooth.
Para desconectarse, presione dos veces el botón Repeat / Link.
Nota: Los altavoces deben estar a una distancia máxima de 100 pies (33,3 m) entre sí
para que se vinculen correctamente.
Nota: Total PA™ Resplandor Máximo no es compatible con los modelos ION PA
anteriores. Para enlazar a un modelo anterior, use un cable XLR (no incluido) y enlace
desde el PA más nuevo al anterior a través de XLR Out en Total PA™ Resplandor Máximo
y XLR Aux In en el modelo anterior.
Modo SD / USB
Presione el botón Mode para alternar y seleccionar el modo SD o USB. Total PA
Resplandor Máximo reproducirá automáticamente el primer archivo compatible. Los
archivos se reproducen en orden alfabético según el nivel raíz, luego alfabéticamente por
carpeta y luego alfabéticamente por nombre de pista. La reproducción de medios se
detendrá cuando se hayan reproducido todos los medios en la tarjeta SD o unidad USB.
Mantenga presionados los botones Siguiente y Anterior para avanzar o retroceder
rápidamente dentro de la canción.
Nota: La tarjeta SD o la unidad USB debe tener archivos reproducibles para que aparezca
en la pantalla del panel de medios. Si no hay una unidad USB o tarjeta SD insertada en el
panel de medios, presione y suelte el botón Modo para alternar entre Bluetooth y radio.
Repita la configuración (las abreviaturas aparecerán en la pantalla):
• TODAS: repite todas las pistas de la carpeta.
• FOLd: repite todas las pistas de la carpeta.
• OnE: repite la pista USB que se está reproduciendo actualmente.
• rAn: cambia el orden de las pistas.
™
19
Page 20

Control de aplicación
IMPORTANTE: Para asegurarse la mejor experiencia posible con la aplicación, utilice el
Android OS o IOS más actualizado en su dispositivo.
Siga los pasos indicados a continuación para descargar la aplicación a su
dispositivo:
1. En su dispositivo, vaya a la tienda de aplicaciones respectiva de Apple o Google Play.
Luego busque la aplicación gratuita ION Sound XP
2. Siga las instrucciones que aparecen en la pantalla para descargar e instalar la
aplicación. Una vez descargada, la aplicación ION Sound XP
pantalla de inicio de su dispositivo.
3. Conecte su dispositivo al altavoz Total PA
Consulte Cómo aparear un dispositivo de Bluetooth para saber cómo hacer esto.
4. Abra la aplicación ION Sound XP
TM
. Si se le pide elegir, permita a la aplicación acceder
a los servicios de Bluetooth y ubicación de su dispositivo.
5. Toque para seleccionar Add A Product en la pantalla. La aplicación escaneará y
encontrará Total PA
™
Resplandor Máximo.
Si tiene problemas para conectarse, toque ¿Necesita ayuda para la configuración?
Para obtener consejos adicionales.
6. Seleccione
li cono Total PA
™
Resplandor Máximo para pasar a la próxima pantalla,
en donde podrá utilizar la aplicación para controlar diversas funciones del altavoz
tales como:
• Radio: Reproducir la radio, cambiar estaciones y editar presets.
• Ecualización: Ajustar la ecualización del altavoz y activar o desactivar el
refuerzo de graves.
• Volumen: Ajustar el volumen del altavoz y el del micrófono.
• Avisos de voz : Activar o desactivar los avisos de voz.
• Soporte: Visite ionaudio.com, contáctese con soporte técnico y obtenga
información sobre la garantía y preguntas frecuentes.
TM
.
TM
aparecerá en la
™
Resplandor Máximo mediante Bluetooth.
20
Page 21

Solución de problemas
Si el sonido está distorsionado: Pruebe bajando el control de volumen de su fuente de sonido
o instrument musical. Pruebe también reduciendo el Main Volume (volumen principal) del
Total PA™ Resplandor Máximo.
Si los graves son demasiado fuertes: Intente ajustando el control de tono o ecualización de su
Total PA™ Resplandor Máximo o fuente de sonido para reducir el nivel de graves. De esta forma
podrá reproducir la música con más volumen antes de que se produzca el recorte (distorsión).
Si hay un silbido agudo cuando se usa un micrófono: Probablemente sea realimentación.
Apunte el micrófono apartándolo del altavoz.
Si no puede oír el micrófono por arriba del volumen de la música: Disminuya el volumen de
la música en su fuente.
Aparece “NONE” en la pantalla: Si ya hay una unidad USB o tarjeta SD insertada
correctamente, asegúrese de que contenga archivos reproducibles (MP3).
Si no puede conectar su dispositivo de audio al Total PA™ Resplandor Máximo mediante
Bluetooth:
• Mantenga su dispositivo de audio (por ej., teléfono inteligente [smartphone] o tableta) y el
Total PA™ Resplandor Máximo lo más cerca posible entre sí al realizar la conexión.
Asegúrese que tanto el dispositivo de audio como el Total PA
estén obstruidos por paredes, muebles, etc.
• Reinicie la conexión Bluetooth del Total PA
™
Resplandor Máximo para desconectarlo Total
PA™ Resplandor Máximo de cualquier otro dispositivo de audio y reinicie el proceso de
búsqueda. Si esto no funciona en seguida, apague el Total PA™ Resplandor Máximo y
luego vuelva a encenderlo. Para más información, consulte Cómo aparear un dispositivo
Bluetooth.
• Reinicie la conexión Bluetooth de su dispositivo de audio apagando el Bluetooth y luego
volviendo a encenderlo. Puede encontrar esta opción dentro del menú Bluetooth en los
ajustes de su teléfono o dispositivo de audio.
Si esto no funciona y ya se había conectado al Total PA™ Resplandor Máximo
anteriormente, busque Total PA™ Resplandor Máximo en la lista de dispositivos
disponibles o previamente conectados en el menú Bluetooth de su dispositivo de audio,
toque el icono de engranaje o "i" ubicado junto a él y luego seleccione Desaparear u
Olvidar. Apague el Total PA™ Resplandor Máximo, luego vuelva a encenderlo e intente
aparearlo nuevamente una vez que vuelva a aparecer en su lista de dispositivos
disponibles.
Nota: Si Total PA™ Resplandor Máximo ya ha sido recientemente apareado con otro
dispositivo de audio que aún se encuentre dentro del alcance, es posible que tenga que
repetir este proceso con ese dispositivo de audio para desconectarlo completamente.
Si experimenta cortes en el audio al reproducir música desde un dispositivo Bluetooth, es
posible que esto suceda debido a que su unidad está intentando enlazarse con otro altavoz.
Esto puede ocurrir si apaga un altavoz que estaba enlazado con su unidad o si acaba de
encender su unidad y la misma se encuentra en modo Stereo-Link. Para detener los cortes de
audio, salga del modo Stereo-Link pulsando dos veces el botón Repeat/Link. Como
alternativa, puede esperar a que su unidad se enlace con otro altavoz si es que hay uno dentro
del alcance.
Si desea impedir que su unidad se enlace automáticamente cuando la enciende, asegúrese
de pulsar dos veces el botón Repeat/Link para salir del modo Stereo-Link antes de apagarlo.
™
Resplandor Máximo no
21
Page 22

Guide d’utilisation (Français)
Présentation
Merci d'avoir fait l'acquisition de l’enceinte Total PA
divertissement est aussi important pour nous qu’il l’est pour vous. C’est pourquoi nous
concevons nos produits avec une seule chose en tête — rendre la vie plus amusante et
plus pratique.
Contenu de la boîte
Total PAMC Glow Max
Microphone avec cable (4,5 m/15 pi)
Câble d’alimentation (1,5 m/5 pi)
Télécommande
Support d'enceinte
Guide d’utilisation rapide
Assistance
Pour les toutes dernières informations concernant la documentation, les spécifications
techniques, la configuration requise, la compatibilité et l’enregistrement du produit,
veuillez visiter ionaudio.com.
Pour de l’assistance supplémentaire, veuillez visiter ionaudio.com/support.
Installation du support pour enceinte
1. Déployez les pieds du support sur une surface plate et stable. Déployez complètement
les pieds jusqu'à ce que le support en plastique soit bloqué par les saillies sur la tige
centrale. Insérez la goupille inférieure directement au-dessus du bouton de réglage
inférieur et serrez le bouton de réglage inférieur.
2. Allongez la perche télescopique du support à la hauteur appropriée et serrez la vis
latérale. Lorsque vous soulevez la tige de montage, assurez-vous que l'extrémité avec
la flèche pointant vers le haut est sur le dessus.
3. Introduisez la goupille supérieur dans le trou supérieur de la perche afin qu'elle demeure
à la hauteur désirée et serrez la vis latérale.
4. Serrez la vis inférieure de la Total PA
bloque pas l'ouverture.
5. Alignez le trou de fixation de la Total PA
l'enceinte sur la perche.
6. Serrez la vis de fixation de la Total PA
Remarque : Retirez la Total PAMC Glow Max avant de déplacer le support pour plus de
sécurité.
MC
Glow Max dans le sens antihoraire afin qu'elle ne
MC
Glow Max à la perche du support et placez
MC
Glow Max dans le sens horaire.
MC
Glow Max. Chez ION, votre
22
Page 23

Démarrage
1. Assurez-vous que tous les articles énumérés dans le Contenu de la boîte de ce guide sont inclus
dans la boîte. Dans la boîte, sous la feuille de polystyrène se trouvent le câble d'alimentation et le
microphone.
2. Veuillez lire la section Consignes de sécurité et informations concernant la garantie avant
d'utiliser le produit.
3. Veuillez examiner le Schéma de connexion.
4. Veuillez vous assurer que tous les appareils d’entrée tels que microphones, lecteurs de disques
compacts ou lecteurs multimédia numériques raccordés sont éteints et que leur volume est à «
zéro ».
5. Branchez tous les appareils comme indiqué sur le schéma de connexion.
6. Mettez tous les appareils sous tension dans l'ordre suivant :
a. sources d'entrée audio (p. ex., microphones, instruments, lecteurs de disques compacts)
b. Total PA
7. Lorsque vous avez terminé d’utiliser la Total PA
dans l'ordre suivant :
a. Total PA
b. sources d’entrée audio
Schéma de connexion
Les éléments qui ne figurent pas dans la section Contenu de la boîte sont vendus séparément.
(limite de 16 Go et seuls les fichiers MP3
MC
Glow Max
MC
Glow Max
Clé USB
sont pris en charge)
MC
Glow Max, mettez tous les appareils hors tension
Carte SD
(limite de 16 Go et seuls
les fichiers MP3 sont
pris en charge)
Téléphone
intelligent
(smartphone)
Microphones
Tablette
PRESETS
LINK
Téléphone
intelligent
MIC IN 2 XLR IN MIX OUTMIC IN 1
(smartphone)
Alimentation
23
Page 24

Caractéristiques
Panneau arrière
1. Touches du panneau des médias :
Commandes pour les sources USB/SD,
Bluetooth
incluent la sélection du mode et les options
de lecture de musique. Veuillez consulter la
section Panneau des médias pour une
description des commandes.
2. Port USB : Ce port permet de brancher une
clé USB pour écouter de la musique. Vous
pouvez également utiliser ce port pour
recharger un appareil USB, comme une
tablette ou un téléphone intelligent. Pour
recharger un appareil qui diffuse de la
musique via Bluetooth, mettez d'abord la
musique en pause, puis attendez qu'il se
reconnecte une fois le câble USB branché.
3. Lecteur de carte SD : Inserez une carte
SD dans cet emplacement.
4. Écran : Cet écran affiche des informations
relatives au fonctionnement actuel de Total
PA
l'utilisateur complet pour en savoir plus.
Remarque : Un film de protection en
plastique recouvre l'écran. Retirez-le pour
un affichage optimal.
5. Entrées microphone (6,35 mm et XLR) :
Ces entrées permettent de brancher un
microphone ou une source de niveau
microphone.
6. Entrées auxiliaires (3,5 mm et XLR) : Ces
entrées peuvent être utilisées pour
connecter un lecteur CD, un lecteur MP3 ou
une autre source audio.
7. Sortie mix (XLR) : Cette sortie permet de
brancher une enceinte, une console de
mixage ou un enregistreur.
8. Bouton de commande : Tourner ce bouton permet de régler le volume principal
(sortie générale) de l’enceinte. Appuyer sur ce bouton permet de sélectionner et de
modifier le réglage du volume des sorties micro 1 et micro 2, de la source (radio, USB,
SD, signal Bluetooth et entrée auxiliaire), de l'effet d'écho, le réglage d’égalisation des
hautes et des basses fréquences. Modifier le volume de la Total PA
n'affecte pas le volume de votre appareil Bluetooth. Pour une qualité sonore optimale,
réglez le volume de votre source d'entrée au maximum et utilisez les commandes de
volume Source et Main de l’enceinte pour régler le volume.
24
®
et la radio FM. Ces commandes
MC
Glow Max. Consultez le guide de
1
2
PRESETS
1
1
14
1
4
1
3
9
LINK
8
10
12
11
1
5
1
6
MIC IN 2 XLR IN MIX OUTMIC IN 1
1
7
13
MC
Glow Max
Page 25

9. Répéter / Link : En mode USB ou SD, appuyer sur cette touche permet de répéter
une seule piste, un dossier ou toutes les pistes. Maintenir cette touche enfoncée
permet de relier une autre enceinte ION compatible (visitez ionaudio.com pour une
liste des enceintes compatibles).
10. Mode : Cette touche permet de sélectionner la source audio à utiliser : USB, SD, radio
FM, Aux (option disponible lorsqu’aucun câble n’est branché au port USB et que le
lecteur de carte SD est vide) ou Bluetooth.
11. Indicateurs d’écrêtage : En présence d'écrêtage du signal des entrées ou du
panneau des médias, la DEL d’écrêtage clignote rouge (distorsion en raison d'un
signal trop fort). Pour remédier à l’écrêtage, diminuez le réglage du volume principal
ou de l’entrée auxiliaire/microphone (si un appareil produisant des signaux audio de
forte intensité est branché).
12. Touche du mode d’éclairage : Cette touche permet de basculer entre l'un de ces cinq
modes d'éclairage du panneau avant :
• Color Cycle (Cycle de couleur) : Les lumières brillent et défilent à travers toutes les
couleurs. C'est le mode par défaut lors de la mise sous tension initiale de la Total
MC
PA
Glow Max. Vous pouvez maintenir la touche du mode d’éclairage enfoncée afin
que les lumières restent allumées dans la couleur actuelle. Appuyez de nouveau sur
la touche afin de faire défiler à nouveau toutes les couleurs.
• Beat Sync (Synchronisation à la musique) : Les lumières clignotent et changent de
couleur selon le rythme de la musique qui joue par le biais de l'enceinte. Pour obtenir
le meilleur effet d'éclairage, vous devrez peut-être régler le volume de votre appareil,
le volume de la source et/ou le volume principal.
• Color Wheel (Roue des couleurs) : Les lumières tournent dans une roue de toutes
les couleurs.
• Color Beat Sync (Roue de couleurs synchronisée à la musique) : Les lumières
tournent dans une roue de toutes les couleurs et changent de direction et de vitesse
en fonction du tempo de la musique diffusée sur l'enceinte. Pour obtenir le meilleur
effet d'éclairage, vous devrez peut-être régler le volume de votre appareil, le volume
de la source et / ou le volume principal.
• Off (Désactivé) : Les lumières ne s'allumeront pas.
13. Entrée d’alimentation (CEI) : Cette entrée permet de brancher le câble d'alimentation
inclus afin de recharger l'appareil.
14. Interrupteur d'alimentation : Cet interrupteur permet de mettre l’enceinte sous et
hors tension.
Remarque : L’enceinte Total PAMC Glow Max se met automatiquement hors tension
après 15 minutes sans signal audio.
25
Page 26

Panneau des médias
Utilisez les touches suivantes sur le module multimédia pour commander les sources
USB/SD, Bluetooth et la radio FM.
Mode : Cette touche permet de commuter entre les sources USB/SD, Bluetooth et la radio
FM, Aux (option disponible lorsqu’aucun câble n’est branché au port USB et que le lecteur
de carte SD est vide). Le mode par défaut lors de la mise sous tension de la Total PA
Max est Bluetooth. Le mode USB/SD ne peut être sélectionné que si une clé USB ou une
carte SD est insérée dans la Total PA
MC
Glow Max, sinon la touche Mode permet uniquement
de sélectionner le mode Bluetooth, Aux, ou la radio FM.
Remarque : La clé USB ou carte SD utilisée doit avoir une capacité maximale de 16 Go et
doit contenir des fichiers audio pour que ses données apparaissent correctement à
l'écran. Elle peut contenir des fichiers MP3. Lorsque vous insérez une clé USB ou une
carte SD contenant des fichiers audio, la Total PAMC Glow Max classe en ordre
alphabétique tous les dossiers dans le répertoire racine, puis toutes les pistes de chaque
dossier.
Lancer/interrompre la lecture : Lorsque USB/SD est sélectionnée comme source audio,
appuyer sur cette touche permet de lancer et d’interrompre la lecture de la piste
sélectionnée. Appuyer deux fois sur cette touche permet d'arrêter la lecture et de revenir
au début de la liste des pistes.
Lorsque Bluetooth est sélectionnée comme source audio, appuyer sur cette touche
permet de lancer et d’interrompre la lecture de la piste sélectionnée, et la maintenir
enfoncée permet d’activer et de désactiver les invites vocales.
Répéter : Enfoncer permet de parcourir les cinq options de lecture répétée/aléatoire :
• Lecture des pistes du dossier USB/SD en ordre avec lecture répétée/aléatoire
désactivée (OFF)
• Lecture aléatoire des pistes (Rd0)
• Lecture répétée de la piste USB/SD sélectionnée (ONE)
• Lecture répétée de toutes les pistes de l’appareil USB ou de la carte SD (ALL)
• Lecture répétée de la liste des pistes du dossier sélectionné (F0d). Le dossier utilisé
est basé sur la piste en cours de lecture lorsqu'elle est activée. Par exemple, si une
piste en cours de lecture est au niveau racine, la sélection de F0d ne répétera que
les pistes au niveau racine. Si une piste se trouve dans le dossier « A », seules les
pistes du dossier « A » seront répétées.
Piste précédente : Lorsque USB/SD ou Bluetooth est sélectionnée comme source audio,
appuyer sur cette touche permet de retourner à la piste précédente dans la liste de
lecture.
Piste suivante : Lorsque USB/SD ou Bluetooth est sélectionnée comme source audio,
appuyer sur cette touche permet de passer à la piste suivante dans la liste de lecture, et la
maintenir enfoncer permet d’augmenter le volume de la source.
Remarque : Dans certaines applications pour appareils Bluetooth, les touches < (piste
précédente) et > (piste suivante) permettent de passer à une autre liste de lecture ou un
autre genre de musique plutôt qu’à une autre piste.
MC
Glow
26
Page 27

Télécommande
Stop : Cette touche permet d'arrêter la lecture de la source du panneau des médias.
Mode : Cette touche permet de sélectionner la source du panneau des médias : Aux,
USB, SD, Bluetooth ou radio FM.
Mute : Cette touche permet de mettre en sourdine le signal audio des sources du
panneau des médias. Appuyez à nouveau sur Muet pour réactiver la lecture de la
musique.
Piste précédente : Cette touche permet de passer à la piste précédente de la source
USB ou de la carte SD. Sur des sources Bluetooth, cette touche permet de passer à
d'autres listes de lecture ou de genre musical, selon l'application. Lorsque vous écoutez la
radio FM, appuyez sur le bouton Précédent pour régler la station de radio vers le bas.
Piste suivante : Cette touche permet de passer à la piste suivante de la source USB ou
de la carte SD. Sur des sources Bluetooth, cette touche permet de passer à d'autres listes
de lecture ou de genre musical, selon l'application. Lorsque vous écoutez la radio FM,
appuyez sur le bouton Suivant pour syntoniser la station de radio.
Lecture/Pause : Cette touche permet de lancer ou d'interrompe la lecture de la source
Bluetooth, USB ou de la carte SD du panneau des médias. Les fichiers sont lus de la
source USB et de la carte SD en ordre alphabétique, en partant du répertoire racine, puis
du dossier et ensuite par le nom de la piste. En mode Radio, appuyez deux fois sur le
bouton Lecture / Pause pour basculer entre les préréglages radio.
Vol – : Diminue le Main Volume (volume principal).
Vol + : Augmente le Main Volume (volume principal).
EQ : Appuyez sur ce bouton pour basculer entre les préréglages d'égaliseur (le nom du
préréglage sera affiché à l'écran).
100+ : Cette touche permet d'effectuer un saut de 100 pistes.
200+ : Cette touche permet d'effectuer un saut de 200 pistes.
Touches numériques : Ces touches permettent de sélectionner le canal pour les stations
de radio FM et de sélectionner les pistes des clés USB et des cartes SD.
27
Page 28

Fonctionnement
Utilisation du bouton de commande
Le bouton de commande contrôle par défaut le volume principal de tous les canaux. Appuyer
sur le bouton de commande permet de basculer entre les différentes fonctions : canal du
microphone, source, niveau d'effet d'écho et égalisation.
• Appuyez sur le bouton de commande pour sélectionner le canal du microphone 1 ou 2.
Tournez le bouton de commande pour augmenter ou diminuer le volume de l'entrée du
microphone indépendamment des autres canaux.
• Appuyez de nouveau sur le bouton de commande pour sélectionner la source. Tournez le
bouton de commande pour augmenter ou diminuer le volume du signal Aux/BT/USB/Radio
indépendamment des canaux du microphone.
• Appuyez de nouveau sur le bouton de commande pour modifier le niveau de l'effet d'écho
pour le canal du microphone.
• Appuyez de nouveau sur le bouton de commande pour sélectionner le réglage d’égalisation
des basses fréquences. Tournez le bouton de commande pour augmenter ou diminuer les
basses fréquences sur tous les canaux.
• Appuyez de nouveau sur le bouton de commande pour sélectionner le réglage d’égalisation
des hautes fréquences. Tournez le bouton de commande pour augmenter ou diminuer les
hautes fréquences sur tous les canaux.
• Appuyez de nouveau sur le bouton de commande pour revenir au paramètre du volume
principal.
Après 5 secondes d’inutilisation, le bouton de commande revient au paramètre du volume
principal.
28
Page 29

Jumelage d'un appareil Bluetooth
1. Mettez la Total PA
La Total PA
indiqué par le voyant Bluetooth bleu clignotant.
2. Accédez à l'écran de configuration Bluetooth de votre appareil, recherchez Total PA
Glow Max et connectez-vous. Ne branchez pas à Total PA Glow Max_BLE. Une fois
connectée, l'icône Bluetooth sur l'écran clignotera et vous entendrez « Connected ».
Remarque: si vous rencontrez des problèmes de connexion, sélectionnez « Oublier
cet appareil » sur votre appareil Bluetooth et essayez de vous connecter à nouveau.
3. Pour supprimer la connexion, désactivez la fonction Bluetooth de votre appareil.
Relier deux enceintes compatibles (Stereo-Link 2.0
1. Mettez les deux enceintes Total PA
interrupteurs d’alimentation. Assurez-vous qu'elles soient en mode de jumelage
Bluetooth et qu'elles ne soient pas connectées à un autre appareil.
2. Maintenez la touche Répéter / Link d’une des enceintes enfoncée (l’enceinte
principale qui contrôlera les deux) pour passer en mode Stereo-Link. Une fois la liaison
établie, le mot LINK s’affichera sur les deux enceintes.
3. Connectez-vous à l’enceinte principale via Bluetooth.
Pour vous déconnecter, appuyez deux fois sur la touche Répéter / Link.
Remarque : Les enceintes doivent être à moins de 30,5 m l'une de l'autre pour être
correctement reliées.
Remarque : La Total PAMC Glow Max n'est pas compatible avec les modèles ION PA
précédents. Pour établir un lien avec un modèle précédent, utilisez un câble XLR (non
inclus) et reliez le nouveau PA au précédent via la sortie XLR sur Total PAMC Glow Max et
l'entrée auxiliaire Aux XLR sur le modèle précédent.
MC
Glow Max sous tension en basculant l'interrupteur d'alimentation.
MC
Glow Max entrera automatiquement en mode de jumelage Bluetooth
MC
MC
Glow Max sous tensions en basculant leurs
)
Mode SD / USB
Appuyez sur la touche Mode pour basculer vers le mode SD ou USB. Total PA
lira automatiquement le premier fichier compatible. Les fichiers sont lus en ordre
alphabétique, en partant du répertoire racine, puis du dossier et ensuite par le nom de la
piste. La lecture multimédia s'arrête lorsque tous les supports ont été lus sur la carte SD
ou le lecteur USB. Appuyez sur les touches Suivant et Précédent et maintenez-les
enfoncés pour avancer ou reculer rapidement dans la chanson.
Remarque : la carte SD ou la clé USB doit contenir des fichiers lisibles pour qu’elle
apparaisse sur l’écran du panneau multimédia. S'il n'y a pas de clé USB ou de carte SD
insérée dans le panneau multimédia, appuyez et relâchez la touche Mode pour basculer
entre Bluetooth et radio.
Les paramètres de lecture répétée (les abréviations s'afficheront à l'écran) :
• ALL : Répète toutes les pistes du dossier.
• FOLd : Répète toutes les pistes du dossier.
• OnE : Répète la piste USB en cours de lecture.
• rAn : Mélanger l'ordre des pistes.
™
Glow Max
29
Page 30

Contrôle d'application
Veuillez suivre les étapes ci-dessous afin de télécharger l’application sur votre appareil :
1. Accédez au Apple App Store ou à Google Play à partir de votre appareil. Recherchez
l’application ION Sound XP
2. Suivez ensuite les consignes à l'écran afin de la télécharger et de l'installer. Une fois
téléchargée, l’application ION Sound XP
appareil.
3. Connectez votre appareil à Total PA
appareil Bluetooth pour savoir comment procéder.
4. Ouvrez l'application ION Sound XP
accéder aux services Bluetooth et de localisation de votre appareil.
5. Appuyez sur pour sélectionner Add A Product sur l'écran. L'application va scanner
et trouver Total PA
MC
Si vous éprouvez des problèmes de connexion, appuyez sur « Help with setting
up? » afin d'obtenir des conseils supplémentaires.
6. Sélectionnez l'icône Total PA
pouvez utiliser l'application pour contrôler diverses fonctions de l’enceinte comme :
• Radio : Ce réglage permet d'écouter la radio, de changer la station et de
modifier les préréglages.
• Égalisation : Ce réglage permet d’ajuster l'égalisation de l’enceinte et d’activer
et de désactiver la fonction Bass Boost.
• Volume : Ce réglage permet d’ajuster le volume de l’enceinte et du microphone.
• Messages vocaux : Ce réglage permet d’activer et de désactiver les messages
vocaux.
• Assistance technique : Ce réglage permet d’accéder à ionaudio.com, de
contacter l’assistance technique et de consulter les informations de garantie et
les questions fréquemment posées.
MC
.
Glow Max.
MC
MC
s’affiche sur la fenêtre d’accueil de votre
MC
Glow Max via Bluetooth. Voir Jumelage d'un
MC
. Si vous y êtes invité, autorisez l'application à
Glow Max pour passer à la fenêtre suivante, où vous
30
Page 31

Dépannage
Lorsqu'il y a de la distorsion : Essayez de diminuer le volume sur l'appareil d'entrée audio ou
l'instrument de musique. Essayez également de diminuer le volume principal de la Total PA
MC
Glow Max.
Lorsqu'il y a trop de basses fréquences : Essayez de régler le niveau de tonalité et
d'égalisation de la Total PAMC Glow Max ou de la source d'entrée audio afin de diminuer le
niveau des basses fréquences. Cela vous permettra d'augmenter le volume de la musique avant
que l'écrêtage se produise.
Lorsqu'il y a un sifflement aigu lors de l'utilisation d'un microphone : Ceci est probablement
causé par la rétroaction (effet Larsen). Dirigez le microphone loin de l'enceinte.
Si vous ne pouvez entendre le microphone à cause du volume trop élevé de la musique :
Baissez le volume de la musique provenant de la source.
Si l'écran affiche « NONE » : Si une clé USB ou une carte SD est correctement insérée,
assurez-vous qu'elle contient des fichiers lisibles (MP3).
Si vous ne pouvez connecter votre appareil audio à la Total PA
MC
Glow Max par connexion
Bluetooth :
• Veillez à ce que votre appareil audio (p. ex., téléphone intelligent ou tablette) et la Total
PAMC Glow Max soient le plus près possible l’un de l’autre lors du jumelage. Veillez
également à ce qu’aucun obstacle ne se trouve entre l’appareil audio et la Total PAMC Glow
Max, comme des murs, des meubles, etc.
• Réinitialisez la connexion Bluetooth sur la Total PAMC Glow Max afin de supprimer toute
connexion à la Total PAMC Glow Max et recommencer le processus de recherche
d’appareil. Si cela ne fonctionne pas immédiatement, mettez la Total PAMC Glow Max hors
tension et de nouveau sous tension. Veuillez consulter la section Jumelage d'un appareil
Bluetooth afin d’en savoir plus.
• Réinitialisez la connexion Bluetooth sur l’appareil audio en désactivant et réactivant la
connexion Bluetooth. Vous pouvez effectuer ceci à partir du menu Bluetooth dans les
réglages de votre téléphone intelligent ou autre appareil audio.
Si cela ne fonctionne pas et que vous avez déjà connecté votre appareil à la Total PAMC
Glow Max auparavant, veuillez rechercher la Total PAMC Glow Max dans la liste des
appareils disponibles ou précédemment connectés dans le menu Bluetooth de votre
appareil audio, puis appuyer sur l'icône engrenage ou « i » située à côté de « Oublier cet
appareil ». Mettez la Total PAMC Glow Max hors tension et de nouveau sous tension et
réessayez de la jumeler une fois qu’elle apparaît dans la liste des appareils disponibles.
Remarque : Si la Total PAMC Glow Max a été récemment jumelée à un autre appareil audio
qui est toujours dans son champ de portée, il se peut que vous deviez répéter ce
processus avec cet appareil audio afin de supprimer la connexion.
Si vous éprouvez des pertes audio lorsque vous écoutez de la musique à partir d’un
appareil Bluetooth, il se peut que la Total PAMC Glow Max tente de se connecter à une autre
enceinte. Ceci peut se produire lorsque vous éteignez une enceinte reliée à la Total PAMC Glow
Max ou lorsque vous venez tout juste d’allumer celle-ci et qu’elle est en mode Link. Pour
supprimer les pertes audio, quittez le mode Link en appuyant deux fois sur la touche
Repeat/Link. Vous pouvez également attendre qu’elle se connecte à une autre enceinte s'il y en
a une à sa portée.
Si vous souhaitez éviter que l’enceinte tente de se connecter automatiquement lorsque
vous la mettez sous tension, assurez-vous d’appuyer deux fois sur la touche Repeat/Link
pour quitter le mode Link avant de la mettre hors tension.
31
Page 32

/
Appendix (English)
Technical Specifications
Output Power
Low Frequency
High Frequency
Frequency Response
Bluetooth* Profile: A2DP, AVCTP
USB/SD Card Audio: Music playback from USB drive or SD card
Remote Battery
500 W (peak)
15.0” / 381 mm woofer
1.0”
25.4 mm tweeter
55 Hz – 20 kHz
Module: Bluetooth 5.1
Range: Up to 100 feet / 30.5 meters
Linked Range: Up to 100 feet / 30.5 meters
Supported File System: FAT 32
Supported File Type: MP3
Maximum File Size: 16 GB
Maximum USB Drive / SD Card Capacity: 16 GB
CR2025
Power
Dimensions
Weight
IEC320 C13 power cable
17.5" x 14" x 27" / 445 x 356 x 686 mm
39.9 lbs. / 18.1 kg.
Specifications are subject to change without notice.
*Bluetooth and wireless reception and range are affected by walls, obstructions, and movement. For
optimal performance, place the product in the center of the room so it is unobstructed by walls,
furniture, etc.
Trademarks & Licenses
ION Audio is a trademark of inMusic Brands, Inc., registered in the U.S. and other countries. App Store
is a trademark of Apple Inc., registered in the U.S. and other countries. Android and Google Play are
registered trademarks of Google Inc. The Bluetooth word mark and logos are owned by the Bluetooth
SIG, Inc. and any use of such marks by ION Audio is under license. All other product names, company
names, trademarks, or trade names are those of their respective owners.
32
Page 33

ionaudio.com
Manual Version 1.2
 Loading...