

Page 1

iPA122
User Guide English ( 3 – 9 )
Guide d’utilisation Français ( 10 – 16 )
Appendix English ( 17 – 18 )
Page 2

2
Page 3

User Guide (English)
Introduction
Thank you for purchasing the Total PA Glow 3. At ION, your entertainment is as important to us as it
is to you. That’s why we design our products with one thing in mind—to make your life more fun and
more convenient.
1. Make sure all items listed in the Box Contents are included in the box. Look in the box under the
foam sheet for the speaker stand rubber feet, speaker stand mounting knob, power cable, and
microphone.
2. Read the Safety & Warranty Manual before using the product.
3. Study the Connection Diagram.
4. Make sure all input devices such as microphones, CD players, or digital media players are turned
off and volume settings are set at “zero.”
5. Connect all devices as shown.
6. Switch everything on in the following order:
• audio input sources (i.e. microphones, instruments, CD players)
• Total PA Glow 3
7. When turning off, always reverse this operation:
• Total PA Glow 3
• any input devices
Box Contents
Total PA Glow 3
Microphone with Cable
Telescoping Speaker Stand
Power Cable (IEC)
Quickstart Guide / Safety & Warranty Manual
Support
For the latest information about this product (system requirements, compatibility information, etc.)
and product registration, visit ionaudio.com.
For additional product support, visit ionaudio.com/support.
Caution: Do not expose Total PA Glow 3 to rain or standing water.
3
Page 4

Quick Setup
Connection Diagram
Items not listed under
Introduction > Box Contents
are sold separately.
Speaker Stand Installation
1. Fully extend the speaker stand tripod legs on a flat, stable
surface. Look in the box contents under the foam sheet for the
rubber feet and speaker stand mounting knob.
2. Raise the mounting pole up to the appropriate height needed
and tighten the side adjustment knob.
3. Insert the pin into the bottom pin-hole so the mounting pole
stays at your set height.
4. On Total PA Glow 3, adjust the bottom knob counter-clockwise
so the screw is not blocking the opening.
5. Line up the Total PA Glow 3 mounting hole with the speaker
stand pole and place on the pole.
6. Tighten the mounting knob clockwise on Total PA Glow 3.
3 4
Microphones
Tablet
SD Card
USB drive
Smartphone
Power
1
2
5/6
4
Page 5

Features
Rear Panel
1. Media Panel: Button controls for the USB/SD, FM
radio, and Bluetooth audio sources. These controls
include mode selection and playback options. See
Media Panel below for more information.
Note: A USB drive or SD card must contain playable
files in order for it to appear properly in the media
panel’s display. You can play MP3s, 16-bit WAVs,
FLAC, APE, and WMA files.
2. USB Port: Connect your USB flash drive here to play
music. You can also use this port for charging a USB
device.
3. SD Card Slot: Insert your SD card here to play music.
4. Display: Shows the Media Panel modes: USB/SD,
FM radio, and Bluetooth. The icon for the currently
selected mode will be illuminated on the Display.
Note: The Display comes with a plastic protector on
it. Remove this for optimal viewing.
5. Mic Inputs (1/4”/6.35 mm & XLR): Connect a dynamic microphone to the 1/4” (6.35 mm) or XLR inputs.
Control the volume of the inputs using the Mic Input Volume knobs.
6. Mic Input Volume Buttons: Press these buttons to increase or decrease the volume of the respective
input.
7. Aux Input (1/8”/3.5 mm): Connect a CD player, digital media player, or other audio source to this 1/8”
(3.5 mm) stereo auxiliary input. Control the volume using the Aux Input Volume knob.
8. XLR Input (XLR): Connect a line-level mixer or musical instrument to this XLR line-level input. Control the
volume using the Aux Input Volume knob. Use this line-level input when linking together two Total PA
Glow 3 units.
9. Aux Input Volume Buttons: Press these buttons to increase or decrease the input volume of the Aux
Input and XLR Input.
10. Mix Out (XLR): Connect this XLR output to another active (powered) speaker. The level of the output is
controlled by the Mic Input Volume Buttons, Aux Input Volume Buttons, and Master Volume.
11. Mic Echo: Use this knob to increase or decrease the echo effect on the Mic Inputs.
12. Low EQ: Increases or decreases the low (bass) frequencies for Mic Inputs, Aux Input, and Media
Panel audio sources at a range between -12 dB to +12 dB.
13. High EQ: Increases or decreases the high (treble) frequencies for the Mic Inputs, Aux Input, and Media
Panel audio sources at a range between -12 dB to +12 dB.
14. Master Volume: Turn this knob to adjust the overall output volume of the loudspeaker.
15. Power LED: Indicates whether Total PA Glow 3 is powered on or off.
16. Clip LED: This LED will flash red if the signal from the inputs or media panel source is clipping. If this
happens, decrease the setting of the Mic Input Volume buttons, Aux Input Volume buttons, or Master
Volume knob.
17. Link Button: Press this button to link your speaker to another Total PA Glow 3. See Operation >
Connecting Two Speakers for more information.
2
4
1
11 12 13 14
66
5
5
5
5
3
15
9
7
8
16
17
18
10
5
Page 6
18. Light Mode Button: Press this button to toggle between four modes for the lights on the front panel:
• Auto 1: The lights steadily cycle through different colors. As they cycle, the light ring will be the
same color as the glowing woofer. While operating in this mode, press and hold the Light Mode
button to freeze the lights on their current color. Press and hold again to unfreeze. Auto 1 is the
default mode when Total PA Glow 3 is powered on.
• Auto 2: The lights steadily cycle through different colors. As they cycle, the light ring will be a
different color than the glowing woofer. While operating in this mode, press and hold the Light
Mode button to freeze the lights on their current color.
• Beat Sync: The light ring flashes and changes colors according to the tempo of the music playing
on the speaker. The glowing woofer will steadily cycle through different colors.
• Off: The lights turn off.
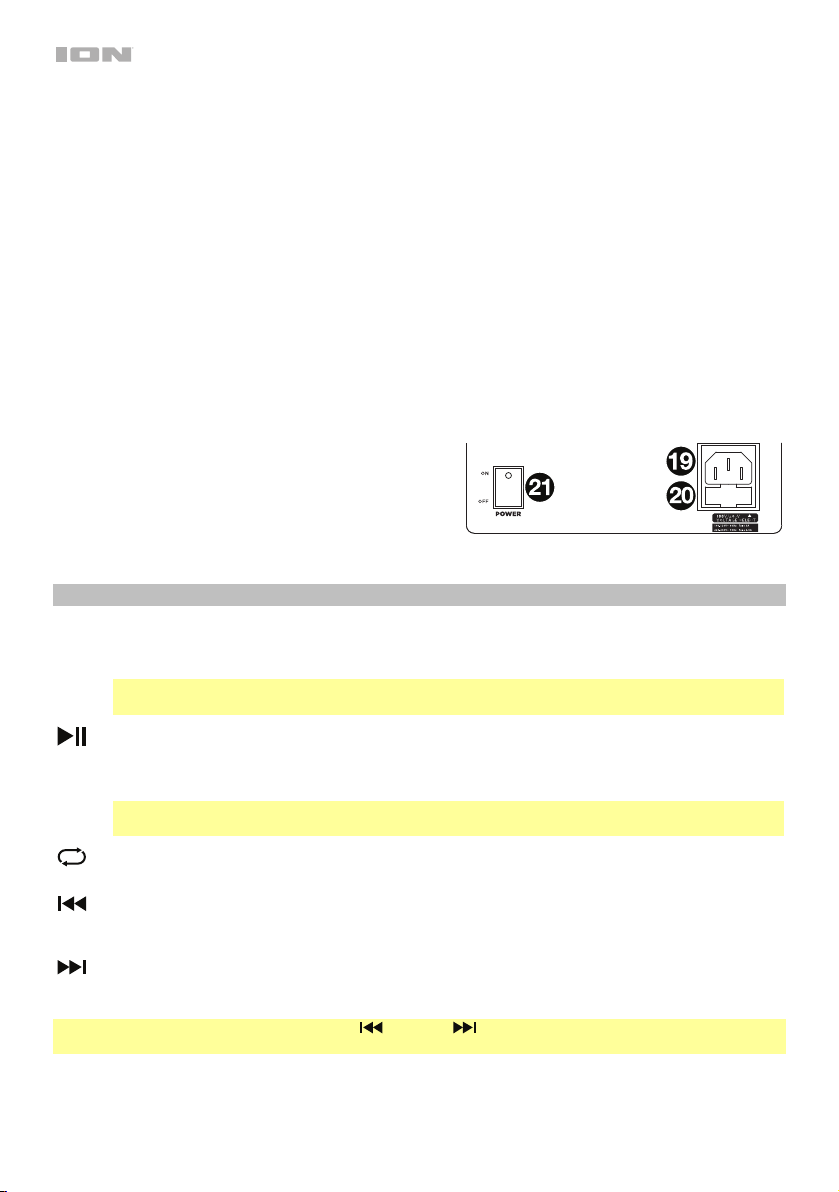
19. Power Cable Input (IEC): Insert the included power cable here to power the unit.
20. Fuse Holder: The orientation of the Fuse Holder determines the unit’s voltage setting: 100–120 V or
220–240 V. As pictured here, the current setting is shown on the right side of the Fuse Holder, above
the triangle symbol (). If you are using Total PA Glow 3 in a region with a voltage different than the
unit’s current setting, change the setting by removing the Fuse Holder, inverting it, and reinserting it.
If the unit’s fuse is broken, remove the Fuse Holder
and replace the broken fuse with one that has the
correct rating (as indicated on the Fuse Holder).
Using a fuse with an incorrect rating can damage the
unit and/or fuse.
21. Power Switch: Turns Total PA Glow 3 on or off.
Media Panel
Media Panel Functions:
Mode: Switches the audio source between USB/SD, FM radio, and Bluetooth.
MODE
Note: A USB drive or SD card must contain playable files in order for its data to appear properly in
the Media panel’s display. You can play MP3s, 16-bit WAVs, FLAC, APE, and WMA files.
Play/Pause: When USB/SD or Bluetooth is selected as the audio source, plays/pauses audio.
When FM radio is selected as the audio source, press and hold this button for 2 seconds to begin
the preset auto-store function. This jumps to the lowest station (87.5) and then travels through the
bandwidth to auto-store the strongest stations as presets.
Note: Files are played from the USB or SD source first by alphabetical order of what is on the root
level, then alphabetical by folder, and then alphabetical by the track name.
Repeat: Cycles through four options: repeat all of the tracks (ALL), repeat all of the tracks in the
folder (FOLd), repeat the current playing USB or SD track (OnE), or shuffle the track order (rAn).
Previous: Plays the previous USB, SD, or Bluetooth track. When listening to the FM radio, press
the button once to skip back through the FM stations and hold the button down to seek back
through the channel presets.
Next: Plays the next USB, SD, or Bluetooth track. When listening to the FM radio, press the button
once to tune the radio down one preset and hold the button down to seek forward through the
channel presets.
Note: In some apps, pressing the Previous ( ) or Next ( ) buttons may go to another playlist or music
genre.
6
Page 7

Operation
App Control
IMPORTANT: To ensure the best possible experience with the app, use the most current Android OS or iOS
on your device.
Note: Ensure that your device has internet access via your service provider or wireless connection. You can
also download the app on your computer, but remember to connect and sync your device to transfer the app.
Follow these steps to download the free app on your device:
1. Open the Apple App Store or Google Play on your device.
2. Search for the ION Sound XP app.
3. Follow the on-screen instructions to download and install the app.
4. Once downloaded, the ION Sound XP app will appear on your device's home screen.
Pairing a Bluetooth Device
1. Turn on your Bluetooth device.
2. Power on Total PA Glow 3.
3. Use the Mode button to select Bluetooth as the audio source, which appears as "bt" in the display.
Total PA Glow 3 will automatically go into pairing mode to search for Bluetooth devices. You will know
you are in pairing mode when the Bluetooth icon is flashing. In addition, automatic voice prompts from
the speaker will alert you of the device’s status: Bluetooth Pairing, Bluetooth Connected, or
Bluetooth Disconnected.
4. Navigate to your Bluetooth device’s setup screen, find Total PA Glow 3, and connect. The Bluetooth
icon will remain solidly lit.
Note: Users should consider updating their device’s OS if experiencing trouble with pairing or playing
music.
5. To disconnect pairing, turn off Bluetooth on your device or select Forget this device on your Bluetooth
device’s setup screen.
If you would like to disable (or enable) the voice prompts, press and hold the Play/Pause button on the
Media Panel.
Note: Bluetooth must be selected as the audio source in order to disable (or enable) the voice prompts.
7
Page 8

Connecting Two Speakers
To wirelessly link two Total PA Glow 3 speakers:
1. Power on both speakers using their Power Switches.
2. With no Bluetooth connected, press the Link button on one Total PA Glow 3 to enter Stereo Link Mode.
Then, press the Link button on a second Total PA Glow 3 to begin pairing.
3. Wait up to 1 minute for the speakers to make the connection. Once the two speakers are linked, press
the Mode button on either speaker to select Bluetooth mode and begin the Bluetooth pairing process.
The speaker you use for Bluetooth pairing will serve as the master speaker. Use the directions above to
connect your Bluetooth device.
4. To disconnect, double-press the Link button on either speaker.
To switch the left and right stereo channels while the speakers are linked, press and hold the Link button.
To link two Total PA Glow 3 speakers using cables:
1. With the Power Switch on each speaker turned to the off position, connect each speaker to a power
outlet.
2. Plug an XLR cable into the Mix Out located on the rear panel of one Total PA Glow 3 speaker. This
speaker (the master) is the one to which you will connect audio sources such as a Bluetooth device,
microphone, or USB flash drive.
3. Plug the other end of the XLR cable into the XLR Input on the rear panel of your second Total PA Glow
3 speaker. This second speaker will receive the audio from any devices connected to the first speaker
(the master).
4. Power on both speakers using their Power Switches.
5. Connect your audio sources to the first speaker (the master).
6. Make sure that each speaker’s Master Volume control is set to the same position.
7. With one of your audio sources playing, gradually turn up the Aux Input Volume on the second Total PA
Glow 3 speaker until the volume of this speaker matches the volume of the first speaker (the master).
8
Page 9

Troubleshooting
If the sound is distorted: Try lowering the volume control of your sound source, musical instrument, or
microphone. Also, try to reduce the overall volume of Total PA Glow 3 using the Master Volume knob.
If there is too much bass: Try adjusting the tone or EQ control on your sound source to lower the bass
level. This will allow you to play the music louder before clipping (distortion) occurs.
If there is a high-pitched whistling noise when using a microphone: This is probably feedback. Point the
microphone away from the speaker.
If you can’t hear the microphone over the music volume: Turn down the music volume from your source.
When I press Previous ( ) or Next ( ), it doesn’t increment to the next FM station: Short presses of
the button will jump to presets. Hold the button down to seek to the next station.
If the radio station channel is flashing: The unit is currently muted. Unmute to stop the flashing and
resume playback.
If the Bluetooth logo is flashing rapidly: The unit is currently in pairing mode.
If the Bluetooth logo is flashing slowly: A device is paired, but the music is muted. Unmute to stop the
flashing and resume playback.
The USB track number (Example: 001) is flashing slowly: The USB drive music playback is muted.
Unmute to stop the flashing and resume playback.
The LCD shows “NONE”: If a USB drive or SD card is already properly inserted, make sure it contains
playable files (MP3s, 16-bit WAVs, FLAC, APE, and WMA files).
If you cannot connect your audio device to Total PA Glow 3 via Bluetooth:
• Have your audio device (e.g., smartphone or tablet) and Total PA Glow 3 as close together as possible
while trying to connect. Make sure both the audio device and Total PA Glow 3 are unobstructed by
walls, furniture, etc.
• Reset the Bluetooth connection on Total PA Glow 3 to disconnect Total PA Glow 3 from any other
audio device and restart the search process. If this does not work right away, power off Total PA Glow
3 and then power it back on. See Operation > Pairing a Bluetooth Device for more information.
• Reset the Bluetooth connection on your audio device by turning Bluetooth off and back on. You can
find this under the Bluetooth menu in the Settings for your phone or other audio device.
If this does not work, and you have connected to Total PA Glow 3 before, find Total PA Glow 3 in the list of
available or previously connected devices in your audio device's Bluetooth menu, tap the "gear" or “i” icon
located next to it and then select Unpair or Forget. Turn Total PA Glow 3 off and back on and try pairing
again once it reappears in your available devices list.
Note: If Total PA Glow 3 has been paired to another audio device recently that is still within range, you may
need to repeat this process with that audio device to fully disconnect.
9
Page 10

Guide d'utilisation (Français)
Présentation
Merci d’avoir fait l’acquisition de l’enceinte Total PA Glow 3. Chez ION, votre divertissement est aussi
important pour nous qu’il l’est pour vous. C’est pourquoi nous concevons nos produits avec une seule
chose en tête — rendre la vie plus amusante et plus pratique.
1. Assurez-vous que tous les articles énumérés dans le Contenu de la boîte de ce guide sont inclus dans
la boîte. Dans la boîte, sous la feuille de polystyrène se trouvent les pieds en caoutchouc et le bouton du
support de l'enceinte, le câble d'alimentation et le microphone.
2. Veuillez lire le livret des consignes de sécurité avant d'utiliser le produit.
3. Veuillez examiner le Schéma de connexion.
4. Veuillez vous assurer que tous les appareils d'entrée tels que microphones, lecteurs de disques
compacts ou lecteurs multimédia numériques raccordés sont éteints et que leur volume est à « zéro ».
5. Veuillez raccorder tous les appareils comme indiqué sur le schéma.
6. Mettez tous les appareils sous tension dans l'ordre suivant :
• sources d'entrée audio (p. ex., microphones, instruments, lecteurs de disques compacts)
• Total PA Glow 3
7. Pour mettre hors tension, toujours inversez l'opération :
• Total PA Glow 3
• sources d’entrée audio
Contenu de la boîte
Total PA Glow 3
Microphone avec câble
Support télescopique
Câble d'alimentation (IEC)
Guide d'utilisation rapide / Consignes de sécurité et information concernant la garantie
Assistance
Pour les dernières informations concernant ce produit (la configuration système minimale requise, la
compatibilité, etc) et l'enregistrement du produit, veuillez visitez le site ionaudio.com.
Pour de l'assistance supplémentaire, veuillez visiter ionaudio.com/support.
Mise en garde : Ne pas exposer le Total PA Glow 3 aux intempéries ou reposer dans l'eau.
10
Page 11

Démarrage rapide
Schéma de connexion
Les éléments qui ne figurent
pas dans Présentation >
Contenu de la boîte sont
vendus séparément.
Carte mémoire SD
Clé USB
Microphones
Téléphone
intelligent
(smartphone)
Alimentation
Tablette
Installation du support pour enceinte
1. Déployez entièrement les pieds du support sur une surface plate et
stable. Dans la boîte, sous la feuille de polystyrène se trouvent les
pieds en caoutchouc et le bouton du support de l'enceinte.
2. Allongez la perche télescopique du support à la hauteur appropriée
et serrez la vis latérale.
3. Introduisez la goupille dans le trou inférieur de la perche afin qu'elle
demeure à la hauteur désirée.
4. Serrez la vis inférieure de la Total PA Glow 3 dans le sens antihoraire
afin qu'elle ne bloque pas l'ouverture.
5. Alignez le trou de fixation de la Total PA Glow 3 à la perche du
support et placez l'enceinte sur la perche.
6. Serrez la vis de fixation de la Total PA Glow 3 dans le sens horaire.
1
2
3 45/6
11
Page 12

Caractéristiques
Panneau arrière
1. Panneau des médias : Commandes pour les sources
USB/SD, radio FM et Bluetooth. L’icône de la source
actuelle s'allume dans l’écran lorsque cette source est
sélectionnée par le Panneau des médias. Veuillez
consulter la section Panneau des médias pour une
description des les commandes.
Remarque : La clé USB ou la carte SD doit contenir
des fichiers lisibles par l'appareil afin que ces derniers
s’affichent dans le panneau multimédia. Les fichiers
MP3, WAV 16 bits, FLAC, APE, et WMA peuvent être
lus.
2. Port USB : Ce port permet de brancher une clé USB
pour écouter de la musique. Vous pouvez également
utiliser ce port pour recharger un appareil USB.
3. Emplacement pour carte mémoire SD : Inserez une
carte SD dans cet emplacement.
4. Écran : Affiche les modes de fonctionnement de
l’enceinte pour USB/SD, radio FM et Bluetooth.
Remarque : Un film de protection en plastique
recouvre l'écran. Retirez-le pour un affichage optimal.
5. Entrées microphone (6,35 mm et XLR) : Ces entrées permettent de brancher un microphone
électrodynamique. Le volume des entrées XLR et 6,35 mm est commandé par le bouton volume des entrées
microphone.
6. Touches de volume des entrées microphone : Ces touches permettent d'ajuster le volume des entrées du
microphone.
7. Entrée auxiliaire (3,5 mm) : Cette entrée stéréo 3,5 mm permet de brancher un lecteur de disques compacts,
un lecteur multimédia ou autres sources audio. Le niveau de cette entrée est commandé par le bouton volume
d'entrée auxiliaire.
8. Entrée ligne (XLR) : Cette entrée à niveau ligne et XLR permet de brancher une niveau ligne console de mixage
ou un instrument de musique. Le niveau de cette entrée est commandé par le bouton volume d'entrée
auxiliaire. Utilisez cette entrée à niveau ligne afin de relier deux enceintes Total PA Glow 3.
9. Touches de volume d'entrée auxiliaire : Ces touches permettent d'ajuster le volume d'entrée auxiliare et
entrée ligne (XLR).
10. Sortie mix (XLR) : Cette sortie XLR permet de brancher une autre enceinte amplifiée. Le volume est commandé
par les touches volume des entrées microphone, volume d'entrée auxiliaire et volume principal.
11. Mic Echo : Ce bouton de réglage permet d'ajouter ou de supprimer un effet d'écho au entrées microphone.
12. Égalisation des basses fréquences : Augmente ou diminue les basses fréquences pour les sources des
entrées microphone, ligne et panneau des médias entre -12 dB à +12 dB.
13. Égalisation des hautes fréquences :
entrées microphone, ligne et panneau des médias entre -12 dB à +12 dB.
14. Volume principal : Cette commande permet d'ajuster le volume principal du haut-parleur Total PA Glow 3.
15. Témoin d'écrêtage : En présence d'écrêtage du signal des entrées ou du panneau des médias, le voyant DEL
clignote. Pour remédier à l'écrêtage, diminuez le réglage des touches volume des entrées microphone,
volume d'entrée auxiliaire et commande volume principal.
16. Témoin d'alimentation DEL : Indique si l'enceinte Total PA Glow 3 est sous ou hors tension.
17. Touche Link : Cette touche permet de relier l’enceinte à une autre enceinte Total PA Glow 3. Veuillez consulter
la section Fonctionnement
> Relier deux enceintes afin d’en savoir plus.
Augmente ou diminue les hautes fréquences pour les sources des
2
4
1
11 12 13 14
66
5
5
5
5
7
8
9
15
17
18
3
16
10
12
Page 13

18. Touche de mode d'éclairage : Cette touche permet de commuter entre les quatre modes d’éclairage du
panneau avant :
• Auto 1 : Cette option permet d’alterner toutes les couleurs. En ce mode, l’anneau lumineux et le haut-
parleur d’extrêmes graves sont de la même couleur. Vous pouvez maintenir la touche du mode
d’éclairage enfoncée afin que les lumières restent allumées dans la couleur actuelle. Pour alterner de
nouveau les couleurs, maintenez la touche du mode d’éclairage enfoncée. Auto 1 est le mode par défaut
lors de la mise sous tension de la Total PA Glow 3.
• Auto 2 : Cette option permet d’alterner toutes les couleurs. En ce mode, l’anneau lumineux et le haut-
parleur d’extrêmes graves sont de couleurs différentes. Vous pouvez maintenir la touche du mode
d’éclairage enfoncée afin que les lumières demeurent allumées dans les couleurs actuelles.
• Beat Sync : L’anneau lumineux clignote et change de couleur selon le rythme de la musique joué par
l'enceinte. Le haut-parleur d’extrêmes graves alterne toutes les couleurs.
• Off : Les lumières sont éteintes.
19. Câble d'alimentation (IEC) : Branchez le câble d'alimentation inclus ici afin d'alimenter l'appareil.
20. Compartiment du fusible : L’orientation du porte-fusible détermine le réglage de tension de l’appareil : 100–
120 V ou 220–240 V. Comme l'indique l’image, le réglage de tension est affiché sur le côté droit du porte-
fusible, au-dessus du triangle blanc (). Si vous utilisez la Total PA Glow 3 dans une région qui utilise une
tension différente, vous devez changer la tension en retirant le porte-fusible, en l’inversant et le réinsérant.
Si le fusible de l’appareil est endommagé, retirez le porte-
fusible et remplacez le fusible endommagé par un
nouveau fusible de même calibre (comme indiqué sur le
porte-fusible). L’utilisation d’un fusible de calibre
inapproprié pourrait endommager l’appareil et/ou le fusible.
21. Interrupteur d'alimentation : Cet interrupteur met la
Total PA Glow 3 sous et hors tension.
Panneau des médias
Fonctions du panneau des médias :
MODE Mode : Permet de changer le mode de fonctionnement : USB/SD, radio FM et Bluetooth.
Remarque : La clé USB ou la carte SD doit contenir des fichiers lisibles par l'appareil afin que ces
derniers s’affichent dans le panneau multimédia. Les fichiers MP3, WAV 16 bits, FLAC, APE, et WMA
peuvent être lus.
Lecture/Pause : Lorsque USB/SD ou Bluetooth sont sélectionnées comme source audio, cette touche
permet de lancer ou d'interrompe la lecture. Lorsque FM radio est sélectionnée comme source audio,
maintenez la touche de lecture/pause pendant 2 secondes afin d'amorcer la fonction d'enregistrement
automatique des stations préréglées. Ceci permet de balayer la bande FM, en commencer par la station
radio la plus basse (87,5), afin d'enregistrer les stations ayant un signal plus fort.
Répéter : Cette touche permet de répéter toutes les pistes (ALL), toutes les pistes dans le dossier (FOLd),
la piste en cours (OnE), ou toutes les pistes de manière aléatoire (rAn) de la source USB ou de la carte SD
en cours de lecture.
Précédente : Cette touche permet de faire jouer la piste USB, SD ou Bluetooth précédente. Durant
l'écoute de la radio FM, appuyer une fois sur cette touche permet de passer à la station FM précédente et
la maintenir enfoncée permet de passer au canal préréglé précédent.
Suivante : Cette touche permet de faire jouer la piste USB, SD ou Bluetooth suivante. Durant l'écoute de
la radio FM, appuyer une fois sur cette touche permet de passer à la station FM suivante et la maintenir
enfoncée permet de passer au canal préréglé suivant.
Remarque : Dans certaines applications, les touches piste précédente ( ) et piste suivante ( ) permettent de
passer à la liste de lecture ou le genre de musique suivant ou précédent.
13
Page 14

Fonctionnement
Contrôle d'application
IMPORTANT : Afin de profiter de la meilleure expérience possible avec l’application, assurez-vous d’avoir la
toute dernière version de Android OS ou de iOS sur votre appareil.
Remarque : Veuillez vous assurer que votre appareil dispose d’une connexion Internet. Vous pouvez
également télécharger l’application gratuite sur votre ordinateur, mais n’oubliez pas de connecter et de
synchroniser votre appareil afin de transférer l’application.
Veuillez suivre les étapes ci-dessous afin de télécharger l’application sur votre appareil :
1. Accédez au Apple App Store ou à Google Play à partir de votre appareil.
2. Recherchez l’application ION Sound XP.
3. Suivez ensuite les consignes à l'écran afin de la télécharger et de l'installer.
4. Une fois téléchargée, l’application ION Sound XP s’affiche sur la fenêtre d’accueil de votre appareil.
Jumelage d'un appareil Bluetooth
1. Mettez votre appareil Bluetooth sous tension.
2. Mettez l'enceinte Total PA Glow 3 sous tension.
3. Utilisez le bouton Mode pour sélectionner le mode Bluetooth qui s’affichera comme « bt ». La Total PA
Glow 3 passera automatiquement en mode jumelage afin de rechercher les appareils Bluetooth. Vous
saurez que le mode jumelage est activé lorsque l’icône Bluetooth clignotera. En outre, les messages
vocaux automatiques de l’enceinte vous avertiront de son état : Bluetooth Pairing (jumelage Bluetooth
en cours), Bluetooth Connected (connexion Bluetooth établie) ou Bluetooth Disconnected
(déconnexion Bluetooth).
4. Accédez à l'écran de configuration de votre appareil Bluetooth, recherchez « Total PA Glow 3 » et
lancez le jumelage. L'icône Bluetooth demeurera allumée.
Remarque : Veuillez mettre à jour le système d'exploitation de votre appareil si vous éprouvez des
problèmes durant le jumelage ou lors de la lecture de musique.
5. Pour supprimer la connexion, désactivez la fonction Bluetooth sur votre appareil ou sélectionnez
Oublier cet appareil.
Si vous souhaitez désactiver (ou activer) les messages vocaux, maintenez la touche Lecture/Pause du
Panneau des médias enfoncée tandis que Bluetooth est sélectionnée comme source audio.
Remarque : Le mode Bluetooth doit être sélectionné comme source audio pour désactiver (ou activer) les
messages vocaux.
14
Page 15

Relier deux enceintes
Pour relier sans fil deux enceintes Total PA Glow 3 :
1. Mettez les deux enceintes sous tension à l'aide de leurs interrupteurs d'alimentation.
2. Vérifiez qu’aucun appareil Bluetooth n’est connecté, puis appuyez sur la touche Link d’une des
enceintes Total PA Glow 3 afin de passer en mode Stereo Link. Appuyez ensuite sur la touche Link de
la deuxième Total PA Glow 3 pour lancer le jumelage.
3. Attendez environ 1 minute afin que les enceintes puissent établir la connexion. Une fois les deux
enceintes jumelées, appuyez sur la touche Mode sur l’une des deux enceintes afin de sélectionner le
mode Bluetooth et de lancer le processus de jumelage Bluetooth. L’enceinte que vous utilisez pour le
jumelage Bluetooth servira d’enceinte maître. Veuillez suivre les instructions ci-dessus pour connecter
votre appareil Bluetooth.
4. Pour déconnecter l’appareil, appuyez deux fois sur la touche Link d’une des enceintes.
Pour commuter les canaux stéréo gauche et droit lorsque les enceintes sont reliées, maintenez la touche
Link enfoncée.
Pour relier deux enceintes Total PA Glow 3 utilisant des câbles :
1. En vous assurant que l’Interrupteur d’alimentation de chaque enceinte est hors tension, branchez les
deux enceintes à une prise secteur.
2. Reliez un câble XLR à la Sortie mix du panneau arrière d’une des enceintes Total PA Glow 3. C’est à
cette enceinte (maître) que vous devrez relier les sources audio comme un appareil Bluetooth, un
microphone ou une clé USB.
3. Reliez l’autre extrémité du câble XLR à l’Entrée ligne du panneau arrière de la deuxième enceinte Total
PA Glow 3. Cette deuxième enceinte recevra l’audio de tous les appareils reliés à la première enceinte
(maître).
4. Mettez les deux enceintes sous tension à l'aide de leurs Interrupteurs d'alimentation.
5. Reliez vos sources audio à la première enceinte (maître).
6. Veillez à ce que le Volume principal de chaque enceinte soit au même réglage.
7. Alors qu’une de vos sources audio joue, augmentez progressivement le réglage du Volume d'entrée
auxiliaire de la deuxième enceinte Total PA Glow 3 jusqu'à ce que le volume de cette enceinte soit au
même niveau que le volume de la première enceinte (maître).
15
Page 16

Dépannage
Lorsqu'il y a de la distorsion : Essayez de diminuer le volume sur l'appareil d'entrée audio ou l'instrument
de musique. Essayez également de diminuer le volume de la Total PA Glow 3.
Lorsqu'il y a trop de basses fréquences : Essayez de régler le niveau de tonalité et d'égalisation de la
Total PA Glow 3 ou de la source d'entrée audio afin de diminuer le niveau des basses fréquences. Cela vous
permettra d'augmenter le volume de la musique avant que l'écrêtage se produise.
Lorsqu'il y a un sifflement aigu lors de l'utilisation d'un microphone : Ceci est probablement causé par
la rétroaction (effet Larsen). Dirigez le microphone loin de l'enceinte.
Si vous ne pouvez entendre le microphone à cause du volume trop élevé de la musique : Baissez le
volume de la musique provenant de la source.
Lorsque j'appuie sur la touche piste précédente (
à la station FM suivante : Appuyer sur les touches permet de sauter au préréglage suivant ou précédent.
Maintenir la touche enfoncée permet de rechercher la station de radio suivante ou précédente.
Si le canal de la station de radio clignote : l'appareil est en mode en sourdine. Désactivez la mise en
sourdine afin d'arrêter le clignotement et reprendre la lecture.
Si le logo Bluetooth clignote rapidement : l'appareil est en mode de jumelage.
Si le logo Bluetooth clignote lentement : un appareil est jumelé, mais la musique a été mise en sourdine.
Désactivez la mise en sourdine afin d'arrêter le clignotement et reprendre la lecture.
Le numéro de piste USB (exemple : 001) clignote lentement : la lecture de la musique de la source USB a
été mise en sourdine. Désactivez la mise en sourdine afin d'arrêter le clignotement et reprendre la lecture.
Si l'écran à cristaux liquides affiche « NONE » : Si une clé USB ou une carte SD est correctement insérée,
assurez-vous qu'elle contient des fichiers lisibles (MP3, WAV 16 bits, FLAC, APE, et WMA).
Si vous ne pouvez connecter votre appareil audio à la Total PA Glow 3 par connexion Bluetooth :
• Veillez à ce que votre appareil audio (p. ex., smartphone ou tablette) et la Total PA Glow 3 soient le
plus près possible l’un de l’autre lors du jumelage. Veillez également à ce qu’aucun obstacle ne se
trouve entre l’appareil audio et la Total PA Glow 3, comme des murs, des meubles, etc.
• Réinitialisez la connexion Bluetooth sur la Total PA Glow 3 afin de supprimer toute connexion à la
Total PA Glow 3 et recommencer le processus de recherche d’appareil. Si cela ne fonctionne pas
immédiatement, mettez la Total PA Glow 3 hors tension et de nouveau sous tension. Veuillez
consulter la section Fonctionnement > Jumelage d'un appareil Bluetooth afin d’en savoir plus.
• Réinitialisez la connexion Bluetooth sur l’appareil audio en désactivant et réactivant la connexion
Bluetooth. Vous pouvez effectuer ceci à partir du menu Bluetooth dans les Réglages de votre
smartphone ou autre appareil audio.
Si cela ne fonctionne pas et que vous avez déjà connecté votre appareil à la Total PA Glow 3 auparavant,
veuillez rechercher la Total PA Glow 3 dans la liste des appareils disponibles ou précédemment connectés
dans le menu Bluetooth de votre appareil audio, puis appuyer sur l'icône engrenage ou « i » située à côté de
« Oublier cet appareil ». Mettez la Total PA Glow 3 hors tension et de nouveau sous tension et réessayez de
la jumeler une fois qu’elle apparaît dans la liste des appareils disponibles.
Remarque : Si la Total PA Glow 3 a été récemment jumelée à un autre appareil audio qui est toujours dans
son champ de portée, il se peut que vous deviez répéter ce processus avec cet appareil audio afin de
supprimer la connexion.
) ou piste suivante ( ), le module ne passe pas
16
Page 17

Appendix (English)
Technical Specifications
Output Power
Max SPL (@ 1 m)
Low Frequency
High Frequency
Crossover
Frequency Response
Frequency Range
Horn Coverage
Input
External Controls
Connectors
Bluetooth* Profile: A2DP
USB/SD Card Audio: Music playback from USB drive or SD card
500 W (Peak)
116 dB peak, 110 dB continuous C-weighted, free space
15” (381 mm) woofer
1” (25 mm) tweeter
2.2 kHz
55 Hz – 20 kHz (+3 dB)
45 Hz – 22 kHz (@ -10 dB)
80/100° H x 60° V, nominal (@ -6 dB)
Gain Range: -∞ to +10 dB (microphone/line)
Max Input Level: +10 dBu
Impedance: 22 KΩ
Channel volume, master volume, power on/off with LED, clip limiter with
LED, echo, 2-band equalizer, mode, play/pause, repeat, previous track,
next track
(3) XLR inputs (2 dynamic microphone/line, 1 line)
(2) 1/4” (6.35 mm) TRS inputs
(1) 1/8” (3.5 mm) TRS input
(1) XLR mix output
(1) SD card slot
(1) USB port (host)
(1) IEC power connection
Module: Bluetooth 4.2
Speed: 3 Mbps
Range: Up to 100 feet / 30.5 meters*
Supported File System: FAT32
Supported File Types: MP3, WAV, WMV, FLAC, APE
Maximum File Size: < 16 GB
Maximum USB Drive / SD Card Capacity: < 16 GB
17
Page 18

Protection Features
Power
Dimensions
(depth x width x height)
Weight
Over-excursion, thermal, short-circuit protection
100–120 VAC, or 220–240 VAC; 50/60 Hz
17.5" x 14" x 27"
445 x 356 x 686 mm
36.24 lbs.
16.44 kg
Specifications are subject to change without notice.
* Bluetooth range is affected by walls, obstructions, and movement. For optimal performance, place the product in
the center of the room so it is unobstructed by walls, furniture, etc.
Trademarks & Licenses
ION Audio is a trademark of ION Audio, LLC, registered in the U.S. and other countries.
App Store is a trademark of Apple Inc., registered in the U.S. and other countries.
Android and Google Play are registered trademarks of Google Inc.
The Bluetooth word mark and logos are owned by the Bluetooth SIG, Inc. and any use of such marks
by ION Audio is under license.
All other product names, company names, trademarks, or trade names are those of their respective
owners.
18
Page 19

19
Page 20

ionaudio.com
Manual Version 1.0
 Loading...