

Ion Telesounds User Manual

Telesounds
Quickstart Guide English ( 2 – 7 )
Guía de inicio rápido Español ( 8 – 13 )
Appendix English ( 14 – 15 )
Quickstart Guide (English)
Introduction
Thank you for purchasing the Telesounds. At ION, your entertainment is as important to us as
it is to you. That’s why we design our products with one thing in mind—to make your life more
fun and more convenient.
Important Safety Notices
Warning: Prolonged exposure to excessive sound pressure (high volumes) from
headphones can cause permanent hearing loss.
Warning: Do not expose batteries to excessive heat such as sunlight, fire, or the like.
Box Contents
Telesounds Headphones 1/4”-to-1/8” (6.35 mm to 3.5 mm) Adapter
Transmitter Power Adapter
Cables (1 of each): (2) Rechargeable AAA Batteries
1/8”-to-1/8” (3.5 mm) Quickstart Guide
RCA-to-RCA Safety & Warranty Manual
1/8”-to-RCA (3.5 mm)
Optical
Coaxial
Support
For the latest information about this product (documentation, technical specifications, system
requirements, compatibility information, etc.) and product registration, visit ionaudio.com.
For additional product support, visit ionaudio.com/support.
2
1
Features
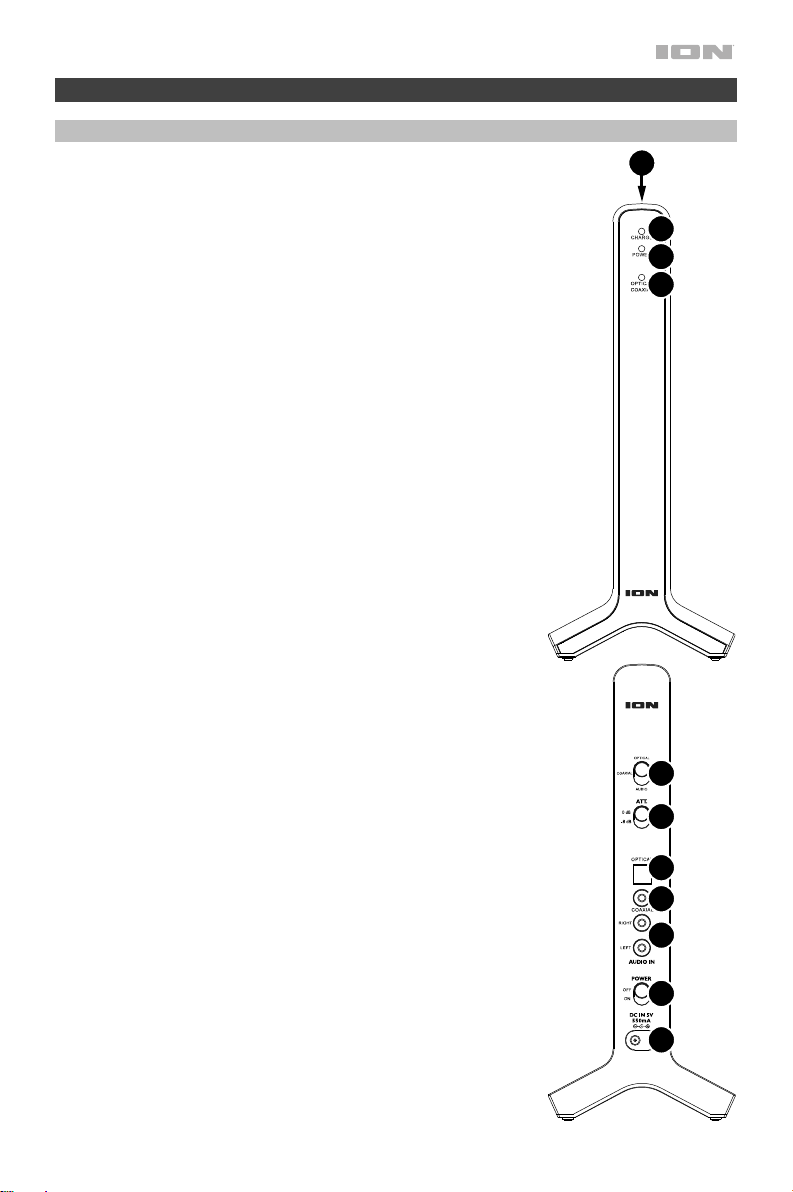
Transmitter
Front Panel
1. Charging Dock: Place the headband of the headphones on
this dock (on top of the transmitter) to charge them. Make
sure that the transmitter is connected to a power outlet and
that its Power switch is set to On.
2. Charge Light: This light is green when the headphones
(placed on the charging station) are charging. It will turn off
when the headphones are fully charged.
3. Power Light: This light is blue when the transmitter is
powered on. If the transmitter detects no audio signal for about
5 minutes, the transmitter will enter a low-power mode to save
energy. When it detects an audio signal again, it will return to
its normal power level and the light will be blue again.
4. Optical/Coaxial Light: This light is red when the source
switch on the rear panel is set to Optical or Coaxial (see
below). The light will flash when the transmitter detects an
issue with the incoming digital signal (see Troubleshooting if
this happens).
Rear Panel
5. Power Input: Using the included power adapter, connect this
power input to a power outlet.
6. Power Switch: Set this switch to On or Off to power the
transmitter on or off, respectively.
7. Audio In: Connect at least one of these connectors to an
audio output on your TV:
• Right & Left: Use the included RCA-to-RCA cable to
connect these to your TV’s RCA stereo outputs.
• Coaxial: Use the included coaxial cable to connect this
to your TV’s coaxial output.
• Optical: Use the included optical cable to connect this
to your TV’s optical output.
8. Source Switch: Set this switch to the type of Audio in
connection you want to use:
• Audio: Select this to use the RCA (Right & Left) inputs.
• Coaxial: Select this to use the Coaxial input. (The
Optical/Coaxial Light on the front panel will light red.)
• Optical: Select this to use the Optical input. (The
Optical/Coaxial Light on the front panel will light red.)
9. Att.: If you connected the transmitter to a TV, receiver, DVD
player, or hi-fi system, set this switch to -8 dB. If you
connected it to CD player, smartphone, tablet, or computer,
set it to 0 dB.
2
3
4
8
9
7
7
7
6
5
3
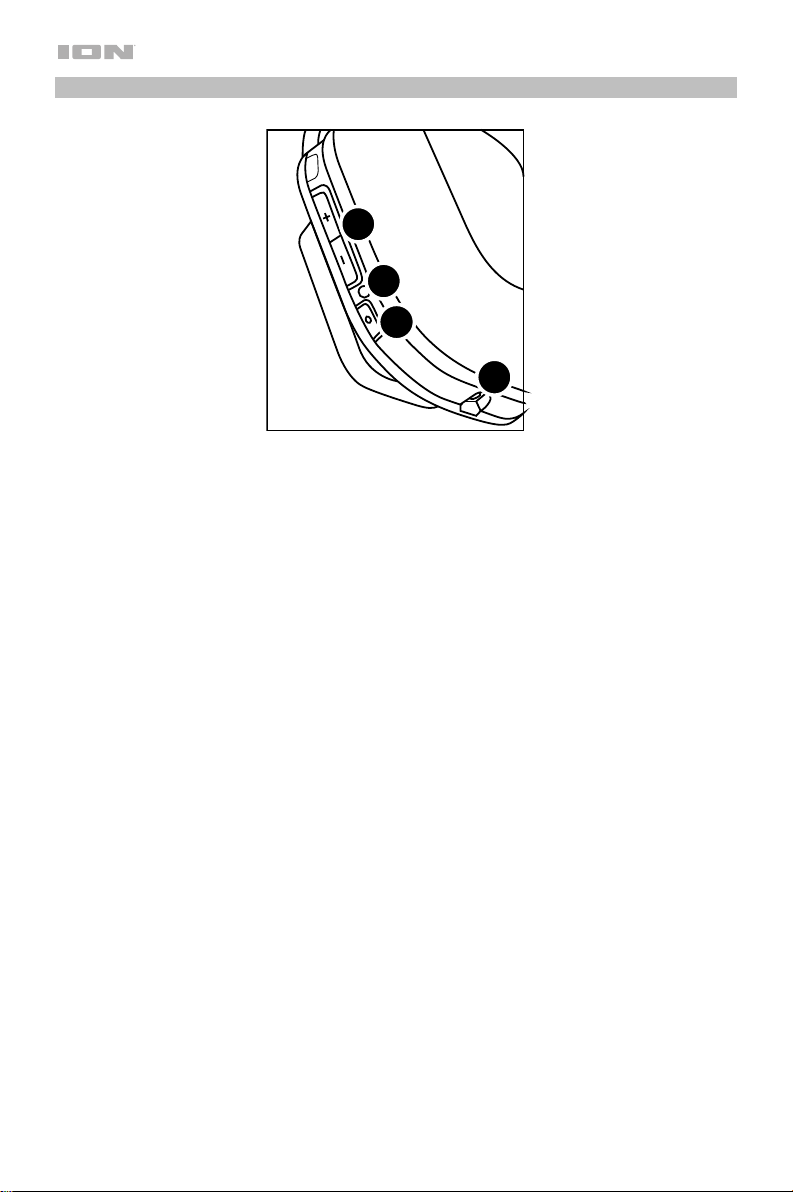
Headphones
3
2
1
4
1. Power Button: Press and hold this button for about 2 seconds to power the headphones
on or off. If the headphones detect no audio signal for about 5 minutes, they will power off
automatically to save battery power.
2. Status Light: This light indicates the status of the headphones:
• Red: The headphones are powered on but not connected wirelessly to the transmitter.
• Flashing red: The headphones are low on battery power. To charge them, place the
headband of the headphones on the charging dock on top of the transmitter (make
sure that the transmitter is connected to a power outlet and that its Power switch is
set to On). See Setup > Powering the Headphones to learn more.
• Green: The headphones are powered on and connected wirelessly to the transmitter.
• Off: When the headphones are charging on the transmitter, the light will turn off
when they are fully charged. When the headphones are not charging and powered
off, the light will be off.
3. –/+: Use these buttons to raise or lower the volume of the headphones.
4. Audio Input (1/8” / 3.5 mm): Connect this input to the audio output of another device
(smartphone, tablet, computer, etc.) to use the headphones in a normally (“wired”).
4

Setup
Items not listed under Introduction > Box Contents are sold separately.
Powering the Headphones
The headphones are powered by 2 rechargeable AAA batteries, which must be charged by
the transmitter. Use the included batteries only.
With fully charged batteries, you can use the headphones for approximately 10 hours. It takes
approximately 6 hours to fully charge them. If this is the first time you are using them,
charge them for the full 6 hours.
When the light on the headphones flashes red, the batteries are low on power. The headphones
will also “beep” to alert you.
To install the headphone batteries:
1. Please read the Introduction > Important Safety Notices
at the beginning of this manual before installing or replacing
the batteries.
2. Carefully rotate and remove the right ear pad (shown here).
3. Install the 2 rechargeable AAA batteries (included) in the
battery compartment. Make sure their polarities (+ and –)
are facing the proper directions.
4. Reattach the ear pad.
To charge the headphones:
Important: If this is the first time you are using the headphones, charge them for 6 hours
before use.
1. After the batteries are installed, make sure the headphones are powered off. (If they are
on, press and hold the power button on the headphones for about 2 seconds. The light
next to the button will turn off.)
2. Place the headband of the headphones on charging dock on top of the transmitter. Make
sure that the transmitter is connected to a power outlet and that its Power switch is set to
On. The headphones will start charging immediately.
While charging, the Charge light on the transmitter’s front panel will turn green. When it
turns off, the headphones are fully charged.
More Important Information About Batteries:
We highly recommend using the included rechargeable batteries. Alternatively, you can use
standard NiMH rechargeable batteries, but they will not charge when you place the headphones
on the charging dock. You could also use alkaline batteries, though these will also not charge.
To order additional or replacement rechargeable batteries (like the included ones), contact
ION Audio’s parts department at ionaudio.com/support.
5
 Loading...