

Page 1

TAILGATER BLUETOOTH®
QUICKSTART GUIDE
ENGLISH ( 3 - 5 )
GUÍA DE INICIO RÁPIDO
ESPAÑOL ( 6 - 8 )
GUIDE D'UTILISATION RAPIDE
FRANÇAIS ( 9 - 11 )
GUIDA RAPIDA
ITALIANO ( 12 - 14 )
KURZANLEITUNG
DEUTSCH ( 15 - 17 )
SNELSTARTGIDS
NEDERLANDS ( 18 - 20 )
SNABBSTARTSGUIDE
SVENSKA ( 21 - 23 )
PIKAKÄYTTÖOPAS
SUOMI ( 24 - 26 )
Page 2

Page 3
QUICKSTART GUIDE (ENGLISH)
t
1. Make sure all items listed on the front of this guide are included in the box.
2. READ SAFETY INSTRUCTION BOOKLET BEFORE USING THE
PRODUCT.
3. MAKE SURE THAT YOU HAVE COMPLETELY CHARGED THE
BATTERY PRIOR TO FIRST USE FOR MAXIMUM BATTERY LIFE.
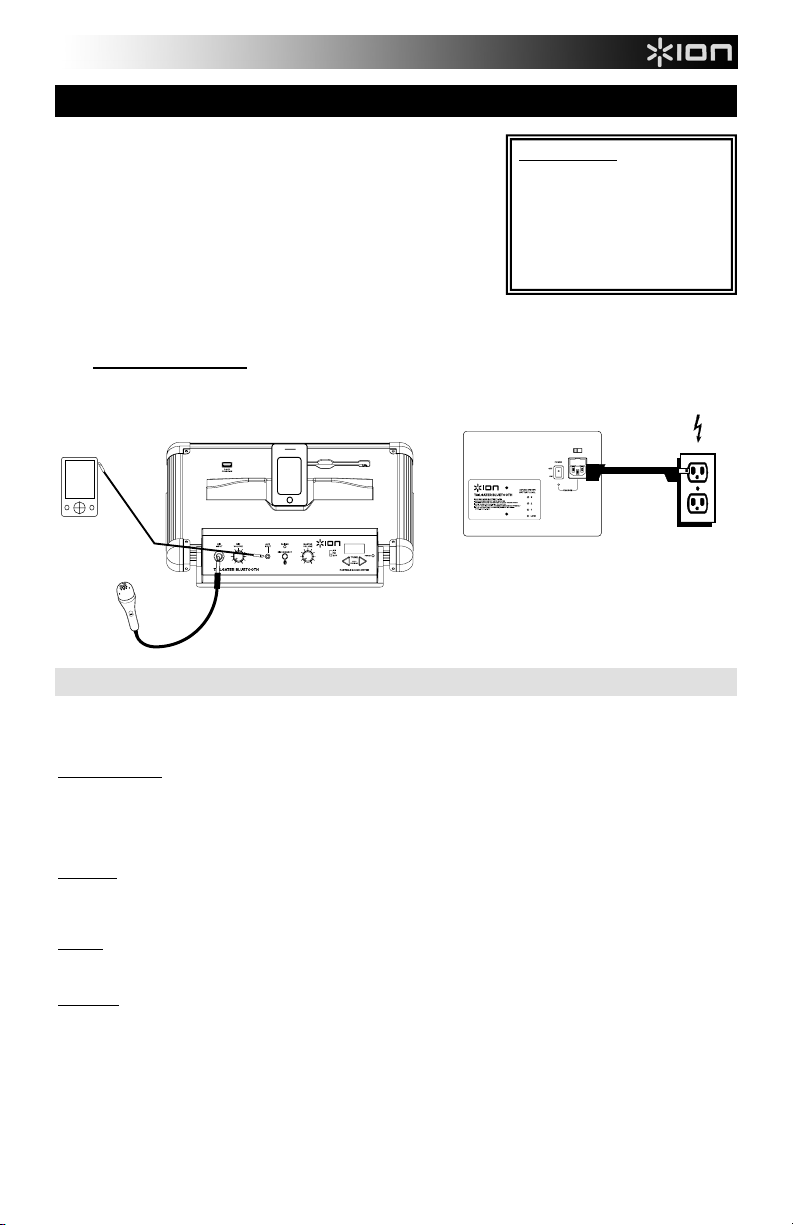
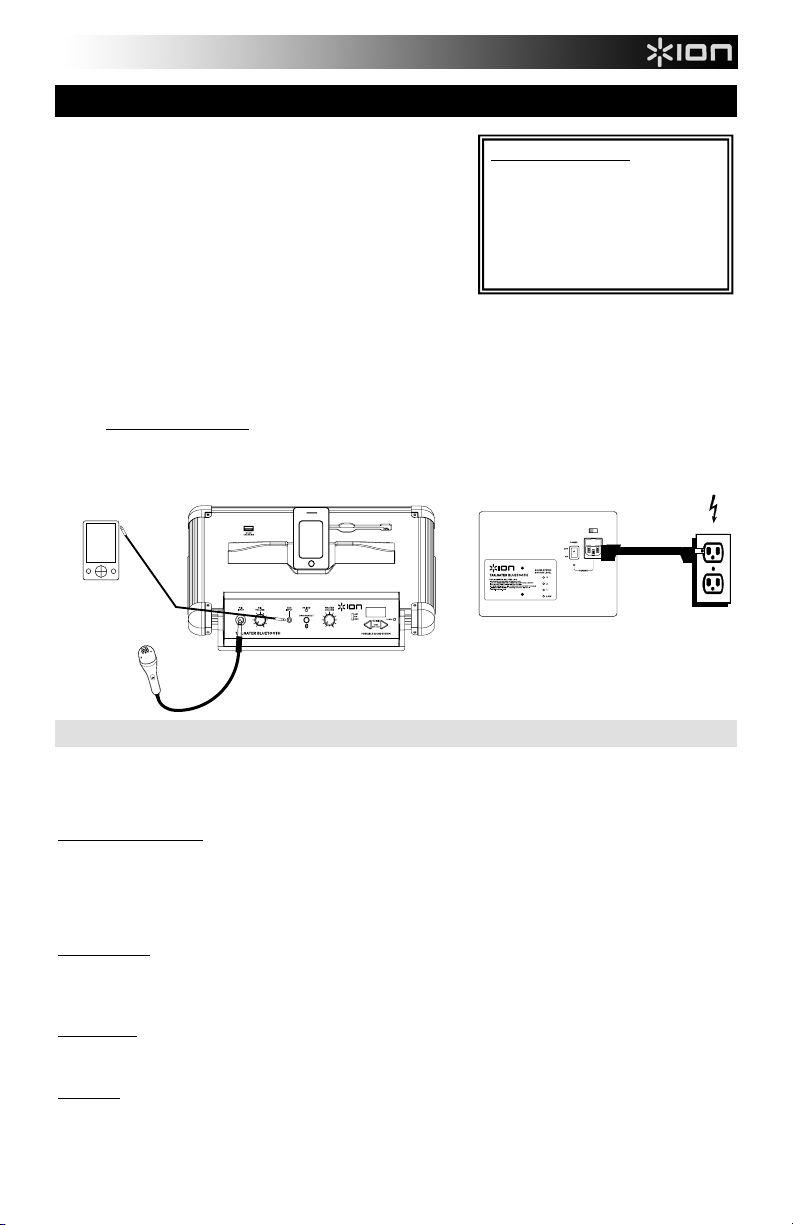
4. Study this setup diagram.
5. Make sure all input devices such as microphones, CD players, or mp3
players are turned off and volume settings are set at "zero."
6. Connect all devices as shown.
7. Switch everything on in the following order:
• audio input sources (i.e. microphones, instruments, CD/MP3 Players)
• TAILGATER BLUETOOTH®
8. When turning off, always reverse this operation:
• TAILGATER BLUETOOTH
• last, any input devices
Go to http://www.ionaudio.com for product registration.
MP3 PLAYER
(not included)
MICROPHONE
TOP PANEL
iPhone® (not included)
RECHARGEABLE BATTERIES
Rechargeable lead-acid batteries are the same type used in automobiles. As with your car battery, how you use this battery has
a significant impact on its lifespan. With proper use and treatment, a lead-acid battery can last for years. Here are some
recommendations for getting the longest life from the internal battery.
GENERAL USAGE
• FULLY CHARGE THE BATTERY BEFORE USING IT.
• CHARGE THE BATTERY COMPLETELY AFTER EACH USE.
• AVOID COMPLETELY DRAINING THE BATTERY.
• You may leave the unit plugged in for up to two weeks.
• For maximum life, drain the battery 80% once a month.
STORAGE
• Avoid storing in high temperatures and moist places.
• For long-term storage, periodically recharge the battery.
• If you do not charge the battery for six months, it may not charge.
REPAIR
• As the battery nears the end of its life, it may lose its ability to recharge. If this occurs, contact ION Audio technical
DISPOSAL
support at www.ionaudio.com/supporthome.
• Bring the unit to a recycling center or dispose of in accordance with local ordinances.
BOX CONTENTS
TAILGATER BLUETOOTH
Microphone with mic cable
1/8" to 1/8" cable
Power Cable (standard IEC)
Quickstart Guide
Safety Instructions & Warranty
Information Bookle
REAR PANEL
POWER
iPad is a trademark of Apple Inc., registered in the U.S. and other countries.
The Bluetooth word mark and logos are registered trademarks owned by Bluetooth SIG, Inc. and any use of such
marks by ION Audio is under license. Other trademarks and trade names are those of their respective owners.
3
Page 4
9
10
11
1
2
4
5
6
8
3
7
7
12
13
14
15
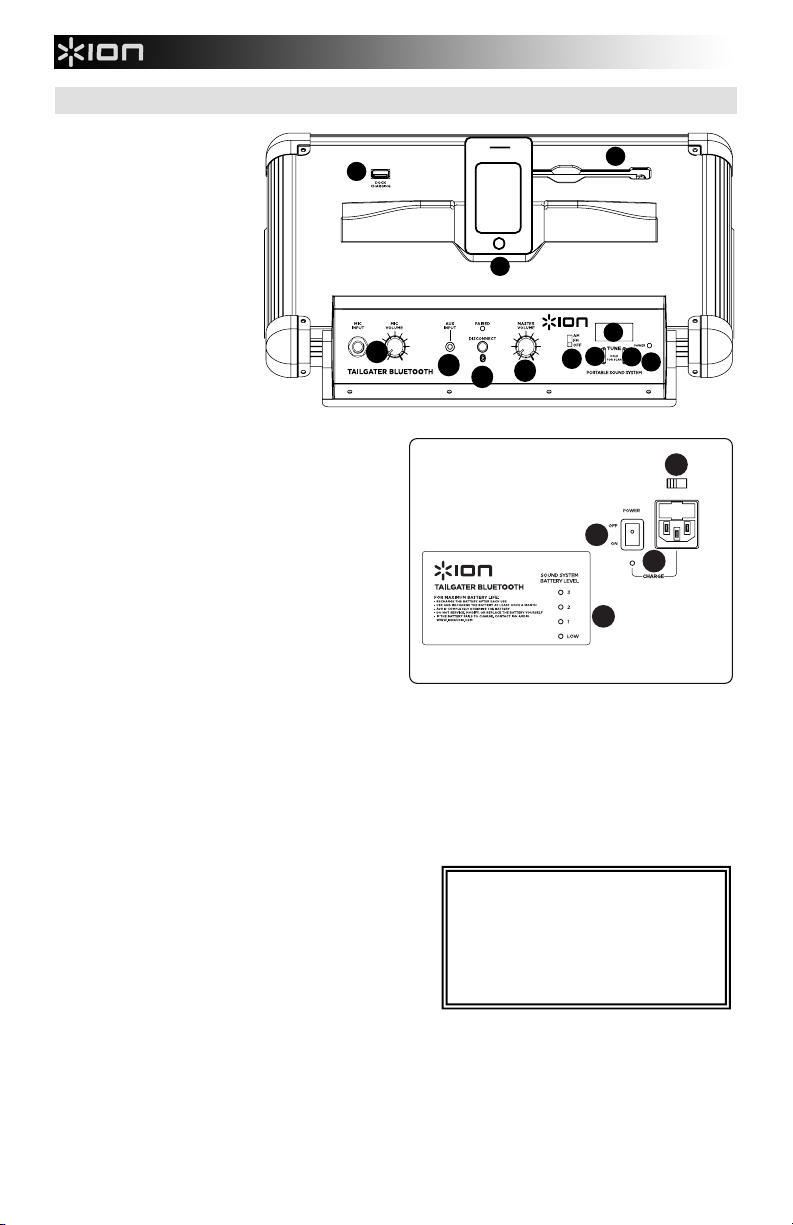
DIAGRAM AND PARTS DESCRIPTION
1. Instrument / Microphone
Input with Volume Control
(1/4"): This mono input
accepts a 1/4" input such as
a microphone, guitar, or
other musical instrument.
2. Auxiliary input: This stereo
1/8” input can be used to
connect a CD player, MP3
player, or other audio
source.
3. Bluetooth: The Paired LED
will be lit when a device is
paired to TAILGATER
BLUETOOTH. This LED will
not be lit when TAILGATER
BLUETOOTH is first
powered on (unless it was
previously paired with a
device). Press the
Disconnect button to
disconnect a paired Bluetooth device.
4. Master Volume Control: This adjusts the speaker’s
main mix volume, which includes
Instrument/Microphone Input, Auxiliary Input, Tuner,
and the audio of a paired Bluetooth device.
5. Radio Selector: This switch sets the tuner to AM or FM
or turns the tuner off. (Note: This switch does not turn
the unit's power off – just the tuner.)
6. LCD: Displays the current radio station.
7. Tuner: Use these buttons to search for a radio station.
To "scan" (jump to the next available station), hold this
down for a few seconds until it starts to seek a station.
Unit will remember the last station you were on and
start at that station when you power off and power on
again.
8. Power LED: Indicates whether TAILGATER
BLUETOOTH is on or off.
9. Dock Charge: Connect your device’s charge cable
here to charge it. USB charging only functions when the
unit’s power is turned on. Note: Users with iPad (3rd
generation) may experience slower charging. We recommend charging with the screen locked when using iPad (3rd
generation).
10. Device Cradle: Place your iPad/iPod touch®/iPhone®, Android® or other device here to be held. These can be
connected via Bluetooth or to aux input using the included 1/8” to 1/8” cable. Note: It is recommended to remove your
iPad or other device from the cradle before transporting or traveling with TAILGATER.
11. Antenna: Adjust this telescoping FM antenna to get the best radio reception.
Note: To prevent accidental damage, we recommend rotating the antenna only when it is extended horizontally. Also,
retract the antenna when the Tuner is not in use. Note: When using AM radio if you have a Bluetooth device that is
paired, this will cause poor AM reception. Unpair your Bluetooth device in order to listen to AM radio.
12. Power Cable Input (IEC): Insert the included power cable here to charge the unit. Note that the TAILGATER
BLUETOOTH can run off the power adapter while it simultaneously charges the battery. The charge indicator illuminates
when the battery is charging.
13. Voltage Selector*: If your unit has a voltage selector switch,
change its setting only when necessary (e.g., when traveling
to a country or region with a different voltage). Selecting an
improper voltage setting can damage the unit. To change its
setting, only remove *one* screw of the cover and slide it
aside to expose the selector.
14. Power ON/OFF Switch: Turns TAILGATER BLUETOOTH on
or off. Please note that while TAILGATER BLUETOOTH is
connected to a power source, it does not need to be powered
on to charge the battery.
15. Battery Level Indicator: While the unit is powered ON and
unit is not plugged in, these four lights indicate the power left
in the battery. Battery life varies based on volume and usage.
iPhone and iPod touch are trademarks of Apple Inc., registered in the U.S. and other countries.
Android is a trademark of Google Inc.
4
10
*WARNING: If your unit has a voltage
selector switch, change its setting only when
necessary (e.g., when traveling to a country
or region with a different voltage). Selecting
an improper voltage setting can damage the
unit. To change its setting, only remove *one*
screw of the cover and slide it aside to
expose the selector.
11
13
14
12
15
Page 5

TROUBLESHOOTING
If the sound is distorted: Try lowering the volume control of your sound source or musical instrument. Also, try to
reduce the overall volume of TAILGATER BLUETOOTH.
If there is too much bass: Try adjusting the tone or EQ control on your sound source to lower the bass level. This
will allow you to play the music louder before clipping (distortion) occurs.
If there is a high-pitched whistling noise when using microphones: This is probably feedback. Point the
microphones away from the speaker.
If there is poor AM reception: When you have a Bluetooth device that is paired, unpair your Bluetooth device in
order to listen to AM radio. To adjust AM reception, move entire unit.
If you can’t hear the microphone over the music volume: Turn down the music volume from your source.
PAIRING A BLUETOOTH DEVICE
1. Turn on your Bluetooth device.
2. Power on TAILGATER BLUETOOTH and it will automatically go into pairing mode to search for Bluetooth
devices. You will know you are in pairing mode when the LED is blank.
3. If your Bluetooth device is not able to pair to the amp, press the disconnect button on the amp to break
previous Bluetooth connections and reset the Bluetooth module.
4. Navigate to your Bluetooth device’s setup screen, find “ION Speaker” and connect.
Note: If your Bluetooth device prompts for a pairing code, enter ‘0000’.
5. TAILGATER BLUETOOTH LED will light up solid when it is 'paired'.
Note: Users should consider updating their OS if experiencing trouble with pairing or playing music.
6. To disconnect pairing, press the ‘Disconnect’ button on TAILGATER BLUETOOTH.
7. To connect to another Bluetooth device, repeat steps 3-4.
Note: Maximum range will be achieved when using devices with Bluetooth 4.0.
5
Page 6
GUÍA DE INICIO RÁPIDO (ESPAÑOL)
1. Asegúrese que todos los artículos incluidos al inicio de este manual estén
incluidos en la caja.
2. LEA LAS INSTRUCCIONES DEL FOLLETO DE SEGURIDAD ANTES DE
UTILIZAR EL PRODUCTO.
3. ASEGÚRESE DE QUE HA CARGADO COMPLETAMENTE LA BATERÍA.
PARA LOGRAR LA MÁXIMA VIDA ÚTIL DE LA BATERÍA, CÁRGUELA
TOTALMENTE ANTES DEL PRIMER USO.
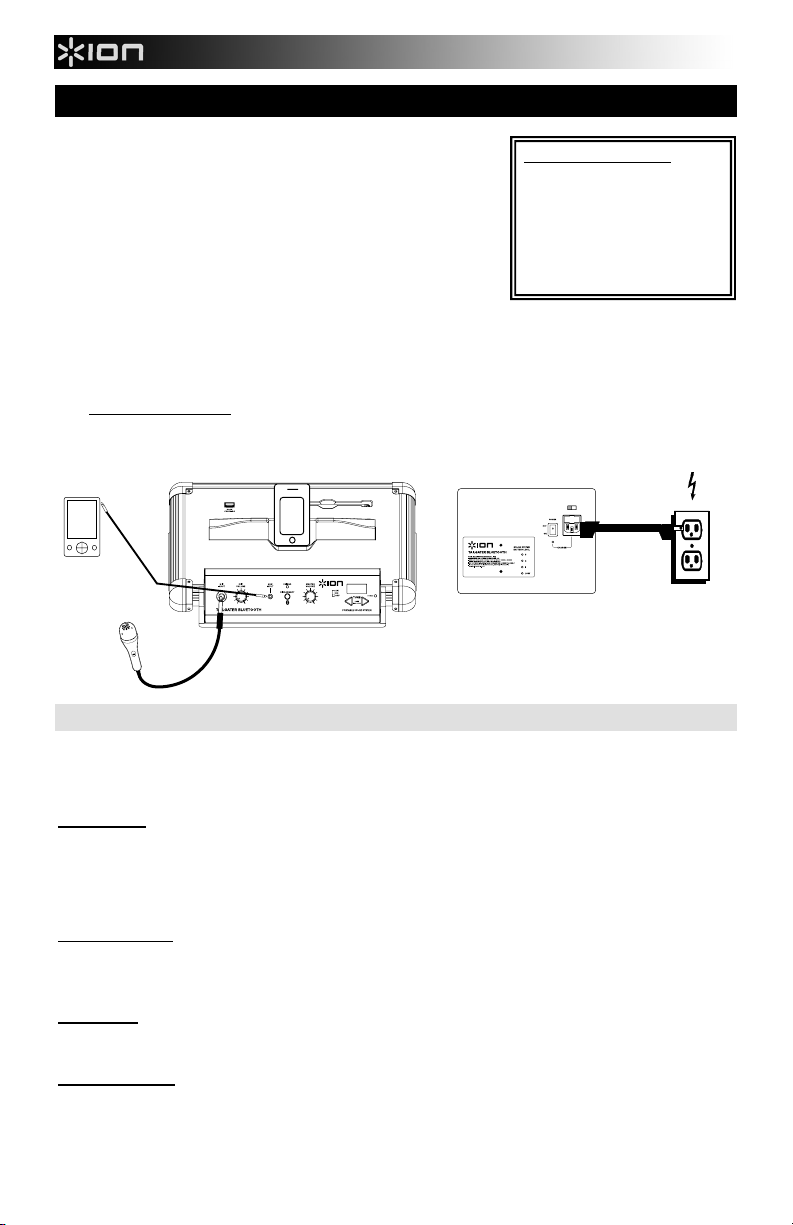
4. Estudie este diagrama de instalación.
5. Asegúrese de que todos los dispositivos de entrada tales como micrófonos,
reproductores de CD, o reproductores MP3 estén apagados y con el control
de volumen en "cero".
6. Conecte todos los dispositivos como se muestra.
7. Encienda todo en el siguiente orden:
• fuentes de entrada de audio (por ejemplo, micrófonos, instrumentos, reproductores de CD/MP3)
• TAILGATER BLUETOOTH
8. Al apagar, realice siempre esta operación en sentido inverso:
• TAILGATER BLUETOOTH
• por último, cualquier dispositivo de entrada
Visite http://www.ionaudio.com para registrar el producto.
REPRODUCTOR
DE MP3 (no incluido)
MICRÓFONO
PANEL SUPERIOR
iPhone (no incluido)
PANEL LATERAL
BATERÍAS RECARGABLES
Las baterías de plomo-ácido recargables son del mismo tipo que se usa en los automóviles. Al igual que con la batería del
vehículo, la forma en que se usa tiene una influencia significativa en la duración de su vida útil. Con un uso y tratamiento
correctos, una batería de plomo-ácido puede durar varios años. He aquí algunas recomendaciones para prolongar la vida útil
de la batería interna.
USO GENERAL
• CARGUE COMPLETAMENTE LA BATERÍA ANTES DE USARLA
• CARGUE LA BATERÍA COMPLETAMENTE DESPUÉS DE CADA USO
• EVITE AGOTARLA COMPLETAMENTE
• Puede dejar la unidad enchufada durante hasta dos semanas
• Para obtener máxima vida, descargue la batería el 80% una vez por mes
ALMACENAMIENTO
• Evite almacenar la batería en lugares húmedos y de alta temperatura
• Si la almacena durante períodos prolongados, recárguela periódicamente
• Si no carga la batería durante seis meses, es posible que luego no pueda cargarse
REPARACIÓN
• Cuando la batería se acerca al final de su vida útil, puede perder su capacidad de recarga. Si esto ocurre,
DISPOSICIÓN FINAL
comuníquese con el soporte técnico de ION Audio al www.ionaudio.com/supporthome.
• Lleve la unidad a un centro de reciclaje o deséchela de acuerdo a las ordenanzas locales
CONTENIDO DE LA CAJA
TAILGATER BLUETOOTH
Micrófono y mic cable
1/8" - 1/8" cable
cable de alimentación
Guía de inicio rápido
Folleto de información sobre la
seguridad y la garantía
SUMINISTRO
ELÉCTRICO
6
Page 7
9
10
11
1
2
4
5
6
8
3
7
7
12
13
14
15
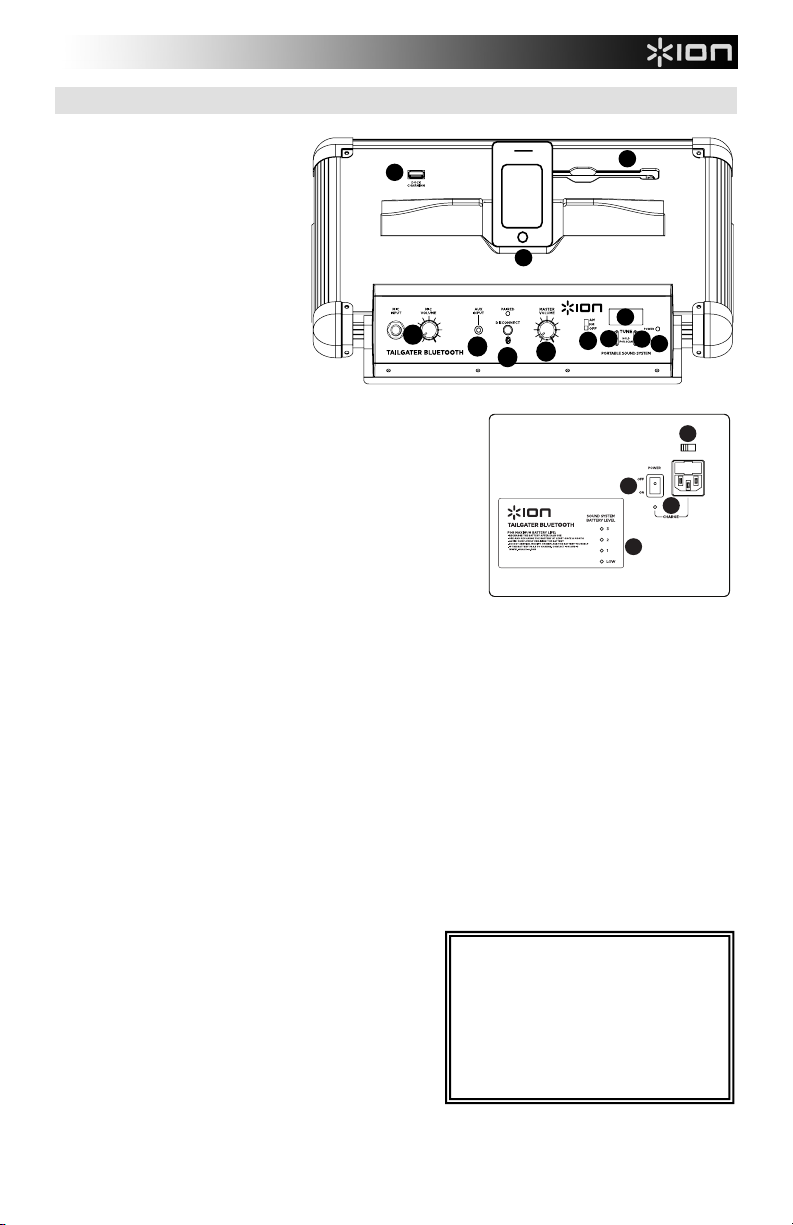
DIAGRAMA Y DESCRIPCIÓN
1. Entrada de instrumento /
Micrófono con control de
volumen (1/4"): Esta entrada
mono admite una entrada de 1/4"
tal como un micrófono, una
guitarra u otro instrumento
musical.
2. Entrada auxiliar: Esta entrada de
1/8" estéreo se puede usar para
conectar un reproductor de CD,
MP3 u otra fuente de audio.
3. Bluetooth: El LED Paired
(Apareado) se enciende cuando
se aparea un dispositivo al
TAILGATER BLUETOOTH. Este
LED no se enciende cuando el
TAILGATER BLUETOOTH se
enciende por primera vez (a
menos que hubiera sido apareado previamente con un
dispositivo). Pulse el botón Disconnect (Desconectar) para
desconectar un dispositivo Bluetooth apareado.
4. Control de volumen maestro: Este control ajusta el volumen de
la mezcla principal del altavoz, que incluye la entrada de
instrumento/micrófono, la entrada auxiliar, el sintonizador y el
audio de un dispositivo Bluetooth apareado.
5. Selector de radio: Este interruptor ajusta la radio a AM o FM o
la apaga. (Nota: Este interruptor no desconecta el suministro
eléctrico de la unidad —sólo el de la radio.)
6. LCD: Muestra la estación de radio actual.
7. Sintonizador: Use estos botones para buscar las emisoras de
radio. Para "explorar" (saltar a la siguiente emisora disponible),
manténgalo pulsado unos segundos hasta que empieza a buscar
la emisora. La unidad recuerda la última emisora que estaba sintonizada y comienza en esa emisora cuando la
apaga y enciende nuevamente.
8. LED de encendido: Indica cuando el TAILGATER BLUETOOTH está encendido o apagado.
9. Carga en la estación de acoplamiento: Conecte aquí el cable de carga de su dispositivo para cargarlo. La
carga por USB funciona solamente cuando la unidad está encendida.
Nota: Los usuarios de iPad (3ra generation) pueden experimentar una carga más lenta. Recomendamos
cargar con la pantalla bloqueada cuando se usa iPad (3ra generation).
10. Base del dispositivo: Coloque aquí su iPad/iPod touch/iPhone, Android u otro dispositivo a sostener.
Se pueden conectar vía Bluetooth o a la entrada auxiliar usando el cable de 1/8” a 1/8” incluido.
Nota: Se recomienda extraer su iPad u otro dispositivo de la base antes de transportarlo o viajar con el
TAILGATER.
11. Antena: Ajuste esta antena telescópica de FM para obtener la mejor recepción de las emisoras de radio.
Nota: Para evitar daños accidentales, recomendamos girar la antena sólo cuando está extendida
horizontalmente. Asimismo, retraiga la antena cuando no está usando el sintonizador. Nota: Cuando usa la
radio de AM, si tiene un dispositivo Bluetooth que está apareado, puede causar problemas en la recepción.
Desaparee su dispositivo Bluetooth a fin de escuchar la radio de AM. Para ajustar la recepción de AM, mueva
la unidad completa.
12. Entrada del cavo de alimentación (IEC): Inserte aquí el cable de alimentación incluido para cargar la unidad.
Tenga en cuenta que el amplificador portátil para altavoces puede funcionar con el adaptador de potencia
mientras se carga simultáneamente la batería. El indicador de carga se enciende cuando se está cargando la
batería.
13. Selector de voltaje*: Si su unidad cuenta con un
conmutador selector de voltaje, cambie el ajuste del
mismo sólo cuando sea necesario (por ej., cuando viaje a
un país o región con un voltaje diferente). Si selecciona
un ajuste de voltaje incorrecto, se puede dañar la unidad.
Para cambiar este ajuste, sólo retire *un* tornillo de la
cubierta y deslícela a un lado para exponer el selector.
14. Interruptor de encendido/apagado: Enciende y apaga
el TAILGATER BLUETOOTH. Tenga en cuenta que
mientras el TAILGATER BLUETOOTH está conectado a
un suministro eléctrico, no es necesario encenderlo para
que cargue la batería.
15. Indicador de nivel de la pila: Mientras la unidad está
encendida y no está enchufada, estas cuatro luces
indican la energía remanente en la pila. La vida útil de la
pila varía en función del volumen y el consumo.
7
10
* ADVERTENCIA:
Si su unidad cuenta con un conmutador
selector de voltaje, cambie el ajuste del
mismo sólo cuando sea necesario (por ej.,
cuando viaje a un país o región con un voltaje
diferente). Si selecciona un ajuste de voltaje
incorrecto, se puede dañar la unidad. Para
cambiar este ajuste, sólo retire *un* tornillo de
la cubierta y deslícela a un lado para exponer
el selector.
11
13
14
12
15
Page 8

SOLUCIÓN DE PROBLEMAS
Si el sonido está distorsionado: Pruebe bajando el control de volumen de su fuente de sonido o instrumento
musical. Pruebe también reduciendo el volumen general del TAILGATER BLUETOOTH.
Si hay demasiados graves: Intente ajustando el control de tono o ecualización de su fuente de sonido para reducir
el nivel de graves. De esta forma podrá reproducir la música con más volumen antes de que se produzca el recorte
(distorsión).
Si hay un silbido agudo cuando se usan micrófonos: Probablemente sea realimentación. Apunte los micrófonos
apartándolos del altavoz.
Si hay recepción pobre de AM: Cuando tiene un dispositivo Bluetooth que está apareado, desaparee ese
dispositivo Bluetooth a fin de escuchar la radio de AM. Para ajustar la recepción de AM, mueva la unidad completa.
Si no puede oír el micrófono por arriba del volumen de la música: Disminuya el volumen de la música en su
fuente.
CÓMO APAREAR UN DISPOSITIVO BLUETOOTH
1. Encienda su dispositivo Bluetooth.
2. Encienda el TAILGATER BLUETOOTH, que pasará automáticamente al modo de apareamiento para buscar
dispositivos Bluetooth. Se dará cuenta de que está en modo de apareamiento cuando el LED está apagado.
3. Si su dispositivo Bluetooth no es capaz de aparearse con el amplificador, pulse el botón de desconexión del
amplificador para romper las conexiones Bluetooth anteriores y reinicie el módulo Bluetooth.
4. Navegue a la pantalla de configuración de su dispositivo Bluetooth, busque “ION Speaker” y conecte.
Nota: Si su dispositivo Bluetooth solicita un código de apareamiento, ingrese ‘0000’.
5. El LED TAILGATER BLUETOOTH se enciende con luz permanente cuando está 'apareado'.
Nota: Los usuarios deben considerar la actualización de su sistema operativo (OS) si experimentan problemas
con el apareamiento o la reproducción de música.
6. Para desconectar el apareamiento, pulse el botón ‘Disconnect’ del TAILGATER BLUETOOTH.
7. Para conectarse a otro dispositivo Bluetooth, repita los pasos 3 y 4.
Nota: El alcance máximo se logra cuando se utilizan dispositivos con Bluetooth 4.0.
8
Page 9
GUIDE D'UTILISATION RAPIDE (FRANÇAIS)
1. Assurez-vous que tous les articles énumérés sur la page couverture
de ce guide sont inclus dans la boîte.
2. VEUILLEZ LIRE LE LIVRET DES CONSIGNES DE SÉCURITÉ
AVANT D'UTILISER LE PRODUIT.
3. VEUILLEZ VOUS ASSURER QUE LA PILE EST COMPLÈTEMENT
RECHARGÉE. RECHARGER COMPLÈTEMENT LA PILE AVANT
LA PREMIÈRE UTILISATION AFIN D'AUGMENTER SA DURÉE DE
VIE.
4. Examinez bien le schéma d'installation.
5. Assurez-vous que tous les appareils d'entrée tels que microphones,
lecteur de disques compacts, lecteur MP3 ou les autres appareils
branchés sont hors tension et que leur volume soit réglé à « zéro ».
6. Connectez tous les appareils tel qu'indiqué sur le schéma.
7. Mettre tous les appareils sous tension dans l'ordre suivant.
• source d'entrée audio (p. ex. microphones, instruments, lecteurs CD/MP3)
• TAILGATER BLUETOOTH
8. Pour mettre hors tension, toujours inverser l'opération:
• TAILGATER BLUETOOTH
• en dernier, tous les appareils d'entrée
Allez à la http://www.ionaudio.com pour l'enregistrement du produit.
LECTEUR DE MP3
(non inclus)
MICROPHONE
PANNEAU SUPÉRIEUR
iPhone (non inclus)
PILES RECHARGEABLES
Les piles au plomb rechargeables sont du même type que les batteries utilisées dans les automobiles. Comme pour la batterie
de votre automobile, la manière dont vous l'utilisez a un impact direct sur sa durée de vie. Cependant, avec une bonne
utilisation la pile au plomb peut avoir une durée de vie de plusieurs années. Voici quelques recommandations pour prolonger
au maximum la durée de vie de la pile interne.
UTILISATION GÉNÉRALE
• CHARGEZ COMPLÈTEMENT LA PILE AVANT DE L'UTILISER
• RECHARGEZ LA PILE COMPLÈTEMENT APRÈS CHAQUE UTILISATION
• ÉVITEZ DE DÉCHARGER LA PILE COMPLÈTEMENT
• L'appareil peut demeurer branché jusqu'à deux semaines
• Afin de prolonger la durée de vie, déchargez la pile à 80 % une fois par mois
ENTREPOSAGE
• Évitez d'exposer l'appareil à de hautes températures et à l'humidité
• Durant l'entreposage à long terme, rechargez la pile régulièrement
• S'il se passe plus de six mois sans que la pile soit rechargée, il se pourrait qu'elle ne se recharge plus
RÉPARATION
• Il se peut que la capacité de recharge de la pile se détériore plus elle se rapproche de la fin de sa durée de vie. Si cela se
produit, veuillez communiquer avec le service technique de ION Audio au www.ionaudio.com/supporthome.
DISPOSER
• Apportez l'appareil dans un centre de recyclage ou disposez selon les règlements de votre municipalité
9
CONTENU DE LA BOÎTE
TAILGATER BLUETOOTH
Microphone et mic câble
1/8" - 1/8" câble
Câble d'alimentation
Guide d'utilisation rapide
Le livret des consignes de sécurité et
des informations concernant la garantie
PANNEAU LATÉRAL
ALIMENTATION
Page 10

SCHÉMA ET DESCRIPTION
9
10
11
1
2
4
5
6
8
3
7
7
12
13
14
15
1. Entrée instrument / microphone
avec commande de volume (1/4 po) :
Cette entrée mono peut accueillir un
câble de 1/4 po pour microphone,
guitare ou un autre instrument de
musique.
2. Entrée auxiliaire : Cette entrée stéréo
1/8 po permettent de brancher un
lecteur de disques compacts, un
lecteur MP3 ou autres sources audio.
3. Bluetooth : La DEL de jumelage sera
allumée lorsqu'un périphérique est
jumelé au TAILGATER BLUETOOTH.
Cette DEL ne sera pas allumée lorsque
le TAILGATER BLUETOOTH est
d'abord alimenté (à moins qu'il a été
jumelé avec un périphérique auparavant). Appuyez sur le bouton
Disconnect pour déconnecter le d'un périphérique Bluetooth
jumelé.
4. Volume général : Ce bouton permet de régler le volume du mix
général qui comprend l'entrée instrument/microphone, l’entrée
auxiliaire, le syntoniseur et l'audio d'un périphérique Bluetooth
jumelé.
5. Sélecteur de bande radio : Ce sélecteur permet de syntoniser la
bande AM ou FM et permet d’éteindre la radio.
(Remarque : Il n’éteint pas l’appareil, seulement la radio.)
6. Écran : Affiche la station radio en cours.
7. Syntoniseur : Ces touches permettent de parcourir la bande à la
recherche d’une station radio. Pour balayer la bande (passer à la
prochaine station), maintenez cette touche enfoncée quelques
secondes, jusqu’à ce qu'il commence à rechercher la prochaine station disponible. L’appareil mémorise la
dernière station syntonisée lorsqu’il est mis hors tension et s’ouvre sur cette station lorsqu’il est mis sous
tension.
8. Témoin d'alimentation DEL : Indique si le TAILGATER BLUETOOTH est sous ou hors tension.
9. Prise de recharge : Branchez le câble de rechargement de votre périphérique à cette prise pour le recharger.
Le rechargement de la pile par la connexion USB fonctionne uniquement lorsque l’appareil est allumé.
Remarque : Les utilisateurs du iPad de 3
long. Pour le iPad de 3
10. Station d’accueil : Placez votre iPad/iPod touch/iPhone, Android ou autre dispositif sur ce socle.
Ceux-ci peuvent être reliés via Bluetooth ou branchés à l'entrée auxiliaire en utilisant le câble 1/8 po à 1/8 po
inclus. Remarque : Nous suggérons de retirer le iPad ou tout autre appareil de la station d’accueil avant de
déplacer ou transporter le TAILGATER.
11. Antenne : Ajustez cette antenne FM télescopique afin d’obtenir la meilleure réception radio.
Remarque : Afin d’empêcher tout dommage accidentel, nous recommandons de tourner l'antenne seulement
lorsqu’elle est tendue horizontalement. En outre, rétractez l'antenne quand le syntoniseur n’est pas utilisé.
Remarque : Lorsque vous avez un périphérique Bluetooth qui est jumelé, désactiver le jumelage de votre
périphérique Bluetooth afin que la réception AM soit meilleure. Pour ajuster la réception AM, déplacer tout
l'appareil.
12. Entrée du câble d'alimentation (IEC) : Brancher le
câble d'alimentation ci-inclus ici pour recharger l'appareil.
Sachez qu'il est possible d'utiliser le système PA portable
tout en le rechargeant à l'aide de l'adaptateur
d'alimentation. L'indicateur de charge s'allume lorsque la
pile se recharge.
13. Sélecteur de tension* : Si votre appareil dispose d’un
sélecteur de tension, changez seulement le réglage si
nécessaire (par exemple, en voyageant dans un pays ou
une région avec une tension différente). L'utilisation d’une
tension inappropriée pourrait endommager l’appareil.
Pour modifier le réglage, retirez uniquement *une* des
vis du couvercle et faites-le glisser afin d’accéder au
sélecteur.
14. Interrupteur Marche/Arrêt: Permet de mettre le TAILGATER BLUETOOTH sous et hors tension. Veuillez
noter que lorsque le TAILGATER BLUETOOTH est branché à une source d’alimentation, il peut recharger la
pile sans être sous tension.
15. Indicateur de niveau de charge de la pile : Lorsque l’appareil est allumé et alimenté par pile (non branché à
l’alimentation secteur), ces quatre témoins indiquent le niveau de charge de la pile. La durée de vie de la pile
dépend du niveau d’utilisation.
e
génération, nous recommandons de verrouiller l’écran lors du rechargement de la pile.
e
génération peuvent éprouver un temps de rechargement de pile plus
* MISE EN GARDE:
Si votre appareil dispose d’un sélecteur de
tension, changez seulement le réglage si
nécessaire (par exemple, en voyageant dans
un pays ou une région avec une tension
différente). L'utilisation d’une tension
inappropriée pourrait endommager l’appareil.
Pour modifier le réglage, retirez uniquement
*une* des vis du couvercle et faites-le glisser
afin d’accéder au sélecteur.
10
10
11
13
14
12
15
Page 11

GUIDE DE DÉPANNAGE
Lorsqu’il y a de la distorsion : Essayez de diminuer le volume sur l’appareil d’entrée audio ou l’instrument de
musique. Essayez également de réduire le volume général du TAILGATER BLUETOOTH.
Lorsqu’il y a trop de basses fréquences : Essayez de régler le niveau de tonalité et d’égalisation sur l’appareil de
source d’entrée audio afin de diminuer le niveau des basses fréquences. Cela vous permettra d'augmenter le volume
de la musique avant que l'écrêtage se produise.
Lorsqu’il y a un sifflement aigu lors de l’utilisation des microphones : Ceci est probablement causé par l’effet
Larsen (feedback). Dirigez les microphones loin des haut-parleurs.
Lorsqu’il y a une mauvaise réception AM : Lorsque vous avez un périphérique Bluetooth qui est jumelé, désactiver
le jumelage de votre périphérique Bluetooth afin d'écouter la radio AM. Pour ajuster la réception AM, déplacer tout
l'appareil.
Si vous ne pouvez entendre le microphone au-dessus de la musique : diminuez le volume de la musique de la
source audio.
JUMELAGE D'UN PÉRIPHÉRIQUE BLUETOOTH
1. Mettez votre périphérique Bluetooth sous tension.
2. Mettez le TAILGATER BLUETOOTH sous tension et il passera automatiquement en mode jumelage afin de
rechercher les périphériques Bluetooth. Vous saurez que vous êtes en mode jumelage lorsque la DEL devient
blanche.
3. Si votre périphérique Bluetooth ne parvient pas à se jumeler à l’amplificateur, appuyez sur le bouton
4. Accédez à l'écran de configuration de votre périphérique Bluetooth, recherchez «ION Audio Speaker» et lancez
5. La DEL du TAILGATER BLUETOOTH s’allumera lorsque le jumelage est réussi.
6. Appuyez sur le bouton Disconnect du TAILGATER BLUETOOTH pour déconnecter le périphérique Bluetooth
7. Pour jumeler un autre périphérique Bluetooth, répétez les étapes 3 et 4.
Remarque : La plage maximale peut être atteinte avec l’utilisation d’appareils dotés de Bluetooth 4.0.
Disconnect de l’amplificateur afin de supprimer la connexion à d'autres périphériques Bluetooth et remettre à
zéro le module Bluetooth.
le jumelage.
Remarque : Si votre périphérique Bluetooth vous demande d’entrer un code de jumelage, entrez « 0000 ».
Remarque : Les utilisateurs devraient envisager de mettre à jour leur système d'exploitation si des ennuis
surviennent durant le jumelage ou lors de la lecture de musique.
branché.
11
Page 12

GUIDA RAPIDA (ITALIANO)
1. Verificare che tutti gli elementi elencati sul frontespizio di questa guida
siano inclusi nella confezione.
2. PRIMA DI UTILIZZARE IL PRODOTTO LEGGERE IL LIBRETTO DELLE
ISTRUZIONI DI SICUREZZA.
3. ASSICURARSI DI AVER CARICATO COMPLETAMENTE LA
BATTERIA. CARICARE TOTALMENTE LA BATTERIA PRIMA DEL
PRIMO UTILIZZO PER GARANTIRNE LA MASSIMA DURATA.
4. Esaminare attentamente lo schema di montaggio.
5. Assicurarsi che tutti i dispositivi d'ingresso quali microfoni, lettori CD, o
lettori mp3 collegati siano spenti e che il volume sia impostato su "zero"
6. Collegare tutti i dispositivi come illustrato.
7. Accendere tutto nel seguente ordine:
• sorgenti di ingresso audio (microfoni, strumenti, lettori CD/MP3)
• TAILGATER BLUETOOTH
8. Al momento dello spegnimento, invertire l'operazione:
• TAILGATER BLUETOOTH
• per ultimi, tutti i dispositivi di ingresso
Recarsi sul sito http://www.ionaudio.com per la registrazione del prodotto.
LETTORE MP3
(non in dotazione)
MICROFONO
PANNELLO SUPERIORE
iPhone (non in dotazione)
BATTERIE RICARICABILI
Le batterie ricaricabili al piombo-acido sono dello stesso tipo di quelle utilizzate nelle automobili. Come nel caso della batteria
dell'auto, la maniera in cui si utilizza questa batteria ha un notevole impatto sulla sua vita utile. Con un utilizzo adeguato, una
batteria al piombo-acido può durare per anni. Ecco alcune raccomandazioni per garantire la massima durata dalla batteria
interna:
UTILIZZO GENERICO
• CARICARE A FONDO LA BATTERIA PRIMA DI UTILIZZARLA
• CARICARE A FONDO LA BATTERIA DOPO CIASCUN UTILIZZO
• EVITARE DI SCARICARE DEL TUTTO LA BATTERIA
• È possibile lasciare l'apparecchio collegato alla rete elettrica per un massimo di due settimane
• Per il massimo della durata, scaricare la batteria dell'80% una volta al mese
COME RIPORRE L'APPARECCHIO
• Evitare di riporre l'apparecchio a temperature elevate e in luoghi umidi
• Se si ripone l'apparecchio per lunghi periodi di tempo, ricaricare periodicamente la batteria
• Se non si carica la batteria per sei mesi, potrebbe non ricaricarsi più
RIPARAZIONI
• Man mano che la batteria si avvicina al termine della sua vita utile, può perdere la capacità di ricarica. Se ciò
COME ELIMINARE L'APPARECCHIO
accade, contattare il servizio di assistenza tecnica di ION Audio al www.ionaudio.com/supporthome.
• Recarsi con l'apparecchi presso un centro di riciclaggio oppure eliminarlo in conformità con le normative locali
12
CONTENUTI DELLA CONFEZIONE
TAILGATER BLUETOOTH
Microfono e mic cavo
1/8" - 1/8" cavo
Cavo di alimentazione
Guida rapida
Libretto di istruzioni di sicurezza e
garanzia
PANNELLO LATERALE
ALIMENTAZIONE
Page 13

DIAGRAMMA E DESCRIZIONE
9
10
11
1
2
4
5
6
8
3
7
7
12
13
14
15
1. Ingresso strumento / microfono con
controllo di guadagno volume
(1/4"): questo ingresso mono accetta
un ingresso da 1/4" quali un
microfono, chitarra o altro strumento
musicale.
2. Ingresso ausiliario: questo ingresso
stereo da 1/8" può essere utilizzato
per collegare un lettore CD, un lettore
MP3 o altre sorgenti audio.
3. Bluetooth: il LED accoppiato sarà
acceso quando un dispositivo è
accoppiato al TAILGATER
BLUETOOTH. Il LED non sarà acceso
quando il TAILGATER BLUETOOTH
viene acceso (a meno che non fosse
accoppiato in precedenza con un
dispositivo). Premere il pulsante Disconnect (scollega) di un
dispositivo Bluetooth accoppiato.
4. Comando volume Master: questo comando regola il volume
principale di mix dell'altoparlante, che comprende l'ingresso
strumento/microfono, l'ingresso ausiliario (aux), il
sintonizzatore e l'audio di un dispositivo Bluetooth accoppiato.
5. Selettore radio: questo interruttore imposta la radio su AM o
FM o spegne la radio. (Nota bene: questo interruttore non
spegne l'apparecchio, solo la radio.)
6. LCD: mostra a display la stazione radio corrente.
7. Sintonizzatore: servirsi di questo tasto per cercare una
stazione radio. Per effettuare la "scansione" (passare alla
stazione disponibile successiva), tenere premuto questo
comando per alcuni secondi fino a quando non inizia a cercare una stazione. L'apparecchio ricorderà l'ultima
stazione in cui ci si trovava e si accenderà sintonizzato su tale stazione quando si spegne e si riaccende
l'apparecchio.
8. LED di alimentazione: indica se il TAILGATER BLUETOOTH è acceso o spento.
9. Dock di carica: collegare a questo livello il cavo di ricarica del dispositivo per ricaricarlo. La carica tramite USB
funziona unicamente quando l'apparecchio è acceso.
Nota bene: gli utenti di iPad (3ª generation) potrebbero notare una ricarica più lenta. Quando si utilizza l'iPad
(3ª generation), si consiglia di caricare con lo schermo bloccato.
10. Cradle del dispositivo: collocare l'iPad/iPod touch/iPhone, Android o altro dispositivo a questo livello per
essere supportato. Questi possono essere collegati tramite Bluetooth o ad un ingresso aux servendosi del cavo
da 1/8” a 1/8” in dotazione. Nota bene: si raccomanda di scollegare l'iPad o qualsiasi altro dispositivo dalla
cradle prima di trasportare o di viaggiare con il TAILGATER.
11. Antenna: regolare questa antenna FM telescopica per ottenere la migliore ricezione radio.
Nota bene: per evitare danni accidentali, si consiglia di ruotare l'antenna solo quando è estesa in senso
orizzontale. Retrarre l'antenna quando il sintonizzatore non è in uso.
Nota bene: quando si utilizza la radio AM, se è presente un dispositivo Bluetooth collegato, si avrà una cattiva
ricezione AM. Scollegare il dispositivo Bluetooth per ascoltare la radio AM. Per regolare la ricezione AM,
spostare l'intero apparecchio.
12. Ingresso cavo di alimentazione (IEC): inserire il cavo di alimentazione in dotazione per caricare
l'apparecchio. Il TAILGATER BLUETOOTH può funzionare con l'adattatore anche durante la ricarica della
batteria. L'indicatore di carica si illumina durante la ricarica stessa.
13. Selettore di voltaggio*: se l'apparecchio dispone di un
interruttore selettore di voltaggio, modificarne
l'impostazione solo se necessario (quando ci si reca in un
Paese o in una regione dove viene impiegato un
voltaggio diverso). L'impostazione di un voltaggio errato
può danneggiare l'apparecchio. Per modificare
l'impostazione, rimuovere solo *una* vite dal coperchio e
farlo scorrere di lato per esporre il selettore.
14. Interruttore di alimentazione ON/OFF: accende o
spegne il TAILGATER BLUETOOTH. Va notato che
quando il TAILGATER BLUETOOTH è collegato ad una
fonte di alimentazione, non deve essere
necessariamente acceso per caricare la batteria.
15. Indicatore del livello della batteria: Quando
l'apparecchio è acceso e non è collegato alla rete
elettrica, queste quattro spie indicano la batteria residua.
La durata della batteria varia a seconda del volume e
dell'utilizzo che se ne fa.
* AVVERTENZA: Se l'apparecchio dispone di
un interruttore selettore di voltaggio,
modificarne l'impostazione solo se necessario
(quando ci si reca in un Paese o in una
regione dove viene impiegato un voltaggio
diverso). L'impostazione di un voltaggio errato
13
può danneggiare l'apparecchio. Per
modificare l'impostazione, rimuovere solo
*una* vite dal coperchio e farlo scorrere di
lato per esporre il selettore.
10
11
13
14
12
15
Page 14

RISOLUZIONE DI PROBLEMI
Il suono è distorto: provare ad abbassare il volume della propria fonte audio o dello strumento musicale. Inoltre,
provare a ridurre il volume complessivo del TAILGATER BLUETOOTH.
Eccessivi bassi: provare a regolare la tonalità o il comando EQ a livello della fonte audio per abbasare il livello dei
bassi. Ciò permetterà di suonare la musica più forte prima che salti (che si verifichi distorsione).
Quando si utilizzano i microfoni si verifica un fischio ad alto pitch: si tratta probabilmente di ritorno. Puntare i
microfoni lontani dalle casse.
C'è una scarsa ricezione AM: se un dispositivo bluetooth è accoppiato, scollegare il dispositivo bluetooth per
ascoltare la radio AM. Per regolare la ricezione AM, spostare l'intero apparecchio.
Se non si sente il microfono al di sopra del volume della musica: abbassare il volume della musica a livello della
fonte.
ACCOPPIAMENTO DI UN DISPOSITIVO BLUETOOTH
1. Accendere il dispositivo Bluetooth.
2. Accendere il TAILGATER BLUETOOTH: entrerà automaticamente in modalità di accoppiamento per cercare
dispositivi Bluetooth. Siete in modalità di accoppiamento quando il LED è bianco.
3. Se il dispositivo Bluetooth non è in grado di allinearsi con l'amp, premere il tasto di scollegamento sull'amp per
interrompere precedenti collegamenti Bluetooth e resettare il modulo Bluetooth.
4. Navigare nella schermata di configurazione del dispositivo Bluetooth, trovare “ION Audio Speaker” e
collegarlo.
Nota bene: se il dispositivo Bluetooth richiede un codice, inserire ‘0000’.
5. Il LED del TAILGATER BLUETOOTH rimarrà illuminato quando è "accoppiato".
Nota bene: Gli utenti dovrebbero aggiornare il loro sistema operativo in caso di problemi con l'accoppiamento
o con la riproduzione di musica.
6. Per annullare il collegamento, premere il pulsante "Disconnect" (scollega) sul TAILGATER BLUETOOTH.
7. Per collegarlo ad un altro dispositivo Bluetooth, ripetere i passaggi 3-4.
Nota bene: la portata massima sarà raggiunta utilizzando dispositivi dotati di Bluetooth 4.0.
14
Page 15

KURZANLEITUNG (DEUTSCH)
1. Überprüfen Sie, ob sich alle auf dem Deckblatt genannten Teile in der
Verpackung befinden.
2. LESEN SIE DIE SICHERHEITSHINWEISE, BEVOR SIE DIESES PRODUKT
VERWENDEN.
3. LADEN SIE DIE BATTERIE VOR DER ERSTEN VERWENDUNG AUF, UM
DIE LEBENSDAUER DER BATTERIE ZU MAXIMIEREN.
4. Sehen Sie sich die Aufbauabbildung an.
5. Schalten Sie alle Eingangsquellen (Mikrofone, CD Player, oder MP3 Player)
aus und drehen Sie deren Lautstärke auf "Null."
6. Verbinden Sie zusätzliche Geräte wie unten abgebildet.
7. Schalten Sie das System in der folgenden Reihenfolge ein:
• Eingangsquellen (z.B. Mikrofon, Instrumente und/oder CD-Player)
• TAILGATER BLUETOOTH
8. Gehen Sie beim Ausschalten in der genau umgekehrten Reihenfolge vor:
• TAILGATER BLUETOOTH
• Und zuletzt die Eingangsquellen
Registrieren Sie Ihr Produkt online unter http://www.ionaudio.com
MP3-PLAYER
(nicht mitgeliefert)
MIKROFON
iPhone (nicht mitgeliefert)
OBERSEITE
WIEDERAUFLADBARE BATTERIEN
Bei wiederaufladbaren Bleibatterien handelt es sich um die gleiche Art von Batterien, die in Autos verwendet werden. Und wie
bei Ihrer Autobatterie ist es auch für die Benutzungsdauer dieser Batterie von äußerster Wichtigkeit, wie sie verwendet wird.
Bei vorschriftsmäßigem Gebrauch und richtiger Pflege kann eine Bleibatterie jahrelang halten. Lesen Sie die nachstehenden
Empfehlungen, um aus der eingebauten Batterie das Beste herauszuholen.
ALLGEMEINE GEBRAUCHSHINWEISE
• BATTERIE VOR GEBRAUCH IMMER VOLL AUFLADEN
• BATTERIE NACH JEDEM GEBRAUCH VOLL AUFLADEN
• VÖLLIGES ENTLEEREN DER BATTERIE SOLLTE VERMIEDEN WERDEN
• Halten Sie das Gerät nicht dauerhaft am Stromnetz (maximal 2 Wochen), benutzen Sie das Gerät regelmäßig im
Batteriebetrieb.
• Um die maximale Benutzungsdauer auszuschöpfen, sollte die Batterie wenigstens einmal im Monat zu 80% entleert
werden
AUFBEW AHRUNG
• Gerät nicht hohen Temperaturen oder feuchter Umgebung aussetzen
• Bei Langzeitaufbewahrung Batterie in regelmäßigen Abständen aufladen
• Wird die Batterie sechs Monate lang nicht geladen, kann sie unter Umständen nicht mehr aufgeladen werden
REPARIEREN
• Mit zunehmendem Alter der Batterie nimmt unter Umständen deren Ladefähigkeit ab. Wenn dies eintritt, wenden Sie
sich an den technischen Support von ION Audio unter www.ionaudio.com/supporthome.
ENTSORGUNG
• Batterie zu einem Wiederverwertungszentrum bringen oder im Rahmen der geltenden Vorschriften entsorgen
INHALT DER VERPACKUNG
TAILGATER BLUETOOTH
Mikrofon und Mikrofonkabel
1/8" - 1/8" kabel
Netzkabel
Kurzanleitung
Broschüre mit den Sicherheits-
und Garantierichtlinien
SEITENTEIL
STROM
15
Page 16

9
10
11
1
2
4
5
6
8
3
7
7
12
13
14
15
BEDIENELEMENTE
11
10
13
14
12
15
* ACHTUNG:
Wenn Ihr Gerät über einen Wahlschalter
verfügt, sollten Sie nur dann Änderungen
vornehmen, wenn es notwendig ist (z.B. wenn
Sie in ein Land oder eine Region mit
unterschiedlicher Spannung reisen). Die Wahl
der falschen Spannung kann das Gerät
beschädigen. Um die Einstellung zu ändern,
entfernen Sie nur *eine* Schraube der
Abdeckung und schieben Sie sie beiseite, um
den Wähler freizulegen.
16
1. Instrument / Mikrofon Eingang mit
Lautstärke-Regler (6,3mm Klinke):
Dieser Mono Eingang ist kompatibel
mit normalen Klinkenkabeln von
einem Mikrofon, einer Gitarre oder
einem anderen Musikinstrument.
2. AUX-Eingang: Dieser 1/8"-StereoEingang kann dazu verwendet
werden, einen CD-Player, einen MP3Player oder eine andere Audio-Quelle
anzuschließen.
3. Bluetooth: Die Koppel-LED leuchtet,
wenn ein Gerät mit dem TAILGATER
BLUETOOTH gekoppelt ist. Diese
LED leuchtet nicht, wenn der
TAILGATER BLUETOOTH zum
ersten Mal eingeschaltet wird (es sei denn, er wurde zuvor mit
einem Gerät gekoppelt). Drücken Sie die Taste Trennen, um ein
angeschlossenes Bluetooth-Gerät zu trennen.
4. Gesamtlautstärkeregler: Regelt die Gesamtlautstärke des
Lautsprechers. Dies beinhaltet den Instrument-/Mikrofon-Eingang,
den AUX-Eingang, den Tuner und das Audiosignal eines
gekoppelten Bluetooth-Geräts.
5. Radiowahlschalter: Dieser Schalter setzt das Radio auf AM oder
FM oder schaltet das Radio aus. (Hinweis: Dieser Schalter
schaltet nicht das gesamte Gerät aus – sondern nur das Radio.)
6. LCD: Zeigt den aktuellen Radiosender an.
7. Tuner: Mit diesen Tasten können Sie nach einem Radiosender
suchen. Um zu "scannen" (also zum nächsten verfügbaren
Sender zu springen), halten Sie diese Taste einige Sekunden lang gedrückt, bis die Suche nach einem Sender
beginnt. Die Einheit wird sich an den zuletzt eingestellten Sender erinnern und diesen aufrufen, nachdem Sie
das Gerät aus- und erneut eingeschaltet haben.
8. Power-LED: Zeigt an, ob TAILGATER BLUETOOTH ein- oder ausgeschaltet ist.
9. Dock-Buchse: Schließen Sie das Ladekabel Ihres Geräts hier an, um es aufzuladen. Das Laden via USB
funktioniert nur, wenn das Gerät eingeschaltet ist.
Hinweis: Bei iPads der 3. generation dauert das Aufladen möglicherweise länger. Bei iPads der 3. generation
empfehlen wir, den Ladevorgang bei gesperrtem Bildschirm durchzuführen.
10. Dockingstation: Setzen Sie Ihr iPad/iPod touch/iPhone, Android oder ein anderes Gerät in diese Halterung.
Diese können per Bluetooth oder Aux-Eingang mit dem mitgelieferten 1/8" auf 1/8"-Kabel angeschlossen
werden. Hinweis: Wir empfehlen Ihnen, Ihr iPad oder anderes Gerät aus der Halterung zu nehmen, bevor Sie
den TAILGATER transportieren.
11. Antenne: Justieren Sie die Teleskop-FM-Antenne, um den besten Radioempfang zu erzielen.
Hinweis: Wenn Sie ein gekoppeltes Bluetooth-Gerät haben und AM-Radio verwenden, kann dies zu
schlechtem AM-Empfang führen. Entkoppeln Sie Ihr Bluetooth-Gerät, um AM-Radio zu hören. Um den AMEmpfang einzustellen, bewegen Sie das gesamte Gerät.
Hinweis: Um eine versehentliche Beschädigung zu vermeiden, empfehlen wir die Antenne nur dann zu
drehen, wenn sie horizontal ausgefahren ist. Fahren Sie die Antenne wieder ein, wenn der Tuner nicht in
Gebrauch ist.
12. Netzkabel-Eingang (IEC): Schließen Sie hier das mitgelieferte Netzkabel zum Laden der Batterie an. Der
TAILGATER BLUETOOTH kann mit dem Netzkabel betrieben werden und gleichzeitig die Batterie laden. Die
Ladekontroll-LED leuchtet, sobald die Batterie aufgeladen wird.
13. Voltauswahl*: Wenn Ihr Gerät über einen Wahlschalter
verfügt, sollten Sie nur dann Änderungen vornehmen,
wenn es notwendig ist (z.B. wenn Sie in ein Land oder
eine Region mit unterschiedlicher Spannung reisen). Die
Wahl der falschen Spannung kann das Gerät
beschädigen. Um die Einstellung zu ändern, entfernen
Sie nur *eine* Schraube der Abdeckung und schieben
Sie sie beiseite, um den Wähler freizulegen.
14. Power ON/OFF Schalter: Schaltet den TAILGATER
BLUETOOTH an oder aus. Beachten Sie bitte, dass
beim Anschluss des TAILGATER BLUETOOTH an ein
Stromnetz das Gerät nicht eingeschaltet werden muss,
um die Batterie aufzuladen.
15. Batteriestandanzeige: Wenn das Gerät
EINGESCHALTET ist und nicht an eine Steckdose angesteckt wurde, zeigen diese vier LEDs die restliche
Lebensdauer der Batterie an. Die Lebensdauer der Batterie hängt von Lautstärke und Betriebsdauer ab.
Page 17

FEHLERBEHEBUNG
Der Ton klingt verzerrt: Drehen Sie den Lautstärkeregler an Ihrer Tonquelle oder dem Musikinstrument zurück.
Versuchen Sie auch, die Gesamtlautstärke des TAILGATER BLUETOOTH zu reduzieren.
Zu viel Bass: Versuchen Sie, den Ton- oder EQ-Regler Ihrer Tonquelle anzupassen, um den Bass zu verringern.
Dies ermöglicht Ihnen, die Musik lauter abzuspielen, bevor der Klang verzerrt.
Bei der Verwendung von Mikrofonen tritt einer hoher Pfeifton auf: Hier handelt es sich wahrscheinlich um einen
Rückkopplungseffekt. Richten Sie es so ein, dass die Mikrofone vom Lautsprecher wegzeigen.
Schlechter AM-Empfang: Wenn Sie ein gekoppeltes Bluetooth-Gerät haben, entkoppeln Sie dieses BluetoothGerät, um AM-Radio zu hören. Um den AM-Empfang einzustellen, bewegen Sie die gesamte Einheit.
Wenn das Mikrofon im Vergleich zur Musik zu leise eingestellt ist: Verringern Sie die Musiklautstärke Ihrer
Quelle.
KOPPELN EINES BLUETOOTH-GERÄTS
1. Schalten Sie Ihr Bluetooth-Gerät ein.
2. Schalten Sie TAILGATER BLUETOOTH ein und das Gerät wird automatisch in den Koppel-Modus schalten,
um nach Bluetooth-Geräten zu suchen. Sie sind im Koppel-Modus, wenn die LED nicht leuchtet.
3. Wenn Ihr Bluetooth-Gerät nicht an den Verstärker gekoppelt werden kann, drücken Sie am Verstärker die
Taste Trennen, um alte Bluetooth-Verbindungen zu trennen und das Bluetooth-Modul zurückzusetzen.
4. Navigieren Sie zum Setup-Bildschirm Ihres Bluetooth-Geräts, suchen Sie "ION Audio Speaker" und verbinden
Sie die Geräte.
Hinweis: Wenn Ihr Bluetooth-Gerät die Eingabe eines Koppel-Codes anfordert, geben Sie '0000' ein.
5. Die TAILGATER BLUETOOTH LED wird durchgehend leuchten, wenn die Geräte "gekoppelt" sind.
Hinweis: Benutzer sollten die Aktualisierung ihres OS in Betracht ziehen, falls sie Probleme beim Koppeln
oder bei der Musikwiedergabe haben.
6. Wenn Sie die Geräte entkoppeln möchten, drücken Sie die Taste "Trennen" am TAILGATER BLUETOOTH.
7. Um ein anderes Bluetooth-Gerät zu verbinden, wiederholen Sie die Schritte 3-4.
Hinweis: Die maximale Reichweite wird erreicht, wenn Sie Geräte mit Bluetooth 4.0 verwenden.
17
Page 18

SNELSTARTGIDS (NEDERLANDS)
1. Controleer dat alle onderdelen die op de voorzijde van deze gids staan
ook in de doos zitten.
2. LEES DE VEILIGHEIDSINSTRUCTIES VOOR HET PRODUCT
GEBRUIKT WORDT
3. ZORG ERVOOR DAT DE BATTERIJ VOLLEDIG OPGELADEN IS
VOOR HET EERSTE GEBRUIK VOOR EEN MAXIMALE
LEVENSDUUR ERVAN.
4. Bestudeer dit installatiediagram.
5. Zorg ervoor dat alle invoerapparatuur zoals microfoons, CD-spelers, en
mp3-spelers uitgeschakeld zijn met volume-instellingen op "nul".
6. Sluit alle apparaten aan zoals weergegeven.
7. Schakel alles in de hier gegeven volgorde in.
• bronnen voor geluidsinput (bijv. microfoons, instrumenten, CD/MP3-spelers)
• TAILGATER BLUETOOTH
8. Bij uitschakelen draait u de volgorde om door:
• TAILGATER BLUETOOTH
• en als de laatste inputapparatuur
Ga naar http://www.ionaudio.com voor productregistratie.
MP3 SPELE
(niet meegeleverd)
MICROFOON
BOVENPANEEL
iPhone (niet meegeleverd)
HERLAADBARE ACCU'S
Oplaadbare loodzwavelzuuraccu's zijn van hetzelfde type dat gebruikt wordt in auto's. Zoals met de accu van uw auto wordt de
levensduur ervan in grote mate bepaald door uw gebruik ervan. Bij een juist gebruik en behandeling kan een
loodzwavelzuuraccu jaren meegaan. Hier zijn wat aanbevelingen voor het zo lang mogelijk laten meegaan van de interne accu.
ALGEMEEN GEBRUIK
• LAAT DE ACCU VOLLEDIG OP VOORDAT DEZE GEBRUIKT WORDT
• LAAD DE BATTERIJ NA ELK GEBRUIK VOLLEDIG OP
• VERMIJD HET HELEMAAL LEEG LATEN LOPEN VAN DE ACCU
• U kunt de unit tot twee weken ingeplugd laten zitten
• Voor een lange levensduur laat u de accu eens per maand voor 80% leeglopen
OPSLAG
• Vermijd opslag bij hoge temperaturen of in vochtige omgevingen
• Bij lange-termijnopslag dient de accu periodiek opnieuw opgeladen te worden
• Als u de accu gedurende zes maanden niet oplaadt, kan het zo zijn dat deze zichzelf niet meer oplaadt
REPARATIE
• Aan het eind van de levensduur van de batterij kan de mogelij kheid tot opladen teruglopen. Als dit voorkomt,
AFVOER
neem dan contact op met de technische dienst van ION Audio op www.ionaudio.com/supporthome.
• Breng de unit naar een kringloopcentrum of voer deze af in overeenstemming met lokale verordeningen
18
INHOUD VERPAKKING
TAILGATER BLUETOOTH
Microfoon en mic kabel
1/8" - 1/8" kabel
Stroomsnoer (standaard IEC)
Snelstartgids
Veiligheids- en garantie-informatie
STROOM
ZIJPANEEL
Page 19

DIAGRAM EN BESCHRIJVING ONDERDELEN
9
10
11
1
2
4
5
6
8
3
7
7
1212
1313
1414
1515
1. Input instrument/microfoon
met volume-besturing (1/4"):
Deze mono-ingang accepteert
1/4"-input zoals microfoon, gitaar
of andere muziekinstrumenten.
2. Aux-ingang: Deze stereo 1/8"ingang kan worden gebruikt om
een cd-speler, mp3-speler of
andere geluidsbron te verbinden.
3. Bluetooth: De LED Gekoppeld
begint te branden wanneer er
een apparaat aan de
TAILGATER BLUETOOTH wordt
gekoppeld. Deze LED licht niet
op wanneer de TAILGATER
BLUETOOTH voor het eerst
wordt aangezet (tenzij het
voorheen aan een apparaat was
gekoppeld). Druk op de knop Verbinding verbreken om een
gekoppeld Bluetooth-apparaat.
4. Hoofdvolumeregeling: Hiermee past u het maximale volume
van de hoofdmix in de luidspreker aan. Tot de hoofdmix
behoren de instrument-/microfooningang, de aux-ingang, de
tuner en het geluidssignaal van een gekoppeld Bluetoothapparaat.
5. Keuzeschakelaar Radio: Deze schakelaar zet de radio op
AM of FM of schakelt de radio uit. (Opmerking: Deze
schakelaar zet het apparaat niet uit . Alleen de radio wordt
uitgezet.)
6. LCD: Geeft het huidige radiostation weer.
7. Tuner: Gebruik deze knoppen om te zoeken naar een
radiostation. Houd dit voor enkele seconden ingedrukt om te "scannen" (naar het volgende beschikbare station
springen), tot het begint te zoeken naar het volgende station. Het apparaat onthoudt bij het uitzetten het laatste
station dat u hebt beluisterd en start met dat station wanneer u het apparaat terug aanzet.
8. Stroom-LED: Geeft aan of TAILGATER BLUETOOTH aan- of uitgeschakeld is.
9. Opladen via dock: Sluit hier de oplaadkabel van uw apparaat aan om het op te laden. Opladen met USB
werkt alleen als het apparaat is ingeschakeld.
Opmerking: Gebruikers met een iPad (3de generatie) kunnen tragere oplaadtijden ervaren. Wij raden aan om
bij gebruik van een iPad (3de generatie) met een vergrendeld scherm op te laden.
10. Apparaathouder: Plaats hier uw iPad/iPod touch/iPhone, Android of ander apparaat in de houder. Deze
kunnen worden aangesloten via Bluetooth of de AUX-ingang met de meegeleverde 1/8" naar 1/8"-kabel.
Opmerking: Het is aanbevolen om uw iPad of ander apparaat uit de houder te verwijderen voor TAILGATER te
transporteren of ermee op reis te gaan.
11. Antenne: Regel deze FM-telescoopantenne voor een zo goed mogelijke radio-ontvangst.
Opmerking: Om onbedoelde schade te voorkomen, adviseren wij om de antenne alleen te draaien in
horizontaal gestrekte positie. Zorg er ook voor dat de antenne is ingetrokken wanneer de tuner niet wordt
gebruikt. Opmerking: Het gebruik van de AM-radio terwijl een Bluetooth-apparaat gekoppeld is verslechtert de
AM-ontvangst. Ontkoppel het Bluetooth-apparaat om naar AM-radio te luisteren. Verplaats heel het apparaat
voor het verbeteren van de AM-ontvangst.
12. Stroomkabel-ingang (IEC):Steek de meegeleverde stroomkabel hierin om de unit op te laden. N.B.: de
TAILGATER BLUETOOTH kan vanaf de stroomadapter werken wanneer de batterij wordt opgeladen. De
oplaadindicator licht op wanneer de batterij opgeladen wordt.
13. Spanningskeuzeschakelaar*: Als uw toestel beschikt over een spanningskeuzeschakelaar, verander dan de
instelling ervan alleen wanneer nodig (bv. wanneer u reist naar een land of regio met een andere netspanning).
Een ongeschikte spanningsinstelling selecteren kan het
apparaat beschadigen. Om de instelling te veranderen:
verwijder enkel *één* schroef van het deksel en schuif het
opzij om de keuzeschakelaar toegankelijk te maken.
14. Stroom AAN/UIT schakelaar: Schakelt de TAILGATER
BLUETOOTH in of uit. N.B.: Wanneer de TAILGATER
BLUETOOTH aangesloten is op een vermogensbron,
hoeft deze niet ingeschakeld te zijn om de batterij te laten
opladen.
15. Batterij-indicator: Wanneer het apparaat is ingeschakeld
en niet is aangesloten op het net, geven deze vier
lampjes
de staat van de batterij aan. De levensduur van de batterij
hangt af van het volume en gebruik.
10
* WAARSCHUWING:
Als uw toestel beschikt over een
spanningskeuzeschakelaar, verander dan de
instelling ervan alleen wanneer nodig (bv.
wanneer u reist naar een land of regio met
een andere netspanning). Een ongeschikte
spanningsinstelling selecteren kan het
apparaat beschadigen. Om de instelling te
veranderen: verwijder enkel *één* schroef
van het deksel en schuif het opzij om de
keuzeschakelaar toegankelijk te maken.
19
11
Page 20

PROBLEMEN OPLOSSEN
Het geluid is vervormd: Probeer het volumeniveau aan de geluidsbron of het muziekinstrument lager te zetten.
Probeer ook om het hoofdvolume van de TAILGATER BLUETOOTH te verminderen.
Er zijn teveel bassen: Probeer op de toon- of EQ-bedieningsknoppen aan uw geluidsbron het niveau van de lage
tonen te verlagen. Dit stelt u in staat de muziek luider te zetten vooraleer “afgeknipte” (vervormde) klanken optreden.
Er is een hoge fluitende pieptoon bij het gebruik van microfoons: Dit is waarschijnlijk feedback. Richt de
microfoons weg van de luidspreker.
Bij slechte AM-ontvangst: Wanneer u over een gekoppeld Bluetooth-apparaat beschikt: ontkoppel het Bluetoothapparaat om naar AM-radio te luisteren. Verplaats heel het apparaat voor het verbeteren van de AM-ontvangst.
Als u de microfoon niet kan horen boven het geluid van de muziek: Verlaag het volume van de muziek van uw
geluidsbron.
EEN BLUETOOTH-APPARAAT KOPPELEN
1. Zet uw Bluetooth-apparaat aan.
2. Bij het aanzetten van TAILGATER BLUETOOTH zet het zich automatisch in koppelmodus, om te zoeken naar
Bluetooth-apparaten. U merkt wanneer u zich in koppelingsmodus bevindt als de LED niet brandt.
3. Als uw Bluetooth-apparaat zich niet kan koppelen aan de versterker, druk dan op de knop Verbinding
verbreken op de versterker om de vorige Bluetooth-verbindingen te verbreken en de Bluetooth-module
opnieuw in te stellen.
4. Navigeer naar het instelscherm van uw Bluetooth-apparaat, zoek naar "ION Audio Speaker" en maak
verbinding.
Opmerking: Als uw Bluetooth-apparaat om een koppelingscode verzoekt, voer dan '0000' in.
5. Na 'koppeling' gaat de LED op TAILGATER BLUETOOTH ononderbroken branden.
Opmerking: Gebruikers moeten het updaten van hun OS overwegen in geval van problemen met het koppelen
of afspelen van muziek.
6. Om de koppeling ongedaan te maken, drukt u op de knop 'Verbinding verbreken' op de TAILGATER
BLUETOOTH.
7. Om het te verbinden met een ander Bluetooth-apparaat, herhaalt u stappen 3-4.
Opmerking: Het maximumbereik wordt bereikt met apparaten die zijn voorzien van Bluetooth 4.0.
20
Page 21

SNABBSTARTSGUIDE (SVENSKA)
g
r
1. Kontrollera att alla delar som räknas upp i början av denna snabbstartsguide
ingår i förpackningen.
2. LÄS SÄKERHETSHANDBOKEN INNAN DU BÖRJAR ANVÄNDA
PRODUKTEN.
3. KOM IHÅG ATT LADDA BATTERIET HELT INNAN DU ANVÄNDER
ENHETEN FÖRSTA GÅNGEN, DET GER MAXIMAL LIVSLÄNGD.
4. Bekanta dig med vidstående anslutningsschema.
5. Kontrollera att alla apparater som kopplas till enheten, t.ex. mikrofoner, CD-
spelare eller MP3-spelare, är avstängda och att deras ljudreglage är
nollställda.
6. Anslut alla apparater enligt bilden.
7. Slå på apparaterna i följande ordning:
• ljudkällor (t.ex. mikrofoner, instrument, CD-/MP3-spelare)
• TAILGATER BLUETOOTH®
8. När du stänger av apparaterna gör du det i motsatt ordning, dvs.:
• TAILGATER BLUETOOTH
• alla ljudkällor (till sist)
Registrera produkten på adressen http://www.ionaudio.com
MP3-spelare (ingår inte)
MIKROFON
TOPPANEL
iPhone® (ingår inte)
LADDNINGSBARA BATTERIER
Det laddningsbara blybatteriet är av samma typ som i bilar. Hur batteriet används har stor inverkan på dess livslängd, precis
som i bilar. Om du använder och hanterar blybatteriet korrekt håller det i många år. Följ följande rekommendationer för maximal
livslängd:
ANVÄNDNING
• LADDA BATTERIET TILLS DET ÄR FULLADDAT INNAN DU BÖRJAR ANVÄNDA DET.
• LADDA BATTERIET TILLS DET ÄR FULLADDAT EFTER VARJE ANVÄNDNING.
• UNDVIK ATT BATTERIET LADDAS UR HELT.
• Håll enheten ansluten till ett vägguttag högst 2 veckor utan avbrott.
• Bäst håller batteriet om du en gång i månaden använder det till 80 procent.
FÖRVARING
• Undvik att förvara enheten där det är varmt och fuktigt.
• Ladda batteriet med jämna mellanrum om det står oanvänt en längre tid.
• Om du inte har laddat batteriet på 6 månader är det inte säkert att det går att ladda mer.
REPARATIONER
• När batteriet närma sig slutet på sin livscykel är det möjligt att det inte längre går att ladda ordentligt. Kontakta
DEPONERING
ION-Audios tekniska support på adressen www.ionaudio.com/supporthome om detta inträffar.
• För enheten till en återvinningscentral eller till en annan plats som anvisats av de lokala myndigheterna.
FÖRPACKNINGENS INNEHÅLL
TAILGATER BLUETOOTH
Mikrofon och mikrofonkabel
1/8”–1/8”-kabel
Elsladd (IEC)
Snabbstartsguide
Säkerhetsanvisningar och
arantiuppgifte
BAKPANEL
NÄTANSLUTNING
21
Page 22

9
10
11
1
2
4
5
6
8
3
7
7
12
13
14
15
ENHETENS DELAR
1. Instrument/mikrofonanslutning
med volymreglering
(1/4"): Till denna
monoanslutning kan du
ansluta en apparat
försedd med 1/4"
teleplugg, t.ex. mikrofon,
gitarr eller något annat
instrument.
2. Aux-ingång: Till denna
1/8" stereo-anslutning
kan du ansluta en CDeller MP3-spelare eller
någon annan ljudkälla.
3. Bluetooth:
Indikatorlampan Paired
tänds när en apparat har
parkopplats med
TAILGATER
BLUETOOTH.
Indikatorlampan tänds inte genast när du slår på
TAILGATER BLUETOOTH (om den inte redan tidigare
har parkopplats med någon apparat). Tryck på knappen
Disconnect när du vill koppla loss en parkopplad
Bluetooth-apparat.
4. Master-ljudreglage: Med detta reglage kan du
justera den totala ljudstyrkan för högtalarna
instrument- eller mikrofoningång, aux-ingång, radions
ljudstyrka och ljudstyrkan för en Bluetooth-apparat som
parkopplats med enheten.
5. Radio-väljare: Med denna knapp kan du välja mellan
AM och FM eller stänga av radion. (Observera: Väljaren
stänger inte av hela enheten, endast radion.)
6. LCD-display: Visar den aktuella radiostationen.
7. Tuner: Använd dessa knappar för att välja radiostation.
När du vill söka efter följande hörbara station håller du
knappen intryckt några sekunder – tills enheten börjar
söka efter en station.
Enheten kommer ihåg vilken station du senast lyssnade till, och startar med den nästa gång du slår på radion.
8. Indikatorlampa Power: Lyser när TAILGATER BLUETOOTH är påslagen.
9. Laddningsdocka: När du vill ladda en apparat ansluter du dess laddningsledning här. USB-laddning fungerar endast
när enheten är påslagen. Observera: Att ladda tredje generationens iPad kan kräva mer tid än normalt. Vi
rekommenderar att du laddar tredje generationens iPad med displayen i låst läge.
10. Apparatställ: Placera din iPad/iPod touch®/iPhone®, Android®-apparat eller motsvarande här. Du kan ansluta dem till
enheten via Bluetooth eller aux-ingången med den medlevererade 1/8”–1/8”-kabeln. Observera: Ta alltid eventuella
apparater (t.ex iPad) ur apparatstället när du flyttar på eller transporterar TAILGAITER.
11. Antenn: Ställ in teleskopantennen för bästa radiomottagning.
Observera: För att undvika skador rekommenderar vi att antennen endast ställs in när den är i horisontalt läge. Tryck in
antennen när du inte använder radion. Observera: En Bluetooth-apparat som parkopplats med enheten orsakar
störningar i AM-mottagningen. Koppla därför loss en eventuellt parkopplad Bluetooth-apparat innan du börjar lyssna på
AM-radio.
12. Elsladdens (IEC) anslutning: Anslut den medlevererade elsladden här för att ladda enheten. Observera: du kan
använda TAILGATER med hjälp av elsladdens adapter samtidigt som du laddar batteriet. En indikatorlampa lyser när
batteriet laddas.
13. Spänningsväljare*: Om enheten är försedd med
spänningsväljare ställer du in den efter behov när du reser till
ett land eller område med avvikande nätspänning. Fel
spänning kan skada enheten. När du vill ändra
spänningsväljarens läge behöver du endast lösgöra en skruv;
skjut locket åt sidan så kommer du åt väljaren.
14. ON/OFF-strömbrytare: Med denna knapp kan du slå på och
stänga av TAILGATER. Observera: Du behöver inte slå på
TAILGATER för att ladda batteriet, det räcker att den är
ansluten till en strömkälla.
15. Indikator för batteriets laddningsnivå: När enheten är
påslagen och dess elsladd inte är ansluten till ett vägguttag
visar dessa fyra indikatorlampor batteriets laddningsnivå.
Batteriets driftstid varierar enligt ljudstyrka och användning.
, dvs.
22
10
*VARNING: Om enheten är försedd med
spänningsväljare ställer du in den efter behov
när du reser till ett land eller område där
nätspänningen avviker. Fel spänning kan
skada enheten. När du ska ändra
spänningsväljarens läge behöver du endast
lösgöra en skruv; skjut locket åt sidan så
kommer du åt väljaren.
11
13
14
12
15
Page 23

FELSÖKNING
Ljudet spricker: Pröva på att minska på ljudkällans eller instrumentets ljudstyrka. Pröva också på att minska
ljudstyrkan för hela TAILGATER BLUETOOTH.
För mycket bas: Pröva på att justera ljudkällans tonkontroll eller EQ för att minska basen. På det viset kan du spela
musik med högre volym innan ljudet börjar skära sig (spricka).
Enheten ger ifrån sig ett högt visslande ljud när du använder mikrofoner: Det är sannolikt fråga om akustisk
rundgång (feedback). Se till att mikrofonerna inte är riktade mot högtalarna.
Svag AM-mottagning: Om en Bluetooth-apparat har parkopplats med enheten, kopplar du loss apparaten för bättre
AM-mottagning. Justera AM-mottagningen genom att flytta på hela enheten.
Mikrofonljudet hörs inte över musiken: Justera ned ljudstyrkan på ljudkällan.
PARKOPPLING AV BLUETOOTH-APPARAT
1. Slå på önskad Bluetooth-apparat.
2. Slå på TAILGATER BLUETOOTH, så går den automatiskt i parläge och börjar söka Bluetooth-apparater.
Indikatorlampan lyser inte när enheten är i parläge.
3. Om parkopplingen av Bluetooth-apparaten till enheten inte lyckas trycker du på enhetens Disconnect-knapp för
att koppla loss tidigare Bluetooth-anslutningar, och återställer Bluetooth-enheten.
4. Gå till Bluetooth-apparatens setup-display, sök där efter “ION Speaker” och anslut den.
Observera: Om din Bluetooth-apparat frågar efter en kod för parkoppling ger du koden "0000".
5. TAILGATER BLUETOOTHs indikatorlampa Paired tänds och lyser kontinuerligt när parkopplingen har lyckats.
Observera: Om du stöter på problem vid parkoppling eller musikuppspelning rekommenderar vi uppdatering
av operativsystemet.
6. Tryck på TAILGATER BLUETOOTHs Disconnect-knapp när du vill koppla loss en parkopplad Bluetoothapparat.
7. Om du vill parkoppla den med en annan Bluetooth-apparat upprepar du steg 3-4.
Observera: Bluetooth fungerar på maxavstånd när apparaterna som parkopplas är försedda med Bluetooth 4.0.
23
Page 24

PIKAKÄYTTÖOPAS (SUOMI)
1. Varmista, että kaikki tämän pikakäyttöoppaan alussa luetellut osat ovat mu-
kana pakkauksessa.
2. LUE TURVALLISUUSOHJEKIRJANEN ENNEN KUIN ALAT KÄYTTÄÄ
TUOTETTA.
3. MUISTA EHDOTTOMASTI LADATA AKKU TÄYTEEN ENNEN ENSIM-
MÄISTÄ KÄYTTÖKERTAA, NIIN SE KESTÄÄ KÄYTÖSSÄ MAHDOLLISIMMAN PITKÄÄN.
4. Tutustu oheiseen liitäntäkaavioon.
5. Varmista, että kaikki yksikköön liitettävät laitteet, kuten mikrofonit, CD-soit-
timet tai mp3-soittimet on kytketty pois päältä ja että niiden äänenvoimakkuuden säätimet on asetettu nollaan.
6. Liitä kaikki laitteet oheisen kuvan osoittamalla tavalla.
7. Kytke laitteet päälle seuraavassa järjestyksessä:
• äänilähteet (kuten mikrofonit, soittimet, CD-/MP3-soittimet)
• TAILGATER BLUETOOTH®
8. Kun kytket laitteet pois päältä, tee se päinvastaisessa järjestyksessä edelliseen nähden, eli:
• TAILGATER BLUETOOTH
• viimeisinä kaikki äänilähteet
Rekisteröi tuote osoitteessa http://www.ionaudio.com.
MP3-soitin (ei kuulu
toimitukseen)
MIKROFONI
YLÄPANEELI
iPhone® (ei kuulu toimitukseen)
LADATTAVAT AKUT
Ladattava lyijyakku on samantyyppinen kuin autoissa. Akun käyttötapa vaikuttaa paljon sen käyttöikään aivan kuten
autoissakin. Kun käytät ja käsittelet lyijyakkua oikein, se kestää käytössä useita vuosia. Kun noudatat seuraavia suosituksia,
akkusi kestää mahdollisimman pitkään.
KÄYTTÖ
• LATAA AKKU TÄYTEEN ENNEN KUIN ALAT KÄYTTÄÄ SITÄ.
• LATAA AKKU TÄYTEEN JOKAISEN KÄYTTÖKERRAN JÄLKEEN.
• VÄLTÄ AKUN PURKAMISTA KOKONAAN.
• Pidä yksikköä pistorasiaan liitettynä enintään 2 viikkoa yhtäjaksoisesti.
• Akku kestää pisimpään, kun käytät sen kerran kuussa 80-prosenttisesti.
SÄILYTYS
• Vältä yksikön säilyttämistä kuumassa ja kosteassa.
• Jos yksikkö on pitkään käyttämättä, lataa akkua välillä.
• Jos et lataa akkua 6 kuukauteen, se ei välttämättä enää ota vastaan latausta.
KORJAUKSET
• Kun akku ei enää ota kunnolla vastaan latausta, sen käyttöaika alkaa lähetä loppuaan. Jos näin käy, ota yhteyttä
KÄYTÖSTÄ POISTAMINEN
ION Audion tekniseen tukeen osoitteessa www.ionaudio.com/supporthome.
• Vie yksikkö kierrätyskeskukseen tai muuhun paikallisten viranomaisten osoittamaan paikkaan.
PAKKAUKSEN SISÄLTÖ
TAILGATER BLUETOOTH
Mikrofoni ja mikrofonikaapeli
1/8” – 1/8” kaapeli
Virtajohto (IEC)
Pikakäyttöopas
Turvallisuusohjeet ja takuutiedot
TAKAPANEELI
SÄHKÖLIITÄNTÄ
24
Page 25

9
10
11
1
2
4
5
6
8
3
7
7
12
13
14
15
LAITTEEN OSAT
1. Soitin-/mikrofoniliitäntä,
jossa äänenvoimakkuuden
säätö (1/4"): Tähän
monoliitäntään voit liittää 1/4"
liittimellä varustetun laitteen,
kuten mikrofonin, kitaran tai
muun soittimen.
2. AUX-tulo: Tähän 1/8" stereoliitäntään voit liittää CD- tai
MP3-soittimen tai muun
äänilähteen.
3. Bluetooth: The Pairedmerkkivalo syttyy, kun jokin
laite on liitetty pariksi
TAILGATER BLUETOOTHlaitteen kanssa. Merkkivalo ei
syty heti, kun kytket
TAILGATER BLUETOOTHlaitteen virran päälle (ellei sitä
ole jo aikaisemmin liitetty
pariksi jonkin laitteen kanssa).
Paina Disconnect-painiketta, kun haluat kytkeä pariksi
liitetyn Bluetooth-laitteen irti.
4. Master-äänenvoimakkuuden säädin: Tällä säätimellä
säädetään kaiuttimien kokonaisäänenvoimakkuutta, eli
soitin-/mikrofonituloa, aux-tuloa, radion
äänenvoimakkuutta ja yksikön kanssa pariksi liitetyn
Bluetooth-laitteen ääntä.
5. Radio-valitsin: Tällä valitsimella voit valita aaltoalueen
AM tai FM tai kytkeä radion pois päältä. (Huomaa: Kytkin
ei kytke koko yksikköä pois päältä, ainoastaan radion.)
6. Nestekidenäyttö: Näyttää valittuna olevan radioaseman.
7. Tuner: Näillä valitsimilla voit hakea radioasemia. Kun
haluat hakea seuraavaan kuuluvan aseman, pidä
painiketta painettuna muutaman sekunnin ajan, kunnes
yksikkö alkaa etsiä uutta asemaa.
Yksikkö muistaa viimeksi kuuntelemasi radioaseman, kun
seuraavan kerran kytket radion päälle.
8. Virran merkkivalo: Palaa, kun TAILGATER
BLUETOOTH on päällä.
9. Lataustelakka: Kun haluat ladata jonkin laitteen, liitä sen latausjohto tähän. USB-lataus toimii vain, kun yksikkö on
kytketty päälle. Huomaa: Kolmannen sukupolven iPad voi latautua tavallista hitaammin. Suosittelemme että lataat
kolmannen sukupolven iPadit näyttö lukittuna.
10. Laiteteline: Aseta iPad/iPod touch®/iPhone®, Android® tai muu laite tähän. Voit liittää ne yksikköön Bluetoothin tai auxtulon kautta yksikön mukana toimitetun 1/8” – 1/8” kaapelin välityksellä. Huomaa: Ota iPad tai muu laite pois telineestä
aina TAILGAITERin siirtämisen tai kuljetuksen ajaksi.
11. Antenni: Säädä teleskooppiantenni asentoon, jossa radio kuuluu parhaiten.
Huomaa: Suosittelemme, että käännät antennia vain, kun se on vaaka-asennossa, niin et vahingossa loukkaa itseäsi.
Kun et käytä radiota, työnnä antenni sisään ja käännä se alas. Huomaa: Yksikön kanssa pariksi liitetty Bluetooth-laite
aiheuttaa häiriöitä AM-vastaanottoon. Kytke siksi Bluetooth-laitteen kanssa pariksi liitetty laite irti ennen kuin alat
kuunnella AM-radiota.
12. Virtajohdon (IEC) liitäntä: Liitä yksikön mukana toimitettu virtajohto tähän ladataksesi yksikön. Huomaa: voit käyttää
TAILGATERia liitäntäjohdon muuntimen avulla samalla kun lataat akkua. Latauksen merkkivalo palaa, kun akku
latautuu.
13. Jännitteen valitsin*: Jos yksikössä on jännitteen valitsin,
säädä sitä tarvittaessa, jos matkustat maahan tai alueelle,
jossa sähköverkon jännite on erisuuruinen. Väärän jännitteen
valitseminen voi vahingoittaa yksikköä. Kun joudut
muuttamaan jännitteen valitsimen asentoa, irrota kannen ruuvi
ja liu'uta kansi sivuun, niin pääset käsiksi valitsimeen.
14. ON/OFF-virtakytkin: Tällä voit kytkeä TAILGATERin päälle ja
päältä pois. Huomaa: TAILGATER BLUETOOTHia ei tarvitse
kytkeä päälle akun lataamisen ajaksi.
15. Akun lataustason osoitin: Kun yksikkö on kytketty päälle,
eikä sen virtajohto ole kytkettynä pistorasiaan, nämä neljä
merkkivaloa ilmaisevat akun lataustason. Akun käyttöaika
vaihtelee käytetyn äänenvoimakkuuden ja käytön mukaan.
25
10
*VAROITUS: Jos yksikössä on jännitteen
valitsin, säädä sitä tarvittaessa, jos matkustat
maahan tai alueelle, jossa sähköverkon
jännite on erisuuruinen. Väärän jännitteen
valitseminen voi vahingoittaa yksikköä. Kun
joudut muuttamaan jännitteen valitsimen
asentoa, irrota kannen ruuvi ja liu'uta kansi
sivuun, niin pääset käsiksi valitsimeen.
11
13
14
12
15
Page 26

VIANETSINTÄ
Ääni säröilee: Kokeile pienentää äänilähteen tai soittimen äänenvoimakkuutta. Kokeile pienentää myös koko
TAILGATER BLUETOOTHin äänenvoimakkuutta.
Jos bassoa on liikaa: Kokeile säätää äänilähteen äänensävysäädintä tai EQ:ta vähentääksesi bassoa. Näin pystyt
soittamaan musiikkia kovempaa ennen kuin ääni alkaa leikata (säröillä).
Jos laitteesta kuuluu korkeaa viheltävää ääntä, kun käytät mikrofoneja: Kyse on todennäköisesti akustisesta
kierrosta (feedbackistä). Suuntaa mikrofonit poispäin kaiuttimista.
Jos AM-vastaanotto on heikko: Jos jokin Bluetooth-laite on liitetty pariksi yksikön kanssa, kytke pari irti, niin AMradion kuuntelu onnistuu paremmin. Säädä AM-vastaanottoa siirtämällä koko yksikköä.
Jos mikrofonin ääni ei kuulu musiikin äänen yli: Säädä äänilähteen äänenvoimakkuutta pienemmälle.
BLUETOOTH-LAITTEEN LIITTÄMINEN PARIKSI
1. Kytke haluamasi Bluetooth-laite päälle.
2. Kytke TAILGATER BLUETOOTH päälle, niin se siirtyy automaattisesti pariksi liittämistilaan ja alkaa etsiä
Bluetooth-laitteita. Kun yksikkö on pariksi liittämistilassa, merkkivalo ei pala.
3. Ellei Bluetooth-laitteesi liittäminen pariksi yksikön kanssa onnistu, paina yksikön Disconnect-painiketta
kytkeäksesi irti aiemmat Bluetooth-yhteydet ja kytke Bluetooth-yksikkö päälle ja päältä pois.
4. Siirry Bluetooth-laitteen setup-näytölle, etsi sieltä “ION Speaker” ja liitä se.
Huomaa: Jos Bluetooth-laitteesi kysyy tunnusta pariksi liittämistä varten, anna koodi "0000".
5. TAILGATER BLUETOOTHin Paired-merkkivalo syttyy ja palaa yhtäjaksoisesti, kun pariksi liittäminen on
onnistunut.
Huomaa: Jos sinulla on ongelmia pariksi liittämisen tai musiikin toiston kanssa, suosittelemme
käyttöjärjestelmän päivitystä.
6. Kun haluat kytkeä pariksi liitetyn laitteen irti, paina TAILGATER BLUETOOTHin Disconnect-painiketta.
7. Jos haluat liittää sen kanssa pariksi jonkin muun Bluetooth-laitteen, toista vaiheet 3-4.
Huomaa: Bluetooth toimii maksimietäisyydellä, kun pariksi liitettävissä laitteissa on Bluetooth 4.0.
26
Page 27

SPECIFICATIONS
Input Voltage: 110-120VAC, 60 Hz; 220-240VAC, 50 Hz
Output Power: 50W Peak
Frequency Response (±3dB): 77 Hz – 20 kHz (Aux)
Microphone type: Dynamic microphone
Time required to fully charge TAILGATER BLUETOOTH: Approximately 6 hours
Battery life: Up to 50 hours* when fully charged
Supported Bluetooth Profile: A2DP
Bluetooth Range: Up to 50 feet
* Battery life may vary based on temperature, age, and volume usage of product.
Radio Frequency Range:
US:
AM 520 – 1710 kHz
FM 87.5 – 108 MHz
EUROPE:
AM 522 – 1629 kHz
FM 87.5 – 108 MHz
JAPAN:
AM 520 – 1710 kHz
FM 75.5 – 90.5 MHz
For the electrostatic discharge (ESD) test of EN301 489-1/17, it was found that manual operation is needed to resume
normal operation as intended after the test.
27
Page 28

www.ionaudio.com
MANUAL VERSION 1.2
 Loading...