

Page 1

TAILGATER
QUICKSTART GUIDE
ENGLISH ( 3 – 4 )
GUÍA DE INICIO RÁPIDO
ESPAÑOL ( 5 – 6 )
GUIDE D'UTILISATION RAPIDE
FRANÇAIS ( 7 – 8 )
GUIDA RAPIDA
ITALIANO ( 9 – 10 )
KURZANLEITUNG
DEUTSCH ( 11 – 12 )
SNELSTARTGIDS
NEDERLANDS ( 13 – 14 )
Page 2

Page 3
QUICKSTART GUIDE (ENGLISH)
)
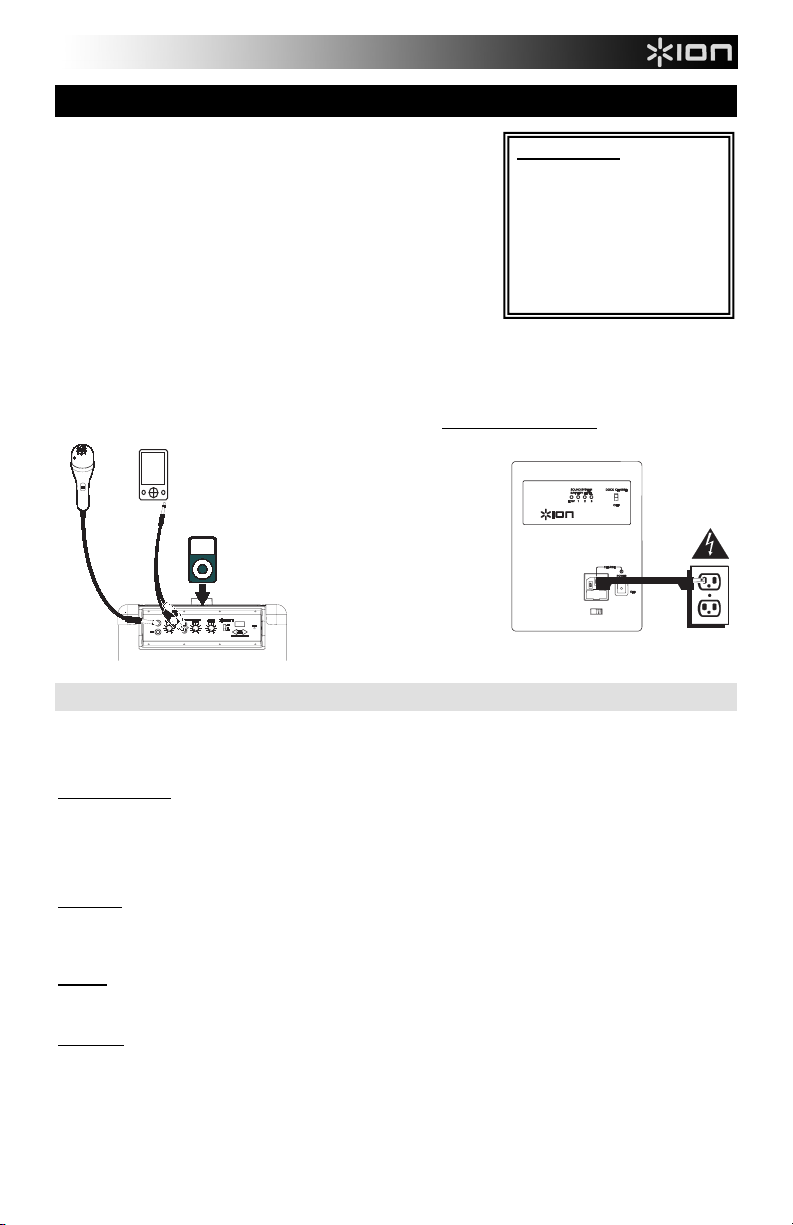
1. Make sure all items listed on the front of this guide are included in the
box.
2. READ SAFETY INSTRUCTION BOOKLET BEFORE USING THE
PRODUCT.
3. MAKE SURE THAT YOU HAVE COMPLETELY CHARGED THE
BATTERY PRIOR TO FIRST USE FOR MAXIMUM BATTERY LIFE.
4. Study this setup diagram.
5. Place product in an appropriate position for operation.
6. Make sure all input devices such as microphones, CD players, or mp3
players are turned off and volume settings are set at "zero."
7. Connect all devices as shown.
8. Switch everything on in the following order:
• audio input sources (i.e. microphones, instruments, CD/MP3
Players)
• TAILGATER
9. When turning off, always reverse this operation:
• TAILGATER
• last, any input devices
MICROPHONE
MP3 PLAYER
(not included)
iPod®
(not
included
TOP PANEL
TAILGATER
Go to http://www.ionaudio.com for product registration.
RECHARGEABLE BATTERIES
Rechargeable lead-acid batteries are the same type used in automobiles. As with your car battery, how you use this
battery has a significant impact on its lifespan. With proper use and treatment, a lead-acid battery can last for years.
Here are some recommendations for getting the longest life from the internal battery.
GENERAL USAGE
• FULLY CHARGE THE BATTERY BEFORE USING IT.
• CHARGE THE BATTERY COMPLETELY AFTER EACH USE.
• AVOID COMPLETELY DRAINING THE BATTERY.
• You may leave the unit plugged in for up to two weeks.
• For maximum life, drain the battery 80% once a month.
STORAGE
• Avoid storing in high temperatures and moist places.
• For long-term storage, periodically recharge the battery.
• If you do not charge the battery for six months, it may not charge.
REPAIR
• As the battery nears the end of its life, it may lose its ability to recharge. If this occurs, contact ION Audio
DISPOSAL
technical support at www.ionaudio.com/supporthome.
• Bring the unit to a recycling center or dispose of in accordance with local ordinances.
BOX CONTENTS
TAILGATER
(1) Microphone Cable
(1) Microphone
(1) Power Cable (standard
IEC)
Quickstart Guide
Safety Instructions & Warranty
Information Booklet
TAILGATER
SIDE PANEL
POWER
iPod is a trademark of Apple Inc., registered in the U.S. and other countries.
3
Page 4
2
2
2
2
3
4
656
7
1
1
1
11
10
12
8
9
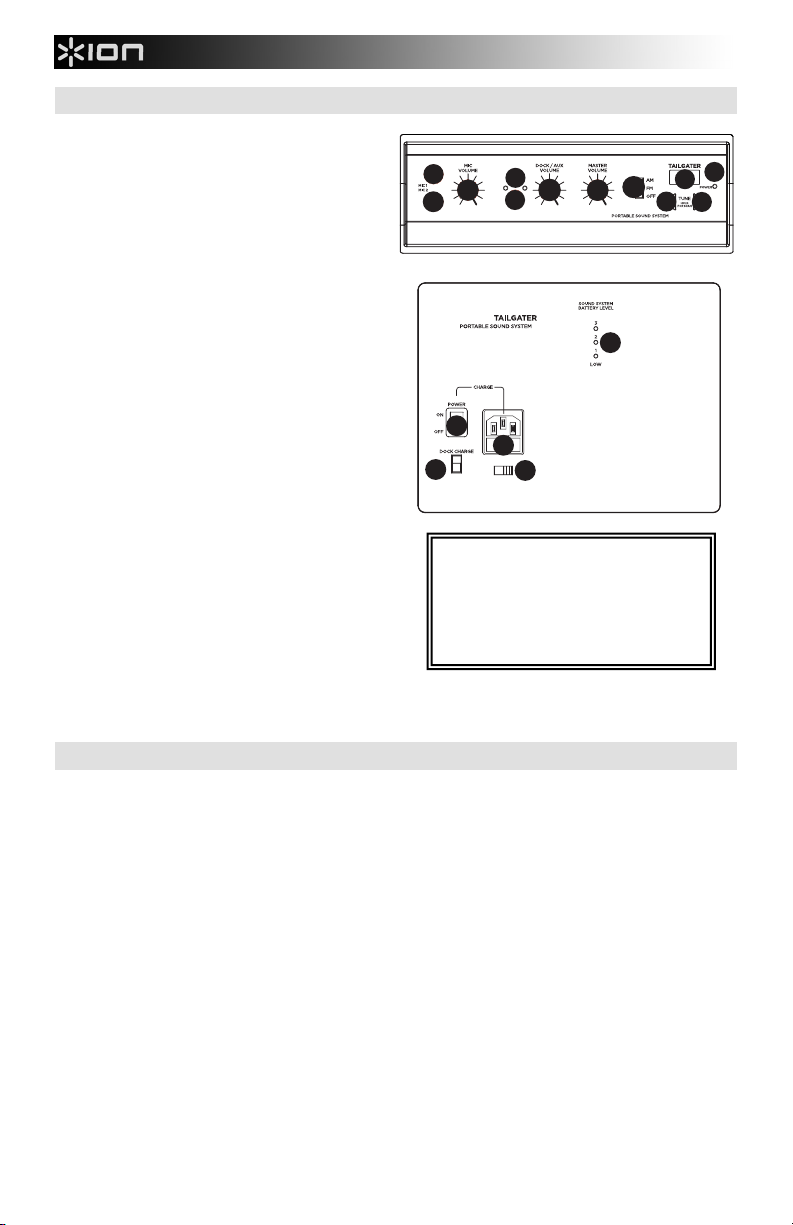
DIAGRAM AND PARTS DESCRIPTION
1. Instrument / Microphone Input with Volume
Control (1/4"): This mono input accepts a 1/4"
input such as a microphone, guitar, or other
musical instrument.
2. Auxuliary input with iPod/Aux Volume Control
(Stereo RCA): This knob controls the level of the
iPod and the RCA input. This stereo RCA input
can be used to connect a CD, MP3, or other
audio source. To connect to a portable device
with a 1/8" headphone jack, you need a 1/8" to
RCA cable which is NOT included.
3. Master Volume Control: This knob controls the
master volume of the TAILGATER.
4. Radio Selector: This switch sets the radio to AM
or FM or turns the radio off. (Note: This switch
does not turn the unit's power off – just the radio.)
5. LCD: Displays the current radio station.
6. Tuner: Use these buttons to search for a radio
station. To "scan" (jump to the next available
station), hold this down for a few seconds until it
starts to seek a station.
7. Power LED: Indicates whether TAILGATER is on
or off.
8. Power Cable Input (IEC): Insert the included
power cable here to charge the unit. Note that
the TAILGATER can run off the power adapter
while it simultaneously charges the battery. The
charge indicator illuminates when the battery is
charging.
9. Voltage Selector*: This must be set to the proper
voltage setting for your location. To change its setting,
only remove *one* screw of the cover and slide it
aside to expose the selector.
10. Power ON/OFF Switch: Turns TAILGATER on or off.
Please note that while TAILGATER is connected to a
power source, it does not need to be powered on to
charge the battery.
11. Battery Level Indicator: While the unit is powered ON and unit is not plugged in, these four lights indicate the
power left in the battery. Battery life varies based on volume and usage.
12. Dock Charge Switch: Turn on iPod charging by setting this switch to the "Dock Charge" position.
* WARNING: Selecting the improper voltage
can damage the unit. Units purchased in the
US, UK, and EU are already set to their
proper voltages. You do not need to change
the voltage unless you are traveling to
another country or are in a country with
varying voltage.
IMPORTANT NOTES
Use this troubleshooting guide if:
The sound is distorted: Try lowering the volume control of your sound source or music instrument. Also, try to
reduce the overall volume of TAILGATER.
There is too much bass: Try adjusting the tone or EQ control on your sound source to lower the bass level. This
will allow you to play the music louder before clipping (distortion) occurs.
There is a high-pitched whistling noise when using microphones: This is probably feedback. Point the
microphones away from the speaker.
4
Page 5
GUÍA DE INICIO RÁPIDO (ESPAÑOL)
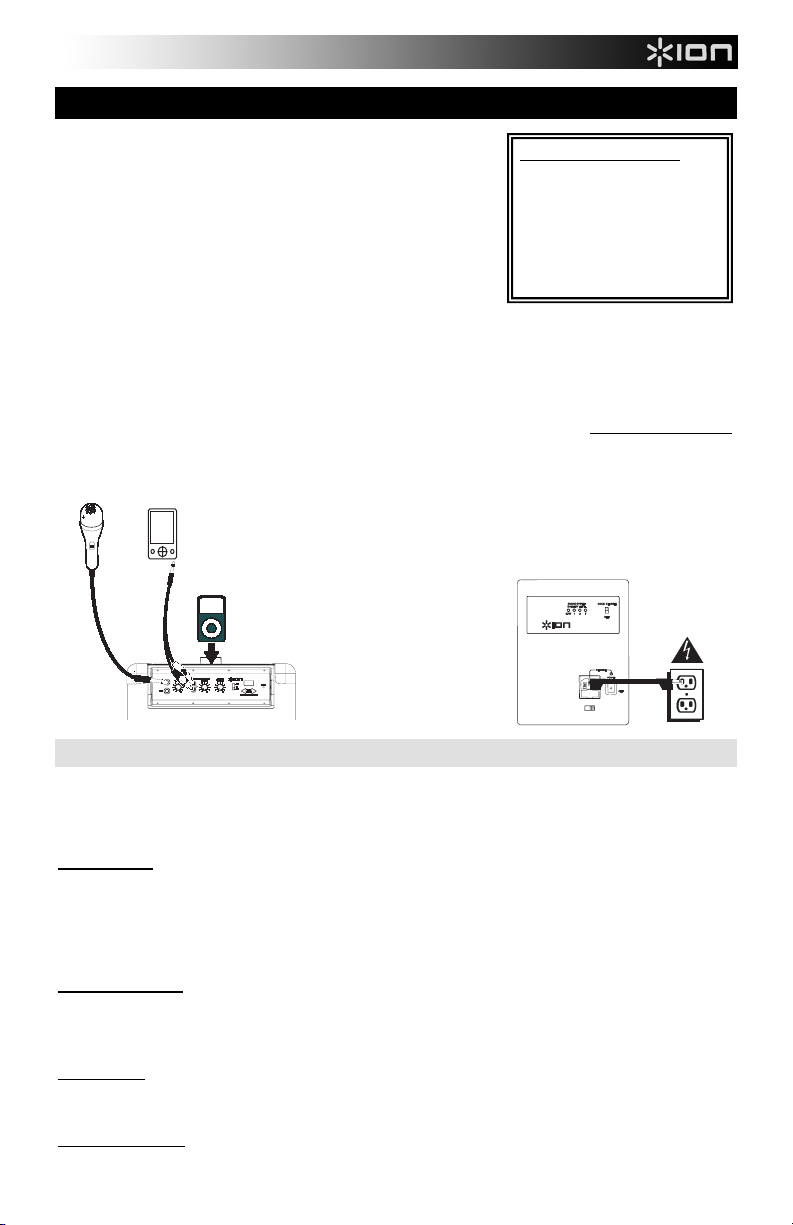
1. Asegúrese que todos los artículos incluidos al inicio de este manual
estén incluidos en la caja.
2. LEA LAS INSTRUCCIONES DEL FOLLETO DE SEGURIDAD
ANTES DE UTILIZAR EL PRODUCTO.
3. ASEGÚRESE DE QUE HA CARGADO COMPLETAMENTE LA
BATERÍA. PARA LOGRAR LA MÁXIMA VIDA ÚTIL DE LA
BATERÍA, CÁRGUELA TOTALMENTE ANTES DEL PRIMER USO.
4. Estudie este diagrama de instalación.
5. Coloque el producto en una posición adecuada para su
funcionamiento.
6. Asegúrese de que todos los dispositivos de entrada tales como
micrófonos, reproductores de CD, o reproductores MP3 estén
apagados y con el control de volumen en "cero".
7. Conecte todos los dispositivos como se muestra.
8. Encienda todo en el siguiente orden:
• fuentes de entrada de audio (por ejemplo, micrófonos, instrumentos, reproductores de CD/MP3)
• TAILGATER
9. Al apagar, realice siempre esta operación en sentido inverso:
• TAILGATER
• por último, cualquier dispositivo de entrada
MICRÓFONO
PANEL SUPERIOR
REPRODUCTOR DE MP3
(no incluido)
iPod
(no incluido)
TAILGATER
BATERÍAS RECARGABLES
Las baterías de plomo-ácido recargables son del mismo tipo que se usa en los automóviles. Al igual que con la
batería del vehículo, la forma en que se usa tiene una influencia significativa en la duración de su vida útil. Con un
uso y tratamiento correctos, una batería de plomo-ácido puede durar varios años. He aquí algunas recomendaciones
para prolongar la vida útil de la batería interna.
USO GENERAL
• CARGUE COMPLETAMENTE LA BATERÍA ANTES DE USARLA
• CARGUE LA BATERÍA COMPLETAMENTE DESPUÉS DE CADA USO
• EVITE AGOTARLA COMPLETAMENTE
• Puede dejar la unidad enchufada durante hasta dos semanas
• Para obtener máxima vida, descargue la batería el 80% una vez por mes
ALMACENAMIENTO
• Evite almacenar la batería en lugares húmedos y de alta temperatura
• Si la almacena durante períodos prolongados, recárguela periódicamente
• Si no carga la batería durante seis meses, es posible que luego no pueda cargarse
REPARACIÓN
• Cuando la batería se acerca al final de su vida útil, puede perder su capacidad de recarga. Si esto
DISPOSICIÓN FINAL
ocurre, comuníquese con el soporte técnico de ION Audio al www.ionaudio.com/supporthome.
• Lleve la unidad a un centro de reciclaje o deséchela de acuerdo a las ordenanzas locales
5
CONTENIDO DE LA CAJA
TAILGATER
(1) cable para micrófono
(1) micrófono
(1) cable de alimentación
Guía de inicio rápido
Folleto de información sobre
la seguridad y la garantía
Visite http://www.ionaudio.com
para registrar el producto.
PANEL LATERAL
SUMINISTRO
TAILGATER
ELÉCTRICO
Page 6

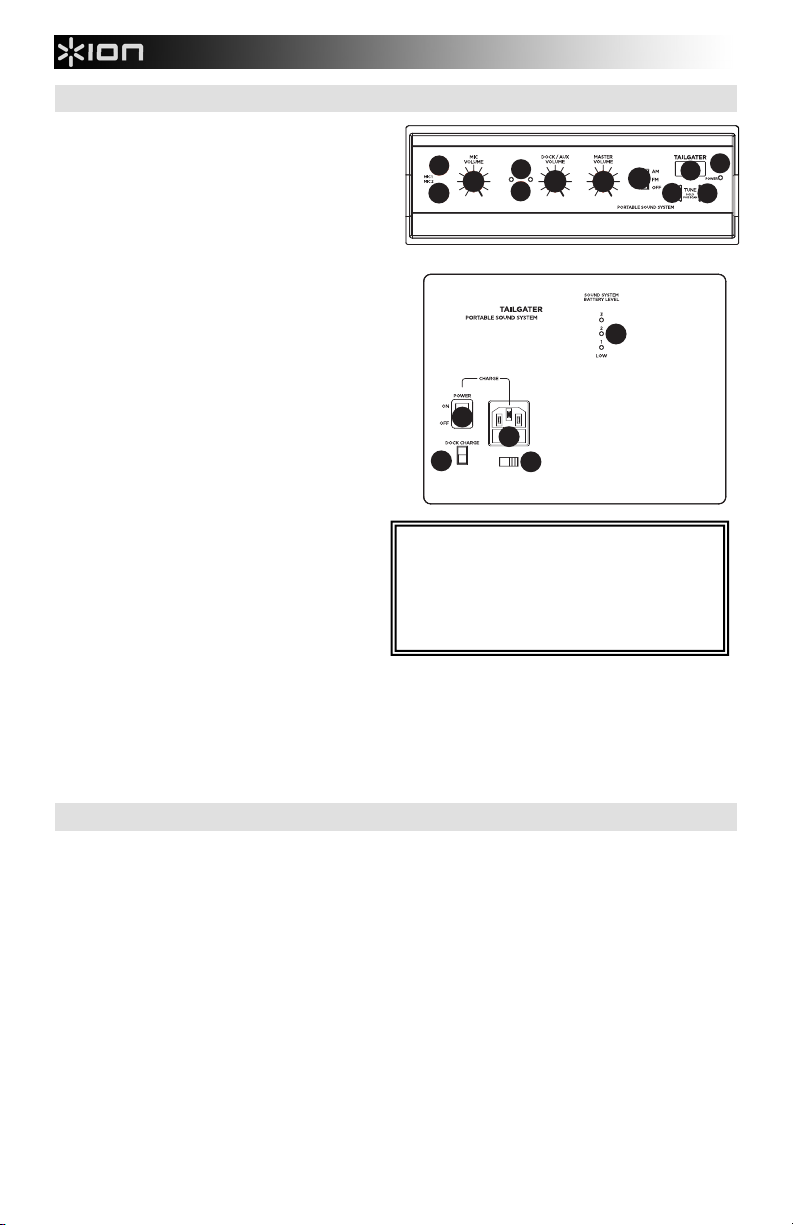
DIAGRAMA Y DESCRIPCIÓN
1. Entrada de instrumento / Micrófono con control
de volumen (1/4"): Esta entrada mono admite
una entrada de 1/4" tal como un micrófono, una
guitarra u otro instrumento musical.
2. Entrada auxiliar con control de volumen
iPod/auxiliary (RCA estéreo): Esta perilla
controla el nivel del iPod y de la entrada de RCA.
Esta entrada se puede usar para conectar un
reproductor de CD, MP3 u otra fuente de audio.
Para unirse a un dispositivo portátil con un 1/8 " el
gato de auricular, usted necesita un 1/8 " al cable
de RCA que no es incluido.
3. Control de volumen master: Esta perilla controla
el volumen master (maestro) del TAILGATER.
4. Selector de radio: Este interruptor ajusta la radio
a AM o FM o la apaga. (Nota: Este interruptor no
desconecta el suministro eléctrico de la unidad —
sólo el de la radio.)
5. LCD: Muestra la estación de radio actual.
6. Sintonizador: Para "buscar" (saltar a la siguiente
emisora disponible), manténgalo pulsado unos 2
segundos. El equipo busca y se detiene en la
siguiente emisora disponible.
7. LED de encendido: Indica cuando el TAILGATER
está encendido o apagado.
8. Entrada del cavo de alimentación (IEC): Inserte
aquí el cable de alimentación incluido para cargar
la unidad. Tenga en cuenta que el amplificador
portátil para altavoces puede funcionar con el
adaptador de potencia mientras se carga
simultáneamente la batería. El indicador de carga se
enciende cuando se está cargando la batería.
9. Selector de voltaje*: Debe colocarse en el voltaje
apropiado para su ubicación. Para cambiar este
ajuste, sólo retire *un* tornillo de la cubierta y
deslícela a un lado para exponer el selector.
10. Interruptor de encendido/apagado: Enciende y
apaga el TAILGATER. Tenga en cuenta que mientras el TAILGATER está conectado a un suministro
eléctrico, no es necesario encenderlo para que cargue la batería.
11. Indicador de nivel de batería: Mientras la unidad está alimentada, estas cuatro luces indican la energía
remanente en la batería. La vida útil de la batería varía en función del volumen y el consumo.
12. Interruptor de carga del iPod: Active la carga de iPod colocando este interruptor en la posición "Dock
Charge."
NOTAS IMPORTANTES
Consulte los siguientes escenarios de solución de problemas:
El sonido está distorsionado: Pruebe bajando el control de volumen de su fuente de sonido o instrumento
musical. Pruebe también reduciendo el volumen general del TAILGATER.
Hay demasiado bajos: Ajustar el tono o EQ de su fuente de sonido para bajar el nivel de graves.
Hay un silbido agudo cuando se usa el micrófono. Probablemente sea realimentación. Apunte los micrófonos
apartándolos de la persona que habla.
1
1
2
1
2
2
4
3
2
11
7
656
10
8
12
9
*IMPORTANTE: Si se selecciona el voltaje
incorrecto, se puede dañar la unidad. Las
unidades adquiridas en EE.UU., el Reino Unido
y la UE ya están ajustadas a los voltajes
correctos. No es necesario que cambie el
voltaje a menos que viaje a otro país o esté en
un país con variaciones de voltaje.
6
Page 7

TAILGATER
GUIDE D'UTILISATION RAPIDE (FRANÇAIS)
1. Assurez-vous que tous les articles énumérés sur la page
couverture de ce guide sont inclus dans la boîte.
2. VEUILLEZ LIRE LE LIVRET DES CONSIGNES DE SÉCURITÉ
AVANT D'UTILISER LE PRODUIT.
3. VEUILLEZ VOUS ASSURER QUE LA PILE EST
COMPLÈTEMENT RECHARGÉE. RECHARGER
COMPLÈTEMENT LA PILE AVANT LA PREMIÈRE
UTILISATION AFIN D'AUGMENTER SA DURÉE DE VIE.
4. Examinez bien le schéma d'installation.
5. Placez l'appareil en position de fonctionnement.
6. Assurez-vous que tous les appareils d'entrée tels que
microphones, lecteur de disques compacts, lecteur MP3 ou les
autres appareils branchés sont hors tension et que leur volume
soit réglé à « zéro ».
7. Connectez tous les appareils tel qu'indiqué sur le schéma.
8. Mettre tous les appareils sous tension dans l'ordre suivant.
• source d'entrée audio (p. ex. microphones, instruments, lecteurs CD/MP3);
• TAILGATER;
9. Pour mettre hors tension, toujours inverser l'opération :
• TAILGATER;
• en dernier, tous les appareils d'entrée.
PANNEAU SUPÉRIEUR
MICROPHONE
LECTEUR DE MP3
(non inclus)
iPod
(non inclus)
PILES RECHARGEABLES
Les piles au plomb rechargeables sont du même type que les batteries utilisées dans les automobiles. Comme pour
la batterie de votre automobile, la manière dont vous l'utilisez a un impact direct sur sa durée de vie. Cependant,
avec une bonne utilisation la pile au plomb peut avoir une durée de vie de plusieurs années. Voici quelques
recommandations pour prolonger au maximum la durée de vie de la pile interne.
UTILISATION GÉNÉRALE
• CHARGEZ COMPLÈTEMENT LA PILE AVANT DE L'UTILISER
• RECHARGEZ LA PILE COMPLÈTEMENT APRÈS CHAQUE UTILISATION
• ÉVITEZ DE DÉCHARGER LA PILE COMPLÈTEMENT
• L'appareil peut demeurer branché jusqu'à deux semaines
• Afin de prolonger la durée de vie, déchargez la pile à 80 % une fois par mois
ENTREPOSAGE
• Évitez d'exposer l'appareil à de hautes températures et à l'humidité
• Durant l'entreposage à long terme, rechargez la pile régulièrement
• S'il se passe plus de six mois sans que la pile soit rechargée, il se pourrait qu'elle ne se recharge plus
RÉPARATION
• Il se peut que la capacité de recharge de la pile se détériore plus elle se rapproche de la fin de sa durée
de vie. Si cela se produit, veuillez communiquer avec le service technique de ION Audio au
DISPOSER
www.ionaudio.com/supporthome.
• Apportez l'appareil dans un centre de recyclage ou disposez selon les règlements de votre municipalité
7
CONTENU DE LA BOÎTE
TAILGATER
(1) Câble pour microphone
(1) Microphone
(1) Câble d'alimentation
Guide d'utilisation rapide
Le livret des consignes de sécurité
et des informations concernant la
garantie
Allez à la http://www.ionaudio.com pour
l'enregistrement du produit.
PANNEAU LATÉRAL
TAILGATER
ALIMENTATION
Page 8

2
2
2
2
3
4
656
7
1
1
1
11
10
12
8
9
SCHÉMA ET DESCRIPTION
1. Entrée instrument / microphone avec commande
de volume (1/4 po) : Cette entrée mono peut
accueillir un câble de ¼ po pour microphone,
guitare ou un autre instrument de musique.
2. Entrée auxiliaire avec commande de volume
iPod/auxiliare (stéréo RCA): Pour brancher un
appareil portatif doté d’une prise casque 1/8 po
(3,5 mm), vous devez utiliser un câble 1/8 po à
RCA (non inclus).
3. Volume général : Ce contrôle permet de régler le
niveau du volume général du TAILGATER.
4. Sélecteur de bande radio : Ce sélecteur permet
de syntoniser la bande AM ou FM et permet
d’éteindre la radio. (Remarque : Il n’éteint pas
l’appareil, seulement la radio.)
5. Écran : Affiche la station radio en cours.
6. Syntoniseur : Pour balayer la bande (passer à la
prochaine station), maintenez cette touche
enfoncée environ 2 secondes. Il balayera, puis
s’arrêtera à la prochaine station disponible.
7. Témoin d'alimentation DEL : Indique si le
TAILGATER est sous ou hors tension.
8. Entrée du câble d'alimentation (IEC) : Brancher
le câble d'alimentation ci-inclus ici pour recharger
l'appareil. Sachez qu'il est possible d'utiliser le
système PA portable tout en le rechargeant à
l'aide de l'adaptateur d'alimentation. L'indicateur de
charge s'allume lorsque la pile se recharge.
9. Sélecteur de tension : Ce réglage doit être réglé avec
la tension adéquate pour votre région. Pour modifier le
réglage, retirez uniquement *une* des vis du couvercle
et faites-le glisser afin d’accéder au sélecteur.
10. Interrupteur Marche/Arrêt: Permet de mettre le
TAILGATER sous et hors tension. Veuillez noter que
lorsque le TAILGATER est branché à une source
d’alimentation, il peut recharger la pile sans être sous
tension.
11. Indicateur de niveau de charge : Lorsque l'appareil est
sous tension, ces quatre témoins indiquent le niveau de charge de la pile. La durée de vie de la pile dépend de
l'utilisation de l'appareil et du réglage du niveau du volume.
12. Interrupteur l'iPod de charge: Activez la fonction de rechargement pour iPod en mettant l’interrupteur à la
position « Dock Charge ».
NOTES IMPORTANTES
Veuillez vous reporter aux scénarios suivants :
Il y a de la distorsion : Essayez de diminuer le volume sur l’appareil d’entrée audio ou l’instrument de musique.
Essayez également de réduire le volume général du TAILGATER.
Il y a trop des basses: Essayez de régler la tonalité ou EQ sur votre source audio pour baisser le niveau de graves.
Il y a un sifflement aigu lors de l’utilisation des microphones : Ceci est probablement causé par l’effet Larsen
(feedback). Dirigez les microphones loin des haut-parleurs.
* IMPORTANT: L'utilisation d’une tension
inappropriée pourrait endommager l’appareil.
Les appareils achetés aux États-Unis, au
Royaume-Uni et en Europe sont livrés avec
la tension appropriée déjà réglée pour leur
région. Vous n’avez pas à la modifier sauf si
vous voyagez dans un autre pays ou si vous
êtes dans un pays avec une tension
différente.
8
Page 9

GUIDA RAPIDA (ITALIANO)
1. Verificare che tutti gli elementi elencati sul frontespizio di questa
guida siano inclusi nella confezione.
2. PRIMA DI UTILIZZARE IL PRODOTTO LEGGERE IL LIBRETTO
DELLE ISTRUZIONI DI SICUREZZA.
3. ASSICURARSI DI AVER CARICATO COMPLETAMENTE LA
BATTERIA. CARICARE TOTALMENTE LA BATTERIA PRIMA
DEL PRIMO UTILIZZO PER GARANTIRNE LA MASSIMA
DURATA.
4. Esaminare attentamente lo schema di montaggio.
5. Posizionare il prodotto in maniera adeguata all'uso.
6. Assicurarsi che tutti i dispositivi d'ingresso quali microfoni, lettori
CD, o lettori mp3 collegati siano spenti e che il volume sia impostato
su "zero"
7. Collegare tutti i dispositivi come illustrato.
8. Accendere tutto nel seguente ordine:
• sorgenti di ingresso audio (microfoni, strumenti, lettori CD/MP3)
• TAILGATER
9. Al momento dello spegnimento, invertire l'operazione:
• TAILGATER
• per ultimi, tutti i dispositivi di ingresso
MICROFONO
LETTORE MP3
(non in dotazione)
iPod
(non in dotazione)
TAILGATER
PANNELLO SUPERIORE
BATTERIE RICARICABILI
Le batterie ricaricabili al piombo-acido sono dello stesso tipo di quelle utilizzate nelle automobili. Come nel caso della
batteria dell'auto, la maniera in cui si utilizza questa batteria ha un notevole impatto sulla sua vita utile. Con un utilizzo
adeguato, una batteria al piombo-acido può durare per anni. Ecco alcune raccomandazioni per garantire la massima
durata dalla batteria interna:
UTILIZZO GENERICO
• CARICARE A FONDO LA BATTERIA PRIMA DI UTILIZZARLA
• CARICARE A FONDO LA BATTERIA DOPO CIASCUN UTILIZZO
• EVITARE DI SCARICARE DEL TUTTO LA BATTERIA
• È possibile lasciare l'apparecchio collegato alla rete elettrica per un massimo di due settimane
• Per il massimo della durata, scaricare la batteria dell'80% una volta al mese
COME RIPORRE L'APPARECCHIO
• Evitare di riporre l'apparecchio a temperature elevate e in luoghi umidi
• Se si ripone l'apparecchio per lunghi periodi di tempo, ricaricare periodicamente la batteria
• Se non si carica la batteria per sei mesi, potrebbe non ricaricarsi più
RIPARAZIONI
• Man mano che la batteria si avvicina al termine della sua vita utile, può perdere la capacità di ricarica. Se
COME ELIMINARE L'APPARECCHIO
ciò accade, contattare il servizio di assistenza tecnica di ION Audio al www.ionaudio.com/supporthome.
• Recarsi con l'apparecchi presso un centro di riciclaggio oppure eliminarlo in conformità con le normative
locali
9
CONTENUTI DELLA CONFEZIONE
TAILGATER
(1) cavo da microfono
(1) microfono
(1) Cavo di alimentazione
Guida rapida
Libretto di istruzioni di sicurezza e
garanzia
Recarsi sul sito http://www.ionaudio.com per la
registrazione del prodotto.
TAILGATER
PANNELLO LATERALE
ALIMENTAZIONE
Page 10

DIAGRAMMA E DESCRIZIONE
2
2
2
2
3
4
656
7
1
1
1
11
10
12
8
9
1. Ingresso strumento / microfono con controllo di
guadagno volume (1/4"): questo ingresso mono
accetta un ingresso da 1/4" quali un microfono,
chitarra o altro strumento musicale.
2. Ingresso ausiliario con controllo di guadagno
volume iPod/ausiliario (RCA Stereo): questa
manopola controlla il livello del iPod e dell'input di
RCA. questo ingresso può essere utilizzato per il
collegamento di un CD, MP3, o altra sorgente
audio. Per collegare un dispositivo portatile con un
jack cuffie da 1/8", servirsi di un cavo standard da
1/8" a RCA (non in dotazione).
3. Comando volume master: questa manopola
controlla il volume master del TAILGATER.
4. Selettore radio: questo interruttore imposta la
radio su AM o FM o spegne la radio. (Nota bene:
questo interruttore non spegne l'apparecchio, solo
la radio.)
5. LCD: mostra a display la stazione radio corrente.
6. Sintonizzatore: per "cercare" (saltare alla
7. LED di alimentazione: indica se il TAILGATER è
8. Ingresso cavo di alimentazione (IEC): inserire il
9. Selettore di voltaggio: questo comando deve
10. Interruttore di alimentazione ON/OFF: accende o spegne il TAILGATER. Va notato che quando il
11. Indicatore di livello batteria: ad apparecchio acceso (ON), queste quattro luci indicano la carica residua della
12. Interruttore caricantesi del iPod: attivare la ricarica dell’iPod impostando questo interruttore su "Dock
stazione disponibile successiva), tenerlo premuto
per circa 2 secondi; effettuerà una scansione in
avanti e si fermerà sulla prima stazione disponibile
successiva.
acceso o spento.
cavo di alimentazione in dotazione per caricare
l'apparecchio. Il TAILGATER può funzionare con
l'adattatore anche durante la ricarica della
batteria. L'indicatore di carica si illumina durante la
ricarica stessa.
essere configurato sulla adeguata impostazione di
tensione per la propria zona. Per cambiare
l'impostazione, rimuovere *una* sola vite dal coperchio e farlo scorrere da parte per esporre il selettore.
TAILGATER è collegato ad una fonte di alimentazione, non deve essere necessariamente acceso per caricare
la batteria.
batteria. La durata della batteria dipende dal volume e dall'uso.
Charge" (carica iPod).
* IMPORTANTE: selezionare il livello di tensione
inadeguato può danneggiare l’apparecchio. Gli
apparecchi acquistati negli Stati uniti, nel Regno
unito e nell'UE sono già impostati sulle tensioni
corrette. Non occorre modificare il voltaggio, a meno
che non ci si rechi in un altro Paese o ci si trovi in un
Paese con tensione variabile.
NOTE IMPORTANTI
Fare riferimento alle seguenti casistiche di risoluzione di problemi:
Il suono è distorto: provare ad abbassare il volume della propria fonte audio o dello strumento musicale. Inoltre,
provare a ridurre il volume complessivo del TAILGATER.
Vi è troppo basso: Prova di adeguamento il tono o EQ del vostro suono fonte di abbassare il livello dei bassi.
Quando si utilizzano i microfoni si verifica un fischio ad alto pitch: si tratta probabilmente di ritorno. Puntare i
microfoni lontani dalle casse.
10
Page 11

KURZANLEITUNG (DEUTSCH)
1. Überprüfen Sie, dass sich alle auf dem Deckblatt genannten Teile in
der Verpackung befinden.
2. LESEN SIE DIE SICHERHEITSHINWEISE, BEVOR SIE DIESES
PRODUKT VERWENDEN.
3. LADEN SIE DIE BATTERIE VOR DER ERSTEN VERWENDUNG
AUF, UM DIE LEBENSDAUER DER BATTERIE ZU MAXIMIEREN.
4. Sehen Sie sich die Aufbauabbildung an.
5. Stellen Sie das Gerät in einer für den Betrieb geeigneten Position auf.
6. Schalten Sie alle Eingangsquellen (Mikrofone, CD Player, oder MP3
Player) aus und drehen Sie deren Lautstärke auf "Null."
7. Verbinden Sie zusätzliche Geräte wie unten abgebildet.
8. Schalten Sie das System in der folgenden Reihenfolge ein:
• Eingangsquellen (z.B. Mikrofon, Instrumente und/oder CD-
Player)
• TAILGATER
9. Gehen Sie beim Ausschalten in der genau umgekehrten Reihenfolge vor:
• TAILGATER
• Und zuletzt die Eingangsquellen
Registrieren Sie Ihr Produkt online unter http://www.ionaudio.com
MIKROFON
OBERSEITE
MP3-PLAYER
(nicht mitgeliefert)
iPod
(nicht mitgeliefert)
TAILGATER
WIEDERAUFLADBARE BATTERIEN
Bei wiederaufladbaren Bleibatterien handelt es sich um die gleiche Art von Batterien, die in Autos verwendet werden.
Und wie bei Ihrer Autobatterie ist es auch für die Benutzungsdauer dieser Batterie von äußerster Wichtigkeit, wie sie
verwendet wird. Bei vorschriftsmäßigem Gebrauch und richtiger Pflege kann eine Bleibatterie jahrelang halten.
Lesen Sie die nachstehenden Empfehlungen, um aus der eingebauten Batterie das Beste herauszuholen.
ALLGEMEINE GEBRAUCHSHINWEISE
• BATTERIE VOR GEBRAUCH IMMER VOLL AUFLADEN
• BATTERIE NACH JEDEM GEBRAUCH VOLL AUFLADEN
• VÖLLIGES ENTLEEREN DER BATTERIE SOLLTE VERMIEDEN WERDEN
• Das Gerät kann bis zu 2 Wochen am Stromnetz belassen werden
• Um die maximale Benutzungsdauer auszuschöpfen, sollte die Batterie wenigstens einmal im Monat zu
AUFBEWAHRUNG
REPARIEREN
ENTSORGUNG
80% entleert werden
• Gerät nicht hohen Temperaturen oder feuchter Umgebung aussetzen
• Bei Langzeitaufbewahrung Batterie in regelmäßigen Abständen aufladen
• Wird die Batterie sechs Monate lang nicht geladen, kann sie unter Umständen nicht mehr aufgeladen
werden
• Mit zunehmendem Alter der Batterie nimmt unter Umständen deren Ladefähigkeit ab. Wenn dies eintritt,
wenden Sie sich an den technischen Support von ION Audio unter www.ionaudio.com/supporthome.
• Batterie zu einem Wiederverwertungszentrum bringen oder im Rahmen der geltenden Vorschriften
entsorgen
11
INHALT DER VERPACKUNG
TAILGATER
(1) Mikrofonkabel
(1) Mikrofon
(1) Netzkabel
Kurzanleitung
Broschüre mit den
Sicherheits- und
Garantierichtlinien
TAILGATER
SEITENTEIL
STROM
Page 12
2
2
2
2
3
4
656
7
1
1
1
11
10
12
8
9
BEDIENELEMENTE
1. Instrument / Mikrofon Eingang mit LautstärkeRegler (6,3mm Klinke): Dieser Mono Eingang
verarbeitet normale Klinkenkabelanschlüsse von
einem Mikrofon, einer Gitarre oder einem anderen
Musikinstrument.
2. Aux Eingang mit iPod/Aux-Lautstärke-Regler
(Stereo RCA): Dieser Drehknopf steuert das
Niveau des iPod und des RCA Einganges. Dieser
Eingang nimmt das Signal eines CD/MP3 Players
oder einer anderen Audioquelle auf. Um ein
tragbares Gerät mit einem 1/8"Kopfhöreranschluss anzuschließen, benötigen Sie
einen handelsüblichen 1/8"-auf-Cinch-Adapter
(nicht im Lieferumfang enthalten).
3. Lautstärkenregler: Hier regeln Sie die
Summenlautstärke des TAILGATER.
4. Radiowahlschalter: Dieser Schalter setzt das
Radio auf AM oder FM oder schaltet das Radio
aus. (Hinweis: Dieser Schalter schaltet nicht das
gesamte Gerät aus – sondern nur das Radio.)
5. LCD: Zeigt den aktuellen Radiosender an.
6. Tuner: Um zu "suchen" (zum nächsten
verfügbaren Sender zu springen), halten Sie ihn
ca. 2 Sekunden lang gedrückt. Es wird gesucht
und beim nächsten verfügbaren Sender
angehalten.
7. Power-LED: Zeigt an, ob TAILGATER ein- oder
ausgeschaltet ist.
8. Netzkabel-Eingang (IEC): Schließen Sie hier
das mitgelieferte Netzkabel zum Laden der
Batterie an. Der TAILGATER kann mit dem
Netzkabel betrieben werden und gleichzeitig die
Batterie laden. Die Ladekontroll-LED leuchtet,
sobald die Batterie aufgeladen wird.
9. Spannungswähler: Dieser muss auf die
richtige Spannung für Ihren Standort gesetzt
werden. Um die Einstellung zu ändern, entfernen Sie nur *eine* Schraube der Abdeckung und schieben Sie
diese beiseite, um den Wähler freizulegen.
10. Power ON/OFF Schalter: Schaltet den TAILGATER an oder aus. Beachten Sie bitte, dass beim Anschluss
des TAILGATER an ein Stromnetz das Gerät nicht eingeschaltet werden muss, um die Batterie aufzuladen.
11. Batteriestand-LEDs: Wenn das Gerät eingeschaltet wird, zeigen diese vier LEDs an, wie viel Spannung in der
Batterie vorhanden ist. Die Laufzeit der Batterie variiert auf Grund von Lautstärke und Betriebsdauer.
12. iPod Ladegerät Schalter: Aktivieren Sie das Aufladen des iPod, indem Sie diesen Schalter in die "Dock
Charge" Position stellen.
* WICHTIG: Die Wahl der falschen Spannung kann
das Gerät beschädigen. In den USA, in
Großbritannien und in der EU gekaufte Produkte
haben bereits die richtigen Spannungen eingestellt.
Sie brauchen die Spannung nicht ändern, es sei denn,
Sie reisen in ein anderes Land oder befinden sich in
einem Land mit unterschiedlicher Spannung.
WICHTIGE HINWEISE
Lesen Sie die folgenden Tipps zur Fehlerbehebung durch:
Der Sound klingt verzerrt: Verringern Sie die Lautstärke an Ihrer Tonquelle oder dem Musikinstrument. Versuchen
Sie auch, die Gesamtlautstärke des TAILGATER zu reduzieren.
Der Sound ist zu Basslastig: Versuchen Sie, Änderungen an EQ oder Klangregelung der verbundenen Signalquelle
vorzunehmen um den Bass zu reduzieren. Dies ermöglicht, die Musik lauter abzuspielen bevor es zu Verzerrungen
(clipping) kommt.
Bei der Verwendung von Mikrofonen tritt einer hoher Pfeifton auf: Hier handelt es sich wahrscheinlich um einen
Rückkopplungseffekt. Achten Sie darauf, dass die Mikrofone vom Lautsprecher wegzeigen.
12
Page 13

SNELSTARTGIDS (NEDERLANDS)
1. Controleer dat alle onderdelen die op de voorzijde van deze gids
staan ook in de doos zitten.
2. LEES DE VEILIGHEIDSINSTRUCTIES VOOR HET PRODUCT
GEBRUIKT WORDT
3. ZORG ERVOOR DAT DE BATTERIJ VOLLEDIG OPGELADEN
IS VOOR HET EERSTE GEBRUIK VOOR EEN MAXIMALE
LEVENSDUUR ERVAN.
4. Bestudeer dit installatiediagram.
5. Plaats het product in een juiste positie voor bediening.
6. Zorg ervoor dat alle invoerapparatuur zoals microfoons, CD-
spelers, en mp3-spelers uitgeschakeld zijn met volume-instellingen
op "nul".
7. Sluit alle apparaten aan zoals weergegeven.
8. Schakel alles in de hier gegeven volgorde in.
• bronnen voor geluidsinput (bijv. microfoons, instrumenten, CD/MP3-spelers)
• TAILGATER
9. Bij uitschakelen draait u de volgorde om door:
• TAILGATER
• en als de laatste inputapparatuur.
MICROFOON
BOVENPANEEL
MP3-SPELER
(niet meegeleverd)
iPod
(niet meegeleverd)
TAILGATER
HERLAADBARE ACCU'S
Oplaadbare loodzwavelzuuraccu's zijn van hetzelfde type dat gebruikt wordt in auto's. Zoals met de accu van uw auto
wordt de levensduur ervan in grote mate bepaald door uw gebruik ervan. Bij een juist gebruik en behandeling kan
een loodzwavelzuuraccu jaren meegaan. Hier zijn wat aanbevelingen voor het zo lang mogelijk laten meegaan van
de interne accu.
ALGEMEEN GEBRUIK
• LAAT DE ACCU VOLLEDIG OP VOORDAT DEZE GEBRUIKT WORDT
• LAAD DE BATTERIJ NA ELK GEBRUIK VOLLEDIG OP
• VERMIJD HET HELEMAAL LEEG LATEN LOPEN VAN DE ACCU
• U kunt de unit tot twee weken ingeplugd laten zitten
• Voor een lange levensduur laat u de accu eens per maand voor 80% leeglopen
OPSLAG
• Vermijd opslag bij hoge temperaturen of in vochtige omgevingen
• Bij lange-termijnopslag dient de accu periodiek opnieuw opgeladen te worden
• Als u de accu gedurende zes maanden niet oplaadt, kan het zo zijn dat deze zichzelf niet meer oplaadt
REPARATIE
• Aan het eind van de levensduur van de batterij kan de mogelijkheid tot opladen teruglopen. Als dit
voorkomt, neem dan contact op met de technische dienst van ION Audio op
AFVOER
www.ionaudio.com/supporthome.
• Breng de unit naar een kringloopcentrum of voer deze af in overeenstemming met lokale verordeningen
13
INHOUD VERPAKKING
TAILGATER
(1) Kabel microfoon
(1) Microfoon
(1) Stroomsnoer (standaard IEC)
Snelstartgids
Veiligheids- en garantie-
informatie
Ga naar http://www.ionaudio.com
voor productregistratie.
TAILGATER
ZIJPANEEL
STROOM
Page 14

DIAGRAM EN BESCHRIJVING ONDERDELEN
2
2
2
2
3
4
656
7
1
1
1
11
10
12
8
9
1. Input instrument/microfoon met volumebesturing (1/4"): Deze mono-ingang accepteert
1/4"-input zoals microfoon, gitaar of andere
muziekinstrumenten.
2. Hulpingang met iPod/aux volume-besturing
(Stereo RCA): Deze knop bestuurt het niveau van
de iPod en de RCA-input. Deze stereo RCAingang kan gebruikt worden voor het aansluiten
van een CD-, MP3- of andere geluidsbron. Gebruik
een standaard 1/8" RCA-kabel (niet meegeleverd)
om een draagbaar apparaat met 1/8" (3,5 mm)
hoofdtelefooningang te verbinden met de unit.
3. Hoofdvolumebesturing: Deze knop bestuurt het
hoofdvolume van de TAILGATER.
4. Keuzeschakelaar Radio: Deze schakelaar zet de
radio op AM of FM of schakelt de radio uit.
(Opmerking: Deze schakelaar zet het apparaat
niet uit . Alleen de radio wordt uitgezet.)
5. LCD: Geeft het huidige radiostation weer.
6. Tuner: Houd dit voor ongeveer 2 seconden
ingedrukt om te "zoeken" (naar het volgende
beschikbare station springen); het apparaat scant
voorwaarts en stopt bij het volgende beschikbare
radiostation.
7. Stroom-LED: Geeft aan of TAILGATER aan- of
uitgeschakeld is.
8. Stroomkabel-ingang (IEC):Steek de meegeleverde
stroomkabel hierin om de unit op te laden. N.B.: de
TAILGATER kan vanaf de stroomadapter werken
wanneer de batterij wordt opgeladen. De
oplaadindicator licht op wanneer de batterij
opgeladen wordt.
9. Spanningskeuzeschakelaar: Deze schakelaar
moet op de juiste spanning voor uw regio staan. Om
de instelling ervan te veranderen is het voldoende
om *één* schroef van het deksel te verwijderen en het opzij te schuiven om de schakelaar bloot te leggen.
10. Stroom AAN/UIT schakelaar: Schakelt de TAILGATER in of uit. N.B.: Wanneer de TAILGATER aangesloten
is op een vermogensbron, hoeft deze niet ingeschakeld te zijn om de batterij te laten opladen.
11. Indicator batterijniveau: Wanneer de unit is ingeschakeld (ON) geven deze vier lampjes de resterende
stroom in de batterij weer. Levensduur batterij varieert, afhankelijk van volume en gebruik.
12. iPod oplaadschakelaar: Schakel het laden van de iPod in door deze schakelaar op "Dock Charge" te zetten.
* BELANGRIJK: Een foute spanning selecteren
kan de unit beschadigen. Apparaten gekocht in de
VS, het VK en de EU zijn al ingesteld op de juiste
spanning. U hoeft de spanning niet te veranderen,
tenzij u reist naar een ander land of zich bevindt in
een land met variërende spanning.
BELANGRIJKE OPMERKINGEN
Gebruik deze gids voor probleemoplossing als:
Het geluid is vervormd: Probeer het volume van de geluidsbron of het muziekinstrument lager te zetten. Probeer
ook om het volume van de TAILGATER zelf te verminderen.
Er is teveel bas: probeer de toon of EQ-besturing op uw geluidsbron aan te passen om het basniveau te verlagen.
Hierdoor zult u in staat zijn de muziek harder af te spelen voor vastlopen (vervormen) voorkomt.
Er is een hoge fluitende pieptoon bij het gebruik van microfoons: Dit is waarschijnlijk feedback. Richt de
microfoons weg van de luidspreker.
14
Page 15

SPECIFICATIONS
Input Voltage: AC 100-120V/ 60Hz, 220-240V/ 50Hz
Input Wattage: 50W
Output Wattage: (RMS) 18W, 1%THD, (Peak) 22W
Frequency Response (±3dB): (Aux) 90Hz-20kHz, (iPod) 77Hz-20kHz
Time required to fully charge the TAILGATER: Approximately 6 hours
Battery life: Up to 12 hours* when fully charged.
*Note: Battery life may vary based on temperature, age, and volume usage of product.
Page 16

www.ionaudio.com
MANUAL VERSION 1.3
 Loading...