

Page 1

Operator's Manual
GAS/OIL
RATIO
50:1
Original Operating Instructions
ION G2
ELECTRIC ICE AUGER
Get parts online at
www.ioniceaugers.com
ION G2
ELECTRIC ICE AUGER
34670
ECN #12383
REV1 07/12/2019
©COPYRIGHT 2019 ARDISAM, INC.
ALL RIGHTS RESERVED.
Page 2
Operator's Manual
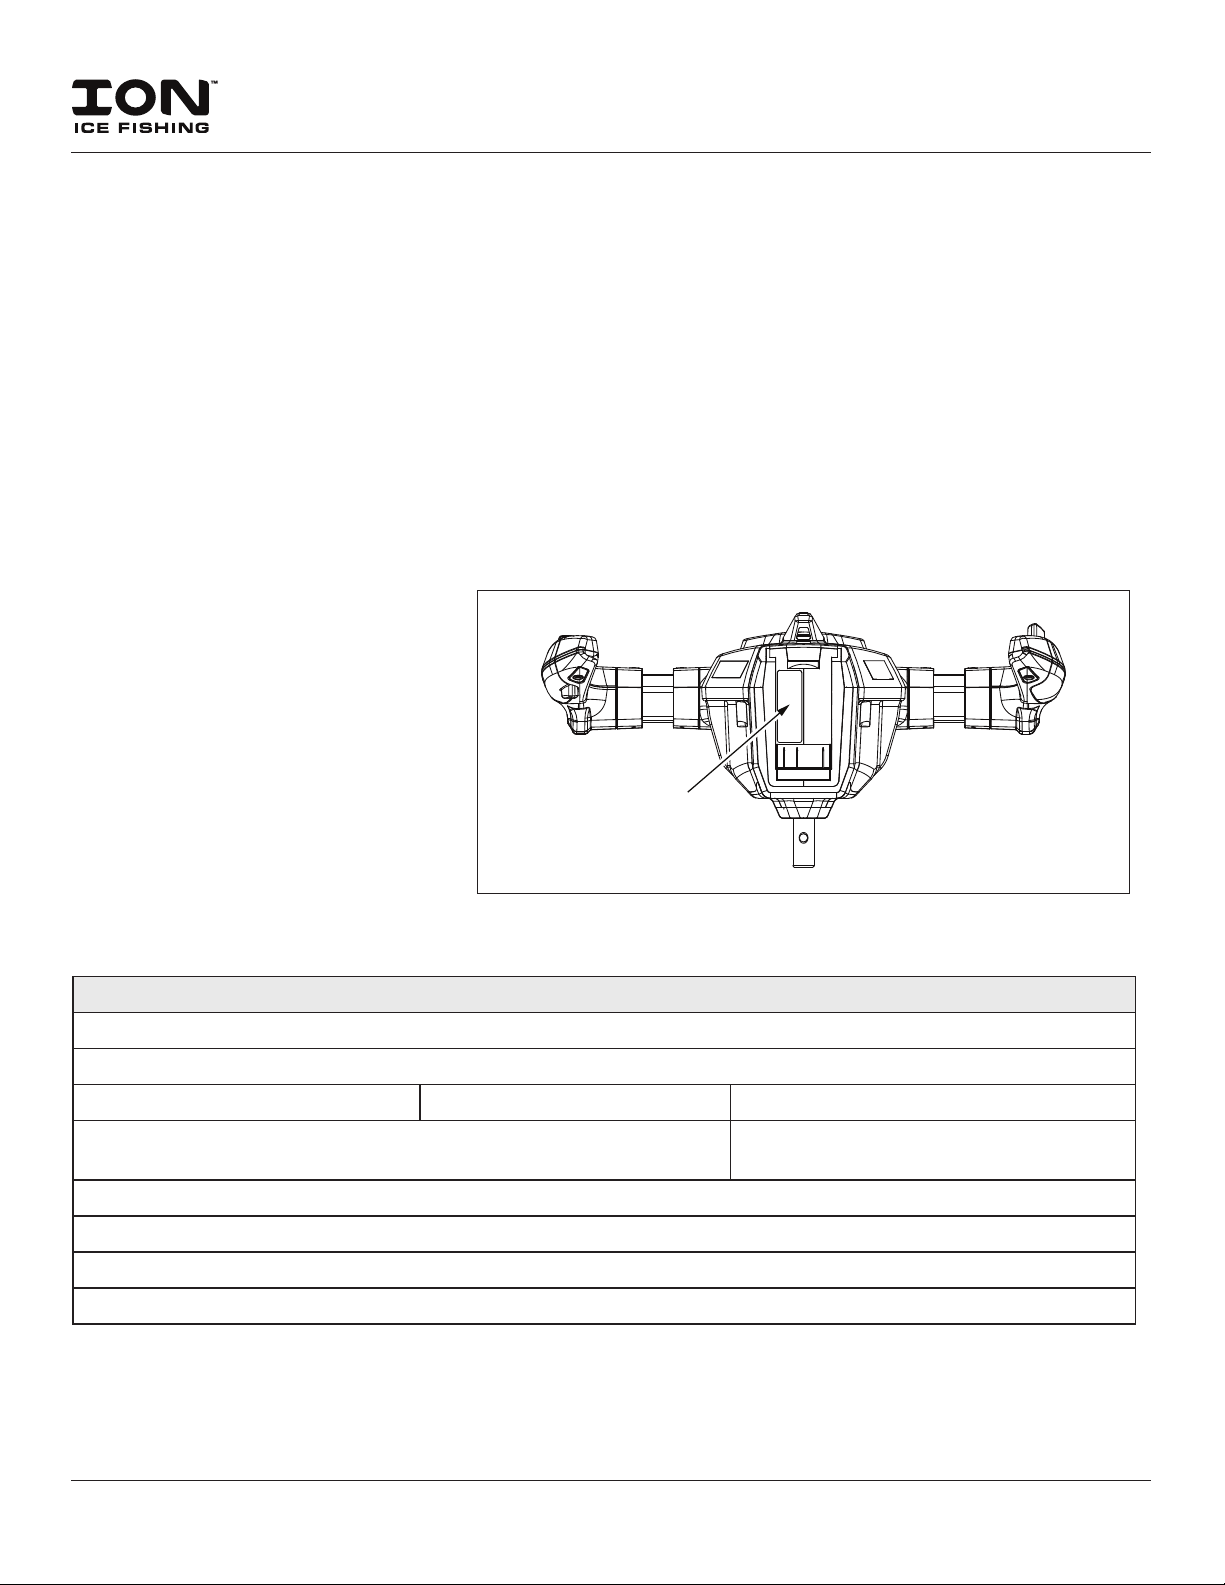
SERIAL
NUMBER
LOCATION
ION G2 Electric Ice Auger
INTRODUCTION
Thank you for purchasing an ION® Electric Ice Auger from Ardisam, Inc. We have worked to ensure that this ice auger meets high
standards for usability and durability. With proper care, your ice auger will provide you many years of service. Please take the time
to read this manual carefully to learn how to correctly operate and maintain your ice auger. Congratulations on your investment
in quality. Save these instructions for future reference. Ardisam, Inc reserves the right to change or alter this manual without
notice.
Contents
Introduction / Registration and Service ............................................................................................................................................................................... 2
Important Safety Precautions .............................................................................................................................................................................................. 3-4
Unpacking and Assembly ......................................................................................................................................................................................................... 5
Operation ........................................................................................................................................................................................................................................ 6
Battery Charging and Monitoring ...................................................................................................................................................................................... 6-7
Maintenance and Storage ......................................................................................................................................................................................................... 7
Service and Repairs ..................................................................................................................................................................................................................... 7
Troubleshooting ...........................................................................................................................................................................................................................8
Warranty .......................................................................................................................................................................................................................................... 9
Registration and Service
Record the product model number and
serial number in the space provided for
easy reference when ordering parts or
requesting technical support. You can
register your warranty online by visiting
www.ioniceaugers.com, or by mailing it to:
ION Ice Fishing
1160 Eighth Avenue, Cumberland, WI 54829.
Our customer service department can be
reached at (800) 345-6007 Mondays through
Fridays from 8 a.m. to 5 p.m. CT.
OWNERSHIP RECORDS
Place of Purchase:
Place of Purchase Address:
City: State/Province: Zip Code/Postal Code:
Model Number: Serial Number
Date of Purchase:
Notes:
This manual may contain information for several models. Read and keep this manual for future reference. This manual contains
important information on SAFETY, ASSEMBLY, OPERATION, AND MAINTENANCE. The owner must be certain that all the product
information is included with the unit. This information includes the MANUAL, the REPLACEMENT PARTS and the WARRANTIES.
This manual should remain with the unit even if it is resold.
2
Check for parts online at www.ioniceaugers.com or call 800-345-6007 M-F 8-5 CT
Page 3
WARNINGS AND SAFETY PRECAUTIONS
Operator’s Responsibility
Accurate, safe and eective use of this product is the
operator’s responsibility.
• Read and follow all safety instructions.
• Maintain this machine according to directions and
schedule included in this operator’s manual.
• Ensure that anyone who uses the machine is
familiar with and understands all controls and safety
precautions.
• Do not discard battery into trash can. Discard the
battery according to your local, state, federal or
country’s regulations.
Safety Messages
Your manual contains special messages to bring attention to
potential safety concerns, as well as helpful operating and
servicing information. Please read all the information carefully
to avoid injury and machine damage.
Operator's Manual
ION G2 Electric Ice Auger
WARNING
WARNING INDICATES A HAZARD WHICH, IF NOT
AVOIDED, COULD RESULT IN DEATH OR SERIOUS
INJURY AND/OR PROPERTY DAMAGE.
CAUTION
CAUTION INDICATES YOU CAN BE HURT OR
YOUR EQUIPMENT DAMAGED IF THE SAFETY
INSTRUCTIONS THAT FOLLOW THIS SIGNAL
WORD ARE NOT OBEYED.
IMPORTANT
INDICATES HELPFUL INFORMATION FOR PROPER
ASSEMBLY, OPERATION, OR MAINTENANCE OF
YOUR EQUIPMENT.
NOTE: General information is given throughout the
manual that may help the operator in the
operation or service of the product.
THIS SYMBOL POINTS OUT IMPORTANT
SAFETY INSTRUCTIONS WHICH IF NOT
FOLLOWED COULD ENDANGER YOUR
PERSONAL SAFETY.
Before Operating Unit:
Please read this section carefully. Read entire operating and
maintenance instructions. Failure to follow instructions could
result in injury or death. Operate the machine according to the
safety instructions outlined here and inserted throughout the
text. Anyone who uses this machine must read the instructions
and be familiar with the controls.
WARNING
READ AND COMPLY WITH ENTIRE OPERATING AND
MAINTENANCE INSTRUCTIONS FOR THIS MACHINE,
IN ADDITION TO ALL SAFETY INSTRUCTIONS.
FAILURE TO FOLLOW AND/OR COMPLY WITH
THESE INSTRUCTIONS COULD RESULT IN LOSS OF
MACHINE CONTROL, SERIOUS PERSONAL INJURY
OR DEATH TO YOU AND/OR BYSTANDERS, AND
EQUIPMENT AND PROPERTY DAMAGE. OPERATE
THE MACHINE ACCORDING TO THE SAFETY
INSTRUCTIONS OUTLINED HERE AND INSERTED
THROUGHOUT THE TEXT. ANYONE WHO USES THIS
MACHINE MUST READ THE INSTRUCTIONS AND BE
FAMILIAR WITH THE CONTROLS.
Check for parts online at www.ioniceaugers.com or call 800-345-6007 M-F 8-5 CT
3
Page 4
Important Safety Precautions
• The ice blades are very sharp. Use extreme caution
when drilling a hole or replacing the blades. Put the
blade guard on after each use.
• Always keep hands, feet, hair, drawstrings, scarves,
hats and loose clothing away from any moving parts
on the unit.
• Do not allow children to operate this unit. Do not
allow adults to operate the unit without proper
instruction.
• Do not operate any power equipment under the
inuence of alcohol or drugs.
• Keep all screws, nuts and bolts tight.
• The battery must be removed before any repairs are
attempted.
• If the unit becomes stuck in a hole, remove the battery
before attempting to remove the unit manually.
• DO NOT use this product for anything other than its
intended purpose.
• DO NOT use attachments and accessories other than
those available from ION.
• DO NOT alter this product in any manner; doing so is
dangerous and will void the warranty.
• DO NOT continue to use this product in the event of
mechanical failure.
• This product produces considerable torque that is
felt by the operator. Make sure your feet are rmly
planted and that the handles are held rmly while
operating the auger.
• During operation, the unit could stop. If this happens,
release the operating trigger. Reposition your feet
and grip the handles tightly. Then squeeze operating
trigger and lift the unit gently.
• When drilling ice holes, do not push down on the unit.
If auger begins to drill slowly, blades may need to be
sharpened or replaced.
• DO NOT discard the battery into trash can. Discard
the battery according to your local, state, federal or
country’s regulations.
Operator's Manual
ION G2 Electric Ice Auger
IMPORTANT
CHARGERS COME PACKAGED SEPARATELY IN
THE AUGER CARTON. BATTERY MUST BE FULLY
CHARGED BEFORE FIRST USE.
LITHIUM
BATTERY
AUGER
FLITE
BLADE
PROTECTOR
AUGER
RING
CAUTION:
SHARP EDGES
4
Check for parts online at www.ioniceaugers.com or call 800-345-6007 M-F 8-5 CT
Page 5
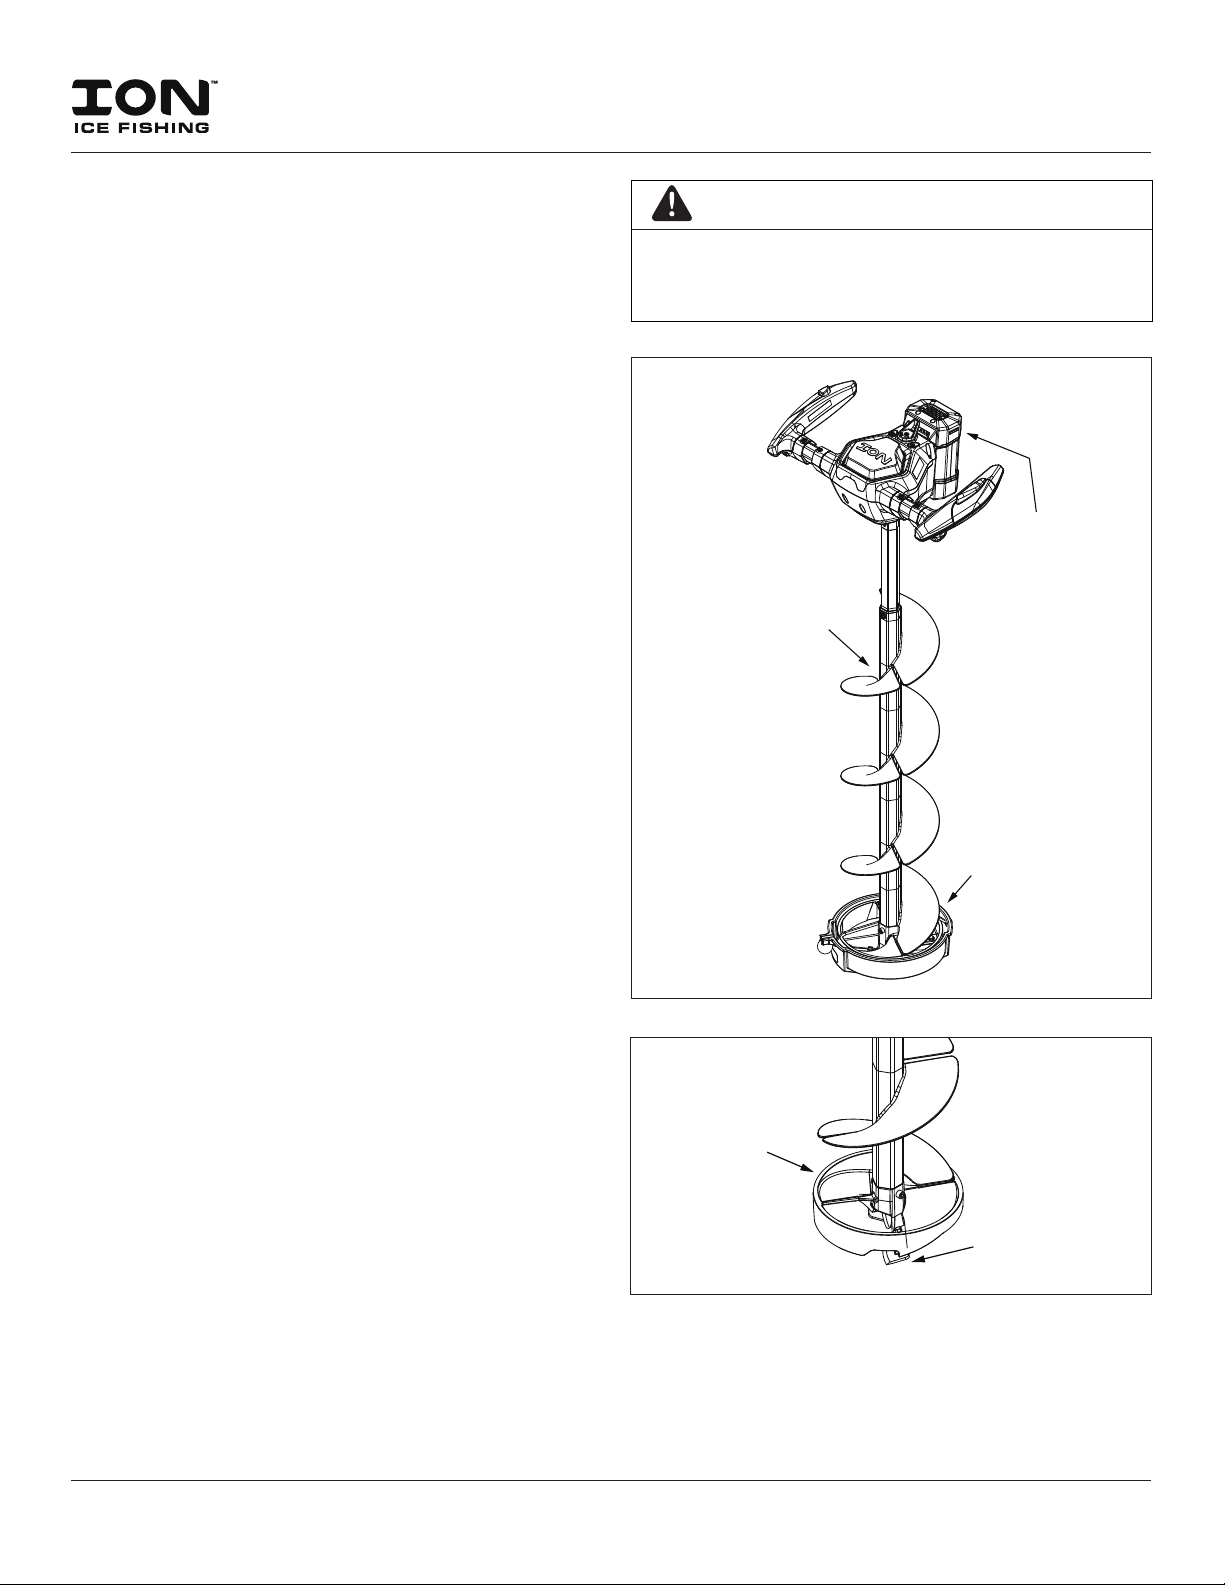
UNPACKING AND ASSEMBLY
INDICATOR
LIGHT
120
VOLT
OUTLET
LITHIUM
BATTERY
BATTERY
LOCK
LEVER
To Assemble the Auger to the Powerhead
1. Use the hex wrench included in the parts bag to remove
the bolt from the stem of the auger.
2. Insert the output shaft of the powerhead into the stem of
the auger and align the hole in the stem with the hole in
the output shaft. SEE FIGURE 1
3. Replace the bolt in the stem of the auger and tighten with
the included hex wrench.
NOTE: There may still be some slop in the
connection between the output shaft and the auger.
This is normal.
Optional:
Apply a small amount of oil or grease to the output
shaft before assembly to aid in disassembly at a later date.
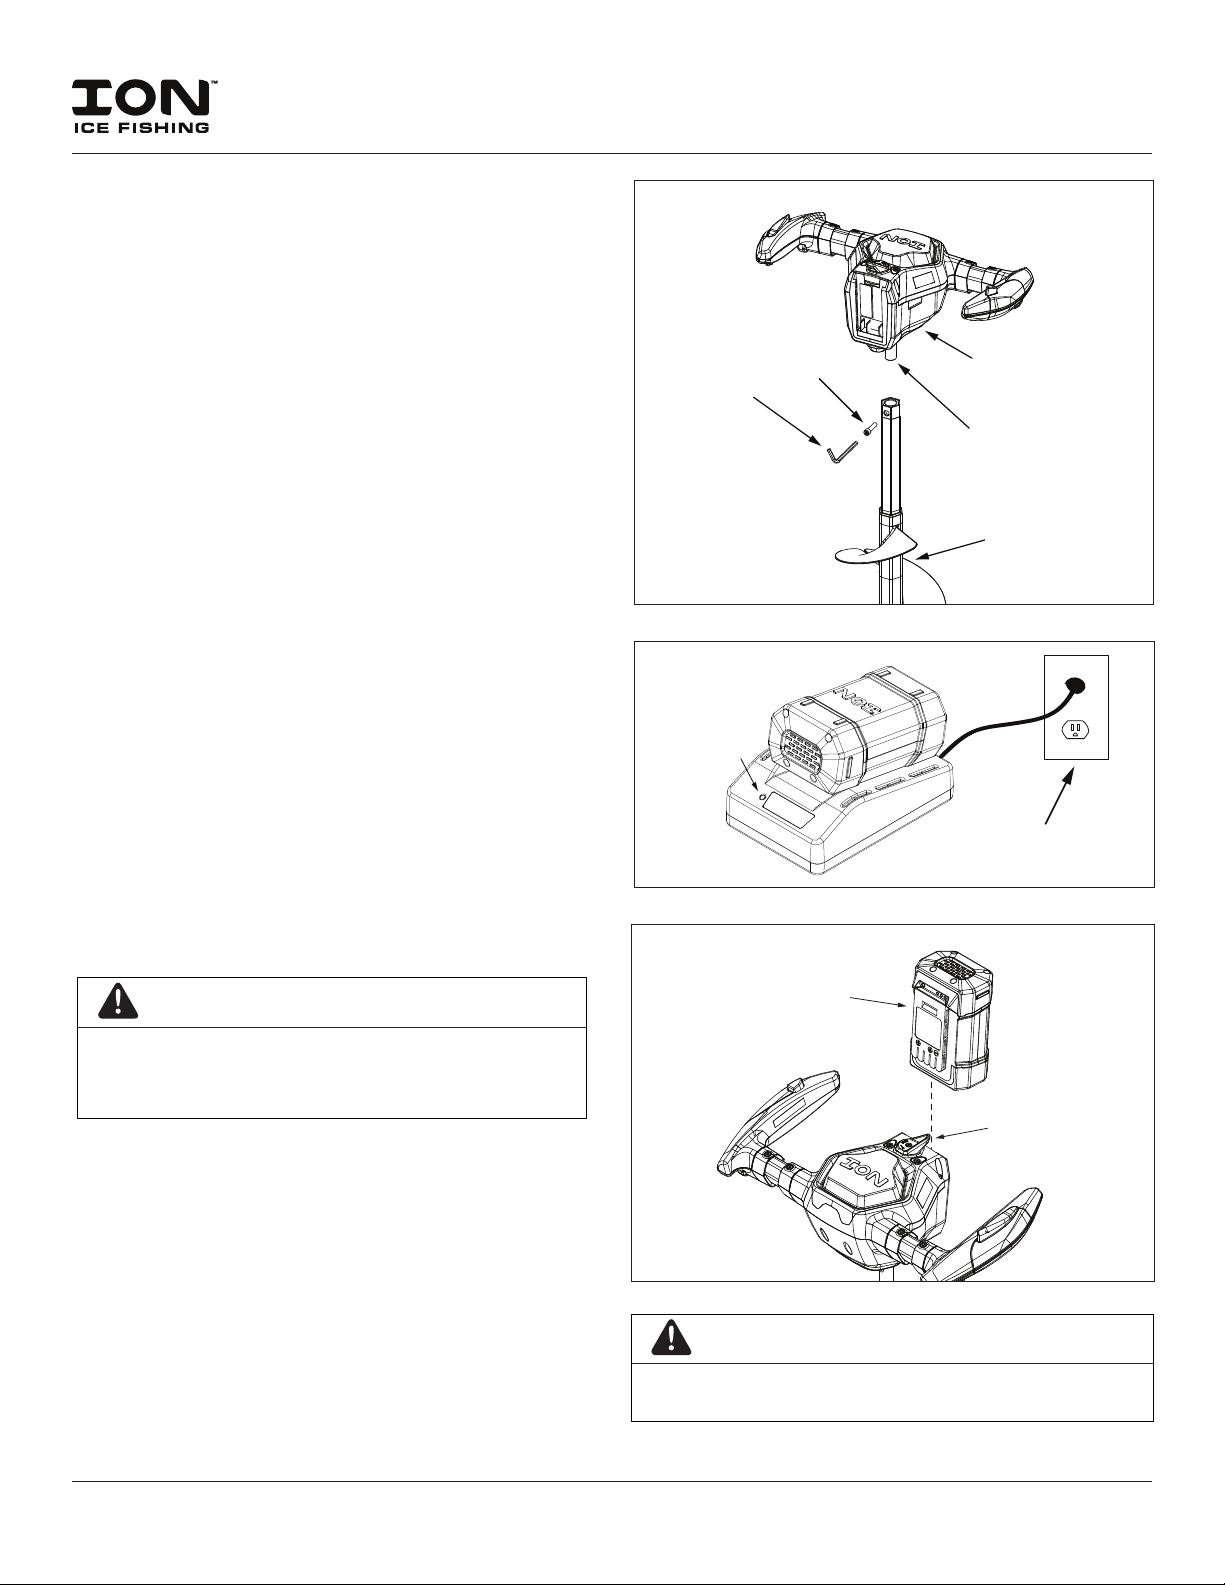
To Charge the Battery for First Use
1. Connect the charger to a standard 120-volt outlet; a
red light should appear on the charger. Always connect
charger to standard 120-volt wall outlet before inserting
battery. SEE FIGURE 2
2. Charge the battery until the light on the charger turns
solid green.
FIGURE 1
HEX
WRENCH
BOLT
Operator's Manual
ION G2 Electric Ice Auger
POWERHEAD
DRIVESHAFT
AUGER
3. To disconnect the battery, remove the plug from the wall
outlet then disconnect the battery from charger.
NOTE: Do not leave the battery on the charger
after the charge is complete. Unplug the charger
from the wall and remove the battery.
IMPORTANT
DO NOT LEAVE BATTERY ON POWERHEAD
WHEN AUGER IS NOT IN USE. ALWAYS DETATCH
BATTERY WHEN NOT USING THE ICE AUGER.
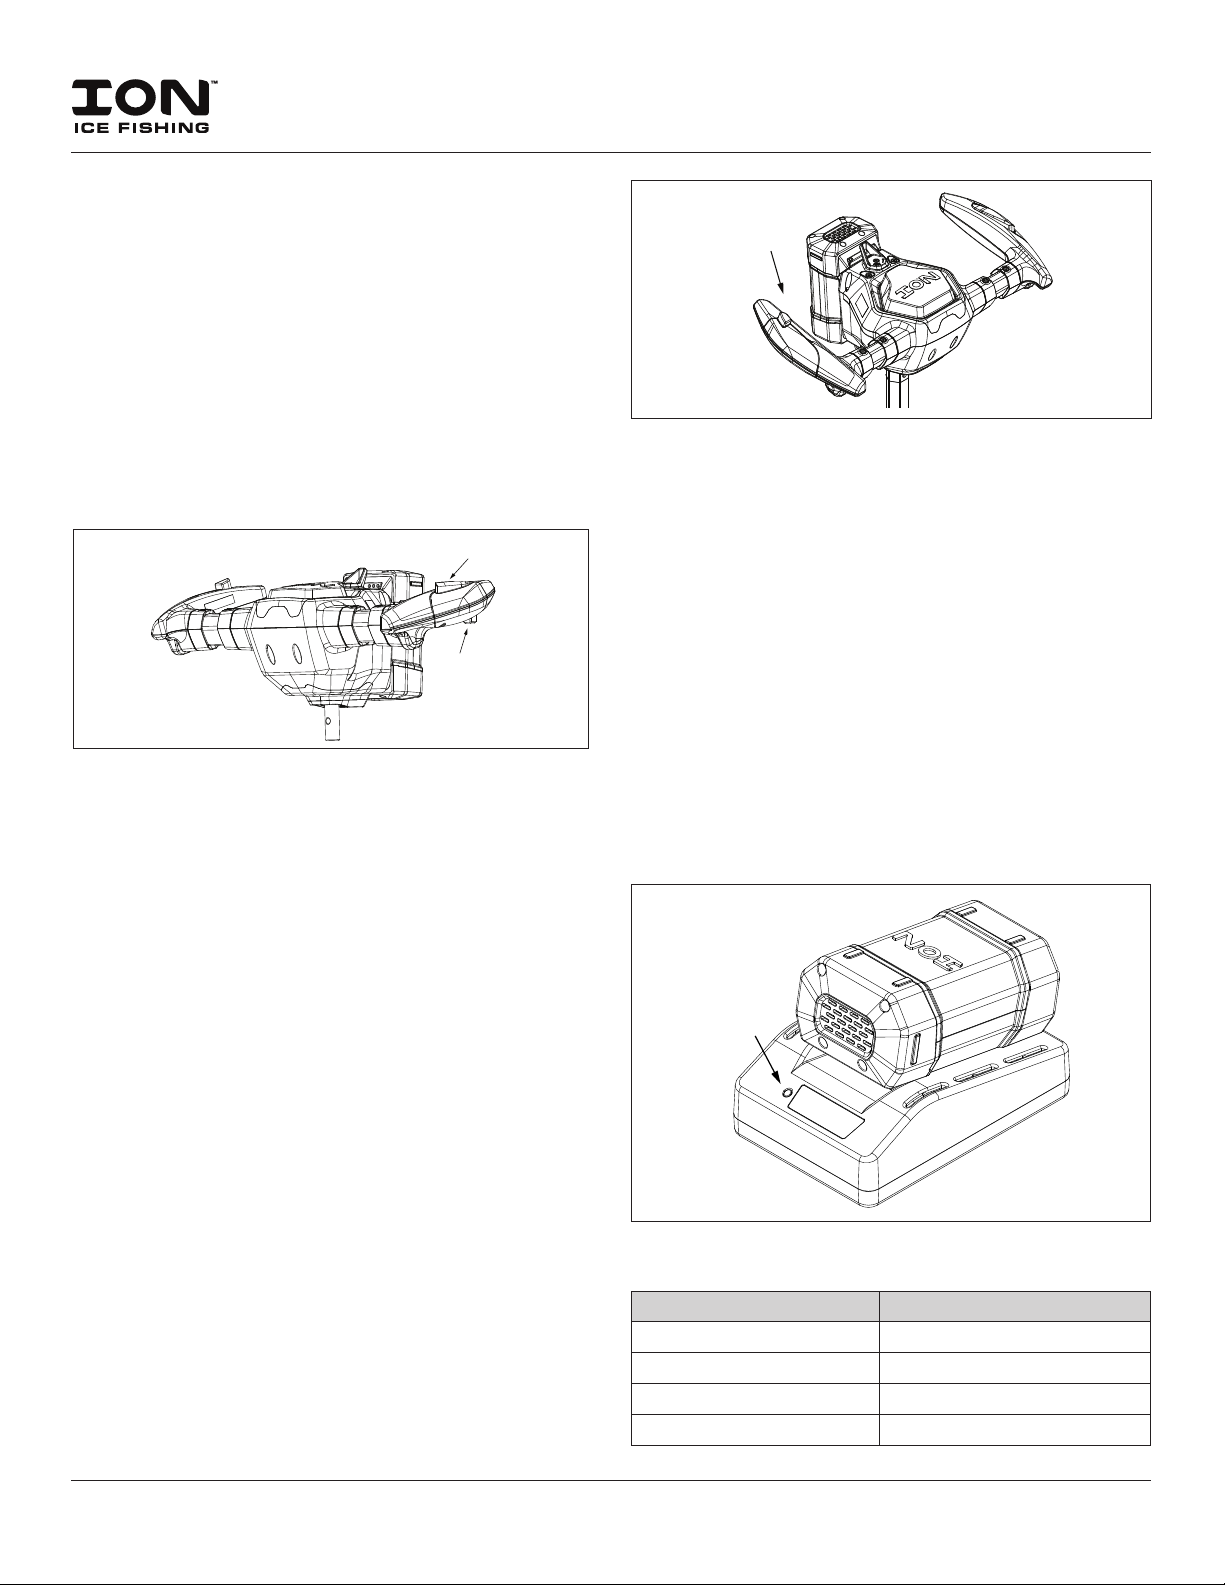
To Install the Battery
1. Turn the battery lock lever right, to the unlocked position.
2. Slide the battery onto the powerhead until it is fully seated.
3. Turn the battery lock lever left, to the locked position.
NOTE: The battery lock lever must be in the
unlocked position before the battery can be slid
onto the powerhead. SEE FIGURE 3
FIGURE 2
FIGURE 3
IMPORTANT
BATTERY MUST BE FULLY CHARGED BEFORE
FIRST USE.
Check for parts online at www.ioniceaugers.com or call 800-345-6007 M-F 8-5 CT
5
Page 6
OPERATING
TRIGGER
OPERATING
LOCK
LEVER
OPERATION
1. Make sure your footing is secure and that you have the
unit in the vertical position rmly in your hands.
2. Depress the operating lock lever, then squeeze the
operating trigger. Following a 1/2 second safety delay,
the auger will then start drilling. SEE FIGURE 4
3. To stop the auger, release the operating trigger.
4. When the auger is not in use, remove the battery.
NOTE: For best results on the ice, remove the
battery and put it in a warm place while you’re
shing.
FIGURE 4
Reverse Switch Operation
To use reverse operation function to ush hole of unwanted
debris do as follows: SEE FIGURE 5
1. To activate reverse function, depress the reverse switch
and then depress the operating lock and operating
trigger at the same time.
2. To stop auger release the operating trigger.
Operator's Manual
ION G2 Electric Ice Auger
REVERSE
SWITCH
FIGURE 5
BATTERY CHARGING AND MONITORING
1. Connect the included power cord into the charger.
Plug the other end into a 120V outlet.
2. Slide the battery into the charger, making sure
the battery pack is fully seated in the charger.
3. The charge indicator light should blink green.
SEE FIGURE 6.
4. When indicator light is lit solid green, the battery
is fully charged.
5. Once the battery has been fully charged, unplug
the charger from the wall.
6. Remove the battery from the charger.
NOTE: Recharging the battery after each use
is best for the life of the battery.
To Flush a hole, do as follows:
1. Place the auger half way down the hole with the auger
starting in the hole. The top of the auger ight must be
above the water and slush.
2. Activate reverse function and continue to lower the
auger into the hole. The lower ring of the auger must exit
the bottom of the hole.
3. After a few seconds of reverse operation, release the
operating trigger.
NOTE: KEEP POWERHEAD CLEAR OF WATER.
Water will come back up the hole and overow.
4. Repeat the above steps three times to clear the hole.
6
Check for parts online at www.ioniceaugers.com or call 800-345-6007 M-F 8-5 CT
INDICATOR
LIGHT
FIGURE 6
Charger Indicator Lights and Meaning
ACTION/COLOR MEANING
Flashing green Battery charging
Solid green Battery fully-charged
Flashing red Battery too hot / too cold
Solid red Power on
Page 7

Operator's Manual
ION G2 Electric Ice Auger
Battery Charge Indicator Light Codes
The battery status lights will turn on automatically when the
auger is in use. To check the battery state when the auger is
not in use, or while charging the battery, press the button
adjacent to the status lights. The lights will turn on for 5
seconds to show the battery charge/status. Battery status
codes listed below:
ACTION MEANING
3 solid lights 65-100% charge remaining
2 solid lights 30-65% charge remaining
1 solid light 5-30% charge remaining
1 ashing light < 5% charge remaining
2 ashing lights Battery internal fault.
Contact customer service
or replace battery.
3 ashing lights Battery outside of
operating temperature range
(too hot or too cold)
MAINTENANCE AND STORAGE
Read the maintenance schedule and observe these
recommendations to extend the life of your electric auger.
Good maintenance is essential for safe, economical, and
trouble-free operation. To help you properly care for your
powerhead, the following pages include a maintenance
schedule, routine inspection procedures, and simple
maintenance procedures using basic hand tools. Other
service tasks that are more difficult, or require special
tools, are best handled by professionals and are normally
performed by a technician or other qualified mechanic.
The maintenance schedule applies to normal operating
conditions. If you operate your powerhead under unusual
conditions, such as sustained high-load, or use in unusually
wet conditions, consult ION® customer service for
recommendations applicable to your individual needs and use.
Maintenance and Schedule
MAINTENANCE ITEM
Before each
day’s use
Check bolts and nuts X
Battery Charge X
Replace X
Sharpen/Replace Blades X
Every 500
complete
charges Yearly
Long-Term Storage
If your ice auger will not be run for more than one month,
prepare it for long-term storage.
• For best results, store your battery with 2 or 3 indicated
lights of charge.
NOTE: You don’t need to completely charge your
battery prior to long-term storage.
NOTE: You don’t need to charge your battery
during long-term storage unless the charge drops
below 2 lights.
• Store battery in a cool dry place.
NOTE: Optimal storage temperature is 68° F.
• Avoid leaving the battery attached to the charger
or powerhead for a prolonged period of time.
IMPORTANT
CONNECT THE BATTERY TO THE CHARGER EVERY
THREE MONTHS TO ENSURE THAT IT MAINTAINS
A FULL CHARGE DURING EXTENDED STORAGE.
Transporting Your Ice Auger
• Remove the battery if transporting the auger.
SERVICE AND REPAIR
Service Information
At Ardisam, we build quality and durability into the design
of our products; but no amount of careful design by us, and
careful maintenance by you, can guarantee a repair-free life
for your auger. Most repairs will be minor, and easily xed by
following the suggestions in the troubleshooting guide in
this section.
The guide will help you pinpoint the causes of common
problems and identify remedies.
For more complicated repairs, contact ION customer service.
A parts catalog is included with the product separately.
We will always be glad to answer any questions you have, or
help you nd suitable assistance. To order parts or inquire
about warranty, call or write us at the address found below.
Ordering Repair Parts
Parts may be obtained from the store where your auger was
purchased or direct from the factory. To order from the factory,
call, e-mail, or order online at www.ioniceaugers.com:
ION® Ice Augers,
A Division of Ardisam, Inc.
1-800-345-6007
E-mail: info@ioniceaugers.com
Please include the part numbers, part description,
quantity, model number and serial number.
Check for parts online at www.ioniceaugers.com or call 800-345-6007 M-F 8-5 CT
7
Page 8

ION G2 Electric Ice Auger
ION TROUBLESHOOTING GUIDE
NO. PROBLEM POSSIBLE CAUSE REMEDY/ACTION
1 Battery Charger LED does not indicate activity when the charger
and battery are plugged in.
2 Battery Charger LED blinks RED or GREEN or is solid GREEN when
the battery is not attached to it.
3 Drilling lights come on, powerhead starts, then stops while
cutting ice; will start again ONLY if switch is activated. (Battery
indicates (1) LED)
4 Battery LED’s do not illuminate. Battery is dead or defective. Charge or replace the battery.
5 Drilling lights do NOT come on, powerhead will NOT start, and the
Battery LEDs do NOT illuminate.
6 Battery charger indicates that the charging battery is “too hot”
or “too cold” (ashing red LED) when the battery is at room
temperature.
7 Drilling lights come on, powerhead will not turn, all (3) battery
LEDs indicate a full charge. Unit WILL run with a dierent battery.
8 Drilling lights come on, powerhead runs smoothly with no load
on it, and turns normally with full power until it stops cutting
ice. Hole count is signicantly reduced from normal operation.
(Battery indicates (2) or (3) LEDs)
9 Drilling lights come on, powerhead will not turn, all (3) battery
LEDs indicate a full charge.
10 Drilling lights do not come on, but powerhead functions normally. LED system has failed or Controller is
11 Drilling lights stay ON all of the time; must remove battery to turn
them o.
12 Drilling lights come on, powerhead makes a “clicking noise” from
the top of the motor cover, and will not turn. Battery LEDs indicate
a full charge. (“ON” switch has been held down for more than 5
seconds, battery core temperature is not frozen). WITH BATTERY
DISCONNECTED, transmission CANNOT be turned over by hand in
either direction without stopping.
13 Hole count has drastically and quickly reduced. Hole count cannot
be increased by switching batteries or even powerheads. (The
blades are new)
14 Auger jumps on the ice and will not cut. Blades are dull or damaged or
15 Auger spins at normal speed, but cuts slowly through the ice. Blades are dull or damaged or
16 Powerhead functions normally, but hole count is drastically
reduced. Battery indicates a full charge. Drilling suddenly requires
downward force to be applied to the handlebars in order to cut
the ice.
17 Powerhead with Reverse, only runs in forward. Reverse switch is faulty (open circuit)
18 Powerhead with Reverse, only runs in reverse. Reverse switch is faulty (closed
Battery charger is defective. Replace battery charger.
Battery charger is defective. Replace battery charger.
Battery is low on power. Charge the battery.
Battery is dead or defective. Charge or replace the battery.
Battery temperature sensor
malfunction.
Battery temperature sensor
malfunction.
Battery will charge normally, and
measures for good voltage, but has
no capacity.
Power switch is not depressed
completely.
not sending power to the LED system.
LED board has failed. Install LED Light Kit or replace Controller.
ION Motor is trying to turn, but
cannot due to transmission problems.
Auger bit is damaged or bent. Replace damaged components.
re-sharpened incorrectly.
re-sharpened incorrectly.
Blades are dull or damaged or
re-sharpened incorrectly.
or has become unplugged inside
the handlebar control, or Controller
is faulty.
circuit) or wiring has become loose
on switch and is touching each
other, or Controller is faulty.
Replace battery.
Replace battery.
Replace battery.
Hold the switch for ve seconds.
Install LED Light Kit or replace Controller.
Replace Motor/Transmission assembly.
Replace with new blades.
Replace with new blades.
Replace with new blades.
Remove handlebar control, replace
Reverse switch or re-connect wiring.
(If switch and wiring is correct, replace
Controller).
Remove handlebar control, replace
Reverse switch or re-connect wiring.
(If switch and wiring is correct, replace
Controller).
Operator's Manual
If above remedies fail, contact ION Customer Service at 800-345-6007 or info@ioniceaugers.com
to locate an authorized Service Center near you.
8
Check for parts online at www.ioniceaugers.com or call 800-345-6007 M-F 8-5 CT
Page 9

Operator's Manual
ION G2 Electric Ice Auger
ION® ELECTRIC ICE AUGER
Warranty Terms and Conditions
PRODUCT WARRANTY: 3YEAR LIMITED WARRANTY*
Ardisam, Inc., warrants this ION Electric Ice Auger under a three-year limited warranty to be free from defects in materials or workmanship or both
for a period not exceeding thirty-six consecutive months from the date of original purchase by the rst retail consumer or commercial end user.
“Consumer use” means personal recreational use by a retail consumer. “Commercial use” or “commercial application” means all other uses, including
use for commercial, income producing or rental purposes. Once a product has experienced commercial use, it shall thereafter be considered as a
commercial use product for purposes of this warranty. This warranty applies to the original owner that provides a proof of purchase. The warranty
is not transferable. The warranty period begins on the date of purchase by the rst retail consumer or commercial end user, and continues for the
thirty-six month consecutive period thereafter. Any unit used in a commercial application is covered for a period of 90 days after purchase. For the
warranty to be valid, the product must be registered online at www.ioniceaugers.com, or the warranty card must be lled out and received by
Ardisam, Inc., within 30 days of purchase. Ardisam, Inc. shall not be obligated to ship any repair or replacement product to any location outside of
the United States of America or Canada.
BATTERY WARRANTY: 3YEAR LIMITED WARRANTY*
Ardisam, Inc., warrants this ION battery under a three-year limited warranty to be free from defects in materials or workmanship or both for
a period not exceeding thirty-six consecutive months from the date of original purchase by the rst retail consumer or commercial end user.
“Consumer use” means personal recreational use by a retail consumer. “Commercial use” or “commercial application” means all other uses, including
use for commercial, income producing or rental purposes. Once a product has experienced commercial use, it shall thereafter be considered as a
commercial product for purposes of this warranty. This warranty applies to the original owner that provides a proof of purchase. The warranty is
not transferable. The warranty period begins on the date of purchase by the rst retail consumer or commercial end user, and continues for the
thirty-six month consecutive period thereafter. Any unit used in a commercial application is covered for a period of 90 days after purchase. For the
warranty to be valid, the product must be registered online at www.ioniceaugers.com, or the warranty card must be lled out and received by
Ardisam, Inc., within 30 days of purchase. Ardisam, Inc. shall not be obligated to ship any repair or replacement product to any location outside of
the United States of America or Canada.
*This warranty applies only to products which have not been subjected to negligent use, misuse, uses other than those indicated in
the product’s owner’s manual, alteration, accident, use of unauthorized parts, failure to perform periodic maintenance as specied in
product’s owner’s manual, normal wear and tear, use of unauthorized parts or repairs performed at non-authorized service centers.
There is no other expressed warranty. Implied warranties, including those of merchantability and tness for a particular purpose, are
limited to one year from purchase, or to the extent permitted by law. All other implied warranties are excluded. Liability for incidental or
consequential damages are excluded to the extent exclusion is permitted by law. Ardisam, Inc. does not assume, and does not authorize
any other person to assume for us, any liability in connection with the sale of our products. To obtain warranty service, you must
have prior approval by calling our customer service department at 1-800-345-6007. If you choose to ship your product to Ardisam
for warranty repair, you must rst have prior approval from Ardisam by calling our customer service department for a return material
authorization number (RMA#). Under these circumstances, all items must be shipped prepaid. Ardisam will at no charge, repair or
replace, at their discretion, any defective part which satises all conditions stated above. Ardisam retains the right to change models,
specications and price without notice. Ardisam, Inc. shall not be obligated to ship any repair or replacement product to any location
outside of the United States of America or Canada.
Check for parts online at www.ioniceaugers.com or call 800-345-6007 M-F 8-5 CT
9
Page 10

ION™ ICE FISHING
A Division of Ardisam, Inc.
1160 8th Avenue, PO Box 666, Cumberland, WI 54829
P. 800-345-6007 | F. 715-822-2223 | E-mail: info@ioniceaugers.com
Check for parts online at www.ioniceaugers.com or call 800-345-6007 M-F 8-5 CST
Page 11

GAS/OIL
RATIO
50:1
Manuel de l’opérateur
Traduction des instructions
originales d’utilisation
ION G2
TARIÈRES À GLACE
ÉLECTRIQUE
Pièces détachées en ligne à
www.ioniceaugers.com
ION G2
TARIÈRES À GLACE ÉLECTRIQUE
34670
ECN #12383
REV1 07/12/2019
©COPYRIGHT 2019 ARDISAM, INC.
TOUS DROITS RÉSERVÉS.
Page 12

Manuel de l’opérateur
EMPLACEMENT
DU NUMÉRO
DE SÉRIE
ION G2 Tarières à glace électrique
INTRODUCTION
Merci d’avoir acheté une tarière à glace électrique haute performance ION® d’Ardisam, Inc. Nous nous sommes attachés à ce que
cette tarière à glace réponde aux plus hautes normes d’utilisation et de durabilité. Moyennant des soins corrects, elle orira de
nombreuses années de service. Conservez ces instructions pour toute consultation ultérieure. Ardisam, Inc se réserve le droit de
changer ou modier ce manuel sans préavis.
SOMMAIRE
Introduction / Enregistrement et service après-vente ..................................................................................................................................................12
Mesures de précaution importantes ............................................................................................................................................................................ 13-14
Déballage et Assemblage .......................................................................................................................................................................................................15
Utilisation ......................................................................................................................................................................................................................................16
Chargement et surveillance de la batterie ................................................................................................................................................................. 16-17
Entretien et entreposage .........................................................................................................................................................................................................17
Service Aprés-vente et Réparations .....................................................................................................................................................................................17
Dépannage ...................................................................................................................................................................................................................................18
Garantie ...................................................................................................................................................................................................................................................................19
ENREGISTREMENT ET
SERVICE APRÈSVENTE
Consigner le numéro de modèle et le numéro
de série du produit dans l’espace prévu pour
y accéder facilement lors des commandes de
pièces détachées ou demandes d’assistance
technique. L’enregistrement de la garantie
peut se faire en ligne à www.ioniceaugers.com
ou par courrier à: ION®, 1160 Eighth Avenue,
Cumberland, WI 54829, États-Unis. Service
après-vente au (800) 345-6007 du lundi au
vendredi de 8h00 à 17h00 HNC.
RENSEIGNEMENTS SUR LE PROPRIÉTAIRE
Lieu d’achat:
Adresse du lieu d’achat:
Ville: État/Province: Code Postal:
Numéro de modèle: Numèro de série: (Trouve à côté de l’étiquette
d’avertissement)
Date d’achat:
Notes:
Le présent manuel peut contenir des informations concernant plusieurs modèles. Lire ce manuel et le conserver pour toute
consultation ultérieure. Ce manuel contient des renseignements importants sur la SÉCURITÉ, l’ASSEMBLAGE, l’UTILISATION
et l’ENTRETIEN. Le propriétaire doit veiller à ce que toute la documentation pertinente accompagne le produit. Cette
documentation comprend le MANUEL, la NOMENCLATURE DES PIÈCES et les GARANTIES. Le présent manuel doit rester
avec la machine, notamment si elle est revendue.
Voir les pièces en ligne au www.ioniceaugers.com ou appeler le 800-345-600712
Page 13

AVERTISSEMENTS ET MESURES DE
PRÉCAUTION
Responsabilité De L’utilisateur
L’utilisation correcte, sûre et ecace de ce produit relève de la
responsabilité du propriétaire.
• Lire et suivre toutes les instructions de sécurité.
• Entretenir cette machine conformément aux
instructions et au calendrier gurant dans le présent
manuel de l’utilisateur.
• S’assurer que quiconque utilise la machine connaît
et comprend toutes les commandes et mesures de
précaution.
• Ne pas éliminer la batterie avec les ordures
ménagères. Éliminer la batterie conformément aux
réglementations locales, provinciales, fédérales,
ou nationales en vigueur.
Messages De Sécurité
Ce manuel contient des messages spéciaux attirant l’attention
sur des problèmes potentiels de sécurité, ainsi que des
informations utiles sur le fonctionnement et l’entretien. Veiller
à lire toutes ces informations avec attention pour éviter les
blessures et les dommages à la machine.
REMARQUE : Des information générales sont fournies à
travers ce manuel pouvant aider l’opérateur dans
l’utilisation ou l’entretien du produit.
CE symbole signale des instructions de sécurité
importantes qui doivent être respectées pour ne
pas mettre en danger la sécurité des personnes.
AVANT DE FAIRE FONCTIONNER LE MOTEUR :
Veiller à lire cette section avec attention. Lire l’ensemble
des instructions d’utilisation et d’entretien. Pour écarter
les risques de blessure ou de mort, veiller à respecter
les instructions. Utiliser la machine conformément aux
instructions de sécurité fournies ici et tout au long du manuel.
Quiconque utilise cette machine doit lire les instructions et
être familiarisé avec les commandes.
Manuel de l’opérateur
ION G2 Tarières à glace électrique
AVERTISSEMENT
INDIQUE UN DANGER QUI, S’IL N’EST PAS ÉVITÉ,
PEUT PROVOQUER LA MORT OU DES BLESSURES
CORPORELLES ET/OU DÉGÂTS MATÉRIELS GRAVES.
ATTENTION
INDIQUE UN RISQUE DE BLESSURES OU DE
DOMMAGES AU MATÉRIEL SI LES INSTRUCTIONS DE
SÉCURITÉ QUI SUIVENT CE MOTINDICATEUR NE SONT
PAS RESPECTÉES.
IMPORTANT
SIGNALE DES INFORMATIONS UTILES CONCERNANT
L’ASSEMBLAGE, L’UTILISATION OU L’ENTRETIEN DU
MATÉRIEL.
AVERTISSEMENT
VEILLER À LIRE ET COMPRENDRE L’ENSEMBLE DES
INSTRUCTIONS D’UTILISATION ET D’ENTRETIEN
DE CETTE MACHINE, EN PLUS DE TOUTES LES
INSTRUCTIONS DE SÉCURITÉ. LE NONRESPECT DE
CES INSTRUCTIONS PEUT ENTRAÎNER UNE PERTE DE
CONTRÔLE DE LA MACHINE, DES BLESSURES GRAVES
OU LA MORT DE L’OPÉRATEUR ET/OU D’AUTRES
PERSONNES PRÉSENTES ET DES DOMMAGES
MATÉRIELS. UTILISER LA MACHINE CONFORMÉMENT
AUX INSTRUCTIONS DE SÉCURITÉ FOURNIES ICI ET
TOUT AU LONG DU MANUEL. QUICONQUE UTILISE
CETTE MACHINE DOIT LIRE LES INSTRUCTIONS ET
ÊTRE FAMILIARISÉ AVEC LES COMMANDES.
Voir les pièces en ligne au www.ioniceaugers.com ou appeler le 800-345-6007
13
Page 14

AVERTISSEMENTS ET MESURES DE PRÉCAUTION
• Les couteaux à glace sont très tranchants. Faire preuve
de beaucoup de précaution pour forer la glace ou
changer les couteaux. Mettre le protège-lame en
place après chaque utilisation.
• Toujours tenir les mains, pieds, cheveux, lacets de
serrage, écharpes, bonnets et vêtements amples à
l’écart de toute pièce en mouvement de la machine.
• Ne pas laisser d’enfant utiliser cette machine. Ne pas
laisser d’adulte utiliser cette machine sans instruction
appropriée.
• Ne pas utiliser de machine à moteur alors qu’on est
sous l’emprise d’alcool ou de drogue.
• Maintenir tous les boulons, vis et écrous bien serrés.
• La batterie doit être retirée avant toute réparation.
• Si la machine se coince dans un forage, retirer la
batterie avant de tenter de la sortir manuellement.
• NE PAS utiliser ce produit à des ns autres que celles
prévues.
• NE PAS utiliser d’accessoires autres que ceux proposés
par ION®.
• NE PAS modier ce produit d’une quelconque façon;
cela est dangereux et a pour eet d’annuler la
garantie.
• NE PAS continuer à utiliser ce produit en cas de
défaillance mécanique.
• Ce produit développe un couple considérable qui
est ressenti par l’utilisateur. Veiller à avoir les pieds
solidement ancrés et à tenir fermement les poignées
durant l’utilisation de la tarière.
• Durant l’utilisation, il est possible que la machine cale.
Si cela se produit, relâcher la gâchette de commande.
Repositionner les pieds et serrer fermement les
poignées. Enfoncer ensuite la gâchette et soulever
délicatement la machine.
• Durant le forage de la glace, ne pas pousser la
machine vers le bas. Si la tarière commence à forer
plus lentement, il peut être nécessaire d’aûter ou de
changer les couteaux.
• Ne pas éliminer la batterie avec les ordures
ménagères. Éliminer la batterie conformément aux
réglementations locales, provinciales, fédérales ou
nationales en vigueur.
Manuel de l’opérateur
ION G2 Tarières à glace électrique
IMPORTANT
LE CHARGEUR EST CONDITIONNÉ SÉPARÉMENT DANS
LE CARTON DE LA TARIÈRE. LA BATTERIE DOIT ÊTRE
COMPLÈTEMENT CHARGÉE AVANT LA PREMIÈRE
UTILISATION.
BATTERIE
AU LITHIUM
VIS SANS
FIN TARIÉRE
PROTÈGE-LAME
ANNEAU
DE TARIÈRE
ATTENTION:
ARÊTES COUPANTES
Voir les pièces en ligne au www.ioniceaugers.com ou appeler le 800-345-600714
Page 15

DÉBALLAGE ET ASSEMBLAGE
VOYANT
INDICATEUR
120
VOLT
OUTLET
BATTERIE
AU LITHIUM
LEVIER DE
VERROUILLAGE
DE LA BATTERIE
Pour monter la tarière sur le bloc moteur :
1. Utilisez la clé hexagonale incluse dans le sac de pièces
pour retirer le boulon de la tige de la vis sans n.
2. Insérez l’arbre de sortie de la tête motrice dans la tige de
la vis et alignez le trou de la tige avec celui de l’arbre de
sortie. VOIR ILLUSTRATION 1
3. Replacez le boulon dans la tige de la tarière et serrez à
l’aide de la clé hexagonale fournie.
REMARQUE: Il se peut que la connexion entre l’arbre
de sortie et la tarière reste légèrement desserrée.
C’est normal.
Optionnel:
Appliquez une petite quantité d’huile ou de graisse
sur l’arbre de sortie avant le montage pour faciliter le
démontage ultérieur.
Pour Charger La Batterie Avant La Première Utilisation
1. Connectez le chargeur à une prise standard de 120 volts;
une lumière rouge devrait apparaître sur le chargeur.
Toujours brancher le chargeur sur une prise murale
standard de 120 volts avant d’insérer la batterie.
VOIR ILLUSTRATION 2
2. Charger la batterie jusqu’à ce que le voyant vert du
chargeur soit allumé en continu.
3. Pour débrancher la batterie, débrancher la che de la
prise murale puis retirer la batterie du chargeur.
REMARQUE : Ne pas laisser la batterie sur le
chargeur une fois que la charge est terminée.
Débrancher le chargeur de la prise murale et
retirer la batterie.
CLÉ
ALLEN
ILLUSTRATION 1
ILLUSTRATION 2
Manuel de l’opérateur
ION G2 Tarières à glace électrique
BOULON
BLOC MOTEUR
ARBRE
D’ENTRAÎNEMENT
TARIÈRE
IMPORTANT
NE PAS LAISSER LA BATTERIE SUR LE BLOC MOTEUR
LORSQUE LA TARIÈREN’EST PAS UTILISÉE. TOUJOURS
DÉTACHER LA BATTERIE LORSQUE LA TARIÈRE À
GLACE EST INUTILISÉE
Pour Mettre En Place La Batterie
1. Tournez le levier de verrouillage de la batterie à droite, en
position déverrouillée.
2. Faites glisser la batterie sur la tête jusqu’à ce qu’elle soit
bien en place.
3. Tournez le levier de verrouillage de la batterie vers la
gauche, en position verrouillée.
REMARQUE: Le levier de verrouillage de la batterie doit
être en position déverrouillée avant de pouvoir insérer
la batterie sur le bloc moteur. VOIR ILLUSTRATION 3
Voir les pièces en ligne au www.ioniceaugers.com ou appeler le 800-345-6007
ILLUSTRATION 3
LA BATTERIE DOIT ÊTRE COMPLÈTEMENT CHARGÉE
AVANT LA PREMIÈRE UTILISATION.
IMPORTANT
15
Page 16

Manuel de l’opérateur
EXPLOITATION
DÉCLENCHEUR
EXPLOITATION
BLOCAGE
LEVIER
ION G2 Tarières à glace électrique
OPERATION
1. Assurez-vous que votre pied est bien en place et que
l’unité est en position verticale dans vos mains.
2. Appuyez sur le levier de verrouillage, puis appuyez sur la
gâchette. Après un délai de sécurité de 1/2 seconde, la
tarière commencera à forer. VOIR ILLUSTRATION 4
3. Pour arrêter la tarière, relâchez la gâchette.
4. Lorsque la tarière n’est pas utilisée, retirez la batterie.
REMARQUE: pour de meilleurs résultats sur la
glace, retirez la batterie et placez-la dans un
endroit chaud pendant que vous pêchez.
ILLUSTRATION 4
Fonctionnement Du Commutateur De Marche Arrière
Pour inverser la marche an de purger le forage de tous débris
indésirables: VOIR ILLUSTRATION 5
1. Pour activer la fonction de marche arrière, appuyer
sur le commutateur de marche arrière puis enfoncer
simultanément le levier de blocage et la gâchette de
commande.
2. Pour arrêter la tarière, relâcher la gâchette de commande.
Pour purger un forage:
1. Enfoncer la tarière à moitié dans le forage en démarrant
la tarière dans le forage. Le haut de la vis sans n
de tarière doit être au-dessus de l’eau et de la glace
fondante.
2. Activer la fonction de marche arrière et continuer
d’abaisser la tarière dans le forage. L’anneau inférieur de
la tarière doit ressortir du dessous de la glace.
3. Après quelques secondes de fonctionnement en marche
arrière, relâcher la gâchette de commande.
COMMUTATEUR
DE MARCHE
ARRIÈRE
ILLUSTRATION 5
CHARGE ET CONTRÔLE DE LA BATTERIE
1. Branchez le cordon d’alimentation inclus dans le chargeur.
Branchez l’autre extrémité dans une prise 120V.
2. Glisser la batterie dans le chargeur, en veillant à bien
l’engager à fond dans le chargeur.
3. Le voyant indicateur de charge doit clignoter en vert.
VOIR ILLUSTRATION 6.
4. Lorsque le voyant indicateur vert brille en continu, la
batterie est complètement chargée.
5. Une fois la batterie complètement chargée, débrancher le
chargeur de la prise murale.
6. Retirer la batterie du chargeur.
REMARQUE: Il est préférable de recharger la batterie
après chaque utilisation pour optimiser sa durée de
service.
VOYANT
INDICATEUR
ILLUSTRATION 6
REMARQUE: GARDER LE BLOC MOTEUR À L’ÉCART
DE L’EAU. L’eau remonte et déborde du forage.
4. Répéter les étapes ci-dessus trois fois pour dégager le
forage.
Voir les pièces en ligne au www.ioniceaugers.com ou appeler le 800-345-600716
Voyants indicateurs du chargeur et signication
ACTION/COULEUR SIGNIFICATION
Vert clignotant Batterie en cours de charge
Vert continu Batterie complètement chargée
Rouge clignotant Batterie trop chaude / froide
Rouge continu Le pouvoir est sur
Page 17

Manuel de l’opérateur
ION G2 Tarières à glace électrique
Codes de voyant de charge de la batterie
Les voyants d’état de la batterie s’allumeront automatiquement
lorsque la tarière sera utilisée. Pour vérifier l’état de la batterie
lorsque la tarière n’est pas utilisée ou pendant le chargement
de la batterie, appuyez sur le bouton situé près des voyants
d’état. Les voyants s’allument pendant 5 secondes pour
indiquer le statut / la charge de la batterie. Codes d’état de la
batterie répertoriés ci-dessous:
ACTION SIGNIFICATION
3 lumières solides 65-100% de charge restante
2 lumières solides 30-65% de charge restante
1 lumière solides 5-30% de charge restante
1 lumière clignotante <5% de charge restante
2 feux clignotants Défaut interne de la batterie.
Contactez le service clientèle ou
remplacez la batterie.
3 feux clignotants Batterie en dehors de la
plage de température de
fonctionnement (trop chaude
ou trop froide)
ENTRETIEN ET ENTREPOSAGE
Lire le calendrier d’entretien et respecter les délais préconisés
pour étendre la durée de service de la tarière électrique.
Un bon entretien est indispensable à un fonctionnement sûr,
économique et sans panne de la machine. Pour assurer des
soins corrects du bloc moteur, les pages suivantes comportent
un calendrier d’entretien, des instructions de contrôle courant
et des instructions d’entretien élémentaire au moyen d’outils à
mains de base.
Il est préférable de coner à des professionnels les tâches
d’entretien ou de réparation plus diciles ou nécessitant un
outillage spécial et qui sont normalement eectuées par un
technicien ou autre mécanicien qualié.
Le calendrier d’entretien s’applique à des conditions normales
d’utilisation. Si le bloc moteur est utilisé dans des conditions
inhabituelles, notamment sous une charge élevée soutenue
ou dans des conditions inhabituellement humides, obtenir des
conseils relatifs à ces besoins et emplois particuliers auprès du
service après-vente d’ION®.
Calendrier D’entretien
Entreposage À Long Terme
Si votre tarière à glace ne sera pas utilisée pendant plus d’un
mois, préparez-le pour le stockage à long terme.
• Pour de meilleurs résultats, rangez votre batterie avec 2 ou
3 voyants de charge indiqués.
REMARQUE: Il n’est pas nécessaire de charger complètement
votre batterie avant de la stocker à long terme.
REMARQUE: vous n’avez pas besoin de charger votre batterie
pendant un stockage à long terme à moins que la charge
tombe en dessous de 2 voyants.
• Rangez la batterie dans un endroit frais et sec.
REMARQUE: La température de stockage optimale
est de 21 ° C (68 ° F).
• Évitez de laisser la batterie attachée au chargeur ou à la
tête d’alimentation pendant une période prolongée.
IMPORTANT
PLACER LA BATTERIE DANS LE CHARGEUR TOUS LES
TROIS MOIS POUR LA MAINTENIR À PLEINE CHARGE
DURANT UN ENTREPOSAGE PROLONGÉ.
Transport De La Tarière À Glace
• Retirer la batterie avant de transporter la tarière.
SERVICE APRÈSVENTE ET RÉPARATION
informations sur le service aprÈs-vente
Chez Ardisam, nous intégrons la qualité et la durabilité dans la
conception de nos produits; mais toute la conception soignée et
tout l’entretien attentionné ne sauraient garantir une existence
de la tarière totalement exempte de réparation. La majorité
des problèmes sont mineurs et aisément résolus en suivant les
indications du guide de dépannage qui suit.
Ce guide aide à diagnostiquer les causes des problèmes les plus
courants et à identier leurs solutions.
Pour les réparations plus compliquées, s’adresser au service aprèsvente d’ION®. Pour commander des pièces ou vous renseigner
sur la garantie, appeler ou nous écrire à l’adresse indiquée dans le
panneau suivant.
Nous sommes toujours heureux de répondre à toute question ou
d’aider à trouver l’assistance qui convient. Pour commander des
pièces ou se renseigner sur la garantie, communiquer avec nous
par téléphone ou par courrier à l’adresse indiquée ci-dessous.
Avant chaque
OPÉRATION D’ENTRETIEN
Contrôler les boulons et écrous X
Batterie Charger X
Remplacer X
Aûter/changer les couteaux X
utilisation
quotidienne
Toutes les
500 charges
complètes
Chaque
année
COMMANDE DE PIÈCES DE RECHANGE
Les pièces peuvent s’obtenir directement auprès de
l’usine. Pour passer une commande, appeler, écrire
ou commander en ligne à www.ioniceaugers.com:
Veiller à inclure la référence, la description, la quantité,
le numéro de modèle et le numéro de série des pièces.
Voir les pièces en ligne au www.ioniceaugers.com ou appeler le 800-345-6007
ION® Ice Augers,
A Division of Ardisam, Inc.
1-800-345-6007
Courriel: info@ioniceaugers.com
17
Page 18

Manuel de l’opérateur
ION G2 Tarières à glace électrique
GUIDE DE DÉPANNAGE D’ION
NO. PROBLÈME CAUSE POSSIBLE SOLUTION / MESURE CORRECTIVE
1 Le voyant du chargeur de batterie n’indique aucune activité alors
que le chargeur et la batterie sont branchés.
2 Le voyant du chargeur de batterie clignote en ROUGE ou en VERT
ou est allumé en VERT continu alors que la batterie n’y est pas
raccordée.
3 Les lampes de forage s’allument, le bloc moteur démarre, puis
s’arrête durant le forage; redémarre UNIQUEMENT si la gâchette est
actionnée (un [1] voyant de batterie allumé)
4 Les voyants de batterie ne s’allument pas. Batterie complètement déchargée ou
5 Les lampes de forage ne s’allument PAS, le bloc moteur ne démarre
PAS et les voyants de la batterie ne s’allument PAS .
6 Chargeur de batterie indique que la batterie en charge est «trop
chaude» ou «trop froide» (voyant rouge clignotant) lorsque la
batterie est à la température ambiante.
7 Les lampes de forage s’allument, le bloc moteur ne tourne pas, les
trois (3) voyants de batterie indiquent la pleine charge. La machine
FONCTIONNE avec une batterie diérente.
8 Les lampes de forage s’allument, le bloc moteur tourne
régulièrement à vide et tourne normalement à pleine puissance
jusqu’à ce qu’il s’arrête durant le forage. Le nombre de forages est
nettement réduit par rapport au fonctionnement normal (deux [2]
ou trois [3] voyants de batterie allumés).
9 Les lampes de forage s’allument, le bloc moteur ne tourne pas, les
trois (3) voyants de batterie indiquent la pleine charge.
10 Les lampes de forage ne s’allument pas, mais le bloc moteur
fonctionne normalement.
11 Les lampes de forage restent toujours allumées, la batterie doit être
retirée pour les éteindre.
12 Les lampes de forage s’allument, un «cliquetis» est audible au
sommet du capot de moteur et le bloc moteur ne tourne pas. Les
voyants de batterie indiquent une pleine charge (la gâchette de
commande a été actionnée pendant plus de 5 secondes, le cœur
de la batterie n’est pas gelé). LA BATTERIE ÉTANT DÉBRANCHÉE, le
réducteur NE PEUT PAS être tourné à la main dans les deux sens sans
interruption.
13 Le nombre de forages s’est fortement et rapidement réduit. Le
nombre de forages ne peut pas être augmenté en changeant de
batterie ni même de bloc moteur (les couteaux son neufs).
14 Soubresauts de la tarière sur la glace et pas de forage. Couteaux émoussés, endommagés ou
15 La tarière tourne à vitesse normale mais fore lentement la glace. Couteaux émoussés, endommagés ou
16 Le bloc moteur fonctionne normalement mais le nombre de forages
est fortement réduit. La batterie indique une pleine charge. Le
forage nécessite soudain l’application d’une pression vers le bas sur
les poignées pour forer la glace.
17 Bloc moteur à marche arrière, fonctionne uniquement en marche
avant.
18 Bloc moteur à marche arrière, fonctionne uniquement en
marche arrière.
Chargeur de batterie défectueux. Changer le chargeur de batterie.
Chargeur de batterie défectueux. Changer le chargeur de batterie.
Charge de la batterie insusante. Charger la batterie.
défectueuse.
Batterie complètement déchargée ou
défectueuse.
Mauvais fonctionnement du capteur de
température de la batterie.
Mauvais fonctionnement du capteur de
température de la batterie.
La batterie se charge normalement et
indique une bonne tension, mais n’a
aucune capacité.
La gâchette de commande n’est pas
complètement enfoncée.
Le système de voyants est défaillant ou
le module de commande n’envoie pas
de courant au système de voyants.
Défaillance de la carte d’éclairage. Installer le nécessaire de voyants indicateurs ou
Le moteur ION essaie de tourner mais
sans y parvenir en raison de problèmes
de réducteur.
Outil endommagé ou faussé. Remplacez les composants endommagés.
mal aûtés.
mal aûtés.
Couteaux émoussés, endommagés ou
mal aûtés.
Commutateur de marche arrière
défectueux (en circuit ouvert)
ou débranché à l’intérieur de la
commande de poignée ou module de
commande défectueux.
Commutateur de marche arrière
défectueux (en circuit fermé) ou
câblage du commutateur desserré
et en court-circuit ou module de
commande défectueux.
Charger ou changer la batterie.
Charger ou changer la batterie.
Changer la batterie.
Changer la batterie.
Changer la batterie.
Tenir la gâchette enfoncée pendant cinq secondes.
Installer le nécessaire de voyants indicateurs ou
changer le module de commande.
changer le module de commande.
Changer l’ensemble moteur-réducteur.
Remplacer par des couteaux neufs.
Remplacer par des couteaux neufs.
Remplacer par des couteaux neufs.
Démonter la commande de poignée, changer ou
rebrancher le commutateur de marche arrière (si le
commutateur et le câblage son corrects, changer le
module de commande).
Démonter la commande de poignée, changer ou
rebrancher le commutateur de marche arrière (si le
commutateur et le câblage son corrects, changer le
module de commande).
Si les solutions ci-dessous échouent, s’adresser au service après-vente ION au 800-345-6007
ou info@ioniceaugers.com pour connaître le centre de réparation agréé le plus proche.
Voir les pièces en ligne au www.ioniceaugers.com ou appeler le 800-345-600718
Page 19

Manuel de l’opérateur
ION G2 Tarières à glace électrique
TARIÈRE À GLACE ÉLECTRIQUE ION®
MODALITÉS ET CONDITIONS DE LA GARANTIE
GARANTIE PRODUIT : GARANTIE LIMITÉE 3 ANS*
Ardisam, Inc., couvre cette tarière à glace électrique ION par une garantie limitée trois ans pièces et main-d’œuvre pendant
une durée maximale de trente-six mois consécutifs à compter de la date de l’achat initial par le premier acheteur au détail ou
utilisateur commercial. L’« usage grand public » fait référence à une utilisation personnelle à des ns récréatives par un acheteur
au détail. L’« usage commercial », ou « application commerciale », correspond à toutes les autres utilisations, notamment à des
ns commerciales, lucratives ou de location. Une fois que le produit a fait l’objet d’un usage commercial, il sera toujours considéré
par la suite comme étant un produit à usage commercial pour les besoins de la garantie. Cette garantie s’applique au propriétaire
initial muni d’une preuve d’achat. La garantie n’est pas cessible. La période de garantie débute à la date d’achat par le premier
acheteur au détail ou utilisateur commercial et s’étend sur la période de trente-six mois consécutifs qui suit. Tout article utilisé
dans le cadre d’une activité commerciale est couvert pendant une durée de 90 jours après l’achat. Pour que la garantie soit
valable, le produit doit être enregistré en ligne à www.ioniceaugers.com ou la carte de garantie doit être remplie et reçue par
Ardisam, Inc. dans les 30 jours après l’achat. Ardisam, Inc. n’est sous aucune obligation d’expédier un produit réparé ou échangé à
une quelconque adresse en dehors des États-Unis d’Amérique et du Canada.
GARANTIE SUR LA BATTERIE : GARANTIE LIMITÉE 3 ANS*
Ardisam, Inc., couvre cette batterie ION par une garantie limitée trois ans pièces et main-d’œuvre pendant une durée maximale
de trente-six mois consécutifs à compter de la date de l’achat initial par le premier acheteur au détail ou utilisateur commercial.
L’« usage grand public » fait référence à une utilisation personnelle à des ns récréatives par un acheteur au détail. L’« usage
commercial », ou « application commerciale », correspond à toutes les autres utilisations, notamment à des ns commerciales,
lucratives ou de location. Une fois que le produit a fait l’objet d’un usage commercial, il sera toujours considéré par la suite
comme étant un produit commercial pour les besoins de la garantie. Cette garantie s’applique au propriétaire initial muni d’une
preuve d’achat. La garantie n’est pas cessible. La période de garantie débute à la date d’achat par le premier acheteur au détail
ou utilisateur commercial et s’étend sur la période de trente-six mois consécutifs qui suit. Tout article utilisé dans le cadre d’une
activité commerciale est couvert pendant une durée de 90 jours après l’achat. Pour que la garantie soit valable, le produit doit être
enregistré en ligne à www.ioniceaugers.com ou la carte de garantie doit être remplie et reçue par Ardisam, Inc. dans les 30 jours
après l’achat. Ardisam, Inc. n’est sous aucune obligation d’expédier un produit réparé ou échangé à une quelconque adresse en
dehors des États-Unis d’Amérique et du Canada.
*La présente garantie s’applique exclusivement aux produits n’ayant pas fait l’objet de négligence, emploi détourné, utilisations autres
que celles indiquées dans le manuel de l’utilisateur du produit, modication, accident, utilisation de pièces non autorisées, manquement
à eectuer l’entretien régulier indiqué dans le manuel de l’utilisateur du produit, usure normale, utilisation de pièces non autorisées ou
réparations eectuées ailleurs que dans un centre de réparation agréé. Il n’existe aucune autre garantie expresse. Les garanties implicites,
y compris celles de qualité marchande et d’adaptation à un emploi particulier, sont limitées à un an à compter de la date d’achat ou dans
la mesure prévue par la loi. Toutes les autres garanties implicites sont exclues. La responsabilité de dommages indirects ou accessoires
est exclue dans la mesure où l’exclusion est autorisée par la loi. Ardisam, Inc. n’assume aucune responsabilité et n’autorise personne à
assumer en son nom une quelconque responsabilité en rapport avec la vente de ses produits. Pour recourir à la garantie, veiller à
obtenir un accord préalable en appelant notre service après-vente au 1-800-345-6007. Avant d’envoyer le produit à Ardisam, Inc.
pour une réparation sous garantie, l’accord préalable d’Ardisam doit être obtenu en appelant notre service après-vente pour recevoir un
numéro d’autorisation de renvoi de matériel (RMA#). Sous ces circonstances, tous les articles doivent être envoyés en port payé. Ardisam,
à son entière discrétion, réparera ou remplacera sans frais toute pièce défectueuse qui remplit toutes les conditions énoncées ci-dessus.
Ardisam se réserve le droit de modier les modèles, les caractéristiques et les prix sans préavis. Ardisam, Inc. n’est sous aucune obligation
d’expédier un produit réparé ou échangé à une quelconque adresse en dehors des États-Unis d’Amérique et du Canada.
Voir les pièces en ligne au www.ioniceaugers.com ou appeler le 800-345-6007
19
Page 20

ION™ ICE FISHING
Division d’Ardisam, Inc.
1160 8th Avenue, PO Box 666, Cumberland, WI 54829
800-345-6007 | Télécopieur 715-822-2223 | Courriel: info@ioniceaugers.com
Voir les pièces détachées en ligne à www.ioniceaugers.com ou composer le 800-345-6007 L-V 8h-17h HAC
 Loading...