

Page 1

FREESOUND
QUICKSTART GUIDE
ENGLISH ( 3 – 6 )
GUÍA DE INICIO RÁPIDO
ESPAÑOL ( 7 – 10 )
GUIDE D'UTILISATION RAPIDE
FRANÇAIS ( 11 – 14 )
GUIDA RAPIDA
ITALIANO ( 15 – 18 )
KURZANLEITUNG
DEUTSCH ( 19 – 22 )
SNELSTARTGIDS
NEDERLANDS ( 23 – 26 )
Page 2

Page 3
QUICKSTART GUIDE (ENGLISH)
BOX CONTENTS
Make sure that the items listed below are included in the box:
• FREESOUND
• Remote Control (includes button cell battery)
• Power Adapter
• Quickstart Guide
• Safety Instructions & Warranty Information Booklet
READ SAFETY INSTRUCTION BOOKLET BEFORE USING THE PRODUCT
THIS DEVICE COMPLIES WITH PART 15 OF THE FCC RULES. OPERATION IS SUBJECT TO THE FOLLOWING TWO CONDITIO NS:
(1) THIS DEVICE MAY NOT CAUSE HARMFUL INT ERFERENCE, AND (2) THIS DEVICE MUST ACCEPT AN Y INTERFERENCE
RECEIVED, INCLUDING INTERFERENCE THAT MAY CAUSE UNDESIRED OPERATION.
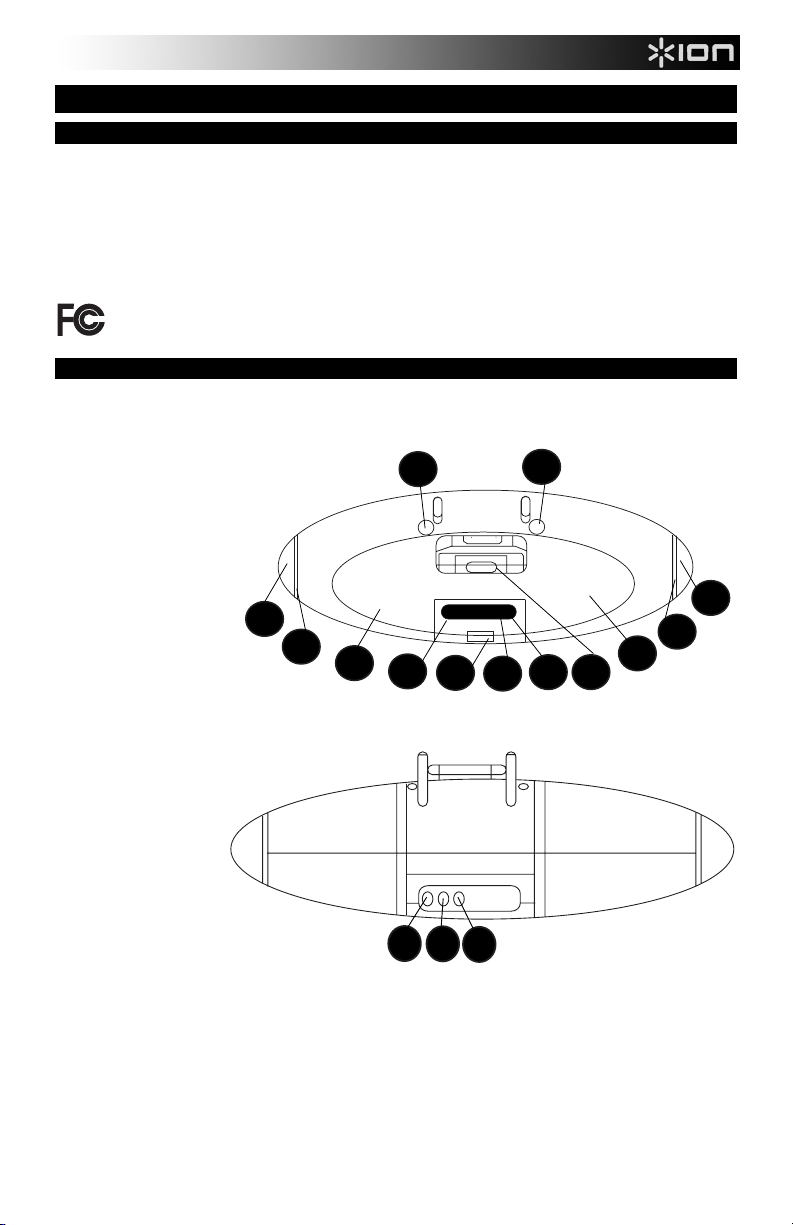
CONTROLS
DOCKING STATION:
Front Panel
1. Volume Rotary Knob
2. Speaker LED Indicator
3. Speaker
4. Speaker Detach Button
5. Skip - Button
6. Power On
Indicator/Remote sensor
7. Play/Pause Button
8. Skip + Button
9. iPhone*/iPod Connector
Rear Panel
10. 9V DC Jack
11. RCA Video out Jack
12. Aux-In Jack
1
2
3
5
4
6
7
4
1
2
3
8 9
10
11
12
* iPhone, iPod, iPod shuffle, and iPod touch are trademarks of Apple, Inc., registered in the U.S.A. and other
countries.
3
Page 4
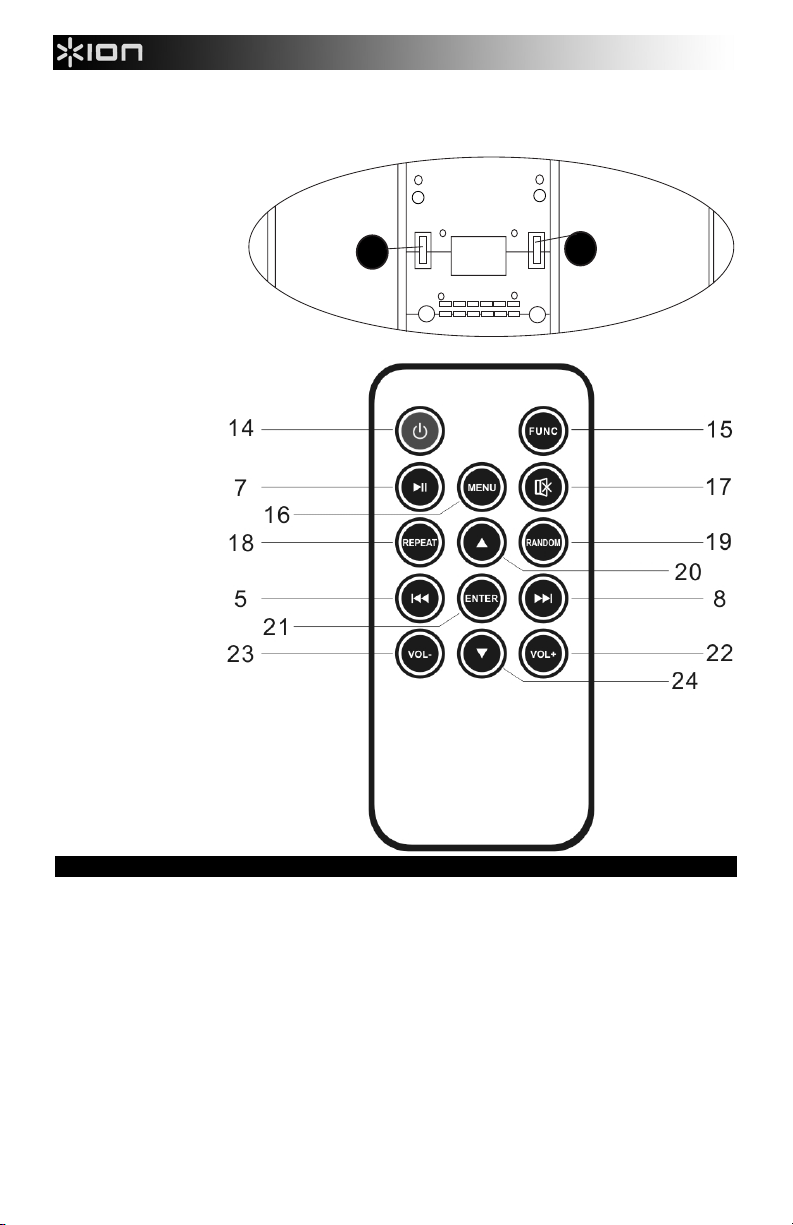
Bottom Panel
13. Lock/Unlock
13
13
Remote
Control
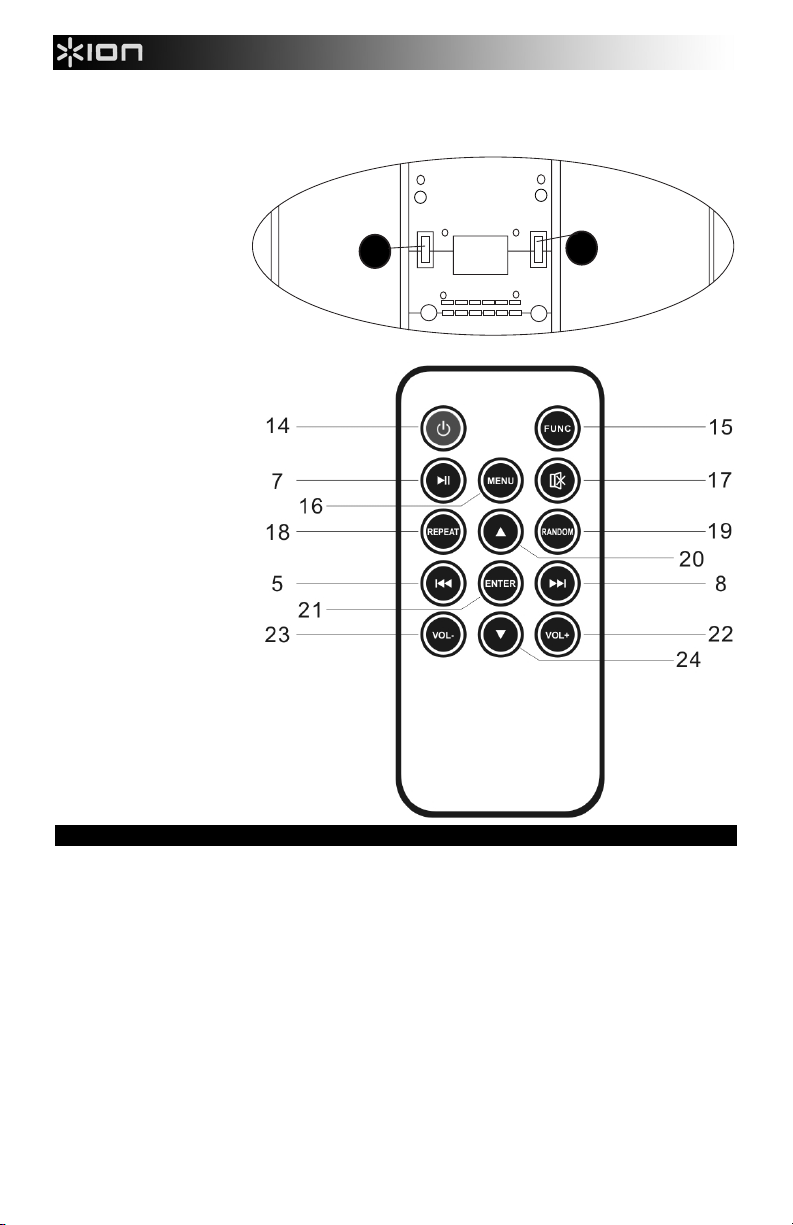
14. Power On/Standby
15. Function button
16. Menu button
17. Mute button
18. Repeat button
19. Random Track Button
20. UP button
21. Enter button
22. VOL + Button
23. VOL - Button
24. Down button
POWER SOURCES
1. Main Base
The main base is operated by AC power. Insert the AC adapter plug into the power jack at the rear side of the base.
2. Individual Speakers
Each speaker has 1 built-in rechargeable lithium battery for independent playback. Before using the speakers for the
first time, charge each speaker for 4 hours. When the speaker is placed on the powered base (with the Power switch
turned on), charging will start automatically. The charging LED indicator is red during charging and will turn blue when
charging is completed. The speaker can be separated from the unit by shifting the Lock knob to the side. Then press
the Open button to have the speaker separate from the unit.
3. Remote Control
To use the remote control, ensure the remote control battery CR2025 (included) is installed properly by taking the
clear insulation paper out. (Once you stop using the remote control, insert the insulation paper again to preserve the
battery life).
Note: Room lighting and battery life can affect the operating range of the remote control.
4
Page 5
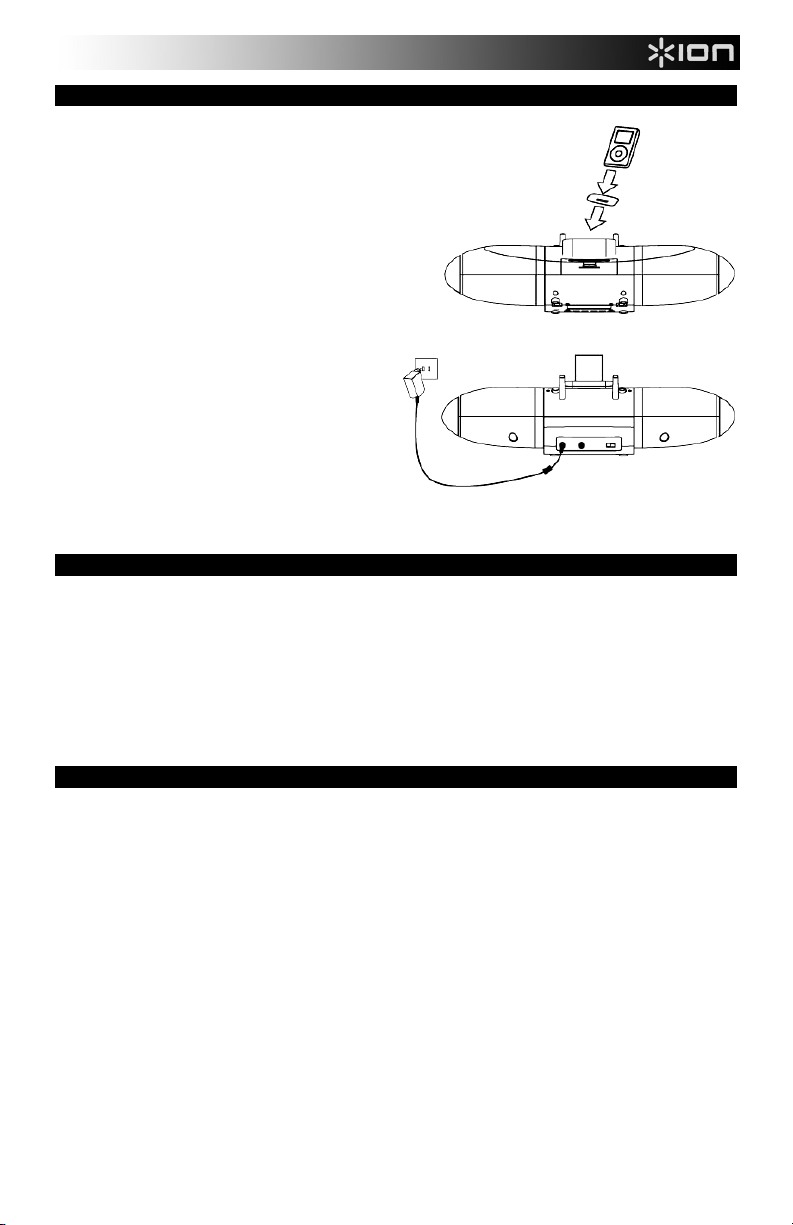
GENERAL OPERATION
1. Select a proper iPod docking adapter (enclosed with
the purchase of an iPod) and place it into the
FREESOUND base. Then dock your iPod gently.
2. Switch on the speakers and begin to play your
iPod. This needs to be done before step 3 in
order for the speakers to sync with the dock.
3. Plug the included power adapter plug into power jack
at the rear side of the FREESOUND base. The unit
should then automatically power on. Alternatively,
use the remote control to power on the unit.
4. Press “VOL +” or “VOL –” to choose a proper volume
level. Take the speakers from room to room to test
(Subject to its surroundings, the range is
approximately 100 feet in an open area without any
interference).
5. If using an iPod shuffle or another audio source with
a 3.5 mm headphone output, connect it to the AUX
line in jack on the rear of base. The transmitter LED
indicator will turn red when the Aux input is being
used. The LED indicator will turn red when an iPod is
docked and transmitting a signal.
Note: The AUX In will not work when an iPod is
docked.
CHARGING INDICATORS
• While the speaker is being charged and the volume rotary knob is not turned on, the speaker LED indicator will be
solid red. Once fully charged, the LED will turn solid blue.
• When the speaker is charging and the volume rotary knob is turned on, the speaker LED indicator will flash purple.
Once the unit has been fully charged, the LED will turn solid blue.
• When the speaker is separated from the FREESOUND dock and the volume rotary knob is being used, the LED
indicator will be solid blue. If the LED is blank, the volume rotary knob will not produce any output of sound,
indicating there is no more battery power.
• When connecting a device to the Aux-in, once the LED indicator turns red, the device can be used. When
connecting an iPod/iPhone to the FREESOUND, once the LED indicator turns blue, the iPod/iPhone can be used.
OUTPUTTING VIDEO FROM AN iPod/iPhone
1. Connect FREESOUND to a television or other video display that has a composite video input.
2. Securely dock your iPhone or iPod with video capability.
3. Connect one end of an RCA cable (not included) to the rear RCA video jack on the FREESOUND base.
4. Connect the other end of the RCA cable to the VIDEO IN of a television or video display.
5. Select a movie from your iPod/iPhone menu.
6. Make sure the iPod’s TV Out menu is set to "ON".
7. Switch back to the movie library and play the movie of your choice.
Note: Video will automatically output when using an iPod touch or iPhone.
5
Page 6

TROUBLESHOOTING
Should you experience difficulties in the use of FREESOUND, please refer to the following chart.
Symptom Possible problem Solution
The base
does not
power on
iPod does
not
respond to
the speaker
system
iPod does
not charge
Speakers
do not play
the sound
from
docked
device
AC adapter is not plugged
into a wall outlet or the
connector is not plugged into
the DC jack on the back of
the FREESOUND.
Wall outlet is not functioning.
Using no/incorrect iPod
cradle.
iPod is not installed properly.
Your iPod is locked up.
iPod is not docked properly.
iPod battery has a problem.
Speakers are receiving a
signal from other devices or
another transmitter.
The transmitter was turned on
before the speakers.
Plug the AC adapter into a wall outlet and
plug the connector into the DC jack on the
FREESOUND.
Plug another device into the same outlet
to confirm the outlet is working.
Make sure the dock cradle is the proper fit
for your iPod.
Remove your iPod from the dock and
check for any obstruction on the
connectors in the docking and on your
iPod. Then reseat it in the dock.
Make sure your iPod is working properly
before docking into the unit.
Remove your iPod from the dock and
check for any obstruction on the
connectors in the docking and on your
iPod. Then reseat it in the dock.
Please make sure your iPod is working
properly before docking into the unit.
Place the unit in a location where there is
less signal interference.
Turn the speakers on first and then turn
on the transmitter.
Sound is
cut off or
noisy
Sound is
distorted
The unit is experiencing
interference.
Sound source is distorted.
Volume level is set too high. Decrease the volume from the source.
Do not turn on other wireless devices
simultaneously.
If the source is an iPod, check the sound
file on a computer to hear if it is also
distorted. If you are using an external
sound source like a digital audio player,
try reducing the output volume on the
device itself. Also try turning bass boost
OFF or change the EQ setting.
6
Page 7
GUÍA DE INICIO RÁPIDO
CONTENIDO DE LA CAJA
Asegúrese de que todos los elementos abajo indicados estén incluidos en la caja:
• FREESOUND
• Control remoto (incluye pila de celda tipo botón)
• Adaptador de alimentación
• Guía de inicio rápido
• Folleto de instrucciones de seguridad e información sobre la garantía
LEA EL FOLLETO DE INSTRUCCIONES DE SEGURIDAD ANTES DE UTILIZAR EL PRODUCTO.
ESTE DISPOSITIVO CUMPLE LO ESTIPULADO EN LA PARTE 15 DE LAS REGLAS DE LA FCC. LA OPERACIÓN ESTÁ SUJETA A LAS
DOS CONDICIONES SIGUIENTES: (1) ESTE DISPOSITIVO NO DEBE CAUS AR INTERFERENCIAS PERJUDICIALES Y (2) DEBE
ACEPTAR CUALQUIER INTERFERENCIA RECIBIDA, INCLUIDAS LAS QUE PUEDEN CAUSAR UN FUNCIONAMIENTO INDESEABL E
CONTROLES
ESTACIÓN DE ACOPLAMIENTO:
Panel frontal
4
4
1. Perilla rotativa de
volumen
2. LED indicador de altavoz
3. Altavoz
4. Botón de
desacoplamiento del
altavoz
5. Botón Saltar -
6. Indicador de
encendido/Sensor del
control remoto
7. Botón Reproducir/Pausa
8. Botón Saltar +
9. Conector para iPhone*/iPod
1
2
3
5
6
7
2
3
8 9
Panel trasero
10. Conector de 9 V CC
11. Conector de salida de video RCA
12. Conector de entrada auxiliar
10
11
12
*iPhone, iPod, iPod shuffle e iPod son marcas comerciales de Apple, Inc., registradas en EE.UU. y otros
países.
7
1
Page 8
Panel inferior
13. Bloqueo/Desbloqueo
13
13
Control remoto
14. Encendido/Modo de
espera
15. Botón de funciones
16. Botón de menú
17. Botón de silenciamiento
18. Botón de repetición
19. Botón de pista aleatoria
20. Botón de subir
21. Botón Enter
22. Botón VOL +
23. Botón VOL -
24. Botón de bajar
FUENTES DE ALIMENTACIÓN
1. Base principal
La base principal se alimenta con CA. Inserte el enchufe del adaptador de CA en el conector hembra del lado trasero
de la base.
2. Altavoces individuales
Cada altavoz tiene una pila de litio recargable integrada para reproducción independiente. Antes de utilizar los
altavoces por primera vez, cargue cada altavoz durante 4 horas. Cuando el altavoz se coloca sobre la base
alimentada (con el interruptor de encendido conectado), la carga comienza automáticamente. El LED indicador de
carga se enciende con luz roja durante la carga y cambia al color azul cuando se completa la misma. El altavoz
puede separarse de la unidad desplazando la perilla Lock (Bloqueo) al costado. Pulse luego el botón Open (Abrir)
para que el altavoz se separe de la unidad.
3. Control remoto
Para usar el control remoto, asegúrese de que la pila CR2025 del mismo esté instalada correctamente retirando el
papel de aislamiento transparente. (Una vez que deje de usar el control remoto, inserte el panel de aislamiento
nuevamente para preservar la vida útil de la pila.)
Nota: La iluminación de la sala y la vida útil de la pila pueden afectar al alcance operacional del módulo.
8
Page 9
OPERACIÓN GENERAL
1. Seleccione un adaptador de acoplamiento de iPod
apropiado (incluido con la compra del iPod) y
colóquelo en la base del FREESOUND. A
continuación, acople cuidadosamente su iPod.
2. Encienda los altavoces y comience a
reproducir con su iPod. Esto debe hacerse
antes del paso 3 a fin de que los altavoces se
sincronicen con la estación de acoplamiento.
3. Inserte el enchufe del adaptador de CA incluido
en el conector hembra de alimentación del lado
trasero de la base del FREESOUND. La unidad
debe encenderse automáticamente. Como
alternativa, use el control remoto para encender la
unidad.
4. Pulse “VOL +” o “VOL -” para elegir un nivel de
volumen adecuado. Lleve los altavoces de una
sala a otra para probarlos (sujeto al entorno, el
alcance es aproximadamente 30 m (100 pies) al
aire libre sin interferencias).
5. Si utiliza un iPod shuffle u otra fuente de audio
con salida para auriculares de 3.5 mm, conéctela
al conector de entrada de línea AUX de la parte
trasera de la base. El LED indicador del
transmisor cambia a luz roja cuando se utiliza la
entrada AUX. El LED indicador cambia a luz roja
cuando se acopla un iPod y se transmite una señal.
Nota: La entrada AUX no funciona cuando se acopla un iPod.
INDICADORES DE CARGA
• Mientras se carga el altavoz y la perilla rotativa de volumen no está activada, el LED indicador del altavoz está
encendido con luz roja fija. Una vez completamente cargado, el LED cambia a luz azul fija.
• Cuando se carga el altavoz y la perilla rotativa de volumen está activada, el LED indicador del altavoz destella
con luz púrpura. Una vez que la unidad está completamente cargada, el LED cambia a luz azul fija.
• Cuando se separa el altavoz de la estación de acoplamiento del FREESOUND y se está usando la perilla rotativa
de volumen, el LED indicador se enciende con luz azul fija. Si el LED está apagado, la perilla rotativa de volumen
no produce ninguna salida de sonido, indicando que se agotó la pila.
• Cuando se conecta un dispositivo a la entrada AUX, el dispositivo se puede usar una vez que el LED indicador se
ilumine con luz roja. Cuando se conecta un iPod/iPhone al FREESOUND, el iPod/iPhone se puede usar una vez
que el LED indicador se ilumine con luz azul.
SALIDA DE VIDEO DESDE UN iPod/iPhone
1. Conecte el FREESOUND a un televisor u otra pantalla de video que tenga una entrada de video compuesto.
2. Acople en forma segura su iPhone o iPod con capacidad de video.
3. Conecte un extremo de un cable RCA (no incluido) al conector de video RCA trasero de la base del
FREESOUND.
4. Conecte el otro extremo del cable RCA a la ENTRADA DE VIDEO de un televisor o pantalla de video.
5. Seleccione una película en el menú de su iPod/iPhone.
6. Asegúrese de que el menú TV Out del iPod esté fijado a "ON".
7. Vuelva a la biblioteca de películas y reproduzca la película que seleccionó.
Nota: El video sale automáticamente cuando se usa un iPod touch o iPhone.
9
Page 10

SOLUCIÓN DE PROBLEMAS
En caso de que experimente dificultades en el uso del FREESOUND, consulte la tabla siguiente.
Síntoma Posible problema Solución
La base no se
enciende
El iPod no
responde al
sistema de
altavoces
El iPod no se
carga
Los altavoces
no
reproducen el
sonido del
dispositivo
acoplado
El adaptador de CA no está
enchufado a un tomacorriente de
pared o el conector no está
enchufado al conector hembra
DC de la parte trasera del
FREESOUND.
El tomacorriente de pared no
funciona.
Uso de una cuna incorrecta o
ninguna cuna del iPod.
El iPod no está instalado
correctamente.
Su iPod está bloqueado.
El iPod no está acoplado
correctamente.
La pila del iPod tiene un
problema.
Los altavoces están recibiendo
señales de otros dispositivos u
otro transmisor.
El transmisor se encendió antes
que los altavoces.
Enchufe el adaptador de CA a un tomacorriente
de pared y enchufe el conector al conector
hembra DC del FREESOUND.
Enchufe otro dispositivo al mismo tomacorriente
para confirmar que funciona.
Asegúrese de que la cuna de acoplamiento sea
la apropiada para su iPod.
Retire su iPod de la base de acoplamiento y
verifique si existen obstrucciones en los
conectores de la misma y del iPod. Luego,
vuelva a asentarlo en la estación de
acoplamiento.
Asegúrese de que su iPod funciona
correctamente antes de acoplarlo a la unidad.
Retire su iPod de la base de acoplamiento y
verifique si existen obstrucciones en los
conectores de la misma y del iPod. Luego,
vuelva a asentarlo en la estación de
acoplamiento.
Asegúrese de que su iPod funciona
correctamente antes de acoplarlo a la unidad.
Coloque la unidad en un lugar donde haya
menos interferencias de señal.
Encienda primero los altavoces y luego el
transmisor.
El sonido
está cortado
o ruidoso
El sonido
está
distorsionado
La unidad está experimentando
interferencias.
La fuente de sonido está
distorsionada.
El nivel de volumen está ajustado
demasiado alto.
No encienda otros dispositivos inalámbricos
simultáneamente.
Si la fuente es un iPod, verifique el archivo de
sonido en una computadora para oír si también
está distorsionado. Si está usando una fuente
de sonido externa como un reproductor de
audio digital, pruebe reduciendo el volumen de
salida en el propio dispositivo. Pruebe también
apagando el refuerzo de bajos o cambiando el
ajuste del ecualizador.
Disminuya el volumen en la fuente.
10
Page 11

GUIDE DE DÉMARRAGE
CONTENU DE LA BOÎTE
Assurez-vous que tous les articles énumérés dans le contenu de la boîte de ce guide sont inclus
dans la boîte :
• FREESOUND
• Télécommande (comprend une pile bouton )
• Câble d’alimentation
• Guide de démarrage
• Consignes de sécurité et informations concernant la garantie
VEUILLEZ LIRE LES CONSIGNES DE SÉCURITÉ AVANT D'UTILISER LE PRODUIT.
CET APPAREIL EST CONFORME AUX CARACTÉRISTIQUES ÉNONCÉES DANS LA PART IE 15 DES RÈGLEMENTS DE LA FCC.
L’UTILISATION DE CET APPAREIL EST SUJETTE AUX DEUX CONDITIONS SUIVANT ES : (1) CET APPAREIL NE PRÉSENTE PAS
D’INTERFÉRENCES NÉFASTES, ET (2) CET APPAREIL DOIT ACCEPTER LES INTERFÉR ENCES, MÊME SUSCEPTIBLES
D’ENTRAÎNER UN FONCTIONNEMENT DÉGRADÉ.
COMMANDES
SOCLE:
4
4
Panneau avant
1. Bouton rotatif du volume
2. Indicateur DEL du haut-
parleur
3. Haut-parleur
4. Bouton pour détacher le
haut-parleur
5. Touche piste précédente
6. Témoin
d'alimentation/Capteur
infrarouge
7. Touche de lecture/pause
8. Touche piste suivante
9. Connecteur iPhone*/iPod
1
2
3
5
6
7
8 9
3
1
2
Panneau arrière
10. Entrée 9 V CC
11. Sortie vidéo RCA
12. Entrée
auxiliaire
10
11
12
iPhone, iPod, iPod shuffle et iPod touch sont des marques de commerce déposées de Apple, inc.,
enregistrées aux États-Unis et dans d'autres pays.
11
Page 12

Panneau inférieur
13. Verrouillage/déverrouillage
13
13
Télécommande
14. Interrupteur d’alimentation/veille
15. Touche fonction
16. Touche menu
17. Touche sourdine
18. Touche de lecture répétée
19. Touche de lecture aléatoire
20. Touche haut
21. Touche retour
22. Touche VOL +
23. Touche VOL -
24. Touche bas
SOURCE D’ALIMENTATION
1. Base principale
La base principale est alimentée par courant alternatif. Brancher l'adaptateur CA dans la prise d'alimentation à
l'arrière de la base.
2. Haut-parleurs individuels
Chaque haut-parleur a une batterie rechargeable au lithium intégrée pour la lecture indépendante. Assurez-vous de
recharger les piles pendant au moins 4 heures avant la première utilisation. Lorsque le haut-parleur est placé sur la
base (avec l'interrupteur d'alimentation allumé), le rechargement de la pile démarre automatiquement. L'indicateur de
charge est rouge durant le rechargement et devient bleu lorsque le rechargement est terminé. Le haut-parleur peut
être séparé de l’appareil en déplaçant le bouton de verrouillage sur le côté. Appuyez ensuite sur le bouton Open afin
de détacher le haut-parleur de l’appareil.
3. Télécommande
Pour utiliser la télécommande, assurez-vous que la pile CR2025 (incluse) est installée correctement en prenant soin
de retirer le papier isolant. (Lorsque vous avez terminé d'utiliser la télécommande, réinsérez le papier isolant afin de
préserver la durée de vie de la pile).
Remarque : L’éclairage de la pièce et la charge de la pile peuvent affecter la plage de fonctionnement de la
télécommande.
12
Page 13

FONCTIONNEMENT DE BASE
1. Sélectionnez l’adaptateur approprié pour le modèle d'iPod
(inclus à l'achat d'un iPod) et placez-le dans la
base FREESOUND. Insérez ensuite votre iPod
doucement.
2. Allumez les haut-parleurs et lancez la lecture
de votre iPod. Ceci doit être fait avant l'étape 3
afin que les haut-parleurs puissent se
synchroniser avec la base.
3. Brancher l'adaptateur CA inclus dans la prise
d'alimentation à l'arrière de la base FREESOUND.
L'appareil devrait alors se mettre sous tension
automatiquement. Vous pouvez également utiliser
la télécommande pour mettre l'appareil sous
tension.
4. Appuyez ensuite sur les touches “VOL +” ou
“VOL -” afin de choisir un niveau de volume
adéquat. Déplacez les haut-parleurs d'une pièce à
l’autre afin de tester (selon l’environnement, la
plage est d’environ 30,5 m (100 pieds ) dans une
pièce à aire ouverte, sans aucune interférence).
5. Si vous utilisez un iPod shuffle ou une autre
source audio avec une sortie casque de 3,5 mm,
branchez-la à l'entrée auxiliaire (AUX IN) à
l'arrière de la base. L’indicateur DEL de
transmission devient rouge lorsque l’entrée
auxiliaire est utilisée. L’indicateur DEL devient
rouge lorsqu’un iPod est inséré dans le socle et
transmet un signal.
Remarque: L’entrée auxiliaire ne fonctionne pas lorsqu’un iPod est inséré dans le socle.
INDICATEURS DE CHARGE
• Durant le rechargement de la pile du haut-parleur, si le bouton rotatif du volume n'est pas activé, l'indicateur
DEL du haut-parleur sera rouge foncé. Une fois la pile complètement rechargée, la DEL sera bleu foncé.
• Durant le rechargement de la pile du haut-parleur, si le bouton rotatif du volume n’est pas activé, l'indicateur
DEL du haut-parleur clignotera et sera mauve. Une fois la pile complètement rechargée, la DEL sera bleu
foncé.
Lorsque le haut-parleur est séparé de la base Freesound et que le bouton rotatif du volume est utilisé,
l'indicateur DEL est bleu foncé. Si l’indicateur n’est pas allumé, le bouton rotatif du volume ne produit aucun
son, indiquant que la pile est déchargée.
• Lorsque vous branchez un appareil à l'entrée auxiliaire, il faut attendre que l’indicateur devienne rouge afin
d’utiliser l'appareil.
• Lorsque vous branchez un iPod/iPhone au FREESOUND, il faut attendre que l’indicateur devienne bleu afin
d’utiliser l'appareil.
SORTIE VIDÉO DEPUIS UN iPod/iPhone
1. Branchez le FREESOUND à un téléviseur ou autre écran qui dispose d’une entrée vidéo composite.
2. Insérez votre iPhone ou iPod avec fonction vidéo sur le socle.
3. Branchez une des extrémités d’un câble RCA (non inclus) à l’entrée RCA vidéo à l’arrière de la base
FREESOUND.
4. Branchez l’autre extrémité du câble RCA à l’entrée vidéo du téléviseur ou de l’écran.
5. Sélectionnez une vidéo à partir du menu de votre iPod/iPhone.
6. Assurez-vous que la sortie télé de votre iPod est activée.
7. Revenez à la bibliothèque vidéo et lancez la vidéo de votre choix.
Remarque : La vidéo est automatiquement lancée lorsque vous utilisez un iPod touch ou iPhone.
13
Page 14

GUIDE DE DÉPANNAGE
Si vous éprouvez des difficultés lors de l’utilisation du FREESOUND, veuillez vous reporter au tableau suivant.
Symptôme Problème possible Solution
La base ne
s'allume pas
Adaptateur CC n'est pas
branché dans une prise
murale ou le connecteur
n'est pas branché dans
la prise CA à l’arrière du
Freesound.
Prise murale ne
fonctionne pas.
Le mauvais adaptateur,
ou aucun adaptateur
pour iPod n’est utilisé.
Branchez l’adaptateur CC dans une prise murale et
branchez le connecteur dans la prise CA à l’arrière du
FREESOUND.
Branchez un autre appareil dans la même prise afin
de vous assurer que la prise fonctionne.
Sélectionnez l’adaptateur approprié pour votre iPod.
L’iPod ne
répond pas au
système de
haut-parleurs
L’iPod ne se
recharge pas
Le son de la
base ne sort
pas des hautparleurs
Le son coupe
ou il y a
beaucoup de
bruit de fond
Il y a de la
distorsion
iPod n'est pas
correctement inséré.
Votre iPod est verrouillé.
L’iPod n'est pas
correctement inséré.
La pile du iPod ne
fonctionne pas
correctement.
Les haut-parleurs
reçoivent le signal
d'autres appareils ou
d'un autre émetteur.
L'émetteur a été mis
sous tension avant les
haut-parleurs.
L'appareil capte des
interférences.
le son est déformé.
Retirez votre iPod du socle et vérifiez qu’il n’y a pas
d’obstruction entre les connecteurs du socle et de
votre iPod. Remettez-le ensuite sur le socle.
Assurez-vous que votre iPod fonctionne correctement
avant de l’insérer dans le socle.
Retirez votre iPod du socle et vérifiez qu’il n’y a pas
d’obstruction entre les connecteurs du socle et de
votre iPod. Remettez-le ensuite sur le socle.
Assurez-vous que votre iPod fonctionne correctement
avant de l’insérer dans le socle.
Placez l'appareil dans un endroit où il y a moins
d'interférences radio.
Veuillez mettre les haut-parleurs sous tension en
premier, puis l’émetteur.
N’allumez pas d'autres appareils sans fil lorsque celuici fonctionne.
Si la source est un iPod, vérifiez le fichier audio sur un
ordinateur afin de vérifier si la distorsion provient du
fichier. Si vous utilisez une source audio externe
comme un lecteur audio numérique, essayez de
réduire le volume de sortie de l'appareil. Essayez
également de désactiver la fonction Bass Boost ou de
modifier l'égalisation.
Le volume est trop élevé. Réduire le volume de la source.
14
Page 15

GUIDA RAPIDA
CONTENUTI DELLA CONFEZIONE
Assicurarsi che gli elementi elencati di seguito siano contenuti nella confezione:
• FREESOUND
• Telecomando (include batteria a bottone)
• Adattatore di alimentazione
• Guida rapida
• Istruzioni di sicurezza e garanzia
LEGGERE ATTENTAMENTE IL LIBRETTO DI ISTRUZIONI PRIMA DI UTILIZZARE IL PRODOTTO
QUESTO DISPOSITIVO È CONFORME ALL A PARTE 15 DELLE NORME FCC. IL SUO UTILIZ ZO È SOGGETTO ALLE DUE SEGUENTI
CONDIZIONI: (1) NON PUÒ CAUSARE INTERFERENZE DANNOSE E (2) DEVE ACCETTARE QUALSIASI INTERFERENZA RICE VUTA,
INCLUSA QUALSIASI INTERFERENZA CH E POSSA CAUSARE UN FUNZIONAMENTO INDESIDER
COMANDI
STAZIONE DI DOCKING:
Pannello
4
4
anteriore
1. Manopola Volume
2. Indicatore altoparlante a
LED
3. Altoparlante
4. Pulsante di scollegamento
altoparlante
5. Tasto skip
6. Spia di accensione /
sensore del telecomando
7. Tasto Play / Pausa
8. Skip + Tasto
9. Connettore per iPhone*/iPod
1
2
3
5
6
7
8 9
3
1
2
Pannello posteriore
10. Jack CC da 9V
11. Jack di uscita RCA video
12. Jack di ingresso
Aux-In
10
11
12
* iPhone, iPod, iPod shuffle e iPod touch sono marchi di fabbrica di Apple, Inc., registrati negli Stati Uniti e in
altri Paesi
15
Page 16

Pannello inferiore
13. Blocca/Sblocca
13
13
Telecomando
14. Accensione/standby
15. Tasto funzioni
16. Tasto menu
17. Tasto muto
18. Tasto ripeti
19. Tasto traccia casuale
20. Tasto SU
21. Tasto invio
22. Tasto VOL+
23. Tasto VOL-
24. Tasto giù
FONTI DI ALIMENTAZIONE
1. Base principale (Main)
La base principale funziona con corrente CA. Inserire la spina dell'adattatore CA nel jack di alimentazione situato a
livello della parte posteriore della base.
2. Altoparlanti individuali
Ciascun altoparlante è dotato di 1 batteria al litio ricaricabile incorporata per la riproduzione indipendente. Prima di
utilizzare gli altoparlanti per la prima volta, caricare ciascuno di essi per 4 ore. Quando l'altoparlante viene collocato
sulla base (con l'alimentazione accesa) la carica inizierà automaticamente. L'indicatore di ricarica a LED è rosso
durante la ricarica e diventa blu una volta che la ricarica è completata. L'altoparlante può essere separato
dall'apparecchio spostando la manopola Lock di lato. Premere quindi il tasto Open per separare l'altoparlante
dall'apparecchio.
3. Telecomando
Per utilizzare il telecomando, assicurarsi che la relativa batteria CR2025 (in dotazione) sia inserita correttamente
estraendo la linguetta trasparente isolante. (Una volta che si termina di utilizzare il telecomando, inserire nuovamente
la linguetta isolante per preservare la batteria.)
Nota bene: l'illuminazione della stanza e la durata della batteria possono influenzare la portata operativa del
telecomando.
16
Page 17

FUNZIONAMENTO
1. Selezionare un adattatore di docking iPod (incluso
con l'acquisto dell'iPod) e collocarlo nella base del
FREESOUND. Quindi collegare l'iPod al dock.
2. Accendere gli altoparlanti e iniziare a
riprodurre l'iPod. Ciò va fatto prima della fase
3 affinché gli altoparlanti si sincronizzino con il
dock.
3. Inserire la spina dell'adattatore CA nel jack di
alimentazione situato a livello della parte
posteriore della base del FREESOUND.
L'apparecchio si dovrebbe accendere
automaticamente. Alternativamente, servirsi del
telecomando per accendere l'apparecchio.
4. Premere “VOL +” o “VOL -“ per scegliere il volume
desideratol. Spostare gli altoparlanti da una
stanza all'altra per testare (in base all'ambiente
circostante, la portata è di circa 30,5 m all'aperto
senza interferenze).
5. Se si utilizza un iPod shuffle o un'altra fonte audio
dotata di un'uscita cuffie da 3,5 mm, collegarla al
jack di ingresso di linea AUX posto a livello della
parte posteriore della base. L'indicatore a LED del
trasmettitore diventerà rosso quando l'ingresso
Aux viene utilizzato. L'indicatore a LED diventa
rosso quando un iPod è collegato al dock e
trasmette un segnale.
Nota bene: l'ingresso Aux In non funziona quando l'iPod è collegato al dock).
INDICATORI DI CARICA
• Mentre l'altoparlante è in carica e la manopola del volume non è accesa, l'indicatore a LED dell'altoparlante sarà
di colore rosso fisso. Una volta carico, il LED diventerà blu.
• Mentre l'altoparlante è in carica e la manopola del volume è accesa, l'indicatore a LED dell'altoparlante sarà di
colore viola lampeggiante. Una volta carico, il LED diventerà blu.
• Quando l'altoparlante è separato dal dock del FREESOUND e la rotella volume è in uso, il LED sarà di colore blu
fisso. Se il LED è bianco, la manopola del volume non produrrà alcun suono in uscita, indicando che la batteria è
scarica.
• Quando si collega un dispositivo all'ingresso Aux-in,quando il LED diventa rosso, il dispositivo può essere
utilizzato. Quando si collega un iPod/iPhone al FREESOUND, una volta che il LED diventa blu, è possibile
utilizzare l'iPod/iPhone.
USCITA DI VIDEO DA UN iPod/iPhone
1. Collegare il FREESOUND ad un televisore o ad un altro display video che sia dotato di un ingresso video
composito.
2. Fissare bene il proprio iPhone o iPod con capacità video.
3. Collegare un capo di un cavo RCA (non in dotazione) al jack video RCA posteriore a livello della base del
FREESOUND.
4. Collegare l'altro capo del cavo RCA all'ingresso VIDEO IN di un televisore o di un altro display video.
5. Selezionare un filmato dal manu dell'iPod/iPhone.
6. Assicurarsi che il menu TV Out dell'iPod sia su "ON".
7. Tornare alla libreria dei filmati e riprodurre il filmato che si desidera.
Nota bene: il video partirà automaticamente quando si utilizza un iPod touch o iPhone.
17
Page 18

RISOLUZIONE DI PROBLEMI
In caso di problemi con l'uso del FREESOUND, fare riferimento al seguente schema.
Sintomo Possibile problema Soluzione
La base non
si accende
L'iPod non
risponde
all'impianto
di
altoparlanti
L'iPod non si
ricarica
Gli
altoparlanti
non
riproducono
l'audio dal
dispositivo
collegato al
dock
L'adattatore CA non è collegato
ad una presa a parete o il
connettore non è collegato al jack
CC sul retro del FREESOUND.
La presa a parete non funziona.
Utilizzo di un cradle iPod scorretto
/ mancato utilizzo del cradle.
L'iPod non è stato installato
correttamente.
L'iPod è bloccato.
L'iPod non è stato inserito
correttamente nel dock.
La batteria dell'iPod presenta un
problema.
Gli altoparlanti ricevono un
segnale da altri dispositivi o da un
altro trasmettitore.
Il trasmettitore è stato acceso
prima degli altoparlanti.
Collegare l'adattatore CA ad una presa a parete
e collegare il collettore nel jack CC del
FREESOUND.
Collegare un altro dispositivo elettrico alla presa
per verificare l'effettivo malfunzionamento della
presa.
Assicurarsi che il cradle sia della dimensione
adeguata per il proprio iPod.
Rimuovere l'iPod dal dock e verificare
l'eventuale presenza di ostruzioni a livello dei
connettori sul docking e sull'iPod. Inserirlo
nuovamente nel dock.
Assicurarsi che l'iPod funzioni correttamente
prima di collegarlo al dispositivo.
Rimuovere l'iPod dal dock e verificare
l'eventuale presenza di ostruzioni a livello dei
connettori sul docking e sull'iPod. Inserirlo
nuovamente nel dock.
Assicurarsi che l'iPod funzioni correttamente
prima di collegarlo al dispositivo..
Collocare l'apparecchio in un punto ove vi siano
minori interferenze.
Accendere prima gli altoparlanti e poi il
trasmettitore.
Il suono
viene
tagliato o è
rumoroso
Il suono è
distorto
L'apparecchio subisce
interferenze.
La fonte audio è distorta.
Il volume è troppo alto. Abbassare il volume della fonte.
Non accendere contemporaneamente altri
dispositivi wireless.
Se la fonte è un iPod, verificare il file audio su
un computer per sentire se anche lì è distorto.
Se si utilizza una fonte audio esterna quale un
lettore audio digitale, provare ad abbassare il
volume del dispositivo stesso. Provare inoltre a
spegnere il bass boost o a cambiare la
configurazione dell'EQ.
18
Page 19

SCHNELLSTART-ANLEITUNG
LIEFERUMFANG
Vergewissern Sie sich, dass alle hier aufgeführten Komponenten in der Schachtel enthalten sind:
• FREESOUND
• Fernbedienung (inklusive Knopfzellenbatterie)
• Netzteil
• Schnellstart-Anleitung
• Sicherheitshinweise und Garantieinformationen
LESEN SIE DIE SICHERHEITSHINWEISE, BEVOR SIE DAS PRODUKT VERWENDEN.
DIESES PRODUKT ERFÜLLT TEIL 15 DER FCC-BESTIMMUNGEN. DER EINSATZ UNTERLIEGT DEN FOLGENDEN ZWEI
BEDINGUNGEN: (1) DIESES GERÄT DARF KEINE SCHÄDLICHEN INTERFERENZEN ERZEUGEN UND (2) DIESES GERÄT MUSS
EMPFANGENE INTERFERENZEN AUFNEHMEN, AUCH WENN DIESE ZU BETRIEBSSTÖRUNGEN FÜHREN KÖNNTEN.
BEDIENELEMENTE
DOCKINGSTATION:
4
4
Vorderseite
1. Lautstärkedrehregler
2. Lautsprecher-LED-Anzeige
3. Lautsprecher
4. Taste zum Lösen der Lautsprecher
5. Taste Überspringen -
6. Betriebsanzeige/Fernbedienungsse
nsor
7. Taste Wiedergabe/Pause
8. Taste Überspringen +
9. Anschluss iPhone*/iPod
1
2
3
5
6
8 9
7
2
3
Rückseite
10. 9V DC Buchse
11. Cinch-Videoausgangsbuchse
12. Aux-In Buchse
10
11
12
* iPhone, iPod, iPod shuffle und iPod touch sind Marken der Apple Inc. und in den U.S.A. und anderen
Ländern eingetragen.
19
1
Page 20

Unterseite
13. Sperren/Entsperren
13
13
Fernbedienung
14. Einschalten/Standby
15. Funktionstaste
16. Menütaste
17. Taste Stummschalten
18. Taste Wiederholen
19. Taste Zufällige
Trackauswahl
20. Taste AUFWÄRTS
21. Enter-Taste
22. Taste VOL +
23. Taste VOL -
24. Taste Abwärts
STROMVERSORGUNG
1. Basisgerät
Die Basis wird mit Netzstrom betrieben. Stecken Sie den Netzstecker in die Buchse an der Geräterückseite.
2. Einzelne Lautsprecher
Jeder Lautsprecher verfügt über 1 eingebaute wiederaufladbare Lithium-Batterie für eine unabhängige Wiedergabe.
Bevor Sie die Lautsprecher zum ersten Mal verwenden, laden Sie erst jeden Lautsprecher 4 Stunden lang auf. Wenn
der Lautsprecher auf die eingeschaltete Basis gesetzt wird (Power-Taste eingeschaltet), wird der Ladevorgang
automatisch gestartet. Die Lade-LED leuchtet während des Ladevorgangs rot und anschließend blau auf, wenn der
Ladevorgang abgeschlossen ist. Der Lautsprecher kann vom Gerät getrennt werden, indem der Sperr-Knopf zur
Seite geschoben wird. Drücken Sie anschließend den Knopf Öffnen, um die Lautsprecher von der Einheit zu trennen.
3. Fernbedienung
Um die Fernbedienung zu verwenden, vergewissern Sie sich, dass ihr CR2025-Batterie (im Lieferumfang enthalten)
richtig eingelegt wurde und ziehen dann die durchsichtige Isolierfolie ab. (Wenn Sie die Fernbedienung nicht mehr
verwenden, legen Sie die Isolierfolie erneut ein, um die Batterie zu schonen).
Hinweis: Die Zimmerbeleuchtung und die Lebensdauer der Batterie kann die Reichweite der Fernbedienung
beeinträchtigen.
20
Page 21

ALLGEMEINER BETRIEB
1. Wählen Sie einen geeigneten iPod-Docking-Adapter (im Lieferumfang eines iPod enthalten) und setzen Sie ihn
in das FREESOUND-Basisgerät. Setzen Sie Ihren iPod dann vorsichtig ein.
2. Schalten Sie die Lautsprecher ein und starten Sie die Wiedergabe Ihres iPod. Dies muss vor Schritt 3
durchgeführt werden, damit die Lautsprecher mit dem Dock synchronisiert werden können.
3. Stecken Sie den mitgelieferten Netzadapterstecker in die vorgesehene Buchse an der Rückseite des
FREESOUND-Basisgeräts. Das Gerät sollte sich dann automatisch einschalten. Wahlweise können Sie die
Fernbedienung verwenden, um das Gerät einzuschalten.
4. Drücken Sie "VOL +" oder "VOL -", um die richtige Lautstärke einzustellen. Testen Sie die Lautsprecher in
verschiedenen Räumen (je nach Umgebung beträgt die Reichweite in offenen Bereichen ohne Störquellen
etwa 100 Meter).
5. Wenn Sie einen iPod shuffle oder eine andere Audioquelle mit einem 3,5mm Kopfhörer-Ausgang verwenden,
verbinden Sie sie mit der AUX-In-Buchse auf der Rückseite des Basisgeräts. Die Sende-LED-Anzeige leuchtet
rot, wenn der Aux-Eingang verwendet wird. Die LED-Anzeige leuchtet rot, wenn ein iPod angedockt ist und ein
Signal sendet.
Hinweis: AUX In funktioniert nicht, wenn ein iPod angedockt ist).
LADEANZEIGEN
• Solange der Lautsprecher aufgeladen wird und der Lautstärkedrehregler auf Null steht, leuchtet die LautsprecherLED-Anzeige rot. Sobald das Gerät vollständig aufgeladen ist, leuchtet die LED-Anzeige durchgehend blau.
• Wenn der Lautsprecher aufgeladen wird und der Lautstärkedrehregler aktiv ist, blinkt die Lautsprecher-LEDAnzeige violett. Sobald das Gerät vollständig aufgeladen ist, leuchtet die LED-Anzeige durchgehend blau.
• Wenn der Lautsprecher vom FREESOUND-Dock getrennt wird und der Lautstärkedrehregler verwendet wird,
leuchtet die LED-Anzeige durchgehend blau. Leuchtet die LED nicht, bedeutet dies, dass die Batterie leer ist.
Auch das Drehen des Lautstärkereglers erzeugt nun keinen Ton.
• Wenn Sie ein Gerät an den Aux-In anschließen, kann es verwendet werden, sobald die LED-Anzeige rot leuchtet.
Wenn Sie einen iPod/ein iPhone an FREESOUND anschließen, kann der iPod/das iPhone verwendet werden,
sobald die LED-Anzeige blau leuchtet.
VIDEOAUSGABE ÜBER iPod/iPhone
1. Schließen Sie FREESOUND an ein Fernsehgerät oder ein anderes Videosichtgerät an, das einen CompositeVideo-Eingang hat.
2. Docken Sie Ihr iPhone oder Ihren iPod mit Videofunktion sicher an.
3. Schließen Sie das eine Ende eines Cinch-Kabels (nicht im Lieferumfang enthalten) an die Video-Cinch-Buchse an
der Rückseite des FREESOUND-Basisgeräts an.
4. Schließen Sie das andere Ende des Cinch-Kabels an das VIDEO IN eines Fernseh- oder Videosichtgeräts an.
5. Wählen Sie einen Film aus Ihrem iPod-/iPhone-Menü.
6. Achten Sie darauf, dass die TV-Ausgabe des iPod auf "EIN" steht.
7. Wechseln Sie zurück in die Videothek und spielen Sie den Film Ihrer Wahl ab.
Hinweis: Video wird automatisch ausgegeben, wenn Sie einen iPod touch oder ein iPhone verwenden.
21
Page 22

FEHLERBEHEBUNG
Sollten Sie Schwierigkeiten bei der Verwendung von FREESOUND haben, beachten Sie bitte folgende Tabelle.
Symptom Mögliches Problem: Lösung
Das
Basisgerät
lässt sich
nicht
einschalten
Ihr iPod
reagiert nicht
auf das
LautsprecherSystem
Der iPod wird
nicht
aufgeladen
Die
Lautsprecher
spielen nicht
die Musik
vom
angedockten
Gerät
Das Netzteil steckt nicht in einer
Steckdose oder der Stecker
steckt nicht in der DC-Buchse
auf der Rückseite des
FREESOUND.
Die Steckdose funktioniert nicht.
Sie verwenden keine - oder die
falsche - iPod-Dockingstation.
Ihr iPod wurde nicht richtig
eingesetzt.
Ihr iPod reagiert nicht mehr.
Der iPod ist nicht richtig
angedockt.
Der iPod-Akku funktioniert nicht
einwandfrei.
Die Lautsprecher erhalten ein
Signal von anderen Geräten
oder einem anderen Sender.
Der Sender wurde vor den
Lautsprechern eingeschaltet.
Stecken Sie das Netzteil in eine Steckdose und
den Stecker in die DC-Buchse des
FREESOUND.
Stecken Sie ein anderes Gerät in die gleiche
Steckdose, um zu überprüfen, ob die Steckdose
funktioniert.
Vergewissern Sie sich, dass die Dockingstation
das passende Modell für Ihren iPod ist.
Nehmen Sie den iPod vom Dock und überprüfen
Sie, ob etwaige Fremdkörper auf den DockingAnschlüssen oder an Ihrem iPod zu finden sind.
Verbinden Sie Ihr Gerät dann erneut mit dem
Dock.
Vergewissern Sie sich, dass Ihr iPod richtig
funktioniert bevor Sie ihn an das Gerät
andocken.
Nehmen Sie den iPod vom Dock und überprüfen
Sie, ob etwaige Fremdkörper auf den DockingAnschlüssen oder an Ihrem iPod zu finden sind.
Setzen Sie Ihr Gerät dann erneut in das Dock.
Bitte vergewissern Sie sich, dass Ihr iPod richtig
funktioniert bevor Sie ihn an das Gerät
andocken.
Stellen Sie das Gerät an einen Ort, wo es
weniger Signalstörungen gibt.
Schalten Sie zuerst die Lautsprecher und dann
erst den Sender ein.
Der Ton ist
abgehackt
oder rauscht
Der Ton
klingt verzerrt
Das Gerät wird durch
Interferenzen behindert.
Die Tonquelle ist verzerrt.
Die Lautstärke ist zu hoch
eingestellt.
Schalten Sie keine anderen drahtlosen Geräte
ein.
Wenn die Quelle ein iPod ist, überprüfen Sie die
Sound-Datei auf einem Computer, um
herauszufinden, ob sie auch hier verzerrt ist.
Wenn Sie eine externe Klangquelle, wie einen
digitalen Audio-Player verwenden, verringern
Sie die Lautstärke direkt am Gerät. Versuchen
Sie auch, die Bassverstärkung auszuschalten
oder die EQ-Einstellung zu verändern.
Verringern Sie die Lautstärke der Quelle.
22
Page 23

INHOUD VAN DE DOOS
Controleer of de doos de onderstaande onderdelen bevat:
• FREESOUND
• Afstandsbediening (inclusief knoopcelbatterij)
• Stroomadapter
• Snelstartgids
• Veiligheidsvoorschriften en boekje met informatie over de garantie
LEES DE VEILIGHEIDSVOORSCHRIFTEN VOORALEER HET PRODUCT TE GEBRUIKEN
DIT APPARAAT VOLDOET AAN ARTIKEL 15 VAN HET FCC-REGLEMENT. DE W ERKING IS ONDERWORPEN AAN DE VOLGEND E
TWEE VOORWAARDEN: (1) DIT APPARAAT MAG GEEN SCHADELIJKE ST ORINGEN VEROORZAKEN, EN (2) DIT APPARAAT MOET
ALLE ONTVANGEN STORINGEN AANVAARDEN, MET INBEGRIP VAN STORINGEN DIE EEN ONGEWENSTE W ERKING KUNNEN
VEROORZAKEN.
BEDIENINGSKNOPPEN
DOCKING STATION:
Voorpaneel
4
4
1. Volumedraaiknop
2. Luidspreker-LED
3. Luidspreker
4. Loskoppelingsknop van de
luidspreker
5. Vorig nummer-knop
6. Aan/uit-indicator/sensor voor
afstandsbediening
7. Afspelen/pauzeren
8. Volgend nummer-knop
9. Connector voor iPhone*/iPod
1
2
3
5
6
8 9
7
3
Achterpaneel
10. 9V DC-ingang
11. RCA Video-uitgang
12. Aux-ingang
10
11
12
* iPod, iPhone en iPad zijn handelsmerken van Apple Inc., geregistreerd in de VS en andere landen.
1
2
23
Page 24

Onderpanee
13. Vergrendelen/ontgrendelen
13
13
Afstandsbediening
14. Aan/uit/standby
15. Functietoets
16. Menutoets
17. Mute-toets
18. Herhaaltoets
19. Willekeurig nummer-toets
20. Omhoogtoets
21. Enter-toets
22. VOL+ toets
23. VOL–- toets
24. Omlaagtoets
STROOMBRONNEN
1. Basisstation
Het basisstation werkt op netstroom. Steek de netstroomadapter in de stroomaansluiting achteraan het basisstation.
2. Aparte luidsprekers
Elke luidspreker beschikt over 1 ingebouwde herlaadbare lithiumbatterij voor onafhankelijke playback. Voordat u de
luidsprekers voor het eerst gebruikt, laadt u elke luidspreker 4 uur lang op. Als de luidsprekers op het werkende
basisstation staan (met de aan/uit-schakelaar op aan), begint het opladen automatisch. Tijdens het opladen is de
oplaad-LED rood. Als het opladen is voltooid, wordt de oplaad-LED blauw. De luidspreker kan van het station worden
losgekoppeld door de vergrendelingsknop opzij te schuiven. Druk vervolgens op de Openen-knop om de luidspreker
los te koppelen van het station.
3. Afstandsbediening
Controleer om de afstandsbediening te gebruiken of de CR2025-batterij van de afstandsbediening (meegeleverd)
naar behoren is geïnstalleerd. Hiervoor moet u het doorzichtige isolatiefolie verwijderen. (Wanneer u de
afstandsbediening niet gebruikt, brengt u het isolatiefolie terug aan om de levensduur van de batterij te verlengen.)
Opmerking: De verlichting in de kamer en de levensduur van de batterij kunnen het werkingsbereik van de
afstandsbediening beïnvloeden.
24
Page 25

ALGEMENE WERKING
1. Kies een gepaste dock-adapter voor uw iPod
(meegeleverd bij de aankoop van een iPod) en
plaats het in het basisstation van de
FREESOUND. Plaats vervolgens zachtjes uw
iPod in het dock.
2. Zet de luidsprekers aan en speel muziek af op
uw iPod. Dit moet voor stap 3 worden gedaan,
om de luidsprekers met het basisstation te
synchroniseren.
3. Steek de stekker van de meegeleverde
stroomadapter in de stroomaansluiting achteraan
het basisstation van de FREESOUND. Het
apparaat zou zich automatisch moeten
inschakelen. Gebruik in het tegengestelde geval
de afstandsbediening om het apparaat in te
schakelen.
4. Druk op “VOL +” of “VOL -” om het gewenste
volumeniveau te kiezen. Breng de luidsprekers
van de ene kamer naar de andere kamer om te
testen (afhankelijk van de omgeving bedraagt het
bereik in een open ruimte zonder hindernissen
ongeveer 30 meter).
5. Als u een iPod shuffle of andere geluidsbron met
3,5mm-koptelefoonuitgang gebruikt, sluit het
apparaat dan aan op de AUX-ingang achteraan
het basisstation. De LED-indicator van de zender
wordt rood bij gebruik van de Aux-ingang. De LEDindicator wordt rood wanneer een iPod in het dock
is geplaatst en een signaal verstuurt.
Opmerking: De AUX-ingang werkt niet wanneer een iPod in het dock is geplaatst.
OPLAADINDICATOREN
• Tijdens het opladen van de luidsprekers en als de volumedraaiknop op nul staat, is de luidspreker-LED rood. Van
zodra het opladen is voltooid, wordt de LED blauw.
• Wanneer de luidspreker aan het opladen is en de volumedraaiknop aan staat, begint de luidspreker-LED paars te
knipperen. Van zodra de luidspreker volledig opgeladen is, wordt de LED blauw.
• Wanneer de luidspreker wordt losgekoppeld van de FREESOUND en de volumedraaiknop wordt gebruikt, dan
wordt de LED blauw. Als de LED niet gaat branden, dan zal de volumedraaiknop geen geluid produceren, wat
betekent dat de batterijen op zijn.
• Wanneer u een apparaat aansluit op de Aux-ingang, kunt u het gebruiken van zodra de LED-indicator rood wordt.
Wanneer u een iPod of iPhone aansluit op de FREESOUND, kunt u deze gebruiken van zodra de LED-indicator
blauw wordt.
VIDEO VERTONEN VANAF EEN iPod OF iPhone
1. Sluit de FREESOUND aan op een televisie of ander videoscherm met een composietvideo-ingang.
2. Plaats uw iPhone of iPod met afspeelmogelijkheid van video's naar behoren in het dock.
3. Sluit één uiteinde van een RCA-kabel (niet meegeleverd) aan op de RCA-video-ingang achteraan het basisstation
van de FREESOUND.
4. Sluit het andere einde van de RCA-kabel aan op de VIDEO-ingang van een televisie of videoscherm.
5. Kies een film vanuit het menu van uw iPhone of iPod.
6. Zorg ervoor dat het menu TV Out van uw iPod op “AAN” staat.
7. Keer terug naar uw filmbibliotheek en speel de film af die u hebt gekozen.
Opmerking: Bij het gebruik van een iPod touch of iPhone werkt de video-uitvoer vanzelf.
25
Page 26

PROBLEMEN OPLOSSEN
Als u moeilijkheden ondervindt bij het gebruik van FREESOUND, raadpleeg dan de volgende tabel.
Symptoom Mogelijk probleem Oplossing
Het basisstation
gaat niet aan
De iPod reageert
niet op het
luidsprekersysteem
De iPod laadt niet
op
De luidsprekers
spelen het geluid
van het op het dock
geplaatste apparaat
niet af
De stroomadapter zit niet in
het stopcontact of de
stekker is niet aangesloten
op de stroomaansluiting
achteraan de
FREESOUND.
Het stopcontact werkt niet.
U gebruikt geen of een niet
geschikte iPod-houder.
De iPod is niet naar
behoren geïnstalleerd.
Uw iPod is vergrendeld.
De iPod is niet naar
behoren in het dock
geplaatst.
De iPod-batterij heeft een
probleem.
De luidsprekers ontvangen
een signaal van andere
apparaten of een andere
zender.
De zender was aangezet
voor de luidsprekers.
Sluit de stroomadapter aan op een stopcontact
en steek de stekker in de stroomaansluiting van
de FREESOUND.
Sluit een ander apparaat aan op hetzelfde
stopcontact om te controleren of het werkt.
Zorg ervoor dat de dock-houder past bij uw
iPod.
Verwijder uw iPod uit het dock en controleer de
connectoren in het docking station en op uw
iPod op eventuele obstructies. Plaats het dan in
het dock terug.
Zorg ervoor dat uw iPod naar behoren werkt
vooraleer hem in het station te plaatsen.
Verwijder uw iPod uit het dock en controleer de
connectoren in het docking station en op uw
iPod op eventuele obstructies. Plaats het dan in
het dock terug.
Zorg ervoor dat uw iPod naar behoren werkt
vooraleer hem in het station te plaatsen.
Plaats het apparaat op een plaats met minder
storing van andere signalen.
Zet eerst de luidsprekers aan en daarna de
zender.
Het geluid wordt
afgesneden of er zit
ruis op
Het geluid is
vervormd
Het apparaat ondervindt
storingen.
De geluidsbron is
vervormd.
Het volume is te hoog. Verlaag het volume van de geluidsbron.
Zet tegelijkertijd geen andere draadloze
apparaten aan.
Als de bron een iPod is, controleer dan het
muziekbestand om te horen of het ook vervormd
is. Als u een externe geluidsbron gebruikt, zoals
bijvoorbeeld een digitale audiospeler, probeer
dan het uitgangsvolume te verminderen op het
apparaat zelf. Probeer ook om bass boost uit te
schakelen of de EQ-instellingen aan te passen.
26
Page 27

SPECIFICATIONS
POWER ADAPTER
• Input AC 100-240V ~ 50/60Hz
• Output 9V DC, 2A
POWER OF REMOTE CONTROL
• 1x DC 3VCR2025 button cell battery
FREQUENCY
• RF Channel Transmission: 2.4GHZ
• Transmission Range: Approximately 100 feet in an open area without any interference.
27
Page 28

www.ionaudio.com
MANUAL VERSION 1.0
 Loading...