

ION Film 2 SD Plus User Manual [en, de, es, fr, it]

FILM 2 SD PLUS
QUICKSTART GUIDE
ENGLISH ( 3 – 10 )
GUÍA DE INICIO RÁPIDO
ESPAÑOL ( 11 – 19 )
GUIDE D'UTILISATION SIMPLIFIÉ
FRANÇAIS ( 20 – 28 )
GUIDA RAPIDA
ITALIANO ( 29 – 37 )
KURZANLEITUNG
DEUTSCH ( 38 – 47 )
SNELSTARTGIDS
NEDERLANDS ( 48 – 57 )

5V-1A
1010
1111 1212
QUICKSTART GUIDE (ENGLISH)
• Film 2 SD Plus
• Negative Holder
• Rapid Slide Feeder
• Cleaning Brush
• USB Cable
• TV Adapter Cable
• Software CD
• Power Adapter
• Quickstart Guide
• Safety Instructions & Warranty Information Booklet
READ SAFETY INSTRUCTION BOOKLET BEFORE USING THE PRODUCT
Registration & Support
Please go to www.ionaudio.com to register your Film 2 SD Plus. Registering your product ensures that we can keep you
up-to-date with any new product developments and provide you with world-class technical support, should you run into
any problems.
BEFORE RETURNING THE PRODUCT, please contact ION Audio or your retailer for technical support. Contact
information can be found in the Safety Instruction Booklet included with this product.
www.ionaudio.com/support
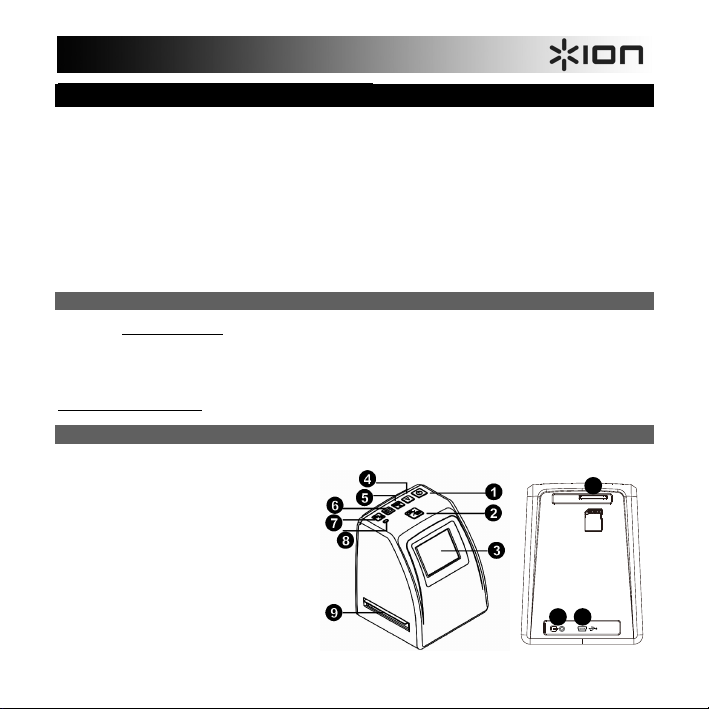
FEATURES
1. Power On/Off
2. Ok/Copy
3. Liquid Crystal Display (LCD)
4. Down
5. Film Type/Up
6. Playback Mode
7. EV (Exposure Value)/Delete
8. Status LED
9. Film/Slide Holder Slot
10. SD Card Slot
11. TV Out Connector
12. USB Out Connector
3

SOFTWARE INSTALLATION
PC:
PC System Requirements
• Pentium® 4, 1.6GHz or equivalent AMD Athlon
• USB 2.0 port
• 512MB RAM
• 500MB free hard disk space
• 1024 x 768 pixel color monitor
• CD-ROM drive
• Windows XP Service Pack 2, Windows Vista (32/64 bit), Windows 7 (32/64 bit), Windows 8 (32/64 bit)
Software Installation
Insert the CD into your CD-ROM drive. On the window that appears after you insert the disc, click "Install Software." If this
window does not automatically appear, double-click "My Computer" then double-click the name of the CD. The window
should appear. If the window still does not appear, right-click the name of the CD and select "Explore." Once the CD's
contents are shown, double-click the ".exe" file. Please refer to the sticker with the serial number located on the CD label
for the installation license key.
Mac:
Mac System Requirements
• PowerPC G5 or Intel Core Duo processor recommended
• USB 2.0 port
• 768MB RAM
• 500MB free hard disk space
• 1024 x 768 color monitor
• CD-ROM drive
• Mac OSX 10.5 - 10.8
Software Installation:
Double-click the CD, then double-click the MediaImpression installer file. Follow the on-screen instructions to install the
software. Please refer to the sticker with the serial number located on the CD label for the installation license key.
Note: You may need to enter your system’s password during the install process.
4
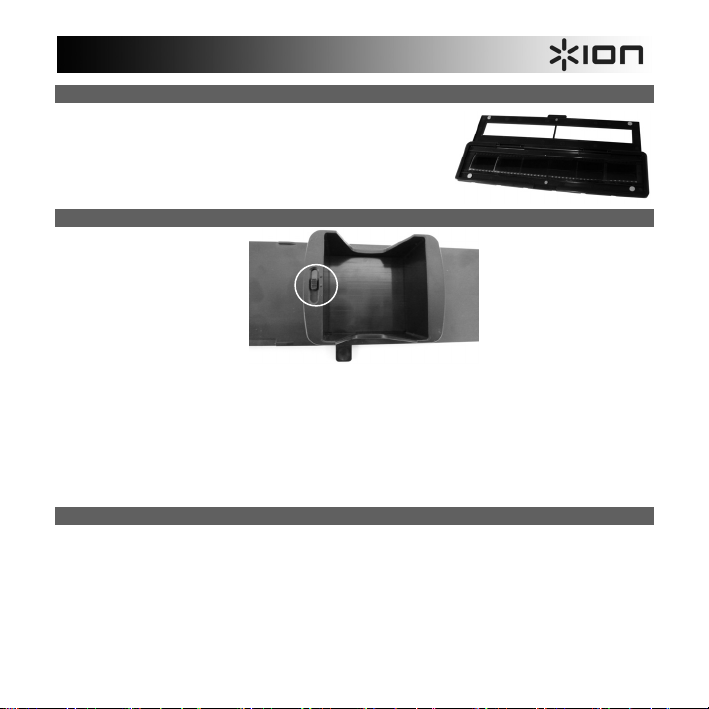
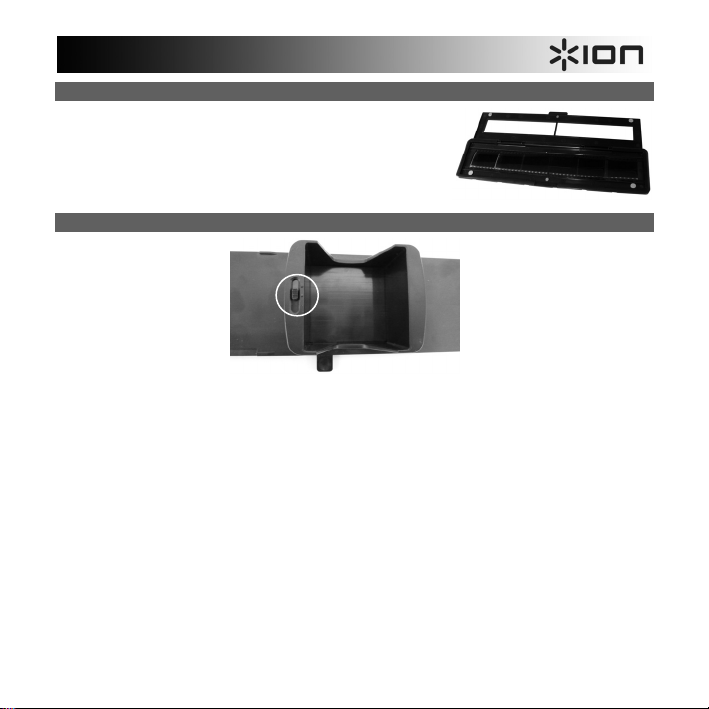
USING THE FILM HOLDER
1. Hold the film holder with the glossy surface facing up.
2. Open the film holder.
3. Put the film into the holder.
4. Close the film holder, making sure the magnets lock in place.
USING THE RAPID SLIDE FEEDER
1. With the lever all the way to the right, stack your slides in the rapid slide feeder.
• Large Dot: If your slides are less than 1.6 mm thick, set the switch to the “1.1-1.6” position.
• Medium Dot: If your slides are more than 1.6 mm thick, set the switch to the “1.6-2.2” position.
• Small Dot: If your slides are more than 2.2 mm thick, set the switch to this position.
Note: If you do not know the thickness of your slides, leave this switch alone. However, if your slides are sticking
in the rapid slide feeder, remove the rapid slide feeder, set the switch to the opposite setting, and try again.
2. Place the rapid slide feeder into the FILM HOLDER SLOT.
3. Push the lever towards the left, then pull the lever back to the right again to load a slide from the feeder into Film 2
SD Plus. Repeat this step for subsequent slides (which will push the used slides out the other side).
SCANNING YOUR IMAGES
1. Connect Film 2 SD Plus to your computer's USB port or to a power outlet with the included power adapter.
2. Turn on Film 2 SD Plus with the Power button.
3. Insert your SD card into the SD card slot with the gold contacts pointed up and away from you. When you save
your scanned images, they will be stored on the SD card.
4. Place your slide(s) or negative into the appropriate holder.
5. Insert the holder into the appropriate Film/Slide Holder Slot, matching the triangle or circle shapes on Film 2 SD
Plus to the film/slide holder.
5

6. Press the Film Type button to select the film type that you are using:
135 positive (slide)
135 negative
135 black & white
110 negative
126 negative
Note: Improper selection of the film type may give undesirable results.
7. To adjust the brightness (exposure), press EV/Delete button to adjust the exposure value. Press the Up or Down
button to adjust the exposure compensation from +2EV to -2EV in 0.5 increments.
8. Capture your image by pressing the OK button.
VIEWING YOUR IMAGES
When you enter Playback Mode, your captured images will be displayed in a slideshow, allowing you to preview them.
If there are no images saved to the SD card while in Playback Mode, a "?" icon will appear on the screen.
To remove the SD card to view your images elsewhere:
1. Turn Film 2 SD Plus off by pressing the Power button.
2. Eject your SD card by pushing it in first, then pulling it out of the slot.
3. To view your pictures, insert the SD card into an SD-compatible device, such as a digital picture frame, computer,
or television.
Note: To view your images on your TV rather than the display of Film 2 SD Plus, connect the TV OUT of Film 2
SD Plus to your TV's video input with the included TV output cable.
Viewing your images from a TV:
1. Set your TV to the appropriate video input mode, and connect the TV cable from Film 2 SD Plus to the TV.
2. Press the Playback button on Film 2 SD Plus for viewing images on the TV.
3. Choose whether your country is using the NTSC or PAL system. (Residents of North America, Central America,
some parts of South America, and Japan should select NTSC. Most others should select PAL.)
4. Press the Up button to advance through photos and press the Down button to review previous photos.
5. Press the Playback button once again to display a photo slideshow on the TV. Stop the slideshow by pressing the
Up or Down button. Continue the slideshow by pressing the Playback button again.
6. Press the Playback button during the slideshow to exit TV mode.
6

Deleting your images:
1. In Playback Mode, to delete the current image, press the Delete button once, then press the OK button.
2. To delete all images, press the Delete button twice, then press the OK button.
3. To format the SD card, press the Delete button three times, then press the OK button.Note: Formatting the SD
card will delete all files on the card. If you do not want to delete the images, press the Down button once to select
"NO," then press the OK button.
TRANSFERRING YOUR IMAGES
To transfer your images from the SD card to your computer:
1. Connect the included USB cable from Film 2 SD Plus to your computer’s USB port and then turn Film 2 SD Plus
on using the Power button.
2. The display will show “SD TO PC”. To enter USB mode, press the Up button to select “Yes”, and then press the
Ok button.
Note: While Film 2 SD Plus is in USB Mode, you will not be able to scan other pictures. To enable scanning again,
turn off Film 2 SD Plus, then turn it on again and enter Capture Mode.
3. Film 2 SD Plus will appear as "Film 2 SD Plus" in My Computer (Windows) or on your Desktop (Mac).
A. To use Film 2 SD Plus as an SD card reader to transfer images: Open the Film 2 SD Plus drive/folder,
then click and drag the pictures to a folder on your computer's hard drive.
B. To use MediaImpression to import photos from the SD card:
select the Import menu. By default, Media Impression will select all scanned photos found on the SD card
for import. If you only want to import some of them, select only the files you want to import. Then click the
4. When you are finished, press the power button on Film 2 SD Plus to turn it off.
Using Film 2 SD Plus with your iPad:
Using Film 2 SD Plus with your iPad requires the Apple iPad Camera Connection Kit (available in the Apple Store). The
Camera Connection Kit includes two adapters – one with an SD card slot and one with a USB connection.
1. Connect the adapter with an SD card slot to your iPad.
2. Remove the SD card from Film 2 SD Plus.
3. Gently insert your SD card (with your scans) into the adapter's SD card slot.
4. After making the connection, you will be prompted to transfer your scans from your SD card to your iPad. These
Import button to start the transfer.
scans will appear in the Photos library of your iPad. You can now access them as you normally would on your
iPad, transfer them to your computer, etc.
Open the MediaImpression software and
7

EDITING YOUR IMAGES
First, click on the picture to select it; then use the MediaImpression tools to edit the pictures as you wish. The Photo
Editing Tools module includes a complete set of photo enhancement, editing and retouching controls. The windows can
be stretched to provide a large size view of the active photo. Double-click the module’s tool bar to maximize the window to
fill the computer screen. In addition to the large photo workspace, the Photo Editing Tools module includes five distinct
sets of controls:
ADJUST
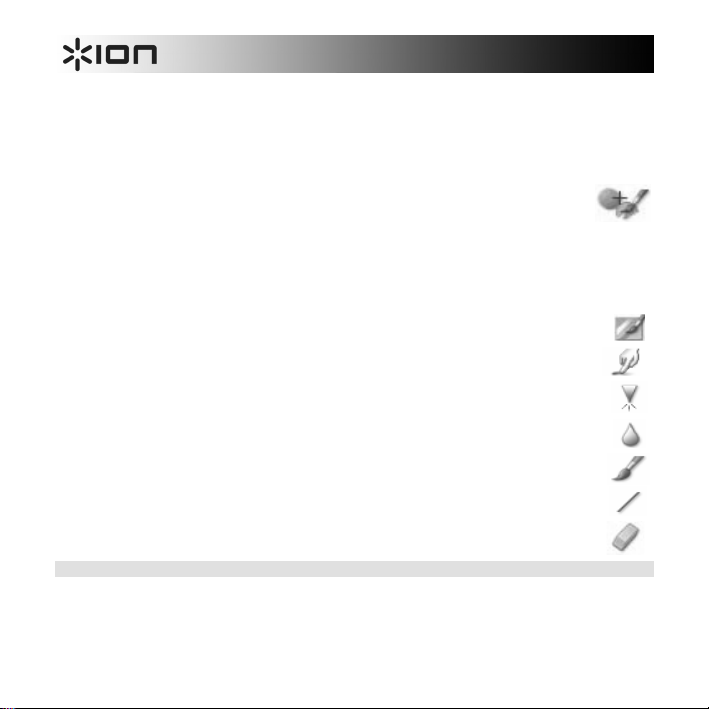
ENHANCE – The Enhance feature includes two types of controls:
AUTO ENHANCE – Click the “Auto Enhance” button to improve the overall quality of your pictures
with a single click.
MANUAL FIX – For precise image enhancement control, adjust the brightness, contrast and sharpen sliders.
How to enhance a photo manually:
1. Move the sliders to adjust the level of brightness, contrast, saturation, hue and sharpen for adjustment.
2. Use the zoom slider to get a closer look at how the adjustment affects the photo.
3. Click “Apply” if you like the result. Click “Cancel” if you do not.
COLOR – This feature is designed to fix digital photos that have unnatural color or appear too dark. It’s also great for
fixing scanned versions of old prints that have faded or whose colors have changed after many years.
How to fix the color of a photo:
1. Drag the color balance sliders to make the photo color appear more natural. Add red or yellow to make the
photo warmer. Add blue or green to make the photo cooler.
2. Drag the Lighter/Darker slider to the left to reveal details hidden in a dark photo or to the right to make a
faded photo look new again.
3. Click “Apply” if you like the result. Clock “Cancel” if you do not.
RED-EYE – This feature makes it easy for you to fix a red-eye – a common problem in flash photography.
There are two ways to fix red-eye:
AUTO FIX
1. Simply click the “Fix Red-Eye” button to automatically find and fix all red-eye.
2. If not all of the red eye is fixed, use the “Click to Fix” method.
8

MANUAL FIX
1. Use the zoom slider on the toolbar to zoom in on the photo.
2. Drag the small white box inside the zoom navigator to move over a red eye.
3. Place your cursor directly over the red eye and click.
4. Repeat the process until all the red eyes are fixed.
5. Click “Undo” if you make a mistake or don’t like the result.
CROP – This feature enables you to trim photos for a dramatic effect or cut off the distracting parts of a picture.
How to use the crop function:
1. Choose the crop orientation (portrait or landscape).
2. Select a fixed proportion for the crop rectangle (4:6, 5:7, 8:10) or choose “Custom” if you want to use a
different proportion.
3. Resize the crop rectangle by clicking and dragging the red lines.
4. Move the crop rectangle into position by clicking and dragging inside the red box.
5. Click “Crop”. The area inside the rectangle will be kept, the area outside will be trimmed away.
6. Click “Undo” if you make a mistake or don’t like the result.
STRAIGHTEN – This feature enables you to fix photos that appear to be tilted. How to use Straighten:
1. Move the slider (or click the rotate buttons) until the photo appears straight.
2. Use the superimposed grid lines for vertical and horizontal reference.
3. Click “Apply” if you like the result. Click “Cancel” if you do not.
BLUR BACKGROUND – This feature can be used in subtle way – to tone down unimportant background details, or for
dramatic effect by making the main subject of a photo “pop out” of the picture.
How to use the Blur Background function:
1. With your cursor, trace a line around the person or object you want to strand out. When you release the
mouse button, the area outside the traced line will become slightly blurred.
2. Drag the first slider to make the transition between the blurred and non-blurred area sharp or smooth.
3. Drag the second slider to increase or decrease the amount of blur.
4. Click “Apply” if you like the result. Click “Cancel” if you do not.
SAVING YOUR RESULTS – When you’re done editing a photo, click “Save as” to save your results. You can choose to
overwrite the original file or save a new one. Click “Close” to exit the Photo Editing Module.
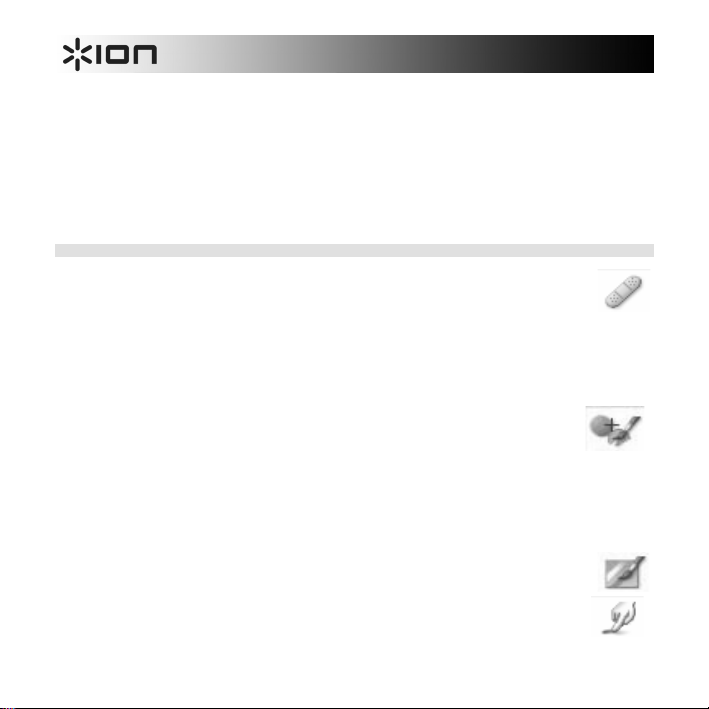
RETOUCH
HEALING BRUSH – The Healing Brush is good for fixing dust, scratches and removing skin blemishes.
9
How to use the Healing Brush to fix a skin blemish:
1. Establish a source point for the Healing Brush by holding the Shift key and clicking on an area of the skin
that is close in color and texture to the area you want to heal.
2. Use the zoom control to zoom in on the blemish.
3. Adjust the size of the healing brush so the cursor (circle) is only slightly larger than the blemish.
4. Paint over the blemish. The area will be concealed. Click “Undo” if you make a mistake or don’t like the
CLONE – The Clone tool is good for the removing of unwanted elements from a photo. It can also be used
for a fun effect, like moving a nose from one person to another.
How to use the Clone tool to remove a telephone pole from the background of a photo:
LIGHTEN/DARKEN – The Light/Darken tool is good for adjusting specific areas of a photo.
SMUDGE – Simulate the smearing of wet paint. Please click and drag the sliders below to change the brush
size and sharpness.
SHARPEN – Sharpen blurry areas. Click and drag the sliders below to change the brush size and
transparency.
BLUR – Smooth out rough areas. Click and drag the sliders below to change the brush size and intensity.
PAINT BRUSH – Allows you to “paint” on your image when you click and drag the mouse. Click and drag the
sliders below to change the brush size and transparency.
LINE – Draw a straight line in the photo. Click and drag the sliders below to change the line width and
transparency.
ERASER – Simulate an eraser, removing the image painting by paintbrush and line tools from your photo.
Click and drag the sliders below to change the eraser size and effect.
CLIPBOARD
The Clipboard controls are used for selecting, copying and pasting elements from photo to photo. Select from
Rectangular, Elliptical, Freehand, Magic Wand and Magnetic.
Note: For more detailed information, please refer to the [Help section] of the program.
result.
1. Establish a source point for the Clone tool by holding the Shift key and clicking on an area
of the sky that you want to use to paint over the telephone pole.
2. Adjust the brush size so the cursor (circle) is only slightly larger than the widest part of the
Telephone pole.
3. Click and hold your mouse button and carefully paint over the telephone pole. Do not release the mouse
button until the job is done. The sky will be cloned into place.
4. Click “Undo” if you make a mistake or don’t like the result.
10
5V-1A
1010
1111 1212
GUÍA DE INICIO RÁPIDO (ESPAÑOL)
• Film 2 SD Plus
• Soporte de negativos
• Alimentador Rápido de Diapositivas
• Cepillo de limpieza
• Cable USB
• Cable adaptador para TV
• CD de software
• Adaptador de alimentación
• Guía de inicio rápido
• Folleto de instrucciones de seguridad e información sobre la garantía
LEA EL FOLLETO DE INSTRUCCIONES DE SEGURIDAD ANTES DE UTILIZAR EL PRODUCTO.
Registro y soporte
Visite www.ionaudio.com para registrar su Film 2 SD Plus. El registro de su producto asegura que podamos mantenerle
actualizado con los nuevos desarrollos de productos y brindarle apoyo técnico de categoría mundial en caso de que
tenga algún problema.
ANTES DE DEVOLVER EL PRODUCTO, comuníquese con Ion Audio o con su vendedor minorista para solicitar soporte
técnico. La información de contacto se encuentra en el folleto de instrucciones de seguridad incluido con este producto.
www.ionaudio.com/support
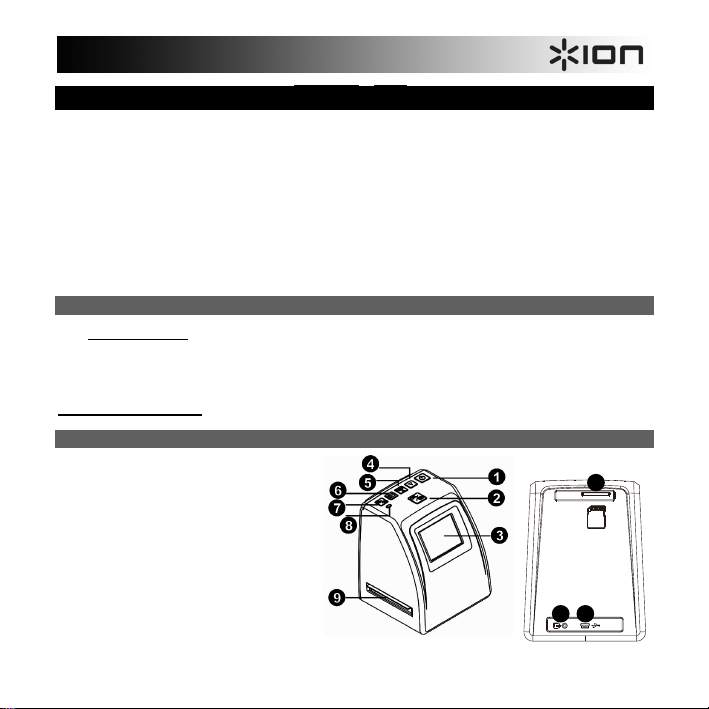
CARACTERÍSTICAS
1. Encendido/apagado
2. Aceptar/Copiar
3. Pantalla de cristal líquido (LCD)
4. Abajo
5. Tipo de película/Arriba
6. Modo de reproducción
7. EV (valor de exposición)/Eliminar
8. LED de estado
9. Ranura para el soporte de
película/diapositivas
10. Ranura para tarjeta SD
11. Conector de salida a televisor
12. Conector de salida USB
11

INSTALACIÓN DEL SOFTWARE
PC:
REQUISITOS DE PC SISTEMA
• Pentium® 4 de 1.6 GHz o AMD equivalente
• Puerto USB2.0 libre
• 512 MB de RAM de memoria interna mínimo
• 500 MB de espacio libre en disco duro
• Monitor color 1024 x 768
• Lector de CD-ROM
• Windows XP Service Pack 2, Windows Vista (32-/64-bit), Windows 7 (32-/64-bit), Windows 8 (32-/64-bit)
Instalación del Software
Inserte el CD en su lector de CDROM. En la ventana que aparece después de insertar el disco, haga clic en "Install
Software". Si esta ventana no aparece automáticamente, haga doble clic en "My Computer" (Mi PC) y luego en el nombre
del CD. Debe aparecer la ventana. (Si la ventana sigue sin aparecer, haga doble clic en el CD y seleccione "Explore"
(Explorar).) Una vez que se muestra el contenido del DVD, haga doble clic en el archivo ".exe".
MAC:
REQUISITOS DE MAC SISTEMA
• Se recomienda procesador PowerPC G5 o Intel Core Duo
• Puerto USB2.0 libre
• 768MB de RAM
• 500MB de espacio libre en disco duro
• Monitor color 1024 x 768
• Lector de CD-ROM
• Mac OSX 10.5 – 10.8
Instalación del Software:
Haga doble clic en el CD y luego doble clic en el archivo MediaImpression installer. Siga las instrucciones de la pantalla
para instalar el software. Busque la clave de la licencia de instalación en el autoadhesivo con el número de serie que se
encuentra en la etiqueta del CD.
Nota: Es posible que deba ingresar su contraseña del sistema durante el proceso de instalación.
12
CÓMO USAR LOS SOPORTE DE PELÍCULA
1. Sostenga el soporte de película con la superficie lustrosa mirando
hacia arriba.
2. Abra el soporte de película.
3. Coloque la diapositiva o la película en el soporte.
4. Cierre el soporte de película, asegurando que los imanes se
bloqueen en su sitio.
CÓMO USAR LOS ALIMENTADOR RÁPIDO DE DIAPOSITIVAS
1. Con la palanca totalmente a la derecha, apile las diapositivas en el alimentador rápido.
• Dot grande: Si sus diapositivas son de menos de 1.6 mm de espesor, coloque el conmutador en la
posición “1.1-1.6.
• Media de puntos: Si sus diapositivas son de más de 1.6 mm de espesor, coloque el conmutador en la
posición “1.6-2.2”.
• Pequeña Dot: Si sus diapositivas son de más de 2.2 mm de espesor, coloque el conmutador en la esta
posición.
Nota: Si no conoce el espesor de sus diapositivas, no toque este conmutador. No obstante, si sus diapositivas se
pegan en el alimentador rápido, retire el alimentador, coloque el conmutador en la posición opuesta y pruebe
nuevamente.
2. Coloque el alimentador rápido de diapositivas en la RANURA DEL SOPORTE DE PELÍCULA.
3. Empuje la palanca hacia la izquierda y luego de regreso a la derecha para cargar una diapositiva del alimentador
en el Film 2 SD Plus. Repita este paso para las diapositivas siguientes (que empujarán a las usadas hacia afuera
del otro lado).
13

CÓMO ESCANEAR LAS IMÁGENES
1. Conecte el Film 2 SD Plus al puerto USB de su computadora o a un tomacorriente con el adaptador de
alimentación incluido.
2. Encienda el Film 2 SD Plus con el botón Power (Encendido).
3. Introduzca su tarjeta SD en la ranura para tarjeta SD con los contactos dorados orientados hacia arriba y en
dirección opuesta a la posición de su mano. Cuando guarde sus imágenes escaneadas, se almacenarán en la
tarjeta SD.
4. Coloque la o las diapositivas o el negativo en el soporte apropiado.
5. Introduzca el soporte en la ranura para soporte de película/diapositivas apropiado, haciendo coincidir las figuras
de triángulo o círculo del Film 2 SD Plus con el soporte de película/diapositivas.
6. Pulse el botón Film Type (Tipo de película) para seleccionar el tipo de película que va a usar.
135 positive (positivo de 135 (diapositiva))
135 negative (negativo de 135)
135 black & white (blanco y negro de 135)
110 negative (negativo de 135)
126 negative (negativo de 126)
Nota: La selección incorrecta del tipo de película puede producir resultados indeseables.
7. Para ajustar el brillo (exposición), pulse el botón EV/Delete (EV/Eliminar) a fin de ajustar el valor de exposición.
Pulse el botón Arriba o Abajo para ajustar la compensación de exposición desde +2EV a -2EV en incrementos de
0.5.
8. Capture la imagen pulsando el botón OK (Aceptar).
CÓMO VER LAS IMÁGENES
Cuando se entra al modo Playback (Reproducción), sus imágenes capturadas aparecen en modo de presentación de
diapositivas, permitiéndole visualizarlas previamente.
Si no hay imágenes guardadas en la tarjeta SD mientras se está en modo de reproducción, aparece un icono "?" en la
pantalla.
Para retirar la tarjeta SD a fin de ver las imágenes en otro lugar:
1. Apague el Film 2 SD Plus pulsando el botón de encendido.
2. Expulse la tarjeta SD empujándola primero y luego tirando de ella para extraerla de la ranura.
3. Para ver las fotos, insértela en un dispositivo compatible con SD, como un marco de imágenes digitales,
computadora o televisor.
Nota: Para ver las imágenes en su televisor en lugar de la pantalla del Film 2 SD Plus, conecte la salida TV OUT
del Film 2 SD Plus a la entrada de video de su televisor con el cable de salida a televisor incluido.
14

Cómo ver las imágenes en un televisor:
1. Ajuste su televisor al modo de entrada de video apropiado y conecte el cable de TV desde el Film 2 SD Plus al
televisor.
2. Pulse el botón Reproducir del Film 2 SD Plus para ver imágenes en el televisor.
3. Elija si su país utiliza el sistema NTSC o PAL. (Los residentes en América del Norte, América Central, algunas
partes de América del Sur y Japón deben seleccionar NTSC. La mayoría de los demás deben seleccionar PAL.)
4. Pulse el botón Arriba para avanzar por las fotos y el botón Abajo para volver a ver las fotos anteriores.
5. Pulse el botón Reproducir una vez más para ver una presentación de las fotos en el televisor. Detenga la
presentación pulsando el botón Arriba o Abajo. Continúe la presentación pulsando el botón Reproducir otra vez.
6. Pulse el botón Reproducir durante la presentación para salir del modo de TV.
Cómo eliminar las imágenes:
1. En modo de reproducción, para eliminar la imagen actual, pulse el botón Delete (Eliminar) y luego el botón OK.
2. Para eliminar todas las imágenes, pulse el botón Delete dos veces y luego el botón OK.
3. Para formatear la tarjeta SD, pulse el botón Delete tres veces y luego el botón OK.
Nota: Al formatear la tarjeta SD, se eliminan todos los archivos de la tarjeta. Si no desea eliminar las imágenes,
pulse el botón Abajo una vez para seleccionar "NO" y luego pulse el botón OK.
CÓMO TRANSFERIR LAS IMÁGENES
Para transferir las imágenes de la tarjeta SD a la computadora:
1. Conecte el cable USB incluido desde el Film 2 SD Plus al puerto USB de su computadora y luego encienda el
Film 2 SD Plus con el botón de encendido.
2. Aparece “SD TO PC” en la pantalla. Para entrar al modo USB, pulse el botón Arriba para seleccionar “Yes” (Sí) y
luego pulse el botón Ok.
Nota: Cuando el Film 2 SD Plus está en modo USB, no es posible escanear otras fotografías. Para volver a
habilitar el escaneo, apague el Film 2 SD Plus, enciéndalo nuevamente y entre al modo de captura.
3. El Film 2 SD Plus aparece como "Film 2 SD Plus" en My Computer(Mi PC) (Windows) o en su escritorio (Mac).
A. Para usar el Film 2 SD Plus como lector de tarjetas SD para transferir las imágenes: Abra la
unidad/carpeta del Film 2 SD Plus y luego haga clic y arrastre las imágenes a una carpeta del disco duro
de su computadora.
B. Para usar MediaImpression a fin de importar fotos desde la tarjeta SD:
MediaImpression y seleccione el menú Import (Importar). Como opción predeterminada, Media Impression
selecciona todas las fotos escaneadas que encuentra en la tarjeta SD para importar. Si solo desea
importar algunas de ellas, seleccione únicamente los archivos que desea importar. Luego haga clic en el
4. Cuando termine, pulse el botón de encendido del Film 2 SD Plus para apagarlo.
Cómo usar el Film 2 SD Plus con el iPad:
Para usar el Film 2 SD Plus con su iPad se requiere el Camera Connection Kit (kit de conexión de cámara) para iPad de
Apple (disponible en Apple Store). El Camera Connection Kit incluye dos adaptadores —uno con ranura para tarjeta SD y
otro con una conexión USB.
botón Import para iniciar la transferencia.
Abra el software
15

1. Conecte el adaptador con ranura para tarjeta SD a su iPad.
2. Retire la tarjeta SD del Film 2 SD Plus.
3. Introduzca cuidadosamente su tarjeta SD (con sus escaneos) en la ranura para tarjeta SD del adaptador.
4. Después de realizar la conexión, el sistema le solicitará transferir sus escaneos de su tarjeta SD a su iPad. Estos
escaneos aparecen en la biblioteca Photos (Fotos) de su iPad. Ahora puede acceder a ellos como lo haría
normalmente en su iPad, transfiriéndolos a su computadora, etc.
CÓMO EDITAR LAS FOTOGRAFÍAS
En primer lugar, haga clic en la fotografía para seleccionarla y luego use las herramientas MediaImpression para editarla
como desee. El módulo Photo Editing Tools incluye un conjunto completo de controles de mejora, edición y retoque de
fotografías. Las ventanas se pueden ampliar para brindar una vista de gran tamaño de la foto activa. Haga doble clic en
la barra de herramientas del módulo para maximizar la ventana y llenar la pantalla de la computadora. Además del
amplio espacio de trabajo con las fotos, el módulo Photo Editing Tools incluye cinco conjuntos distintos de controles:
AJUSTE
ENHANCE (Mejora) – Esta función incluye dos tipos de controles:
AUTO ENHANCE (Mejora automática) – Haga clic en el botón
calidad general de sus fotografías con un solo clic.
MANUAL FIX (Arreglo manual) – Para lograr un control preciso de la mejora de imagen ajuste los cursores de
brillo, contraste y nitidez.
Cómo mejorar manualmente una fotografía:
1. Mueva los cursores para ajustar el nivel de brillo, contraste, saturación, tinte y nitidez.
2. Use el cursor de zoom para lograr una vista más cercana de cómo afectan los controles a la foto.
3. Haga clic en "Apply" (Aplicar) si le gusta el resultado. Haga clic en "Cancel" (Cancelar) si no le gusta.
COLOR – Esta función está diseñada para reparar las fotos digitales que tienen colores poco naturales o son demasiado
oscuras. Es también ideal para reparar versiones escaneadas de viejas impresiones que se han descolorido o cuyos
colores cambiaron después de muchos años.
Cómo reparar el color de una foto:
1. Arrastre los cursores de balance de color para hacer que el color de la foto parezca más natural. Agregue
rojo o amarillo para hacer la foto más cálida. Agregue azul o verde para hacerla más fría.
2. Arrastre el cursor de aclarar/oscurecer a la izquierda para revelar detalles ocultos en una foto oscura o a la
derecha para hacer que una foto descolorida parezca otra vez nueva.
3. Haga clic en "Apply" (Aplicar) si le gusta el resultado. Haga clic en "Cancel" (Cancelar) si no le gusta.
"Auto Enhance" para mejorar la
16

RED-EYE (Ojos rojos) – Esta función permite reparar fácilmente los ojos rojos, un problema común de la
fotografía con flash. Hay dos maneras de reparar los ojos rojos:
REPARACIÓN AUTOMÁTICA
1. Simplemente haga clic en el botón "Fix Red-Eye" para encontrar y reparar automáticamente todos los ojos
rojos.
2. Si no se reparan todos los ojos rojos, use el método "Click to Fix" (Hacer clic para reparar).
REPARACIÓN MANUAL
1. Use el cursor de zoom de la barra de herramientas para acercar la foto.
2. Arrastre el recuadro blanco pequeño que está dentro del navegador de zoom para llevarlo sobre el ojo
rojo.
3. Coloque su cursor directamente sobre el ojo rojo y haga clic.
4. Repita el proceso hasta que repare todos los ojos rojos.
5. Haga clic en "Undo" (Deshacer) si comete un error o no le gusta el resultado.
CROP (Recortar) – Esta función le permite recortar las fotos para lograr un efecto destacado o cortar las partes
innecesarias de una imagen. Esta función le permite recortar las fotos para lograr un efecto destacado o cortar las partes
innecesarias de una imagen.
Cómo usar la función de recorte:
1. Elija la orientación del recorte (vertical o apaisada).
2. Seleccione una proporción fija para el rectángulo de recorte (4:6, 5:7 ó 8:10) o elija "Custom"
(Personalizado) si desea usar una proporción diferente.
3. Redimensione el rectángulo de recorte haciendo clic y arrastrando las líneas rojas.
4. Mueva el rectángulo de recorte a su posición haciendo clic y arrastrando adentro del recuadro rojo.
5. Haga clic en "Crop" (Recortar). Se mantendrá el área interior del rectángulo y se recortará la exterior.
6. Haga clic en "Undo" (Deshacer) si comete un error o no le gusta el resultado.
STRAIGHTEN (Enderezar) – Esta función le permite reparar las fotos que parecen estar inclinadas. Cómo usar la función
de enderezar:
1. Mueva el cursor (o haga clic en los botones de girar) hasta que la foto parezca derecha.
2. Use las líneas de grilla superpuestas como referencia vertical y horizontal.
3. Haga clic en "Apply" (Aplicar) si le gusta el resultado. Haga clic en "Cancel" (Cancelar) si no le gusta.
BLUR BACKGROUND (Borrosidad del fondo) – Esta función se puede usar de manera sutil —para bajar el tono de los
detalles sin importancia del fondo o para lograr un efecto destacado, haciendo que el objeto principal de una foto "salte"
de la imagen.
17
Cómo usar la función de borrosidad del fondo:
1. Con el cursor, trace una línea alrededor de la persona u objeto que desea destacar. Cuando suelte el
botón del mouse, el área exterior de la línea trazada se pondrá ligeramente borrosa.
2. Arrastre el primer cursor para hacer que la transición entre el área borrosa y no borrosa sea nítida o
suave.
3. Arrastre el segundo cursor para aumentar o disminuir la magnitud de la borrosidad.
4. Haga clic en "Apply" (Aplicar) si le gusta el resultado. Haga clic en "Cancel" (Cancelar) si no le gusta.
CÓMO GUARDAR LOS RESULTADOS – Cuando termine de editar la foto, haga clic en "Save as" (Guardar como) para
guardar sus resultados. Puede elegir sobreescribir el archivo original o guardar uno nuevo. Haga clic en "Close" (Cerrar)
para salir del módulo de edición de fotos.
RETOQUE
HEALING BRUSH ("Curita") – La bandita o "curita" es ideal para reparar polvo, rayaduras y eliminar
manchas de la piel. Cómo usar la bandita para reparar una mancha de la piel:
1. Establezca un punto fuente para la bandita manteniendo pulsada la tecla Shift y haciendo
clic en un área de la piel que sea de color y textura simulares a los del área que desea reparar.
2. Use el control de zoom para acercar la mancha.
3. Ajuste el tamaño de la bandita de modo que el cursor (círculo) sea sólo ligeramente más grande que la
mancha.
4. Pinte sobre la mancha. El área quedará oculta. Haga clic en "Undo" (Deshacer) si comete un error o no le
gusta el resultado.
CLONE – La herramienta Clone es útil para remover los elementos no deseados de una foto. También
se puede usar para efectos divertidos, como pasar una nariz de una persona a otra. Cómo usar la
herramienta Clone para sacar un poste telefónico del fondo de una foto:
1. Establezca un punto fuente para la herramienta Clone manteniendo pulsada la tecla Shift y haciendo clic
en un área del cielo que desea usar para pintar sobre el poste telefónico.
2. Ajuste el tamaño del pincel de modo que el cursor (círculo) sea sólo ligeramente mayor que la parte más
ancha del poste telefónico.
3. Haga clic y mantenga pulsado el botón del mouse y pinte cuidadosamente sobre el poste telefónico. No
suelte el botón del mouse hasta que el trabajo esté terminado. El cielo se clonará en el sitio.
4. Haga clic en "Undo" (Deshacer) si comete un error o no le gusta el resultado.
LIGHTEN/DARKEN (Aclarar/oscurecer) – La herramienta de aclarar/oscurecer es útil para ajustar áreas
específicas de la foto.
SMUDGE (Mancha) – Simula la mancha de la pintura fresca. Haga clic y arrastre los cursores de abajo
para cambiar el tamaño y la nitidez de la mancha.
18
 Loading...