

Page 1
Wi-Fi PODZ TM
Quick Start Guide
Page 2
Wi-Fi PODZ TM
Quick Start Guide
1. Key Features
A Wi-Fi PODZ TM turns your iON camera into a Wi-Fi access point. View the camera’s videos/photos and
change camera settings from your mobile phone, tablet (using the free to download iON App) or computer.
Transfer files back to your computer or mobile device. You can also live-stream the camera view,
start/stop recording or take a photo. The clever app also allows you to upload to social media sites
directly from your smart device.
2. Package Content
Carefully unpack the package and ensure that you have the following item:
Wi-Fi PODZ
TM
Rotate to seal the camera.
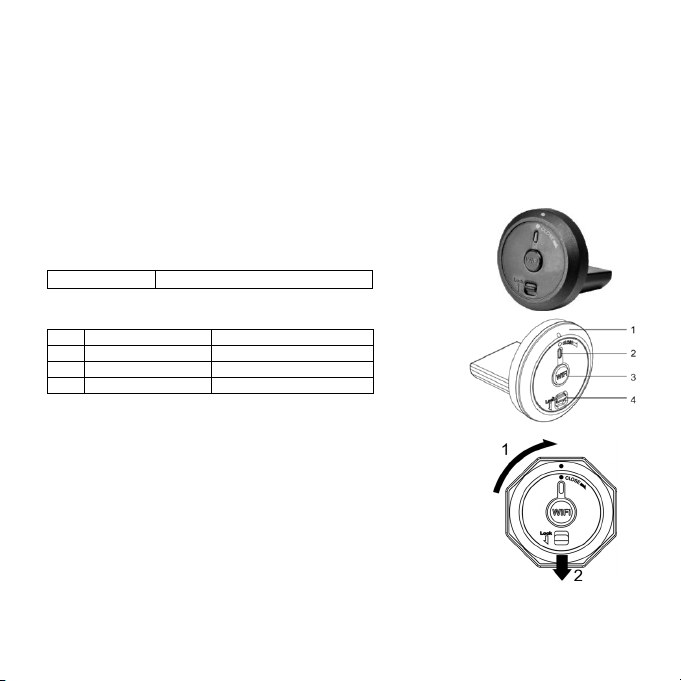
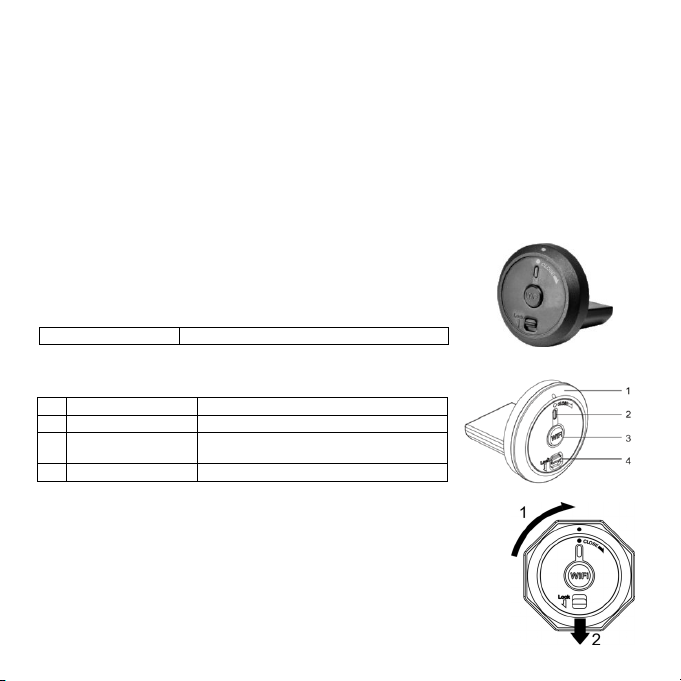
3. Functional Parts
1 Wi-Fi PODZ TM Rotate to seal the camera
2 Wi-Fi LED indicator Shows the Wi-Fi status
3 Wi-Fi Power button Turns the Wi-Fi on or off
4 PODZ TM Latch Locks the PODZ TM
4. Installing the PODZ TM
1. Attach the Wi-Fi PODZ TM to the back of the camera and rotate
clockwise until the two dots are aligned.
2. Slide the latch on the Wi-Fi PODZ
Warnings:
1. The latch must be locked in place to ensure the waterproof seal is
activated – failure to do so may cause water leakage.
2. You must keep the rubber seal on the PODZ
waterproof barrier to protect the camera in wet and underwater
conditions.
5. Using the Wi-Fi PODZ
5.1 Turning on the Wi-Fi PODZ
1. Remove your standard PODZ TM from the back of the camera and place your Wi-Fi PODZ TM into the
TM
to lock it.
TM
clean as it forms a
TM
TM
EN-1
Page 3

camera PODZ TM socket.(Refer to section 4).
2. Press and hold the Power
3. Press the Wi-Fi power button on the Wi-Fi PODZ
indicate the Wi-Fi is warming up. It will take around 15-20 seconds for the Wi-Fi to warm up and
become connectable. The LED will flash when the Wi-Fi function is active or connected.
4. Press the Wi-Fi power button to turn off the Wi-Fi anytime.
Note: Wi-Fi will drain your camera battery more rapidly when activated. Turn the Wi-Fi off if you are not
using it to change settings or upload content.
button to turn on your camera.
TM
to turn on your Wi-Fi. The blue LED lights up to
5.2 Connecting the Camera to Your Computer
1. Turn on your camera and Wi-Fi PODZ TM.
2. Go to the network settings of your PC and choose Wi-Fi settings. Search the network, find and click
“WIFIPODZ”.
3. Enter password “123456789” and to connect to your camera.
4. Open your Internet browser and input “192.168.1.2”. You will then be able to view the files stored in
your camera.
5.3 Connecting the Camera to Your Smart Device (Browser)
1. Turn on your camera and Wi-Fi PODZ TM.
2. Go to the network setting of your mobile device and choose Wi-Fi settings. Search the network,
find and click “WIFIPODZ”.
3. Enter password “123456789” to connect to your camera.
4. Open your Internet browser and input “192.168.1.2” or “wifi.podz”. You can now view the photos
and videos stored in your camera.
5.4 Connecting the Camera to Your Smart Device (App)
1. Search “iontheaction” app via the Google Play store of an Android device or via the App store of
an IOS device.
Note: You need to download Google Play store or App store first if they are uninstalled in your
smart device.
2. Find “ iON Camera” app, download and install it to your smart device.
3. Turn on your Wi-Fi PODZ
4. Go to the network settings of your device and choose Wi-Fi settings. Search the network, find
and click “WIFIPODZ”.
5. Enter password “123456789” to connect to your camera.
6. Open your “iON Camera” app. You may conduct relevant operations in accordance with
specific App interface.
TM
.
6. Trademark Information
© 2013 World Wide Licenses Limited.
® The iON logo is a registered trademark of World Wide Licenses Limited.
EN-2
Page 4

PODZ TM, Shoot/Share and Air Pro and their respective logos are trademarks or registered trademarks of
World Wide Licenses Limited in the United States and other countries. Copyright © 2013. All Rights
Reserved.
FCC Statement
Caution Statement
“Modifications not approved by the party responsible for compliance could void the user’s authority
to operate the equipment.”
Instruction Statement
NOTE: This equipment has been tested and found to comply with the limits for a Class B digital
device, pursuant to Part 15 of the FCC Rules. These limits are designed to provide reasonable
protection against harmful interference in a residential installation. This equipment generates, uses
and can radiate radio frequency energy and, if not installed and used in accordance with the
instructions, may cause harmful interference to radio or television reception, which can be
determined by turning the equipment off and on, the user is encouraged to try to correct the
interference by one or more of the following measures:
• Reorient or relocate the receiving antenna.
• Increase the separation between the equipment and receiver.
• Connect the equipment into an outlet on a circuit different from that to which the receiver is
connected.
• Consult the dealer or an experienced radio/ TV technician for help.
WARNING: THE MANUFACTURER IS NOT RESPONSIBLE FOR ANY RADIO OR TV
INTERFERENCE CAUSED BY UNAUTHORIZED MODIFICATIONS TO THE DEVICE. ANY SUCH
MODIFICATIONS COULD VOID THE USER’S AUTHORITY TO OPERATE THE EQUIPMENT.
Questions?
Need Some Help?
This manual should
help you understand
your new product.
If you still have questions,
visit our website:
www.iontheaction.com
Like Us:
www.facebook.com/iontheaction
Tweet Us:
www.twitter.com/iontheaction
EN-3
Page 5
WiFi-PODZ
1. Hauptfunktionen
Das WiFi-PODZ macht aus Ihrer iON-Kamera einen WiFi-Zugangspunkt. Kamera-Videos/-Fotos
ansehen und Kameraeinstellungen von Ihrem Handy, Tablet (mithilfe der kostenlosen iON-App zum
Herunterladen) oder Computer ändern. Dateien zurück zu Ihrem Computer oder Handy übertragen. Sie
können auch das Kamerabild streamen, eine Aufzeichnung starten/beenden oder ein Foto aufnehmen.
Dank der cleveren App können Sie auch Seiten sozialer Medien direkt von Ihrem Smart-Gerät hochladen.
2. Packungsinhalt
Entfernen Sie vorsichtig die Verpackung und kontrollieren Sie, ob Sie
folgendes Zubehör
WiFi-PODZ Drehen, um die Kamera zu verschließen.
erhalten haben:
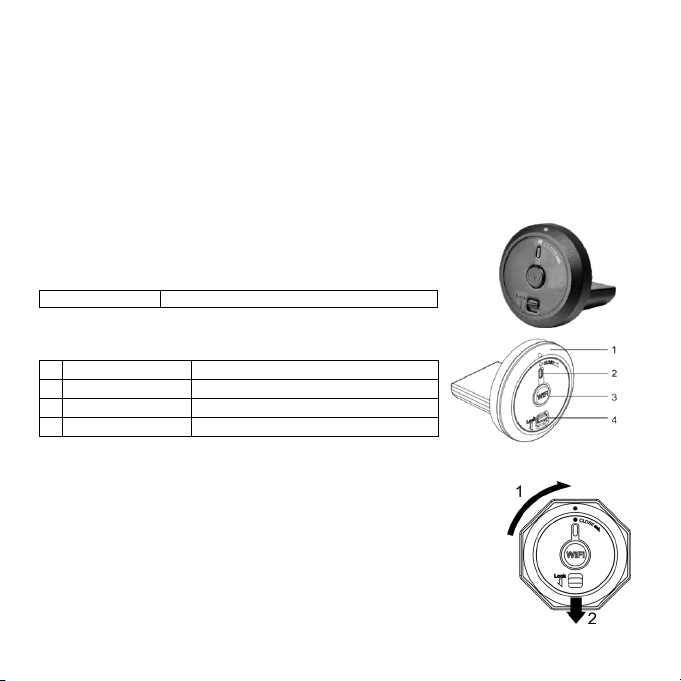
3. Funktionsteile
1 WiFi-PODZ Drehen, um die Kamera zu verschließen
2 WiFi-LED-Anzeige Zeigt den WiFi-Status an
3 WiFi-Netztaste Schaltet WiFi an bzw. aus
4 PODZ -Verriegelung Verriegelt das PODZ
4. Das PODZ installieren
1. Bringen Sie das PODZ an der Rückseite der Kamera an und drehen Sie
es im Uhrzeigersinn, bis zwei Punkte eine Linie bilden.
2. Schieben Sie die Verriegelung auf das PODZ, um es zu sichern.
Warnhinweise:
1. Die Verriegelung muss einrasten, um die wasserdichte Versiegelung
zu gewährleisten – ansonsten kann Wasser eindringen.
2. Die Gummidichtung auf dem PODZ bildet eine wasserdichte Barriere,
um die Kamera unter nassen Bedingungen und unter Wasser zu
schützen.
5. Das WiFi-PODZ verwenden
Kurzanleitung
DE-1
Page 6

5.1 Das WiFi-PODZ einschalten
1. Nehmen sie Ihr Standard-PODZ von der Rückseite der Kamera ab und platzieren Sie Ihr WiFi-PODZ
in die PODZ -Kamerabuchse. (Siehe Abschnitt 4)
2. Halten Sie zum Anschalten der Kamera die Netztaste
3. Drücken Sie die WiFi-Netztaste auf dem WiFi-PODZ, um Ihr Wi-Fi einzuschalten.Das blaue LED
leuchtet auf und zeigt an, dass das Wi-Fi hochfährt. Das WiFi benötigt zum Hochfahren etwa 15 - 20
Sekunden und wird dann verbindungsbereit. Das LED blinkt, sobald die WiFi-Funktion aktiv oder
verbunden ist.
4. Die WiFi-Netztaste drücken, um WiFi jederzeit auszuschalten.
Hinweis: Aktiviertes WiDi verbraucht Ihren Kameraakku schneller. Schalten Sie WiFi aus, wenn es nicht
verwendet wird, um Einstellungen zu ändern oder Inhalte hochzuladen.
gedrückt.
5.2 Die Kamera an Ihren Computer anschließen
1. Schalten Sie Kamera und WiFi-PODZ ein.
2. Die Netzwerkeinstellung Ihres PCs aufrufen und die WiFi-Einstellung auswählen. Suchen Sie das
Netzwerk und wenn Sie es gefunden haben, klicken Sie auf “WIFIPODZ”.
3. Das Kennwort “123456789” eingeben und die Verbindung zu Ihrer Kamera herstellen.
4. Ihren Internet-Browser öffnen und “192.168.1.2” eingeben. Nun können Sie die in Ihrer Kamera
gespeicherten Bilder sehen.
5.3 Ihre Kamera an Ihr Smart-Gerät (Browser) anschließen
1. Schalten Sie Kamera und WiFi-PODZ ein.
2. Die Netzwerkeinstellung Ihres Mobilgeräts aufrufen und die WiFi-Einstellung auswählen. Suchen
Sie das Netzwerk und wenn Sie es gefunden haben, klicken Sie auf “WIFIPODZ”.
3. Das Kennwort “123456789” eingeben, um die Verbindung zu Ihrer Kamera herstellen.
4. Ihren Internet-Browser öffnen und “192.168.1.2” oder “wifi.podz” eingeben. Sie können die in Ihrer
Kamera gespeicherten Fotos und Videos ansehen.
5.4 Ihre Kamera an Ihr Smart-Gerät (App) anschließen
1. Die iontheaction-App in Ihrem Geräte-Appstore suchen.
2. Die App auf Ihr Smart-Gerät herunterladen und darauf installieren.
3. WiFi-PODZ einschalten.
4. Die Netzwerkeinstellung Ihres Geräts aufrufen und die WiFi-Einstellungen auswählen. Suchen Sie
das Netzwerk und wenn Sie es gefunden haben, klicken Sie auf “WIFIPODZ”.
5. Das Kennwort “123456789” eingeben, um die Verbindung zu Ihrer Kamera herstellen.
6. Ihre App öffnen.
7. Eine detaillierte Bedienungsanleitung finden Sie auf der App-Seite.
6. Informationen zu den Warenzeichen
© 2013 World Wide Licenses Limited.
® Das iON-Logo ist ein eingetragendes Warenzeichen von World Wide Licenses Limited.
DE-2
Page 7
PODZ, Shoot/Share und AIR PRO und deren entsprechende Logos sind Warenzeichen oder
eingetragene Warenzeichen von World Wide Licenses Limited in den Vereinigten Staaten und anderen
Ländern. Copyright © 2013. Alle Rechte vorbehalten.
FCC-Erklärung
Warnhinweis
„Veränderungen, die nicht ausdrücklich von der für die Übereinstimmung verantwortlichen Partei
genehmigt sind, können dazu führen, dass die Betriebsgenehmigung des Benutzers ungültig wird.“
Übereinstimmungserklärung
ANMERKUNG: DIESES GERÄT WURDE ÜBERÜRÜFT UND STIMMT MIT DEN GRENZWERTEN
FÜR DIGITALE GERÄTE DER KLASSE B ÜBEREIN, DIE IM ARTIKEL 15 DER
FCC-BESTIMMUNGEN AUSGEFÜHRT WERDEN. Diese Grenzwerte sollen einen angemessenen
Schutz vor Störungen in Wohngegenden bieten. Dieses Gerät verursacht und verwendet Energie im
Radiofrequenzbereich und kann auf solchen Frequenzen ausstrahlen. Falls es nicht entsprechend den
Anweisungen installiert und verwendet wird, so kann es störende Interferenzen bei
Funkkommunikation hervorrufen. So sollte der Benutzer die Interferenz auf eine oder mehrere der
folgenden Arten beheben:
• NEUAUSRICHTUNG ODER POSITIONSVERÄNDERUNG DER EMPFANGSANTENNE.
• VERGRÖSSERUNG DES ABSTANDS ZWISCHEN DEM GERÄT UND DEM EMPFÄNGER.
• ANSCHLUSS DES GERÄTS AN EINE STECKDOSE, DIE NICHT AM SELBEN STROMKREIS
ANGESCHLOSSEN IST; WIE DIE DES EMPFÄNGERS.
• DEN HÄNDLER ODER EINEN ERFAHRENEN RADIO- UND FERNSEHTECHNIKER UM HILFE
ERSUCHEN.
WARNUNG: DER HERSTELLER IST FÜR RADIO- ODER FERNSEH-STÖRUNGEN NICHT
VERANTWORTLICH, DIE DURCH UNBEFUGTE MODIFIKATIONEN AM GERÄT VERURSACHT
WERDEN. SOLCHE MODIFIKATIONEN KÖNNEN DAZU FÜHREN, DASS DIE
BETRIEBSGENEHMIGUNG DES BENUTZERS UNGÜLTIG WIRD.
Fragen?
Benötigen Sie Hilfe?
Dieses Handbuch
soll Ihnen helfen, Ihr
neues Produkt zu
verstehen.
Wenn Sie noch Fragen
haben,
besuchen Sie unsere
Website:
www.iontheaction.com
Gefällt mir:
www.facebook.com/iontheaction
Senden Sie uns einen Tweet:
www.twitter.com/iontheaction
DE-3
Page 8
PODZ Wi-Fi
Guide de démarrage rapide
1. Caractéristiques principales
Un PODZ Wi-Fi transforme votre Air Pro 2 de iON en un point d'accès Wi-Fi. Vous pouvez alors accéder
à son contenu photo/vidéo et modifier les paramètres de la caméra depuis votre téléphone mobile,
tablette(à l'aide de l'application ION disponible gratuitement en téléchargement) ou ordinateur. Effectuez
le transfert de fichiers vers votre ordinateur ou appareil mobile. Vous pouvez également consulter en
direct la vue de la caméra, lancer ou arrêter un enregistrement ou prendre une photo. L'application
intelligente vous permet d'envoyer vos fichiers sur des sites de réseaux sociaux directement depuis votre
appareil intelligent.
2. Contenu de la boîte
Déballez le contenu de la boîte avec précautions et confirmez la présence
des éléments suivants :
PODZ Wi-Fi Faire pivoter pour sceller la caméra.
3. Composants fonctionnels
1 PODZ Wi-Fi Faire pivoter pour sceller la caméra
2 Voyant DEL Wi-Fi Affiche le statut Wi-Fi
Bouton d'activation
3
4 Loquet PODZ Pour verrouiller le PODZ
du Wi-Fi
Allumer ou éteindre le Wi-Fi
4. Installer le PODZ
1. Attachez le PODZ à l'arrière de la caméra et faites-le pivoter dans le
sens des aiguilles d'une montre pour aligner les deux points.
2. Faites glisser le loquet du PODZ pour le verrouiller.
Avertissements :
1. Le loquet doit être verrouillé pour assurer l'intégrité du joint d'étanchéité
– si cela n'est pas fait, des fuites pourraient se produire.
FR-1
Page 9

2. Le joint de caoutchouc du PODZ doit être tenu propre car il assure l'étanchéité qui protège votre
caméra sous l'eau.
5. Utilisation du PODZ Wi-Fi
5.1 Installer et allumer le PODZ Wi-Fi
1. Retirez le PODZ standard présent à l'arrière de la caméra et insérez votre PODZ Wi-Fi dans le port
PODZ de la caméra. (Voir la section A).
2. Appuyez longuement sur le bouton d'Alimentation
3. Appuyez sur le bouton d'alimentation du PODZ Wi-Fi pour allumer le Wi-Fi. Le voyant DEL Bleu
s'allume pour indiquer que le Wi-Fi est en cours d'allumage. Cela prendra entre 15 à 20 secondes
avant que la connexion ne soit utilisable. Le voyant DEL clignotera pour indiquer que la fonction
Wi-Fi est active et connectée.
4. Appuyez sur le bouton d'alimentation Wi-Fi à tout moment pour désactiver la fonction.
Remarque : La fonction Wi-Fi activée consommera la batterie de votre caméra plus rapidement.
Éteignez le Wi-Fi lorsque vous n'en avez pas besoin pour changer un paramètre ou transférer du
contenu.
5.2 Connecter la caméra à votre ordinateur
1. Allumez la caméra et le PODZ Wi-Fi
2. Rendez-vous dans les paramètres réseau de votre PC et sélectionnez les paramètres Wi-Fi.
Recherchez les réseaux disponibles et sélectionnez « WIFIPODZ »
3. Saisissez le mot de passe « 123456789 » pour effectuer la connexion avec votre caméra.
4. Lancez votre navigateur et saisissez l'adresse « 192.168.1.2 ». Vous pourrez alors visualiser les
fichiers présents dans votre caméra.
5.3 Connecter la caméra à un appareil intelligent (via navigateur)
1. Allumez la caméra et le PODZ Wi-Fi
2. Rendez-vous dans les paramètres réseau de votre appareil mobile et sélectionnez les paramètres
Wi-Fi. Recherchez les réseaux disponibles et sélectionnez « WIFIPODZ »
3. Saisissez le mot de passe « 123456789 » pour effectuer la connexion avec votre caméra.
4. Lancez votre navigateur et saisissez l'adresse « 192.168.1.2 » ou « wifi.podz ». Vous pouvez alors
parcourir les photos ou vidéos contenues dans votre caméra.
5.4 Connecter la caméra à un appareil intelligent (via App)
1. Recherchez l'application iontheaction dans la boutique d'application de votre appareil.
2. Téléchargez et installez l'application sur votre appareil.
3. Allumez votre PODZ Wi-Fi
4. Rendez-vous dans les paramètres réseau de votre appareil et sélectionnez les paramètres Wi-Fi.
Recherchez les réseaux disponibles et sélectionnez « WIFIPODZ »
5. Saisissez le mot de passe « 123456789 » pour effectuer la connexion avec votre caméra.
6. Ouvrez votre application.
pour allumer votre caméra.
FR-2
Page 10

7. Reportez-vous à la page de l'app pour en savoir plus sur son utilisation.
6. Informations légales
© 2013 World Wide Licenses Limited.
® Le logo iON est une marque déposée de World Wide Licenses Limited.
PODZ, Shoot/Share et Air Pro ainsi que leurs logos respectifs sont des marques ou marques déposées
de World Wide Licenses Limited aux États-Unis et autres pays. Copyright © 2013. Tous droits réservés.
Déclaration de la FCC
Avertissement
« Toute modification effectuée sans l'approbation du fabricant de l'équipement pourrait annuler
l'autorité de l'utilisateur sur son utilisation. »
Instructions
REMARQUE : Cet équipement à été testé et est conforme aux limites d'un appareil de Classe B,
selon l'article 15 des Règles FCC. Ces limites ont étés mises en place pour offrir une protection
raisonnable contre les interférences dans un complexe résidentiel. Si cet équipement crée des
interférences pour la réception radio ou télévisuelle, ce qui peut être constaté en l'allumant et en
l'éteignant, alors il vous est conseillé d'y remédier d'une des manières suivantes :
• Réorientez ou déplacez l'antenne réceptrice.
• Augmentez la distance entre l'équipement et le récepteur.
• Connectez l'équipement à une prise ou circuit différent de celui du récepteur.
• Prenez conseil auprès du revendeur ou d'un technicien radio/TV qualifié pour obtenir de l'aide.
AVERTISSEMENT : LE FABRICANT NE PEUT EN AUCUN CAS ÊTRE TENU POUR
RESPONSABLE DES INTERFÉRENCES RADIO OU TV CAUSÉES PAR UNE MODIFICATION
NON AUTORISÉE DE L'APPAREIL UNE TELLE MODIFICATION POURRAIT RÉVOQUER LES
DROITS DE L'UTILISATEUR CONCERNANT L'UTILISATION DE L'ÉQUIPEMENT.
Des questions ?
Besoin d'aide ?
Ce guide vous
aidera à comprendre
votre nouveau
produit.
Si vous avez des
questions
supplémentaires,
visitez notre site web :
www.iontheaction.com
Aimez nous :
www.facebook.com/iontheaction
Twittez nous :
www.twitter.com/iontheaction
FR-3
Page 11

PODZ Wi-Fi
Guida all’avvio rapido
1.Caratteristiche principali
Un PODZ Wi-Fi consente alla propria videocamera iON di diventare un punto di accesso Wi-Fi. Diventa
possibile visualizzare i video/le foto nella videocamera e modificare le impostazioni della videocamera da
telefono cellulare, tablet (mediante l'App iON gratuita) o computer e trasferire file su computer o dispositivi
mobili. È anche possibile visualizzare la vista della videocamera come streaming in tempo reale,
avviare/arrestare le registrazioni o scattare foto. L'app intelligente consente inoltre di caricare file sui siti di
social network direttamente dal proprio smart device.
2. Contenuto della confezione
Aprire la confezione e verificare che siano presenti i seguenti elementi:
PODZ Wi-Fi Ruotare per sigillare la videocamera.
3. Parti
1 PODZ Wi-Fi Ruotare per sigillare la videocamera.
2 Spia LED Wi-Fi Indica lo stato del Wi-Fi.
Tasto di attivazione del
3
4 Blocco PODZ Blocca il PODZ in posizione.
Wi-Fi
Attiva o disattiva il Wi-Fi.
4 Montaggio del PODZ
1. Collegare il PODZ Wi-Fi al retro della videocamera e ruotarlo in senso
orario fino a quando i due punti sono allineati.
2. Far scorrere il blocco sul PODZ per bloccarlo in posizione.
Avvertenze:
1. il blocco deve essere esattamente in posizione di blocco per assicurare
che il sigillo impermeabile svolga la sua funzione in modo corretto; in
caso contrario si potrebbero verificare infiltrazioni d'acqua.
2. Il sigillo di gomma sul PODZ forma la barriera impermeabile che
protegge la videocamera in condizioni di umidità e sott'acqua.
IT-1
Page 12

5. Utilizzo del PODZ Wi-Fi
5.1. Accensione del PODZ Wi-Fi
1. Rimuovere il PODZ standard dal retro della videocamera e posizionare il PODZ Wi-Fi nell'attacco
PODZ della videocamera (consultare la sezione 4).
2. Tenere premuto il tasto di accensione
3. Premere il tasto di accensione del Wi-Fi sul PODZ Wi-Fi per attivare il Wi-Fi. La spia LED blu si
accende, a indicare che il Wi-Fi è in fase di riscaldamento. Il Wi-Fi impiega circa 15-20 secondi per
riscaldarsi e diventare connettibile. La spia LED inizia a lampeggia quando la funzione Wi-Fi è attiva
o connessa.
4. Premere il tasto di accensione del Wi-Fi per disattivare il Wi-Fi in qualsiasi momento.
Nota: quando attivo, il Wi-Fi scarica la batteria più rapidamente. Disattivare il Wi-Fi quando non lo si
utilizza per modificare delle impostazioni o caricare dei contenuti.
per accendere la videocamera.
5.2 Collegamento della videocamera a un computer
1. Accendere la videocamera e il PODZ Wi-Fi.
2. Andare alle impostazioni di rete del computer e selezionare la voce relativa alle impostazioni Wi-Fi.
Cercare la rete e una volta trovata fare clic su “WIFIPODZ”.
3. Inserire la password “123456789” per connettersi alla videocamera.
4. Aprire il browser Internet e digitare “192.168.1.2”. A questo punto è possibile visualizzare i file
archiviati nella videocamera.
5.3 Collegamento della fotocamera a uno smart device (browser)
1. Accendere la videocamera e il PODZ Wi-Fi.
2. Andare alle impostazioni di rete del dispositivo mobile e selezionare la voce relativa alle
impostazioni Wi-Fi. Cercare la rete e una volta trovata fare clic su “WIFIPODZ”.
3. Inserire la password “123456789” per connettersi alla videocamera.
4. Aprire il browser Internet e digitare “192.168.1.2” o “wifi.podz”. A questo punto è possibile
visualizzare le foto e i video salvati nella fotocamera.
5.4 Collegamento della fotocamera a uno smart device (app)
1. Cercare l'applicazione iontheaction nell'App Store del proprio dispositivo.
2. Scaricare e installare l'app nello smart device.
3. Accendere il PODZ Wi-Fi.
4. Andare alle impostazioni di rete del proprio dispositivo e selezionare la voce relativa alle
impostazioni Wi-Fi. Cercare la rete e una volta trovata fare clic su “WIFIPODZ”.
5. Inserire la password “123456789” per connettersi alla videocamera.
6. Aprire l'app.
7. Consultare la pagina dell'applicazione per istruzioni d'uso dettagliate.
6. Informazioni sul marchio
IT-2
Page 13

© 2013 World Wide Licenses Limited.
® Il logo iON è un marchio registrato di World Wide Licenses Limited.
PODZ, Shoot/Share e Air Pro e i loro rispettivi loghi sono marchi o marchi registrati di World Wide
Licenses Limited negli Stati Uniti e in altri Paesi. Copyright © 2013. Tutti i diritti riservati.
Dichiarazione FCC
Avvertenza
“Modifiche non approvate dalla parte responsabile della conformità possono annullare l'autorità
dell'utente sull'utilizzo dell'apparecchio.”
Istruzioni
NOTA: Il presente apparecchio è stato testato ed è risultato conforme ai limiti per i dispositivi digitali
di Classe B, ai sensi della Parte 15 delle Normative FCC. Tali limiti sono stati ideati per fornire
un’adeguata protezione nei confronti di interferenze dannose in installazioni residenziali. Questo
apparecchio genera, utilizza e può emettere radio frequenze e, se non installato e utilizzato secondo
le istruzioni, può causare interferenze dannose alla ricezione radio o TV. Ciò può essere determinato
spegnendo e riaccendendo l'apparecchio. Si incoraggia l'utente a tentare di correggere l'interferenza
adottando una o più delle seguenti misure:
• Riorientare o riposizionare l'antenna di ricezione.
• Aumentare la distanza tra l'apparecchio e il ricevitore.
• Collegare l'apparecchio a una presa su un circuito diverso da quello a cui è collegato il ricevitore.
• Consultare il rivenditore o un tecnico radio/TV esperto per ricevere assistenza.
ATTENZIONE: IL PRODUTTORE NON È RESPONSABILE DELLE INTERFERENZE RADIO O TV
CAUSATE DA MODIFICHE AL DISPOSITIVO NON AUTORIZZATE. TALI MODIFICHE POSSONO
ANNULLARE L'AUTORITÀ DELL'UTENTE AD UTILIZZARE L'APPARECCHIO.
Domande?
Bisogno di aiuto?
Il presente manuale
aiuta a capire come
utilizzare il nuovo
prodotto.
Per ulteriori domande,
visita il nostro sito web
all'indirizzo:
www.iontheaction.com
Seguici su:
www.facebook.com/iontheaction
Seguici su:
www.twitter.com/iontheaction
IT-3
Page 14

Wi-Fi PODZ
Guía rápida de uso
1. Características principales
El Wi-Fi PODZ convierte tu cámara iON en un punto de acceso Wi-Fi. Visualiza tus fotos/videos y
cambia la configuración de la cámara desde tu móvil, tablet (usando la aplicación iON de descarga
gratuita) y ordenador. Transfiere tus archivos al ordenador ó a un dispositivo móvil. También puedes ver
en directo la imagen de la cámara, comenzar y parar de grabar ó tomar fotos. Esta aplicación inteligente
también te permite subir los archivos directamente a las redes sociales desde el móvil.
2. Contenido
Desempaqueta cuidadosamente la caja y asegúrate de que contiene el
siguiente artículo:
Wi-Fi PODZ Rotar para sellar la cámara
3. Funciones
1 Wi-Fi PODZ Rotar para sellar la cámara
2 Indicador LED Wi-Fi Muestra el estado del Wi-Fi
Botón encendido del
3
4 Cierre PODZ Bloquea el PODZ
Wi-Fi
Enciende ó apaga el Wi-Fi
4. Instalar el PODZ
1. Acopla el PODZ a la parte trasera de la cámara y rótalo en el sentido de
las agujas del reloj hasta que se alineen dos puntos.
2. Desliza el cierre del PODZ para cerrarlo.
Advertencias:
1. El cierre debe estar bloqueado para asegurar que el sellado
impermeable está activado-en caso de no estarlo, esto puede provocar
daños por agua.
ES-1
Page 15

2. Debes mantener el sellado de goma del PODZ limpio, ya que este forma la barrera protectora
que protege la cámara en condiciones de humedad ó bajo el agua.
5. Usar el Wi-Fi PODZ
5.1 Encender el Wi-Fi PODZ
1. Quita el PODZ estándar de la parte trasera de la cámara y posiciona el Wi-Fi PODZ en la ranura
para PODZ.(Ver sección 4)
2. Pulsa y mantén presionado el botón
3. Pulsa el botón de encendido del Wi-Fi en el Wi-Fi PODZ para encender el Wi-Fi. La luz LED azul se
ilumina para indicar que el Wi-Fi se está calentando. Tarda unos 15-20 segundos en calentarse y
adquirir conectividad. La luz LED parpadeará cuando la función Wi-Fi esté activa ó conectada.
4. Pulsa el botón de encendido/apagado del Wi-Fi para apagar el Wi-Fi en cualquier momento.
Nota: El Wi-Fi hace que la batería de la cámara se descargue más rápido cuando está activado. Apaga
el Wi-Fi si no lo estás usando ó si estás cambiando la configuración ó subiendo contenido.
para encender la cámara.
5.2 Conectar la cámara a un ordenador
1. Enciende la cámara y el Wi-Fi PODZ.
2. Ve a la configuración de red de tu ordenador y selecciona configuración de WiFi. Busca la red y
cuando la encuentres haz click sobre “WIFIPODZ”
3. Introduce la contraseña “123456789” y conecta la cámara.
4. Abre tu navegador de internet e introduce “192.168.1.2”. Podrás ver los archivos almacenados en
la cámara.
5.3 Conectar la cámara a tu dispositivo móvil (navegador)
1. Enciende la cámara y el Wi-Fi PODZ.
2. Ve a la configuración de red de tu dispositivo móvil y selecciona configuración de WiFi. Busca la
red y cuando la encuentres haz click sobre “WIFIPODZ”.
3. Introduce la contraseña “123456789” y conecta la cámara.
4. Abre tu navegador de internet e introduce “192.168.1.2”. o “wifi.podz”. Podrás ver los archivos
almacenados en la cámara.
5.4 Conectar la cámara a tu dispositivo móvil (aplicación)
1. Busca la Aplicación Iontheaction en la App store.
2. Bájate e instala la aplicación en tu dispositivo móvil.
3. Enciende tu WiFi PODZ.
4. Ve a la configuración de red de tu dispositivo y selecciona configuración de WiFi. Busca la red y
cuando la encuentres haz click sobre “WIFIPODZ”.
5. Introduce la contraseña “123456789” y conecta la cámara. .
6. Abre la aplicación.
6. INFORMACION SOBRE LA MARCA
ES-2
Page 16

© 2013 World Wide Licenses Limited.
® El logotipo iON es una marca registrada de World Wide Licenses Limited.
CamLOCK, PODZ, Shoot/Share y AIR PRO y sus respectivos logotipos son marcas registradas de
World Wide Licenses Limited en los Estados Unidos y otros países. Copyright © 2013. All Rights
Reserved.
Declaración FCC
Declaración de precaución
“Los cambios o modificaciones no acreditadas por la parte responsable de su cumplimiento, puede
invalidar la autoridad del usuario de manejar el equipo.”
Declaración de instrucción
NOTA: Se ha comprobado que este equipo cumple los límites para dispositivos digitales de clase B,
de acuerdo con el apartado 15 de las normas de la FCC. Estos límites se han previsto para ofrecer
una protección razonable contra interferencias en instalaciones residenciales. Este equipo genera,
utiliza y puede irradiar energía de radiofrecuencia y si no se instala y se utiliza de acuerdo con las
instrucciones suministradas, podría ocasionar interferencias perjudiciales para las transmisiones de
radio y televisión, lo que se puede determinar apagando y encendiendo el aparato, se recomienda
al usuario que intente corregirlas realizando una o varias de las siguientes acciones:
-Cambie la orientación o ubicación de la antena receptora.
-Aumente la separación entre el aparato y el receptor.
-Conecte el aparato a una fuente de alimentación que esté en un circuito distinto a aquél donde esté
conectado el receptor.
-Consulte con el distribuidor o con un técnico especializado en radio/TV.
AVISO: EL FABRICANTE NO SE HACE RESPONSABLE DE NINGUNA INTERFERENCIA DE
RADIO Ó TELEVISION CAUSADA POR UNA MODIFICACION NO AUTORIZADA DE ESTE
DISPOSITIVO, CUALQUIER TIPO DE MODIFICACION PUEDE INVALIDAR LA AUTORIDAD DEL
USUARIO DE MANEJAR EL EQUIPO.
Preguntas?
Necesitas ayuda?
Este manual debería
ayudarte a entender
tu producto.
Si tienes dudas,
Visita nuestra página web:
www.iontheaction.es
Like Us:
www.facebook.com/iontheaction
Tweet Us:
www.twitter.com/iontheaction
ES-3
Page 17

Wi-Fi PODZ
Guia de usuário
1. Características principais
o Wi-Fi PODZ transformar a tua câmara iON num ponto de acessor Wi-Fi. Visualiza as tuas fotos/vídeos
e muda as configurações desde o teu telemóvel, tablet (com a aplicação gratuita iON) ou computador.
Descarrega os teus ficheiros no computador ou dispositivo móvel. Também podes ver em direto a
imagem da câmara, iniciar ou parar a gravação o tirar fotos. Esta aplicação também permite descarregar
diretamente os ficheiros para as redes sociais a partir do telemóvel.
2. Conteúdo.
Abre cuidadosamente a caixa e verifica que contém o seguinte artigo:
Wi-Fi PODZ Rodar para selar a câmara
3. Funções
1 Wi-Fi PODZ Rodar para selar a câmara
2 Indicador LED Wi-Fi Mostra o status do Wi-Fi
Botão de ligação do
3
4 Fecho PODZ Blodeia a tampa PODZ
Wi-Fi
Liga ou desliga o Wi-Fi
4. Instalar a tampa PODZ
1. Coloque a tampa PODZ na parte traseira da câmara e roda a tampa no
sentido das agulhas de um relógio até os ponteiros estarem alinhados.
2. Ponha o fecho do PODZ para baixo para fechar.
Cuidados:
1. O fecho deve estar bloqueado para assegurar a impermeabilidade da
câmara. Caso não esteja, pode provocar danos com entrada de água.
2. Como manutenção deve ter a borracha do PODZ sempre limpa.
Esta serve de barreira de proteção da câmara contra a humidade
quando está debaixo ou não de água.
PT-1
Page 18

5. Utilizar o Wi-Fi PODZ
5.1 Ligar o Wi-Fi PODZ
1. Tira a tampa PODZ standard da parte traseira da câmara e posicione o Wi-Fi PODZ na ranhura para
PODZ.(Ver parágrafo 4)
2. Pressione e mantenha pressionado o botão
3. Pressione o botão de ligação do Wi-Fi no Wi-Fi PODZ para ligar o Wi-Fi. Um LED azul acende e
pisca quando estiver a emitir sinal. Demora cerca de 15-20 segundos em ligar-se e a emitir sinal de
ligação. A luz azul do LED começa a piscar quando estiver em modo emissão ou quando estiver
aparelhado.
4. Pressione o botão de ligação do Wi-Fi para desliga-lo a qualquer momento.
Nota: El Wi-Fi descarrega rapidamente a bateria quando está ativado. Desligue o Wi-Fi se não está a
utilizá-lo ou se não estiver a alterar as configurações ou a descarregar conteúdo.
para ligar a câmara.
5.2 Ligar a câmara a um computador.
1. Ligue a câmara e o Wi-Fi PODZ.
2. Va a configurações de rede do seu computador e selecione busca de rede WiFi. Quando
encontrará “WIFIPODZ”, clique nele.
3. Introduza a palavra chave“123456789” e ligue à câmara.
4. Abre o seu navegador de internet e introduza “192.168.1.2”. Conseguirá visualizar os arquivos na
câmara.
5.3 Ligar a câmara ao seu dispositivo móvel. (navegador)
1. Ligue a câmara e o Wi-Fi PODZ.
2. Va a configurações de rede do seu dispositivo móvel e selecione busca de rede WiFi. Quando
encontrará “WIFIPODZ”, clique nele.
3. Introduza a palavra chave“123456789” e ligue à câmara.
4. Abre o explorador internet e introduza “192.168.1.2”. ou “wifi.podz”. Conseguirá visualizar os
arquivos na câmara.
5.4 Ligar a câmara ao seu dispositivo móvel. (aplicação)
1. Procure a Aplicação Iontheaction na App store.
2. Descarregue a aplicação no seu dispositivo móvel.
3. Ligue o seu WiFi PODZ.
4. Va a configurações de rede do seu dispositivo e selecione “WIFIPODZ”.
5. Coloque a palavra chave “123456789” e ligue a câmara
6. Abre a aplicação
6. INFORMAÇÃO SOBRE A MARCA
© 2013 World Wide Licenses Limited.
® O logotipo iON é uma marca registada da World Wide Licenses Limited.
PT-2
Page 19

CamLOCK, PODZ, Shoot/Share e AIR PRO e seus respectivos logotipos são marcas registadas da
World Wide Licenses Limited nos Estados Unidos e noutros países. Copyright © 2013. All Rights
Reserved.
Declaração FCCDeclaração de precauçãoo
“As mudanças ou modificações não acreditadas pelo responsável da marca, pode invalidar a
utilização do equipamento pelo utilizador.”Declaração de instruções
NOTA: Foi comprovado que este equipamento cumpre os parâmetros para dispositivos digitais de
classe B, de acordo com o regulamento 15 das normas FCC. Estos parâmetros foram previstos
para oferecer uma proteção razoável contra interferências em instalações residenciais. Este
equipamento causa, utiliza e pode irradiar energias de radiofrequência quando não é instalada ou
utilizada conforme as instruções fornecidas, e pode provocar interferências prejudiciais para as
transmissões de rádio e televisão, ao ligar e desligar o aparelho. Recomenda-se ao utilizador que
tente corrigi-las realizando uma ou várias das seguintes ações:
-Mudar a orientação ou colocação da antena receptora.
-Aumentar a distância entre o equipamento e o receptor.
-Conecte el aparato a una fuente de alimentación que esté en un circuito distinto a aquél donde esté
conectado el receptor.
-Consulte con el distribuidor o con un técnico especializado en radio/TV.
AVISO: EL FABRICANTE NO SE HACE RESPONSABLE DE NINGUNA INTERFERENCIA DE
RADIO Ó TELEVISION CAUSADA POR UNA MODIFICACION NO AUTORIZADA DE ESTE
DISPOSITIVO, CUALQUIER TIPO DE MODIFICACION PUEDE INVALIDAR LA AUTORIDAD DEL
USUARIO DE MANEJAR EL EQUIPO.
Preguntas?
Necesitas ayuda?
Este manual debería
ayudarte a entender
tu producto.
Si tienes dudas,
Visita nuestra página web:
www.iontheaction.es
Like Us:
www.facebook.com/iontheaction
Tweet Us:
www.twitter.com/iontheaction
PT-3
Page 20

Wi-Fi PODZ
Руководство по быстрому запуску
1. Главные функции
Wi-Fi PODZ превращает Вашу iON Air Pro 2 в точку доступа Wi-Fi. Смотрите видео/фото с камеры
и меняйте настройки с вашего мобильного устройства или компьтера. Загружайте файлы на Ваши
мобильные устройства или ПК. Также, Вы можете видеть картинку с камеры в реальном времени,
запускать/останавливать запись и делать фото. С помощью приложений загружать файлы на
сайты
соц. сетей прямо с вашего мобильного устройства.
2. Комплект
Осторожно достаньте содержимое упаковки и убедитесь в наличии
следующего:
Wi-Fi PODZ Поверните для герметизации камеры.
3. Функциональные части
1 Wi-Fi PODZ
Wi-Fi LED
2
индикатор
Кнопка питания
3
4 Защелка PODZ Защелкните PODZ
Wi-Fi
4. Установка PODZ
1. Установ ите WiFi PODZ к задней панели камеры и поверните
по часовой стрелке, пока две точки не будут на одной линии.
2. Сдвиньте защелку на PODZ для ее фиксации
Внимание:
1. Защелка должна быть закрыта для обеспечения водозащиты.
2. Резино вое уплотнение на PODZ образует
водонепроницаемый барьер для защиты камеры в условиях
влажности и под водой. Вы должны содержать это
уплотнение в чистоте, так как один единственные волос или песчинка могут вызвать
Поверните для герметизации
камеры
Показывает статус Wi-Fi
Включает и выключает Wi-Fi
RU-1
Page 21

протечку в устройство.
5. Использование модуля Wi-Fi PODZ
5.1 Включение Wi-Fi PODZ
1. Снимите Ваш PODZ и вставьте WiFi PODZ в гнездо PODZ на камере
2. Закройте камеру, повернув заднюю панель и передвинув защелку.
3. Нажмите и удержива йте кнопку Power
4. Нажмите кнопку включения WiFi на WiFi PODZ для того, чтобы включить WiFi. Загорится
голубой светодиодный индикатор, указывая на то, что WiFi готовится к работе. Необходимо
около 15-20 секунд для того, чтобы WiFi был готов, и его можно было подключить.
Светодиодный индикатор замигает, когда функция Wi-Fi будет активна или ее можно будет
подключить.
5.
Чтобы отключить WiFi в любое время, нажмите кнопку WiFi.
Примечание: при включении WiFi батарейка на вашей камере будет расходоваться быстрее.
Выключите WiFi, если вы не пользуетесь им, чтобы изменить настройки или загрузить контент.
5.2 Подсоединение камеры к компьютеру
1. Включите WiFi PODZ.
2. Откройте раздел настройки сети на вашем ПК и выберите настройки WiFi. Поищите в сети, и
найдите и кликните “WIFIPODZ”
3. Введите пароль “123456789” и вы подсоединитесь к вашей камере.
4. Откройте Интернет браузер и введите “192.168.1.2”. Вы увидите файлы, хранящиеся в
вашей камере
5.3 Подсоединение камеры к смарт-устройству (Браузеру)
1. Включите WiFi PODZ.
2. Откройте раздел настройки сети на вашем мобильном устройстве и выберите настройки
WiFi. Найдите сеть и кликните “WIFIPODZ”
3. Введите пароль “123456789” и вы можете подсоединиться к вашей камере.
4. Откройте Интернет браузер и введите “192.168.1.2” или “wifi.podz”. Вы увидите фотографии и
видео, хранящиеся в вашей камере.
5.4 Connecting the Camera to Your Smart Device (App)
1. Найдите приложение “iontheaction” или “iON Camera” в Google Play store для Android
устройс тва или в App для IOS.
2. Загрузите и установите приложение на свое устройство.
для того, чтобы включить камеру
RU-2
Page 22

3. Включите WiFi PODZ.
4. Откройте раздел настройки сети на вашем ПК и выберите настройки WiFi. Найдите и
кликните “WIFIPODZ”.
5. Введите пароль “123456789” и вы можете подсоединиться к вашей камере.
6. Откройте приложение и следуйте его инструкциям.
6. ИНФОРМАЦИЯ О ТОРГОВОЙ МАРКЕ
© 2013 World Wide Licenses Limited.
® Логотип iON является торговой маркой зарегитсрированной на имя компании World Wide
Licenses Limited.
CamLOCK, PODZ, Shoot/Share и AIR PRO а также их соответствующие логотипы являются
торговыми марками, зарегистрированными на имя компании World Wide Licenses Limited в
Соединенных Штатах Америки и других странах. Авторское право © 2013. Авторские права
защищены.
Заявление Федеральной комиссии связи (FCC ID: NW71006)
ВАЖНАЯ НОРМАТИВНАЯ ИНФОРМАЦИЯ
Данное устройство соответствует части 15 Правил FCC. Его использование возможно
следующих двух условия х:
• Данное устройство не вызывает вредоносных воздействий.
• Данное устройство принимает любое внешнее воздействие, включая воздействия,
вызывающие нежелательные результаты.
ПРЕДУПРЕЖДЕНИЕ:
“Изменения, не одобренные стороной, ответственной за соответствие, могут привести к
лишению пользователя права на эксплуатацию оборудования.”
ПРИМЕЧАНИЕ:
Данное оборудование было протестировано и сочтено соответствующим ограничениям по
цифровым
ограничения рассчитаны на обеспечение защиты в разумных пределах от вредоносных
воздействий при установк е в жилом помещении. Данное оборудование создает,
использует и может излучать энергию в радиодиапазоне, которая, при установке или
использовании данного оборудования не в соответствии с инструкциями производителя,
может создавать
отсутствие помех в каждом конкретном случае. В случае, если данное оборудование
действительно вызывает помехи в радио или телевизионн ом приеме, что можно
проверить, включив и выключив данное оборудование, пользователю рекомендуется
устройствам класса В в соответствии с частью 15 Правил FCC. Эти
помехи в радиосвязи. Тем не менее, невозможно гарантировать
при
RU-3
Page 23

попытаться уда лить помехи следующими средствами:
• Переориентировать или переместить принимающую антенну.
• Увеличить расстояние между данным прибором и приемником.
• Подключить данное оборудование к розетке другой электроцепи, нежели та, к которой
подключен приемник.
• Проконсультироваться с продавцом или квалифицированным радио/ ТВ техником.
Questions?
Need Some Help?
This manual should
help you understand
your new product
If you still have questions,
visit our website:
www.iontheaction.com
Like Us:
www.facebook.com/iontheaction
Tweet Us:
www.twitter.com/iontheaction
RU-4
Page 24

Wi-Fi PODZ
快速入門指南
1. 主要特徵
Wi-Fi PODZ 使 iON Air Pro 2 成為 Wi-Fi 的接入點,通過免費下載 iON 應用程序,在移動電話、平板電腦
或電腦上瀏覽相機視頻/照片文件、改變相機設置,或將文件傳到電腦或移動設備。你也可以實時預覽相機
畫面, 開始/停止錄影或拍照。此智能 app 也可讓你將相機內的文件直接上傳至社交網站。
2. 包裝內容
小心打開包裝並確保你有下列附件:
Wi-Fi PODZ
旋轉密封相機
3.功能部件
1 Wi-Fi PODZ
Wi-Fi LED 指示燈 顯示Wi-Fi狀態
2
Wi-Fi開關鍵 開/關Wi-Fi
3
4
鎖扣 鎖住PODZ
PODZ
旋轉密封相機
4. 安裝 Wi-Fi PODZ
1. 在相機尾部附上 Wi-Fi PODZ,順時針方向旋轉,直到兩個點對齊;
2. 撥動 Wi-Fi PODZ 上面的鎖扣,將其鎖住。
警告:
1. 確保扣緊鎖扣,以達到防水密封效果,否則會導致漏水。
2. 密封在 PODZ 的橡膠形成了一層防水屏障,它可在潮濕或水下的
環境中保護相機。因此,請保持此處清潔。
繁-1
Page 25

5. 使用 Wi-Fi PODZ
5.1 開啟 Wi-Fi PODZ
1. 移除相機標準 PODZ,將 Wi-Fi PODZ 插入相機 PODZ 插槽(請參考第 4 章節);
2. 按住電源鍵開啟相機;
3. 按 Wi-Fi 鍵開啟 Wi-Fi,正在開啟 Wi-Fi 時藍燈常亮,Wi-Fi 啟動時間約為 15-20 秒。當 Wi-Fi 開啟完畢,
藍燈閃爍;
4. 按 Wi-Fi 鍵關閉 Wi-Fi;
注意:開啟 Wi-Fi 時,電池耗電更快,如果不需要使用 Wi-Fi 時,請將其關閉。
5.2 連接相機至電腦
1. 開啟相機和 Wi-Fi PODZ;
2. 在電腦上打開無線網絡連接,搜索無線網絡名稱,找到並點擊“WIFIPODZ”;
3. 輸入密碼“123456789”連接至相機;
4. 打開因特網瀏覽器並輸入“192.168.1.2”,你可以查看儲存在相機裡的文件。
5.3 連接相機至智能設備(瀏覽器)
1. 開啟相機和 Wi-Fi PODZ ;
2. 進入移動設備網絡設置,選擇 Wi-Fi 設置。搜索無線網絡名稱,找到並點擊“WIFIPODZ”;
3. 輸入密碼“123456789”連接至相機;
4. 打開因特網瀏覽器並輸入“192.168.1.2” 或“wifi.podz”,你可以查看儲存在相機裡的文件。
5.4 連接相機至智能設備(App 應用程序)
1. 如果你使用的是安卓設備,請通過穀歌商店”Google Play”搜素關鍵字 “iontheaction”;如果你使用的是
IOS 設備,請通過蘋果商店 “App store”搜索關鍵字“iontheaction”;
注意:如果”Google Play”或“App store”未安裝在你的智能設備上,請先對它們進行相應下載。
2. 找到“ iON Camera”應用程序,將其下載並安裝至你的智能設備;
3. 開啟 Wi-Fi PODZ;
4. 進入智能設備網絡設置,選擇 Wi-Fi 設置。搜索網絡,找到並點擊“WIFIPODZ”;
5. 輸入密碼“123456789”連接至相機;
6. 打開 app 應用程序,你可以根據實際的 App 界面進行相應的操作。
6. Trademark Information
© 2013 World Wide Licenses Limited.
® The iON logo is a registered trademark of World Wide Licenses Limited.
繁-2
Page 26

PODZ, Shoot/Share and Air Pro and their respective logos are trademarks or registered trademarks of
World Wide Licenses Limited in the United States and other countries. Copyright © 2013. All Rights
Reserved.
FCC Statement
Caution Statement
“Modifications not approved by the party responsible for compliance could void the user’s authority
to operate the equipment.”
Instruction Statement
NOTE: This equipment has been tested and found to comply with the limits for a Class B digital
device, pursuant to Part 15 of the FCC Rules. These limits are designed to provide reasonable
protection against harmful interference in a residential installation. This equipment generates, uses
and can radiate radio frequency energy and, if not installed and used in accordance with the
instructions, may cause harmful interference to radio or television reception, which can be
determined by turning the equipment off and on, the user is encouraged to try to correct the
interference by one or more of the following measures:
• Reorient or relocate the receiving antenna.
• Increase the separation between the equipment and receiver.
• Connect the equipment into an outlet on a circuit different from that to which the receiver is
connected.
• Consult the dealer or an experienced radio/ TV technician for help.
WARNING: THE MANUFACTURER IS NOT RESPONSIBLE FOR ANY RADIO OR TV
INTERFERENCE CAUSED BY UNAUTHORIZED MODIFICATIONS TO THE DEVICE. ANY SUCH
MODIFICATIONS COULD VOID THE USER’S AUTHORITY TO OPERATE THE EQUIPMENT.
有些問題?
需要一些幫助?
本手冊將幫助你
瞭解你的新產品
如果您還有問題,請
訪問我們的網頁:
www.iontheaction.com
聯繫我們:
www.facebook.com/iontheaction
關注我們:
www.twitter.com/iontheaction
繁-3
Page 27

Wi-Fi PODZ
快速入门指南
1. 主要特征
Wi-Fi PODZ 使 iON Air Pro 2 成为 Wi-Fi 的接入点,通过免费下载 iON 应用程序,在移动电话、平板电脑
或电脑上浏览相机视频/照片文件、改变相机设置,或将文件传到电脑或移动设备。你也可以实时预览相
机画面, 开始/停止录影或拍照。此智能 app 也可让你将相机内的文件直接上传至社交网站。
2. 包装内容
小心打开包装并确保你有下列附件:
Wi-Fi PODZ
旋转密封相机
3.功能部件
1 Wi-Fi PODZ
Wi-Fi LED 指示灯 显示Wi-Fi状态
2
Wi-Fi开关键 开/关Wi-Fi
3
4
锁扣 锁住PODZ
PODZ
旋转密封相机
4. 安装 Wi-Fi PODZ
1. 在相机尾部附上 Wi-Fi PODZ,顺时针方向旋转,直到两个点对齐;
2. 拨动 Wi-Fi PODZ 上面的锁扣,将其锁住。
警告:
1. 确保扣紧锁扣,以达到防水密封效果,否则会导致漏水。
2. 密封在 PODZ 的橡胶形成了一层防水屏障,它可在潮湿或水下的环
境中保护相机。因此,请保持此处清洁。
简-1
Page 28

5. 使用 Wi-Fi PODZ
5.1 开启 Wi-Fi PODZ
1. 移除相机标准 PODZ,将 Wi-Fi PODZ 插入相机 PODZ 插槽(请参考第 4 章节);
2. 按住电源键开启相机;
3. 按 Wi-Fi 键开启 Wi-Fi,正在开启 Wi-Fi 时蓝灯常亮,Wi-Fi 启动时间约为 15-20 秒。当 Wi-Fi 开启完
毕,蓝灯闪烁;
4. 按 Wi-Fi 键关闭 Wi-Fi;
注意:开启 Wi-Fi 时,电池耗电更快,如果不需要使用 Wi-Fi 时,请将其关闭。
5.2 连接相机至电脑
1. 开启相机和 Wi-Fi PODZ;
2. 在电脑上打开无线网络连接,搜索无线网络名称,找到并点击“WIFIPODZ ”;
3. 输入密码“123456789”连接至相机;
4. 打开因特网浏览器并输入“192.168.1.2”,你可以查看储存在相机里的文件。
5.3 连接相机至智能设备(浏览器)
1. 开启相机和 Wi-Fi PODZ ;
2. 进入移动设备网络设置,选择 Wi-Fi 设置。搜索无线网络名称,找到并点击“WIFIPODZ”;
3. 输入密码“123456789”连接至相机;
4. 打开因特网浏览器并输入“192.168.1.2” 或“wifi.podz”,你可以查看储存在相机里的文件。
5.4 连接相机至智能设备(App 应用程序)
1. 如果你使用的是安卓设备,请通过谷歌商店”Google Play”搜素关键字 “iontheaction”;如果你使用的
是 IOS 设备,请通过苹果商店 “App store”搜索关键字“iontheaction”;
注意:如果”Google Play”或“App store”未安装在你的智能设备上,请先对它们进行相应下载。
2. 找到“ iON Camera”应用程序,将其下载并安装至你的智能设备;
3. 开启 Wi-Fi PODZ;
4. 进入智能设备网络设置,选择 Wi-Fi 设置。搜索网络,找到并点击“WIFIPODZ”;
5. 输入密码“123456789”连接至相机;
6. 打开 app 应用程序,你可以根据实际的 App 界面进行相应的操作。
6. Trademark Information
© 2013 World Wide Licenses Limited.
® The iON logo is a registered trademark of World Wide Licenses Limited.
简-2
Page 29

PODZ, Shoot/Share and Air Pro and their respective logos are trademarks or registered trademarks of
World Wide Licenses Limited in the United States and other countries. Copyright © 2013. All Rights
Reserved.
FCC Statement
Caution Statement
“Modifications not approved by the party responsible for compliance could void the user’s authority
to operate the equipment.”
Instruction Statement
NOTE: This equipment has been tested and found to comply with the limits for a Class B digital
device, pursuant to Part 15 of the FCC Rules. These limits are designed to provide reasonable
protection against harmful interference in a residential installation. This equipment generates, uses
and can radiate radio frequency energy and, if not installed and used in accordance with the
instructions, may cause harmful interference to radio or television reception, which can be
determined by turning the equipment off and on, the user is encouraged to try to correct the
interference by one or more of the following measures:
• Reorient or relocate the receiving antenna.
• Increase the separation between the equipment and receiver.
• Connect the equipment into an outlet on a circuit different from that to which the receiver is
connected.
• Consult the dealer or an experienced radio/ TV technician for help.
WARNING: THE MANUFACTURER IS NOT RESPONSIBLE FOR ANY RADIO OR TV
INTERFERENCE CAUSED BY UNAUTHORIZED MODIFICATIONS TO THE DEVICE. ANY SUCH
MODIFICATIONS COULD VOID THE USER’S AUTHORITY TO OPERATE THE EQUIPMENT.
有些问题?
需要一些帮助?
本手册将帮助你了
解你的新产品
如果您还有问题,请
访问我们的网页:
www.iontheaction.com
联系我们:
www.facebook.com/iontheaction
关注我们:
www.twitter.com/iontheaction
AM-QG-PODZ-9L-EU1
简-3
 Loading...