

Page 1
35MM FILM AND SLIDE SCANNER
QUICKSTART GUIDE
ENGLISH ( 1 – 6 )
GUÍA DE INICIO RÁPIDO
ESPAÑOL ( 7 – 12 )
GUIDE D’UTILISATION SIMPLIFIÉ
FRANÇAIS ( 13 – 18 )
GUIDA RAPIDA
ITALIANO ( 19 – 24 )
KURZANLEITUNG
DEUTSCH ( 25 – 30 )
SNELSTARTGIDS
NEDERLANDS ( 31 – 36 )
Page 2

Page 3
BOX CONTENTS:
FILM2SD
Negative Film Holder
Slide Film Holder
Roll Film Holder
USB Cable
TV Output Cable
1GB SD Card
Power Adapter
Cleaning Brush
User Manual
Safety Information & Warranty
Booklet
MAINTENANCE & CARE
Periodically clean FILM2SD’s glass surface with a dry
cotton swab to ensure it produces a clear image
during operation.
Use the included cleaning brush to remove dust from
FILM2SD’s backlight.
We recommend cleaning your film (and FILM2SD’s
trays) before inserting it into the scanner so dust or
dirt does not mar the image. If you do not have the
materials to do this properly, consult a professional
film store.
9
10
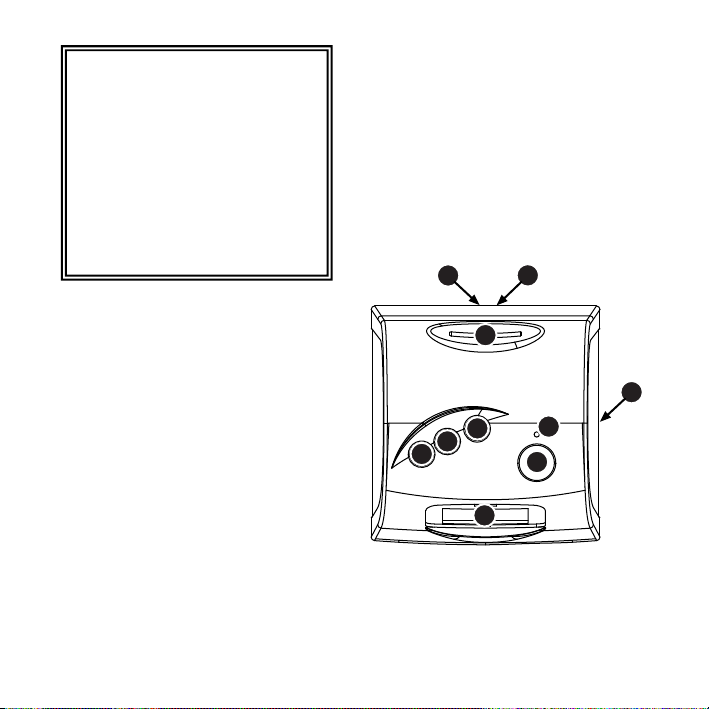
OVERVIEW
1. Power Button
2. Power LED
3. OK Button
4. Up / Mirror Button
5. Down / Flip Button
6. Display
7. Film Holder Slot
8. SD Card Slot
9. USB Port
10. TV Output
Note: Insert your SD card with the label facing down into the SD CARD SLOT. To eject your
SD card from the SD CARD SLOT, push it in first, then pull it out of the slot.
Note: To view your images on your TV instead of FILM2SD's DISPLAY, connect FILM2SD's TV
OUTPUT to your TV's video input with the included TV output cable.
5
8
7
1
4
2
3
6
1
Page 4
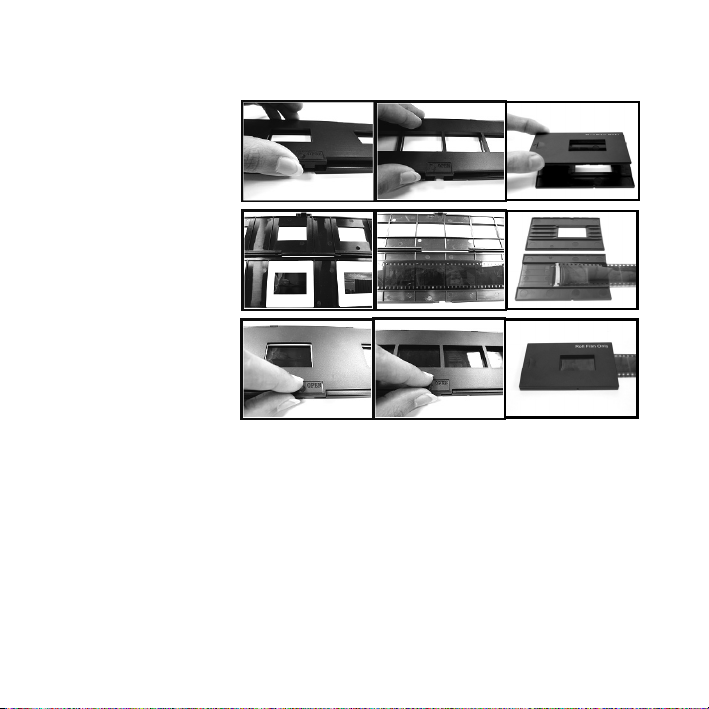
PLACING SLIDES & NEGATIVES IN THE HOLDERS
1. Open the film holder
by lifting the tab on
the bottom.
2. Insert the slide(s) into
the slide slot(s) or lay
the negative over the
negative slot.
3. Close the film holder.
Be sure the latch and
sides of the holder are
securely in place.
Only push the holder
through the FILM
HOLDER SLOT in the
direction of the arrow (from right to left).*
* To change move to the next picture when using the Roll Film Holder, slide the film itself
through the holder (while the holder is inserted in FILM2SD's FILM HOLDER SLOT).
Note: If the image is scanned upside down or mirrored, you can also correct this by using the
FLIP or MIRROR buttons later.
Tip: To avoid laying a negative in the wrong direction (which will produce a mirror image), be
sure you can correctly read the serial numbers at the top of the negative when placing it in the
holder.
Slides Negatives
Negatives (Roll)
2
Page 5

QUICKSTART
1. Connect FILM2SD to your computer’s USB port or to a power outlet with the included
power adapter.
2. Turn on the FILM2SD with the POWER button.
3. Place your slide(s) or negative into the appropriate holder. Be sure the latch and sides of
the holder are securely in place.
4. Insert the holder into the FILM HOLDER SLOT. Only push the holder through the FILM
HOLDER SLOT in the direction of the arrow (from right to left).
5. Insert your SD card with the label facing down into the SD CARD SLOT. When you save
your scanned images, they will be stored on the SD card.
6. Capture your image by pressing the OK button.
7. Press the OK button again to save the image.
8. Turn off FILM2SD before removing your SD card (otherwise its contents may be lost). To
eject your SD card from the SD CARD SLOT, push it in first, then pull it out of the slot.
Now you can insert it into an SD-compatible device, such as a digital picture frame,
computer or television, to view your pictures.
If you want to transfer your image(s) directly to your computer from FILM2SD, connect
FILM2SD to your computer with the included USB cable and select the USB icon (USB
Mode) from the Main Menu to establish the connection. FILM2SD will appear as a
removable device in "My Computer" (Windows) or on your Desktop (Mac). Once the
connection has been established, you can copy the images to your computer by dragging
the image files to your hard drive.
Note: While FILM2SD is in USB Mode, you will not be able to scan other pictures. To
enable scanning again, turn off FILM2SD, then turn it on again and enter Capture Mode.
Note: To view your images on your TV instead of FILM2SD's DISPLAY, connect
FILM2SD's TV OUTPUT to your TV's video input with the included TV output cable.
3
Page 6
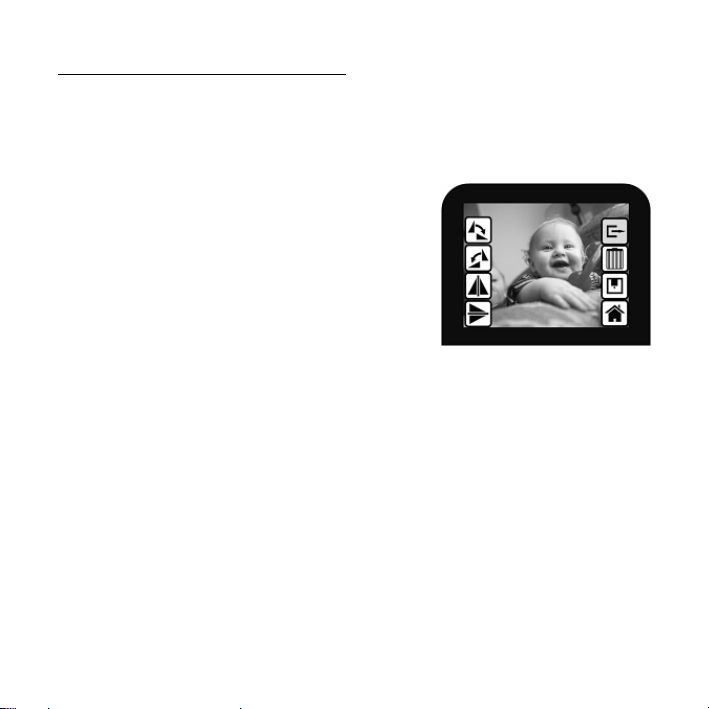
OPERATION & FEATURES
When viewing any menus with multiple options, you can use the UP / MIRROR and DOWN /
FLIP buttons to move through them and press the OK button to select one.
MAIN MENU
1. Capture Mode: Allows you to capture images.
FILM2SD will enter Capture Mode automatically if no
buttons are pressed for five seconds.
2. Playback Mode: Allows you to view your images.
3. Film Type: Select the kind of film you are using.
4. USB Mode: Allows you to transfer your images to a
connected computer via USB. Once your images
are on your computer, you can view and edit them as
you wish.
If there is no SD card in the SD Card Slot, a “?” icon will appear on the screen.
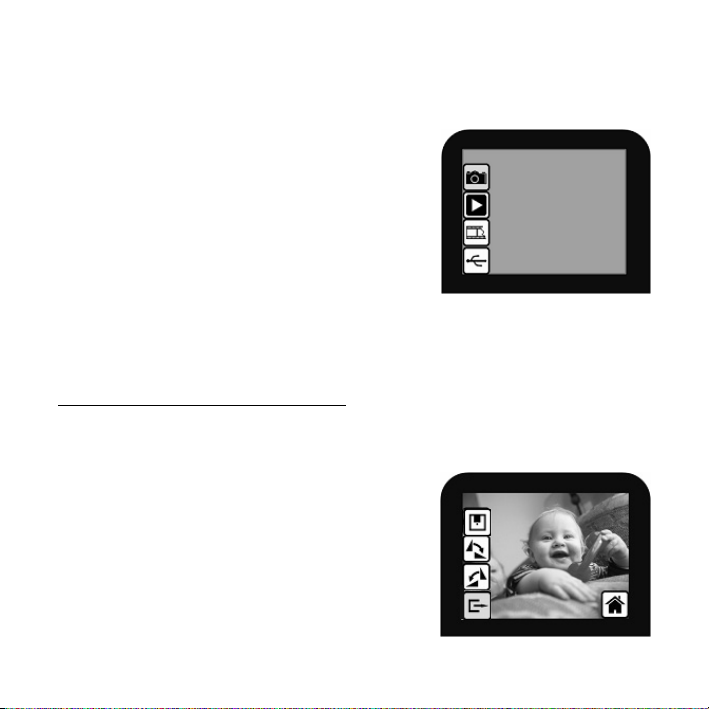
Capture Mode
When in Capture Mode, a red indicator in the upper left-hand corner will indicate FILM2SD is
viewing the image in the film holder. Press OK to capture the image.
Once an image is captured, you will see the following
menu options:
1. Save: Saves the captured image.
2. Rotate Right: Rotates the image clockwise by
90°.
3. Rotate Left: Rotates the image
counterclockwise by 90°.
4. Cancel: Cancels editing without saving the
image to the SD card.
5. Home: Returns to the Main Menu.
After selecting Save or Cancel, you can move the film holder to the next image you want to
capture. Once the SD card is full, a “FULL” icon will appear on the screen. Either transfer the
contents of the SD card to your computer or insert an SD card with available memory.
4
1
2
3
4
1
2
3
4 5
Page 7
Playback / Edit Mode
When you enter Playback/Edit Mode, your captured images will be displayed in a slideshow,
allowing you to preview and/or edit them. To stop the slideshow, press the OK button.
With the slideshow stopped, you can use the UP / MIRROR and DOWN / FLIP buttons to move
through your saved images one by one. Press the OK button to select one to edit.
In Playback/Edit Mode, you will see the following menu
options.
1. Rotate Right: Rotates the image clockwise by
90°.
2. Rotate Left: Rotates the image
counterclockwise by 90°.
3. Mirror: Flips the image left to right.
4. Flip: Flips the image upside-down.
1 5
2 6
3 7
4 8
5. Exit: Returns to the slideshow.
6. Delete: Deletes the image from the SD card.
7. Save: Saves the captured image.
8. Home: Returns to the Main Menu.
If there are no images saved to the SD card while in Playback Mode, a “?” icon will appear on
the screen.
5
Page 8
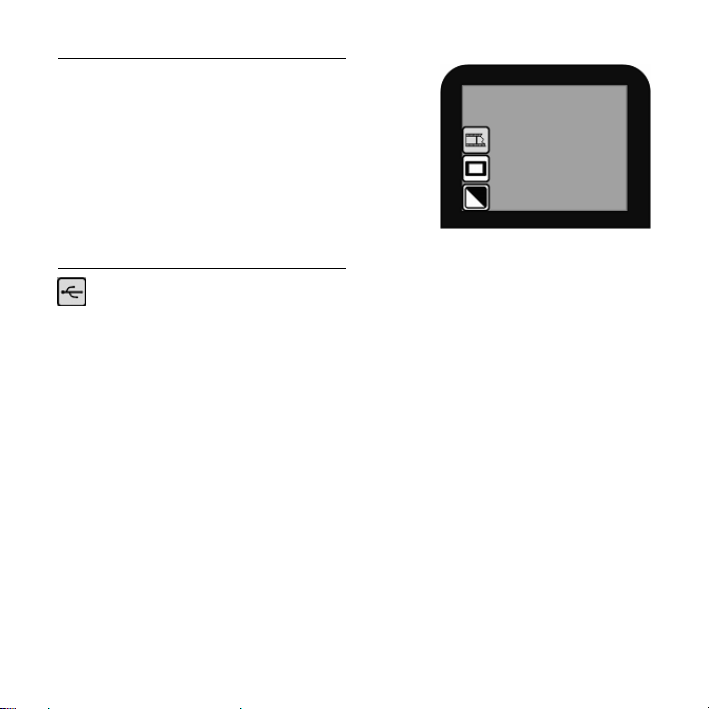
Film Type
Here, select the type of film you have placed in the film
holder.
1. Color Negative
2. Slide
3. Black & White Negative
1
2
3
USB Mode
USB Mode allows you to transfer images from your SD card directly to your computer.
While in USB Mode, FILM2SD becomes an SD card reader for your computer. To enter
USB mode, connect FILM2SD to your computer’s USB port with the included USB cable. Then,
select the USB icon from FILM2SD’s Main Menu. A USB symbol should appear on the
DISPLAY, signifying that the connection has been established. FILM2SD will appear as a
removeable device in "My Computer" (Windows) or on your Desktop (Mac).
Note: While FILM2SD is in USB Mode, you will not be able to scan other pictures. To enable
scanning again, turn off FILM2SD, then turn it on again and enter Capture Mode.
6
Page 9
CONTENIDO DE LA CAJA
Film 2 SD
Soporte de diapositivas
Soporte de negativos
Soporte de negativos (rollo)
Cable USB
Cable de salida para TV
Tarjeta SD de 1 GB
Adaptador de alimentación
Cepillo de limpieza
Manual del usuario
Folleto de información sobre la
seguridad y la garantía
MANTENIMIENTO Y CUIDADO
Limpie periódicamente la superficie de vidrio del
FILM2SD con un hisopo de algodón seco para
asegurar que produzca una imagen clara durante el
funcionamiento.
Use el cepillo de limpieza incluido para limpiar el
polvo de la luz de retroiluminación del FILM2SD.
Recomendamos que limpie su película (y las
bandejas del FILM2SD) antes de insertarlas en el
escáner, de modo que el polvo o la suciedad no
arruinen la imagen. Si no cuenta con los materiales
para hacerlo correctamente, consulte en una tienda
profesional de fotografía.
9
10
DESCRIPCIÓN GENERAL
1. Botón de alimentación
2. LED de encendido
3. Botón Aceptar
4. Botón Arriba / Espejo
5. Botón Abajo / Invertir
6. Pantalla
7. Ranura para soporte de la película
8. Ranura para tarjeta SD
9. Puerto USB
10. Salida para TV
Nota: Inserte su tarjeta SD con el rótulo mirando hacia abajo en la RANURA PARA LA TARJETA SD. Para
expulsar su tarjeta SD desde la RANURA PARA LA TARJETA SD, presiónela primero hacia adentro y luego
extráigala de la ranura.
Nota: Para ver sus imágenes en su televisor en lugar de la PANTALLA de FILM2SD, conecte la SALIDA PARA
TV de FILM2SD a la entrada de video de su televisor, con el cable de salida para TV incluido.
5
7
8
7
1
4
2
3
6
Page 10
CÓMO COLOCAR LAS DIAPOSITIVAS Y LOS NEGATIVOS EN LOS
SOPORTES
1. Abra el soporte de la
película levantando la
lengüeta de la parte
inferior.
2. Deslice la o las
diapositivas en las
ranuras para las
mismas o extienda el
negativo sobre la
ranura para negativos.
3. Cierre el soporte de la
película. Asegúrese de
que la traba y los
costados del soporte
estén colocados
firmemente en su sitio.
Presione únicamente el
soporte a través de la
RANURA PARA EL SOPORTE DE PELÍCULA en la dirección de la flecha (de derecha a izquierda).*
* Para cambiar a la siguiente imagen cuando usa el soporte para película (rollo), deslice la película
propiamente dicha a través del soporte (mientras el soporte está insertado en la RANURA PARA SOPORTE
DE PELÍCULA de FILM2SD).
Nota: Si la imagen se escanea en forma invertida o espejada, puede corregirlo usando los botones FLIP
(Invertir) o MIRROR (Espejo) más adelante.
Consejo: Para evitar colocar el negativo en sentido incorrecto (lo que produciría una imagen espejada),
asegúrese de que pueda leer correctamente los números de serie de la parte superior del mismo cuando lo
coloca en el soporte.
Diapositivas Negativos
Negativos (Rollo)
8
Page 11

INICIO RÁPIDO
1. Conecte el FILM2SD al puerto USB de su computadora o a un tomacorriente con el
adaptador de alimentación incluido.
2. Encienda el FILM2SD con el botón POWER (Encendido).
3. Coloque la o las diapositivas o el negativo en el soporte apropiado. Asegúrese de que la
traba y los costados del soporte estén colocados firmemente en su sitio.
4. Inserte el soporte en la RANURA PARA SOPORTE DE LA PELÍCULA. Presione
únicamente el soporte a través de la RANURA PARA EL SOPORTE DE PELÍCULA en la
dirección de la flecha (de derecha a izquierda).
5. Inserte la tarjeta SD en la RANURA PARA TARJETA SD. Inserte su tarjeta SD con el
rótulo mirando hacia abajo en la RANURA PARA LA TARJETA SD. Cuando guarde sus
imágenes escaneadas, se almacenarán en la tarjeta SD.
6. Capture la imagen pulsando el botón OK (Aceptar).
7. Pulse nuevamente este botón para guardar la imagen.
8. Apague el FILM2SD antes de retirar su tarjeta SD (de lo contrario, puede perderse su
contenido). Para expulsar su tarjeta SD desde la RANURA PARA LA TARJETA SD,
presiónela primero hacia adentro y luego extráigala de la ranura. Ahora puede insertarla
en un dispositivo compatible con SD, como un marco de imágenes digitales,
computadora o televisión, para ver sus fotografías o imágenes.
Si desea transferir sus imágenes directamente a su computadora desde el FILM2SD,
conecte el FILM2SD a la computadora con el cable USB incluido y seleccione el icono de
USB (Modo USB) en el Menú principal para establecer la conexión. FILM2SD aparece
como dispositivo removible en "My Computer" (Mi PC) (Windows) o en el escritorio (Mac).
Una vez establecida la conexión, puede copiar las imágenes a su computadora
arrastrándolas al disco duro de la misma.
Nota: Mientras el FILM2SD está en modo USB, no puede escanear otras fotografías.
Para volver a habilitar el escaneo, apague el FILM2SD, enciéndalo nuevamente y entre al
modo de captura.
Nota: Para ver sus imágenes en su televisor en lugar de la PANTALLA de FILM2SD,
conecte la SALIDA PARA TV de FILM2SD a la entrada de video de su televisor, con el
cable de salida para TV incluido.
9
Page 12
FUNCIONAMIENTO Y CARACTERÍSTICAS
Cuando vea menús con varias opciones, puede usar los botones UP / MIRROR (Arriba /
Espejo) y DOWN / FLIP (Abajo / Invertir) para recorrerlas y pulse el botón OK (Aceptar) para
seleccionar una.
MAIN MENU (Menú principal)
1. Capture Mode (Modo de captura): Permite capturar
imágenes. FILM2SD entra automáticamente al
modo de captura si no se pulsa ningún botón
durante cinco segundos.
2. Playback Mode (Modo de reproducción): Permite
ver las imágenes.
3. Film Type (Tipo de película): Para seleccionar el
tipo de película que va a usar.
4. USB Mode (Modo USB): Permite transferir sus
imágenes a una computadora conectada vía USB. Una vez que sus imágenes estén en
la computadora, puede verlas y editarlas como desee.
Si no hay una tarjeta SD conectada en la ranura para dicha tarjeta, aparece en la pantalla un
icono “?”.
Modo de Captura
En modo de captura, un indicador rojo de la esquina superior izquierda indica que el FILM2SD
está viendo la imagen colocada en el soporte para la película. Pulse OK para capturar la
imagen.
Una vez capturada una imagen, vera las siguientes
opciones del menú:
1. Save (Guardar): Permite guardar la imagen
capturada.
2. Rotate Right (Girar a la derecha): Gira la
imagen 90° en sentido horario.
3. Rotate Left (Girar a la izquierda): Gira la
imagen 90° en sentido antihorario.
10
1
2
3
4
1
2
3
4 5
Page 13

4. Cancel (Cancelar): Cancela la edición sin guardar la imagen en la tarjeta SD.
5. Home (Inicio): Permite volver al menú principal.
Después de seleccionar Save o Cancel, puede mover el soporte para la película a la imagen
siguiente que desea capturar. Una vez que la tarjeta SD se llena, aparece el icono “FULL”
(Lleno) en la pantalla. Transfiera el contenido de la tarjeta SD a la computadora o inserte una
tarjeta SD con memoria disponible.
Modo de Reproducción y Edición
Cuando se entra al modo Playback/Edit (Reproducción/Edición), sus imágenes capturadas
aparecerán en modo de “show”, permitiéndole visualizarlas previamente y/o editarlas. Para
detener la reproducción, pulse el botón OK.
Una vez detenida la reproducción, puede usar los botones UP / MIRROR y DOWN / FLIP para
recorrer las imágenes guardadas una por una. Pulse el botón OK para seleccionar la que
desea editar.
En modo Playback/Edit, verá las siguientes opciones de
menú.
1. Rotate Right (Girar a la derecha): Gira la
imagen 90° en sentido horario.
2. Rotate Left (Girar a la izquierda): Gira la
imagen 90° en sentido antihorario.
3. Mirror (Espejo): Invierte la imagen de
izquierda a derecha.
4. Flip (Invertir): Invierte la imagen de arriba
abajo.
5. Exit (Salir): Vuelve a la reproducción de diapositivas.
6. Delete (Eliminar): Permite eliminar la imagen de la tarjeta SD.
7. Save (Guardar): Permite guardar la imagen capturada.
8. Home (Inicio): Permite volver al menú principal.
Si no hay imágenes guardadas en la tarjeta SD mientras se está en modo de reproducción,
aparece un icono “?” en la pantalla.
1 5
2 6
3 7
4 8
11
Page 14

Film Type (Tipo de película)
Seleccione aquí el tipo de película que colocó en el
soporte para la película.
1. Color Negative (Negativo color)
2. Slide (Diapositiva)
3. Black & White Negative (Negativo blanco y
negro)
1
2
3
USB Mode (Modo USB)
El modo USB le permite transferir imágenes desde la tarjeta SD directamente a su
computadora. Cuando está en modo USB, el FILM2SD se convierte en un lector de
tarjetas SD para su computadora. Para entrar al modo USB, conecte el FILM2SD al puerto
USB de su computadora con el cable USB incluido. Luego, seleccione el icono de USB en el
menú principal de FILM2SD. Debe aparecer un símbolo de USB en la PANTALLA, que
significa que se estableció la conexión. FILM2SD aparece como dispositivo removible en "My
Computer" (Mi PC) (Windows) o en el escritorio (Mac).
Nota: Mientras el FILM2SD está en modo USB, no puede escanear otras fotografías. Para
volver a habilitar el escaneo, apague el FILM2SD, enciéndalo nuevamente y entre al modo de
captura.
12
Page 15

CONTENU DE LA BOÎTE
Film 2 SD
Porte-diapositive
Porte-négatif
Porte-négatif (pellicule)
Câble USB
Câble de sortie téléviseur
Carte mémoire flash de 1 Go
Adaptateur CA
Brosse de nettoyage
Guide d’utilisation
Consignes de sécurité et information
concernant la garantie
ENTRETIEN ET NETTOYAGE
Nettoyez périodiquement la surface vitrée du
FILM2SD avec un tampon sec afin de vous assurer
qu'il produise une image nette durant l'utilisation.
Utilisez la brosse incluse pour enlever la poussière
du rétroéclairage du FILM2SD.
Nous vous recommandons de nettoyer le film et les
plateaux du FILM2SD avant de les insérer dans le
numériseur afin que la poussière ou la saleté
viennent gâter l’image. Si vous n’avez pas le matériel
adéquat pour faire le nettoyage, consultez votre
détaillant de produit professionnel.
9
10
VUE D’ENSEMBLE
1. Touche d'alimentation
2. Témoin d'alimentation DEL
3. Touche OK
4. Touche Up/Mirror
5. Touche Down/Flip
6. Écran
7. Film Holder Slot (Emplacement pour porte-film)
8. SD Card Slot (Emplacement pour carte mémoire
flash)
9. Port USB
10. Sortie téléviseur
Remarque: Insérez une carte mémoire flash, étiquette vers le bas, dans la fente pour carte mémoire flash.
Pour éjecter la carte mémoire, enfoncez-la d'abord, puis retirez-la de la fente.
Remarque : Pour visionner les images sur votre téléviseur au lieu de sur l’écran du FILM2SD, raccordez la
sortie téléviseur (TV OUTPUT) du FILM2SD à l’entrée vidéo de votre téléviseur à l’aide du câble de sortie
téléviseur.
5
8
7
1
4
2
3
6
13
Page 16

COMMENT INSÉRER LES DIAPOSITIVES ET LES NÉGATIFS DANS
LE PORTE-FILM
1. Ouvrir le porte-film en
levant l’onglet du
dessous.
2. Faites glisser les
diapositives ou
déposez les négatifs
sur le porte-film.
3. Refermez le porte-
film. Assurez-vous
que le fermoir et les
côtés du porte-film
sont bien fermés. Ne
poussez le porte-film
à travers l’ouverture
pour porte-film que dans la direction de la flèche (de droite à gauche).*
* Glissez la pellicule à travers le Porte-négatif (pellicule) (lorsque le porte-film est inséré dans la
fente du FILM2SD) pour passer à l’image suivante lorsque vous utilisez le Porte-négatif
(pellicule).
Remarque : Si l’image est balayée à l’envers ou est inversée, vous pourrez la corriger dans
une étape ultérieure à l’aide des touches FLIP ou MIRROR.
Conseil : Afin d’éviter de placer le négatif dans la mauvaise direction (image inversée), vérifiez
que vous pouvez lire correctement les numéros de série dans le haut du négatif.
Dispositives Négatifs
Négatifs (Pellicule)
14
Page 17

DÉMARRAGE
1. Branchez le FILM2SD à un port USB de votre ordinateur ou à une prise d’alimentation
murale à l’aide du câble d’alimentation inclus.
2. Mettez le FILM2SD sous tension à l’aide de la touche d’alimentation.
3. Placez vos diapositives ou négatifs dans le porte-film approprié. Assurez-vous que le
fermoir et les côtés du porte-film sont bien fermés.
4. Insérez le porte-film dans la fente FILM HOLDER SLOT. Ne poussez le porte-film à
travers l’ouverture pour porte-film que dans la direction de la flèche (de droite à gauche).
5. Insérez une carte mémoire flash dans la fente SD CARD SLOT. Insérez une carte
mémoire flash, étiquette vers le bas, dans la fente pour carte mémoire flash. Lorsque
vous sauvegardez les images balayées, elles se retrouvent sur la carte mémoire flash.
6. Faites la capture de l’image en appuyant sur la touche OK.
7. Appuyez de nouveau sur la touche OK afin de sauvegarder l’image.
8. Avant de retirer la carte mémoire flash, mettez le FILM2SD hors tension, autrement le
contenu de la carte pourrait être endommagé. Pour éjecter la carte mémoire, enfoncez-la
d'abord, puis retirez-la de la fente. Vous pouvez maintenant l’insérer dans n’importe quel
appareil compatible avec ce format, tel qu’un cadre photo numérique, un ordinateur ou un
téléviseur afin de visionner vos photos.
Si vous désirez transférer vos images directement du FILM2SD à votre ordinateur, utilisez
le câble USB inclus pour brancher le FILM2SD à l’ordinateur, puis sélectionnez l’icône
USB (USB Mode) à partir du menu principal afin d’établir la connexion. Le FILM2SD
apparaît comme périphérique amovible sous « Poste de travail » (Windows) ou sur le
bureau (Mac). Une fois la connexion établie, vous pourrez copier les images à votre
ordinateur en glissant les fichiers image sur votre disque dur.
Remarque : Lorsque le FILM2SD est en mode USB, vous ne pouvez pas numériser
d’autres images. Afin de pouvoir numériser de nouveau, vous devez mettre le FILM2SD
hors tension, puis le remettre sous tension et passer au mode Capture Mode.
Remarque : Pour visionner les images sur votre téléviseur au lieu de sur l’écran du
FILM2SD, raccordez la sortie téléviseur (TV OUTPUT) du FILM2SD à l’entrée vidéo de
votre téléviseur à l’aide du câble de sortie téléviseur.
15
Page 18

CARACTÉRISTIQUES ET FONCTIONNEMENT
Lors du visionnement d’un menu avec de multiples options, vous pouvez utiliser les touches
UP/MIRROR et DOWN/FLIP afin de les parcourir, puis ensuite appuyer sur la touche OK pour
en sélectionner une.
MAIN PRINCIPAL
1. Capture Mode: Permet de capturer les images. Le
FILM2SD entre automatiquement en Capture Mode
lorsqu’aucune touche n’est enfoncée pour plus de
cinq secondes.
2. Playback Mode: Permet de visionner les images.
3. Film Type: Permet de sélectionner le type de film
utilisé.
4. USB Mode: Permet de transférer les images à un
ordinateur branché via USB. Une fois que les images sont transférées sur votre
ordinateur, vous pouvez les visionner et les modifier comme bon vous semble.
S'il n’y a pas de carte mémoire flash dans l’emplacement, un « ? » apparait à l’écran.
Menu Capture Mode
Lorsque l’appareil est en mode capture, un indicateur rouge apparait dans le coin supérieur
gauche indiquant que le FILM2SD visionne l’image dans le porte-film. Appuyez sur la touche
OK afin de capturer l’image.
Une fois l’image captée, les options suivantes s'affichent :
1. Save : Permet de sauvegarder l’image.
2. Rotate Right : Permet de pivoter l’image dans
le sens horaire de 90°.
3. Rotate Left : Permet de pivoter l’image dans
le sens antihoraire de 90°.
4. Cancel : Permet d’annuler les modifications
sans sauvegarder l’image sur la carte mémoire
flash.
5. Home : Permet de retourner au menu principal.
1
2
3
4
1
2
3
4 5
16
Page 19

Après avoir sélectionné les options Save ou Cancel, vous pouvez déplacer le porte-film sur la
prochaine image que vous désirez capturer.
Lorsque la carte mémoire flash est remplie, une icône « FULL » apparait à l’écran. Vous
pouvez soit transférer le contenu de la carte mémoire flash à votre ordinateur, soit insérer une
autre carte avec de l'espace mémoire disponible.
Menu Playback / Edit
Lorsque l’appareil est en mode de lecture/modification, les images sont affichées dans un
diaporama, vous permettant de le visionner et/ou de les modifier. Afin d'arrêter le diaporama,
appuyez sur la touche OK.
Lorsque le diaporama est arrêté, vous pouvez utiliser les touches UP/MIRROR et DOWN/FLIP
afin de parcourir une à une les images sauvegardées. Appuyez sur la touche OK afin d’en
sélectionner une à modifier.
En mode Playback/Edit, les options suivantes s'affichent :
1. Rotate Right : Permet de pivoter l’image de
90°.
2. Rotate Left : Permet de pivoter l’image dans le
sens antihoraire de 90°.
3. Mirror : Permet d’inverser l’image de gauche à
droite.
4. Flip : Permet de mettre l’image à l’envers.
1 5
2 6
3 7
4 8
5. Exit : Permet de retourner en mode
diaporama.
6. Delete : Permet de supprimer l’image de la carte mémoire flash.
7. Save : Permet de sauvegarder l’image capturée.
8. Home : Permet de retourner au menu principal.
Lorsqu’il n’y a pas d’image sauvegardée sur la carte en Playback Mode, un « ? » s’affiche à
l’écran.
17
Page 20

Menu Film Type
À partir de ce menu vous pouvez sélectionner le type de
film que vous avez placé dans le porte-film.
1. Color Negative (négatif couleur)
2. Slide (diapositive)
3. Black & White Negative (négatif noir et blanc)
1
2
3
USB Mode
Le mode USB vous permet de transférer les images sur une carte mémoire flash à un
ordinateur branché via USB. EN mode USB, le FILM2SD devient un lecteur de cartes
mémoire pour votre ordinateur. Pour passer au mode USB, utilisez le câble USB inclus pour
brancher le FILM2SD au port USB d’un ordinateur. À partir du menu principal du FILM2SD,
sélectionnez l’icône USB. Un symbole USB devrait s’afficher sur l’écran, indiquant que la
connexion est établie. Le FILM2SD apparaît comme périphérique amovible sous « Poste de
travail » (Windows) ou sur le bureau (Mac).
Remarque : Lorsque le FILM2SD est en mode USB, vous ne pouvez pas numériser d’autres
images. Afin de pouvoir numériser de nouveau, vous devez mettre le FILM2SD hors tension,
puis le remettre sous tension et passer au mode Capture Mode.
18
Page 21

CONTENUTI DELLA
CONFEZIONE
Film 2 SD
Supporto per diapositive
Supporto per negativi
Supporto per negativi (rullino)
Cavo USB
Cavo di uscita TV
Scheda SD da 1GB
Adattatore di alimentazione
Spazzola per la pulizia
Manuale per l'uso
Libretto di istruzioni di sicurezza
e garanzia
MANUTENZIONE E CURA
Pulire periodicamente la superficie di vetro del FILM2SD
con uno straccio asciutto di cotone per garantire che
produca un’immagine nitida durante l’uso.
Servirsi della spazzola per la pulizia in dotazione per
rimuovere la polvere dalla lampada posteriore del
FILM2SD.
Si raccomanda di pulire la pellicola (e i supporti del
FILM2SD) prima di inserirla nello scanner in modo che la
polvere o la sporcizia non offuschino l’immagine. Se non si
hanno i materiali adatti per procedere adeguatamente a
questa operazione, rivolgersi ad un negozio specializzato
in fotografia.
9
10
PANORAMICA
1. Tasto di alimentazione
2. LED di alimentazione
3. Tasto OK
4. Tasto Up / Mirror
5. Tasto Down / Flip
6. Display
7. Slot supporto della pellicola
8. Slot scheda SD
9. Porta USB
10. Uscita TV
5
8
7
1
4
2
3
6
Nota Bene: Inserire la scheda SD con l’etichetta rivolta verso il basso nello SLOT per SCHEDA SD. espellere
la scheda SD dallo SLOT per SCHEDA SD, innanzitutto premerlo, quindi estrarla dallo slot.
Nota bene: per visualizzare le immagini sul televisore anziché sul display del FILM2SD, collegare l’USCITA TV
del FILM2SD all’ingresso video del proprio televisore servendosi del cavo di uscita TV in dotazione.
19
Page 22

COLLOCAMENTO DI PELLICOLA E DIAPOSITIVE NEI SUPPORTI
1. Aprire il supporto della
pellicola sollevando la
linguetta posta sul fondo.
2. Inserire le diapositive
negli appositi slot, oppure
appoggiare il negativo
sull'apposito slot.
3. Chiudere il supporto della
pellicola. Assicurarsi che
il dispositivo di chiusura e
i lati del supporto siano
saldamente in posizione.
Premere il supporto
unicamente tramite lo
SLOT PORTA
PELLICOLE nella direzione della freccia (da destra a sinistra).*
* Per passare all’immagine successiva quando si utilizza il supporto negativi (rullino), far scorrere la pellicola
stessa attraverso il supporto (quando il supporto è inserito nello SLOT PER IL SUPPORTO DELLA
PELLICOLA del FILM2SD).
Nota bene: se l’immagine viene scannerizzata al contrario o riflessa, si può correggere questa situazione
servendosi in seguito dei tasti FLIP o MIRROR.
Suggerimento: per evitare di collocare il negativo nella direzione sbagliata (cosa che provocherà un’immagine
specchiata), assicurarsi di leggere correttamente i numeri di serie in cima al negativo quando lo si colloca nel
supporto.
Diapositive Negativi
Negativi (Rullino)
20
Page 23

GUIDA RAPIDA
1. Collegare il FILM2SD alla porta USB del computer o ad una presa di alimentazione
servendosi dell’adattatore in dotazione.
2. Accendere il FILM2SD servendosi del tasto POWER.
3. Collocare le diapositive o i negativi nel supporto adeguato. Assicurarsi che il dispositivo
di chiusura e i lati del supporto siano saldamente in posizione.
4. Inserire il supporto nello SLOT SUPPORTO DELLA PELLICOLA. Premere il supporto
unicamente tramite lo SLOT PORTA PELLICOLE nella direzione della freccia (da destra
a sinistra).
5. Inserire la scheda SD nello SLOT per SCHEDA SD. Inserire la scheda SD con l’etichetta
rivolta verso il basso nello SLOT per SCHEDA SD. Quando si salvano le immagini
scannerizzate, queste verranno memorizzate sulla scheda SD.
6. Catturare l’immagine premendo il tasto OK.
7. Premere nuovamente il tasto OK per salvare l’immagine.
8. Spegnere il FILM2SD prima di rimuovere la scheda SD (altrimenti i relativi contenuti
potrebbero andare perduti). Per espellere la scheda SD dallo SLOT per SCHEDA SD,
innanzitutto premerlo, quindi estrarla dallo slot. È ora possibile inserirla in un dispositivo
compatibile SD quale un portafotografie digitale, un computer o un televisore, per
visualizzare le immagini.
Se si desidera trasferire le immagini direttamente al computer dal FILM2SD, collegare il
FILM2SD al computer con il cavo USB in dotazione e selezionare l’icona USB (modalità
USB) dal Menu principale per stabilire il collegamento. Il FILM2SD apparirà come una
periferica rimuovibile in "Risorse del computer" (Windows) o sul Desktop (Mac). Una volta
stabilito il collegamento, è possibile copiare le immagini sul computer trascinando i file
immagine sul disco rigido.
Nota bene: quando il FILM2SD si trova in modalità USB, non sarà possibile
scannerizzare altre immagini. Per abilitare nuovamente la scansione, spegnere il
FILM2SD, quindi accenderlo nuovamente ed entrare in Modalità Capture.
Nota bene: per visualizzare le immagini sul televisore anziché sul display del FILM2SD,
collegare l’USCITA TV del FILM2SD all’ingresso video del proprio televisore servendosi
del cavo di uscita TV in dotazione.
21
Page 24

USO E FUNZIONI
Quando si visualizzano menu con opzioni multiple, si possono utilizzare i tasti UP / MIRROR e
DOWN / FLIP per scorrere lungo i menu stessi e premere il tasto OK per selezionare una voce.
MAIN PRINCIPALE
1. Modalità Capture: permette di catturare le
immagini. Il FILM2SD entrerà automaticamente in
modalità Capture se non vengono premuti tasti per
cinque secondi.
2. Modalità Playback (di riproduzione): permette di
visualizzare le immagini.
3. Tipo di pellicola: selezionare il tipo di pellicola
utilizzata.
4. Modalità USB: permette di trasferire le immagini ad
un computer collegato tramite USB. Una volta che le immagini si trovano sul computer, è
possibile visualizzarle e modificarle come desiderato.
Se non sono presenti schede SD dell’apposito slot, sullo schermo apparirà un’icona “?”.
Modalità Captura
Quando ci si trova in modalità Capture, una spia rossa a livello dell’angolo superiore sinistro
indicherà che il FILM2SD sta visualizzando l’immagine nel supporto pellicola. Premere OK per
catturare l’immagine.
Una volta catturata l’immagine, appariranno le seguenti
opzioni del menu:
1. Save (salva): salva l’immagine captata.
2. Rotate right (ruota a destra): ruota
l’immagine in senso orario di 90°.
3. Rotate left (ruota a sinistra): ruota l’immagine
in senso antiorario di 90°.
4. Cancel (annulla): annulla la modifica senza
salvare l’immagine sulla scheda SD.
5. Home: torna al Menu principale.
Dopo aver selezionato Save o Cancel, si può spostare il supporto per la pellicola all’immagine
successiva che si desidera captare.
22
1
2
3
4
1
2
3
4 5
Page 25

Una volta che la scheda SD è piena, sullo schermo appare l’icona “FULL”. Trasferire i contenuti
della scheda SD al computer, oppure inserire una scheda SD con memoria disponibile.
Modalità Playback / Edit (riproduzione / modifica)
Quando si entra in modalità di riproduzione/modifica, le immagini catturate verranno
visualizzate in una presentazione, potendo così visualizzarne un’anteprima o modificarle. Per
interrompere la presentazione, premere il tasto OK.
Quando la presentazione è stata interrotta, ci si può servire dei tasti UP / MIRROR e DOWN /
FLIP per passare da un’immagine salvata all’altra. Premere il tasto OK per selezionarne una da
modificare.
In modalità Playback/Edit appariranno le seguenti opzioni
da menu:
1. Rotate right (ruota a destra): ruota l’immagine
in senso orario di 90°.
2. Rotate Left (ruota a sinistra): ruota
l’immagine in senso antiorario di 90°.
3. Mirror: gira l’immagine da sinistra a destra.
4. Flip: capovolge l’immagine.
5. Exit: torna alla presentazione.
6. Delete (cancella): cancella l’immagine dalla scheda SD.
7. Save (salva): salva l’immagine captata.
8. Home: torna al Menu principale.
Se non sono presenti immagini salvate sulla scheda SD quando ci si trova in modalità di
riproduzione, sullo schermo apparirà un’icona “?”.
1 5
2 6
3 7
4 8
23
Page 26

Typo di Pellicola
Selezionare qui il tipo di pellicola inserito nel supporto.
1. Negativo a colori
2. Diapositiva
3. Negativo in bianco e nero
Modalità USB
La modalità USB permette di trasferire immagini dalla scheda SD direttamente sul
computer. In modalità USB, il FILM2SD diventa un lettore di schede SD per il computer.
Per entrare in modalità USB, collegare il FILM2SD alla porta USB del computer servendosi del
cavo USB in dotazione. Quindi, selezionare l’icona USB dal Menu principale del FILM2SD. A
DISPLAY apparirà un simbolo USB a indicare che è stata stabilita la connessione. Il FILM2SD
apparirà come una periferica rimuovibile in "Risorse del computer" (Windows) o sul Desktop
(Mac).
Nota bene: quando il FILM2SD si trova in modalità USB, non sarà possibile scannerizzare
altre immagini. Per abilitare nuovamente la scansione, spegnere il FILM2SD, quindi accenderlo
nuovamente ed entrare in Modalità Capture.
1
2
3
24
Page 27

INHALT DER VERPACKUNG
Film 2 SD
Halter für Dias
Halter für Negative
Halter für Negative (Rolle)
USB Kabel
TV-Ausgangskabel
1 GB SD Card
Netzeil
Reinigungspinsel
Bedienungsanleitung
Broschüre mit Sicherheits- und
Garantiehinweisen
REINIGUNG & PFLEGE
Reinigen Sie die Glassoberfläche des FILM2SD
regelmäßig mit einem trockenen Baumwolltuch, um
sicherzustellen, dass im Betrieb einwandfreie Bilder
übertragen werden.
Mit der beiliegenden Reinigungsbürste können Sie
Staubpartikel von der FILM2SD Beleuchtung entfernen.
Wir empfehlen Ihnen, den Film (und die FILM2SD
Halterungen) vor dem Einlegen in den Scanner zu
reinigen, damit kein Staub oder anderer Schutz die
Bildqualität beeinträchtigt. Sollten Ihnen dazu die
passenden Materialien fehlen, wenden Sie sich bitte an
einen Fotofachgeschäft.
9
10
ÜBERBLICK
1. Power Taste
2. Power LED
3. OK Taste
4. Up / Mirror Taste
5. Down / Flip Taste
6. Display
7. Filmhalterung Einschub
8. SD Card Einschub
9. USB Port
Hinweis: Schieben Sie die SD Card mit der Beschriftung nach vorn in den SD CARD SLOT. Um die SD Card
aus dem SD CARD SLOT auszuwerfen, drücken Sie diese zunächst leicht nach unten und ziehen Sie sie
danach aus dem Slot.
Hinweis: Um Ihre Bilder auf Ihrem TV-Gerät statt der Anzeige des FILM2SD anzusehen, verbinden Sie den
TV-AUSGANG des FILM2SD mithilfe des mitgelieferten TV-Ausgangs-Kabels mit dem Video-Eingang Ihres TVGeräts.
5
25
8
7
1
4
2
3
6
Page 28

DIAS UND NEGATIVE IN DIE HALTERUNGEN EINLEGEN
1. Öffnen Sie die
Filmhalterung, indem
Sie die Lasche am
Boden anheben.
2. Legen Sie die Dias
in die Diaführung
bzw. die Negative
über die
Negativführung.
3. Schließen Sie die
Filmhalterung.
Achten Sie darauf,
dass der Riegel und
die Seiten des
Filmhalters sicher
gehalten werden.
Schieben Sie den Filmhalter nur in Pfeilrichtung (von rechts nach links) durch den
FILMHALTER SLOT.*
* Um zum nächsten Bild zu wechseln, wenn Sie den
rollen Sie den Film selbst durch den Halter (während der Halter im STECKPLATZ des
FILM2SD-FILMHALTERS eingesteckt ist).
Hinweis: Falls das Bild verkehrt herum oder gespiegelt gescannt wird, können Sie dies später
mit den FLIP oder MIRROR Tasten korrigieren.
Tipp: Um zu verhindern, dass ein Negativ falsch herum eingelegt wird, was zu einem
gespiegelten Bild führt, achten Sie darauf, dass Sie die obere Seriennummer des Bildes beim
Einlegen in die Halterung richtig erkennen können.
Dias Negatives
Halter für Negative (Rolle) verwenden,
Negatives (Rolle)
26
Page 29

KURZANLEITUNG
1. Verbinden Sie den FILM2SD mit dem USB Port Ihres Computers oder mit Hilfe des
beiliegenden Netzteils mit einer Steckdose.
2. Schalten Sie den FILM2SD mit der POWER Taste ein.
3. Legen Sie Ihre Dias oder Negative in die jeweilige Halterung ein. Achten Sie darauf, dass
der Riegel und die Seiten des Filmhalters sicher gehalten werden.
4. Führen Sie die Halterung in den FILMHALTERUNG ein. Schieben Sie den Filmhalter nur
in Pfeilrichtung (von rechts nach links) durch den FILMHALTER SLOT.
5. Schieben Sie Ihre SD Card in den SD CARD SLOT. Schieben Sie die SD Card mit der
Beschriftung nach vorn in den SD CARD SLOT. Wenn Sie Ihre gescannten Bilder
speichern, werden Sie auf der SD Card abgelegt.
6. Nehmen Sie Ihr Bild mit der OK Taste auf.
7. Drücken Sie die OK Taste noch einmal, um das Bild zu speichern.
8. Schalten Sie den FILM2SD aus, bevor Sie die SD Card entnehmen, um einen
Datenverlust zu vermeiden. Um die SD Card aus dem SD CARD SLOT auszuwerfen,
drücken Sie diese zunächst leicht nach unten und ziehen Sie sie danach aus dem Slot.
Nun können Sie die Card in einen Gerät, welches SD-kompatibel ist (digitaler
Bilderrahmen, Computer oder TV-Gerät, usw.) einlegen, um die Bilder anzusehen.
Falls Sie Ihre Bilder direkt vom FILM2SD auf einen Computer übertragen möchten,
verbinden Sie Ihren FILM2SD mit dem beiliegenden USB Kabel mit Ihrem Computer und
wählen Sie das USB Symbol (USB Modus) aus dem Main Menü, um die Verbindung zu
erstellen. FILM2SD erscheint als Wechseldatenträger unter “Mein Computer” (Windows)
oder auf Ihrem Desktop (Mac). Wenn die Verbindung hergestellt wurde können Sie die
Bilder auf Ihren Computer kopieren, indem Sie die Bilddateien mit der Maus auf Ihre
Festplatte ziehen.
Hinweis: Falls sich der FILM2SD im USB Mode befindet können Sie keine anderen
Bilder scannen. Um die Scan Funktion wieder zu aktivieren, starten Sie den FILM2SD
neu und wechseln dann in den Capture Mode.
27
Page 30

BEDIENUNG & EIGENSCHAFTEN
Wenn Sie die verschiedenen Menüs mit den vielfältigen Optionen ansehen, können Sie mit den
UP / MIRROR und DOWN / FLIP Tasten durch die Optionen wechseln, um mit der OK Taste
eine der Optionen auswählen.
MAIN MENÜ
1. Capture Mode: Ermöglicht die Aufnahme von
Bildern. FILM2SD wechselt automatisch in den
Capture Mode, falls für 5 Sekunden keine Taste
gedrückt wurde.
2. Playback Mode: Ermöglicht die Ansicht Ihrer Bilder.
3. Film Type: Definiert die von Ihnen verwendete
Filmart.
4. USB Mode: Gestattet es Ihnen, die Bilder über USB
an einen angeschlossenen Computer zu senden. Nach der Bildübertragung an den
Computer können Sie die Bilder dort ansehen und bearbeiten.
Falls sich keine SD Card im SD Card Slot befindet, wird ein “?” Symbol im Display des Gerätes
angezeigt.
Capture Mode
Im Capture Mode zeigt eine rote LED in der linken unteren Ecke an, dass der FILM2SD das
Bild in der Film Halterung lädt. Drücken Sie OK, um das Bild aufzunehmen.
Nachdem Sie das Bild aufgenommen haben, sehen Sie
die folgenden Menüoptionen:
1. Save: Speichert das aufgenommene Bild.
2. Rotate Right: Dreht das Bild 90° im
Uhrzeigersinn.
3. Rotate Left: Dreht das Bild 90° im
entgegengesetzten Uhrzeigersinn.
4. Cancel: Bricht die Bearbeitung ab, ohne dass
das Bild auf der SD Card gespeichert wird.
5. Home: Kehrt zum Main Menü zurück.
1
2
3
4 5
28
Page 31

Nachdem Sie sich für die Auswahl Save oder Cancel entschieden haben, können Sie den Film
in der Halterung zum nächsten Bild, das Sie aufnehmen möchten, bewegen.
Wenn die SD Card voll ist, sehen Sie ein “FULL” Symbol im Display. Übertragen Sie dann
entweder den Inhalt Ihrer SD Card zu Ihrem Computer oder verwenden Sie eine SD Card mit
noch freier Speicherkapazität.
Playback / Edit Mode
Im Playback/Edit Mode können Sie Ihre aufgenommenen Bilder als Diaschau präsentieren
sowie diese vorher ansehen und bearbeiten. Zum Beenden der Diaschau drücken Sie die OK
Taste.
Wenn die Diaschau gestoppt ist, können Sie mit den UP / MIRROR und DOWN / FLIP Tasten
nacheinander die einzelnen Bilder anwählen. Drücken Sie die OK Taste zur Auswahl eines
Bildes für die Bearbeitung.
Im Playback/Edit Mode sehen Sie die folgenden
Menüoptionen.
1. Rotate Right: Dreht das Bild 90° im
Uhrzeigersinn.
2. Rotate Left: Dreht das Bild 90° im
entgegengesetzten Uhrzeigersinn.
3. Mirror: Dreht das Bild von links nach rechts.
4. Flip: Dreht das Bild auf den Kopf.
1 5
2 6
3 7
4 8
5. Exit: Kehrt zur Diaschau zurück.
6. Delete: Löscht das Bild von der SD Card.
7. Save: Speichert das aufgenommene Bild.
8. Home: Kehrt zum Hauptmenü (Main Menu) zurück.
Falls sich auf der SD Card keine Bilder befinden und Sie den Playback Mode aufrufen, wird ein
“?” Symbol im Display des Gerätes angezeigt.
29
Page 32

Film Type
Hier können Sie die Art des Films, den Sie in die Film
Halterung eingelegt haben, definieren.
1. Color Negative
2. Slide
3. Black & White Negative
1
2
3
USB Mode
Der USB Mode ermöglicht es Ihnen die Bilder auf Ihrer SD Card direkt auf einen
Computer zu übertragen. Im USB Mode wird der FILM2SD zu einem SD Card Reader für
Ihren Computer. Zum Aufrufen des USB Modes verbinden Sie mit Hilfe des mitgelieferten USB
Kabels den FILM2SD mit einem USB Port Ihres Computers. Wählen Sie danach das USB
Symbol aus dem Main Menü des FILM2SD. Im DISPLAY erscheint ein USB Symbol und zeigt
Ihnen an, dass die Verbindung hergestellt wurde. FILM2SD erscheint als Wechseldatenträger
unter “Mein Computer” (Windows) oder auf Ihrem Desktop (Mac).
Hinweis: Falls sich der FILM2SD im USB Mode befindet können Sie keine anderen Bilder
scannen. Um die Scan Funktion wieder zu aktivieren, starten Sie den FILM2SD neu und
wechseln dann in den Capture Mode.
30
Page 33

INHOUD VERPAKKING
Film 2 SD
Houder voor diafilms
Houder voor filmnegatieven
Houder voor filmnegatieven (rolfilm)
USB-kabel
TV-uitgangkabel
1GB SD-kaart
Stroomadapter
Schoonmaakborsteltje
Gebruikshandleiding
Veiligheids- en garantie-informatie
ONDERHOUD & ZORG
Maak het glazen oppervlak van de FILM2SD regelmatig
schoon met een droog wattenstaafje om een helder
beeld tijdens werking te waarborgen.
Gebruik het meegeleverde schoonmaakborsteltje om
stof te verwijderen uit de backlight van de FILM2SD.
Het wordt aanbevolen de film (en de laatjes van de
FILM2SD) schoon te maken voordat ze in de scanner
worden geplaatst om zo te voorkomen dat de beelden
niet ontsierd worden door stof. Als u niet over de
materialen beschikt om dit op juiste wijze te doen, raadpleeg dan een professional.
9
10
OVERZICHT
1. Knop aan/uit
2. StroomLED
3. Knop OK
4. Knop up/mirror (op/spiegelen)
5. Knop down/flip (neer/omdraaien)
6. Monitor
7. Sleuf voor filmhouder
8. Sleuf voor SD-kaart
9. USB-poort
10. Tv-uitgang
N.B.: Steek uw SD-kaart met het etiket naar beneden in de SLEUF VOOR SD-KAART. Om de SD-kaart uit de
SLEUF VOOR SD-KAART te laten werpen drukt u de kaart eerst naar binnen en trekt deze hierna uit de sleuf.
Opmerking: om uw afbeelding op uw tv in plaats van op de display van FILM2SD te bekijken, dient u de TV-
UITGANG van de FILM2SD m.b.v. de meegeleverde tv-uitgangkabel met de video-ingang van uw tv te
verbinden.
5
8
7
1
4
2
3
6
31
Page 34

PLAATSEN VAN DIA'S EN NEGATIEVEN IN DE HOUDERS
1. Open de filmhouder
Dia's Negatieven
door de tab op de
bodem op te tillen.
2. Plaats de dia(s) in de
diasleuf (-sleuven) of
leg het negatief over
de sleuf voor negatieven.
3. Sluit de filmhouder.
Waarborg dat de
vergrendeling en
zijkanten van de
houder goed op hun
plek zitten. Duw de
houder alleen door de
SLEUF VOOR FILMHOUDER in de richting van de pijl (van rechts naar links).*
* Om naar de volgende afbeelding te gaan als u de rolfilmhouder gebruikt, dient u de film zelf
door de houder te schuiven (terwijl de houder in de houdersleuf van de FILM2SD wordt
geplaatst).
N.B.: Als het beeld ondersteboven of gespiegeld wordt gescand, kan dit later worden
gecorrigeerd m.b.v. knoppen FLIP (omdraaien) of MIRROR (spiegelen).
Tip: Om te voorkomen dat een negatief in onjuiste richting wordt geplaatst (wat een gespiegelde afbeelding zal opleveren) zorgt u ervoor dat de serienummers aan de bovenzijde van negatieven te lezen zijn bij plaatsing in de houder.
Negatieven (Rolfilm)
32
Page 35

SNEL BEGINNEN
1. Sluit de FILM2SD aan op de USB-poort van uw PC of steek deze, met de bijgeleverde
stroomadapter, in een stopcontact.
2. Schakel de FILM2SD in met knop aan/uit.
3. Plaats uw dia(s) of negatief/negatieven in de juiste houder. Waarborg dat de
vergrendeling en zijkanten van de houder goed op hun plek zitten.
4. Plaats de houder in de SLEUF VOOR FILMHOUDER. Duw de houder alleen door de
SLEUF VOOR FILMHOUDER in de richting van de pijl (van rechts naar links).
5. Plaats de SD-kaart in de SLEUF VOOR SD-KAART. Steek uw SD-kaart met het etiket
naar beneden in de SLEUF VOOR SD-KAART. Wanneer u de gescande afbeeldingen
opslaat, zullen deze op de SD-kaart worden opgeslagen.
6. Leg de afbeelding vast met een druk op knop OK.
7. Druk opnieuw op knop OK om de afbeelding op te slaan.
8. Schakel de FILM2SD uit voordat u de SD-kaart verwijdert (anders kan de inhoud ervan
verloren gaan). Om de SD-kaart uit de SLEUF VOOR SD-KAART te laten werpen drukt u
de kaart eerst naar binnen en trekt deze hierna uit de sleuf. Nu kunt u de SD-kaart in een
ander apparaat, dat compatibel is met SD-kaarten plaatsen (bijv. een fotolijst, PC of TV)
om uw afbeeldingen te bekijken.
Als u afbeeldingen direct wilt overzetten naar een PC, sluit dan de FILM2SD met
bijgeleverde USB-kabel aan op de PC en selecteer het USB-pictogram (USB-modus) uit
het Main Menu (hoofdmenu) om de verbinding tot stand te brengen. FILM2SD zal als
apparaat voor verwisselbare opslag in “Computer” (Windows) of op uw bureaublad (Mac)
verschijnen. Nadat de verbinding is gelegd, kunnen de afbeeldingen naar de PC worden
gekopieerd door de bestanden naar uw harde schijf te verslepen.
N.B.: Met de FILM2SD in USB-modus zult u niet in staat zijn andere afbeeldingen te
scannen. Om opnieuw te kunnen scannen, wordt de FILM2SD uit- en hierna weer
ingeschakeld in Capture Mode (vastleggen).
Opmerking: om uw afbeelding op uw tv in plaats van op de display van FILM2SD te
bekijken, dient u de TV-UITGANG van de FILM2SD m.b.v. de meegeleverde tvuitgangkabel met de video-ingang van uw tv te verbinden.
33
Page 36

BEDIENING EN KENMERKEN
Bij het bekijken van menu's met meerdere opties kan met de knoppen UP/MIRROR en
DOWN/FLIP door de opties gebladerd worden en kan op knop OK te worden gedrukt om er één
te selecteren.
HOOFDMENU
1. Capture Mode (vastleggen): Vastleggen van
afbeeldingen. De FILM2SD schakelt automatisch
naar deze modus wanneer er 5 seconden niet op
een knop wordt gedrukt.
2. Playback Mode (afspelen): Bekijken van uw
afbeeldingen.
3. Film Type (type film): Gebruikt type film selecteren.
4. USB Mode (USB-modus): Via USB overzetten van
afbeeldingen naar een aangesloten PC. Wanneer de
afbeeldingen op de PC staan kunt u deze naar wens bekijken en bewerken.
Als er zich geen SD-kaart in de sleuf voor SD-kaarten bevindt, verschijnt een pictogram "?" op
het scherm.
Vastleggen
In deze modus geeft een rode indicator links bovenin het scherm aan dat de FILM2SD de
afbeelding in de filmhouder bekijkt. Druk op OK om de afbeelding vast te leggen.
Nadat een afbeelding is vastgelegd, worden de volgende
menuopties getoond:
1. Save (opslaan): Voor bewaren van de
vastgelegde afbeelding.
2. Rotate Right (rechts roteren): Afbeelding
90° met de klok mee roteren.
3. Rotate Left (links roteren): Afbeelding 90°
tegen de klok in roteren.
4. Cancel (annuleren): Bewerkingen annuleren
zonder op te slaan naar de SD-kaart.
5. Home (home): Terugkeren naar Main Menu (hoofdmenu).
1
2
3
4 5
34
Page 37

Na selectie van Save of Cancel kan de filmhouder naar de volgende vast te leggen afbeelding
worden verplaatst.
Wanneer de SD-kaart vol is, verschijnt een pictogram "FULL" op het scherm. De inhoud van de
SD-kaart kan overgezet worden naar uw PC, of er kan een andere SD-kaart worden geplaatst
die geheugenruimte beschikbaar heeft.
Afspelen / Bewerken
Wanneer u naar deze modus schakelt, worden uw vastgelegde afbeeldingen weergegeven in
een diapresentatie, waarbij u ze kunt bekijken en/of bewerken. Om de diapresentatie te stoppen, drukt u op knop OK.
Na het stoppen van de diapresentatie kan met de knoppen UP/MIRROR en DOWN/FLIP één
voor één door de opgeslagen afbeeldingen worden gebladerd. Druk op knop OK om er één uit
te kiezen om te bewerken.
In deze modus heeft u de volgende menuopties.
1. Rotate Right (rechts roteren): Afbeelding 90°
met de klok mee roteren.
2. Rotate Left (links roteren): Afbeelding 90°
tegen de klok in roteren.
3. Mirror (spiegelen): Afbeelding van links naar
rechts draaien.
4. Flip (omdraaien): Afbeelding van boven naar
1 5
2 6
3 7
4 8
beneden omdraaien.
5. Exit (beëindigen): Terugkeren naar de diapresentatie.
6. Delete (verwijderen): Afbeelding van de SD-kaart verwijderen.
7. Save (opslaan): Vastgelegde afbeelding bewaren.
8. Home (home): Terugkeren naar het Main Menu (hoofdmenu).
Als er zich geen opgeslagen afbeeldingen op de SD-kaart bevinden in modus afspelen, verschijnt een pictogram "?" op het scherm.
35
Page 38

Type Film
Selecteer hier welk type film er in de filmhouder geplaatst
is.
1. Color Negative (kleurennegatief)
2. Slide (dia)
3. Black & White Negative (zwart-wit negatief)
1
2
3
USB-Modus
In USB-modus kunnen afbeeldingen van de SD-kaart direct naar de PC worden
overgezet. De FILM2SD wordt bij gebruik in deze modus een SD-kaartlezer voor de PC.
Om te schakelen naar USB-modus, sluit u de FILM2SD met de bijgeleverde USB-kabel aan op
de USB-poort van uw PC. Selecteer hierna het pictogram USB uit het Main Menu (hoofdmenu)
van de FILM2SD. Er hoort een USB-pictogram op de monitor te verschijnen dat aangeeft dat
verbinding is gemaakt. FILM2SD zal als apparaat voor verwisselbare opslag in “Computer”
(Windows) of op uw bureaublad (Mac) verschijnen.
N.B.: Met de FILM2SD in USB-modus zult u niet in staat zijn andere afbeeldingen te scannen.
Om opnieuw te kunnen scannen, wordt de FILM2SD uit- en hierna weer ingeschakeld in
Capture Mode (vastleggen).
36
Page 39

SPECIFICATIONS
Image Sensor: 5-megapixel CMOS sensor
Lens: F no.=2.0, 4 glass elements
LCD: 2.4" color TFT LCD
Scan Quality: 1,800 dpi (3,600 interpolated)
Scan Method: Single pass
Light Source: Backlight (3 white LEDs)
Data Conversion: 10 bits per color channel
Exposure Control: Automatic
Color Balance: Automatic
Focus Range: Fixed focus
Internal Memory: 24 MB NAND Flash (for saving images)
External Memory: SD/MMC compatible
USB Configuration: Mass Storage Device Class / MSDC
Interface: USB2.0, TV-out (video 3.5mm jack)
Operating Systems: Windows XP / Vista
Power: 5 V adapter (included) or USB-powered
Dimensions: 82mm x 86mm x 152mm
Weight: .39 kg
ION Audio, LLC
Tel: (U.S.) 401.658.3743
E-mail: support@ion-audio.com
MANUAL VERSION 1.4
Page 40

www.ionaudio.com
 Loading...