

Page 1

User’s Guide and
Technical Reference
TapeWare®
Yosemite Technologies, Inc
Page 2

ii TapeWare® User’s Guide and Technical Reference
Notice
Information in this document is subject to change without notice. Yosemite Technologies, Inc makes no representations or warranties
with respect to the contents of this document and specifically disclaims any implied warranties of merchantability or fitness for any
particular purpose. Further, Yosemite Technologies, Inc reserves the right to revise this publication and to make changes without
obligation to notify any person or organization of such revisions or changes.
Persons mentioned in the examples of this manuscript are historical figures associated with Yosemite National Park. Beyond the use of
their names, the examples in this text are fictitious. Any other resemblance, incidental or otherwise, to any person living or dead is
purely coincidental.
Copyright
Under copyright laws, the contents of this document may not be copied, photocopied, reproduced, translated or reduced to any
electronic medium or machine-readable form, in whole or in part, without prior written consent of Yosemite Technologies, Inc.
Copyright © 1998-2003 Yosemite Technologies, Inc. All rights reserved.
www.TapeWare.com
Trademarks
TapeWare® is a registered trademark of Yosemite Technologies, Inc.
Windows
NetWare
trademark of The Open Group.
Netscape
Adobe
trademark of Apple, Inc. WinZip
®
, Windows NT® and MS-DOS® are registered trademarks of Microsoft Corporation.
®
is a registered trademark of Novell, Inc. Linux® is a registered trademark of Linus Torvalds. UNIX® is a registered
®
is a registered trademark of Netscape Communications Corporation. Java™ is a trademark of Sun Microsystems, Inc.
®
, Acrobat® and Acrobat® Reader® are registered trademarks of Adobe Systems Incorporated. Macintosh® is a registered
®
is a registered trademark of WinZip Computing, Inc.
Page 3

Table of Contents
Before You Begin................................................................................................................xv
TapeWare Documentation .....................................................................................................................xv
Printed Documentation ............................................................................................................................................xv
Release Notes ........................................................................................................................................................ xvi
Online Help ............................................................................................................................................................ xvii
HTML Help............................................................................................................................................................. xvii
Customer Support............................................................................................................................... xviii
Chapter 1 — TapeWare Overview........................................................................................1
Physical Peripherals................................................................................................................................ 1
Storage Management Database ............................................................................................................. 2
Backup Management Program................................................................................................................ 3
Managing the Storage Management Database .........................................................................................................3
Objects...............................................................................................................................................................3
Properties...........................................................................................................................................................4
Storage Management Zones..............................................................................................................................5
Storage Management Zones and Security.........................................................................................................6
Creating and Running Jobs................................................................................................................................6
Chapter 2 — TapeWare Workplace...................................................................................... 9
Starting TapeWare .................................................................................................................................. 9
Logon Window ...................................................................................................................................... 10
Selecting a Storage Management Zone ..................................................................................................................11
User Name and Password .......................................................................................................................................11
Changing Your Password ................................................................................................................................12
Logging on the First Time ........................................................................................................................................13
Grace Logons...................................................................................................................................................13
Logging Out .............................................................................................................................................................13
Logging Out and Running Scheduled Jobs......................................................................................................14
Main TapeWare Object Window............................................................................................................ 14
Tabs .................................................................................................................................................................15
Toolbar.............................................................................................................................................................15
Object View Areas............................................................................................................................................16
Status Bar ........................................................................................................................................................17
Working with Objects in the Main TapeWare Window .............................................................................................17
Arranging Objects ............................................................................................................................................18
Keyboard Shortcuts..........................................................................................................................................18
Shortcut Menus................................................................................................................................................19
Find Button...............................................................................................................................................................19
Property Sheets .................................................................................................................................... 19
iii
Page 4

iv TapeWare® User’s Guide and Technical Reference
Opening Property Sheets.........................................................................................................................................20
Menus ................................................................................................................................................... 21
Reports ................................................................................................................................................. 22
Additional Report Capabilities..................................................................................................................................23
Working with the TapeWare Wizard...................................................................................................... 24
Chapter 3 — Creating TapeWare Jobs.............................................................................. 27
Overview ............................................................................................................................................... 27
Backup, Restore and Verify Jobs.......................................................................................................... 27
Backup Jobs ............................................................................................................................................................28
Restore Jobs............................................................................................................................................................29
Verify Jobs ...............................................................................................................................................................29
Job and Database Tabs...........................................................................................................................................29
Creating New Jobs................................................................................................................................ 30
Creating Jobs with the Wizard .................................................................................................................................30
Creating New Jobs from a Job Tab .........................................................................................................................31
Creating New Jobs by Copying................................................................................................................................32
Renaming, Deleting and Moving Jobs................................................................................................... 33
Organizing Jobs with Folders................................................................................................................ 34
Types of Folders ......................................................................................................................................................34
Folders and Job Tabs ..............................................................................................................................................35
Home, Admin and Everyone Folders .......................................................................................................................36
Everyone Folder and Permissions ...................................................................................................................36
Creating Job Folders................................................................................................................................................37
Moving, Renaming and Deleting Folders.................................................................................................................38
Modifying Folders.............................................................................................................................................38
Chapter 4 — Permissions................................................................................................... 39
Overview ............................................................................................................................................... 39
Users and Groups................................................................................................................................. 40
Everyone Group.......................................................................................................................................................40
Effective Permissions............................................................................................................................ 41
Determining Effective Permissions ..........................................................................................................................41
Examples of Determining Effective Permissions......................................................................................................42
How Moving Objects Affects Permissions................................................................................................................44
Types of Permission.............................................................................................................................. 44
Supervisor................................................................................................................................................................45
Access .....................................................................................................................................................................45
Create ......................................................................................................................................................................46
Modify ......................................................................................................................................................................46
Delete, Read and Write............................................................................................................................................46
Examples of Permissions...................................................................................................................... 47
Granting Permissions to Other TapeWare Users .................................................................................. 50
Restricting User Permissions...................................................................................................................................51
Page 5

Table of Contents v
Chapter 5 — Selecting Files and Instances...................................................................... 53
Overview ............................................................................................................................................... 53
Backup Selection Concepts .................................................................................................................. 54
Marking Files for Backup .........................................................................................................................................54
Selecting Folders vs. Selecting Files ...............................................................................................................55
Selecting Files with Filters........................................................................................................................................56
How Selection Filters Work..............................................................................................................................56
Filters and Grayed Folders...............................................................................................................................57
Selecting Changed Files Only..................................................................................................................................57
Automatically Selecting New Files for Backup.........................................................................................................58
Selecting Files for Backup Jobs ............................................................................................................ 59
Applying Filter Criteria..............................................................................................................................................59
Filter Selection Criteria.............................................................................................................................................60
Backup Range..................................................................................................................................................60
Modify Range...................................................................................................................................................61
Create Range...................................................................................................................................................61
Access Range..................................................................................................................................................61
Size Range.......................................................................................................................................................61
Instance Range................................................................................................................................................62
Wildcard Type ..................................................................................................................................................63
Must Match.......................................................................................................................................................63
Cannot Match...................................................................................................................................................63
Required Attributes ..........................................................................................................................................63
Exclude Attributes ............................................................................................................................................64
Parents.............................................................................................................................................................64
Children............................................................................................................................................................64
Media ...............................................................................................................................................................64
Restore Selection Concepts.................................................................................................................. 65
Selecting Files for Restoring ....................................................................................................................................65
Selecting Instances of Files .............................................................................................................................66
Selecting Instances of Folders.........................................................................................................................67
Selecting Folders vs. Selecting Files ...............................................................................................................68
Instances and Filters........................................................................................................................................69
Selecting Files with Filters........................................................................................................................................69
How Selection Filters Work..............................................................................................................................69
Changing the Name and Location of Restored Files ...............................................................................................70
Selecting Instances of Files for Restore Jobs ....................................................................................... 70
Applying Filter Criteria..............................................................................................................................................71
Filter Selection Criteria.............................................................................................................................................72
Backup Range..................................................................................................................................................72
Modify Range...................................................................................................................................................73
Create Range...................................................................................................................................................73
Delete Range ...................................................................................................................................................73
Access Range..................................................................................................................................................75
Size Range.......................................................................................................................................................75
Instance Range................................................................................................................................................75
Page 6

vi TapeWare® User’s Guide and Technical Reference
Wildcard Type ..................................................................................................................................................76
Must Match.......................................................................................................................................................76
Cannot Match...................................................................................................................................................76
Required Attributes ..........................................................................................................................................77
Exclude Attributes ............................................................................................................................................77
Parents.............................................................................................................................................................77
Children............................................................................................................................................................77
Media ...............................................................................................................................................................78
Restoring Files with New Names and Locations ...................................................................................78
Restoring a File with a New Name...........................................................................................................................78
Restoring Files to a Different Folder ........................................................................................................................79
Restoring Files to a New Folder...............................................................................................................................80
Verify Selection Concepts ..................................................................................................................... 80
Selecting Files for Verifying......................................................................................................................................81
Selecting Instances of Files .............................................................................................................................82
Selecting Folders vs. Selecting Files ...............................................................................................................83
Selecting Files with Filters........................................................................................................................................83
How Selection Filters Work..............................................................................................................................83
Selecting Instances of Files for Verify Jobs........................................................................................... 84
Applying Filter Criteria..............................................................................................................................................85
Filter Selection Criteria.............................................................................................................................................85
Backup Range..................................................................................................................................................86
Modify Range...................................................................................................................................................86
Create Range...................................................................................................................................................86
Access Range..................................................................................................................................................87
Size Range.......................................................................................................................................................87
Instance Range................................................................................................................................................88
Wildcard Type ..................................................................................................................................................88
Must Match.......................................................................................................................................................88
Cannot Match...................................................................................................................................................89
Required Attributes ..........................................................................................................................................89
Exclude Attributes ............................................................................................................................................89
Parents.............................................................................................................................................................89
Children............................................................................................................................................................90
Media ...............................................................................................................................................................90
Chapter 6 — Scheduling Jobs ........................................................................................... 91
Overview ............................................................................................................................................... 91
Backup Job Scheduling Concepts......................................................................................................... 92
Backup Job Schedule Type .....................................................................................................................................92
Backup Mode ...........................................................................................................................................................93
Media Rotation.........................................................................................................................................................94
Selecting a Backup Job Schedule......................................................................................................... 95
Not Scheduled Backup Jobs....................................................................................................................................96
Built-In Schedules for Backup Jobs .........................................................................................................................96
Which Built-In Schedule to Select............................................................................................................................97
Page 7

Table of Contents vii
Full Data Recovery Period ...............................................................................................................................97
Access to Historical Files .................................................................................................................................97
Minimum Number of Tapes or Media...............................................................................................................98
Built-In Schedules Compared ..................................................................................................................................99
Scheduling Backup Jobs with Built-In Schedules ....................................................................................................99
Customizing Schedules....................................................................................................................... 100
Creating Custom Schedules ..................................................................................................................................100
Modifying Built-In Schedules..................................................................................................................................101
Modifying the Custom Schedule ............................................................................................................................102
Changing the Tape Count..............................................................................................................................102
Changing the Backup Mode...........................................................................................................................103
Determining the Length of the Full Data Recovery Period.............................................................................103
Incremental Jobs and Full Data Recovery .....................................................................................................104
Manual Backup Jobs........................................................................................................................... 105
Scheduling Restore Jobs .................................................................................................................... 106
Scheduling Verify Jobs........................................................................................................................ 107
Chapter 7 — Job Options................................................................................................. 109
Overview ............................................................................................................................................. 109
Backup Job Options ............................................................................................................................ 110
Number of Passes..........................................................................................................................................110
Delay Between Passes ..................................................................................................................................111
Log Options....................................................................................................................................................111
Backup Mode .................................................................................................................................................112
Change Mode.................................................................................................................................................112
Write Mode.....................................................................................................................................................113
Auto Verify Mode............................................................................................................................................114
Compression Type.........................................................................................................................................115
Auto Format Mode .........................................................................................................................................116
New Media Location.......................................................................................................................................117
New Media Name...........................................................................................................................................118
Device ............................................................................................................................................................118
Media .............................................................................................................................................................119
Media Password….........................................................................................................................................119
Backup Options Automatically Updated.................................................................................................................120
Advanced Options............................................................................................................................... 121
Native Data Streams Format..........................................................................................................................122
Parent Security...............................................................................................................................................122
Child Security.................................................................................................................................................123
Volume Restrictions .......................................................................................................................................123
Space Restrictions .........................................................................................................................................123
Auto Eject.......................................................................................................................................................123
Auto Retension...............................................................................................................................................123
Autoprint Log..................................................................................................................................................123
Extended Attributes........................................................................................................................................124
Macintosh Finder............................................................................................................................................124
Page 8

viii TapeWare® User’s Guide and Technical Reference
NFS Information.............................................................................................................................................124
Object Owner .................................................................................................................................................124
Hardware Compression .................................................................................................................................124
Mount Points ..................................................................................................................................................124
Restore Job Options ........................................................................................................................... 125
Number of Passes..........................................................................................................................................125
Delay Between Passes ..................................................................................................................................126
Restore Files in Use.......................................................................................................................................126
Log Options....................................................................................................................................................126
Device ............................................................................................................................................................127
Advanced Options..................................................................................................................................................127
Parent Security...............................................................................................................................................128
Child Security.................................................................................................................................................128
Volume Restrictions .......................................................................................................................................128
Space Restrictions .........................................................................................................................................128
Auto Retension...............................................................................................................................................129
Autoprint Log..................................................................................................................................................129
Extended Attributes........................................................................................................................................129
Macintosh Finder............................................................................................................................................129
NFS Information.............................................................................................................................................129
Object Owner .................................................................................................................................................129
Mount Points ..................................................................................................................................................129
Verify Job Options............................................................................................................................... 130
Number of Passes..........................................................................................................................................130
Delay Between Passes ..................................................................................................................................131
Log Options....................................................................................................................................................131
Verify Mode....................................................................................................................................................131
Device ............................................................................................................................................................132
Advanced Options..................................................................................................................................................133
Auto Retension...............................................................................................................................................133
Autoprint Log..................................................................................................................................................133
Chapter 8 — Running Jobs.............................................................................................. 135
Overview ............................................................................................................................................. 135
Queue Tab .......................................................................................................................................... 136
Queue Tab Details View ........................................................................................................................................136
Running Scheduled Jobs .................................................................................................................... 137
Automatically Running Scheduled Jobs.................................................................................................................137
Security and Scheduled Jobs.................................................................................................................................138
Forcing Scheduled Jobs to Run.............................................................................................................................138
How Forcing Jobs to Run Affects Job Parameters ........................................................................................139
How Forcing Jobs to Run Affects Permissions ..............................................................................................141
Viewing and Printing Scheduled Job Instructions ..................................................................................................142
Running Unscheduled Jobs ................................................................................................................ 143
Unscheduled Job Parameters and Permissions ....................................................................................................143
Job Status Window ............................................................................................................................. 144
Page 9

Table of Contents ix
Job Status Messages.............................................................................................................................................145
Job Logs ............................................................................................................................................. 146
Viewing Job Logs...................................................................................................................................................147
Autoprinting Job Logs ............................................................................................................................................147
Emailing Job Logs..................................................................................................................................................148
Audit Logs ........................................................................................................................................... 150
Chapter 9 —Media, Device and Database Tabs ............................................................. 153
Overview ............................................................................................................................................. 153
Media Tab ........................................................................................................................................... 154
Creating Media Folders..........................................................................................................................................154
Deleting Media Folders ..........................................................................................................................................155
Creating New Media ..............................................................................................................................................155
Media Passwords...........................................................................................................................................157
Deleting Media .......................................................................................................................................................158
Media Content........................................................................................................................................................158
Device Tab.......................................................................................................................................... 158
Restarting Failed Devices ......................................................................................................................................159
Device Tab Commands .........................................................................................................................................160
Eject Media ....................................................................................................................................................160
Eject Magazine...............................................................................................................................................160
Rewind ...........................................................................................................................................................160
Retension.......................................................................................................................................................160
Quick Erase and Secure Erase......................................................................................................................161
Format Media.................................................................................................................................................161
Import Media ..................................................................................................................................................162
Restore Database ..........................................................................................................................................164
Clean Device..................................................................................................................................................166
Identify Media.................................................................................................................................................166
Database Tab...................................................................................................................................... 166
Chapter 10 — Tips, Techniques and Strategies............................................................. 169
Managing the Storage Management Database................................................................................... 169
Where to Locate the Storage Management Database...........................................................................................169
Accounting for Storage Management Database Size ............................................................................................172
Storage Management Server and Machine Platforms ...........................................................................................173
Strategies for Faster Jobs ................................................................................................................... 173
What Slows Down Tape Drives? ...........................................................................................................................173
Maintaining the Flow of Data .................................................................................................................................174
Other Factors that Affect Job Speed......................................................................................................................176
Working with Permissions ................................................................................................................... 177
Checking the Effective Permissions of a User .......................................................................................................177
Using Groups to Handle Complex Security Needs ................................................................................................178
Working with Scheduled Jobs ............................................................................................................. 178
Running a Failed Rotation Job Again ....................................................................................................................178
Page 10

x TapeWare® User’s Guide and Technical Reference
Scheduling a Job to Run Once Only......................................................................................................................180
Scheduling Simple Backup Jobs............................................................................................................................180
Simple Daily Backup ......................................................................................................................................181
Simple Five-Day Rotation ..............................................................................................................................182
Selecting Files for Jobs ....................................................................................................................... 183
Selecting Files not Previously Backed Up..............................................................................................................183
Selecting Deleted Files for Restoring.....................................................................................................................184
Selecting Instances from a Specific Job ................................................................................................................185
Selecting Instances from Specific Media ...............................................................................................................185
Restoring Tips..................................................................................................................................... 186
Restoring Volumes for the Latest Date ..................................................................................................................186
Restoring Volumes for a Specific Date ..................................................................................................................186
Copying a Directory Structure................................................................................................................................188
Restoring Files to a New or Different Folder..........................................................................................................188
Restoring Files with New Names ...........................................................................................................................190
Other Tips ...........................................................................................................................................191
Moving Data Between Operating Systems ............................................................................................................191
Setting Up an Autoloader for Automatic Cleaning .................................................................................................192
Chapter 11 — Advanced Permissions and Security...................................................... 193
Overview ............................................................................................................................................. 193
Before Proceeding Further.....................................................................................................................................195
Adding New Users and Groups........................................................................................................... 195
New User/Group Folders .......................................................................................................................................196
Setting Up Users....................................................................................................................................................196
Logon Control Tab, User Object ....................................................................................................................196
Groups Tab, User Object ...............................................................................................................................198
Equivalencies.................................................................................................................................................199
Permissions Tab, User Object .......................................................................................................................200
Setting Up Groups .................................................................................................................................................202
Members Tab.................................................................................................................................................202
Permissions Tab, Group Object.....................................................................................................................203
Effective Permissions.......................................................................................................................... 203
Calculating Effective Permissions..........................................................................................................................204
Effective Permissions Algorithm.....................................................................................................................204
Permissions from Multiple Sources................................................................................................................205
Examples of Effective Permissions........................................................................................................................206
Checking Effective Permissions.............................................................................................................................208
Permissions Reference ....................................................................................................................... 209
Read Permission....................................................................................................................................................210
Write Permission....................................................................................................................................................210
Delete Permission..................................................................................................................................................211
Modify Permission..................................................................................................................................................211
Create Permission .................................................................................................................................................212
Access Permission.................................................................................................................................................212
Supervisor Permission ...........................................................................................................................................213
Page 11

Table of Contents xi
Chapter 12 — Objects and Properties Reference .......................................................... 215
Address Tab........................................................................................................................................ 216
Audit Tab............................................................................................................................................. 217
Autoprint Tab....................................................................................................................................... 218
Command Tab .................................................................................................................................... 219
Communication Test Tab .................................................................................................................... 221
Running the Test....................................................................................................................................................221
Test Results ...........................................................................................................................................................222
Connections Tab ................................................................................................................................. 223
Diagnostics Tab .................................................................................................................................. 224
Drivers Tab.......................................................................................................................................... 225
Email Tab............................................................................................................................................ 226
Equivalencies Tab............................................................................................................................... 227
General Tab ........................................................................................................................................ 229
Groups Tab ......................................................................................................................................... 233
Instances Window ............................................................................................................................... 235
Available Instances ................................................................................................................................................235
Details ....................................................................................................................................................................236
Loader Test Tab.................................................................................................................................. 238
Logon Control Tab .............................................................................................................................. 239
Expiration ...............................................................................................................................................................239
Connection.............................................................................................................................................................240
Grace Logons ........................................................................................................................................................240
Password ...............................................................................................................................................................241
Logs Tab ............................................................................................................................................. 242
Media Control Tab............................................................................................................................... 244
Members Tab...................................................................................................................................... 246
Options Tab......................................................................................................................................... 247
Number of Passes .................................................................................................................................................247
Delay Between Passes ..........................................................................................................................................247
Log Options............................................................................................................................................................248
Backup Mode .........................................................................................................................................................248
Change Mode ........................................................................................................................................................249
Write Mode.............................................................................................................................................................249
Auto Verify Mode ...................................................................................................................................................250
Compression Type.................................................................................................................................................250
Auto Format Mode .................................................................................................................................................251
New Media Location ..............................................................................................................................................252
New Media Name ..................................................................................................................................................252
Device ....................................................................................................................................................................252
Media .....................................................................................................................................................................253
Media Password….................................................................................................................................................253
Permissions Tab ................................................................................................................................. 255
Page 12

xii TapeWare® User’s Guide and Technical Reference
Ping Test Tab...................................................................................................................................... 257
Preferences Window ........................................................................................................................... 258
Confirmation...........................................................................................................................................................258
Tree View...............................................................................................................................................................258
Text Editor..............................................................................................................................................................259
Query Window..................................................................................................................................... 260
Schedule Tab...................................................................................................................................... 263
Type .......................................................................................................................................................................263
Start Time ..............................................................................................................................................................264
Daily, Weekly, Monthly, Yearly...............................................................................................................................264
End of Week ..........................................................................................................................................................264
Selection Tab ...................................................................................................................................... 266
Selection Filters Window..................................................................................................................... 267
Status Tab........................................................................................................................................... 271
Loader Statistics ....................................................................................................................................................271
Import… .................................................................................................................................................................272
Format…................................................................................................................................................................272
Identify ...................................................................................................................................................................272
Rebuild...................................................................................................................................................................272
Clean......................................................................................................................................................................272
Change Status…....................................................................................................................................................273
Storage Tab ........................................................................................................................................ 274
Backup Stream ......................................................................................................................................................274
Audit Object Actions...............................................................................................................................................275
Appendix A — Disaster Recovery ................................................................................... 277
Overview ............................................................................................................................................. 277
Create the Disaster Recovery Backup ................................................................................................279
Create Full Backup ................................................................................................................................................279
Create Bootable Media ..........................................................................................................................................280
Windows.........................................................................................................................................................280
NetWare.........................................................................................................................................................282
Linux...............................................................................................................................................................283
Troubleshooting Disaster Recovery Backup..........................................................................................................285
When to Create New Bootable Media....................................................................................................................285
Testing Disaster Recovery Media ....................................................................................................... 286
Recovering from a Disaster................................................................................................................. 288
Disaster Recovery from Diskette/CD .............................................................................................................288
Disaster Recovery from Bootable Tape .........................................................................................................290
Troubleshooting Recovering from a Disaster.........................................................................................................292
Using Disaster Recovery with Autoloaders ......................................................................................... 292
Using Disaster Recovery with Windows Active Directory.................................................................... 293
Appendix B — Troubleshooting Guide........................................................................... 295
Page 13

Table of Contents xiii
Troubleshooting Backup Jobs ............................................................................................................. 295
When I run a backup job, it uses the backup device on my local machine instead of the one on the server. .......295
My scheduled job is not running.............................................................................................................................296
I have two tape drives, but it is only using one to run a job....................................................................................296
How do I replace media in a rotation group? .........................................................................................................297
How can I tell when the next job will run and which media is required? ................................................................297
How can I easily view the logs for each job? .........................................................................................................297
How can I determine which files were not backed up? ..........................................................................................297
Troubleshooting Restore Jobs ............................................................................................................ 298
I can’t restore a backup to a different operating system. .......................................................................................298
How can I restore data to a different file name? ....................................................................................................298
How can I restore data to another location? ..........................................................................................................299
How can I restore all the files from a single instance?...........................................................................................299
How can I determine which files are on particular media?.....................................................................................299
When restoring, I get many alerts. What is wrong? ...............................................................................................299
Does TapeWare back up files as compressed?.....................................................................................................300
Troubleshooting Verify Jobs................................................................................................................ 300
I occasionally get a ‘stream sync error’ when verifying media. ..............................................................................300
Troubleshooting the Storage Management Database......................................................................... 300
How do I select the location of the storage management database in a network installation?..............................300
How do I create a storage management zone? .....................................................................................................301
When recovering from a storage server failure, does TapeWare recover all of the database information? ..........301
Troubleshooting Error Messages ........................................................................................................ 301
Error 51 – Database corrupt appears during a backup or when adding a new object. ..........................................301
Error 212 – Unknown error appears when I restore files under Windows. ............................................................302
Error 630 – Unable to create a directory appears when I restore files under Windows.........................................302
Index................................................................................................................................... 303
Page 14

Page 15

Before You Begin
The TapeWare User’s Guide and Technical Reference provides all of the information
necessary to effectively implement and use all of TapeWare’s advanced features.
However, we ask you to refer to the TapeWare Installation Guide to install TapeWare. It
includes system requirements as well as step-by-step instructions.
TapeWare Documentation
The following documentation is included with TapeWare to help you install and use all
of TapeWare’s features and options.
Note In the following sections, <dir> represents the platform-specific directory on the
TapeWare CD-ROM, for example, win (Windows), dos (DOS), lin (Linux) and net
(NetWare).
Note In the following sections, <lng> represents eng (English), fre (French), ger
(German), ita (Italian), jpn (Japanese) or spa (Spanish).
Printed Documentation
The /doc/<lng>/acrobat directory on the TapeWare CD-ROM contains the following
printed documentation:
• TapeWare Installation Guide (install.pdf): Contains installation information for each
supported platform.
• TapeWare User’s Guide and Technical Reference (usersgd>.pdf): Contains
information for configuring and using TapeWare.
• TapeWare Error Code Reference (errcodes.pdf): Lists all TapeWare error codes
along with possible remedies.
xv
Page 16

xvi TapeWare® User’s Guide and Technical Reference
• TapeWare Addendum (addendum.pdf): Contains information on additional features
(English only).
Note You can also download these documents from the TapeWare website.
If you require extra copies of these manuals, you can print the PDF file. They were
designed to be printed one-sided, with a margin for placing them in a binder. For
consistency with this manual, the page numbers, page layout, table of contents and index
are the same (except that the PDF file does not have facing pages or odd/even headers).
To view or print this documentation, Adobe Acrobat Reader (version 4.0 or higher) must
be installed on your Windows or X Window (Linux/UNIX) computer. If not currently
installed, you can install it from the Adobe Acrobat Reader website at
http://www.adobe.com/products/acrobat/readstep2.html
Note Adobe Acrobat Reader does not offer versions for DOS or NetWare systems.
Therefore, you can only view or print the TapeWare documentation on Windows or
X Window (Linux/UNIX) systems.
To print the documentation, open the appropriate file into Adobe Acrobat Reader.
Choose Page Setup… from the File menu and set the proper options for your printer. If
your printer supports it, select the Larger Print Area option. Then choose Print… from
the File menu and print the document.
.
(You can also purchase additional printed and bound copies of this manual. Contact us at
the numbers listed below for additional information.)
Release Notes
Release notes are included with every service pack. Before installing TapeWare, please
read and print the release notes for additional information. The release notes are available
in both HTML (/<dir>/read_<lng>.htm) and text (/<dir>/read_<lng>.txt) formats,
depending on platform. Access the release notes from the directory for your platform on
the TapeWare CD-ROM.
Page 17

Before You Begin xvii
Online Help
Windows
To get online help while using TapeWare, select Help Topics from the Help menu.
For context-sensitive help while using TapeWare:
Help
button
Non-Windows
HTML Help
• Click on the Help button and then click on the part of the object you want help with.
• Right-click an object and select What’s this?
• Use the Tab key to select an area in the TapeWare window and press F1.
You can access online help from most TapeWare screens by pressing F1.
You can install the HTML help version of our online help system. Then you can access it
with a web browser. Please note that TapeWare will not access HTML help topics.
Note You can also download the HTML help system from the TapeWare website.
To install HTML help:
• Windows: Copy htmlhelp.zip from the \doc\<lng>\htmlhelp subdirectory on the
TapeWare CD-ROM. Use WinZip or some other file extraction software to unpack it
onto your computer.
• X Window (Linux/UNIX): Copy htmlhelp.tgz from the \doc\<lng>\htmlhelp
subdirectory on the TapeWare CD-ROM. Use tar/gzip or some other file extraction
software to unpack it onto your computer.
Note The HTML help system requires the Java Plug-in. Internet Explorer users must
enable it. Netscape offers to install the plug-in if it is not installed.
Note For best results on X Window (Linux/UNIX) computers, we recommend Netscape
v6.x.
To launch HTML help, use your browser to open index.htm.
Page 18

xviii TapeWare® User’s Guide and Technical Reference
Customer Support
You can get customer support for TapeWare in one of three ways:
• Visit our website at www.TapeWare.com and fill out an Online Customer Support
Form. (For a quick connection, select Web Page from the Help menu.)
• Fax us at (559) 449-1188.
• Phone us at (559) 449-8181. Visit our website at www.TapeWare.com for our
customer support hours.
Page 19

Chapter 1 — TapeWare Overview
TapeWare provides a powerful, yet cost effective and easy to use, management tool for
protecting data on network file servers and workstations. TapeWare provides users with
the capacity to back up and restore data across a network and the ability to administer a
comprehensive backup plan.
A complete network backup system consists of three parts: physical peripherals, storage
management database and backup management program.
Physical Peripherals
TapeWare works with your existing computer network. A network connects workstations
and file servers together in order to allow various users to work together on projects and
with common files. Networks also allow users to share peripherals, such as disk drives,
printers, fax machines and modems. Sharing peripherals across a network makes
economic sense, since multiple workstations can use a single peripheral. Backup devices,
such as tape drives, which back up or copy files onto tapes or other media, may also be
shared.
For more
information
about backup
device LAN
location, see
Strategies for
Faster Jobs in
Chapter 10 —
Tips,
Techniques
and Strategies.
Sharing a backup device or tape drive makes operational as well as economic sense.
Rather than back up each workstation individually, a shared backup device on a network
can back up every workstation and file server on the network. This lowers costs and
makes it possible to centralize backup operations for the network. Further, a single user,
such as the network administrator, can have primary responsibility for backing up all the
file servers and workstations on a network.
1
Page 20
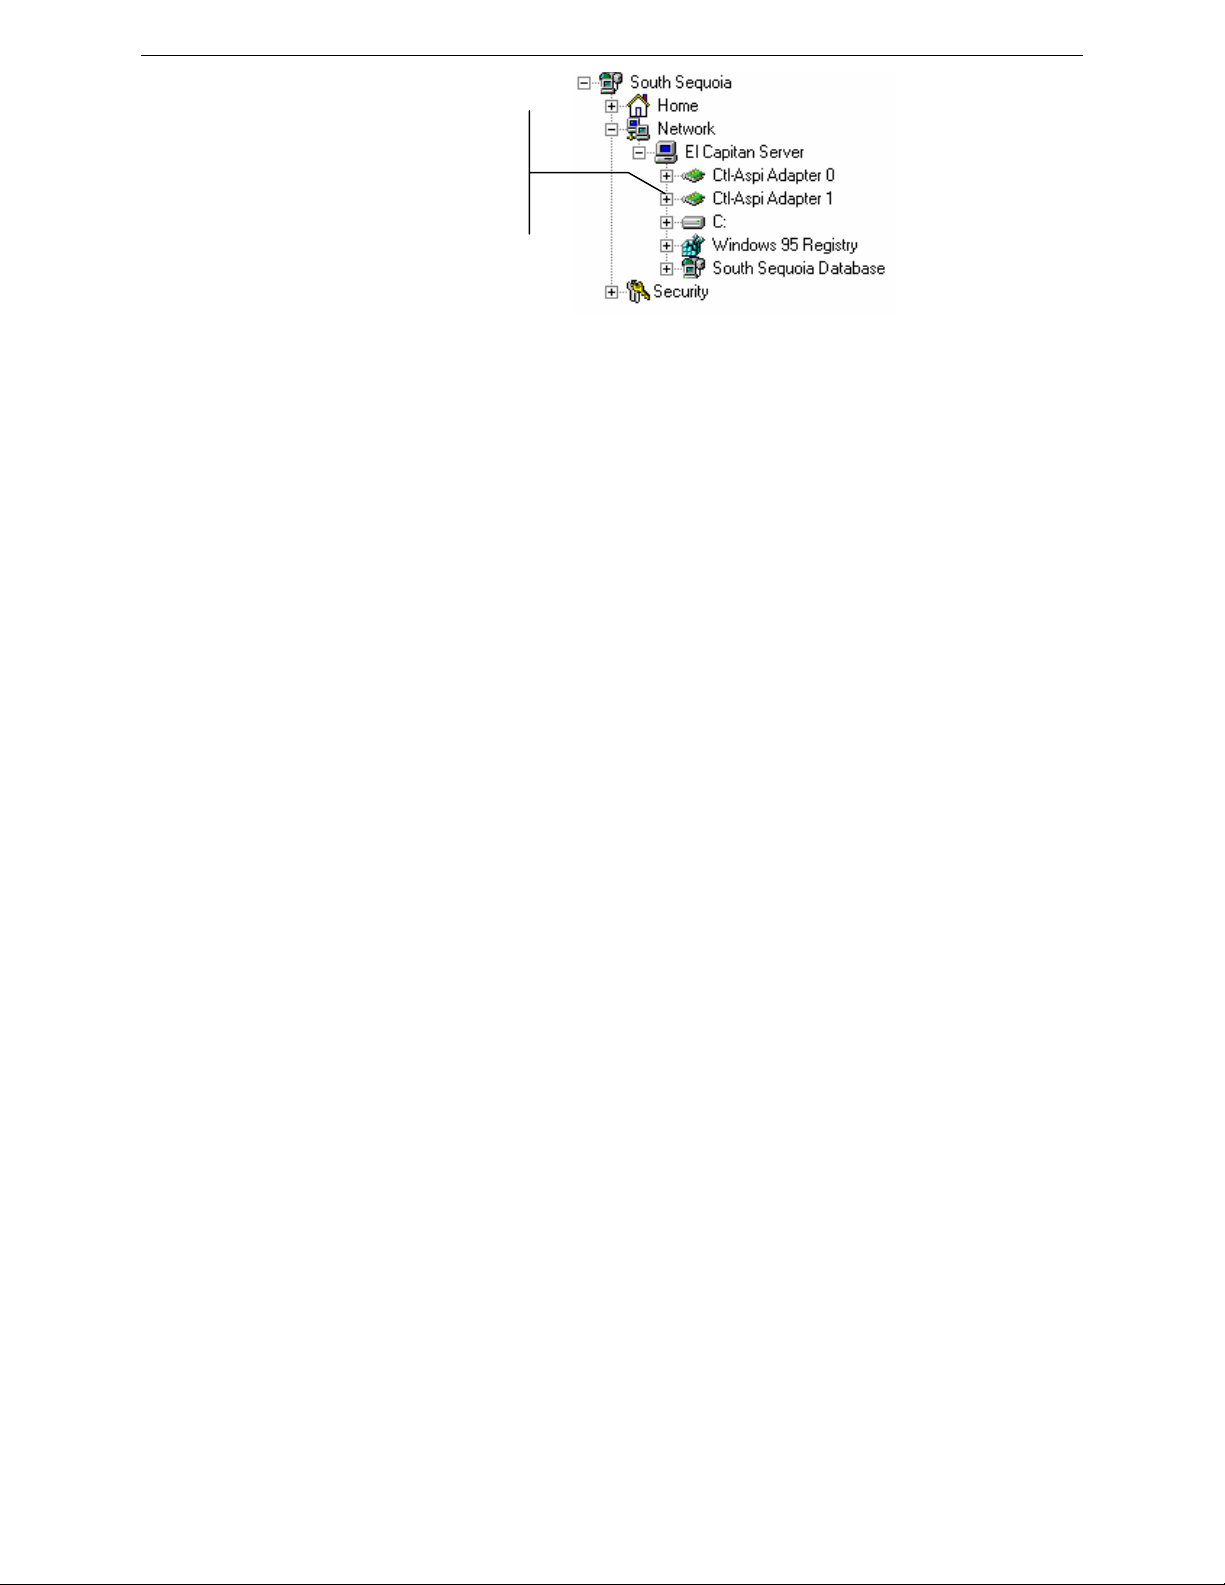
2 TapeWare® User’s Guide and Technical Reference
Backup devices can be
shared on a network, so that
you can locate backup
devices on any workstation or
file server.
Although sharing a backup device or tape drive on a network makes economic and
practical sense, it also poses several problems.
• First, security is an issue. Most networks have elaborate security systems that prevent
sensitive or confidential data from being accessed by unauthorized users. However,
unless protective measures are taken, once these files are backed up onto a tape or
other media, any user in physical possession of the media can gain access to those
files. Although it is possible to physically store the media in a secure location, a
complete network backup system will prevent unauthorized viewers from accessing
confidential or classified information.
• Second, tracking the location of backed up files is a further issue. While a single user
may be able to find a file backed up onto a floppy disk by manually searching
through a stack of disks, this approach is unworkable for large networks. Without the
appropriate software, locating a given occurrence of a file may be impossible, since
there may be hundreds of thousands of files backed up on hundreds of tapes created
over weeks or months.
Storage Management Database
For more
information,
see Managing
the Storage
Management
Database in
Chapter 10 —
Tips,
Techniques
and Strategies.
To solve the problems of security and tracking files, TapeWare creates and manages a
storage management database. The TapeWare database keeps track of each tape or
other media and each file that is on that tape. For each tape, the storage management
database contains detailed information about the tape, such as when it was created and
who created it and about the files on the tapes, such as when they were backed up and on
which tape the file is stored. This is true as well for other media.
The storage management database also addresses the security complication. Included in
the database is information about which users can use or view which files. The storage
management database prevents unauthorized users from accessing files for which they
have no security clearance. It tracks each user and ensures that only approved users have
access to files stored on the backup media.
Page 21
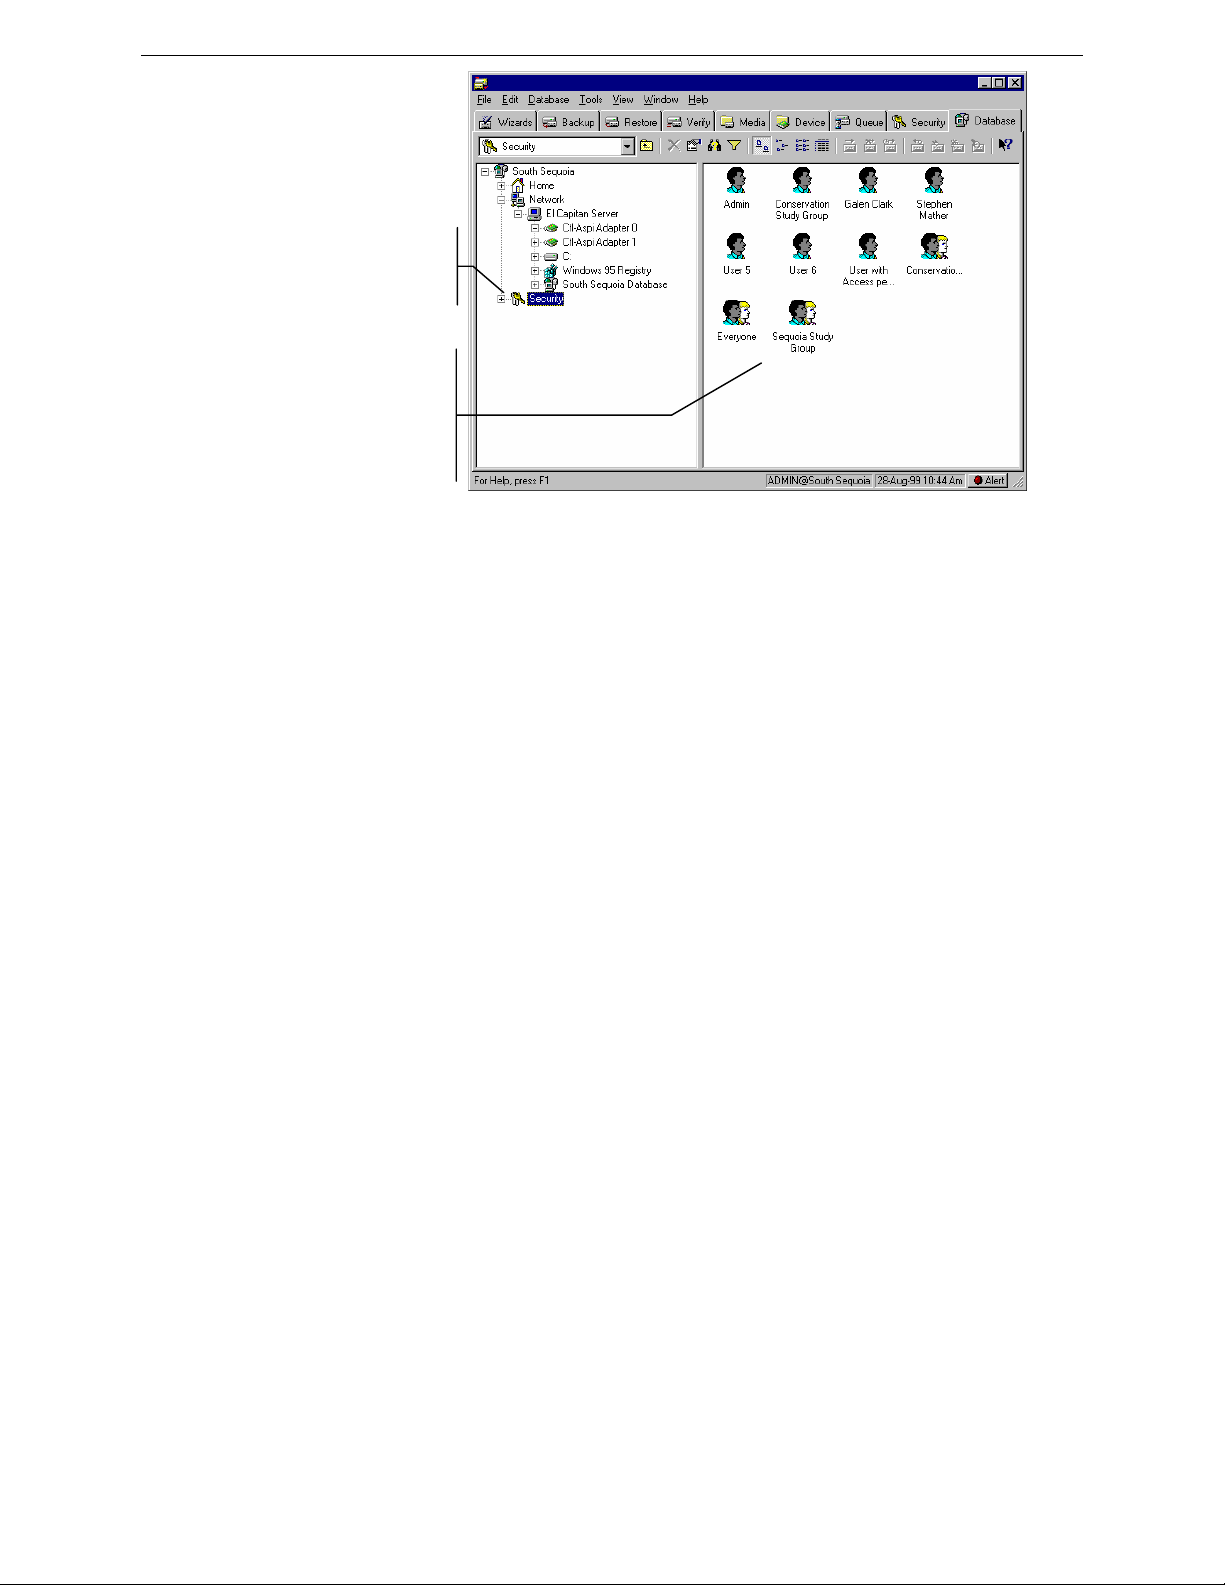
Chapter 1 — TapeWare Overview 3
The database
tracks jobs and
media…
…and handles
security by
controlling user
permissions to
database objects.
Backup Management Program
Writing files to the backup media and managing the storage management database
requires an application program, such as TapeWare. Two of the most important functions
of TapeWare are managing the storage management database and creating and running
jobs. TapeWare manages the storage management database to keep track of files and to
ensure security. TapeWare also creates and runs jobs, such as backup and restore jobs,
which transfer files back and forth between backup devices (such as tape drives) and file
servers and workstations.
Managing the Storage Management Database
Much of the power and usefulness of TapeWare comes from its extensive capabilities to
manage the storage management database. There are three important concepts associated
with the database: objects, properties and storage management zones.
Objects
The storage management database collects and organizes information about objects. An
object is any file, machine, tape or user about which TapeWare needs to store data.
Examples of objects which TapeWare tracks in its database include tapes, tape drives,
network servers, occurrences of files, backup jobs, users and so forth.
Page 22
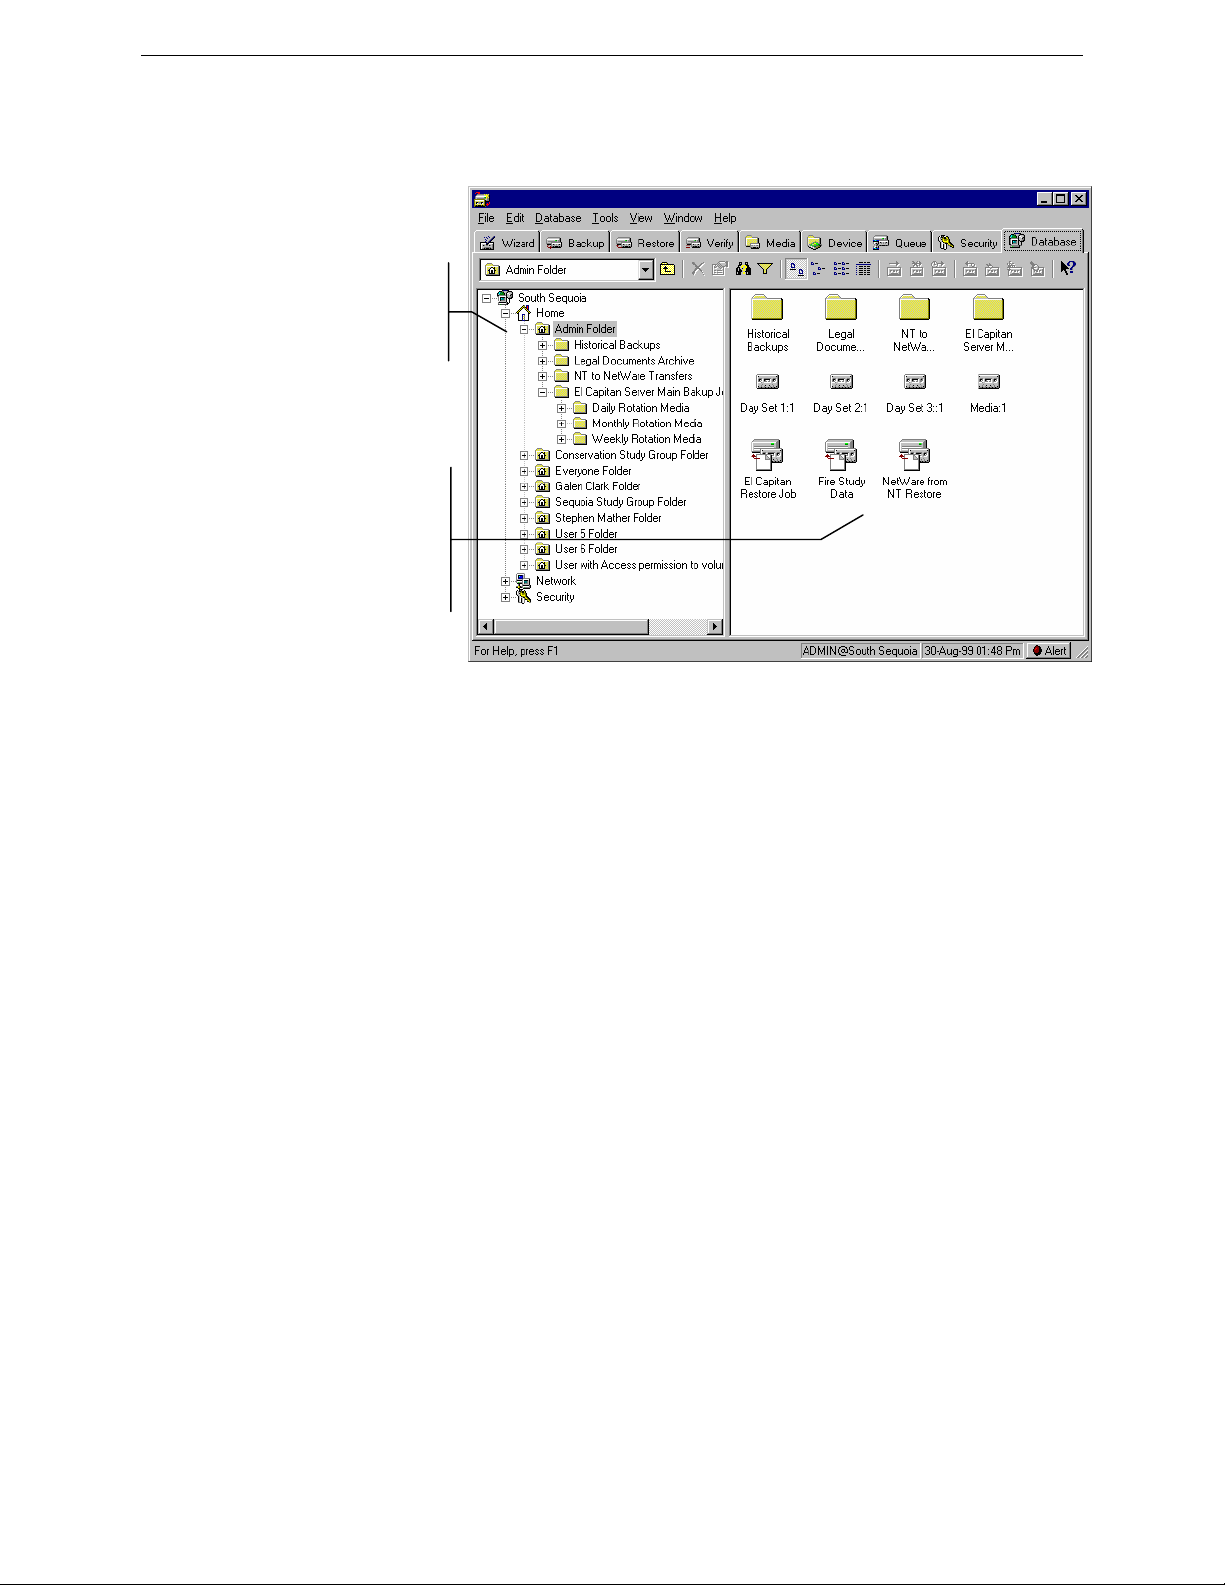
4 TapeWare® User’s Guide and Technical Reference
)
Objects that contain other objects within them are referred to as containers. A simple
example of a container is a folder. It contains other objects within it, including objects
that are not containers, such as jobs and files and objects that are containers, such as other
folders.
Container objects
contain other
objects inside
them…
…including other
objects (like jobs
and media) and
other containers
(such as job
folders
.
Properties
For more
information on
property
sheets, see
Chapter 12 —
Objects and
Properties
Reference.
The information about each object that TapeWare stores in its database are called
properties. The properties of each object include important information about that
object, such as what kind of object it is, who has security clearance to use it and its
relationship to other objects.
For example, an individual backup tape is an object in the TapeWare database. Some of
the properties of that tape stored in the storage management database include the name of
the tape, when it was created, who has clearance to use the tape and whether or not the
tape can be erased.
Page 23
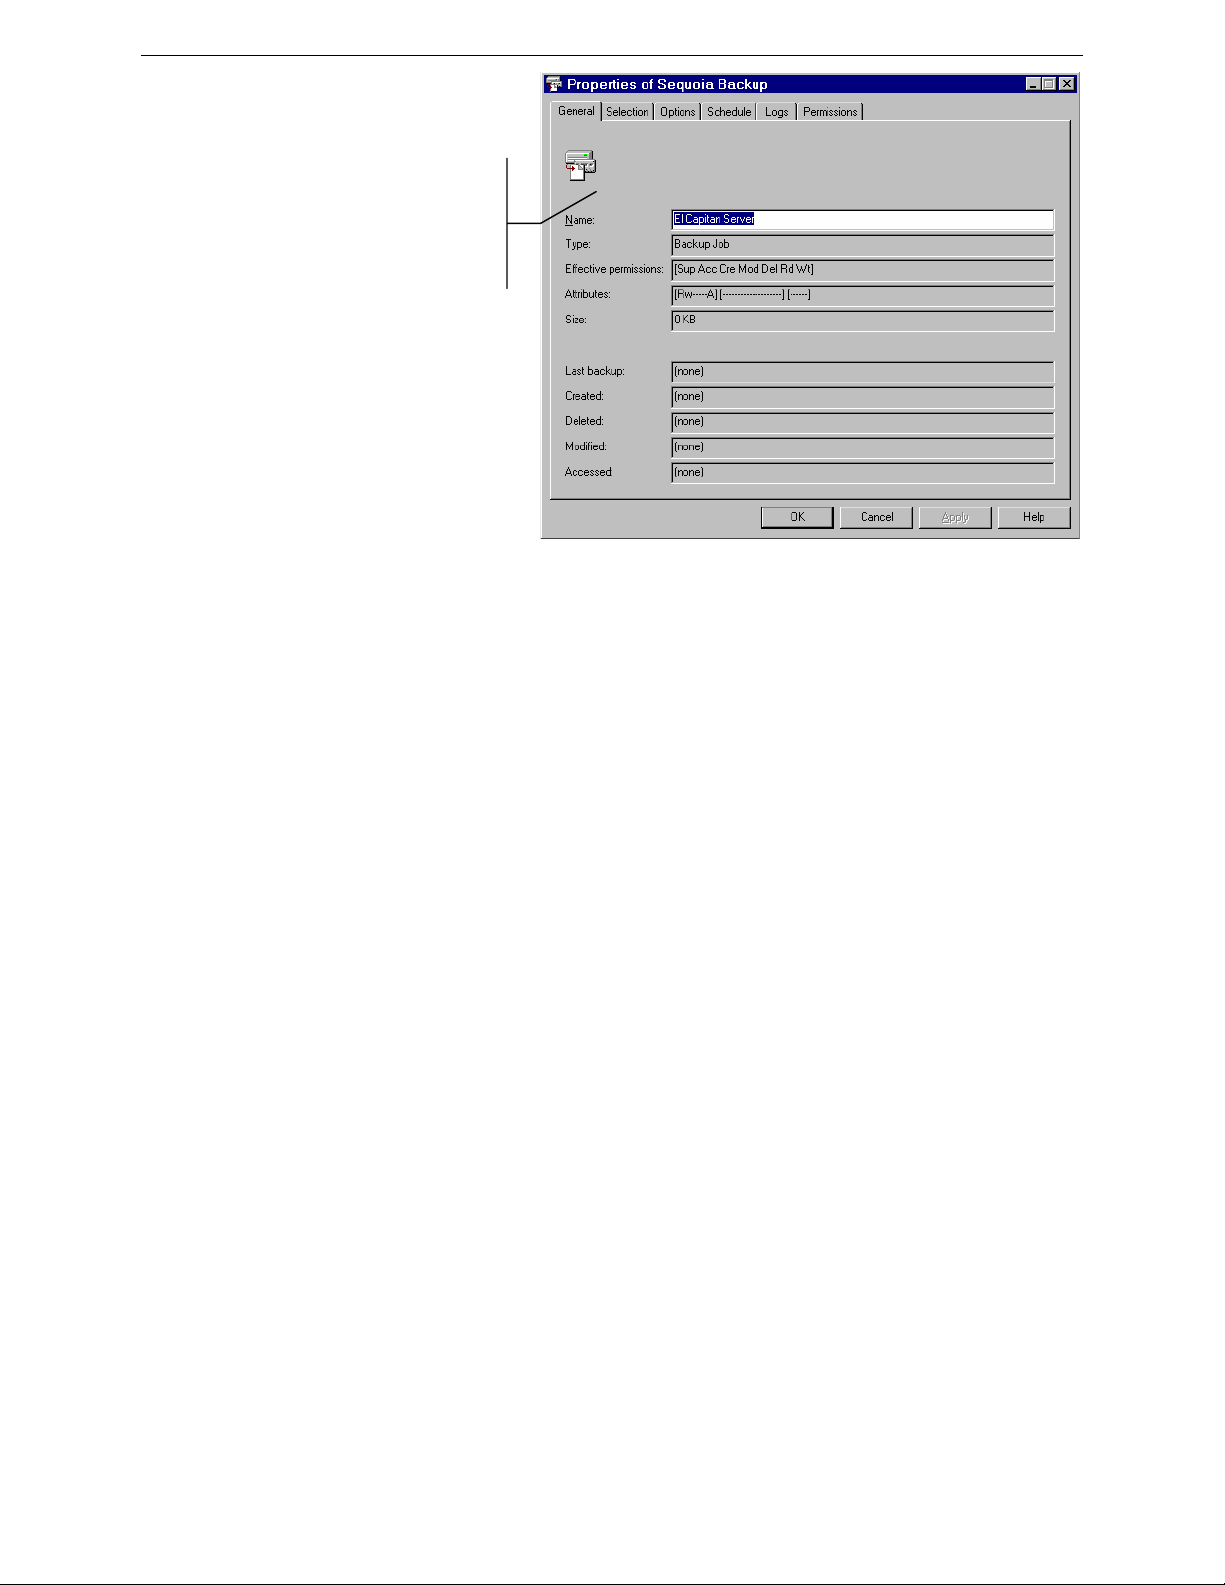
Chapter 1 — TapeWare Overview 5
Use property sheets, such
as this property sheet of a
backup job, to set, modify
and view the properties of
an object.
Working with TapeWare objects and properties is easy. Even though when you work
with TapeWare you work primarily with objects and properties, extensive knowledge
about objects and properties is not necessary. If you know how to use Windows Explorer,
you already know most of what you need to use TapeWare.
Storage Management Zones
TapeWare is not limited to just one database. On a large network, it may be useful to
have multiple storage management databases, each addressing different storage needs.
For example, there may be a separate database for each work group or department, even
though they are all on the same network.
If your network has multiple TapeWare databases, then you choose which database you
wish to use by selecting a storage management zone when you log on to TapeWare.
Choosing a storage management zone is simply a way to select which database you wish
to use.
Each TapeWare storage management zone is overseen by a TapeWare administrator. It
is the TapeWare administrator’s job to manage the security and integrity of the files in his
or her storage management zone.
Page 24

6 TapeWare® User’s Guide and Technical Reference
Storage Management Zones and Security
For more
information,
see Chapter 11
— Permissions
and Security
Reference.
Storage management zones also help ensure network security. TapeWare uses storage
management zones to promote security in two ways: first, by preventing users from
working with more than one storage management zone at a time and, second, by allowing
file servers and workstations to be the member of only one storage management zone.
Note the following about machines, users and storage management zones:
• Workstations or file servers (called a machine container) can only be the member of
one—and only one—storage management zone. Because these machines belong to
only one database, their peripherals, such as disk drives and backup devices, can
belong to only one storage management database.
• Tapes or other media created in one storage management zone cannot be used in
another storage management zone without following special procedures. This ensures
that there is no improper access to secure files and data.
• Each storage management zone must have at least one backup device, such as a tape
drive. Further, that backup device can only belong to one storage management zone:
it cannot be shared among multiple zones. (However, a storage management zone
could have multiple backup devices.)
• From one workstation, a user can work in other storage management zones besides
the zone his or her workstation belongs to. This means they can remotely administer
jobs for other storage management zones besides the zone their workstation belongs
to. They cannot, however, work in multiple storage management zones at the same
time.
• A user can work from other machines with other storage management zones besides
the one to which their machine belongs. Their machine, along with its drives,
peripherals and accompanying data, however, always remain in a single storage
management zone. This helps to prevent the unauthorized sharing of data between
storage management zones. Thus while users can work outside of their database, the
workstations and file servers they use always stay within their home zone.
Creating and Running Jobs
TapeWare creates backup tapes and restores files with jobs. Working with backup
devices and a network, TapeWare jobs either back up network file servers and
workstations onto media or restore files from media onto file servers or workstations.
When you want TapeWare to back up or restore a file, you create and run a job.
There are three kinds of jobs: backup, restore and verify. Every kind of job you create
and run has six components: creating the job, permissions, selection, options, scheduling
and running.
Page 25

Chapter 1 — TapeWare Overview 7
Creating the Job You begin by creating a job, either a backup, verify or restore job. Refer
to Chapter 3 — Creating TapeWare Jobs for more information.
Permissions In order to create a job, you must have permissions to the objects that job
will work with. For example, to create a backup job, you must have permissions to the
tape drive, the tape and the files you will back up. If you wish to backup files on another
workstation, you must have permissions to that workstation and to the files on that
workstation. Individual users are assigned permissions by the TapeWare administrator,
who is responsible for ensuring the security and integrity of the backup system. Refer to
Chapter 4 — Permissions for more information.
Selection Once you have permissions to a file, you must select it to be included in your
job. You might select all files, only a few files or perhaps only a single file. You select
files first by selecting them in the selection window and second by having TapeWare
‘sort’ them with filters, which apply additional selection criteria, such as date modified,
type of file and so forth. Refer to Chapter 5 — Selecting Files and Instances for more
information.
Scheduling After selecting files, the job is scheduled to be run. A job may be scheduled
to run later or to run immediately. It can be scheduled to run regularly or only once. Refer
to Chapter 6 — Scheduling Jobs for more information.
Options After scheduling the job, you specify the job’s option parameters. Some of the
options you can specify include what backup device to use, what media to use, whether to
automatically format the media and so forth. Refer to Chapter 7 — Job Options for more
information.
Running Finally, the job is run. Many scheduled jobs are run automatically by
TapeWare, but you can manually run a job at any time. Refer to Chapter 8 — Running
Jobs for more information.
Every time you create a job in TapeWare, your job must include these six components.
You begin by specifying a type of job. Before you can proceed further however, you must
be certain that you have permissions to the objects, such as files and tape drives, that you
wish to use. Your TapeWare administrator will work with you to determine which type of
permissions you require. Then you select the files for your job, specify the option
parameters and finally schedule the job to run.
Page 26

Page 27

Chapter 2 — TapeWare Workplace
TapeWare is designed to be easy to use. This chapter will familiarize you with all you
need to know in order to use most of TapeWare’s features, including keyboard shortcuts
and mouse conventions.
Note This manual deals specifically with the graphical user interface available on
Windows systems and Linux and UNIX systems running X Window. The console
interface operates basically the same way on DOS, NetWare, Linux and UNIX systems.
In This Chapter
• Starting TapeWare
• Logon Window
• Main TapeWare Object Window
• Property Sheets
• Menus
• Reports
• Working with the TapeWare Wizard
Starting TapeWare
After you have installed TapeWare, you start it like any other program.
Windows
To start TapeWare in Windows, double-click the TapeWare Administrator icon on the
desktop.
You can also click the Start button and select TapeWare from the Programs (or All
Programs) submenu. Then select TapeWare Administrator.
9
Page 28
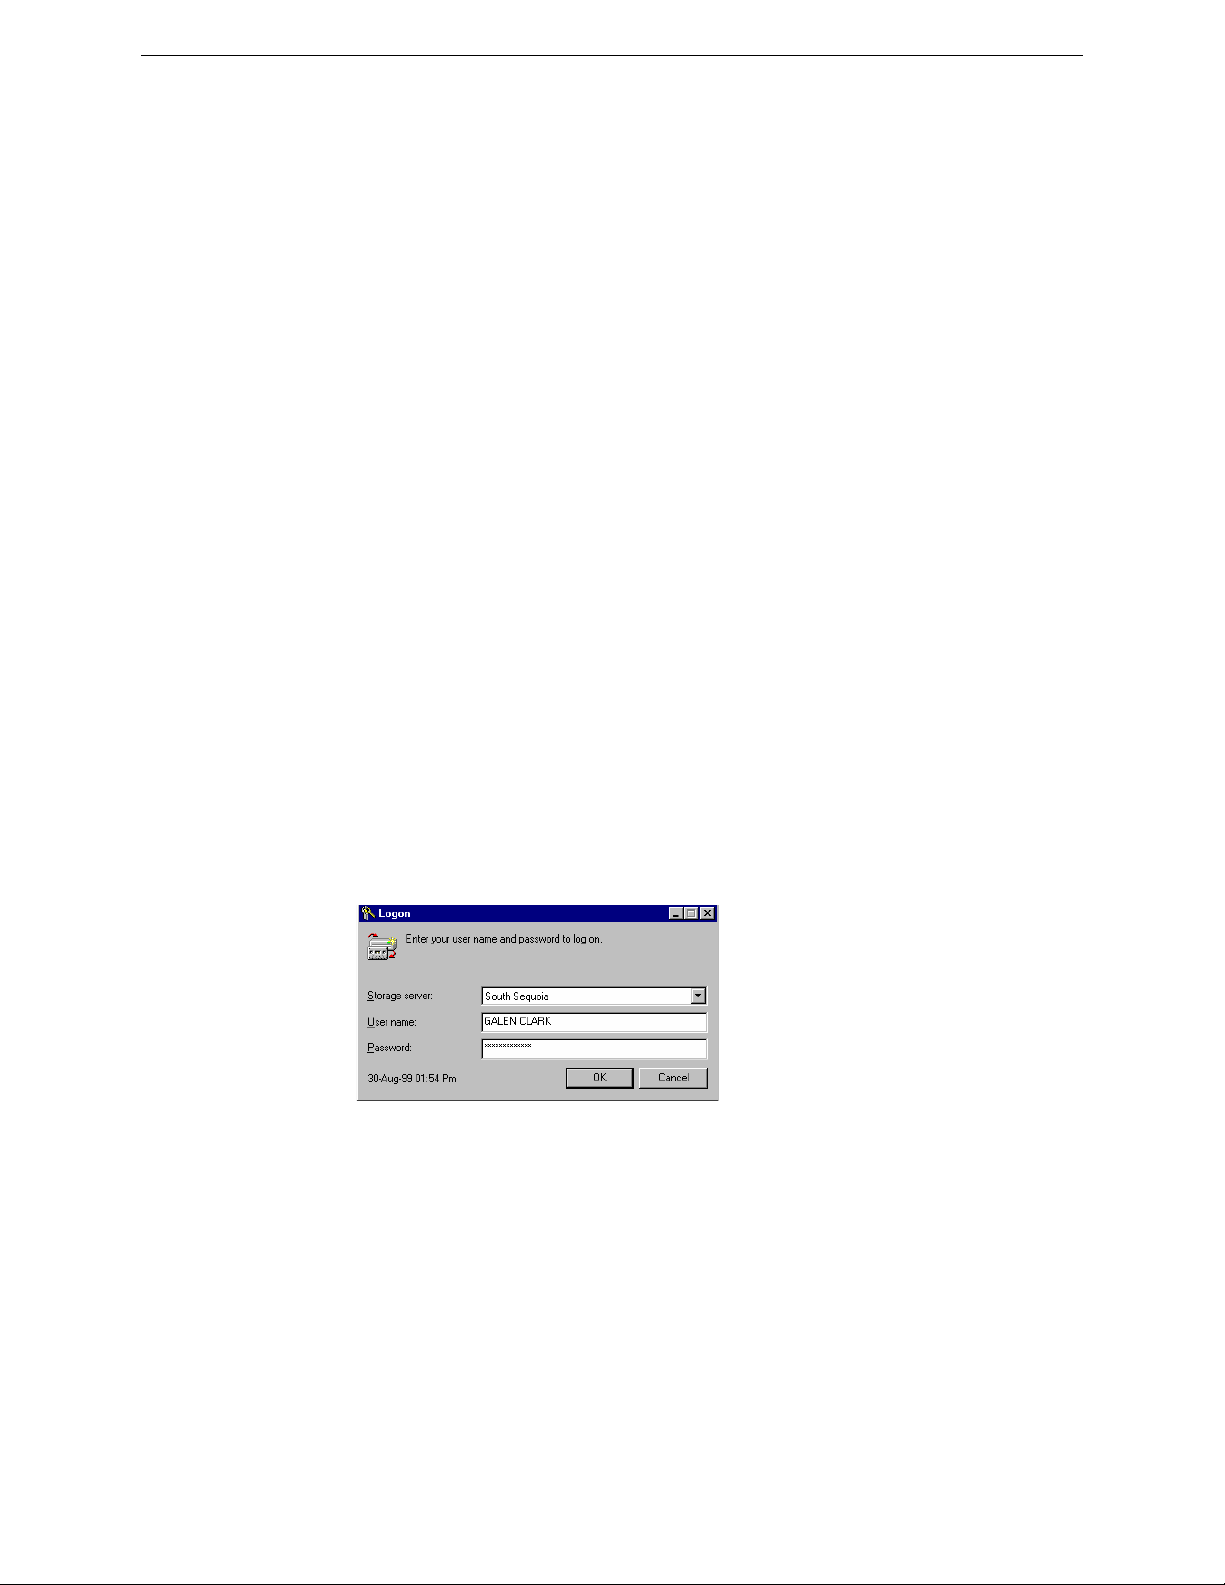
10 TapeWare® User’s Guide and Technical Reference
NetWare
To start TapeWare on a NetWare machine, access the server console. Then type
TWAdmin. It is not necessary to specify a search path. For example:
SERVER: TWAdmin
DOS
To start TapeWare on a DOS machine, access the directory where you installed
TapeWare. Then type TWAdmin. For example:
C:\...>TWAdmin
Linux/UNIX
To start TapeWare on a Linux or UNIX machine, open a terminal window. Then access
the directory where you installed TapeWare. Type ./twadmin. For example:
[root /usr/local/tapeware]# ./twadmin
Linux/UNIX (X Window)
To start TapeWare on a Linux or UNIX machine running X Window, open a terminal
window. Then access the directory where you installed TapeWare. Type ./twxadmin. For
example:
[root /usr/local/tapeware]# ./twxadmin
On Linux systems, you can create a shortcut on your KDE or GNOME desktop. On
UNIX systems, you can create a shortcut on your CDE desktop. (See the TapeWare
Installation Guide for more information.)
Logon Window
Each time you start TapeWare, you are shown the TapeWare Logon window.
Logon
window
To log on, you must select a storage management server, enter your user name and enter
your password.
Page 29

Chapter 2 — TapeWare Workplace 11
Selecting a Storage Management Zone
When your TapeWare administrator set up TapeWare to run on your network, he
assigned your workstation to a storage management zone. Your workstation, along with
its drives and peripherals, can only be the member of one database zone. The name of this
zone is the default name that appears in the Storage server list box.
Normally, you should leave the default name in the list box unchanged. This is because
you will typically want to work with the storage management zone your workstation
belongs to.
Occasionally, however, you may wish to work in a different zone. You might be asked by
a co-worker or your TapeWare administrator, for example, to run a TapeWare job in a
different storage management zone.
To select a storage management zone other than the default zone, first click the arrow
next to the Storage server list box. You will see a list of possible storage management
zones. Select the storage management zone you wish to use.
To select a storage
management zone,
click on the Storage
server list box and
select the storage
management server
you wish to use.
Note Although you can log on to different storage management servers, you can only
create and run jobs within a single storage management zone. Further, you can only
access files and devices in a single storage management zone. This means, for example,
that you will be unable to restore files backed up from workstations in one storage
management zone to workstations in another storage management zone. (If you need to
share data from one storage management zone to a different storage management zone,
see Import Media in Chapter 9 — The Media, Device and Database Tabs.)
User Name and Password
After selecting a storage management zone, type in your User name and Password.
If you type your name or password wrong, you will be asked to re-enter your name and
password.
Page 30
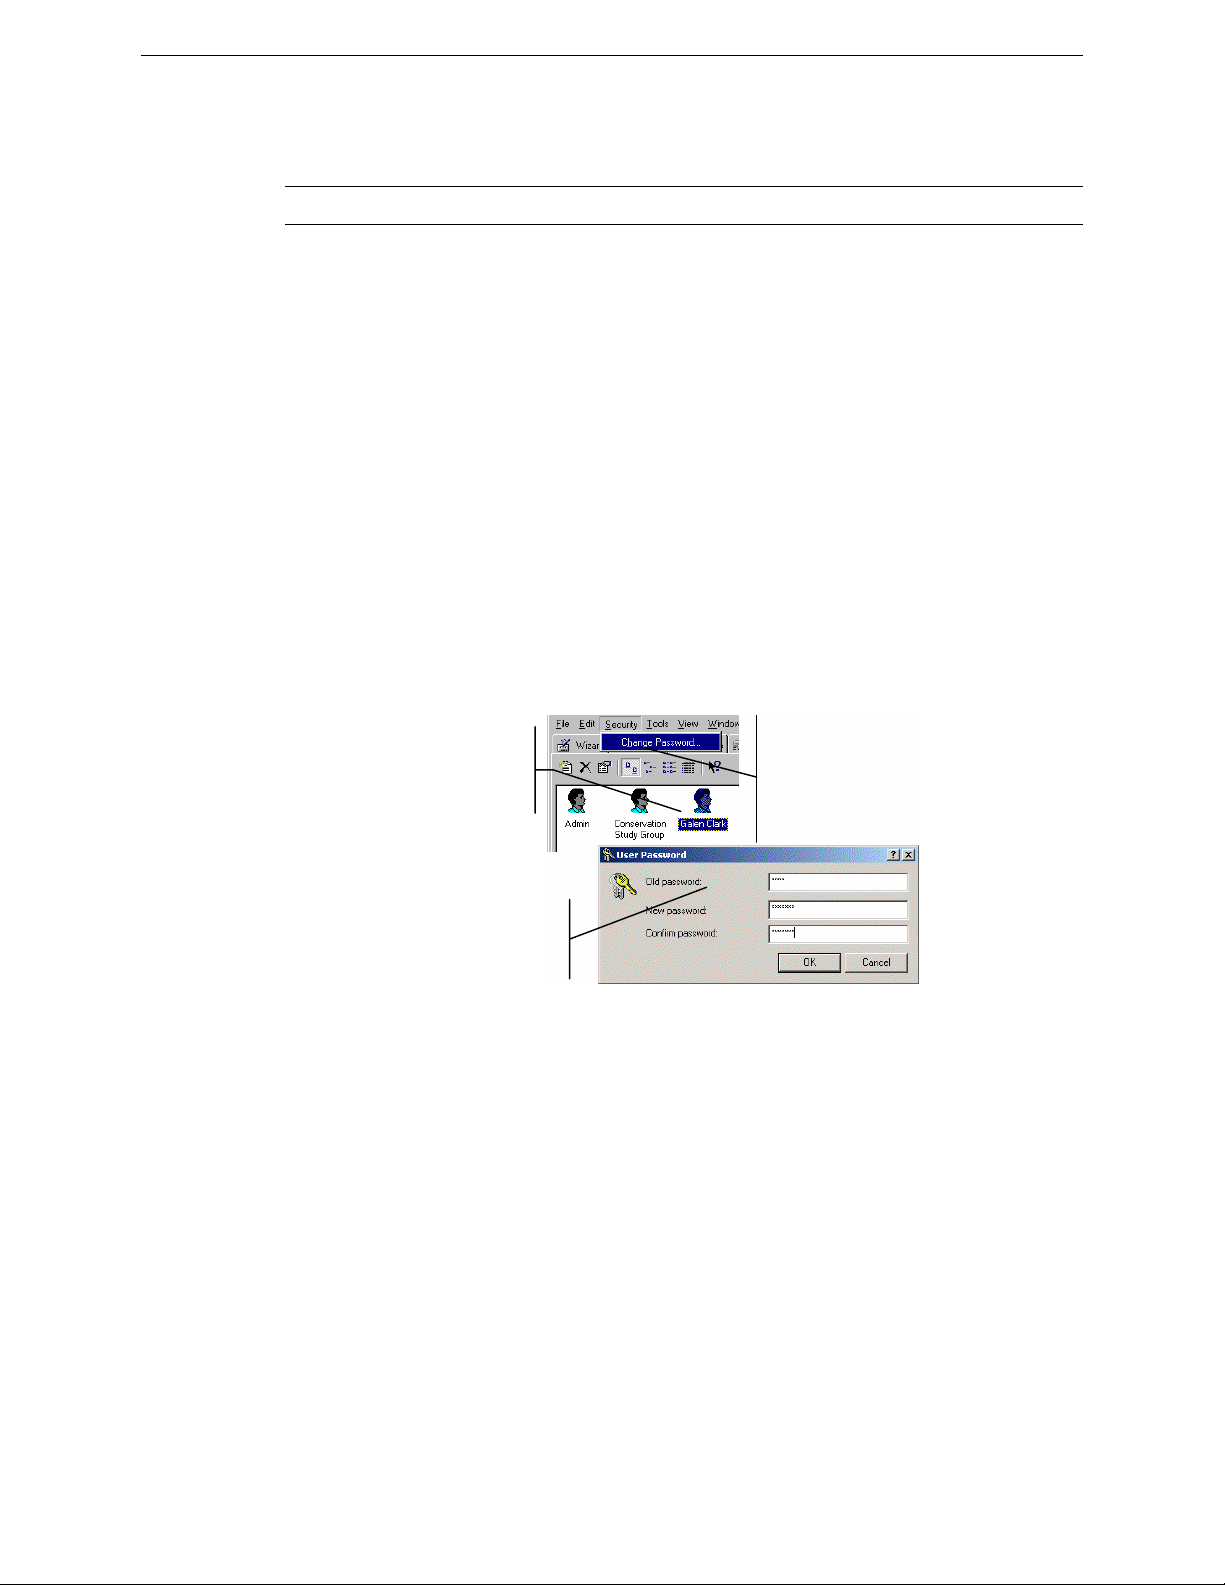
12 TapeWare® User’s Guide and Technical Reference
In order to log on, your TapeWare administrator must first assign you a user name and a
password. If you are having difficulty logging on, ask your system administrator to
specify again the exact spelling of the user name and password assigned to you.
Note Passwords are not case-sensitive, e.g., USER1 is the same as user1.
Changing Your Password
It is a good idea to regularly change your password, particularly if you are working with
sensitive and important data.
To Change Your Password
1. Click on the Security menu to make it active.
2. Click on your User Object icon.
3. Open the User Password window by either
• Selecting Change Password… from the Security menu, or
• Right-clicking the user object and selecting Change Password… from the
shortcut menu.
4. Type in your old password and then your new password, unless you are logged in as
the TapeWare administrator.
5. Confirm your new password and then click OK.
To change your
password, highlight your
User Object icon...
In the New Password window,
type in your old password and your
new password twice.
…then select
Change
Password… from
the Security
menu.
When selecting a password, remember that some passwords are notoriously easy to
break. For example, because many people use their birth date or the name of their spouse,
these are not good choices for passwords.
Page 31

Chapter 2 — TapeWare Workplace 13
Tip The TapeWare administrator can change a user’s password without knowing the
user’s current password. TapeWare does not even ask you to enter the old password. This
is useful when the user has forgotten his or her password.
Logging on the First Time
The default user name for the TapeWare administrator is ADMIN. There is no default
password required for this user to log on.
Warning TapeWare administrators have unlimited access to all of the objects in the
database. Any user who logs on as the TapeWare administrator will have complete access
to all of the files and machines on the database.
Your first security step should be to change the TapeWare administrator’s password.
Click on the Security tab. Select the Admin user object. Select Change Password…
from the Security menu. Type in the new administrator’s password, enter it again to
confirm and click OK. Do not continue until you have changed this password.
Grace Logons
Your TapeWare administrator may have set up your password to expire after a set period
of time. For example, your password may expire after 60 days. This forces you to change
your password regularly.
If your password has expired, TapeWare will prompt you to change your password. If
you choose not to change your password, TapeWare may still let you log on, even with
an expired password. Logging on with an expired password is called a grace logon. Your
TapeWare administrator will determine how many grace logons you are allowed.
When your password has expired and you have used all of your grace logons, TapeWare
will ask you to change your password when you log on.
Logging Out
On occasions you may want to change the storage management zone you are using or
want to log on as a different user. Although you could quit TapeWare and restart the
program, it is quicker and faster to log on again without quitting TapeWare.
To log on again, choose Log Out from the File menu. You will be presented with the
TapeWare Logon window and asked to log on again.
Page 32

14 TapeWare® User’s Guide and Technical Reference
Select Log
Out from the
File menu to
log on to a
new zone or to
close the main
window.
Logging Out and Running Scheduled Jobs
For more
information,
see Running
Scheduled
Jobs in Chapter
8 — Running
Jobs.
TapeWare can run scheduled jobs even when no one is logged on. (Only scheduled jobs
can be performed when no one is logged on to TapeWare.)
When you leave your workstation, you may need to leave TapeWare open. In order to not
let any other users have unauthorized access to the network, log out of TapeWare before
leaving your workstation. Any scheduled jobs will still run, but no unauthorized users
will be able to work with TapeWare unless they can log on.
Note If the TapeWare service is installed and running, you can close TapeWare and your
scheduled jobs will still run (see Appendix E — TapeWare Service in the TapeWare
Installation Guide for more information).
Main TapeWare Object Window
You use the main TapeWare object window to view, create and manipulate TapeWare
objects, such as jobs and tapes.
In addition to the menu bar, the TapeWare window has the following parts: tabs, toolbar,
the hierarchical or “tree” view area, the object detail area and the status bar.
Page 33

Chapter 2 — TapeWare Workplace 15
Tabs
Toolbar
Tabs
Toolbar
Hierarchical
“tree view”
area
Status bar
Object
detail
area
At the top of the window are eight tabs which help to group and organize similar sets of
objects. For example, you use the Backup tab to display and work with backup jobs, the
Restore tab to display and work with restore jobs and so forth. To display a different tab,
click on the tab you wish to view. You can also display a different tab by using the View
menu.
The toolbar has a list box and several buttons. Not all buttons are on all tabs and some
buttons on a tab may be unavailable. When a button is grayed out, it is not available
because no object that it can work with is currently selected.
List box
Up One Level
Properties
Delete
Find
Display buttons
Job control buttons
Help
• The List box contains the name of the folder (or container) currently displayed in the
object detail area.
• The Up One Level button changes the currently displayed folder (or container) to the
next higher container in the hierarchy, that is, the container that contains the current
container.
• The Properties button displays the properties of any object you have selected in the
object view area.
Page 34

16 TapeWare® User’s Guide and Technical Reference
• The Delete button lets you delete any object you have selected in the object view
area.
• The Find button lets you search for an object in either the left or right window pane.
• The Display buttons determine how objects are displayed in the object detail area.
• The Job control buttons let you start, stop and pause a job. You can also perform a
variety of tape-specific tasks.
You can use the View menu to either hide or show the toolbar.
Object View Areas
The left window pane displays containers, such as folders. Examples of other container
objects include networks, workstations and drives. These are displayed in hierarchical or
“tree” view. This portion of the window is referred to as the tree view area.
The right window pane is referred to as the object detail area. It displays the contents of
the container currently selected in the tree view area. If you select an object in the tree
view area, you will see its contents displayed in the object detail area on the right side of
the window.
Contents of the
container selected
in tree view area…
Only containers
are displayed on
the left side of the
window, the tree
view area.
…are displayed in
the right side of
the window, the
object detail area.
The object view area is designed to be easy to use and if you have worked with Windows
Explorer, you probably already know all you need to work with it. If you are new to
working with objects presented like this, keep the following in mind:
• The left window pane, the tree view area, only displays containers, that is, objects
that hold other objects. Objects that do not contain other objects are displayed only in
the right window pane, the object detail area.
• To display the objects in a folder or other container, open it by clicking on it in the
tree view area.
Page 35

Chapter 2 — TapeWare Workplace 17
Expand tree
icon
Collapse tree
icon
Status Bar
• To view the folders within a folder, expand the “tree” by clicking on the expand tree
icon next to the folder. Alternatively, you can double-click the folder and it will both
expand and display its contents in the object detail area.
• To close a folder, click the collapse tree icon next to the folder. Alternatively, you
can double-click the open folder and it will close.
Note You can instruct TapeWare to only show the expand tree icons when a container
contains other containers within it. Select Preferences… from the File menu and check
the Smart expandable indicators check box. Before displaying the expand tree icon,
TapeWare will check to see if that container contains other containers in it. If it doesn’t,
the expand tree icon will not be displayed.
There are numerous keyboard shortcuts available that make it easier to work with objects
in TapeWare. For more information, see Keyboard Shortcuts later in this chapter.
The status bar displays short descriptive messages about the menu commands on its left
side. The middle of the status bar displays the current user’s name and the database zone
they are currently logged on to.
Descriptive messages about menu commands
Current user and zone Alert button
The Alert button is on the right. This button flashes whenever there is a problem that
requires your attention. For example, TapeWare might not be able to locate a backup
device you specified for a job and so it will send an alert to the Alert window notifying
you of the problem. When you click on the Alert button, TapeWare brings up the Alert
window so you can view any pending alerts.
You can use the View menu to either hide or show the Status Bar.
Working with Objects in the Main TapeWare Window
You can easily change how objects are displayed in the main TapeWare object window.
This will assist you in working more effectively and quickly.
Page 36

18 TapeWare® User’s Guide and Technical Reference
Arranging Objects
In the object detail area, you can arrange the objects in several different ways using either
buttons on the toolbar or the Arrange Icons submenu on the View menu. Depending on
the tab, you can sort the objects by name, date or type. You can also
• Drag the icons to arrange them when working with either large or small icons; and,
• Use the column head at the top of the object detail area to change how the objects are
displayed when working in detail view.
Large
icon
view
Keyboard Shortcuts
Although you may find using the mouse to be the most intuitive way to work with objects
in the main TapeWare window, there are several keyboard shortcuts that will help speed
up your work. The next time you work with TapeWare, try these keyboard shortcuts.
Detail
view
Use these buttons to arrange
icons in the object detail area.
In an icon view, drag
icons to arrange them.
Click column
heads in object
detail view to
sort objects by
name, size, etc.
• The
TAB key will move the active or highlighted area to a different area of the
window.
• The
PLUS SIGN (+) on the numeric keypad or the RIGHT ARROW key expands the tree
in the tree view area.
• The
MINUS SIGN (-) on the numeric keypad or the LEFT ARROW key collapses the tree
in the tree view area.
Page 37

Chapter 2 — TapeWare Workplace 19
Shortcut Menus
Find Button
• The
• The
ASTERISK key (*) on the numeric keypad will expand the tree as far as possible.
ARROW keys also select objects in the tree view area and in the object detail area,
as well as change the active tab.
When you right-click in most windows, the shortcut menu appears. The shortcut menu
list commands that pertain to the particular portion of the screen you clicked on. This is
often the fastest and easiest way to create new objects and modify existing objects.
Click the right
mouse button to
bring up a contextsensitive shortcut
menu.
Find button
The Find button lets you locate objects in the database quickly without searching through
multiple volumes and directories.
To use the Find command, click on the Find button, select Find... from the Edit menu or
CTRL+F. In the Find window, type in the name of the object you wish to find.
press
TapeWare will search through the database, attempting to locate that object. When the
object is found, it will be displayed and highlighted.
Note that the Find command is not case-sensitive; additionally, you may use the wildcard
characters ? and *.
Property Sheets
Every object in the TapeWare database has a property sheet associated with it. Each
property sheet has two or more tabbed pages on it that display the properties of that
object.
Page 38

20 TapeWare® User’s Guide and Technical Reference
Examples of property
sheets for a job folder…
…a network
server…
…and a
backup job.
Opening Property Sheets
You can display the property sheet of an object in one of three ways:
Properties
button
• Select the object with the mouse or keyboard and then click the Properties button on
the toolbar.
• Right-click the object to display a shortcut menu, then select Properties.
• Select the object and press
ALT+ENTER.
Page 39

Chapter 2 — TapeWare Workplace 21
You can view
the properties of
an object either
by selecting it
and clicking the
Properties
button on the
toolbar…
…or selecting
Properties
from the
shortcut
menu.
Note Property sheets work just like other windows, except that their size cannot be
changed. You can leave them open when you return to working in the main TapeWare
object window and you can have multiple property sheets open at once.
Menus
You will find the menus easy and intuitive to use. Most of the menu commands are
discussed in some detail in later chapters of this book.
If you are having difficulty with a particular command, look in the index of this manual
under the name of the menu. The Status Bar also displays a short description of the
highlighted menu command. Alternatively, select Help Topics from the Help menu.
Then type the name of the command with which you are having difficulty in the list box
on the Index tab of the TapeWare Help window.
Page 40

22 TapeWare® User’s Guide and Technical Reference
You can get help on any
menu command by typing the
name of the command on
Index tab of the Help Topics
window.
Reports
TapeWare has a series of helpful diagnostic and summary reports available. To run a
report, select Print report from the File menu. In the Report type list box, you will see a
list of the reports available. When you select a report, a short description appears in the
Description field.
Report type lists
the name of the
selected report.
Indicate the object
in the Storage
Management
database
hierarchy to begin
the report with in
this field.
The Description
field has a short
description of the
report.
To save the report
as a file instead of
printing it, check
this option.
Page 41

Chapter 2 — TapeWare Workplace 23
Before printing a report, specify which objects you want the report to cover by selecting a
Starting object. The report will generate information for all of the objects in the
TapeWare hierarchy that are below the object specified in the Starting object field. You
can change the starting object by clicking on the Browse button and selecting a new
object.
You can also specify the font the report will be printed in by clicking on the Font…
button.
Note These reports can output many hundreds of pages. Therefore, we recommend that
you select the Save report to a file instead of printing option. Then you can use a text
editor to print the appropriate report information.
You can print the following reports:
Objects At Risk The Summary and Detail versions of this report lists the files,
directories and volumes that have not been sufficiently backed up. Therefore, they are at
risk unless additional backups are performed.
Media Information The Summary report lists general information about the media,
including read and write statistics. The Detail report lists the summary as well as the
files, directories and volumes that have been backed up to the media.
Database Listing The Summary and Detail reports list all objects in the storage
management database. Select a different Starting object to only list data for particular
objects, such as users or media. For example, to list database information about Users and
Groups, set Starting object to the Security folder.
Diagnostics This report lists diagnostic information about each device.
Printer Test This sample report lets you verify operation of a specific printer.
Additional Report Capabilities
Besides its reporting capabilities, TapeWare has several advanced features to help you
track and compile necessary information.
• The Instructions command on the Tools menu lets you check to see which media
and devices are required for the scheduled jobs. See Viewing and Printing Scheduled
Job Instructions in Chapter 8 — Running Jobs for more details.
• The Email (SMTP or MAPI) option allows you to email the logs of jobs to any valid
email address. For more information, see Email Support for Job Logs in Chapter 8 —
Running Jobs.
Page 42

24 TapeWare® User’s Guide and Technical Reference
• You can also create audit logs for files, directories and volumes in order to monitor
the backup and restore activity for these objects. See Audit Logs in Chapter 8 —
Running Jobs for additional information.
Working with the TapeWare Wizard
The TapeWare Wizard gives you a fast and quick way to perform most tasks. You can
use the TapeWare Wizard to create and schedule backup jobs, restore jobs and verify
jobs. You can also create and edit reports from the Wizard tab. The TapeWare Wizard
will guide you through each step necessary to create and run a job or create a report.
Wizard
tab
The name of each TapeWare Wizard option indicates what task that wizard helps you
perform. The descriptions are self-explanatory. The backup, restore and verify options
create jobs; for additional information about creating these jobs without the TapeWare
Wizard or about the jobs the TapeWare Wizard created, consult chapters 3 through 8 of
this manual. The Media Content wizard is a specialized implementation of the Query
Filters window, discussed in greater detail at the end of chapter 9 and in chapter 12. The
Instructions and Logs wizard tells you which media and devices are required for
scheduled jobs and results of previously executed jobs; for additional information,
consult Viewing and Printing Scheduled Job Instructions in Chapter 8 — Running Jobs.
Page 43

Chapter 2 — TapeWare Workplace 25
If an option is not listed on a screen, e.g., Disaster Recovery on the Wizards tab or SQL
Connector on the Tools | Configurations submenu, it may be caused by one of the
following:
• The option has not been installed. For example, you must install the Disaster
Recovery option for it to appear.
• The option is not available due to your license agreement. For example, you must
purchase a license to back up more than one file server.
• An error occurred when starting TapeWare. Examine the twtrace.txt file located in
your TapeWare directory.
Page 44

Page 45

Chapter 3 — Creating TapeWare Jobs
To transfer files back and forth from backup devices, such as tape drives, to network
workstations and file servers, you create and run jobs. You organize and store these jobs
in folders you create on job tabs in the main TapeWare administrator window.
In This Chapter
•
Backup, Restore and Verify Jobs
• Creating New Jobs
• Renaming, Deleting and Moving Jobs
• Organizing Jobs with Folders
Overview
You use backup jobs in order to protect against loss of data due to disasters or equipment
malfunction, to archive important files and to create permanent historical records. Restore
jobs allow you to transfer stored files on media back to file servers and workstations.
Verify jobs compare the version of a file stored on media, such as tapes, with current
versions of the file stored on machines on a network.
You can create folders to store these jobs in on one of the job tabs. These folders and the
jobs stored within them can be renamed, deleted and moved to new locations.
Backup, Restore and Verify Jobs
TapeWare can create and run three types of jobs: backup jobs, restore jobs and verify
jobs.
27
Page 46

28 TapeWare® User’s Guide and Technical Reference
Backup Jobs
Backup jobs copy selected files from workstations and file servers to various media, such
as tapes. This media can then be stored, preserving a copy of the file for future use. You
might create and run a backup job for one of the following reasons:
• To ensure the integrity of data should a disk drive on a workstation or file server fail.
This is perhaps the most common type of backup job. Its purpose is to protect
valuable information in case of a disastrous data loss. This type of backup allows
a company or organization to return to work quickly, even after the failure of a
main file server. To be effective, these backup jobs must be run regularly
(normally daily) without exception in order that recent changes to files can be
safely restored. This type of backup job is for disaster protection.
• To remove files from a workstation or file server that are infrequently used.
Some files are important to keep, but are never or rarely used. For example, you
may wish to keep a copy of correspondence from last year for legal reasons, but
have no regular need to access these files under normal circumstances. By
backing up the files onto a tape or other media, you safely store the media,
preserving a copy of the file and then delete the file from the workstation or file
server. TapeWare will keep track of which files you have backed up and which
tape they are located on. As long as the media is undamaged and safely stored,
you will be able to retrieve the file if necessary. This type of backup job is called
an archive job.
• To store a copy of a particular historical version of a file.
Sometimes you may wish to keep a permanent record of a particular version of a
file. For example, you may need to preserve a copy of company records as they
exist on a certain date or before they are converted for use in a new program.
You can store a copy of the file as it exists on a certain date and instruct
TapeWare to make certain that this file and media it is on are not overwritten
with other data. TapeWare will keep track of the file and the media in its
database and you will be able to retrieve it if necessary. Unlike an archive job,
the file that was backed up is not deleted from the file server or workstation. This
type of backup job is sometimes called a historical backup.
Page 47

Chapter 3 — Creating TapeWare Jobs 29
Restore Jobs
Restore jobs copy files from backup devices to workstations and file servers. You might
create and run a restore job when files on a workstation or file server have been lost
because of a disk crash, when you need to view a file that has been archived (backed up
onto a tape and then deleted) or when you need data from a particular historical version
of a file.
Verify Jobs
Verify jobs compare a file on some media, such as a tape, with a file at a workstation or
file server. These jobs verify that the two files are in fact the same file. A verify job is
useful when you wish to make sure a particular file, such as a program file, has not been
corrupted or modified.
Job and Database Tabs
The three different job types each have their own tab. You create, modify and run backup
jobs with the Backup tab selected, restore jobs with the Restore tab selected and verify
jobs with the Verify tab selected.
Note that a job only appears on its own type of job tab. For example, backup jobs are
displayed on the Backup tab, but not on the Restore or Verify tabs.
However, you can also view all three types of jobs on the Database tab. But because the
Database tab keeps track of all of the objects in the TapeWare database, it may appear
very cluttered. Normally, when working with jobs, make the appropriate job tab active.
Job tabs
Jobs only
appear on their
own tabs, in this
case, a restore
job on the
Restore tab.
Page 48

30 TapeWare® User’s Guide and Technical Reference
Creating New Jobs
There are three ways to create new jobs: with the wizard, from the job tab and by copying
old jobs.
Creating Jobs with the Wizard
Wizard button
The TapeWare wizard will help guide you through all of the steps necessary to create and
run a backup, restore or verify job. This is often the fastest way to create a new job,
especially when you are inexperienced using TapeWare. After you answer a few
questions, the TapeWare wizard will create the job for you. You can then work with this
job in the database just like any other job.
The fastest way to activate the TapeWare wizard is to click on the Wizard tab. Then
click on the appropriate button to create either a new backup, restore or verify job. You
can also create reports from the Wizard tab which will help you monitor how jobs have
run and the backup status of various files and databases.
Use the
Wizard tab
to create
new backup,
restore and
verify jobs.
You can also create a new job with the TapeWare wizard by either
• Selecting Wizard... from the Job menu,
Page 49

Chapter 3 — Creating TapeWare Jobs 31
• Typing
CTRL+W, or
• Clicking the Wizard button on the toolbar.
Creating New Jobs from a Job Tab
Commonly, you will create jobs while working with one of the three job tabs (Backup,
Restore, Verify) in the main TapeWare object window. When you create a job this way,
TapeWare opens the property sheet of the new job so you can name the job, select files
and schedule it to run. Selecting files and scheduling a job to run is covered in detail in
chapters 5 through 7.
The type of job created depends
on which job tab is active.
When you create a new job, its property
sheet automatically opens.
Which type of job you create depends on which job tab is active. Where TapeWare keeps
track of the job depends on which folder is open in the tree display area.
For example, if the Backup tab is active, TapeWare will create a new backup job. If a
personal or workgroup folder is open, TapeWare stores the job in the open folder.
Page 50

32 TapeWare® User’s Guide and Technical Reference
To Create a New Job from a Job Tab
1. Make either the Backup, Restore or Verify tab active by clicking on it. This
determines what type of job TapeWare will create.
2. Open the folder in the tree view area where you want to store the job. The contents of
that folder are displayed in the object detail area. TapeWare will store your new job
here.
3. Create the new job by either
• Selecting New Object… from the File menu and then selecting the appropriate
job from the New Object window, or
• Right-clicking in the TapeWare object detail area and selecting New…Job from
the shortcut menu, or
New Object
button
• Clicking the New Object button on the toolbar and selecting the appropriate job
from the New Object window.
4. Type in the name of the new job in the Name box.
To create a new job, right
click the mouse and select
New…Job from the
shortcut menu.
New jobs are stored in
the folder open in the
tree view area.
Creating New Jobs by Copying
Creating a new job by copying an existing job is sometimes a useful method of creating a
job. In particular, copying an existing job is appropriate when you want your new job to
be like the old job in every way except for a few minor changes.
To Create a New Job by Copying an Existing Job
1. Copy the existing job you wish to duplicate by either
• Holding down the
CTRL key as you drag the existing job to a new location, then
skip to step 4 below, or
• Selecting the existing job (with the mouse or keyboard) and pressing
CTRL+C, or
Page 51

Chapter 3 — Creating TapeWare Jobs 33
• Right-clicking the existing job and selecting Copy from the shortcut menu, or
• Selecting Copy from the Edit menu.
2. Open the folder you want the new job to be stored in by selecting it in the tree view
area. (To store the job in the same folder as the existing job, skip this step.)
3. Right-click the folder where you want the new job to be pasted and select Paste from
the shortcut menu. Alternatively, highlight the location where you want the job
pasted; then select Paste from the Edit menu or press
CTRL+V.
4. Change the name of the new job.
Note TapeWare copies all job properties, including job logs, to the new job.
Renaming, Deleting and Moving Jobs
Delete button
You can change the names of jobs or move them to new folders. Or, if you don’t plan to
use a job again in the future, you can delete it.
You rename, delete and move jobs by either
• Selecting the appropriate command from the Edit menu, or
• Right-clicking the job and selecting the appropriate command from the shortcut
menu.
To move a job, drag it to a new location. You can also use the
DELETE key and the Delete
button to delete jobs.
Right-click an object to
display the shortcut
menu to Copy, Move,
Delete and Rename
objects.
Note When you run a backup job, TapeWare uses its storage management database to
keep track of the files you have backed up and the name of the tape on which they are
stored. Deleting a job does not affect how the storage management database tracks files
and tapes. TapeWare continues to track these files and tapes even after the job that
created them has been deleted.
Page 52

34 TapeWare® User’s Guide and Technical Reference
Organizing Jobs with Folders
Every backup, restore and verify job is stored by TapeWare inside a folder. You can
create new folders to help organize your jobs or you can use existing folders.
When the TapeWare administrator added you as a user, TapeWare created a personal
folder for your use. Generally, because there may be many users in your TapeWare
storage management zone, it is a good idea to store your personal jobs in your personal
folder. Alternatively, you can store workgroup jobs in the appropriate group folder.
Types of Folders
There are three types of folders: User/Group folders, Job folders and Media folders.
Each of these folders is a container, that is, they store other objects within them. They
differ from each other according to the type of object that can be stored within them.
• User/Group folders can only be stored in a special folder, called the Home folder.
These folders can have either Job folders or Media folders within them; additionally,
you can store jobs or media “loose” in these folders.
• Job folders can only be stored in User/Group folders or in other Job folders. These
folders usually have jobs stored within them, although you can also store additional
job folders within them.
• Media folders can only be stored in User/Group folders or in other Media folders.
These folders usually have media stored within them, although you can also store
additional Media folders within them. Media folders are discussed further in Chapter
9 — The Media, Device and Database Tabs.
Job
folders
Media
User/Group
folders
folders
Page 53

Chapter 3 — Creating TapeWare Jobs 35
Folders and Job Tabs
Job folders are unlike jobs in one important way: Job folders appear on all the job tabs
and on the database tab. Jobs, on the other hand, only appear on one tab (backup jobs on
the Backup tab and so forth) and on the Database tab. When you create a new job folder,
that folder appears on all the job tabs and on the database tab.
Similarly, User/Group folders appear on every job tab, as well as the Media tab and the
Database tab.
Media folders, however, only appear on the Media and Database tabs.
…displays
different jobs,
depending on
which tab is
The
same
folder…
active.
Because every folder is seen on every job tab, you may not need or want to have separate
folders for different types of jobs. For example, a folder that stores only backup jobs will
appear on all three job tabs, including the Restore tab and Verify tab. For this reason, it
is better to name the folder after your workgroup or yourself, than by the type of job
stored in it. Again, a single folder can store all of your personal or workgroup jobs.
Don’t name job folders after
type of job, since they
appear on every tab.
Page 54

36 TapeWare® User’s Guide and Technical Reference
s
Home, Admin and Everyone Folders
Three folders play a special role in every database: the Home folder, the Admin Folder
and the Everyone Folder.
Home, Admin and
Everyone folders
The Home folder is the folder that stores all of the User/Group folders within it. It is
always at the top of the hierarchy in the tree view area of a job tab. You are not allowed
to store jobs “loose” in the Home folder, only inside other folders.
The Admin Folder is a special folder used by the TapeWare administrator. Normally,
only the TapeWare administrator has permissions to the Admin Folder. If you don’t see
it inside your Home folder, this is because the TapeWare administrator has not given you
permissions to view it.
The Everyone Folder is a folder to which every TapeWare user has permission. Your
TapeWare administrator may place jobs in this folder to which he wants everyone to have
access.
Everyone Folder and Permissions
For more
information,
see Chapter 4
— Permission
Because of the way TapeWare assigns permissions to new objects, if you create a new
object inside the Everyone Folder, normally everyone will have at least some
permissions to it. For example, if you create a new backup job and store it in the
.
Everyone Folder, it is likely that every TapeWare user will have permissions to that
folder and thus to the job.
To restrict the permissions of other TapeWare users to a job or folder, the best strategy is
to use a folder to which only you or your workgroup have permission. Granting
permissions are covered in detail in the Chapter 4 — Permissions.
Page 55

Chapter 3 — Creating TapeWare Jobs 37
Creating Job Folders
Usually, the best strategy for organizing your personal jobs or the jobs of your
workgroup is to create a special folder in which to store them. This is particularly true
because it makes it easier and quicker to manage permissions to those jobs.
When the TapeWare administrator adds a user or group, TapeWare creates a personal
folder for that user or group. If you have the proper permissions, you can also create as
many additional new job folders as you need and organize them in whatever way is
convenient. You can create additional job folders either inside your personal or
workgroup folder or inside the Everyone Folder.
You can create
additional job
folders inside your
personal folder.
To Create a New Folder
New Object
button
1. Select the existing folder in which you want to store the new job folder. (It cannot be
the Home folder.)
2. Create the new folder by either
• Selecting New Object… from the File menu and then selecting New Job Folder
from the New Object window, or
• Right-clicking in either the tree view or object detail area and selecting New Job
Folder from the shortcut menu, or
• Clicking the New Object button and selecting New Job Folder from the New
Object window.
TapeWare creates the new folder inside the selected folder.
3. Type in the name of the new folder on its property sheet.
Tip After creating a new folder, be certain to specify which users have permissions to it.
This is the simplest and fastest way to assign permissions to multiple objects stored in the
folder.
Page 56

38 TapeWare® User’s Guide and Technical Reference
Moving, Renaming and Deleting Folders
You can move, rename or delete a folder just like you can any other TapeWare objects,
such as jobs; however, you cannot copy folders. When moving, deleting or renaming
folders, keep the following in mind:
Moving Folders Contents of a folder move with the folder to the new location. This may
change the permissions of the objects stored in that folder.
Renaming Folders Only the name of the folder is changed. TapeWare still treats that
folder and any objects associated with it in the same manner.
Deleting Folders Deleting folders also deletes their contents, including any other folders
or jobs contained in that folder. Before deleting a folder, be certain that you wish to
delete all of its contents.
Warning Once a folder has been deleted, its contents cannot be recovered. Be certain
either that the folder is empty or that you no longer need the contents of the folder before
deleting it.
Modifying Folders
You can rename, delete and move folders using one of these methods:
• Selecting the appropriate command from the Edit menu, or
• Right-clicking the job and selecting the appropriate command from the shortcut
menu, or
• Clicking and dragging the folder to a new location.
Page 57

Chapter 4 — Permissions
Security is an important issue when managing a network. One of the most important
functions of the TapeWare storage management database is to handle security. The
storage management database prevents unauthorized users from working with objects to
which they have not been granted security clearance. To ensure only authorized users can
access sensitive data, TapeWare tracks the permissions of each user. The TapeWare
administrator can grant different types of permissions to various users to ensure the
security and integrity of the network data while efficiently implementing a productive
backup program.
In This Chapter
Overview
•
Overview
• Users and Groups
• Effective Permissions
•
Types of Permission
•
Two Examples of Permissions
• Granting Permissions to Other Users
Before you can work with any object (directory, file, user, etc.) in the TapeWare storage
management database, you must have effective permissions to that object.
Different types of permissions restrict what type of operations can be performed on an
object. For example, some permissions allow users to write to an object (such as a file, a
tape or a workstation) or create new objects (such as folders or jobs). Sometimes a user is
granted unlimited permissions to an object or all objects. Usually, however, to protect the
integrity of the data and for security reasons, most users have only limited effective
permissions to some (not all) of the objects in the TapeWare database.
39
Page 58

40 TapeWare® User’s Guide and Technical Reference
Maintaining the security of data on a network is the primary responsibility of the
TapeWare administrator. Because of this, this chapter is only an overview of security and
permissions. This chapter will help the typical user understand how TapeWare handles
security and permissions so that you can work efficiently with your TapeWare
administrator. More detailed information on permissions is covered in Chapter 11 —
Advanced Permissions and Security.
Users and Groups
For more
information on
setting up
users and
groups, see
Adding New
Users and
Groups in
Chapter 11 —
Permissions
and Security
Reference.
The TapeWare administrator grants permissions to objects in the TapeWare database to
either a user or to a group. Individual TapeWare users have effective permission to an
object either as a user or as the member of a group. A group is a set of users that are all
granted permissions in the same way and at the same time. For example, the TapeWare
administrator may grant permission to read the files on a tape to users individually, to a
group of users or both to users and to groups.
Users and groups
can be granted
permissions to
any object, in this
case a tape.
Individual TapeWare users can be the member of more than one group or of every group,
depending on how the TapeWare administrator arranges the storage management
database security. The number of groups the TapeWare administrator creates and the
assignment of members to those groups depends on the security needs of your particular
network.
Everyone Group
Normally most TapeWare users are a member of a special group, the Everyone group.
Whenever a new user is added to a TapeWare storage management zone, TapeWare
automatically assigns that user to the Everyone group. Typically, only limited
permissions are granted to the Everyone group, although users can be granted more
extensive permissions either individually or as members of other groups.
Page 59

Chapter 4 — Permissions 41
Effective Permissions
The permissions you have to an object in the TapeWare storage management database are
called your Effective permissions. You can view your effective permissions to an object
on the General tab of that object.
The current user’s effective
permissions to an object are
shown on the General tab
of that object.
Determining Effective Permissions
A user is assigned effective permissions to an object through by direct permissions or
inherited permissions.
A user has direct permissions to an object if they are listed on the Permissions tab of the
object, if they are equivalent to a user who has direct permissions to the object or if they
are a member of a group that is listed on the Permissions tab of that object.
A user has inherited permissions to an object if they do not have direct permission, but
they have effective permissions to the container that contains the object. If you do not
have direct permissions to an object, you must have effective permissions to the container
in which the object is stored.
Note Your effective permissions to a container object can be either direct or inherited.
All that matters is that you have effective permissions to the container.
When determining a user’s effective permissions to an object, TapeWare checks if the
user has direct permission; if not, TapeWare checks if they have inherited permission.
For example, if a user has the Read direct permission, but the group has the Access
permission, the user’s effective permission is Access.
Page 60

42 TapeWare® User’s Guide and Technical Reference
Examples of Determining Effective Permissions
The following two examples illustrate how TapeWare determines the effective
permissions a user has to an object.
Effective Permissions Example #1
In this example, a user named Galen Clark has direct permissions only to the User/Group
folder named Galen Clark’s Folder.
Clark has direct permissions to this
folder.
When determining the effective permissions Clark has to Galen Clark’s Folder,
TapeWare first looks to see if he has direct permission to the folder. Because Clark is
listed as a user on the Permissions tab of the folder’s property sheet, Clark has direct
permission to the folder. TapeWare uses this information to determine Clark’s effective
rights. TapeWare does NOT look to see if there are any inherited permissions to the
folder.
When determining the effective permissions Clark has to the backup job named Clark’s
Personal Backup Job stored in Galen Clark’s Folder, TapeWare first looks to see if he
has direct permission to the job. Because Clark does not have direct permissions,
TapeWare checks to see if Clark has effective permissions to the container that contains
the job. In this case, TapeWare checks to see if Clark has effective permissions to Galen
Clark’s Folder; because Clark has effective permission to this folder, TapeWare uses
this information to calculate the effective permissions Clark has to the job.
Effective Permissions Example #2
In this example, a user named Stephen Mather has direct permission to the User/Group
folder named Conservationist Workgroup Folder as a member of the Conservationist
Workgroup and to the Job folder named Mather’s Personal Jobs as a user.
Mather has effective
permissions
to this folder as
a member of the
conservationist group…
…and to this folder
as a user.
Page 61

Chapter 4 — Permissions 43
When determining the effective permissions Mather has to the Conservationist
Workgroup Folder, TapeWare first looks to see if he has direct permission to the folder.
Because Mather is a member of the Conservationist Workgroup which has direct
permissions to the folder, Mather also has direct permissions to the folder. TapeWare
uses this information to determine Mather’s effective permissions. TapeWare does NOT
look to see if there are any inherited permissions to the folder.
When determining the effective permissions Mather has to the Job folder named
Wawona Workgroup Folder stored in the Conservationist Workgroup Folder,
TapeWare first looks to see if he has direct permission to the folder. Because no users or
groups have direct permissions to this folder, TapeWare checks to see if Mather has
effective permissions to the container that contains this folder. In this case, TapeWare
checks to see if Mather has effective permissions to the Conservationist Workgroup
Folder; because Mather has effective permission to this folder, TapeWare uses this
information to calculate the effective permissions Mather has to the Wawona
Workgroup Folder.
Similarly, TapeWare determines the effective permissions Mather has to the folder
named Mather’s Personal Jobs by the direct permissions Mather has to that folder. Note
that when determining the effective permissions to this folder, it makes no difference that
Mather also has effective permissions to the Wawona Workgroup Folder which
contains this folder.
When determining the effective permissions Mather has to the job Mather’s Archive
Job contained in the Mather’s Personal Jobs folder, TapeWare checks to see if Mather
has direct permissions. Because he does not, TapeWare checks to see if Mather has
effective permissions to the container that contains the job. Because Mather has effective
permissions to the Mather’s Personal Jobs folder, TapeWare uses these effective
permissions to determine his effective permissions to Mather’s Archive Job.
Note especially that the effective permissions Mather has to Mather’s Archive Job are
determined ONLY by Mather’s effective permissions to the Mather’s Personal Jobs
folder—and NOT by his effective permissions to the Conservationist Workgroup
Folder or the Wawona Workgroup Folder.
Mather’s permisssions
to Mather’s Archive
Job are determined by
his effective permissions
to this folder…
…but NOT
by his
effective
permissions
to this folder.
Page 62

44 TapeWare® User’s Guide and Technical Reference
How Moving Objects Affects Permissions
When an object is moved from one container to another, TapeWare determines the
effective permissions of the object based on its new location.
For example, suppose a user has effective permissions to a job because that job is stored
in his or her User/Group folder, a container to which the user has been granted direct
permission. If the job is moved from that folder to a new folder, the user’s effective
permissions to the job may change. If the job were moved to the Admin folder, the user
would lose permission to it because he or she does not have permission to the Admin
folder. On the other hand, if the job were moved to the Everyone folder, the user will
still be able to access the job, although the effective permissions might be different.
If Clark’s
permissions to
this job are
inherited from his
User/Group
folder, then they
will change when
it is moved to the
Admin folder.
Types of Permission
TapeWare controls access to objects in its database with seven different types of
permission. The type of permission determines what actions a user can perform on an
object. Users and groups can be granted all seven types of permission, only some of the
permissions or none of the permissions.
The seven types of permission are Supervisor, Access, Create, Modify, Delete, Read
and Write.
Page 63

Chapter 4 — Permissions 45
Users or groups
can have any of
seven permissions
to an object.
Supervisor
This is the most powerful permission. Supervisor permission grants the user three specific
abilities:
• First, a user with supervisor permission to an object is automatically granted the other
six permissions to that object;
• Second, a user with supervisor permission to an object automatically has effective
permission to all the objects in the storage management database below that object;
and
Access
• Third, a user with supervisor permission to an object cannot be denied any of the
seven permissions to any object in the storage management database below that
object.
The TapeWare administrator is automatically granted supervisor permission to the
highest container in the TapeWare storage management database hierarchy (called the
System Container). This means that the TapeWare administrator has full permissions to
all the objects in the TapeWare database and that none of these permissions can be
denied.
Often, only the TapeWare administrator will be assigned supervisor permission.
A user with Access permission to an object can grant other users and groups permissions
to that object. For example, if you wish to grant a co-worker permissions to a tape you
have created, you must have Access permission to that tape.
Page 64

46 TapeWare® User’s Guide and Technical Reference
Access permission can be very powerful, since it allows a single user the ability to grant
all other users in the TapeWare database extensive permissions to an object. For this
reason, your TapeWare administrator may not grant you Access permission to objects
even though you have other permissions to them. For example, your TapeWare
administrator may grant you permission to read and write from a particular tape. Without
Access permission however, you will not be able to grant other users or groups that same
ability.
You can only grant permissions to other users or groups if you have Access permission.
If you want other users to have permissions to an object, such as a job or tape, and do not
have Access permission to that object, ask your TapeWare administrator to grant the
permissions for you.
Create
This permission allows a user to create new objects within a container object. For
example, to create a new job within a folder, a user must have Create permission to the
folder. Note that the Create permission applies to the folder, not to the job: it grants the
user permission to create new objects within that folder.
If you want to create new folders or jobs, your TapeWare administrator must grant you
Create permission. Your permission to create new jobs or folders might be limited to a
single folder. For example, you may have Create permission only to the Everyone folder
or to a personal folder that your TapeWare administrator has created for you or your
workgroup.
If you can’t create a new job or folder, first make sure you have selected a folder in the
tree view area to which you have Create rights. If you still cannot create a new job or
folder, ask your TapeWare administrator to grant you Create permission to a folder.
Modify
This permission allows a user to change the name and location of an object, such as a job,
in the TapeWare storage management database. Modify permission also allows a user to
change or modify the property sheets of an object. If you have this permission, you will
be able to move, rename and change the property sheets of objects. For example, to
change the name of job, a user must have Modify permission to that job. You must also
have Modify permission to move a job from one folder to another.
Delete, Read and Write
These three permissions control user access to objects, such as tapes, devices and files,
that are read, deleted or written to. These permissions are necessary in order to run
backup, restore and verify jobs as specified below.
Page 65

Chapter 4 — Permissions 47
• To complete a backup job, a user must be granted Read permission to the files to be
backed up and Write permission to both the media and the backup device. If the
backup job will overwrite the media with the new data (as opposed to merely
appending the new data), the user must also have Delete permission to the media.
• To complete a restore job, a user must be granted Write permission to the volumes
(disk drives) on which the files are going to restored and Read permission to the
media and backup device. If the restore job will overwrite or replace old files, the
user must have Delete permission to those files.
• To complete a verify job, a user must be granted Read permission to the files on the
workstation or file server to be verified, to the media and to the backup device.
Examples of Permissions
The following two examples illustrate how the permissions work with each other.
Permissions Example #1
In this example, a user named Galen Clark has effective permissions to a folder named
Clark’s Jobs, to a drive (or volume) named Clark’s 2 Gig Drive and to a tape named
Clark’s Personal Backup Tape.
Database Object Effective Permissions
Clark’s Jobs (Job folder)
Clark’s 2 Gig Drive (Volume)
Clark’s Personal Backup Tape (Media)
These permissions allow Clark to do the following:
• Because Clark has Create permission to the Clark’s Jobs folder, he will be able to
create new job folders within that folder and to create backup, restore and verify jobs
inside that folder. The Modify permission allows him to move these jobs between
folders, to change the name of the job and to change the property sheets of these jobs.
The Delete permission allows him to delete any jobs or folders inside this folder.
Clark also has Read and Write permissions to the Clark’s Jobs folder and will have
these same permissions to any object stored in that folder.
[––CMDRW]
[–––––R-]
[–––––R-]
Page 66

48 TapeWare® User’s Guide and Technical Reference
• Because Clark also has Read permission to the volume named Clark’s 2 Gig Drive,
he will be able to select files from that drive for backup. He will also be able to select
files for restoring.
• Because Clark has Read permission to both the tape and to the volume, he will be
able to create and run verify jobs—if he also has Read permission to the backup
device.
These permissions do NOT allow Clark to do the following:
• Although Clark will be able to create a backup job, he will not be able to run the
backup job because he does not have Write permission to the tape. The job must be
run by the TapeWare administrator or some other user the TapeWare administrator
grants Write permission to the tape.
• Similarly, although Clark will be able to create a restore job, he will not be able to
run the restore job because he does not have Write permission to the disk drive. If
Clark wants to run the restore job, he must ask the TapeWare administrator to run it
for him or to grant him the permissions necessary to run it.
• Clark is prevented from granting permission to other users to his folder, to his drive
and to his tape because he lacks Access permission to these objects.
Permissions Example #2
In this example, a user named Stephen Mather has effective permissions to a drive named
Mather’s 1 Gig Drive and to a tape named Mather’s Personal Backup Tape. He is also
a member of the Conservationist group which has effective permissions to a folder
named Conservationist Workgroup Jobs.
Database Object Effective Permissions
These permissions allow Mather to do the following:
• Because he is a member of the Conservationist group, Mather will be able to create
jobs and folders within the Conservationist Workgroup Jobs folder. He will also be
able to modify and delete any jobs or folders in that folder.
Mather’s 1 Gig Drive (Volume)
Mather’s Personal Backup Tape (Media)
Conservationist Workgroup Jobs (Folder)
Mather: [–––––R–]
Mather: [–––––RW]
Conservationists: [––CMDRW]
Page 67

Chapter 4 — Permissions 49
• Because Mather has Modify permission to the folder and Read permission to the
drive named Mather’s 1 Gig Drive, he will be able to select files from that drive to
backup. Similarly, Mather will be able to select files for restoring because he has
Read permission to the tape named Mather’s Personal Backup Tape.
• Unlike Clark, Mather will be able to run backup jobs because he has Write
permission to the tape. (This assumes he also has Write permission to a tape drive.)
• Mather will also be able to create and run Verify jobs.
These permissions do NOT allow Mather to do the following:
• Although Mather will be able to create and run backup jobs, he will not be allowed to
restore files from those tapes onto his drive because he has not been granted Write
permission to his disk drive.
• When Mather runs a backup job, he will be prevented from overwriting old files on
the tape with new files because he does not have Delete permissions to the tape. Thus
the backup jobs he creates and runs must all be append jobs.
• Mather, like Clark, is prevented from granting permission to other users to either his
drive or his tape because he lacks Access permission.
Other members of the Conservationist group also have some permissions to the jobs and
folders inside the Conservationist Workgroup Folder, including those created by
Mather. This affects them in the following ways:
• They will be able to view the folders and jobs Mather creates in the Conservationist
Workgroup Folder. Because they have Modify permission, members of the
Conservationist group will be able to modify the properties of any jobs or folders
Mather creates inside the Conservationist Workgroup Folder.
• Because members of this group lack Read permission to Mather’s drive and tape,
they will be unable to change the files Mather selected for backing up or restoring—
even if they have Modify permission to a job Mather created.
• No other members of this group can run one of Mather’s jobs unless the TapeWare
administrator grants them the appropriate Read and Write permissions.
Page 68

50 TapeWare® User’s Guide and Technical Reference
Granting Permissions to Other TapeWare Users
If your TapeWare administrator has given you Access permission to an object, you will
be able to grant other users and groups permissions to that object. Generally your
TapeWare administrator will only grant you Access permission to objects in the
TapeWare database when he or she wants you to be able to share this data with other
users.
For example, if your TapeWare administrator has given you Access permission to an
archive tape, you will be able to grant other users Read permission to the tape. This
would allow other users to restore files from this tape to any drive they have Write
permission to.
To Grant Permission to Other TapeWare Users
1. Open the properties window of the object to which you wish to grant users or groups
permission.
2. Click on the Permissions tab. (If you don’t have Access permission to an object, the
Permissions tab will not appear on the object’s property sheet.)
3. Click the Add… button.
4. Select a user or group to add in the Browse window and then click OK.
5. Select the appropriate Permissions check boxes at the right of the window.
Page 69

Chapter 4 — Permissions 51
p
…and check the
appropriate
ermissions.
To grant
permissions
to another
user, begin
by clicking
the Add…
button…
…then
select a
user or
group in the
Browse
window…
Restricting User Permissions
In most cases you can restrict the permissions a user has to an object in the same way you
grant permissions—by clearing the appropriate check boxes on the Permissions tab of
that object. If the user or group is not listed on the Permissions tab of the object, you
must first add that user or group to the list of users or groups that have direct permissions
to that object.
To Restrict Permissions of Other TapeWare Users
1. Open the properties window of the object to which you wish to restrict user or group
permissions.
2. Click on the Permissions tab. (If you don’t have Access permission to an object, the
Permissions tab will not appear on the object’s property sheet.)
3. If the user is not listed on the Permissions tab, first add the user or group by clicking
the Add… button and then selecting a user or group to add in the Browse window.
4. Select the user or group to whom you wish to deny permissions on the Permissions
tab.
5. Clear the appropriate Permissions check boxes at the right of the window.
Page 70

52 TapeWare® User’s Guide and Technical Reference
To deny a user
permissions to an
object, add that
user to the object’s
Permissions tab
and clear all of the
Permissions check
boxes.
When you restrict a user’s direct permissions to a container, you also change that user’s
effective permissions to objects within that container—but only when the user’s effective
permissions to those objects are inherited from that container’s effective permissions. For
example, if you deny a user direct Modify permission to a job folder by clearing the
Modify check box under that user’s name, you also deny that user effective Modify
permission to jobs stored in that folder—unless that user has direct permissions to those
jobs.
Normally, your TapeWare administrator will have arranged the security of your storage
management zone to prevent unauthorized permission to files and tapes. However, if you
believe another user’s permission to an object should be restricted and you cannot restrict
it yourself, notify your TapeWare administrator.
Page 71

Chapter 5 — Selecting Files and Instances
You use the Selection tab of a job’s property sheet to select files for backing up, restoring
and verifying. TapeWare’s powerful selection filters allow you to select exactly the files
you want and to automatically update your selection before the job is run.
In This Chapter
• Overview
• Backup Selection Concepts
• Selecting Files for Backup Jobs
• Restore Selection Concepts
• Selecting Files for Restore Jobs
Overview
• Restoring Files with New Names and Locations
• Verify Selection Concepts
• Selecting Files for Verify Jobs
When you select files for a job, you want to select only those files which are necessary
for your job and not any others. However, you also want your selection criteria to be
flexible enough to automatically select new files that meet your criteria.
TapeWare allows files to be selected in several ways: by directly selecting volumes,
folders and files; by using filters to sort through selected files; and by additional
automated filters used by TapeWare when your job is run. For restore jobs, you can also
specify which instance or version of a file you wish to restore, what name that new file
will have and what folder or directory the file will be restored to.
53
Page 72

54 TapeWare® User’s Guide and Technical Reference
By specifying your selection criteria carefully, when TapeWare automatically updates the
selected file list each time your job is run, you can be certain that the job will work with
those files you intended to select.
This chapter discusses how to select files for separately each type of job: backup jobs,
restore jobs and verify jobs. For each type of job, there is a discussion of concepts you’ll
need to correctly and carefully select files. Be certain to read this section before
proceeding.
Backup Selection Concepts
You use the Selection tab of a job to select files for that job.
Files are selected for backup in three steps. In the first step, the appropriate files are
selected by marking them with a check. In the second step, these marked files are sorted
through using filter selection criteria. This step is optional. In the last step, as the job is
run, TapeWare checks to see if it will back up all the files or only those files that have
changed since the last backup job.
Marking Files for Backup
A file is selected for backup when the selection box next to the file is checked.
When the box next to a folder or other container is gray, it means that this folder or
container contains selected files, even though it is not selected itself. When the box next
to a folder or other container is grayed and checked, the folder itself is selected and may
also contain selected files within it.
Grayed selection boxes
without checks mean that
there are selected objects
in the container.
Grayed selection boxes
with checks mean that the
container itself is selected
and may also contain
selected objects within it.
A checked
selection box
indicates the
file is selected.
Page 73

Chapter 5 — Selecting Files and Instances 55
You can select or deselect a file for backup by checking or clearing the selection box next
to the file. You can also select the folder that contains the file and not the file itself.
Notice that when you mark a container, such as a folder or volume, all of its contents,
including all the folders and containers it contains, are also marked.
When you select
a folder…
…its contents
are automatically
selected as well.
Selecting Folders vs. Selecting Files
You can select the contents of the folder in one of two ways: either by individually
marking the selection box of each object in that folder one-by-one or by marking the
selection box of the folder itself. Which method you choose is important because it
affects which files TapeWare includes in the selection list after changes have been made
to that folder.
If you select the contents of the folder individually, when new objects such as files are
added to the folder, TapeWare does not select them for backup. However, if you select
the folder itself, when new items are created in that folder, TapeWare also selects these
files for backing up.
…new objects
When you
select a
folder…
created in that
folder are
automatically
selected.
In general, when selecting files for backup, especially for jobs designed for disaster
protection, begin by selecting containers at the top of the TapeWare hierarchy. Then
deselect containers or files lower in the hierarchy that you do not need to back up.
For example, you could begin by selecting the network container icon at the top of the
hierarchy. This will automatically select all of the machines on the network and all of the
volumes on those machines. If there are machines, volumes or folders you do not want
backed up, unselect them by clearing their selection box. When new machines or
volumes are added to the network (that is to the current storage management zone),
TapeWare will automatically select these machines and volumes.
Page 74

56 TapeWare® User’s Guide and Technical Reference
There is an additional reason to select containers rather than the objects in the containers:
to ensure that you don’t miss any files stored loose in the container.
For example, suppose you want to back up a folder named 1995 Fire Study Data &
Reports and the folder named 1995 Reports that is in it, but not the folder named Field
Data. If you check only the 1995 Reports folder, your job will not back up any files in
the 1995 Fire Study Data & Reports folder that are not in the 1995 Reports folder.
Instead, check the 1995 Fire Study Data & Reports folder and then clear the Field Data
folder. This selects all files in both the 1995 Fire Study Data & Reports and 1995
Reports folders.
When you
select a
container…
…all of its contents
are also checked,
including loose files.
But when you
select the
contents of a
container…
…loose
objects
are not
selected.
Selecting Files with Filters
Selection
Filters button
How Selection Filters Work
Selection filters let you identify specific volumes, folders and files to exclude from the
backup, restore or verify job. Click the Selection Filters button on the toolbar. Then
specify the filter criteria for the job.
Note The selection filters you specify are applied to all of the volumes, folders and files
that have been marked for the job. You cannot apply different filters to different folders
or volumes in the same job.
By default, TapeWare backs up all volumes, folders and files that have been marked for
the job. Selection filters let you identify specific criteria for excluding one or more of
these marked objects. TapeWare applies these filter criteria at runtime, in effect
unmarking any objects that do not meet the criteria.
Page 75

Chapter 5 — Selecting Files and Instances 57
For example, suppose you want to exclude all files that were created before 2002. Access
the Date Range window for the Create range field. Select On or after for the Range
type. Enter 1-Jan-2002 for the Starting date. When you run the job, TapeWare
temporarily deselects all files with a creation date before 2002. They will be excluded
from the backup.
You can change the filter criteria at any time. You can also mark or unmark objects
before running the job. TapeWare does not apply the filter criteria to any marked object
until it runs the job.
Note You cannot use selection filters to add unmarked objects to the job set. Selection
filters are only used to exclude marked objects from the job set.
Filters and Grayed Folders
When you apply a filter to a marked folder, this may result in no files from that folder
being selected. Although no files in that folder are selected, the folder will still appear
with a grayed selection box next to it. The grayed selection box indicates that if any new
files which meet the filter criteria are created in that folder, they will be selected for the
job.
Grayed folders
indicate that any files
contained in the
folder that meet the
selection filter’s
criteria will be
selected.
Selecting Changed Files Only
When you run a job repeatedly, particularly backup jobs designed for disaster protection,
many times you only want to back up files that have changed since the last time you ran a
backup job. TapeWare handles this with the backup mode setting.
If you want to back up all selected files, use the Full backup mode setting; TapeWare
does not deselect any selected files.
If you only want to back up files that have changed since the last full backup, use the
Differential backup mode setting; TapeWare automatically deselects all the files that
have not changed since the last full backup.
Page 76

58 TapeWare® User’s Guide and Technical Reference
If you only want to back up files that have changed since the last backup, use the
Incremental backup mode setting; TapeWare automatically deselects all the files that
have not changed since the last backup.
The job then runs with this updated selected file list.
Automatically Selecting New Files for Backup
When you set up a job to run repeatedly, you want that job to adjust to changes made to
any of the directories on your computer or any machine in your storage management
zone. Sometimes these changes include the addition of new files and directories that were
not originally selected when the job was created. It may even include the addition of new
machines on the network or any volumes on these machines that were not previously
selected for backup.
If your selection criteria was carefully specified, TapeWare will also select these new
files, folders, volumes and machines for backup. In general, a new file or container is
selected for backup if (1) it is in a container selected for backup and (2) it meets the
selection filter criteria.
For example, a new folder will be included in the backup selection list if it is in a selected
container. If you create a new folder at the root level on a volume, that folder will be
selected for backup if the volume was marked for backup. The files in that folder that
pass through the selection filter criteria will be included in the backup job. However, if
the volume itself was not selected, the new folder will not be selected.
…any new
If you’ve
selected
the folder
itself…
objects created
in it will be
automatically
selected.
If you want to see what files will be backed up, open up the Selection tab on the job’s
property sheet. Whenever this tab is opened, TapeWare recalculates which files should be
selected for backup. Check the display to see that the files you intended to be backed up
are selected.
Note The Selection tab shows all files that will be backed up by a full backup job. It does
NOT indicate which files will not be backed up by a differential or incremental backup.
Page 77

Chapter 5 — Selecting Files and Instances 59
Selecting Files for Backup Jobs
To select files for backup jobs
1. Open the property sheet of the backup job and click on the Selection tab.
2. Check the selection boxes next to the files, folders or other containers you wish to
include in the job.
Selection
Filters button
3. Click on the Selection Filters button on the toolbar and specify filter selection
criteria. (You can skip this step if you don’t wish to apply any selection filters.)
4. Examine the tree view and object detail areas on the Selection tab to see that the files
you intended to select are marked for backup.
Applying Filter Criteria
Selection
Filters button
When you click on the Selection Filters button, the Selection Filters window appears.
This window has multiple selection filters you can apply to the files you have selected.
Selection
Filters
window for
backup jobs
Note Each filter criterion works independently. To be selected for backup, each file must
pass every filter criterion specified. For example, if you specify that every file selected
must have been created after January 1, 2002 and must have .doc as its extension,
TapeWare will only select files which meet both selection criteria.
Page 78

60 TapeWare® User’s Guide and Technical Reference
Filter Selection Criteria
This section contains a brief description of each selection filter TapeWare applies to the
files and folders marked for backup.
Note that some of the selection criteria are operating system-specific. Your storage
management zone may include multiple machines working with files created by different
operating systems. If you select a filter criterion that is operating system-specific, files
from other operating systems will be automatically excluded from the backup. This
affects, in particular, the Required attributes and Exclude attributes filters.
Note TapeWare figures the century dates using the following algorithm: if the year is 70
or smaller, the century is set to 20 (21st century); if the year is 71 or greater, the century
is set to 19 (20th century). For example, if you set the date to 01-Jun-33, TapeWare
calculates the date as June 1, 2033. If the date is set to 05-Apr-81, TapeWare calculates
the date as April 5, 1981.
Backup Range
The backup date is the date a file or other object was last backed up. Each time a file is
backed up, TapeWare changes the backup date to match the current date. Each file has
exactly one backup date. You can use this filter for files that have been backed up on
specific dates. More often, however, you would use this filter to filter out files that have
been recently backed up.
Filter Change
button
To select files that have specific backup dates, click on the Filter Change button next to
the Backup range field. In the Date Range window that appears, select the appropriate
range type and the starting and ending dates and times.
Date Range
window
Page 79

Chapter 5 — Selecting Files and Instances 61
Modify Range
Each time a file is modified, its modified date is updated. You can use this filter to
backup files whose modified date matches your criteria. TapeWare checks the directory
information on the volume to see if the file should be included for backup. For example,
you can select only those files that were modified after a certain date and time or,
alternatively, those that were modified before a certain date and time.
Filter Change
button
Create Range
Filter Change
button
Access Range
To select files that have specific modify dates, click on the Filter Change button next to
the Modify range field. In the Date Range window that appears, select the appropriate
range type and the starting and ending dates and times.
When a file is first created, it is assigned a create date. You can use this filter to select
only those files that match your criteria. TapeWare checks the created date for each file
stored in the directory of the volume and uses this to select files for backing up.
To select files that have specific creation dates, click on the Filter Change button next to
the Create range field. In the Date Range window that appears, select the appropriate
range type and the starting and ending dates and times.
Note Since DOS does not support create dates, TapeWare ignores this filter on DOS
volumes.
Each time a file is read, whether or not it is modified, its access date is updated. You can
use this information to select files for backup. For example, you might want to back up
only those files which have been accessed (opened or read) in the past two months.
Alternatively, you could back up only those files which have not been accessed in the
past two months.
Filter Change
button
Size Range
To select files that have specific access dates, click on the Filter Change button next to
the Access range field. In the Date Range window that appears, select the appropriate
range type and the starting and ending dates and times.
Note Since DOS does not support access dates, TapeWare ignores this filter on DOS
volumes.
This filter lets you select files for backup according to their sizes. You might want to
select only smaller files, larger files or files between two sizes.
Page 80

62 TapeWare® User’s Guide and Technical Reference
Filter Change
button
Instance Range
To specify a filter that sorts files according to their sizes, click on the Filter Change
button next to the Size range field and then select the appropriate criteria in the Size
Range window that appears.
Size Range
window
Each time TapeWare backs up a file, it creates a new instance of that file. For example, a
file named Expense Account Reporting Form may have been backed up several times
during the previous months and years. Typically, each instance of the file is stored on the
backup media of a different job. TapeWare tracks each instance of a file separately in its
storage management database.
You can use this filter to instruct TapeWare to not back up files for which you already
have multiple instances. For example, you may not want any more than three instances of
a particular file backed up. When you set the Range type to At most and Maximum
instances to 3, TapeWare only backs up those files with less than three instances.
Filter Change
button
Note, however, that having multiple instances of a file does not ensure that the instances
you have reflect the latest changes to the file. It may have been modified after the last
time you backed it up. If so, your latest instance may not match the file’s current form.
To specify a filter that selects files according to their number of instances, click on the
Filter Change button next to the Instance range field and then select the appropriate
criteria in the Instances Range window that appears.
Instances
Range
window
Page 81

Chapter 5 — Selecting Files and Instances 63
Wildcard Type
Select which wildcard format you wish to use from the list box. You can use any of the
following formats:
• DOS: Uses the 11-character name format with the eight-character primary name and
the three-character extension, e.g., filename.txt.
• Long: Uses the 256-character name format with a long primary name and an
extension with multiple characters, e.g., Monday_backup.txt.
• UNIX: Uses UNIX search expression format, e.g., [Mm]onday.
Must Match
TapeWare lets you use wildcard matches to include files. Only files that match the
wildcard indicated in the Must match field are included in the backup set. For example,
if you enter *.exe, TapeWare will only back up those files with the .exe file extension.
You can specify multiple wildcards by separating each with a semicolon (no spaces). For
example, if you enter *.exe;*.doc in the Must match field, TapeWare selects all files that
have either the .exe extension or the .doc extension.
Cannot Match
This wildcard field works just like the Must match field except that it excludes any files
that match the wildcards. You can specify multiple wildcards by separating them with a
semicolon (no spaces); if you specify multiple wildcards, TapeWare excludes any file
that matches any one of the wildcards you specify.
Required Attributes
Operating systems track certain features of files called attributes that they use to manage
these files. You can use these same attributes as a selection filter. In the Required
attributes field, if an attribute is checked, TapeWare only selects those files which have
these attributes. For example, if you check Hidden, TapeWare only selects those files
which the operating system has assigned the Hidden attribute.
You can select multiple attributes. In this case, TapeWare only selects those files that
meet all of the required attributes.
Note that some of these attributes are only supported by certain operating systems. If you
specify an attribute that is specific to a particular operating system, then only files created
under that operating system will be selected for backup.
Page 82

64 TapeWare® User’s Guide and Technical Reference
Exclude Attributes
This field works like the Required attributes field except that TapeWare excludes files
that match these attributes. For example, if you have checked the Execute Only box,
TapeWare will exclude from the backup job any files with the Execute Only attribute.
You can select multiple attributes. A file that has any one of these attributes will be
excluded. For example, if you mark the Hidden and System attributes, any file that has
either attribute will be excluded.
Parents
When this option is checked, TapeWare backs up the directory information for the parent
along with the file. This option must be checked in order for folders and other directory
data to be backed up. When this option is not checked, TapeWare will not back up any
parent information for any file backed up.
Children
When this option is checked, TapeWare backs up the selected files. If you want only to
back up the marked directories, however, you can clear this option. When the Children
box is unchecked and the Parents box is checked, TapeWare backs up the directory
structure, but not the files stored in the directories (that is, in the folders).
Media
This option can be useful for replicating a complex directory structure. Begin by marking
the directory structure you wish to duplicate. Then clear the Children option. TapeWare
will back up only the directory structure. You can then replicate that directory structure to
any volume by restoring the directory to that volume.
TapeWare tracks instances of files and the media on which those instances are stored.
You can use this information to sort files according to the media on which they appear.
Only files with instances on the media in the Media field will be selected for the backup
job. For example, if you select media named “Daily Set:1,” TapeWare will only include
files in the backup job which have a valid instance on the media named “Daily Set:1.”
To sort files according to the media on which they appear, click the Add... button and
select the media from the Browse window. Note that you must select a Media object, not
a Media folder or User/Group folder. If there are multiple media shown in the Media
filter field, only files which have a valid instance on all the media listed will be selected.
Page 83

Chapter 5 — Selecting Files and Instances 65
This filter has limited applications for backup jobs. One way to use it, however, would be
in the case of media you know is corrupt or damaged. To back up a new instance of every
file on that damaged media, begin by creating a new job and then selecting the
appropriate Network or Machine object on the Selection tab. Then open the Selection
Filters window by clicking on the Selection Filters button. Add the damaged media to
the Media field. Then set the Backup mode on the job’s Options tab to Snapshot. When
TapeWare runs the job, it will only back up files which had an instance on the damaged
media shown in the Media field.
Restore Selection Concepts
You select files for restoring the same way you select files for backing up; however
besides selecting which files you wish to restore, you can also change the name of the
restored file, restore it to a new location and create a new folder in which to restore the
file. Additionally, when you select a file for restoring, you must specify which instance of
the file you wish to restore.
Files are selected for restoring in four steps. In the first step, you modify the file tree to
look the way you want it to appear when you restore the files. For example, you might
make a new folder to store the restored files in. Second, the appropriate files are selected
by marking them with a check and selecting the appropriate instance. In the third step,
these files are filtered using multiple selection criteria. In the last step, you can specify
new names and locations for the restored files.
Selecting Files for Restoring
A file is selected for restoring when a check mark appears in the selection box next to the
file.
When the box next to a folder or other container is gray, it means that this folder or
container contains selected files, even though it is not selected itself. When the box next
to a folder or other container is grayed and checked, the folder itself is selected and may
also contain selected files within it.
Page 84

66 TapeWare® User’s Guide and Technical Reference
Grayed selection boxes
without checks mean that
there are selected objects
in the container.
Grayed selection boxes
with checks mean that the
container itself is selected
and may also contain
selected objects within it.
A checked
selection box
indicates the
file is selected.
You can select or deselect a file for restoring by checking or clearing the selection box
next to the file. You can also select the folder that contains the file and not the file itself.
Notice that when you mark a container, such as a folder or volume, all of its contents,
including all the folders and containers it contains, are also marked.
When you select
a folder…
…its contents
are automatically
selected as well.
Note The tree view and object detail areas are different for restore jobs than for backup
jobs. For restore jobs, the files displayed in the tree view and object detail areas are the
files for which TapeWare has instances in its storage management database. For backup
jobs, on the other hand, the files displayed are those currently present on the file servers
and workstations in the current database zone.
Selecting Instances of Files
Each time a file is backed up, an instance of that file is created. There may be multiple
instances of files stored on different media created by different backup jobs. TapeWare
keeps track of all the instances of each file in its storage management database and the
media on which each instance is stored. When media is overwritten or deleted, TapeWare
deletes those instances from its storage management database as well.
Page 85

Chapter 5 — Selecting Files and Instances 67
When you select a file for restoring, TapeWare automatically selects the <Latest>
instance. If you want to select an instance other than the latest instance of a file backed
up, you must select that instance in the Instances of... window. When you open the
Instances of... window, the Available instances field shows a list of the instances of the
file and the media on which those instances are stored. Select which instance you want to
restore by highlighting it. For more information about a particular instance of a file, click
on the Details button. TapeWare displays various details it uses to manage the file in its
storage management database, including its backup date and its modify date.
Instances
window
If you select the <Latest> parameter, TapeWare will restore the most recent instance of
that file or folder.
In general, if you want to restore a specific instance of the file, you must select that file
directly and specify which instance you wish to restore in the Instances of… window.
Note that when you specify an instance date for a container, such as a folder or a volume,
only those files which have matching instance dates will be selected. If a file does not
have an instance date that matches the date of the container, it will not be selected. On the
other hand, if you want only certain files to be restored, you can specify the instance date
of a container to only select those files with matching instance dates.
Selecting Instances of Folders
When you select a folder, TapeWare automatically selects the <Latest> instance for that
folder and for every file within that folder. If you wish to specify another instance, open
the Instances of… window and highlight the instance date to select it.
TapeWare uses the instance you specified when you selected the folder to also select files
contained within that folder. Specifically, a file is selected for restoring only if an
instance matches the folder instance.
Note When you specify an instance date for a folder, volume or other container, files
stored in that container are only selected when they have an instance date that matches
the instance date of the container. Many times, files will not have instance dates that
match the dates of the containers they are stored in, for example, when you select an
instance date from an incremental or differential backup job. To be sure you select all of
the files inside a container, select the <Latest> instance for that container.
Page 86

68 TapeWare® User’s Guide and Technical Reference
Consider these two examples:
In the first example, by selecting the <Latest> instance of the folder, all of the files
contained within the folder are selected because each of these files has a <Latest>
instance. Note that these instances may be from different dates and different backup jobs,
but because each file has a <Latest> instance, each one will be restored.
When you select
the <Latest>
instance of a
folder…
…every object in it
will be selected.
In the second example, another instance besides the <Latest> instance was selected. In
order for the files within the folder to be selected for restoring, they must have an
instance date that matches that selected for the folder. In this example, some files are not
selected for restoring because they do not have an available instance which matches the
instance date selected for the folder.
When you select
an instance date of
a folder other than
the <Latest>…
…some objects in that
folder may not be selected if
they do not have a matching
instance date.
In general, if you want to restore a specific instance of the file, you must select that file
directly and specify which instance you wish to restore in the Instances of… window.
Selecting Folders vs. Selecting Files
You can select the contents of the folder in one of two ways: either by individually
marking the selection box of each object in that folder one-by-one or by marking the
selection box of the folder itself. Which method you choose is important because it
affects which files TapeWare includes in the selection list after changes have been made
to that folder.
Page 87

Chapter 5 — Selecting Files and Instances 69
For example, if you select a folder for restoring by marking its selection box, all of the
contents of that folder are restored. If a new backup job is run before the restore job is
run, TapeWare selects files for restoring using the new folder’s contents. So, for example,
if a new file is created in that folder, TapeWare will also restore that file. Additionally, if
you have selected the <Latest> instance of the folder, TapeWare will use the latest
instance of each file in its storage management database. These files may be newer than
the files you originally selected.
Instances and Filters
You cannot use filters for selecting instances. The Selection Filters window can be used
to sort through the instances you have otherwise specified in the Instances of... window,
but filters will not change the selected instance date.
Selecting Files with Filters
Selection
Filters button
Selection filters let you identify specific volumes, folders and files to exclude from the
restore job. Click the Selection Filters button on the toolbar. Then specify the filter
criteria for the restore job.
Note The selection filters you specify are applied to all of the volumes, folders and files
that have been marked for restore. You cannot apply different filters to different folders
or volumes in the same job.
How Selection Filters Work
By default, TapeWare restores all volumes, folders and files that have been marked for
restore. Selection filters let you identify specific criteria for excluding one or more of
these marked objects. TapeWare applies these filter criteria at runtime, in effect
unmarking any objects that do not fit the criteria.
For example, suppose you want to exclude all files that were created before 2002. Access
the Date Range window for the Create range field. Select On or after for the Range
type. Enter 1-Jan-2002 for the Starting date. When you run the job, TapeWare
temporarily deselects all files with a creation date before 2002. They will be excluded
from the restore.
You can change the filter criteria at any time. You can also mark or unmark objects
before running the job. TapeWare does not apply the filter criteria to any marked object
until it runs the job.
Note You cannot use selection filters to add unmarked objects to the restore set.
Selection filters are only used to exclude marked objects from the restore set.
Page 88

70 TapeWare® User’s Guide and Technical Reference
Changing the Name and Location of Restored Files
When you restore a file, you may wish to restore the file with a new name or in a new
location. If you restore a file to its original location using its original name, if that file
currently exists there, TapeWare overwrites the current file with the restored file.
You can avoid overwriting current files by giving the file a new name or by restoring the
file to a new directory. For example, to avoid replacing the current file named Project
List with a previous, older instance of the file, you can rename the file before restoring it
or restore it to a different folder.
You can either select a different folder or, alternatively, TapeWare lets you create a new
folder in which to restore the files.
Selecting Instances of Files for Restore Jobs
Each time you mark a selection box of a file or folder for restoring, TapeWare
automatically selects the <Latest> instance. If you want to specify a different instance,
use the Instances of… window to select which instance of the file you wish to restore.
Select Instance
button
You can also specify a particular instance of a file or folder by highlighting it in the tree
view or object detail areas and then clicking the Select Instance button on the toolbar.
TapeWare will show you the Instances of… window with a list of the available instances
for that file.
Be certain to specify carefully which instance of a file you wish to restore. A single
TapeWare restore job can restore files backed up over a period of months or years on
media created by many different backup jobs. You can easily restore all of the latest
instances of the files by selecting <Latest> in the Instances of… window. However, if
you want instances of files that were created on different dates, you must select each
instance of each file individually.
Note that you cannot restore multiple instances of the same file in a single restore job. If
you want to restore more than one instance of a file, you must create and run a separate
job for each instance.
To select instances of files for restore jobs
1. Open the Properties sheet of the restore job and click on the Selection tab.
2. Check the selection boxes next to the files, folders or other containers you wish to
include in the job.
Page 89

Chapter 5 — Selecting Files and Instances 71
Select Instance
button
3. To select a specific instance of the objects you selected, highlight the folder or file
and click the Select Instance button. In the Instances of… window that appears,
select the appropriate date of the instance you wish to restore. If you want to include
all of the files in a folder or on a volume, select <Latest>.
Selection
Filters
button
4. Click on the Selection Filters button on the toolbar and specify filter selection
criteria. (You can skip this step if you don’t wish to apply any selection filters.)
5. Examine the tree view and object detail areas on the Selection tab to check that the
files you intended are marked for restoring.
Additionally, you can change the names of the files and store them in new locations. This
is discussed in Restoring Files with New Names and Locations later in this chapter.
Applying Filter Criteria
Selection
Filters
button
When you click on the Selection Filters button, the Selection Filters window appears.
This window has multiple selection filters you can use to sort through the files you have
selected for restoring.
Selection
Filters
window for
restore jobs
Note Each filter criterion works independently. To be selected for restoring, each file
must pass every filter criterion specified. For example, if you specify that every file
selected for restoring must have been created after January 1, 2002 and must have .doc as
its extension, TapeWare will only select files which meet both selection criteria.
Page 90

72 TapeWare® User’s Guide and Technical Reference
Filter Selection Criteria
This section contains a brief description of each selection filter TapeWare applies to the
files and folders marked for restoring.
Note that the Selection Filters window for restore jobs is similar to the Selection Filters
window for backup jobs. This allows you to use the same filters to select the files for
restoring that you used for selecting files for backing up previously. This allows you to
create a restore job that selects the same files as a backup job, no matter how widely
distributed over the network these files may be.
Note TapeWare figures the century dates using the following algorithm: if the year is 70
or smaller, the century is set to 20 (21st century); if the year is 71 or greater, the century
is set to 19 (20th century). For example, if you set the date to 01-Jun-33, TapeWare
calculates the date as June 1, 2033. If the date is set to 05-Apr-81, TapeWare calculates
the date as April 5, 1981.
Backup Range
When a file is backed up, TapeWare stores in its storage management database the date
the file was backed up. This is called the backup date. Each time you back up a file,
TapeWare changes the backup date to the date of the backup. (You can view this
information for all of the available instances in the Instances of… window in the Backed
up field list.) You can use this information to filter files for restore jobs.
Filter Change
button
To select files that have specific backup dates, click on the Filter Change button next to
the Backup range field. In the Date Range window that appears, select the appropriate
range type and the starting and ending dates and times.
Date Range
window
Page 91

Chapter 5 — Selecting Files and Instances 73
Modify Range
Each time a file is modified, its modified date is updated. You can use this filter to restore
files whose modified date matches your criteria. TapeWare checks the directory
information on the volume to see if the file should be included in the restore job. For
example, you can select only those files that were modified after a certain date and time
or, alternatively, those that were modified before a certain date and time.
Filter Change
button
Create Range
Filter Change
button
Delete Range
To select files that have specific modify dates, click on the Filter Change button next to
the Modify range field. In the Date Range window that appears, select the appropriate
range type and the starting and ending dates and times.
When a file is first created, it is assigned a create date. You can use this filter to select
only those files that match your criteria. TapeWare checks the created date for each file
stored in the directory of the volume and uses this to select files for restoring.
To select files that have specific creation dates, click on the Filter Change button next to
the Create range field. In the Date Range window that appears, select the appropriate
range type and the starting and ending dates and times.
Note Since DOS does not support create dates, TapeWare ignores this filter on DOS
volumes.
This filter gives you an easy way to select files to restore that have been deleted from the
volume, but for which TapeWare has valid instances stored in its storage management
database and on valid media.
When files that have once been backed up are later deleted, TapeWare marks these files
with a special icon, indicating that they have been deleted. In addition, TapeWare assigns
the file a delete date, which you can view on the General tab of that file’s property sheet.
Page 92

74 TapeWare® User’s Guide and Technical Reference
Files that have been
backed up and then
deleted show special
icons on the
Selection tab of a
restore job.
Any object that has
been backed up and
then is deleted will
show a Deleted date
on its General tab.
This filter instructs TapeWare to only restore files which have a delete date that matches
the criteria you have set. Note that if a file has not been deleted from the volume, it will
be excluded by this filter and thus will not be selected for restoring.
Filter Change
button
You can easily select every file deleted for restoring by first marking the selection box of
the volume and selecting the <Latest> instance. This will cause all of the files to be
selected initially. Then, click on the Filter Change button next to the Delete range field
and then select On or before from the Range type list box. Next select a random future
date, for example, February 6, 2106. TapeWare will exclude all of the files that have not
been deleted from the set of files to be restored. When you return to the Selection tab,
only those files that have been deleted will be checked.
On the other hand, you can also not restore files that have been deleted. In this case, set
the Delete range filter to On or before some random early date, such as January 1, 1980.
Any file that has been deleted will be filtered out by this filter, so that no deleted files
will be restored. This can be useful if you don’t want to unnecessarily restore files that
were properly deleted in the first place.
Page 93

Chapter 5 — Selecting Files and Instances 75
Access Range
Each time a file is read, whether or not it is modified, its access date is updated. You can
use this information to select files for restoring. For example, you might want to restore
only those files which have been accessed (opened or read) in the past two months.
Alternatively, you could restore only those files which have not been accessed in the past
two months.
Filter Change
button
Size Range
Filter Change
button
To select files that have specific access dates, click on the Filter Change button next to
the Access range field. In the Date Range window that appears, select the appropriate
range type and the starting and ending dates and times.
Note Since DOS does not support access dates, TapeWare ignores this filter on DOS
volumes.
This filter lets you select files to restore according to their sizes. You might want to select
only smaller files, larger files or files between two sizes.
To specify a filter that sorts files according to their sizes, click on the Filter Change
button next to the Size range field and then select the appropriate criteria in the Size
Range window that appears.
Size Range
window
Instance Range
Each time TapeWare backs up a file, it creates a new instance of that file. For example, a
file named Expense Account Reporting Form may have been backed up several times
during the previous months and years. Typically, each instance of the file is stored on the
backup media of a different job. TapeWare tracks each instance of a file separately in its
storage management database.
You can use this filter to instruct TapeWare to select files according to the number of
instances that exist in the database. You might, for example, instruct TapeWare to restore
all of the files for which there is only one instance. When you set Range type to At most
and Maximum instances to 1, TapeWare only restores those files with a single instance.
Page 94

76 TapeWare® User’s Guide and Technical Reference
Note, however, that having multiple instances of a file does not ensure that the selected
instances reflect the latest changes to the file. If it was modified after the last time you
backed it up, your latest instance may not match the file’s current form.
Filter Change
button
Wildcard Type
Must Match
To specify a filter that sorts files according to their number of instances, click on the
Filter Change button next to the Instance range field and then select the appropriate
criteria in the Instances Range window that appears.
Instances
Range
window
Select which wildcard format you wish to use from the list box. You can use any of the
following formats:
• DOS: Uses the 11-character name format with the eight-character primary name and
the three-character extension, e.g., filename.txt.
• Long: Uses the 256-character name format with a long primary name and an
extension with multiple characters, e.g., Monday_backup.txt.
• UNIX: Uses UNIX search expression format, e.g., [Mm]onday.
Cannot Match
TapeWare lets you use wildcard matches to include files. Only files that match the
wildcard indicated in the Must match field are included in the restore set. For example,
if you enter *.exe, TapeWare will only restore those files with the .exe file extension.
You can specify multiple wildcards by separating each with a semicolon (no spaces). For
example, if you enter *.exe;*.doc in the Must match field, TapeWare selects all files that
have either the .exe extension or the .doc extension.
This wildcard field works just like the Must match field except that it excludes any files
that match the wildcards. You can specify multiple wildcards by separating them with a
semicolon (no spaces); if you specify multiple wildcards, TapeWare excludes any file
that matches any one of the wildcards you specify.
Page 95

Chapter 5 — Selecting Files and Instances 77
Required Attributes
Operating systems track certain features of files called attributes that they use to manage
these files. You can use these same attributes as a selection filter. In the Required
attributes field, if an attribute is checked, TapeWare only selects those files which have
these attributes. For example, if you check Hidden, TapeWare only selects those files
which the operating system has assigned the Hidden attribute.
You can select multiple attributes. In this case, TapeWare only selects those files that
meet all of the required attributes.
Note Some attributes are only supported by certain operating systems. If you specify an
attribute that is specific to a particular operating system, then only files created under that
operating system will be selected for restore.
Exclude Attributes
This field works like the Required attributes field except that TapeWare excludes files
that match these attributes. For example, if you have checked the Execute Only box,
TapeWare will exclude from the restore job any files with the Execute Only attribute.
You can select multiple attributes. A file that has any one of these attributes will be
excluded. For example, if you mark the Hidden and System attributes, any file that has
either attribute will be excluded.
Parents
Children
When this option is checked, TapeWare restores directory information for any selected
folder or volume. For example, if you have marked a folder, TapeWare will restore that
folder only if this option is checked. When this option is not checked, directory
information about folders and volumes is not restored.
When this option is checked, TapeWare restores files. When this option is unchecked,
TapeWare does not restore files. This is useful if you want to restore a complex directory
structure, but not the files in that directory. To restore a directory structure, but not the
files (children) stored in the directories, begin by marking the directory for restoring.
Then clear the Children option. TapeWare will restore only the directory structure to the
volume you specify.
Page 96

78 TapeWare® User’s Guide and Technical Reference
Media
TapeWare tracks instances of files and the media on which those instances are stored.
You can use this information to sort files according to the media on which they appear.
Only files with instances on the media in the Media field will be selected for the restore
job. For example, if you select media named “Daily Set:1,” TapeWare will only include
files in the restore job which have a valid instance on the media named “Daily Set:1.”
To sort files according to the media on which they appear, click the Add... button and
select the media from the Browse window. Note that you must select a Media object, not
a Media folder or User/Group folder. If there are multiple media shown in the Media
filter field, only files which have a valid instance on all the media listed will be selected.
For more
information,
see Import
Media in
Chapter 9 —
The Media,
Device and
Database
Tabs.
This filter can be useful for restore jobs if you want to restore files only from a particular
media. For example, you may have imported media from another storage management
zone and may wish to limit the files restored to those on that particular media. In this
case, you can ensure that only files on that media are selected by adding that media to the
Media field.
Note, however, that under ordinary circumstances, you should let TapeWare track the
instances of particular files and restore files not according to the media on which they
appear, but rather according to their instance date. For example, if you want to restore
the most recent version of a file, simply select the file. TapeWare will automatically
select that file and identify the proper media on which that instance is stored. TapeWare
will then prompt you for the correct media when the job is run.
Restoring Files with New Names and Locations
You can change the name and location (folder) of a file when it is restored. You can also
create a new folder in which to store the file.
Restoring a File with a New Name
After a file has been selected for restoring, you can rename the file. When you rename the
file, TapeWare restores the file with the new name. This can be useful for not overwriting
versions of the file that currently exist on disk.
To rename a file, right-click the file name, select Rename from the shortcut menu and
type the new name. You can also click its name again and type the new name.
To restore a file with a new name,
select it, click it again and type
the new name.
Page 97

Chapter 5 — Selecting Files and Instances 79
Note that when you rename an instance, you are only renaming that file for the purposes
of restoring it with this particular restore job. Only the current restore job will assign the
new name to that file. When you create a new restore job, you will see the file displayed
with its original name. Similarly, the Database tab always displays files with the names
they had when they were backed up.
Restoring Files to a Different Folder
You can also restore files to different folders. When TapeWare restores the file, it creates
a new file in the new location. Similarly, you can restore folders in new locations as well.
This is useful in order to prevent overwriting files and folders that currently exist on disk.
To restore a file to a different folder, drag the file in the tree view area to the new folder.
Alternatively, right-click the file name and select Move… from the shortcut menu. In the
Confirm Move window, select a target location. TapeWare will move the file to the
location you specify in the Target field.
To restore a folder
or file to a different
folder, select it and
then drag it to the
new folder…
…and then confirm
the move in the
Confirm Move
window.
You can also restore folders and volumes in new locations. The contents of these
containers move with them and are restored, along with the folder or volume, in the new
location.
Note that when you move an instance on the Selection tab of a restore job, the changes
you make are only recorded for that restore job. Only the current restore job will assign
the file or folder the new location. When you create a new restore job, you will see the
files and folders in their original locations. Likewise, the Database tab will continue to
display files in their original locations.
Page 98

80 TapeWare® User’s Guide and Technical Reference
Restoring Files to a New Folder
You can also create a new folder and restore files to that new folder. When TapeWare
restores the files, it creates the new folder and restores the files you specified to that new
location. Similarly, you can restore folders and their contents in new folders you create.
To create a new folder in which to restore the file or folder, first highlight the location
you want to create the new folder in the tree view area. Then click on the New Object
button on the Selection tab’s toolbar. You can also right-click the container and select
New Directory from the shortcut menu. TapeWare creates the new folder in the specified
location. Give the folder a new name and then drag the files and folders to restore into the
new folder.
To restore a file or folder to a new folder,
right-click the container in which you
want to create the new folder and select
New Directory from the shortcut menu.
Next, drag the folder or file
you want to restore to the
new folder you created.
Note that any new folder you create on the Selection tab of the restore job is only created
in the restore job currently opened. Only the current job will show this new folder. When
you create a new restore job or open another restore job, the new folder you created in the
current job will not be displayed. Likewise, the new folder you created will not be
displayed on the Database tab either.
Verify Selection Concepts
You select files for verifying the same way you select files for backing up or restoring,
including selecting which instance to verify.
Files are selected for verifying in two steps. In the first step, the appropriate files are
selected by marking them with a check and selecting the appropriate instance. In the
second step, these files are filtered using multiple selection criteria.
Page 99

Chapter 5 — Selecting Files and Instances 81
Tip You can quickly check to see if a file was verified when it was backed up by opening
the Instances of… window for that file. The Status field will show either Verify
complete, Verify failed or Not verified depending on whether or not that file was
successfully verified or not when the job was run.
Selecting Files for Verifying
A file is selected for verifying when a check mark appears in the selection box next to the
file.
When the box next to a folder or other container is gray, it means that this folder or
container contains selected files, even though it is not selected itself. When the box next
to a folder or other container is grayed and checked, the folder itself is selected and may
also contain selected files within it.
Grayed selection boxes
without checks mean that
there are selected objects
in the container.
Grayed selection boxes
with checks mean that the
container itself is selected
and may also contain
selected objects within it.
You can select or deselect a file for verifying by checking or clearing the selection box
next to the file. You can also select the folder that contains the file and not the file itself.
Notice that when you mark a container, such as a folder or volume, all of its contents,
including all the folders and containers it contains, are also marked.
A checked
selection box
indicates the
file is selected.
When you select
a folder…
…its contents
are automatically
selected as well.
Page 100

82 TapeWare® User’s Guide and Technical Reference
Note The tree view and object detail areas are different for verify jobs than for backup
jobs. For verify jobs, the files displayed in the tree view and object detail areas are the
files for which TapeWare has instances in its storage management database. For backup
jobs, on the other hand, the files displayed are those currently present on the file servers
and workstations in the current database zone.
Selecting Instances of Files
Each time a file is backed up, an instance of that file is created. There may be multiple
instances of files stored on different media created by different backup jobs. TapeWare
keeps track of all the instances of each file in its storage management database and the
media on which each instance is stored. When media is overwritten or deleted, TapeWare
deletes those instances from its storage management database as well.
When you select a file for verifying, TapeWare automatically selects the <Latest>
instance. If you want to select an instance other than the latest instance of a file backed
up, you must select that instance in the Instances of... window. When you open the
Instances of... window, the Available instances field shows a list of the instances of the
file and the media on which those instances are stored. Select which instance you want to
verify by highlighting it. For more information about a particular instance of a file, click
on the Details button. TapeWare displays various details it uses to manage the file in its
storage management database, including its backup date and its modify date.
Instances
window
If you select the <Latest> parameter, TapeWare will verify the most recent instance of
that file or folder.
In general, if you want to verify a specific instance of the file, you must select that file
directly and specify which instance you wish to verify in the Instances of… window.
Note that when you specify an instance date for a container, such as a folder or a volume,
only those files which have matching instance dates will be selected. If a file does not
have an instance date that matches the date of the container, it will not be selected. On the
other hand, if you want only certain files to be verified, you can specify the instance date
of a container to only select those files with matching instance dates.
 Loading...