

Page 1
StorCenter™ Pro
NAS
450r Server
Quick Start Guide
Guide de démarrage rapide
Schnellstart-Handbuch
Guida di installazione rapida
Guía de instrucciones rápidas
Guia de uso rápido
クイック スタート ガイド
快速入门指南
快速入門指南
빠른 시작 설명서
Page 2
Quick Install • Installation rapide • Schnellinstallation
Installazione rapida
• Instalación rápida • Instalação rápida
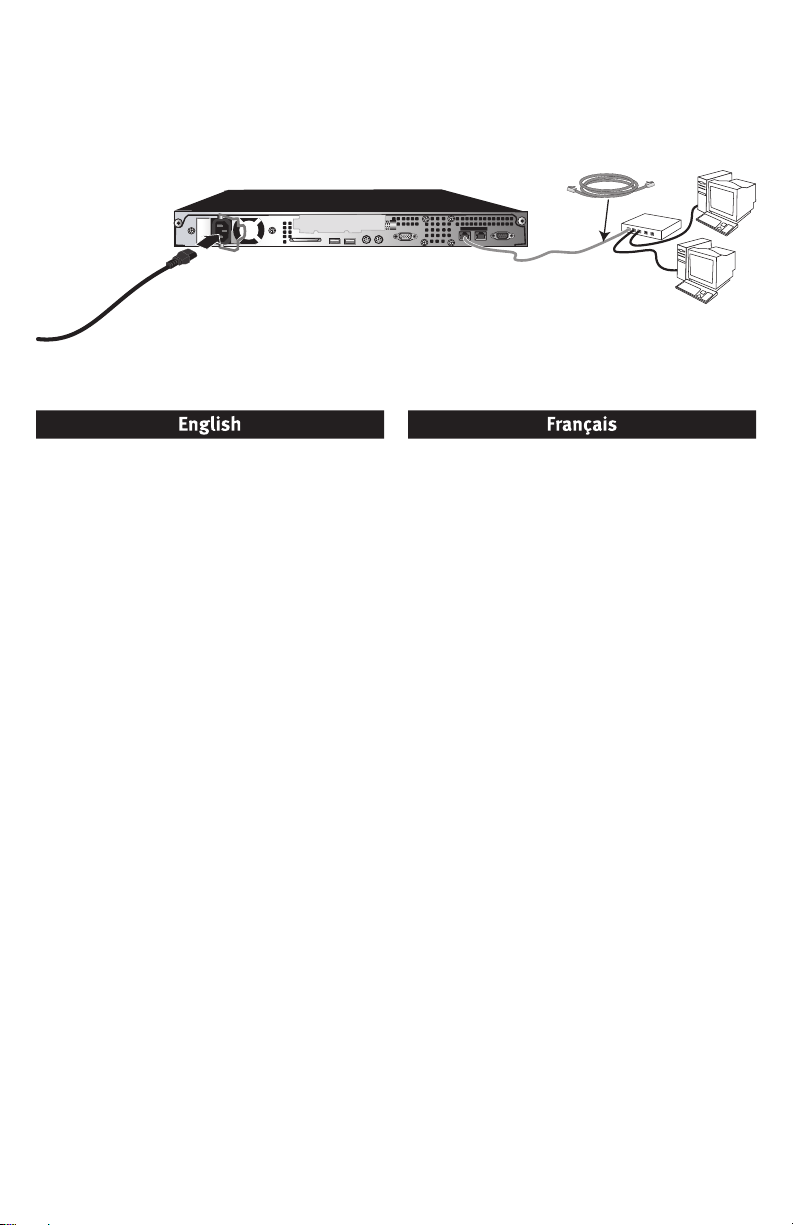
1. Use the included network cable to connect the
StorCenter Pro to a network hub or switch.
2. Plug the the StorCenter Pro into an uninterruptible
power supply (UPS).
3. Power on the StorCenter Pro using the power button
on the front panel.
4. Insert the Solutions CD. If the CD menu does not
launch automatically, double click the CD icon, then
double click the Start icon.
5. Click on the Discovery Tool Pro Software button to run
the software
NOTE: The client computer must be on the same
subnet or network segment as the StorCenter Pro.
6. The Iomega Discovery Tool Pro software will list
all Iomega StorCenter Pro servers on your network
segment. Select the StorCenter Pro you would like
to configure from the Discovery window, then click
the Manage button. Refer to the software help for
information on configuration options.
7. Log into the StorCenter Pro. If you are logging in for
the first time, the user name is Administrator and the
password is
.
ADMIN.
1. A l’aide du câble réseau inclus, connectez le serveur
StorCenter Pro à un commutateur ou concentrateur
réseau.
2. Connectez le cordon d’alimentation fourni à l’arrière
du système Iomega StorCenter Pro et à un onduleur
(UPS).
3. Activez votre système StorCenter Pro à l’aide du
bouton d’alimentation situé sur le panneau avant.
4. Insérez le CD Solutions. S’il ne démarre pas
automatiquement, double-cliquez sur l’icône du CD,
puis double-cliquez sur l’icône Start (Démarrer).
5. Cliquez sur le bouton Logiciel Discovery Tool Pro pour
exécuter le logiciel.
REMARQUE :
le même segment de réseau ou sous-réseau que
l’ordinateur sur lequel s’exécute Iomega StorCenter Pro.
6. Le logiciel Iomega Discovery Tool Pro répertorie tous
les serveurs Iomega StorCenter Pro sur votre segment
de réseau. Sélectionnez le système StorCenter Pro
à configurer dans la fenêtre Discovery, puis cliquez
sur le bouton Gérer. Reportez-vous à l’aide du
logiciel pour plus d’informations sur les options de
configuration.
7. Connexion à StorCenter Pro. Lors de la première
connexion, le nom d’utilisateur est Administrator et
le mot de passe
l’ordinateur client doit se trouver sur
ADMIN.
2
Page 3
1. Verbinden Sie den StorCenter Pro-Server mit dem
mitgelieferten Netzwerkkabel mit einem NetzwerkHub oder -Switch.
2. Schließen Sie das im Lieferumfang enthaltene
Netzkabel an der Geräterückseite und an einer
unterbrechungsfreien Stromversorgung (USV) an
3. Schalten Sie den StorCenter Pro mit dem Netzschalter
auf der Vorderseite ein
4. Legen Sie die Solutions-CD ins Laufwerk ein. Falls
das Programm nicht automatisch gestartet wird,
doppelklicken Sie auf das CD-Symbol. Doppelklicken
Sie anschließend auf Start
5. Klicken Sie auf die Schaltfläche Discovery Tool Pro
Software, um die Software zu starten
Hinweis: Der Client-Computer muss sich im selben
Subnetz oder Netzwerksegment wie das Iomega
StorCenter Pro-Gerät befinden.
6. Die Software Iomega Discovery Tool Pro listet
alle Iomega StorCenter Pro-Server in Ihrem
Netzwerksegment auf. Wählen Sie das StorCenter
Pro-Gerät, das Sie über das Discovery-Fenster
konfigurieren möchten, und klicken Sie auf die
Schaltfläche für die Verwaltung. Informationen zu
Konfigurationsoptionen finden Sie in der Hilfe der
Software.
7. Melden Sie sich beim StorCenter Pro-System an.
Wenn Sie sich das erste Mal anmelden, lautet der
Benutzername Administrator und das Passwort ist
ADMIN.
.
.
.
.
1. Utilizzare il cavo di rete incluso per collegare l’unità
StorCenter Pro Server a un hub o a uno switch di rete.
2. Collegare il cavo di alimentazione incluso alla parte
posteriore dell’unità Iomega StorCenter Pro e a un
gruppo di continuità (UPS)
3. Accendere l’unità StorCenter Pro utilizzando il
pulsante di accensione situato sul pannello anteriore
4. Inserire il CD Soluzioni. Se il CD non si avvia
automaticamente, fare doppio clic sull’icona del CD,
quindi sull’icona di Start (Avvio).
5. Fare clic sul pulsante Software Discovery Tool Pro per
eseguire il software
NOTA: il computer client deve trovarsi sulla stessa
sottorete o sullo segmento di rete dell’unità Iomega
StorCenter Pro.
6. Il software Iomega Discovery Tool Pro elencherà
tutti i server Iomega StorCenter Pro presenti sul
segmento di rete. Selezionare l’unità StorCenter Pro
da configurare nella finestra Rilevamento, quindi
fare clic sul pulsante Gestisci. Per informazioni sulle
opzioni di configurazione, fare riferimento alla guida
del software.
7. Modalità di accesso all’unità StorCenter Pro. Se si
effettua l’accesso per la prima volta, il nome utente è
Administrator e la password è
.
.
ADMIN.
.
1. Utilice el cable de red suministrado para conectar
el servidor StorCenter Pro a un concentrador o
conmutador de red.
2. Conecte el cable de alimentación suministrado a la
parte trasera de Iomega StorCenter Pro y un sistema
de alimentación ininterrumpida (UPS)
3. Encienda StorCenter Pro con el botón de encendido
del panel frontal
4. Introduzca el CD de soluciones. Si la instalación no
se inicia automáticamente, haga doble clic en el
icono del CD, a continuación, haga doble clic en el
icono Start (Iniciar).
5. Haga clic en el botón Discovery Tool Pro Software
para ejecutar el software
NOTA: el equipo cliente debe encontrarse en la
misma subred o segmento de red que Iomega
StorCenter Pro.
6. El software Iomega Discovery Tool Pro mostrará una
lista de todos los servidores de Iomega StorCenter
Pro detectados. Seleccione el dispositivo StorCenter
Pro que desea configurar en la ventana Discovery y
después haga clic en el botón Administrar. Consulte
la ayuda del software para obtener información sobre
las opciones de configuración.
7. Inicie sesión en StorCenter Pro. Si inicia sesión por
primera vez, el nombre de usuario es Administrador y
la contraseña,
.
.
ADMIN.
.
1. Use the included network cable to connect the
StorCenter Pro to a network hub or switch.
2. Conecte o cabo de alimentação que acompanha o
produto à parte traseira do Iomega StorCenter Pro e a
uma fonte de alimentação ininterrupta (UPS).
3. Ligue o StorCenter Pro usando o botão de
alimentação no painel dianteiro.
4. Insira o CD Soluções. Se o software não for
executado automaticamente, clique duas vezes no
ícone do CD Soluções e, em seguida, clique duas
vezes no ícone Iniciar.
5. Clique no botão Discovery Tool Pro Software para
executar o software.
NOTA: O computador cliente deve estar na mesma
sub-rede ou no mesmo segmento de rede que o
Iomega StorCenter Pro.
6. O software Iomega Discovery Tool Pro listará todos
os servidores Iomega StorCenter Pro encontrados.
Na janela Discovery, selecione o StorCenter Pro que
deseja configurar e, em seguida, clique no botão
Gerenciar
.
7. Efetuar login no StorCenter Pro. Se você estiver
efetuando login pela primeira vez, o nome de usuário
é Administrador e a senha é ADMIN.
3
Page 4

クイック インストール ガイド
快速安裝指南 • 빠른 설치 설명서
• 快速安裝指南
1. ネットワーク ハブまたはスイッチに StorCenter Pro
サーバを直接接続する場合は、付属のネットワー
ク ケーブルを使用します。
2.
付属の電源コードで Iomega StorCenter Pro の背面
と UPS (無停電電源装置) を接続します。
3. 前面パネルにある電源ボタンを使用し、StorCenter
Pro の電源を入れます。
4.
ソリューションズ CD を挿入してください。 ソフ
トウェアが自動的に起動されない場合は、ソリュ
ーションズ CD アイコンをダブル クリックし、[ス
タート] アイコンをダブルクリックします。”
5.
このソフトウェアを実行するには、[Discovery Tool
Pro Software] ボタンをクリックします。
注記: クライアント コンピュータは、Iomega
StorCenter Pro と同じサブネットまたはネットワー
ク セグメント上に存在している必要があります。
6. Iomega Discovery Tool Pro ソフトウェアは、検索
したすべての Iomega StorCenter Pro サーバをリ
スト表示します。[検索] ウィンドウで、設定する
StorCenter Pro を選択し、[管理] ボタンをクリック
します。
7. StorCenter Pro にログインします。初めてログオ
ンする場合は、ユーザ名は「Administrator」を使
用し、パスワードは「ADMIN」を使用してくださ
い。
1. 使用附带的网络电缆将 StorCenter Pro 服务器连接到
网络集线器或交换机。
2.
将随附的电源线连接到 Iomega StorCenter Pro 的背
面和不间断电源 (UPS
3. 使用前挡板上的电源按钮打开 StorCenter Pro。
4. 然后插入解决方案 CD。 如果该软件未自动运行,双
击解决方案 CD 图标,然后双击启动图标。
5. 单击Discovery Tool Pro 软件按钮以运行软件。
注意:客户机必须与 Iomega StorCenter Pro 位于同一
子网或网段上。
6. Iomega Discovery Tool Pro 软件将列出所有已发现的
Iomega StorCenter Pro 服务器。从 Discovery 窗口选
择要配置的 StorCenter Pro,然后单击管理按钮。如果
Iomega Discovery 未列出您的 StorCenter Pro
见故障排除。
7. 登录到 StorCenter Pro.如果您是初次登录,则用户名
为 Administrator,密码为 ADMIN。
)。
,则请参
4
Page 5

1. 使用內附的網路線將 StorCenter Pro Server 連接到網
路集線器或交換器。
2. 請將隨附的電源線連接到 Iomega StorCenter Pro 後
面,再將它連接到不斷電系統 (UPS) 插座。
3.
使用前端面板的電源按鈕來開啟 StorCenter Pro 的電
源。
4. 插入「解決方案CD」。若軟體沒有自動執行,按兩下
Solutions CD 圖示,然後再按兩下「開始」圖示。
5.
按一下 Discovery Tool Pro Software 按鈕來執行軟
體。
注意: 用戶端電腦必須與 Iomega StorCenter Pro 位在
相同的子網路或是網路區段。
6. Iomega Discovery Tool Pro Software
路區段上的所有 Iomega StorCenter Pro 伺服器。從
Discovery
後按一下「管理」按鈕。請參閱軟體說明以取得組
態選項的資訊。
7. 登入 StorCenter Pro。若您是第一次登入,使用者名稱
是 Administrator,而密碼是 ADMIN。
視窗中選取您要設定的 StorCenter Pro,然
會列出您在網
1.
동봉된 네트워크 케이블을 사용하여
Server
를 네트워크 허브 또는 스위치에 연결합니다.
2.
동봉된 전원 코드를
UPS(Uninterruptible Power Supply
다.
3.
전면 패널의 전원 단추를 사용하여
켭니다.
4.
컴퓨터를 시작하여 운영 체제가 로드될 때까지 기다
린 후
Solutions CD
으로 실행되지 않으면
누른 다음 시작 아이콘을 두 번 누르십시오.
5.
소프트웨어를 실행하려면
단추를 누릅니다.
주: 클라이언트 컴퓨터는 Iomega StorCenter Pro와
동일한 서브넷 또는 네트워크 세그먼트에 있어야 합
니다.
6.
Iomega Discovery Tool Pro 소프트웨어는 검색
된 모든
Iomega StorCenter Pro
다.
Discovery
한 후 관리 단추를 누릅니다.
StorCenter Pro
하십시오.
7. StorCenter Pro
사용자 이름은 Administrator이고 암호는
니다.
Iomega StorCenter Pro
를 넣습니다. 소프트웨어가 자동
Solutions CD
Discovery Tool Pro Software
창에서 구성할
를 찾지 못하는 경우 문제 해결을 참조
에 로그인합니다. 처음 로그인할 경우,
StorCenter Pro
)의 뒤쪽에 연결합니
StorCenter Pro
아이콘을 두 번
서버를 나열합니
StorCenter Pro
Iomega Discovery
및
를
를 선택
가
ADMIN입
5
Page 6

Hard Drive Replacement
Hot-Swappable Hard Drive Replacement
Thank you for purchasing an Iomega
increased data accessibility and ease of maintenance. To enhance your experience with your StorCenter Pro, it is very
important to become familiar with the basics of drive handling.
Always:
l Back up the StorCenter Pro
As with any computer hardware or peripheral, it is highly recommended that you back up your StorCenter Pro
regularly. A backup can be performed either directly through the SCSI port (some StorCenter Pro models) or
over a TCP/IP network.
l Use an Uninterruptible Power Supply (UPS)
To protect your StorCenter Pro against power loss and/or power surges, an external UPS device is
recommended.
l Have a spare StorCenter Pro hot-swappable hard drive available
The StorCenter Pro has been designed to allow a single hard drive to be replaced during normal operation.
As a result, Iomega recommends that you have a spare hard drive available in the event of a hard drive
failure. This will permit a faster return to normal performance speeds.
l Enable email alert notifications
The StorCenter Pro has been designed with an email alert notification system. During initial device setup,
specify the administrator’s email address and an appropriate SMTP server.
Always:
l Verify the failed hard drive number
Before removing a hard drive, verify the location of the failed drive by checking email notifications,
administration UI alerts and logs, and the status LEDs on the front of the StorCenter Pro. If an additional
functioning drive (other than the failed drive) is removed, data loss will result!
Never:
Remove more than one hard drive at a time
In RAID 1 and RAID 5 data protection modes, your Iomega StorCenter Pro can continue operating after a
single drive failure. Do NOT remove any other drives while there is a failed drive in the system or while the
replacement drive is being restored.
Insert a spare hot-swappable hard drive until the StorCenter Pro operating system shows the missing drive
When a hard drive is removed, the system may take a few minutes to recognize the removal. Do NOT insert a
replacement drive until the Iomega StorCenter Pro has recognized the drive removal. The StorCenter Pro will
notify you of a hard drive removal through a notification email, a flashing LED sequence on the front of the
StorCenter Pro, or the graphical user interface (GUI).
Interrupt the system rebuild process
After inserting the replacement drive, you MUST allow the RAID volume to restore. An active restoration is
indicated by either a flashing power/status LED in conjunction with continuous hard drive activity, or by
continuous independent hard drive activity. During this process,
power down the StorCenter Pro. This process may take many hours depending on the capacity of the RAID
volume and amount of data that is being restored.
Your Iomega StorCenter Pro has an Operating System (OS) that resides on the first drive. In addition, a mirrored copy of
the OS has been created on the second drive. Your StorCenter Pro has been configured (RAID 1) so that you can lose any
single drive, including an OS drive, and the system will remain operational.
In the event of failure of an OS drive, you do not need to shut down your system. Simply remove the failed drive from the
system and wait for the system to indicate a successful removal. Insert the replacement drive and wait for the system
®
StorCenter™ Pro appliance. Your StorCenter Pro has hot-swappable hard drives for
During Normal Operation
In the Event of a Hard Drive Failure
do NOT remove any of the hard drives or
Replacing the OS Drive
6
Page 7

to restore the OS as well as any RAID volumes that were configured on the original drive. It is very important that the
system is
NOT shutdown and that no other drives are removed until this restoration is complete. Failure to follow these
steps could result in system failure and loss of data!
For more information on all of the above items, please refer to the user’s manual located on the Solutions CD.
Recovering the StorCenter Pro from the Recovery DVD
CAUTION! This utility will restore the StorCenter Pro to its original factory state. All data may be lost! Make sure your data
is backed up before proceeding.
1. Connect a monitor, USB keyboard, and a USB DVD drive to the Iomega StorCenter Pro.
2. Insert the StorCenter Pro Recovery disc into the DVD drive and boot the StorCenter Pro from the recovery DVD.
3. The StorCenter Pro Recovery utility will run automatically. Follow the on-screen instructions.
4. Allow the StorCenter Pro to finish the automated rebuild process. The StorCenter Pro will restart several times during
this process. Do NOT disturb or shutdown the StorCenter Pro during this process. The StorCenter Pro will shutdown
automatically when the rebuild is complete.
Remplacement du disque dur • Ersetzen von Festplatten •
Rimontaggio dell’azionamento duro •
disco duro • Substituição do disco rígido
Reemplazo de la unidad de
• Hard Drive の交換 •
硬盘替换 • 硬碟替換 • 하드드라이브 보충
Visitez www.iomega.com pour plus d’informations sur le remplacement du disque dur de votre serveur StorCenter Pro.
Weitere Informationen zum Ersetzen von Festplatten im StorCenter Pro finden Sie unter: www.iomega.com.
Visiti www.iomega.com per le più informazioni sul rimontaggio dell’azionamento duro.
Para obtener más información sobre cómo reemplazar su unidad de disco duro de StorCenter Pro, visite www.iomega.com.
Visite www.iomega.com para obter mais informações sobre a substituição do disco rígido do StorCenter Pro.
StorCenter Pro Hard Drive の交換の詳細は www.iomega.com をご覧ください。
请访问 www.iomega.com 以获得有关更换 StorCenter Pro 硬盘驱动器的详细信息。
請訪問 www.iomega.com 以獲得有關更換 StorCenter Pro 硬碟驅動器的詳細資訊。
StorCenter Pro 하드 드라이브 교체에 대한 자세한 내용을 보려면 www.iomega.com을 방문하십시오.
7
Page 8

Troubleshooting
Enabling eTrust
The StorCenter Pro ships with a full version of Computer Associates eTrust Antivirus software preinstalled; however, the
software is disabled by default. As with other third-party applications, enabling eTrust may degrade system performance.
To enable the eTrust software:
1. Log into the StorCenter Pro as an administrator using Terminal Services.
2. Right-click on the eTrust icon
3. Select either the Monitor Outgoing Files Only or Monitor Outgoing and Incoming Files.
NOTE! See the eTrust Help System for more information on configuring eTrust.
Updating the StorCenter Pro
Iomega does NOT recommend the installation of Microsoft Service Packs on the StorCenter Pro. Installing Service Packs
may impact the performance of the StorCenter Pro and may prevent the StorCenter Pro from starting up.
We recommend that each Critical Update and Security Patch be evaluated on a case-by-case basis as needed for your
network environment. These updates and patches are tested by Microsoft and should be supported by the StorCenter Pro.
Iomega strongly recommends that you
Pro before performing any software installation or update.
the StorCenter Pro and installing through Terminal Services.
information and recommendations on installing updates.
Iomega will test and provide any necessary patches and updates to our customers on a periodic basis. Please check the
Iomega website for a list of current updates.
The Power LED Indicates that the StorCenter Pro is Booting for More than 10 Minutes
After powering on the StorCenter Pro, check the Power LED to make sure that the StorCenter Pro has completed the boot
process and is running properly. If the power LED light indicates that the StorCenter Pro is booting
LED is off for an extended period of time (over 10 minutes), the Iomega StorCenter Pro unit is not booting up properly.
Please visit
CAUTION! Do not perform any troubleshooting or make any modifications to the StorCenter Pro unit before contacting
Iomega for support.
www.iomega.com
for further help with this issue.
in the Task Bar.
back up your data and shut down any running applications on your StorCenter
Iomega also recommends loading any required files to
Please see the Microsoft Updates website for additional
and the Drive Activity
Iomega Discovery Tool Pro does not find the StorCenter Pro
1. Make sure that the Iomega StorCenter Pro has started up (Check the Power LED to make sure that the StorCenter
Pro has completed the boot process and is running properly).
2. Make sure the StorCenter Pro is on the same subnet or network segment as the computer running the Iomega
Discovery Tool Pro utility.
3. See the user’s manual included on the Solutions CD for more Troubleshooting steps.
Using Remote Desktop Connection
Microsoft Remote Desktop Connection (also known as Terminal Services) allows you to log onto and configure your
Iomega StorCenter Pro. Remote Desktop Connection allows you to log into the StorCenter Pro as if you were actually
sitting at the keyboard. There are two ways to use Terminal Services:
• Use the web-based administration tool. When you manage your StorCenter Pro via the Iomega Discovery Tool
Pro software, you will be connected to the web-based administration tool. The web-based tool runs in a browser
window. web-based Terminal Services requires Microsoft Internet Explorer and ActiveX on a Windows PC.
• Use the Remote Desktop Connection application built-in to Microsoft Windows XP (Start
Accessories
application from www.microsoft.com. Remote Desktop Connection is also available for Mac OS X.
l Communications l Remote Desktop Connection). Download the Remote Desktop Connection
l All Programs l
8
Page 9

Dépannage
Activation de eTrust
StorCenter Pro est expédié avec une version pré-installée complète du logiciel Computer Associates eTrust Antivirus.
Cependant, par défaut le logiciel est désactivé. Comme avec toute autre application tierce, l’activation de eTrust peut
affaiblir les performances du système.
Pour activer le logiciel eTrust :
1. Connectez-vous en tant qu’administrateur au système StorCenter Pro à l’aide des services Terminal.
2. Cliquez avec le bouton droit sur l’icône eTrust
3. Sélectionnez Monitor Outgoing Files Only (Contrôler les fichiers sortants uniquement ) ou Monitor Outgoing and
Incoming Files (Contrôler les fichiers entrants et sortants).
REMARQUE : Consultez le système d’aide eTrust pour plus d’informations sur la configuration de eTrust.
Mise à jour de StorCenter Pro
Iomega ne recommande PAS l’installation de Microsoft Service Packs sur StorCenter Pro. L’installation de Service Packs
peut affecter les performances de StorCenter Pro et peut empêcher celui-ci de démarrer.
Nous recommandons d’évaluer spécifiquement au cas par cas la nécessité de chaque mise à jour cruciale et de correctif
de sécurité au sein de votre environnement réseau. Ces mises à jour et correctifs sont testés par Microsoft et devraient
être pris en charge par StorCenter Pro.
Iomega vous recommande fortement de sauvegarder vos données et de fermer toute application en cours d’exécution
sur StorCenter Pro avant d’installer un logiciel ou de procéder à une mise à jour. Iomega vous recommande également
de charger tous les fichiers requis sur StorCenter Pro et de procéder à l’installation via les services Terminal. Pour plus
d’informations et des instructions d’installation des mises à jour, visitez le site Web des mises à jour Microsoft.
Iomega teste et fournit tous les correctifs et toutes les mises à jour nécessaires à ses clients régulièrement. Visitez le site
Web Iomega pour obtenir la liste des mises à jour actuelles.
Le voyant d’alimentation indique que StorCenter Pro effectue l’amorçage pendant plus de 10 minutes
Après la mise sous tension de StorCenter Pro, vérifiez le voyant d’alimentation pour vous assurer que StorCenter Pro a
terminé le processus d’amorçage et fonctionne correctement. Si le voyant d’alimentation indique que StorCenter Pro est
en phase d’amorçage
signifie que l’unité Iomega StorCenter Pro ne s’amorce pas correctement.
Visitez le site www.iomega.com pour obtenir plus d’informations sur ce problème.
ATTENTION ! N’effectuez aucun dépannage ni aucune modification sur l’unité StorCenter Pro avant de nous avoir
contactés pour obtenir de l’aide.
et que le voyant d’activité du lecteur est éteint pendant un certain temps (10 minutes ou plus), cela
dans la barre des tâches.
Iomega Discovery Tool Pro ne trouve pas StorCenter Pro
1. Vérifiez que Iomega StorCenter Pro a démarré (vérifiez la LED d’alimentation pour vous assurer que StorCenter Pro
a terminé le processus d’amorçage et fonctionne correctement).
2. Assurez-vous que Iomega StorCenter Pro se trouve sur le même segment de réseau ou sous-réseau que
l’ordinateur sur lequel s’exécute Iomega Discovery Tool Pro.
3. Consultez le guide de l’utilisateur sur le CD Solutions pour obtenir des informations sur la procédure de dépannage.
Utilisation des services Terminal
L’application Connexion bureau à distance de Microsoft (ou Terminal Services) vous permet de vous connecter à votre
système Iomega StorCenter Pro et de le configurer. L’application Connexion bureau à distance vous permet de vous
connecter au système StorCenter Pro comme si vous vous trouviez en face de l’ordinateur. Il est possible d’utiliser les
services Terminal de deux manières :
• Utilisez l’outil d’administration Web. Lors de la gestion de votre système StorCenter Pro via le logiciel Iomega
Discovery Tool Pro, vous serez connecté à l’outil d’administration Web. L’outil Web s’exécute dans une fenêtre du
navigateur. Les services Web Terminal Services nécessitent Microsoft Internet Explorer et ActiveX sur PC Windows.
• Utilisez l’application Connexion Bureau à distance intégrée à Microsoft Windows XP (Démarrer
programmes
l’application Connexion Bureau à distance à partir du site www.microsoft.com. La connexion bureau à distance est
également disponible pour Mac OS X.
l Accessoires l Communications l Connexion Bureau à distance). Vous pouvez télécharger
l Tous les
9
Page 10

Fehlerbehebung
Aktivieren von eTrust
Die StorCenter Pro-Appliance wird mit einer bereits installierten Vollversion der Software eTrust Antivirus von Computer
Associates geliefert. Dies ist jedoch standardmäßig nicht aktiviert. Das Aktivieren von eTrust kann, wie andere
Anwendungen von Drittanbietern, die Performance des Systems verringern.
So aktivieren Sie die Software eTrust:
1. Melden Sie sich mithilfe des Terminaldienstes als Administrator beim StorCenter Pro-System an.
2. Klicken Sie mit der rechten Maustaste auf das eTrust-Symbol
3. Wählen Sie entweder Monitor Outgoing Files Only (Nur ausgehende Dateien überwachen) oder Monitor Outgoing
and Incoming Files (Ein- und ausgehende Dateien überwachen).
HINWEIS: Weitere Informationen zum Konfigurieren von eTrust finden Sie im eTrust-Hilfesystem.
Aktualisieren der StorCenter Pro-Appliance
Eine Installation der Microsoft Service Packs auf der StorCenter Pro-Appliance wird von Iomega
das Installieren der Service Packs wird möglicherweise die Performance des StorCenter Pro-Systems beeinträchtigt und
das Gerät am Hochfahren gehindert.
Wir raten Ihnen daher, jedes wichtige Update und jeden Sicherheits-Patch von Fall zu Fall für Ihre Netzwerkumgebung
zu prüfen. Diese Updates (Aktualisierungen) und Patches sind von Microsoft erprobt und werden normalerweise vom
StorCenter Pro-System unterstützt.
Bevor Sie eine Software installieren oder eine Aktualisierung durchführen, sollten Sie unbedingt Ihre Daten sichern und
alle auf dem StorCenter Pro-System laufenden Anwendungen beenden. Außerdem empfiehlt es sich, alle benötigten
Dateien auf das StorCenter Pro-System zu laden und über Terminaldienste zu installieren. Weitere Informationen und
Empfehlungen für die Installation der Aktualisierungen finden Sie auf der Microsoft Update-Website.
Bei Iomega werden regelmäßig sämtliche erforderlichen Patches und Updates getestet und den Kunden bereitgestellt.
Überprüfen Sie die Iomega Webseite auf aktuelle Updates.
Strom-LED zeigt an, dass das StorCenter Pro-Gerät seit über 10 Minuten bootet
Überprüfen Sie nach dem Einschalten des Geräts anhand der Strom-LED, ob das StorCenter Pro-System den Bootvorgang
abgeschlossen hat und einwandfrei läuft. Wenn die Strom-LED anzeigt, dass das StorCenter Pro-System bootet, und die
LED für die Laufwerksaktivität längere Zeit (mehr als 10 Minuten) nicht leuchtet, fährt das Gerät ordnungsgemäß hoch.
Weitere Hilfe zu diesem Thema erhalten Sie unter www.iomega.com
ACHTUNG! Versuchen Sie nicht, die Fehler zu beheben oder Änderungen am StorCenter Pro-Gerät vorzunehmen, bevor
Sie sich an unseren Kundendienst gewandt haben.
in der Taskleiste.
NICHT empfohlen. Durch
.
Iomega Discovery Tool Pro findet StorCenter Pro nicht
1. Vergewissern Sie sich, dass Iomega StorCenter Pro hochgefahren ist (Strom-LED zeigt an, wenn StorCenter Pro den
Bootvorgang abgeschlossen hat und einwandfrei läuft).
2. Stellen Sie sicher, dass sich das Gerät im selben Subnetz oder Netzwerksegment befindet wie der Computer, auf
dem das Dienstprogramm Iomega Discovery Tool Pro ausgeführt wird.
3.
Lesen Sie im Benutzerhandbuch auf der Lösungs-CD nach, um weitere Anweisungen zur Fehlerbehebung zu erhalten.
Terminaldienste
Mit der Microsoft Remotedesktopverbindung (auch bekannt als Terminaldienste) können Sie sich bei Ihrem
Iomega StorCenter Pro-System anmelden und dieses konfigurieren. Außerdem ermöglicht es Ihnen die
Remotedesktopverbindung, sich beim StorCenter Pro-System anzumelden, als würden Sie tatsächlich dort an der
Tastatur sitzen. Es gibt zwei Möglichkeiten, die Terminaldienste zu verwenden:
• Verwenden Sie das webbasierte Verwaltungstool. Beim Verwalten Ihres StorCenter Pro-Systems über die Software
Iomega Discovery Tool Pro werden Sie mit dem webbasierten Verwaltungstool verbunden. Das webbasierte Tool
startet in einem Browserfenster. Für die webbasierten Terminaldienste unter Windows sind der Microsoft Internet
Explorer und ActiveX erforderlich.
• Verwenden Sie die Anwendung für die Remotedesktopverbindung in Microsoft Windows XP (Start l Programme l
l Kommunikation l Remotedesktopverbindung). Laden Sie die Anwendung für die Remotedesktopverbindung
Zubehör
von der Website www.microsoft.com herunter. Die Remotedesktopverbindung ist auch für Mac OS X erhältlich.
10
Page 11

Risoluzione dei problemi
Abilitazione di eTrust
L’unità StorCenter Pro viene fornita dotata di una versione completa del software Computer Associates eTrust Antivirus
preinstallata; per impostazione predefinita, tuttavia, il software non è abilitato. Come nel caso di applicazioni di altri
fornitori, l’abilitazione di eTrust può ridurre le prestazioni del sistema.
Per abilitare il software eTrust:
1. Accedere all’unità StorCenter Pro come amministratore utilizzando Servizi terminal.
2. Fare clic con il pulsante destro del mouse sull’icona eTrust
3. Selezionare Monitor Outgoing Files Only (Monitora solo file in uscita) o Monitor Outgoing and Incoming Files
(Monitora file in uscita e in entrata)
NOTA:
Aggiornamento del software dell’unità Iomega StorCenter Pro
Iomega SCONSIGLIA l’installazione di Service Pack Microsoft nelle unità Iomega StorCenter Pro. Tale installazione può
infatti incidere sulle prestazioni dell’unità.
Consiglia pertanto di eseguirne una valutazione caso per caso, basandosi sulle esigenze dell’ambiente di rete utilizzato.
Gli aggiornamenti e le patch sono testati da Microsoft e devono essere supportati dall’unità Iomega StorCenter Pro.
Iomega consiglia vivamente di effettuare il backup dei dati e di chiudere eventuali applicazioni in esecuzione sull’unità
Iomega StorCenter Pro prima di installare nuovo software o aggiornamenti. Consiglia inoltre di caricare i file richiesti
sull’unità StorCenter Pro e di installarli utilizzando i servizi terminal. Per ulteriori informazioni e suggerimenti
sull’installazione di aggiornamenti, visitare il sito Web Microsoft Update.
Iomega testerà e fornirà le patch e gli aggiornamenti necessari ai propri clienti regolarmente. Per un elenco degli attuali
aggiornamenti, visitare il sito Web Iomega.
Il LED di alimentazione indica che l’unità StorCenter Pro sta tentando di avviarsi da più di 10 minuti
Dopo avere acceso l’unità StorCenter Pro, controllare il LED dell’alimentazione in modo da accertarsi che l’unità abbia
completato il processo di avvio e che funzioni correttamente. Se la spia dell’alimentazione indica che l’unità StorCenter
Pro si sta avviando
che l’unità non si sta avviando correttamente.
Per ulteriore assistenza relativamente a questo problema, visitare il sito Web www.iomega.com.
ATTENZIONE! Non eseguire operazioni di risoluzione dei problemi o interventi di modifica dell’unità Iomega StorCenter
Pro prima di rivolgersi al supporto tecnico.
per ulteriori informazioni sulla configurazione di eTrust, consultare l’apposita guida.
e il LED di attività dell’unità è spento da un periodo di tempo prolungato (oltre 10 minuti), significa
.
nella barra delle applicazioni.
Iomega Discovery Tool Pro non rileva l’unità Iomega StorCenter Pro
1. Accertarsi che l’unità Iomega StorCenter Pro sia stata avviata (controllare il LED dell’alimentazione in modo da
accertarsi che l’unità abbia completato il processo di avvio e che funzioni correttamente).
2. Verificare che l’unità Iomega StorCenter Pro si trovi sulla stessa sottorete o sullo stesso segmento di rete del
computer in cui viene eseguita la utility Iomega Discovery Tool Pro.
3. Veda il manuale dell’utente incluso sul CD Soluzioni per più punti d’analisi guasti.
Configurazione dell’unità Iomega StorCenter Pro con i servizi terminal
La connessione desktop remoto Microsoft (nota anche come servizi Terminal) consente di accedere all’unità Iomega
StorCenter Pro e di configurarla. La connessione desktop remoto consente di accedere all’unità StorCenter Pro come si ci
si trovasse seduti davanti alla tastiera. Esistono due modi di utilizzare i servizi Terminal:
• Utilizzare lo strumento di amministrazione basato su web. Quando si gestisce l’unità StorCenter Pro tramite il
software Iomega Discovery Tool Pro, si verrà connessi allo strumenti di amministrazione basato sul web. Tale
strumento viene eseguito nella finestra del browser. I servizi Terminal basati su web richiedono Microsoft Internet
Explorer e ActiveX su un PC Windows.
• Utilizzare l’applicazione Connessione desktop remoto integrata in Microsoft Windows XP (Inicio
los programas
Connessione desktop remoto da www.microsoft.com. L’applicazione è disponibile anche per Mac OS X.
l Accesorios l Comunicaciones l Conexión a escritorio remoto). Scaricare l’applicazione
l Todos
11
Page 12

Solución de problemas
Activar eTrust
El StorCenter Pro se envía con una versión completa del software Computer Associates eTrust Antivirus preinstalado; sin
embargo, el software está desactivado por defecto. Como ocurre con otras aplicaciones de terceros, activar eTrust puede
perjudicar el rendimiento del sistema.
Para activar el software eTrust:
1. Inicie sesión en StorCenter Pro como administrador utilizando servicios de terminal.
2. Haga clic con el botón derecho en el icono de eTrust
3. Seleccione Monitor Outgoing Files Only (Controlar archivos salientes sólo) o Monitor Outgoing and Incoming Files
(Controlar archivos salientes y entrantes).
NOTA: Consulte el sistema de ayuda de eTrust para obtener más información sobre cómo configurar eTrust.
Actualizar StorCenter Pro
Iomega
NO recomienda la instalación de Microsoft Service Packs en StorCenter Pro. La instalación de Service Packs
puede tener un efecto sobre el funcionamiento de StorCenter Pro e impedir que éste arranque.
Le recomendamos que evalúe cada actualización vital y parche de seguridad de manera específica y de forma exhaustiva
en función de las necesidades de su entorno de red. Microsoft comprueba estas actualizaciones y parches que deberían
ser admitidos por StorCenter Pro.
Iomega recomienda encarecidamente que realice copias de seguridad de los datos y apague cualquier aplicación que se esté
ejecutando en StorCenter Pro antes de realizar una instalación o actualización de software. Asimismo recomienda que cargue
los archivos requeridos en StorCenter Pro y que se instalen a través de los servicios de terminal. Consulte el sitio Web de
actualizaciones de Microsoft si desea conocer información adicional y recomendaciones sobre cómo instalar las actualizaciones.
Iomega comprueba y proporciona todos los parches y actualizaciones necesarios para nuestros clientes de forma
periódica. Consulte el sitio Web de Iomega para obtener una lista de las actualizaciones disponibles.
El indicador de alimentación muestra que el proceso de arranque de StorCenter Pro supera los 10 minutos
Después de encender Iomega StorCenter Pro, compruebe el indicador de alimentación para garantizar que el proceso
de arranque del dispositivo se ha completado correctamente y que éste funciona sin problemas. Si el indicador de
alimentación muestra que StorCenter Pro se está arrancando y el indicador de actividad de la unidad está apagado
durante un largo período de tiempo (más de 10 minutos), Iomega StorCenter Pro no se está iniciando adecuadamente.
Consulte www.iomega.com para obtener más ayuda sobre este asunto.
¡PRECAUCIÓN! No realice ninguna acción de solución de problemas ni modificación alguna a la unidad de StorCenter Pro
antes de solicitar nuestra asistencia.
en la barra de tareas.
Discovery Tool Pro de Iomega no encuentra StorCenter Pro
1. Confirme que Iomega StorCenter Pro se ha iniciado; compruebe el indicador de alimentación para garantizar que el
proceso de arranque del dispositivo se ha completado correctamente y que éste funciona sin problemas.
2. Asegúrese de que Iomega StorCenter Pro está en la misma subred o segmento de red que el equipo en el que se
ejecuta la utilidad Iomega Discovery Tool Pro. Si no está seguro, póngase en contacto con nuestro administrador.
3. Consulte el manual del usuario que se incluye en el CD de Soluciones para obtener más información sobre los
pasos de las acciones de solución de problemas.
Utilización de servicios de terminales
La función de conexión a escritorio remoto de Microsoft (también conocida como servicios de terminal) le permite
iniciar sesión y configurar Iomega StorCenter Pro. La función de conexión a escritorio remoto permite iniciar sesión en
StorCenter Pro como si estuviera utilizando el teclado del equipo. Hay dos formas de utilizar los Servicios de terminal:
• Uso de la herramienta de administración basada en Web. Cuando gestiona StorCenter Pro mediante el software de
Iomega Discovery Tool Pro, podrá conectarse a la herramienta de administración basada en Web. La herramienta
basada en Web se ejecuta en una ventana del explorador. Los servicios de terminal basados en Web requieren
Microsoft Internet Explorer y ActiveX en un PC compatible con Windows.
• Utilice la aplicación de conexión a escritorio remoto en Microsoft Windows XP (Inicio
Accesorios
remoto en www.microsoft.com. La función de conexión a escritorio remoto está también disponible para Mac OS X.
l Comunicaciones l Conexión a escritorio remoto). Descargue la aplicación de conexión a escritorio
l Todos los programas l
12
Page 13

Solução de problemas
Ativação do eTrust
O StorCenter Pro é enviado com uma versão completa pré-instalada do software antivírus Computer Associates eTrust;
no entanto, o software está desativado por padrão. Como acontece com outros aplicativos de terceiros, a ativação do
eTrust pode prejudicar o desempenho do sistema.
Para ativar o software eTrust:
1. Faça login no StorCenter Pro como administrador usando a ferramenta Terminal Services.
2. Clique com o botão direito do mouse no ícone do eTrust
3. Selecione Monitor Outgoing Files Only ou Monitor Outgoing and Incoming Files
NOTA! Consulte o sistema de ajuda do eTrust para obter mais informações sobre a configuração do eTrust.
Atualização do StorCenter Pro
A Iomega
NÃO recomenda a instalação dos Service Packs da Microsoft no StorCenter Pro. A instalação dos Service Packs
pode ter um impacto sobre o desempenho do StorCenter Pro e pode impedir sua inicialização.
Recomendamos que cada Atualização crítica e Arquivo de correção de segurança sejam avaliados caso a caso conforme
necessário para o ambiente de rede. Essas atualizações e arquivos de correção são testados pela Microsoft e devem ser
compatíveis com o StorCenter Pro.
A Iomega recomenda que você faça um backup dos seus dados e encerre quaisquer aplicativos que estejam em funcionamento
no StorCenter Pro antes de executar qualquer instalação de software ou atualização. A Iomega também recomenda que você
carregue quaisquer arquivos necessários ao StorCenter Pro e instale-os através da ferramenta Terminal Services. Consulte o site
Microsoft Updates para obter informações adicionais e recomendações sobre como instalar atualizações.
A Iomega testará e fornecerá quaisquer arquivos de correção e atualizações necessários para seus clientes
periodicamente. Consulte o site da Iomega para obter uma lista de novas atualizações.
O LED de alimentação indica que o StorCenter Pro está inicializando há mais de 10 minutos
Após ligar o StorCenter Pro, verifique o LED de alimentação para certificar-se de que o StorCenter Pro tenha concluído
o processo de inicialização e esteja sendo executado corretamente. Se a luz do LED de alimentação indicar que o
StorCenter Pro está inicializando
10 minutos), a unidade Iomega StorCenter Pro não está inicializando corretamente.
Visite o site www.iomega.com para obter ajuda adicional sobre esse assunto.
CUIDADO! Não tente solucionar nenhum problema ou fazer modificações na unidade StorCenter Pro antes de entrar em
contato com o suporte.
e o LED de atividade da unidade estiver apagado por um período prolongado (mais de
na barra de tarefas.
.
A ferramenta Iomega Discovery Pro não encontra o StorCenter Pro
1. Certifique-se de que o Iomega StorCenter Pro tenha sido inicializado (Verifique o LED de alimentação para certificarse de que o StorCenter Pro tenha concluído o processo de inicialização e esteja sendo executado corretamente).
2. Certifique-se de que o Iomega StorCenter Pro esteja na mesma sub-rede ou no mesmo segmento de rede do
computador que executa o utilitário da ferramenta Iomega Discovery Pro.
3. Consulte o manual do usuário incluído no CD Soluções para mais opções de solução de problemas.
Utilização do Terminal Services
A Conexão remota da área de trabalho da Microsoft (também conhecido como Terminal Services) permite o login e a
configuração do Iomega StorCenter Pro. A Conexão remota da área de trabalho possibilita que você efetue login no
StorCenter Pro como se estivesse sentado na frente do teclado. Há duas maneiras de utilizar a ferramenta Terminal
Services:
• Utilização da ferramenta de administração baseada na Web. Ao gerenciar o StorCenter Pro por meio do software
Iomega Discovery Tool Pro, você estará conectado à ferramenta de administração baseada na Web. Essa
ferramenta é executada na janela de um navegador da Web. O Terminal Services baseado na Web requer Microsoft
Internet Explorer e ActiveX em um PC Windows.
• Utilização do aplicativo Remote Desktop Connection incluído no Microsoft Windows XP (Iniciar
Programas
aplicativo Remote Desktop Connection no site www.microsoft.com. A Conexão remota da área de trabalho também
está disponível para Mac OS X.
l Acessórios l Comunicações l Conexão de área de trabalho remota). Faça o download do
l Todos os
13
Page 14

トラブルシューティング
eTrust
の有効化
StorCenter Pro は、Computer Associates eTrust アンチウィルス ソフトウェアがあらかじめインストールされた状態
で出荷されますが、デフォルトでは、このソフトウェアが無効になっています。他のサードパーティ アプリケーシ
ョンの場合と同様、eTrust を有効にすると、システムパフォーマンスが低下することがあります。
eTrust ソフトウェアを有効化する手順:
1. ターミナル サービスを使用して、管理者として StorCenter Pro にログインします。
2. タスク バーの eTrust
3. Monitor Outgoing Files Only (送信ファイルだけを監視) または Monitor Outgoing and Incoming Files (送受信フ
ァイルを監視) のどちらかを選択します。
注記!eTrust の設定に関する詳細については、eTrust ヘルプ システムを参照してください。
アイコンを右クリックします。
StorCenter Pro
StorCenter Pro に Microsoft Service Pack をインストールすることはお勧めしません。Service Pack をインストールす
ると、StorCenter Pro のパフォーマンスに影響し、StorCenter Pro が起動しなくなることがあります。
重要な更新とサービス パッチは、ネットワーク環境における必要性に応じて個別に評価することをお勧めします。
更新とパッチは、Microsoft でテストされており、StorCenter Pro でサポートされています。
ソフトウェアのインストールと更新を実行する前に、データをバックアップし、実行中のアプリケーションを終了
することを強くお勧めします。また、StorCenter Pro に必要なファイルはすべてロードし、ターミナル サービスを
使用してインストールすることも合わせてお勧めします。更新プログラムのインストールに関するその他の情報と
推奨事項については、Microsoft Updates の Web サイトを参照してください。
Iomega では、必要なパッチと更新プログラムを定期的にテストし、提供しています。Iomega の Web サイトで、現
在の更新プログラムを確認してください。
電源 LED が、StorCenter Pro の起動に 10 分以上かかることを示している
Iomega StorCenter Pro の電源を入れた後に、電源 LED を点検して、StorCenter Pro が起動処理を完了し、正しく動
作しているか確認します。電源 LED ランプが、StorCenter Pro が起動中で、同時にドライブ動作 LED が長時間点灯
しない場合 (
この問題の詳細については、www.iomega.com にアクセスしてください。
注意!サポートにご連絡いただく前に、StorCenter Pro ユニットのトラブルシューティングや変更などを行わないで
ください。
Iomega Discovery Tool Pro
1. Iomega StorCenter Pro が起動したか確認します (電源 LED を点検して、StorCenter Pro が起動処理を完了
2. Iomega StorCenter Pro が、Iomega Discovery Tool Pro ユーティリティを実行しているコンピュータと同じサブ
3. トラブルシューティングの詳細な手順については、ソリューションズ
の更新
10 分以上) は、Iomega StorCenter Pro ユニットが正しく起動していません。
が StorCenter Pro を検出しない
し、正しく動作しているか確認します)。
ネットまたはネットワーク セグメントにあることを確認します。詳細が分からない場合は、ネットワーク管
理者にお問い合わせください。
CD に収録されているユーザーズ マニ
ュアルを参照してください。
ターミナル サービスの使用
Microsoft リモート デスクトップ接続 (別名ターミナル サービス) を使用すると、Iomega StorCenter Pro にログオ
ンして設定できます。リモート デスクトップ接続により、まるで実際にキーボードで操作しているかのように
StorCenter Pro にログインできます。ターミナル サービスは、次の
• Web ベースの管理ツールを使用します。Iomega Discovery Tool Pro ソフトウェアを使用して StorCenter Pro を
管理すると、Web ベースの管理ツールに接続します。Web ベースの管理ツールは、ブラウザ ウィンドウで実
行されます。Web ベースのターミナル サービスを使用するには、Windows PC に Microsoft Internet Explorer
と ActiveX が必要です。
• Microsoft Windows XP に組み込まれているリモート デスクトップ接続アプリケーションを使用してください
(スタート l すべてのプログラム l アクセサリ l 通信 l リモート デスクトップ接続) www.microsoft.com
からリモート デスクトップ接続アプリケーションをダウンロードします。Mac OS X 用のリモート デスクト
ップ接続もあります。
2 つの方法で使用します。
14
Page 15

故障排除
启用 eTrust
StorCenter Pro 附带了预安装的完整版 Computer Associates eTrust Antivirus 软件,但是该软件默认情况下是被禁用的。
与其他第三方应用程序一样,启用 eTrust 可能会降低系统性能。
要启用 eTrust 软件:
1.
以管理员身份使用“终端服务”登录 StorCenter Pro。
2.
右键单击任务栏中的 eTrust 图标。
3.
选择Monitor Outgoing Files Only“仅监视输出文件”或Monitor Outgoing and Incoming Files“监视输出和输入文
件”。
注意!有关配置 eTrust 的详细信息,请参见 eTrust 帮助系统。
更新 StorCenter Pro
Iomega 不推荐在 StorCenter Pro 上安装 Microsoft Service Pack
并可能使 StorCenter Pro 无法启动。
我们建议,如果网络环境的需要请根据具体情况判断是否需要安装各“关键更新”和“安全补丁”。这些更新和补丁程序经
过了 Microsoft 的测试并受 StorCenter Pro 支持。.
Iomega 强烈建议您在进行任何软件安装和更新前备份数据并关闭 StorCenter Pro 上运行的所有应用程序。另
外,Iomega 建议将所有需要的文件加载至 StorCenter Pro 并通过“终端服务”进行安装。有关安装更新程序的其他信息和
建议,请查看 Microsoft Updates 网站。
Iomega 将定期测试并向客户提供所有必要的补丁和更新程序。有关当前更新程序的列表,请查看 Iomega 网站。
电源 LED 指示 StorCenter Pro 的引导时间已超过了 10 分钟
在启动 StorCenter Pro 后,检查电源 LED 以确保 StorCenter Pro 已完成引导过程,并且目前运行正常。如果电源 LED 灯
指示 StorCenter Pro 正在引导,并且”驱动器活动”LED 指示灯很长时间(超过 10 分钟)一直不亮,则 Iomega StorCenter Pro
设备没有成功完成引导。
要获得有关此问题的更多帮助,请访问 www.iomega.com。
警告!与我们联系获取帮助前,请勿执行任何故障排除操作或对 StorCenter Pro 设备进行任何修改。
。安装 Service Pack 可能会影响 StorCenter Pro 的性能
Iomega Discovery Tool Pro
1. 确保 Iomega StorCenter Pro 已启动(请检查电源 LED,确保 StorCenter Pro 已完成引导过程且目前运行正常)。
2. 确保 Iomega StorCenter Pro 与运行 Iomega Discovery Tool Pro 实用程序的计算机位于相同的子网或网段中。
3. 有关更多“故障排除”步骤,请参见《解决方案光盘》上包括的用户手册。.
使用终端服务
使用 Microsoft 远程桌面连接(也就是所谓的”终端服务”),可登录和配置 Iomega StorCenter Pro。远程桌面连接允许您登
录到 StorCenter Pro,如同直接通过键盘操作一样。有两种使用”终端服务”的方式:
• 使用基于 web 的管理工具。当通过 Iomega Discovery Tool Pro 软件管理 StorCenter Pro 时,您将连接到基于
Web 的管理工具。基于 Web 的工具在浏览器窗口运行。基于 Web 的”终端服务”要求在 Windows PC 机上安装
Microsoft Internet Explorer 和 ActiveX
• 使用 Microsoft Windows XP 中内置的”远程桌面连接”应用程序(开始 l 程序 l 附件 l 通讯 l 远程桌面连
接)。从www.microsoft.com下载”远程桌面连接”应用程序。远程桌面连接也可用于 Mac OS X。
未找到 StorCenter Pro
。
15
Page 16

疑難排解
啟用 eTrust
StorCenter Pro 出廠時已預先安裝完整版本的 Computer Associates eTrust Antivirus 軟體;但是,軟體依預設為停用。若與
其他協力廠商的應用程式使用,啟用 eTrust 可能會使系統效能降低。
若要啟用 eTrust 軟體:
1.
使用終端機服務以系統管理員身份登入 StorCenter Pro。
2.
以滑鼠右鍵按一下工作列中的 eTrust 圖示。
3. 選擇「僅監視外寄檔案」或是「監視外寄和內送檔案」。
注意:請參閱 eTrust 說明系統以取得更多關於設定 eTrust 的資訊。
更新 StorCenter Pro 軟體
Iomega 不建議在 Iomega StorCenter Pro 上安裝 Microsoft Service Pack
StorCenter Pro 的效能。
若您的網路環境需要的話,我們建議以個案的方式評估每一個「重大更新」與「安全修正程式」。這些更新與修正程式
經過 Microsoft 測試,Iomega StorCenter Pro 應該支援。
在安裝任何軟體或更新程式之前,Iomega 強烈建議您備份您的資料並關閉任何在 Iomega StorCenter Pro 中執行的應
用程式。Iomega 同時建議您載入任何需要的檔案到 StorCenter Pro,並透過「終端機服務」安裝。請參閱 Microsoft
Updates 網站取得其他安裝更新程式的資訊與建議。
Iomega 會定期測試並提供任何需要的修正程式與更新給我們的客戶。請查詢 Iomega 網站取得目前更新的清單。
電源 LED 表示 StorCenter Pro 已開機超過 10 分鐘
開啟 StorCenter Pro 電源之後,請檢查電源 LED 以確定 StorCenter Pro 已完成開機程序且已正常執行。若電源 LED 指
出 StorCenter Pro 正在開機,且 磁碟機指示 LED 已熄滅超過一段時間 (十分鐘),表示 Iomega StorCenter Pro 裝置沒有正
常開機。
請造訪 www.iomega.com 取得這個問題的進一步說明。
注意!在與我們聯絡取得支援之前,不要執行任何疑難排解或是修改 Iomega StorCenter Pro 機器。
。安裝 Service Pack 可能會影響 Iomega
Iomega Discovery Tool Pro
1. 確定 Iomega StorCenter Pro 已開啟 (檢查電源 LED 確定 StorCenter Pro 已完成開機程序,並已經正常執行)。
2. 確認
3. 有关更多“故障排除”步骤,请参见《解决方案光盘》上包括的用户手册。.
使用「遠端桌面連線」設定 Iomega StorCenter Pro
Microsoft 遠端桌面連線 (也稱作「終端機服務」) 能讓您登入並設定 Iomega StorCenter Pro。「遠端桌面連線」能讓您
像是坐在電腦前面登入 StorCenter Pro。有兩個方法可以使用「終端機服務」:
•
• 使用 Microsoft Windows XP 內建的「遠端桌面連線」應用程式 (开始 l 程序 l 附件 l 通讯 l 远程桌面连
Iomega StorCenter Pro
不確定,請聯絡您的網路管理員。
使用網頁架構的管理工具。當您藉由 Iomega Discovery Tool Pro 軟體來管理 StorCenter Pro 時,將會連線到網頁架
構的管理工具。網頁架構的工具執行於瀏覽器視窗中。網頁架構的「終端機服務」需要含有 Microsoft Internet
Explorer 與 ActiveX 的 Windows 作業系統電腦。
接)。從 www.microsoft.com 下載「遠端桌面連線」應用程式。Mac OS X 也可以使用「遠端桌面連線」。
找不到 StorCenter Pro
與執行
Iomega Discovery Tool Pro
公用程式的電腦位在相同的子網路或網路區段。若您
16
Page 17

문제 해결
eTrust
활성화
StorCenter Pro에는 사전 설치된 Computer Associates eTrust Antivirus 소프트웨어의 전체 버전이 함께 제공되지만, 소
프트웨어는 기본적으로 비활성화되어 있습니다. 다른 제
성능이 저하될 수 있습니다.
eTrust 소프트웨어를 설정하려면:
1. 터미널 서비스를 사용하여 관리자로 StorCenter Pro에 로그인합니다.
2. 작업 표시줄의 eTrust
3. Monitor Outgoing Files Only(발신 파일만 모니터) 또는 Monitor Outgoing and Incoming Files(송수신 파일 모니
터)를 선택합니다.
주! eTrust 구성에 대한 자세한 내용은 eTrust 도움말을 참조하십시오.
아이콘에서 마우스 오른쪽 단추를 누릅니다.
3자 응용프로그램과 마찬가지로 eTrust를 설정하면 시스템
StorCenter Pro
Iomega
성능에 영향을 미치고 StorCenter Pro를 시작할 수 없습니다.
각각의 중요한 업데이트 및 보안 패치는 네트워크 환경을 고려하여 상황에 따라 평가하는 것이 좋습니다. 이러한 업
데이트 및 패치는 Microsoft의 테스트를 거치고 StorCenter Pro에 의해 지원됩니다.
Iomega는 데이터를 백업하고 모든 소프트웨어 설치 또는 업데이트 전에 StorCenter Pro에서 실행 중인 모든 응용프로
그램을 종료할 것을 적극 권장합니다. 또한 필요한 모든 파일을 StorCenter Pro에 로드하고 터미널 서비스를 통해 설
치하는 것이 좋습니다. 업데이트 설치에 대한 추가 정보 및 권장사항은 Microsoft 업데이트 웹사이트를 참조하십시
오.
Iomega는 정기적으로 고객에게 필요한 모든 패치 및 업데이트를 테스트 및 제공합니다. 현재 업데이트 목록을 보려
면 Iomega 웹 사이트를 확인해주십시오.
전원 LED는 StorCenter Pro가 10분 이상 부팅 중임을 나타냅니다
StorCenter Pro 전원을 켠 후 StorCenter Pro가 부팅 프로세스를 완료하여 올바르게 실행 중인지 전원 LED를 확인
합니다. 전원
StorCenter Pro 장치가 제대로 부팅되지 않았음을 나타냅니다.
이 문제에 대한 추가 도움말을 보려면 www.iomega.com을 방문하십시오.
주의! StorCenter Pro에 지원을 요청하기 전에 문제 해결을 수행하거나 StorCenter Pro 장치를 수정하지 마십시오.
Iomega Discovery Tool Pro
1. Iomega StorCenter Pro를 시작했는지 확인합니다.(StorCenter Pro가 부팅 프로세스를 완료하고 올바르게 실행 중
2. Iomega StorCenter Pro가 Iomega Discovery Tool Pro 유틸리티를 실행하는 컴퓨터와 동일한 서브넷 또는 네트워
3. 문제 해결 단계에 대한 자세한 내용은 Solutions CD에 동봉된 사용 설명서를 참조합니다.
터미널 서비스 사용
Microsoft 원격 데스크톱 연결(터미널 서비스로도 알려져 있음)을 사용하여 Iomega StorCenter Pro에 로그온하고 구성
할 수 있습니다. 원격 데스크톱 연결을 사용하여 실제로 키보드 앞에 앉아 있는 것처럼 StorCenter Pro에 로그인할 수
있습니다. 터미널 서비스를 사용하는 두 가지 방법은 다음과 같습니다
• 웹 기반 관리 도구를 사용합니다. Iomega Discovery Tool Pro 소프트웨어를 통해 StorCenter Pro를 관리할 때 웹
• Microsoft Windows XP(시작-모든 프로그램-보조프로그램-통신-원격 데스크탑 연결)에 내장된 Remote Desktop
업데이트
는 StorCenter Pro에 Microsoft Service Pack 설치를 권장하지 않습니다. Service Pack을 설치하면 StorCenter Pro
LED 등은 StorCenter Pro가 부팅된 후 10분이 지나도 드라이브 활동 LED가 켜지지 않는 경우 Iomega
가 StorCenter Pro를 찾을 수 없습니다
인지 확인하려면 전원
크 세그먼트에 있는지 확인합니다. 잘 모를 경우, 네트워크 관리자에게 문의하십시오.
기반 관리 도구에 연결됩니다. 웹 기반 도구는 브라우저 창에서 실행됩니다. 웹 기반 터미널 서비스를 사용하려
면 Windows PC에 Microsoft Internet Explorer 및 ActiveX가 설치되어 있어야 합니다.
Connection 응용프로그램을 사용합니다. www.microsoft.com에서 원격 데스크톱 연결 응용프로그램을 다운로
드하십시오. Mac OS X용 원격 데스크톱 연결도 사용할 수 있습니다.
LED를 확인합니다.)
17
Page 18

Customer Support • Assistance clientèle • Kundenunterstützung
Assistenza clienti • Asistencia al cliente • Suporte ao cliente
If you have a problem, we can help. Please do NOT return this product to the store!
Your answer is on the web. Visit our award-winning web support site
Support & Downloads
Si vous avez un problème, nous pouvons vous aider. NE RENVOYEZ PAS ce produit au magasin !
Votre réponse est sur le Web. Site Web d’assistance primé www.iomega.com
Support et téléchargements
Wenn Sie ein Problem haben, können wir Ihnen helfen. Bringen Sie dieses Produkt NICHT zu Ihrem Händler zurück!
Ihre Antwort steht im Netz.
auf Support und Downloads
In caso di problemi, noi possiamo fornire assistenza. NON restituire questo prodotto al rivenditore!
La risposta
scegliere Assistenza e Download
Si tiene algún problema, podemos ayudar. ¡Por favor, NO devuelva este producto a la tienda!
Su respuesta está en la web. Destacado sitio Web de atención al cliente
seleccione Suporte y Descargas
è sul Web. Sito di supporto sul Web premiato www.iomega.com. Selezionare la propria regione, quindi
.
.
Preisgekrönte Support-Website www.iomega.com. Wählen Sie Ihr Gebiet aus und klicken Sie
.
.
.
www.iomega.com. Select your region, then select
. Sélectionnez votre région puis
www.iomega.com. Elija su región y luego
Se você tiver um problema, nós podemos ajudar. NÃO devolva esse produto à loja!
A resposta para você está na web. Site da web vencedor de prêmios www.iomega.com
e Downloads
.
18
. Selecione a sua região e Suporte
Page 19

カスタマ サポート • 客户支持 • 客戶支援 • 고객 지원
ハー ドウエ ア を接続 する前 に 、ソフ トウエ アのイン ストー ルを開始 してく ださい。 問題がある場合は、弊社
がお手伝いいたします。
回答 は Web 上 に掲載さ れてい ます。 Web サポート サイト
を選択します。
如果遇到问题, 我们可以帮助您。切勿将产品退回商店!
您可 以在网 上 找到答 案。
如果發生問題, 我們可以提供協助。請「勿」將此產品退回至門市!
您要 的解答 就 在網站 上。
문제가 발생하는 경우 도움을 받으실 수 있습니다. 제품을 대리점으로 반송하지 마십시오!
웹 사이트 에서 해결책 을 찾으 실 수 있습니 다.
후 “
지원”을 선택합니다.
饮誉四方的支持网站 www.iomega.com。请选择您所在的地区,然后选择“支持”。
優質的網路支援網站 www.iomega.com。選擇您所在的地區,然後選擇「支援」。
수상 경력이 있는 웹 지원 사이트 www.iomega.com. 지역을 선택한
www.iomega.com。地域を選択し、次に「サポート」
19
Page 20

Copyright © 2007 Iomega Corporation. All rights reserved. Iomega, the stylized “i” logo, and all Iomega brand blocks are either registered
trademarks or trademarks of Iomega Corporation in the United States and/or other countries. Microsoft and Windows are either registered
trademarks or trademarks of Microsoft Corporation in the United States and/or other countries. Apple and Mac are either registered
trademarks or trademarks of Apple, Inc. in the United States and/or other countries. Certain other product names, brand names, and
company names may be trademarks or designations of their respective owners.
31681800 1/26/07 c
 Loading...