

Page 1
This EasyGuide is a brief introduction to MGI VideoWave Software SE Plus for Buz™.
Putting together the clips provided for this EasyGuide (found on CD #2), will give you a
hands-on feel for the software functions. However, to get full benefit and enjoyment
from the Buz package, you need to explore and create on your own. Not all the
features and functions will be covered in this short tutorial, just the basics.
GETTING STARTED
Put the CD marked Disk 2
into your CD ROM drive.
From the Buz Start Screen,
click MGI EasyGuide for
Buz. MGI VideoWave™
will automatically start and
load the clips you need for
this practice production. If
the install program does
not start automatically,
double-click the CD ROM
drive icon and double-click
the Start icon. Follow the
on-screen prompts until the
Welcome to MGI
VideoWave screen appears,
then select "Start a New
Production" .
Click Ok.
The Options , screen will appear with the Production Goal
tab selected. It is recommended you leave the default
settings for this practice.
Output Device : "Jaz Drive" (or Videotape if you don’t
have a Jaz drive)
Video Standard : "NTSC"
Video Quality: “Good", and click Ok. Now you are ready
to proceed with your production.
The following video and audio clips will
appear in your Library :
shaelynn flying.avi, shaelynn great
match.avi, viktor magic key.avi, viktor
perfect.avi, crusher.avi, flying.avi, slip.avi,
shaelynn flying.wav, shaelynn amazing.wav.
The clips provided are of “Free Dance”
competitors, ShaeLynn Bourne and Viktor
Kraatz, winners of the bronze medal at the
1996 World Championships in Edmonton,
Alberta.
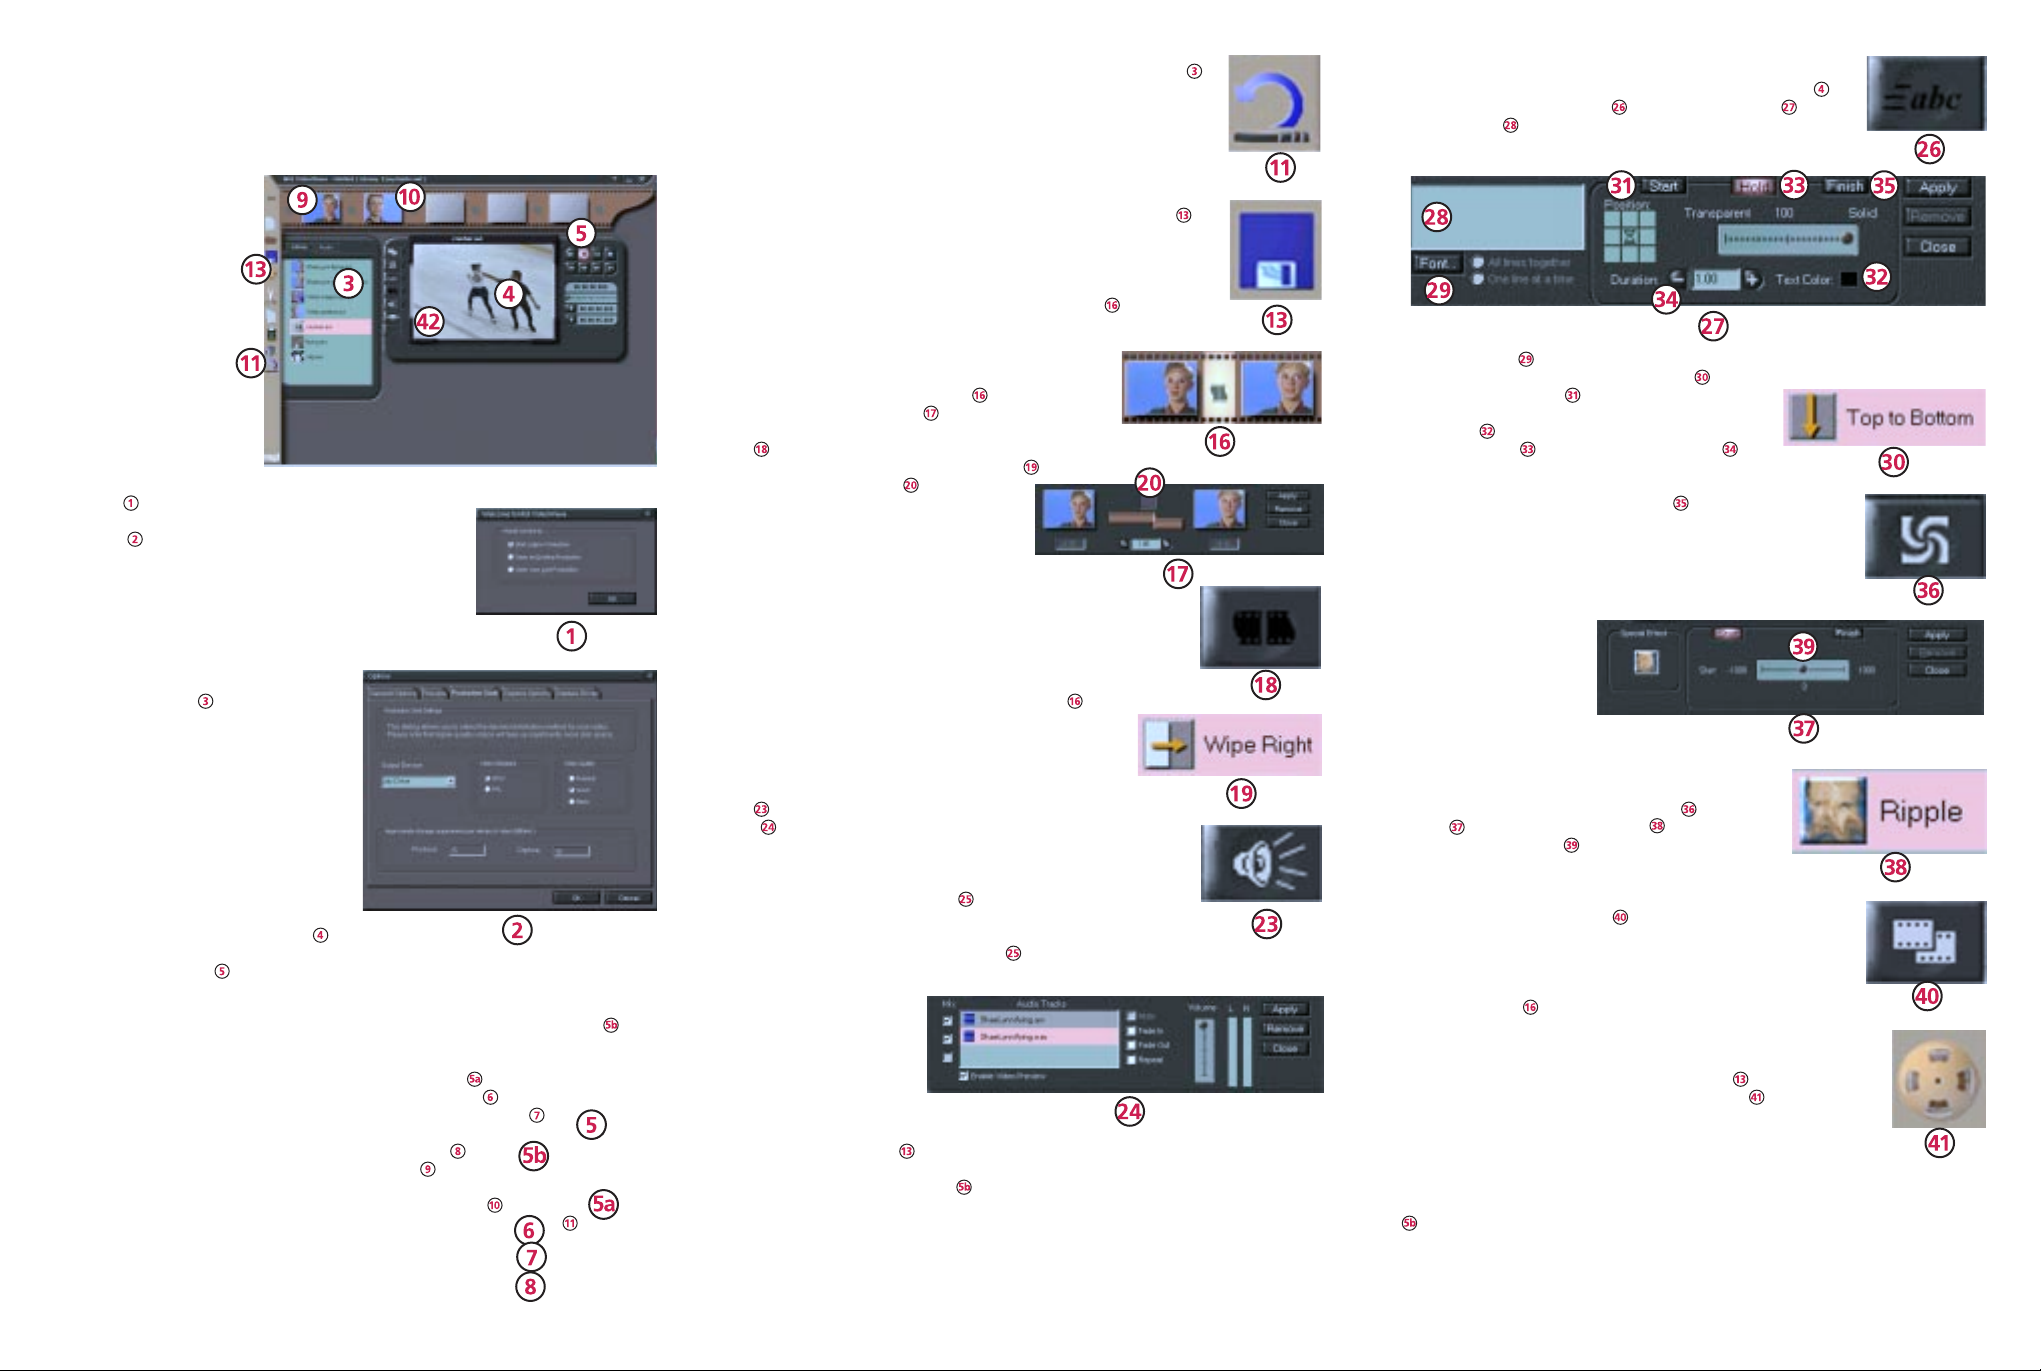
1) VIEWING CLIPS
Click and drag the shaelynn flying.avi clip
from the Library onto the View Screen .
Use the MGI VCR controls to play, pause,
rewind and fast forward .
2) TRIMMING CLIPS
Click and drag the shaelynn great match.avi clip onto the View Screen, click Play . The
selection you want to use is: "We were very lucky that we did end up together, because
if we hadn't, we wouldn't be where we are."
To shorten the length of this clip use the Next Frame button , to advance through the
clip, frame-by-frame or just drag the slider along the slider bar until the time counter
shows about 0.3 (you don't have to be exact). Click the Mark In-Point . This will
become the start of the clip. Now drag the slider along approximately 1/3 of the way
across or at about 5.7 seconds and set the Mark Out-Point . Then click and drag the
clip from the View Screen up to the first empty frame of the Storyline. The viktor
perfect.avi clip has been trimmed for you.
Click and drag the viktor perfect .avi clip into the second frame . If you make a
mistake, you can quickly correct the problem by clicking on the undo icon .
3) ADDING CLIPS
MGI Main
Screen
To add clips to the Library, place the cursor over the Library window
and click the right mouse button. Select Add files to Library... and choose
chromakey.avi which is located on the CD marked Disk 2, (click on MGI,
then EasyGuide, then Media). (As you become more familiar with MGI
VideoWave SE Plus for Buz, you may want to explore some of the
additional features in the retail version, as described in the MGI
VideoWave tutorial). Once chromakey.avi appears in the Library, click
and drag the clip up to the next open frame in the Storyline. At this
point you should save your production. Click the Save as icon
and name your file. Your unfinished file will save as an .sbd (story board
file), which can be reopened and easily edited at a later time.
4) ADDING TRANSITIONS
Between each of the scenes, there is a Transition Marker , where you
can place a transition. A transition helps one scene to flow into another.
Add a transition between the clips of shaelynn great
match.avi on the left of the transition marker and viktor
perfect.avi on the right.
Double click on the Transition Marker in the Storyline
to open the Transition Console Another way to open
the Transition Console is to select the transition effect
button .
Click and drag the Wipe Right transition icon from the
Library to the transition box in the console.
From the Transition Console, click on the
minus sign (-) located to the left of the Time
Readout to set the duration to 0.30 seconds.
You can preview your work at any time, but
transitions, special effects, etc., will not
preview smoothly until they are produced.
NOTE: PreviewView Screen may look choppy, depending on
the tasks you've applied to the Storyline and speed of your
computer, however, the final production will look great.
Click "Apply" to add the transition to the Storyline. The transition
marker updates to reflect the transition being used .
5) ADDING VOICE-OVER
To add a voice track to the flying.avi video clip, drag the
clip from the Library to the storyline.
Single click on the flying.avi file. Click on the Audio Studio
button . The Audio Library appears and the Audio
Console
opens under the View Screen.
To add the shaelynn flying.wav sound track as a voice-over to the
flying.avi clip, click and drag shaelynn flying.wav from the Audio
Library to the Audio Tracks window . Click Apply.
Now, highlight the Chromakey.avi from the Storyline and click the
Audio Studio button. Next drag Shaelynn amazing.wav from the
Audio Library to the Audio Tracks window . To preview the voice-over,
click Play while the Audio Console View Screen is still open.
Click Apply.
NOTE: To preview a clip
simply click and drag it onto
the View Screen and click Play.
Save the story line often by
clicking on the Save As icon before previewing. Highlight the area to be
previewed by clicking on each clip while holding down the Control key (the clips will
highlight). Click on the Play button .
Remember, you have to be in the Audio Console View Screen to hear the voice-over
during preview, until after you have produced your work. You will be able to hear
the voice-over(s) whenever the produced file is played.
6) ADDING TITLES, TEXT or CREDITS
Click and drag slip.avi from the Library over to the View Screen .
Click on the Text Animator button to open the console . In
the Text Entry area , type "Produced by", press enter and type
your name.
Click the Font button and select Arial in the font list, then select the font size 20.
Click Ok. Double-click the Top to Bottom icon under the Text tab in the Library.
(make sure the Start button is highlighted). Select the
text color by clicking on the small black square next to the
label Text Color . Choose the color yellow.
Click the Hold button . Make sure the Duration is
set to 0.00 seconds, so that the text will keep scrolling
down without pausing in the middle of the screen. Keep
the text the same yellow color. Click Apply .
The clip will automatically be placed in the Storyline.
7) SPECIAL EFFECTS
Return to the beginning of the Storyline by placing the mouse
pointer on the bottom of the film strip (where the cursor turns into
a hand). Click and hold down
the left mouse button, click
and drag the Storyline to the
right. You may need to repeat
this operation to go to the
beginning of the Storyline.
Click and drag the crusher.avi
clip onto the Storyline, placing
it before the first clip.
To give the production some additional visual impact,
add a special effect. Select the crusher.avi clip in the
Storyline and click the Special Effects button to open
the console . Double-click on Ripple in the Library.
Click Start and set the slider to 0 to begin the ripple.
Click the Finish button and drag the slider to about 60
for a medium impact ripple effect. Click Apply. To
change the look of the ripple, remove some of the blue
tint. Click the Video Editor button and set the Blue slider to
about [-30]. Click Apply.
8) ADDING A DISSOLVE
Place a 0.30 second dissolve before flying.avi by double-clicking on
the Transition Marker . Click on the plus sign (+) to increase the
duration to 0.30 seconds. Click Apply.
9) MAKING THE MOVIE
Save before producing by clicking on the Save icon . Begin
producing your movie by clicking on the Produce icon .
Give your file a name and location. Click Next to see your production
specifications, then click Produce to begin producing your movie.
Producing is a time consuming process. The ripple effect in particular
requires a lot of time to be produced. Be patient, as you will be
delighted with your result.
Congratulations! When your production is finished, you are done. Click
Play to view your creation.
Turn to the other side of this guide for important information on capturing,
producing and saving.
Page 2
Information About Capturing and Producing
Now that you have a good idea of how to create productions, you can start building
your own. Explore MGI VideoWave™ software! Connect your VCR, camcorder, or
other devices to the Buz Box and ensure you have enough disk space to store your
captured clips. Depending upon the capture settings, your clips could be large. A Jaz
drive is an ideal companion to Buz.
Starting a New Production
Click on the Iomega Buz icon on your desktop, then double-click on the Buz Video
icon, then double-click the MGI VideoWave icon. Follow the screen prompts until the
window “Welcome to MGI VideoWave” appears. Select "Start a New Production”.
When the "Options" window appears, select the Production Goal tab and set the
following:
Production Goal settings:
Output Device: If you do not have a Jaz drive, select the output device for your
final production.
Video Standard: Don’t change this setting unless you are using European video
equipment.
Video Quality:
Premium: The premium setting produces the highest quality and takes the most
disk space. If your storage device is not fast enough you should choose the next
lower setting. Frames will be dropped if your storage device is not capable of
keeping up.
Good: Use this setting if your system cannot support the Premium video quality.
Basic: Use this if the other settings will not work. The basic setting uses the
least disk space.
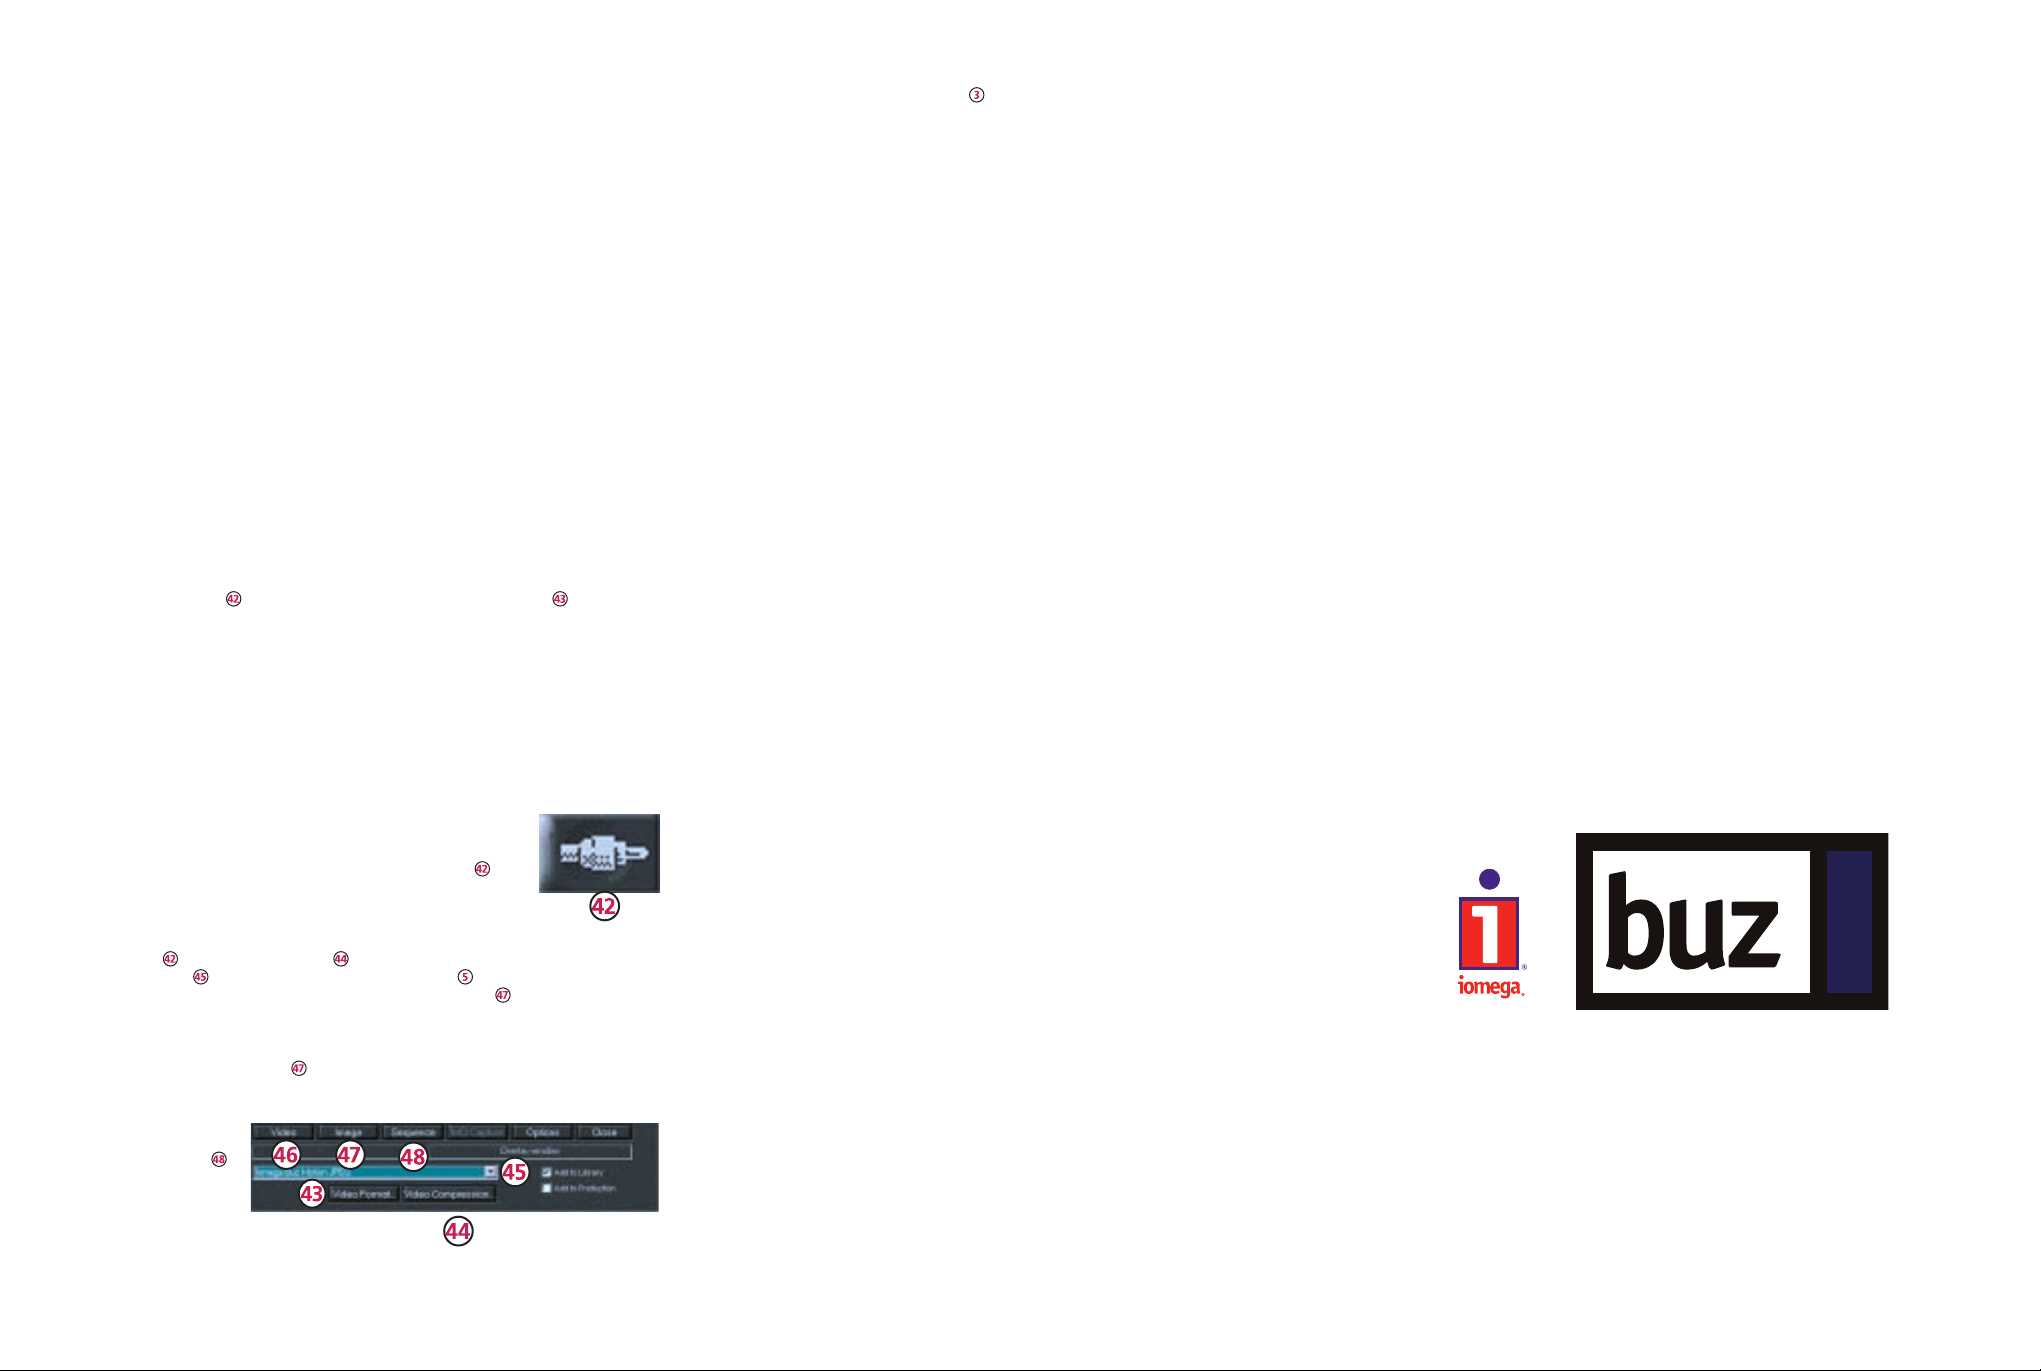
Custom Settings
Select the Capture icon from the main screen. Select video format to adjust the
these settings:
Video Input: Choose the type of video input signal.
Video Standard: Don’t change this setting unless you are using European video
equipment.
Video Format: The default setting is Motion JPEG (MJPEG).
Brightness: Increases or decreases light.
Contrast: Makes the shadows lighter or darker.
Saturation: Increases or decreases color.
Hue: Adjusts tint.
(KB/Frame): Changes the amount of compression in each frame. A higher number
yields better quality video, but also increases the disk space necessary for the
capture.
Capturing
Start capturing video by clicking the video Capture button after
selecting the settings. Click on Stop to end capture.
Still Image Capturing From a Clip
To capture a single frame in a clip, click and drag the clip to the View Screen, then
select Capture . The capture screen will appear under the View Screen. From
the drop down list , select Video File. Move the slider (or use the Frame by Frame
button) to the frame you wish to capture, and click on Image This is a great feature
for capturing single shots to be used in PictureWorks NetCard™ or HotShots™.
Still Image Capturing from Source
In Capture mode, click on Image to capture a single frame. It will automatically be
saved in your Library as a bit map (bmp) file.
Sequence
In capture mode, click
the Sequence button
to capture still shots in
sequence from the
same clip .
Adding Files Created in Iomega’s RecordIt™
Click the Audio tab from the Library (MGI Main Screen). Right click and Select Add
Files to Library. An Open dialog box appears. From the File Type pull down menu,
Select MPEG Audio (.MP2). Locate RecordIt files. Click Open. MGI will convert
RecordIt files to .wav format and add them to your Audio Library. You can now use
them in your Audio Studio.
NOTE: If you have a previous version of RecordIt installed on your system, uninstall it
and use the new version that comes with Buz. Buz cannot use files created by a
version of RecordIt lower than 1.1.
Produce
This is the process of combining all the clips, still images, transitions, audio files, text
and any other edits into one continuous file that can be played like a movie. The
computer uses the .sbd file or storyboard information as a reference for its
calculations. The information in the .sbd file is used to build the .avi file.
The size of your produced file is dependant on the number of transitions,
special effects, sound clips, etc., used. The final produced file may be large.
Ensure you have enough room on your storage drive for your produced file.
Playing your produced files on a system without Buz hardware
If your final movie was produced to a Jaz or Zip disk, Buzplay.exe will be automatically
copied to the Jaz or Zip disk. On a system without Buz, insert the Jaz or Zip disk, open
My Computer or Explorer in Windows 95, select the Jaz or Zip drive icon, and doubleclick Buzplay.exe. Video clips on the Jaz or Zip disk will be automatically loaded into
the Buzplay window. Double click on the .avi file you wish to play. Playback quality
will not be as good on a computer without Buz installed.
Exporting Video
Connect a VCR to the output of the Buz box. Place the produced file in the MGI View
Screen, press Record on your VCR, then click the MGI Play button. Press Stop on the
VCR after the produced image has finished playing .
The following are terms and procedures you will encounter while using MGI
software.
File Length: actual duration or the play time 00:(hours) 00:(minutes) 00:(seconds)
.000(milliseconds).
Frames: total number of images in the production.
Clip Start: starting point of the production.
Frame: exact frame where the production starts.
Estimated File Size: estimated size of the file that will be produced after rendering
has been completed.
Disk Free space: indicates the amount of free disk space you have. Select a different
drive with more free disk space if the estimated file size is larger than the disk free
space. The file will not produce if there is not enough disk space.
File types
.VWL: a list of clips that make up a Library used to group clips associated with a
production.
.SBD: a snapshot of the storyboard that contains all of the edits, transitions, start and
stop points, text inserts, etc.
.AVI: a digital movie that can be imported into a new MGI Production and used as a
source for creating a new .AVI file. The end product of a completed MGI production
and a playable file that is used to export Audio/Video clips to disks and tapes.
How to Get Help
Iomega’s goal is to provide state-of-the-art support for its customers. Over time, our
support options and pricing policy may change in light of evolving technology and
global changes across the computer industry. This section of the manual contains
information on the support options available at the time this manual was prepared.
For up-to-date support information, contact Iomega’s Home Page on the World
Wide Web.
Internet Home Page...............................................................http://www.iomega.com
America Online™.............................................................................. Keyword: Iomega
Automated FAX Help (U.S. & Canada Only) ......................................... 1-801-778-5763
One-on-One Iomega Technical Support
One-on-One T echnical Support for the Buz card and Buz box is provided 30 days free
of charge f o r a consecutive 30 day period, beginning with the first call. Call
1-888-4-IOMEGA, toll-free. Af ter the 30 day period, a fee of $14.99 will be charged
per incident. You may charge the support cost to your credit card (Visa, MasterCard,
American Express or Discover) by calling 1-888-4-IOMEGA, or you can call
1-900-4-IOMEGA to put the support cost on your phone bill. One-on -One Technical
Support is free of charge for issues Iomega determines relate to a defect in an
Iomega product. Iomega’s technical support associates are ready to take your call
Monday through Friday from 6 a.m. to 9 p.m. and Saturday from 7 a.m. to 2 p.m.
(Mountain time).
NOTE: 1-888-4-IOMEGA is available in the U.S. and Canada; 1-900-4-IOMEGA is
available only in the U.S.
How do you register your Buz Multimedia Producer?
Registration can be accomplished either electronically during software installation or
by mailing the registration card located in the Welcome Packet.
For issues specific to MGI VideoWave software please call:
1-905-707-3573 9:00 a.m. to 6:00 p.m. Eastern Time
Fax: 1-905-707-3694 Email: videowave@mgisoft.com
For issues specific to PictureWorks software please call:
1-888-218-4956 Monday-Thursday 8:00 a.m. to 5:00 p.m. Pacific Standard Time
Product Repair or Return
Please call Iomega Technical Support for information on returning your Buz
Multimedia Producer for repair.
© 1998 Iomega Corporation. Iomega, the Iomega logo, Jaz and Zip are registered
trademarks of, and Buz and Buz Multimedia Producer are trademarks of, Iomega
Corporation. Windows is a trademark of Microsoft Corporation registered in the
United States and other countries. All other product and brand names are the
property of their respective owners.
Friday 8:00 a.m. to 4:00 p.m. Pacific Standard Time
EN387500
™
™
producer
multimedia
MGI VideoWave SE Plus For Buz
™
EasyGuide
 Loading...