


Iomega StorCenter ix2-200 User Guide
D31581301
|
2 |
|
|
Iomega StorCenter ix2-200 |
||
|
|
|
Table of Contents |
|
|
|
|
Table of Contents |
2 |
|
|
||
|
How to Get Help |
7 |
|
|
||
|
About the Iomega StorCenter ix2-200 |
8 |
|
|
||
|
|
Drive Components |
8 |
|
|
|
|
|
Connecting the Iomega StorCenter ix2-200 |
10 |
|
|
|
|
|
Connecting the Iomega StorCenter ix2-200 |
10 |
|
|
|
|
|
Iomega StorCenter ix2-200 |
11 |
|
|
|
|
Regulatory Information |
12 |
|
|
||
|
Safety Information |
13 |
|
|
||
|
Troubleshooting Routers |
14 |
|
|
||
|
Enabling the DMZ |
14 |
|
|
||
|
Configuring Port Forwarding on Double NAT Networks |
14 |
|
|
||
|
Bridging the Secondary Router |
14 |
|
|
||
|
Bridging the Primary Router |
14 |
|
|
||
|
Limited Warranty |
16 |
|
|
||
|
Getting Started |
17 |
|
|
||
|
Interface Overview |
18 |
|
|
||
|
Setup |
19 |
|
|
||
|
Shares Overview |
20 |
|
|
||
|
|
Share Information |
20 |
|
|
|
|
|
Access Permissions |
20 |
|
|
|
|
|
Active Folders |
20 |
|
|
|
|
|
Content Viewer |
21 |
|
|
|
|
Managing Shares |
22 |
|
|
||
|
|
Adding and Modifying Shares |
22 |
|
|
|
|
|
|
Changing Share Information |
22 |
|
|
|
|
|
Changing Access Permissions |
22 |
|
|
|
|
|
Enabling NFS Secured Access |
22 |
|
|
|
|
|
Making a Share an Active Folder |
22 |
|
|
|
Deleting Shares |
23 |
|
|
||
|
Shares Properties |
24 |
|
|
||
|
Email Distribution Active Folders |
25 |
|
|
||
|
|
How to Set Up an Email Distribution Active Folder |
25 |
|
|
|
|
|
|
Configuring an Email Distribution Active Folder |
25 |
|
|
|
Facebook Active Folders |
26 |
|
|
||
|
|
How to Set Up a Facebook Active Folder |
26 |
|
|
|
|
|
|
Configuring a Facebook Active Folder |
26 |
|
|
|
Flickr Active Folders |
27 |
|
|
||
|
|
How to Set Up a Flickr Active Folder |
27 |
|
|
|
|
|
Configuring a Flickr Active Folder |
27 |
|
|
|
|
Photo Resize Active Folders |
28 |
|
|
||
|
|
How to Set Up a Photo Resize Active Folder |
28 |
|
|
|
|
|
|
Configuring a Photo Resize Active Folder |
28 |
|
|
|
Torrent Active Folders |
29 |
|
|
||
|
|
How to Set Up a Torrent Active Folder |
29 |
|
|
|
|
|
|
Configuring a Torrent Active Folder |
29 |
|
|
|
YouTube Active Folders |
30 |
|
|
||
|
|
How to Set Up a YouTube Active Folder |
30 |
|
|
|
|
|
|
Configuring a YouTube Active Folder |
30 |
|
|
|
Drive Management |
31 |
|
|
||
|
|
Setting Write Caching |
31 |
|
|
|
|
|
Applying Global Drive Management Settings |
31 |
|
|
|
|
|
Drive status |
31 |
|
|
|
|
|
External Storage |
32 |
|
|
|
|
|
Safely removing external storage |
32 |
|
|
|
|
iSCSI Overview |
33 |
|
|
||
|
|
Enabling iSCSI Drives |
33 |
|
|
|
|
|
Connecting to iSCSI Drives |
33 |
|
|
|
|
|
|
Viewing the Connected iSCSI Clients |
33 |
|
|
|
|
|
|
|
|
|

3 Iomega StorCenter ix2-200
|
Managing iSCSI Drives |
34 |
|
|
||
|
|
Adding iSCSI Drives |
34 |
|
|
|
|
|
Changing Access Permissions |
34 |
|
|
|
|
|
Deleting iSCSI Drives |
35 |
|
|
|
|
Protocols |
36 |
|
|
||
|
Apple File Sharing |
37 |
|
|
||
|
Bluetooth |
38 |
|
|
||
|
|
Configuring Bluetooth settings |
38 |
|
|
|
|
FTP |
39 |
|
|
||
|
NFS |
40 |
|
|
||
|
rsync Server Settings |
41 |
|
|
||
|
|
Configuring rsync server settings |
41 |
|
|
|
|
SNMP |
42 |
|
|
||
|
|
Configuring SNMP settings |
42 |
|
|
|
|
TFTP |
43 |
|
|
||
|
Windows DFS |
44 |
|
|
||
|
|
Windows DFS terms |
44 |
|
|
|
|
|
Configuring Windows DFS settings |
44 |
|
|
|
|
|
WebDAV |
45 |
|
|
|
|
|
Configuring WebDAV settings |
45 |
|
|
|
|
|
Configuring WebDAV with Remote Access |
45 |
|
|
|
|
|
Windows File Sharing |
46 |
|
|
|
|
QuikTransfer |
47 |
|
|
||
|
|
Setting QuikTransfer |
47 |
|
|
|
|
Torrent Download |
48 |
|
|
||
|
|
Enabling Torrent Downloads |
48 |
|
|
|
|
|
Managing torrent downloads |
48 |
|
|
|
|
Adding torrent jobs |
49 |
|
|
||
|
Deleting torrent jobs |
50 |
|
|
||
|
Configuring your router for torrent downloads |
51 |
|
|
||
|
|
Port information used to configure your router |
51 |
|
|
|
|
Copy Jobs |
52 |
|
|
||
|
|
QuikTransfer Button |
52 |
|
|
|
|
|
Managing Copy Jobs |
53 |
|
|
|
|
Adding Copy Jobs |
54 |
|
|
||
|
|
Adding and Modifying Copy Jobs |
54 |
|
|
|
|
|
|
From: Settings |
54 |
|
|
|
|
|
To: Settings |
54 |
|
|
|
|
|
Setting a Schedule |
54 |
|
|
|
Modifying Copy Jobs |
56 |
|
|
||
|
Deleting Copy Jobs |
57 |
|
|
||
|
Mozy Backup |
58 |
|
|
||
|
|
Enabling Mozy Account Information |
58 |
|
|
|
|
|
Selecting folders to back up |
58 |
|
|
|
|
|
Restoring folders |
58 |
|
|
|
|
Time Machine |
59 |
|
|
||
|
|
Enabling Time Machine Support |
59 |
|
|
|
|
|
Changing the Time Machine Destination Share |
59 |
|
|
|
|
|
Manually Creating Backup Folders for Macs |
59 |
|
|
|
|
|
Starting a Time Machine Backup |
59 |
|
|
|
|
|
Deleting Backup Shares for the Macs |
59 |
|
|
|
|
Cloud Services Overview |
60 |
|
|
||
|
Amazon S3 |
61 |
|
|
||
|
|
Enabling the Amazon S3 Feature |
61 |
|
|
|
|
|
Backing up Files to the Amazon S3 Cloud |
61 |
|
|
|
|
|
Restoring Files from the Amazon S3 Cloud |
61 |
|
|
|
|
|
Avamar |
62 |
|
|
|
|
|
Avamar |
62 |
|
|
|
|
|
63 |
|
|
||
|
Flickr |
64 |
|
|
||
|
Iomega Personal Cloud Overview |
65 |
|
|
||
|
4 |
|
|
Iomega StorCenter ix2-200 |
||
|
|
|
|
|
|
|
|
|
Iomega Personal Cloud Key Terms |
65 |
|
|
|
|
|
Creating an Iomega Personal Cloud Account |
66 |
|
|
|
|
Adding Iomega Personal Cloud Members |
67 |
|
|
||
|
|
Inviting members to join your Personal Cloud |
67 |
|
|
|
|
Joining Your Iomega Personal Cloud to an Iomega StorCenter ix2-200 |
68 |
|
|
||
|
|
Disconnecting and deleting a Personal Cloud |
68 |
|
|
|
|
|
Managing Members on Your Iomega Personal Cloud |
69 |
|
|
|
|
|
Disconnecting Members |
69 |
|
|
|
|
|
Deleting Members |
69 |
|
|
|
|
Using Copy Jobs with an Iomega Personal Cloud |
70 |
|
|
||
|
YouTube |
71 |
|
|
||
|
Setup |
72 |
|
|
||
|
Date and Time |
73 |
|
|
||
|
Email Notification |
74 |
|
|
||
|
Energy Saving |
75 |
|
|
||
|
|
Power Down Drives |
75 |
|
|
|
|
|
Brightness |
75 |
|
|
|
|
|
Factory Reset |
76 |
|
|
|
|
Drive Management |
77 |
|
|
||
|
Software Updates |
78 |
|
|
||
|
|
Manual update process: installing a device software update |
78 |
|
|
|
|
Home Page Settings |
79 |
|
|
||
|
|
Deleting a Slideshow |
79 |
|
|
|
|
|
Configuration Backup and Restore |
80 |
|
|
|
|
|
Backing up Device Configuration |
80 |
|
|
|
|
|
Restoring a Configuration Backup |
80 |
|
|
|
|
|
Network Settings |
81 |
|
|
|
|
|
Manually Configuring Your Network |
81 |
|
|
|
|
|
Enabling Jumbo Frames for Each NIC |
81 |
|
|
|
|
|
Manually Configuring the Network |
82 |
|
|
|
|
Remote Access Overview |
83 |
|
|
||
|
Enabling Remote Access |
84 |
|
|
||
|
|
Basic option: Completing the enable remote access process |
84 |
|
|
|
|
|
Premium option: Completing the enable remote access process |
84 |
|
|
|
|
|
Accessing Your Device Remotely |
85 |
|
|
|
|
Media Server |
86 |
|
|
||
|
|
Scanning for media content |
86 |
|
|
|
|
|
Enabling media aggregation |
86 |
|
|
|
|
|
Sharing media content over the internet |
86 |
|
|
|
|
|
Enabling internet access from the Media Server page |
86 |
|
|
|
|
Video Surveillance |
87 |
|
|
||
|
|
Video Surveillance features |
87 |
|
|
|
|
|
|
Name |
87 |
|
|
|
|
|
Space |
87 |
|
|
|
|
|
Model |
87 |
|
|
|
|
|
Action |
87 |
|
|
|
Adding a Video Camera |
88 |
|
|
||
|
|
Manually Adding a Video Camera |
88 |
|
|
|
|
|
Setting a Retention Policy |
88 |
|
|
|
|
|
Scheduling the Recordings |
88 |
|
|
|
|
Picture Transfer |
89 |
|
|
||
|
Printers |
90 |
|
|
||
|
System Status page |
91 |
|
|
||
|
|
Space Usage |
91 |
|
|
|
|
|
Control Panel |
91 |
|
|
|
|
|
|
Blink the lights |
91 |
|
|
|
|
|
Restart |
91 |
|
|
|
|
|
Shut down |
91 |
|
|
|
|
|
Device Information |
91 |
|
|
|
|
|
Status |
91 |
|
|
|
Event Log |
92 |
|
|
||
|
|
Downloading the complete event log file |
92 |
|
|
|
|
|
|
|
|
|
|

5 Iomega StorCenter ix2-200
Languages |
93 |
||
Support |
94 |
||
Device Identification |
95 |
||
|
Configuring Active Directory |
95 |
|
|
Enabling Active Directory Trusted Domains |
95 |
|
UPS Management |
96 |
|
|
Security Overview |
97 |
||
Enabling Security |
98 |
||
|
Disabling security |
98 |
|
Using Security: How to log in |
99 |
|
|
|
User credentials |
99 |
|
Users Overview |
100 |
|
|
Manage Users |
101 |
||
|
Add and Modify Users |
101 |
|
|
Changing User Information |
101 |
|
|
Changing Access Permissions |
101 |
|
|
Setting Quotas |
101 |
|
|
Deleting Users |
102 |
|
Resetting the administrator password |
103 |
||
Groups Overview |
104 |
||
|
How access rights are granted using groups in Workgroup mode |
104 |
|
|
Managing Groups |
105 |
|
|
Add or Modify a Group |
105 |
|
|
Removing a User from the Group |
105 |
|
|
Changing Access Permissions |
105 |
|
|
Deleting Groups |
106 |
|
Active Directory Users and Groups Overview |
107 |
||
Managing Users and Groups with Active Directory |
108 |
||
|
Importing Users and Groups from Active Directory |
108 |
|
|
Synchronizing with the Active Directory Controller |
108 |
|
|
Changing Access Permissions |
108 |
|
|
Setting Quotas |
108 |
|
|
Deleting Active Directory Users and Groups |
109 |
|

6 |
Iomega StorCenter ix2-200 |

7 |
Iomega StorCenter ix2-200 |
How to Get Help
Iomega is committed to providing excellent customer support. To meet this goal, Iomega offers a variety of support options designed to meet the needs of a wide range of users. For complete information on the support options available for your Iomega product, visit the Iomega website. Please select your region carefully.
Here's just some of what is available on Iomega's award-winning web support site 24 hours a day, 7 days a week:
Answers to frequently asked questions (FAQs)
Online help pages with troubleshooting or basic how to information
Up-to-date Iomega software and drivers
Advanced online support options, such as 1-on-1 live chat and email
Electronic copies of Iomega product manuals
Information on telephone support options
Information on advanced technical service options, such as data recovery
Warranty information and product return instructions
Support options available may vary depending on your region and language of choice. Iomega's specific customer support policies (including fees for services) and procedures change as technology and market conditions dictate. To obtain information about Iomega's current policies, please visit our website or write to:
Iomega Customer Service 4059 South 1900 West Roy, UT 84067, USA

8 |
Iomega StorCenter ix2-200 |
About the Iomega StorCenter ix2-200
Drive Components
Front Panel
1. Status Indicators
QuikTransfer Indicator: Displays QuikTransfer backup status. Irregular Flashing Blue: QuikTransfer backup in progress.
Regular Flashing Blue: QuikTransfer backup failed, see device log for more information.
Drive Activity Indicator: Flashes Blue when the drives are in use.
System Status Indicator: Displays the current operational status of the Iomega StorCenter ix2-200.
Solid White: Powered up and ready.
Flashing White: Data protection is being reconstructed.
Flashing Red: System or drive error, performance is degraded.
Power Indicator: Illuminated when the Iomega StorCenter ix2-200 is running. Flashes when the Iomega StorCenter ix2-200 is starting up or shutting down.
2.Power Button: Use the power button to power the Iomega StorCenter ix2-200 on and off.
CAUTION! To power off the Iomega StorCenter ix2-200, press but do not hold down the power button. It is not recommended to hold down the power button to shut down the Iomega StorCenter ix2-200. This may result in data loss.
3.QuikTransfer Button: Initiates a QuikTransfer backup job.
4.USB Connector: Supports devices such as USB storage devices and printers.
The Iomega StorCenter ix2-200 is capable of sharing 3 USB printers and 3 USB storage devices with other systems on your network.
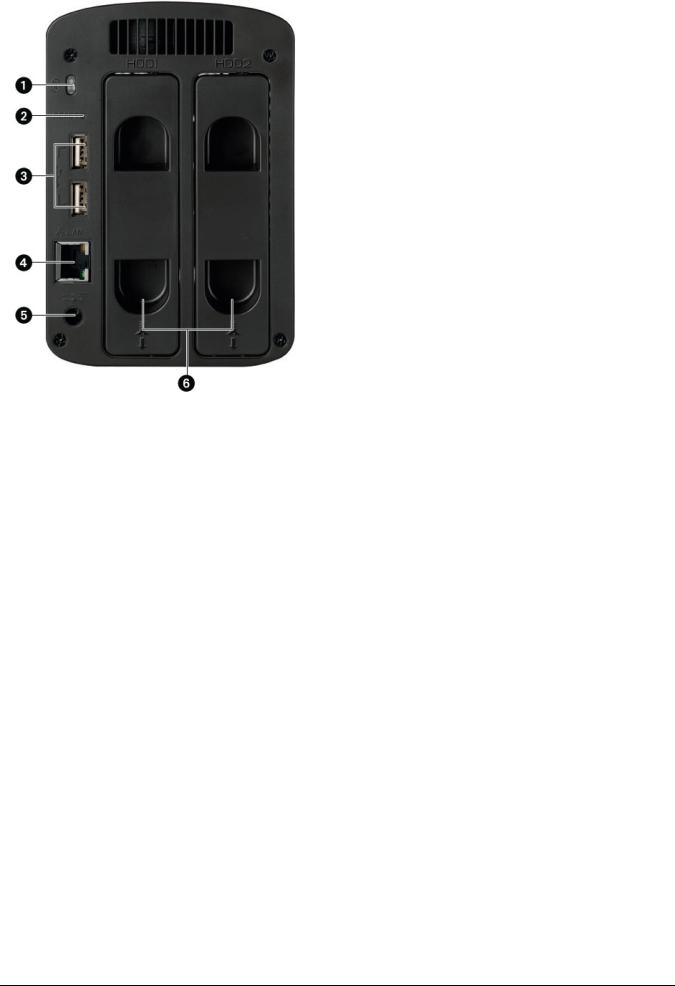
Rear Panel
9 |
Iomega StorCenter ix2-200 |
1.Security Lock: Connect a security cable to prevent theft.
2.Reset Button: Press the RESET button to reset security and network settings. This allows you to regain access if network settings are incorrect or you've forgotten your password.
3.High-Speed USB 2.0 Connectors: Supports devices such as USB storage devices and printers. The Iomega StorCenter ix2-200 is capable of sharing 3 USB printers and 3 USB storage devices with other systems on your network.
4.Gigabit Ethernet: High-speed ethernet connector that will automatically detect your network speed (10/100/1000Base-T).
5.Power Connector: Plug the power cord into this connector.
6.Drive Sled: The Iomega StorCenter ix2-200 has two user-serviceable drive bays.
Default Settings
IP Address: If no DHCP server is found on your network the Iomega StorCenter ix2-200 will get a self-assigned IP address in the 169.254.x.x range. Device Name: The default name for your Iomega StorCenter ix2-200 is 'ix2-200-XXXXXX' (where XXXXXX is a unique string of letters and numbers). Default Shares: Backups, Documents, Movies, Music, Pictures
10 |
Iomega StorCenter ix2-200 |
Connecting the Iomega StorCenter ix2-200
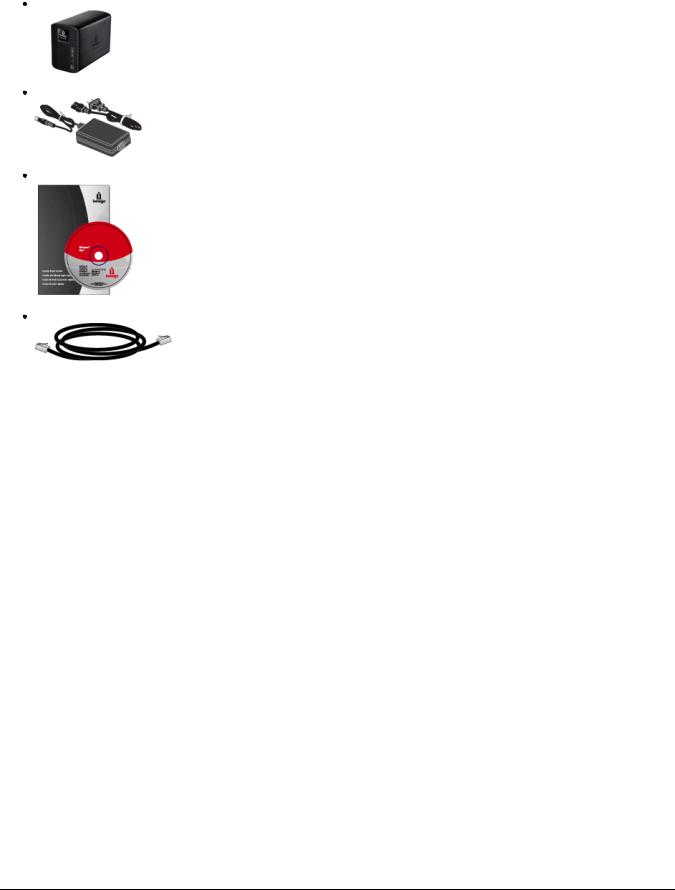
Check Package Contents
Verify that the box contains the following items:
Iomega StorCenter ix2-200 (models may vary)
External Power Supply (models may vary)
Solutions CD and Quick Start Guide
Ethernet Cable
Package contents may vary.
Connecting the Iomega StorCenter ix2-200
Initial Setup
If you have purchased more than one Iomega StorCenter ix2-200, complete all steps on one device before setting up additional devices.
1.Use the included network cable to connect the device to a network hub, switch or directly to a computer.
2.Connect the included power cord to the back of the device and a power socket or Uninterruptible Power Supply (UPS).
3.Your Iomega StorCenter ix2-200 should power on automatically.
4.Start your computer, wait for the operating system to load, and then insert the CD.
5.For best results, use a computer that is connected to the same router, hub, or switch as the device. If the software doesn't run automatically, double click on the CD icon, then double-click the Start icon.
6.Install the Iomega Storage Manager software.
Once the installation completes, the Iomega Storage Manager icon will appear in the System Tray (Windows) or Menu Bar (Mac). The Iomega Storage Manager will automatically scan your network and connect to available Shares.
If you receive a message from your operating system's firewall alerting you of network activity, be sure to unblock communications. Mac Users: Shares on the Iomega StorCenter ix2-200 will mount and appear on the Mac Desktop.
PC Users: Shares on the Iomega StorCenter ix2-200 will automatically be assigned a drive letter and will be available in the Network Drives section under My Computer.
11 |
Iomega StorCenter ix2-200 |
Iomega StorCenter ix2-200
Iomega, the stylized logo, and all Iomega brand blocks are either registered trademarks or trademarks of Iomega Corporation in the United States and/or other countries. Microsoft and Windows are either registered trademarks or trademarks of Microsoft Corporation in the United States and/or other countries. Mac, Macintosh, and AppleTalk are registered trademarks or trademarks of Apple Computer Inc. in the United States and/or other countries. Certain other product names, brand names, and company names may be trademarks or designations of their respective owners.

12 |
Iomega StorCenter ix2-200 |
Regulatory Information
FCC (United States)
The computer equipment described in this manual generates and uses radio frequency (RF) energy. If the equipment is not installed and operated in strict accordance with the manufacturer's instructions, interference to radio and television reception might result.
This equipment complies with Part 15 of the FCC Rules. Operation is subject to the following conditions: (1) This device may not cause harmful interference, and (2) this device must accept any interference received, including interference that may cause undesired operation.
Part 15, Class B, of the FCC Rules, is designed to provide reasonable protection against radio and television interference in a residential installation. Although the equipment has been tested and found to comply with the allowed RF emission limits, as specified in the above cited Rules, there is no guarantee that interference will not occur in a particular installation. Interference can be determined by turning the equipment off and on while monitoring radio or television reception. The user may be able to eliminate any interference by implementing one or more of the following measures:
Reorient the affected device and/or its receiving antenna.
Increase the distance between the affected device and the computer equipment.
Plug the computer and its peripherals into a different branch circuit from that used by the affected device.
If necessary, consult an experienced radio/television technician for additional suggestions.
Changes or modifications to the electronics or enclosure of this product must be expressly approved by Iomega; otherwise, the user's authority to operate this product might be voided by the FCC.
Canadian Verification
This Class B digital apparatus meets all requirements of the Canadian Interference-Causing Equipment Regulations (ICES-003, Class B)
CE (European Community)
This Iomega product conforms to the following European Directive(s)and Standard(s): Application of Council Directives: 73/23/EEC, 89/336/EEC.
Standards to which Conformity is declared: EN60950, EN55022, EN55024, EN61000-3-2, EN61000-3-3.
Importer's Name: Iomega International, S.A. Type of Equipment: Information Technology Equipment.
Waste Electrical and Electronic Equipment (WEEE)
In accordance with European Directive 2002/96/EC on Waste Electrical and Electronic Equipment (WEEE), the presence of the above symbol on the product or on its packaging indicates that this item must not be disposed of in the normal unsorted municipal waste stream. Instead, it is the user's responsibility to dispose of this product by returning it to a collection point designated for the recycling of electrical and electronic equipment waste. Separate collection of this waste helps to optimize the recovery and recycling of any reclaimable materials and also reduces the impact on human health and the environment.
For more information concerning the correct disposal of this product, please contact your local authority or the retailer where this product was purchased.
Manufacturer/Responsible Party
Iomega Corporation
4059 South 1900 West
Roy, UT 84067 USA
EU Representative
Iomega International SA
H/O Iomega Netherlands
Hardwareweg 4
3821 BM Amersfoort
NL - The Netherlands

13 |
Iomega StorCenter ix2-200 |
Safety Information
Observe the following guidelines when using your Iomega StorCenter ix2-200:
1.Follow all instructions marked on the Iomega StorCenter ix2-200 and in the documentation.
2.Always use the appropriate power supply plug clip for your country.
3.Do not use the Iomega StorCenter ix2-200 near water. Do not spill liquid on or into the Iomega StorCenter ix2-200.
4.Do not place the Iomega StorCenter ix2-200 on an unstable surface.
5.Do not walk on the power cord or allow anything to rest on it.
6.Openings in the device are provided for fans and air ventilation and should not be blocked or covered. Make sure the device has ample ventilation (at least 6 inches or 127 mm) in front and behind the unit. Do not place the device near or on a radiator or heat register.
7.Under any of the following conditions, unplug the device from the wall outlet and contact technical support: The power cord or plug is damaged. Liquid has been spilled into the device. The device does not function properly when the operating instructions are followed. The device was dropped or the exterior enclosure is damaged.

14 |
Iomega StorCenter ix2-200 |
Troubleshooting Routers
If you encounter a problem while connecting or using your Iomega StorCenter ix2-200, check the topics listed below for possible solutions.
If you have properly set port forwarding on your router and remote access still does not work, you may have multiple routers on your network. In this situation you will most likely have two NAT (Network Address Translation) firewalls.
1.One of the easiest ways to identify this issue is to log in to the router to which the Iomega StorCenter ix2-200 is connected.
2.Once you have logged in, go to the page that shows the router's WAN IP address, usually Status or Network Info.
3.If the WAN IP address begins with 192.168, 10, or 172, you may have a NAT Firewall between the router and internet connection.
There are several options for resolving double NAT situations. The sections below will explore the pros and cons of each resolution:
 These instructions will refer to the router that is connected directly to the internet as the Primary Router. The cascaded router or router to which your Iomega StorCenter ix2-200 is connected will be referred to as the Secondary Router.
Use the primary router's DMZ
Port forward the primary router to the secondary router
Put the secondary router in bridging mode
Put the primary router in bridging mode
Enabling the DMZ
Most routers have a feature called DMZ or Default Server. DMZ stands for Demilitarized Zone, Data Management Zone, Demarcation Done, or Perimeter Network. The DMZ allows you to enter an IP address that will exist outside the router's NAT Firewall.
This is the easiest way to configure your network to handle double NAT situations; however, it is dependent on your primary router having DMZ functionality.
To enable the DMZ:
1.Log in to the primary router.
2.Navigate to the settings page for DMZ or Default Server. Refer to the documentation that came with your router for information on where this feature is found.
3.Enter the secondary router's IP address.
4.Save your settings.
Your secondary router is no longer behind your primary router's firewall. If port forwarding is correctly configured, remote access should now be working properly. Moving your secondary router into the DMZ should not have any effect on the security of the network, since it is still protected by the secondary router's firewall.
Configuring Port Forwarding on Double NAT Networks
If for some reason the network configuration cannot be changed and your setup requires the double NAT, you must perform the port forwarding steps twice. On the primary router, set the port forwarding to the cascaded router's external IP address. On the cascaded router, set the port forwarding to the Iomega StorCenter ix2-200's IP address.
Bridging the Secondary Router
Make sure that the primary router (usually the one connected to or acting as the DSL/Cable modem) is the only one with DHCP (Dynamic Host Configuration Protocol) and NAT (Network Address Translation) enabled. The secondary should be changed to bridging mode. Make sure the secondary router connects to the primary router using a standard port rather than the port labeled Uplink or internet. This will basically turn your secondary router into a switch; however, you can still enable its Wireless Access Point (if equipped.)
Refer to the documentation that came with your router for configuration information and settings.
Bridging the Primary Router
If none of the above options are available, you will need to enable transparent bridging on your primary router. You will probably need to call your ISP (Internet Service Provider) to have the DSL or Cable Modem/NAT put into bridge mode, which will then disable the first NAT/Firewall. Once this first firewall in the modem is disabled, the secondary router will handle all the network traffic, Port Forwarding, and allow Remote Access to work.
You should not attempt bridging without help from the ISP. If bridge mode is attempted by the customer and not configured properly it can render the customer's internet connection inoperable. Primary router bridging may also require special configuration information and settings on the secondary router.
If you configured your Iomega StorCenter ix2-200 using DHCP you may not be able to reconnect to it via Remote Access after a reboot. DHCP will automatically get an IP address from the server whenever the Iomega StorCenter ix2-200 restarts. This is a very simple way to configure the Iomega StorCenter ix2-200 but can cause problems with your router's port forwarding settings. The router does not dynamically update port forwarding settings and cannot port forward to your Iomega StorCenter ix2-200 if its IP address changes.
To resolve this problem you can try one of the following techniques:
Increase the length of the DHCP lease: Your router will attempt to remember all DHCP clients and give them the same IP address every time they request an IP address; however, the router will forget clients if they do not request an IP address for a certain amount of time. Your router will have a

15 Iomega StorCenter ix2-200
setting for how long the DHCP lease is valid. If your network requires DHCP, this may be a good solution; however, it is not always guaranteed to work. You may need to occasionally update your router's port forwarding settings.
Use Static DHCP: Some routers allow you to assign Static IP addresses through the DHCP system based on the MAC address of the device. This ensures that the Iomega StorCenter ix2-200 will always get the same IP address and your port forwarding settings will always be correct. Static DHCP allows you to leave your Iomega StorCenter ix2-200 in DHCP mode. See the manual that came with your router for more information on configuring DHCP settings. Use a Manual IP Address: Changing the Manual IP address will reduce the reliance of your Iomega StorCenter ix2-200 on the DHCP server; however, you will need to perform additional configuration for it to work properly.
1.Log in to your router and write down the DHCP range it is using.
2.See the manual that came with your router for more information on configuring DHCP settings.
3.Navigate to the IP address settings interface page on your Iomega StorCenter ix2-200. For more information, check the Network Settings section of this manual.
4.Enter a new IP address that is outside of your router's DHCP range. For example, if your router is distributing IP addresses in the range of 192.168.14.2-192.168.14.50, you will want to assign the Iomega StorCenter ix2-200 a number between 192.168.14.51 and 192.168.14.255. Make sure you are assigning the Iomega StorCenter ix2-200 an IP address that is not in use by another device.
5.Enter a subnet mask. The subnet mask describes the size of your network. For most networks this will be 255.255.255.0 which allows for 256 network devices. If you are on a larger network or are using the self-assigned APIPA range (169.254.x.x), you will want to use a 255.255.0.0 or larger subnet mask.
6.For best results, enter the IP address(es) for your DNS Server(s).
7.If necessary, enter the IP address(es) for your WINS server(s).
8.Enter a gateway address. In most cases, this will be the IP address of your router.
9.If necessary, update your router's port forwarding information with the new static DHCP IP address.
16 |
Iomega StorCenter ix2-200 |
Limited Warranty
Drives and Media
Coverage
Excluded Products and Problems
Remedies
Obtaining Warranty Service
Limitations
Coverage
Iomega warrants this hardware product to be free from defects in materials and workmanship for the warranty period. This non-transferable, limited warranty is only to you, the first end-user purchaser. The warranty begins on the date of purchase and lasts for a period of one (1) year for products purchased in the Americas, the Asia-Pacific region, or non-European Union nations in Europe, the Middle East, or Africa; ninety (90) days for Iomega reconditioned products purchased in these regions; or, two (2) years for products purchased by an end-user in member nations of the European Union. Customers who register their new products at www.iomegareg.com within 90 days of purchase will receive a warranty extension so that their total warranty shall be a period of three (3) years in all regions. Reconditioned products are not eligible for a warranty extension.
Excluded Products and Problems
This warranty does not apply to: (a) Iomega software products; (b) expendable components such as fuses or bulbs; or (c) third-party products, hardware or software, supplied with the warranted product. Iomega makes no warranty of any kind on such products which, if included, are provided "AS IS." this warranty also excludes damage caused by accident, misuse, abuse, use of non-Iomega approved media, exposure of media to excessive magnetic fields, or external environmental causes.
Remedies
Your sole and exclusive remedy for a covered defect is repair or replacement of the defective product, at Iomega's sole option and expense (shipping may be charged), and Iomega may use new or refurbished parts or products to do so. If Iomega is unable to repair or replace a defective product, your alternate exclusive remedy shall be a refund of the original purchase price.
The above is Iomega's entire obligation to you under this warranty. IN NO EVENT SHALL IOMEGA BE LIABLE FOR INDIRECT, INCIDENTAL, CONSEQUENTIAL OR SPECIAL DAMAGES OR LOSSES, INCLUDING LOSS OF DATA, USE, OR PROFITS EVEN IF IOMEGA HAS BEEN ADVISED OF THE POSSIBILITY OF SUCH DAMAGES. In no event shall Iomega's liability exceed the original purchase price of the drive or the media disk. Some jurisdictions do not allow the exclusion or limitation of incidental or consequential damages, so the above limitation or exclusion may not apply to you.
Obtaining Warranty Service
You must notify Iomega within the warranty period to receive warranty service. Just as technology and market conditions vary, Iomega's specific customer support policies (including fees for services) and procedures change over time. To obtain information about Iomega's current policies or warranty service, please visit our website at www.iomega.com/supportpolicy.html or write to: Iomega Customer Service, 4059 South 1900 West, Roy, UT 84067. Contact information for Iomega Customer Service can be obtained on our support website at:
Americas www.iomega.com/support
Europe www.iomega.com/europe/support
Asia www.iomega.com/ap/support
If your product is eligible for warranty service, you will be required to return it to Iomega, along with proper identification, a return authorization number obtained from the Iomega website or provided by the Iomega representative, and proof of purchase. Iomega will not protect, recover, or return data during warranty service so you should duplicate your data before shipment.
Limitations
THE ABOVE WARRANTY IS EXCLUSIVE AND IN LIEU OF ALL OTHER WARRANTIES, EXPRESS OR IMPLIED. To the extent permitted by applicable law, IOMEGA SPECIFICALLY DISCLAIMS ANY IMPLIED WARRANTIES, INCLUDING ANY IMPLIED WARRANTY OF MERCHANTABILITY OR FITNESS FOR A PARTICULAR PURPOSE. Any implied warranty required by applicable law shall be limited in duration to the express warranty term. Some jurisdictions do not allow disclaimers of implied warranties or limitations on how long an implied warranty lasts, so the above limitation may not apply to you.
This warranty gives you specific legal rights, and you may also have other rights that vary from jurisdiction to jurisdiction. Any suit for breach of any warranty on your product must be filed within one (1) year of the first date the suit could have been brought.

17 |
Iomega StorCenter ix2-200 |
Getting Started
Getting started is quick and easy with the Iomega StorCenter ix2-200. Before you can use your Iomega StorCenter ix2-200, you must connect all the cables and turn it on. Once you have connected the hardware, you can install the optional Iomega Storage Manager Software and begin using your Iomega StorCenter ix2200.
Your Iomega StorCenter ix2-200 has three separate interfaces:
Iomega StorCenter ix2-200 Console
configure features, manage Shares, and administer your Iomega StorCenter ix2-200. Refer to Interface Overview for more information about the Iomega StorCenter ix2-200 Console.
Iomega Storage Manager
optionally installed on your local computer, it discovers any Iomega storage devices on your subnet, maps device Shares to computers, and provides local access to your content. It provides access to Shares through your computer's file management program, such as Windows Explorer or Mac Finder, allowing you to drag and drop many files between your computer and the Iomega StorCenter ix2-200. Installing the Iomega Storage Manager is optional.
Home Page
serves as a web-accessible interface to your Iomega StorCenter ix2-200. The Home page content is configured using the Iomega StorCenter ix2-200 Console. If you are using Remote Access, the Home page is the landing page to access your device. You can access the Home page of your Iomega StorCenter ix2-200 by entering the device name or IP address directly in your browser. If security is enabled and you are an administrator user, you
can access the Iomega StorCenter ix2-200 Console from the Home page by clicking  .
.
How do I...
enable or disable security enable remote access

18 |
Iomega StorCenter ix2-200 |
Interface Overview
The user-friendly Iomega StorCenter ix2-200 Console enables you to configure and manage your Iomega StorCenter ix2-200 storage, attached peripheral devices, users, Shares, and media server capabilities. It also displays the overall state of your Iomega StorCenter ix2-200.
There are a number of ways to access the features of the Iomega StorCenter ix2-200 Console. You can select one of the predefined categories, use the All Features page that lists every feature alphabetically, or search for a feature by keyword. When security is enabled, only an administrator user can access the Iomega StorCenter ix2-200 Console.
How do I...
set up the Iomega StorCenter ix2-200 enable security
enable remote access

19 |
Iomega StorCenter ix2-200 |
 Setup
Setup
The Setup page opens when you first access the Iomega StorCenter ix2-200 Console from the Home Page or the Iomega Storage Manager. On this page, you can configure some basic device features by clicking the appropriate link. The current setting of the feature displays above the link. You can also configure all features shown on the Setup page by accessing the specific features directly.

20 |
Iomega StorCenter ix2-200 |
 Shares Overview
The Shares page displays a table that contains folders, connected drives, and any cloud storage to which your Iomega StorCenter ix2-200 Console is connected. The Properties column displays the features that are enabled for each Share.
Share Information
The Information section displays the Share name, graphically displays the space usage of the Share, and allows you to view the content using the web-based content viewer.
To view the content of a Share, click the View Content link to bring up the Content Viewer.
To learn how to modify your Share information, refer to Managing Shares.
Access Permissions
Access Permissions section contains a list of users who currently have access to that Share. Access Permissions displays when the Iomega StorCenter ix2-200 is secured, otherwise the section is not included in the Share. By default, user Everyone has read and write access to that Share, which means that all users have open access to that share.
To learn how to modify Access Permissions on a Share, refer to Managing Shares.
Active Folders
Follow the link to the Active Folder options for information on configuring each:
Email Distribution
Flickr
Photo Resize
Torrents
YouTube
How do I...
manage a Share delete a Share
21 |
Iomega StorCenter ix2-200 |
 Content Viewer
The Content Viewer is a graphical file browser that lets you view and manage content in the Shares on your Iomega StorCenter ix2-200.
The Content Viewer is divided into two panes. The left pane lists the Shares on the Iomega StorCenter ix2-200 and allows you to delete or add a Share. If you select a Share that contains pictures, you can start a slideshow of the pictures in that Share. The right pane lists the files and folders in a Share and allows you to delete content or upload a file to the Share.
To delete multiple files simultaneously, hold the Ctrl key on your keyboard and select each file, or drag your mouse over the filenames. Share content can be sorted, and you can switch between a list view and a thumbnail view of the files. When you are looking at content in a list view and you hover your mouse over an image, a thumbnail view of the image displays next to your mouse. If all the content cannot fit on one page, there are pagination controls that allow you to continue browsing the content.

22 |
Iomega StorCenter ix2-200 |
 Managing Shares
The page describes how to:
Add and Modify Shares
Change Share Information
Enable NFS Secured Access
Change Access Permissions
Make a Share an Active Folder
Adding and Modifying Shares
1.From the Iomega StorCenter ix2-200 Console, click Shares.
2.To add a new Share, click Add a Share. Type a name for the Share. All Shares must have a name. Names cannot exceed 32 characters. The following are not valid Share names: global, homes, printers
3.Click Create. To modify an existing Share, click to expand the Share.
Changing Share Information
1.Modify the existing name for the Share.
2.Choose whether to enable content search and media sharing. When Media sharing is enabled, the media server scans this Share for any media content
and makes it available to anyone with access to your network, even if this Share is secured. If you do not want media content made available to anyone, do not check this option. When Media sharing search is enabled,  displays in the Properties for that Share.
3.To view the content of a Share, click the View Content link to open the Content Viewer.
4.Click Apply to save your changes.
Changing Access Permissions
 You should enable security on your Iomega StorCenter ix2-200 before changing access permissions.
1.Expand Access Permissions to change user permissions to this Share. A security icon  displays in Properties indicating a secure Share. When a secure Share is first created, Everyone has read and write access to that Share by default, which means that everyone on your network can read, write, and delete files to and from that Share. When user Everyone has Read and Write permissions to a Share, the Share is not secure and is open to all users.
2.Check Allow users to change file level security to allow file and folder permissions to be set through other programs, such as Windows Explorer, independent of the Iomega StorCenter ix2-200. Setting this option allows users to put additional access restrictions on individual files and folders.
3.To limit access to this Share to a specific set of users, click the  and choose one or more users from the pop-up window. If you have created groups, you can also limit access for them in this way.
4.In the Access Permissions section, check Read, Write, or both to set access to this Share for each user. To remove a user, leave both Read and Write unchecked for that user. If you grant Read and Write permissions to Everyone, the list of users is also cleared since all users (Everyone) has access to this Share. If you have created groups, you can also limit access for them in this way.
5.Click Apply to save your changes.
Enabling NFS Secured Access
1.To enable NFS, first click the switch on from the Protocols page.
2.On the Shares page, select a secure Share and expand the NFS section. You cannot apply a rule to a public Share.
3.Click  Add an NFS rule to add a Host Name for the rule. Rules are added to specify the hosts that are allowed to access Shares using NFS. Use this table to add NFS rules to specify access for hosts. For example, *.cs.foo.com matches all hosts in the domain cs.foo.com. To export a Share to all hosts on an IP address or local network simultaneously, specify an IP address and netmask pair as address/netmask where the netmask can be in dotteddecimal format, or as a contiguous mask length. For example, either /255.255.252.0 or /22 will result in identical local networks.
4.When the rule is added, read access is automatically set to the Share. Select Write to allow users to write to that Share. Use  and
and  to modify the rule priority for NFS access.
5.Click Apply to save your changes.
Making a Share an Active Folder
1.You can optionally enable Active Folders on a Share to allow you to associate this Share with a specific feature that will happen automatically when files are copied to the Share. You can only set one Active Folder option per Share.
2.Expand the Active Folder section and check Enable. Select one of the following Active Folder options and follow the link for details on configuring each:
 Email Distribution
 Facebook
 Flickr
 Photo Resize
 Torrents
 YouTube
3.Click Apply to save your changes.
How do I...
delete a Share

23 |
Iomega StorCenter ix2-200 |
 Deleting Shares
1.From the Iomega StorCenter ix2-200 Console, click Shares.
2.To delete an existing Share, click to expand the Share.
3.In the Information section, click Delete to delete the Share.
4.In the Delete Share confirmation pop-up window, click Yes.
5.If you do not wish to delete the Share, click Cancel to return to the Shares page.
24 Iomega StorCenter ix2-200
 Shares Properties
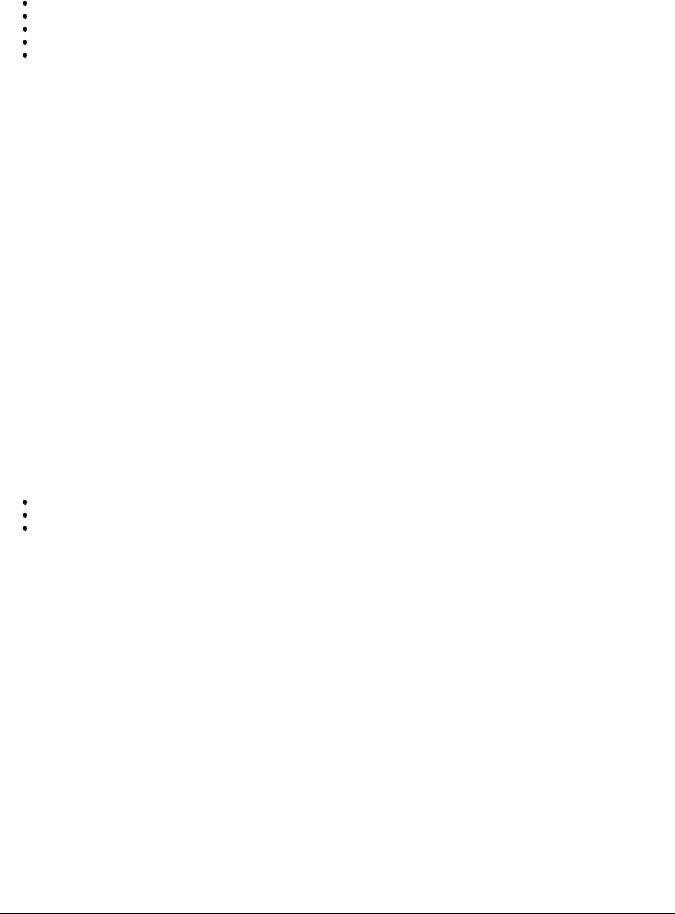
The Shares page displays properties for the Share's different functions. The Properties column displays the features that are enabled for each Share. The following list identifies the Shares page icons:
identifies a Share with Media Sharing enabled.
identifies a secured Share.
identifies a Share as an Email Distribution Active Folder.
identifies a Share as a Facebook Active Folder.
identifies a Share as a Flickr Active Folder.
identifies a Share as a Photo Resizing Active Folder.
identifies a Share as a Torrent Active Folder.
identifies a Share as a YouTube Active Folder.

25 |
Iomega StorCenter ix2-200 |
 Email Distribution Active Folders
You can optionally enable Active Folders on a Share, which enables you to associate this Share with a specific feature or operation that occurs automatically when files are copied to the Share.
How to Set Up an Email Distribution Active Folder
Email Distribution lets you email your files to friends and family right from your Iomega StorCenter ix2-200 Console. Use Email Distribution to share files with an email list.
 To prevent email distribution list spamming, the Iomega StorCenter ix2-200 allows lists of 250 or fewer email recipients and sends a maximum of six emails in a 24-hour period.
Refer to Managing Shares for more information on managing Shares and Active Folders.
Configuring an Email Distribution Active Folder
1.From the Iomega StorCenter ix2-200 Console, click Shares.
2.Select a Share to use as an Email Distribution Active Folder, and click to expand the Active Folder section.
3.Check Enable.
4.Select Email Distribution from the drop-down menu.
5.Include an email address in the Sender Email Address text box. Distribution is sent from this email address.
6.You can add multiple email addresses in the Email To: text box by separating them with commas, spaces, or semicolons.
7.Add a subject and email message for your recipients.
8.Check Send the file as an attachment, Send a link to the file, or both.
9.Click Apply to save your changes.
10.Once configured, all files in this Share are sent by email to your recipients. Click View Transfer History to see the transfer activity from this Share to your account.
How do I...
Manage a Share

26 |
Iomega StorCenter ix2-200 |
 Facebook Active Folders
You can optionally enable Active Folders on a Share, which enables you to associate this Share with a specific feature or operation that occurs automatically when files are copied to the Share.
How to Set Up a Facebook Active Folder
Facebook is a social network to connect with friends and family. You can configure a Share as a Facebook Active Folder so that photos added to that Share are automatically uploaded to your Facebook account. To configure a Share as a Facebook Active Folder, access Shares from the Iomega StorCenter ix2-200 Console, select a Share, and expand the Active Folders section to enable and configure it.
Refer to Managing Shares for more information on managing Shares and Active Folders.
 If you do not have a Facebook account, go to the Facebook website to open an account.
Configuring a Facebook Active Folder
1.From the Iomega StorCenter ix2-200 Console, click Shares.
2.Select a Share to use as a Facebook Active Folder, and click to expand the Active Folder section.
3.Check Enable.
4.Select Facebook from the drop-down menu.
5.Click Configure Facebook account access to configure your Facebook account. You will be taken to a Facebook page to configure your account. Follow the instructions provided by Facebook.
6.Check Delete files after upload to delete images from the Share once they are transferred to your Facebook account.
7.Images can also be resized prior to upload. Check 800x600, 1024x768, or enter a custom resolution for resizing images.
8.Click Apply to save your changes.
Once configured, all of your images in this Active Folder will upload to your Facebook account.
9.Click View Transfer History to see the transfer activity from this Share to your account.
How do I...
manage a Share

27 |
Iomega StorCenter ix2-200 |
 Flickr Active Folders
You can optionally enable Active Folders on a Share, which enables you to associate this Share with a specific feature or operation that occurs automatically when files are copied to the Share.
How to Set Up a Flickr Active Folder
Flickr is a photo sharing network to share photos with friends and family. You can configure a Share as a Flickr Active Folder so that images and albums added to that Share are automatically uploaded to your Flickr account. To configure a Share as a Flickr Active Folder, access Shares from the Iomega StorCenter ix2200 Console, select a Share, and expand the Active Folders section to enable and configure it.
Refer to Managing Shares for more information on managing Shares and Active Folders.
 If you do not have a Flickr account, go to the Flickr website to open an account.
Configuring a Flickr Active Folder
1.From the Iomega StorCenter ix2-200 Console, click Shares.
2.Select a Share to use as a Flickr Active Folder and click to expand the Active Folder section.
3.Check Enable.
4.Select Flickr from the drop-down menu.
5.Click Configure Flickr account access to configure your Flickr account. You will be taken to a Flickr page to configure your account. Follow the instructions provided by Flickr.
6.Check Delete files after upload to delete images from the Share once they are transferred to your Flickr account.
7.Click Apply to save your changes.
8.Once configured, all of your images in this Active Folder will upload to your Flickr account. Click View Transfer History to see the transfer activity from this Share to your account.
How do I...
manage a Share

28 |
Iomega StorCenter ix2-200 |
 Photo Resize Active Folders
You can optionally enable Active Folders on a Share, which enables you to associate this Share with a specific feature or operation that occurs automatically when files are copied to the Share.
How to Set Up a Photo Resize Active Folder
Photo Resize changes the size of all your photos in that Share to a set size. Your original photos added to this Share can also be kept while a copy of the new resized version is created. The resized photos are saved to a folder on the Share named by the photo size you choose, such as 800x600. To configure a Share as a Photo Resize Active Folder, access Shares from the Iomega StorCenter ix2-200 Console, select a Share, and expand the Active Folders section to enable and configure it.
Refer to Managing Shares for more information on managing Shares and Active Folders.
Configuring a Photo Resize Active Folder
1.From the Iomega StorCenter ix2-200 Console, click Shares.
2.Select a Share to use as a Photo Resize Active Folder and click to expand the Active Folder section.
3.Check Enable.
4.Select Photo Resize from the drop-down menu.
5.You can set a size for your pictures. Select 640x480, 800x600, 1024x768, or enter a Custom Resolution for resizing images. The resized photos are saved to a folder on the Share named by the photo size you choose, such as 800x600.
6.You can keep a copy of the original by selecting Keep the original files after resizing.
7.To add a watermark to your photo, select Add a watermark to the photos. Click the Watermark file icon to apply a watermark image to your file.
8.Click Apply to save your changes.
9.Once configured, all of your photos in this Active Folder will be resized to your settings. Click View Content to see the files in this Share.
How do I...
manage a Share

29 |
Iomega StorCenter ix2-200 |
 Torrent Active Folders
You can optionally enable Active Folders on a Share, which enables you to associate this Share with a specific feature or operation that occurs automatically when files are copied to the Share.
How to Set Up a Torrent Active Folder
Torrent downloads allow you to share files using a peer-to-peer file sharing protocol. With Torrent Download, you can download files using the torrent protocol to your device and then those files can be uploaded by other torrent users. To configure a Share as a Torrent Active Folder, access Shares from the Iomega StorCenter ix2-200 Console, select a Share, and expand the Active Folders section to enable and configure it.
Refer to Managing Shares for more information on managing Shares and Active Folders.
Configuring a Torrent Active Folder
1.From the Iomega StorCenter ix2-200 Console, click Shares.
2.Select a Share to use as a Torrent Active Folder and click to expand the Active Folder section.
3.Check Enable.
4.Select Torrent from the drop-down menu.
5.Click General torrent settings to set up Torrent settings. Refer to Torrent Downloads for more information on configuring your Torrent downloads.
6.Click Apply to save your changes.
7.Click View Content to see the files in this Share.
How do I...
manage a Share

30 |
Iomega StorCenter ix2-200 |
 YouTube Active Folders
You can optionally enable Active Folders on a Share, which enables you to associate this Share with a specific feature or operation that occurs automatically when files are copied to the Share.
How to Set Up a YouTube Active Folder
YouTube is a social site to share video content. You can configure a Share as a YouTube Active Folder so that videos added to that Share are automatically uploaded to your YouTube account. To configure a Share as a YouTube Active Folder, access Shares from the Iomega StorCenter ix2-200 Console, select a Share, and expand the Active Folders section to enable and configure it.
Refer to Managing Shares for more information on managing Shares and Active Folders.
 If you do not have a YouTube account, go to the YouTube website to open an account.
Configuring a YouTube Active Folder
1.From the Iomega StorCenter ix2-200 Console, click Shares.
2.Select a Share to use as a YouTube Active Folder and click to expand the Active Folder section.
3.Check Enable.
4.Select YouTube from the drop-down menu.
5.Check Delete files after upload to delete videos from the Share once they are transferred to your YouTube account.
6.Click Apply to save your changes.
Once configured, all of your videos in this Active Folder will upload to your YouTube account.
7.Click View Transfer History to see the transfer activity from this Share to your account.
How do I...
manage a Share
 Loading...