

Iomega Jaz drive 1 GB, Jaz 1GB Installation Manual
dri ve
1GB
SCSISCSI
SCSISCSI
SCSI
Installation Guide
Check your SCSI (Small Computer System Interface)
connection.
Your computer MUST have an internal SCSI adapter or
connection for the Jaz drive.
• If you plan to use an Iomega SCSI adapter, install it NOW
using the installation guide shipped with the adapter; then
return to step 2 below. If you need to purchase an adapter,
call your Iomega dealer or 1-800-MY-STUFF.
• If you plan to use a non-Iomega SCSI adapter, refer to
"Non-Iomega SCSI Adapters" in the Jaz User's Guide.
M Windows NT Users You may need to install driver software for
your SCSI adapter. Refer to NTReadme.txt on the Windows NT Install
diskette for additional information. M
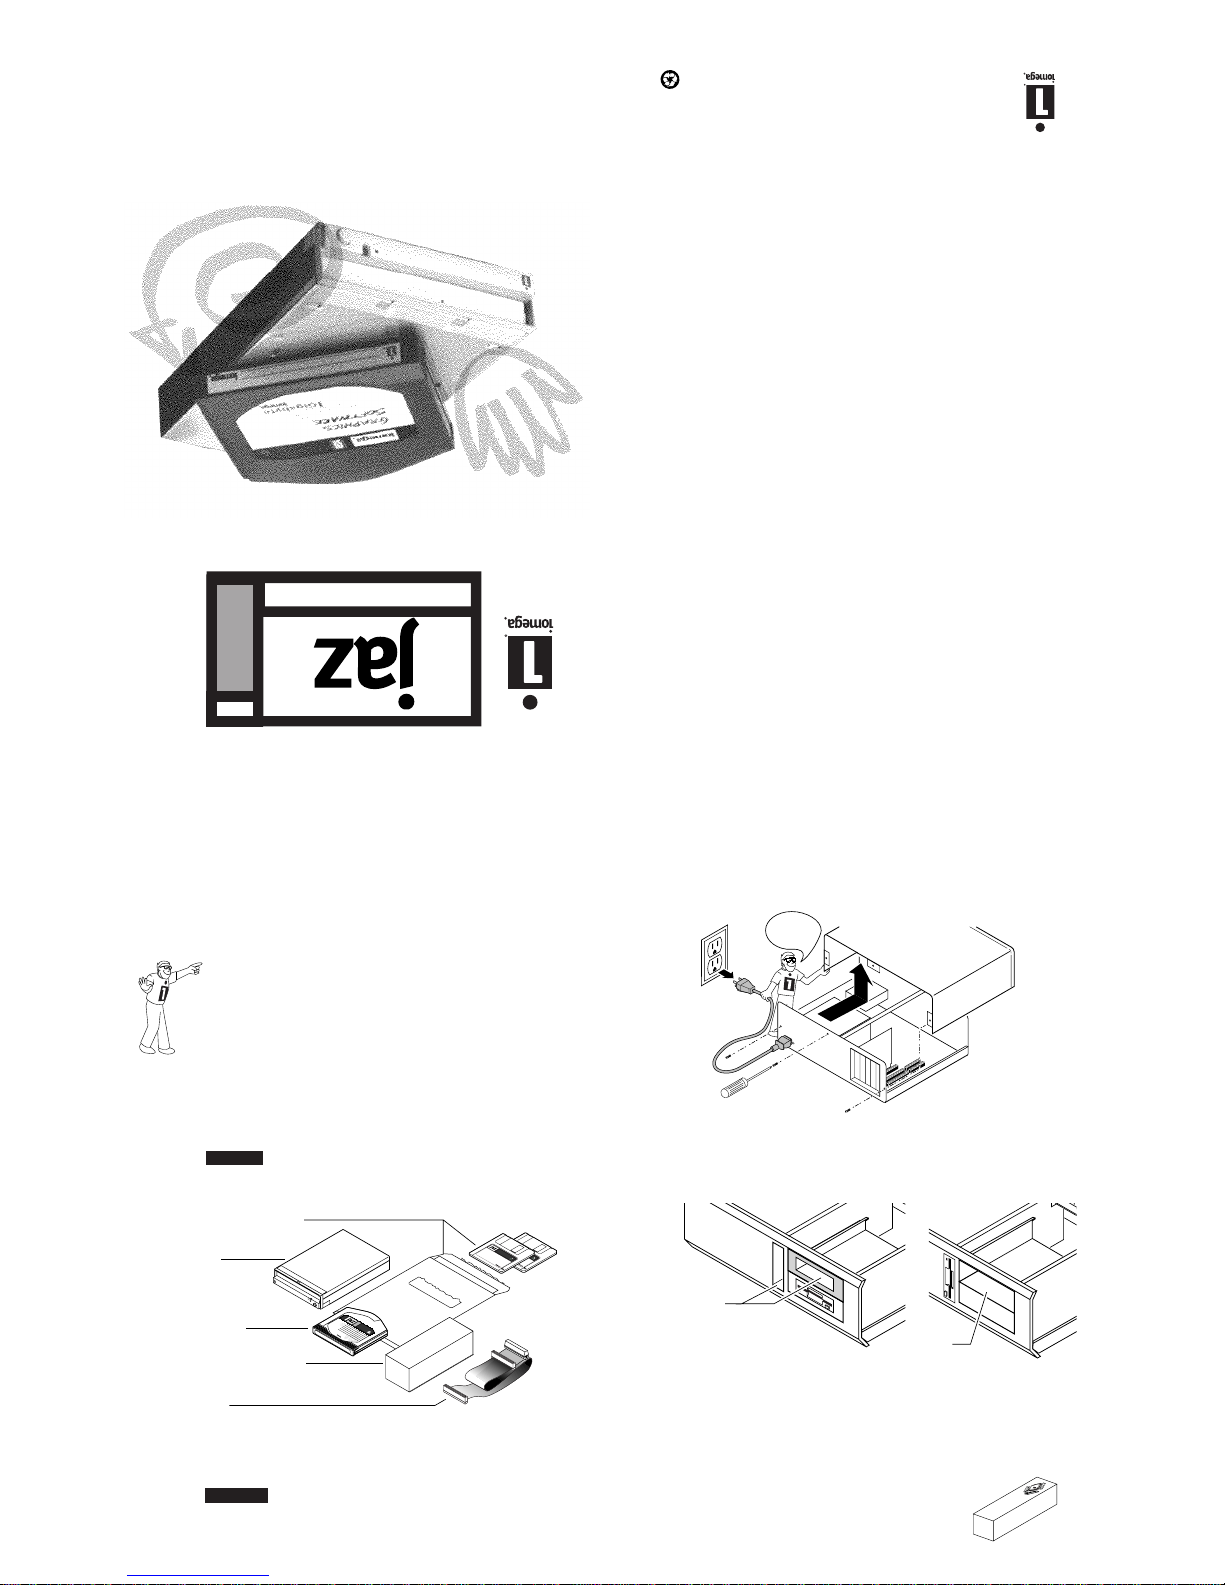
Unpack the Jaz drive and accessories.
CAUTION Before handling the Jaz drive, touch a grounded metal
object (like an unpainted metal screw on your computer) to
discharge any buildup of personal static electricity. M
Manuals and Install Diskettes
Jaz Drive
Jaz "tools" Disk
(contains Jaz Tools software)
Data Cable
3.5" Universal Installation Kit
(includes mounting screws)
3.5" UNIVERSAL INSTALLATION KIT
1
GB
1
GB
tools
Install
Windows/
DOS
Install
Windows/
DOS
Turn OFF the computer power switch, and
DISCONNECT the computer power cord.
WARNING Always disconnect computer electrical power before
beginning a computer hardware change. M
Remove the cover from your computer. (Refer to
your computer manual if removal is unclear.)
Disconnect
power
Locate a vacant 31/2-inch or 51/4-inch drive bay. See
notes in illustration for the next step.
31/2-inch Bays
(after selecting bay,
go to step 6)
5
1
/4-inch Bay
(after selecting bay,
go to step 5a)
51/4-inch drive bays ONLY:
Use the 3.5" Universal Installation Kit to assemble a 5.25"
mounting bracket and attach it to the drive, then go to step 6.
M Instructions for assembling the mounting
bracket are printed on the box. M
Installation Guide
1
2
4
5
5
a
Attach the left rail 1 to the faceplate 3 insert bottom
tab first, then repeat process for the right rail
Attach the DC cable 4 onto the connector of the disk drive.
Slide the disk drive into position, aligning the
bottom holes of the disk drive with posts of the bracket
assembly. Verify that no gaps are present on the faceplate.
Align the disk drive retaining clip 5 over the center of the disk
drive as pictured. Slightly flex the drive clip and push down until
both clip tabs engage the slots on the bottom of each rail.
NOTE: 6 Screws were provided in this kit to further secure
the brackets to the disk drive if desired,
however THIS IS NOT A NECESSARY STEP!
1–
2–
3–
4–
3
Iomega's Automated Help Systems
Internet Home Page: ............................................................ http://www.iomega.com
America Online™ ................................................................ Keyword: Iomega
Microsoft Network ............................................................... GoWord: Iomega
Automated FAX Help (U.S. & Canada only) ..................... 1-801-778-5763
Automated E-Mail................................................................ support@iomega.com
(Please type "Jaz" in the subject header when sending your E-Mail)
Iomega Bulletin Board ......................................................... 1-801-778-5888
8,N,1; 9600 baud and above; ANSI (24 hrs - Download only)
Repair and Return Information ........................................... 1-801-779-6100
(No technical support information is available at this number.)
One-on-One Iomega Technical Support
One-on-One Technical Support is free of charge for issues Iomega determines
relate to a defect in an Iomega product. Other issues are charged at the rate of
$19.99 per incident for Jaz products. You can call 1-888-4-IOMEGA, toll-free,
to charge the support cost to your credit card (VISA, MasterCard, American
Express, or Discover), or you can call 1-900-988-4747 to put the support cost
on your phone bill. Either way, the charge will be reversed if your issue is found
by Iomega to be due to a product defect.
Iomega's technical support associates are ready to take your call Monday
through Friday from 6 a.m. to 6 p.m. Mountain time (U.S. & Canada only).
European Support Numbers
Refer to the electronic manual included with your Jaz software package for a
complete list of European support numbers.
EN143604
Printed on recycled paper
®
© 1997 Iomega Corporation. Iomega, the Iomega logo and Jaz are registered trademarks of, and the graphic
swirl, hand, and eye are trademarks of, Iomega Corporation. All other product and brand names are the
property of their respective companies.
Check mounting requirements:
Your drive bay may require
side rails. (HINT: Use the same
side rails as on similar drives in your system. See your
computer dealer for any special hardware.)
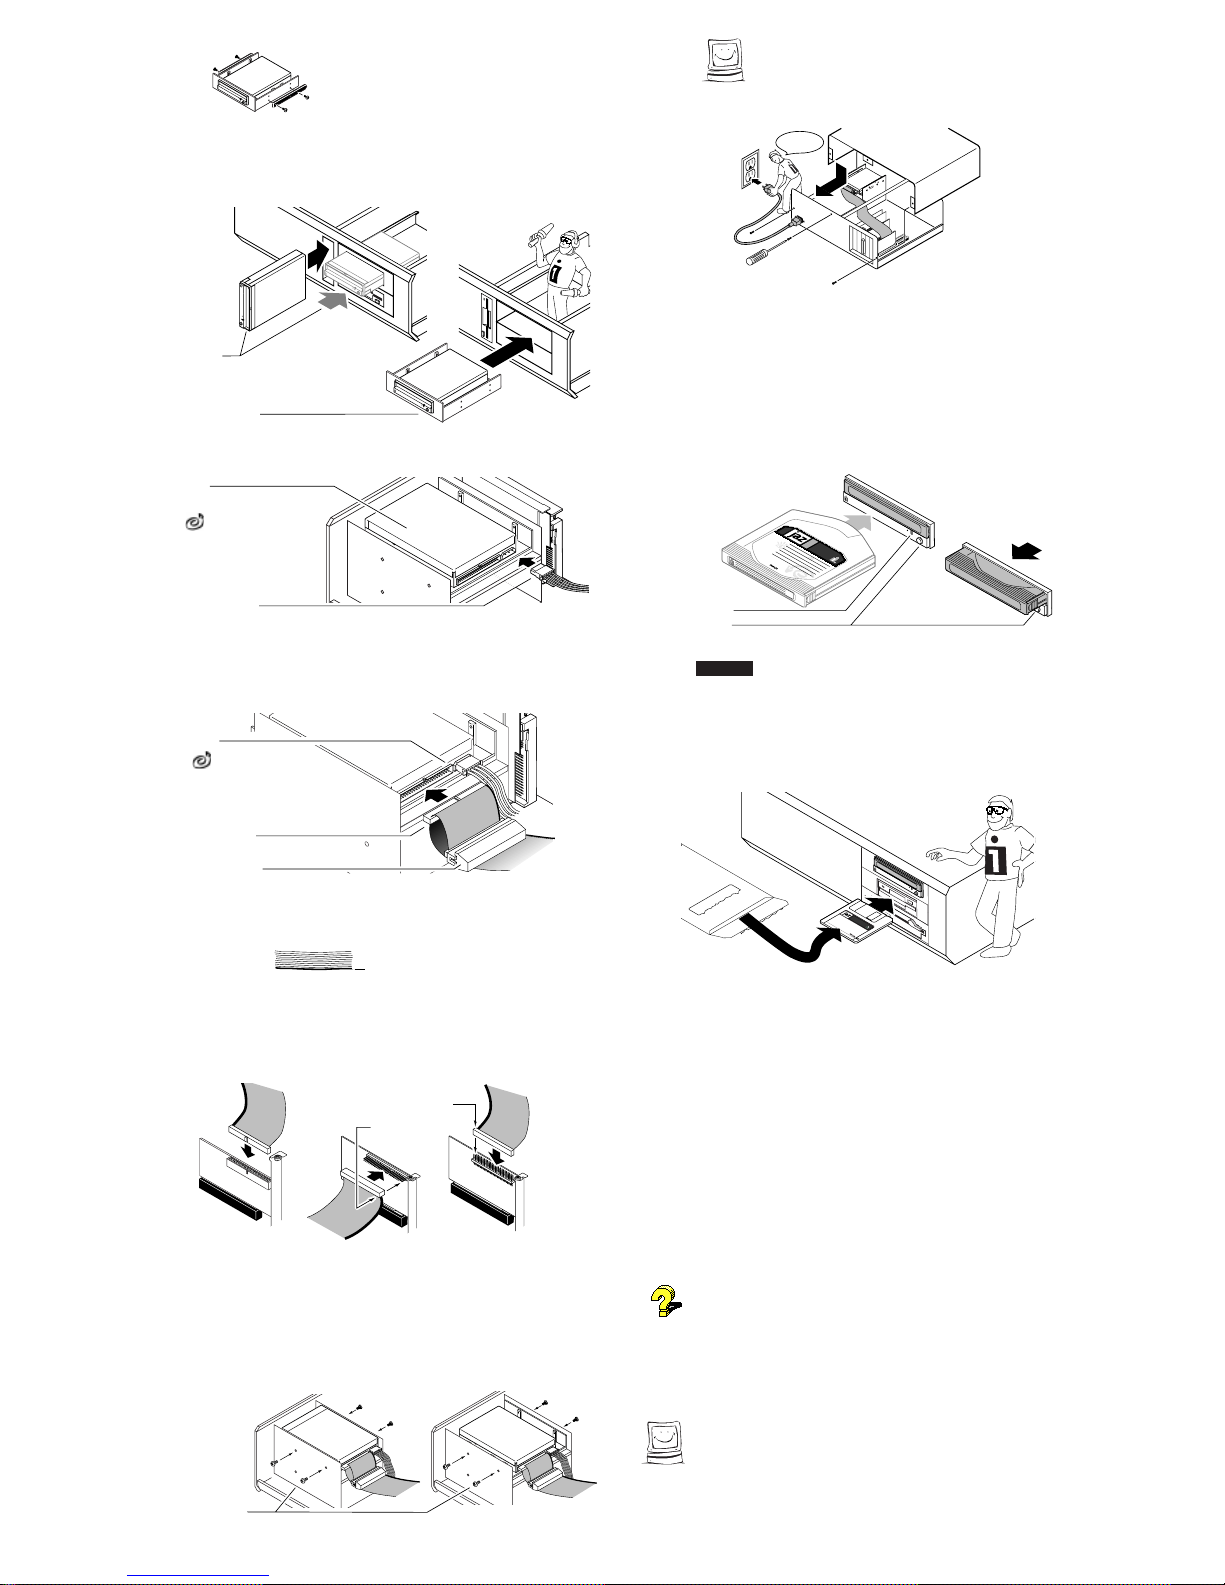
Slide the Jaz drive into the drive bay.
31/2-inch
Installations
5
1
/4-inch Installation
IMPORTANT! If your Jaz drive will be part of a
SCSI chain, check the SCSI ID BEFORE sliding the
drive into the drive bay. (See Jaz User's Guide.)
Connect a computer power supply cable.
Power Supply Cable
Jaz Drive
If your computer has no
spare power supply cable,
you will need to use a power
Y-cable. Call your dealer or
1-800-MY-STUFF to order.
Connect the data cable connector that is closest to
the termination block to your Jaz drive. (Connector
fits only one way.)
Jaz Drive
Cable Connector
Termination Block
Pin One
If there is more than one
internal drive in the SCSI chain, you
will need to use a different data cable
in order to daisy-chain your internal
devices. Call 1-800-MY-STUFF to order.
Find the colored stripe (or printing) on one side of
the data cable, showing PIN 1.
Stripe or printing shows the
PIN-ONE side of the data cable.
Connect the PIN 1 side of the data cable to
PIN 1 on the SCSI adapter (or other SCSI
connector). (Check the adapter documentation to
identify PIN 1 position.)
PIN 1
PIN 1
Some adapters have a
keyed connector to help
PIN 1 connection.
Some adapters have PIN 1
toward rear of computer.
Some adapters have PIN 1
toward front of computer.
Secure drive in drive bay using the screws included
in the 3.5" Universal Installation Kit. (If necessary,
refer to your computer manual for instructions on how
to access drive bay mounting holes.)
31/2-inch Drive Bay 51/4-inch Drive Bay with Bracket
Drive Bay Metric
Mounting Screws
Good job! Now check all connections,
arrange the cables to fit under the cover, and
replace the computer cover.
Reconnect
power
Reconnect power cord, turn ON power switch, and
wait for DOS or Windows to come up.
Gently insert the 1GB Jaz "tools" disk into the
Jaz drive.
The drive status light on the Jaz drive flashes as the disk spins up
and glows steadily while it acquires. When the light goes out, the
drive is ready to use. To eject a Jaz disk, push the disk eject button.
The drive will take a few seconds to spin down and eject the disk.
Drive-Status Light
Disk Eject Button
Disk shown
ejected from drive
Disk shown
fully inserted
1
GB
1
GB
tools
CAUTION Never put anything except Jaz disks into the Jaz drive as
this could damage your drive. M
Insert the Install diskette for your system into your
computer's floppy drive.
Use Disk 1 if your computer is running Windows 95, Windows 3.1,
or DOS. Use Disk 2 if your computer is running Windows NT.
Install
Windows/
DOS
Start the Setup or Install program as described
below and follow the screen instructions to install
your Jaz Tools software.
Windows®95 Users: Open My Computer and double click
on the floppy drive icon to open a window for Install Disk 1.
Double click on the Setup icon to install Tools 95 on your system.
Windows NT Users: Run SetupNT from Install Disk 2 to
install your ToolsNT software package.
Windows 3.1 Users: Start Windows. In the Windows
Program Manager, select the File menu and choose Run. In the
Command Line box, type a:setup if Install Disk 1 is in drive a: (or
b:setup if it is in drive b:), then click OK or press the Enter key.
DOS Users: Run GUEST.EXE from the DOS prompt for Install
Disk 1, then run INSTALL.EXE from the DOSSTUFF directory on
the Jaz "tools" disk. After the software installation is complete, run
RECLAIM.EXE from the DOSSTUFF directory. If you need detailed
instructions, refer to MANUAL.EXE on Install Disk 1.
If you need help, refer to "Troubleshooting" in the Jaz User's
Guide. The electronic manual (MANUAL.EXE) located on Install
Disk 1 also includes problem solving information for software
installations under Windows 95, Windows 3.1, and DOS.
M IMPORTANT! Your 1GB Jaz "tools" disk contains installation
files for your Jaz Tools software. Avoid deleting the installation files
for your system in case you need to reinstall your software. M
Congratulations! When the software installation
is complete, your Jaz drive will be ready to use.
Use your Jaz drive just like any other drive on your system. You can store
and copy files to and from the Jaz drive using the same methods you use
for your other drives. For more information about using your new drive
and Jaz Tools software, refer to the Jaz User's Guide.
13
6
7
8
9
10
11
12
17
16
15
14
EN143604
 Loading...