

Page 1
™
Installation and
User’s Guide
producer
multimedia
For Apple® Power Macintosh® G3
TM
Page 2

Welcome to Buz™Multimedia Producer!
The Buz package includes:
The Buz Card:
The Buz card is a PCI adapter that provides professional quality video capture, real-time
hardware Motion-JPEG video compression and video output.
It is also an intelligent, high-performance PCI* Ultra-SCSI** host adapter, ideally
suited for connection to Iomega’s Jaz
*PCI–Peripheral Component Interconnect – is a local bus interface that enables high
speed data transfer.
**SCSI (pronounced SKUH-zee) is an acronym for the Small Computer System
Interface - an industry standard for connecting peripherals to personal computers.
Check the Buz Box Connections section of this guide on page 8, for additional
technical information.
The Buz Box:
The Buz box is used to connect video devices such as a camcorder, VCR, laserdisk,
DVD or television to your computer through the Buz Box.
The Audio/Video Cable:
The A/V cable connects audio and video from your input devices, such as a camcorder,
to the Buz box, or the Buz Box to your output devices, such as a VCR or television.
®
drives and other fast SCSI devices.
Page 3

Macintosh installation CD:
Provides an integrated installer for:
• Adobe Premiere® 4.2 LE
• Buz Drivers and Utilities for Power Macintosh
Note: This software is based in part on the work of the Independent JPEG Group.
®
• Apple
• Apple AudioTuneUp 2.0
• Iomega RecordIt
QuickTime® 3 Pro
™
1.3
®
G3.
• Iomega Tools
It also contains a useful tutorial on
• How To Make Better Movies
This Installation Guide will lead you through the installation process including how to
connect your Buz Box to the back of your computer and to video and audio devices.
Iomega Buz EasyGuide for Adobe Premiere® 4.2 LE steps you through the software
basic functions such as capturing video and audio, editing, still capturing and saving
your productions.
The Welcome Packet:
The Welcome Packet contains registration information and important information
about accessories and other Iomega products.
Page 4

Buz Performance Characteristics
Video Specifications
Compression Hardware Motion JPEG (MJPEG)
Resolution Up to 720x480 at 29.27 frames per second (60 fields) NTSC
Up to 720x576 at 25 frames per second (50 fields) PAL/SECAM
Up to 24 bit (16 million) colors
Capture Format QuickTime Movie (Motion JPEG A)
Video Data Rate Capable of broadcast TV studio, without dropped frames
6.75 to 225 KB/frame; 200 KB/sec to 6.6 MB/sec; 3:1 to 100:1
compression (software selectable)
Production Format QuickTime Movie (Motion JPEG A or all available QuickTime 3
codecs)
Still Images Capture up to 720x480 (NTSC) or (720x576) (PAL/SECAM)
at 24 bit color from video
Video In/Out Composite (RCA) and S-Video (Mini DIN)
Audio In/Out Stereo RCA pass-through to the Macintosh sound ports
Capture at up to 16 bit stereo 44.1KHz
System audio synchronization
SCSI Specifications
Technology Ultra SCSI (Narrow)
Transfer Rates Up to 20MB/sec burst
Interfaces 32 bit PCI bus mastering, PCI 2.1 compliant, Plug and Play
Connectors 50-pin internal and high-density 50-pin external connectors
SCSI Addresses Adds seven fast SCSI addresses to your Macintosh
Page 5

Index
Installation Guide ................................................................................ 2
Install Your Software............................................................................ 7
Buz Box Connections .......................................................................... 8
Video/Audio Connections ................................................................. 14
Optimizing Your System.................................................................... 15
Your Legal Responsiblities.................................................................. 16
SCSI Guidelines ................................................................................ 17
Software Features ............................................................................... 18
Special Notes ..................................................................................... 19
Adobe Features Not Supported .......................................................... 21
How To Get Help ............................................................................. 22
Regulatory Agency Statements ........................................................... 26
Page 6

Installation Guide
M NOTE: Buz Multimedia Producer is a technologically sophisticated package.
It is recommended that you disable all system crash recovery, anti-virus software, or
other background-running software. Also check the ‘Optimizing Your System’
section on page 15 of this guide. M
Contents:
CD ROM
Buz Installation Guide
Iomega Buz EasyGuide
For Adobe Premiere 4.2 LE
Buz Card
A/V-Cable
Buz Box
M VERY IMPORTANT! View the video tutorial on installing the Buz card in
your Macintosh G3 before following the instructions in this Installation Guide.
Insert the Buz Installation CD in your CD-ROM drive, double click on Start Here
and choose Hardware Install Guide. M
Buz installs on three types of Apple Power Macintosh G3 systems: Mini Tower,
Desktop and All-in-one.
2
Page 7
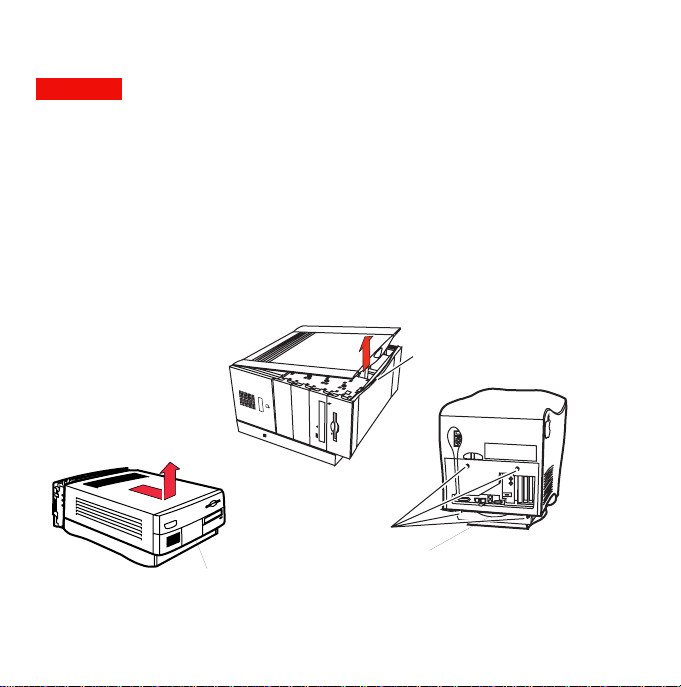
1. Remove the computer cover.
CAUTION If you are unsure about how to open your computer, please refer to the
user’s manuals that came with your system. M
Lay the Mini Tower G3 on its side, press the latch button, lift the cover panel up a few
inches, and lift it off.
On the Desktop G3, remove the holding screw, press the security bar in the center,
then press the release latches on each side and slide the cover forward, as shown in the
graphic.
The Power Mac All-in-one G3 has four screws on the back of the computer that must
be removed.
MINI TOWER G3
Lay tower on its side
DESKTOP G3
Remove 4 screws
Pull out logic board tray
Remove screw,
press the security bar
then press the Release Buttons
Latch Button
Lift cover up and off
All-IN-ONE G3
3
Page 8

2. Open the computer.
The Mini Tower G3 has two green colored locking levers. Pull the levers up and out to
release the chassis, then open the chassis by pulling up the big brown handle.
Pull the All-in-one G3 logic board tray out carefully until it stops. Be careful that you
do not tip the computer over.
On the Desktop G3, pull the card cage plastic cover up to reveal the PCI slots.
(Not shown.)
Unlock the top chassis
by pulling the two
green locking levers
upward and outward
MINI TOWER G3
Use the handle to
carefully open the chassis
Pull logic board
tray out until it stops
ALL-IN-ONE G3
4
Page 9
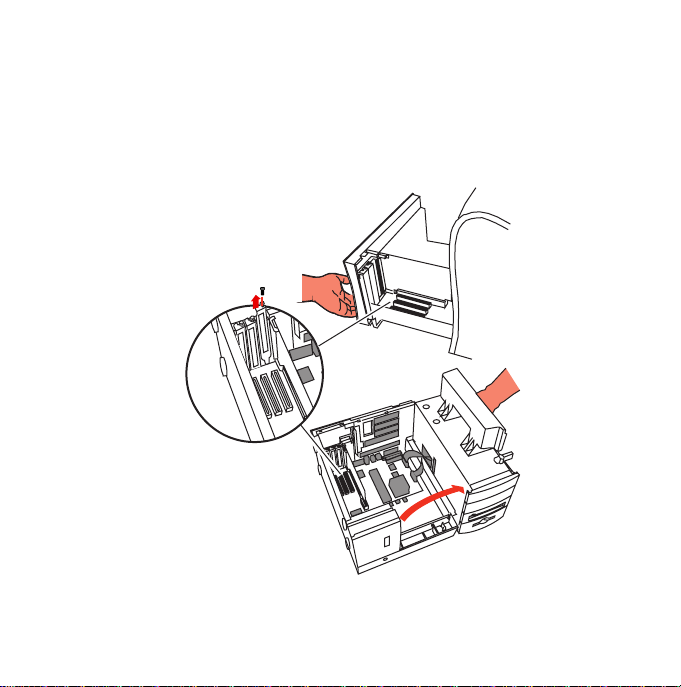
3. Locate any vacant PCI expansion slot and remove
the expansion slot cover.
(Save the slot cover screw for use in the next step.)
Support the tray with
your hand while installing
the Buz card
PCI slots
Remove slot cover
and retain screw
MINI TOWER G3
Swing the chassis open until
it rests firmly on the work surface
ALL-IN-ONE G3
5
Page 10
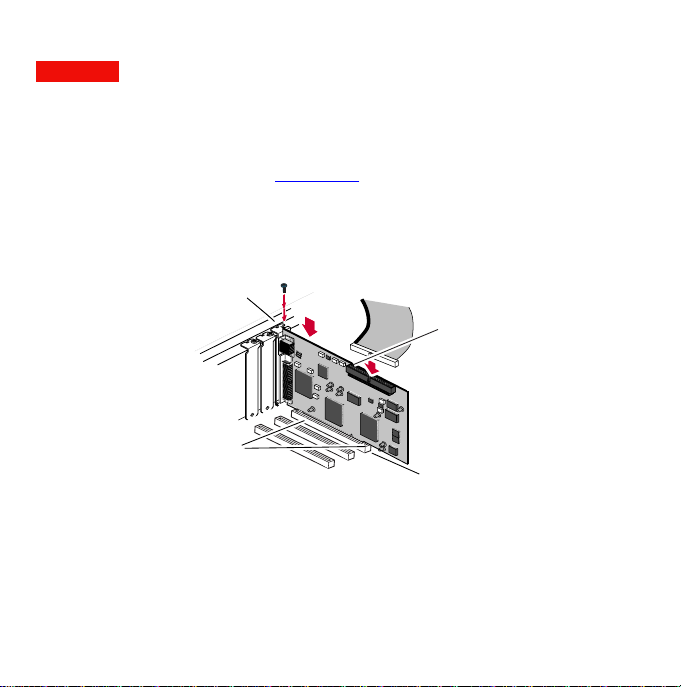
4. Unpack the Buz card.
CAUTION Touch a grounded metal object to discharge any build-up of static
electricity before handling the Buz card. M
Handle the card by its edges. If you lay it down, place it on the static-proof bag it is
shipped in.
5. Push the Buz card FIRMLY into the PCI slot, then
replace the PCI slot cover screw.
Optional:
Bracket
flush to chassis
Connector
fits evenly
Ensure the bracket fits flush against the chassis. The connector should fit evenly on
both ends of the PCI slot to ensure a good connection.
M Optional internal drive installation: If you are connecting an internal SCSI
drive to the SCSI connector on your Buz card, you may want to install or connect it
at this time.M
Connect internal
SCSI device Data
cable here
Pin 1
PCI slot
6
Page 11

6. Install your software.
Start your computer. Put the Buz Installation CD into your CD-ROM drive.
• Double click on the Start Here icon. Choose install software.
Note: The system will prompt you to restart your computer a few times through the
installation process.
• The default install settings wi ll automatically install the software drivers and will
create the Iomega Buz folder on your hard drive and will install all of the Buz software
pieces (drivers, applications, utilities, etc.).
At the end of the software installation you will be asked to register your Buz
Multimedia Producer. The serial number is located on the label on the bottom of the
Buz Box.
NOTE: When launching Adobe Premiere 4.2 LE for the first time, you will be
asked to enter your serial number. Enter MSM420B7147935-100-345 in the
serial number field. M
7
Page 12

Buz Box Connections
1. Connect the Buz box cable to the Buz card on the
back of your computer.
The longer connector on the back of the Buz card is the connector for external SCSI
devices (such as Jaz drives). A variety of SCSI devices can connect to the Buz card. See
your SCSI device documentation for proper connection. Also see the SCSI Guidelines
section in this booklet.
Buz Card Connectors
SCSI Connector
M Optional: If you are connecting an external SCSI device to the Buz card, it will
be easier to connect it before connecting the Buz box fifteen-pin connector. M
M NOTE: If your external SCSI device does not match the connector on the back
of the Buz card, purchase a quality cable converter from your dealer or call 1-800
MYSTUFF. M
Fifteen-Pin Connector
8
Page 13

Buz Box connector: The fifteen-pin connector from the Buz Box goes to the matching
connector of the Buz card. Look at this plug carefully. Check orientation before
connecting. After connecting, tighten the thumbscrews. Avoid bending any pins.
Audio In: The smaller of the two Buz audio connectors is the Audio In connector.
Connect it to the Microphone port on the back of your computer.
Look for the MICROPHONE symbol:
Plug the 'Audio In' connector into the
Microphone port on the back of your computer
'Audio in' Connector
from Buz Box
9
Page 14

Audio Out: The larger of the two Buz audio connectors is the Buz Audio Out Passthrough connector. It should be plugged into the speaker port on the back of your
computer. If you have a connector for external speakers already plugged into the
speaker port, disconnect and reconnect it into the back of the Pass-through connector
so your speakers will continue to work.
Note: If you don’t hear sound when playing videos on your computer, you may need to
unplug the Pass-through connector to hear sound through your computer’s internal
speaker.
CAUTION When you want to play your videos out to a VCR or TV, remember to
reconnect the Pass-through connector into the back of your computer or no audio
will go out to the VCR or TV. M
Look for the SPEAKER symbol on the back of your computer.
Plug the Buz Audio Out Pass-through connector
into the speaker port on the back of your computer
Unplug your existing
External 'Speaker Out'
connector and reconnect it
into the back of the Pass-through
Audio Out
Pass-through
connector
10
Page 15

CAUTION The clearance surrounding the
External ‘Speaker Out’ connector on the Mini
Tower G3 with the Personality card is limited.
You may need to apply pressure to the Passthrough connector for a good connection.
Take care to not damage the connector or the
input. M
Buz Audio In
Connector
Buz Audio Out
Pass-through Connector
Your Existing
Speaker's Connector
External SCSI Connector
Buz Box
Connector
NOTE: The back of your Macintosh may not look the same as the graphic. If you
are unsure about the connections , refer to your Power Macintosh G3 User’s
Guide. M
11
Page 16

4. Plug your audio and video input and output
devices into the Buz Box.
Buz Box Connections
Input from Source
Side
Audio Left Channel
Audio Right Channel
S-Video Input
Composite Video Input
CAUTION Do not connect your audio equipment to the composite video input
or output jack. You could damage your equipment or your Buz card. M
Output to Storage
Side
Composite Video
Output
S-Video Output
Audio Right Channel
Audio Left Channel
Audio Input/Output: The Buz Box uses universal color codes for video and audio
connectors. The left-channel is WHITE and the right-channel is RED. Simply match
the colors for proper connection.
If your video equipment has a single audio connector, connect it to the Left or WHITE
channel. You will not be using the right channel, or RED connector.
Composite Video Input/Output: The RCA connector for composite video uses
the universal yellow color code. Composite video connectors are the same type as the
RCA audio connectors; do not connect audio to this jack.
12
Page 17

If your Power Macintosh G3 system has the Personality card installed, it is equipped
L
R
OUT
IN
with high quality audio inputs. You may want to connect RCA audio connectors
directly to these rather than connecting through the Buz box. If you do, you must
change your settings in the Control Panel setting: Monitors and Sound/ Sound/Sound
Monitoring Source/RCA in. If your are unsure how to connect to the back of your
computer, consult your G3 User’s Guide.
Buz Audio Out Pass-through
Connector
Bus Input
to MIC IN
RCA Input to
Personality Card
S-Video Input/Output: This cable is not included in
the Buz package. The four-pin S-Video input is used with
some video equipment such as VCRs, video cameras or
televisions. This plug has a small ‘key’ on the connector that
directs you to plug it in correctly. Look closely at your S-
Video connector and plug for correct orientation.
Key
S-Video Connector
13
Page 18

Video/Audio Connections
Video: If your camcorder or VCR has an S-Video connector, use it for better video
quality.
To select S-Video, launch Adobe Premiere 4.2 LE. Select File, then Capture, then
Movie Capture. A new menu item appears: Movie Capture. Select the Video Input
command in this menu. Choose Source in the pop-up menu and S-Video in the Input
pop-up menu. Click OK.
Input Devices: Connect the ‘OUT’ connectors of your camcorder, VCR, DVD,
etc., into the ‘IN’ side of the Buz Box.
Output Devices: (Output devices are not necessary for Buz to function properly.)
Connect the ‘OUT’ connectors from the Buz Box to the ‘IN’ connectors on your
output device (VCR or other). If a television is hooked to your VCR you’ll be able to
monitor output. Consult your VCR and TV manuals to select the proper channels to
view video from an external source like Buz.
Typical Camcorder, Buz, VCR/TV Hookup
Audio
Output
"IN" Side
Video
Output
VCR or TV
Input
"OUT" Side
14
Page 19

Optimizing your System
Get the best performance from Buz by optimizing your system before you start to use
Buz:
• Go through the configuration instructions at the beginning of the Iomega
Buz EasyGuide for Adobe Premiere 4.2 LE to setup your system for use
with Adobe Premiere.
• Use third party software if you have any, to defragment or otherwise
optimize the target drive for your captured video.
• Iomega Jaz drives and disks are ideal storage solutions for video capture
and production. Make sure to turn off write verification (using the
Iomega Tools application) and to use new or newly formatted disks for
optimal performance. (Use the long format option.)
• Turn OFF virus protection software, disk utilities and backgroundrunning software.
• Turn off AppleTalk to disconnect from any network.
• Before running Adobe Premiere, quit all other applications.
15
Page 20

Congratulations!
You have successfully installed your new Buz Multimedia Producer.
The next step in optimally configuring your system and becoming familiar with Buz is
to carefully read the Iomega Buz EasyGuide for Adobe Premiere 4.2 LE. This tutorial has
been created to let you quickly gain proficiency with this powerful video editing
software program. We also recommend that you view the ‘How to Make Movies’
tutorial. To view this video, insert the Buz Installation CD in your CD-ROM drive
and double click Start Here, then select How to Make Better Movies.
Have Fun!
Your Legal Responsibilities
Photographs, artwork, recordings and videos created by others, including material from
the Internet, television/radio broadcasts, and any other media, are generally covered by
copyright and other laws. Whenever you use content which you did not create, or any
recording of a person other than yourself, get permission from the owner of the material
or the person you have recorded. Failure to get permission could put you at risk of
copyright infringement or other liability.
16
Page 21

SCSI Guidelines
The Small Computer System Interface (SCSI) is an industry standard for connecting
peripherals to personal computers. SCSI guidelines define how to connect more than
one SCSI device to the same SCSI connection (either built-in or from a SCSI host
adapter).
A SCSI chain is a series of SCSI devices cabled one to another on a single SCSI
connection. When using Ultra SCSI, it is important to use only shorter, premium
quality data cables for any drives connected to the Buz card.
Ensure the combined length (external and internal) of a SCSI chain using Ultra SCSI
does not exceed l.5 meters (about 5 feet).
The Buz card is factory set at SCSI ID 7 with automatic termination and provides
termination power to the bus. For detailed installation information, consult your SCSI
device’s installation manual.
Ultra SCSI Configuration
The Buz adapter card is shipped with the Ultra SCSI function turned on.
Refer to the Iomega Tools folder located in the Iomega Buz folder on your hard drive
for software utilities and information about your Iomega Jaz or Zip® drive.
17
Page 22

Software Featur es
Creating productions can be easy and fun using the software included in Buz
Multimedia Producer.
RecordIt
package from Iomega allows you to record music, conversations, even lectures and
meetings on your computer (directly to Jaz and Zip disks if you have any!)
• Record from a microphone or analog audio source connected through the Buz Box.
• Record audio files from a compact disc, then take those recordings anywhere there
• Compile your favorite audio tracks from multiple sources onto a single Jaz or Zip
• Play recorded files directly from Jaz or Zip disks.
• Integrate your RecordIt files with your video productions. (Consult the last section
Adobe Premiere is a powerful program for creating great videos on your computer.
Use the Iomega Buz EasyGuide for Adobe Premiere 4.2 LE to help you get the basics for
creating movies in Premiere. Study the Premiere LE User’s Guide pdf file (located in
the Adobe Premiere 4.2.1 LE ƒ folder on your hard drive) for getting acquainted with all
the features of this powerful software.
Apple QuickTime 3 Pro. Buz features the fully enabled version of Apple’s
QuickTime 3 (called QuickTime 3 Pro) when the Buz card is installed on your system
and the Buz extensions are enabled. QuickTime 3 Pro offers many advanced features
including an enhanced version of MoviePlayer, powerful file conversion, real-time
effects and transitions, slide-shows and Web streaming.
Iomega Jaz products are excellent choices for capturing, previewing,
storing and playing back audio and video.
TM
is audio recording software for your computer! This new multimedia
is a Jaz or Zip® drive.
disk.
of the Iomega Buz EasyGuide for Adobe Premiere 4.2 LE for instructions.)
18
Page 23

Special notes about Adobe Premiere and Buz
For additional information not included here, review the Read Me file located in
the Iomega Buz folder on your hard drive. For the most up-to-date Buz
information visit the Iomega web site at URL: http://www.iomega.com/buz
Switching between NTSC and PAL modes
Use the Buz Video control panel to switch between NTSC and PAL. Make sure you quit
Adobe Premiere before switching.
Data rate issues
Buz is capable of producing video at very large data rates (6+MB/sec), which Adobe Premiere
can handle too. However, if your storage solution is not fast enough, performance problems
may occur (such as jerky playback, dropped frames, etc.).
To resolve these issues, you can:
• Use a faster storage solution (File/Preferences/Scratch Disks… to set your capture drive).
• Use third party solutions to defragment your drive if it is too fragmented.
• Lower the data rate of your video capture Compression Settings dialog in Adobe Premiere.
(Select File/Capture/Movie Capture. From the Movie Capture menu that then appears, select the
Video Input... menu command and Compression popup menu.)
“I get big black borders when playing back 720x480 (or 720x576)
videos”
Videos of this size are too big to play smoothly on the computer screen at full size. The Buz
driver resizes them automatically for smooth playback. Video output, as you will see, will still
be playing at its highest resolution.
19
Page 24

“I checked my data rate, but video playback is still jerky on my
computer monitor”
In order for Buz to provide optimal playback performance, make sure that the Premiere
Preview window or Clip window is fully visible on your monitor and not overlapped by any
other element. Also make sure your monitor is set to thousands of colors.
“Why is my last video frame always displayed on my TV monitor?”
The purpose of the Iomega Buz Startup file (located in the Startup Items folder of your System
folder) is to provide optimal Bu z performance in certain areas of Ado be Premiere LE. You
can dis able it if it annoys you by using the Extensions Manager. Locate the Iomega Buz Startup
item in the ‘Startup Items’ category of the Extensions Manager and disable the item by
removing the check mark. However, note tha t disabling this item will cause unwanted color
bars to appear in your video output at times. We recommend that you keep it enabled.
“I get jerky transitions in my productions”
Set the values for Type and Audio Blocks in the Make/Output Options... to the following:
• For video sizes 176x120, 176x144, 352x240 and 352x288: set Type to Full-Size Frame and
Audio Blocks to 1/2 second.
• For video sizes 720x480 and 720x576: set Type to Field 1 (upper) and Audio Blocks to 1/2
second.
“I suspect that Adobe Premiere LE is tight on memory availability”
It is important that 4MB of system memory be available for the Buz driver to perform
optimally. After you have launched Adobe Premiere, switch to the Finder, choose About this
computer in the Apple menu and verify that at least 4MB of memory are free. If this is not the
case, quit any other open application and reduce the memory allocation of Adobe Premiere if
necessary.
“How can I use Buz with the full edition of Adobe Premiere 4.2 or 5.0?”
Please visit our web site at http://www.iomega.com/buz for special instructions and files.
20
Page 25

Adobe Premiere features curr ently not
supported by Buz
For additional information not included here, review the Read Me file located in
the Iomega Buz folder on your hard drive. For the most up-to-date Buz
information visit the Iomega web site at URL: http://www.iomega.com/buz
The Buz driver supplied with the present Installation CD does not currently support the
following features of Adobe Premiere. We invite you to regularly check www.iomega.com for
possible updates fixing some of these issues over time.
Print to Video, with Zoom enabled.
Uncheck the Zoom screen option in the Print toVideo dialog.
Productions made of clips of different resolutions and/or codec types.
Make sure you convert these clips to the Buz Motion-JPEG codec and the resolution of your
production.
Smooth playback of clips in reverse mode in a Clip window.
21
Page 26

How to Get Help
Iomega’s goal is to provide state-of-the-art support for its customers. Over time, our support
options and pricing policies may change in light of evolving technology and global changes across
the computer industry. This section of the manual contains information on the support options
available at the time this manual was prepared. For up-to-date support information, contact
Iomega’s Home Page on the World Wide Web or call our automated FAX-back help system at
1-801-778-5763.
Iomega’s Home Page: http://www.iomega.com
If you have access to the Internet, Iomega’s home page offers you advanced problem-solving
support readily available 24 hours a day from a single Web site. Here’s just some of what’s
available from our home page:
Latest drivers and other upgrades – Just download a single executable file, then run
it to update your Iomega drivers or Tools software installation.
“i-man” Iomega’s virtual consultant, works with your Web browser to offer individualized
problem solving for all Iomega products. “i-man” uses CBR(case-based reasoning) to interactively
diagnose your problem and guide you through a solution. “i-man” is like having a personal
support technician available 24 hours a day!
PDF library for Iomega manuals, installation guides, and user’s guides. Use the PDF library
to find the manual you’ve mislaid or updated documentation for the drive you bought last year.
All you need to view and print the latest Iomega documentation is the Acrobat Reader. If you
don’t already have the Acrobat Reader installed on your system, you can download it from
Adobe’s Web site: http://www.adobe.com.
HTML document library – A complete collection of support white papers for all Iomega
products. Documents can be viewed and browsed directly within leading Web browsers. Any
document you want to keep for reference can be printed directly or downloaded to your local
system.
22
Page 27

Automated Voice Technical Support:1-800-879-7660*
This free, 24 hour support option allows you to use a touch-tone phone to quickly and easily
access pre-recorded solutions to common problems. Just dial 1-800-879-7660* and the
automated voice technical support system will guide you through a series of questions to an easyto-follow solution.
*1-800-879-7660 is available in the U.S. and Canada.
Support Forums – America Online
If you use the America Online service, you have access to Iomega support forums for Zip, Jaz,
and Ditto products. All forums include hypertext links to Iomega’s Home Page on the Web so
that you can readily access our total Internet solutions.
SM
America Online Keyword: Iomega
Automated FAX-back Help: (801) 778-5763 (U.S. & Canada)
Our FAX-back automated help system allows you to use any touch-tone phone to instantly
retrieve detailed support information to your FAX machine. When you call our FAX-back help
number, you can order a catalog listing the FAX-back documents available for your Iomega
product, or any document listed in the catalog. Just follow the voice instructions to order what
you need.
23
Page 28

One-on-One Iomega Technical Support
If you don’t have access to the Internet or a FAX machine and you have a problem you just can’t
resolve using our automated voice technical support system or the troubleshooting information in
the manual, you can call One-on-One technical support for help.
Before calling Iomega for technical support, turn on your computer and call from a phone at or
near your computer. You may be asked to type commands at the keyboard or relay information
about the system.
If your Buz card or Buz Box is under warranty, One-on-One technical support is provided free of
charge (i) during the warranty period for a consecutive 30-day period beginning with the first
call, and (ii) for those calls during the warranty period in which your product is determined to be
defective. Other calls are charged at the rate of $14.99 per incident. You can call 1-888-4IOMEGA*, toll-free, to charge the support cost to your credit card (VISA, MasterCard,
American Express, or Discover), or you can call 1-900-988-4634** to put the support cost on
your phone bill. Your credit card will not be charged if your Buz card or Buz Box are still under
warranty and (i) if your call is made within thirty days from your first call for technical support,
or (ii) if your product is determined to be defective. Technical support fees are subject to change
without notice.
Iomega's highly trained technical support associates are ready to take your call Monday through
Friday from 6 a.m. to 9 p.m. and Saturday from 7 a.m. to 2 p.m. (Mountain Time). Technical
support hours are subject to change.
*1-888-4-IOMEGA is available in the U.S. and Canada.
**1-900-988-4634 is a toll call of $14.99. This number is available only in the U.S.
Product Return or Repair
For information on returning your Buz card, Buz Box, or other Iomega product for warranty
service (or repair after the warranty period), please call the Iomega Customer Satisfaction Hotline
at 1-888-4-IOMEGA. Because many returns are found to be due to a technical problem rather
than a defective product, you may want to check with Iomega Technical Support before
returning your product - our trained support personnel can often resolve the problem over the
phone. If you choose to contact Technical Support, you will not be charged the standard support
fee for the call if your Iomega product is still under warranty and is determined to be defective.
24
Page 29

Warranty Information
Your Buz card and Buz Box have a one-year limited warranty from the date of purchase. For
complete warranty information, refer to the warranty card included with your product. If you
have a question about the limited warranty on your Buz card, Buz Box, or other Iomega product,
please call 1-888-4-IOMEGA and choose the option for warranty information. If you choose to
contact Technical Support, the standard support fee may apply.
The Buz package contains third-party software which is not warranted by Iomega. For technical
support relating to that software, contact the vendor listed.
Product Information
Call 1-800-MY-STUFF for information on new Iomega products, promotions, and rebates. You
can also purchase Iomega products over the phone using your credit card (VISA, MasterCard,
American Express, or Discover). Simply select the option of interest to you. Press the pound sign
(#) if you want to return to the main menu.
International Support Numbers
For information on international customer support options and phone numbers, contact the
Iomega Web site at http://www.iomega.com.
Adobe Premiere 4.2 LE Fee-Based Technical Support
Tel: (206) 675-6205
Adobe web site http://www.adobe.com
Asia-Pacific Technical Support
Singapore Regional Customer Support Service Centre
750E Chai Chee Industrial Park #05-05 Singapore 469000
Tel: 65-245-9442 Fax 65-329-5580
Hong Kong: Tel: 852-2197-7722 Fax: 852-2197-7721
Australia: Tel: 612-9925-7799 Fax: 612-9925-7788
Japan: Tel: 03-3432-1510 Fax: 03-3432-2055
Email Support: custsvc@iomega.com
25
Page 30

Regulatory Agency Statements
United States FCC Information
The computer equipment described in this installation guide generates and uses radio frequency
(RF) energy. If the equipment is not installed and operated in strict accordance with the
manufacturer’s instructions, interference to radio and television reception may result.
M Interference This equipment complies with Part 15 of the FCC Rules and its operation is subject
to the following conditions: (1) the equipment may not cause harmful interference, and (2) the
equipment must accept any interference received, including interference that may cause undesired
operation. M
Part 15, Class B, of the FCC Rules, is designed to provide reasonable protection against radio and
television interference in a residential installation. Although the equipment has been tested and
found to comply with allowed RF emission limits, as specified in the above cited Rules, there is no
guarantee that interference will not occur in a particular situation. Interference can be determined
by turning the equipment off and on while monitoring radio or television reception. The user
may be able to eliminate any interference by implementing one or more of the following
measures:
• Reorient the affected device and/or its receiving antenna.
• Increase the distance between the affected device and the computer equipment.
• Plug the computer and its peripherals into a different branch circuit from that used by the
affected device.
WARNING Only the manufacturer’s cable or an equivalent double shielded, host interface cable
should be used with external subsystems. Other types of cables may violate FCC rules and regulations.
Also, changes or modifications to the electronics or enclosure of this product must be expressly
approved by Iomega; otherwise, the user’s authority to operate the equipment may be voided by the
FCC.
M
26
Page 31

FCC Declaration of Conformity
The Buz Multimedia Producer PCI card has been tested and found to comply with the limits for
a Class B digital device, pursuant to part 15 of the FCC rules. Model: Buz. Manufacturer’s
Name: Iomega Corporation. Manufacturer’s Address: 1821 West Iomega Way, Roy, UT, USA.
Manufacturer’s Telephone Number: (801) 778-1000. Responsible Party: John Glavin.
Canadian DOC Information
This digital apparatus does not exceed the Class B limits for radio noise emissions from digital
devices as set out in the Radio Interference Regulations of the Canadian Department of
Communications.
Declaration of Conformity
The Buz Multimedia Producer is CE certified and conforms to the following Directive(s) and
Standard(s): Application of Council Directive(s): 89/336/EEC. Standard(s) to which Conformity
is Declared: EN 55022, EN 50082-1. Manufacturer’s Name: Iomega Corporation.
Manufacturer’s Address: 1821 West Iomega Way, Roy, UT, USA. Importer’s Name: Iomega
Netherlands branch of Iomega International S.A. Type of Equipment: Multimedia Producer.
Model No.: BUZ. Netherlands branch of Iomega International S.A
27
Page 32

© 1998 Iomega Corporation. Iomega, Jaz, Zip and the stylized “i” logo, are registered trademarks of,
and Buz, Buz Multimedia Producer, RecordIt are trademarks of, Iomega Corporation. Adobe and Adobe
Premiere are trademarks of Adobe Systems Incorporated which may be registered in certain
jurisdictions. Apple, the Apple logo, Mac, Macintosh, the Mac OS logo, Power Macintosh and
QuickTime are trademarks of Apple Computer, Inc., registered in the U.S. and other countries. All
other product and brand names are the property of their respective owners.
EN602400
 Loading...