

Page 1
Solara Ventilator Tray Option
Assembly, Installation and Operating Instructions
SAVE THESE INSTRUCTIONS
NOTE: Check all parts for shipping damage. In case of
damage, DO NOT use. Contact Carrier/Invacare for further instructions.
SAFETY SUMMARY
The following recommendations are made for the safe
and proper installation and use of the Ventilator Tray:
GENERAL WARNINGS
DO NOT install this equipment without first
reading and understanding this instruction
sheet. If you are unable to understand the
Warnings, Cautions and Instructions, contact
a healthcare professional, dealer or technical personnel if applicable, before attempting to install this equipment - otherwise, injury or damage may occur.
D. Refer to
VENTILATOR ARMS ONTO THE
VENTILATOR TRAY/CHAIR
FRAME in this Instruction Sheet.
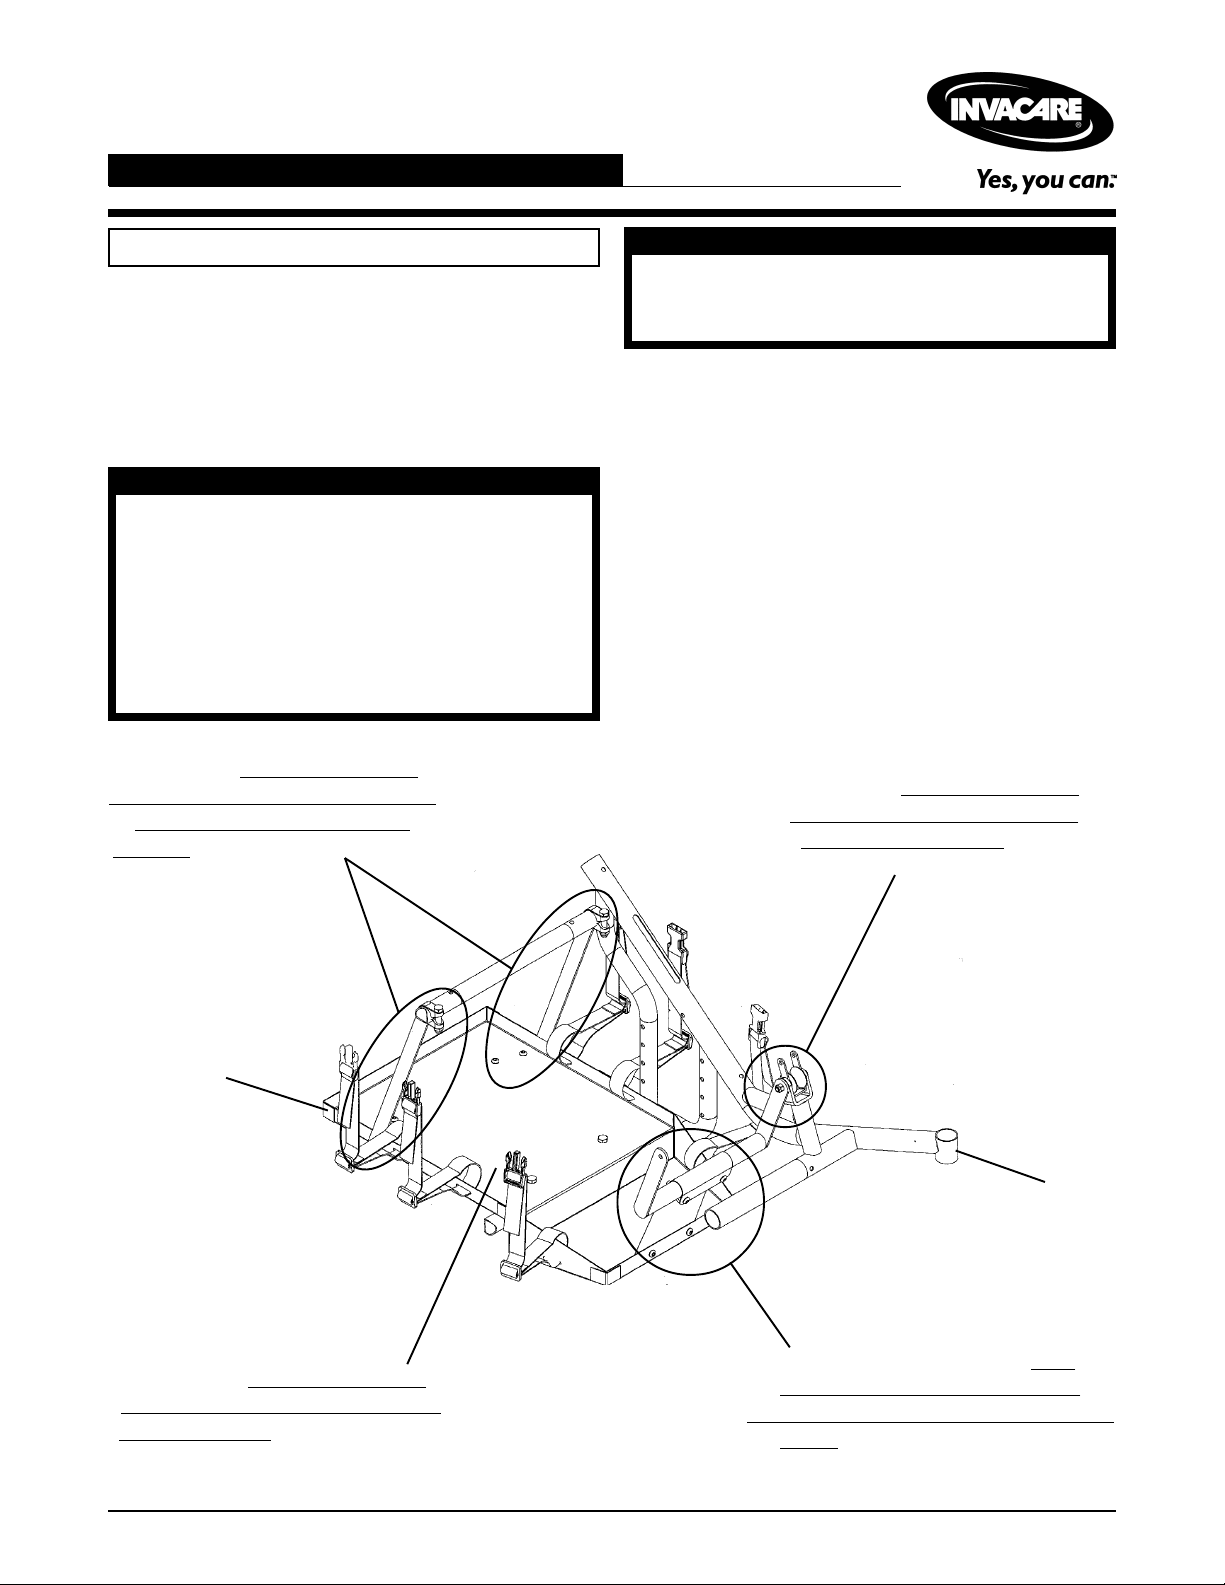
INSTALLING THE
INST ALLATION WARNINGS
After ANY adjustments, repair or service and
BEFORE use, make sure that all attaching
hardware is tightened securely.
INSTALLING THE VENTILATOR
TRAY (FIGURE 1)
NOTE: Refer to the following diagram for the proper location of the ventilator tray attachment points.
1. Attach the ventilator tray components in the following
order:
A. Install the ventilator tray hanger bracket onto the
ventilator tray.
B. Install the ventilator brace onto the chair frame.
C. Install the ventilator tray onto the chair frame.
D. Install the ventilator arms onto the ventilator tray/
chair frame.
B. Refer to
VENTILATOR BRACE ONTO
THE CHAIR FRAME in this
INSTALLING THE
Instruction Sheet.
Ventilator Tray
C. Refer to
VENTILATOR TRAY ONTO THE
CHAIR FRAME in this Instruction
INSTALLING THE
Sheet.
FIGURE 1 - INSTALLING THE VENTILATOR TRAY/ATTACHMENT POINT LOCATIONS
Chair Frame
A. Refer to INSTALLING THE
VENTILATOR TRAY HANGER
BRACKET ONTO THE VENTILATOR
TRAY in this Instruction Sheet.
1
Page 2
Installing The Ventilator Tray Hanger
Bracket Onto The Ventilator Tray
(FIGURE 2)
EXISTING
Screw
NOTE: The plastic washer
is not shown.
1. Align the two (2) mounting holes in the ventilator tray
hanger bracket with the two (2) mounting holes in the
FRONT of the ventilator tray.
2. Secure the ventilator tray hanger bracket to the ventilator tray using two (2) 1/4 - 20 x 3/8-inch button head
screws and self locking nuts. Securely tighten.
Self Locking Nuts
Ventilator Tray
Hanger Bracket
Roller
EXISTING
Self
Locking
Nut
Mounting Hole
Ventilator Brace
Chair
Frame
NOTE: Only one side of the ventilator brace attachment
shown for clarity.
FIGURE 3 - INST ALLING THE VENTILATOR BRACE
ONTO THE CHAIR FRAME
Installing The Ventilator Tray Onto The
Chair Frame (FIGURE 4)
1/4 20 x 3/8-inch
Mounting
Holes
Button Head Screws
FIGURE 2 - INST ALLING THE VENTILA TOR TRAY
HANGER BRACKET ONTO THE VENTILATOR TRAY
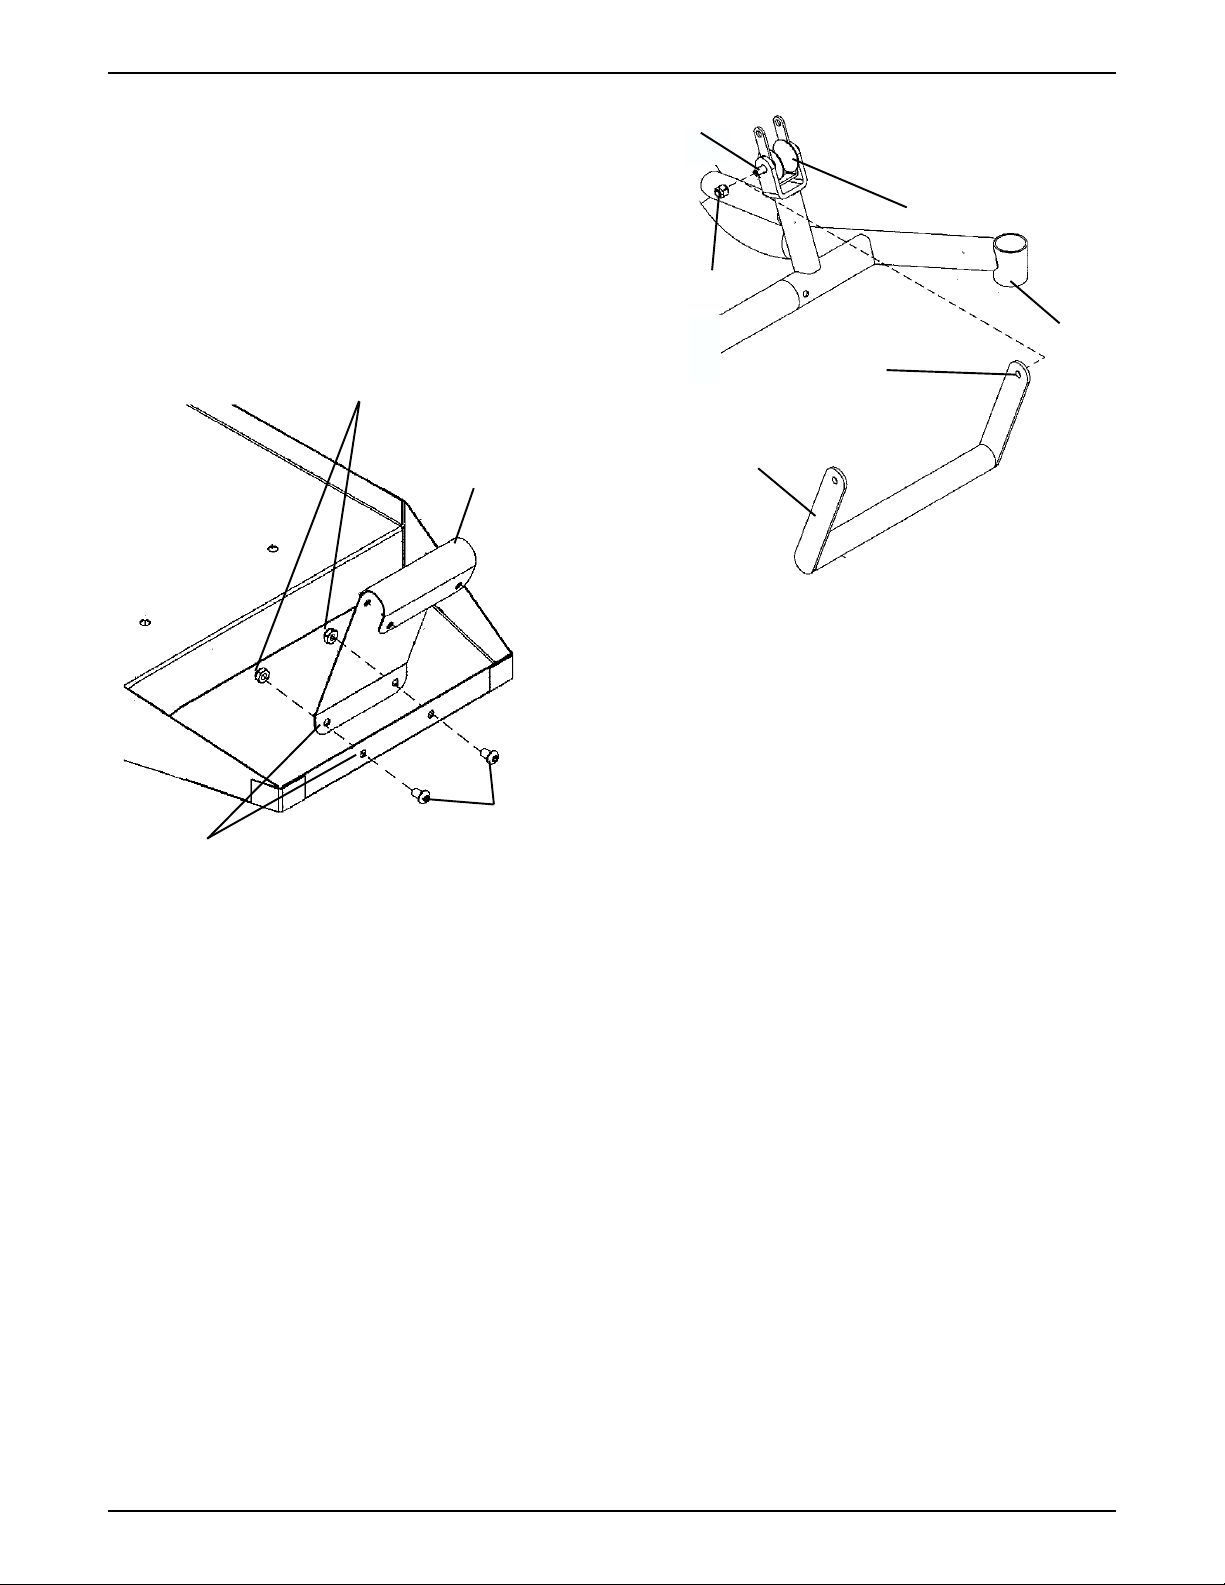
Installing The Ventilator Brace Onto The
Chair Frame (FIGURE 3)
1. Remove the self locking nut and plastic washer from
the screw securing the roller to the chair frame.
NOTE: Save the EXISTING self locking nut for reuse
when installing the ventilator tray. Discard the plastic
washer.
2. Align the mounting hole in the ventilator brace with
the EXISTING screw securing the roller to the chair
frame.
3. Secure the ventilator brace onto the EXISTING screw
using the EXISTING self locking nut. Securely tighten.
4. Repeat STEPS 1 - 3 for the opposide side of the
ventilator brace.
1. Position the two (2) tube clamps on the LOWER brace
of the chair frame by firmly grasping each tube clamp,
and bending it around the LOWER brace of the chair
frame.
NOTE: Be sure the open ends of the tube clamps are
facing TOWARD the UPPER brace of the chair frame.
2. Position the ventilator tray between the MIDDLE brace
and the LOWER brace of the chair frame, making
sure the ventilator brace fits securely in the ventilator
tray hanger bracket.
3. Align the two (2) MIDDLE mounting holes of the ventilator tray with the mounting holes in the two (2) tube
clamps on the LOWER brace.
4. Secure ventilator tray to the two (2) tube clamps on the
LOWER brace using two (2) 5/16 - 24 x 1-1/2-inch hex
head screws and self locking nuts. Hand tighten ONLY.
5. Position the clamp saddle under the ventilator tray hanger
bracket AND the ventilator brace, making sure the two
(2) mounting holes in the clamp saddle align with the
two mounting holes in the ventilator hanger bracket.
6. Thread two (2) 1/4 - 20 x 1-1/2-inch button head screws
through one side of the ventilator hanger, the clamp saddle
and the other side of the ventilator hanger, and secure
using two (2) self locking nuts. Hand tighten ONLY.
2
Page 3

Upper Brace
Chair Frame
Ventilator Tray
5/16-24x1-1/2-inch
Hex Head Screw
(STEP 4)
Lower
Brace
Rear
Middle Mounting
Hole (STEP 3)
Mounting Hole
(STEP 3)
Tube Clamp (STEP 1)
Ventilator Tray Hanger Bracket (STEP 5)
Self Locking Nut
(STEP 4)
Front
NOTE: The ventilator tray hanger bracket and the ventilator brace are shown unattached for clarity.
Tube Clamp (STEP 1)
Mounting Holes
(STEP 5)
Self Locking
Nut (STEP 6)
Middle Brace
Ventilator Brace
(STEP 5)
Clamp Saddle
(STEP 5)
1/4-20x1-1/2-inch Button
Head Screws (STEP 6)
FIGURE 4 - INST ALLING THE VENTILATOR TRAY ONTO THE CHAIR FRAME
Installing The Ventilator Arms Onto The
Ventilator Tray/Chair Frame (FIGURE 5)
1. Position one (1) ventilator tray arm on the UPPER
brace of the chair frame by firmly grasping the tube
clamp on the top of the ventilator tray arm and bending it around the UPPER brace of the chair frame.
2. Secure the tube clamp on the ventilator tray arm to
the UPPER brace of the chair frame using one (1)
5/16 - 24 x 1-1/2-inch hex cap screw and self locking
nut. Hand tighten ONLY.
3. Position the LOWER end of the ventilator tray arm
UNDER the ventilator tray, making sure the two (2)
mounting holes in the LOWER end of the ventilator
tray arm align with the two (2) mounting holes in the
REAR of the ventilator tray.
4. Secure the ventilator tray arm to the ventilator tray
using two (2) 1/4 - 20 x 1/2-inch button head screws
and self locking nuts. Hand tighten ONLY.
5/16-24x1-1/2-inch Button
Head Screws
Upper Brace
Ventilator Tray Arms
Mounting Holes
Chair Frame
Tube Clamp
Self
Locking
Nut
Rear
1/4-20x1/2-inch
Button Head
Screws
5. Repeat STEPS 1 - 4 for the other vent tray arm.
6. Securely tighten ALL attaching hardware on the
ventilaor tray.
Self
Locking Nuts
Ventilator Tray
FIGURE 5 - INSTALLING THE VENTILATOR ARMS
ONTO THE VENTILATOR TRAY/CHAIR FRAME
3
Page 4

USING THE VENTILATOR TRAY
(FIGURE 6)
NOTE: The ventilator tray straps are positioned on the
ventilator tray BEFORE the ventilator tray is shipped.
1. Position all six (6) strap slides on the outside of the
ventilator tray.
2. Position the ventilator battery in the front portion of
the ventilator tray.
3. Secure the two (2) straps around the top of the ventilator battery and clip together.
4. Position the ventilator in the rear portion of the ventilator tray.
5. Secure the four (4) straps around the top of the ventilator and clip together.
6. Adjust the slides, located in the middle of each strap,
up or down to increase or decrease length. See DETAIL “J”.
7. Securely tighten the straps around the battery and
ventilator by pulling the ends of the straps through
the rear portion of each buckle DETAIL “K”.
Strap
Slide
Rear Portion
of Ventilator
Tray
Buckle
Slide
Ventilator
Tray
See Detail “J”
DETAIL “K”DETAIL “J”
Strap
Rear
Portion
of Buckle
See Detail “K”
Ventilator
Battery
Front Portion
of Ventilator
Tray
FIGURE 6 - USING THE VENTILATOR TRAY
Invacare Corporation www.invacare.com
One Invacare Way Technical Support Invacare and Yes, you can are trademarks of Invacare
Elyria, Ohio USA 800-832-4707 Corporation.
44036-2125
800-333-6900 Form No. 99-203 Part No. 1093582 Rev B (1) 03/00
©
2000 Invacare Corporation
 Loading...