

Page 1
RELIANT SCALE RLS6
Assembly, Installation and Operating Instructions
SAVE THESE INSTRUCTIONS
NOTE: The Reliant Scale CANNOT be used in conjunction with the swivel bar supplied with the
Invacare 9805 Lift. The Reliant Swivel Bar (Part No. 1064518) MUST be purchased and
installed on the Invacare 9805 lift in order to install the Reliant Scale.
NOTE: Check all parts for shipping damage before using. In case of damage, DO NOT use the
equipment. Contact the Dealer/Carrier for further instructions.
SAFETY SUMMARY
GENERAL WARNINGS
DO NOT install or use this equipment without first reading and
understanding these instructions. If you are unable to understand the
Warnings, Cautions or Instructions, contact a healthcare professional,
dealer or technical personnel before attempting to install this equipment
- otherwise, injury or damage may occur.
The weight capacity is limited to the lowest rated capacity of any one of
the components in use (i.e. Patient Lift, Sling or Scale). The patient's
weight MUST NOT exceed the lowest rated capacity of any component.
After ANY adjustments, repair or service and BEFORE use, make sure all
attaching hardware is tightened securely - otherwise injury or damage
may occur.
Patient and sling MUST be removed from the lift during ALL installation
procedures.
This kit contains the following:
DESCRIPTION QTY
Load Cell Assembly 1
Nylon Washers 2
Swivel Bar Pin 1
Locknut 1
Mounting Screw 1
Small Steel Washer 1
1/8-inch thick nylon washer (9805 lift) 2
1/4-inch thick nylon washer (450/600 lb lift) 2
Reliant Scale 1 Part No. 1114832 Rev B
Page 2
DESCRIPTION
The Reliant Scale is a compact precision scale system designed specifically for the
Invacare Patient Lift System.
SPECIFICATIONS
Weight Range: Up to 600 lbs. (272.7 kg.)
Resolution: +/- 0.2 lbs (.1 kg)
Display: Liquid Crystal Digital
Automatic Power Down: Two (2) minutes
Size: 5-3/4 L x 3-5/8 W x 4 H
Weight: 1.55 lbs
Power: Nine (9) volt alkaline battery (Included)
Battery Life: Approximately 1500 readings
Temperature Range: 50
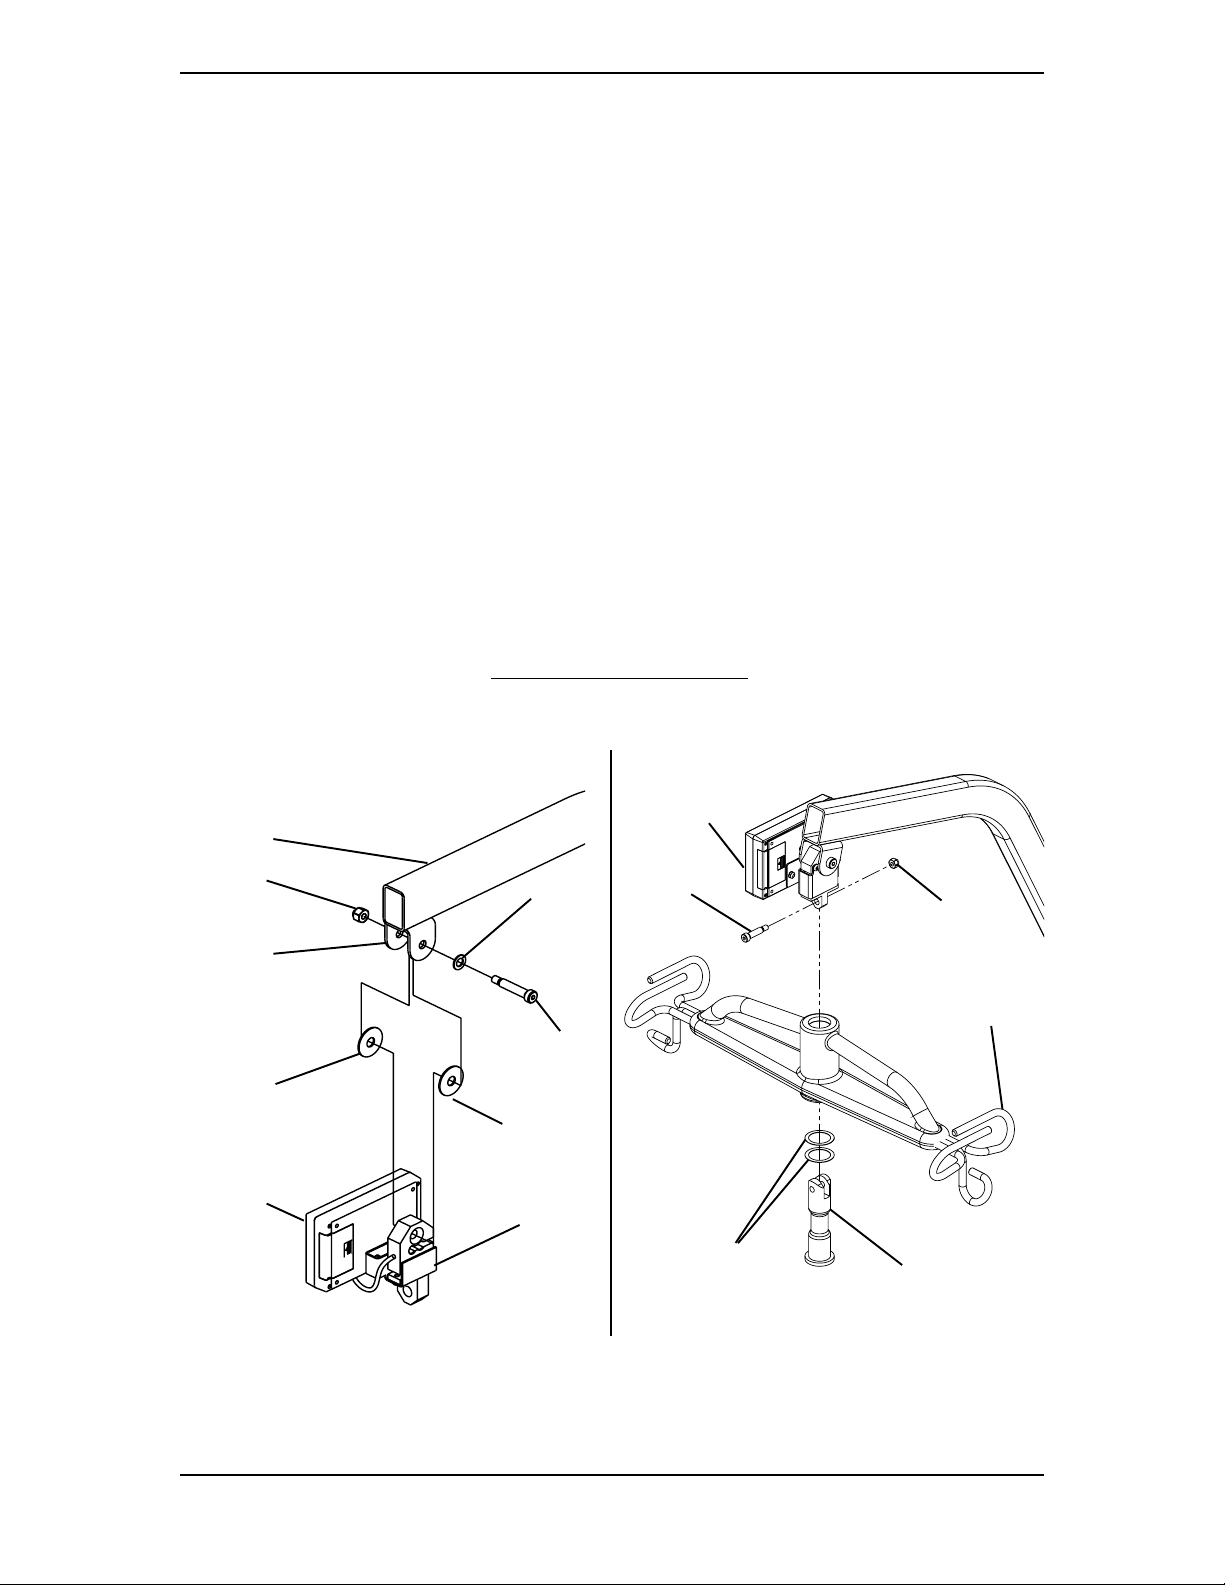
REMOVE THE SWIVEL BAR (FIGURE 1)
1. Perform one (1) of the following:
A. FOR 450 lb and 600 lb RELIANT LIFTS - Remove shoulder bolt, locknut, pinch
guard and washer which secure the swivel bar to the boom mounting bracket.
o
to 104o F (10o to 40o C)
NOTE: Save the shoulder bolt, small steel washer and locknut to secure the Reliant Scale to
the boom. The pinch guard will not be used when the scale is installed. Save pinch guard
for future use of swivel bar without scale.
B. FOR MODEL NO. 9805 LIFT - Remove shoulder bolt and locknut which secure
the swivel bar to the boom mounting bracket.
NOTE: Save the shoulder bolt and locknut to secure the Reliant Scale to the boom.
NOTE: Removing the swivel bar hardware will release the swivel bar, two (2) nylon washers
and the swivel bar pin. Save the swivel bar pin and the two (2) nylon washers for future use of
the swivel bar without the scale.
Reliant Scale 2 Part No. 1114832 Rev B
Page 3

450 LB / 600 LB RELIANT LIFTS
*NOTE: 600 lift swivel bar not shown.
Boom Mounting
Bracket
Washer
(Save for
installing
Scale)
Shoulder Bolt
(Save for
installing
Scale)
Nylon
Washers
Boom
Pinch
Guard
Swivel Bar
Swivel Bar Pin
Locknut
(Save for
installing
Scale)
*450 lb
9805 LIFT
Locknut
(Save for
installing
Scale)
Swivel Bar
Nylon
Washers
Boom
Boom
Mounting
Bracket
Shoulder
Bolt
(Save for
installing
Scale)
Swivel Bar Pin
NOTE: Some hardware has been enlarged for
clarification purposes.
FIGURE 1 - REMOVE THE SWIVEL BAR
Reliant Scale 3 Part No. 1114832 Rev B
Page 4
INSTALLING THE RELIANT SCALE (FIGURE 2)
1. Position the load cell assembly of the Reliant Scale into the boom mounting bracket.
Refer to DETAIL "A" in FIGURE 2.
NOTE: For 9805 lift use 1/8-inch thick nylon washer. For 450 lb/600 lb lifts use 1/4-inch nylon
washer.
2. Secure the Reliant Scale to the boom mounting bracket with a shoulder bolt, one (1)
small steel washer, two (2) nylon washers and a locknut. Securely tighten. Refer to
DETAIL "A" in FIGURE 2 for washer orientation.
NOTE: Ensure the shaft of the shoulder bolt passes through both sides of the boom mounting
bracket.
3. Insert swivel bar pin with two (2) nylon washers through the swivel bar. Refer to DETAIL
"B" in FIGURE 2.
4. Align the mounting holes in the swivel bar pin with the mounting holes in the
load cell assembly. Refer to DETAIL "B" in FIGURE 2.
5. Secure swivel bar pin to the load cell assembly with the provided mounting screw and locknut.
Securely tighten. Refer to DETAIL "B" in FIGURE 2.
6. Weigh the patient. Refer to OPERATING THE SCALE in this instruction sheet.
Boom
Locknut
Boom
Mounting
Bracket
Nylon
Washer
Reliant
Scale
DETAIL "A"
Small
Steel
Washer
Shoulder
Bolt
Nylon
Washer
Load
Cell
Assembly
Reliant
Scale
Mounting
Screw
Nylon Washers
DETAIL "B"
Locknut
Swivel Bar
Swivel Bar Pin
FIGURE 2 - INSTALLING THE RELIANT SCALE
Reliant Scale 4 Part No. 1114832 Rev B
Page 5
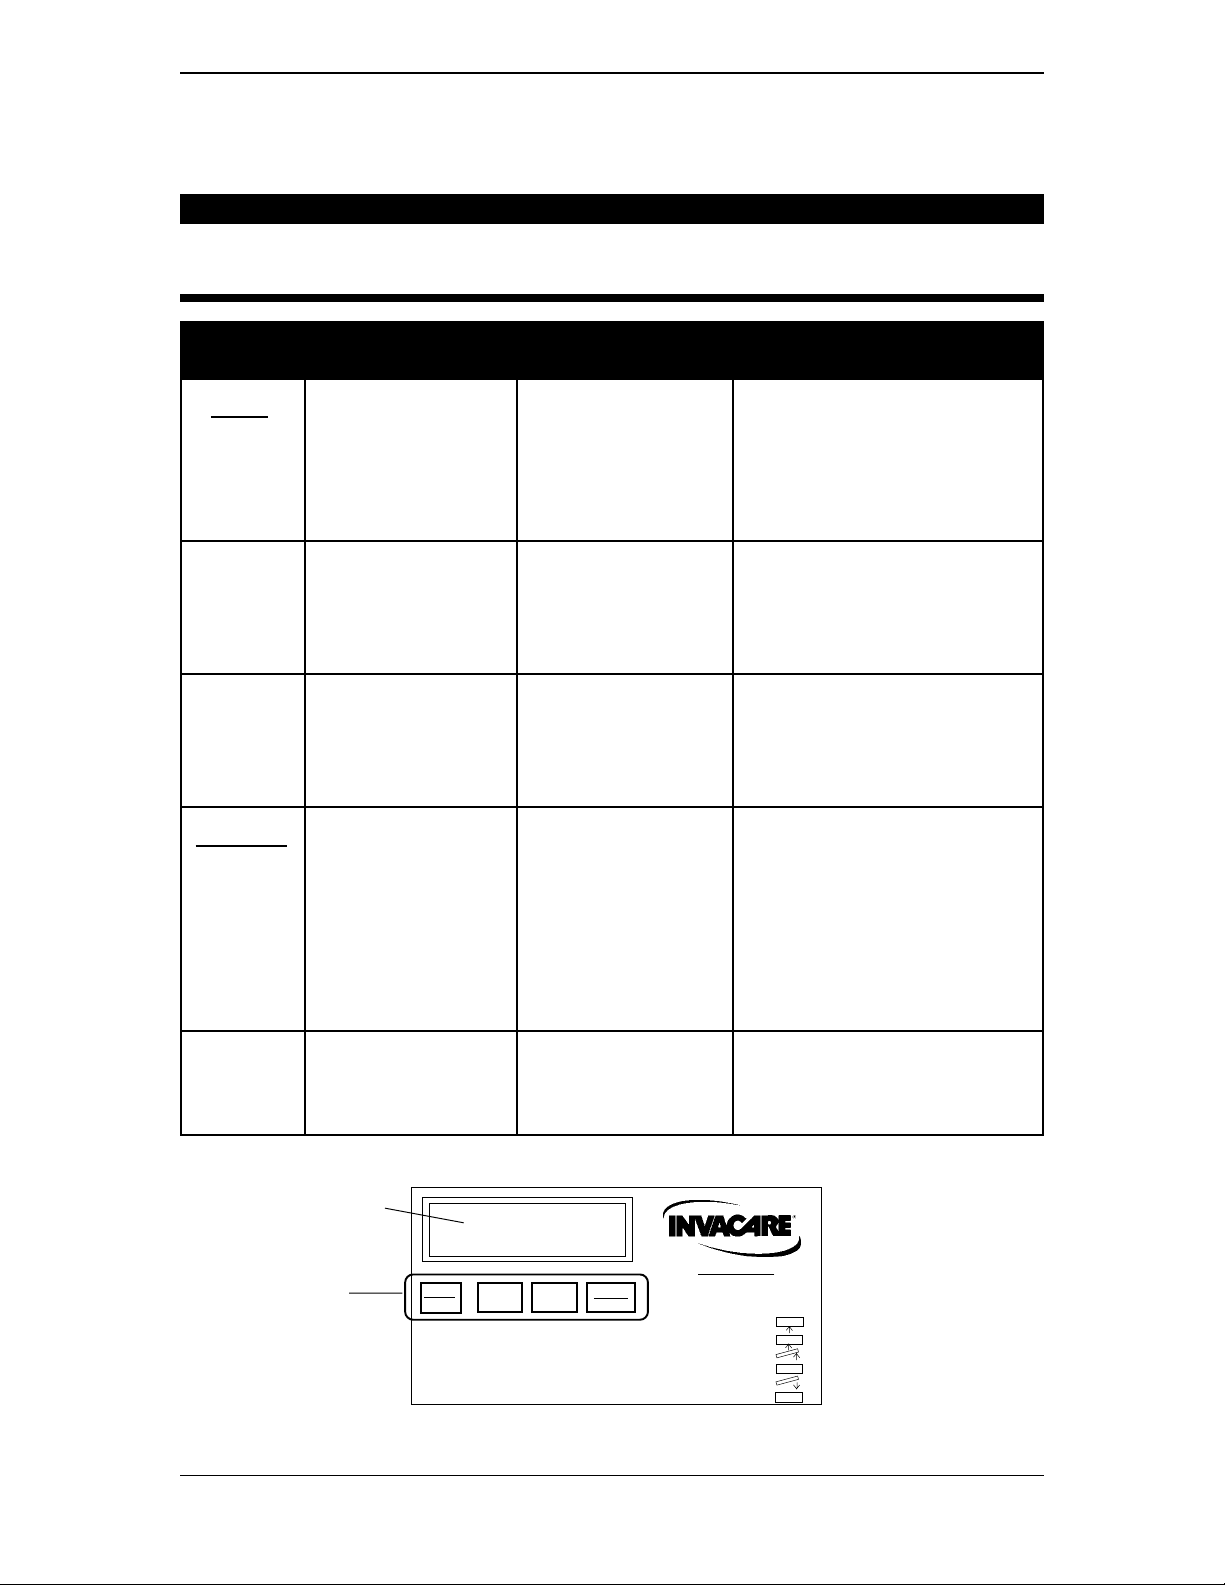
OPERATING THE SCALE
KEYPAD FUNCTIONS (FIGURE 3)
CAUTION
DO NOT operate key strokes with pointed objects (i.e. pencils, pens,
fingernails, etc.) - otherwise damage to the key pad will result.
INDICATOR INDICATOR
KEY DISPLAYED LOCATION DEFINITION
ON
OFF
OFF Center of
Display Window
Pressing this key will apply
power to the scale and turn
the unit on. When the scale is
already on, pressing the
button will turn the unit off.
ZERO ZERO Pressing this key when the
Lower Left Corner
of the Display
Window
scale is on will reset the
weight shown in the display
window to zero.
UNITS lb or kg The function of this key is to
Upper Right
Corner of the
Display Window
change the unit of
measurement from pounds
(lb) to kilograms (kg).
LOCK
UNLOCK
LOCK Lower Right Corner
of the Display
Window
This key is used to LOCK or
UNLOCK a weight value in
the display window.
NOTE: Weight displayed is a
STORED weight and not the
current weight when the key is
used in the lock position.
LO BATN/A Center of
Display Window
Indicator is shown in the
display window to notify
when battery is low.
Display
Window
Operation
Keys
ZERO
ON
ZERO
OFF
Reliant Scale
Model RLS6
CAPACITY 600 LB, 272 KG
UNITS
lb kg
LOCK
LOCK
UNLOCK
By
DETECTO
To Operate:
1. Attach sling.
2. Press ON key.
3. Press ZERO key.
4. Lift patient.
5. Press LOCK key
6. Lower Patient
7. Read Weight
ON
ZERO
LOCK
WEIGHT
FIGURE 3 - KEYPAD FUNCTIONS/OPERATING THE SCALE
Reliant Scale 5 Part No. 1114832 Rev B
Page 6

WARNING
Invacare slings and patient lift accessories are specifically designed to be
used in conjunction with Invacare patient lifts. Slings and accessories
designed by other manufacturers are not to be utilized as a component of
Invacares lift system.
Use of these products is prohibited and will void Invacares patient lift
warranty.
Use only genuine Invacare slings and patient lift accessories to maintain
patient safety and product utility.
Be sure to check the sling attachments each time the sling is removed
and replaced, to ensure that it is properly attached before the patient is
removed from a stationary object (bed, chair or commode).
1. Attach sling straps to the swivel bar. For proper attachment instructions refer to the
Sling Owner's Manual - Part No. 1023891.
NOTE: For improved accuracy on the 450 and 600 Reliant lifts, attach all sling straps to the
center hooks on both sides of the swivel bar. However, patient comfort may require a different
configuration of sling straps.
2. Press the ON/OFF key.
NOTE: The display will indicate the last weight that was measured. The word "LOCK" will be
seen in the display box.
NOTE: The ZERO key is pressed in order to avoid capturing the weight of the sling and the
hardware. If the ZERO key is not pressed the weight of the sling and the weight of the
hardware will be included in the weight displayed. NOT ZERO-ING OUT WILL GIVE A FALSE
READING OF THE USER'S TRUE WEIGHT.
3. Press the ZERO key. When the ZERO key is pushed the following will happen:
A. The scale will reset to zero and the word "ZERO" will appear in the display.
B. The lock function will then be turned off and the word "LOCK" will disappear
from the display.
NOTE: The scale is now active and continually updating the weight display.
4. Place the patient in the sling. For patient placement instructions refer to the Sling
Owner's Manual - Part No. 1023891.
WARNING
When elevated a few inches off the surface of a stationary object (bed, chair
or commode) and before moving the patient, check to make sure that the
sling is properly connected to the hooks of the swivel bar. If any attachments
are NOT properly in place, lower the patient back onto the stationary
surface and correct this problem - otherwise, injury or damage may occur.
5. Activate the lift mechanism to raise the patient until they are completely supported
by the lift.
Reliant Scale 6 Part No. 1114832 Rev B
Page 7

6. Note the weight display.
7. When the weight display becomes stable press the LOCK button to lock the weight
display. This will be indicated by the word "LOCK" appearing in the display window.
NOTE: Should it be necessary to unlock the weight while the patient is still supported by the lift,
the UNLOCK button may be pressed. The weight will unlock and the word "LOCK" will
disappear from the display window. The weight value will then be updated. Once the weight
becomes stable the weight can be locked again by pressing the LOCK button.
NOTE: Stable being defined as the weight fluctuating two tenths (2/10) of a pound. For
example, a patient weighing one hundred (100) lbs the scale will fluctuate between 99.8 and
100.2 until the LOCK key is pressed. Fluctuation of the weight displayed is normal as noted
above. Press the LOCK button to lock the weight.
NOTE: The UNITS button may be pressed to toggle between units of pounds and kilograms.
This is indicated by lb or kg appearing in the display window.
8. The lift may now be lowered and the sling removed from the patient.
NOTES:
The patient's weight will continue to be seen in the display window.
The display will turn off automatically after a two minute period of non-use [no changes in
weight exceeding five (5) pounds (2 kilograms)]. You can NOT adjust the time delay for
automatic shut off.
After the display has turned off , the weight may be recalled by pressing the ON/OFF
button.
The unit can be turned off by pressing the ON/OFF button a second time.
BATTERY REPLACEMENT (FIGURE 4)
NOTE: The scale is powered by a nine (9) volt alkaline battery that should provide
approximately 1500 readings before needing replacement.
When battery replacement is needed, LO BAT will appear on the display.
Perform the following:
1. Slide the battery door open in the direction of the arrow.
2. Remove existing battery.
3. Install NEW battery.
4. Reinstall the battery door.
Assembled Scale
9V Battery
Battery
Door
Arrow
FIGURE 4 - BATTERY REPLACEMENT
Reliant Scale 7 Part No. 1114832 Rev B
Page 8

CALIBRATION OF THE RELIANT SCALE
NOTE: The Reliant Scale will be pre-calibrated at the factory with the load cell. Should it be
necessary to re-calibrate the scale follow the instructions outlined below.
1. The patient and the sling must be removed from the scale to properly calibrate the
Reliant Scale. For removing the patient instructions refer to the Sling Owner's
Manual - Part No. 1023891. For sling detachment instructions refer to the Sling
Owner's Manual - Part No. 1023891.
2. With the Reliant Scale on, remove the four screws on the back of the enclosure and
remove front cover to expose the PC board.
3. Press the CAL button located on the PC board. The CAL switch is not labeled but
is the only button on the PC board located in the lower right corner. Once the CAL
button is pushed "CAL1" will be seen in the display window.
NOTE: CAL1 selects the calibration mode using 50 pounds of calibrated weight. CAL2 selects
the calibration mode for use with 200 pounds of calibrated weight. Pressing the UNITS key
toggles between CAL1 and CAL2.
4. When the desired calibration mode is displayed, press the LOCK/UNLOCK key.
NOTE: The display window will now show UnLd.
5. Ensure that there is no load on the scale and press the ZERO key.
6. The display window will show a dashed line (------) scrolling across and then the
word LOad will appear in the display window.
7. Perform one (1) of the following:
A. FOR CAL1 OPTION - support 50 pounds of calibrated weight from the scale
and press the ZERO key.
B. FOR CAL2 OPTION - support 200 pounds of calibrated weight from the scale
and press the ZERO key.
8. The display window will show a dashed line (------) scrolling across and then the
word dOnE will appear in the display window.
9. Remove the weight from the scale and press the LOCK/UNLOCK key.
NOTE: The unit will now be in a temporary test mode and will not lock the weight display. This
will allow weight to be loaded and unloaded to check the calibration.
10. Turn the unit off by pressing the ON/OFF key.
11. Turn the unit on by pressing the ON/OFF key.
NOTE: Scale will now be in normal operation .
Reliant Scale 8 Part No. 1114832 Rev B
Page 9

TROUBLESHOOTING
SYMPTOM
Unit does NOT work properly.
Battery has been replaced
and unit still does NOT work
properly.
PROBABLE CAUSE
Battery failure.
Check battery. Replace if necessary.
Contact Invacare for Service at
1-800-333-6900
SOLUTIONS
DISPLAY CODES
CAL CALIBRATION REQUIRED - Indicates improper stored calibration data,
calibration is necessary.
OCAP OVER CAPACITY - Indicates a weight exceeding the capacity has been
loaded on the scale.
Reliant Scale 9 Part No. 1114832 Rev B
Page 10

LIMITED WARRANTY
PLEASE NOTE: THE WARRANTY BELOW HAS BEEN DRAFTED TO COMPLY WITH
FEDERAL LAW APPLICABLE TO PRODUCTS MANUFACTURED AFTER JULY 4, 1975.
This warranty is extended only to the original purchaser/user of our products.
This warranty gives you specific legal rights and you may also have other legal rights
which vary from state to state.
Invacare warrants the Reliant Scale to be free from defects in materials and
workmanship for a period of two (2) years from the date of purchase. If within such
warranty period the Reliant Scale shall be proven to be defective, the Reliant Scale
shall be repaired or replaced, at Invacare's option. This warranty does not include any
labor or shipping charges incurred in replacement part installation or repair of any
such product. Invacare's sole obligation and your exclusive remedy under this warranty
shall be limited to such repair and/or replacement.
For warranty service, please contact the dealer from whom you purchased your
Invacare product. In the event you do not receive satisfactory warranty service, please
write directly to Invacare at the address on the bottom of the page. Provide dealer's
name, address, model number, date of purchase, indicate nature of the defect and, if
the product is serialized, indicate the serial number.
Invacare Corporation will issue a return authorization. The defective unit or parts
must be returned for warranty inspection using the serial number, when applicable, as
identification within thirty (30) days of return authorization date. DO NOT return
products to our factory without our prior consent. C.O.D. shipments will be refused;
please prepay shipping charges.
LIMITATIONS AND EXCLUSIONS: THE WARRANTY SHALL NOT APPLY TO
PROBLEMS ARISING FROM NORMAL WEAR OR FAILURE TO ADHERE TO THE
ENCLOSED INSTRUCTIONS. IN ADDITION, THE FOREGOING WARRANTY
SHALL NOT APPLY TO SERIAL NUMBERED PRODUCTS IF THE SERIAL NUMBER
HAS BEEN REMOVED OR DEFACED; PRODUCTS SUBJECTED TO NEGLIGENCE,
ACCIDENT, IMPROPER OPERATION, MAINTENANCE OR STORAGE; OR
PRODUCTS MODIFIED WITHOUT INVACARE'S EXPRESS WRITTEN CONSENT
INCLUDING, BUT NOT LIMITED TO: MODIFICATION THROUGH THE USE OF
UNAUTHORIZED PARTS OR ATTACHMENTS: PRODUCTS DAMAGED BY
REASON OF REPAIRS MADE TO ANY COMPONENT WITHOUT THE SPECIFIC
CONSENT OF INVACARE; PRODUCTS DAMAGED BY CIRCUMSTANCES BEYOND
INVACARE'S CONTROL; PRODUCTS REPAIRED BY ANYONE OTHER THAN AN
AUTHORIZED INVACARE DEALER, SUCH EVALUATION SHALL BE SOLELY
DETERMINED BY INVACARE.
THE FOREGOING EXPRESS WARRANTY IS EXCLUSIVE AND IN LIEU OF ANY
OTHER WARRANTIES WHATSOEVER, WHETHER EXPRESS OR IMPLIED,
INCLUDING THE IMPLIED WARRANTIES OF MERCHANTABILITY AND FITNESS
FOR A PARTICULAR PURPOSE, AND THE SOLE REMEDY FOR VIOLATIONS OF ANY
WARRANTY WHATSOEVER, SHALL BE LIMITED TO REPAIR OR REPLACEMENT OF
THE DEFECTIVE PRODUCT PURSUANT TO THE TERMS CONTAINED HEREIN. THE
APPLICATION OF ANY IMPLIED WARRANTY WHATSOEVER SHALL NOT EXTEND
BEYOND THE DURATION OF THE EXPRESS WARRANTY PROVIDED HEREIN.
INVACARE SHALL NOT BE LIABLE FOR ANY CONSEQUENTIAL OR INCIDENTAL
DAMAGES WHATSOEVER.
THIS WARRANTY SHALL BE EXTENDED TO COMPLY WITH STATE/PROVINCIAL
LAWS AND REQUIREMENTS.
Reliant Scale 10 Part No. 1114832 Rev B
Page 11

BALANCE RELIANT RLS6
Instructions pour l'assemblage, l'installation et le fonctionnement.
CONSERVER CES INSTRUCTIONS
NOTE: La balance Reliant NE PEUT pas être utilisée avec la barre à rotule fournie avec le
lève-patient Invacare 9805 . La barre à rotule Reliant (numéro de pièce No. 1064518)DOIT
être achetée et installée sur le lève patient 9805 pour pouvoir installer la balance Reliant.
NOTE: Vérifier si les pièces ont été endommagées lors du transport. Le cas échéant, NE PAS
utiliser. Contacter le fournisseur/transporteur pour de plus amples instructions.
RÉSUMÉ DE SÉCURITÉ
AVERTISSEMENTS GÉNÉRAUX
NE PAS installer ou utiliser cet équipement sans d'abord avoir lu et
compris ces instructions. Si nous ne comprenez pas les avertissements, les
notes attention ou les instructions, contacter un professionnel des soins de
santé, un fournisseur ou un technicien, avant de tenter d'installer cet
équipement, sans quoi des blessures ou des dommages peuvent survenir.
La limite de poids correspond à la limite de poids la plus petite de toutes
les composantes utilisées (i.e. lève-patient, toile ou balance).Le poids du
patient NE doit PAS excéder la limite de poids la plus petite des
composantes utilisées.
Après tout réglage, réparation ou entretien, et AVANT utilisation,
s'assurer que toute la quincaillerie de fixation est bien serrée.
Le patient et la toile doivent être enlevés du lève-patient avant
l'exécution de TOUTES procédures d'installation.
Cet ensemble comprend:
DESCRIPTION QUANTITÉ
Capteur de pesage 1
Rondelles en nylon 2
Tige de la barre à rotule 1
Écrou de blocage 1
Vis de montage 1
Petites rondelles en aciers 1
Rondelle épaisse en nylon 1/8 po.(lève-patient 9805) 2
Rondelle épaisse en nylon 1/4 po.(lève-patient 450/600 lb ) 2
Reliant Scale 11 Part No. 1114832 Rev B
Page 12

DESCRIPTION
La balance Reliant est un système de précision compact conçu spécifiquement pour les
lève-patients.
SPÉCIFICATIONS
Limite de poids: jusqu'à 600 lbs. (272.7 kg.)
Résolution: 0,2 lbs./0,1 kg
Précision: 0,2%
Écran: Cristaux liquides numériques
Arrêt automatique: deux (2) minutes
Taille : 4-1/8 largeur x 2-1/8 profondeur x 5 longueur
Poids: 2,2 lbs. / 1 kg
Puissance: Pile alcaline neuf (9) volts
Durée de la pile: environ 3000 lectures
Écarts de température: 50 à 104 F (10 à 40 C)
+ .1 lbs/kg
ENLEVER LA BARRE À ROTULE (FIGURE 1)
1. Exécuter une (1) des étapes suivantes
A. Pour les lève-patients Reliant de 450 lb et 600 lb - Enlever le boulon à épaule,
l'écrou, le protecteur et la rondelle qui fixent la barre à rotule au support de
montage du treuil.
NOTE: Conserver le boulon à épaule et l'écrou pour fixer la balance Reliant au treuil. Le
protecteur et la petite rondelle en acier ne seront pas utilisés lorsque la balance sera
installée. Conserver le protecteur et la rondelle pour un usage futur de la barre à rotule
sans balance.
B. Pour le lève-patient # 9805 - Enlever le boulon à épaule et l'écrou de blocage
qui fixent la barre à rotule au support de montage du treuil.
NOTE: Conserver le boulon à épaule et l'écrou pour fixer la balance Reliant au treuil.
NOTE: Enlever la quincaillerie de la barre à rotule libérera la barre à rotule, deux (2) rondelles
en nylon et la goupille de la barre à rotule. Conserver la tige de la barre à rotule et les deux (2)
rondelles de nylon pour un usage ultérieur de la barre à rotule sans la balance.
Reliant Scale 12 Part No. 1114832 Rev B
Page 13

LÈVE-PATIENT RELIANT
450 LB / 600 LB
*NOTE: La barre à rotule du lève-patient 600 n'est
pas illustrée.
Support de
montage du treuil
Rondelle (conserver
pour installer la
balance)
Boulon à épaule
(conserver pour
installer la
balance)
Treuil
Protecteur
Écrou de
blocage
(conserver
pour installer
la balance)
LÈVE-PATIENT 9805
Écrou de
blocage(conserver pour
installer la balance)
Barre à
rotule
Treuil
Support de
montage
Boulon à
épaule(conserver
pour installer la
balance)
Rondelles
en nylon
Rondelles
en nylon
Barre à
rotule*450 lb
Goupille de la
barre à rotule
NOTE: Certaines pièces de quincaillerie ont été agrandies pour plus de clarté.
FIGURE 1 - ENLEVER LA BARRE À ROTULE
Goupille de la
barre à rotule
Reliant Scale 13 Part No. 1114832 Rev B
Page 14

INSTALLER LA BALANCE RELIANT (FIGURE 2)
1. Placer l'ensemble du compartiment à batteries de la balance Reliant sur le support
de montage du treuil. Se référer au SCHÉMA a "A" de la FIGURE 2.
NOTE: Pour le lève-patient 9805, utiliser la rondelle en nylon de 1/8 de pouce. Pour les lèvepatients 450/600 livres, utiliser la rondelle en nylon de 1/4 de pouce.
2. Fixer la balance Reliant sur le support de montage du treuil avec le boulon à épaule,
une (1) petite rondelle en acier, deux (2) rondelles en nylon et un (1) écrou de
blocage. Bien serrer. Se référer au SCHÉMA "A" de la FIGURE 2 pour connaître
l'orientation des rondelles.
NOTE: S'assurer que la tige du boulon à épaule passe au travers des deux côtés du support de
montage du treuil.
3. Insérer la goupille de la barre à rotule avec deux (2) rondelles en nylon dans la barre à rotule.
Se référer au SCHÉMA "B" de la FIGURE 2.
4. Aligner les orifices de montage de la goupille de la barre à rotule avec le capteur de
pesage. Se référer au SCHÉMA "B" de la FIGURE 2.
5. Fixer la goupille de la barre à rotule au capteur de pesage avec la vis de montage et l'écrou
de blocage fournis. Bien serrer.Se référer au DETAIL "B" de la FIGURE 2.
6. Peser le patient. Se référer à
SCHÉMA "A" SCHÉMA "B"
Treuil
Écrou de
blocage
Support de
montage
du treuil
Rondelle en
nylon
Balance
Reliant
Ensemble du
capteur de pesage
UTILISER LA BALANCE dans ce feuillet d'instruction.
Balance
Petite
rondelle en
acier
Boulon à
épaule
Rondelle en
nylon
Reliant
Vis de
montage
Rondelles en
nylon
Écrou de
blocage
Barre à rotule
Goupille de la barre
à rotule
FIGURE 2 - INSTALLER LA BALANCE RELIANT
Reliant Scale 14 Part No. 1114832 Rev B
Page 15

FONCTIONNEMENT DE LA BALANCE
FONCTIONS DES TOUCHES (FIGURE 3)
ATTENTION
NE PAS faire fonctionner les touches avec des objets pointus (i.e. crayons, stylos,
ongles, etc.), sans quoi le clavier pourrait être endommagé.
INDICATEUR
TOUCHE AFFICHÉ EMPLACEMENT DÉFINITION
ON
OFF
OFF
Centre de l'écran
Appuyer sur la touche
allumera la balance. Lorsque
la balance est déjà en marche,
appuyer sur la touche
éteindra la balance.
ZERO ZERO
UNITS lb or kg
LOCK
LOCK
UNLOCK
LO BATN/A
Écran
Coin inférieur
gauche de l'écran
Coin supérieur
droit de l'écran
Coin inférieur droit
de l'écran
Centre de l'écran
lb kg
Appuyer sur la touche
lorsque la balance est allumée
remettra à zéro le poids
affiché à l'écran.
Permet de changer les unités
: livres (lb) en kilogrammes
(kg)
Cette touche permet de
BLOQUER ou DÉBLOQUER
une valeur sur l'écran.
NOTE: le poids affiché est
ENREGISTRÉ et non le poids
courant
L'indicateur s'allume pour
indiquer que les piles sont
faibles.
Touches
ZERO
ON
ZERO
OFF
Reliant Scale
Model RLS6
CAPACITY 600 LB, 272 KG
UNITS
LOCK
LOCK
UNLOCK
By
DETECTO
To Operate:
1. Attach sling.
2. Press ON key.
3. Press ZERO key.
4. Lift patient.
5. Press LOCK key
6. Lower Patient
7. Read Weight
ON
ZERO
LOCK
WEIGHT
FIGURE 3 - FONCTIONS DES TOUCHES ET FONCTIONNEMENT DE LA
BALANCE
Reliant Scale 15 Part No. 1114832 Rev B
Page 16

AVERTISSEMENT
Les toiles et les accessoires Invacare pour les lève-patients sont
spécifiquement conçus pour être utilisés avec les lève-patients Invacare.
Les toiles et les accessoires conçus par d'autres fabricants ne doivent pas
être utilisés avec les lève-patients Invacare.
L'utilisation de ces produits est interdite et annulera la garantie.
Utiliser seulement des toiles et des accessoires Invacare d'origine afin
d'assurer la sécurité et le fonctionnement du produit.
S'assurer de vérifier les fixations de la toile chaque fois que la toile est
enlevée et replacée, pour s'assurer qu'elle est bien fixée avant de déplacer
le patient du lit ou du fauteuil.
1. Fixer les courroies de la toile à la barre à rotule. Pour une installation adéquate, se
référer au manuel de l'utilisateur de la toile numéro de pièce 1023891.
NOTE: Pour une meilleure précision avec les lève-patient Reliant 450 et 600, fixer toutes les
courroies de la toile sur les crochets du centre de chaque côté de la barre à rotule. Toutefois,
une configuration différentes des courroies peut être nécessaire pour le confort du patient.
2. Appuyer sur la touche ON/OFF .
NOTE: L'écran affichera le dernier poids mesuré. Le mot "lock" apparaîtra.
NOTE: Il faut appuyer sur la touche ZERO afin d'éviter de peser la toile et la quincaillerie. Si la
touche Zero n'est pas enfoncée, le poids de la toile et de la quincaillerie seront inclus dans la
valeur du poids affiché. Ne pas remettre à zéro donnera une fausse lecture du poids du patient.
3. Appuyer sur la touche ZERO. Une fois la touche ZERO enfoncée, voici les
résultats:
A. La balance se remettra à zéro et le mot "ZERO" apparaîtra sur l'écran.
B. La fonction de blocage sera éteinte et le mot "LOCK" disparaîtra de l'écran.
NOTE: La balance est maintenant en fonction et mettra continuellement à jour le poids
affiché.
4. Installer le patient sur la toile. Pour connaître les instructions pour placer le patient,
se référer au manuel de l'utilisateur Numéro 1023891.
AVERTISSEMENT
Une fois le patient soulevé à quelques pouces de la surface fixe (lit,
fauteuil ou chaise d'aisance), et avant de déplacer le patient, vérifier si la
toile est bien fixée sur les crochets de la barre à rotule. Si les fixations NE
sont PAS adéquates, abaisser le patient sur la surface fixe et corriger le
problème, sans quoi des blessures ou des dommages peuvent survenir.
5. Actionner le mécanisme pour soulever le patient jusqu'à ce qu'il soit complètement
supporté par le lève-patient.
Reliant Scale 16 Part No. 1114832 Rev B
Page 17

6. Noter le poids affiché.
7. Lorsque la valeur du poids affiché est stable, appuyer sur la touche LOCK pour
verrouiller la valeur du poids affiché. Le mot /LOCK/ apparaîtra à l'écran.
NOTE: Si vous devez déverrouiller la valeur du poids affiché lorsque le patient est encore supporté
par le lève-patient, vous pouvez appuyer sur la touche "UNLOCK". La valeur sera déverrouillée et
le mot "LOCK" disparaîtra de l'écran. La valeur du poids sera alors modifiée à la valeur courante.
Une fois la valeur du poids stable, appuyer de nouveau sur la touche "LOCK".
NOTE: Stable correspond à une fluctuation de poids de 1/10 de livre. Par exemple, pour un
patient pesant 100 livres, la valeur du poids affiché fluctuera de 99,9 à 100,1 livres jusqu'à ce
que la touche LOCK soit enfoncée. La fluctuation de la valeur du poids affiché est normale.
Appuyer sur la touche LOCK pour verrouiller la valeur du poids.
NOTE: La touche UNIT peut être enfoncée pour changer l'unité de mesure des livres en
kilogrammes. L'abréviation lb ou kg apparaîtra à l'écran.
8. Le lève-patient peut être abaissé et la toile retirée.
NOTES:
Le poids du patient restera affiché à l'écran.
L'écran s'éteindra automatiquement après deux (2) minutes d'inutilisation ( aucune
variation de poids de plus de 5 livres (2 kilos) enregistrée) Vous ne pouvez PAS régler le
délai de fermeture automatique.
Une fois l'écran éteint, la valeur du poids peut être ramenée à l'écran en appuyant sur la
touche ON/OFF. L'appareil peut être éteint en appuyant de nouveau sur la touche ON/OFF.
REMPLACER LA PILE (FIGURE 4)
NOTE:La balance fonctionne avec une pile alcaline 9 volts qui devrait permettre environ 3000
lectures avant d'être remplacée.
Lorsque la pile a besoin d'être changée, les mots LOW BATTERY apparaîtront à
l'écran. Exécuter alors la procédure suivante:
1. Enlever la porte du compartiment à pile dans le sens de la flèche.
2. Enlever la pile
3. Installer une NOUVELLE pile.
4. Réinstaller la porte du compartiment pour la pile.
Balance assemblée
porte du
compartiment
Pile 9V
Flèche
FIGURE 4 - REMPLACER LA PILE
Reliant Scale 17 Part No. 1114832 Rev B
Page 18

CALIBRER LA BALANCE RELIANT
NOTE: La balance est pré-calibrée à l'usine avec le capteur de pesage. S'il est nécessaire de
recalibrer la balance, suivre les instructions suivantes.
1. Pour bien calibrer la balance Reliant, enlever la toile et le patient de la balance; se
référer au manuel de l'utilisateur de la toile, numéro 1023891.
2. La balance installée, enlever les quatre (4) vis à l'endos du compartiment et enlever
le couvercle pour exposer la carte à circuit imprimé.
3. Appuyer sur la touche CAL située sur la carte à circuit imprimé. La touche CAL
n'est pas identifiée, mais c'est la seule touche de la carte située dans le coin inférieur
droit. Une fois la touche CAL enfoncée, le mot "CAL 1" apparaîtra à l'écran.
NOTE: CAL1 permet de calibrer pour un poids de 50 livres alors que CAL2 permet de calibrer
pour un poids de 200 livres. Pour passer de CAL 1 à CAL 2 appuyer sur la touche UNIT.
4. Lorsque le mode de calibrage choisi est affiché, appuyer sur la touche
LOCK"UNLOCK".
NOTE: Le mot UnLd apparaîtra à l'écran.
5. S'assurer qu'il n'y a aucun poids sur la balance et appuyer sur la touche ZERO.
6. Un pointillé (------) défilera à l'écran et le mot LOad apparaîtra à l'écran.
7. Exécuter une (1) des étapes suivantes:
A. Pour l'option CAL 1 - accrocher un poids étalon de 50 livres sur la balance et
appuyer sur la touche ZERO .
B. Pour l'option CAL 2 - accrocher un poids étalon de 200 livres sur la balance et
appuyer sur la touche ZERO .
8. Un pointillé (------) défilera à l'écran et le mot dONe apparaîtra à l'écran .
9. Enlever le poids de la balance et appuyer sur la touche LOCK"UNLOCK.
NOTE: L'appareil sera momentanément en mode de test et ne verrouillera pas le poids affiché.
Ceci permet d'installer le poids et de l'enlever pour vérifier le calibrage.
10. Éteindre l'appareil en appuyant sur la touche ON/OFF .
11. Allumer l'appareil en appuyant sur la touche ON/OFF .
NOTE: La balance est maintenant prête pour l'utilisation.
Reliant Scale 18 Part No. 1114832 Rev B
Page 19

DÉPANNAGE
SYMPTÔME
Unité ne fonctionne pas
adéquatement
CAUSE PROBABLE
Défaillance des piles
SOLUTIONS
Vérifier les piles, les remplacer si
nécessaire.
Pile a été changée mais
l'unité ne fonctionne pas
adéquatement.
Contacter Invacare pour le service au
1-800-333-6900
CODES
CAL calibrage requis - Indique que des données de calibrage ne sont pas bien
enregistrées. Un calibrage est nécessaire
OCAP SURCHARGE - Indique que le poids dépasse la limite permise de la
balance.
Reliant Scale 19 Part No. 1114832 Rev B
Page 20

GARANTIE LIMITÉE
REMARQUE: LA GARANTIE CI-DESSOUS A ÉTÉ RÉDIGÉE EN ACCORD AVEC LA LOI
FÉDÉRALE APPLICABLE SUR LES PRODUITS FABRIQUÉS APRÈS LE 4 JUILLET 1975.
Cette garantie est valable pour l'acheteur/utilisateur initial de nos produits seulement.
Cette garantie vous donne des droits légaux spécifiques. D'autres droits variant d'un État
(provinces) à l'autre peuvent se rajouter.
INVACARE garantit la balance Reliant contre tout défaut de fabrication ou défaut dans le
matériel pour une période de deux (2) ans à partir de la date d'achat. Si, durant cette
période, la balance Reliant devait s'avérer défectueuse, elle sera réparée ou remplacée,
suivant le choix d'INVACARE. Cette garantie ne comprend pas les frais de main doeuvre
ou d'envoi encourus pour la réparation ou le remplacement des pièces de tels produits. La
seule et unique obligation d'INVACARE et votre seul recours selon cette garantie se limite
au remplacement et/ou à la réparation du produit.
Pour le service,contacter le fournisseur duquel vous avez acheté votre produit Invacare,.
Dans le cas où le service de garantie n'est pas satisfaisant, veuillez écrire directement à
Invacare à l'adresse indiqueés au bas de cette page . Veuillez fournir le nom du fournisseur,
son adresse, le numéro de modèle, la date d'achat, indiqué la nature du problème, et
indiquer le numéro de série si le produit en comporte un.
À la réception dune allégation de défaut, Invacare émettre une autorisation de retour.
Les pièces ou l'unité défectueuses doivent être retournées pour inspection en identifiant le
numéro de série, s'il y a lieu, dans les trente (30) jours suivant la date dautorisation de
retour. Ne pas retourner un produit à lusine avant davoir eu notre consentement. Les
envois payables sur réception seront refusés; veuillez payer les frais denvoi.
Restrictions: La présente garantie ne s'applique pas aux produits dont le numéro de série a
été effacé ou modifié, aux produits mal entretenus, accidentés, inadéquatement utilisés,
entretenus ou entreposés, placés dans un environnement enfumé ou contenant de la suie,
dusage commercial ou dusage autre que lusage normal ou aux produits modifiés sans le
consentement écrit dINVACARE, (incluant, mais ne se limitant pas à, la modification avec
des pièces ou accessoires non autorisés), aux produits endommagés par des réparations
faites sans l'approbation d'Invacare, ou aux produits endommagés dans des circonstances
au-delà du contrôle d'INVACARE, et l'évaluation sera faite par INVACARE.
LA PRÉSENTE GARANTIE EST EXCLUSIVE ET REMPLACE TOUTES LES AUTRES
GARANTIES. LES GARANTIES IMPLICITES, S'IL Y A LIEU, INCLUANT LA GARANTIE
DE COMMERCIALISATION ET D'AJUSTEMENT DANS UN BUT PARTICULIER, NE
DOIVENT SE PROLONGER AU-DELA DE LA DURÉE DE LA PRÉSENTE GARANTIE,
ET LE RECOURS POUR VIOLATION DE QUELCONQUE GARANTIE IMPLICITE DOIT
SE LIMITER À LA RÉPARATION OU AU REMPLACEMENT DU PRODUIT
DÉFECTUEUX CONFORMÉMENT AUX PRÉSENTS TERMES. INVACARE NE SERA
PAS TENU RESPONSABLE POUR TOUT DOMMAGE-INTÉRÊT DIRECT OU
ACCESSOIRE.
CERTAINS ÉTATS NAUTORISANT PAS LES RESTRICTIONS POUR DOMMAGESINTÉRÊTS ACCESSOIRES OU DOMMAGES INDIRECTS OU LA DURÉE DE LA
GARANTIE IMPLICITE, LES RESTRICTIONS CI-DESSUS POURRAIENT NE PAS
SAPPLIQUER DANS VOTRE CAS.
CETTE GARANTIE DEVRA ÊTRE ÉLARGIE POUR RÉPONDRE AUX LOIS ET AUX
RÈGLEMENTS DES ÉTATS (PROVINCES).
Invacare Corporation www.invacare.com
USA Canada
One Invacare Way 570 Matheson Blvd E. Invacare is registered trademark of
Elyria, Ohio USA Unit 8 Mississauga, Ontario Invacare Corporation.
44036-2125 L4Z 4G4, Canada Yes, you can is a trademark of Invacare
800-333-6900 800-668-5324 Corporation.
© 2003 Invacare Corporation
Part No. 1114832 Rev B - 5/03
 Loading...