

Page 1

Quick Start Guide
PB20
Printer
Page 2

Packing List
Checktoensurethatyoureceivetheseitems:
R
S Intermec
Bluetooth)
S 1 roll of paper (in printer)
S Compliance Insert
S Warranty Card
Common Accessories List
Cable Part Number
Data Cable (Hirose to RJ-11) 226-469-002
Power Adapters Part Number
International AC Wall Charger (order power cord separately) 851-060-102
Cigarette Lighter Adapter, 2 Amp., 30 volt DC 852-052-201
Supplies Part Number
Replacement Li-Ion 900 mAhr Battery 320-082-122
Thermal paper 105’/roll, 50/case 816-034-022
Standard Paper Printer Cleaning Kit 320-081-014
PB20 Printer (2 inch Thermal Belt printer with
2 PB20 Printer Quick Start Guide
Page 3

Getting Started
Here are the main components of the IntermecRPB20 printer.
Cover Latch
Charge LED (red charging;
green complete)
Paper Advance
Charger Jack
Belt Clip
Computer to Printer Jack
PB20 Printer Quick Start Guide
3
Page 4

Charging the Lithium Ion Batteries
S The printer battery charges in about 3 hours.
LED Battery Indicators
LED State of Charge Action
Solid Red In Progress Waiting for green LED
Green Complete Remove Charger
Slow Red Flashing Low Temperature or
battery is disconnected
Fast Red Flashing High Temperature Change environment
Slow Red and Orange
Flashing
Fast Red and Orange
Flashing
Slow Orange Flashing Timeout Restart charge
Fast Orange Flashing Internal Error Remove battery to pow-
Low Voltage Wait for solid red
High Voltage Wait for solid red
Change environment or
connect battery
er down completely and
reconnect. Or unplug
from charging source,
wait 15-20 seconds and
reconnect.
Beep Indicator
Number of Beeps Indicates
One Printer has come out of sleep mode
Two Printer is out of paper
Three Battery is low
One long beep No program in printer, only boot code
Determining Current Battery Power
To determine the current charge on the battery pack, print out a
self test by pressing a nd holding the red self-test button for four
seconds. If the battery is good, you will see the abbreviation for
the word “GOOD” next to the Battery voltage print out.
4 PB20 Printer Quick Start Guide
Page 5

This printer has a built in low battery detector. When the printer’s battery voltage is low, the printer beeps three times, indicating a Low Battery Warning. This only happens if the printer is
awake.
Paper Loading
Out of Paper
The PB20 Printer sounds two quick beeps when it runs out of
paper. If the printer is out of paper, the printer suspends operation until paper is present and the lever is down. The printer
continues to communicate with the mobile computer as long as
it does not “time out.” Once the printer restarts, it finishes the
rest of the print job from where it left off.
Removing Paper Core from your PB20 Printer
1 Unsnap the latch and lift up the cover.
2 Wrap your index finger around the empty paper core and pull
up. The paper rod will snap out.
3 Remove the empty paper core and discard.
Paper Loading
Standard Paper
If you are using standard paper, you can load the paper automatically or manually. Experiment to find out which method is
best for you.
Linered Labels
If you are using linered paper, it is best to use the manual paper
loading method.
Automatic Paper Loading
1 Press the red self test button to wake the printer.
2 With the loose, clean edge of the paper coming from the bot-
tom of the roll, insert the edge of the paper between the roller
and the platen.
3 Push the button again while the printer is awake causes the
mechanism to feed about 1” of paper.
4 Insert the paper into the paper well with it resting on the pa-
per rod clips.
PB20 Printer Quick Start Guide
5
Page 6

Manual Paper Loading
1 Lift up the paper release lever. This takes the pressure off the
platen. Make sure you have a clean edge on the new paper
roll.
2 Take the edge of the paper and fold it 45 degrees.
3 Insert the tip of the paper between the roller and the platen.
4 Push on the paper until the tip is peeking out the other side.
(If it seems too tight to insert the tip, lift up the paper release
lever and turn the gear to advance the paper).
5 Grab the tip and pull it through until the paper is straight.
6 Push down the paper release lever and insert the paper into
the paper well with it resting in the paper rod clips.
7 Press the red button while the printer is on and it will feed
paper. You will need about 2 inches of paper coming out of
the mechanism.
8 Lowerthecoverwhileplacingtheextrapaperthoughthetear
bar.
9 Close Latch Cover and tear off extra paper.
6 PB20 Printer Quick Start Guide
Page 7

Printer Self Test
Push the red button and hold for about four seconds to print a
self test. Below is an explanation of the print-out.
Self Test Print-out Explanation
Tes t It em Description
F/W Ver The internal software version (4.26 for printer, 1.09
or greater for card reader)
Timeout The seconds between printing and sleep mode.
Baud Rate The speed at which the printer receives data.
Parity Odd, Even, or None
Data Bits Matches with computer sending data to printer.
Handshake The way the printer handles flow control from host.
Burn Adj Amount of heat used to print on the thermal paper.
Beeper May be turned On or Off.
Batt Volt Current voltage of the battery pack.
Batt Temp Temperature of the battery.
Flash/RAM 1Megor4MegFlash/1Megor4MegRAM
Boot Version Boot sector firmware.
Prnhd Temp Temperature of print head (between 0 and 50 de-
grees).
Infrared Not available at this time.
Device Name Type of device (i.e. 2t for 2 i nch thermal printer)
Device Nickname Shows user name for printer.
Available Fonts “LOC” shows whether a font is Resident (R) or
Downloaded (D). “CPI” shows characters per inch.
“DESCRIPTION” describes the font. “NAMES”
give the “Easy Print” name, the Line Printer name,
and the hexadecimal equivalent of that name.
Available Graphics “LOC” shows whether a font is Resident (R) or
Downloaded (D). “CPI” shows characters per inch.
“DESCRIPTION” describes the graphic.
“NAMES” give the “Easy Print” name, the Line
Printer name, and the hexadecimal equivalent of that
name.
PB20 Printer Quick Start Guide
7
Page 8

Self Test Print-out Explanation (continued)
DescriptionTes t It em
Available Bar Codes All supported barcodes are displayed. “DE-
SCRIPTION” describes the graphic. “NAMES”
give the “Easy Print” name, the Line Printer name,
and the hexadecimal equivalent of that name.
Card Reader Option Shows the current Card Reader configuration.
Battery Pack Removal
Note: Ensure that you have your ESD wrist strap
connected to the ESD static free mat before placing
yourprinteronthematandbeginremovingthebattery pack.
1 Remove the four screws securing the printer mechanism.
Screws (4)
(two on each side)
2 Lift the printer mechanism out of the case. One way to do
this is to turn the printer case on its side and gently tap
the bottom of the case to remove the board assembly. Be
careful not to pull on the cluster of black wires running
fromtheinsideoftheprintercasetotheprintermechanism a ssembly.
8 PB20 Printer Quick Start Guide
Page 9
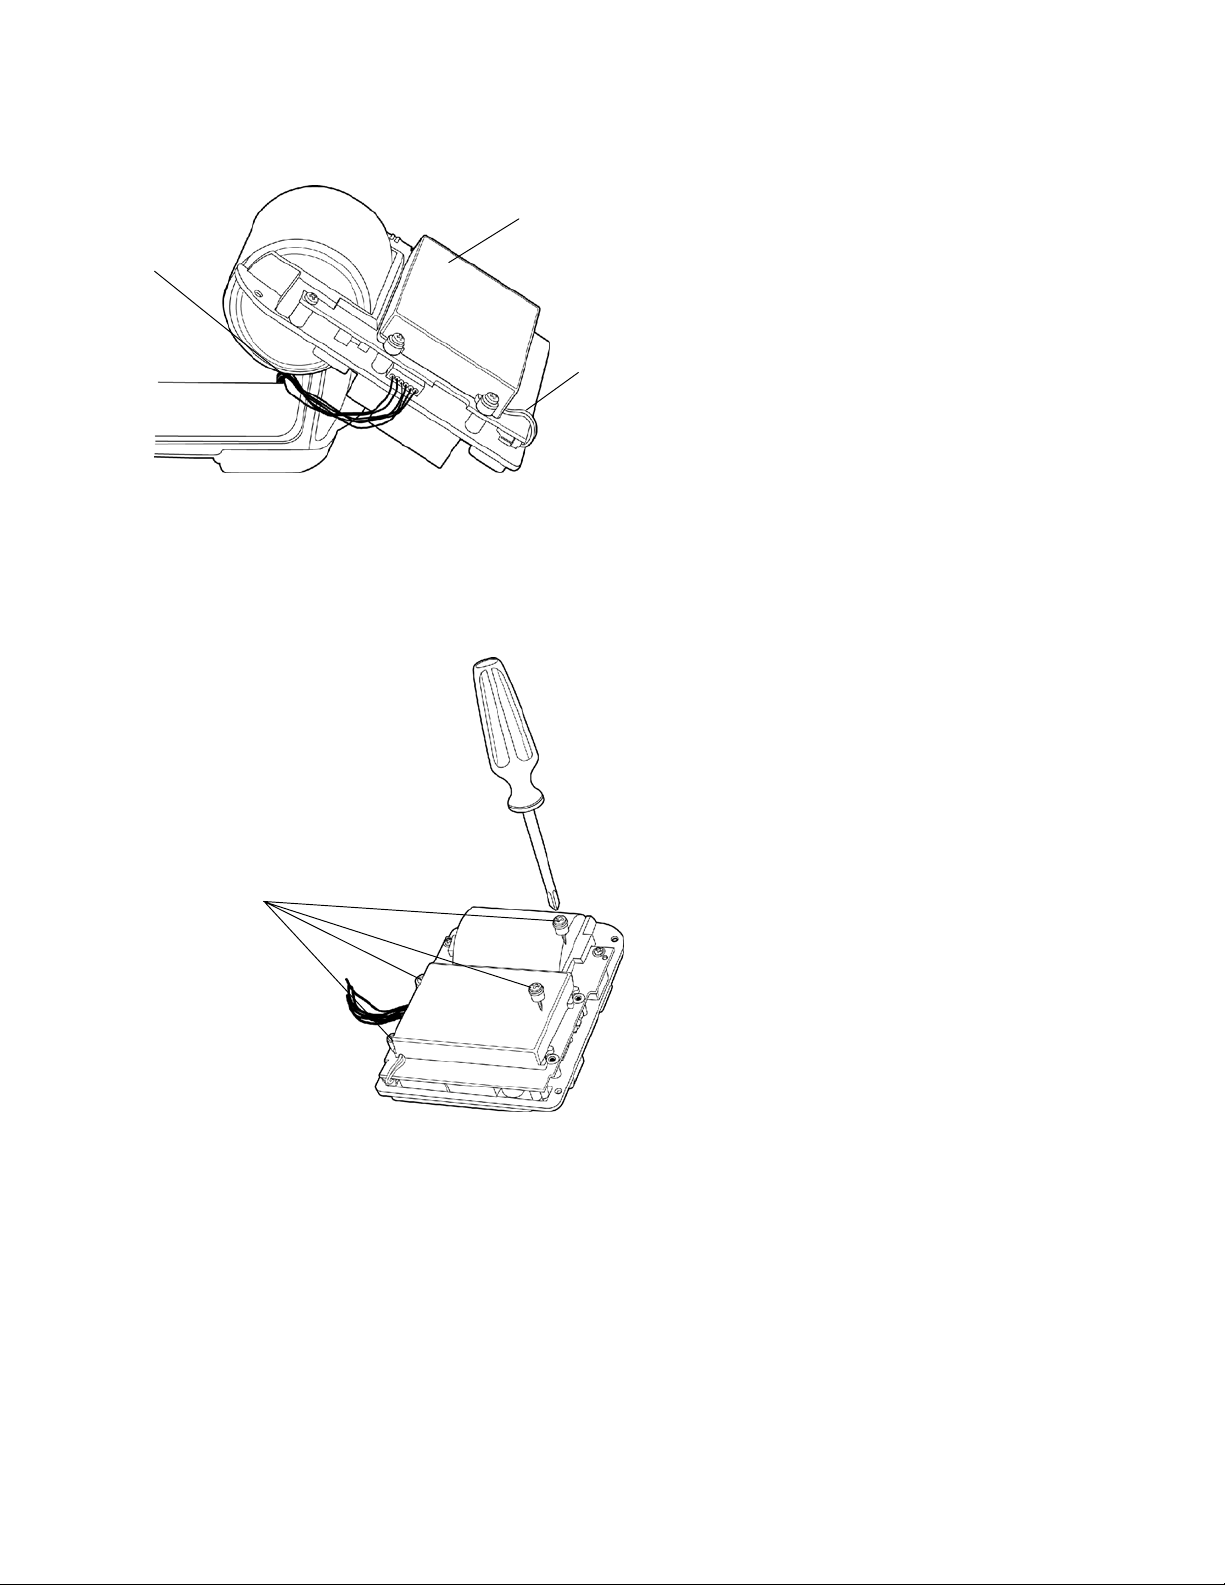
3 Set the printer assembly down to view the underside of
printer mechanism and battery compartment.
Battery pack
Printer assembly
wire cluster
compartment
4 Remove the four screws securing the battery cover. Avoid
contact with the printer control board unless the board is
grounded.
Battery
pack
cable
Battery cover screws
PB20 Printer Quick Start Guide
9
Page 10

5 Gently disconnect the keyed battery pack connector (with
the black and red wires) from the board assembly. You
may find that you have to wiggle the connector a bit to
remove it from the connector.
Underside of battery
compartment
5b
Keyed battery
pack cable
5a
Keyed battery
pack connector
6 Once the cover is removed gently tap the cover in your
hand or lift up on one of the battery retaining foam strips
to separate the battery pack from the cover.
7 Insert the new battery pack into the battery cover.
8 Reinstall the battery cover.
9 Reconnect the keyed battery cable. Routing the battery
packwiresisveryimportant.
S The wires must not be pinched or crimped when reinserting
the printer mechanism into the printer case.
10 Reposition the battery pack assembly on the printer
mechanism.
11 Replace the four screws to secure the battery pack cover to
the printer mechanism.
S Install the screws enough so they are fully seated but not any
further or you will strip the screw holes in the printer case.
10 PB20 Printer Quick Start Guide
Page 11

12 Carefully seat the printer in the case, you do not want to
pinch the wires between the printer mechanism and the
case.
13 Replace the four screws securing the printer mechanism to
the printer case.
14 Charge the battery 2-3 hours using your AC adapter or
cigarette lighter adapter.
15 Properly dispose of the used battery pack.
Using Your Printer with Serial
Connection
1 Attach the Mobile Computer to Printer cable.
Computer to Printer Jack
Mobile Computer to Printer Cable
2 As you use the printer the power comes from the battery in
the printer. When the printer battery runs down the printer
will not operate until the battery is recharged.
PB20 Printer using Wireless Printing
IrDA/Wireless Mode
Your printer comes to you as an IrDA mode printer. To switch
the mode to Wireless Printing it is necessary to toggle the mode
via the self-test function of the printer.
Performing the self-test indicates the current mode of the printer. The mode displays on the ticket and an audible indication
sounds. Each time the self-test function is performed the mode
will toggle between wireless printing and IrDA modes.
PB20 Printer Quick Start Guide
11
Page 12

Printer Preparation
1 Prepare the PB20 by holding down the red button for about
two seconds until you hear a short beep. This means the
printer is ready to go and will be discoverable.
S Any time you press and hold the button until it beeps, you
will dump any active wireless printing sessions.
2 You are ready to print wireless transactions.
Printer Self-Test
1 Press the Paper Advance (red) button for at least five seconds
to run a Self-Test.
S This means you will be holding it long enough to hear the
beep and complete a paper advance.
S The self-test indicates the current state of your printer.
S Verify the current mode by reading the Power status line
from the printout.
S When your printer is turned off, the radio is u ndiscoverable
and unconnectable.
When shipping your printer via air freight, turn the
wireless printing mode off and set to IrDA so that
the radio is not enabled.
Why Printer Beeps Every 5 Minutes When Unconnected
As part of the implementation of the serial port service, this service refreshes itself every five minutes. That refresh sends a message to the printer, which then wakes up and causes the beep
while resynchronizing with the serial port service. The printer
then goes back to sleep based on its timeout. The beep can be
turned off within the ’printer configuration utility’.
700 Mobile Computer Preparation
1 On your mobile computer, tap the Bluetootht icon located
in the System tray on the Today screen.
2 Select Advanced Features>Bluetooth Devices.
3FromtheTools menu, select Device Discovery.Youarepre-
sented with a couple of screens detailing the device discovery
process.
4 You are now presented with a screen allowing you to modify
the selection parameters. The default should work for your
needs.
12 PB20 Printer Quick Start Guide
Page 13

5ClickNext to proceed. A search for Bluetooth devices is per-
formed followed by a look-up of discovered device names.
The progress bars indicate the inquiry status.
6 A list of discovered devices displays.
If your remote wireless printer is discovered and presented in the
list, select the appropriate check box and click Next.
If your remote device is not displayed, ensure that the device
and its radio are switched ON. Click Next, then select Finish.
7 A progress bar appears indicating Service Directory is being
performed.
If the discovery is successful a screen with Successful discovery
displays. Click Finish. The remote device icon appears in the
Bluetooth Devices Folder. Verify that this device was discovered
by looking at the properties (Device>Properties).
If the Services tab lists Portable Printer, the service was discovered correctly.
If it doesn’t, select the Update buttonontheServices tab to try
to rediscover the services available (sometimes it will take a couple tries to correctly discover the services).
8ClickNext twice, all Wireless Printing devices within range
will be discovered and displayed. You may have to repeat this
step from time-to-time.
9TheBluetooth Serial Port service is necessary for the virtual
COM port to work. Choose COM6 in your application to
use the Wireless Printing device you selected. Verify that this
service was discovered by looking at the properties for this
printer (Device>Properties).
10 Verify that your Wireless Printing device is set as your “favor-
ite” device. In the Bluetooth Devices Folder, select
Tools>My Favorite.IntheFavorites screen, ensure your
printer shows as My Favorite Device.
*Bluetooth is a trademark of Bluetooth SIG, Inc., U.S.A.
PB20 Printer Quick Start Guide
13
Page 14

Maintenance and Troubleshooting
Cleaning the Interior
Dirt,adhesiveandresiduecollectontheprintheadoftheprinter and need to be removed. Clean your printer once a month if
you use it frequently, or once every three months if used infrequently.
Cleaning the Exterior
When the outside of your portable printer needs cleaning, use a
soft cloth and mild cleanser if necessary. Do not use abrasive
cleanser, chemicals or scrubbing pads, as your printer’s finish
could become marked.
Troubleshooting
Paper Loading Problems
If the paper feed mechanism does not feed correctly on the first
part of a new paper roll, remove two to three feet of paper from
theoutsideoftheroll.Thelengthofpaperrollscanvarybyas
much as five feet, making the roll too thick for the printer to
accommodate.
If the printer is out of paper (or the paper release lever is in the
up position) this condition interrupts a batch of receipts, and
the printer suspends operation until the condition is fixed. The
printer continues to communicate with the mobile computer as
long as it does not “time out.”
Once the printer is operational, the suspended print batch (if
any) continues to print, ensuring that all receipts are properly
printed.
Not Printing
1 Print a self test. If the self test will not print, check battery
voltage by plugging the printer into a wall outlet using the
AC adapter. Repeat the self test, and check the Battery Voltage print out. Charge battery if necessary or replace.
Note: If the battery is depleted, it may take 5--10
minutes of charging before the printer can print a
self test.
2 Make sure the paper is properly installed (with lever closed).
3 Turn the print head knob to ensure that paper is not
jammed.
14 PB20 Printer Quick Start Guide
Page 15

4 Check cable connections. Make sure the modular connector
is inserted and clipped in.
5 Check to see if your cable has been damaged by excessive
pulling.Acablemayalsobedamagedifitisbentatsharp
angles.
6 Use only the recommended battery pack for the printer.
7 Printer will not print on wrong side of paper. Re-load if nec-
essary.
Print Roller Appears Dirty
Clean Your Printer.
Linered Labels
Linered label printing can cause the print head to become sticky.
Print is Too Light
If you are not getting satisfactory darkness, connect your printer
to the personal computer containing your Configuration Program and click on the Paper Options button. Adjust the Darkness setting to a higher percentage until the print is dark and
crisp. Refer to the Intermec Portable Printers Technical Reference
Manual (p/n: 978-018-001) Section 4 for more details.
Charging Problems
UsinganACAdapter
If the printer does not respond when it is connected to an AC
adapter, there could be a problem with the adapter or with the
wall outlet.
Note:If the battery is depleted, it may take 5--10
minutes of charging before the printer can print a
self test.
Using a Cigarette Lighter Adapter
If the printer does not respond when it is connected to a cigarette lighter adapter, it is possible that the fuse may be blown.
To check, remove the cigarette lighter adapter from all power
supplies and unscrew the cover over the pin. Pull out the fuse. If
the elements in the fuse appear broken, replace the fuse.
Programming Problems
Refer to the Intermec Portable Printers Technical Reference Manual (p/n: 978-018-001) Section 4 for more details OR call the
Intermec Technical Support 1-800-755-5505 for assistance.
PB20 Printer Quick Start Guide
15
Page 16

Specifications
Printer Specifications
Item Spec Detail
Dimension 4.39 x 5.65 x 2.4 in.
111.5 x 143.5 x 61 mm)
Weight 20.3 oz. (575 g)
Print Method Direct Thermal
Paper Medium Thermal paper
Paper Width 2.25 inch
Operating Temperature + 32 to +122°F (0 to +50°C)
Interface RS-232C, Infrared, IrDA, ASK
Characters Full IBM and international character
sets
Protocol Easy Print Protocol for Bar C odes,
Stored Graphics, Rotated Fonts.
Power 1800 mAh Li Ion 2 cell pack
Warranty One year, includes print head. Ex-
tended warranty available.
16 PB20 Printer Quick Start Guide
Page 17

Global Services and Support
To request technical support, on-site repair service, return your
equipment for factory repair, arrange to have a site survey or
product installation or check on service contract status, you may
select one of the options:
Web Support
Visit our web site http://www.intermec.com to download many of
our current manuals in PDF format, utilize our technical knowledge base ‘Knowledge Central’ or to request technical support.
Technical Support
To request technical support on your Intermec product call
1-800-755-5505.
PB20 Printer Quick Start Guide
17
Page 18

Product Warranty
We warrant that Intermec Technologies Corporation products
will be free from defects in manufacturing materials and workmanship for one (1) year from date of shipment. This one year
warranty applies to the PB20 Printer only. The warranty on the
battery pack is 90 days from date of shipment.
Conditions of warranty
1 Purchaser must obtain a Return Authorization (RA) number
from the Intermec Service Center (1-800-755-5505) within
the warranty period.
2 Purchaser will provide a written, detailed description of the
defect.
3 The product must be promptly returned to the designated
Intermec Service Center, freight prepaid by Purchaser.
4 Upon examination of the product, Intermec must agree that
the defect exists and is covered by this warranty. Warranty
repairs will be completed at the Service Center and returned to the Purchaser by prepaid surface freight.
The foregoing is a summary of the standard warranty, which
shall be purchaser’s sole remedy. Complete warranty details can
be found in your purchase agreement or obtained from your
local Intermec sales office.
In no event shall Intermec Technologies Corporation nor its
suppliers be liable for any special, consequential or incidental
damages.
18 PB20 Printer Quick Start Guide
Page 19

PB20 Printer Quick Start Guide
19
Page 20

� ����� ����� �����������
�����������
���������� ���������������
������
��� ������������
��� ������������
� �� ������� � � ��
�
� �������������������� �������������������������������������������������
PB20 Printer Quick Start Guide
������� ���
�
�
*962-018-024E*
P/N 962-018-024E
 Loading...