

Page 1

TruVision NVR 50
Quick Start Guide
EN TruVision NVR 50 Quick Start Guide
DE TruVision NVR 50 Schnellstartanleitung
ES Guía de inicio rápido de TruVision NVR 50
FR Guide rapide de démarrage du TruVision NVR 50
IT Guida di avvio rapido di TruVision NVR 50
NL TruVision NVR 50 Snel aan de slag-gids
PL Instrukcja szybkiego uruchamiania rejestratora TruVision NVR 50
PT Guia Rápido do TruVision NVR 50
RU Краткое руководство по началу работы с TruVision NVR 50
TR TruVision NVR 50 Hızlı Başlangıç Kılavuzu
P/N 1072605B-multilingual
• REV 1.0 • ISS 28MAY13
Page 2

Copyright © 2013 UTC Fire & Security Americas Corporation, Inc.
Interlogix is part of UTC Climate Controls & Security, a unit of United
Technologies Corporation. All rights reserved.
Trademarks and
patents
Contact
information
The TruVision and Interlogix names and logos are trademarks of United
Technologies.
Other trade names used in this document may be trademarks or registered
trademarks of the manufacturers or vendors of the respective products.
www.interlogix.com or www.utcfireandsecurity.eu
Page 3

TruVision NVR 50
Quick Start Guide
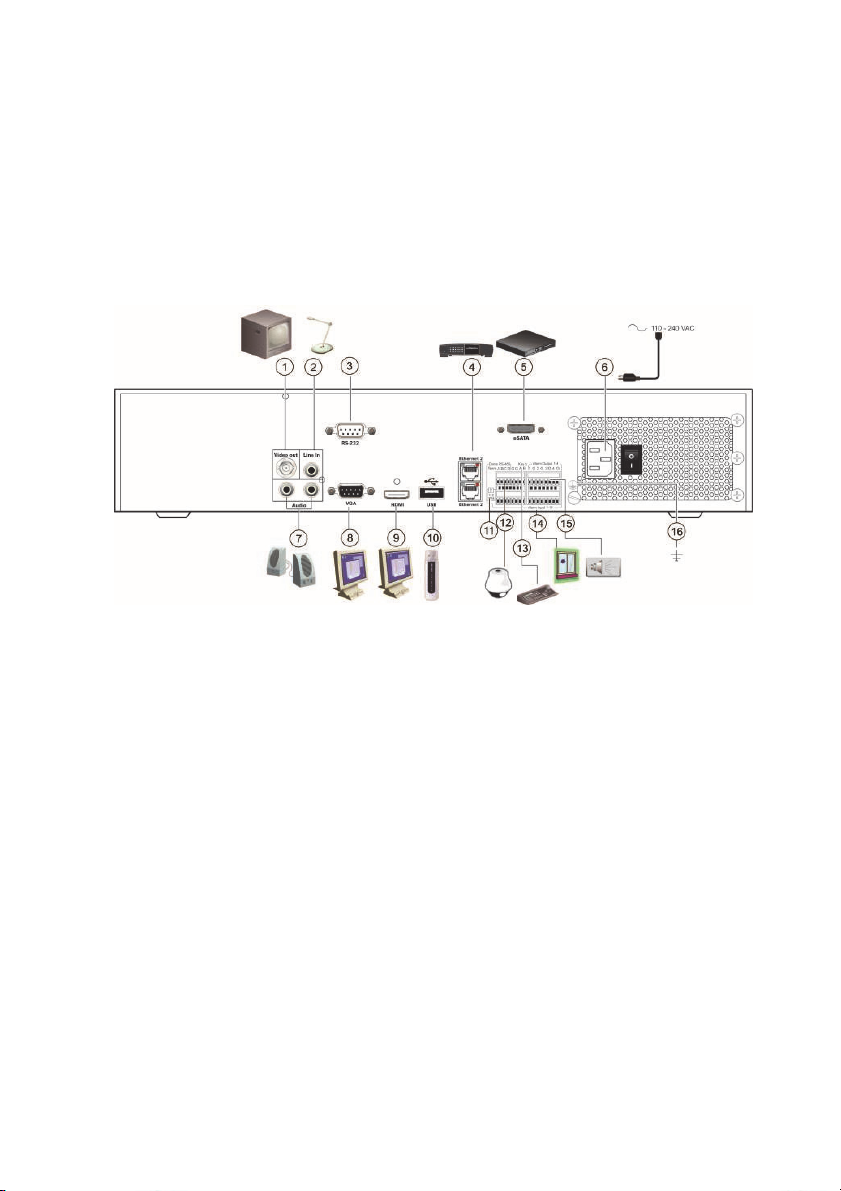
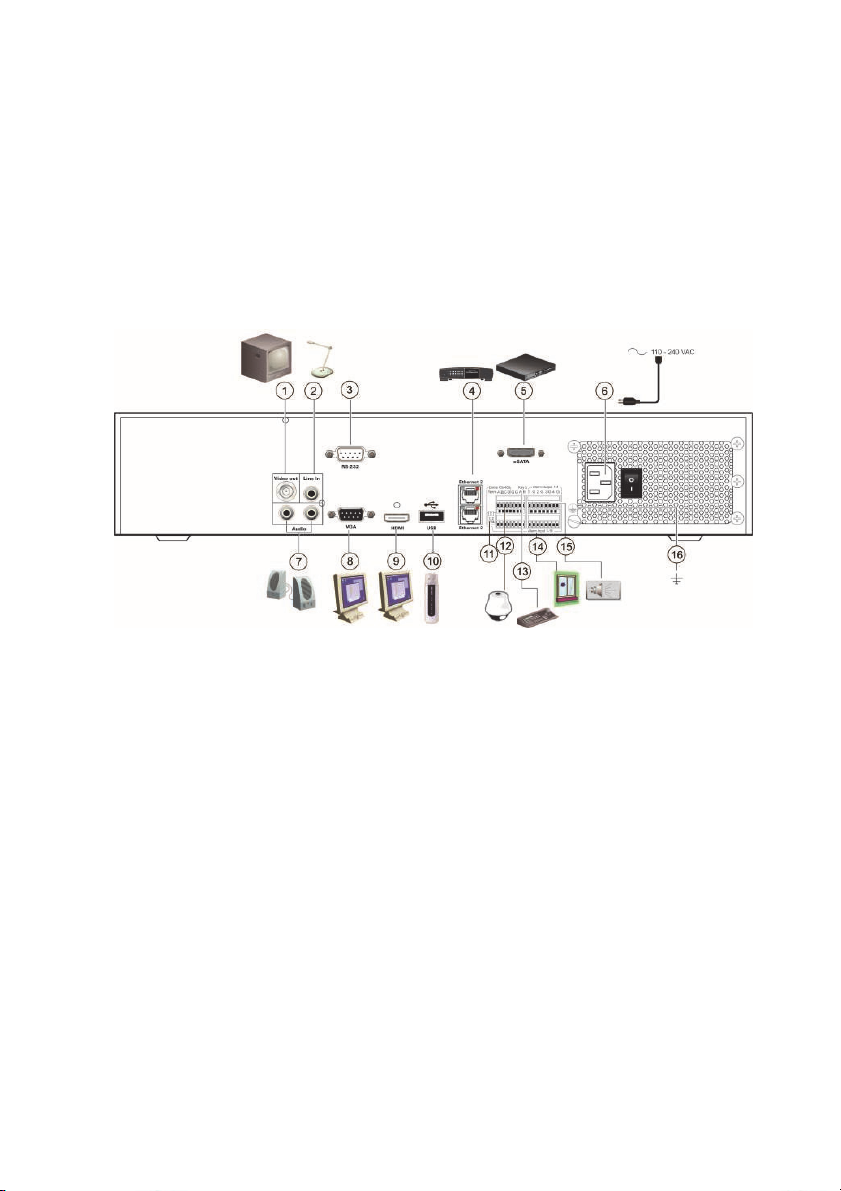
Figure 1: Back panel connections
1. Connect to one CCTV monitors (BNC-type
connectors): Main monitor
2. Connect one audio input to RCA connectors.
3. Connect to a RS-232 device.
4. Connect to a network.
5. Connect to an optional eSATA device such as
SATA HDD, CD/DVD-RM.
6. Connect to a power cord.
7. Connect to speakers for audio output.
8. Connect to a VGA monitor.
EN
9. Connect to a HDTV. The HDMI connection
supports both digital audio and video.
10. Connect to an optional USB device such as a
mouse, CD/DVD burner or HDD.
11. Terminate the line to the dome cameras using
this RS-485 switch. Default is Off.
12. Connect to a PTZ control.
13. Connect to a keyboard (KTD-405 shown)
14. Connect up to 16 alarm input cables to relay
outputs.
15. Connect up to four alarm relay outputs.
16. Connect to ground.
TVN 50 Quick Start Guide 1 : EN
Page 4
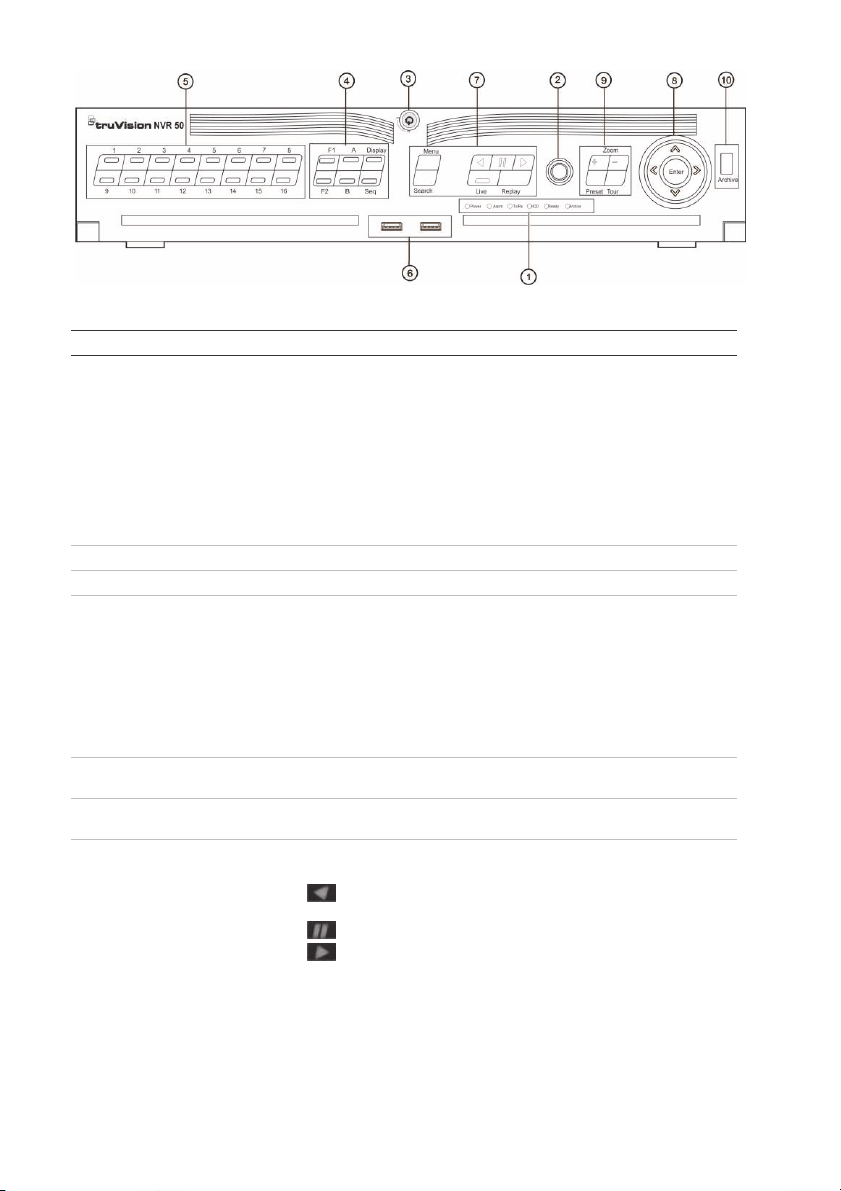
Figure 2: Front panel controls
Item Name Description
1. Status LEDs Power: Green indicates the NVR is working correctly. Red indicates
a fault.
Alarm: Lit indicates an external alarm status or motion.
Tx/Rx: Tx/Rx indicator blinks green when network connection is
functioning properly.
HDD: HDD indicator blinks red when data is being read from or
written to the HDD.
Ready: Green indicates the device is functioning properly.
Archive: Archive indicator blinks green when record files or pictures
are being exported to a USB or eSATA device.
2. IR receiver Receiver for IR remote.
3. Front Panel Lock You can lock or unlock the front panel with a key.
4. Display buttons Display: Toggles through the various multiviews: full, quad, 1+5, 1+7,
9, and 16.
Sequence: Starts/stops sequencing in live view mode.
A: Selects the main monitor
B: Selects the spot monitor (in live view)
F1: In all-day playback, click to start and stop video clipping.
F2: In live view mode, click to display/hide the time bar.
In all-day playback, click to hide/display the playback control toolbar.
5. Numeric buttons Switch between different cameras in live, PTZ control or playback
modes.
6. USB Interfaces Universal Serial Bus (USB) ports for additional devices such as a
USB mouse and USB Hard Disk Drive (HDD).
7. Menu and Search
buttons
Playback buttons
Menu: Enter/exit the main menu.
Search: Enter the advanced search menu.
: Jump back to the oldest available video and starts the
playback.
: Pause playback.
: Instantly playback the currently selected file. Default time is
1 minute.
Live: Switch to live view mode.
Replay: Replay the current file in playback Starts at the beginning of
the file.
EN : 2 TVN 50 Quick Start Guide
Page 5

Item Name Description
8. Direction The DIRECTION buttons are used to navigate between different
Enter button The ENTER button is used to confirm selection in any of the menu
9. PTZ buttons Zoom: Use + and – for digital zoom.
10. Archive button Press once to enter quick archive mode. Press twice to start
Package contents
The TruVision NVR 50 (model TVN 50) is
shipped with the following items:
• IR (infrared) remote control
• Two AAA batteries for the remote
control
• AC power cords (US, Europe, UK)
• USB mouse
• NVR
fields and items in menus.
In the Playback mode, the left and right button is used to speed up
and slow down recorded video.
In Live View mode, these buttons can be used to cycle through
channels.
In PTZ control mode, it can control the movement of the PTZ camera.
modes.
In single-frame Playback mode, pressing the button will advance the
video by a single frame.
Preset: Call up preprogrammed preset positions.
Tour: Call up preprogrammed shadow tours.
archiving. Indicator blinks green when data is being written to backup
device.
Quick install
Recommended steps for setting up the
NVR:
1. Connect all the devices required to the
back panel of the TVN 50. See Figure 1
on page 1.
Basic connections:
Connect monitor A to the BNC, VGA or
HDMI output. Connect the mouse to the
USB port in the front panel.
• CD with software and manuals
• TruVision NVR 50 Quick Start Guide
• TruVision NVR 50 User Manual (on CD)
Optional connections:
All the other connections shown are
optional and depend upon installation
requirements.
Installation environment
Refer to the user manual for detailed
information, but observe these important
requirements:
2. Connect the power cord to the unit and
turn on the power.
3. Set up the unit with the required
settings using the setup wizard.
• Place the unit in a secure location.
• Ensure that the unit is in a wellventilated area.
• Do not expose the unit to rain or
moisture.
First-time use
The TVN 50 has an express installation
wizard that lets you easily configure basic
NVR settings when first used. It configures
all cameras simultaneously. The
configuration can then be customized as
required.
By default, the setup wizard will start once
TVN 50 Quick Start Guide 3 : EN
Page 6

the NVR has loaded. The wizard walks you
through some of the more important
settings of your NVR. Select the preferred
language for the system and then enter the
administrator password. The default admin
password is 1234. It is strongly
recommended that this password is
changed.
The wizard will then guide you through the
menus to set the time and date, network
configuration, HDD management, and
recording configuration.
When all the required changes have been
entered, click Finish to exit the wizard. The
NVR 50 is now ready to use. Recording
starts automatically.
Operating the TVN 50
There are several ways to control the unit:
• Front panel
• IR remote control
• Mouse
• Web browser
Front panel
The buttons on the front panel control most
functions. See Figure 2 on page 2 for the
locations of the controls.
IR remote control
The IR remote control buttons are similar to
those on the front panel. Place the two AAA
batteries in the remote control.
To connect the remote control to the
NVR:
1. Press Menu on the front panel or right-
click the mouse and select Menu. The
main menu screen appears.
2. Select Display mode settings >
Monitor.
3. Check and remember NVR device
address value. The default value is 255.
The device address is valid for all IR
controls.
4. On the remote control press the Device
button.
5. Enter the device address value. It must
be the same as that on the TVN 50.
6. Press ENTER on the remote or front
panel.
USB mouse
The USB mouse provided with the TVN 50
operates all the functions of the NVR, unlike
the front panel, which has limited
functionality. The mouse lets you navigate
and make changes to settings in the user
interface.
Connect the mouse to the NVR by plugging
the mouse USB connector into the USB
port on the front panel. The mouse is
immediately operational and the pointer
should appear.
Web browser control
The TVN 50 Web browser lets you view,
record, and play back videos as well as
manage all aspects of the NVR from any
PC with Internet access. The browser’s
easy-to-use controls give you quick access
to all NVR functions. See Figure 3 on page 5.
To access the unit, open a web browser
and enter the IP address assigned to the
NVR as a Web address. In the login screen,
enter the default user ID and password:
• User ID: admin
• Password: 1234
The default values for TVN 50 network
settings are:
• DHCP: Enabled by default.
• IP address - 192.168.1.82
• Subnet mask - 255.255.255.0
• Gateway address - 192.168.1.1
• Ports:
When using the browser:
RTSP port: 554
HTTP port: 80
EN : 4 TVN 50 Quick Start Guide
Page 7
When using TruNav:
RTSP port: 554
Server/Client software port : 8000
Figure 3: Web browser interface
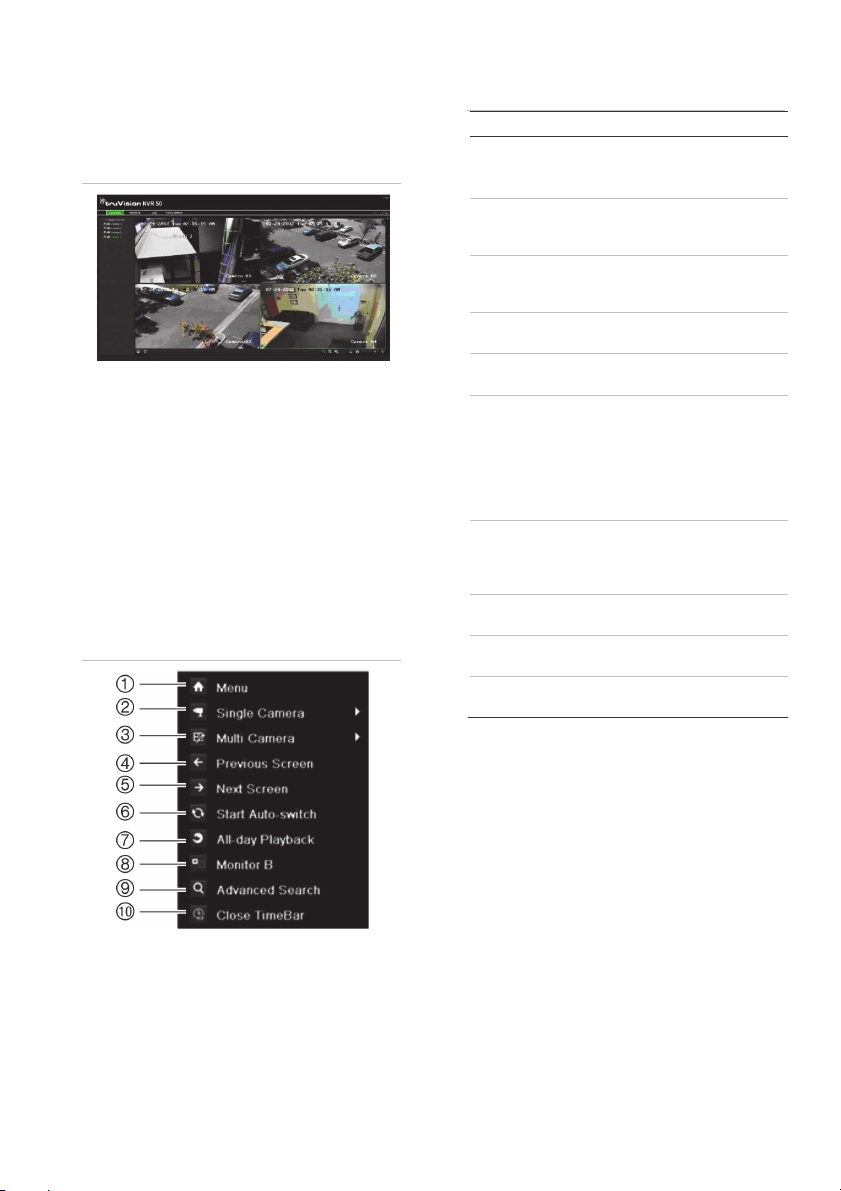
Live view mode
Live mode is the normal operating mode of
the unit where you watch live pictures from
the cameras.
Regularly used functions in live view can be
quickly accessed by clicking the right-button
of the mouse on the camera image. The
shortcut pop-up toolbar appears. See
Figure 4 below for a description of the
functions available.
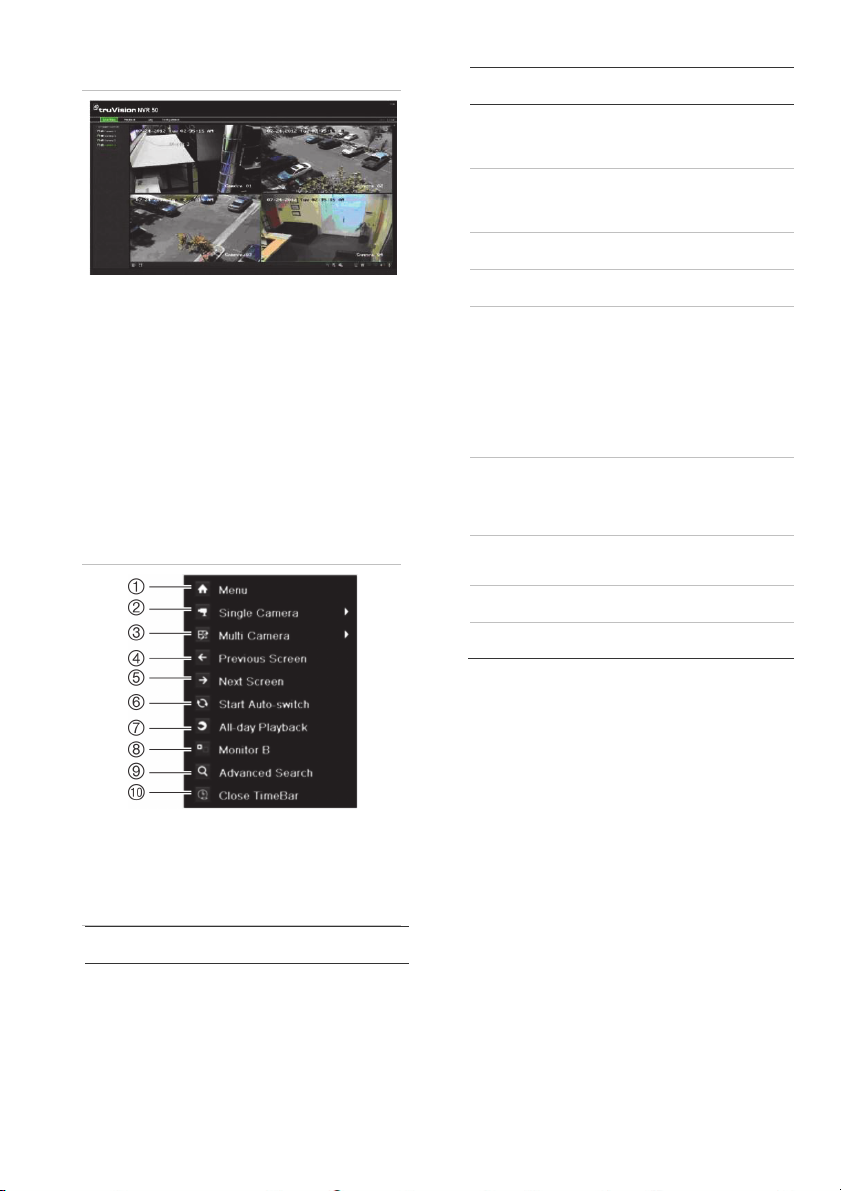
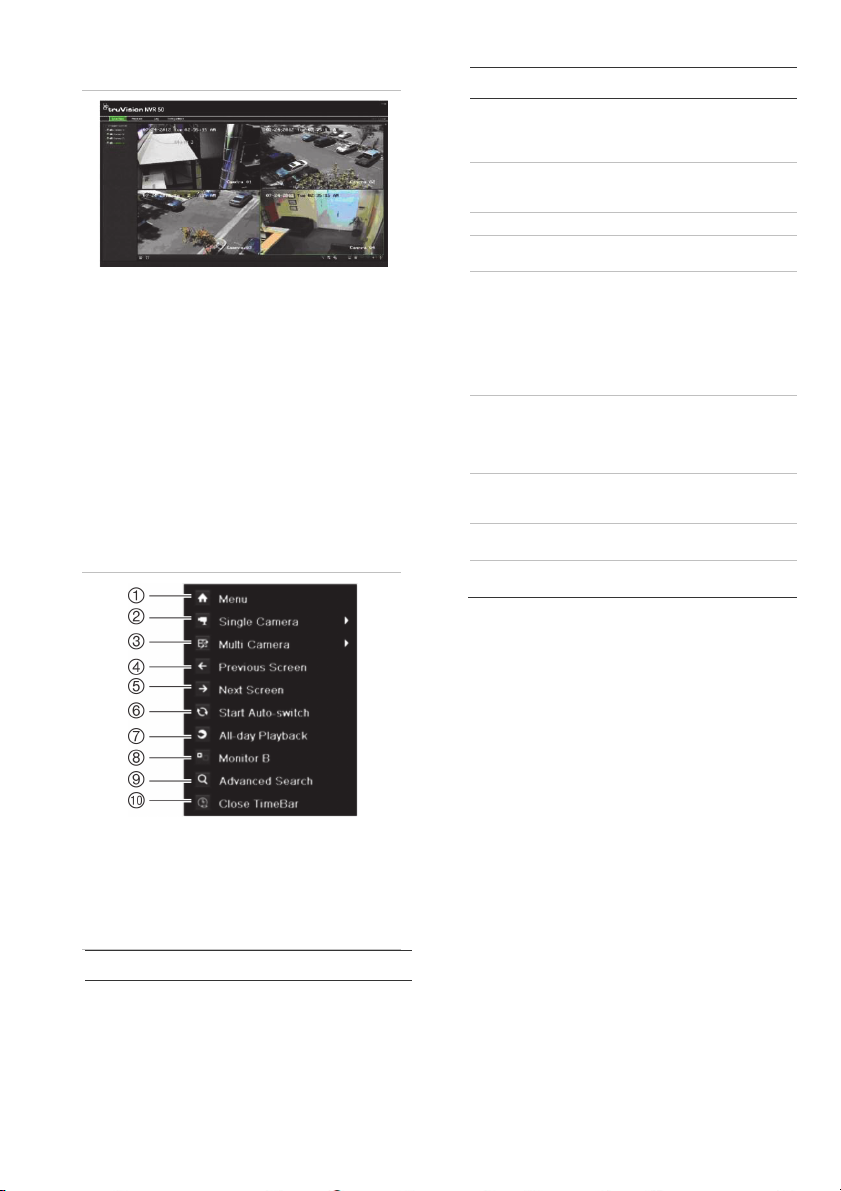
Figure 4: The mouse menu for the main
monitor
Table 1: Mouse menu for monitor A
(main monitor)
Item Name Description
1. Menu Enter the Main menu.
This option is not available
from monitor B.
2. Single
camera
3. Multi
camera
4. Previous
screen
5. Next
screen
6. Start auto-
switch
7. All-day
playback
8. Monitor B Switch between monitors A
9. Advanced
search
10. Close
timebar
Switch to a full-screen view
for the selected camera from
the dropdown list.
Switch between the different
multiview options from the
dropdown list.
Displays the previous
camera.
Displays the next camera.
Turn on sequence mode.
The screen automatically
sequences between
cameras.
Go to Menu > Display Mode
Settings > Layout > Dwell
Time to set up.
Playback the recorded video
of the selected day from the
selected camera. The current
day is selected by default.
(main) and B (spot).
Enter the advanced video
search menu.
Open/close the time bar.
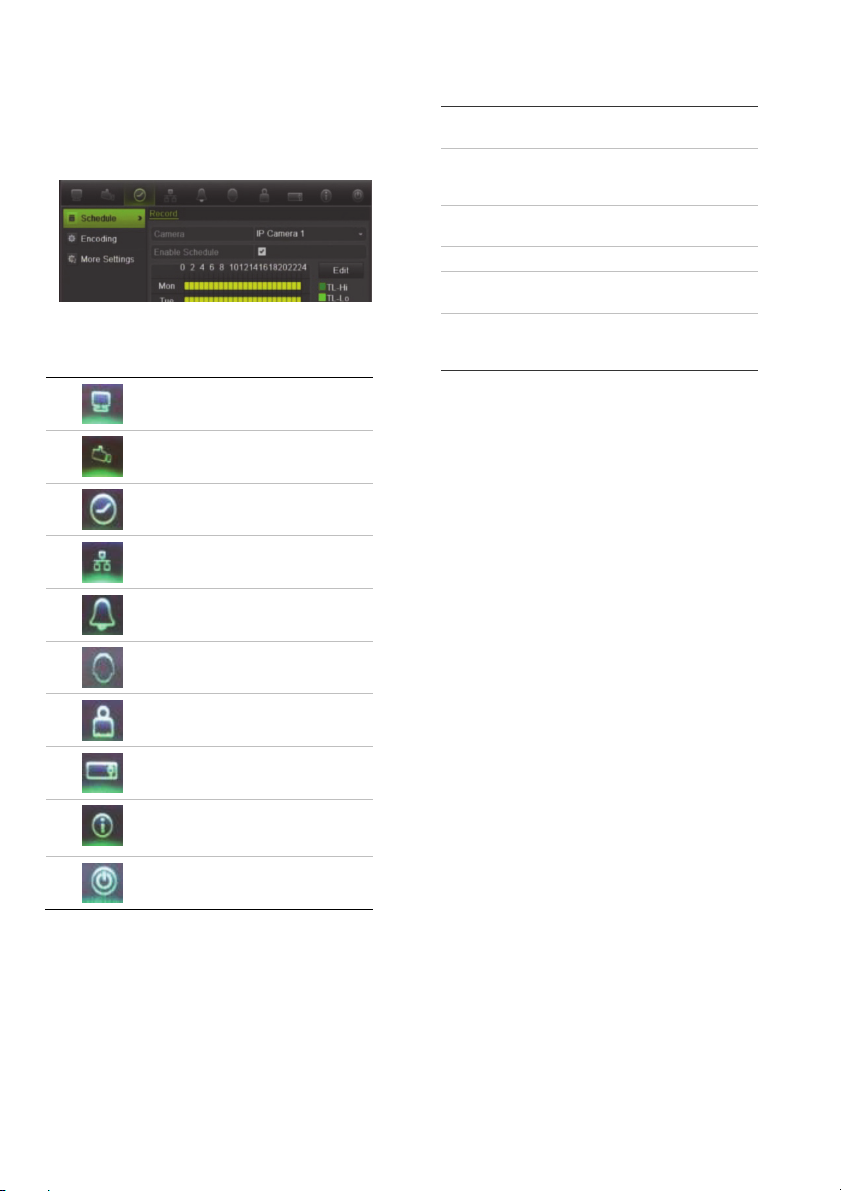
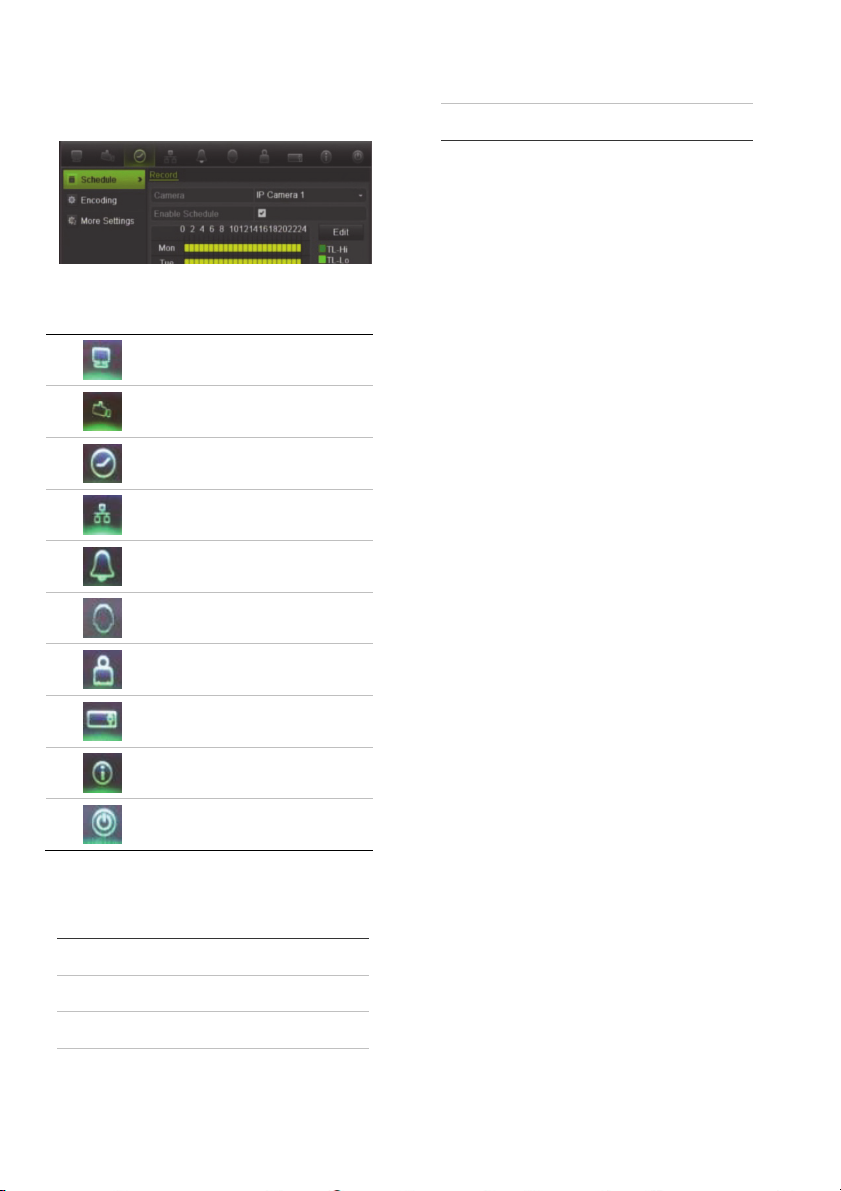
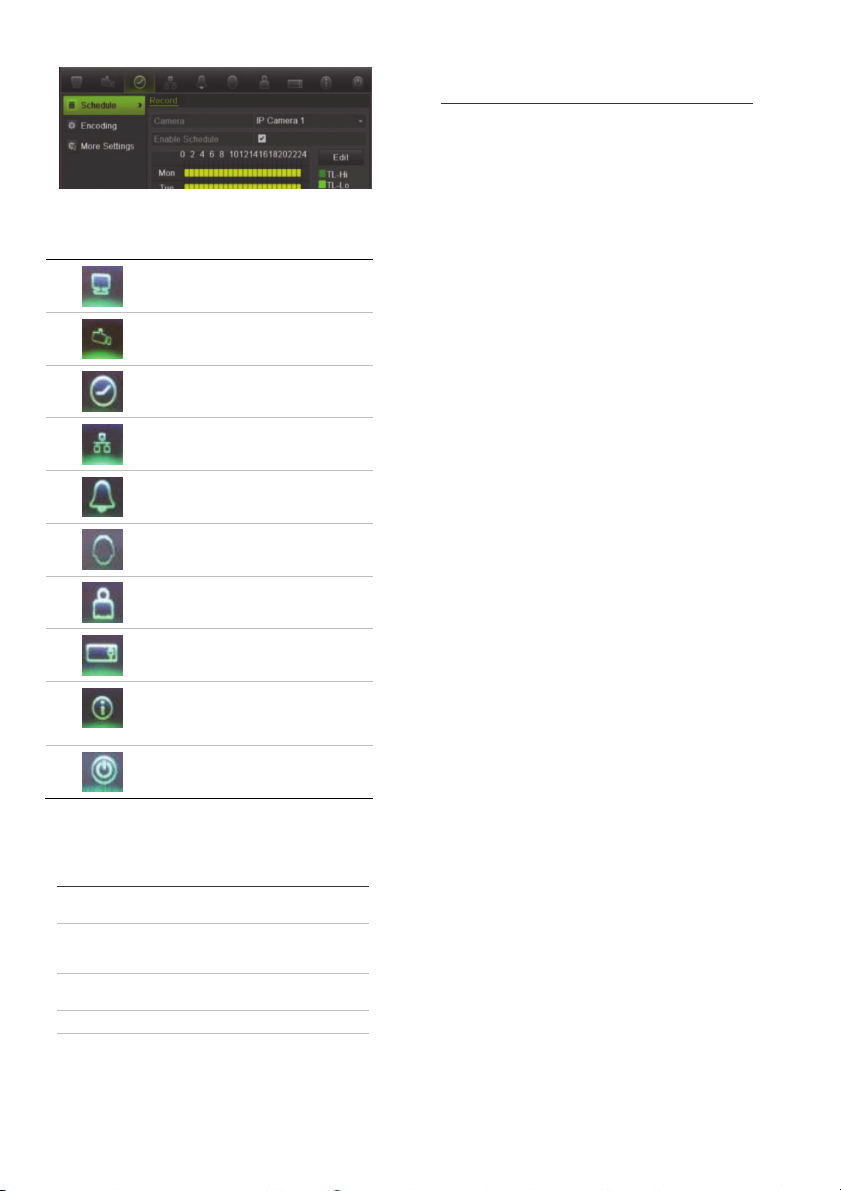
Configuring the TVN 50
The TVN 50 has an icon-driven menu
structure that allows you to configure the
unit’s parameters. Each command icon
displays a screen that lets you edit a group
of settings. Most menus are available only
to system administrators.
The list of commands available depends on
which monitor is active; main or spot
(monitor B). See Table 1 below.
TVN 50 Quick Start Guide 5 : EN
Refer to the TVN 50 user manual for
detailed information on configuring the unit.
To access the main menu from live view:
Press the Menu button on the remote
control or front panel
- Or -
Page 8
Right-click the mouse and select Menu
from the pop-up menu.
The main menu screen appears. Move the
mouse over a command icon in the menu
toolbar and click to select it.
Description of the command icons in the
menu toolbar:
Configures camera settings.
Configures display settings.
Configures recording settings.
Configures standard network
settings.
Configures alarm settings.
Configures PTZ settings.
Configures user settings.
Configures system settings.
Provides reference information
to the various toolbars and
menus within the interface.
Provides access to logout,
reboot and shutdown options.
Specifications
Power supply 100 to 240 VAC,
Power consumption
(without HDD)
TVN 5032
Operating
temperature
Relative humidity 10 to 90%
Dimensions
(W x H x D)
Weight ≤ 8 kg (≤ 17.6 lb.)
6.3 A, 50 to 60 Hz
<= 45 W
-10 to +55 ºC
(50 to 131 °F)
445 × 470 × 90 mm
(17.5 × 18.5 × 3.5 in.)
(without HDD or DVDR/W)
Contact information
For contact information, see
www.interlogix.com, or
www.utcfssecurityproducts.eu
EN : 6 TVN 50 Quick Start Guide
Page 9
TruVision NVR 50
Schnellstartanleitung
Abbildung 1: Anschlüsse an der Rückseite
1. Anschluss eines CCTVÜberwachungsmonitors (BNC-Anschluss).
Main Monitor (Hauptmonitor).
2. Anschluss eines Audioeingangs über
Cinchstecker.
3. Anschluss an ein RS-232-Gerät.
4. Anschluss an ein Netzwerk.
5. Anschluss an ein optionales eSATA-Gerät,
z. B. SATA-Festplatte, CD/DVD-RM.
6. Anschluss des Netzkabels.
7. Anschluss von Lautsprechern für
Audioausgabe.
8. Anschluss an einen VGA-Monitor.
DE
9. Anschluss an einen HDTV. Die HDMI-Verbindung
unterstützt digitales Audio und Video.
10. Anschluss an ein optionales USB-Gerät, z. B.
Maus, CD/DVD-Brenner oder Festplatte.
11. Beenden der Dome-Leitung mithilfe dieses
RS-485-Schalters. Standard ist "Off" (Aus).
12. Anschluss einer PTZ-Steuerung.
13. Anschluss an ein Bedienpult (abgebildet ist das
KTD-405)
14. Anschluss von bis zu 16 Alarmeingangskabeln
an Relaisausgänge.
15. Anschluss von bis zu vier AlarmrelaisAusgängen.
16. Erdung.
TVN 50 Schnellstartanleitung 7 : DE
Page 10
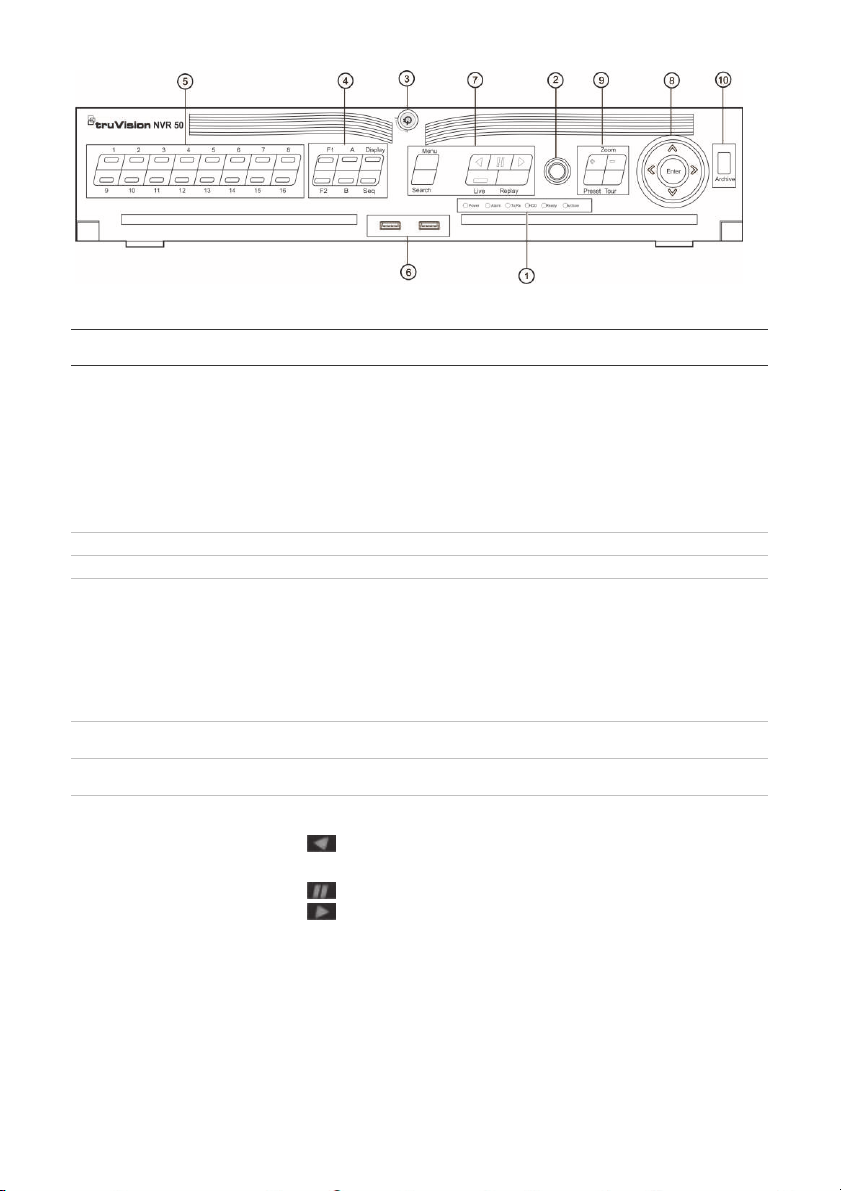
Abbildung 2: Steuerungen des Frontbedienelements
Komponente
1. Status-LEDs Power: Grün zeigt an, dass der NVR einwandfrei funktioniert. Rot weist auf einen
2. IR-Empfänger Empfänger für IR-Fernbedienung
3. Frontbedienelementsperre Sie können das Frontbedienelement mit einem Schlüssel sperren oder entsperren.
4. Display-Tasten Display: Schaltet zwischen den verschiedenen Mehrfachanzeigen um: Voll, Quad,
5. Zahlentasten Schaltet zwischen verschiedenen Kameras in den Modi "Live", "PTZ-Steuerung" oder
6. USB-Anschlüsse Universal Serial Bus (USB)-Anschlüsse für zusätzliche Geräte wie USB-Maus und
7. Tasten "Menu" (Menü)
Name Beschreibung
Fehler hin.
Alarm: Rot zeigt an, dass ein Sensor Alarmeingang oder ein anderer Alarm, z. B.
Bewegungsalarm oder Sabotagealarm vorliegt.
TX/RX: Grün weist auf eine normale Netzwerkverbindung hin.
HDD: Wenn die HDD-Anzeige rot blinkt, werden auf der HDD Daten gelesen oder
geschrieben.
Ready: Grün zeigt an, dass das Gerät ordnungsgemäß funktioniert.
Archive: Wenn die Archive-Anzeige grün blinkt, werden Aufnahmedateien oder
Schnappschüsse auf ein USB- oder eSATA-Gerät exportiert.
1+5, 1+7, 9 und 16.
Sequenz: Startet/beendet die Sequenzierung im LiveView-Modus.
A: Auswahl des gewünschten Monitors.
B: Auswahl des Spotmonitors (in der Liveanzeige).
F1: Startet und stoppt das Mitschneiden von Videos in ganztägigen Wiedergaben.
F2: Blendet die Zeitleiste im Liveanzeigemodus ein/aus.
Blendet die Wiedergabe-Steuerungsleiste in ganztägigen Wiedergaben ein/aus.
"Wiedergabe" um.
USB-Festplatte (HDD).
und "Search" (Suche)
Wiedergabetasten
Menü: Das Hauptmenü aufrufen/beenden.
Suche: Erweitertes Videosuchmenü aufrufen.
: Rücklauf: Livebildanzeige: Wiedergabe des ersten Videos der aktuellen
Kamera; Videowiedergabemodus: Wiedergabe eines Kamerabilds im Rücklauf;
Wiedergabemodus für Bilder: Anzeige von Bildern in umgekehrter Reihenfolge.
: Pause: Wiedergabe anhalten.
: Play: Sofortige Wiedergabe der aktuell ausgewählten Datei. Standardzeit ist 1
Minute.
Live: Zum Liveanzeigemodus wechseln.
Wiedergabe: Aktuelle wiedergegebene Datei wiederholen; startet am Anfang der
Datei.
DE : 8 TVN 50 Schnellstartanleitung
Page 11

Komponente
8. Richtung
Eingabetaste Mit der ENTER-Taste wird in jedem Menümodus eine Auswahl bestätigt.
9. PTZ-Tasten Zoom: Verwenden Sie + und - für digitalen Zoom.
10. Archivierungstaste Drücken Sie einmal, um den Schnell-Archivierungs-Modus aufzurufen. Drücken Sie
Packungsinhalt
Die folgenden Teile sind im Lieferumfang des
TruVision NVR 50 (Modell TVN 50) enthalten:
• IR (Infrarot)-Fernbedienung
• Zwei AAA-Batterien für die Fernbedienung
• Netzkabel (Wechselspannung; USA, Europa
und GB)
• USB-Maus
• NVR
• CD mit Software und Benutzerhandbüchern
• TruVision NVR 50 Schnellstartanleitung
• TruVision NVR 50 Benutzerhandbuch (auf
CD)
Installationsumgebung
Ausführliche Informationen dazu finden Sie im
Benutzerhandbuch, die folgenden wichtigen
Anforderungen sollten jedoch beachtet werden:
• Stellen Sie das Gerät an einem geschützten
Ort auf.
• Stellen Sie sicher, dass das Gerät in einer
gut belüfteten Umgebung installiert wird.
• Achten Sie darauf, dass das Gerät vor Regen
oder Feuchtigkeit geschützt ist.
Schnellinstallation
Empfohlene Schritte für das Setup des NVR:
Name Beschreibung
Mit den Richtungstasten können Sie durch die verschiedenen Felder und Elemente der
Menüs navigieren.
Im Wiedergabemodus kann das aufgenommene Video mit der linken und rechten
Taste beschleunigt bzw. verlangsamt werden. Mit den Aufwärts- und Abwärtstasten
kann im aufgenommenen Video 30 Sekunden vor- bzw. zurückgesprungen werden.
Im Pausenmodus kann mit der linken bzw. rechten Taste im aufgenommenen Video
um einen Frame (Bild) vor bzw. zurückgesprungen werden. Mit den Aufwärts- und
Abwärtstasten können im aufgenommenen Video Sprünge von einer Sekunde vor bzw.
zurück durchgeführt werden.
Im Liveanzeigemodus können Sie mit diesen Tasten durch die Kanäle wechseln.
Im PTZ-Steuerungsmodus steuern sie die Bewegungen der PTZ-Kamera.
Im Einzelbild-Wiedergabemodus wechselt das Video mit dieser Taste zum nächsten
Einzelbild.
Preset: Vorprogrammierte Preset-Positionen aufrufen.
Tour: Vorprogrammierte Touren aufrufen.
zweimal, um die Archivierung zu starten. Die Anzeige blinkt grün, wenn Daten auf ein
Sicherungsgerät geschrieben werden.
1. Schließen Sie alle erforderlichen Geräte an
der Rückseite des TVN 50 an. Siehe
Abbildung 1 auf Seite 7.
Grundlegende Anschlüsse:
Anschließen von Monitor A an den BNC-,
VGA- oder HDMI-Ausgang. Schließen Sie die
Maus an den USB-Port des
Frontbedienelements an.
Optionale Anschlüsse:
Alle sonstigen dargestellten Verbindungen
sind optional und hängen von den jeweiligen
Installationsanforderungen ab.
2. Schließen Sie das Netzkabel an und schalten
Sie das Gerät ein.
3. Nehmen Sie die erforderlichen
Geräteeinstellungen mithilfe des SetupAssistenten vor.
Erstmalige Verwendung
Der TVN 50 verfügt über einen ExpressInstallationsassistenten, der bei der erstmaligen
Verwendung die Konfiguration grundlegender
NVR-Einstellungen erleichtert. Er konfiguriert alle
Kameras gleichzeitig. Die Konfiguration kann
anschließend je nach Bedarf angepasst werden.
Der Setup-Assistent wird standardmäßig
gestartet, sobald der NVR bereit ist. Der Assistent
führt Sie durch die wichtigsten Einstellungen Ihres
NVR. Wählen Sie die gewünschte Sprache für
das System aus und geben Sie anschließend das
Administratorpasswort ein. Das Standard-
TVN 50 Schnellstartanleitung 9 : DE
Page 12

Administratorpasswort lautet 1234. Es wird
dringend empfohlen, dieses Passwort zu ändern.
Der Assistent führt Sie anschließend durch die
Menüs, um Uhrzeit und Datum,
Netzwerkkonfiguration, Festplattenverwaltung
sowie Aufnahmekonfiguration festzulegen.
Wenn Sie alle erforderlichen Änderungen
vorgenommen haben, klicken Sie auf Fertig
stellen, um den Setup-Assistenten zu beenden.
Der NVR 50 ist nun einsatzbereit. Die Aufnahme
wird automatisch gestartet.
Betrieb des TVN 50
Es bestehen verschiedene Möglichkeiten, das
Gerät zu steuern:
• Frontbedienelement
• IR-Fernbedienung
• Maus
• Webbrowser
Frontbedienelement
Mithilfe der Tasten des Frontbedienelements
können die meisten Funktionen gesteuert werden.
Die Position der Steuerungen können Sie
Abbildung 2 auf Seite 8 entnehmen.
IR-Fernbedienung
Die Tasten der IR-Fernbedienung sind ähnlich
den Tasten auf dem Frontbedienelement. Legen
Sie die zwei AAA-Batterien in die Fernbedienung.
So verbinden Sie die Fernbedienung mit dem
NVR:
1. Drücken Sie die Taste Menu (Menü) auf der
Fernbedienung oder wählen Sie per
Rechtsklick mit der Maus die Option Menü
aus. Das Hauptmenü wird angezeigt.
2. Wählen Sie Anzeigemodus-Einstellungen >
Monitor aus.
3. Prüfen und merken Sie sich den Adresswert
des NVR-Gerätes. Der Standardwert beträgt
255. Die Geräteadresse gilt für alle
Infrarotfernbedienungen.
4. Drücken Sie auf der Fernbedienung die Taste
Gerät.
5. Geben Sie den Adresswert des Gerätes ein.
Er muss mit dem entsprechenden Wert des
TVN 50 übereinstimmen.
6. Drücken Sie die Taste ENTER auf der
Fernbedienung oder dem
Frontbedienelement.
USB-Maus
Die mit dem TVN 50 gelieferte USB-Maus steuert
alle Funktionen des NVR (im Gegensatz zum
Frontbedienelement, dessen Funktionalität
eingeschränkt ist). Verwenden Sie die Maus zum
Navigieren und nehmen Sie in der
Bedieneroberfläche so Änderungen an den
Einstellungen vor.
Schließen Sie die Maus an den NVR an, indem
Sie den Maus-USB-Anschluss in den USBAnschluss am Frontbedienelement einstecken.
Die Maus ist sofort einsatzbereit, und der
Mauszeiger sollte erscheinen.
Steuerung über den Webbrowser
Mit dem TVN 50-Webbrowser können Sie Videos
anzeigen, aufzeichnen und wiedergeben sowie
alle Aspekte des NVR von jedem PC mit
Internetzugriff verwalten. Die
benutzerfreundlichen Steuerungen des Browsers
ermöglichen einen schnellen Zugriff auf alle NVRFunktionen. Siehe Abbildung 3 Seite 11.
Um auf das Gerät zuzugreifen, öffnen Sie einen
Webbrowser und geben Sie die IP-Adresse ein,
die dem NVR als Webadresse zugewiesen ist.
Geben Sie im Anmeldebildschirm die StandardBenutzer-ID und das Standardpasswort ein.
• Benutzer-ID: admin
• Passwort: 1234
Die Standardwerte für die Netzwerkeinstellungen
des TVN 50 sind:
• DHCP: Standardmäßig aktiviert.
• IP-Adresse – 192.168.1.82
• Subnetzmaske – 255.255.255.0
• Gateway-Adresse – 192.168.1.1
• Ports:
Beim Verwenden des Browsers:
RTSP-Port: 554
HTTP-Port: 80
Beim Verwenden von TruNav:
RTSP-Port: 554
Server/Client-Softwareport: 8000
DE : 10 TVN 50 Schnellstartanleitung
Page 13
A
Abbildung 3: Webbrowser-Oberfläche
Liveanzeigemodus
Der Livemodus ist der normale Betriebsmodus
des Geräts, in dem Sie die Liveschnappschüsse
der Kameras sehen.
Regelmäßig verwendete Funktionen in der
Liveanzeige können durch Klicken mit der rechten
Maustaste auf das Kamerabild schnell aufgerufen
werden. Die Popup-Symbolleiste der jeweiligen
Verknüpfung wird angezeigt. Die nachfolgende
Abbildung 4 enthält eine Beschreibung der
verfügbaren Funktionen.
Abbildung 4: Das Mausmenü für den
Hauptmonitor
Komponente
2. Einzelkamera Zu einer Vollbildanzeige für
3. (Mehrfach-
4. Vorheriger
5. Nächster
6.
7. Tägliche
8. Monitor B Zwischen Monitor A
9.
10.
Name Beschreibung
die ausgewählte Kamera aus
der Dropdown-Liste
umschalten.
Wechselt zwischen den
kamera
Bildschirm
Bildschirm
utomatischen
Wechsel starten
Wiedergabe
Suche erweitert Erweitertes Videosuchmenü
Zeitleiste
schließen
verschiedenen
Mehrfachanzeige-Optionen
aus der Dropdown-Liste.
Zeigt die vorherige Kamera
an.
Zeigt die nächste Kamera an.
Schaltet den Sequenzmodus
ein. Der Bildschirm wechselt
automatisch zwischen den
Kameras.
Zum Einrichten wechseln Sie
zu "Menu" (Menü) > "Display
Mode Settings"
(Anzeigemoduseinstellungen) >
"Layout" (Layout) > "Dwell
Time" (Verweildauer).
Gibt das aufgenommene Video
des ausgewählten Tages der
ausgewählten Kamera wieder.
Der aktuelle Tag ist
standardmäßig ausgewählt.
(Hauptmonitor) und B
(Spotmonitor) umschalten.
aufrufen.
Öffnet/schließt die Zeitleiste.
Konfigurieren des TVN 50
Der TVN 50 hat eine symbolgesteuerte
Menüstruktur, die Ihnen die Konfiguration der
Geräteparameter erlaubt. Jeder Befehl zeigt einen
Die Liste der verfügbaren Befehle hängt davon
ab, welcher Monitor aktiv ist; Haupt- oder
Spotmonitor (Monitor B). Siehe Tabelle 1 unten.
Tabelle 1: Mausmenü für Monitor A
(Hauptmonitor)
Komponente
1. Menü Hauptmenü aufrufen.
Name Beschreibung
Diese Option steht für
Monitor B nicht zur
Verfügung.
TVN 50 Schnellstartanleitung 11 : DE
Bildschirm an, in dem Sie eine Gruppe von
Einstellungen bearbeiten können. Die meisten
Menüs sind nur für Systemadministratoren
zugänglich.
Einzelheiten zur Konfiguration des Gerätes finden
Sie im Benutzerhandbuch des TVN 50.
So greifen Sie in der Liveanzeige auf das
Hauptmenü zu:
Drücken Sie die Taste
Menü auf der
Fernbedienung oder dem
Frontbedienelement.
- oder -
Klicken Sie mit der rechten Maustaste und
wählen Sie Menü aus dem Popup-Menü.
Page 14
Das Hauptmenü wird angezeigt. Bewegen Sie die
A
Maus über ein Befehlssymbol in der
Menüsymbolleiste und klicken Sie darauf, um es
auszuwählen.
Beschreibung der Befehlssymbole in der
Menüsymbolleiste:
Konfiguriert Kameraeinstellungen.
Konfiguriert Anzeigeeinstellungen.
Konfiguriert Aufnahmeeinstellungen.
Konfiguriert StandardNetzwerkeinstellungen.
Konfiguriert Alarmeinstellungen.
Konfiguriert PTZ-Einstellungen.
Konfiguriert Benutzereinstellungen.
Konfiguriert Systemeinstellungen.
Enthält Informationen zu den
verschiedenen Symbolleisten und
Menüs der Benutzeroberfläche.
Enthält Informationen zu Optionen
für Abmeldung, Neustart und
Herunterfahren.
bmessungen
(B × H × T)
Gewicht ≤ 8 kg (≤ 17,6 lb.)
445 × 470 × 90mm
(ohne HDD oder DVD-R/W)
Kontaktinformationen
Kontaktinformationen finden Sie unter
www.interlogix.com oder
www.utcfssecurityproducts.eu.
Technische Daten
Stromversorgung 100 bis 240V AC,
Energieverbrauch (ohne
HDD) TVN 5032
Betriebstemperatur -10 bis +55 ºC
Relative Luftfeuchtigkeit 10 bis 90 %
DE : 12 TVN 50 Schnellstartanleitung
6,3A, 50 bis 60Hz
<= 45 W
(50 bis 131 °F)
Page 15
Guía de inicio rápido de
TruVision NVR 50
Figura 1: Conexiones del panel posterior
1. Conexión de un monitor CCTV (conector tipo BNC):
Monitor principal.
2. Conexión de una entrada de audio a conectores RCA.
3. Conexión a un dispositivo RS-232.
4. Conexión a una red.
5. Conexión a un dispositivo eSATA opcional como, por
ejemplo, un HDD SATA y una unidad de CD/DVD-RM.
6. Conexión del cable de alimentación.
7. Conexión de altavoces para la salida de audio.
8. Conexión a un monitor VGA.
9. Conexión a un dispositivo HDTV. La conexión HDMI
admite tanto audio como vídeo digital.
10. Conexión a un dispositivo USB opcional como, por
ejemplo, un ratón, un grabador de CD/DVD o una
unidad de HDD.
11. Cierre la línea a las cámaras domo utilizando este
microinterruptor RS-485. "Off" (Desactivado) es la
opción predeterminada.
12. Conexión de un control PTZ.
13. Conexión a un teclado (KTD-405 como se muestra).
14. Conexión de hasta 16 cables de entrada de alarma a
salidas de relé.
15. Conexión de hasta cuatro salidas de relés de alarma.
16. Conexión a toma de tierra.
ES
Guía de inicio rápido de TVN 50 13 : ES
Page 16
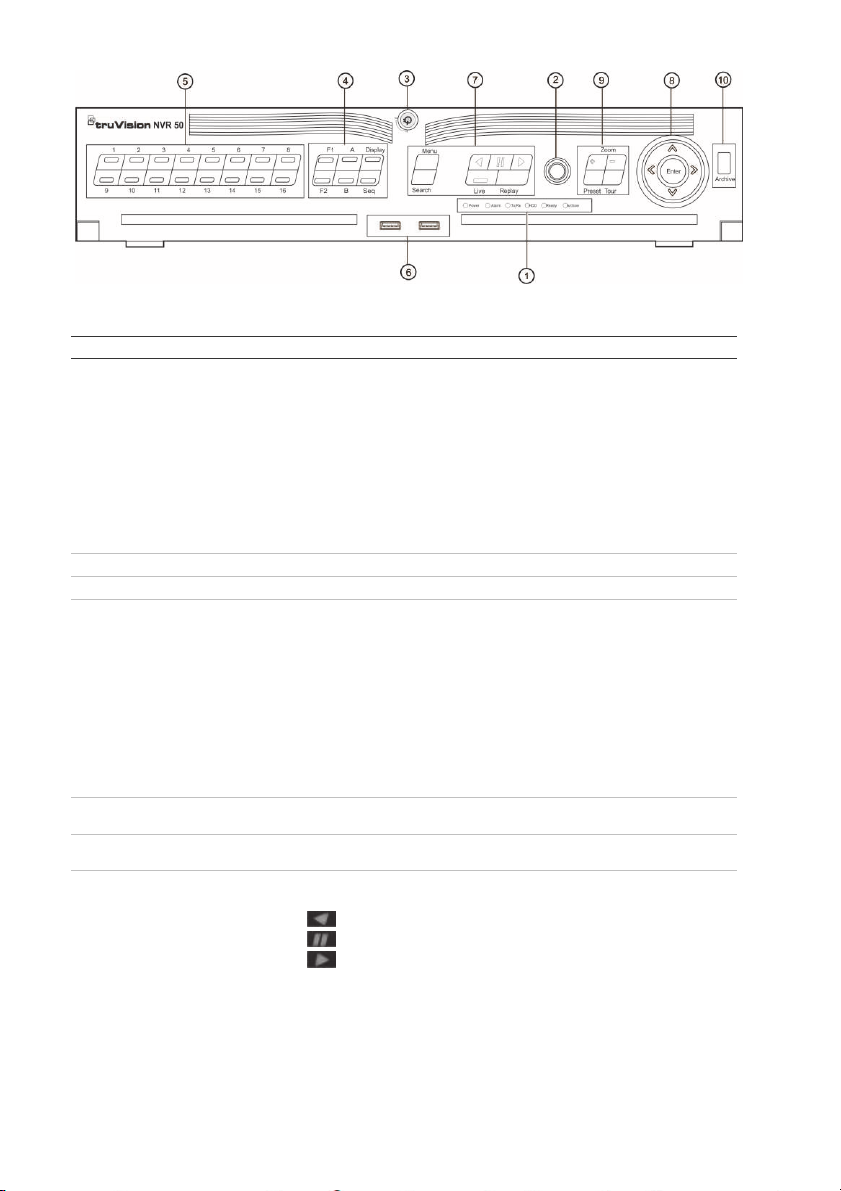
Figura 2: Controles del panel frontal
Elemento Nombre Descripción
1. LED de estado Power (Alimentación): si se ilumina en verde, significa que la unidad NVR está
2. Receptor de infrarrojos Receptor para el control remoto de infrarrojos.
3. Bloqueo del panel frontal Puede bloquear o desbloquear el panel frontal con una clave.
4. Botones de visualización Display (Visualización): permite cambiar entre las diversas vistas múltiples:
5. Botones numéricos Permiten cambiar entre las diferentes cámaras en los modos visual directo,
6. Interfaces USB Puertos bus universales en serie (USB) para dispositivos adicionales como, por
7. Botones Menu (Menú) y
Search (Búsqueda)
Botones de reproducción
funcionando correctamente. Si se ilumina en rojo, indica la presencia de un fallo.
Alarm (Alarma): rojo indica que hay un sensor de alarma activado u otra alarma
como de movimiento o de manipulación.
TX/RX: verde indica una conexión de red normal.
HDD (Disco duro): el indicador HDD parpadea en rojo cuando se están leyendo
o escribiendo datos en el HDD.
Ready (Preparado): verde significa que el dispositivo está funcionando
correctamente.
Archive (Archivado): el indicador de archivado parpadea en verde cuando los
archivos grabados o las instantáneas se están exportando a un dispositivo USB
o eSATA.
completa, cuádruple, 1+5, 1+7, 9 y 16.
Sequence (Secuencia): inicia o detiene las secuencias en el modo visual
directo.
A: selecciona el monitor principal.
B: selecciona el monitor secundario (en modo de visionado en vivo).
F1: en reproducción de todo el día, haga clic para iniciar y detener la
delimitación de vídeo.
F2: en el modo de visionado en vivo, haga clic para mostrar/ocultar la barra de
hora.
En reproducción de todo el día, haga clic para mostrar/ocultar la barra de
herramientas de control de reproducción.
control PTZ o reproducción.
ejemplo, un ratón o una unidad de disco duro (HDD) USB.
Menu (Menú): accede/sale del menú principal.
Search (Búsqueda): permite acceder al menú de búsqueda avanzada.
: retrocede hasta el vídeo más antiguo disponible e inicia la reproducción.
: pausa la reproducción.
: reproduce de forma instantánea el archivo seleccionado actualmente. El
tiempo predeterminado es de 1 minuto.
Live (En vivo): cambia al modo de visualización en directo.
Replay (Repetición): vuelve a reproducir el archivo actual desde el comienzo.
ES : 14 Guía de inicio rápido de TVN 50
Page 17

Elemento Nombre Descripción
8. Dirección Los botones de DIRECCIÓN se utilizan para desplazarse entre diferente campos
Botón Enter (Intro) El botón ENTER (Intro) se utiliza para confirmar la selección en cualquiera de los
9. Botones de PTZ Zoom: use los botones + y – para manejar el zoom digital.
10. Botón Archive (Archivado) Pulse este botón una vez para acceder al modo de archivado rápido. Púlselo dos
y elementos en los menús.
En modo de reproducción, los botones izquierdo y derecho se utilizan para
ralentizar o acelerar el vídeo grabado. Los botones arriba y abajo se utilizan para
hacer retroceder o avanzar el vídeo grabado 30 segundos.
En modo de pausa, los botones izquierdo y derecho se utilizan para hacer
retroceder o avanzar el vídeo grabado un fotograma. Los botones arriba y abajo
se utilizan para hacer retroceder o avanzar el vídeo grabado 1 segundo..
En el modo de visionado en vivo, esos botones se pueden utilizar para
desplazarse por los diferentes canales.
En el modo de control PTZ, se puede controlar el movimiento de la cámara
PTZ.
modo de menú.
En el modo de reproducción de un solo fotograma, al pulsar el botón avanzará
en el vídeo un solo fotograma.
Preset (Posición preestablecida): permite mostrar las posiciones preestablecidas
preprogramadas.
Tour: permite mostrar los shadow tours preprogramados.
veces para empezar a archivar. El indicador parpadeará en verde cuando se
estén escribiendo o realizando copias de seguridad de datos en el dispositivo.
Contenido del paquete
La unidad NVR 50 de TruVision (modelo TVN 50)
se suministra con los siguientes elementos:
• Control remoto por infrarrojos
• Dos pilas AAA para el control remoto
• Cables de alimentación CA (EE.UU., Europa
y Reino Unido)
• Ratón USB
• NVR
• CD con software y manuales
• Guía de inicio rápido de TruVision NVR 50
• Manual de usuario de TruVision NVR 50 (en
CD)
Entorno de instalación
Consulte el manual del usuario para obtener
información detallada, pero cumpla los
importantes requisitos que se indican a
continuación:
• Coloque la cámara en un lugar seguro.
• Asegúrese de que la unidad esté en una
zona bien ventilada.
• No exponga la unidad a la lluvia ni a la
humedad.
Instalación rápida
Pasos recomendados para configurar la unidad
NVR:
1. Conecte todos los dispositivos necesarios al
panel trasero del TVN 50. Consulte la
Figura 1 en la página 13.
Conexiones básicas:
Conecte el monitor A al BNC, VGA o salida
HDMI. Conecte el ratón al puerto USB del
panel delantero.
Conexiones opcionales:
El resto de conexiones mostradas son
opcionales, y su uso depende de los
requisitos de instalación.
2. Conecte el cable de alimentación a la unidad
y enciéndala.
3. Configure la unidad con los parámetros
necesarios mediante el asistente de
configuración.
Primer uso
La unidad TVN 50 cuenta con un asistente de
instalación rápida que le permite establecer con
facilidad la configuración básica de NVR cuando
se utiliza por primera vez. El asistente configura
todas las cámaras simultáneamente. La
configuración se puede personalizar
Guía de inicio rápido de TVN 50 15 : ES
Page 18

posteriormente según sea necesario.
El asistente de configuración se iniciará de forma
predeterminada una vez que se haya cargado la
unidad NVR. Le guiará por algunos de los
parámetros de configuración más importantes de
su unidad NVR. Seleccione el idioma que prefiera
para el sistema, e introduzca la contraseña de
administrador. La contraseña de administrador
predeterminada es 1234. Le recomendamos
encarecidamente que cambie dicha contraseña.
Después, el asistente le guiará por los menús
para establecer la hora y fecha, la configuración
de red, la administración de HDD y la
configuración de grabación.
Una vez introducidos todos los cambios
necesarios, haga clic en Finalizar para salir del
asistente de configuración. La unidad NVR 50 ya
puede utilizarse. La grabación se iniciará de
manera automática.
Funcionamiento del TVN 50
Existen varias formas de controlar la unidad:
• Panel frontal
• Mando a distancia por infrarrojos
• Ratón
• Explorador Web
Panel frontal
Los botones del panel frontal controlan casi todas
las funciones. Consulte la Figura 2 en la página
14 para obtener la ubicación de los controles.
Control remoto por infrarrojos
Los botones del mando a distancia son similares a
los del panel de control. Coloque las dos pilas AAA
en el mando a distancia.
Para conectar el control remoto con la unidad
NVR:
1. Pulse el botón Menú del panel frontal o bien
haga clic con el botón derecho del ratón y
seleccione el botón Menú. Aparecerá la
pantalla de menú principal.
2. Seleccione Configuración del modo de
visualización > Monitor.
3. Compruebe y recuerde el valor de la
dirección de la unidad NVR. El valor
predeterminado es 255. El dispositivo es
compatible con todo tipo de mandos por
infrarrojos.
4. En el control remoto, pulse Dispositivo.
5. Introduzca el valor de dirección del
dispositivo. Debe ser igual al de la unidad
TVN 50.
6. Pulse el botón ENTER (Intro) del control
remoto o del panel frontal.
Ratón USB
El ratón USB que se suministra con el TVN 50
controla todas las funciones de la unidad NVR, a
diferencia del panel frontal, que cuenta con una
funcionalidad limitada. El ratón USB le permite
navegar y hacer cambios en las opciones de la
interfaz de usuario.
Conecte el ratón a la unidad NVR insertando el
conector USB del ratón en el puerto USB situado
en el panel delantero. Aparecerá el puntero y
podrá utilizar el ratón de inmediato.
Control mediante explorador Web
El explorador Web de la unidad TVN 50 le permite
ver, grabar y reproducir vídeos, así como
administrar todos los aspectos de la unidad NVR
desde cualquier PC con acceso a Internet. Los
sencillos controles del explorador le ofrecen un
rápido acceso a todas las funciones de la unidad
NVR. Consulte la Figura 3 en la página 17.
Para acceder a la unidad, abra el explorador Web
e introduzca la dirección IP asignada a la unidad
NVR, como si fuese una dirección Web. En la
pantalla de registro, introduzca el ID de usuario y
la contraseña predeterminados:
• Nombre de usuario: admin
• Contraseña: 1234
Los valores predeterminados de la configuración
de red de la unidad TVN 50 son los siguientes:
• DHCP: los siguientes parámetros están
activados por defecto.
• Dirección IP: 192.168.1.82
• Máscara de subred: 255.255.255.0
• Dirección de puerta de enlace: 192.168.1.1
• Puertos:
Cuando se utiliza el explorador:
Puerto RTSP: 554
Puerto HTTP: 80
Cuando se utiliza TruNav:
Puerto RTSP: 554
Puerto de software del servidor/cliente: 8000
ES : 16 Guía de inicio rápido de TVN 50
Page 19
e
Figura 3: Interfaz del explorador Web
Modo visual directo
El modo de vídeo en directo es el modo de
operación normal de la unidad, mediante el que
se visualiza la imagen en directo de las cámaras.
Puede acceder de manera rápida a todas
funciones que se usan regularmente en el modo
de visionado en vivo colocando el cursor sobre la
imagen de cámara y pulsando el botón izquierdo
del ratón. Aparecerá una barra de herramientas
de acceso rápido. Consulte la Figura 4 en la
página siguiente para obtener una descripción de
las funciones disponibles.
Figura 4: El menú del ratón para el monitor
principal
Elemento Nombre Descripción
2. Cámara única Permite pasar a la vista de
3. Multi cámara Cambia entre las diferentes
4. Pantalla anterior Muestra la cámara anterior.
5. Pantalla
6. Iniciar
7. Reproducción
8. Monitor B Permite alternar entre los
9. Búsqueda
10. Cerrar barra de
siguiente
conmutación
automática
de todo el día
avanzada
hora
pantalla completa en la
cámara seleccionada desde
la lista despegable.
opciones de vistas múltiples
desde la lista desplegable.
Muestra la cámara siguiente.
Activa el modo de secuencia.
Se muestran automáticament
las secuencias entre las
cámaras.
Vaya a Menú > Configuración
del modo de visualización >
Diseño > Configuración de
tiempo expo.
Reproduce el vídeo grabado
del día seleccionado de la
cámara seleccionada. El día
actual aparece seleccionado
por defecto.
monitores A (principal) y
B (secundario).
Permite acceder al menú de
búsqueda avanzada.
Abre/cierra la barra de hora.
Configuración del TVN 50
La unidad TVN 50 tiene una estructura controlada a
través de menús que le permite configurar sus
parámetros. Cada icono de comando muestra una
pantalla que le permite editar un grupo de valores.
La mayoría de los menús solo están disponibles
para los administradores del sistema.
Para obtener información detallada sobre la
configuración de la unidad, consulte el Manual de
La lista de comandos disponibles depende de que
el monitor esté activo, sea el principal o sea el
secundario (monitor B). Consulte la Tabla 1 a
continuación.
Tabla 1: Menú del ratón para el monitor A
(monitor principal)
Elemento Nombre Descripción
1. Menú Permite acceder al menú
principal.
Esta opción no está
disponible desde el
monitor B.
Guía de inicio rápido de TVN 50 17 : ES
usuario de TVN 50.
Para acceder al menú principal del modo de
visualización en directo:
Pulse
Intro en el mando a distancia o en el
panel frontal.
O bien,
Haga clic con el botón derecho del ratón y
seleccione la opción Menú del menú
emergente.
Aparecerá la pantalla de menú principal. Sitúe el
ratón sobre uno de los iconos de comando de la
barra de herramientas del menú y haga clic para
seleccionarlo.
Page 20
Descripción de los iconos de comando de la
barra de herramientas del menú:
Permite configurar los parámetros
de la cámara.
Permite configurar los parámetros
de la pantalla.
Permite configurar los parámetros
de grabación.
Permite configurar parámetros de
red estándar.
Permite configurar los parámetros
de alarma.
Permite configurar los parámetros
de PTZ.
Permite configurar los parámetros
de usuario.
Permite configurar los parámetros
de sistema.
Proporciona información de
referencia sobre las diversas barras
de herramientas y menús de la
interfaz.
Proporciona acceso a las opciones
de cierre de sesión, reinicio y
apagado.
Peso ≤ 8 kg (≤ 17,6 libras)
(sin HDD o unidad de DVD-R/W)
Información de contacto
Para ver la información de contacto, consulte
www.interlogix.com o
www.utcfssecurityproducts.eu.
Especificaciones
Fuente de
alimentación
Consumo de energía
eléctrica (sin HDD)
TVN 5032
Temperatura de
funcionamiento
Humedad relativa de 10 a 90%
Dimensiones
(An. x Al. x Pro.)
ES : 18 Guía de inicio rápido de TVN 50
100 a 240 VCA,
6,3 A, 50 a 60 Hz
<= 45 W
de -10 a +55 ºC
(de 50 a 131 °F)
445 × 470 × 90 mm
(17,5" ×18,5" × 3,5")
Page 21

Guide rapide de démarrage
du TruVision NVR 50
FR
Figure 1 : connexions du panneau arrière
1. Connexion à un moniteur CCTV (connecteur de type
BNC) : Moniteur principal.
2. Connexion d’une entrée audio aux connecteurs RCA.
3. Connexion à un périphérique RS-232.
4. Connexion à un réseau.
5. Connexion à un périphérique eSATA facultatif (par
exemple, un disque dur ou CD/DVD-RM SATA).
6. Connexion à un cordon d’alimentation.
7. Connexion de haut-parleurs pour sortie audio.
8. Connexion à un moniteur VGA.
9. Connexion à un téléviseur HD. La connexion HDMI
prend en charge l’audio et la vidéo numériques.
10. Connexion à un périphérique USB facultatif (par
exemple, une souris, un graveur CD/DVD ou un disque
dur).
11. Terminaison de la ligne des caméras dômes à l’aide de
ce commutateur RS-485. La valeur par défaut est Off
(Désactivé).
12. Connexion à une commande PTZ.
13. Connexion à un clavier (KTD-405 illustré).
14. Connexion d’un maximum de 16 câbles d’entrée
d’alarme aux sorties relais.
15. Connexion d’un maximum de quatre sorties relais
d’alarme.
16. Connexion à la masse.
Guide de démarrage rapide du TVN 50 19 : FR
Page 22

Figure 2 : commandes du panneau avant
Élément Nom Description
1. Voyants d’état Power (Alimentation) : vert, indique que le NVR fonctionne correctement. Rouge,
2. Récepteur IR Récepteur pour la télécommande IR.
3. Verr. panneau avant Vous pouvez verrouiller ou déverrouiller le panneau avant à l’aide d’une clé.
4. Touches Display
5. Touches numériques Permettent de basculer d’une caméra à l’autre en mode en direct, commande
6. Interfaces USB Ports USB (Universal serial bus) pour des périphériques supplémentaires tels
7. Boutons Menu et Search
(Affichage)
(Recherche)
Touches de lecture
indique une panne.
Alarm (Alarme) : un voyant rouge indique la présence d'un signal d'entrée
d'alarme, ou d'une autre alarme se trouvant en mode détection de mouvement
ou auto-protection.
Tx/Rx : un voyant vert indique une connexion réseau normale.
HDD (Disque dur) : le voyant du disque dur clignote en rouge lorsque des
données sont en cours de lecture ou d’écriture sur le disque dur.
Ready (Prêt) : vert, indique que l’appareil fonctionne correctement.
Archive : le voyant de l’archivage clignote en vert lorsque des fichiers ou des
photos enregistrés sont exportés vers un appareil USB ou eSATA.
Display (Affichage) : permet de basculer entre les différentes multi-vues : plein
écran, quad, 1+5, 1+7, 9 et 16.
Sequence (Séquence) : démarre/arrête le séquençage en mode en direct.
A : sélection du moniteur principal.
B : sélection du moniteur d’alarme (en affichage en direct).
F1 : cliquez pour démarrer et arrêter la création de clips vidéo lors d’une lecture
toute la journée.
F2 : en mode d’affichage en direct, cliquez pour afficher/masquer la barre
temporelle.
Cliquez pour afficher/masquer la barre d’outils de contrôle de lecture lors d’une
lecture toute la journée.
PTZ ou lecture.
qu’une souris USB et un disque dur USB.
Menu : entrer dans/quitter le menu principal.
Search (Recherche) : accéder au menu Advanced Search (Recherche avancée).
: revenir à la plus ancienne vidéo disponible et commencer la lecture.
: suspendre la lecture.
: lire instantanément le fichier sélectionné à cet instant. Le temps par
défaut est de 1 minute.
Live (Aff. direct) : passer au mode en direct.
Replay (Relecture) : relire le fichier en cours en mode lecture, depuis le début du
fichier.
FR : 20 Guide de démarrage rapide du TVN 50
Page 23

Élément Nom Description
8. Direction
Touche Enter (Entrée) La touche ENTER (Entrée) est utilisée pour confirmer la sélection dans les
9. Boutons PTZ Zoom : utilisez les touches + et - pour le zoom numérique.
10. Bouton Archive (Archiver) Appuyer une fois pour accéder au mode sauvegarde rapide. Appuyer deux fois
Les boutons de DIRECTION sont utilisés pour naviguer entre les différents
champs et éléments dans les menus.
En mode Lecture, les boutons de gauche et de droite sont utilisés pour
accélérer et ralentir la vidéo enregistrée. Les boutons vers le haut ou vers le bas
permettent d'avancer ou de reculer de 30 secondes dans une vidéo enregistrée.
En mode Pause, les boutons de gauche et de droite permettent d'avancer ou de
reculer d'une image dans une vidéo enregistrée. Les boutons vers le haut ou
vers le bas permettent d'avancer ou de reculer d'une seconde dans une vidéo
enregistrée.
En mode Aff. direct, ces boutons peuvent être utilisés pour naviguer entre les
canaux.
En mode de contrôle PTZ, ces boutons peuvent contrôler le mouvement de la
caméra PTZ.
modes de menu.
En mode de lecture par image, appuyez sur cette touche pour faire avancer la
vidéo image par image.
Preset (Présélection) : appel de prépositions programmées.
Tour (Suivi) : appel de la fonction suivi programmée.
pour commencer l’archivage. Le voyant clignote en vert lorsque des données
sont enregistrées sur l’appareil de sauvegarde.
Contenu du coffret
Le TruVision NVR 50 (modèle TVN 50) est livré
avec les éléments suivants :
• Télécommande infrarouge
• Deux piles AAA pour la télécommande
• Cordons d’alimentation CA (États-Unis,
Europe et R.U.)
• Souris USB
• NVR
• CD avec logiciel et manuels d’utilisation
• Guide rapide de démarrage du TruVision
NVR 50
• Guide de l’utilisateur du TruVision NVR 50
(sur CD)
Environnement d’installation
Reportez-vous au guide de l’utilisateur pour
obtenir des informations détaillées, mais tenez
compte des considérations importantes
suivantes :
• Placez l’unité dans un endroit sûr.
• Assurez-vous qu’elle se trouve dans une
zone bien ventilée.
• Évitez d’exposer l’unité à l’humidité.
Installation rapide
Étapes recommandées pour la configuration du
NVR :
1. Connectez tous les périphériques requis au
panneau arrière du TVN 50. Voir la Figure 1
en page 19.
Connexions de base :
Connectez le moniteur A à la sortie BNC,
VGA ou HDMI. Connectez la souris au port
USB situé sur le panneau avant.
Connexions facultatives :
Les autres connexions illustrées dans ce
document sont facultatives et dépendent du
type d’installation.
2. Branchez le cordon d’alimentation et mettez
l’unité sous tension.
3. Configurez l’unité avec les paramètres requis
à l’aide de l’assistant d’installation.
Première utilisation
Le TVN 50 est doté d’un assistant d’installation
express qui vous permet de configurer facilement
les paramètres de base du NVR lors de sa
première utilisation. Il configure toutes les
caméras de manière simultanée. La configuration
peut ensuite être personnalisée au gré de
l’utilisateur.
Guide de démarrage rapide du TVN 50 21 : FR
Page 24

Par défaut, l’assistant d’installation démarre dès
que le NVR est chargé. L’assistant vous
accompagne durant quelques-uns des réglages
les plus importants de votre NVR. Sélectionnez la
langue du système, puis saisissez le mot de
passe administrateur. Le mot de passe
administrateur par défaut est 1234. Nous vous
recommandons de le modifier.
L’assistant vous aidera ensuite à régler la date et
l’heure, la configuration réseau, la gestion du
disque dur, ainsi que la configuration
d’enregistrement.
Une fois les modifications effectuées, cliquez sur
Terminer pour quitter l’assistant d’installation.
Le NVR 50 est désormais prêt à l’emploi.
L’enregistrement commence automatiquement.
6. Appuyez sur ENTER (Entrée) à partir de la
télécommande ou du panneau avant.
Souris USB
À la différence du panneau avant dont la
fonctionnalité est limitée, la souris USB fournie avec
le TVN 50 peut être utilisée pour activer toutes les
fonctions du NVR. La souris permet de parcourir le
menu et de modifier les réglages de l’interface
utilisateur.
Connectez la souris au NVR en raccordant le
connecteur USB de la souris au port USB situé
sur le panneau avant. La souris est
immédiatement prête à l’emploi et le curseur
devrait s’afficher.
Utilisation du TVN 50
L’unité peut être contrôlée de plusieurs façons :
• Panneau avant
• Télécommande infrarouge
• Souris
• Navigateur Web
Panneau avant
Les boutons du panneau avant contrôlent la
plupart des fonctions. Voir la Figure 2 en page 20
pour connaître l’emplacement des commandes.
Télécommande infrarouge
Les touches de la télécommande infrarouge sont
similaires aux boutons du panneau avant. Insérez
les deux piles AAA dans la télécommande.
Pour connecter la télécommande au NVR :
1. Appuyez sur Menu à partir du panneau avant
ou cliquez sur le bouton droit de la souris et
sélectionnez Menu. L’écran du menu
principal s’affiche.
2. Sélectionnez Paramètres du mode
d’affichage > Moniteur.
3. Vérifiez et mémorisez la valeur de l’adresse
du NVR. La valeur par défaut est 255.
L’adresse du périphérique est valable pour
toutes les télécommandes infrarouges.
4. Sur la télécommande, appuyez sur le bouton
Périphérique.
5. Entrez la valeur d’adresse du périphérique.
Celle-ci doit être égale à la valeur indiquée
sur le TVN 50.
Commande à l’aide du navigateur
Web
Le navigateur Web du TVN 50 vous permet
d’afficher, d’enregistrer et de visionner les vidéos.
Il vous offre également la possibilité de gérer
toutes les fonctionnalités du NVR à partir de tout
PC doté d’une connexion Internet. Il dispose de
commandes faciles à utiliser qui vous donnent un
accès rapide à toutes les fonctions du NVR. Voir
la Figure 3 en page 23.
Pour accéder à l’unité, ouvrez un navigateur Web et
entrez l’adresse IP attribuée au NVR comme
adresse Web. Dans l’écran d’ouverture de session,
entrez l’ID d’utilisateur et le mot de passe par
défaut :
• ID utilisateur : admin
• Mot de passe : 1234
Les valeurs par défaut des paramètres réseau du
TVN 50 sont les suivantes :
• DHCP : activé par défaut.
• Adresse IP - 192.168.1.82
• Masque de sous-réseau - 255.255.255.0
• Adresse de la passerelle - 192.168.1.1
• Ports :
Avec le navigateur :
Port RTSP : 554
Port HTTP : 80
Avec TruNav :
Port RTSP : 554
Port du logiciel serveur/client : 8000
FR : 22 Guide de démarrage rapide du TVN 50
Page 25

Figure 3 : Interface du navigateur Web
Mode d’affichage en direct
Le mode direct est le mode de fonctionnement
normal de l’unité. Il vous permet de regarder les
photos prises en direct par les caméras.
Vous pouvez accéder rapidement aux fonctions
utilisées régulièrement dans l’affichage direct en
cliquant avec le bouton droit de la souris sur
l’image de la caméra. La barre d’outils
contextuelle de raccourci s’affiche. Reportez-vous
à la Figure 4 ci-dessous pour une description des
fonctions disponibles.
Figure 4 : Menu de la souris pour le moniteur
principal
Élément Nom Description
3. Multi-caméras Passer d’une option multi-
4. Écran
5. Écran suivant Afficher la caméra suivante.
6. Démarrer
7. Lecture
8. Moniteur B Passer du moniteur A
9.
10.
précédent
interrupteur
auto
d’enregistreme
nt de toute la
journée
Recherche
avancée
Fermer
la barre
temporelle
dans la liste déroulante.
affichage à l’autre dans la
liste déroulante.
Afficher la caméra
précédente.
Activer le mode séquence.
L’écran bascule
automatiquement entre les
caméras.
Pour configurer cette option,
allez dans Menu > Display
Mode Settings > Layout >
Dwell Time (Menu >
Paramètres du mode
d’affichage > Configuration >
Tps commut.).
Lire la vidéo enregistrée
correspondant au jour et à la
caméra sélectionnés. Le jour
actuel est sélectionné par
défaut.
(principal) au B (moniteur
d’alarme) et inversement.
Accéder au menu Advanced
Video Search (Recherche
vidéo avancée).
Ouvrir/fermer la barre
temporelle.
Configuration du TVN 50
Le TVN 50 dispose d’une structure de menu
basée sur des icônes vous permettant de
configurer les paramètres de l’unité. Chaque
icône de commande affiche un écran permettant
de modifier certains paramètres. La plupart des
menus ne sont accessibles qu’aux
administrateurs du système.
La liste des commandes disponibles dépend du
moniteur qui est actif : le moniteur principal ou le
moniteur d’alarme (B). Reportez-vous au Tableau 1
ci-dessous.
Tableau 1 : menu de la souris pour le
moniteur A (moniteur principal)
Élément Nom Description
1. Menu Accéder au menu principal.
2. Caméra
unique
Cette option n’est pas
disponible pour le
moniteur B.
Passer à une vue plein écran
pour la caméra sélectionnée
Guide de démarrage rapide du TVN 50 23 : FR
Reportez-vous au guide de l’utilisateur du TVN 50
pour obtenir des informations détaillées sur la
configuration de l’unité.
Pour accéder au menu principal en mode
direct :
Appuyez sur le bouton Menu à partir de la
télécommande ou du panneau avant
- Ou -
Appuyez sur le bouton droit de la souris et
sélectionnez Menu dans le menu contextuel.
L’écran du menu principal s’affiche. Cliquez sur
une icône de commande dans la barre d’outils du
menu pour la sélectionner.
Page 26

Description des icônes de commande de la
A
barre d’outils du menu :
Permet de configurer les paramètres
de caméras.
Permet de configurer les paramètres
d’affichage.
Permet de configurer les paramètres
d’enregistrement.
Permet de configurer les paramètres
réseau standard.
Permet de configurer les paramètres
d’alarme.
Permet de configurer les paramètres
PTZ.
Permet de configurer les paramètres
utilisateur.
Permet de configurer les paramètres
système.
Fournit des informations de
référence aux divers menus et
barres d’outils de l’interface.
Permet d’accéder aux options de
déconnexion, de redémarrage et
d’arrêt.
Poids ≤ 8 kg
(sans DD ou DVD-R/W)
Informations de contact
Pour connaître nos coordonnées, consultez les
sites www.interlogix.com ou
www.utcfssecurityproducts.eu.
Spécifications
limentation électrique 100 à 240 VCA,
Consommation (sans
disque dur) TVN 5032 <= 45 W
Température de service -10 à +55 ºC
Humidité relative 10 à 90 %
Dimensions
(l x H x P)
FR : 24 Guide de démarrage rapide du TVN 50
6,3 A, 50 à 60 Hz
(50 à 131 °F)
445 x 470 x 90 mm
Page 27

Guida di avvio rapido di
TruVision NVR 50
IT
Figura 1: Collegamenti del pannello posteriore
1. Consente il collegamento a un monitor TVCC
(connettore di tipo BNC): Main monitor [Monitor
principale].
2. Consente di collegare un ingresso audio ai connettori
RCA.
3. Collegare a un dispositivo RS-232.
4. Collegare a una rete.
5. Collegare a un dispositivo eSATA opzionale, ad
esempio HDD SATA, CD/DVD-RM.
6. Collegare a un cavo di alimentazione.
7. Collegare ad altoparlanti per l'uscita audio.
8. Collegare a un monitor VGA.
9. Collegare a un HDTV. Il collegamento HDMI supporta
audio e video digitali.
10. Collegare a un dispositivo USB opzionale, ad esempio
un mouse, un masterizzatore CD/DVD o un HDD.
11. Terminare la linea alle telecamere dome utilizzando
questo interruttore RS-485. Per impostazione
predefinita, è disattivata.
12. Collegare a un dispositivo PTZ.
13. Collegare a una tastiera (nella figura: modello KTD-405)
14. Collegare fino a 16 cavi di ingresso allarme a uscite a
relè.
15. Collegare fino a quattro uscite allarme a relè.
16. Collegare alla terra.
Guida rapida di avvio di TVN 50 25 : IT
Page 28

Figura 2: Controlli del pannello frontale
Elemento Nome Descrizione
1. LED di stato Alimentazione: il colore verde indica che l'unità NVR funziona correttamente. Il
2. Ricevitore IR Ricevitore per telecomando a infrarossi.
3. Blocco del pannello
4. Pulsanti display Display: consente di passare da una vista multipla all'altra: schermo intero,
5. Pulsanti numerici Consentono di passare da una telecamera all'altra nelle modalità live, controllo
6. Interfacce USB Porte USB (Universal Serial Bus) per dispositivi aggiuntivi, ad esempio mouse
7. Pulsanti Menu e Ricerca
frontale
Pulsanti di riprod.
rosso indica un guasto.
Allarme: il colore rosso indica che c'è un Ingresso allarme relativo a un sensore
o un altro allarme, per esempio movimento o manomissione.
Tx/Rx: il colore verde indica un corretto funzionamento della connessione di rete.
HDD: l'indicatore HDD lampeggia in rosso quando i dati vengono letti da o scritti
su disco rigido.
Pronto: il colore verde indica che il dispositivo funziona correttamente.
Archivia: l'indicatore lampeggia in verde quando le immagini o i file registrati
vengono esportati in un dispositivo eSATA o USB.
È possibile bloccare o sbloccare il pannello frontale con una chiave.
quad, 1+5, 1+7, 9 e 16.
Sequenza: consente di avviare/arrestare la visualizzazione in sequenza in Mod.
Vista Live.
A: consente di selezionare il monitor principale.
B: consente di selezionare il monitor spot (in visualizzazione live).
F1: in modalità riproduzione continua, fare clic su F1 per avviare o terminare il
ritaglio del video.
F2: in Mod. Vista Live, fare clic su F2 per visualizzare/nascondere la barra
temporale.
In modalità riproduzione continua, fare clic su F2 per visualizzare/nascondere la
barra degli strumenti di controllo della riproduzione.
PTZ o riproduzione.
USB e unità disco rigido (HDD) USB.
Menu: accesso/uscita dal menu principale.
Ricerca: consente di accedere al menu di ricerca avanzata.
: salta al video meno recente disponibile e avvia la riproduzione.
: mette in pausa la riproduzione.
: avvia immediatamente la riproduzione del file correntemente selezionato.
L'intervallo predefinito è 1 minuto.
Live: consente di passare alla Mod. Vista Live.
Riproduzione: riproduce nuovamente il file correntemente in corso di
riproduzione ripartendo dall'inizio del file.
IT : 26 Guida rapida di avvio di TVN 50
Page 29

Elemento Nome Descrizione
8. Direction [Direzione] I pulsanti di DIREZIONE vengono utilizzati per spostarsi tra diversi campi e voci
Pulsante Enter Il pulsante ENTER viene utilizzato per confermare la selezione in una qualsiasi
9. Pulsanti PTZ Zoom: utilizzare + e – per lo zoom digitale.
10. Tasto Archivio Premere una volta per accedere alla modalità di archiviazione rapida. Premere
nei menu.
In Modalità riproduzione, i tasti sinistra e destra vengono utilizzati per
accelerare o rallentare la riproduzione del video registrato. I tasti su e giù fanno
avanzare o tornare indietro la riproduzione del video di 30 secondi.
In Modalità pausa, i tasti sinistra e destra fanno avanzare o tornare indietro la
riproduzione del video di un fotogramma. I tasti su e giù fanno avanzare o
tornare indietro la riproduzione del video di un secondo.
Nella modalità Vista Live, tali pulsanti possono essere utilizzati per scorrere i
canali.
Nella modalità di controllo Brandeggio e Zoom, è possibile controllare i
movimenti della telecamera Brandeggio e Zoom.
modalità del menu.
Nella modalità di riproduzione per fotogramma singolo, la pressione del pulsante
consente di far avanzare il video di un fotogramma singolo.
Preset: richiama posizioni di preset preprogrammate.
Tour: richiama shadow tour preprogrammati.
due volte per avviare l'archiviazione. L'indicatore lampeggia in verde in caso di
scrittura dei dati su un dispositivo di backup.
Contenuto della confezione
L'unità TruVision NVR 50 (modello TVN 50) viene
fornita con i seguenti elementi:
• Telecomando IR (a infrarossi)
• Due batterie AAA per il telecomando
• Cavi di alimentazione CA (Stati Uniti, Europa
e Regno Unito)
• Mouse USB
• NVR
• CD con software e manuali
• Guida di avvio rapido di TruVision NVR 50
• Manuale dell'utente di TruVision NVR 50 (su
CD)
Condizioni ambientali per
1. Collegare tutti i dispositivi richiesti al pannello
posteriore dell'unità TVN 50. Vedere la
Figura 1 a pagina 25.
Connessioni di base:
collegare il monitor A all'uscita BNC, VGA o
HDMI. Collegare il mouse alla porta USB
posizionata sul pannello frontale.
Connessioni opzionali:
tutte le altre connessioni visualizzate sono
opzionali e variano in base ai requisiti di
installazione.
2. Collegare il cavo di alimentazione all'unità e
accenderla.
3. Configurare l'unità con le impostazioni
richieste utilizzando la procedura guidata di
configurazione.
l'installazione
Per informazioni dettagliate fare riferimento al
manuale utente, ma rispettare i seguenti
importanti requisiti:
• Posizionare l'unità in un luogo sicuro.
• Accertarsi che l'unità sia ubicata in un'area
ben ventilata.
• Non esporre l'unità alla pioggia o all'umidità.
Installazione rapida
Passaggi consigliati per la configurazione
dell'unità NVR:
Primo utilizzo
L'unità TVN 50 dispone di una procedura guidata
per l'installazione rapida che consente di
configurare facilmente le impostazioni di base
dell'unità NVR in occasione del primo utilizzo.
Tutte le telecamere vengono configurate
simultaneamente. La configurazione può quindi
essere personalizzata secondo necessità.
Per impostazione predefinita, la procedura di
configurazione guidata viene avviata una volta
caricata l'unità NVR. La procedura guidata guida
l'utente attraverso alcune delle più importanti
Guida rapida di avvio di TVN 50 27 : IT
Page 30

impostazioni dell'unità NVR. Selezionare la lingua
preferita per il sistema, quindi immettere la
password di amministratore. La password
predefinita dell'amministratore è 1234. Si consiglia
di modificare la password.
La procedura guidata accompagnerà l'utente
attraverso i menu per l'impostazione di data e ora,
configurazione di rete gestione HDD e
configurazione della registrazione.
Una volta apportate tutte le modifiche desiderate,
fare clic sul pulsante
procedura guidata. L'unità NVR 50 è pronta per
essere utilizzata. La registrazione inizia
automaticamente.
Fine per uscire dalla
Funzionamento dell'unità TVN 50
Sono disponibili diversi modi per controllare
l'unità:
• Pannello frontale
• Telecomando IR
• Mouse
• Browser web
Pannello frontale
I pulsanti sul pannello frontale controllano la
maggior parte delle funzioni. Per le posizioni dei
controlli vedere la Figura 2 a pagina 26.
Telecomando a infrarossi
I pulsanti del telecomando IR sono simili a quelli
del pannello frontale. Posizionare due batterie
AAA nel telecomando.
Per collegare il telecomando all'unità NVR:
1. Premere Menu sul pannello frontale oppure
fare clic con il pulsante destro del mouse e
selezionare Menu. Verrà visualizzata la
schermata del menu principale.
2. Selezionare Impostazioni modalità di
visualizzazione > Monitor.
3. Controllare e ricordare il valore dell'indirizzo
del dispositivo NVR. Il valore predefinito è
255. L'indirizzo del dispositivo è valido per
tutti i telecomandi a infrarossi.
4. Sul telecomando premere il pulsante Dispos.
5. Immettere il valore dell'indirizzo del
dispositivo. Deve essere uguale a quello
dell'unità TVN 50.
6. Premere il pulsante ENTER sul telecomando
o sul pannello frontale.
Mouse USB
Il mouse USB fornito insieme all'unità TVN 50
utilizza tutte le funzioni del NVR, a differenza del
pannello frontale, che ha funzionalità limitate.
Utilizzare il mouse per spostarsi ed apportare
modifiche alle impostazioni nell'interfaccia utente.
Collegare il mouse al NVR inserendo il connettore
USB del mouse nella porta USB sul pannello
frontale. Il mouse è immediatamente operativo e
dovrebbe venire visualizzato il puntatore.
Browser Web
Il browser web dell'unità TVN 50 consente di
visualizzare, registrare e riprodurre video, oltre a
gestire tutti gli aspetti del NVR da qualsiasi PC
dotato di accesso a Internet. Gli intuitivi comandi
del browser consentono di accedere rapidamente
a tutte le funzioni del NVR. Vedere la Figura 3 in
basso.
Per accedere all'unità, aprire un browser Web e
immettere l'indirizzo IP assegnato all'unità NVR
come indirizzo Web. Nella schermata di accesso
immettere l'ID utente e la password predefiniti:
• ID utente: admin
• Password: 1234
I valori predefiniti per le impostazioni di rete
dell'unità TVN 50 sono i seguenti:
• DHCP: abilitato per impostazione predefinita.
• Indirizzo IP - 192.168.1.82
• Subnet mask - 255.255.255.0
• Indirizzo gateway - 192.168.1.1
• Porte:
Browser in uso:
Porta RTSP: 554
Porta HTTP: 80
TruNav in uso:
Porta RTSP: 554
Porta software server/client: 8000
IT : 28 Guida rapida di avvio di TVN 50
Page 31

Figura 3: Interfaccia browser Web
Mod. Vista Live
La modalità live è la modalità di funzionamento
normale dell'unità in cui vengono visualizzate le
immagini live provenienti dalle telecamere.
È possibile accedere rapidamente a funzioni di
uso frequente nella vista live facendo clic con il
pulsante destro del mouse sull'immagine della
telecamera. Verrà visualizzata il collegamento
rapido della barra degli strumenti a comparsa. Per
una descrizione delle funzioni disponibili vedere la
Figura 4 in basso.
Figura 4: Menu per il mouse per il monitor
principale
Elemento Nome Descrizione
3. Cam.
4. Schermata
5. Schermo
6. Avvia
7. Riprod.
8. Monitor B Consente di passare dal
9. Ricerca
10. Chiudi barra
multipla
precedente
succ.
commut. aut.
continua
avanz.
temporale
discesa.
Consente di passare da
un'opzione di vista multipla
all'altra dall'elenco a discesa.
Consente di visualizzare la
telecamera precedente
Consente di visualizzare la
telecamera successiva.
Consente di avviare la
modalità sequenza. La
schermata avvia
automaticamente la
visualizzazione in sequenza
delle telecamere.
Per la configurazione andare
a Menu > Impostazioni
modalità di visualizzazione >
Layout > Tempo sosta.
Consente di riprodurre il
video registrato del giorno
selezionato dalla telecamera
selezionata. Il giorno corrente
è selezionato per
impostazione predefinita.
monitor A (principale) al
monitor B (spot).
Consente di accedere al
menu di ricerca video
avanzata.
Consente di aprire/chiudere
la barra temporale.
Configurazione dell'unità TVN 50
L'unità TVN 50 ha una struttura basata su menu
accessibili tramite icone che consente di
impostare i parametri dell'unità. Ciascuna icona di
comando consente di visualizzare una schermata
che consente di modificare un gruppo di
L'elenco dei comandi disponibili dipende dal
monitor attivo; principale o spot (monitor B).
Vedere la Tabella 1 alla pagina successiva.
Tabella 1: Menu per il mouse per monitor A
(monitor principale)
Elemento Nome Descrizione
1. Menu Consente di accedere al
2. Cam. Singola Consente di passare alla
menu principale.
L'opzione non è disponibile
dal monitor B.
visualizzazione a schermo
intero per la telecamera
selezionata dall'elenco a
Guida rapida di avvio di TVN 50 29 : IT
impostazioni. La maggior parte dei menu è
disponibile solo per gli amministratori del sistema.
Per informazioni dettagliate sulla configurazione
dell'unità, fare riferimento al manuale utente di
TVN 50.
Accesso al menu principale dalla modalità
live:
Premere il pulsante Menu sul telecomando o
sul pannello frontale.
- Oppure -
Fare clic con il pulsante destro del mouse e
selezionare Menu dal menu a comparsa.
Verrà visualizzata la schermata del menu
principale. Spostare il mouse su un'icona di
Page 32

comando nella barra degli strumenti del menu e
A
A
fare clic per selezionarla.
Descrizione delle icone di comando nella barra
degli strumenti del menu:
Consente di configurare le
impostazioni della telecamera.
Consente di configurare le
impostazioni di visualizzazione.
Consente di configurare le
impostazioni di registrazione.
Consente di configurare le
impostazioni standard di rete.
Consente di configurare le
impostazioni degli allarmi.
Consente di configurare le
impostazioni PTZ.
Consente di configurare le
impostazioni dell'utente.
Consente di configurare le
impostazioni di sistema.
Fornisce informazioni di riferimento
sulle varie barre degli strumenti e i
menu dell'interfaccia.
Fornisce l'accesso a opzioni di
disconnessione, riavvio e arresto.
Dimensioni
(L x A x P)
Peso ≤ 8 kg
445 × 470 × 90 mm
(senza HDD o DVD-R/W)
Informazioni di contatto
Per informazioni di contatto, vedere
www.interlogix.com o
www.utcfssecurityproducts.eu.
Specifiche tecniche
limentazione Da 100 a 240 V CA,
ssorbimento (senza
HDD) TVN 5032 ≤ 45 W
Temperatura di
funzionamento
Umidità relativa Da 10 a 90%
IT : 30 Guida rapida di avvio di TVN 50
6,3 A, da 50 a 60 Hz
Da -10 a +55 ºC
Page 33

TruVision NVR 50 Snel aan
de slag-gids
Afbeelding 1: Aansluitingen achterpaneel
1. Aansluiting voor een CCTV-monitor (BNCaansluitingen): Main monitor (Hoofdmonitor).
2. Aansluiting voor een audioingang op de RCAconnectors.
3. Aansluiting voor een RS-232-apparaat.
4. Aansluiting voor een netwerk.
5. Aansluiting voor een optioneel eSATA-apparaat, zoals
SATA HDD, CD/DVD-RM.
6. Aansluiting voor een voedingskabel.
7. Aansluiting voor luidsprekers op de audio-uitgang.
8. Aansluiting voor een VGA-monitor.
9. Aansluiting voor een HDTV. De HDMI-aansluiting
ondersteunt digitale audio en video.
10. Aansluiting voor een optioneel USB-apparaat, zoals een
muis, CD/DVD-brander of HDD.
11. Sluit de lijn naar de domecamera's af met deze RS-485schakelaar. De standaardinstelling is Off (Uit).
12. Aansluiting voor PTZ-besturing.
13. Aansluiting voor een toetsenbord (KTD-405 wordt
weergegeven).
14. Aansluiting voor maximaal 16 alarmingangskabels op
relaisuitgangen.
15. Aansluiting voor maximaal vier alarmrelaisuitgangen.
16. Aansluiting voor aarde.
NL
TVN 50 Snel aan de slag-gids 31 : NL
Page 34

Afbeelding 2: Bedieningselementen op het voorpaneel
Item Naam Beschrijving
1. Statuslampjes Power: Groen geeft aan dat de NVR correct werkt. Rood geeft een storing aan.
2. Infraroodontvanger Ontvanger voor de draadloze afstandsbediening.
3. Vergrendeling voorpaneel U kunt het voorpaneel vergrendelen of ontgrendelen met een sleutel.
4. Weergaveknoppen Display (Beeld): Schakelt tussen de verschillende multiview-weergaven:
5. Cijfertoetsen Schakel tussen de verschillende camera's in de live-weergave-, PTZ-bedienings-
6. USB-interfaces USB (Universal Serial Bus)-poorten voor extra apparaten, zoals een USB-muis
7. Menu- en zoekknoppen
Afspeeltoetsen.
Alarm: Rood geeft aan dat er een sensor Alarm In of een andere alarm is
geactiveerd, zoals beweging of sabotage.
Tx/Rx: Groen geeft een normale werking van de netwerkverbinding aan.
HDD: HDD-lampje knippert rood wanneer gegevens worden gelezen van of
geschreven naar de HDD.
Ready: Groen geeft aan dat het apparaat goed werkt.
Archive: Het Archive-lampje knippert groen wanneer opnamebestanden of
momentopnamen worden geëxporteerd naar een USB- of eSATA-apparaat.
volledig, quad, 1+5, 1+7, 9 en 16.
Seq (Reeks): Weergavereeks in live-weergavemodus starten/stoppen.
A: Hiermee selecteert u de hoofdmonitor.
B: Hiermee selecteert u de spotmonitor (in live-weergavemodus).
F1: Klik in de modus voor gehele dag afspelen om het opnemen van videoclips
te starten en stoppen.
F2: Klik in de live-weergavemodus om de tijdbalk weer te geven/te verbergen.
Klik in de modus voor gehele dag afspelen om de werkbalk voor de
afspeelbediening weer te geven/te verbergen.
of afspeelmodus.
en USB harde schijf (HDD).
Menu: Het hoofdmenu openen/afsluiten.
Search (Zoeken): Het geavanceerde zoekmenu openen.
: Springt terug naar de oudste beschikbare video-opname en begint met
afspelen.
: Afspelen onderbreken.
: Begint meteen met het afspelen van het momenteel geselecteerde
bestand. De standaardtijd is 1 minuut.
Live: Overschakelen naar de live-weergavemodus.
Replay: Het huidige bestand dat wordt afgespeeld weer aan het begin van het
bestand laten afspelen.
NL : 32 TVN 50 Snel aan de slag-gids
Page 35

Item Naam Beschrijving
8. Richting
Enter Met de ENTER-knop kunt u selecties in de menumodi bevestigen.
9. PTZ-knoppen Zoom: Gebruik + en – voor digitaal zoomen.
10. Archief Druk één keer om de archiveringsmodus te activeren. Druk twee keer om het
Inhoud van de verpakking
De TruVision NVR 50 (model TVN 50) wordt
geleverd met de volgende items:
• Draadloze afstandsbediening
• Twee AAA-batterijen voor de
afstandsbediening
• Voedingskabels (VS, Europa, VK)
• USB-muis
• NVR
• CD met software en handleidingen
• TruVision NVR 50 Snel aan de slag-gids
• TruVision NVR 50 Gebruikershandleiding (op
CD)
Met de richtingsknoppen kunt u navigeren tussen de verschillende velden en
items in menu's.
In de afspeelmodus kunt u met de knoppen links en rechts de video-opname
versnellen of vertragen. Met de knoppen omhoog en omlaag kunt u binnen de
video-opname 30 seconden vooruit of achteruit springen.
In de pauzemodus kunt u met de knoppen links en rechts binnen de videoopname 1 frame vooruit of achteruit springen. Met de knoppen omhoog en
omlaag kunt u binnen de video-opname 1 seconde vooruit of achteruit springen.
In de live-weergavemodus kunt u met deze knoppen de kanalen verwisselen.
In de PTZ-bedieningsmodus kunt u de bewegingen van de PTZ-camera
besturen.
In de enkelframe afspeelmodus gaat u met het indrukken van deze knop één
frame verder in de video-opname.
Preset: Vooringestelde en voorgeprogrammeerde posities oproepen.
Tour: Voorgeprogrammeerde schaduwtrajecten oproepen.
archiveren te starten. Het lampje knippert groen wanneer er gegevens naar het
back-upapparaat worden geschreven.
Afbeelding 1 op pagina 31.
Basisaansluitingen:
Sluit monitor A aan op de BNC-, VGA- of
HDMI-uitgang. Sluit de muis aan op de USBpoort in het voorpaneel.
Optionele aansluitingen:
Alle overige weergegeven aansluitingen zijn
optioneel en afhankelijk van de
installatievereisten.
2. Sluit de voedingskabel aan op de eenheid en
schakel de voeding in.
3. Stel de vereiste instellingen in voor de
eenheid met behulp van de installatiewizard.
Installatieomgeving
Raadpleeg de gebruikershandleiding voor
gedetailleerde informatie maar let op de volgende
belangrijke vereisten:
• Zet de camera op een veilige plek neer.
• Zorg dat de camera in een goed
geventileerde omgeving staat.
• Stel de unit niet bloot aan regen of vocht.
Voor de eerste keer
De TVN 50 beschikt over een installatiewizard
waarmee u snel en eenvoudig voor het eerst de
basis NVR-instellingen kunt instellen. Alle
camera's worden gelijktijdig geconfigureerd. De
configuratie kan vervolgens naar wens worden
aangepast.
Standaard wordt de installatiewizard gestart zodra
de NVR is geladen. De wizard helpt u met een
aantal van de belangrijkste instellingen van uw
NVR. Stel de voorkeurtaal in voor het systeem en
Snelle installatie
Aanbevolen stappen voor het instellen van de
NVR:
1. Sluit alle vereiste apparaten aan op het
achterpaneel van de TVN 50. Zie
voer vervolgens het admin-wachtwoord in. Het
standaard admin-wachtwoord is 1234. Het wordt
ten zeerste aanbevolen om dit wachtwoord te
wijzigen.
De wizard leidt u vervolgens door de menu's voor
het instellen van tijd en datum,
TVN 50 Snel aan de slag-gids 33 : NL
Page 36

netwerkconfiguratie, HDD-beheer en
opnameconfiguratie.
Wanneer alle vereiste wijzigingen zijn ingesteld,
klikt u op de knop Voltooien om de wizard af te
sluiten. De NVR 50 is nu klaar voor gebruik. Het
opnemen wordt automatisch gestart.
De TVN 50 bedienen
De eenheid kan op een aantal manieren worden
bediend:
• Voorpaneel
• Draadloze afstandsbediening
• Muis
• Webbrowser
Voorpaneel
Met de toetsen op het voorpaneel kunt u de
meeste functies bedienen. Zie Afbeelding 2 op
pagina 32 voor de locatie van de
bedieningselementen.
Draadloze afstandsbediening
De knoppen op de draadloze afstandsbediening
lijken op die van het voorpaneel. Plaats twee
AAA-batterijen in de afstandsbediening.
U verbindt als volgt de afstandsbediening met
de NVR:
1. Druk op de toets Menu op het voorpaneel of
klik met de rechtermuisknop en selecteer
Menu. Het hoofdmenu wordt weergegeven.
2. Selecteer Instellingen weergavemodus >
Monitor.
3. Controleer en onthoud de waarde van het
NVR-apparaatadres. De standaardwaarde is
255. Dit apparaatadres is geldig voor alle
infrarood afstandsbedieningen.
4. Druk op de knop Apparaat op de draadloze
afstandsbediening.
5. Voer de waarde voor het apparaatadres in.
Deze moet hetzelfde zijn als die van de
TVN 50.
6. Druk op ENTER op de afstandsbediening of
het voorpaneel.
Sluit de muis aan op de NVR door de USBaansluiting van de muis in de USB-poort van het
voorpaneel te steken. De muis is meteen
operationeel en de muisaanwijzer wordt
weergegeven.
Bediening via de webbrowser
Met de TVN 50-webbrowser kunt u video
bekijken, opnemen en afspelen, maar ook alle
aspecten van de NVR beheren vanaf een
willekeurige PC met internettoegang. De
eenvoudige browserbediening biedt u snel
toegang tot alle NVR-functies. Zie Afbeelding 3
hieronder.
Als u toegang wilt tot de eenheid, opent u een
webbrowser en voert u het IP-adres dat is
toegewezen aan de NVR in als webadres. Geef in
het aanmeldingsvenster het standaard gebruikersID en wachtwoord op:
• Gebruikers-id: admin
• Wachtwoord: 1234
De standaardwaarden voor de TVN 50netwerkinstellingen zijn:
• DHCP: Standaard ingeschakeld.
• IP-adres - 192.168.1.82
• Subnetmasker - 255.255.255.0
• Gateway-adres - 192.168.1.1
• Poorten:
Als u de browser gebruikt:
RTSP-poort: 554
HTTP-poort: 80
Als u TruNav gebruikt:
RTSP-poort: 554
Server/Client-softwarepoort: 8000
Afbeelding 3: Webbrowserinterface
USB-muis
De USB-muis die bij de TVN 50 is geleverd
bedient alle functies van de NVR, in tegenstelling
tot het voorpaneel dat slechts een beperkte
functionaliteit biedt. Met de muis kunt u navigeren
en instellingen wijzigen in de gebruikersinterface.
NL : 34 TVN 50 Snel aan de slag-gids
Page 37

Live-weergavemodus
De live-weergavemodus is de normale modus van
de eenheid voor het bekijken van livebeelden van
de camera's.
Regelmatig gebruikte functies in de live-weergave
kunnen snel worden geselecteerd door op de
rechtermuisknop te klikken wanneer de cursor in
het camerabeeld staat. De snelkoppeling voor de
pop-upwerkbalk verschijnt. Zie Afbeelding 4
hieronder voor een beschrijving van de
beschikbare functies.
Afbeelding 4: Het muismenu voor de
hoofdmonitor
Het overzicht van beschikbare opdrachten is
afhankelijk van welke monitor actief is; hoofd of
spot (monitor B). Zie Tabel 1 verderop.
Tabel 1: Muismenu voor monitor A
(hoofdmonitor)
Item Naam Beschrijving
1. Menu Het hoofdmenu weergeven.
2. Eén camera Overschakelen naar volledige
3. Meer
camera's
4. Vorig
scherm
5. Volgende
scherm
6. Automa-
tisch overschakelen
starten
Deze optie is niet beschikbaar
vanaf monitor B.
schermweergave voor de
geselecteerde camera in de
vervolgkeuzelijst.
Schakelen tussen de
verschillende multiviewweergaveopties in de
vervolgkeuzelijst.
De vorige camera weergeven.
De volgende camera weergeven.
De sequentiemodus inschakelen.
Het scherm schakelt automatisch
over naar de volgende camera in
de volgordereeks.
Ga naar Menu >
Modusinstellingen weergeven >
Indeling > Dwell-tijd om het in te
Item Naam Beschrijving
7. Gehele dag
afspelen
8. Monitor B Schakelen tussen monitoren A
9. Geavanceerd
zoeken
10. Tijdbalk
sluiten
stellen.
De opgenomen videobeelden van
de geselecteerde dag voor de
geselecteerde camera afspelen.
Standaard wordt de huidige dag
geselecteerd.
(hoofd) en B (spot).
Het geavanceerde zoekmenu voor
video-opnames openen.
De tijdbalk openen/sluiten.
De TVN 50 configureren
De TVN 50 beschikt over een pictogramaangestuurde bedieningsstructuur waarmee u de
parameters van de unit kunt instellen. Elk
opdrachtpictogram toont een scherm waarmee u
een groep instellingen kunt bewerken. De meeste
menu's zijn alleen beschikbaar voor
systeembeheerders.
Raadpleeg de gebruikershandleiding van de
TVN 50 voor gedetailleerde informatie over het
configureren van de eenheid.
U opent als volgt het hoofdmenu vanuit de
live-weergave:
Druk op de knop Menu op de
afstandsbediening of het voorpaneel.
- Of -
Klik met de rechtermuisknop en selecteer
Menu in het pop-upmenu.
Het hoofdmenu wordt weergegeven. Beweeg de
muis over een opdrachtpictogram en klik erop om
het te selecteren.
TVN 50 Snel aan de slag-gids 35 : NL
Page 38

Beschrijving van de opdrachtpictogrammen in
A
de menuwerkbalk:
Camera-instellingen configureren.
Weergave-instellingen configureren.
Opnameinstellingen configureren.
Standaard netwerkinstellingen
configureren.
Alarminstellingen configureren.
PTZ-instellingen configureren.
Gebruikersinstellingen configureren.
Systeeminstellingen configureren.
Referentiegegevens over de
verschillende werkbalken en menu's
van de interface.
Verschaft toegang tot de opties voor
afmelden, opnieuw opstarten en
afsluiten.
Contactgegevens
Zie www.interlogix.com of
www.utcfssecurityproducts.eu voor
contactgegevens.
Specificaties
Voedingseenheid 100 tot 240 VAC,
Stroomverbruik (zonder
HDD) TVN 5032 <= 45 W
Bedrijfstemperatuur -10 tot +55 ºC
Relatieve
luchtvochtigheid
fmetingen
(B x H x D)
Gewicht ≤ 8 kg (17,6 lb.)
NL : 36 TVN 50 Snel aan de slag-gids
6,3 A, 50 tot 60 Hz
(50 tot 131 °F)
10 tot 90%
445 × 470 × 90 mm
(17,5 × 18,5 × 3,5 in.)
(zonder HDD of DVD-R/W)
Page 39

PL
Instrukcja szybkiego uruchamiania
rejestratora TruVision NVR 50
Rysunek 1: Złącza na panelu tylnym
1. Podłącz do jednego z monitorów telewizji
przemysłowej (złącza typu BNC): Monitor główny.
2. Podłącz jedno wejście audio do złączy RCA.
3. Podłącz do urządzenia RS-232.
4. Podłącz do sieci.
5. Podłącz do opcjonalnego urządzenia eSATA, takiego
jak dysk twardy SATA lub nagrywarka CD/DVD-RW.
6. Podłącz do przewodu zasilającego.
7. Podłącz do głośników w celu uzyskania audio.
8. Podłącz do monitora VGA.
9. Podłącz do telewizora HD. Połączenie HDMI obsługuje
cyfrowe audio i wideo.
Skrócona instrukcja obsługi rejestratora TVN 50 37 : PL
10. Podłącz do opcjonalnego urządzenia USB, takiego jak
mysz, nagrywarka CD/DVD lub dysk twardy.
11. Zakończ linię do kamer, używając przełącznika RS-485.
Ustawienie domyślne to Off (Wył.).
12. Podłącz kamerę PTZ.
13. Podłącz do klawiatury (pokazano KTD-405).
14. Podłącz do 16 alarmowych kabli wejściowych do wyjść.
15. Podłącz do czterech przekaźnikowych wyjść alarmu.
16. Podłączenie uziemienia.
Page 40

Rysunek 2: Elementy sterujące na panelu przednim
Element Nazwa Opis
1. Diody stanu Power (Zasilanie): Kolor zielony wskazuje, że układ rejestrator NVR działa
2. Odbiornik pilota na
3. Blokada panelu
4. Przyciski Ekran Display (Ekran): Przełączanie między różnymi widokami z wielu kamer: pełny,
5. Przyciski numeryczne Przełącza między różnymi kamerami na żywo i trybami sterowania PTZ lub
6. Interfejsy USB Porty USB (Universal Serial Bus) do podłączania urządzeń dodatkowych, takich
7. Przyciski Menu i Szukaj
podczerwień
przedniego
Przyciski odtwarzania
prawidłowo. Kolor czerwony oznacza błąd.
Alarm: Kolor czerwony wskazuje, że jest występuje alarm wejścia czujki lub inny
alarm, jak np. związany z ruchem lub sabotażem.
Tx/Rx: Kolor zielony wskazuje stan normalny połączenia sieciowego.
HDD (Dysk twardy): Wskaźnik HDD (Dysk twardy) miga na czerwono podczas
odczytywania lub zapisywania danych na dysku twardym.
Ready (Gotowe): Kolor zielony wskazuje, że urządzenie działa prawidłowo.
Archive (Archiwum): Wskaźnik Archive (Archiwum) miga na zielono podczas
eksportowania plików nagrań lub zrzutów obrazu do urządzenia USB lub eSATA.
Odbiornik dla pilota na podczerwień.
Panel przedni można zablokować lub odblokować za pomocą klucza.
poczwórny, 1+5, 1+7, 9 i 16.
Sequence (Sekwencja): Rozpoczęcie lub zatrzymanie pracy sekwencyjnej w
trybie podglądu na żywo.
A: Wybór monitora głównego.
B: Wybór monitora B (w podglądzie na żywo).
F1: Przy odtwarzaniu całodniowym naciśnij, aby rozpocząć lub zakończyć
wycinanie fragmentu wideo.
F2: W trybie podglądu na żywo kliknij, aby wyświetlić/ukryć pasek czasu.
Przy odtwarzaniu całodniowym naciśnij, aby ukryć/wyświetlić pasek narzędzi
sterowania odtwarzaniem.
odtwarzania.
jak mysz USB czy dysk twardy USB.
Menu: Przejście do menu głównego/wyjście z tego menu.
Szukaj: Przejście do zaawansowanego menu wyszukiwania.
: Przechodzi do najstarszego dostępnego nagrania wideo i rozpoczyna
odtwarzanie.
: Wstrzymanie odtwarzania.
: Odtwarzanie aktualnie wybranego pliku. Wartość domyślna to 1 minuta.
Live (Na żywo): Przełączanie do trybu podglądu na żywo.
Replay (Powtórka): Powtarza aktualnie odtwarzany plik i rozpoczyna
odtwarzanie od początku pliku.
PL : 38 Skrócona instrukcja obsługi rejestratora TVN 50
Page 41

Element Nazwa Opis
8. Direction (Kierunek) Przyciski DIRECTION (Kierunek) służą do nawigacji między różnymi polami i
Przycisk Enter Przycisk ENTER służy do potwierdzania wyboru w dowolnym trybie menu.
9. Przyciski PTZ. Zoom (Powiększenie): Użyj przycisków + i -, aby powiększać/pomniejszać
10. Przycisk Archiwum Naciśnij raz, aby przejść do trybu szybkiej archiwizacji. Naciśnij dwa razy, aby
elementami w menu.
W trybie odtwarzania przyciski strzałek w lewo i w prawo służą do zwiększania i
zmniejszania tempa odtwarzania wideo. Przyciski strzałki w górę i w dół
umożliwiają przejście o 30 sekund w przód lub w tył w nagranym wideo.
W trybie pauzy przyciski strzałek w lewo i w prawo służą do przeskakiwania w
przód lub w tył o jedną klatkę w nagranym wideo. Przyciski strzałki w górę i w dół
umożliwiają przejście o jedną sekundę w przód lub w tył w nagranym wideo.
W trybie podgląd na żywo te przyciski umożliwiają przełączanie między
kanałami.
W trybie sterowania PTZ umożliwia sterowanie ruchem kamery PTZ.
W trybie Playback (Odtwarzanie) poklatkowego naciśnięcie tego przycisku
powoduje przewinięcie wideo o jedną klatkę do przodu.
cyfrowo obraz.
Preset (Zaprogramowane): Wywołanie presetu.
Tour (Trasa): Wywołanie zaprogramowanych tras Shadow.
rozpocząć archiwizację. Wskaźnik miga na zielono podczas zapisywania danych
na urządzeniu pamięci.
Zawartość opakowania
Rejestrator TruVision NVR 50 (model TVN 50)
jest dostarczany z następującymi elementami:
• Pilot zdalnego sterowania (na podczerwień)
• Dwie baterie typu AAA do pilota
• 3 przewody zasilające (USA, Europa, Wielka
Brytania)
• Mysz USB
• Rejestrator sieciowy (NVR)
• Dysk CD z oprogramowaniem oraz
instrukcjami obsługi
• Instrukcja szybkiego uruchamiania
rejestratora TruVision NVR 50
• Instrukcja obsługi rejestratora TruVision NVR
50 (na dysku CD)
Zalecana procedura konfigurowania rejestratora
NVR:
1. Podłącz wszystkie wymagane urządzenia do
panelu tylnego rejestratora TVN 50. Zobacz
Rysunek 1 na stronie 37.
Połączenia podstawowe:
Podłącz monitor A do wyjścia BNC, VGA lub
HDMI. Podłącz mysz do portu USB na panelu
przednim.
Połączenia opcjonalne:
Wszystkie inne przedstawione połączenia są
opcjonalne i zależne od wymagań instalacji.
2. Podłącz przewód zasilający do urządzenia i
włącz zasilanie.
3. Skonfiguruj wymagane ustawienia
urządzenia przy użyciu kreatora konfiguracji.
Warunki instalacji
Szczegółowe informacje znajdują się w instrukcji
obsługi, ale należy przestrzegać następujących
ważnych wymagań:
• Umieścić urządzenie w bezpiecznym
miejscu.
• Upewnić się, że urządzenie znajduje się w
dobrze wentylowanym pomieszczeniu.
• Nie wystawiać urządzenia na działanie
deszczu czy wilgoci.
Szybka instalacja
Pierwsze użycie
Rejestrator TVN 50 jest wyposażony w
ekspresowy kreator instalacji, który umożliwia
łatwą konfigurację podstawowych ustawień
rejestratora przy pierwszym użyciu. Konfiguruje
wszystkie kamery jednocześnie. Konfigurację
można następnie dostosować.
Domyślnie kreator konfiguracji uruchamia się po
załadowaniu rejestratora. Kreator umożliwia
skonfigurowanie najważniejszych ustawień
rejestratora krok po kroku. Wybierz preferowany
język dla systemu, a następnie wprowadź hasło
Skrócona instrukcja obsługi rejestratora TVN 50 39 : PL
Page 42

administratora. Domyślne hasło administratora to
ciąg 1234. Zaleca się zmianę tego hasła.
Następnie kreator prowadzi przez menu w celu
ustawienia daty i godziny, skonfigurowania sieci,
zarządzania dyskiem twardym i skonfigurowania
nagrywania.
Po wprowadzenia wszelkich niezbędnych zmian,
kliknij przycisk
kreatora. Rejestrator NVR 50 jest gotowy do
użytku. Nagrywanie rozpoczyna się
automatycznie.
Zakończ, aby zakończyć pracę
Mysz USB
Mysz USB dostarczona z rejestratorem TVN 50
może być używana do obsługi wszystkich funkcji
urządzenia w przeciwieństwie do panelu
przedniego, który ma ograniczone funkcje. Za
pomocą myszy można przechodzić między menu i
wprowadzać zmiany w ustawieniach w interfejsie
użytkownika.
Mysz należy podłączyć do rejestratora za
pośrednictwem portu USB na panelu przednim.
Mysz natychmiast rozpocznie pracę i powinien
pojawić się kursor.
Sterowanie rejestratorem TVN 50
Dostępnych jest kilka sposobów sterowania
urządzeniem:
• Panel przedni
• Pilot zdalnego sterowania (na podczerwień)
• Mysz
• Przeglądarka internetowa
Panel przedni
Przyciski na panelu przednim służą do sterowania
większością funkcji. Zobacz Rysunek 2 na stronie
38, aby sprawdzić lokalizację elementów
sterujących.
Sterowanie za pomocą pilota na podczerwień
Obsługa przycisków pilota na podczerwień
przypomina użycie panelu przedniego. Włóż do
pilota dwie baterie typu AAA.
Aby podłączyć pilota do rejestratora:
1. Naciśnij przycisk Menu na panelu przednim
lub kliknij prawym przyciskiem myszy i
wybierz polecenie Menu. Otworzy się menu
główne.
2. Wybierz kolejno opcje Ustawienia trybu
wyświetlania > Monitor.
3. Sprawdź i zapamiętaj adres urządzenia NVR.
Wartość domyślna wynosi 255. Ten adres
urządzenia jest prawidłowy dla wszystkich
pilotów na podczerwień.
4. Na pilocie naciś
5. Wprowadź adres urządzenia. Musi być taki
sam jak na urządzeniu TVN 50.
6. Naciśnij przycisk ENTER na pilocie lub
panelu przednim.
nij przycisk Urządzenie.
Sterowanie za pomocą przeglądarki
internetowej
Przeglądarka internetowa rejestratora TVN 50
umożliwia wyświetlanie, nagrywanie i odtwarzanie
obrazów wideo, a także zarządzanie wszystkimi
aspektami systemu z dowolnego komputera z
dostępem do Internetu. Łatwe w obsłudze
elementy sterujące przeglądarki zapewniają
szybki dostęp do wszystkich funkcji rejestratora.
Zobacz Rysunek 3 na stronie 41.
Aby uzyskać dostęp do rejestratora, należy
otworzyć przeglądarkę internetową i jako adres
internetowy wpisać adres IP przypisany do
urządzenia NVR. Na ekranie logowania należy
wprowadzić domyślny identyfikator użytkownika i
hasło.
• ID użytkownika: admin
• Hasło: 1234
Domyślne wartości ustawień sieciowych
rejestratora TVN 50:
• DHCP: włączony domyślnie.
• Adres IP — 192.168.1.82
• Maska podsieci — 255.255.255.0
• Adres bramy — 192.168.1.1
• Porty:
Dla przeglądarki:
Port RTSP: 554
Port HTTP: 80
Dla programu TruNav:
Port RTSP: 554
Port oprogramowania klienta/serwera: 8000
PL : 40 Skrócona instrukcja obsługi rejestratora TVN 50
Page 43

Rysunek 3: Interfejs przeglądarki internetowej
Tryb podglądu na żywo
Tryb podglądu na żywo to standardowy tryb pracy
urządzenia, w którym użytkownik widzi bieżący
obraz z kamer.
Regularnie używane funkcje trybu podglądu na
żywo są dostępne za pomocą kliknięcia prawym
przyciskiem myszy na obrazie z kamery. Zostanie
wyświetlony wyskakujący pasek narzędzi ze
skrótami. Opis dostępnych funkcji można znaleźć
w Rysunek 4 poniżej.
Rysunek 4: Menu podręczne dla monitora
głównego
Element Nazwa Opis
4. Poprzedni
5. Następny
6. Uruchom
ekran
ekran
automatyczne
przełączanie
7. Odtw.
8. Monitor B Przełączanie między monitorem
9. Wyszukiwanie
10. Zamknij pasek
całodniowe
zaawansowane
czasu
Wyświetlenie poprzedniej
kamery.
Wyświetlenie następnej kamery.
Włączenie trybu sekwencyjnego.
Ekran jest automatycznie
przełączany między kolejnymi
kamerami.
Wybierz kolejno Menu >
Ustawienia trybu wyświetlania >
Czas przełączania, aby określić
ustawienia.
Odtworzenie nagranego obrazu
wideo z wybranego dnia i z
wybranej kamery. Domyślnie
wybrany jest dzień bieżący.
głównym (A) i monitorem B.
Przejście do zaawansowanego
menu wyszukiwania wideo
Otwarcie/zamknięcie paska
czasu.
Konfigurowanie rejestratora TVR 50
Rejestrator TVN 50 udostępnia menu złożone z
ikon umożliwiające skonfigurowanie parametrów
urządzenia. Każda ikona polecenia wyświetla
ekran, który umożliwia edycję grupy ustawień.
Większość menu jest dostępna tylko dla
administratorów systemu.
Szczegółowe informacje na temat konfigurowania
urządzenia zawiera Instrukcja użytkownika
rejestratora TVN 50.
Aby przejść do menu głównego z trybu
podglądu na żywo:
Lista dostępnych poleceń zależy od tego, który
monitor jest aktywny: główny czy B. Patrz
Tabela 1.
Tabela 1: Menu myszy dla monitora A
(głównego)
Element Nazwa Opis
1. Menu Przejście do głównego menu.
2. Jedna kamera Wybór wyświetlania
3. Wiele kamer Wybór różnych opcji widoku z
Ta opcja nie jest dostępna na
monitorze B.
pełnoekranowego dla kamery
wybranej z listy rozwijanej.
wielu kamer z listy rozwijanej.
Naciśnij przycisk Menu na pilocie lub panelu
przednim.
- lub -
Kliknij prawym przyciskiem myszy i wybierz
opcję Menu z menu podręcznego.
Otworzy się menu główne. Umieść wskaźnik
myszy nad ikoną polecenia na pasku narzędzi
menu i kliknij, aby wybrać ikonę.
Skrócona instrukcja obsługi rejestratora TVN 50 41 : PL
Page 44

Opis ikon poleceń na pasku narzędzi menu:
Konfigurowanie ustawień kamery.
Konfigurowanie ustawień
wyświetlania.
Konfigurowanie ustawień
nagrywania.
Konfigurowanie standardowych
ustawień sieci.
Konfigurowanie ustawień alarmu.
Konfigurowanie ustawień PTZ.
Konfigurowanie ustawień
użytkownika.
Konfigurowanie ustawień systemu.
Dostarcza informacje dotyczące
różnych pasków narzędzi i menu
interfejsu.
Dostęp do opcji wylogowania,
ponownego uruchomienia i
wyłączenia.
Dane techniczne
Zasilanie od 100 do 240 V AC,
Pobór mocy (bez
dysku twardego)
TVN 5032
Temperatura robocza -10 do +55°C
Wilgotność względna 10 do 90%
Wymiary
(Sz x W x G)
Waga ≤ 8 kg
6,3 A, od 50 do 60 Hz
<= 45 W
445 × 470 × 90 mm
(bez dysku twardego lub
nagrywarki DVD-R/W)
Informacje kontaktowe
Informacje kontaktowe zawiera witryna
internetowa www.interlogix.com lub
www.utcfssecurityproducts.eu.
PL : 42 Skrócona instrukcja obsługi rejestratora TVN 50
Page 45

PT
Guia Rápido do TruVision NVR 50
Figura 1: Ligações do painel traseiro
1. Ligar a um monitor de CCTV (conectores de tipo
BNC). Monitor principal.
2. Ligar uma entrada de áudio a conectores RCA.
3. Ligar a um dispositivo RS-232.
4. Ligar a uma rede.
5. Ligar a um dispositivo eSATA opcional, como HDD
SATA, CD/DVD-RM.
6. Ligar a um cabo de alimentação.
7. Ligar a colunas para saída de áudio.
8. Ligar a um monitor VGA.
9. Ligar a uma TV de alta definição (HDTV). A ligação
HDMI suporta áudio e vídeo digital.
10. Ligar a um dispositivo USB opcional, como um rato,
gravador de CD/DVD ou HDD.
11. Termine a linha para as câmaras dome utilizando este
interruptor RS-485. A predefinição é Off (Desactivado).
12. Ligar a um controlo PTZ.
13. Ligar a um teclado (KTD-405 ilustrado).
14. Ligar até 16 cabos de entrada de alarme a saídas de
relé.
15. Ligar até quatro saídas de relé de alarme.
16. Ligar à terra.
Guia Rápido do TVN 50 43 : PT
Page 46

Figura 2: Controlos do painel frontal
Item Nome Descrição
1. LEDs de estado Power (Alimentação): Verde indica que o NVR está a funcionar correctamente.
2. infravermelhos Receptor de comando à distância por infravermelhos.
3. Bloqueio do painel frontal Pode bloquear e desbloquear o painel frontal utilizando uma chave.
4. Botões Display Display (Visualização): Alterna entre os vários modos de divisão de ecrã: full
5. Botões numéricos Alternar entre câmaras diferentes nos modos de visualização em directo,
6. Interfaces USB Portas universal serial bus (USB) para dispositivos adicionais, tais como um rato
7. Botões Menu e Search
(Procurar)
Botões de reprodução
Vermelho indica uma falha.
Alarm (Alarme): Vermelho indica que existe um sensor de entrada de alarme ou
outro alarme, como um alarme de movimento ou de sabotagem (tamper).
Tx/Rx (Transmissão/Recepção): Verde indica uma ligação de rede normal.
HDD (Disco rígido): O indicador HDD pisca com cor vermelha quando estão a
ser lidos dados a partir do disco rígido ou quando estão a ser gravados dados no
disco.
Ready (Pronto): Verde indica que o dispositivo está a funcionar correctamente.
Archive (Arquivo): O indicador Archive pisca com cor verde quando fotografias
ou ficheiros de gravações estão a ser exportados para um dispositivo eSATA ou
USB.
(ecrã inteiro), quad, 1+5, 1+7, 9, e 16.
Seq (Sequenciação): Inicia/pára a sequenciação de imagens no modo de
visualização em directo.
A: Selecciona o monitor principal.
B: Selecciona o monitor de contexto (em visualização em directo).
F1: Na reprodução do dia todo, clique para iniciar e parar corte de vídeo.
F2: No modo de visualização em directo, clique para apresentar/ocultar a barra
de tempo.
Na reprodução do dia todo, clique para apresentar/ocultar a barra de
ferramentas de controlo da reprodução.
controlo PTZ ou reprodução.
USB e um disco rígido USB.
Menu: Entrar/sair do menu principal.
Search (Procurar): Entrar no menu de procura avançada.
: Saltar para trás para o vídeo mais antigo disponível e iniciar a
reprodução.
: Efectuar uma pausa na reprodução.
: Reproduzir instantaneamente o ficheiro actualmente seleccionado. O
tempo predefinido é de 1 minuto.
Live (Directo): mudar para o modo de visualização em directo.
Replay (Reproduzir novamente): voltar a reproduzir o ficheiro actual. Inicia no
princípio do ficheiro.
PT : 44 Guia Rápido do TVN 50
Page 47

Item Nome Descrição
8. Botões de Direcção
Botão Enter O botão ENTER é utilizado para confirmar a selecção em qualquer um dos
9. Botões PTZ Zoom: Utilize + e - para zoom digital.
10. Botão Archive (Arquivar) Premir uma vez para entrar no modo de arquivo rápido. Premir duas vezes para
Conteúdo da embalagem
O TruVision NVR 50 (modelo TVN 50) é fornecido
com os seguintes componentes:
• Comando à distância IR (infravermelhos)
• Duas pilhas AAA para o comando à distância
• Cabos de alimentação de CA (EUA, Europa
e Reino Unido)
• Rato USB
• NVR
• CD com software e manuais
• Guia Rápido do TruVision NVR 50
• Manual do Utilizador do TruVision NVR 50
(em CD)
Ambiente de instalação
Consulte o manual do utilizador para obter
informações detalhadas, mas observe os
seguintes requisitos importantes:
• Coloque a unidade num local seguro.
• Certifique-se de que a unidade se encontra
num local bem ventilado.
• Não exponha a unidade à chuva ou à
humidade.
Os botões de DIRECÇÃO são utilizados para navegar entre os diferentes
campos e itens dos menus.
No modo de reprodução, os botões de navegação para a direita ou para a
esquerda são utilizados para acelerar ou diminuir a velocidade de reprodução de
vídeos gravados. Os botões de navegação para cima e para baixo são utilizados
para fazer avançar ou recuar 30 segundos a reprodução de vídeos gravados.
No modo de pausa, os botões de navegação para a direita e para a esquerda
são utilizados para fazer avançar ou recuar um frame os vídeos gravados. Os
botões de navegação para cima e para baixo são utilizados para fazer avançar
ou recuar 1 segundo os vídeos gravados.
Em modo de visualização em directo, estes botões podem ser utilizados para
percorrer todos os canais.
No modo de controlo PTZ, podem controlar o movimento da câmara PTZ.
modos de menu.
No modo de reprodução por fotogramas, premindo este botão avança um
fotograma no vídeo.
Preset (Predefinições): Chama posições predefinidas pré-programadas.
Tour (Ronda): Chama rondas gravadas pré-programadas.
começar a arquivar. O indicador pisca com cor verde quando estão a ser
gravados dados no dispositivo de cópia de cópia de segurança.
Instalação rápida
Passos recomendados para a configuração do
NVR:
1. Ligue todos os dispositivos necessários ao
painel traseiro do TVN 50. Consulte a
Figura 1 na página nº 43.
Ligações básicas:
Ligue o monitor A à saída BNC, VGA ou
HDMI. Ligue o rato à porta USB no painel
frontal.
Ligações opcionais:
Todas as restantes ligações mostradas são
opcionais e dependem de requisitos de
instalação.
2. Ligue o cabo de alimentação à unidade e
ligue a alimentação.
3. Configure a unidade com as definições
requeridas, utilizando o assistente de
configuração.
Primeira utilização
O TVN 50 dispõe de um assistente de instalação
rápida, que permite configurar facilmente as
definições básicas do NVR quando o aparelho é
utilizado pela primeira vez. Configura
simultaneamente todas as câmaras. A
configuração pode então ser personalizada
conforme necessário.
Guia Rápido do TVN 50 45 : PT
Page 48

Por predefinição, o assistente de instalação iniciase assim que o NVR é carregado. O assistente
guia o utilizador por algumas das definições mais
importantes do NVR. Seleccione o idioma
preferido para o sistema e, a seguir, introduza a
password de administrador. A password admin
predefinida é 1234. Recomenda-se vivamente a
alteração desta password.
O assistente orienta então o utilizador pelos
menus para definir data e hora, a configuração de
rede, a gestão dos discos rígidos (HDDs) e a
configuração de gravação.
Após a introdução de todas as alterações
pretendidas, clique em Finish (Terminar) para
sair do assistente. O NVR 50 está agora pronto
para ser utilizado. A gravação inicia-se
automaticamente.
Operar o TVN 50
A unidade pode ser controlada de várias
maneiras:
• Painel frontal
• Comando à distância IR (infravermelhos)
• Rato
• Browser web
Painel frontal
Os botões do painel frontal controlam a maior
parte das funções. Consulte a Figura 2 na página
nº 44 para ver a localização dos controlos.
Comando à distância IR (infravermelhos)
Os botões do comando à distância IR
assemelham-se aos do painel frontal. Coloque as
duas pilhas AAA no comando à distância.
Para ligar o comando à distância ao NVR:
1. Prima Menu no painel frontal ou clique com o
botão direito do rato e seleccione Menu. É
apresentado o ecrã do menu principal.
2. Seleccione Definições do modo de
visualização > Monitor.
3. Seleccione e memorize o valor do endereço
do dispositivo NVR. O valor predefinido é
255. O endereço do dispositivo é válido para
todos os controlos IR.
4. No comando à distância, prima o botão
Dispositivo.
5. Introduza o valor do endereço do dispositivo.
O valor tem de ser idêntico ao valor no
TVN 50.
6. Prima ENTER no comando à distância ou no
painel frontal.
Rato USB
O rato USB fornecido com o TVN 50 pode ser
utilizado para operar todas as funções do NVR,
ao contrário do painel frontal, o qual tem uma
funcionalidade limitada. O rato permite navegar e
efectuar alterações às definições na interface de
utilizador.
Para ligar o rato ao NVR, basta ligar o conector
USB do rato à porta USB no painel frontal. O rato
fica imediatamente operacional e o ponteiro
deverá ser visível no ecrã.
Controlo pelo browser da Web
O browser da Web do TVN 50 permite visualizar,
gravar e reproduzir vídeos, bem como gerir todos
os aspectos do NVR a partir de qualquer PC com
acesso à Internet. Os controlos do browser, muito
fáceis de utilizar, proporcionam um acesso rápido
a todas as funções do NVR. Consulte a Figura 3
na página nº 47.
Para aceder à unidade, abra um browser da Web
e introduza o endereço IP atribuído ao NVR como
um endereço da Web. No ecrã de acesso,
introduza a ID de utilizador e a password
predefinidas:
• ID de utilizador: admin
• Password: 1234
Os valores predefinidos para as definições de
rede do TVN 50 são os seguintes:
• DHCP: Activado por predefinição.
• Endereço IP - 192.168.1.82
• Máscara de subrede - 255.255.255.0
• Endereço gateway - 192.168.1.1
• Portas:
Quando utilizar o browser:
Porta RTSP: 554
Porta HTTP: 80
Quando utilizar o TruNav:
Porta RTSP: 554
Porta de software do servidor/cliente: 8000
PT : 46 Guia Rápido do TVN 50
Page 49

Figura 3: Interface do browser da Web
Modo de visualização em directo
O modo de visualização em directo é o modo de
funcionamento normal da unidade, permitindo a
visualização de fotografias das câmaras em
directo.
As funções utilizadas regularmente no modo de
visualização em directo podem ser acedidas
rapidamente, clicando com o botão direito do rato
na imagem da câmara. Aparece a barra de
ferramentas instantânea de atalhos. Consulte a
Figura 4 a seguir para ver uma descrição das
funções disponíveis.
Figura 4: Menu do rato para o monitor
principal
Item Nome Descrição
3. Multi-câmara Alternar entre as diferentes
4. Ecrã anterior Apresenta a câmara anterior.
5. Próximo ecrã Apresenta a câmara seguinte.
6. Iniciar
alternância
automática
7. Reprodução
do dia todo
8. Monitor B Alternar entre os monitores A
9. Procura
avançada
10. Fech barra
tpo
pendente.
opções de ecrã dividido a partir da
lista pendente.
Ligar o modo de sequenciação. O
ecrã faz automaticamente a
sequenciação entre câmaras.
Vá até Menu > Definições do
modo de visualização >
Disposição > Tempo de espera a
configurar.
Reproduzir o vídeo gravado para
o dia seleccionado a partir da
câmara seleccionada. Está
seleccionado o dia actual por
predefinição.
(principal) e B (de contexto).
Aceder ao menu de procura de
vídeo avançada.
Abrir/fechar a barra de tempo.
Configuração do TVN 50
O TVN 50 dispõe de uma estrutura de menus
controlada por ícones que permite configurar os
parâmetros da unidade. Cada ícone de comando
apresenta um ecrã que permite editar um
conjunto de definições. A maior parte dos menus
está disponível apenas aos administradores do
sistema.
Para informações detalhadas sobre a
configuração da unidade, consulte o manual do
utilizador do TVN 50.
Para aceder ao menu principal no modo de
A lista de comandos disponíveis depende do
monitor que estiver activo: principal ou de
contexto (monitor B). Consulte a Tabela 1 a
seguir.
Tabela 1: Menu do rato para o monitor A
(monitor principal)
Item Nome Descrição
1. Menu Entrar no menu principal.
2. Câmara única Alternar para visualização em
Esta opção não está disponível a
partir do monitor B.
ecrã total para a câmara
seleccionada a partir da lista
visualização em directo:
Prima o botão Menu no comando à distância
ou no painel frontal.
- Ou -
Clique com o botão direito do rato e
seleccione Menu no menu instantâneo.
É apresentado o ecrã do menu principal. Mova o
rato sobre um ícone de comando na barra de
ferramentas do menu e clique para seleccionar.
Guia Rápido do TVN 50 47 : PT
Page 50

Descrição dos ícones de comando na barra de
ferramentas do menu:
Configura as definições de câmara.
Configura as definições de
visualização.
Configura as definições de
gravação.
Configura as definições
normalizadas de rede.
Configura as definições de alarme.
Configura as definições PTZ.
Configura as definições de
utilizador.
Configura as definições de sistema.
Proporciona informações de
referência às diversas barras de
ferramentas e menus na interface.
Dá acesso às opções de logout,
reiniciar e encerrar.
Peso ≤ 8 kg
(sem HDD ou DVD-R/W)
Informações de contacto
Para informações de contacto, consulte
www.interlogix.com, ou
www.utcfssecurityproducts.eu.
Especificações
Fonte de alimentação 100 a 240 VAC,
Consumo de energia
(sem HDD)
TVN 5032
Temperatura de
funcionamento
Humidade relativa
Dimensões
(L x A x P)
PT : 48 Guia Rápido do TVN 50
6,3 A, 50 a 60 Hz
<= 45 W
-10 a +55 ºC
10 a 90%
445 × 470 × 90 mm
Page 51

RU
Краткое руководство по началу
работы с TruVision NVR 50
Рис. 1. Разъемы на задней панели
1. Подключение к одному монитору системы
наблюдения (разъемы BNC). Основной монитор.
2. Подключение одного аудиовхода к разъемам RCA.
3. Подключение к устройству RS-232.
4. Подключение к сети.
5. Подключение к дополнительному устройству
eSATA, например, к жесткому диску SATA и
приводу CD/DVD-R.
6. Подключение шнура питания.
7. Подключение аудиовыхода к громкоговорителям.
8. Подключение к монитору VGA.
9. Подключение к HDTV. Соединение HDMI
поддерживает цифровое аудио и видео.
10. Подключение дополнительного USB-устройства,
например, мыши, устройства записи CD/DVD или
жесткого диска.
11. Переключатель RS-485 для линии купольных камер.
По умолчанию линия отключена.
12. Подключение прибора управления PTZ
(панорамированием, наклоном и
масштабированием).
13. Подключение клавиатуры (показана клавиатура KTD-
405).
14. Подключение до 16 кабелей ввода аварийных
сигналов к выходам реле.
15. Подключение до четырех выходов сигнальных реле.
16. Заземление.
Краткое руководство по началу работы с TVN 50 49 : RU
Page 52

Рис. 2. Элементы управления на передней панели
Номер Название Описание
1. Светодиодные
2. Инфракрасный
3. Блокировка передней
4. Кнопки дисплея Display (дисплей) Переключение между различными режимами
5. Числовые кнопки Переключение между различными камерами в режиме реального времени,
6. Интерфейсы USB USB-порт для дополнительных устройств, например USB-мыши и жесткого
индикаторы состояния
приемник
панели
Power (питание) Зеленый индикатор означает, что сетевой
видеорегистратор NVR правильно работает. Красный индикатор означает
наличие сбоя.
Alarm (тревога) Красный цвет означает наличие сигнала с датчика тревоги
Alarm In или другой сигнал тревоги, например, обнаружение движения или
проникновения в охраняемую зону.
Tx/Rx (прием-передача) Зеленый цвет означает нормальное сетевое
соединение.
HDD (жесткий диск) Красный индикатор жесткого диска мигает, когда
данные считываются с жесткого диска или записываются на него.
Ready (готовность) Зеленый цвет означает, что устройство правильно
работает.
Аrchive (архивирование) Зеленый индикатор архивирования мигает, когда
файлы записей или изображения экспортируются на устройство USB или
eSATA.
Приемник для инфракрасного пульта ДУ.
Переднюю панель можно заблокировать или разблокировать с помощью
ключа.
мультипросмотра: полный, четыре камеры, 1+5, 1+7, 9 и 16.
Sequence (последовательность) Включение и выключение функции
последовательного просмотра в режиме реального времени.
A Выбор основного монитора.
B Выбор вспомогательного монитора (в режиме просмотра в реальном
времени).
F1 Нажмите при воспроизведении записи всего дня для запуска и остановки
обрезки видео.
F2 Нажмите в режиме реального времени для отображения или скрытия
панели времени.
Нажмите при воспроизведении записи всего дня, чтобы скрыть или
отобразить панель управления воспроизведением.
в режиме управления PTZ и воспроизведения.
диска USB.
RU : 50 Краткое руководство по началу работы с TVN 50
Page 53

Номер Название Описание
7. Кнопки меню и поиска
8. Направление
Кнопка Enter (Ввод) Кнопка ENTER используется для подтверждения выбора в любом режиме
9. Кнопки PTZ Zoom (Масштабирование) Для увеличения и уменьшения цифрового
10. Кнопка Archive
Кнопки воспроизведения
(Архивирование)
Menu (Меню) Открытие и закрытие главного меню.
Search (Поиск) Открытие меню расширенного поиска.
Переход к наиболее старой видеозаписи и ее воспроизведение.
Приостановка воспроизведения.
Немедленное воспроизведение выбранного файла. Время по
умолчанию — 1 мин.
Live (Режим реального времени) Переключение в режим реального
времени.
Replay (Воспроизведение) Повторное воспроизведение текущего файла с
начала.
Кнопки НАПРАВЛЕНИЯ используются для навигации между различным
полями и элементами в меню.
В режиме Воспроизведение кнопки «Влево» и «Вправо» используются для
ускорения и замедления записанного видео. Кнопки «Вверх» и «Вниз»
используются для перехода по видеозаписи на 30 с вперед или назад.
В режиме Пауза кнопки «Влево» и «Вправо» используются для перехода по
видеозаписи на один кадр вперед или назад. Кнопки «Вверх» и «Вниз»
используются для перехода по видеозаписи на 1 с вперед или назад.
В режиме Просмотр в реальном времени эти кнопки можно использовать
для циклического перехода между каналами.
В режиме управления PTZ они могут управлять движением PTZ-камеры.
меню.
В покадровом режиме воспроизведения нажатие этой кнопки приводит к
перемотке видеозаписи вперед на один кадр.
изображения используйте кнопки «+» и «–».
Preset (Предварительная установка) Вызов предварительно заданного
положения.
Tour (Маршрут) Вызов предварительно заданных маршрутов
патрулирования.
Для перехода в режим быстрого архивирования нажмите кнопку один раз.
Чтобы начать архивирование, нажмите кнопку дважды. Зеленый индикатор
мигает, когда производится запись данных на устройство резервного
копирования.
Комплектация
В комплект видеорегистратора TruVision NVR
50 (модель TVN 50) входят следующие
компоненты:
• инфракрасный пульт ДУ,
• две батареи типа AAA для пульта ДУ,
• шнуры питания от сети переменного тока
(США, Европа и Великобритания),
• USB-мышь,
• сетевой видеорегистратор NVR,
Среда установки
Подробные инструкции содержатся в
руководстве пользователя. Однако
необходимо учитывать следующие важные
обстоятельства.
• Устанавливайте устройство в безопасном
месте.
• Устройство должно быть установлено в
помещении с хорошей вентиляцией.
• Необходимо защищать устройство от
дождя и сырости.
• диск с программным обеспечением и
руководствами,
• Краткое руководство по началу работы
с TruVision NVR 50,
• Руководство пользователя TruVision NVR
50 (на
компакт-диске).
Краткое руководство по началу работы с TVN 50 51 : RU
Page 54

Краткое описание установки
Рекомендуемые действия по установке
сетевого видеорегистратора NVR
1. Подключите все необходимые устройства
к задней панели TVN 50. См. Рис. 1 на стр.
49.
Основные подключения
Подключите монитор А к выходу BNC,
VGA или HDMI. Подключите мышь к USBпорту на передней панели.
Дополнительные подключения
Все остальные показанные подключения
являются необязательными и зависят от
требований к установке.
2. Подсоедините шнур питания
и включите питание.
3. Задайте необходимые настройки
устройства, используя мастер настройки.
к устройству
Первое использование
В TVN 50 имеется мастер экспресс-установки,
с помощью которого можно легко настроить
основные параметры сетевого
видеорегистратора NVR при первом
включении. Он позволяет настроить все
камеры одновременно. При необходимости
конфигурацию можно позднее изменить.
Мастер настройки запускается по умолчанию
сразу же после загрузки сетевого
видеорегистратора NVR. Он помогает задать
основные настройки устройства. Выберите
нужный язык системы
администратора. По умолчанию пароль
администратора — 1234. Настоятельно
рекомендуется сменить этот пароль.
Затем мастер поможет настроить дату и
время, задать настройки сети, жесткого диска и
записи.
После внесения всех необходимых изменений
нажмите кнопку Готово, чтобы закрыть
мастер. Теперь NVR 50 готов к работе. Запись
начинается автоматически.
и введите пароль
Управление видеорегистратором
TVN 50
Управлять устройством можно с помощью
• передней панели,
• инфракрасного пульта ДУ,
• мыши,
• веб-браузера.
Передняя панель
Кнопки, находящиеся на передней панели,
позволяют работать с большинством функций.
Расположение кнопок показано на Рис. 2 на
стр. 50.
Инфракрасный пульт ДУ
Кнопки ИК-пульта дистанционного управления
аналогичны тем, что расположены на
передней панели. В пульт
вставить две батареи типа AAA.
Подключение пульта ДУ к сетевому
видеорегистратору NVR
1. Нажмите кнопку Меню на передней
панели или щелкните правой кнопкой
мыши и выберите пункт Меню. Появится
экран основного меню.
2. Выберите Настройки режима
отображения > Монитор.
3. Проверьте и запомните адрес сетевого
видеорегистратора NVR. Значение по
умолчанию — 255. Адрес устройства
действителен
управления.
4. Нажмите кнопку Устройство на пульте
дистанционного управления.
5. Введите адрес устройства. Он должен
совпадать с адресом, указанным для
TVN 50.
6. Нажмите кнопку ENTER на пульте ДУ или
передней панели.
USB-мышь
Поставляемую вместе с TVN 50 USB-мышь
можно использовать для управления всеми
функциями сетевого видеорегистратора NVR в
отличие от передней
возможности которой ограничены. Мышь
позволяет перемещаться по
пользовательскому интерфейсу и изменять
настройки.
Подсоедините мышь к сетевому
видеорегистратору NVR, вставив разъем
мыши в USB-порт на передней панели. Мышью
можно пользоваться сразу же; на экране
должен появиться курсор.
ДУ необходимо
для всех ИК-элементов
панели, функциональные
RU : 52 Краткое руководство по началу работы с TVN 50
Page 55

Веб-браузер
Веб-браузер TVN 50 позволяет просматривать,
записывать и воспроизводить видео, а также
управлять всеми аспектами сетевого
видеорегистратора NVR с помощью любого
ПК, имеющего доступ к Интернету. Удобные
элементы управления браузера позволяют
быстро обращаться ко всем функциям
устройства. См. Рис. 3 ниже.
Чтобы получить доступ к устройству, откройте
веб-браузер и введите IP-адрес, присвоенный
видеорегистратору в
качестве веб-адреса. На
экране входа в систему введите
идентификатор пользователя и пароль по
умолчанию.
• Имя пользователя: admin
• Пароль: 1234
Значения параметров сети для TVN 50 по
умолчанию.
• DHCP: по умолчанию включено.
• IP-адрес: 192.168.1.82
• Маска подсети: 255.255.255.0
• Адрес шлюза: 192.168.1.1
• Порты
При использовании браузера
Порт RTSP: 554
Порт HTTP: 80
При использовании TruNav
Порт RTSP: 554
Порт серверного/клиентского ПО: 8000
Рис. 3. Интерфейс веб-браузера
Режим просмотра в реальном
времени
Режим просмотра в реальном времени
является обычным рабочим режимом
устройства, в котором пользователь может
просматривать изображения, регистрируемые
камерами.
При выборе этого режима просмотра можно
легко получить доступ к регулярно
используемым функциям, нажав правую кнопку
мыши, когда курсор наведен на изображение
камеры. Откроется всплывающая панель
инструментов. Описание доступных функций
см. на Рис
. 4 ниже.
Рис. 4. Меню мыши для основного
монитора
Список доступных команд зависит от того,
какой именно монитор активен — основной или
вспомогательный (монитор B). См. Табл. 1
ниже.
Табл. 1. Меню мыши для монитора А
(основной монитор)
Номер Название Описание
1. Меню Переход к главному меню.
2. Одна камера Переход в режим
3. Несколько
4. Предыду-щий
5. Следую-щий
6. Автома-
камер
экран
экран
тическое
переключение
Эта функция недоступна на
мониторе В.
полноэкранного просмотра
для выбранной из
раскрывающегося списка
камеры.
Переключение между
различными вариантами
мультипросмотра из
раскрывающегося списка.
Отображает предыдущую
камеру.
Отображает следующую
камеру.
Включение режима
последовательного
перехода. На экране
автоматически
последовательно
отображаются видеозаписи с
камер.
Для настройки откройте
Меню >Настройки режима
отображения > Формат >
Время задержки.
Краткое руководство по началу работы с TVN 50 53 : RU
Page 56

Номер Название Описание
7. Воспроиз-
8. Монитор B Переключение между
9. Расширенный
10. Закрыть
ведение
записи всего
дня
поиск
панель
времени
Воспроизведение
видеозаписи, записанной в
выбранный день с
выбранной камеры. По
умолчанию выбран текущий
день.
мониторами А (основной) и В
(вспомогательный).
Переход в меню
расширенного видеопоиска.
Открыть/закрыть панель
времени.
Настройка TVN 50
Структура меню TVN 50 основана на значках, с
помощью которых можно настроить параметры
устройства. Каждый значок команды выводит
на экран окно, которое позволяет изменять
группу настроек. Большая часть меню
доступна только системным администраторам.
Более подробная информация о настройке
устройства содержится в руководстве
пользователя TVN 50.
Настройка параметров дисплея.
Настройка параметров записи.
Настройка стандартных
параметров сети.
Настройка параметров тревоги.
Настройка параметров PTZ.
Настройка параметров
пользователя.
Настройка системных
параметров.
Справочная информация о
различных панелях инструментов
и меню интерфейса.
Доступ к параметрам выхода из
системы, перезагрузки и
выключения.
Доступ к главному меню в режиме
просмотра в реальном времени
Нажмите кнопку
Меню на пульте ДУ или
на передней панели.
- или -
Нажмите правую кнопку мыши и выберите
пункт
Меню из всплывающего меню.
Появится экран основного меню. Наведите
курсор на значок команды на панели
инструментов меню и нажмите, чтобы выбрать.
Описание значков команд на панели
инструментов меню
Настройка параметров камеры.
Характеристики
Электропитание 100-240 В переменного тока, 6,3
Энергопотребление
(без жесткого диска)
TVN 5032
Рабочая
температура
Относительная
влажность
Размеры
(Ш х В х Д)
Вес ≤ 8 кг
A, 50-60 Гц
<= 45 Вт
от -10 до +55ºC
от 10 до 90%
445 × 470 × 90 мм
(без жесткого диска или привода
DVD-R/W)
Контактная информация
Контактную информацию см. на веб-сайте
www.interlogix.com или
www.utcfssecurityproducts.eu.
RU : 54 Краткое руководство по началу работы с TVN 50
Page 57

TruVision NVR 50 Hızlı
Başlangıç Kılavuzu
TR
Şekil 1: Arka panel bağlantıları
1. Bir CCTV monitöre (BNC tipi konnektörler)
bağlayın. Ana monitör.
2. Tek ses girişini RCA konnektöre bağlayın.
3. RS-232 cihazına bağlayın.
4. Bir ağa bağlayın.
5. SATA HDD, CD/DVD-RM gibi isteğe bağlı bir
eSATA cihaza bağlayın.
6. Güç kablosuna bağlayın.
7. Ses çıkışı için hoparlörler bağlayın.
8. Bir VGA monitöre bağlayın.
9. Bir HDTV'ye bağlayın. HDMI bağlantısı dijital
ses ve videoyu destekler.
TVN 50 Hızlı Başlangıç Kılavuzu 55 : TR
10. Fare, CD/DVD yazıcı veya HDD gibi isteğe bağlı
bir USB cihazına bağlayın.
11. Dome kamera hattın
sonlandırın. Off (Kapalı) varsayılan ayardır.
12. Bir PTZ kontrolüne bağlayın.
13. Klavyeye (gösterilen KTD-405'tir) bağlayın
14. 16 alarm girişi kablosuna kadar röle çıkışına
bağlayın.
15. Dört alarm rölesi çıkışına kadar bağlayın.
16. Toprak hattına bağlayın.
ı RS-485 anahtar ile
Page 58

Şekil 2: Ön panel kontrolleri
Öğe Ad Açıklama
1. Durum LED’leri Güç: Yeşil ışık, NVR'ın doğru şekilde çalıştığını gösterir. Kırmızı ışık,
bir arıza olduğunu gösterir.
Alarm: Kırmızı, bir sensör Alarm girişi veya hareket ya da kurcalama
gibi başka bir alarmın olduğunu gösterir.
Tx/Rx: Yeşil, normal bir ağ bağlantısı olduğunu gösterir.
HDD (Sabit Disk): HDD göstergesi, HDD'den veri okunurken veya
HDD'ye veri yazılırken kırmızı yanıp söner.
Ready (Hazır): Yeşil ışık, cihazın doğru şekilde çal
ıştığını gösterir.
Archive (Arşivle): Arşiv göstergesi, kayıt dosyaları veya resimleri bir
USB'ye ya da eSATA cihazına aktarılırken yeşil yanıp söner.
2. IR alıcı IR uzaktan kumanda için alıcı
3. Ön Panel Kilidi Ön paneli bir anahtar ile kitleyebilir ve açabilirsiniz.
4. Ekran düğmeleri Display (Ekran): Çeşitli çoklu görüntü aracılığıyla geçiş yapabilirsiniz:
tam, dörtlü, 1+5, 1+7, 9 ve 16.
Sequence (Sıra): Canlı izleme modunda sıralamayı başlatır/bitirir.
A: Ana monitörü seçer.
B: Alarm monitörünü seçer (canlı izlemede).
F1: Tüm gün izlemede, video kesme işlemini başlatmak ve
durdurmak için tıklayın.
F2: Canlı izleme modunda, zaman çubuğunu görüntülemek/gizlemek
için tıklayın.
Tüm gün izlemede, izleme kontrol araç çubuğunu
gizlemek/görüntülemek için tıklayın.
5. Sayısal düğmeler Canlı, PTZ kontrolü veya izleme modlarında farklı kameralar arasında
geçiş yapın.
6. USB Arayüzleri USB fare ve USB Hard Disk Sürücüsü (HDD) gibi ek cihazlar için
Üniversal Seri Veri Yolu (USB) portu.
7. Menü ve Arama
düğmeleri
İzleme düğmeleri
Menu (Menü): Ana menüye gir/ana menüden çık.
Search (Ara): Gelişmiş video arama menüsüne gir.
: Mevcut olan en eski videoya gider ve izleme işlemini başlatır.
: İzlemeyi duraklatır.
: Seçili dosyayı aniden oynatır. Varsayılan zaman 1 dakikadır.
Live (Canlı): Canlı izleme moduna geçer.
Replay (Tekrar İzle): İzlemedeki mevcut dosyayı yeniden oynatır,
dosyanın en başından Başlatır.
TR : 56 TVN 50 Hızlı Başlangıç Kılavuzu
Page 59

Öğe Ad Açıklama
8. Direction (Yön) YÖN düğmeleri, menülerdeki farklı alanlar ve öğeler arasında
Enter düğmesi ENTER düğmesi, tüm menü modlarında seçimi doğrulamak için
9. PTZ düğmeleri Zoom: Dijital zoom için + ve - tuşlarını kullanın.
10. Arşiv düğmesi Hızlı arşiv moduna girmek için bir defa basın. Arşivlemeyi başlatmak
Paketin içindekiler
TruVision NVR 50 (model TVN 50)
aşağıdaki öğelerle nakledilir:
• IR (kızıl ötesi) uzaktan kumanda
• Uzaktan kumanda için iki AAA pil
• AC güç kabloları (ABD, Avrupa,
İngiltere)
• USB fare
• NVR
• Yazılım ve kılavuzlar içeren CD
• TruVision NVR 50 Hızlı Başlangıç
Kılavuzu
• TruVision NVR 50 Kullanıcı Kılavuzu
(CD'de)
gezinmek için kullanılır.
İzleme modunda, sol ve sağ düğmeler, kayıtlı videoyu hızlandırmak
ve yavaşlatmak için kullanılır.. Yukarı ve aşağı düğmeleri, kayıtlı
videoyu 30 sn ileri veya geri atlatmak için kullanılır.
Duraklatma modunda, sol ve sağ düğmeler, kayıtlı videoyu bir kare
ileri veya geri atlatmak için kullanılır. Yukarı ve aşağı düğmeleri,
kayıtlı videoyu bir saniye ileri veya geri atlatmak için kullanılır.
Canlı İzleme modunda bu düğmeler, kanallar arasında geçiş için
kullanılabilir.
PTZ kontrol modunda, PTZ kameranın hareketini kontrol edebilir.
kullanılır.
Tek kare İzleme modunda düğmeye basıldığında, videoyu tek kare
ileri alır.
Preset (Ön Ayar): Önceden programlanmış ön ayar konumlarını
çağırır.
Tour (Tur): Önceden programlanmış gölge turlarını çağırır.
için iki defa basın. Gösterge, veriler yedek cihaza yazılırken yeşil
yanıp söner.
• Kameranın, iyi havalandırılan bir alanda
olduğundan emin olun.
• Üniteyi yağmura ya da neme maruz
bırakmayın.
Hızlı kurulum
NVR'ı kurmak için önerilen adımlar:
1. Gerekli olan tüm cihazları TVN 50 arka
paneline bağlayın. Bkz. Şekil 1,
Sayfa 55 Sayfadaki.
Temel bağlantılar:
Monitör A'yı BNC, VGA veya HDMI
çıkışına bağlayın. Ön panelde bulunan
USB portuna fareyi bağlayın.
Opsiyonel bağlantılar:
Gösterilen tüm diğer bağlantıları
Kurulum ortamı
Ayrıntılı bilgiler için kullanım kılavuzuna
başvurun, ancak bu önemli gereksinimleri
dikkate alın:
• Üniteyi güvenli bir konuma yerleştirin.
opsiyoneldir ve montaj gereksinimlerine
bağlıdır.
2. Üniteye güç kablosunu bağlayın ve
gücü açın.
3. Kurulum sihirbazını kullanarak ünitenin
gerekli ayarlarını yapılandırın.
TVN 50 Hızlı Başlangıç Kılavuzu 57 : TR
Page 60

İlk kez kullanım
TVN 50, ilk kullanıldığında temel NVR
ayarlarını kolaylıkla yapılandırabileceğiniz
hızlı bir kurulum sihirbazına sahiptir. Tüm
kameraları eşzamanlı olarak yapılandırır.
Konfigürasyon sonrasında gerektiği şekilde
özelleştirilebilir.
Varsayılan olarak, NVR yüklendiğinde
kurulum sihirbazı başlatılır. Sihirbaz
NVR'ınızın önemli birkaç ayarında size
rehberlik eder. Sistem için tercih edilen dili
seçin ve sonra yönetici parolasını girin.
Varsayılan şifre 1234'tür. Bu şifrenin
değiştirilmesi önemle tavsiye edilir.
Sihirbaz daha sonra, saat ve tarih, ağ
kurulumu, HDD yönetimi ve kayıt
yapılandı
size yol gösterecektir.
Gerekli tüm değişiklikler girildiğinde,
sihirbazdan çıkmak için Son tuşuna tıklatın
NVR 50 artık kullanıma hazırdır. Kayıt
otomatik olarak başlar.
rmasını ayarlamak için menülerde
TVN 50'yi çalıştırma
Üniteyi kontrol etmek için çeşitli yollar
mevcuttur:
• Ön panel
• IR uzaktan kumanda
• Fare
• Web tarayıcı
Ön panel
Ön paneldeki düğmeler çoğu fonksiyonu
kontrol eder. Düğmelerin konumları için bkz.
Şekil 2, Sayfa 56.
IR uzaktan kumanda
IR uzaktan kumanda düğmeleri ön
paneldekilere benzemektedir. Uzaktan
kumandaya için iki AAA pil takın.
Uzaktan kumandayı NVR'a bağlamak
için:
1. Ön paneldeki Menü düğmesine basın
veya fareyi sağ tıklayıp Menü
düğmesini seçin. Ana menü ekranı
görünür.
2. Ekran Modu Ayarları > Monitör
öğesini seçin.
3. NVR aygıt adresi değerini kontrol edin
ve unutmayın. Varsayılan değer 255'dir.
Bu cihaz adresi tüm IR kontrolleri için
geçerlidir.
4. Uzaktan kumanda üzerinde Cihaz
düğmesine basın.
5. Cihazın adres değerini girin.
TVN 50'dekiyle aynı olmalıd
6. Uzaktan kumandadaki veya ön
paneldeki ENTER düğmesine basın.
USB fare
TVN 50 ile birlikte gelen USB fare, sınırlı
işlevselliğe sahip ön panelden farklı olarak
NVR'ın tüm işlevlerini için kullanılabilir. USB
fare kullanıcı arayüzünde gezinmenizi ve
ayarlarda değişiklikler yapmanızı sağlar.
Fareyi NVR'ye bağlamak için farenin USB
konektörünü ön paneldeki USB portuna
takın. Fare hemen çalışır hale gelir ve
işaretçi görünür.
ır.
Web tarayıcı kontrolü
TVN 50, web tarayıcısı videoları
görüntülemenizi, kaydetmenizi ve izlemenizi
sağlamasının yanında, NVR ile ilgili her şeyi
İnternet erişimi olan her bilgisayar
üzerinden yönetmenizi de sağlar.
Tarayıcının kullanımı kolay kontrolleri size
tüm NVR fonksiyonları için hızlı bir erişim
sunar. Bkz. Şekil 3, Sayfa 59.
Üniteye erişmek için bir Web tarayıcı açın
ve NVR'a atanmış IP adresini bir web adresi
gibi girin. Oturum açma ekranında
varsayılan kullanıcı adını ve parolayı girin:
• Kullanıcı Kimliği: admin
• Şifre: 1234
TVN 50 ağ ayarları için varsayılan değerler:
DHCP: Varsayılan etkindir.
•
•
IP adresi - 192.168.1.82
• Alt ağ maskesi - 255.255.255.0
• Ağ geçidi adresi - 192.168.1.1
TR : 58 TVN 50 Hızlı Başlangıç Kılavuzu
Page 61

• Portlar:
Tarayıcıyı kullanırken:
RTSP portu: 554
HTTP portu: 80
TruNav'ı kullanırken:
RTSP portu: 554
Sunucu/İstemci yazılımı portu: 8000
Şekil 3: Web tarayıcı arayüzü
Canlı izleme modu
Canlı mod, ünitenin, kameralardan canlı
resimler izlediğiniz normal çalışma modudur.
Canlı görünümde düzenli kullanılan işlevler
imleci kamera görüntüsü üzerindeki fare
sağ butonuna tıklayarak hızla ulaşılabilirler.
Kısayol açılır ekranı görünür. Kullanılabilir
fonksiyonların açıklaması için aşağıdaki
Şekil 4'e bakın.
Şekil 4: Ana monitör için fare menüsü
Tablo 1: Monitör A için fare menüsü
(ana monitör)
Öğe Ad Açıklama
1. Menü Ana menüye girer.
Bu seçenek monitör B için
mevcut değildir.
2. Tek
kamera
3. Çoklu
kamera
4. Bir önceki
ekran
5. Bir sonraki
ekran
6. Otomatik
geçişi
başlat.
7. Tüm gün
izleme
8. Monitör B A (ana) ve B (alarm)
9. Gelişmiş
arama:
10. Zaman
çubuğunu
kapat
Açılır listeden seçili kamera
için tam ekran görüntüsüne
geçer.
Açılır listeden farklı çoklu
görüntü seçenekleri arasında
geçiş yapar.
Bir önceki kamerayı
görüntüler.
Bir sonraki kamerayı
görüntüler.
Sıra modunu aç. Ekran
otomatik olarak kameralar
arasında sıralanır.
Ayar yapmak için Menü >
Ekran Modu Ayarları >
Döşeme > Yerleşme Zamanı
öğesine gidin.
Seçilen kameranın seçilen
gündeki kayıtlı videosunu
oynatır. Geçerli gün
varsayılan olarak seçilmiştir.
monitörleri arasında geçiş
yapar.
Gelişmiş video arama
menüsüne girer.
Zaman çubuğunu
açar/kapatır.
TVN 50'nin yapılandırılması
TVN 50, ünitenin parametrelerini
ayarlamanıza izin veren simgelere dayalı bir
menü yapısına sahiptir. Her bir komut
simgesi, bir grup ayarını düzenlemenize izin
veren bir ekranı görüntüler. Çoğu menü
yalnızca sistem yöneticilerine açıktır.
Mevcut komutların listesi hangi monitörün
aktif olduğuna bağlıdır; ana veya alarm
(monitör B). Aşağıdaki Tablo 1 öğesine
bakın.
TVN 50 Hızlı Başlangıç Kılavuzu 59 : TR
Üniteyi yapılandırma hakkında detaylı bilgi
için TVN 50 Kullanım Kılavuzu'na bakın.
Canlı moddan ana menüye erişmek için:
Uzaktan kumanda veya ön paneldeki
Menü düğmesine basın.
Page 62

- Veya -
A
Fareye sağ tıklayın ve açılır menüden
Menü öğesini seçin.
Ana menü ekranı görünür. Fareyi bir komut
simgesinin üzerine hareket ettirin ve
seçmek için tıklayın.
Menü araç çubuğundaki kontrol
simgelerinin açıklaması:
Kamera ayarlarını yapılandırır.
Ekran ayarlarını yapılandırır.
Kayıt ayarlarını yapılandırır.
Standart ağ ayarlarını
yapılandırır.
Alarm ayarlarını yapılandırır.
PTZ ayarlarını yapılandırır.
Kullanıcı ayarlarını yapılandırır.
Sistem ayarlarını yapılandırır.
Arayüzdeki çeşitli araç
çubukları ve menüler için
referans bilgileri sağlar.
Oturumu kapatma, yeniden
başlatma ve kapatma
seçeneklerine erişim sağlar.
Teknik özellikler
Güç kaynağı 100 ila 240 VAC,
Güç tüketimi (HDD
olmadan) TVN 5032 <= 45 W
Çalışma sıcaklığı -10 ila +55 º C
Bağıl nem 10 ila %90
Boyutlar
(G x Y x D)
ğırlık ≤ 8 kg (≤ 17,6 lb.)
6,3 A, 50 ila 60 Hz
(50 ila 131 ° F)
445 × 470 × 90 mm
(17,5 × 18,5 × 3,5 inç)
(HDD veya DVD-O/Y
olmadan)
İletişim bilgileri
İletişim bilgileri için, www.interlogix.com
veya www.utcfssecurityproducts.eu
adreslerine bakınız.
TR : 60 TVN 50 Hızlı Başlangıç Kılavuzu
Page 63

Page 64

 Loading...