

Page 1

Intel® Server RAID Controller U2-1 (SRCU21)
Quick Start Guide
Before You Be gi n
FCC/ Emissions Disclaimer......................................................................2
Cautions and Warnings.............................................................................3
Introduction
Product Check List ...................................................................................4
Items Provided on the Intel® Server RAID Controller U2-1 CD-ROM
(bootable)..................................................................................................4
Hardware/Software Installation Overview................................................4
Intel Server RAID Controller U2-1 Hardware Setup
Installing Intel Server RAID Controller U2-1 into a System....................6
Intel Integrated RAID Software Setup and Installation
Create a RAID Volume for the Operating System....................................7
Setup and Installation for Microsoft Windows NT† Server ......................9
Setup and Installation for Novell NetWare
Setup and Installation for UnixWare
Getting Help
World Wide Web....................................................................................21
Translations of this guide are avail abl e at:
Übersetzungen dieses Handbuchs sind erhältlich bei:
Versiones traducidas de esta guía se encuentran disponibles en:
Des traductions de ce guide sont disponibles à l' adresse:
Le versioni tradotte di questa Guida sono disponibili presso:
As traduções deste guia e s tão disponíveis em:
Переводы данного руководства можно найти по адресу:
†
...........................................13
†
7.1...............................................17
http://support.intel.com/support/motherboards/server/srcu21/manual.htm
Copyright © 1999 Intel Corporation. All rights reserved. No part of this document may be
copied, or reproduced in any form, or by any means without prior written consent of Intel.
Intel Corporation (Intel) makes no warranty of any kind with regard to this material, including,
but not limited to, the implied warranties of merchantability and fitness for a particular
purpose. Intel assumes no responsibility for any errors that may appear in this document.
Intel makes no commitment to update nor to keep current the information contained in this
document.
†
Third-party brands and trademarks are the property of their respective owners.
Order Number: A06952-002
Page 2

Before You Begin
FCC/ Emissions Disclaimer
This device complies with Part 15 of the FCC Rules. Operation is subject to
the following two conditions: (1) this device may not cause harmful
interference, and (2) this device must accept any interference received,
including interference that may cause undesired operation.
This equipment has been tested and found to comply with the limits for a
Class B digital device, pursuant to Part 15 of the FCC Rules, CISPR 22, and
EN55022. These limits are designed to provide reasonable protection
against harmful interference in a residential installation. This equipment
generates, uses, and can radiate radio frequency energy and, if not installed
and used in accordance with the instructions, may cause harmful
interference to radio and television reception. However, there is no
guarantee that interference will not occur in a particular installation. If this
equipment does cause interference to radio and television reception, which
can be determined by turning the equipment off and on, the user is
encouraged to try to correct the interference by one or more of the following
measures:
• Reorient or relocate the receiving antenna.
• Increase the separation between the equipment and the receiver.
• Connect the equipment into an outlet on a circuit different from that
which the receiver is connected.
• Consult an experienced radio/TV technician for help.
Warning
The connection of a non-shielded equipment interface cable to this
equipment will invalidate the FCC certification of this device and may cause
interference levels that exceed the limits established by the FCC for this
equipment. It is the responsibility of the user to obtain and use a shielded
equipment interface cable with this device. If the equipment has more than
one interface connector, do not leave cables connected to unused interfaces
unless otherwise instructed to do so in the user manual.
Changes or modifications not expressly approved by the manufacturer could
void the user's authority to operate the equipment.
Canadian Users
This Class B digital apparatus meets all requirements of the Canadian
Interference-Causing Equipment Regulations.
Cet appariel num'erique de la Class B respect toutes les exigences du
Reglement sur materiel brouilleur du Canada.
2 Intel Server RAID Controller U2-1 (SRCU21) Quick Start Guide
Page 3

Cautions and Warnings
WARNINGS
This guide is for qualified technical personnel with experience
installing and configuring PCI adapter cards.
Read and adhere to all warnings, cautions, and notices in this guide
and the documentation supplied with this product.
CAUTION
Take precautions to prevent electrostatic discharge (ESD) damage before
handling the Intel Server RAID Controller U2-1 Adapter Card.
Electrostatic discharge (ESD) can damage adapter card components.
Perform the described procedures only at an ESD workstation. If no such
station is available, you can provide some ESD protection by wearing an
antistatic wrist strap and attaching it to a metal part of the computer
chassis.
Intel Server RAID Controller U2-1 (SRCU21) Quick Start Guide 3
Page 4

Introduction
The Intel® Server RAID Controller U2-1 (SRCU21) combines i960® I/O
processor based hardware, firmware and an easy to use interface. The SRCU21
runs the Intel Integrated RAID software.
®
This guide provides an introduction to Intel
provides a set of instructions to install and configure the Intel SRCU21. For
detailed information on installing and configuration the Intel SRCU21, please
refer to the Intel Server RAID Controller U2-1 User's Manual located on the
CD-ROM included with this product.
Product Check List
The following hardware and soft ware components are supplied with the standard
shipping package:
• Intel Server RAID Controller U2-1
• Intel Server RAID Controller U2-1 CD-ROM
• Intel Server RAID Controller U2-1 Quick Start Guide
Items Provided on the Intel Server RAID Controller U2-1
CD-ROM (bootable)
• Intel Server RAID Controller U2-1 User' Manual
• Intel Integrated RAID Software
Firmware
Drivers (OSM's)
Utilities (Firmware, Make Diskettes, Troubleshooting etc.)
Monitor Application
Storage Console
DMI Component Instrumentation
SNMP Extension Agent
The Intel Server RAID Controller U2-1 User' Manual is provided on the
CD-ROM in an online/html format (at <cdromdrive>:\DOCS\COVER.HTM)
viewable with any HTML - compatible browser, such as Microsoft Internet
Explorer or Netsca pe Navigator
†
. The User's Manual can also be displayed and
printed using Adobe†Acrobat† Reader.
Hardware/Software Installati on O verview
Integrated RAID software and
Begin
Installation of
OS on a
Intel Integrated
RAID
Volume
Gather Required
Run
Intel Integrated
RAID
Setup
Hardware
and
Software
Install OS on a
RAID Volume
Install
Adapter Card
Create OS
Installation
Drivers
Diskette
Create Bootable
RAID Volume
Using RAID
Configuration
Utility
4 Intel Server RAID Controller U2-1 (SRCU21) Quick Start Guide
Page 5
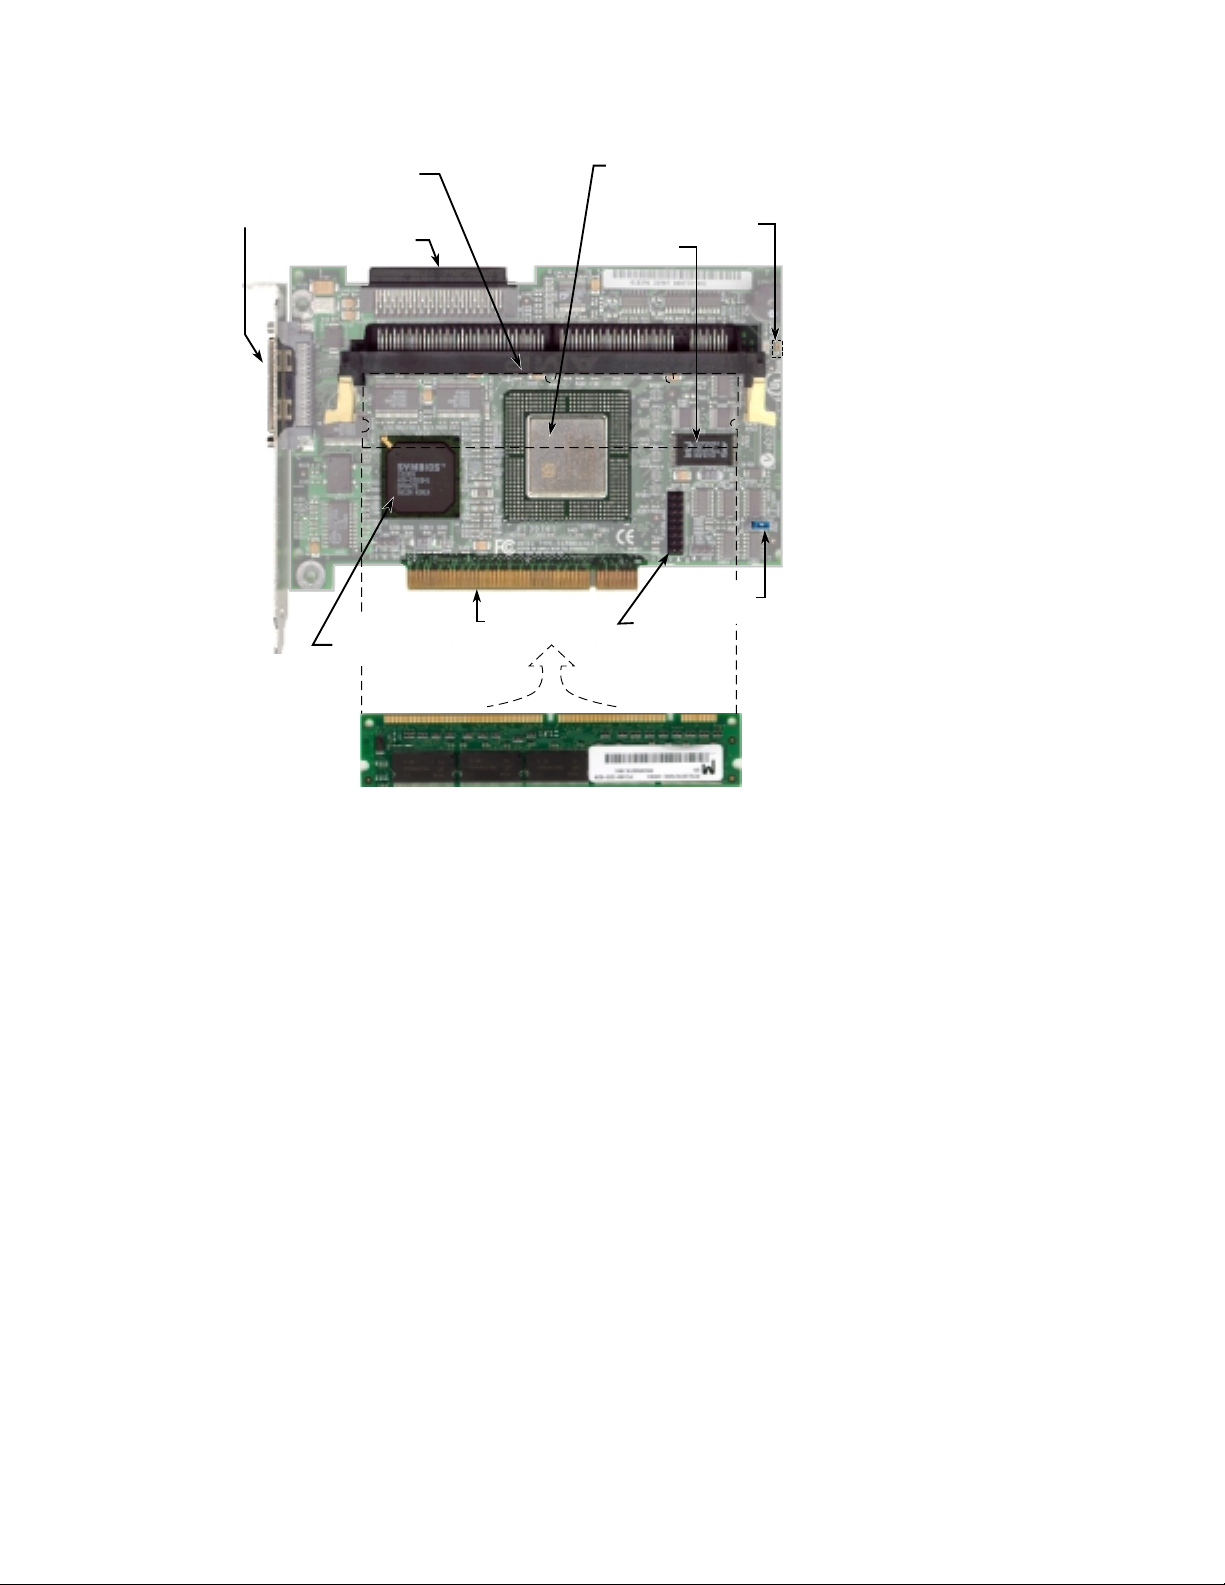
Intel Server RAID Controller U2-1 Adapter Card
CD
A
J
B
I
F
H
E
G
K
A7469-01X
A E xternal VHDCI Connector G
Flash Recovery
(FRU) Jumper
B I nt ernal 68-pi n Connect or H JTAG Port
(Debug)
C SDRAM DIMM Socket
I PCI 32-bit, 33 MHz
ECC 66 MHz or PC100
D Intel i960 RM I/O Processor
100MHz Core
Hardware XOR
J Ultra2 SCSI
1 Channel
LSI Logic SYM53C895
E SCSI Activity LED K SDRAM DIMM
F 16 Mb Flash
Intel Server RAID Controller U2-1 (SRCU21) Quick Start Guide 5
Page 6

Intel Serv er RAID Cont rolle r U2-1 Hard ware
Setup
Hardware Requirements
• Server with CD-ROM Drive not attached to Intel Server RAID
Controller U2-1
• One available PCI slot (33MHz recommended)
• Monitor display r esolution of 800 x 600 or higher
• Intel Server RAID Controller U2-1 Adapter Card
• PCI 2.2 Compliant B IOS
Installing Intel Server RAID Controller U2-1 into a System
The Intel Server RAID Controller U2-1 comes with the Intel Integrated RAID
firmware already programed into the flach memory. All that is necessary before
installing the SRCU21 adapter into the Intel server board is to install an
approved SDRAM ECC DIMM into t he memory socket. Install an appropreate
DIMM into the memory socket as indicated in the diagram on the previ ous page.
Please refer to the approved memory list at:
http://support.intel.com/support/motherboards/server/srcu21.
WARNING
SHOCK HAZARDS may be present inside the unit in which this card
is being installed. Disconnect all power cords to the unit before
removal of any covers.
Follow the warnings noted in your computers user or service manual
before installing this board. ONLY after all the covers are reinstalled
should you reattach the power cords and power up the unit for the
software installation and use.
1 Power down the system, disconnect power cord(s) and remove the system
cover.
2 Install the SRCU21 into an available PCI slot. Connect one end of the
SCSI cable to the internal (68 pin) or external (VHDCI) SCS I connector on
the SRCU21. Connect the other end of the SCSI cable to the SCS I drives
or drive enclosure.
3 Replace the system cover, reconnect power cord(s).
✏✏✏✏ NOTE
SRCU21 will work in a 66MHz slot, however, a 33MHz PCI slot is
recommended. Consult the system guide for the target server board to
determine an appropriate 33MHz PCI slot.
6 Intel Server RAID Controller U2-1 (SRCU21) Quick Start Guide
Page 7

✏✏✏✏ NOTE
Ensure that the end of the SCSI bus is properly terminated. Consult the
documentation for the drives or drive enclosure for termination details.
Intel Integ rated RA ID Soft ware Se tup and
Installation
This section details installation of supported operating systems to a RAID
volume controlled by the SRCU21. Operating systems can also be installed to a
pass-through drive (drive attached to S RCU21, but controll ed directly by the
host) or to a drive connected to a different c ontroller. For operating system
installation instruct ions on pass-through drives and drives attached to another
controller, refer to the Intel Server RAID Controller U2- 1 User's Manual.
Create a RAID Volume for the Operatin g System
A volume (or logical drive) must be set up prior to installing an operating
system. The volume created in this step will host the appropriate operating
system. Ensure that the volume's size is large enough to contain the operati ng
system. The volume may co ntain more than just the h ost operating system if
desired.
Create and configure the operating system RAID volume (boot volume) using
the RAID Configuration Utility (RCU).
1 Turn on target system with the SRCU21 installed. Dur ing system boot-up,
the message Press Ctrl C to run the RAID Configuration Utility appears
in the display. Press Ctrl-C when this message appears, to execute the
RAID Configuration Utility (RCU).
2 Follow the screen instructio ns to create and configure a RAID volume.
Ensure that the volume is designated as the boot device when creating the
volume (you can verify it is the boot vol ume after it has been created by
using the custom configuration menu option in the main menu of the RCU).
3 Reboot when finished and proceed to t he appropriate section to install the
desired operating syst em. For more information on using the RCU pl ease
refer to the Intel Server RAID Control ler U2-1 User's Manual.
✏✏✏✏ NOTE
The RCU is designed to create one volume for the host operating system,
and therefore contains only a subset of the RAID configuration features.
The RCU is limited to the creation of one RAID volume across all available
drives. When using the RCU to create a volume using fewer than all disks
attached to the SRCU21, first mark drives that will not be used in the RAID
volume as pass-through. These drives can be changed to be non-passthrough drives after the volume has been created. The Storage Console
application is the primary management tool and provides all RAID
configuration options (including creation of more that one RAID volume).
For instructions on using Storage Console, please refer to chapter 4 in the
Intel Server RAID Controller U2-1 User’s Manual
Intel Server RAID Controller U2-1 (SRCU21) Quick Start Guide 7
.
Page 8

CAUTION
Do not install OSMs (Operation System Service Modules) downloaded
from OS vendor websites. An OSM is the operating system half of the I²O
split driver model. The OSMs provided on the Intel Integrated RAID
CD-ROM are a later version than the OSMs currently provided by OS
vendors. Using OSMs other than those provided on the Intel Integrated
RAID CD-ROM may yield unpredictable results.
8 Intel Server RAID Controller U2-1 (SRCU21) Quick Start Guide
Page 9

Setup and Installation for Microsoft Windows NT Server
Software Requirements
• Intel Integrated RAID CD-ROM
• Hard Disk Space: 9 MB Minimum
• Windows NT Installation Di skette (Microsoft Wi ndows NT SCSI Miniport
Diskette)
• Microsoft Windows NT Server 4.0 including Microsoft Internet
Information Server 2.0*
• Microsoft Windows NT 4. 0 Service Pack 5 or gr eater*. (Service Pack 5
will automatically upgrade Internet Information Server 2.0 to Internet
Information Server 3.0.)
• Microsoft Internet Explorer 4.01 Service Pack 1 (recommended) or greater
or Netscape Navigator 4.05 or greater*
* Not supplied
✏✏✏✏ NOTE
Microsoft Internet Information Server 4.0 may also be required (instead of
Microsoft Internet Information Server 3.0) for servers that will be used to
host web sites. These servers typically require the advanced features
and security provided with Microsoft Internet Information Server 4.0. See
the Intel Server RAID Controller U2-1 User's Manual for instructions on
setting up SRCU21 with Microsoft Internet Information Server 4.0.
✏✏✏✏ NOTE
Microsoft Internet Explorer with Service Pack 1 can be downloaded from
the Microsoft website (www.microsoft .com) and is also included in the
Microsoft Windows NT 4.0 Option Pack (available as web download
or CD).
Installing Microsoft Windows NT Server on a Intel Integrated
RAID Volume
This procedure install s Microsoft Windows NT Server on an Intel Integrated
RAID volume.
1 Create a Microsoft Windows NT SCSI Minipor t Diskette: Insert the Intel
Integrated RAID CD-ROM into the target system and restart the system to
boot from the CD-ROM. When the ROM-DOS Startup Menu appears
select option #1 “Make Diskettes”. When the “Select a diskette to create ”
screen appears, select “Windows NT I nst al lation”. A command window
then appears. Insert a blank high-density di skette in drive A: and press
Enter to create the Windows NT SCSU Miniport Diskette. Alternatively
the CD-ROM can be insert ed into a system already running Windows 95,
98 or NT. The CD-ROM’s “auto-run” feature will bring up a menu that
will allow creation of the Miniport Diskette.
Intel Server RAID Controller U2-1 (SRCU21) Quick Start Guide 9
Page 10

2 Install the following required software:
a. Microsoft Windows NT Server 4.0
Select the scenario below (1 or 2) which matches your installation to
complete the Microsof t Windows NT SCSI diskette miniport driver
installation.
1. If you are installing NT with boot disks (booting from diskettes
initially to setup NT), during install let NT detect the storage
devices in your system. When device detectio n is complete,
select “S” to specify additional storage devices, then select
“Other”. Insert the Microsoft Windows NT SCSI Miniport
Diskette (created in step 1 above) i n t he floppy drive. Press
Enter to select the “I2O Miniport Driver” and continue with the
NT installation. Go to step b.
2. If you are installing NT without boot disks, for example, you are
booting with the NT Server C D -ROM, press F6 as soon as the
blue screen appears to ens ure that the Microsoft Windows NT
bypasses mass storage controller detection. When prompted to
specify a mass storage controll er, select “S” to specify additional
storage devices and then select “Other”. Insert the Microsoft
Windows NT SCSI Miniport Diskette (created in step 1 above) in
the floppy drive. Pr ess Enter to select the “I2O Miniport
Driver” and continue with the NT installation. Go to step b.
b. During the Windows NT Server 4.0 installat ion install:
• TCP/IP
• Microsoft Internet Information Server 2.0 (TCP/IP must be
installed prior to installing Internet Information Server).
c. After completing the NT installation, install the following components
and software:
• Microsoft Windows NT 4. 0 Service Pack 5 or great er. (This will
automatically upgrade Internet Information Server 2.0 to Internet
Information Server 3.0.)
• Microsoft Internet Explorer 4.01 Servi ce Pack 1 (recommended)
or greater or Netscape Navigator 4.05 or greater.
✏✏✏✏ NOTE
If your browser is configured to use a proxy server, ensure that it is
configured to bypass the proxy server for local addresses. See the User's
Manual for details on configuring a browser to bypass the proxy server for
local addresses.
✏✏✏✏ NOTE
Due to added security in Intel Integrated RAID, anonymous connections
must be disabled in Microsoft Internet Information Server in order to
execute the Intel Integrated RAID Storage Console in NT.
10 Intel Server RAID Controller U2-1 (SRCU21) Quick Start Guide
Page 11

3 Configure Micros oft Internet Infor mation Server 3.0
a. Start Internet Service Manager from the Microsoft Internet Server
program group.
b. Double-click on the server name in the WWW Service row (top
computer name).
c. Under the Service tab in the WWW Service Properties window clear
the Allow Anonymous checkbox in the Password Authentication
section. See the figure below.
WWW Service Properties
d. Select “OK” and clos e Internet Service Manager.
✏✏✏✏ NOTE
If you use Netscape Navigator as the default browser on an NT system
where Intel Integrated RAID is installed, you will have to enable Basic
Authentication in Microsoft Internet Information Server to use the Intel
Integrated RAID Storage Console. Netscape Navigator does not support
Windows NT Challenge/Response authentication. Please follow the
instructions in the Intel RAID User's Manual to enable Windows NT
Challenge/Response if you are using Netscape Navigator.
Intel Server RAID Controller U2-1 (SRCU21) Quick Start Guide 11
Page 12

4 Install the Intel Integrated RAID software (run the Intel Integrated RAID
setup). The system should be powered on and l ogged into NT with an
administrators account before proceeding.
✏✏✏✏ NOTE
You must have administrative level permissions to install Intel Integrated
RAID software.
a. Insert the Intel Server RAID Controller U2-1 CD-ROM in the
CD-ROM drive. (If the RAID Installer Menu does not appear, then
run the setup.exe file that resides at:
<CD-ROM root>\os_s etup\winnt\setup.exe on the CD-ROM and skip
step B.)
b. Click on the Se tup button. See the following figure. Fol low the on-
screen prompts to complete installation.
Intel Integrated RAID Inst a lle r Main Menu
c. The four components in the "presel ected components" window below
are preselected. Accept this configurat ion by clicking on N ext.
12 Intel Server RAID Controller U2-1 (SRCU21) Quick Start Guide
Page 13

Preselect Components
✏✏✏✏ NOTE
The DMI and SNMP components are not selected by default.
✏✏✏✏ NOTE
Refer to section “Intel Integrated RAID Software Component Installation”
in chapter 4 of the Intel Server RAID Controller U2-1 User's Manual for
information on HP Openview and RAID Monitor.
5 See Section 4.5 in the I nt el Server RAID Controller U2-1 User's Manual to
customize your RAID volumes using Storage Console.
Setup and Installation for Novell NetWare
Software Requirements
• Intel Server RAID Controller U2-1 CD-ROM
• Hard disk space: minimum 4 MB
• MS-DOS 6.22 or earlier * (Novell 4.2 only)
• NetWare Installation Diskette
• Novell NetWare 4.2 with S e r vice Pack 6 or higher or Novell NetWare 5.0
with Service Pack 2a or higher*
* Not supplied
Intel Server RAID Controller U2-1 (SRCU21) Quick Start Guide 13
Page 14

Installing Novell NetWare on a RAID Volume
Follow the required procedure below to install Intel Integrated RAID. There are
two procedures listed below (one for each supported version of NetWare).
Please follow the instructions for the version you wish to install
(version 4.2 or 5.0).
NetWare 4.2
1 Create a NetWare Installation Diskette: Insert the Intel Integrated RAID
CD-ROM into the target system and restart the system to boot from the
CD-ROM. When the ROM-DOS Startup Menu appears select option #1
“Make Diskettes”. When the “Select a diskette to create” screen appears,
select “NetWare Installation”. A command window appears. I nsert a
blank high-density diskette in drive A: and press Enter to create the
NetWare Installation Diskette. Alternatively the CD-ROM can be inserted
into a different system running Windows 95, 98 or NT. The CD-ROM’s
“auto-run” feature will bring up a menu that will allow creation of the
NetWare Installation Diskette.
2 Insert MS-DOS floppy and reboot. Once you reboot, you will have to run
FDISK to create a DOS partition of at least 50MB on the newly created
volume (make sure it is flagged as the “Active” partition). Reboot and
format the new partition. Make the new partition bootable.
3 Copy the desired MS-DOS files to the hard drive, copy the necessary
CD-ROM drivers (e.g. ATAPI_CD.SYS and MSCDE X.EXE) and create a
CONFIG.SYS and AUTOEXEC.BAT that loads those drivers.
Additionally, insert the following lines in the CONFIG.SYS file:
files=30
buffers=20
4 Reboot the server, insert the NetWare Installation CD-ROM, go to the
appropriate drive letter and run INSTALL.BAT.
5 After booting you will first be asked to Accept the License Agreement. Do
so and then select “NetWare 4.2”, then select “Custom installation of
NetWare 4.2”. Enter the server name and internal network number. Hit
Enter to begin the initial file copy.
6 Confirm the locale configuration and select Continue. Modify the
NCF files. Make any desir ed modifications. Next , the device driver
installation screen appears.
7 Choose “Select additional or modify selected Disk/LAN drivers”.
8 Choose “Select an additional driver”. Hit Insert to install an unlisted
driver. Make sure that the NetWare Installation diskette is in the floppy
drive and hit Enter. Select “BKSTROSM.HAM” from the list.
9 Continue with the NetWare installation as normal by following the screen
prompts.
10 Once the server installation is finished, complete the installation of the Intel
Integrated RAID software suite by following the steps below.
11 Run "LOAD INSTALL".
14 Intel Server RAID Controller U2-1 (SRCU21) Quick Start Guide
Page 15

12 Select "Product Options", then "Install product not listed". It will tell you
that it is going to scan the A: drive for installation scripts. Ensure the
"NetWare Installation" diskette is in the floppy drive, hit Enter to
continue.
13 A screen prompt will ask which components you wish to install. Select the
desired components, and hit F10 to continue. The appropriate files will be
copied and the AUTOEXEC.NCF and STARTUP.NCF files modified as
necessary.
CAUTION
Once the product is installed, check for and remove any duplicate lines in
STARTUP.NCF. For example, NetWare 4.2 installations may insert an
extra load line for the module PK411.NLM. Remove the extra line.
14 After the installation is complete, reboot the server to load the new drivers.
15 See Section 4.5 in the Intel Server RAID Controller U2-1 User's Manual to
customize your RAID volumes using Storage Console.
NetWare 5
✏✏✏✏ NOTE
If you do not use the boot capability of the NW5 CD, then replace step 2-5
below with steps 2-4 of the NetWare 4.2 instructions above.
1 Create a NetWare Installation Diskette: Insert the Intel Integrated RAID
CD-ROM into the target system and restart the system to boot from the
CD-ROM. When the ROM-DOS Startup Menu appears select option #1
“Make Diskettes”. When the “Select a diskette to create” screen appears,
select “NetWare Installation”. A command window then appears. Insert a
blank high-density diskette in drive A: and press Enter to create the
NetWare Installation Diskette. Alternatively the CD-ROM can be inserted
into a different system running Windows 95, 98 or NT. The CD-ROM’s
“auto-run” feature will bring up a menu that will allow creation of the
NetWare Installation Diskette.
2 Insert the NetWare CD-ROM and reboot.
✏✏✏✏ NOTE
The CMOS may need to be edited on some systems to be set to boot from
the CD-ROM. Otherwise, if the system finds a partition on the hard drive it
will attempt to boot from it and an error will result.
3 After booting you will first be asked to Accept the License Agreement. Do
so. For a brand new volume, you should then select “Create a New Boot
Partition”.
4 NetWare will then ask for the size of the boot partition, you can either keep
the default of 50MB or hit Modify to change the size t o suit your needs.
When you are done, select “Continue”.
Intel Server RAID Controller U2-1 (SRCU21) Quick Start Guide 15
Page 16

5 It will ask you confirm the boot partition creation. Select Continue. You
will then press a key to reboot.
6 When NetWare boots again, it will first format the newly created boot
partition, and then start loading files. During this initialization, you will
see a white graphical NetWare logo screen.
7 It will eventually load a Welcome screen, asking you to verify the startup
directory (C:\NWSERVER). Hit Alt F10 to exit the installation. At the
console, type “Down”. The installation exits to the boot drive prompt.
8 Insert the NetWare installation diskette into the A: drive. If your boot
drive is C:, then run NWUPDATE.BAT. If your bo ot drive is other than
C:, then create an NWUPDATE subdirectory and copy all the files from
A:\DRIVERS into the NWUPDATE subdirectory.
9 Remove the diskette from the A: drive and re boot the server. After bo oting
you will be asked to Accept the License Agreement. Do so and then select
“Continue with Existing Partition”. You are now ready t o install
NetWare 5 on the Intel Integrated RAID volume.
10 Continue with the NetWare installation as normal by following the screen
prompts. Select the “Block Storage OSM” when prompted.
11 Reboot the server and install Service Pack 2a or higher. Once the server
installation is completed, reboot the server.
12 Install the Intel Integrated RAID software (run the Intel Integrated RAID
setup).
13 Run "NWCONFIG".
14 Select "Product Options", then "Install product not listed". It will tell you
that it is going to scan the A: drive for installation scripts. Ensure the
"NetWare Installation" diskette is in the floppy drive, hit Enter to
continue.
15 A screen prompt will ask which components you wish to install. Select all
of the components a nd hit F10 to continue.
BKSTROSM.HAM
SCSIOSM.HAM
HTTP and Winsock Services
RAID Management Agents
The appropriate files are copied and the AUTOEXEC.NCF and
STARTUP.NCF files are modified as neces sary.
16 After the installation is complete, reboot the server to load the new drivers.
17 See Section 4.5 in the Intel Server RAID Controller U2-1 User's Manual to
customize your RAID volumes using Storage Console.
16 Intel Server RAID Controller U2-1 (SRCU21) Quick Start Guide
Page 17

Setup and Installation for UnixWare 7.1
Software Requirements
• SCO UnixWare 7.1 software with Netscape 4.08 or greater included *
• Intel Server RAID Controller U2-1 CD-ROM
• Hard disk space: mini mum 20 MB
• UnixWare Installation Diskette
* Not supplied
Installing UnixWare on a RAID Volume
Follow the required procedure below to install Intel Integrated RAID.
1 Create a UnixWare Installation Diskette: Insert the Intel Integrated RAID
CD-ROM into the target system and restart the system to boot from the
CD-ROM. When the ROM-DOS Startup Menu appears select option #1
“Make Diskettes”. When the “Select a diskette to create” screen appears,
select “UnixWare Installation”. A command window then appears. Insert
a blank high-density diskette in drive A: and press Enter to create the
UnixWare Installation Diskette. Alternatively the CD-ROM can be
inserted into a differ ent system running Win dows 95, 98 or NT. The
CD-ROM’s “auto-run” feature will bring up a menu that will allow creation
of the UnixWare Installation Diskette.
2 Insert UnixWare 7.1 Volume: 1 of 2 diskett e and reboot. Install the OS
using the install instruction provided in UnixWare 7 Installation Guide
Manual. UnixWare will prompt you to install Host Bus Adapter diskette.
At that time insert the UnixWare Installation Diskette when prompted.
✏✏✏✏ NOTE
During the installation of UnixWare, you will be prompted to install the
Network Information Services (NIS) package. By default the installation
will configure your system as an NIS client. See your s ys te m
administrator for configuration of the NIS services.
After the installation, files such as /etc/inet/inetd.conf are supposed to be
distributed to the client via NIS. If, however, you don't have a master NIS
server on the network, the client will be unable to retrieve its copy of this
(and other) file(s) . Depending on the particular service being requested,
fulfilling the request may take a long time, or may fail completely.
If you do not plan on u s ing NIS, defer installation of NIS duri ng the
installation by pressing F8 on the NI S configuration screen. If you decide
at a later time to install NIS, you can do so using the pkgadd(1) command.
3 Install the Netscape browser. The Netscape browser is provided in the
SCO UnixWare CD-ROM Disk 2 of 3.
Intel Server RAID Controller U2-1 (SRCU21) Quick Start Guide 17
Page 18

4 After completing the UnixWare installation insert the Intel Server RAID
Controller U2-1 CD-ROM in the CD-ROM drive and mount the CD-ROM.
a. Create a directory to mount the file. For example, type “mkdir
cdfiles” at the prompt.
b. Mount the CD-R OM to the folder by typing “mount –F cdfs –r
/dev/cdrom/cdrom1 /cdfiles”
5 Install all the Packages/Services Requirements first before installing the
components packages. The following table lists the installation
components and preinstallation requirements provided by Intel Integrated
RAID for UnixWare.
Installation Components and Preinstallation Requirements
Component
Name
SNMP
Extension
Agent
Raid Monitor raidmon
RAID
Documentation
Storage
Console
Component
Package
Name
raidxa Snmpd,
raiddoc Web Browser N/A
i2oOSM,
ptf7066a,
ptf7429a
Packages/
Services
Requirements
i2OosM,
ptf7066a,
ptf7429a
i2oOSM,
ptf7066a,
ptf7429a
inetd & Web
Browser
Optional
Packages Note
N/A Snmpd service
provided with the
UnixWare
CD-ROM. A
typical
installation
should have the
snmpd service
running.
N/A
Install the web
browser from the
UnixWare
Installation
CD-ROM.
N/A By default inetd
is installed and
started. Install
the web browser
from the
UnixWare
Installation
CD-ROM.
18 Intel Server RAID Controller U2-1 (SRCU21) Quick Start Guide
Page 19

Optional Installation Components
Component
Name
Component
Instrumentation
Component
Package
Name
raidci Dmi, i2oOSM,
Packages/Services
Requirements
ptf7066a, ptf7429a
Optional
Packages Note
DMIman,
DMIdoc
6 Launch the installer by typing the following:
a. Type “cd /cdfiles/os_setup/unixware”
b. Type “sh install” to start the install script. The launched scripts are
shown in the followin g f igure.
Launched Scripts
DMI
services
installation
only
c. Select option 1 (by typing 1) to install the r equirements and
components. See the figure a bove.
Intel Server RAID Controller U2-1 (SRCU21) Quick Start Guide 19
Page 20

Install Components
Packages can be individually installed by typing the package number
listed on the screen as shown in the figure above. To select all
packages, press Enter. To install multiple packages, type <package
number>, <package number> etc. For example, 1,2,3,6 etc., then
press Enter. After completing the installation type quit and hit
Enter to return to the main menu. Packages which have been
previously installed will only be updated if the revision number of the
currently installed package is older or newer.
7 After completing the installation of the components launch the application
using the commands in the following table.
Component Launch Commands
Component
Name
Component
Instrumentation
SNMP
Extension
Agent
RAID Monitor /opt/rss/bin Type “.raidmon” (if path set)
Documentation /opt/rss/docs Type “raiddoc” (if path is set) or
Storage
Console
20 Intel Server RAID Controller U2-1 (SRCU21) Quick Start Guide
Path to Add in
.cshrc File Launch by Typing
/opt/rss/bin Type “raidci” (if path is set)
/opt/rss/bin Type “.iraidxa” (if path set)
Type “netscape /opt/rss/docs/cover.htm”
N/A Launch the browser and type the following in
the http address box:
“http://localhost:360/”
Page 21

Getting Help
World Wide Web
http://support.intel.com/support/motherboards/server/srcu21
Telephone
Talk to a Customer Support Technician** (Intel reserves the right to change
pricing for telephone support at any time without notice).
In U.S.: 1-900-555-5800 (M–F, 7:00 am–5:00 pm, Th 7:00 am–3:00 pm, PST).
Calls billed at U.S. $2.50 per minute.
In U.S. and Canada: 1-800-404-2284 (M–F, 7:00 am–5:00 pm,
Th 7:00 am–3:00 pm, PST). Credit card calls billed at U.S. $25 per incident.
In Europe:
English language: +44-131-458-6847
French language: +44-131-458-6848
German language: +44-131-458-6954
Italian language: +44-131-458-6951
(M, Th, F, 8:00 am–5:00 pm, T–W, 8:00 am–4:00 pm, UK time)
Credit card calls billed at U.S. $25 per incident (levied in local currency at the
applicable credit card exchange rate plus applicable VAT).
In Asia-Pacific region (Singapore local time, Oct–April: M–F, 6:00 am–4:00 pm;
April–Oct: M–F, 5:00 am–4:00 pm).
Credit card calls billed at U.S. $25 per incident.
Australia (Sydney): +1-800-649-931
Hong Kong: +852-2-844-4456
Korea: +822-767-2595
PRC: +852-2-844-4456
Singapore: +65-831-1311
Taiwan: +886-2-718-9915
Rest of the world: Call the North American Service Center at +1-916-377-7000
(M–F, 7:00 am–5:00 pm, U.S. pacific st andard ti m e).
Credit card calls billed at U.S. $25 per incident.
** Or contact your local dealer or distributor.
Technical Training & Support
If you are registered in the Intel Processor Dealer Program (North America), the
Genuine Intel Dealer Program (Asia-Pacific Region), or the Intel Processor
Integrator Program (Europe/Latin America), you are eligible for technical trai ni ng
and support.
In U.S. and Canada: 1-800-538-3373, ext. 442 (M–F, 5:00 am–5:00 pm, PST)
In Europe: contact your distributor or fax your details to European Literature on
+44 (0) 1793 513142.
In Asia: +65-831-1379 (M–F, 8:30 am–5:30 pm, Singapore local time) or via
e-mail: APAC_gid@ccm.isin.intel.com
Intel Server RAID Controller U2-1 (SRCU21) Quick Start Guide 21
 Loading...