

Installing Red Hat*
Enterprise Linux 4.4*
Intel® Server Board S5000PAL
Recipe ID: 15RHAT250000000013-04

Installing Red Hat* Enterprise Linux 4*
Intel® Server Board S5000PAL
Contents
Pass-Through Certification...............................................................................................4
Red Hat Linux Pass-Through Hardware Requirements......................................................................................................................4
Reseller Steps to Receive Pass-Thru OS Certification..........................................................................................................................4
Hardware Components............................................................................................................................................................................................................5
(Configuration 1)..........................................................................................................................................................................................................................................5
(Configuration 2)..........................................................................................................................................................................................................................................6
(Configuration 3)..........................................................................................................................................................................................................................................8
Software Used in the Installation..................................................................................9
Development Tools (Optional)........................................................................................9
Red Hat* Enterprise Linux 4* Installation................................................................10
The Graphical Installation Program User Interface................................................................................................................................10
A Note about Virtual Consoles...........................................................................................................................................................................................10
The Text Mode Installation Program User Interface..........................................................................................................................12
Using the Keyboard to Navigate.....................................................................................................................................................................................13
Starting the Installation Program...................................................................................................................................................................................14
Booting the Installation Program on x86 and Intel® 64 Systems....................................................................................14
Additional Boot Options ...............................................................................................................................................................................................................15
Kernel Options ............................................................................................................................................................................................................................................16
Selecting an Installation Method.....................................................................................................................................................................................17
Installing from CD-ROM................................................................................................................................................................................................................17
What If the IDE CD-ROM Was Not Found?........................................................................................................................................................18
Installing from a Hard Drive.....................................................................................................................................................................................................19
Performing a Network Installation................................................................................................................................................................................19
Installing via NFS....................................................................................................................................................................................................................................19
Installing via FTP.....................................................................................................................................................................................................................................21
Installing via HTTP...............................................................................................................................................................................................................................21
Welcome to Red Hat Enterprise Linux....................................................................................................................................................................22
Language Selection............................................................................................................................................................................................................................23
Keyboard Configuration...............................................................................................................................................................................................................24
Disk Partitioning Setup..................................................................................................................................................................................................................24
Automatic Partitioning ...................................................................................................................................................................................................................25
Partitioning Your System...........................................................................................................................................................................................................27
Graphical Display of Hard Drive(s)...................................................................................................................................................................................27
Disk Druid’s Buttons...........................................................................................................................................................................................................................28
Partition Fields...........................................................................................................................................................................................................................................29
Recommended Partitioning Scheme ..........................................................................................................................................................................29
Adding Partitions ....................................................................................................................................................................................................................................32
File System Types................................................................................................................................................................................................................................33
Editing Partitions....................................................................................................................................................................................................................................34
2

Installing Red Hat* Enterprise Linux 4*
Intel® Server Board S5000PAL
Deleting a Partition.............................................................................................................................................................................................................................34
x86 and Intel® 64 Boot Loader Configuration.............................................................................................................................................34
Advanced Boot Loader Configuration.....................................................................................................................................................................36
Rescue Mode...............................................................................................................................................................................................................................................37
Alternative Boot Loaders...........................................................................................................................................................................................................37
SMP Motherboards and GRUB.............................................................................................................................................................................................38
Network Configuration ..................................................................................................................................................................................................................39
Firewall Configuration.....................................................................................................................................................................................................................41
Language Support Selection.................................................................................................................................................................................................43
Time Zone Configuration...........................................................................................................................................................................................................45
Set Root Password.............................................................................................................................................................................................................................46
Package Group Selection............................................................................................................................................................................................................47
Preparing to Install...............................................................................................................................................................................................................................49
Installing Packages..............................................................................................................................................................................................................................49
Installation Complete.......................................................................................................................................................................................................................49
Appendix A: Additional Boot Options.........................................................................51
3

Installing Red Hat* Enterprise Linux 4*
Intel® Server Board S5000PAL
Pass-Through Certification
Pass-Through Certification refers to the ability for third-party systems to be granted the same
certification status as models previously certified by Intel Corporation. Currently, Pass-Through
Certification is only available to vendors who purchase Intel server boards and/or systems and Red Hat*
Ready Business Partner, Advanced & Premier Program with Red Hat, Inc.
Red Hat Linux Pass-Through Hardware Requirements
Intel Corporation first performs an original model certification as described in the Red Hat Hardware
Certification Policies. Subsequent pass-through system certifications of EPSD OEM must meet the
following additional requirements:
• Pass-Through certifications must be performed on systems that are a subset of the components
covered by testing completed in the original model certification.
• No features or hardware may be added or subtracted from a pass-through system that would
impact the certification of the pass-through system.
• Each Pass-Through Certification must have a unique vendor, make, and model number that are not
shared with any other hardware that would not be covered by the original certification.
• Each Pass-Through Certification must have a unique vendor specification URL or must utilize the
equivalent OEM specification URL.
Reseller Steps to Receive Pass-Thru OS Certification
• Submit the vendor server model name/number that corresponds to the Intel server platform name
listed in this recipe along with the specific URL for the vendor platform used in the recipe to:
red.hat.linux@intel.com
• The vendor server model will be placed on the Red Hat certified hardware list
4

Hardware Components
(Configuration 1)
Installing Red Hat* Enterprise Linux 4*
Intel® Server Board S5000PAL
Quantity Item Version/Model
1 Intel Server Board
S5000PAL
1 Intel® Server Chassis SR1500 (1U)
2 Intel® Xeon® processors Please refer to the Qualified
8 Memory 16GB (8x2GB) Please refer to the Tested
BIOS 66 S5000.86B.02.00.0066
BMC 55
FRUSDR 38
HSC 2.01
EERROM 3.01
S5000PAL
and Supported Processor List
for Intel® Server Board
S5000PAL at
http://www.intel.com/support/m
otherboards/server/sb/CS-
022346.htm
Memory List for Intel® Server
Board S5000PAL at
http://www.intel.com/support/m
otherboards/server/s5000pal/s
b/CS-022919.htm
Notes
ESB2 Ctrl:
AHCI Enabled Embedded
1 Midplane Active w/ RAK PBA: D28949-301
SAS Mode HW RAID Embedded
1 Backplane ESG-SHV BP
1 NIC PRO/1000 EB Embedded 7.0.27
I/OAT Enabled NO SUPPORT
Video ATI ES1000 Embedded/VESA
RMM None
Disk Drives Please refer to the Tested
Hardware and Operating
System List for Intel® Server
Board S5000PAL at
http://support.intel.com/sup
port/motherboards/server/s
b/CS-025416.htm
2 SAS 2x73GB SAS
1 SAS 0 RAID 1
1 SAS 1 RAID 1
5

Installing Red Hat* Enterprise Linux 4*
Intel® Server Board S5000PAL
1 SAS 2 RAID 0
1 SAS 3 RAID 0
1 CD-ROM Installed
I/O Module NIC I/O Embedded 7.0.27
Table 1 – Intel® Server Board S5000PAL Configuration Hardware (Configuration 1)
(Configuration 2)
Quantity Item Version/Model
1 Intel Server Board
S5000PAL
1 Intel® Server Chassis SR1500 (1U)
2 Intel® Xeon® processors Please refer to the Qualified
Memory 16GB (8x2GB) Please refer to the Tested
BIOS 66 S5000.86B.02.00.0066
BMC 55
FRUSDR 38
HSC 2.01
EERROM 3.01
S5000PAL
and Supported Processor List
for Intel® Server Board
S5000PAL at
http://www.intel.com/support/m
otherboards/server/sb/CS-
022346.htm
Memory List for Intel® Server
Board S5000PAL at
http://www.intel.com/support/m
otherboards/server/s5000pal/s
b/CS-022919.htm
Notes
ESB2 Ctrl:
AHCI Enabled Embedded
Midplane Active w/ RAK PBA: D28949-301
SAS Mode HW RAID Embedded
Backplane ESG-SHV BP
NIC PRO/1000 EB Embedded 7.0.27
I/OAT Enabled NO SUPPORT
Video ATI ES1000 Embedded/VESA
RMM None
Disk Drives Please refer to the Tested
Hardware and Operating
System List for Intel® Server
Board S5000PAL at
6
Installing Red Hat* Enterprise Linux 4*
Intel® Server Board S5000PAL
Quantity Item Version/Model
Notes
http://support.intel.com/sup
port/motherboards/server/s
b/CS-025416.htm
SAS 2x73GB SAS
SAS 0 RAID 1
SAS 1 RAID 1
SAS 2 RAID 0
SAS 3 RAID 0
CD-ROM Installed
I/O Module 1064e SAS I/O Embedded mptsas
Table 2 – Intel® Server Board S5000PAL Configuration Hardware (Configuration 2)
7

Installing Red Hat* Enterprise Linux 4*
Intel® Server Board S5000PAL
(Configuration 3)
Quantity Item Model/Version
1 Intel Server Board S5000PAL S5000PAL
1 Intel® Server Chassis SR1500 (1U)
2 Intel® Xeon® processors Any Supported Please refer to the Qualified
and Supported Processor List
for Intel® Server Board
S5000PAL at
http://www.intel.com/support/m
otherboards/server/sb/CS-
022346.htm
RAM 16GB (8x2GB) Please refer to the Tested
Memory List for Intel® Server
Board S5000PAL at
http://www.intel.com/support/m
otherboards/server/s5000pal/s
b/CS-022919.htm
BIOS 66 S5000.86B.02.00.0066
BMC 55
FRUSDR 38
HSC 2.01
EERROM 3.01
Notes
ESB2 Ctrl:
AHCI Enabled Embedded
Midplane Passive PBA: D28949-301
SAS Mode None
Backplane ESG-SHV BP
NIC PRO/1000 EB Embedded 7.0.27
I/OAT Enabled NO SUPPORT
Video ATI ES1000 Embedded/VESA
RMM Installed Embedded USB drivers
Disk Drives Please refer to the Tested
Hardware and Operating
System List for Intel® Server
Board S5000PAL at
http://support.intel.com/sup
port/motherboards/server/s
b/CS-025416.htm
SAS 3x73GB 3.5” SAS
CD-ROM Installed
I/O Module None
Table 3 – Intel® Server Board S5000PAL Configuration Hardware (Configuration 3)
8

Installing Red Hat* Enterprise Linux 4*
Software Used in the Installation
Dist. By Description File Name
Red Hat
Table 4 - Software Bill of Materials
Red Hat * Enterprise Linux 4* Update 4 Red Hat Enterprise Linux (sku# -
IPP)
Development Tools (Optional)
Product Description Where to Buy
Intel® C++
Compilers for
LINUX
Intel® Fortran
Compiler for LINUX
Intel® Math Kernel
Library
The compiler automatically
optimizes and parallelizes
software to deliver rapid
development and winning
performance taking best
advantage of the latest
multi-core Intel®
processor-based
platforms.
The compiler automatically
optimizes and parallelizes
software to deliver rapid
development and winning
performance taking best
advantage of the latest
multi-core Intel®
processor-based
platforms.
Highly optimized,
extensively threaded math
routines for scientific,
engineering, and financial
applications that require
maximum performance.
http://www3.intel.com/cd/software/products/asmona/eng/compilers/278609.htm
http://www3.intel.com/cd/software/products/asmona/eng/compilers/279636.htm
http://www3.intel.com/cd/software/products/asmona/eng/266860.htm
Intel® Server Board S5000PAL
Intel® Integrated
Performance
Primitives
Intel® Threading
Building Blocks
Table 5 – Development Tools
Extensive library of multicore-ready, highly
optimized software
functions for multimedia
and data processing
Intel’s new C++ templatebased runtime library
that simplifies writing
multithreaded applications
for performance and
scalability
http://www3.intel.com/cd/software/products/asmona/eng/perflib/ipp/buy/238658.htm
http://www3.intel.com/cd/software/products/asmona/eng/294795.htm
9

Installing Red Hat* Enterprise Linux 4*
Intel® Server Board S5000PAL
Red Hat* Enterprise Linux 4* Installation
This section explains how to perform a Red Hat Enterprise Linux installation from the CD-ROM, using
the graphical, mous e-based installation program.
The Graphical Installation Program User Interface
If you have used a graphical user interface (GUI) before, you are already familiar with this process; use
your mouse to navigate the screens, click buttons, or enter text fields.
You can also navigate through the installation using the keyboard. The [Tab] key allows you to move
around the screen, the Up and Down arrow keys to scroll through lists, [+] and [-] keys expand and
collapse lists, while [Space] and [Enter] selects or removes from selection a highlighted item. You can
also use the [Alt]-[X] key command combination as a way of clicking on buttons or making other screen
selections, where [X] is replaced with any underlined letter appearing within that screen.
Note: If you are using an x86 or Intel® 64 system, and you do not wish to use the GUI installation
program, the text mode installation program is also available. To start the text mode installation
program, use the following command at the boot: prompt:
linux text
Refer to “The Text Mode Installation Program User Interface” section for a brief overview of text
mode installation instructions.
It is highly recommended that installs be performed using the GUI installation program. The GUI
installation program offers the full functionality of the Red Hat Enterprise Linux installation
program, including LVM configuration which is not available during a text mode installation.
Users who must use the text mode installation program can follow the GUI installation instruc tions
and obtain all needed information.
A Note about Virtual Consoles
The Red Hat Enterprise Linux installation program offers more than the dialog boxes of the installation
process. Several kinds of diagnostic messages are available to you, as well as a way to enter commands
from a shell prompt. The installation program displays these messages on five virtual consoles, among
which you can switch using a single keystroke combination.
A virtual console is a shell prompt in a non -graphical environment, accessed from the physical machine,
not remotely. Multiple virtual consoles can be accessed simultaneously.
10
Installing Red Hat* Enterprise Linux 4*
Intel® Server Board S5000PAL
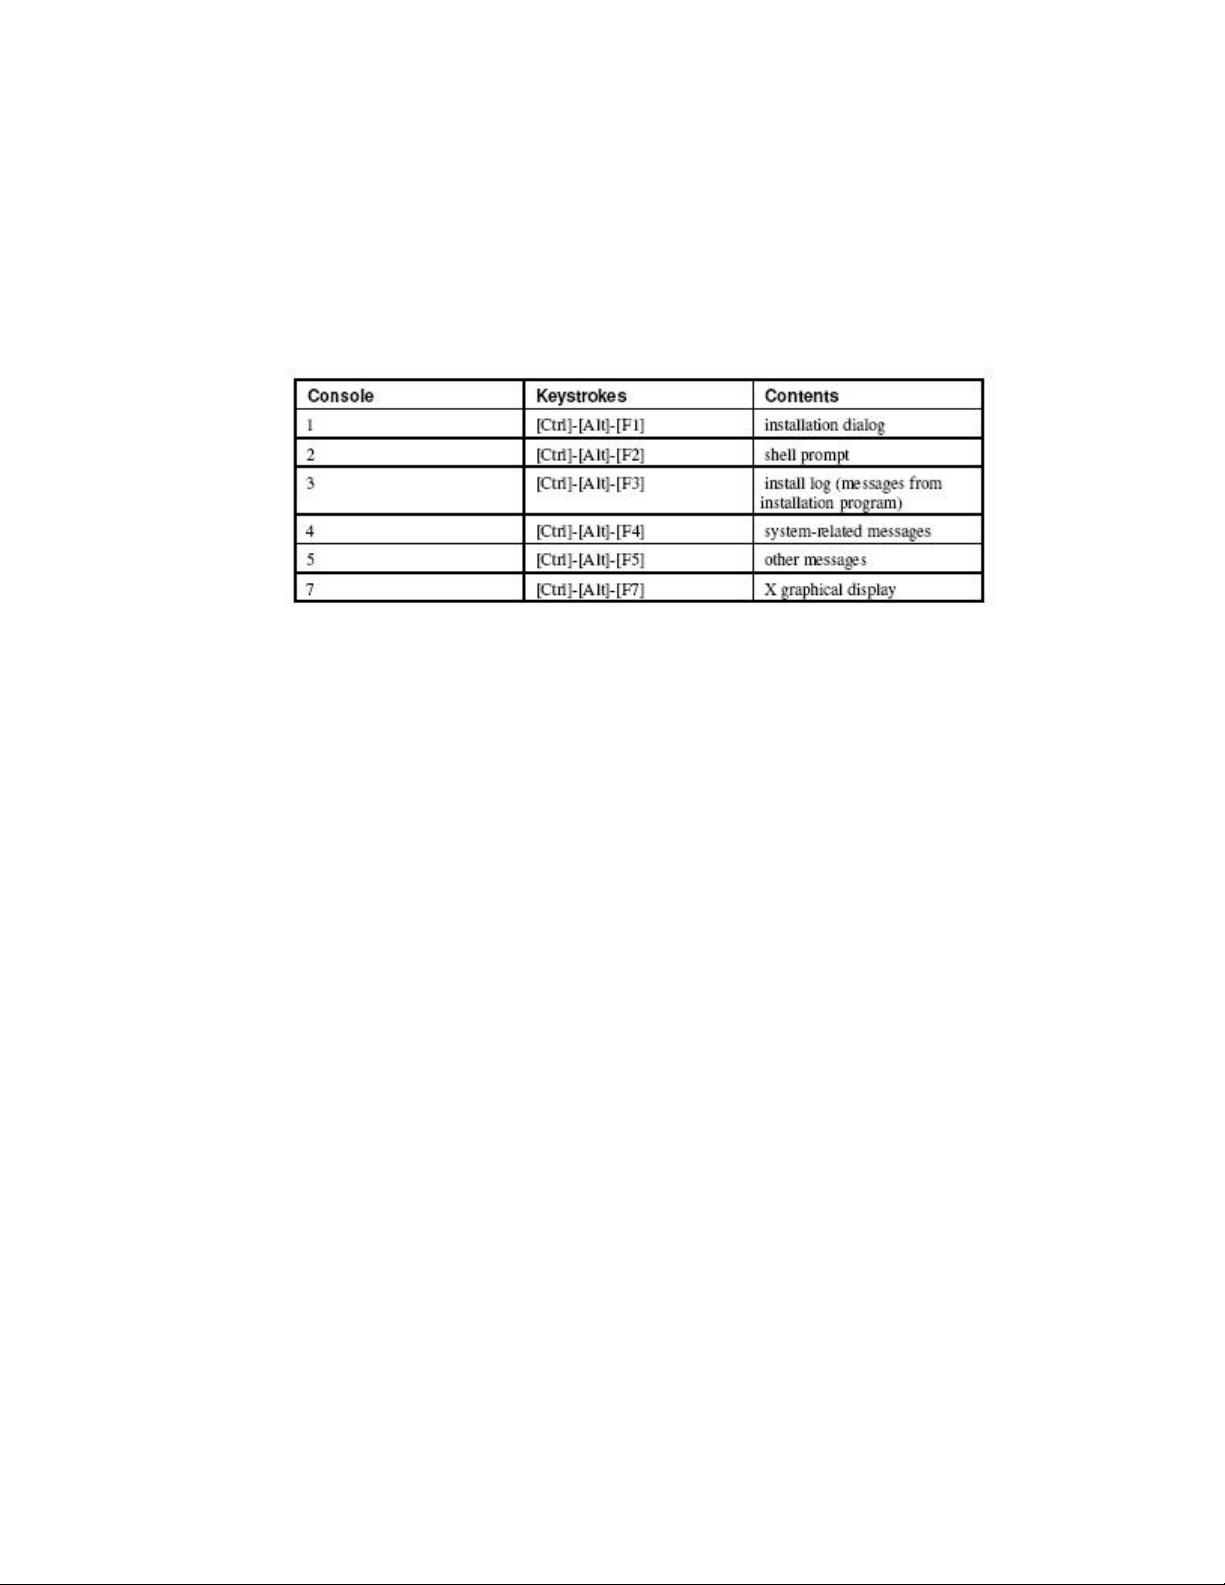
These virtual consoles can be helpful if you encounter a problem while installing Red Hat Enterprise
Linux. Messages displayed on the installation or system consoles can help pinpoint a problem. Refer to
Table 5-1 for a listing of the virtual consoles, keystrokes used to switch to them, and their contents.
Generally, there is no reason to leave the default console (virtual console #7 for graphical i nstallations)
unless you are attempting to diagnose installation problems.
Table 5-1 Console, Keystrokes, and Contents
11
Installing Red Hat* Enterprise Linux 4*
Intel® Server Board S5000PAL
The Text Mode Installation Program User Interface
The Red Hat Enterprise Linux text mode installation program uses a screen-based interface that
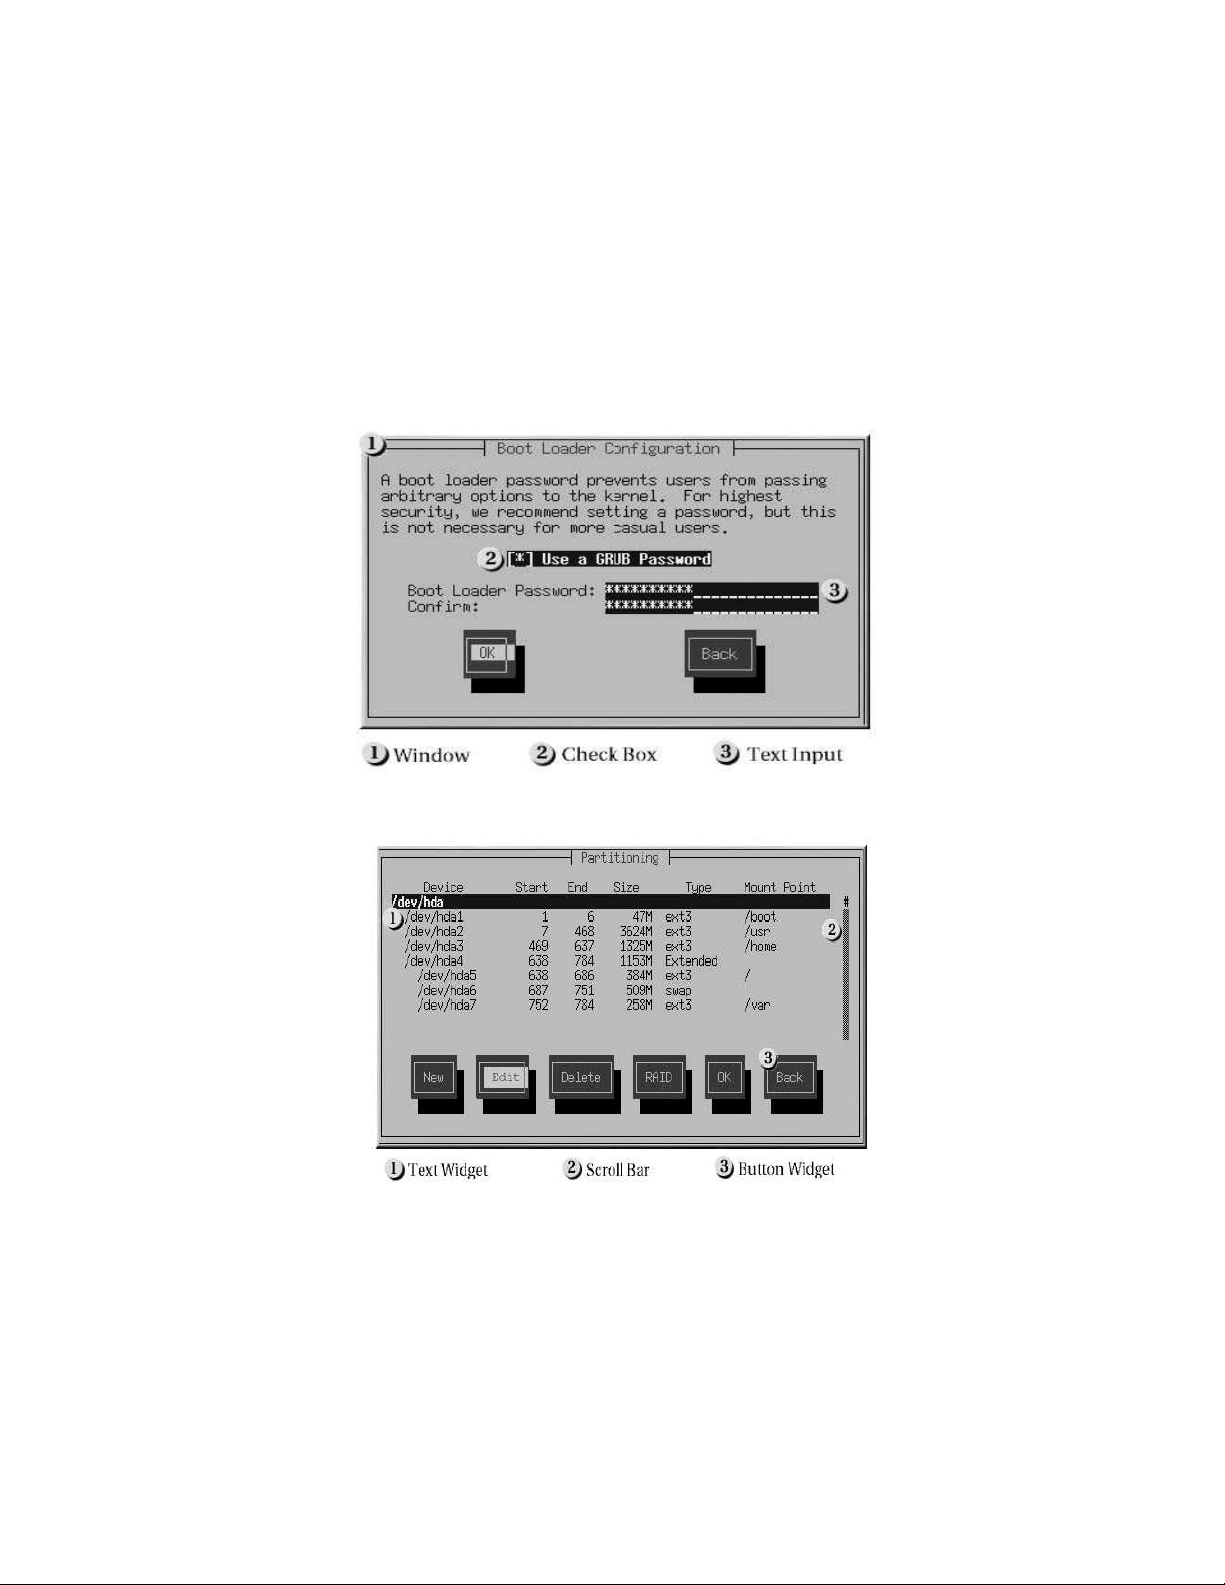
includes most of the on -screen widgets commonly found on graphical user interfaces. Figures 4-1, and
Figure 4-2, illustrate the screens that appear during the installation process.
Note:
While text mode installations are not explicitly documented, those using the text mode installation
program can easily follow the GUI installation instructions.
Figure 4-1. Installation Program Widgets as seen in Boot Loader Configuration
Figure 4-2. Installation Program Widgets as seen in Disk Druid
12

Installing Red Hat* Enterprise Linux 4*
Intel® Server Board S5000PAL
The list of the most important widgets shown in Figure 4-1 and Figure 4-2:
• Window — Windows (usually referred to as dialogs in this manual) appear on your screen throughout
the installation process. At times, one window may overlay another; in these cases, you can only
interact with the window on top. When you are finished in that window, it disappears, allowing you
to continue working in the window underneath.
• Checkbox — Checkboxes allow you to select or deselect a feature. The box displays either an
asterisk (selected) or a space (unselected). When the cursor is within a checkbox, press [Space] to
select or deselect a feature.
• Text Input — Text input lines are regions where you can enter information required by the
installation program. When the cursor rests on a text input line, you may enter and/or edit
information on that line.
• Text Widget — Text widgets are regions of the screen for the display of text. At times, text widgets
may also contain other widgets, such as checkboxes. If a text widge t contains more information
than can be displayed in the space reserved for it, a scroll bar appears; if you position the cursor
within the text widget, you can then use the [Up] and [Down] arrow keys to scroll through all the
information available. Your current position is shown on the scroll bar by a # character, which moves
up and down the scroll bar as you scroll.
• Scroll Bar — Scroll bars appear on the side or bottom of a window to control which part of a list or
document is currently in the window’s frame. The scroll bar makes it easy to move to any part of a
file.
• Button Widget — Button widgets are the primary method of interacting with the installation
program. You progress through the windows of the installation program by navigating these
buttons, using the [Tab] and [Enter] keys. Buttons can be selected when they are highlighted.
• Cursor — Although not a widget, the cursor is used to select (and interact with) a particular widget.
As the cursor is moved from widget to widget, it may cause the widget to change color, or the
cursor itself may only appear positioned in or next to the widget. In Figure 4-1, the cursor is
positioned on the OK button. Figure 4-2, shows the cursor on the Edit button.
Using the Keyboard to Navigate
Navigation through the installation dialogs is performed through a simple set of keystrokes. To move
the cursor, use the [Left], [Right], [Up], and [Down] arrow keys. Use [Tab], and [Alt]-[Tab] to cycle
forward or backward through each widget on the screen. Along the bottom, most screens display a
summary of available cursor positioning keys.
To "press" a button, position the cursor over the button (using [Tab], for example) and press [Space] or
[Enter]. To select an item from a list of items, move the cursor to the item you wish to select and press
13

Installing Red Hat* Enterprise Linux 4*
Intel® Server Board S5000PAL
[Enter]. To select an item with a checkbox, move the cursor to the checkbox and press [Space] to select
an item. To deselect, press [Space] a second time.
Pressing [F12] accepts the current values and proceeds to the next dialog; it is equivalent to pressing
the OK button.
Caution: Unless a dialog box is waiting for your input, do not press any keys during the installation
process (doing so may result in unpredictable behavior).
Starting the Installation Program
To start, first make sure that you have all necessary resources for the installation. If you have already
read through Chapter 2 Steps to Get You Started, and followed the instructions, you should be ready to
start the installation process. When you have verified that you are ready to begin, boot the installation
program using the Red Hat Enterprise Linux CD-ROM #1 or any boot media that you have created.
Note:
Occasionally, some hardware components require a driver diskette during the installation. A driver
diskette adds support for hardware that is not otherwise supported by the installation program.
Booting the Installation Program on x86 and Intel® 64 Systems
You can boot the installation program using any one of the following media (depending upon what your
system can support):
• Red Hat Enterprise Linux CD-ROM — Your machine supports a bootable CD-ROM drive and you have
the Red Hat Enterprise Linux CD-ROM set.
• Boot CD -ROM — Your machine supports a bootable CD-ROM drive and you want to perform network
or hard drive installation.
• USB pen drive — Your machine supports booting from a USB device.
1) To create a boot CD-ROM or to prepare your USB pen drive for installation, refer to the “Making an
Installation Boot CD-ROM” section.
2) Insert the boot media and reboot the system. Your BIOS settings may need to be changed to allow
you to boot from the CD-ROM or USB device.
14

Installing Red Hat* Enterprise Linux 4*
Intel® Server Board S5000PAL
Tip: To change your BIOS settings on an x86 or Intel® 64 system, watch the instructions provided on
your display when your computer first boots. A line of text appears, telling you which key to press to
enter the BIOS settings.
3) Once you have entered your BIOS setup program, find the section where you can alter your boot
sequence. The default is often C, A or A, C (depending on whether you boot from your hard drive [C]
or a diskette drive [A]). Change this sequence so that the CD-ROM is first in your boot order and that
C or A (whichever is your typical boot default) is second. This instructs the computer to first look at
the CD-ROM drive for bootable media; if it does not find bootable media on the CD-ROM drive, it
then checks your hard drive or diskette drive.
4) Save your changes before exiting the BIOS. For more information, refer to the documentation that
came with your system.
5) After a short delay, a screen containing the boot: prompt should appear. The screen contains
information on a variety of boot options. Each boot option also has one or more help screens
associated with it. To access a help screen, press the appropriate function key as listed in the line at
the bottom of the screen.
6) As you boot the installation program, be aware of two issues:
7) Once the boot: prompt appears, the installation program automatically begins if you take no action
within the first minute. To disable this feature, press one of the help screen function keys.
8) If you press a help screen function key, there is a slight delay while the help screen is read from the
boot media.
Normally, you only need to press [Enter] to boot. Be sure to watch the boot messages to review if the
Linux kernel detects your hardware. If your hardware is properly detected, continue to the next section.
If it does not properly detect your hardware, you may need to restart the installation and use one of the
boot options provided in Appendix A “Additional Boot Options ”.
Additional Boot Options
While it is easiest to boot using a CD -ROM and perform a graphical installation, sometimes there are
installation scenarios where booting in a different manner may be needed. This section discusses
additional boot options available for Red Hat Enterprise Linux.
• For x86 and Intel® 64 users:
To pass options to the boot loader on an x86 or Intel® 64 system, use the instructions as provided in the
boot loader option samples below.
15

Installing Red Hat* Enterprise Linux 4*
Intel® Server Board S5000PAL
Note: Refer to Appendix A “Additional Boot Options ” for additional boot options not covered in this
section.
1) To perform a text mode installation, at the installation boot prompt, type:
linux text
2) ISO images have an md5sum embedded in them. To test the checksum integrity of an ISO image, at
the installation boot prompt, type:
linux mediacheck
3) The installation program prompts you to insert a CD or select an ISO image to test, and select OK to
perform the checksum operation. This checksum operation can be performed on any Red Hat
Enterprise Linux CD and does not have to be performed in a specific order (for example, CD #1 does
not have to be the first CD you verify). It is strongly recommended to perform this operation on any
Red Hat Enterprise Linux CD that was created from downloaded ISO images. This command works
with the CD, DVD, hard drive ISO, and NFS ISO installation methods.
4) Also in the images/ directory is the boot.iso file. This file is an ISO image than can be used to boot
the installation program. To use the boot.iso, your computer must be able to boot from its CD-ROM
drive, and its BIOS settings must be configured to do so. You must then burn the boot.iso file onto a
recordable/rewriteable CD-ROM.
5) If you need to perform the installation in serial mode, type the following command:
linux console=<device>
6) For text mode installations, use:
linux text console=<device>
Note: In the above command, <device> should be the device you are using (such as ttyS0 or ttyS1).
For example, linux text console=ttyS0.
7) Text mod e installations using a serial terminal work best when the terminal supports UTF-8. Under
UNIX and Linux, Kermit supports UTF-8. For Windows, Kermit ’95 works well. Non -UTF-8 capable
terminals works as long as only English is used during the installation process. An enhanced serial
display can be used by passing the utf8 command as a boot -time option to the installation program.
For example:
linux console=ttyS0 utf8
Kernel Options
1) Options can also be passed to the kernel. For example, to instruct the ke rnel to use all the RAM in a
system with 128 MB of RAM, at the installation boot prompt, enter:
linux mem=128M
16

Installing Red Hat* Enterprise Linux 4*
Intel® Server Board S5000PAL
2) For text mode installations, use:
linux text mem=128M
With most computers, there is no need to pass this argument to the kernel. The kernel detects the
amount of memory your system has in most cases. However, using this command is often helpful for
testing purposes. For example, you can boot with less memory by passing a linux mem=64M or linux
text mem=64M option to the kernel.
3) After entering any options, press [Enter] to boot using those options.
If you need to specify boot options to identify your hardware, please write them down. The boot
options are needed during the boot loader configuration portion of the installation (refer the “x86 and
Intel® 64 Boot Loader Configuration” section for more information).
Selecting an Installation Method
The following installation methods are available:
• CD-ROM - If you have a CD-ROM drive and the Red Hat Enterprise Linux CD-ROMs, you can use this
method. Refer to the section on “Installing from CD-ROM”, for CD-ROM installation instructions.
• Hard Drive - If you have copied the Red Hat Enterprise Linux ISO images to a local hard drive, you
can use this method. You need a boot CD-ROM. Refer to “Installing from a Hard Drive”, for hard drive
installation instructions.
• NFS - If you are installing from an NFS server using ISO images or a mirror image of Red Hat
Enterprise Linux, you can use this method. You need a boot CD-ROM (use the linux askmethod boot
option). Refer to “Installing via NFS” for network installation instructions. Note that NFS installations
may also be performed in GUI mode.
• FTP - If you are installing directly from an FTP server, use this method. You need a boot CD-ROM
(use the linux askmethod boot option). Refer to “Installing via FTP”, for FTP installation instructions.
• HTTP - If you are installing directly from an HTTP (Web) server, use this method. You need a boot
CDROM (use the linux askmethod boot option). Refer to Section 4.10 Installing via HTTP, for HTTP
installation instructions.
Installing from CD-ROM
1) To install Red Hat Enterprise Linux from a CD-ROM, choose the CD-ROM option and select OK. When
prompted, insert the Red Hat Enterprise Linux CD into your CD -ROM drive (if you did not boot from
the CD). Once the CD is in the CD-ROM drive, select OK, and press [Enter].
Note: The first CD-ROM is required when booting the installation program, and again after
subsequent CD -ROMs have been processed.
17

Installing Red Hat* Enterprise Linux 4*
Intel® Server Board S5000PAL
2) The installation program then probes your system and attempts to identify your CD-ROM drive. It
starts by looking for an IDE (also known as an ATAPI) CD-ROM drive. If found, continue to the next
stage of the installation process (refer to the Language Selection section ).
Note: To abort the installation process at this time, reboot your machine and then eject the boot
media. You can safely cancel the installation at any point before the “About to Install” screen. Refer
to the “Preparing to Install ” section for more information.
If your CD-ROM drive is not detected, and it is a SCSI CD-ROM, the installation program prompts you to
choose a SCSI driver. Choose the driver that most closely resembles your adapter. You may specify
options for the driver if necessary; however, most drivers detect your SCSI adapter automatically.
What If the IDE CD-ROM Was Not Found?
If you have an IDE (ATAPI) CD-ROM on an x86 or Intel® 64 system, but the installation program fails to
find your IDE (ATAPI) CD-ROM and asks you what type of CD-ROM drive you have, try the following boot
command. Restart the installation, and at the boot: prompt enter linux hdX=cdrom. Replace X with one
of the following letters, depending on the interface the unit is connected to, and whether it is
configured as master or slave (also known as primary and secondary):
• a — first IDE controller, master
• b — first IDE controller, slave
• c — second IDE controller, master
• d — second IDE controller, slave
If you have a third and/or fourth controller, continue assigning letters in alphabetical order, going from
controller to controller, and master to slave.
18

Installing Red Hat* Enterprise Linux 4*
Intel® Server Board S5000PAL
Installing from a Hard Drive
1) The Select Partition screen applies only if you are installing from a disk partition (that is, if you
selected Hard Drive in the Installation Method dialog). This dialog allows you to name the disk
partition and directory from which you are installing Red Hat Enterprise Linux.
Figure 4-3 Selecting Partition Dialog for Hard Drive Installation
2) Enter the device name of the partition containing the Red Hat Enterprise Linux ISO images. There is
also a field labeled Directory holding images.
3) If the ISO images are in the root (top -level) directory of a partition, enter a /. If the ISO images are
located in a subdirectory of a mounted partition, enter the name of the directory holding the ISO
images within that partition. For example, if the partition on which the ISO images is normally
mounted as /home/, and the images are in /home/new/, you would enter /new/.
4) After you have identified the disk partit ion, the Welcome dialog appears.
Performing a Network Installation
1) If you are performing a network installation, the Configure TCP/IP dialog appears. This dialog asks
for your IP and other network addresses. You can choose to configure the IP address and Netmask
of the device via DHCP or manually. If manually, enter the IP address you are using during installation
and press [Enter]. The installation program attempts to guess your Netmask based on your IP
address; you may change the netmask if it is incor rect. Press [Enter]. The installation program
guesses the Default gateway and Primary nameserver addresses from your IP address and netmask;
you may change them if they are incorrect.
Installing via NFS
1) The NFS dialog applies only if you are installing from an NFS server (if you selected NFS Image in
the Installation Method dialog).
19

Installing Red Hat* Enterprise Linux 4*
Intel® Server Board S5000PAL
2) Enter the domain name or IP address of your NFS server. For example, if you are installing from a
host named eastcoast in the domain example.com, enter eastcoast.example.com in the NFS Server
field.
3) Next, enter the name of the exported directory.
Figure 4-4 NFS Dialog Setup
4) If the NFS server is exporting a mirror of the Red Hat Enterprise Linux installation tree, enter the
directory which contains the RedHat/ directory. (If you do not know this directory path, ask your
system administrator.) For example, if the NFS site contains the directory
/mirrors/redhat/arch/RedHat/, enter /mirrors/redhat/arch/ (where arch is replaced with the
architecture type of your system, such as i386, ia64, ppc, or s390). If everything was specified
properly, a message appears indicating that the installation program for Red Hat Enterprise Linux is
running.
5) If the NFS server is exporting the ISO images of the Red Hat Enterprise Linux CD-ROMs, enter the
directory which contains the ISO images.
6) Next, the Welcome dialog appears.
20

Installing Red Hat* Enterprise Linux 4*
Intel® Server Board S5000PAL
Installing via FTP
The FTP dialog applies only if you are installing from an FTP server (if you selected FTP in the
Installation Method dialog). This dialog allows you to identify the FTP server from which you are
installing Red Hat Enterprise Linux.
Figure 4-5. FTP Setup Dialog
1) Enter the name or IP address of the FTP site you are installing from, and the name of the directory
containing the RedHat/ installation files for your architecture. For example, if the FTP site contains
the directory /mirrors/redhat/arch/RedHat/, enter /mirrors/redhat/arch/ (where arch is replaced with
the architecture type of your system, such as i386, ia64, ppc, or s390). If everything was specified
properly, a message box appears indicating that base/hdlist is being retrieved.
2) Next, the Welcome dialog appears.
Tip: You can save disk space by using the ISO images you have already copied to the server. To
accomplish this, install Red Hat Enterprise Linux using ISO images without copying them into a single
tree by loopback mounting them. For each ISO image:
mkdir discX
mount -o loop example-1.iso discX
Installing via HTTP
The HTTP dialog applies only if you are installing from an HTTP server (if you selected HTTP in the
Installation Method dialog). This dialog prompts you for information about the HTTP server from which
you are installing Red Hat Enterprise Linux.
21

Installing Red Hat* Enterprise Linux 4*
Intel® Server Board S5000PAL
1) Enter the name or IP address of the HTTP site you are installing from, and the name of the directory
containing the RedHat/ installation files for your architecture. For example, if the HTTP site contains
the directory /mirrors/redhat/arch/RedHat/, enter /mirrors/redhat/arch/ (where arch is replaced with
the architecture type of your system, such as i386, ia64, ppc, or s390). If everything was specified
properly, a message box appears indicating that base/hdlist is being retrieved.
Figure 4-6. HTTP Setup Dialog
2) Next, the Welcome dialog appears.
Tip: You can save disk space by using the ISO images you have already copied to the server. To
accomplish this, install Red Hat Enterprise Linux using ISO images without copying them into a single
tree by loopback mounting them. For each ISO image:
mkdir discX
mount -o loop example-1.iso discX
Welcome to Red Hat Enterprise Linux
1) The Welcome screen does not prompt you for any input. Read over the help text in the left panel for
additional instructions and information on where to register your Red Hat Enterprise Linux product.
2) Notice the Hide Help button at the bottom left corner of the screen. The help screen is open by
default. To minimize the help text, click on Hide Help.
3) Click on the Next button to continue.
22

Installing Red Hat* Enterprise Linux 4*
Intel® Server Board S5000PAL
Language Selection
1) Using your mouse, select a language to use for the installation (refer to Figure 4-7).
2) Selecting the appropriate language also helps target your time zone configuration later in the
installation. The installation program tries to define the appropriate time zone based on what you
specify on this screen.
Figure 4-7, Language Selection
3) Once you have made your selection, click Next to continue.
23

Installing Red Hat* Enterprise Linux 4*
Intel® Server Board S5000PAL
Keyboard Configuration
1) Using your mouse, select the correct layout type (for example, U.S. English) for the keyboard you
would prefer to use for the installation and as the system default (refer to Figure 4-8).
2) Once you have made your selection, click Next to continue.
Figure 4-8. Keyboard Con?guration
Tip: To change your keyboard layout type after you have completed the installation, use the
Keyboard Configuration Tool.
Type the system-config-keyboard command in a shell prompt to launch the Keyboard Configuration
Tool. If you are not root, it prompts you for the root password to continue.
Disk Partitioning Setup
Partitioning allows you to divide your hard drive into isolated sections, where each section behaves as
its own hard drive. Partitioning is particularly useful if you run multiple operating systems. On this screen,
you can choose to perform automatic partitioning, or manual partitioning using Disk Druid.
3) Automatic partitioning allows you to perform an installation without having to partition your drive(s)
yourself. If you do not feel comfortable with partitioning your system, it is recommended that you
do not choose to partition manually and instead let the installation program partition for you.
4) To partition manually, choose the Disk Druid partitioning tool.
Warning: The Red Hat Update Agent downloads updated packages to /var/spool/up2date/ by
default. If you partition the system manually, and create a separate /var/ partition, be sure to create
the partition large enough (3.0 GB or more) to download package updates.
24

Installing Red Hat* Enterprise Linux 4*
Intel® Server Board S5000PAL
Figure 4-9. Disk Partitioning Setup
Warning: If you receive an error after the Disk Partitioning Setup phase of the installation saying
something similar to “The partition table on device hda was unreadable. To create new partitions it
must be initialized, causing the loss of ALL DATA on this drive.” you may not have a partition table
on that drive or the partition table on the drive may not be recognizable by the partitioning
software used in the installation program. Users who have used programs such as EZ-BIOS have
experienced similar problems, causing data to be lost (assuming the data was not backed up before
the ins tallation began). No matter what type of installation you are performing, backups of the
existing data on your systems should always be made.
Automatic Partitioning
Automatic partitioning allows you to have some control concerning what data is removed (if any) from
your system. Your options are:
• Remove all Linux partitions on this system — select this option to remove only Linux partitions
(partitions created from a previous Linux installation). This does not remove other partitions you
may have on your hard drive(s) (such as VFAT or FAT32 partitions).
• Remove all partitions on this system — select this option to remove all partitions on your hard
drive(s) (this includes partitions created by other operating systems such as Windows VFAT or NTFS
partitions).
25

Installing Red Hat* Enterprise Linux 4*
Intel® Server Board S5000PAL
Caution: If you select this option, all data on the selected hard drive(s) is removed by the installation
program. Do not select this option if you have information that you want to keep on the hard
drive(s) where you are installing Red Hat Enterprise Linux.
• Keep all partitions and use existing free space — select this option to retain your current data and
partitions, assuming you have enough free space available on your hard drive(s).
Figure 4-10. Automatic Partitioning
1) Using your mouse, choose the hard drive(s) on which you want Red Hat Enterprise Linux to be
installed. If you have two or more hard drives, you can choose which hard drive(s) should contain this
installation. Unselected hard drives, and any data on them, are not touched.
Caution: It is always a good idea to back up any data that you have on your systems. For example, if
you are upgrading or creating a dual-boot system, you should back up any data you wish to keep on
your hard drive(s). Mistakes do happen and can result in the loss of all your data.
Tip: If you have a RAID card, be aware that some BIOSes do not support booting from the RAID card.
In cases such as these, the /boot/ partition must be created on a partition outside of the RAID array,
such as on a separate hard drive. An internal hard drive is necessary to use for partition creation
with problematic RAID cards.
A /boot/ partition is also necessary for software RAID setups.
2) If you have chosen to automatically partition your system, you should select Review and ma nually
edit your /boot/ partition.
3) To review and make any necessary changes to the partitions created by automatic partitioning,
select the Review option. After selecting Review and clicking Next to move forward, the partitions
created for you in Disk Druid appear. You can make modifications to these partitions if they do not
meet your needs.
26

Installing Red Hat* Enterprise Linux 4*
Intel® Server Board S5000PAL
4) Click Next once you have made your selections to proceed.
Partitioning Your System
1) If you chose automatic partitioning and did not select Review, skip ahead to the “Network
Configuration” section.
2) If you chose automatic partitioning and selected Review, you can either accept the current partition
settings (click Next), or modify the setup using Disk Druid, the manual partitioning tool.
3) If you chose to partition manually, you must tell the installation program where to install Red Hat
Enterprise Linux. This is done by defining mount points for one or more disk partitions in which Red
Hat Enterprise Linux is installed. You may also need to create and/or delete partitions at this time.
The partitioning tool used by the installation program is Disk Druid. With the exception of certain
esoteric situations, Disk Druid can handle the partitioning requirements for a typical installation.
Figure 4-11. Partitioning with Disk Druid on x86 and Intel® 64 Systems
Graphical Display of Hard Drive(s)
Disk Druid offers a graphical representation of your hard drive(s).
1) Using your mouse, click once to highlight a particular field in the graphical display. Double -click to edit
an existing partition or to create a partition out of existing free space.
27

Installing Red Hat* Enterprise Linux 4*
Intel® Server Board S5000PAL
2) Above the display, you can review the Drive name (such as /dev/hda), the Geom (which shows the
hard disk’s geometry and consists of three numbers representing the number of cylinders, heads,
and sectors as reported by the hard disk), and the Model of the hard drive as detected by the
installation program.
Disk Druid’s Buttons
These buttons control Disk Druid’s actions. They are used to change the attributes of a partition (for
example the ?le system type and mount point) and also to create RAID devices. Buttons on this screen
are also used to accept the changes you have made, or to exit Disk Druid. For further explanation, take a
look at each button in order:
• New: Used to request a new partition. When selected, a dialog box appears containing fields (such
as the mount point and size fields) that must be filled in.
• Edit: Used to modify attributes of the partition currently selected in the Partitions section. Selecting
Edit opens a dialog box. Some or all of the fields can be edited, depending on whether the partition
information has already been written to disk.
• You can also edit free space as represented in the graphical display to create a new partition within
that space. Either highlight the free space and then select the Edit button, or double-click on the
free space to edit it.
• To make a RAID device, you must first create (or reuse existing) software RAID partitions. Once you
have created two or more software RAID partitions, select Make RAID to join the software RAID
partitions into a RAID device.
• Delete: Used to remove the partition currently highlighted in the Current Disk Partitions section.
You will be asked to confirm the deletion of any partition.
• Reset: Used to restore Disk Druid to its original state. All changes made will be lost if you Reset the
partitions.
• RAID: Used to provide redundancy to any or all disk partitions. It should only be used if you have
experience using RAID. To read more about RAID, refer to the Red Hat Enterprise Linux System
Administration Guide.
• To make a RAID device, you must first create software RAID partitions. Once you have created two
or more software RAID partitions, select RAID to join the software RAID partitions into a RAID
device.
• LVM: Allows you to create an LVM logical volume. The role of LVM (Logical Volume Manager) is to
present a simple logical view of underlying physical storage space, such as a hard drive(s). LVM
manages individual physical disks — or to be more precise, the individual partitions present on them.
It should only be used if you have experience using LVM. To read more about LVM, refer to the Red
Hat Enterprise Linux System Administration Guide. Note, LVM is only available in the graphical
installation program.
28

Installing Red Hat* Enterprise Linux 4*
Intel® Server Board S5000PAL
To create an LVM logical volume, you must ?rst create partitions of type physical volume (LVM). Once
you have created one or more physical volume (LVM) partitions, select LVM to create an LVM logical
volume.
Partition Fields
Above the partition hierarchy are labels which present information about the partitions you are creating.
The labels are defined as follows:
• Device: This field displays the partition’s device name.
• Mount Point/RAID/Volume: A mount point is the location within the directory hierarchy at which a
volume exists; the volume is "mounted" at this location. This field indicates where the partition is
mounted. If a partition exists, but is not set, then you need to define its mount point. Double -click on
the partition or click the Edit button.
• Type: This field shows the partition’s file system type (for example, ext2, ext3, or vfat).
• Format: This veld shows if the partition being created will be formatted.
• Size (MB): This field shows the partition’s size (in MB).
• Start: This field shows the cylinder on your hard drive where the partition begins.
• End: This field shows the cylinder on your hard drive where the partition ends.
• Hide RAID device/LVM Volume Group members: Select this option if you do not want to view any
RAID device or LVM Volume Group members that have been created.
Recommended Partitioning Scheme
Unless you have a reason for doing otherwise, we recommend that you create the following partitions
for Itanium systems:
• A /boot/efi/ partition (100 MB minimum) — the partition mounted on /boot/efi/ contains all the
installed kernels, the initrd images, and ELILO configuration files.
Warning: You must create a /boot/efi/ partition of type VFAT and at least 100 MB in size as the first
primary partition.
• A swap partition (at least 256 MB) — swap partitions are used to support virtual memory. In other
words, data is written to a swap partition when there is not enough RAM to store the data your
system is processing.
• If you are unsure about what size swap partition to create, make it twice the amount of RAM on
your machine (but no larger than 2 GB). It must be of type swap.
• Creation of the proper amount of swap space varies depending on a number of factors including the
following (in descending order of importance):
- The applicatio ns running on the machine.
29

Installing Red Hat* Enterprise Linux 4*
Intel® Server Board S5000PAL
- The amount of physical RAM is installed on the machine.
- The version of the OS.
• Swap should equal 2x physical RAM for up to 2 GB of physical RAM, and then 1x physical RAM for
any amount above 2 GB, but never less than 32 MB.
• Using this formula, a system with 2 GB of physical RAM would have 4 GB of swap, while one with 3
GB of physical RAM would have 5 GB of swap. Creating a large swap space partition can be
especially helpful if you plan to upgrade your RAM at a later time.
Tip: If your partitioning scheme requires a swap partition that is larger than 2 GB, you should create
an additional swap partition. For example, if you need 4 GB of swap, you should create two 2 GB
swap partitions. If you have 4 GB of RAM, you should create three 2 GB swap partitions. Red Hat
Enterprise Linux supports up to 32 swap files.
For systems with really large amounts of RAM (more than 32 GB) you can likely get away with a
smaller swap partition (around 1x, or less, of physical RAM).
• A root partit ion (500 MB -5.0 GB) — this is where "/" (the root directory) is located. In this setup, all
files (except those stored in /boot/efi) are on the root partition. A 500 MB partition allows you to
install a minimal installation, while a 5.0 GB root partition lets you perform a full installation,
choosing all package groups.
• Unless you have a reason for doing otherwise, we recommend that you create the following
partitions for x86 and Intel® 64 systems:
• A swap partition (at least 256 MB) — swap partitions are used to support virtual memory. In other
words, data is written to a swap partition when there is not enough RAM to store the data your
system is processing.
• If you are unsure about what size swap partition to create, make it twice the amount of RAM on
your machine (but no larger than 2 GB). It must be of type swap.
• Creation of the proper amount of swap space varies depending on a number of factors including the
following (in descending order of importance):
- The applications running on the machine.
- The amount of physical RAM is installed on the machine.
- The version of the OS.
• Swap should equal 2x physical RAM for up to 2 GB of physical RAM, and then 1x physical RAM for
any amount above 2 GB, but never less than 32 MB.
• Using this formula, a system with 2 GB of physical RAM would have 4 GB of swap, while one with 3
GB of physical RAM would have 5 GB of swap. Creating a large swap space partition can be
especially helpful if you plan to upgrade your RAM at a later time.
30

Installing Red Hat* Enterprise Linux 4*
Intel® Server Board S5000PAL
• A /boot/ partition (100 MB) — the partition mounted on /boot/ contains the operating system kernel
(which allows your system to boot Red Hat Enterprise Linux), along with files used during the
bootstrap process. Due to the limitations of most PC BIOSes, creating a small partition to hold these
files is a good idea. For most users, a 100 MB boot partition is suf ficient.
Tip: If your hard drive is more than 1024 cylinders (and your system was manufactured more than
two years ago), you may need to create a /boot/ partition if you want the / (root) partition to use all
of the remaining space on your hard drive.
Tip: If you have a RAID card, be aware that some BIOSes do not support booting from the RAID card.
In cases such as these, the /boot/ partition must be created on a partition outside of the RAID array,
such as on a separate hard drive.
31

Installing Red Hat* Enterprise Linux 4*
Intel® Server Board S5000PAL
Adding Partitions
1) To add a new partition, select the New button. A dialog box appears (refer to Figure 4-12).
Note: You must dedicate at least one partition for this installation, and optiona lly more.
Figure 4-12. Partitioning with Disk Druid on x86 and Intel® 64 Systems
• Mount Point: Enter the partition’s mount point. For example, if this partition should be the root
partition, enter /; enter /boot for the /boot partition, and so on. You can also use the pull-down menu
to choose the correct mount point for your partition.
• File System Type: Using the pull-down menu, select the appropriate file system type for this
partition. For more information on file system types, refer to Section 4.16.5.1 File System Types.
• Allowable Drives: This field contains a list of the hard disks installed on your system. If a hard disk’s
box is highlighted, then a desired partition can be created on that hard disk. If the box is not checked,
then the partition will never be created on that hard disk. By using different checkbox settings, you
can have Disk Druid place partitions where you need them, or let Disk Druid decide where partitions
should go.
• Size (MB): Enter the size (in megabytes) of the partition. Note, this field starts with 100 MB; unless
changed, only a 100 MB partition will be created.
• Additional Size Options: Choose whether to keep this partition at a fixed size, to allow it to "grow"
(fill up the available hard drive space) to a certain point, or to allow it to grow to fill any remaining
hard drive space available.
If you choose Fill all space up to (MB), you must give size constraints in the field to the right of this
option. This allows you to keep a certain amount of space free on your hard drive for future use.
32

Installing Red Hat* Enterprise Linux 4*
Intel® Server Board S5000PAL
• Force to be a primary partition: Select whether the partition you are creating should be one of the
first four partitions on the hard drive. If unselected, the partition is created as a logical partition.
Refer to Section D.1.3 Partitions within Partitions — An Overview of Extended Partitions, for more
information.
• OK: Select OK once you are satis fied with the settings and wish to create the partition.
• Cancel: Select Cancel if you do not want to create the partition.
File System Types
Red Hat Enterprise Linux allows you to create different partition types, based on the ?le system they
will use. The following is a brief description of the different file systems available, and how they can be
utilized.
• ext2 — An ext2 file system supports standard Unix file types (regular files, directories, symbolic
links, etc). It provides the ability to assign long file names, up to 255 characters.
• ext3 — The ext3 file system is based on the ext2 file system and has one main advantage —
journaling. Using a journaling file system reduces time spent recovering a file system after a crash as
there is no need to fsck1 the file system. The ext3 file system is selected by default and is highly
recommended.
• physical volume (LVM) — Creating one or more physical volume (LVM) partitions allows you to create
an LVM logical volume. LVM can improve performance when using physical disks. For more
information regarding LVM, refer to the Red Hat Enterprise Linux System Administration Guide.
• software RAID — Creating two or more software RAID partitions allows you to create a RAID
device. For more information regarding RAID, refer to the chapter RAID (Redundant Array of
Independent Disks) in the Red Hat Enterprise Linux System Administration Guide.
• swap — Swap partitions are used to support virtual memory. In other words, data is written to a
swap partition when there is not enough RAM to store the data your system is processing. Refer to
the Red Hat Enterprise Linux System Administration Guide for addit ional information.
The fsck application is used to check the file system for metadata consistency and optionally repair one
or more Linux file systems.
• vfat — The VFAT file system is a Linux file system that is compatible with Microsoft Windows long
filenames on the FAT file system. This file system must be used for the /boot/efi/ partition on
Itanuim systems.
33

Installing Red Hat* Enterprise Linux 4*
Intel® Server Board S5000PAL
Editing Partitions
To edit a partition, select the Edit button or double -click on the existing partition.
Note: If the partition already exists on your hard disk, you can only change the partition’s mount
point. To make any other changes, you must delete the partition and recreate it.
Deleting a Partition
To delete a partition, highlight it in the Partitions section and click the Delete but ton. Confirm the
deletion when prompted.
For further installation instructions for x86 and Intel® 64 systems, skip to the next section, x86 and
Intel® 64 Boot Loader Configuration.
x86 and Intel® 64 Boot Loader Configuration
To boot the system without boot media, you usually need to install a boot loader. A boot loader is the
first software program that runs when a computer starts. It is responsible for loading and transferring
control to the operating system kernel software. The kernel, in turn, init ializes the rest of the operating
system.
Figure 4-13. Boot Loader Configuration
GRUB (GRand Unified Bootloader), which is installed by default, is a very powerful boot loader. GRUB can
load a variety of free operating systems, as well as proprietary operating systems with chain-loading
34

Installing Red Hat* Enterprise Linux 4*
Intel® Server Board S5000PAL
(the mechanism for loading unsupported operating systems, such as DOS or Windows, by loading
another boot loader).
If you do not want to install GRUB as your boot loader, click Change boot loader, where you can choose
not to install a boot loader at all.
1) If you already have a boot loader that can boot Red Hat Enterprise Linux and do not want to
overwrite your current boot loader, choose Do not install a boot loader by clicking on the Change
boot loader button.
Caution: If you choose not to install GRUB for any reason, you will not be able to boot the system
directly, and you must use another boot method (such as a commercial boot loader application). Use
this option only if you are sure you have another way of booting the system!
2) Every bootable partition is listed, including partitions used by other operating systems. The partition
holding the system’s root file system has a Label of Red Hat Enterprise Linux (for GRUB). Other
partitions may also have boot labels. To add or change the boot label for other partitions that have
been detected by the installation program, click once on the partition to select it. Once selected, you
can change the boot label by clicking the Edit button.
3) Select Default beside the preferred boot partition to choose your default bootable OS. You cannot
move forward in the installation unless you choose a default boot image.
Note: The Label column lists what you must enter at the boot prompt, in non-graphical boot
loaders, in order to boot the desired operating system.
4) Once you have loaded the GRUB boot screen, use the arrow keys to choose a boot label or type [e]
for edit. You are presented with a list of items in the configuration file for the boot label you have
selected.
5) Boot loader passwords provide a security mechanism in an environment where physical access to
your server is available.
6) If you are installing a boot loader, you should create a password to protect your system. Without a
boot loader password, users with access to your system can pass options to the kernel which can
compromise your system security. With a boot loader password in place, the password must first be
entered before selecting any non-standard boot options. However, it is still possible for someone
with physical access to the machine to boot from a diskette, CD-ROM, or USB media if the BIOS
supports it. Security plans which include boot loader passwords should also address alternate boot
methods.
7) If you choose to use a boot loader password to enhance your system secur ity, be sure to select the
checkbox labeled Use a boot loader password.
8) Once selected, enter a password and confirm it.
9) To configure more advance boot loader options, such as changing the drive order or passing options
to the kernel, be sure Configure advanced boot loader options is selected before clicking Next.
35

Installing Red Hat* Enterprise Linux 4*
Intel® Server Board S5000PAL
Advanced Boot Loader Configuration
Now that you have chosen which boot loader to install, you can also determine where you want the
boot loader to be installed. You may install the boot loader in one of two places:
• The master boot record (MBR) — This is the recommended place to install a boot loader, unless the
MBR already starts another operating system loader, such as System Commander. The MBR is a
special area on your hard drive that is aut omatically loaded by your computer’s BIOS, and is the
earliest point at which the boot loader can take control of the boot process. If you install it in the
MBR, when your machine boots, GRUB presents a boot prompt. You can then boot Red Hat
Enterprise Lin ux or any other operating system that you have configured the boot loader to boot.
• The first sector of your boot partition — This is recommended if you are already using another boot
loader on your system. In this case, your other boot loader takes control first. You can then
configure that boot loader to start GRUB, which then boots Red Hat Enterprise Linux.
Figure 4-13. Boot Loader Installation
Tip: If you have a RAID card, be aware that some BIOSes do not support booting from the RAID card.
In cases such as these, the boot loader should not be installed on the MBR of the RAID array. Rather,
the boot loader should be installed on the MBR of the same drive as the /boot/ partition was
created.
If your system only uses Red Hat Enterprise Linux, you should choose the MBR.
1) Click the Change Drive Order button if you would like to rearrange the drive order or if your BIOS
does not return the correct drive order. Changing the drive order may be useful if you have multiple
SCSI adapters, or both SCSI and IDE adapters, and you want to boot from the SCSI device.
36

Installing Red Hat* Enterprise Linux 4*
Intel® Server Board S5000PAL
2) The Force LBA32 (not normally required) option allows you to exceed the 1024 cylinder limit for the
/boot/ partition. If you have a system which supports the LBA32 extension for booting operating
systems above the 1024 cylinder limit, and you want to place your /boot/ partition above cylinder
1024, you should select this option.
Tip: While partitioning your hard drive, keep in mind that the BIOS in some older systems cannot
access more than the first 1024 cylinders on a hard drive. If this is the case, leave enough room for
the /boot Linux partition on the first 1024 cylinders of your hard drive to boot Linux. The other
Linux partitions can be after cylinder 1024.
In parted, 1024 cylinders equals 528MB . For more information, refer to:
http://www.pcguide.com/ref/hdd/bios/sizeMB504-c.html
3) To add default options to the boot command, enter them into the Kernel parameters ?eld. Any
options you enter are passed to the Linux kernel every time it boots.
Rescue Mode
Rescue mode provides the ability to boot a small Red Hat Enterprise Linux environment entirely from
boot media or some other boot method instead of the system’s hard drive. There may be times when
you are unable to get Red Hat Enterprise Linux running completely enough to access files on your
system’s hard drive. Using rescue mode, you can access the files stored on your system’s hard drive,
even if you cannot actually run Re d Hat Enterprise Linux from that hard drive. If you need to use rescue
mode, try the following method:
• Using the CD-ROM to boot an x86, AMD64, or Intel® EM64T system, type linux rescue at the
installation boot prompt. Itanium users should type elilo linux rescue to enter rescue mode.
• For additional information, refer to the Red Hat Enterprise Linux System Administration Guide.
Alternative Boot Loaders
If you do not wish to use a boot loader, you have several alternatives:
• LOADLIN - You can load Linux from MS -DOS. Unfortunately, this requires a copy of the Linux kernel
(and an initial RAM disk, if you have a SCSI adapter) to be available on an MS -DOS partition. The only
way to accomplish this is to boot your Red Hat Enterprise Linux system using some ot her method
(for example, from a boot CD-ROM) and then copy the kernel to an MS-DOS partition. LOADLIN is
available from ftp://metalab.unc.edu/pub/Linux/system/boot/dualboot/ and associated mirror sites.
• SYSLINUX - SYSLINUX is an MS-DOS program very similar to LOADLIN. It is also available from
ftp://metalab.unc.edu/pub/Linux/system/boot/loaders/ and associated mirror sites.
37

Installing Red Hat* Enterprise Linux 4*
Intel® Server Board S5000PAL
• Commercial boot loaders - You can load Linux using commercial boot loaders. For example, System
Commander and Partition Magic are able to boot Linux (but still require GRUB to be installed in your
Linux root partition).
Note: Boot loaders such as LOADLIN and System Commander are considered to be third-party boot
loaders and are not supported by Red Hat.
SMP Motherboards and GRUB
This section is specific to SMP motherboards only. SMP, short for Symmetric Multiprocessing, is a
computer architecture providing fast performance by making multiple CPUs available to complete
individual processes simultaneously (multiprocessing).
• If the ins tallation program detects an SMP motherboard on your system, it automatically creates
two boot loader entries.
Note: An SMP kernel is installed by default on Intel® Pentium® 4 systems with hyperthreading.
• The two GRUB entries are Red Hat Enterprise Linux (kernel version) and Red Hat Enterprise Linux
(kernel version-smp). The Red Hat Enterprise Linux (kernel version-smp) boots by default. However,
if you have trouble with the SMP kernel, you can elect to boot the Red Hat Enterprise Linux (kernel
version) entry instead. You retain all the functionality as before, but only operate with a single
processor.
38

Installing Red Hat* Enterprise Linux 4*
Intel® Server Board S5000PAL
Network Con figuration
If you do not have a network device, this screen does not appear during your installation and you should
advance to Firewall Co nfiguration.
Figure 4-14. Network Configuration
1) The installation program automatically detects any network devices you have and display them in
the Network Devices list.
39

Installing Red Hat* Enterprise Linux 4*
Intel® Server Board S5000PAL
2) Once you have selected a network device, click Edit. From the Edit Interface pop -up screen, you can
choose to configure the IP address and Netmask of the device via DHCP (or manually if DHCP is not
selected) and you can choose to activate the device at boot time. If you select Activate on boot,
your network interface is started when you boot. If you do not have DHCP client access or you are
unsure what to provide here, please contact your network administrator.
Figure 4-15. Editing a network Device
Note: Do not use the numbers as seen in this sample configuration. These values will not work for
your own network configuration. If you are not sure what values to enter, contact your network
administrator for assistance.
If you have a hostname (fully qualified domain name) for the network device, you can choose to
have DHCP (Dynamic Host Configuration Protocol) automatically detect it or you can manually enter
the hostname in the field provided.
Finally, if you entered the IP and Netmask information manually, you may also enter the Gateway
address and the Primary, Secondary, and Tertiary DNS addresses.
Tip: Even if your computer is not part of a network, you can enter a hostname for your system. If
you do not take this opportunity to enter a name, your system will be known as localhost.
Tip: To change your network configuration after you have completed the installation, use the
Network Administration Tool. Type the system-config-network command in a shell prompt to launch
the Network Administration Tool. If you are not root, it prompts you for the root password to
continue.
40

Installing Red Hat* Enterprise Linux 4*
Intel® Server Board S5000PAL
Firewall Configuration
Red Hat Enterprise Linux offers firewall protection for enhanced system security. A firewall exists
between your computer and the network, and determines which resources on your computer remote
users on the network can access. A properly configured firewall can greatly increase the security of your
system.
Figure 4-16. Firewall Configuration
1) Next, you can decide whether to enable a firewall for your Red Hat Enterprise Linux system.
• No firewall
• No firewall provides complete access to your system and does no security checking. Security
checking is the disabling of access to certain services. This should only be selected if you are running
on a trusted network (not the Internet) or plan to do more firewall configuration later.
• Enable firewall
- If you choose Enable firewall, connections are not accepted by your system
(other than the default settings) that are not explicitly defined by you. By default, only connections
in response to outbound requests, such as DNS replies or DHCP requests, are allowed. If access to
services running on this machine is needed, you can choose to allow specific services through the
firewall. If you are connecting your system to the Internet, this is the safest option to choose.
2) Next, select which services, if any, should be allowed to pass through the firewall.
41

Installing Red Hat* Enterprise Linux 4*
Intel® Server Board S5000PAL
3) Enabling these options allow the specified services to pass through the firewall. Note, these
services may not be installed on the system by default. Make sure you choose to enable any options
that you may need.
• Remote Login (SSH)
• Secure Shell (SSH) is a suite of tools for logging in to and executing commands on a remote
machine. If you plan to use SSH tools to access your machine through a firewall, enable this option.
You need to have the openssh-server package installed in order to access your machine remotely,
using SSH tools.
• Web Server (HTTP, HTTPS)
• The HTTP and HTTPS protocols are used by Apache (and by other Web servers) to serve web-
pages. If you plan on making your Web server publicly available, enable this option. This option is not
required for viewing pages locally or for developing webpages. You must install the httpd package if
you want to serve webpages.
• File Transfer (FTP) The FTP protocol is used to transfer files between machines on a network. If you
plan on making your FTP server publicly available, enable this option. You must install the vsftpd
package in order to publicly serve files.
• Mail Server (SMTP) If you want to allow incoming mail delivery through your firewall, so that remote
hosts can connect directly to your machine to deliver mail, enable this option. You do not need to
enable this if you collect your mail from your Internet Service Provider’s server using POP3 or IMAP,
or if you use a tool such as fetchmail. Note that an improperly configured SMTP server can allow
remote machines to use your server to send spam.
Note: By default, the Sendmail mail transport agent (MTA) does not accept network connections
from any host other than the local computer. To configure Sendmail as a server for other clients,
you must edit /etc/mail/sendmail.mc and change the DAEMON_OPTIONS line to also listen on
network devices (or comment out this option entirely using the dnl comment delimiter). You must
then regenerate /etc/mail/sendmail.cf by running the following command (as root):
make -C /etc/mail
You must have the sendmail-cf package installed for this to work.
Additionally, you can now setup SELinux (Security Enhanced Linux) during your installation of Red Hat
Enterprise Linux.
SELinux allows you to provide granular permissions for all subjects (users, programs, and processes) and
objects (files and devices). You can safely grant an application only the permissions it needs to do its
function.
The SELinux implementation in Red Hat Enterprise Linux is designed to improve the security of various
server daemons while minimizing the impact on the day-to-day operations of your system.
Three states are available for you to choose from during the installation process:
42

Installing Red Hat* Enterprise Linux 4*
Intel® Server Board S5000PAL
• Disable — Select Disable if you do not want SELinux security controls enabled on this system. The
Disabled setting turns enforcing off and does not set up the machine for the use of a security
policy.
• Warn — Select Warn to be notified of any denials. The Warn state assigns labels to data and
programs, and logs them, but does not enforce any policies. The Warn state is a good starting place
for users who eventually want a fully active SELinux policy, but who first want to see what effects
the policy would have on their ge neral system operation. Note that users selecting the Warn state
may notice some false positive and negative notifications.
• Active — Select Active if you want SELinux to act in a fully active state. The Active state enforces
all policies, such as denying access to unauthorized users for certain files and programs, for
additional system protection. Choose this state only if you are sure that your system can still
properly function with SELinux fully enabled.
• For additional information about SELinux, refer to the following URLs:
- http://www.redhat.com/docs/
- http://www.nsa.gov/selinux/
Tip: To change your security configuration after you have completed the installation, use the
Security Level Configuration Tool.
Type the system-config-securitylevel command in a shell prompt to launch the Security Level
Configuration Tool. If you are not root, it prompts you for the root password to continue.
Language Support Selection
You can install and support multiple languages for use on your system.
You must select a language to use as the default language. The default language is the language used
on the system once the installation is complete. Typically, the default language is the language you
selected to use during the installation.
If you choose to install other languages during this installation, you can change your default language
after the installation. If you are only going to use one language on your system, selecting only that
language saves significant disk space.
43

Installing Red Hat* Enterprise Linux 4*
Intel® Server Board S5000PAL
Caution: If you select only one language, you can only use that specified language after the
installation is complete.
Figure 4-17. Language Support Selection
To use more than one language on your system, choose specific languages to be installed or select all
languages to have all available languages installed on your Red Hat Enterprise Linux system.
Use the Reset button to cancel your selections. Resetting reverts to the default; only the language you
selected for use during the installation is installed.
Tip: To change the language configuration after you have completed the installation, use the
Language Configuration Tool.
Type the system-config-language command in a shell prompt to launc h the Language Configuration
Tool. If you are not root, it prompts you for the root password to continue.
44

Installing Red Hat* Enterprise Linux 4*
Intel® Server Board S5000PAL
Time Zone Configuration
Set your time zone by selecting the city closest to your computer’s physical location.
There are two ways for you to select your time zone:
1) Using your mouse, click on the interactive map to select a specific city (represented by a yellow
dot). A red X appears indicating your selection.
2) You can also scroll through the list at the bottom of the screen to select your time zone. Using your
mouse, click on a location to highlight your selection.
Figure 4-18. Con figuring the Time Zone
3) Select System Clock uses UTC if you know that your system is set to UTC.
Tip:To change your time zone configuration after you have completed the installation, use the Time
and Date Properties Tool.
Type the system-config-date command in a shell prompt to launch the Time and Date Properties
Tool. If you are not root, it prompts you for the root password to continue.
To run the Time and Date Properties Tool as a text-based application, use the command timeconfig.
45

Installing Red Hat* Enterprise Linux 4*
Intel® Server Board S5000PAL
Set Root Password
Setting up a root account and password is one of the most important steps during your installation.
Your root account is similar to the administrator account used on Windows NT machines. The root
account is used to install packages, upgrade RPMs, and perform most system maintenance. Logging in
as root gives you complete control over your system.
Note: The root user (also known as the superuser) has complete access to the entire system; for
this reason, logging in as the root user is best done only to perform system maintenance or
administration.
Figure 4-19. Root Password
Use the root account only for system administration. Create a non -root account for your general use
and su -to root when you need to fix something quickly. These basic rules minimize the chances of a
typo or an incorrect command doing damage to your system.
1) To become root, type su -at the shell prompt in a terminal window and then press [Enter]. Then,
enter the root password and press [Enter].
2) The installation program prompts you to set a root password2 for your system. You cannot proceed
to the next stage of the installation process without entering a root password.
3) The root password must be at least six characters long; the password you type is not echoed to the
screen. You must enter the password twice; if the two passwords do not match, the installation
program asks you to enter them again.
46

Installing Red Hat* Enterprise Linux 4*
Intel® Server Board S5000PAL
4) You should make the root password something you can remember, but not something that is easy
for someone else to guess. Your name, your phone number, qwerty, password, root, 123456, and
anteater are all examples of bad passwords. Good passwords mix numerals with upper and lower
case letters and do not contain dictionary words: Aard387vark or 420BMttNT, for example.
Remember that the password is case-sensitive. If you write down your password, keep it in a secure
place. However, it is recommended that you do not write down this or any password you create.
5) A root password is the administrative password for your Red Hat Enterprise Linux system. You
should only log in as root when needed for system maintenance. The root account does not operate
within the restrictions placed on normal user accounts, so changes made as root can have
implications for your entire system.
Note: Do not use one of the example passwords offered in this manual. Using one of these
passwords could be considered a security risk.
Tip: To change your root password after you have completed the installation, use the Root
Password Tool.
6) Type the system-config-rootpassword command in a shell prompt to launch the Root Password
Tool. If you are not root, it prompts you for the root password to continue.
Package Group Selection
Now that you have made most of the choices for your installation, you are ready to confirm the default
package selection or customize packages for your system.
1) The Package Installation Defaults screen appears and details the default package set for your Red
Hat Enterprise Linux installation. This screen varies depending on the version of Red Hat Enterprise
Linux you are installing.
2) If you choose to accept the current package list, skip ahead to Section 4.24 Preparing to Install.
3) To customize your package set fur ther, select Customize the set of packages to be installed option
on the screen. Clicking Next takes you to the Package Group Selection screen.
47

Installing Red Hat* Enterprise Linux 4*
Intel® Server Board S5000PAL
4) You can select package groups, which group components together according to function (for
example, X Window System and Editors), individual packages, or a combination of the two.
Note: Users of Intel® 64, and Itanium systems who want support for developing or running 32-bit
applications are encouraged to select the Compatibility Arch Support and Compatibility Arch
Development Support packages to install architecure specific support for their systems.
To select a component, click on the checkbox beside it (refer to Figure 4-20).
Figure 4-20. Package Group Selection
5) Select each component you wish to install. Selecting Everything (at the end of the component list)
installs all packages included with Red Hat Enterprise Linux.
48

Installing Red Hat* Enterprise Linux 4*
Intel® Server Board S5000PAL
6) Once a package group has been selected, click on Details to view which packages are installed by
default, and to add or remove optional packages from that group.
Figure 4-21. Package Group Details
Preparing to Install
1) A screen preparing you for the installation of Red Hat Enterprise Linux now appears.
2) For your reference, a complete log of your installation can be found in /root/instal l.log once you
reboot your system.
Warning: If, for some reason, you would rather not continue with the installation process, this is your
last opportunity to safely cancel the process and reboot your machine. Once you press the Next
button, partitions are written and packages are installed. If you wish to abort the installation, you
should reboot now before any existing information on any hard drive is rewritten.
3) To cancel this installation process, press your computer’s Reset button or use the [Control][Alt][Delete] key combination to restart your machine.
Installing Packages
At this point there is nothing left for you to do until all the packages have been installed. How quickly
this happens depends on the number of packages you have selected and yo ur computer’s speed.
Installation Complete
1) Congratulations! Your Red Hat Enterprise Linux installation is now complete!
2) The installation program prompts you to prepare your system for reboot. Remember to remove any
installation media if it is not ejected automatically upon reboot.
49

Installing Red Hat* Enterprise Linux 4*
Intel® Server Board S5000PAL
3) After your computer’s normal power-up sequence has completed, the graphical boot loader prompt
appears at which you can do any of the following things:
a) Press [Enter] — causes the default boot entry to be booted.
b) Select a boot label, followed by [Enter] — causes the boot loader to boot the operating
system corresponding to the boot label.
c) Do nothing — after the boot loader’s timeout period, (by default, five seconds) the boot
loader automatically boots the default boot entry.
4) Do whatever is appropriate to boot Red Hat Enterprise Linux. One or more screens of messages
should scroll by. Eventually, a login: prompt or a GUI login screen (if you installed the X Window
System and chose to start X automatically) appears.
5) The first time you start your Red Hat Enterprise Linux system in run level 5 (the graphical run level),
the Setup Agent is presented, which guides you through the Red Hat Enterprise Linux
configuration. Using this tool, you can set your system time and date, install software, register your
machine with Red Hat Network, and more. The Setup Agent lets you configure your environment at
the beginning, so that you can get started using your Red Hat Enterprise Linux system quickly.
6) For more information on using the Setup Agent, refer to the chapter titled Getting Started in the
Red Hat Enterprise Linux Step By Step Guide.
For information on registering your Red Hat Enterprise Linux subscription, refer to Section 4.27 Activate
Your Subscription.
50

Installing Red Hat* Enterprise Linux 4*
Intel® Server Board S5000PAL
Appendix A: Addition al Boot Options
This appendix discusses additional boot and kernel boot options available for the Red Hat Enterprise
Linux installation program.
To use any of the boot options presented here, type the command you wish to invoke at the installation
boot: prompt.
Boot Time Command Arguments
askmethod :
This command asks you to select the installation method you would like to use when booting from the
Red Hat Enterprise Linux CD-ROM.
apic:
This x86 boot command works around a bug commonly encountered in the Intel 440GX chipset BIOS
and should only be executed with the installation program kernel.
apm=allow_ints :
This x86 boot command changes how the suspend service is handled (and may be necessary for some
laptops).
apm=off:
This x86 boot command disables APM (Advanced Power Management). It useful because some BIOSes
have buggy power management (APM) and tend to crash.
apm=power_off:
This x86 boot command makes Red Hat Enterprise Linux shutdown (power off) the system by default.
It is useful for SMP systems that do not shutdown by default.
apm=realmode_power_off:
Some BIOSes crash on x86-based systems when trying to shutdown (power off) the machine. This
command changes the method of how this is done from the Windows NT way to the Windows 95 way.
dd :
This argument causes the installation program to prompt you to use a driver diskette.
dd=url:
This argument causes the installation program to prompt you to use a driver image from a speci?ed
HTTP, FTP, or NFS network address.
display=IP:0:
This command allows remote display forwarding. In this command, IP should be replaced with the IP
address of the system on which you want the display to appear.
On the system you want the display to appear on, you must execute the command xhost
+remotehostname, where remotehostname is the name of the host from which you are running the
51

Installing Red Hat* Enterprise Linux 4*
Intel® Server Board S5000PAL
original display. Using the command xhost +remotehostname limits access to the remote display
terminal and does not allow access from anyone or any system not specifically authorized for remote
access.
driverdisk:
This command performs the same function as the dd command and also prompts you to use a driver
diskette during the installation of Red Hat Enterprise Linux.
ide=nodma:
This command disables DMA on all IDE devices and may be useful when having IDE -related problems.
linux upgradeany:
This command relaxes some of the checks on your /etc/redhat-release file. If your /etc/redhat-release
file has been changed from the default, your Red Hat Enterprise Linux installation may not be found
when attempting an upgrade to Red Hat Enterprise Linux 4. Use this option only if your existing Red
Hat Enterprise Linux installation was not detected.
mediacheck:
This command gives you the option of testing the integrity of the install source (if an ISO -based
method). This command works with the CD, DVD, hard drive ISO, and NFS ISO installation methods.
Verifying that the ISO images are intact before you attempt an installation helps to avoid problems that
are often encountered during an installation.
mem=xxxM:
This command allows you to override the amount of memory the kernel detects for the machine. This
may be needed for some older systems where only 16 MB is detected and for some new machines
where the video card shares the video memory with the main memory. When executing this command,
xxx should be replaced with the amount of memory in megabytes.
nmi_watchdog=1:
This command enables the built -in kernel deadlock detector. This command can be used to debug hard
kernel lockups. By executin g periodic NMI (Non Maskable Interrupt) interrupts, the kernel can monitor
whether any CPU has locked up and print out debugging messages as needed.
noapic:
This x86 boot command tells the kernel not to use the APIC chip. It may be helpful for some
motherboards with a bad APIC (such as the Abit BP6) or with a buggy BIOS. Systems based on the
NVIDIA nForce3 chipset (such as the ASUS SK8N) have been known to hang during IDE detection at
boot time, or display other interrupt-delivery issues.
noht:
This x86 boot command disables hyperthreading.
52

Installing Red Hat* Enterprise Linux 4*
Intel® Server Board S5000PAL
nofb:
This command disables frame buffer support and allows the installation program to run in text mode.
This command may be necessary for accessibility with some screen reading hardware.
nomce:
This x86 boot command disables self -diagnosis checks performed on the CPU. The kernel enables self-
diagnosis on the CPU by default (called Machine Check Exception). Early Compaq Pentium systems may
need this option as they do not support processor error checking correctly. A few other laptops, notably
those using the Radeon IGP chipset, may also need this option.
nopass:
This command disables the passing of keyboard and mouse information to stage 2 of the installation
program. It can be used to test keyboard and mouse configuration screens during stage 2 of the
installation program when performing a network installation.
nopcmcia:
This command ignores any PCMCIA controllers in system.
noprobe:
This command disables hardware detection and instead prompts the user for hardware information.
noshell:
This command disables shell access on virtual console 2 during an installation.
nousb:
This command disables the loading of USB support during the installation. If the installation program
tends to hang early in the process, this command may be helpful.
nousbstorage:
This command disables the loading of the usbstorage module in the installation program’s loader. It may
help with device ordering on SCSI systems.
numa=off:
Red Hat Enterprise Linux supports NUMA (Non-Unifor m Memory Access) on the AMD64 architecture.
While all CPUs can access all memory even without NUMA support, the NUMA support present in the
updated kernel causes memory allocations to favor the CPU on which they originate as much as
possible, thereby minimizing inter-CPU memory traffic. This can provide significant performance
improvements in certain applications. To revert to the original non -NUMA behavior, specify this boot
option.
reboot=b:
This x86, AMD64, and Intel® EM64T boot command changes the way the kernel tries to reboot the
machine. If a kernel hang is experienced while the system is shutting down, this command may cause
the system to reboot successfully.
53

Installing Red Hat* Enterprise Linux 4*
Intel® Server Board S5000PAL
rescue:
This command runs rescue mode. Refer to the Red Hat Enterprise Linux System Admi nistration Guide
for more information about rescue mode.
resolution=:
Tells the installation program which video mode to run. It accepts any standard resolution, such as
640x480, 800x600, 1024x768, and so on.
serial:
This command turns on serial console support.
skipddc:
This x86 boot command skips the ddc monitor probe which causes problems on some systems.
text:
This command disables the graphical installation program and forces the installation program to run in
text mode.
updates:
This command prompts you to insert a ?oppy diskette containing updates (bug fixes). It is not needed if
you are performing a network installation and have already placed the updates image contents in
RHupdates/ on the server.
vnc:
This command allows you to install from a VNC server.
vncpassword=:
This command sets the password used to connect to the VNC server
54

Installing Red Hat* Enterprise Linux 4*
Intel® Server Board S5000PAL
www.intel.com/go/esaa
The information contained in this document is provided for informational purposes only and represents the current view of Intel Corporation (“Intel”)
and its contributors ("Contributors") on, as of the date of publication. Intel and the Contributors make no commitment to update the information
contained in this document, and Intel reserves the right to make changes at any time, without notice.
DISCLAIMER. THIS DOCUMENT, IS PROVIDED “AS IS.” NEITHER INTEL, NOR THE CONTRIBUTORS MAKE ANY REPRESENTATIONS OF ANY KIND WITH
RESPECT TO PRODUCTS REFERENCED HEREIN, WHETHER SUCH PRODUCTS ARE THOSE OF INTEL, THE CONTRIBUTORS, OR THIRD PARTIES. INTEL,
AND ITS CONTRIBUTORS EXPRESSLY DISCLAIM ANY AND ALL WARRANTIES, IMPLIED OR EXPRESS, INCLUDING WITHOUT LIMITATION, ANY
WARRANTIES OF MERCHANTABILITY, FITNESS FOR ANY PARTICULAR PURPOSE, NON-INFRINGEMENT, AND ANY WARRANTY ARISING OUT OF THE
INFORMATION CONTAINED HEREIN, INCLUDING WITHOUT LIMITATION, ANY PRODUCTS, SPECIFICATIONS, OR OTHER MATERIALS REFERENCED HEREIN.
INTEL, AND ITS CONTRIBUTORS DO NOT WARRANT THAT THIS DOCUMENT IS FREE FROM ERRORS, OR T HAT ANY PRODUCTS OR OTHER TECHNOLOGY
DEVELOPED IN CONFORMANCE WITH THIS DOCUMENT WILL PERFORM IN THE INTENDED MANNER, OR WILL BE FREE FROM INFRINGEMENT OF THIRD
PARTY PROPRIETARY RIGHTS, AND INTEL, AND ITS CONTRIBUTORS DISCLAIM ALL LIABILITY THEREFOR.
INTEL, AND ITS CONTRIBUTORS DO NOT WARRANT THAT ANY PRODUCT REFERENCED HEREIN OR ANY PRODUCT OR TECHNOLOGY DEVELOPED IN
RELIANCE UPON THIS DOCUMENT, IN WHOLE OR IN PART, WILL BE SUFFICIENT, ACCURATE, RELIABLE, COMPLETE, FREE FROM DEFECTS OR SAFE FOR
ITS INTENDED PURPOSE, AND HEREBY DISCLAIM ALL LIABILITIES THEREFOR. ANY PERSON MAKING, USING OR SELLING SUCH PRODUCT OR
TECHNOLOGY DOES SO AT HIS OR HER OWN RISK.
Licenses may be required. Intel, its contributors and others may have patents or pending patent applications, trademarks, copyrights or other
intellectual proprietary rights covering subject matter contained or described in this document. No license, express, implied, by estoppel or otherwise,
to any intellectual property rights of Intel or any other party is granted herein. It is your responsibility to seek licenses for such intellectual property
rights from Intel and others where appropriate.
Limited License Grant. Intel hereby grants you a limited copyright license to copy this document for your use and internal distribution only. You may not
distribute this document externally, in whole or in part, to any other person or entity.
LIMITED LIABILITY. IN NO EVENT SHALL INTEL, OR ITS CONTRIBUTORS HAVE ANY LIABILITY TO YOU OR TO ANY OTHER THIRD PARTY, FOR ANY LOST
PROFITS, LOST DATA, LOSS OF USE OR COSTS OF PROCUREMENT OF SUBSTITUTE GOODS OR SERVICES, OR FOR ANY DIRECT, INDIRECT, SPECIAL OR
CONSEQUENTIAL DAMAGES ARISING OUT OF YOUR USE OF THIS DOCUMENT OR RELIANCE UPON THE INFORMATION CONTAINED HEREIN, UNDER ANY
CAUSE OF ACTION OR THEORY OF LIABILITY, AND IRRESPECTIVE OF WHETHER INTEL, OR ANY CONTRIBUTOR HAS ADVANCE NOTICE OF THE
POSSIBILITY OF SUCH DAMAGES. THESE LIMITATIONS SHAL L APPLY NOTWITHSTANDING THE FAILURE OF THE ESSENTIAL PURPOSE OF ANY LIMITED
REMEDY.
Intel, the Intel logo, and Intel Xeon are trademarks or registered trademarks of Intel Corporation or its subsidiaries in the United States and other
countries.
*Other names and brands may be claimed as the property of others.
Copyright © 2006, Intel Corporation. All Rights Reserved.
55
 Loading...