

Page 1

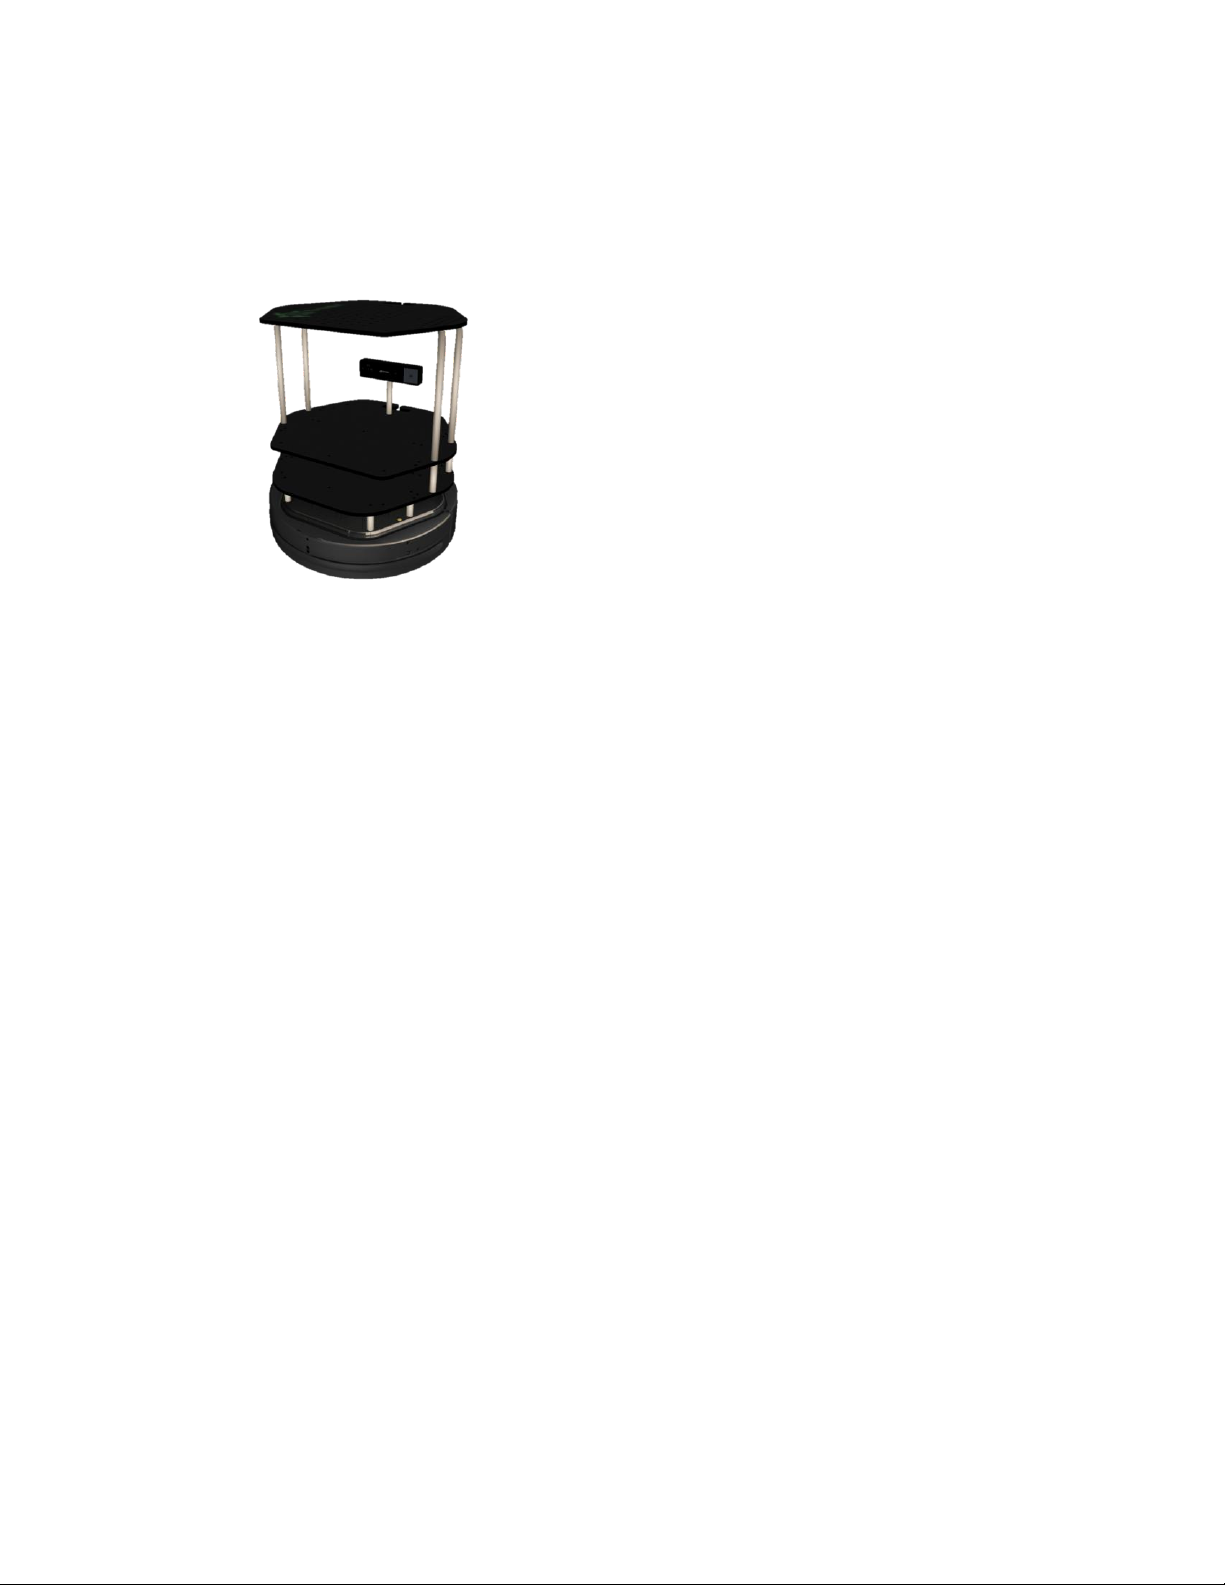
Euclid
PerC System Innovation
GETTING STARTED GUIDE
PERC SYSTEM INNOVATION
INTEL CORPORATION |
Page 2

Table of Contents
1. Getting started guide............................................................................................................... 2
1.1. High level specs ............................................................................................................... 2
1.2. Connect and play – Euclid OOBE - Web interface ........................................................... 2
1.3. The Web interface - Overview ......................................................................................... 3
1.3.1. Portal: ...................................................................................................................... 3
1.3.2. System status: .......................................................................................................... 4
1.3.3. Scenarios.................................................................................................................. 5
1.3.4. Nodes Status: ........................................................................................................... 6
1.3.5. Monitor .................................................................................................................... 7
1.3.6. Nodes Configuration ................................................................................................ 9
1.3.7. Arduino .................................................................................................................. 10
1.3.8. Wireless Settings ................................................................................................... 11
1.3.9. System Log ............................................................................................................. 11
1.4. Remote Work – .............................................................................................................. 13
1.4.1. VNC ........................................................................................................................ 13
1.4.2. SSH ......................................................................................................................... 13
1.5. Local Work – HUB .......................................................................................................... 13
1.6. Connect Euclid to an external network ......................................................................... 15
1.7. Euclid IP Discovery ......................................................................................................... 15
1.8. Working with a ROS companion machine ..................................................................... 15
1.8.1. Euclid as a master .................................................................................................. 15
1.8.2. Euclid as a ROS device ........................................................................................... 16
1.9. Working with and Arduino Device................................................................................. 16
1.10. Adding a new ROS package to Euclid ........................................................................ 17
1.11. Update Euclid SW ...................................................................................................... 18
4. Turtlebot follower tutorial .................................................................................................... 19
5. Known Issues ......................................................................................................................... 19
6. Contact details – PerC Robotics Innovation Team ................................................................ 20
Page 3

1. Getting started guide
1.1. High level specs
1.2. Connect and play – Euclid OOBE - Web interface
Intel® Euclid™ offers a unique out-of-the-box experience by providing a “zero-installation”
approach for first time users. As you will turn on your device, you will be able to connect to it
wirelessly and control it from any device you own. Follow the steps below:
1. Turn on the device by clicking the ON/OFF button for 3-4 seconds.
Page 4
2. Wait for 30 seconds
3. On your personal device (laptop/tablet/smartphone), connect to the wireless network
(SSID) with the prefix “Euclid”
4. Open the browser and enter the URL: http://cs.local
a. On Android devices, you will need to enter the full IP - http://10.42.0.1/
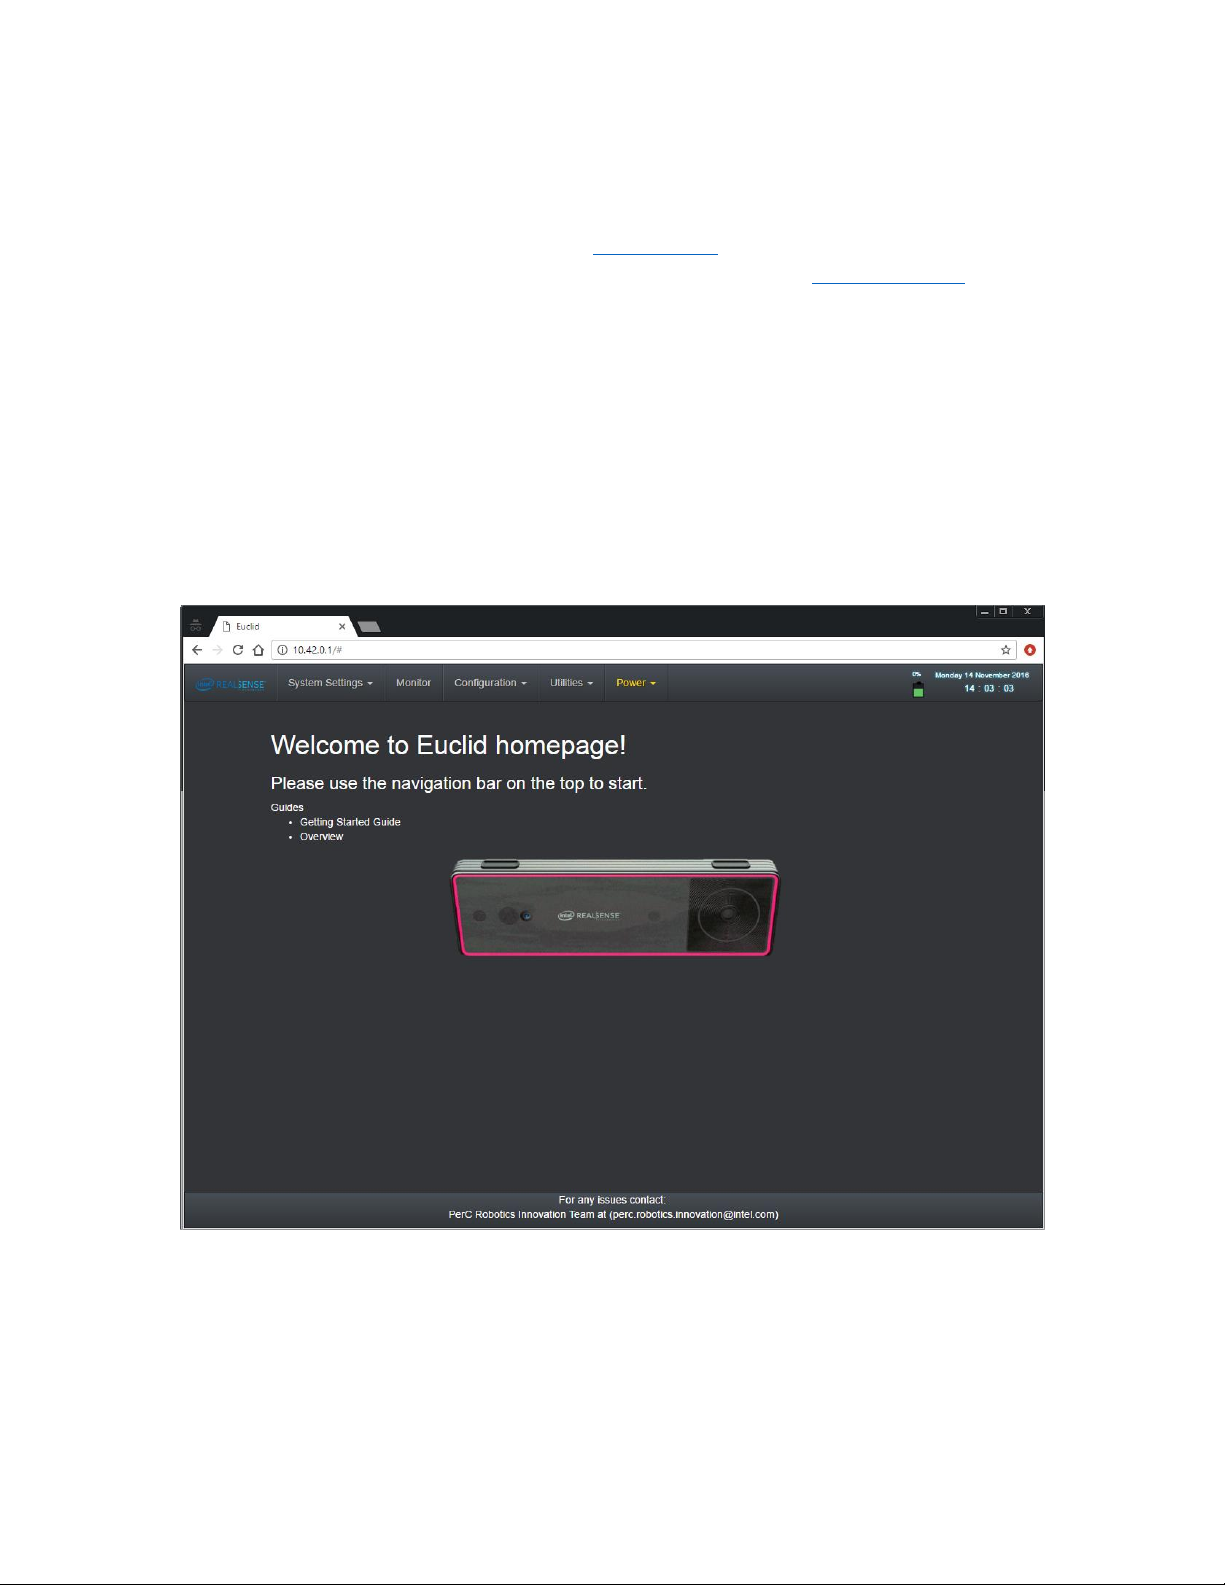
This will open the main portal for the Euclid™ device.
In this website you can monitor the device status, create, edit and launch different
scenarios and change configuration.
1.3. The Web interface - Overview
1.3.1. Portal:
Page 5
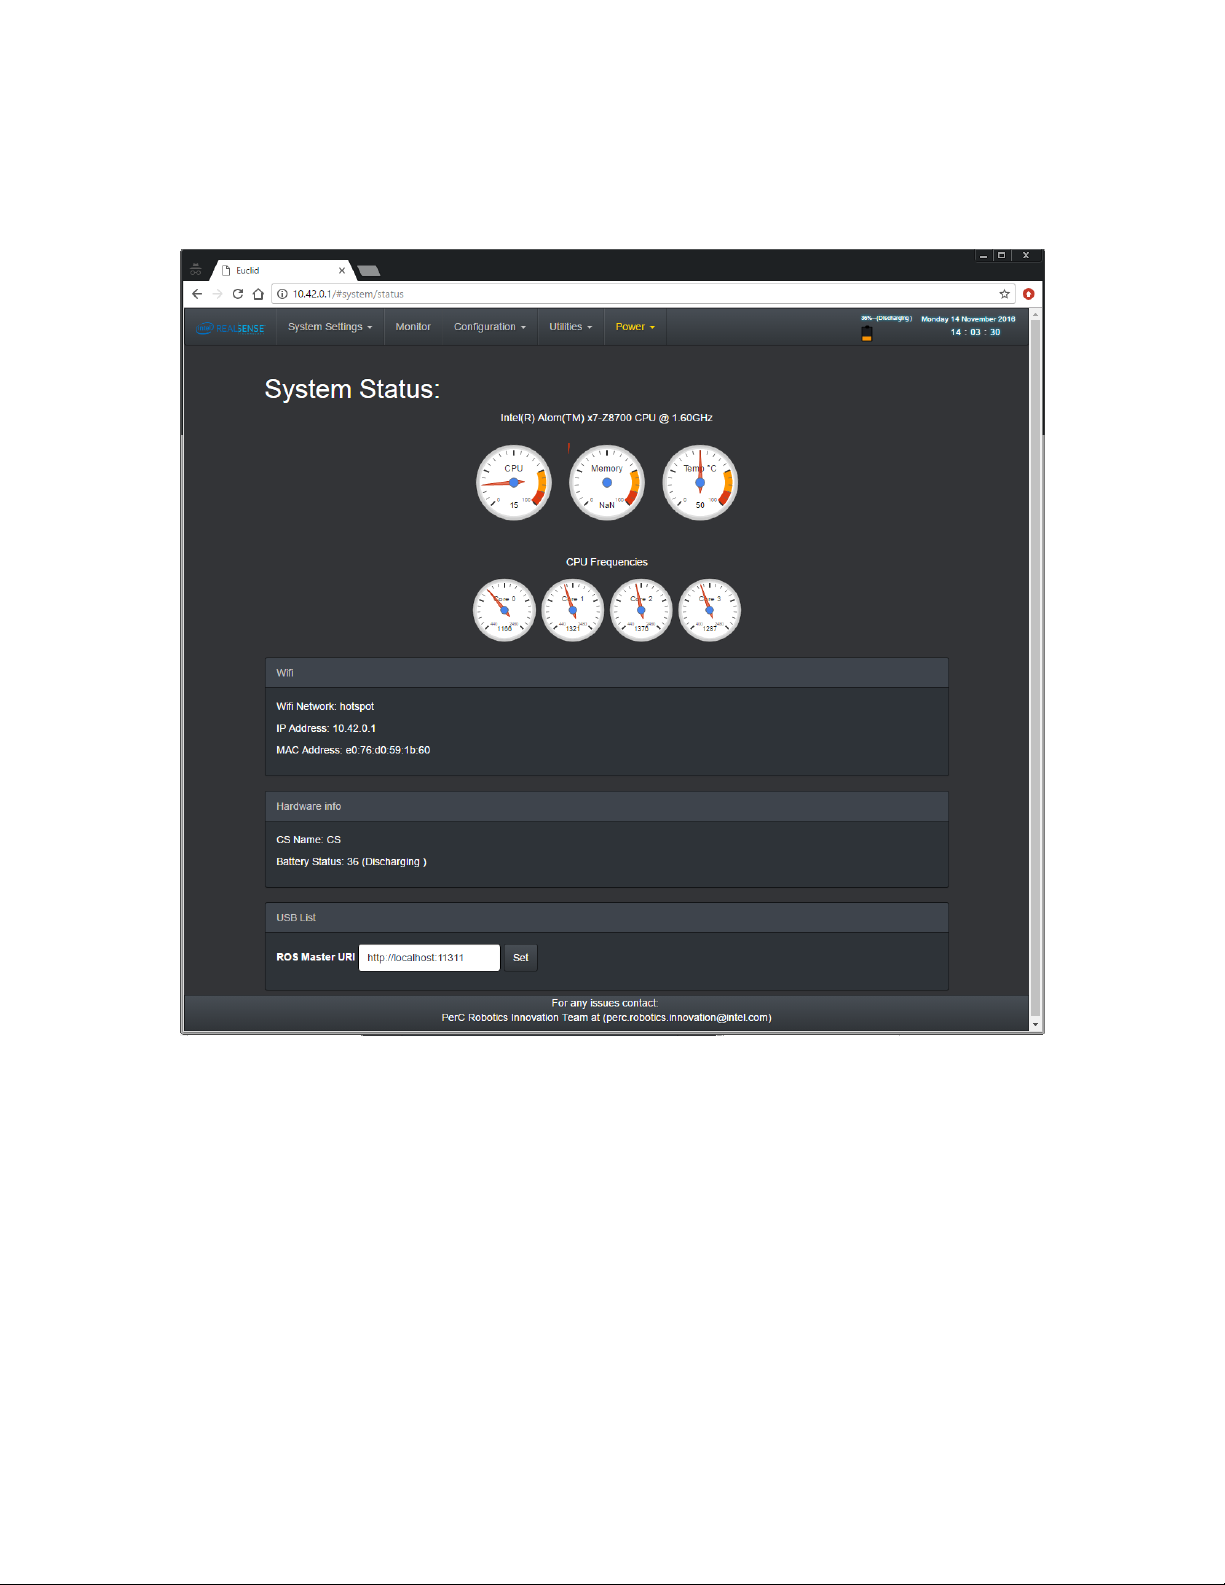
1.3.2. System status:
This part provides basic monitoring for the device’s state. Including Wifi status,
connected USB devices etc.
Page 6
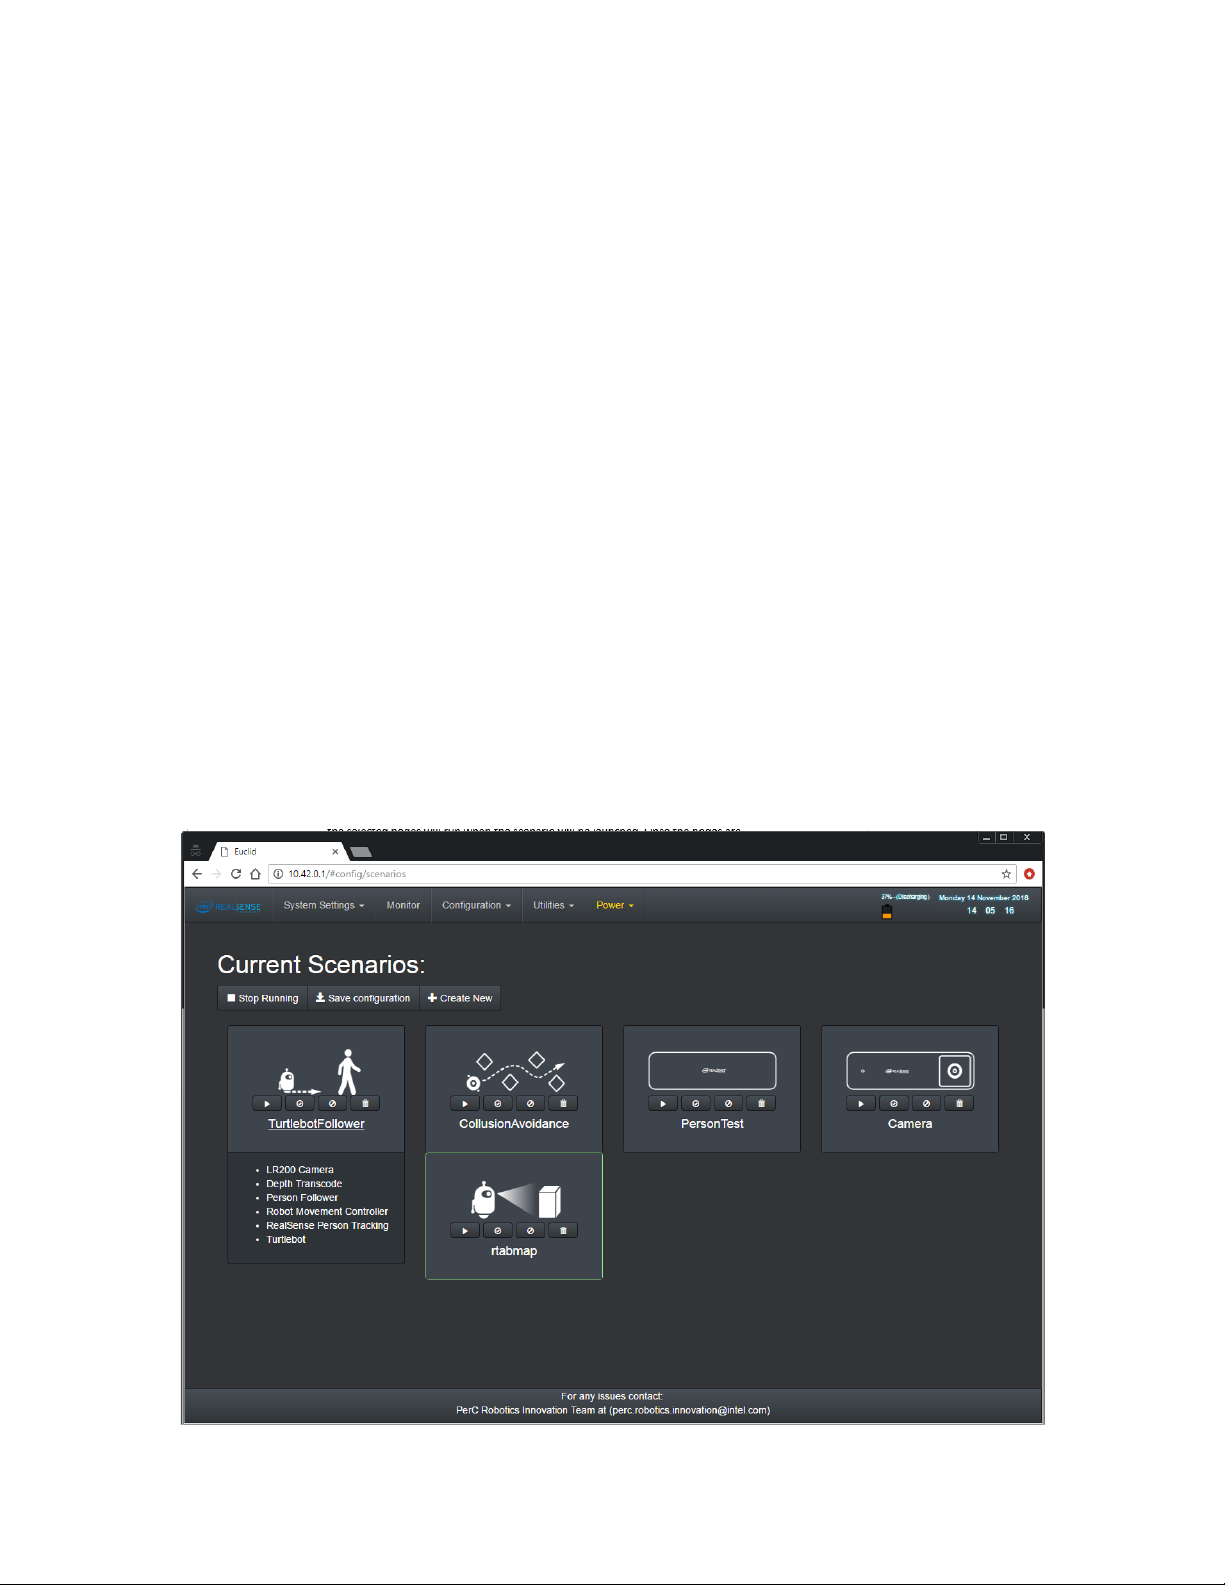
1.3.3. Scenarios
This page allows to configure scenarios, create new scenarios, start/stop scenarios and
remove existing scenarios.
A scenario is the heart of the control interface of Euclid™. The concept is that a scenario
is an experience or an application. A scenario is first defined by that experience. In order
to create a scenario, you only need to enter a name and select the underlying nodes. All
the selected nodes will run when the scenario will be launched. Once the nodes are
running, they can be configured via the configuration interface (see Configuration page).
Moreover, the communication with the robot can be selected (ROS native –turtlebot –
or general serial Arduino connection) and even the pose of the Euclid device with
respect to the robot.
At a whole a scenario is defined by a set of nodes running together, their respective
configurations, the pose of the device with respect to the robot (URDF) and the
underlying communication (native ROS robot or Arduino based interaction).
For example, a turtlebot follower scenario can be created by selecting to run the camera
node, follower node and choose the native ROS robot.
Only one scenario can run at a time. A scenario can be marked as “run on startup”. This
will cause the system to load that specific scenario as the system starts.
Page 7

A running scenario is marked in Green rectangle.
The basic functionality:
Create a scenario:
In order to create a new Scenario, simply check the nodes you want to use under the
“Create new scenario:” title, enter a scenario name and click on the “Create new
scenario” button.
Once clicked, you will see a new scenario appears above under the “Current Scenarios”.
Remove a scenario:
In order to remove an existing scenario, simply mark one of the “current scenarios” and
click on the Remove selected.
Run a scenario:
Only one scenario can run at a time.
Select a scenario from the current scenarios and click on “Run selected”.
Stop a scenario:
In order to stop a running scenario, simply click on the “Stop Running” button. Since
only one scenario can run at a time, no need to check the scenario.
Activate Scenario:
To set a scenario as the one that will run as default when the system starts, you need to
set it as the “Active” scenario.
Simply select a scenario from the current scenarios and click on “Activate selected”
button.
Deactivate Scenario:
To un-set a scenario as the one that will run as default when the system starts,s imply
select a scenario from the current scenarios and click on “Deactivate selected” button.
Save Configuration:
Once you created a scenario and you set it as running, you can start configuring it. (See
Nodes Configuration page).
Once you configured the nodes, you can click on “Save configuration”. Next time this
scenario will load, it will load this configuration.
1.3.4. Nodes Status:
This part provides basic monitoring functionality. All the Nodes should be Green,
meaning they are running. If one is done, this may cause unexpected behavior. You
should try relaunching the scenario or in a more extreme cases try to restart the device.
You can also check the system log page to get more information what is the root for this
behavior.
Page 8
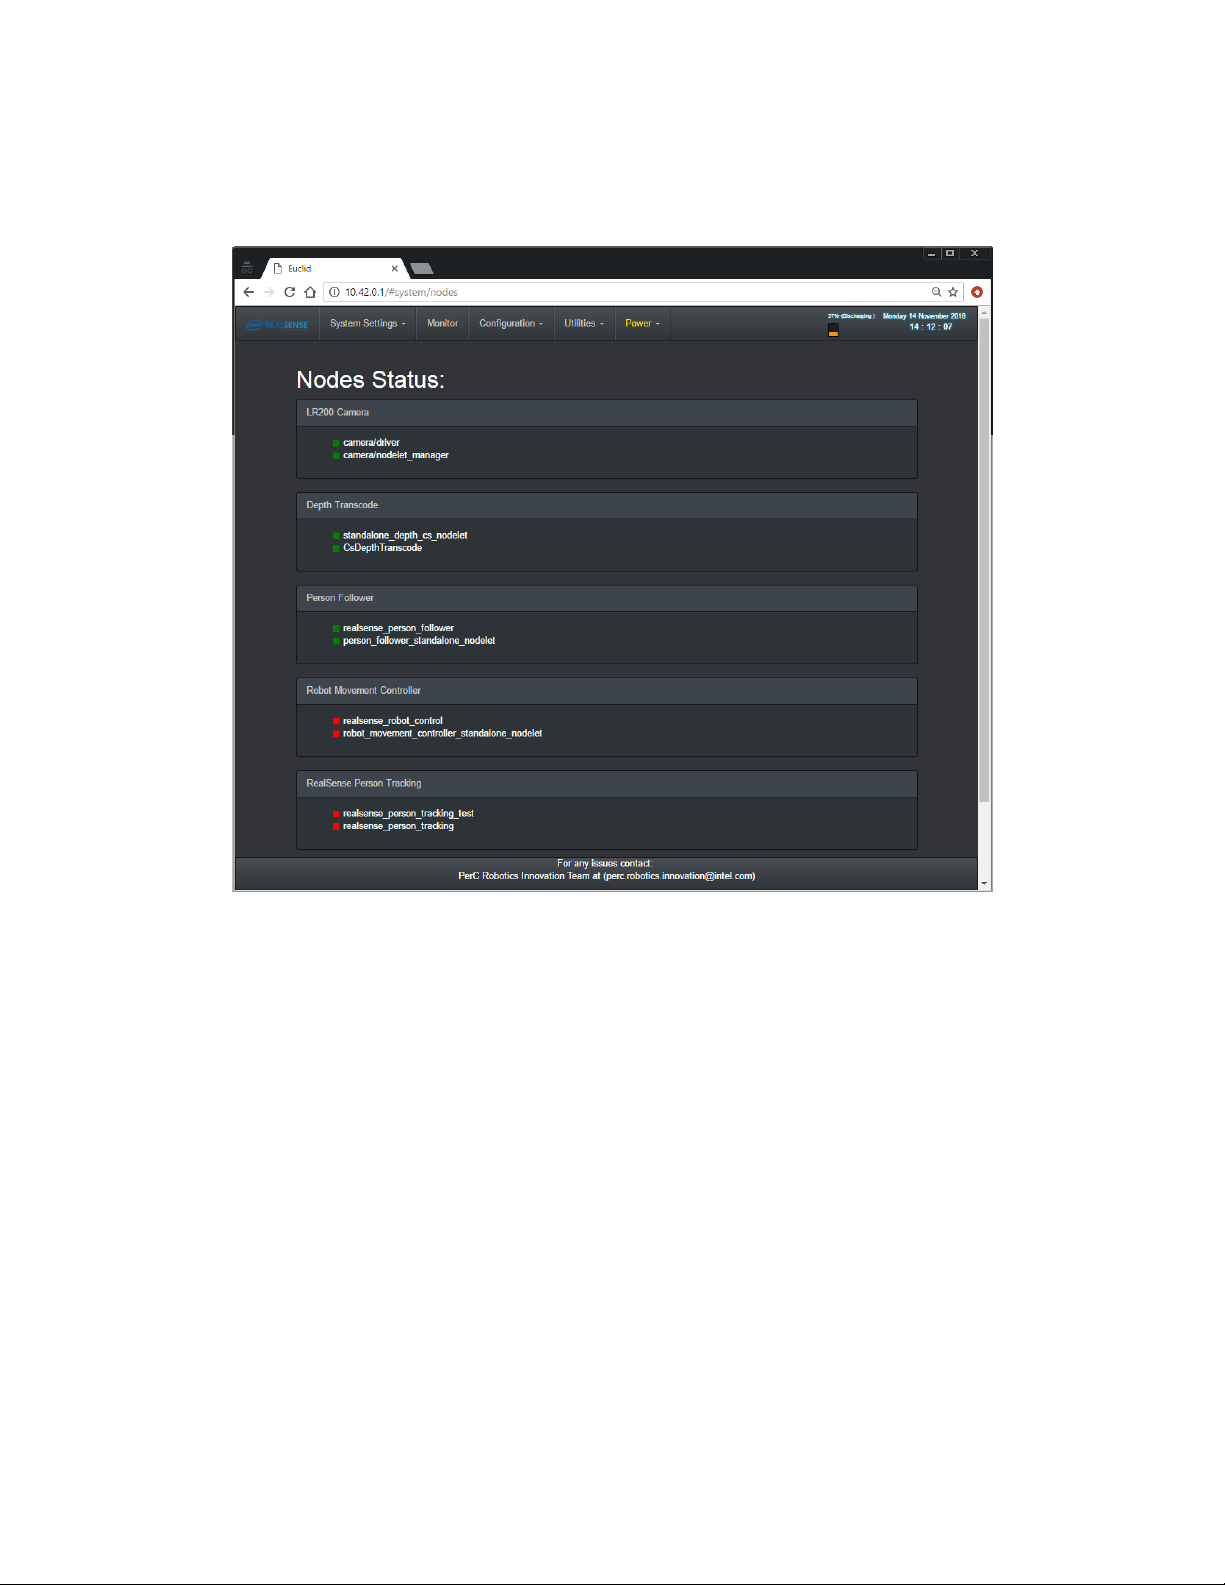
Green = running as expected
Red = not running
You will see only nodes that are part of the current running scenario (see Scenario
section)
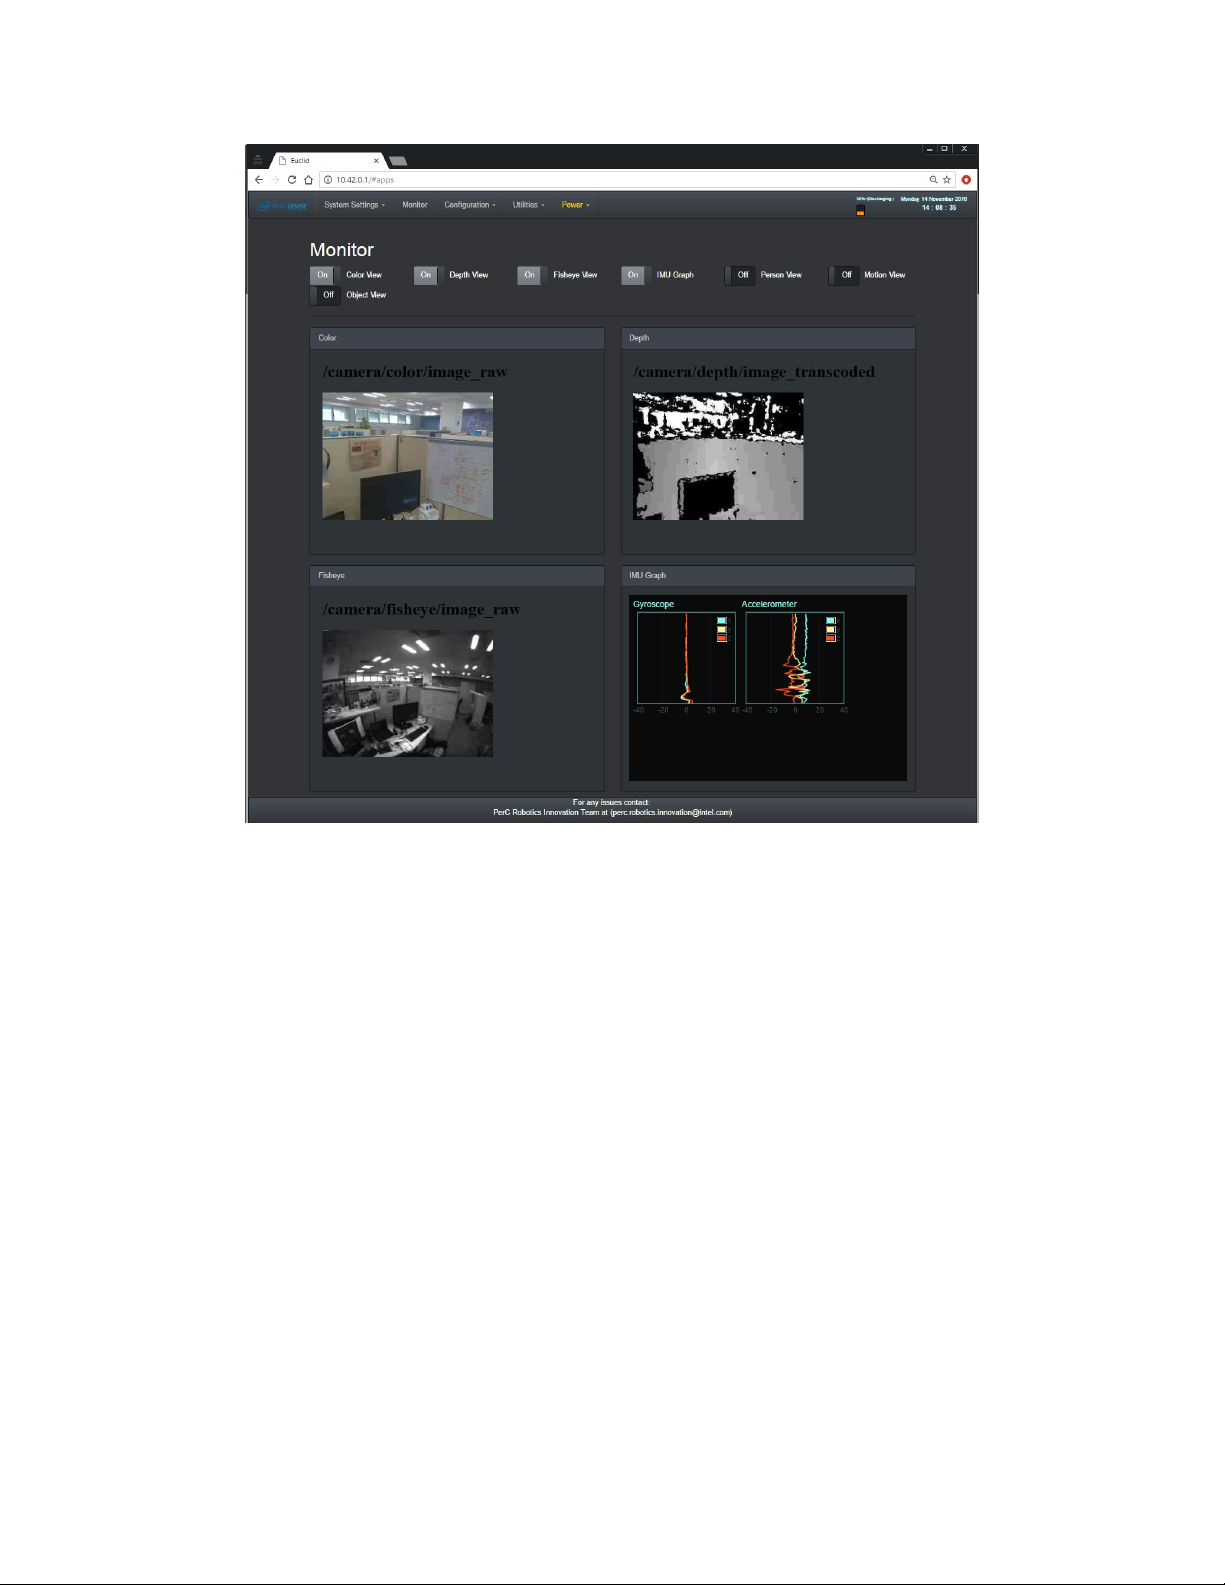
1.3.5. Monitor
In this page you will be able to view different previews. Each monitoring app can be
turned on or off via the dedicated button on the top of the page.
Please note that turning a monitor app does not run the underlying camera or
algorithm. This needs to be done first via a scenario
.
Page 9
Page 10

1.3.6. Nodes Configuration
Each node in the system can be configured independently. For example, camera node
can be configured with different white balance values.
You will need simply to choose the desired node from the list and the available
parameters will appear. Once you changed the values of one or several parameters,
click on the “update”. The changes are being updated instantly in the system.
Page 11
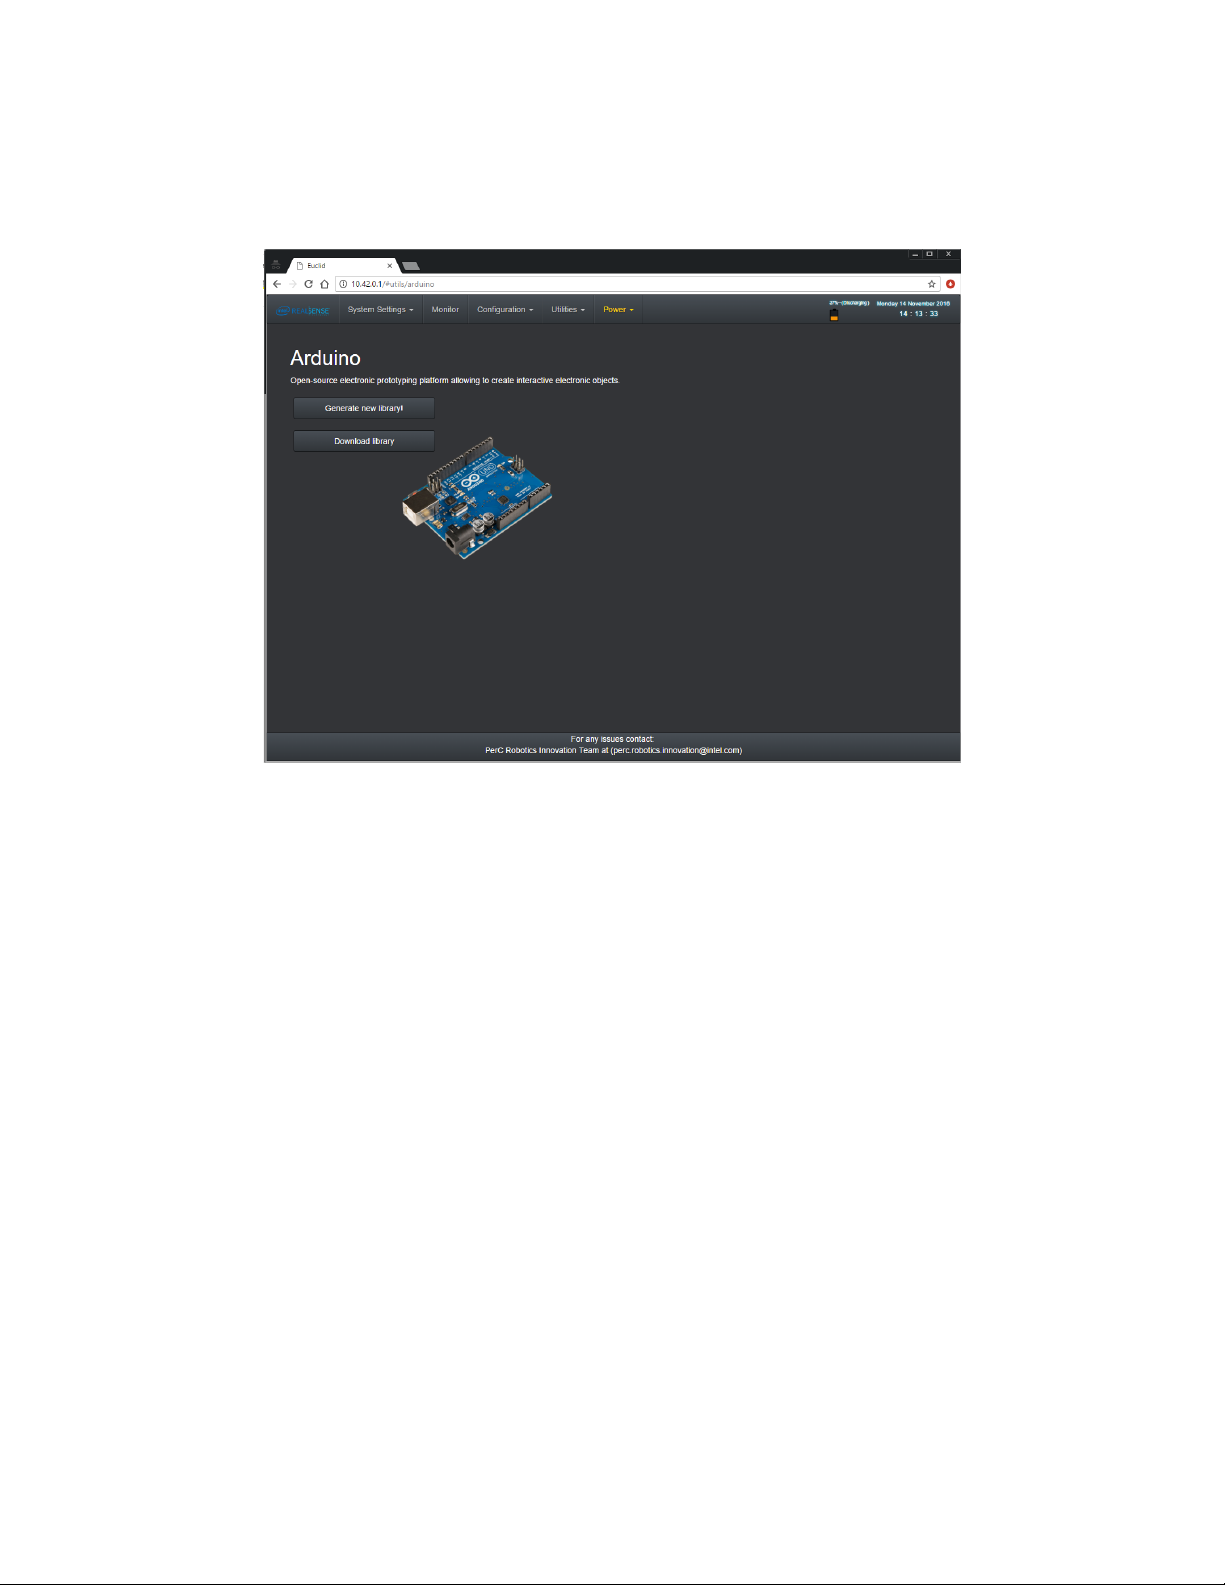
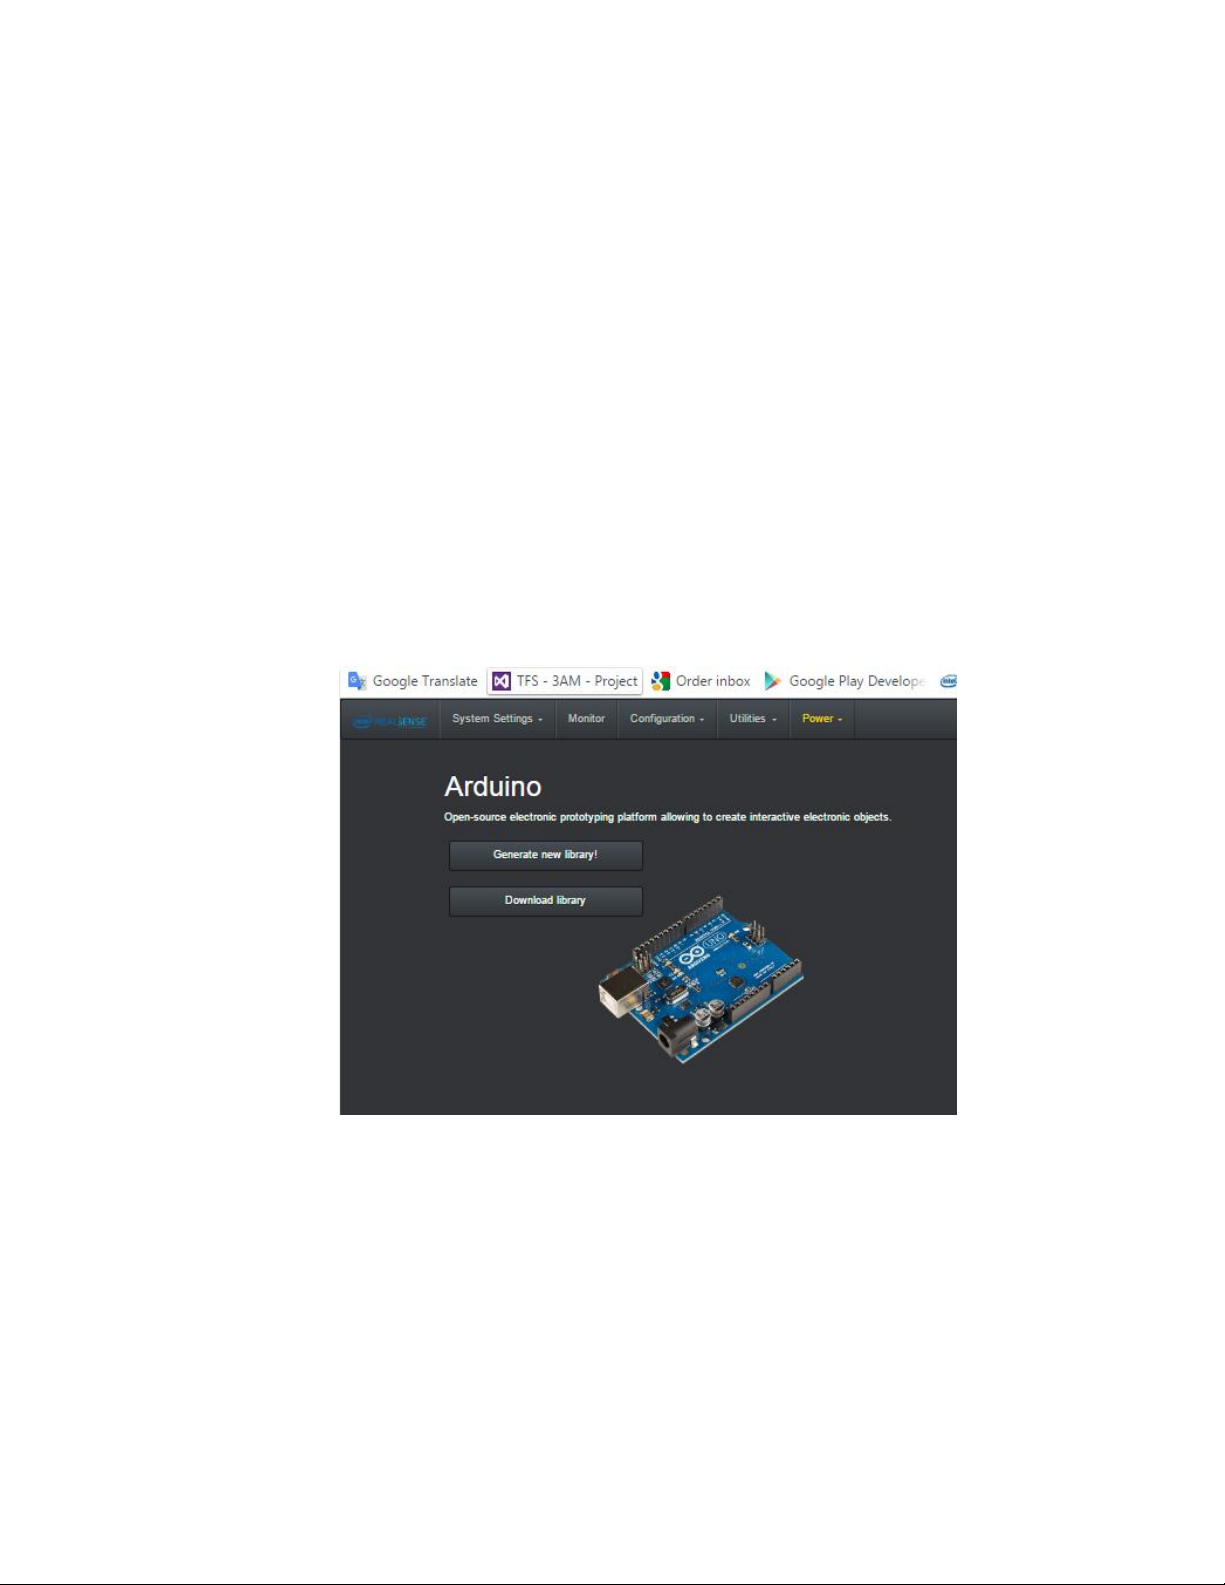
1.3.7. Arduino
This section provides an interface to regenerate libraries for the Arduino device and to
download it to the PC.
First button will start the regeneration (takes few sections)
Once done, click on the “Download library” button to get a zip file. This file needs to be
extracted to Arduino IDE libraries directory.
Page 12

1.3.8. Wireless Settings
This section allows the user to connect to another WLAN or to enable the hotspot.
Please note the known issues
1.3.9. System Log
Under the system log page you can get a glimpse of what is going “under the hood”.
Page 13

Page 14

1.4. Remote Work –
Once you got it all settled in, you can take the work to the next level by remotely connect to the
device and have a more tight interaction.
There are several options, but first make sure the device is working and you are connected to it:
1. Turn on the device by clicking the ON/OFF button for 3-4 seconds.
2. Wait for 30 seconds
3. On your personal device (laptop/tablet/smartphone), connect to the wireless network
(SSID) with the prefix “Euclid”
1.4.1. VNC
The Euclid device runs by automatically a VNC server, so by connecting to its’ hotspot and
running a VNC client, you will be able to remotely work on your Euclid.
1. Launch VNC client on your device
2. Enter the device’s IP - 10.42.0.1
3. Et Voila!
1.4.2. SSH
Since Euclid runs Linux, you can use SSH natively. On another Linux machine simply type:
ssh <ip of eculid>
1.5. Local Work – HUB
Another possibility is to use Euclid as computer by connecting a screen, a keyboard and a
mouse.
Just connect all the wires and you are set to go. Easy as that.
Page 15

Page 16
1.6. Connect Euclid to an external network
Euclid, by default, is running a hotspot. You can configure Euclid to connect to an external
network. Follow those steps (future version will include a web interface option):
1. Connect Euclid to a terminal (See Section 1.5)
2. Call:
a. rosservice call /cs/network/scan
b. rosservice call /cs/network/list
Verify that the SSID you want it listed.
c. rosserivce call /cs/network/connect “ssid:’<SSID_NAME>’
password:’<PASSWORD>’ “
d. rosservice call /cs/restart_oobe
e. run ifconfig* in order to get device’s IP
*see section 1.7
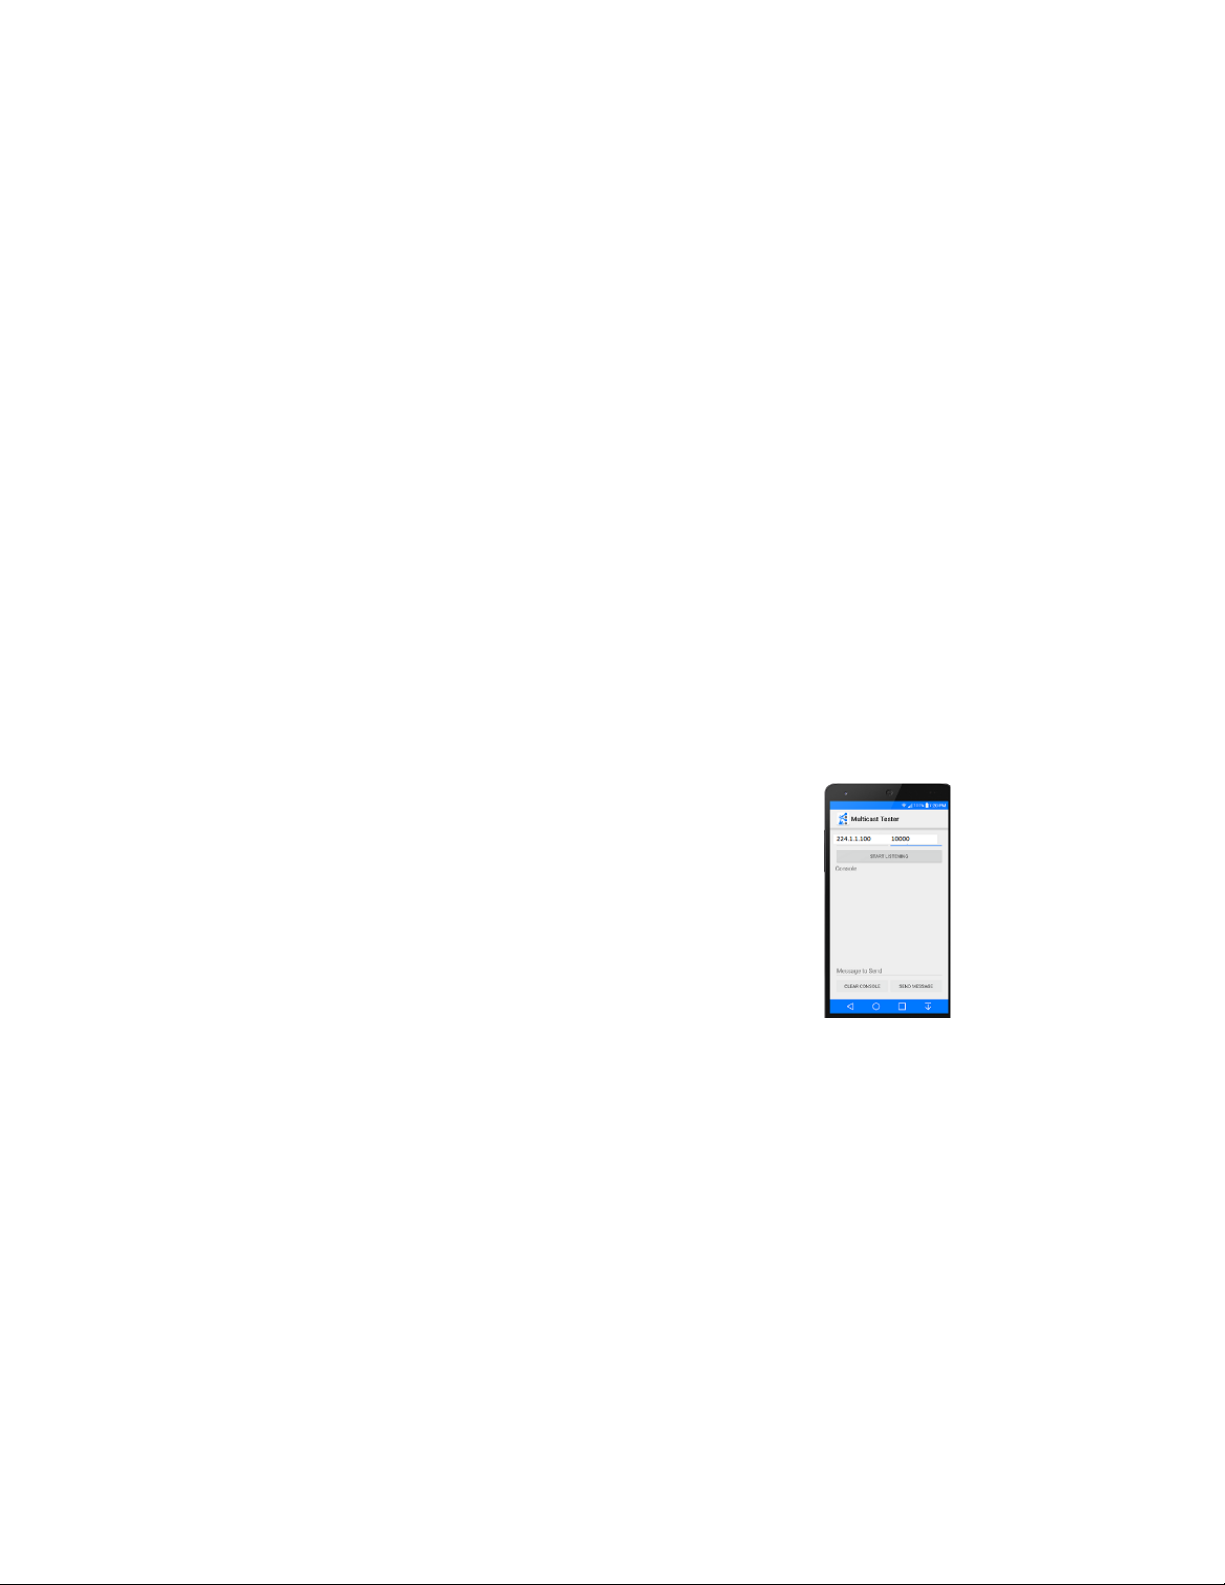
1.7. Euclid IP Discovery
Euclid publish its IP address in order to be identified on network. Publishing is done by standard
multicast system so message can be consumed by any multicast receiver. Following is example
on how to consume message with your mobile phone:
1. On your phone install multicast app such as ‘Multicast Tester’ for example.
2. Connect your phone to same network as the one your Euclid device is connected.
3. Open the multicast application on your phone:
a. Multicast IP: 224.1.1.100
b. Multicast Port: 10000
c. Stat Listening to multicast messages.
d. Messages will appear with the corresponding Euclid
hostname and its IP address.
** Discovery app will show every Euclid device that is connected to the specified network.
*** See Wiki for sample multicast client code.
1.8. Working with a ROS companion machine
In case you have an existing ROS machine there are two options working with the Euclid device:
1.8.1. Euclid as a master
Euclid is running a ROS Core on it by default. Simply configure your client device to connect to
Euclid’s Hotspot and follow those steps:
1. Configure the ROS_MASTER_URI to 10.42.0.1 (the Euclid’s IP on its own hotspot)
a. $> export ROS_MASTER_URI=10.42.0.1
2. Run ifconfig to get you IP addres and set it to ROS_IP:
a. $> export ROS_IP=<Machine IP>
Page 17
1.8.2. Euclid as a ROS device
Euclid can be configured to connect to existing an ROS Master device. In order to do so, first
configure Euclid to connect to the desired wireless network (see section 1.6), then follow the
steps below:
1. Connect to the web interface
2. Navigate to the system settings page
3. Change the ROS MASTER URI
1.9. Working with and Arduino Device
Euclid comes with a native support for Arduino, based on ros_bridge, ros_serial and
ros_arduion.
In general, Euclid sends data to the companion Arduino device via serial interface (USB or
Bluetooth). There are many examples how to use ROS and Euclid directly from Arduino.
In order to user Euclid with an Arduino follow the following steps:
1. On a device with Arduino IDE installed, connect to the Web interface (see section 1.2)
2. Navigate to the Arduino page an click on “Generate a new library”
After few seconds you will get a notification to download the library to your machine.
Download it.
3. Open the IDE and click on the import .zip library:
Page 18

4. Select the downloaded ZIP library and follow the instructions on the IDE.
5. To get started, you can choose any of the provided samples:
1.10. Adding a new ROS package to Euclid
You can add a new package to Euclid by any of the following:
1. Installing a deb from apt-get or another source
Page 19

2. Compile directly on the device
Once you have a working ROS package on Euclid, follow those steps to add it to the web
interface:
1. Open this page on your client device: http://10.42.0.1/AddNewNode.html
2. Follow the instructions
3. Restart OOBE via the web or restart the device
1.11. Update Euclid SW
In order to update Euclid SW stack:
1. Connect the Euclid device to a screen/keyboard/mouse (see section 1.5)
2. Copy the given update.tr.gz in the follosing path: /intel/euclid_update
3. Call the update service:
rosservice call /euclid/update_version
4. Done. You can see the version number in /intel/euclid/config/version.ini.
a. If there was an issue, you can verify the log at /intel/euclid_update/LOG.txt
Page 20
4. Turtlebot follower tutorial
This is a step by step tutorial showing how to define a new scenario that will allow a turtlebot to
start following objects in-front of it.
1. Attach the Euclid to a turtlebot as described in this image:
2. Connect to OOBE layer
Turn on the device and connect your client device to the hotspot SSID (see getting
started guide for detailed explanation)
3. In the web interface, navigate to the Scenario section
4. Select the following nodes:
a. R200 Camera
b. Depth Enhance
c. Depth Follower
d. Turtlebot
5. Give a name to that Scenario and click on “Create Scenario”.
6. Navigate to the Configuration section for RealSense and Depth follower.
a. You can configure the parameters if needed.
7. Navigate to the Scenario section
8. Click Save Configuration
9. You can mark the scenario as Default if you want it to run on start-up by default.
5. Known Issues
1. 6DOF cannot work together with camera streams. User can choose to get 6DOF data OR
to enable the different streams.
2. Device natively supports only WLAN.
3. Arduino connection – currently supports “ttyACM0” or “ttyUSB0”
4. Scenario names shouldn’t contain spaces.
5. Add New Euclid Node has a different HTML page.
Page 21

6. Contact details – PerC Robotics Innovation Team
Amit Moran: amit.moran@intel.ocm
Majd Srour: majd.srour@intel.com
Tsahi Mizrahi: tsahi.mizrahi@intel.com
Sarang Borude: sarang.h.borude@intel.com
Page 22

Federal Communication Commission Interference Statement
This device complies with Part 15 of the FCC Rules. Operation is subject to the following two
conditions: (1) This device may not cause harmful interference, and (2) this device must
accept any interference received, including interference that may cause undesired operation.
This equipment has been tested and found to comply with the limits for a Class B digital
device, pursuant to Part 15 of the FCC Rules. These limits are designed to provide
reasonable protection against harmful interference in a residential installation. This equipment
generates, uses and can radiate radio frequency energy and, if not installed and used in
accordance with the instructions, may cause harmful interference to radio communications.
However, there is no guarantee that interference will not occur in a particular installation. If
this equipment does cause harmful interference to radio or television reception, which can be
determined by turning the equipment off and on, the user is encouraged to try to correct the
interference by one of the following measures:
Reorient or relocate the receiving antenna.
Increase the separation between the equipment and receiver.
Connect the equipment into an outlet on a circuit different from that
to which the receiver is connected.
Consult the dealer or an experienced radio/TV technician for help.
FCC Caution:
Any changes or modifications not expressly approved by the party responsible for
compliance could void the user's authority to operate this equipment.
This transmitter must not be co-located or operating in conjunction with any other
antenna or transmitter.
Operations in the 5.15-5.25GHz band are restricted to indoor usage only.
Radiation Exposure Statement:
This device meets the government’s requirements for exposure to radio waves.
This device is designed and manufactured not to exceed the emission limits for exposure to
radio frequency (RF) energy set by the Federal Communications Commission of the U.S.
Government.
The exposure standard for wireless device employs a unit of measurement known as the
Specific Absorption Rate, or SAR. The SAR limit set by the FCC is 1.6W/kg. *Tests for SAR
are conducted using standard operating positions accepted by the FCC with the device
transmitting at its highest certified power level in all tested frequency bands.
Page 23

Industry Canada statement
This device complies with Industry Canada license-exempt RSS standard(s). Operation
is subject to the following two conditions:
1) this device may not cause interference, and
2) this device must accept any interference, including interference that may cause
undesired operation of the device.
Le présent appareil est conforme aux CNR d'Industrie Canada applicables aux appareils
radio exempts de licence. L'exploitation est autorisée aux deux conditions suivantes:
1) l'appareil ne doit pas produire de brouillage, et
2) l'utilisateur de l'appareil doit accepter tout brouillage radioélectrique subi, même si
le brouillage est susceptible d'en compromettre le fonctionnement.
This Class B digital apparatus complies with Canadian ICES-003.
Cet appareil numérique de la classe B est conforme à la norme NMB-003 du Canada.
This device complies with RSS-310 of Industry Canada. Operation is subject to the
condition that this device does not cause harmful interference.
Cet appareil est conforme à la norme RSS-310 d'Industrie Canada. L'opération est
soumise à la condition que cet appareil ne provoque aucune interférence nuisible.
This device and its antenna(s) must not be co-located or operating in conjunction with
any other antenna or transmitter, except tested built-in radios.
Cet appareil et son antenne ne doivent pas être situés ou fonctionner en conjonction avec
une autre antenne ou un autre émetteur, exception faites des radios intégrées qui ont été
testées.
The County Code Selection feature is disabled for products marketed in the US/ Canada.
La fonction de sélection de l'indicatif du pays est désactivée pour les produits
commercialisés aux États-Unis et au Canada.
Page 24

Radiation Exposure Statement:
The product comply with the Canada portable RF exposure limit set forth for an uncontrolled
environment and are safe for intended operation as described in this manual. The further RF
exposure reduction can be achieved if the product can be kept as far as possible from the user
body or set the device to lower output power if such function is available.
Déclaration d'exposition aux radiations:
Le produit est conforme aux limites d'exposition pour les appareils portables RF pour les
Etats-Unis et le Canada établies pour un environnement non contrôlé.
Le produit est sûr pour un fonctionnement tel que décrit dans ce manuel. La réduction aux
expositions RF peut être augmentée si l'appareil peut être conservé aussi loin que possible du
corps de l'utilisateur ou que le dispositif est réglé sur la puissance de sortie la plus faible si
une telle fonction est disponible.
FCC ID: 2AK6WEUCLID1
IC: 22461-EUCLID1
 Loading...