

Page 1

ASSIST PLUS Operating instructions
128950_V02
Page 2

Declaration of conformity
INTEGRA Biosciences AG – 7205 Zizers, Switzerland
declares on its own responsibility that the ASSIST PLUS (Model 4505) complies with:
EU Directives
Low Voltage Equipment 2014/35/EU
Electromagnetic Compatibility 2014/30/EU
Restriction of Hazardous Substances 2011/65/EU
Waste Electrical and Electronic Equipment 2012/19/EU
Radio Equipment Directive 2014/53/EU
EU Regulations
Registration, Evaluation, Authorisation and Restriction of Chemicals (REACH)
Ecodesign - Power supplies 278/2009
Standards for EU (titles shortened)
Safety requirements for electrical equipment for measurement,
control and laboratory use - General requirements.
Particular requirements for automatic and semi-automatic
laboratory equipment for analysis and other purposes.
Electrical equipment for measurement, control and laboratory
use - EMC requirements.
Radio equipment and services - Common requirements EN 301 489-1 V2.2.0
Specific conditions for Broadband Data Transmission Systems EN 301 489-17 V3.2.0
Wideband transmission systems - Access to radio spectrum EN 300 328 V2.2
EN 61010-1: 2010
EN 61010-2-81: 2015
EN 61326-1: 2013
1907/2006
Standards for Canada and USA
Safety requirements for electrical equipment for measurement,
control and laboratory use - General requirements.
Safety requirements for electrical equipment for measurement,
control and laboratory use - General requirements.
Particular requirements for automatic and semi-automatic
laboratory equipment for analysis and other purposes.
Operation is subject to the following two conditions:
(1) this device may not cause harmful interference, and
(2) this device must accept any interference received, including
interference that may cause undesired operation.
Zizers, October 7, 2019
Urs Hartmann
CEO
Thomas Neher
Quality Manager
CAN/CSA-C22.2
No. 61010-1
UL 61010-1
UL 61010-2-81
Part 15 of the
FCC Rules
Contains FCC ID:
PI4410B
Page 3

ASSIST PLUS – Operating instructions V02
Table of Contents
Chapter 1 Introduction
1.1 Symbols used...................................................................................5
1.2 Intended use.....................................................................................6
1.3 Safety notes .....................................................................................7
Chapter 2 Description of the device
2.1 Scope of delivery..............................................................................8
2.2 Overview of the ASSIST PLUS ........................................................8
2.2.1 ASSIST PLUS base unit .......................................................8
2.2.2 Touch panel ..........................................................................9
2.2.3 Interfaces ..............................................................................9
2.3 Overview of INTEGRA Electronic Pipettes.....................................10
2.3.1 Pipette parts........................................................................10
2.3.2 Display ................................................................................10
Chapter 3 Installation
3.1 Operating environment...................................................................11
3.2 Setting up and moving of the instrument........................................11
3.3 Charging the battery of the electronic pipette.................................11
3.4 Removing the tip ejector lid ............................................................12
3.5 Adapting the pipette holder ............................................................12
3.6 Attaching and removing an electronic pipette ................................12
3.7 Inserting decks ...............................................................................13
3.8 Inserting waste bags and waste bin ...............................................13
3.9 Toolbox settings .............................................................................14
3.9.1 Enabling ASSIST PLUS program .......................................14
3.9.2 Overview of Toolbox for ASSIST PLUS..............................14
3.9.3 Device Information..............................................................14
3.9.4 Bluetooth Pairing.................................................................15
3.9.5 Tip Monitor ..........................................................................15
3.9.6 Setting tip type ....................................................................15
3.9.7 Position adjustment.............................................................16
Chapter 4 Operation
4.1 Turn on/off the ASSIST PLUS device ............................................17
4.2 Turn on/off an INTEGRA electronic pipette....................................17
4.3 Connection ASSIST PLUS to Pipette.............................................17
4.3.1 Bluetooth connection ..........................................................17
4.3.2 Via communication cable ....................................................18
4.4 Running a program.........................................................................18
4.5 Troubleshooting..............................................................................19
www.integra-biosciences.com 3
Page 4

ASSIST PLUS – Operating instructions V02
Chapter 5 Programming
5.1 Overview pipetting programs..........................................................20
5.2 Setting up a program directly on the pipette...................................21
5.3 Modify existing programs ...............................................................21
5.4 Adjust heights and positions...........................................................22
5.4.1 Enter heights/positions directly ...........................................22
5.4.2 Teach heights/positions on ASSIST PLUS .........................22
5.5 Program offset................................................................................23
5.6 Pipetting alternating wells...............................................................24
5.7 Detailed description of predefined programs..................................25
5.7.1 Serial Dilution program .......................................................25
5.7.2 Repeat/Variable dispense programs...................................29
5.7.3 Multi aspirate program ........................................................32
5.7.4 Plate copy program.............................................................34
5.7.5 Reformat program...............................................................35
5.7.6 Custom programs ...............................................................37
Chapter 6 Maintenance
6.1 Cleaning .........................................................................................41
6.2 Decontamination ............................................................................41
6.3 Servicing.........................................................................................42
6.4 Equipment disposal ........................................................................42
Chapter 7 Technical Data
7.1 Environmental conditions ...............................................................43
7.2 Specification of the device..............................................................43
7.3 Intellectual property ........................................................................43
7.4 Compatible pipettes........................................................................44
7.5 Maximum labware height on deck..................................................44
7.6 Plate compatibility ..........................................................................45
7.7 Plate access pattern.......................................................................46
7.8 Tip travel distances ........................................................................47
Chapter 8 Accessories
8.1 Accessories ...................................................................................48
8.2 Consumables .................................................................................50
Imprint ...................................................................................................56
4 INTEGRA Biosciences AG
Page 5
ASSIST PLUS – Operating instructions V02 Introduction
1 Introduction
These operating instructions contain all the information required for installation, operation
and maintenance of the ASSIST PLUS. This chapter informs about the symbols used in
these operating instructions, the intended use of the ASSIST PLUS and the general safety
instructions.
1.1 Symbols used
The operating instructions specifically advise of residual risks with the following symbols:
ARNING
W
This safety symbol warns against hazards that could result in injury. It also
indicates hazards for machinery, materials and the environment.
It is essential that you follow the corresponding precautions.
C
AUTION
This symbol cautions against potential material damage or the loss of data in
a microprocessor controller. Follow the instructions.
OTE
N
This symbol identifies important notes regarding the correct operation of the
device and labor-saving features.
The device is marked with the following symbols:
IOHAZARD
B
The instrument can be potentially biohazardous due to the use of
biohazardous substances by the operator.
C
RUSHING OF HANDS
The hands may be squeezed, pulled in or otherwise injured by moving parts
of the instrument.
MOVING PARTS
For correct operation, keep the tower moving area free of any
labware and keep hands away.
L
ASER CLASS 1
The sensor contains a class 1 laser which is inherently safe
under reasonably foreseeable conditions of operation.
www.integra-biosciences.com 5
Page 6

ASSIST PLUS – Operating instructions V02 Introduction
1.2 Intended use
This is a general-purpose laboratory instrument for use in research only. Any use of this
instrument in a medical or IVD setting is the sole responsibility of the user.
This product may only be operated in a secure, protected network with validated,
trustworthy clients. The operator must ensure that network security measures are always
up-to-date and state-of-the-art. This product may not be directly exposed to the internet.
If the ASSIST PLUS is used in a manner not specified by INTEGRA Biosciences, the
protection provided by the ASSIST PLUS may be impaired.With a VIAFLO electronic
multichannel or VOYAGER pipette attached, ASSIST PLUS performs pipetting operations
automatically (for pipette compatibility see 7.4
OTE
N
Each INTEGRA pipette needs its own Bluetooth module, which has to be
ordered separately (part no. 4221).
Electronic INTEGRA pipettes are microprocessor controlled and stepper motor driven
pipettes. They are used for aspirating and dispensing liquids in the volume range of 0.5 –
1250 µl using GripTip pipette tips. Please refer to the VIAFLO/VOYAGER electronic
pipettes operating instructions for more detailed informations on www.integrabiosciences.com.
).
6 INTEGRA Biosciences AG
Page 7
ASSIST PLUS – Operating instructions V02 Introduction
1.3 Safety notes
ASSIST PLUS complies to the recognized safety regulations and is safe to operate.
ASSIST PLUS can only be operated when in intact condition and while observing these
operating instructions.
The device may be associated with residual risks if it is used or operated improperly by
untrained personnel. Any person operating the ASSIST PLUS must have read and
understood these operating instructions, and particularly, the safety notes, or must have
been instructed by supervisors so that safe operation of the device is guaranteed.
AUTION
C
Do not open or modify the ASSIST PLUS in any way. Repairs may only be
performed by INTEGRA Biosciences AG or by an authorized after-sales
service member. Parts may be replaced with original INTEGRA Biosciences
parts only.
ARNING
W
Do not use the ASSIST PLUS near flammable material or in explosive areas.
Also, do not pipette highly flammable liquids such as acetone or ether.
When handling dangerous substances, comply with the material safety data
sheet (MSDS) and with all safety guidelines such as the use of protective
clothing and safety goggles.
OTE
N
Prolonged exposure of the ASSIST PLUS to UV-light can cause
discoloration and/or yellowing. However, this will not affect the performance
of the device in any way.
Regardless of the listed safety notes, additional applicable regulations and guidelines of
trade associations, health authorities, trade supervisory offices, etc. must be observed.
Please visit our website www.integra-biosciences.com
information regarding REACH classified chemicals contained in our products.
on a regular basis for up to date
www.integra-biosciences.com 7
Page 8
ASSIST PLUS – Operating instructions V02 Description of the device
1
4
3
7
12
13
9
6
10
11
2
8
14
5
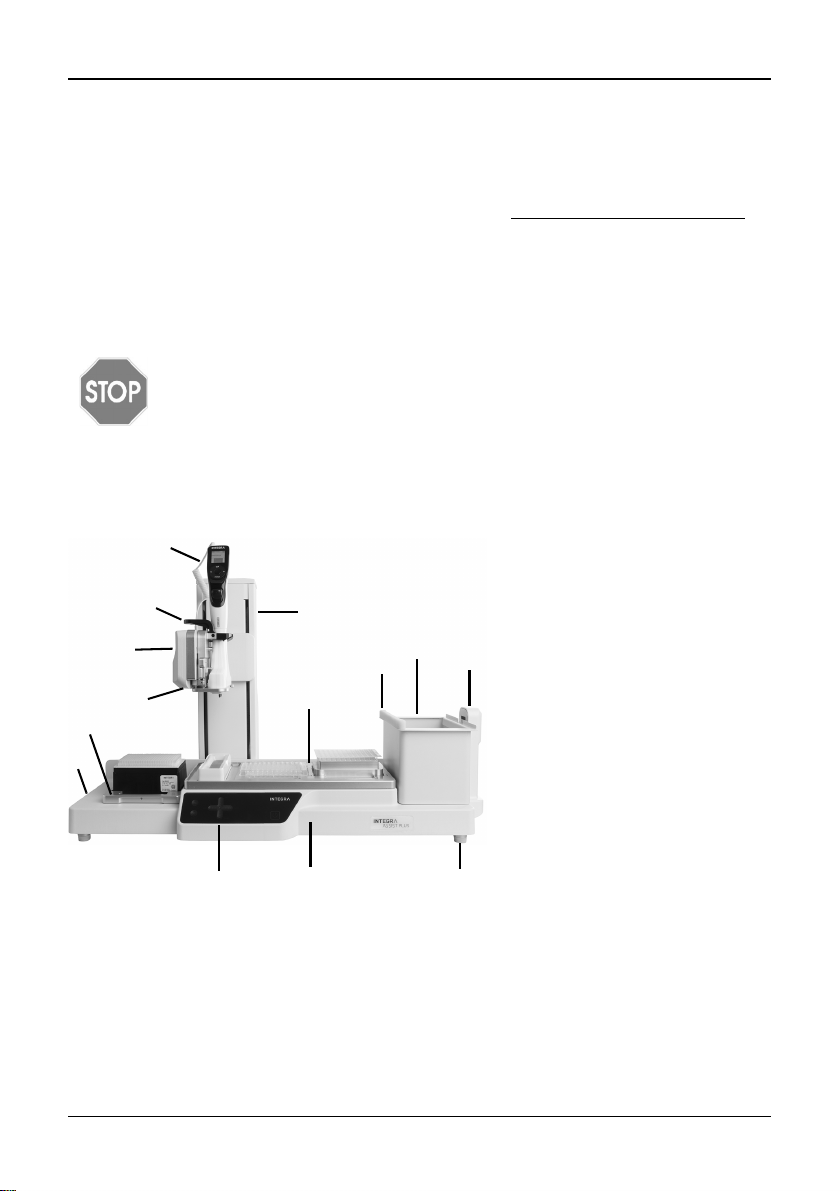
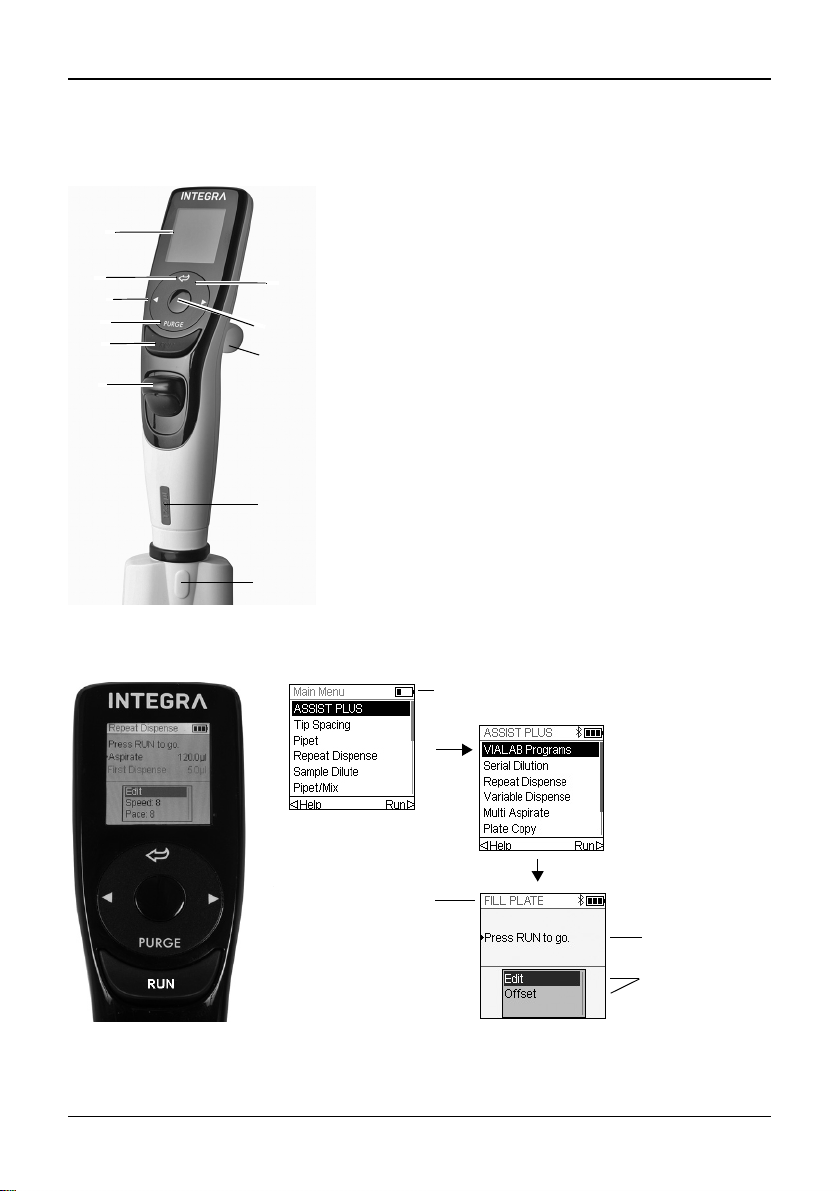
2 Description of the device
2.1 Scope of delivery
• ASSIST PLUS (pipettes to be ordered separately, see “8.1 Accessories” on page 48)
• Mains adapter
• Tip waste bags sample pack
• Trial pack 10 ml, 25 ml and 100 ml multichannel reagent reservoir
• Trial pack 300 ml automation friendly reagent reservoir
• Pipette charging cable, tip waste bin with reflector for tip sensor
AUTION
C
Verify the scope of delivery when unpacking the device and check for
potential transportation damage. Do not operate a device that is damaged,
instead contact your local dealer.
2.2 Overview of the ASSIST PLUS
2.2.1 ASSIST PLUS base unit
1 Tower with Pipette arm.
Tower moves in X-direction,
Pipette arm in Z-direction.
2 Charging cable for pipette
3 Gripper with lever to release
the pipette.
4 Pipette arm with Pipette
holder, that moves in Ydirection.
5 LEDs for adjustable deck
illumination.
6 Tip rack deck for GripTips,
8 Reflector for tip sensor, removable.
9 Waste bin, for automatic tip ejection,
removable.
10 Tip sensor, for tip monitoring.
removable.
7 Deck, removable, with
Positions, e.g. A, B and C.
11 Interfaces and Main switch
12 Touch panel
13 Instrument base
14 Feet, adjustable.
8 INTEGRA Biosciences AG
Page 9
ASSIST PLUS – Operating instructions V02 Description of the device
14
15
16
17
18
Z
X
Y
(Tower: right and left)
(Pipette arm: up and down)
(Pipette holder: back and fore)
20
21
22
23
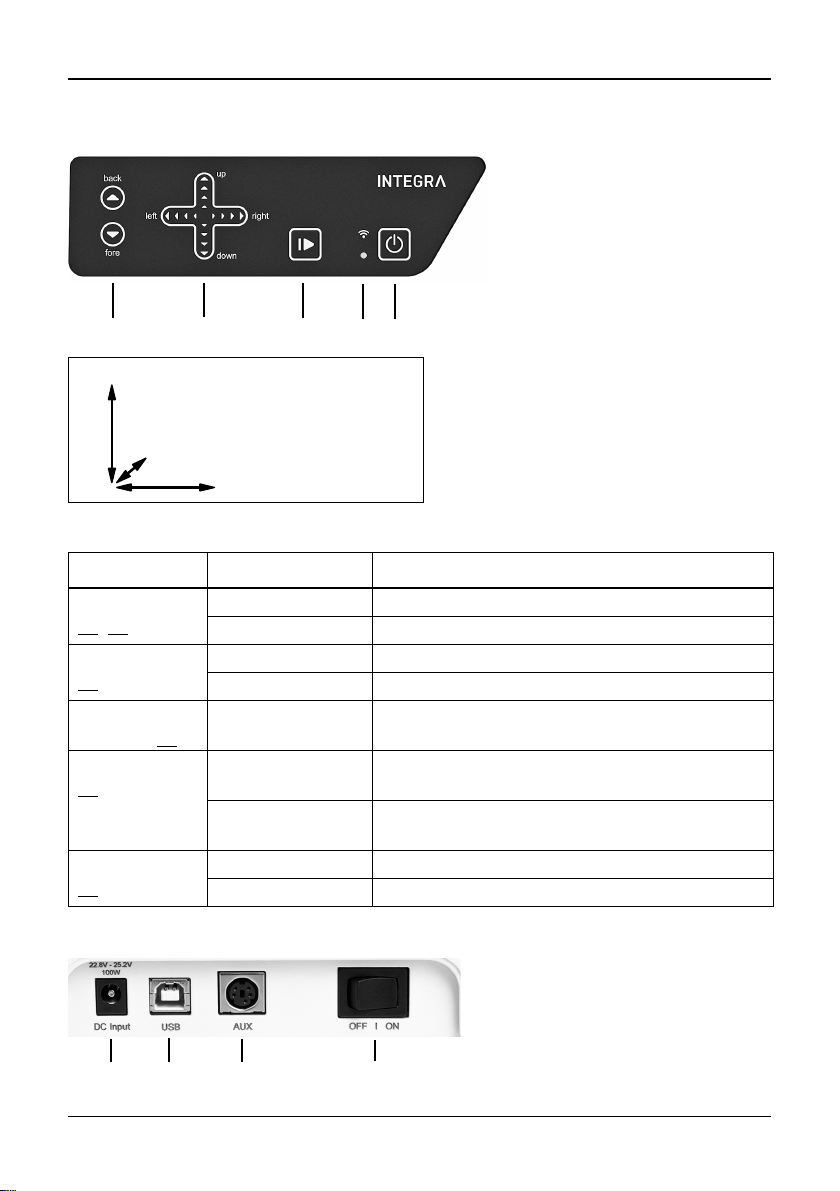
2.2.2 Touch panel
15 Back and Fore arrow
keys move the pipette along
the Y-axis.
16 Up and Down arrow keys
move the pipette along the Zaxis to teach pipetting heights.
Left and Right ar ro w keys
move the pipette along the Xaxis to access each position on
the deck.
17 Start/Pause key, to start/stop
operations.
18 Communication LED (on top)
and Error LED (at the bottom)
19 On/Standby key
Each key lights white as soon it can be used.
Key Light Information/Action
Arrow
, 16)
(15
Start/Pause
(17
)
Communication LED (18
Error LED
(18 at the
bottom)
On/Standby
(19
)
lights blue finger contact detected
flashes moving in this direction not allowed
flashes white press to start operation, homing or to quit error
lights white performing operation, press to pause
lights blue Bluetooth connection active
)
flashes red error not critical, press Start/Pause key or follow
the instructions on the pipette
lights red critical error, switch off ASSIST PLUS with On/
Standby key or Main switch
lights white ASSIST PLUS is switched on
inner symbol dims standby program, press to switch on
2.2.3 Interfaces
20 Socket for mains adapter
21 USB port, for firmware
updates
www.integra-biosciences.com 9
22 AUX connection
23 Main switch
Page 10
ASSIST PLUS – Operating instructions V02 Description of the device
25
28
29
30
31
26
27
32
33
24
34
Program Name
OK
OK
2.3 Overview of INTEGRA Electronic Pipettes
2.3.1 Pipette parts
24 Display
25 Back button, to navigate backward
26 Touch wheel, spin to scroll and move the cursor
27 OK button, to make a selection
28 Left and right arrow buttons, for selections
29 Purge button, to empty tips
30 Run key, to start operations
31 Tip ejector
32 Finger hook, facilitates easy operation
33 Volume indicator label, color matches GripTip box
insert
34 Tip ejector lid, remove before using the pipette with
ASSIST PLUS
2.3.2 Display
The Display shows all pipetting options.
Battery life indicator
10 INTEGRA Biosciences AG
select a
Program
category
and a
Program
Instruction
Options
Page 11
ASSIST PLUS – Operating instructions V02 Installation
3 Installation
3.1 Operating environment
ASSIST PLUS has been designed for use in a laboratory. It shall be operated in a dry and
dust-free location with a temperature of 5–40°C and a maximal (non-condensing) relative
humidity of 80 %, see “7.1
3.2 Setting up and moving of the instrument
The ASSIST PLUS must be set up on a cleaned, dry and horizontal surface. Two persons
are required to lift the ASSIST PLUS. Hold the ASSIST PLUS firmly on both sides of the
Instrument base (13
ARNING
W
Never lift the instrument on the Pipette arm (4), the Gripper (3) or on the Tip
sensor (10).
It must always be possible to manually disconnect the plug of the
ASSIST PLUS from electricity supply. The corresponding socket shall be
within easy reach of the operator and be clearly labeled as the disconnecting
device of ASSIST PLUS.
Only use a 3 core mains cable with protective earth to connect the external mains adapter
of ASSIST PLUS.
Relocating
ARNING
W
ASSIST PLUS must be secured in the park position before carrying.
Environmental conditions” on page 43.
).
Before ASSIST PLUS can be relocated the tower must be parked. Clear both Decks (6
) of all labware and remove the Waste bin (9). Remove the Deck (7) or pull both levers
7
of the Pipette holder (4) down. Set the instrument to park position: Press the Back and
Fore arrow keys (15) and then the On/Standby key (19) simultaneously for approx. 3
seconds until the tower moves to park position. Alternatively, select “MOVE to park
position” within the Toolbox of ASSIST PLUS and press the Run key (30
Switch off the device and disconnect it from the electricity mains.
).
3.3 Charging the battery of the electronic pipette
The battery indicator in the upper right corner of the pipette screen informs about the
battery status. When it turns red, the pipette needs to be charged.
CAUTION
Use only the approved INTEGRA battery, power supply and charging stand.
Use of an incompatible power transformer can damage the pipette.
The battery can be charged using the mains adapter, a charging stand or the pipette
Charging cable (2) on the ASSIST PLUS, see “8.1 Accessories” on page 48.
www.integra-biosciences.com 11
,
Page 12

ASSIST PLUS – Operating instructions V02 Installation
a
b
3.4 Removing the tip ejector lid
For automatic tip ejection, remove the Tip ejector lid
(34
) with your thumb nail and store it in a safe place
(pipettes with serial number ≥7 000 000 only).
3.5 Adapting the pipette holder
The pipette holder can be adapted to accommodate INTEGRA electronic multichannel
pipettes.
To adapt the holder for an 8- or 16-channel VIAFLO
pipette fold both silver levers (a, b) down as shown
beside.
To adapt the holder for a 12-channel VIAFLO pipette,
only pull the lower silver lever (b) down.
Fold both levers up to insert a VOYAGER pipette.
3.6 Attaching and removing an electronic pipette
Rotate the lower hosing of the electronic pipette by 90 degrees as displayed in the picture
below.
AUTION
C
The VOYAGER pipette may only be
rotated clockwise to 90 degrees.
To install a pipette, the Tip ejector opening (34
must face the Pipette holder (4
Hold the pipette at an angle and insert it into the
pipette holder.
Then lift up until the black gripper snaps in place.
12 INTEGRA Biosciences AG
).
)
Page 13
ASSIST PLUS – Operating instructions V02 Installation
a
To release the pipette lift the black gripper by pushing
down the left end.
3.7 Inserting decks
Hold the front and the back of the Tip box deck (6
find the correct orientation and place it over the
corresponding positioning studs. Press down firmly
until you hear a click.
Hold the Deck (7
the corresponding positioning studs. Press down
firmly until you hear a click.
) with both hands and place it over
3.8 Inserting waste bags and waste bin
Remove the frame from Waste bin (9) and insert a waste bag (see “8.2 Consumables” on
page 50) into the bin.
Place the opening of the waste bin frame on the
centering bar (a) of the Waste bin.
Lower the frame onto the bin while holding the bag to
the side wall of the Waste bin. The bag is now fixed.
Attach the Sensor reflector (8
pins into the two holes of the frame. The reflector is
Place the Waste bin on the Instrument base (13
The Sensor reflector (8
) must face the Tip sensor (10), as shown in the picture above.
fixed magnetically.
) on the right side next to the tip sensor.
) by inserting the two
),
www.integra-biosciences.com 13
Page 14

ASSIST PLUS – Operating instructions V02 Installation
3.9 Toolbox settings
3.9.1 Enabling ASSIST PLUS program
By default the ASSIST PLUS program is hidden from the Main Menu.
Use the Tou ch wheel to s elec t Toolbox fr om th e Mai n Men u an d pre ss
OK.
Select Preferences and then Main Menu. Enable the ASSIST PLUS
program by pressing OK (green ) and press to save your settings.
3.9.2 Overview of Toolbox for ASSIST PLUS
The Toolbox for ASSIST PLUS provides options to adapt the pipette to appropriate
applications.
Toolbox Description
Tip Monitor Defines whether loaded tips should be checked directly after tip
loading, before tip ejection and after tip ejection.
Tip Type Sets the tip type standard, short or long (only for 12.5 μl
pipettes). Note: Tip definitions in VIALAB programs will not be
overwritten by this setting.
Preferences Deck brightness sets brightness of deck illumination.
Device Information Contains Information about the instrument and the software.
Bluetooth Pairing Pairs the INTEGRA pipette and the ASSIST PLUS.
Move to park position Fixes the tower and the instrument base for safe transportation.
Move to reference
pos.
Position Adjustment Sets an offset of the tip rack deck.
Moves the tower to the reference position to verify correct
alignment. Adjustment Tool required, for INTEGRA staff only.
3.9.3 Device Information
This section contains information about your ASSIST PLUS, such as serial number,
firmware (FW) and hardware (HW) version and error status.
14 INTEGRA Biosciences AG
Page 15

ASSIST PLUS – Operating instructions V02 Installation
3.9.4 Bluetooth Pairing
The first time a specific pipette is connected to the ASSIST PLUS, both instruments need
to be paired via Bluetooth. (Alternatively, the pipette can be connected using the
communication cable, see 3.4.) Scroll to the Toolbox and press OK.
From the ASSIST PLUS option select Bluetooth Pairing.
Switch OFF and ON the ASSIST PLUS device, see “4.1 Turn on/off
the ASSIST PLUS device” on page 17, and wait approx. 30 sec. until
the message “Pairing successful” is displayed. Press OK.
3.9.5 Tip Monitor
Define whether the tip loading should be checked after tip loading, before tip ejection or
after tip ejection.
Select Tip Monitor and press OK.
Use the Touch wheel to highlight an option. Press OK to toggle
between on (green ) and off (red ). Save your settings.
N
OTE
It is recommended to keep tip monitoring settings Before and After Tip Eject
active.
3.9.6 Setting tip type
Electronic Pipettes of 12.5, 300 and 1250 µl sizes can be used with standard, SHORT and
LONG GripTips. In order to teach the correct heights for ASSIST PLUS movements, the
used tip type must be specified. Go to the Toolbox of the pipette, select ASSIST PLUS and
press OK.
Select Tip Type and press OK.
Use the Touch wheel to highlight Standard, SHORT or LONG. Press
OK to select the correct tip type (green ) and Save your settings.
www.integra-biosciences.com 15
Page 16
ASSIST PLUS – Operating instructions V02 Installation
X
Y
Z
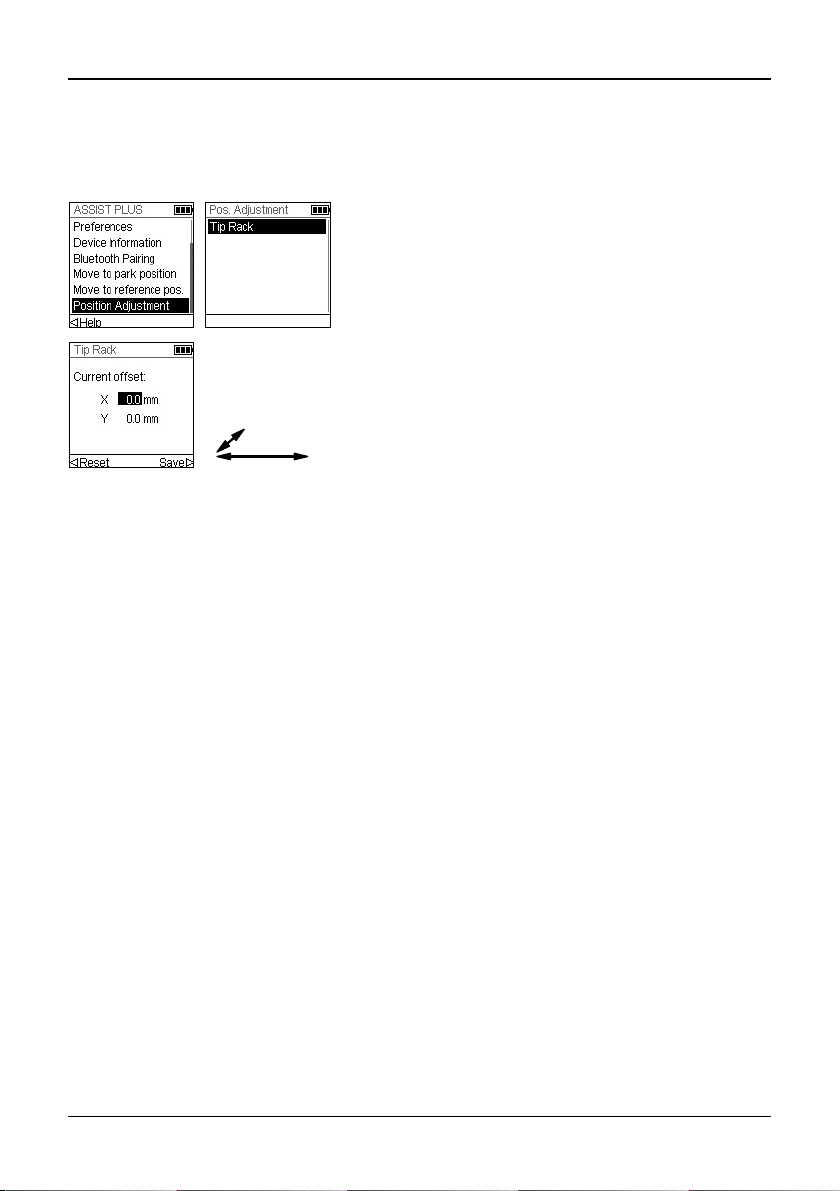
3.9.7 Position adjustment
The Position Adjustment option is used to set an offset for the absolute X/Y/Z-coordinates
in mm to adjust the tip rack position. Select ASSIST PLUS on the Toolbox and press OK.
Select Position Adjustment and press OK.
Use the Touch wheel to select Tip Rack and press
OK.
Set the offset(s) in mm of the selected option and
Save your settings.
X: positive value moves to the right
Y: positive value moves to the rear
16 INTEGRA Biosciences AG
Page 17

ASSIST PLUS – Operating instructions V02 Operation
4 Operation
4.1 Turn on/off the ASSIST PLUS device
Connect ASSIST PLUS to the power supply with the supplied mains adapter. Turn on
ASSIST PLUS using the Main switch (11).
Press the Start/Pause key (17
ARNING
W
Remove hands from ASSIST PLUS during homing.
After homing the LED of the Start/Pause key will turn off.
To switch ASSIST PLUS to standby press the On/Standby key (19
its LED dims. The ASSIST PLUS automatically switches in standby program after 2 hours
of inactivity. Press the On/Standby key again to return in active program.
Use the Main switch to turn off the instrument.
4.2 Turn on/off an INTEGRA electronic pipette
Press and release the Run key (30) to turn on the pipette.
To turn off the pipette, press and hold the Back button (25
4.3 Connection ASSIST PLUS to Pipette
4.3.1 Bluetooth connection
Select the ASSIST PLUS program in the Main Menu of the INTEGRA
pipette and press OK. The pipette establishes the Bluetooth
connection.
When the blue Bluetooth symbol ( ) next to the battery indicator is
displayed and the Communication LED (18
instruments are connected.
If the connection fails, press to retry the connection or refer to “4.5 Troubleshooting” on
page 19. Alternatively, continue Offline . In offline program you cannot run programs but
you can view and edit them. Active height teaching is not possible in offline program.
) when it is blinking to home the ASSIST PLUS.
) for two seconds until
) for 3 seconds.
) lights up in blue, both
www.integra-biosciences.com 17
Page 18

ASSIST PLUS – Operating instructions V02 Operation
4.3.2 Via communication cable
Alternatively to Bluetooth pairing, the pipette can be connected to the ASSIST PLUS using
the communication/charging cable (PN 4548).
Click in the 4-pin of the communication cable to the pipette back and
plug in the cable to the pipette holder of ASSIST PLUS.
On the pipette screen next to the battery indicator a plug symbol
indicates the successful connection of the ASSIST PLUS.
4.4 Running a program
Place all required labware (reservoir, plates, etc.) on the deck.
From the ASSIST PLUS menu select the program category and the
program you would like to run and press OK.
Press the Run key (30
Press OK to select the first complete row/column with new tips, e.g.
Column 2.
Insert the appropriate tip box in the correct orientation, e.g. 300 μl
landscape. Press the tip box down so that it rests completely on the
deck. 300 µl and 1250 µl tip boxes have lids with latches. Either
remove the lid or open it towards you and not towards the back when
placing the box on the instrument.
Press the Run key (30
You are prompted to place the pipette on the ASSIST PLUS device, see “3.6
and removing an electronic pipette” on page 12. Press the blinking Start/Pause key (17)
on the ASSIST PLUS device. It switches to solid white, the ASSIST PLUS homes and the
program will be performed automatically.
AUTION
C
Keep hands out of area of moving ASSIST PLUS parts during the run.
).
).
Attaching
A program can be interrupted by pressing the Start/Pause key (17). Either press the
Start/Pause key again to continue the program or press Abort on the pipette to abort
the program.
18 INTEGRA Biosciences AG
Page 19

ASSIST PLUS – Operating instructions V02 Operation
4.5 Troubleshooting
Problem Probable cause Remedy
The connection
between pipette and
ASSIST PLUS cannot be established.
Error LED (18)
blinks red
After firmware
update, the Error
LED (18
and ASSIST PLUS
cannot be started.
The tip height is not
correct using 12.5,
300 or 1250 μl GripTips.
) blinks red
• The two instruments have not
been paired or the pairing
was lost.
• ASSIST PLUS motor lost
steps during movement.
• Pipetting heights were set
wrong and the pipette
crashed into the plate.
• Firmware may be corrupted. • Contact INTEGRA Bioscience
• Wrong tip type set. • Enter the tip type used, see
• From the main menu of the
pipette go to Toolbox -> ASSIST
PLUS and select Bluetooth
Pairing, see “3.9.3
Information” on page 14. Follow
the instructions on the pipette
screen.
• Follow the instructions on the
pipette display.
service.
Tip Monitor” on page 15.
“3.9.5
Device
www.integra-biosciences.com 19
Page 20

ASSIST PLUS – Operating instructions V02 Programming
5 Programming
5.1 Overview pipetting programs
ASSIST PLUS pipetting programs can be created in different ways:
• Preset programs: Change default pipetting parameters directly on the pipette to adapt
the program to your application.
• Custom programs: Create completely individual step-based programs directly on the
pipette or using the VIALINK PC software.
• VIALAB software: Create multi-step programs on a PC and transfer them to the pipette.
The VIALAB software offers a simple and intuitive graphical user interface, allowing you
to create programs with a few clicks, without extensive programming knowledge. Please
refer to www.integra-biosciences.com/download-vialab
The table below shows the ASSIST PLUS program categories: VIALAB programs,
predefined programs (Serial Dilution, Repeat Dispense, Variable Dispense, Multi Aspirate,
Plate Copy, Reformat) and custom programs.
Program category Description
VIALAB Programs Contains the programs created with VIALAB software.
Serial Dilution Allows aspirating a transfer volume followed by a mix.
Repeat Dispense Allows dispensing multiple aliquots of the same volume without
refilling the tips after each dispense.
Variable Dispense Allows dispensing multiple aliquots of different volumes.
Multi Aspirate Allows aspirating multiple aliquots of the same or different
volumes.
Plate Copy Transfers samples between plates of the same well number to
create a copy of the source plate.
Reformat Allows to reformat 12, 24, 48, 96 and 384 well plates.
Custom Programs Allows to create multi-stepped user-defined pipetting programs.
for more information.
20 INTEGRA Biosciences AG
Page 21

ASSIST PLUS – Operating instructions V02 Programming
5.2 Setting up a program directly on the pipette
Use the Touch wheel to scroll to your desired pipetting category and
press OK.
NOTE
If no Bluetooth connection is available, you can also use the offline mode to
create a new program. Live teaching of pipetting heights is not possible in
offline mode.
Press New to create a new program. Your are prompted to enter a
name.
Use the Tou ch wheel to select characters and press OK. Once
finished, press to save the name. The programs can later be
renamed, see “5.3
Define all parameters of your program and press Save .
Modify existing programs” on page 21.
To run the program, select the stored program and press OK on the pipette, see “4.4
Running a program” on page 18.
5.3 Modify existing programs
In any program category, use the Touch wheel to highlight an existing
program.
Press Options, use the Touch wheel to select an option (View/Edit,
Delete, Copy, Rename) to modify the program and press OK.
www.integra-biosciences.com 21
Page 22

ASSIST PLUS – Operating instructions V02 Programming
5.4 Adjust heights and positions
Predefined programs, e.g. Repeat Dispense
Open a program and scroll to any Height setting.
Custom programs
Open a program and select any Move step and the desired position.
VIALAB programs
Heights are defined in the VIALAB software but can later be fine tuned once the program
is copied to the pipette. Open a program and select “Height Adjust” on the Run screen,
then a step and a Height.
5.4.1 Enter heights/positions directly
Press OK or Edit and OK to display the setting dial showing the current height/position.
If the exact values of heights or X/Y/Z positions are
known, they can be entered directly using the Touch
Wheel.
The height is the distance between the Deck (7
the end of the GripTips. Press OK and Save/Set to
save the settings.
5.4.2 Teach heights/positions on ASSIST PLUS
If height and position values are unknown, they can be set in an active teaching mode.
Insert a pipette into the Pipette holder and establish a Bluetooth connection.
NOTE
Perform teaching of all position settings with GripTips attached. For 12.5 µl,
300 µl and 1250 µl volume pipettes the correct tip type needs to be defined
first, see 3.9.5
.
) and
Open a predefined or a custom program. When the setting dial is displayed as described
above, use the ASSIST PLUS Touch panel (12
• Press the Left and Right keys to move the GripTips into the desired X-position.
• Press the Back and Fore arrow keys to move them into the Y-position.
• Press the Up and Down keys to position the GripTips at the desired height/Zposition.
• Press OK and Save/Set to save current settings.
OTE
N
You can adjust the movement speed during position teaching as follows:
Back and Fore arrow keys: keep the keys pressed to increase the
speed. Press the keys shortly for fine adjustmens.
Left, Right, Up and Down keys: press near the center of the cross
for slow movements and at the edges for fast movements.
22 INTEGRA Biosciences AG
):
Page 23

ASSIST PLUS – Operating instructions V02 Programming
Z
X
Y
For VIALAB programs you can move the pipette automatically to the programmed
position. Select Height Adjust, a step and scroll to a Height [1/n].
Press Move to pos. and press the Start/Pause
key on ASSIST PLUS to move the pipette to the
programmed position.
Use the Arrow keys (, ) to adjust the Height.
Press OK and Save to save current settings.
5.5 Program offset
The Offset option is used to adjust all position settings of a given program if tips are not
aligned properly to the labware.
Adjusting the offset should not be the first action to correct positions. First the labware
dimensions should be verified in the VIALAB library.
On the Run screen of a VIALAB or predefined program select “Offset” on the list of options
and press OK. Use the Touch wheel to select the deck position A, B or C and press OK.
Set the offset(s) in mm of the selected position and
Save your settings.
X: positive value moves to the right
Y: positive value moves to the rear
Z: positive value moves up
www.integra-biosciences.com 23
Page 24

ASSIST PLUS – Operating instructions V02 Programming
B
A
21
zero
1234
A
B
C
D
2.25
-2.25
5.6 Pipetting alternating wells
The pipetting arm of ASSIST PLUS moves in Y-direction (to the rear or the front) to
accommodate even and odd rows/columns of plates using a pipette that does not
correspond directly to the row/column number. For example, pipetting into all 16 wells per
column of a 384 well plate with an 8-channel pipette.
In predefined programs and in VIALAB created programs the movement is automatically
performed. In Custom Programs the movement needs to be manually defined by adding
a Move Y step.
A positive value (e.g. Move Y 2.25) moves the pipette to the rear to accommodate the
wells in the rear, starting with A1.
A negative value (e.g. Move Y -2.25) moves the pipette to the front to accommodate the
wells in the front, starting with B1.
24 INTEGRA Biosciences AG
96 well plate 384 well plate
Page 25

ASSIST PLUS – Operating instructions V02 Programming
Portrait
Pipette Rows
Landscape
Pipette Columns
5.7 Detailed description of predefined programs
Use the Touch wheel to select an option, define the required parameters and press OK.
Press OK to toggle between on (green ) and off (red ). All heights are defined relative
to the deck, see “5.4 Adjust heights and positions” on page 22. If a parameter is out of
range, the pipette beeps. Press Error to read the error message.
5.7.1 Serial Dilution program
Application: Use this program to perform serial dilutions. It enables aspiration of a
specific volume followed by a dispense and mix.
Options Steps Description of Serial Dilution
Plate Wells Sets the type of well plate (12, 24, 48, 96 or 384) to be used
as (source)/target. On VOYAGER pipettes this automatically
defines the tip spacing. Note: only pipette compatible plates
can be selected, see “7.6
Orientation Sets the orientation of the plate (landscape, portrait).
Plate compatibility” on page 45
Note: orientation can only be changed if it is compatible with
the pipette.
Tip Change If activated, tips are changed before each new aspiration.
Tips are emptied and by default a BlowOut is performed in
the same location.
Deactivate the BlowOut to prevent air bubbles in the sample.
This will activate the Tip Touch (Side), for which an appropriate height needs to be set. Then a BlowOut is performed at
this height.
www.integra-biosciences.com 25
Page 26

ASSIST PLUS – Operating instructions V02 Programming
Options Steps Description of Serial Dilution
Source
(Reservoir)
Source
(Plate)
Source
(General)
Type Sets the source container where the initial sample is
aspirated from (Reservoir or Plate). Only INTEGRA
reservoirs can be used as Reservoir type.
Tracking If Reservoir is selected and Tracking is active, the pipette
automatically adjusts the pipetting height according to the
defined tip immersion depth. Set the:
• Reservoir type, see “8.2
• Start volume: the filling volume that is currently in the
INTEGRA reagent reservoir.
• Tip immersion: the approx. immersion depth of the pipette
tips (2-3 mm are recommended).
Type Sets the source container where the initial sample is
aspirated from (Reservoir or Plate).
Plate Select the deck position (B or C) as location for the source
plate.
Column/Row Select the column/row of the plate where the sample is
aspirated from. Note: the column/row number depends on
plate orientation.
Clear Height Sets the travel height at which the GripTips move above the
plates.
Height Sets the sample aspiration height of the source container.
Note: only visible if Tracking is switched off.
Aspirate Sets the sample volume that will be transferred from well to
well.
Asp Speed Sets speed uniquely for aspiration (1 = low, 10 = fast).
Mixing Mixes the sample in the source container before the first
aspiration.
If activated, define Mix volume, Mix Speed and number of
Mix Cycles.
Consumables” on page 50.
26 INTEGRA Biosciences AG
Page 27

ASSIST PLUS – Operating instructions V02 Programming
Options Steps Description of Serial Dilution
Target Plate Sets the destination plate position (B or C).
Clear Height Sets the travel height at which the GripTips move from well
to well on the target plate. Note: only visible if not yet defined
under source.
Last
Aspirate
First Column
or First Row
Count Sets the number of columns or rows to dilute (1-n, including
Height This is the dispense, mix and aspiration height in the target
Mix Sets the mixing volume after dispensing. It does not affect
Mix Speed Sets the mixing speed (1 = low, 10 = fast).
Mix Cycles Sets the number of mixes per well (1-30).
Mix with
Blowout
Location Sets the destination of the last aspirate:
BlowOut at The BlowOut is following the last dispense and expels extra
Sets the destination for the first transfer of the serial dilution
(column 1-24 or row A-P).
the first column/row).
container. If Tip Travel is enabled, this height is used as base
from which the tip travel starts for dispensing, see “7.8
travel distances” on page 47.
the transfer volume.
Sets a Blowout/Blowin after the mix step is completed.
• Reservoir: the last aspirate is dispensed in the reservoir.
• Tip: last aspirate remains in the GripTips and is purged
automatically with the tip ejection.
• Waste: the last aspirate is dispensed in the selected
column/ row of the selected plate.
air to discharge residual liquid from the tips. Adjust the blow
out height, see “5.4
Adjust heights and positions” on page 22.
Tip
www.integra-biosciences.com 27
Page 28

ASSIST PLUS – Operating instructions V02 Programming
Options Steps Description of Serial Dilution
Advanced
Press to save your settings. This will return you to the list of Serial Dilution programs.
Tip Travel Defines the distance which the tips move during an aspira-
tion, dispense and mix step to artificially track the liquid level,
see “7.8
• Source Asp: moves the set distance down during aspira-
• Source Mix: moves the set distance down and up during
• Target Disp: moves the set distance up during dispensing
• Target Mix: moves the set distance down and up during
Tip travel distances” on page 47.
tion in the source location.
mixing in the source location.
in the target location. The same distance is used to move
down during aspiration in the target location.
mixing in the target location.
28 INTEGRA Biosciences AG
Page 29

ASSIST PLUS – Operating instructions V02 Programming
5.7.2 Repeat/Variable dispense programs
Application: These programs can be used for fast reagent addition to microplates from
one source container. Single transfers are also possible.
The settings for Variable dispense are identical to Repeat dispense except the dispense
steps in the target can have different volumes.
Options Steps Description of Repeat/Variable Dispense
Plate Wells Sets the type of well plate (12, 24, 48, 96 or 384) to be used
as (source)/target. On VOYAGER pipettes this automatically
defines the tip spacing. Note: only pipette compatible plates
Plate compatibility” on page 45.
Consumables” on page 50.
Source
(Reservoir)
Source
(Plate)
can be selected, see “7.6
Orientation Sets the orientation of the plate (landscape, portrait).
Note: orientation can only be changed if it is compatible with
the pipette.
Clear Height Sets the travel height at which the GripTips move above the
plate(s) relative to the deck.
Single
Transfer
Tip Change If activated, tips are changed before each new aspiration.
Type Sets the source container where the initial sample is
Tracking If Reservoir is selected and Tracking is active, the pipette
Type Sets the source container where the initial sample is
Plate Select the deck position (B or C) as location for the source
Column/Row Select the column/row of the plate where the sample is
Instead of pipetting aliquots, a single transfer is performed.
Aspiration volume = Dispense volume.
aspirated from (Reservoir or Plate). Only INTEGRA reservoirs can be used in the Reservoir mode.
automatically adjusts the pipetting height according to the
defined tip immersion depth. Set the:
• Reservoir type, see “8.2
• Start volume: the filling volume that is currently in the
INTEGRA reagent reservoir.
• Tip immersion: the approx. immersion depth of the pipette
tips (2-3 mm are recommended).
aspirated from (Reservoir or Plate).
plate.
aspirated from. Note: the column/row number depends on
plate orientation.
www.integra-biosciences.com 29
Page 30

ASSIST PLUS – Operating instructions V02 Programming
Options Steps Description of Repeat/Variable Dispense
Source
(General)
Target Plate Sets the destination plate position (B or C).
Start Height The height where aspiration starts. The ASSIST PLUS will
automatically refill the GripTips if the total dispense volume
required for the target exceeds the maximum volume of the
pipette. The first aspiration will be at the start height and for
consecutive aspiration steps the pipette will go lower until it
reaches the end height.
Note: only visible if Tracking is switched off.
End Height Sets the height for the last aspiration step.
Asp Speed Sets speed uniquely for aspiration (1 = low, 10 = fast).
Mixing Mixes the sample in the source container before each
aspiration.
If on, define Mix volume, Mix Speed and number of Mix
Cycles.
Pre-Dispense A Pre-Dispense volume can be selected independently,
which is discarded back to the source immediately after
aspiration, to improve accuracy and precision.
Note: option only available if Single Transfer is inactive.
If on, define the Pre-Dispense volume. Suggested: at least
3-5% of the pipette's maximum volume.
Count Sets the total number of dispensing steps.
First Column
or First Row
Dispense Only Repeat dispense:
Dispense
1 to n
Disp. Speed Sets speed of all dispensing steps (1 = low, 10 = fast).
Height Sets the height for the dispensing steps.
Sets the column/row where dispensing of the first dispense
should be started (column 1-24 or row A-P).
Sets the volume to be dispensed in each well. The total
aspiration volume is calculated automatically. The pipette
cannot be overfilled.
Only Variable dispense:
Set the different dispense volumes for every variable
dispense step.
30 INTEGRA Biosciences AG
Page 31

ASSIST PLUS – Operating instructions V02 Programming
Options Steps Description of Repeat/Variable Dispense
Target TipTouch It is highly recommended to activate a tip touch after a
dispensing step to remove drops that may cling to the pipette
tips.
• Sets where the tip touch should be performed.
“Liquid”: the tips will dip into the center of the wells.
“Side”: the tips will touch to the side of the wells.
• Defines the height for the tip touch (“TipTouch at”).
Plate count Sets the total number of target plates (1-9) used in the
current run.
PostDispense
Reuse
Post-Disp.
Press to save your settings. This will return you to the list of Repeat/Variable Dispense
programs.
A Post-Dispense volume can be selected independently,
which is discarded, to improve accuracy and precision.
Note: only available if Single Transfer is inactive.
If on, define:
• the location where the Post-Dispense should be discarded
(ejected with tips or dispensed into the source container)
and
• the Post-Dispense volume. Suggested: at least 3-5% of the
pipette's maximum volume.
Only Repeat dispense:
If on, at the end of the program the post-dispense remains in
the tip, while the pipette is ready to aspirate a new volume to
start the next repeat dispense run.
www.integra-biosciences.com 31
Page 32

ASSIST PLUS – Operating instructions V02 Programming
5.7.3 Multi aspirate program
Application: This program can be used for pooling applications or removal of
supernatants.
Options Steps Description of Multi aspirate
Plate Wells Sets the type of well plate (12, 24, 48, 96 or 384) to be used
as (source)/target. On VOYAGER pipettes this automatically
defines the tip spacing. Note: only pipette compatible plates
can be selected, see “7.6
Orientation Sets the orientation of the plate (landscape, portrait).
Note: orientation can only be changed if it is compatible with
the pipette.
Clear Height Sets the travel height at which the GripTips move above the
plates.
Single
Transfer
Tip Change If activated, tips are changed before each new aspiration.
Source Plate Select the deck position (B or C) as location for the source
Count Sets the total number of aspiration steps.
First Column
or First Row
Repeat
Vol ume
Aspirate
(1 to n)
Asp Speed Sets speed uniquely for aspiration (1 = low, 10 = fast).
Height Set the (start) Height for all aspiration (and mixing) steps.
Mixing Mixes the sample in the source container before each
Instead of pipetting aliquots, a single transfer is performed.
Aspiration volume = Dispense volume.
plate.
Define the column/row where the first volume should be
aspirated from.
If activated, identical volumes are aspirated.
If off, define the different volumes for aspiration.
Set the volume(s) to be aspirated (for every aspirate step).
aspiration.
If on, define Mix volume, Mix Speed and number of Mix
Cycles.
Plate compatibility” on page 45.
32 INTEGRA Biosciences AG
Page 33

ASSIST PLUS – Operating instructions V02 Programming
Options Steps Description of Multi aspirate
Target Type Sets the target container where the sample is dispensed
(Reservoir or Plate).
Plate If plate, set the destination plate position (B or C).
Column/Row Select the column/row of the plate where the sample is
dispensed. Note: the column/row number depends on plate
orientation.
Disp. Speed Sets speed of all dispensing steps (1 = low, 10 = fast).
Height Sets the height for the dispensing steps.
Advanced
Press to save your settings. This will return you to the list of Multi aspirate programs.
Tip Travel Defines the distance which the tips move during an aspira-
tion, dispense and mix step to artificially track the liquid level,
see “7.8
• Source Asp: moves the set distance down during aspira-
• Source Mix: moves the set distance down and up during
Tip travel distances” on page 47.
tion in the source location.
mixing in the source location.
www.integra-biosciences.com 33
Page 34

ASSIST PLUS – Operating instructions V02 Programming
5.7.4 Plate copy program
Application: This program can be used to copy all columns/rows from plate A to plate B
with optional tip change after each transfer. The well number and the orientation of the
plate must be the same.
Options Steps Description of Plate Copy
Source Plate Sets the deck position (B or C) as location for the source
plate.
Wells Sets the type of well plate (12, 24, 48, 96 or 384) and defines
the well to well distance.
Orientation Sets the orientation of the plate (landscape, portrait).
Note: orientation can only be changed if it is compatible with
the pipette.
Clear Height Sets the travel height at which the GripTips move above the
source.
Tip Change If activated, tips are changed before each new aspiration.
Aspirate Aspirate Sets the aspiration volume.
Asp. Speed Sets speed uniquely for aspiration (1 = low, 10 = fast).
Height Sets the aspiration height of the source plate.
Mixing Mixes the sample in the source plate before the first aspira-
tion.
If on, define Mix volume, Mix Speed and number of Mix
Cycles.
Dispense Disp. Speed Sets speed of all dispensing steps (1 = low, 10 = fast).
Height Sets the height for the dispensing steps.
Mixing Mixes the sample in the target plate after dispensing.
If on, define Mix volume, Mix Speed and number of Mix
Cycles.
TipTouch It is highly recommended to activate a tip touch after a
dispensing step to remove drops that may cling to the pipette
tips.
• Sets where the tip touch should be performed.
“Liquid”: the tips will dip into the center of the wells.
“Side”: the tips will touch to the side of the wells.
• Defines the height for the tip touch (“TipTouch at”).
34 INTEGRA Biosciences AG
Page 35

ASSIST PLUS – Operating instructions V02 Programming
Options Steps Description of Plate Copy
Advanced
Press to save your settings. This will return you to the list of Plate copy programs.
5.7.5 Reformat program
Application: This program samples between plates of different well number (12, 48, 96
and 384) can be transferred to merge several plates in one plate or to split one plate in
several plates.
Options Steps Description of Reformat
Source Plate Sets the deck position (B or C) as location for the source
Target Wells Sets the well plate type (12, 24, 48, 96 or 384) to be used as
Tracking Chooses if the pipette automatically follows the liquid level,
see “7.8 Tip travel distances” on page 47.
• Source Asp: moves the set distance down during aspiration from the source location.
• Source Mix: moves the set distance down and up during
mixing in the source location.
• Target Disp: moves the set distance up during dispensing
in the target location. The same distance is used to move
down during aspiration in the target location.
• Target Mix: moves the set distance down and up during
mixing in the target location.
plate.
Wells Sets the well plate type (12, 24, 48, 96 or 384) to be used as
source. On VOYAGER pipettes this automatically defines
the tip spacing. Note: only pipette compatible plates can be
selected, see “7.6
Orientation Sets the orientation of the source plate (landscape, portrait).
Note: orientation can only be changed if it is compatible with
the pipette.
Clear Height Sets the travel height at which the GripTips move above the
plates.
Tip Change If activated, tips are changed before each new aspiration.
target.
Orientation Sets the orientation of the target plate (landscape, portrait).
Transfer
pattern
Defines whether to complete columns (N) or rows first (Z),
see “7.7
Plate access pattern” on page 46.
Plate compatibility” on page 45.
www.integra-biosciences.com 35
Page 36

ASSIST PLUS – Operating instructions V02 Programming
Options Steps Description of Reformat
Aspirate Aspirate Sets the aspiration volume.
Asp. Speed Sets speed uniquely for aspiration (1 = low, 10 = fast).
Height Sets the height for the aspiration step.
Mixing Mixes the sample in the source plate before the first aspira-
tion.
If on, define Mix volume, Mix Speed and number of Mix
Cycles.
Dispense Disp. Speed Sets speed of all dispensing steps (1 = low, 10 = fast).
Height Sets the height for the dispensing steps.
Mixing Mixes the sample in the target plate during dispensing.
If on, define Mix volume, Mix Speed and number of Mix
Cycles after a transfer.
TipTouch It is highly recommended to activate a tip touch after a
dispensing step to remove drops that may cling to the pipette
tips.
• Sets where the tip touch should be performed.
“Liquid”: the tips will dip into the center of the wells.
“Side”: the tips will touch to the side of the wells.
• Defines the height for the tip touch (“TipTouch at”).
Advanced
Press to save your settings. This will return you to the list of Reformat programs.
Tip Travel Defines the distance which the tips move during an aspira-
tion, dispense and mix step to artificially track the liquid level,
see “7.8
• Source Asp: moves the set distance down during aspira-
• Source Mix: moves the set distance down and up during
• Target Disp: moves the set distance up during dispensing
• Target Mix: moves the set distance down and up during
Tip travel distances” on page 47.
tion from the source location.
mixing in the source location.
in the target location. The same distance is used to move
down during aspiration in the target location.
mixing in the target location.
36 INTEGRA Biosciences AG
Page 37

ASSIST PLUS – Operating instructions V02 Programming
5.7.6 Custom programs
A custom program uses a step based operating technique. Each pipetting step is entered
separately in the sequence in which they will be performed. Custom programs can contain
up to 98 steps.
From the ASSIST PLUS Menu select “Custom Programs”, press OK and New . Define
and save a name for your program.
The first line is highlighted. Press OK.
Use the Touch wheel to select a first step from the
menu. Press OK, define the required parameters and
press OK to add the step.
After adding the first step, the selection should now be on the second line. Press OK again
to define the second step. Continue adding steps until your entire pipetting program is
defined.The individual steps are based upon the following basic operations:
Step Description of Custom Program
1
↓)
Aspirate Sets an aspiration volume, Tip Travel distance (
Dispense Sets a dispense volume, Tip Travel distance (↑)1 and pipetting speed.
Mix Performs a mixing cycle. Defines the number of cycles, mixing volume, Tip
Travel distance (
1
↕)
and mix speed.
Purge Purges all remaining liquid currently in the GripTips with the selected
purge speed.
TipSpacing Sets tip spacing of VOYAGER pipettes. Note: Tip load may change the tip
spacing for the loading procedure.
Prompt Pauses the program and displays a message. Three lines with 12
characters each are available. To continue the program, press the RUN
key.
Move X,Z Moves the pipette to new X,Z-position in mm of the selected coordinates.
(If current position is higher than next target, the movement sequence is X
and then Z. If current position is lower than next target, the movement
sequence is Z and then X.) Enter the coordinates manually on the pipette’s
screen. When the pipette is connected to ASSIST PLUS, press any Arrow
key of the ASSIST PLUS Touch panel to show the actual coordinates.
Teach the positions and click Set on the pipette to set the coordinates.
and pipetting speed.
1. Tip Travel distance: the distance the pipette automatically follows during aspirating, dispensing or mixing allowing to optimize tip immersion depth, see 7.8
.
www.integra-biosciences.com 37
Page 38

ASSIST PLUS – Operating instructions V02 Programming
Step Description of Custom Program
Move X Moves the pipette by the defined distance in X-direction relative to the
current position by X mm. Setting a negative value (mm) moves it to the
left, setting a positive value (mm) moves it to the right.
The distance from well to well for a 96 well plate is 9 mm and for a 384 well
plate 4.5 mm.
Move Z Moves the pipette in Z direction to the selected coordinate (the higher the
value, the longer is the distance between pipette tip and deck). Use the
Arrow keys on ASSIST PLUS to teach the position or dial the height
manually on the pipette’s screen. Press OK on the pipette to accept the
settings.
Move Y Moves the pipette in Y-direction to accommodate even and odd rows/
columns of plates using a pipette that does not correspond directly to the
row/column number. Setting a positive value (mm) moves it to the rear,
setting a negative value (mm) moves it to the front.
BlowOut Performs a blow out. A blow out needs to be performed after the last
dispense to remove liquid that may cling to the tips.
Note: When using “Purge” to empty the tips, a blowout/blowin is performed
automatically and does not need to be programmed.
BlowIn After a blow out, a blow in has to follow at some point. It does not have to
follow immediately and can have steps in between. E.g. after the blow out
a move step can be programmed to move the tips out of the liquid, and is
then followed by the blow in.
Delay A delay is a pause between one step and the next step. Define a delay
time (in seconds) or select Press RUN, i. e. pressing the RUN key is
needed to continue.
Loop A loop repeats the steps between the selected step and the loop command
as many times as defined. E.g. if the program reaches the loop step, it
goes back to step 3 and repeats the steps until there 2 times.
The number of program steps can often be shortened by adding a loop.
Loops inside loops are not allowed.
Call Calls another custom program to run as subprogram in the current program.
This can be utilized to run frequently used sequences, e.g. a tip touch after
a dispense, without programming the individual steps every time.
TipLoad Moves the pipette to the tip rack and attachs new GripTips. The pipette
moves automatically to the required position.
TipEject Ejects the GripTips into the waste bin. The pipette moves automatically to
the required position.
Beep Sets a beep. The sound is only active, if under Preferences - Sounds the
When finished, press to save the Custom program. To run the program, press OK.
38 INTEGRA Biosciences AG
option Messages is set to On.
Page 39

ASSIST PLUS – Operating instructions V02 Programming
Example of custom program
Application: The task is to aspirate liquid from a 100 ml reservoir with a 300 µl pipette
and fill the first 6 columns of a 96 well plate with 50 µl. The custom program would be set
up as follows:
1) 2), 3) 4) 5)-8) 9)
Program step Action
1) TipLoad Tips are automatically loaded and the pipette moves
up.
2) Move X,Z: 180.2; 20.0 Move to absolute X,Z-position to aspirate liquid from the
reservoir (to the right and down).
3) Aspirate: 300 µl,
Tip Travel: 3.0 mm,
Speed: 8
4) Move X,Z: 242.5; 50 Move to absolute X,Z-position above first row (up =
5) Move Z 10.0 mm Move down to absolute Z-position 10.0 mm for
6) Dispense: 50 µl,
Tip Travel: 3.0 mm,
Speed: 8
7) Move X: 5.0 mm Move 5 mm beside for Tip touch on the side of the well
8) Move X: -5.0 mm Move back to the middle of the well.
9) Move Z: 16.0 mm Move up to coordinate 16 mm (clearance height).
10) Move X: 9.0 mm Move 9 mm beside (center of next wells).
11) Loop: 5
Number of loops: 6
12) TipEject Eject tips.
Aspirate liquid from 100 ml reservoir.
clearance height reservoir, and to the right).
dispense.
Dispense liquid with Tip Travel 3 mm.
(height at coordinate 13.0 mm due to Tip Travel).
Repeat steps 5-10 (five times) to dispense a total of 6
columns of a 96-well plate.
www.integra-biosciences.com 39
Page 40

ASSIST PLUS – Operating instructions V02 Programming
Programming errors
Problem Probable cause Remedy
Z-Speed (ASSIST)
too low! Increase
distance or pipetting
speed.
• Tracking distance of Aspirate,
Dispense or Mix step is too
short for the current pipetting
speed or volume.
• Pipetting speed is too low for
the current tip travel distance
or pipetting volume.
• Increase tracking distance or
pipetting speed.
40 INTEGRA Biosciences AG
Page 41

ASSIST PLUS – Operating instructions V02 Maintenance
6 Maintenance
WARNING
Always turn off power and disconnect the ASSIST PLUS from the mains
when carrying out maintenance work.
6.1 Cleaning
The materials used on the exterior of the ASSIST PLUS support regular cleaning
intervals. Clean the external components with a lint-free cloth lightly soaked with mild soap
solution in distilled water or with a 70% dilution of Isopropyl or E than o l. Nev er use a ceton e
or other solvents. If solvents are used during pipetting clean the waste bin frame, including
the ledge where the tips are ejected, with water.
6.2 Decontamination
From regular use ASSIST PLUS should not come into direct contact with liquids. If
aerosols or biohazardous fluids splash on the surfaces, they must be decontaminated in
accordance to good laboratory practice.
Take out the Waste bin (9
magnetically attached Sensor reflector (8
the back of the Tip rack deck (6) or holding the Deck (7) on the right and left side,
respectively.
Wipe the clean instrument surface with a lint-free cloth, lightly soaked e. g. with the
following disinfectants:
• Ethanol 70%
• Microcide SQ 1:64
• Glutaraldehyde solution 4%
• Virkon solution 1-3%
Follow the instructions provided with the disinfectants.
The aluminum Decks and the Waste bin with frame can be autoclaved at 121°C, 1 bar
overpressure for 20 minutes.
AUTION
C
Do not autoclave the sensor reflector because it will be damaged.
) to the front. Lift up and remove the waste bin frame and the
). Remove the decks by holding the front and
The sensor reflector may be decontaminated by spraying and wiping it with 70% Ethanol
and after a short treatment time (1-2 minutes) wiping it dry.
www.integra-biosciences.com 41
Page 42

ASSIST PLUS – Operating instructions V02 Maintenance
6.3 Servicing
INTEGRA Biosciences recommends annual preventative maintenance service for the
ASSIST PLUS. Please contact INTEGRA for pricing and details.
For any service or repairs, please contact your local service technician.
ARNING
W
ASSIST PLUS needs to be cleaned before sending it to service. The
declaration on the absence of health hazards must be signed. This is
necessary to protect service personnel.
6.4 Equipment disposal
The ASSIST PLUS must not be disposed of with unsorted municipal waste.
Dispose the ASSIST PLUS in accordance with the laws and regulations in your
area governing disposal of devices.
42 INTEGRA Biosciences AG
Page 43

ASSIST PLUS – Operating instructions V02 Technical Data
7 Technical Data
7.1 Environmental conditions
Operation
Temperature range operation 5–40°C
Temperature range storage -10 to +50°C
Humidity range Max. rel. humidity 80% for temperatures up to 31°C,
decreasing linearly to 50% rel. humidity at 40 °C.
Altitude 0– 2000 m AMSL
Pollution degree 2 According to IEC EN/UL 61010-1, i.e. non-conductive
pollution only.
Operation Indoor use only.
7.2 Specification of the device
Electricity supply Mains adapter input: 100– 240 VAC, 47-63 Hz
Device input: 22.8–25.2 VDC, 100 W
Frequency:
Maximum transmit power:
Dimensions (H x D x W) 511 mm x 383 mm x 747 mm
Weight 25 kg
Material of surfaces Housing: Polyurethane
2.400– 2.485 GHz
+6 dBm
(with pipette attached: height 630 mm)
Tower, waste bin, sensor: painted stainless steel
Decks: anodized aluminum
Touch panel: glass
Sensor reflector: Polymethylmethacrylate (PMMA),
aluminum
7.3 Intellectual property
The ASSIST PLUS is covered under the following patents:
Patent Number Country Title Apply to
9,321,048 USA Sample Distribution System And Pro-
cess
www.integra-biosciences.com 43
ASSIST,
ASSIST PLUS
Page 44

ASSIST PLUS – Operating instructions V02 Technical Data
7.4 Compatible pipettes
The following INTEGRA pipettes are compatible with ASSIST PLUS:
Pipette Firmware Serial No.
VIAFLO 4.xx 7xxxxxx
VOYAGER 4.xx 7xxxxxx
7.5 Maximum labware height on deck
The maximum labware height defines the distance between pipette tip end and deck (in
mm) and depends on the pipette model and tip type:
Pipette Model SHORT tips Standard tips LONG tips
12.5 µl VIAFLO 213.7 205.1 196.2
12.5 µl VOYAGER 205.1 196.4 187.5
50/125 µl VIAFLO - 185.1 -
50/125 µl VOYAGER - 176.4 -
300 µl VIAFLO - 179.2 138.0
300 µl VOYAGER - 171.3 130.1
1250 µl VIAFLO 155.4 137.9 -
1250 µl VOYAGER 147.1 129.6 -
44 INTEGRA Biosciences AG
Page 45

ASSIST PLUS – Operating instructions V02 Technical Data
7.6 Plate compatibility
The tables below provide an overview outlining the compatibilities of pipettes with different
well plates and plate orientations.
VIAFLO pipettes 96 well plate (8 x 12) 384 well plate (16 x 24)
Channels Volume
[μl]
12.5 9 x x
50 9 x x
8
12
16
VOYAGER pipettes 12 well 24 well 48 well 96 well 384 well
Channels Volume
4
6
8
12
125 9 x x
300 9 x x
1250 9 x
12.5 9 x x
50 9 x x
125 9 x x
300 9 x x
1250 9 x
12.5 4.5 x
50 4.5 x
125 4.5 x
[μl]
300 9–32.5 xx xx xx
1250 9– 32.5 x x x x
300 9–19.5 x x x x
1250 9– 19.5 x x x
12.5 4.5 – 14 x x x x
50 4.5 – 14 x x x x
125 4.5–14 x x x x
300 9–14 x x x x
1250 9–14 x x
12.5 4.5–9 x x
50 4.5 – 9 x x
125 4.5 – 9 x x
Tip dist.
[mm]
Spacing
[mm]L(3)P(4)L (4)P (6)L (6)P (8)L (8)P (12)L (16)P(24)
Landscape
(8 wells)
Portrait
(12 wells)
Landscape
(16 wells)
Portrait
(24 wells)
www.integra-biosciences.com 45
Page 46

ASSIST PLUS – Operating instructions V02 Technical Data
1
3 4
3 1
2 4
2
1
2
3
4
384 wells
96 wells
or
Z-pattern
N-pattern
1 5
2 6
3 7
4 8
1 2 3 4
5 6 7 8
1 2 5 6 3 4 7
8
96 wells
12 wells
or
Z-pattern
N-pattern
7.7 Plate access pattern
Plates can be reformatted in two different patterns using the predefined Reformat
program.
Reformat four 96 well source
plates with an 8 channel
VOYAGER pipette into 4
quadrants of one target 384 well
plate.
Reformat eight 12 well source
plates with a 4 channel
VOYAGER (300 μl) into 8
quadrants of one target 96 well
plate.
46 INTEGRA Biosciences AG
Page 47

ASSIST PLUS – Operating instructions V02 Technical Data
(Hs)
(Sm)
(Hs)
a
)
(Ht)
(Td)
(Ht)
(T
d
)
(Tm)
(Ht)
(Td)
7.8 Tip travel distances
The Tip Travel defines the distance which the tips move during an aspiration, dispense
and mix step to artificially track the liquid level. The Tip Travel starts from a user defined
height as shown below.
Section Steps and parameters
Source Source Mix (
↕):
Source Asp. (
↓):
Tip Travel starts from Height (H
Moves the Source Mix (S
distance down and up.
Ta rg e t Targe t Disp. (
Tip Travel starts from
Height (Ht). Moves the
set Target Disp. (Td)
distance up.
↑):
).
Tip Travel starts from Height/Start
s
)
m
Height (H
(S
a
s
) distance down.
Tar get Mix (↕):
Tip Travel starts after
dispense from the
Height (H
) plus Tar get
t
Disp. (Td). Moves the
Tar get Mix (Tm)
distance down and up.
). Moves the Source Asp.
Target Asp. (
↓):
Tip Travel starts from
Height (H
) plus Tar get
t
Disp. (Td) distance.
Moves the Tar g et
Disp. (T
) distance
d
down.
www.integra-biosciences.com 47
Page 48

ASSIST PLUS – Operating instructions V02 Accessories
8 Accessories
8.1 Accessories
General Part No.
Pipette Li-ion battery 4205
Bluetooth module for INTEGRA electronic pipettes 4221
Communication/charging cable pipette to ASSIST PLUS 4548
Pipette charging cable 4549
Charging/communication stand for 1 pipette, incl. mains adapter 4211
Tip waste bin (incl. frame and reflector) 4550
Bags for tip waste bin (200 bags) 4570
Reflector for tip sensor 4572
3 Position universal deck 4520
Rack for 1.5 / 2 ml microcentrifuge tubes 4540
Rack for 0.5 ml microcentrifuge tubes 4541
Rack for 15 ml centrifuge tubes, 4 x 6 tubes 4542
Rack for 5 ml test tubes (12 x 75 mm), 6 x 8 tubes 4543
Rack for cryogenic tubes, 6 x 8 tubes 4544
Dual reservoir adapter (compatible with 10 ml , 25 ml or divided reagent
reservoirs)
Slanted plate holder (0-30°) 4510
PCR 96 well cooling block 6250
PCR 384 well cooling block 6255
4547
48 INTEGRA Biosciences AG
Page 49

ASSIST PLUS – Operating instructions V02 Accessories
VIAFLO Electronic Pipettes Part No.
8-channel pipette, 0.5 – 12.5 μl 4621
8-channel pipette, 2 – 50 μl 4626
8-channel pipette, 5 – 125 μl 4622
8-channel pipette, 10 – 300 μl 4623
8-channel pipette, 50 – 1250 μl 4624
12-channel pipette, 0.5 – 12.5 μl 4631
12-channel pipette, 2 – 50 μl 4636
12-channel pipette, 5 – 125 μl 4632
12-channel pipette, 10 – 300 μl 4633
12-channel pipette, 50 – 1250 μl 4634
16-channel pipette, 0.5 – 12.5 μl 4641
16-channel pipette, 2 – 50 μl 4646
16-channel pipette, 5 – 125 μl 4642
VOYAGER Electronic Pipettes Part No.
4-channel pipette, 10 – 300 μl 4743
4-channel pipette, 50 – 1250 μl 4744
6-channel pipette, 10 – 300 μl 4763
6-channel pipette, 50 – 1250 μl 4764
8-channel pipette, 0,5 – 12.5 μl 4721
8-channel pipette, 2 – 50 μl 4726
8-channel pipette, 5 – 125 μl 4722
8-channel pipette, 10 – 300 μl 4723
8-channel pipette, 50 – 1250 μl 4724
12-channel pipette, 0,5 – 12.5 μl 4731
12-channel pipette, 2 – 50 μl 4736
12-channel pipette, 5 – 125 μl 4732
www.integra-biosciences.com 49
Page 50

ASSIST PLUS – Operating instructions V02 Accessories
8.2 Consumables
10 ml Disposable Reagent Reservoirs for multichannel pipettes Part No.
10 ml Reservoir Base, 10 pack 4306
Polystyrene Trial pack (1 base and 3 reservoirs), sterile 4330
30 reservoirs individually sealed, sterile, 1 base per case 4331
Four sleeves of 50 reservoirs, sterile, 200 reservoirs and
1 base per case
Polystyrene,
SureFlo™
Polypropylene Trial pack (1 base and 3 reservoirs), sterile 4335
SureFlo™ = anti-sealing array
Trial pack (1 base and 3 reservoirs), sterile 4370
30 reservoirs individually sealed, sterile, 1 base per case 4371
Four sleeves of 50 reservoirs, sterile, 200 reservoirs and
1 base per case
30 reservoirs individually sealed, sterile, 1 base per case 4336
Four sleeves of 50 reservoirs, sterile, 200 reservoirs and
1 base per case
4332
4372
4337
50 INTEGRA Biosciences AG
Page 51

ASSIST PLUS – Operating instructions V02 Accessories
25 ml Disposable Reagent Reservoirs for multichannel pipettes Part No.
25 ml Reservoir Base, 10 pack 4304
Polystyrene Trial pack (1 base and 3 reservoirs), sterile 4310
30 reservoirs individually sealed, sterile, 1 base per case 4311
Four sleeves of 50 reservoirs, sterile, 200 reservoirs and
1 base per case
Polystyrene,
SureFlo™
Polystyrene,
SureFlo™, divided
(5 ml + 10 ml)
Polypropylene Trial pack (1 base and 3 reservoirs), sterile 4315
Polypropylene,
SureFlo™, divided
(5 ml + 10 ml)
• SureFlo™ = anti-sealing array
Trial pack (1 base and 3 reservoirs), sterile 4380
30 reservoirs individually sealed, sterile, 1 base per case 4381
Four sleeves of 50 reservoirs, sterile, 200 reservoirs and
1 base per case
Trial pack, sterile 4350
30 reservoirs individually sealed, sterile, 1 base per case 4351
Four sleeves of 50 reservoirs, sterile, 200 reservoirs and
1 base per case
30 reservoirs individually sealed, sterile, 1 base per case 4316
Four sleeves of 50 reservoirs, sterile, 200 reservoirs and
1 base per case
Trial pack (1 base and 3 reservoirs), sterile 4355
30 reservoirs individually sealed, sterile, 1 base per case 4356
Four sleeves of 50 reservoirs, sterile, 200 reservoirs and
1 base per case
4312
4382
4352
4317
4357
www.integra-biosciences.com 51
Page 52

ASSIST PLUS – Operating instructions V02 Accessories
100 ml Disposable Reagent Reservoirs for multichannel pipettes Part No.
100 ml Reservoir Base, 10 pack 4305
Polystyrene Trial pack (1 base and 3 reservoirs), sterile 4320
30 reservoirs individually sealed, sterile, 1 base per case 4321
Four sleeves of 50 reservoirs, sterile, 200 reservoirs and
1 base per case
Polystyrene,
SureFlo™
Polypropylene Trial pack (1 base and 3 reservoirs), sterile 4325
• SureFlo™ = anti-sealing array
Trial pack (1 base and 3 reservoirs), sterile 4390
30 reservoirs individually sealed, sterile, 1 base per case 4391
Four sleeves of 50 reservoirs, sterile, 200 reservoirs and
1 base per case
30 reservoirs individually sealed, sterile, 1 base per case 4326
Four sleeves of 50 reservoirs, sterile, 200 reservoirs and
1 base per case
4322
4392
4327
Automation friendly Clear Advantage™ reagent reservoirs Part No.
150 ml 8 reservoir bases, automation friendly (microplate
format), non-sterile
25 lids, sterile, polypropylene 6302
Polystyrene Trial pack (1 base, 1 reservoir and 1 lid), polystyrene,
sterile
30 reservoirs, individually sealed, sterile, polystyrene,
incl. 1 trial pack
100 reservoirs, 4 sleeves of 25 inserts, sterile,
polystyrene, incl. 1 trial pack
Polypropylene Trial pack (1 base, 1 reservoir and 1 lid), polypropylene,
sterile
30 reservoirs, individually sealed, sterile, polypropylene,
incl. 1 trial pack
100 reservoirs, 4 sleeves of 25 inserts, sterile,
polypropylene, incl. 1 trial pack
52 INTEGRA Biosciences AG
6301
6303
6317
6318
6308
6337
6338
Page 53

ASSIST PLUS – Operating instructions V02 Accessories
Automation friendly Clear Advantage™ reagent reservoirs Part No.
300 ml 8 reservoir bases, automation friendly (microplate
format), non-sterile
25 lids, sterile, polypropylene 6306
6305
Polystyrene Trial pack (1 base, 1 reservoir and 1 lid), polystyrene,
sterile
30 reservoirs, individually sealed, sterile, polystyrene,
incl. 1 trial pack
100 reservoirs, 4 sleeves of 25 inserts, sterile,
polystyrene, incl. 1 trial pack
Polypropylene Trial pack (1 base, 1 reservoir and 1 lid), polypropylene,
sterile
30 reservoirs, individually sealed, sterile, polypropylene,
incl. 1 trial pack
100 reservoirs, 4 sleeves of 25 inserts, sterile,
polypropylene, incl. 1 trial pack
Standard footprint polypropylene reagent reservoirs Part No.
96 Well, 300 ml 25 reservoirs per case, pyramid bottom, non-sterile 6351
25 reservoirs per case, pyramid bottom, pre-sterilized 6352
12 Column 25 reservoirs per case, pyramid bottom,
non-sterile
125 reservoirs per case, pyramid bottom,
pre-sterilized
6307
6327
6328
6309
6347
6348
6361
6362
8 Row 25 reservoirs per case, pyramid bottom, non-sterile 6371
25 reservoirs per case, pyramid bottom, pre-sterilized 6372
www.integra-biosciences.com 53
Page 54

ASSIST PLUS – Operating instructions V02 Accessories
GripTips for automation of INTEGRA Pipettes Part No.
Purple:
12.5 µl
Purple:
12.5 μl
low retention
Yel low:
50 μl, 125 μl
Yel low:
50 μl, 125 μl
low retention
Green:
300 µl
5 XYZ racks of 384 tips, non-sterile 6453
5 XYZ racks of 384 tips, sterile 6454
5 XYZ racks of 384 tips, sterile, filter 6455
5 XYZ racks of 384 tips, non-sterile, LONG 6403
5 XYZ racks of 384 tips, sterile, LONG 6404
5 XYZ racks of 384 tips, sterile, filter, LONG 6405
5 XYZ racks of 384 tips, sterile, filter, SHORT 6475
5 XYZ racks of 384 tips, non-sterile 6553
5 XYZ racks of 384 tips, sterile 6554
5 XYZ racks of 384 tips, sterile, filter 6555
5 XYZ racks of 384 tips, non-sterile, LONG 6503
5 XYZ racks of 384 tips, sterile, LONG 6504
5 XYZ racks of 384 tips, sterile, filter, LONG 6505
5 XYZ racks of 384 tips, non-sterile 6463
5 XYZ racks of 384 tips, sterile 6464
5 XYZ racks of 384 tips, sterile, filter 6465
5 XYZ racks of 384 tips, non-sterile 6563
5 XYZ racks of 384 tips, sterile 6564
5 XYZ racks of 384 tips, sterile, filter 6565
5 inserts of 96 tips, non-sterile, GREEN CHOICE 6432
5 racks of 96 tips, non-sterile 6433
5 racks of 96 tips, sterile 6434
5 racks of 96 tips, sterile, filter 6435
5 inserts of 96 tips, non-sterile, LONG, GREEN CHOICE 6482
5 racks of 96 tips, non-sterile, LONG 6483
5 racks of 96 tips, sterile, LONG 6484
5 racks of 96 tips, sterile, filter, LONG 6485
5 racks of 96 tips, non-sterile, WIDE BORE 6633
5 racks of 96 tips, sterile, WIDE BORE 6634
5 racks of 96 tips, sterile, filter, WIDE BORE 6635
54 INTEGRA Biosciences AG
Page 55

ASSIST PLUS – Operating instructions V02 Accessories
GripTips for automation of INTEGRA Pipettes Part No.
Green:
300 μl
low retention
Blue:
1250 µl
Blue:
1250 μl
low retention
5 racks of 96 tips, non-sterile 6533
5 racks of 96 tips, sterile 6534
5 racks of 96 tips, sterile, filter 6535
5 inserts of 96 tips, non-sterile, GREEN CHOICE 6442
5 racks of 96 tips, non-sterile 6443
5 racks of 96 tips, sterile 6444
5 racks of 96 tips, sterile, filter 6445
5 inserts of 96 tips, non-sterile, SHORT, GREEN CHOICE 6492
5 racks of 96 tips, non-sterile, SHORT 6493
5 racks of 96 tips, sterile, SHORT 6494
5 racks of 96 tips, sterile, filter, SHORT 6495
5 racks of 96 tips, non-sterile, WIDE BORE 6643
5 racks of 96 tips, sterile, WIDE BORE 6644
5 racks of 96 tips, sterile, filter, WIDE BORE 6645
5 racks of 96 tips, non-sterile 6543
5 racks of 96 tips, sterile 6544
5 racks of 96 tips, sterile, filter 6545
5 racks of 96 tips, non-sterile, SHORT 6593
5 racks of 96 tips, sterile, SHORT 6594
5 racks of 96 tips, sterile, filter, SHORT 6595
NOTE
Autoclaving of GripTips is not recommended as they may warp during the
process, which can lead to incorrect tip loading and obstruct precise well
targeting.
www.integra-biosciences.com 55
Page 56

ASSIST PLUS – Operating instructions V02
Imprint
© 2019 INTEGRA Biosciences AG
All rights to this documentation are reserved. In particular the rights of reproduction,
processing, translation and the form of presentation lie with INTEGRA Biosciences AG.
Neither the complete documentation nor parts thereof may be reproduced in any way, or
stored and processed using electronic media or distributed in any other way without the
written consent of INTEGRA Biosciences AG.
This operating instruction manual has part number 128950, the version is V02. It applies
as of (see Toolbox - Device information):
FW version VIAFLO pipettes 4.20 or higher
FW version VOYAGER pipettes 4.20 or higher
FW version ASSIST PLUS 1.08 or higher
of ASSIST PLUS until a newer revision is released.
VIAFLO, VOYAGER, VIALINK, VIALAB and GripTip are trademarks of INTEGRA Holding,
Switzerland.
Manufacturer
INTEGRA Biosciences AG
CH-7205 Zizers, Switzerland
T +41 81 286 95 30
F +41 81 286 95 33
info@integra-biosciences.com
www.integra-biosciences.com
INTEGRA Biosciences Corp.
Hudson, NH 03051, USA
T +1 603 578 5800
F +1 603 577 5529
Customer service
Please contact your local INTEGRA Biosciences representative.
To find out name and address go to www.integra-biosciences.com
Further information and operating instructions in other languages are available on
www.integra-biosciences.com
56 INTEGRA Biosciences AG
or on request info@integra-biosciences.com.
.
 Loading...