

Page 1

User Guide
AV Home Theater Receiver
NS-R5101AHD-A
Page 2

Contents
Introduction . . . . . . . . . . . . . . . . . . . . . . . . . . . . . . . . . . . . . . . . . . . . . . . . . . . . .1
Safety information . . . . . . . . . . . . . . . . . . . . . . . . . . . . . . . . . . . . . . . . . . . . . . .1
Ventilation . . . . . . . . . . . . . . . . . . . . . . . . . . . . . . . . . . . . . . . . . . . . . . . . . . . . . . 1
Power cord . . . . . . . . . . . . . . . . . . . . . . . . . . . . . . . . . . . . . . . . . . . . . . . . . . . . . . 1
Important safety instructions . . . . . . . . . . . . . . . . . . . . . . . . . . . . . . . . . . . . . 1
Precautions . . . . . . . . . . . . . . . . . . . . . . . . . . . . . . . . . . . . . . . . . . . . . . . . . . . . . . 2
Components . . . . . . . . . . . . . . . . . . . . . . . . . . . . . . . . . . . . . . . . . . . . . . . . . . . . .3
Features . . . . . . . . . . . . . . . . . . . . . . . . . . . . . . . . . . . . . . . . . . . . . . . . . . . . . . . . . 3
Package contents . . . . . . . . . . . . . . . . . . . . . . . . . . . . . . . . . . . . . . . . . . . . . . . . 3
Front controls . . . . . . . . . . . . . . . . . . . . . . . . . . . . . . . . . . . . . . . . . . . . . . . . . . . 3
Display . . . . . . . . . . . . . . . . . . . . . . . . . . . . . . . . . . . . . . . . . . . . . . . . . . . . . . . . . . 4
Back . . . . . . . . . . . . . . . . . . . . . . . . . . . . . . . . . . . . . . . . . . . . . . . . . . . . . . . . . . . . . 4
Remote control . . . . . . . . . . . . . . . . . . . . . . . . . . . . . . . . . . . . . . . . . . . . . . . . . . 4
Top panel - NS-RB1 . . . . . . . . . . . . . . . . . . . . . . . . . . . . . . . . . . . . . . . . . . . . . . 5
Back panel - NS-RB1 . . . . . . . . . . . . . . . . . . . . . . . . . . . . . . . . . . . . . . . . . . . . . . 5
Setting up your home theater system . . . . . . . . . . . . . . . . . . . . . . . . . . . . .5
Finding a location for your home theater system . . . . . . . . . . . . . . . . . . 5
Placing your speakers . . . . . . . . . . . . . . . . . . . . . . . . . . . . . . . . . . . . . . . . . . . . 6
Connecting your speakers to the receiver . . . . . . . . . . . . . . . . . . . . . . . . . 6
Connecting devices . . . . . . . . . . . . . . . . . . . . . . . . . . . . . . . . . . . . . . . . . . . . . . 7
What is Rocketboost™? . . . . . . . . . . . . . . . . . . . . . . . . . . . . . . . . . . . . . . . . . . 11
Installing batteries in the remote control . . . . . . . . . . . . . . . . . . . . . . . . 14
Using the remote control . . . . . . . . . . . . . . . . . . . . . . . . . . . . . . . . . . . . . . . 14
Using the Audyssey 2EQ® room correction and speaker setup . . . . 14
Operating your receiver . . . . . . . . . . . . . . . . . . . . . . . . . . . . . . . . . . . . . . . . 16
Turning your receiver on and off . . . . . . . . . . . . . . . . . . . . . . . . . . . . . . . . 16
Understanding basic operations . . . . . . . . . . . . . . . . . . . . . . . . . . . . . . . . . 16
Listening to your receiver . . . . . . . . . . . . . . . . . . . . . . . . . . . . . . . . . . . . . . 17
Listening to the radio . . . . . . . . . . . . . . . . . . . . . . . . . . . . . . . . . . . . . . . . . . . 17
Presetting FM or AM stations . . . . . . . . . . . . . . . . . . . . . . . . . . . . . . . . . . . . 17
Using the listening modes . . . . . . . . . . . . . . . . . . . . . . . . . . . . . . . . . . . . . . 18
Using advanced setup . . . . . . . . . . . . . . . . . . . . . . . . . . . . . . . . . . . . . . . . . . 20
Using on-screen setup menus . . . . . . . . . . . . . . . . . . . . . . . . . . . . . . . . . . . 20
Setting up HDMI input (HDMI Input menu) . . . . . . . . . . . . . . . . . . . . . . 20
Setting up Component input (Component menu) . . . . . . . . . . . . . . . 21
Setting up Digital Audio (Digital Audio menu) . . . . . . . . . . . . . . . . . . . 21
Configuring speakers (Sp Config menu) . . . . . . . . . . . . . . . . . . . . . . . . . 21
Setting the Wireless Surround/Subwoofer . . . . . . . . . . . . . . . . . . . . . . . 22
Setting speaker distance (Sp Distance menu) . . . . . . . . . . . . . . . . . . . . 22
Setting the level calibration (Level Cal menu) . . . . . . . . . . . . . . . . . . . . 22
Adjusting the audio (Audio Adjust menu) . . . . . . . . . . . . . . . . . . . . . . . . 22
Naming inputs (Name Edit menu) . . . . . . . . . . . . . . . . . . . . . . . . . . . . . . . 24
Setting up HDMI (HDMI Setup menu) . . . . . . . . . . . . . . . . . . . . . . . . . . . . 24
Changing audio settings . . . . . . . . . . . . . . . . . . . . . . . . . . . . . . . . . . . . . . . . 26
Selecting a digital input signal format . . . . . . . . . . . . . . . . . . . . . . . . . . . 27
ii
www.insigniaproducts.com
Page 3

Contents
Controlling other components . . . . . . . . . . . . . . . . . . . . . . . . . . . . . . . . . 28
Preprogrammed remote control codes . . . . . . . . . . . . . . . . . . . . . . . . . . 28
Using the remote control to control other components . . . . . . . . . . 28
Remote control codes . . . . . . . . . . . . . . . . . . . . . . . . . . . . . . . . . . . . . . . . . . . 29
Maintaining . . . . . . . . . . . . . . . . . . . . . . . . . . . . . . . . . . . . . . . . . . . . . . . . . . . . 32
Troubleshooting . . . . . . . . . . . . . . . . . . . . . . . . . . . . . . . . . . . . . . . . . . . . . . . 32
Specifications . . . . . . . . . . . . . . . . . . . . . . . . . . . . . . . . . . . . . . . . . . . . . . . . . . 34
Amplifier section . . . . . . . . . . . . . . . . . . . . . . . . . . . . . . . . . . . . . . . . . . . . . . . . 34
Video section . . . . . . . . . . . . . . . . . . . . . . . . . . . . . . . . . . . . . . . . . . . . . . . . . . . 34
Tuner section . . . . . . . . . . . . . . . . . . . . . . . . . . . . . . . . . . . . . . . . . . . . . . . . . . . 34
General section . . . . . . . . . . . . . . . . . . . . . . . . . . . . . . . . . . . . . . . . . . . . . . . . . 34
Wireless . . . . . . . . . . . . . . . . . . . . . . . . . . . . . . . . . . . . . . . . . . . . . . . . . . . . . . . . 34
Legal notices . . . . . . . . . . . . . . . . . . . . . . . . . . . . . . . . . . . . . . . . . . . . . . . . . . . 35
Dolby TrueHD . . . . . . . . . . . . . . . . . . . . . . . . . . . . . . . . . . . . . . . . . . . . . . . . . . 35
DTS HD™ . . . . . . . . . . . . . . . . . . . . . . . . . . . . . . . . . . . . . . . . . . . . . . . . . . . . . . . 35
HDMI® . . . . . . . . . . . . . . . . . . . . . . . . . . . . . . . . . . . . . . . . . . . . . . . . . . . . . . . . . . 35
Audyssey 2EQ® . . . . . . . . . . . . . . . . . . . . . . . . . . . . . . . . . . . . . . . . . . . . . . . . . 35
One-year limited warranty . . . . . . . . . . . . . . . . . . . . . . . . . . . . . . . . . . . . . . 37
www.insigniaproducts.com
iii
Page 4

Contents
iv
www.insigniaproducts.com
Page 5
Insignia NS-R5101AHD-A
AV Home Theater Receiver
Introduction
Congratulations on your purchase of a high-quality
Insignia product. Your NS-R5101AHD-A represents
the state of the art in AV Home Theater Receiver
design and is designed for reliable and trouble-free
performance.
WARNING:
TO REDUCE THE RISK OF FIRE OR ELECTRIC
SHOCK, DO NOT EXPOSE THIS APPARATUS TO
RAIN OR MOISTURE.
CAUTION:
TO REDUCE THE RISK OF ELECTRIC SHOCK,
DO NOT REMOVE COVER (OR BACK). NO
USER-SERVICEABLE PARTS INSIDE. REFER
SERVICING TO QUALIFIED SERVICE
PERSONNEL.
Ventilation
Caution
Do not block any ventilation openings. Install in
accordance with these instructions.
Slots and openings in the cabinet are provided for
ventilation and to ensure reliable operation of your
system and to protect it from over-heating.
The openings should never be blocked by placing
your system on a bed, sofa, rug, or other similar
surface. This system should not be placed in a built-in
installation such as a bookcase or rack unless correct
ventilation is provided or these instructions have
been adhered to.
Power cord
Caution
We recommend that most appliances be placed
upon a dedicated circuit—a single outlet circuit
which powers only that appliance and has no
additional outlets or branch circuits. Check the
specification page of this manual for power
requirements.
Do not overload wall outlets. Overloaded wall
outlets, loose or damaged wall outlets, extension
cords, frayed power cords, or damaged or cracked
wire insulation are dangerous. Any of these
conditions could result in electric shock or fire.
Periodically examine the power cord. If its
appearance indicates damage or deterioration,
unplug it, discontinue use of your system, and have
the cord replaced with an exact replacement part by
an authorized service provider.
Protect the power cord from physical or mechanical
abuse, such as being twisted, kinked, pinched, closed
in a door, or walked upon. Pay particular attention to
plugs, wall outlets, and the point where the cord exits
your receiver.
To disconnect power from the outlet, pull out the
plug. When installing your system, make sure that the
plug is easily accessible.
Safety information
WARNING
RISK OF ELECTRIC SHOCK
DO NOT OPEN
The lightning flash with arrowhead symbol, within an
equilateral triangle, is intended to alert the user to the
presence of uninsulated “dangerous voltage” within
the product’s enclosure that may be of sufficient
magnitude to constitute a risk of electric shock to
persons.
The exclamation point within an equilateral triangle is
intended to alert the user to the presence of important
operating and maintenance (servicing) instructions in
the literature accompanying the appliance.
Important safety instructions
1 Read these instructions.
2 Keep these instructions.
3 Heed all warnings.
4 Follow all instructions.
5 Do not use this apparatus near water.
6 Clean only with dry cloth.
7 Do not block any ventilation openings. Install in
accordance with the manufacturer’s
instructions.
8 Do not install near any heat sources such as
radiators, heat registers, stoves, or other
apparatus (including amplifiers) that produce
heat.
9 Do not defeat the safety purpose of the
polarized or grounding-type plug. A polarized
plug has two blades with one wider than the
other. A grounding type plug has two blades
and a third grounding prong. The wide blade or
the third prong are provided for your safety. If
the provided plug does not fit into your outlet,
consult an electrician for replacement of the
obsolete outlet.
10 Protect the power cord from being walked on or
pinched particularly at plugs, convenience
receptacles, and the point where they exit from
the apparatus.
11 Only use attachments/accessories specified by
the manufacturer.
AVIS
RISQUE DE CHOC ELECTRIQUE
NE PAS
OUVRIR
www.insigniaproducts.com
1
Page 6

Insignia NS-R5101AHD-A AV Home Theater Receiver
G
12 Use only with the cart,
PORTABLE CART WARNIN
stand, tripod, bracket, or
table specified by the
manufacturer, or sold with
the apparatus. When a cart
is used, use caution when
moving the cart/apparatus
combination to avoid injury
S3125A
from tip-over.
13 Unplug this apparatus during lightning storms
or when unused for long periods of time.
14 Refer all servicing to qualified service personnel.
Servicing is required when the apparatus has
been damaged in any way, such as
power-supply cord or plug is damaged, liquid
has been spilled or objects have fallen into the
apparatus, the apparatus has been exposed to
rain or moisture, does not operate normally, or
has been dropped.
15 Damage Requiring Service
Unplug the apparatus from the wall outlet and
refer servicing to qualified service personnel
under the following conditions:
• When the power-supply cord or plug is
damaged,
• If liquid has been spilled, or objects have fallen
into the apparatus,
• If the apparatus has been exposed to rain or
water,
• If the apparatus does not operate normally by
following the operating instructions. Adjust
only those controls that are covered by the
operating instructions as an improper
adjustment of other controls may result in
damage and will often require extensive work
by a qualified technician to restore the
apparatus to its normal operation,
• If the apparatus has been dropped or
damaged in any way, and
• When the apparatus exhibits a distinct change
in performance this indicates a need for
service.
16 Object and Liquid Entry
• Never push objects of any kind into the
apparatus through openings as they may
touch dangerous voltage points or short-out
parts that could result in a fire or electric
shock.
• The apparatus shall not be exposed to
dripping or splashing and no objects filled
with liquids, such as vases shall be placed on
the apparatus.
• Don’t put candles or other burning objects on
top of this unit.
17 Batteries
Always consider the environmental issues and
follow local regulations when disposing of
batteries.
18 If you install the apparatus in a built-in
installation, such as a bookcase or rack, ensure
that there is adequate ventilation.
Leave 20 cm (8") of free space at the top and
sides and 10 cm (4") at the rear. The rear edge of
the shelf or board above the apparatus shall be
set 10 cm (4") away from the rear panel or wall,
creating a flue-like gap for warm air to escape.
Precautions
1 Recording copyrighted material—Unless it’s for
personal use only, recording copyrighted
material is illegal without the permission of the
copyright holder.
2 AC fuse—The AC fuse inside the unit is not
user-serviceable. If you cannot turn on the unit,
contact your Insignia dealer.
3 Care—Occasionally you should dust the unit all
over with a soft cloth. For stubborn stains, use a
soft cloth dampened with a weak solution of
mild detergent and water. Dry the unit
immediately afterwards with a clean cloth.
Don’t use abrasive cloths, thinners, alcohol, or
other chemical solvents, because they may
damage the finish or remove the panel lettering.
4 Power
Warni ng
AC outlet voltages vary from country to country.
Make sure that the voltage in your area meets
the voltage requirements printed on the unit’s
rear panel (e.g., AC 230 V, 50 Hz or AC 120 V, 60
Hz).
The power cord plug is used to disconnect this
unit from the AC power source. Make sure that
the plug is readily operable (easily accessible) at
all times.
Pressing ON/STANDBY to select Standby mode
does not fully shutdown the unit. If you do not
intend to use the unit for an extended period,
remove the power cord from the AC outlet.
5 Preventing Hearing Loss
Caution
6 Batteries and heat exposure
Warni ng
7 Never touch this unit with wet hands—Never
handle this unit or its power cord while your
hands are wet or damp. If water or any other
liquid gets inside this unit, have it checked by
your Insignia dealer.
8 Handling notes
• If you need to transport this unit, use the
original packaging to pack it how it was when
you originally bought it.
• Do not leave rubber or plastic items on this
unit for a long time, because they may leave
marks on the case.
• This unit’s top and rear panels may get warm
after prolonged use. This is normal.
Before plugging in the unit for the first time, read the
following section carefully.
Excessive sound pressure from earphones and
headphones can cause hearing loss.
Batteries (battery pack or batteries installed) shall not
be exposed to excessive heat as sunshine, fire or the
like.
2
www.insigniaproducts.com
Page 7

Insignia NS-R5101AHD-A AV Home Theater Receiver
Components
Features
• 90 Watts/Channel @ 8 ohms
• Rocketboost™ Expandable Wireless Audio
Technology: sends wireless audio for surround
sound, subwoofer, and 2nd zone; receives wireless
audio from Rocketboost™ devices
• Audyssey 2EQ® to Correct Room Acoustic
Problems
• Audyssey Dynamic EQ® to Maintain Surround and
Bass Detail at any Volume
• Audyssey Dynamic Volume to Stop Volume Spikes
and Maintain Optimal Volume
• HDMI (Ver.1.4 with Audio Return Channel, 3D),
Deep-Color, x.v.Color, Lip Sync, DTS-HD Master
Audio, DTS-HD High Resolution Audio, Dolby
TrueHD, Dolby Digital Plus, DSD and Multi-CH
PCM
• 3 HDMI Inputs and 1 Output
• 3 Digital Inputs (2 Optical/1 Coaxial)
• Component Video Switching (2 Inputs/1 Output)
• Banana Plug-Compatible Speaker Posts
• 40 FM/AM Presets
• H.C.P.S. (High Current Power Supply) Massive High
Power Transformer
•Direct Mode
• 192 kHz/24-bit D/A Converters
• Powerful and Highly Accurate 32-bit Processing
DSP
• Crossover Adjustment
(40/50/60/80/100/120/150/200 Hz)
• A/V Sync Control Function (up to 100 ms)
•On-Screen Display via HDMI
* “x.v.Color” is a trademark of Sony Corporation.
Package contents
• Receiver
• Rocketboost™ Sender/Receiver (NS-RB1)
•Remote control
• 2 x AA batteries
• FM antenna
• AM antenna
• Speaker setup microphone
Front controls
Item Description Function
1
|/ ON/STANDBY button
2 HDMI THRU indicator Lights when the HDMI pass-through function is
3 Zone 2 indicator Lights when NS-RB1 is connected to the
4 STANDBY indicator Lights red when your stereo receiver is in
5 Remote control sensor Recei ves the signal from the remote control.
6 Display See “Display” on page 4 for additional
7 SETUP button Press to open the on-screen menus.
8
TUNING /
PRESET /
ENTER
9 RETURN button In menu mode, press to return to the main
10 MEMORY button Press to save a radio station preset. Press with
11 TUNING MODE button Press to turn on the receiver tuning mode and
12 MASTER VOLUME knob Turn to increase or decrease the volume.
13 Headphone jack Plug your headphones into this jack.
14 Input selector buttons Press to select the input signal source you want.
15 Protective cap Remove when using jack.
16 AUX INP UT VIDEO jack Plug an external video source into this jack.
17 AUX INPUT AUDIO L/R
jacks
18 SETUP MIC jack Plug the Audyssey setup microphone into this
19 AUDIO button Press to access audio settings. See “Changing
Press to turn on your stereo receiver.
activated in standby mode.
Rocketboost
standby mode.
information.
Press TUNING / to tune the radio to the
next or previous station.
Press PRESET / to tune the radio to the
next or previous station preset.
Press ENTER to confirm a selec tion.
menu.
the TUNING MODE button to clear presets.
listen to the radio. Press with the MEMORY
button to clear presets.
Plug an external sound source into this jack.
jack. See “Using the Audyssey 2EQ® room
correction and speaker setup” on page 14.
audio settings” on page 26.
™ Por t.
www.insigniaproducts.com
3
Page 8
Insignia NS-R5101AHD-A AV Home Theater Receiver
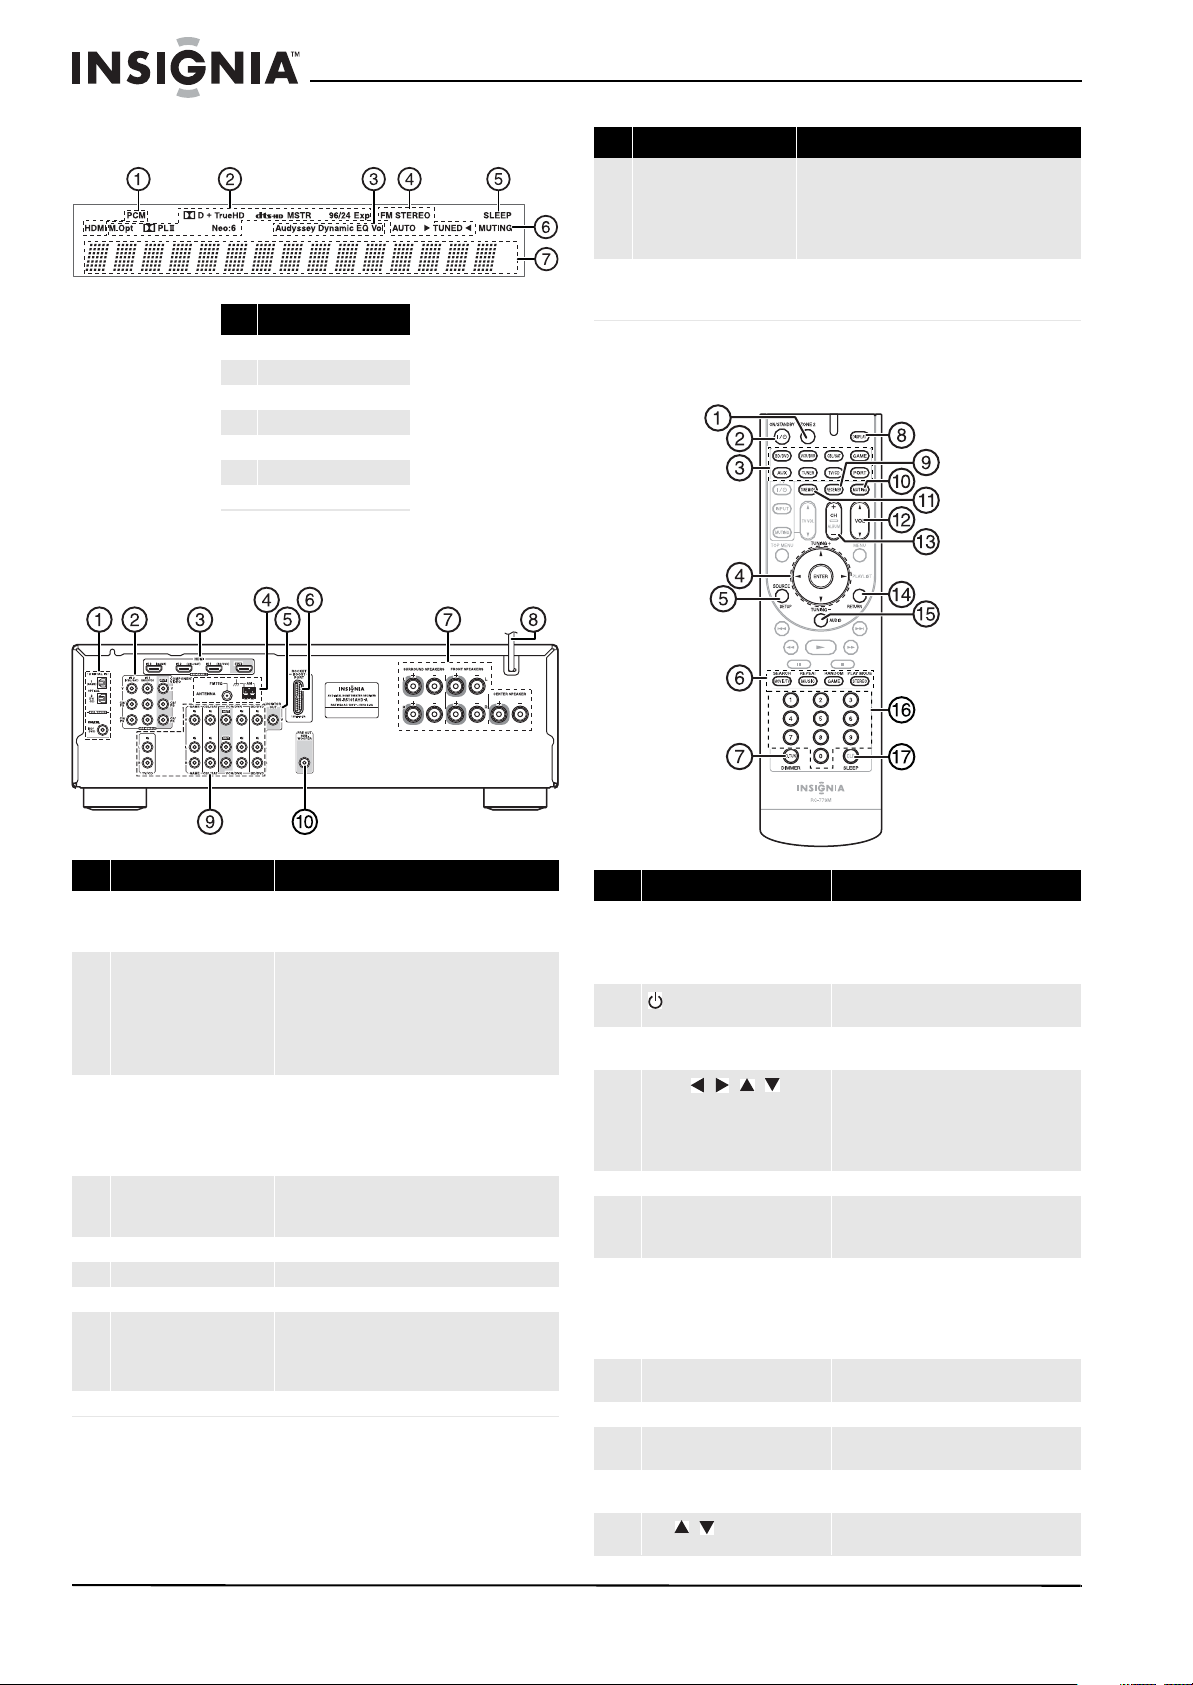
Display
Back
# Indicator
1 Audio input indicator
2 Listening mode indicator
3 Audyssey indicators
4 Tuning indicators
5 SLEEP indicator
6 MUTING indicator
7 DIGITAL display
# Description Function
9 Composite Video and
Audio L/R jacks
10 SUBWOOFER Connect the subwoofer to this jack. If you use the
Plug the composite video and audio L/R output
cables from the indicated devices into these jacks.
For video recording, plug the composite video and
audio L/R input cables to a VCR or DVR into the
OUT jacks
NS-RB1 to connect your subwoofer, connect the
NS-RB1 to this jack.
Remote control
# Description Function
1 DIGITAL IN jacks Plug the optical digital cable from a game (1) or
2 COMPONENT video jacks Plug the cables from a component video source
3 HDMI jacks Plug the HDMI signal input cable from a GAME
4 ANTENNA connectors Connect a 75 ohm FM antenna to the coaxial
5 MONITOR OUT V (Video) Connect this jack to a TV monitor.
6 Rocketboost™ port Connect the NS-RB1 to this port.
7 FRONT SPEAKERS Connect the front speakers to these jacks.
SURROUND SPEAKERS
CENTER SPEAKER
8 AC power cord Plug this cord into an AC power outlet.
TV/CD (2) into the upper jacks, or the coaxial
digital cable from a BD/DVD into the lower jack.
into the #1 (BD/DVD) or #2 (CBL/SAT) jacks.
Plug the cables to a component video monitor into
the OUT jacks.
The jacks are color coded (red, green, and blue) to
correspond to the cable connectors.
(IN3), cable/satellite box (IN2), or a BD/DVD player
(IN1).
Plug the HDMI output signal cable to a TV or
monitor into the OUT jack.
connector or an AM loop antenna to the wire
connectors.
Connect the left and right surround speakers and
the center speaker to these connectors. If you use
the NS-RB1 to connect your surround speakers, do
not connect them here.
Item Description Function
1 Zone2 button Press to select Zone2 input source. Press this
2 ON/STANDBY button Press to turn the power on to your receiver.
3 Remote mode input selector
buttons
4
ENTER ///
TUNING+/–
5 SOURCE/SETUP button Press to open the on-screen menus.
6 LISTENING MODE buttons Press to select the listening mode you want.
7 D.T UN
DIMMER
8 DISPLAY button Press repeatedly to cycle through the
9 RECEIVER button Press to co ntrol the receive r.
10 MUTING button Press to mute the sound output from the
11 TUNE MODE button Press to toggle between auto and manual
12
VOL / buttons
button then press input selector button.
Note: Zone 2 operation is only used with the
Rocketboost
Press again to go to standby mode.
Press to directly select your receiver input
source.
Press the arrow keys to navigate through the
on-screen menus. Press ENTER to confirm a
selection or setting.
In tuning mode, press to tune to the next
(TUNING+) or previous (TUNING–) station.
See “Using the listening modes” on page 18
for additional information.
In tuner mode, press D.TUN , then the
number buttons to tune directly to a
frequency.
Press DIMMER to adjust the brightness of
the display.
available input source information.
receiver.
tuning modes.
Press to increase or decrease the sound
volume.
™ NS-RB1.
4
www.insigniaproducts.com
Page 9

Insignia NS-R5101AHD-A AV Home Theater Receiver
Item Description Function
13 CH +/– buttons
ALBUM
14 RETURN button In menu mode, press to return to the main
15 AUDIO button Press to access audio settings. See
16 Number buttons Press to enter a preset number or to
17 SLEEP/CLR button Press repeatedly to select the sleep timer
In tuner mode, press to go to the next or
previous preset channel.
menu or previous menu.
“Changing audio settings” on page 26.
manually tune the radio.
duration.
In menu mode, press to clear an entry.
Top panel - NS-RB1
13 4
ON/STANDBY
STANDBY SUBWOOFER STEREO
# Description Function
1 Power/ Join button Press to turn the device on, then hold to initiate
2 Power/ Join indicator Lights blue when HUB STATUS is set to DISABLE.
3 Standby indicator Lights red when the sender/receiver is in standby
4 Subwoofer - Sender mode
indicator
5 Surround - Sender mode
indicator
6 Stereo - Sender mode
indicator
7 Source button Press to move to the next receivin g source. Each
8 Rx - Receiver mode indicator Lights blue when receiving signals.
joining. Press again to go to standby.
Lights green when HUB STATUS is set to ENABLE.
Lights steady when the sender/receiver is joined to
a network.
Blinks slowly when the sender/receiver is not
joined to a network.
Blinks quickly when the sender/receiver is in
joining mode.
mode.
Lights blue when the sender setup for subwoofer
is ON.
Lights blue when the sender setup for surround is
ON.
Lights blue when the sender setup for Zone 2 is
ON.
press toggles to the next source.
5
6782
SOURCE
SURROUND
Back panel - NS-RB1
1132
DISABLE ENABLE
HUB STATUS SUBWOOFER
# Description Function
1 External antenna Receives signals from other Rocketboost™ senders.
Sends signals to other Rocketboost
2 HUB STATUS switch Enables/disables hub mode operation. See
“Establishing communications” on page 13 for
additional information.
When hub status is enabled, the device is on even
when the receiver is in standby mode.
When hub status is disabled, the device is off when
the receiver is in standby mode.
Note: In a Rocketboost™ network, only one
Rocketboost™ device should have the Hub Status
switch set to ENABLE.
3 Subwoofer IN jack Connect to the Subwoofer Preout jack using a
mono RCA cable (not provided).
4 NS-RB1 cable Connect to the Rocketboost™ port on the receiver.
The receiver supplies power, surround L/R,
subwoofer, and Zone2 signals. The device supplies
received signals from other Rocketboost
4
IN
™ receivers.
™ senders.
Setting up your home theater system
Finding a location for your home theater system
• Install your home theater system on a stable flat
surface. Position your receiver so that it has a
direct line of sight to the remote control.
• Do not expose your system to extremes of
temperature or humidity.
• Avoid placing your system on a hot surface such
as on top of other hot running equipment. Make
sure that there is adequate ventilation to your
system.
Caution
Do not install the receiver in a confined space such as
a bookcase.
www.insigniaproducts.com
Caution
Connect the AC cord only after the speakers,
antenna, and all optional equipment have been
connected. Never make or change any
connections with the power turned on.
5
Page 10

Insignia NS-R5101AHD-A AV Home Theater Receiver
Placing your speakers
1 - Center speaker
This speaker enhances the front speakers, making
sound movements distinct and providing a
full-sound image. In movies it is used mainly for
dialog. Position it close to your TV facing forward at
about ear level, or at the same height as the front
speakers.
2 - Front speakers
These provide the overall sound. Their role in a
home theater system is to provide a solid anchor for
the sound image. They should be positioned facing
the listener at about ear level, and equidistant from
the TV. Angle them inward so as to create a triangle,
with the listener at the apex.
3 - Subwoofer
The subwoofer handles the bass sounds of the LFE
(Low-Frequency Effects) channel. The volume and
quality of the bass output from your subwoofer will
depend on its position, the shape of your listening
room, and your listening position. In general, a
good bass sound can be obtained by installing the
subwoofer in a front corner, or at one-third the
width of the wall, as shown.
Tip
To find the best position for your subwoofer, while
playing a movie or some music with good bass,
experiment by placing your subwoofer at various
positions within the room, and choose the one that
provides the most satisfying results.
4 - Surround speakers
These speakers are used for precise sound
positioning and to add realistic ambience. Position
them at the sides of the listener, or slightly behind,
about two to three feet (60 to 100 cm) above ear
level. Ideally they should be equidistant from the
listener.
Speaker precautions
• Do not put water or other liquids close to the
speakers. If liquid is spilled on the speakers, they
may be damaged.
• Speakers should only be placed on sturdy, flat
surfaces that are free from vibration. Putting them
on uneven or unstable surfaces, where they may
fall and cause damage, affects the sound quality.
• If the subwoofer is placed near a turntable, CD
player, or Blu-ray Disc/DVD player, howling or
slipping of the sound may occur. To prevent this,
move the unit away from the turntable, CD player,
or Blu-ray Disc/DVD player, or lower the
subwoofer’s output level.
Connecting your speakers to the receiver
Speaker configuration
The following table indicates the channels you
should use depending on the number of speakers
that you have. For 5.1-channel surround-sound
playback, you need five speakers and a powered
subwoofer.
Number of channels 2 3 4 5
Front speakers
Center speaker
Surround speakers
No matter how many speakers you use, a powered
subwoofer is recommended for a really powerful
and solid bass.
To get the best from your surround sound system,
you need to set the speaker settings. You can do
this automatically (see “Using the Audyssey 2EQ®
room correction and speaker setup” on page 14, or
manually (see “Configuring speakers (Sp Config
menu) on page 21).
Attaching the speaker cable labels
The AV receiver’s positive (+) speaker terminals are
all red. (The negative (–) speaker terminals are all
black.)
Speaker Color
Front left White
Front right Red
Center Green
Surround left Blue
Surround right Gray
The supplied speaker cable labels are also
color-coded. You should attach them to the positive
(+) side of each speaker cable in accordance with
the table above. Then all you need to do is to match
the color of each label to the corresponding
speaker terminal.
Speaker connection precautions
Read the following before connecting your
speakers:
• You can connect speakers with an impedance of
between 6 and 16 ohms. If you use speakers with
a lower impedance, and use the amplifier at high
volume levels for a long period of time, the
built-in amp protection circuit may be activated.
• Disconnect the power cord from the wall outlet
before making any connections.
XXXX
X X
XX
Red line
6
www.insigniaproducts.com
Page 11

Insignia NS-R5101AHD-A AV Home Theater Receiver
• Pay close attention to speaker wiring polarity. In
other words, connect positive (+) terminals only
to positive (+) terminals, and negative (–)
terminals only to negative (–) terminals. If you get
them the wrong way around, the sound will be
out of phase and will sound unnatural.
• Unnecessarily long, or very thin speaker cables
may affect the sound quality and should be
avoided.
• Be careful not to short the positive and negative
wires. Doing so may damage the receiver.
• Make sure the metal core of the wire does not
have contact with the receiver’s rear panel. Doing
so may damage the receiver.
• Don’t connect more than one cable to each
speaker terminal. Doing so may damage the
receiver.
• Don’t connect one speaker to several terminals.
To connect the subwoofer:
1 Using a subwoofer RCA cable, connect the AV
receiver's SUBWOOFER PRE OUT jack to an
input on your powered subwoofer, as shown.
Front right speaker
Powered subwoofer
Center speaker
Surround right
speaker
Front left s peaker
Surround left
speaker
To connect the speaker cables:
1 Strip 1/2" to 5/8" (12 to 15 mm) of insulation
from the ends of the speaker cables, and twist
the bare wires tightly, as shown.
2 Loosen the speaker terminals on the receiver
and insert the speaker wires into the terminals.
The following illustration shows which speaker
should be connected to each pair of terminals.
3 Tighten the terminals to secure the wire.
Tips
• If you are using banana plugs, tighten the
speaker terminal before inserting the banana
plug.
• Do not insert the speaker wire directly into the
center hole of the speaker terminal.
Connecting devices
Warni ng
Do not plug the AC cord into the AC outlet until all
connections are completed.
Notes
• Be sure to observe the color coding when
connecting audio and speaker cords.
• Make connections firmly and correctly. Failure
to do this can cause loss of sound, add noise to
the sound, or damage your receiver.
Connecting the antenna
This section explains how to connect the supplied
indoor FM antenna and AM loop antenna.
The receiver won’t pick up any radio signals without
any antenna connected, so you must connect the
antenna to use the tuner.
FM 75 Ohm
Thumbtac ks
Indoor FM antenna (supplied)
www.insigniaproducts.com
Insert the plug
fully into the jack
Push
Insert wire
Assembling the AM loop antenna
AM loop antenna (supplied)
Release
7
Page 12

Insignia NS-R5101AHD-A AV Home Theater Receiver
To connect the antennas:
1 Connect the FM antenna to your receiver.
Note
If you are using an indoor FM antenna, change the
position of the antenna until you get the best
reception of your favorite FM stations.
T o im prove re ception, use a 75 Ω outdoor antenna
instead of an indoor antenna. Disconnect the
indoor antenna before replacing it with an outdoor
antenna.
Tip
Once your receiver is ready for use, you need to tune
into a radio station and position the antenna to
achieve the best possible reception.
If you cannot achieve good reception with the
supplied indoor FM antenna, try a commercially
available outdoor FM antenna instead.
2 Connect the AM loop antenna to the receiver.
Notes
Place the AM loop antenna as far as possible from the
receiver, television, speaker cords, and the AC cord.
Change the position of the antenna until you get the
best reception of your favorite AM stations.
To improve reception, use an outdoor AM antenna
instead of a loop AM antenna. Disconnect the indoor
antenna before replacing it with an outdoor antenna.
Connecting audio components
HDMI cable
Other cables
TV or projector
Notes
• Before making any AV connections, read the
manuals supplied with your AV components.
• Don’t connect the power cord until you’ve
completed and double-checked all AV
connections.
• Push plugs in all the way to make good
connections (loose connections can cause noise
or malfunctions).
• To prevent interference, keep audio and video
cables away from power cords and speaker
cables.
AV cables and jacks
Video
Audio
Receiver
Blu-ray disc/DVD player
Game console
Receiver
Blu-ray disc/DVD player
TV or projector
Game console
Signal Cable Jack Description
Video and
audio
Video
Audio
HDMI
Y
Component video
Pb/Cb
Pr/Cr
Composite video Yellow
Optical digital audio
Coaxial digital audio
Analog audio (RCA)
HDMI
Y
Pb
Pr
Y
OPTICAL
DIGITAL
L
R
Green
Blue
Red
Orange
White
Red
HDMI connections can carry digital video and audio.
Component video separates the luminance (Y) and color difference
signals (PR, PB), providing the best picture quality (some TV
manufacturers label their component video sockets slightly differently).
Composite video is commonly used on TVs, VCRs, and other video
equipment.
Optical digital connections allow you to enjoy digital sound such
as PCM* or Dolby Digital. The audio quality is the same as
coaxial.
Note: The available sampling rate for PCM input signals is
32/44.1/48/88.2/96 kHz. Even 176.4/192 kHz is effective in case of the
HDMI connection.
Coaxial digital connections allow you to enjoy digital sound such as PCM*
or Dolby Digital. The audio quality is the same as optical.
Analog audio connections (RCA) carry analog audio.
8
www.insigniaproducts.com
Page 13
Insignia NS-R5101AHD-A AV Home Theater Receiver
Notes
• The AV receiver does not support SCART plugs.
• The AV receiver’s optical digital jacks have
shutter-type covers that open when an optical
plug is inserted and close when it’s removed.
Push plugs in all the way.
Caution
To prevent shutter damage, hold the optical plug
straight when inserting and removing.
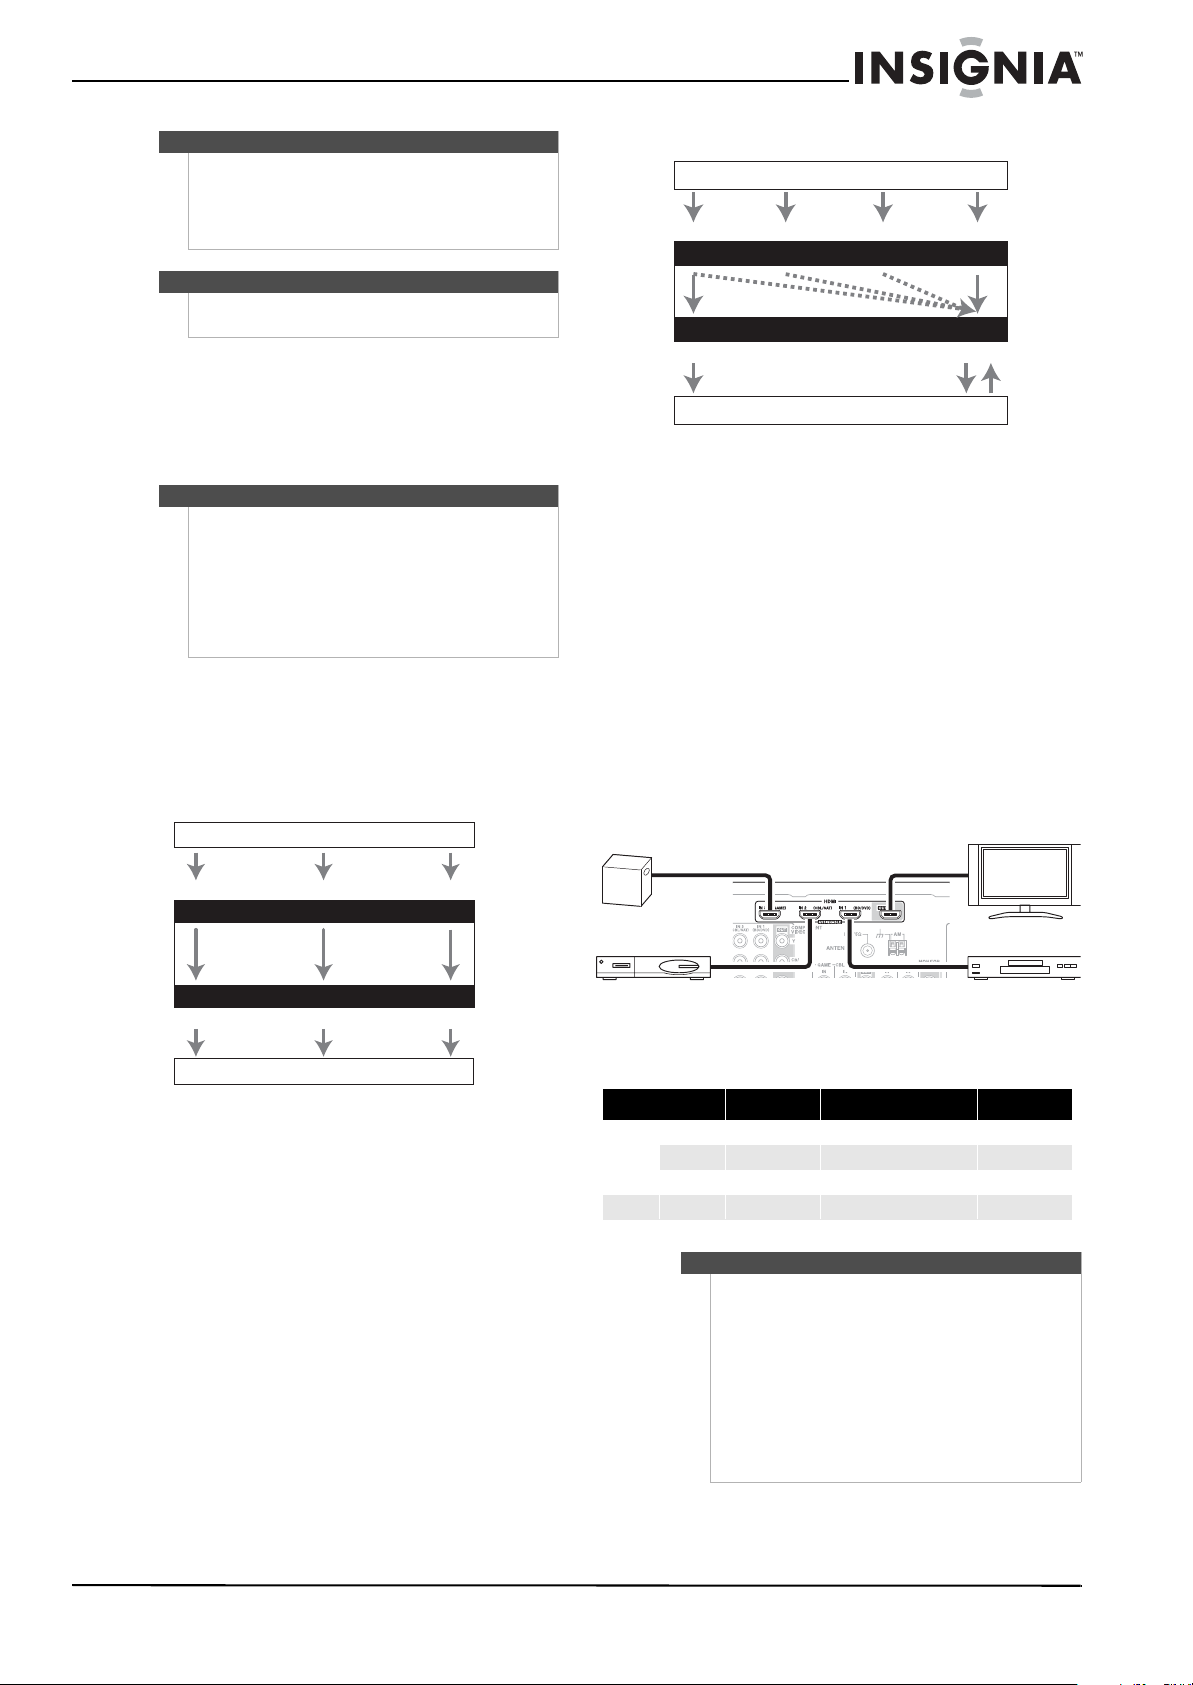
Deciding which connections to use
The receiver supports several connection formats
for compatibility with a wide range of AV
equipment. The format you choose depends on the
formats supported by your components. Use the
following sections as a guide.
Notes
• The on-screen setup menus appear only on a TV
that is connected to the HDMI OUT. If your TV is
connected to the MONITOR OUT V or the
COMPONENT VIDEO OUT, use the receiver’s
display when changing settings.
• The on-screen setup menus are displayed when
there is no video input, or the video input is
480p, 576p, 720p, 1080i, or 1080p.
Video connection formats
Video components can be connected by using any
one of the following video connection formats:
composite video, component video, or HDMI (for
the best picture quality).
Video Signal Flow Chart
Blu-ray Disc, DVD player, etc.
Audio Signal Flow Chart
Blu-ray Disc, DVD player, etc.
Optical
IN
1
1
*
*1 - Depends on the Audio TV Out setting.
*2 - This setting is available when the Audio Return Ch setting is
set to Auto. You must select the TV/CD input selector and your
TV must support ARC function.
*
OUT
TV, projector, etc.
1
*
When choosing a connection format, note that the
receiver does not convert digital input signals for
analog line outputs and vice versa. For example,
audio signals connected to an optical or coaxial
digital input are not output by the analog VCR/DVR
OUT.
If signals are present at more than one input, the
inputs are selected automatically in the following
order of priority:
•HDMI
•Digital
•Analog
Connecting components with HDMI
Game console
HDMICoaxial Analog
HDMI Analog
*1*
2
TV or projector
Composite
Composite
Component
IN
MONITOR OUT
Component
TV, projector, etc.
When choosing a connection format, bear in mind
that the receiver does not convert between formats,
so only outputs of the same format as the input will
output the signal.
Audio connection formats
Audio components can be connected by using any
of the following audio connection formats:
•Analog
•Optical
•Coaxial
•HDMI
HDMI
HDMI
Satellite, cable, or set-top box
Blu-ray Disc/DVD player
Connect your components to the appropriate jacks.
The default input assignments are shown below. To
change assignments, see “Setting up HDMI input
(HDMI Input menu)” on page 20.
Jack Signal Components Assignable
Input HDMI IN1 Audio/Video Blu-ray disc/DVD player X
HDMI IN2 Satellite, cable, set-top box X
HDMI IN3 Game console X
Output HDMI OUT TV or projector
Tip
To listen to audio received by the HDMI IN jacks
through your TV’s speakers:
• Set the TV Control setting to On for a
CEC-compatible TV.
• Set the Audio TV O UT setting to On when the TV
is not compatible with CEC or the TV Control
setting is Off.
• Set your Blu-ray Disc/DVD player’s HDMI audio
output setting to PCM.
• To listen to TV audio through the receiver, see
“Connecting external components” on page 10.
www.insigniaproducts.com
9
Page 14

Insignia NS-R5101AHD-A AV Home Theater Receiver
Using the audio return channel (ARC) function
The audio return channel (ARC) function lets an
HDMI-capable TV send the audio stream to the
HDMI OUT jack of the receiver. To use this function,
you must select the TV/CD input selector and your
TV must support the ARC function.
Connecting external components
Note
The on-screen setup menus appear only on a TV that
is connected to the HDMI OUT jack. If your TV is
connected to the MONITOR OUT V jack or the
COMPONENT VIDEO OUT jack, use the receiver’s
display when changing settings.
No. Jack Signal Components Assign.
4 MONITOR OUT Composite
video
BD/DVD IN Analog audio
and composite
video
VCR/DVR IN VCR or DVD
CBL/SAT IN Satellite, cable,
GAME IN Game console
TV/CD IN Analog audio TV, CD player,
Connect to a turntable (MM) that has a phono preamp built-in. If your
*
turntable (MM) does not have a built-in preamp, you will need a
commercially available phono preamp.
If your turntable has a moving coil (MC) type cartridge, you will need a
commercially available MC head amp or MC transformer as well as a
phono preamp. See your turntable’s manual for details.
Notes
• The receiver can output audio and video signals
from the AUX INP UT jacks to the VCR/DVR OUT
jacks.
• With connection 2, you can enjoy Dolby Digital
and DTS.
• With connection 4, if your Blu-ray Disc/DVD
player has both main stereo and multichannel
outputs, be sure to connect the main stereo.
• With the connections described above, you
cannot record the video through the receiver. To
make a connection for video recording, see the
following section.
TV or projector
Blu-ray disc/DVD
player
recorder /Digital
Video reco rder
set-top box
turntable*, cassette
tape player, MD,
CD-R
Connect your components to the appropriate jacks.
The default input assignments are shown below.To
change assignments, see “Setting up Component
input (Component menu)” on page 21.
No. Jack Signal Components Assign.
1AUX INPUTVIDEO Composite
video
AUDIO L/R Analog audio
2 DIGITAL IN OPTICAL
Digital audio Game console X
IN 1 (GAME)
IN 2 (TV/CD) TV or CD player X
COAXIAL
IN 1 (BD/DVD)
3 CO MPONENT
VIDEO
IN 1 (BD/DVD) Co mponent
video
IN 2 (CBL/SAT) Satellite, cable,
OUT TV or projector
Camcorder
Blu-ray disc/DVD
player
Blu-ray disc/DVD
player
set-top box
X
X
X
Connecting recording components
To record audio and video from the same
source input
LR
VCR or DVR Recorder
OR
Cassette, CDR, or MD
AUDI O
VIDEO
IN
IN
10
www.insigniaproducts.com
Page 15

Insignia NS-R5101AHD-A AV Home Theater Receiver
Notes
• The AV receiver must be turned on for
recording. Recording is not possible while it’s in
Standby mode.
• If you want to record directly from your TV or
playback VCR to the recording VCR without
going through the AV receiver, connect the
TV/VCR’s audio and video outputs directly to
the recording VCR’s audio and video inputs. See
the manuals supplied with your TV and VCR for
details.
• Video signals connected to composite video
inputs can be recorded only via composite
video outputs. If your TV/VCR is connected to a
composite video input, the recording VCR must
be connected to a composite video output.
• The surround sound and DSP listening modes
cannot be recorded.
• Copy-protected Blu-ray discs and DVDs cannot
be recorded.
• Sources connected to a digital input cannot be
recorded. Only analog inputs can be recorded.
• DTS signals will be recorded as noise, so don’t
attempt analog recording of DTS CDs or LDs.
AV Recording
Audio sources can be recorded to a recorder (such
as a cassette deck, CDR, MD) connected to the VCR
OUT jacks. Video sources can be recorded to a
video recorder (such as a VCR or DVD recorder)
connected to the VCR/DVR Out jack.
To record an audio source:
1 Use the input selector buttons to select the
source that you want to record. You can watch
the source while recording. The receiver’s
MASTER VOLUME control has no effect on
recording.
2 Start recording on your recorder.
3 On the source component, start playback. If you
select another input source during recording,
that input source will be recorded.
Recording Separate AV Sources
You can record audio and video from completely
separate sources, allowing you to overdub audio
onto your video recordings. This function takes
advantage of the fact that when an audio-only
input source (TV/CD) is selected, the video input
source remains unchanged.
In the following example, audio from the CD player
connected to the TV/CD IN jack and video from the
camcorder connected to the AUX INPUT VIDEO
jack are recorded by the VCR connected to the
VCR/DVR OUT jacks.
To record the audio from one source input and the
video from another source input
Camcorder
CD player
VCR
: Video signal
: Audio signal
To record separate AV sources:
1 Prepare the camcorder and CD player for
playback and the VCR for recording.
2 Press the AUX input selector.
3 Press the TV/CD input selector. This selects the
CD player as the audio source, but leaves the
camcorder as the video source.
4 Start recording on the VCR and start playback
on the camcorder and CD player. The video from
the camcorder and the audio from the CD player
are recorded by the VCR.
Connecting the power
To connect your receiver to power:
• Plug the power cord into an AC outlet.
What is Rocketboost™?
Rocketboost™ is expandable wireless digital audio.
• Products with Rocketboost™ technology let you
easily expand your listening experience
throughout your home.
• Rocketboost™ does not interfere with other
wireless products in your home.
• Rocketboost™ is uncompressed digital audio
compatible with all audio formats like Dolby
TrueHD and DTS-HD Master Audio used with
Blu-ray.
www.insigniaproducts.com
11
Page 16

Insignia NS-R5101AHD-A AV Home Theater Receiver
When you see the Rocketboost™ logo on any
product, it has been designed to work with other
Rocketboost™ products, no matter who
manufactures them.
How can I use Rocketboost™ with the NS-R5101AHD-A?
This product includes the NS-RB1 Rocketboost™
sender/receiver. The NS-RB1 can be used to receive
any Rocketboost™ audio stream from your other
Rocketboost™ products. For example, you can play
music from audio sources that are in other rooms.
Plus, the NS-RB1 can be used to send audio from
the NS-R101AHD-A. For example, you can connect
your rear surround sound speakers, or even
subwoofer, by using Rocketboost™ wireless instead
of wires. You can also send Zone 2 audio from the
NS-R101AHD-A to other rooms in your house. For
these applications you will need additional
Rocketboost™ products. You can learn more about
Rocketboost™ products at www.rocketboost.com.
Initial Rocketboost™ setup
Connect the NS-RB1 cable to the Rocketboost™ Port
on the back of the NS-R5101AHD-A receiver.
If you are using Rocketboost™ to wirelessly send the
audio signal to a subwoofer, then connect a
subwoofer cable from the NS-R5101AHD-A receiver
subwoofer pre-out jack to the NS-RB1 subwoofer in
jack. If you are not using Rocketboost™ with a
subwoofer then this connection should not be
made.
Cable not provided
Not supplied
SUBWOOFER
NS-RB1
Setting up the Sender
Note
This is only required if you are using Rocketboost™ for
your Zone2, Surround, or Subwoofer audio.
IN
NS-RB1
Adjust the antennas on the NS-RB1 as shown in the
diagram.
To set up the Sender:
1 Press the Power button on the NS-RB1
sender/receiver to turn it on.
2 Press the PORT input selector on the remote
control.
3 Press SOURCE/SETUP on the remote control to
enter the Source/Setup menu for the NS-RB1.
This menu will appear on the TV connected to
your receiver.
Source/Setup
Rocketfish RF-RBAUX(Aud...
Sender Setup
4 Press or to select Sender Setup, then
press ENTER.
5 Press or to select the Sender you want
(Zone 2, Surround, or Subwoofer).
6 Press or to turn the selected Sender ON or
OFF.
Zone2
On
Off
12
www.insigniaproducts.com
Page 17

Insignia NS-R5101AHD-A AV Home Theater Receiver
Sender Signal Status
ZONE2 STEREO ON ZONE2 STEREO is ON
ZONE2 STEREO OFF ZONE2 STEREO is OFF
Surround ON Surround signal is ON
Surround OFF Surround signal is OFF
Subwoofer ON Subwoofer signal is ON
Subwoofer OFF Subwoofer signal is OFF
Note
Set the Sender signals to OFF for any signals (Zone2,
Surround, or Subwoofer) that you are not using.
Establishing communications
Note
Every Rocketboost™ network must contain a device
called a Hub, which directs network data traffic and
helps devices join the network. The network can
have only one hub, which is selected using the Hub
Status switch on the back of all Rocketboost™
senders. If you are setting up your network for the
first time choose one of your Rocketboost
to be your hub by setting the Hub Status switch to
Enable. If you already have a Rocketboost™ network,
then set the Hub Status switch on the NS-RB1 to
disable. The Status LED lights green for the
Rocketboost™ Hub device, and lights blue for all
other Rocketboost™ devices.
To establish communications:
1 Press the Power button on the NS-RB1
sender/receiver to turn it on.
2 Set the HUB STATUS switch to ENABLE if the
sender/receiver is to be used as the network
hub, otherwise set to DISABLE.
• The power indicator lights green when the
HUB STATUS switch is set to ENABLE.
• The power indicator lights blue when the HUB
STATUS switch is set to DISABLE.
Note
When the HUB STATUS is set to ENABLE, power
remains on when your receiver is off. When the HUB
STATUS is set to DISABLE, the power will be off
when your receiver is off.
™ senders
Listening to music from other Rocketboost™ products
To listen to music:
1 Press the Power button on the NS-RB1
sender/receiver to turn it on.
2 Press the PORT input selector on the remote
control.
3 Turn on your other Rocketboost™ sender device
(sold seperately) and make sure the audio
source connected to that device is active.
• The Rx indicator should be lit if a source is
active on the network. If not, check to make
sure there is an active source.
• If there are multiple sources you may need to
press the Source button on the NS-RB1 to find
the source you wish to listen to. Each press will
toggle through the available sources.
• You can also select the Rocketboost™ source
using the NS-RB1 Source/Setup menu. To do
this, press PORT on the remote control to
enter the menu. This menu appears on the TV
connected to your receiver. Then press or
to select the Source you want to listen to
and press the ENTER button to select it.
Listening to Zone 2 audio from your other Rocketboost™ products
To listen to Zone 2 audio from your other
Rocketboost™ products:
1 Press the Power
button on the NS-RB1
sender/receiver to turn it on.
2 Press Zone 2 on the remote control and then
press the input selector on the remote for the
source you want to listen to. For example, to
listen to the TUNER from zone 2, press Zone 2
and then press TUNER.
3 Use the NEXT SOURCE switch at the receiving
Rocketboost™ product to select the audio being
sent on Zone 2 from the NS-RB1.
Note
Use analog input only for Zone2. The audio signal of
Zone2 is analog. If the input selector is connected to
digital or HDMI input, no sound is produced.
3 Press and hold the Power button on the
sender/receiver for more than three seconds to
put it into joining mode (it will remain in joining
mode for 30 seconds). The power indicator LED
starts blinking rapidly.
4 Press the Power/Join button on the
sender/receiver device (the one configured as
the hub) for more than three seconds, so the
sender and receiver will enter joining mode.
• When connected, the power indicator on both
joining device and the hub will go solid,
indicating the device is now connected to the
network.
• The power indicator lights steadily if the link is
activated between both of the units.
• The power indicator blinks at a slower rate if
the communication link is not successful.
www.insigniaproducts.com
Going into standby mode
To go to standby mode:
• Press the Power button and the standby indicator
will light, indicating the device is in sleep mode.
Installing batteries in the remote control
Cautions
• If the remote control doesn’t work reliably, try
replacing the batteries.
• Don’t mix new and old batteries or different
types of batteries.
• If you intend not to use the remote control for a
long time, remove the batteries to prevent
damage from leakage or corrosion.
• Remove expired batteries as soon as possible to
prevent damage from leakage or corrosion.
13
Page 18

Insignia NS-R5101AHD-A AV Home Theater Receiver
To install the batteries:
1 Remove the cover.
Batteries (AA/R6)
2 Insert two AA batteries into the compartment
matching the polarity indicated.
3 Replace the cover.
Using the remote control
Use the remote control by pointing it towards the
receiver’s remote sensor window. Objects between
the remote control and sensor window may
prevent proper operation.
Remote control sensor
Use the remote control within about 16 feet
(5 meters) of the receiver and within 30 degrees of
perpendicular to the front of the receiver.
Cautions
• Do not expose the remote control to shock. In
addition, do not expose the remote control to
liquids, and do not place in an area with high
humidity.
• Do not place the remote control under direct
sunlight. The heat may cause deformation of
the remote control.
• The remote control may not work properly if the
remote sensor window of the receiver is under
direct sunlight or strong lighting. In such a case,
change the angle of the lighting or receiver, or
operate the remote control closer to the remote
sensor window.
Receiver
Approx. 16 ft. (5 m)
Using the Audyssey 2EQ® room correction and speaker setup
With the supplied calibration microphone,
Audyssey 2EQ® automatically determines the
number of speakers connected, their size (for
purposes of bass management), optimum
crossover frequencies to the subwoofer (if present),
and distances from the primary listening position.
Audyssey 2EQ then removes the distortion caused
by room acoustics by capturing room acoustical
problems over the listening area in both the
frequency and time domain. The result is clear,
well-balanced sound for everyone.
Enabling Audyssey 2EQ lets you also use Audyssey
Dynamic EQ®, which maintains the proper
octave-to-octave balance at any volume level.
Before using this function, connect and position all
of your speakers.
It takes about 15 minutes to complete the room
correction and speaker setup for three positions.
Total measurement time varies depending on the
number of speakers.
Using Audyssey 2EQ®
To create a listening environment in your home
theater that all listeners can enjoy, Audyssey 2EQ®
takes measurements at up to three positions within
the listening area.
Position the microphone at ear height of a seated
listener with the microphone tip pointed directly at
the ceiling using a tripod. Do not hold the
microphone in your hand during measurements as
this produces inaccurate results.
First measurement position (1)–Also referred to
as the Main Listening Position this refers to the
most central position where one would normally sit
within the listening environment. 2EQ uses the
measurements from this position to calculate
speaker distance, level, polarity, and the optimum
crossover value for the subwoofer.
Second measurement position (2)–The r ight side
of the listening area.
Third measurement position (3)–The left side of
the listening area.
The distances from position 1 to 2 and 1 to 3 must
be at least 3.3 feet (1 meter).
TV
14
www.insigniaproducts.com
Page 19

Insignia NS-R5101AHD-A AV Home Theater Receiver
Notes
• Make the room as quiet as possible. Background
noise and Radio Frequency Interference (RFI)
can disrupt the room measurements. Close
windows, and turn off televisions, radios, air
conditioners, fluorescent lights, home
appliances, light dimmers, or other devices.
Silence the cell phone (even if it is not in use) or
place it away from all audio electronics.
• The microphone picks up test tones which
played through each speaker as Audyssey 2EQ
Room Correction and Speaker Setup run.
To use Audyssey to set up and correct your
speakers:
Note
• Room correction and speaker setup cannot be
performed while a pair of headphones is
connected.
1 Turn on the receiver and the connected TV.
2 On the TV, select the input to which the receiver
is connected.
3 Set the speaker setup microphone at the Main
Listening Position 1, and connect it to the
SETUP MIC jack on the front of the receiver.
SETUP MIC jack
Speaker setup microphone
The speaker setting menu appears.
Note
The on-screen setup menus only appear on a TV that
is connected to the HDMI OUT jack. If your TV is
connected to the MONITOR OUT V or CO MPONE NT
VIDEO OUT jacks, use the receiver’s display when
changing the settings.
4 Press ENTER.
The room correction and speaker setup starts.
Test tones are played through each speaker as
Audyssey 2EQ® Room Correction and Speaker
Setup runs. This process takes a few minutes.
Refrain from talking during measurements and
do not stand between speakers and the
microphone. Do not disconnect the speaker
setup microphone during the room correction
and speaker setup unless you want to cancel the
setup.
5 Place the setup microphone at the next
position, then press ENTER.
Audyssey 2EQ® performs more measurements.
This takes a few minutes.
6 When prompted, place the setup microphone at
the next position, then repeat step 5.
7 Use or to select an option, then press
ENTER. The options are:
• Save–To save the calculated settings and exit
the room correction and speaker setup.
• Cancel–To cancel the room correction and
speaker setup.
Note
You can view the calculated settings for the speaker
configuration, speaker distances, and speaker levels
by using or .
8 Disconnect the speaker setup microphone.
Notes
• When Audyssey 2EQ® Room Correction and
Speaker Setup is complete, Audyssey is set to
On and the Audyssey indicator lights.
• You can cancel Audyssey 2EQ
and Speaker Setup at any point in this
procedure by disconnecting the setup
microphone.
• Do not connect or disconnect any speakers
during Audyssey 2EQ
Speaker Setup.
• If the receiver is muted, it will be unmuted
automatically when Audyssey 2EQ
Correction and Speaker Setup starts.
• Changes to the room after Audyssey 2EQ
Room Correction and Speaker Setup requires
that you run Audyssey 2EQ
and Speaker Setup again, as room EQ
characteristics may have changed.
® Room Correction
® Room Correction and
® Room Correction
Error Messages
While the room correction and speaker setup is in
progress, one of the following error messages may
appear:
• Retry–Try again.
• Cancel–Cancel the room correction and
speaker setup.
• Ambient noise is too high–The background
noise is too loud. Remove the source of the
noise and try again.
• Speaker Matching Error!–The number of
speakers detected was different from that of
the first measurement. Check the speaker
connection.
• Writing Error!–This message appears if saving
fails. Try saving again. If this message appears
after two or three attempts, contact your
Insignia dealer.
• Speaker Detect Error–This message appears
if a speaker is not detected. No means that no
speaker was detected.
Changing the speaker settings manually
You can manually make changes to the settings
found during the room correction and speaker
setup.
See also:
• “Configuring speakers (Sp Config menu)” on
page 21.
• “Setting speaker distance (Sp Distance menu)”
on page 22.
• “Setting the level calibration (Level Cal menu)”
on page 22.
Using the powered subwoofer
The powered subwoofer outputs very
low-frequency sound at a low volume level,
therefore it may not be detected by Audyssey 2EQ®
Room Correction and Speaker Setup.
® Room
®
www.insigniaproducts.com
15
Page 20

Insignia NS-R5101AHD-A AV Home Theater Receiver
If Subwoofer appears on the Review Speaker
Configuration screen as No, increase the
subwoofer’s volume to the half-way point, set it to
its highest crossover frequency, and then try
running Audyssey 2EQ® Room Correction and
Speaker Setup again. Note that if the volume is set
too high and the sound distorts, detection issues
may occur, so use an appropriate volume level. If
the subwoofer has a low-pass filter switch, set it to
Off or Direct.
Operating your receiver
Turning your receiver on and off
To turn your receiver on and off:
1 Press ON/STANDBY on the front panel.
- OR Press RECEIVER, then ON/STANDBY on the
remote control.
The receiver turns on, the display lights, and the
STANDBY indicator turns off.
2 Press ON/STANDBY on the remote control
again. The receiver enters standby mode.
To prevent any loud surprises when you turn on
the receiver, always turn down the volume
before you turn it off.
The following information can typically be
displayed:
Input source and volume
Signal format or sampling frequency
Input source and listening mode
Notes
• When AM or FM radio is used, the band, preset
number, and frequency are displayed.
• If the input signal is analog, no format
information is displayed. If the input signal is
PCM, the sampling frequency is displayed. If the
input signal is digital but not PCM, the signal
format is displayed. Information is displayed for
about three seconds, then the previously
displayed information reappears.
• The input source is displayed with the default
name even when you have selected a name. See
“Naming inputs (Name Edit menu)” on page 24.
Understanding basic operations
Notes
• The on-screen setup menus appear only on a TV
that is connected to the HDMI OUT jack. If your
TV is connected to the MONITOR OUT V or the
COMPONENT VIDEO OUT jacks, use the
receiver’s display when changing settings.
• This manual describes the procedure using the
remote control unless otherwise specified.
Playing a connected component
To play a connected component:
1 Press RECEIVER, then press INPUT SELECTOR
buttons to select the input source.
2 Start playback on the source component.
3 To adjust the volume, use the MASTER
VOLUME control.
4 Select a listening mode and enjoy!
See also “Using the listening modes” on page
18.
Displaying source information
To display source information:
• Press RECEIVER, then press DISPLAY
repeatedly to cycle through the available
information.
Using the music optimizer
The music optimizer enhances the sound quality of
compressed music files.
To use the music optimizer:
1 Press AUDIO, then press or to select
M.Optimizer.
2 Press or to select On.
The M.Opt indicator lights on the display.
Notes
• The music optimizer function only works with
PCM digital audio input signals with a sampling
rate below 48 kHz and analog audio input
signals. The music optimizer is disabled when
the direct listening mode is selected.
• The setting is stored individually for each input
selector.
Setting the display brightness
You can adjust the brightness of the receiver’s
display.
To set the display brightness:
• Press RECEIVER, then press DIMMER
repeatedly to select: Dim, Dimmer, or Normal
brightness.
Muting the receiver
16
To mute the receiver:
• Press RECEIVER, then press MUTING.
www.insigniaproducts.com
Page 21

Insignia NS-R5101AHD-A AV Home Theater Receiver
The output is muted and the MUTING indicator
flashes on the display.
Tip
• To unmute, press MUTING again or adjust the
volume.
• Muting is also cancelled when the receiver is set
to Standby.
Using the sleep timer
With the sleep timer, you can set the receiver to turn
off automatically after a specified period.
To use the sleep timer:
• Press RECEIVER, then press SLEEP repeatedly
to select the sleep time you want.
The sleep time can be set from 90 to 10 minutes,
in 10 minute steps.
The SLEEP indicator lights on the display when
the sleep timer has been set. The specified sleep
time appears on the display for about five
seconds, then the previous display reappears.
Tip
• To cancel the sleep timer, press SLEEP
repeatedly until the SLEEP indicator goes off.
• To check the time remaining until the receiver
turns off, press SLEEP. If you press SLEEP while
the sleep time is being displayed, the sleep time
is shortened by 10 minutes.
Using headphones
To use headphones:
• Connect a pair of stereo headphones with a
standard plug (1/4 inch or 6.3 mm) to the
PHONES jack.
Tip
• Always turn down the volume before
connecting your headphones.
• While the headphones plug is inserted in the
PHONES jack, the speakers are turned off.
• When you connect a pair of headphones, the
listening mode is set to Stereo, unless it is
already set to Stereo, Mono, or Direct.
• The listening modes cannot be selected while a
pair of headphones is connected.
• To automatically tune to a station:
• Press TUNING MODE until the AUTO
indicator appears on the display.
• Press TUNING or . The receiver
automatically searches for stations and
stops when a station is found.
FM Stereo
AUTO
TUNED
Tip
You can also press the TUNE MODE and arrow
buttons on the remote control.
- OR -
• To manually tune to a station:
• Press TUNING MODE until the AUTO
indicator goes off.
• Press and hold TUNING or . The
receiver tunes up or down the frequency
band as long as you hold the button. Press
the button repeatedly to tune up or down
by steps.
Tip
• In Manual Tuning mode, FM stations are in
mono.
• If the signal from a stereo FM station is weak, it
may be impossible to get good reception. In this
case, switch to Manual Tuning mode and listen
to the station in mono.
• You can also press the TUNE MODE and arrow
buttons on the remote control.
- OR -
• To tune to a station by entering the frequency:
• Using the remote control, press TUNER
repeatedly to select AM or FM, then press
D.TUN.
Listening to your receiver
Important: The procedures described in this
section use the buttons on the front panel, unless
otherwise specified.
Listening to the radio
With the built-in tuner you can enjoy AM and FM
radio stations. You can store your favorite stations
as presets for quick selection.
To listen to the radio:
• Press TUNER to select either AM or FM (each time
you press TUNER, the radio band changes
between AM and FM).
In this example, FM has been selected.
Band
Frequency
www.insigniaproducts.com
• Within eight seconds, press the number
buttons to enter the frequency of the radio
station you want. For example, to tune to
87.50, press 8, 7, then 5.
Presetting FM or AM stations
You can store a combination of as many as 40 of
your favorite AM or FM stations as presets.
To store a station as a preset:
1 Tune to the FM or AM station that you want to
store as a preset. See “Listening to the radio” on
page 17 for information on tuning your receiver.
2 Press MEMORY. The preset number flashes.
3 While the preset number is flashing (about eight
seconds), press PRESET or to select a
preset number from one through 40.
4 Press MEMORY again to store the station or
channel. The station or channel is stored and the
preset number stops flashing.
17
Page 22

Insignia NS-R5101AHD-A AV Home Theater Receiver
5 Repeat steps 1 through 4 to preset your favorite
radio stations.
Tuning to a preset station
To tune to a preset station:
• To select a preset, press PRESET or on
the receiver, or press CH +/– on the remote
control.
Tip
You can also press the number buttons on the
remote control to select a preset station directly.
Deleting preset stations
To delete a preset station:
1 Select the preset you want to delete.
2 Press TUNING MODE while pressing and
holding MEMORY. The preset is deleted and its
number disappears from the display.
Using the listening modes
Notes
• You can only select the Dolby Digital and DTS
listening modes if your Blu-ray Disc/DVD player
is connected to the receiver with a digital audio
connection (coaxial, optical, or HDMI).
• The listening mode you can select depends on
the format of the input signal. To check the
format, see “Displaying source information” on
page 16.
• You can only select Mono, Direct, and Stereo
listening modes with a pair of headphones is
connected.
• Listening modes cannot be selected while a pair
of headphones is connected.
The receiver’s listening modes can transform your
listening room into a movie theater or concert hall,
with high fidelity and stunning surround sound.
The following audio formats are supported by the
listening modes:
Listening Mode Description
In this mode, audio from the input source is output without surround-sound processing. The “Sp Config (Speaker
Direct (Direct)
Stereo (Stereo)
Mono (Mono)
Multichannel
(Multich)
Dolby Pro Logic II
(PL II Movie)
(PL II Music)
(PL II Game)
Configuration)” (presence of speakers), “Sp Distance (Speaker Distance)” and “A/V Sync (A/V Sync)” settings are enabled,
but much of the processing set via AUDIO is disabled. See “Using advanced setup” on page 20 for more details.
Sound is output by the front left and right speakers and subwoofer. MONO
Use this mode when watching an old movie with a mono soundtrack, or use it with the foreign language soundtracks
recorded in the left and right channels of some m ovies. It can also be used with DVDs or other sources containing
multiplexed audio, such as karaoke DVDs.
Multichannel This mode is for use with PCM multichannel sources. 5.1ch
Dolby Pro Logic II Dolby Pro Logic II expands any 2-channel source for 5.1-channel playback. It provides a very natural and
seamless surround-sound experience that fully envelops the listener. As well as music and movies, video games can also
benefit from the dramatic spatial effects and vivid imaging.
• Dolby PLII Movie–Use this mode with DVDs and videos that bear the Dolby Surround logo or TV shows that feature
Dolby Surround. You can also use this mode with stereo movies or TV shows and the receiver creates a 5.1 surround
mix from the 2-channel stereo.
• Dolby PLII Music–Use this mode to add 5.1 surround to stereo sources such as music CDs and DVDs.
• Dolby PLII Game–Use this mode when playing game discs.
• MONO–This is mono (monophonic) sound. All the
audio signals are mixed and reproduced through
a single speaker.
• STEREO–This is stereo (stereophonic) sound. Two
independent audio signal channels are
reproduced through two speakers.
• 5.1ch–This is 5.1-channel surround sound. This
surround system has five main channels of sound
and a sixth subwoofer channel (called the
point-one channel).
• 7.1ch–This is 7.1-channel surround sound. This is
a further sound enhancement to 5.1 channel
sound with two additional speakers that provide
greater sound envelopment and more accurate
positioning of sounds. The receiver outputs this
source in 5.1-channel surround sound.
Selecting a listening mode
To select a listening mode:
• Press one of the following buttons. If you are
using the remote control, press the RECEIVER
button first. See “Listening modes” on page 18,
and “Insignia-Original Listening Modes” on page
19 for information on listening modes.
• MOVIE/TV–This button selects the listening
modes intended for use with movies and TV.
• MUSIC–This button selects the listening
modes intended for use with music.
• GAME–This button selects the listening
modes intended for use with video games.
• STEREO–This button selects the Stereo
listening mode and All Channel Stereo
listening mode.
Listening modes
These listening modes become available when one
of the buttons described in “Selecting a listening
mode” on page 18 are pushed. The optional modes
available depend on which button is pushed.
Input
Source
MONO
STEREO
5.1ch
7.1ch
STEREO
5.1ch
7.1ch
MONO
STEREO
5.1ch
7.1ch
7.1ch
STEREO 3.1, 5.1
Speaker Layout
2.1, 3.1, 5.1
2.1, 3.1, 5.1
2.1, 3.1, 5.1
3.1, 5.1
18
www.insigniaproducts.com
Page 23

Insignia NS-R5101AHD-A AV Home Theater Receiver
Listening Mode Description
Dolby Digital
(Dolby D)
Dolby Digital
Plus
(Dolby D+)
Dolby TrueHD
(Dolby TrueHD)
DTS (DTS)
DTS-HD High
Resolution Audio
(DTS-HD HR)
DTS-HD Master
Audio
(DTS-HD MSTR)
DTS Express
(DTS Express)
DSD
(DSD)
DTS 96/24
(DTS 96/24)
DTS Neo:6
(Neo : 6Cinema)
(Neo : 6Movie)
1
Dolby Digital is used for Blu-ray discs.
2
The receiver can use the DSD signal from HDMI IN. Setting the output on the player side to PCM might provide better sound to the player.
3
Depending on the input source, DTS is used.
Dolby Digital In this mode, audio from the input source is output without surround-sound processing.
Sp Config (Speaker Configuration), (presence of speakers), Crossover (Crossover Frequency), Sp Distance (Speaker Distance),
A/V Sync (A/V Sync), and much of the processing set via AUDIO are enabled. See “Using advanced setup” on page 20.
In this mode, audio from the input source is output without surround-sound processing.
1
Sp Config (Speaker Configuration), (presence of speakers), Crossover (Crossover Frequency), Sp Distance (Speaker Distance),
A/V Sync (A/V Sync), and much of the processing set via AUDIO are enabled. See “Using advanced setup” on page 20.
In this mode, audio from the input source is output without surround-sound processing.
2
Sp Config (Speaker Configuration), (presence of speakers), Crossover (Crossover Frequency), Sp Distance (Speaker Distance),
A/V Sync (A/V Sync), and much of the processing set via AUDIO are enabled. See “Using advanced setup” on page 20.
3
This mode is for use with DTS 96/24 sources. This is high-resolution DTS with a 96 kHz sampling rate and 24-bit resolution,
providing superior fidelity. Use it with DVDs that bear the DTS 96/24 logo.
This mode expands any 2-channel source for up to 5.1-channel playback. It uses seven full-bandwidth channels of matrix
decoding for matrix-encoded material, providing a very natural and seamless surround sound experience that fully envelops
the listener.
• Neo:6 Cinema–Use this mode with any stereo movie (such as TV, DVD, VHS).
• Neo:6 Music–Use this mode with any stereo music source (such as CD, radio, cassette, TV, VHS, DVD).
Input
Source
5.1ch 3.1, 5.1
5.1ch
7.1ch
5.1ch
7.1ch
5.1ch 3.1, 5.1
5.1ch
7.1ch
5.1ch
7.1ch
STEREO
5.1ch
5.1ch 3.1, 5.1
5.1ch 3.1, 5.1
STEREO 3.1, 5.1
Speaker Layout
3.1, 5.1
3.1, 5.1
3.1, 5.1
3.1, 5.1
3.1, 5.1
Insignia-Original Listening Modes
Listening Mode Description Input Source Speaker Layout
Orchestra
(Orchestra)
Unplugged
(Unplugged)
Studio-Mix
(Studio-Mix)
TV Logic
(TV Logic)
Game-RPG
(Game - RPG)
Game-Action
(Game - Action)
Game-Rock
(Game - Rock)
Game-Sports
(Game - Sports)
Suitable for classical or operatic music, this mode emphasizes the surround channels in order to widen the stereo
image, and simulates the natural reverberation of a large hall.
Suitable for acoustic instruments, vocals, and jazz, this mode emphasizes the front stereo image, giving the impression
of being right in front of the stage.
Suitable for rock or pop music, listening to music in this mode creates a lively sound field with a powerful acoustic
image, like being at a club or rock concert.
This mode adds realistic acoustics to TV shows produced in a TV studio, surround effects to the entire sound, and clarity
to voices.
Use this mode when playing role playing game discs. MONO
Use this mode when playing action game discs. MONO
Use this mode when playing rock game discs. MONO
Use this mode when playing sports game discs. MONO
MONO
STEREO
5.1ch
MONO
STEREO
5.1ch
MONO
STEREO
5.1ch
MONO
STEREO
5.1ch
STEREO
5.1ch
STEREO
5.1ch
STEREO
5.1ch
STEREO
5.1ch
5.1
5.1
5.1
5.1
5.1
5.1
5.1
5.1
www.insigniaproducts.com
19
Page 24

Insignia NS-R5101AHD-A AV Home Theater Receiver
Listening Mode Description Input Source Speaker Layout
All Ch Stereo
(All Ch St)
Full Mono
(Full Mono)
T-D (Theater-
Dimensional)
(T-D)
Ideal for background music, this mode fills the entire listening area with stereo sound from the front, surround, and
surround back speakers.
In this mode, all speakers output the same sound in mono, so the sound you hear is the same regardless of where you
are within the listening room.
With this mode you can enjoy a virtual surround sound even with only two or three speakers. This works by controlling
how sounds reach the listener’s left and right ears. Good results may not be possible if there is too much reverb, so we
recommend that you use this mode in an environment with little or no natural reverb.
MONO
STEREO
5.1ch
7.1ch
MONO
STEREO
5.1ch
7.1ch
MONO
STEREO
5.1ch
7.1ch
3.1, 5.1
3.1, 5.1
2.1, 3.1, 5.1
Speaker layout
The following shows the speakers that are activated
in each type of configuration.
2.1ch
ZXC
3.1ch
Using advanced setup
Using on-screen setup menus
On-screen setup menus appear on the connected
TV and provide a convenient way to change the
receiver’s various settings. Settings are organized
into nine categories on the main menu.
You can change the settings by using the on-screen
display.
To use the on-screen setup menus:
1 Press RECEIVER, then press SETUP. The Setup
menu opens.
Setup Menu
1. HDMI Input
2. Component
3. Digital Audio
4. Sp Config
5. Sp Distance
6. Level Cal
7. Audio Adjust
8. Name Edit
9. HDMI Setup
Tip
If the main menu doesn’t appear, make sure the
appropriate external input is selected on your TV.
2 Press or to select a menu, then press
ENTER.
3 Press or to select an option, then press
or to change the setting.
4 Press SETUP to close the menu.
5.1ch
b
a
c
a - Front speakers
b - Center speaker
c - Subwoofer
d - Surround speakers
5 Press RETURN to return to the main menu.
Tip
You can also performed these changes on the
receiver by pressing SETUP, the arrow buttons, then
ENTER.
Setting up HDMI input (HDMI Input menu)
If you connect a video component to HDMI inputs,
you must assign that input to an input selector. For
example, if you connect your Blu-ray Disc/DVD
player to HDMI IN 2, you must assign HDMI2 to the
BD/DVD input selector.
Here are the default assignments:
Input selector Default assignment
BD/DVD HDMI1
VCR/DVR -----CBL/SAT HDMI2
GAME HDMI3
AUX -----TV/CD -----PORT ------
HDMI1, HDMI2, HDMI3–Select the HDMI input to
which the video component has been connected.
- - - - -–Select if you’re not using the HDMI OUT.
d
20
www.insigniaproducts.com
Page 25

Insignia NS-R5101AHD-A AV Home Theater Receiver
Each HDMI input can only be assigned to a single
input selector. When HDMI1 - HDMI3 have already
been assigned, you must first set unused input
selectors to “- - - - -,” or you cannot assign HDMI1 HDMI3 to an input selector.
Notes
• When an HDMI IN is assigned to an input
selector as explained here, the digital audio
input for that input selector is automatically set
to the same HDMI IN.
• If you connect NS-RB1 to the ROCKETBOOST
PORT jack, you can not assign any input to the
PORT selector.
• Do not assign the component connected with
the HDMI input to a TV/CD selector when you
set the TV Control setting to On. Otherwise, the
appropriate CEC (Consumer Electronics Control)
operation can not be guaranteed.
Setting up Component input (Component menu)
Tip
If you connect NS-RB1 to the ROCKETBOOST PORT
jack, you can not assign any input to the PORT
selector.
If you connect a video component to a component
video input, you must assign that input to an input
selector. For example, if you connect your Blu-ray
Disc/DVD player to COMPONENT VIDEO IN 2, you
must assign IN2 to the BD/DVD input selector.
Here are the default assignments:
Input selector Default assignment
BD/DVD IN1
VCR/DVR -----CBL/SAT IN2
GAME -----AUX -----TV/CD -----PORT ------
IN1, IN2–Select the component input to which the
video component has been connected.
- - - - -–Select if you’re not using the COMPONENT
VIDEO OUT.
Setting up Digital Audio (Digital Audio menu)
If you connect a component to a digital audio input,
you must assign that input to an input selector. For
example, if you connect your CD player to the
OPTICAL IN 1, you must assign OPT1 to the TV/CD
input selector.
Here are the default assignments:
COAX, OPT1, OPT2–Select the digital audio input
to which the video component has been
connected.
- - - - -–Select if you are using an analog audio input.
Notes
• When an HDMI IN is assigned to an input
selector as explained here, the digital audio
input for that input selector is automatically set
to the same HDMI IN. In addition to the usual
inputs, such as COAX, you can also select HDMI
inputs.
• The available sampling rate for PCM signals
from a digital input (optical and coaxial) is
32/44.1/48/88.2/96 kHz/16, 20, 24 bit.
• If you connect NS-RB1 to the ROCKETBOOST
PORT jack, you cannot assign any input to the
PORT selector.
Configuring speakers (Sp Config menu)
Note
Some of the settings in this section are made
automatically by the Audyssey 2EQ® Room
Correction and setup function. See “Using the
Audyssey 2EQ® room correction and speaker setup”
on page 14.
This section explains how to specify which speakers
are connected and defines their sizes.
For speakers with a cone diameter larger than 6.5
inches (16 cm), specify Large (full band). For those
with a smaller diameter, specify Small (default
crossover 150Hz).
The crossover frequency can be changed in the
Crossover submenu.
Note
Speaker Configuration, Crossover Frequency, and
Double Bass settings are disabled while headphones
are connected, or when Audio TV OUT is set to On.
Speaker(s) Configuration
Subwoofer
Front
Center and Surround
Yes–if a subwoofer is connected.
No–if no subwoofer is connected.
Small–If speaker cone is 6.5 inches (16 cm) or less in
diameter.
Large–If speaker cone is larger than 6.5 inches (16 cm)
in diameter.
Note: If the Subwoofer setting is No, the default setting
for this is Large and cannot be changed.
Small–If speaker cone is 6.5 inches (16 cm) or less in
diameter.
Large–If speaker cone is larger than 6.5 inches (16 cm)
in diameter.
None–If no center speaker is connected.
Note: If the Front setting is Small, the Large option
cannot be selected.
Input selector Default assignment
BD/DVD COAX
VCR/DVR -----CBL/SAT -----GAME OPT1
AUX -----TV/CD OPT2
PORT ------
Setting the crossover frequency (Crossover Frequency submenu of Sp Config menu)
This setting is recommended for the speakers that
you specify as Small. To get the best bass
performance from your speaker system, you need
to set the crossover frequency according to the size
and frequency response of your speakers. Options
include 40Hz, 50Hz, 60Hz, 80Hz, 100Hz, 120Hz,
150Hz, and 200Hz.
www.insigniaproducts.com
21
Page 26

Insignia NS-R5101AHD-A AV Home Theater Receiver
Use the diameter of the smallest speaker in your
system when choosing the crossover frequency.
Speaker cone diameter
Over 8 in. (20 cm) 40/50/60 Hz
6-1/2 to 8 in. (16 to 20 cm) 80 Hz
5-1/4 to 6-1/2 in. (13 to 16 cm) 100 Hz
3-1/2 to 5-1/4 in. (9 to 13 cm) 120 Hz
Under 3-1/2 in. (9 cm) 150/200 Hz
Notes
• For a more accurate setting, look up your
speaker’s specifications.
• Choose a higher crossover frequency if you
want more sound from your subwoofer.
Recommended
Crossover Frequency
Using the Double Bass setting (Double Bass submenu of Sp Config menu)
Lets you boost bass output by feeding bass sounds
from the front left, right, and center channels to the
subwoofer. Optional settings are On and Off.
Note
This function can only be set if the Subwoofer
setting is Ye s , and the Front setting is Large. This
setting is not made by Audyssey 2EQ®.
Notes
• The speaker distance setting is disabled while
headphones are connected, or when Audio TV
OUT is set to On.
• Speakers that you set to No or None in the
speaker configuration (Sp Config menu) cannot
be selected.
• The Center, Right, and Subwoofer distances can
be set up to 5 ft. (1.5 m) more or less than the
Left distance. For example, if the Left distance is
set to 20 ft. (6 m), the Center, Right, and
Subwoofer distances can be set between 15 and
25 ft. (4.5 and 7.5 m).
• The Surround distances can be set up to 5 ft.
(1.5 m) more or 15 ft. (4.5 m) less than the Left
distance. For example, if the Left distance is set
to 20 ft. (6 m), the SurrRight and SurrLeft
distances can be set between 5 and 25 ft. (1.5
and 7.5 m).
Setting the level calibration (Level Cal menu)
Note
This setting is made automatically by the Audyssey
2EQ® Room Correction and setup function. See
“Using the Audyssey 2EQ® room correction and
speaker setup” on page 14.
Lets you adjust the level of each speaker with the
built-in test tone so that the volume of each
speaker is the same at the listening position.
Setting the Wireless Surround/Subwoofer
Set when using the wireless surround or subwoofer
speakers with the NS-RB1. Optional settings are On
and Off.
Setting speaker distance (Sp Distance menu)
Note
This setting is made automatically by the Audyssey
2EQ® Room Correction and setup function. See
“Using the Audyssey 2EQ® room correction and
speaker setup” on page 14.
Lets you specify the distance from each speaker to
the listening position so that the sound from each
speaker arrives at the listener’s ears as the sound
designer intended.
Option Configuration
Feet (default)–Distances can be set from 1 to 30
Unit
Left, Center, Right,
Surround Right, Surround
Left, Subwoofer
feet, in one foot increments.
Meters–Distances can be set from 0.3 to 9.0 meters,
in 0.3 meter increments.
Specify the distance from each speaker to your
listening position.
Option Configuration
Left, Center, Right,
-12 dB to 0 dB to +12 dB, in 1 dB steps.
Surround Right,
Surround Left
Subwoofer
Notes
Tip
-15 dB to 0 dB to +12 dB, in 1 dB steps.
• The speaker level setting is disabled while
headphones are connected, or the receiver is
muted, or the Audio TV OUT setting is set to ON.
• Speakers that you set to No or None in the
speaker configuration (Sp Config menu) cannot
be selected.
• The center speaker and subwoofer level settings
made by using AUDIO are saved here as the
default settings.
If you’re using a handheld sound level meter, adjust
the level of each speaker so that it reads 75 dB SPL at
the listening position, measured with C-weighting
and slow reading.
Adjusting the audio (Audio Adjust menu)
With the audio adjust settings you can adjust the
sound and listening modes to your taste.
Setting the Multiplex (Input Ch(Mux) submenu) and Mono (Input Ch(Mono) submenu)
The multiplex setting determines which channel of
a stereo multiplex source is output. Use it to select
audio channels or languages with multiplex
sources, multilingual TV broadcasts, and so on.
22
www.insigniaproducts.com
Page 27

Insignia NS-R5101AHD-A AV Home Theater Receiver
The mono setting specifies the channel to be used
for playing any 2-channel digital source, such as
Dolby Digital, or 2- channel analog/PCM source in
the Mono listening mode.
Option Settings
Main (default)–The main channel is output.
Multiplex
Mono
Sub–The sub channel is output.
M/S–Both the main and sub channels are output.
L+R–Both the left and right channels are output.
Left–Only the left channel is output.
Right–Only the right channel is output.
Setting the Dolby options (Panorama, Dimension, and Center Width submenus)
These settings only apply to 2-channel stereo
sources.
The Panorama setting lets you broaden the width
of the front stereo image when using the Dolby Pro
Logic II Music listening mode.
The Dimension setting lets you move the sound
field forward or backward when using the Dolby
Pro Logic II Music listening mode. Higher settings
move the sound field backward. Lower settings
move it forward. If the stereo image feels too wide,
or there’s too much surround sound, move the
sound field forward to improve the balance.
Conversely, if the stereo image feels like it’s in
mono, or there’s not enough surround sound, move
it backward.
The Center Width setting lets you adjust the width
of the sound from the center speaker when using
the Dolby Pro Logic II Music listening mode.
Normally, if you’re using a center speaker, the center
channel sound is output by only the center speaker.
(If you’re not using a center speaker, the center
channel sound is distributed to the front left and
right speakers to create a phantom center). This
setting controls the front left, right, and center mix,
allowing you to adjust the weight of the center
channel sound.
Submenu Configuration
Panorama
Dimension
Center Width
On– Turns the Panorama function on.
Off–Turns the Panorama function off.
–3 to 0 to +3
0 to 3 to 7
Setting the DTS options (Center Image submenu)
The DTS Neo:6 Music listening mode lets you create
6-channel surround sound from 2-channel stereo
sources. With this setting, you can specify by how
much the front left and right channel output is
attenuated in order to create the center channel.
A value 0 is only audible from the center speaker. A
value of more than 0 is audible from the left and
right speakers as well.
Adjusting the Audyssey settings (Audyssey 2EQ®, Dynamic EQ®, Dynamic Volume® and Reference Level submenus
Audyssey 2EQ® is a room equalization solution that
calibrates any audio system so that it can achieve
optimum performance for every listener in a large
listening area. Based on several room
measurements, 2EQ calculates an equalization
solution that corrects for both time and frequency
response problems in the listening area and
performs a fully automated surround system setup.
With Audyssey Dynamic EQ®, you can enjoy great
sound even when listening at low volume levels.
Audyssey Dynamic EQ® solves the problem of
deteriorating sound quality as volume is decreased
by taking into account human perception and room
acoustics. It does so by selecting the correct
frequency response and surround volume levels
moment-by-moment, so that the content sounds
the way it was created, at any volume level — not
just at reference level.
Note
The setting is stored individually for each input
selector.
Movies are mixed in rooms calibrated for film
reference. To achieve the same reference level in a
home theater system, each speaker level must be
adjusted so that –30 dBFS band-limited (500 Hz to
2000 Hz) pink noise produces 75 dB sound pressure
level at the listening position. A home theater
system automatically calibrated by Audyssey 2EQ®
plays at reference level when the master volume
control is set to the 0 dB position. At that level you
can hear the mix as the mixers heard it.
Audyssey Dynamic EQ® is referenced to the
standard film mix level. It makes adjustments to
maintain the reference response and surround
envelopment when the volume is turned down
from 0 dB. However, film reference level is not
always used in music or other non-film content. The
Dynamic EQ Reference Level Offset provides three
offsets from the film level reference (5 dB, 10 dB,
and 15 dB) that can be selected when the mix level
of the content is not within the standard.
Submenu Configuration
Off–No Audyssey 2EQ equalizing is applied.
Audyssey
Dynamic EQ
On–Dynamic EQ
available. The Audyssey indicator lights.
Off (default)–Audyssey Dynamic EQ off.
On–Audyssey Dynamic EQ on. The Dynamic EQ
indicator lights.
® and Dynamic Volume® become
®
Submenu Configuration
Center Image
0 to 2 (default) to 5
www.insigniaproducts.com
23
Page 28

Insignia NS-R5101AHD-A AV Home Theater Receiver
Submenu Configuration
0 dB (default)–Use when listening to movies.
5 dB–Select this setting for content that has a very
wide dynamic range, such as classical music.
10 dB–Select this setting for jazz or other music that
Reference Level
Dynamic Volume
Notes
Note
has a wider dynamic range. This setting should also
be selected for TV content as that is usually mixed at
10 dB below film reference.
15 dB–Select this setting for pop/rock music or other
program material that is mixed at very high listening
levels and has a compressed dynamic range.
Off (default)–Audyssey Dynamic Volume® off.
Light–Light Compression Mode becomes active.
Medium–Medium Compression Mode becomes
active.
Heavy–Heav y Compression Mode becomes active.
This setting affects volume the most, causing all
sounds to be of equal loudness.
• The setting is stored individually for each input
selector. If you make Audyssey Dynamic
® active, Audyssey and Dynamic EQ
Volu me
settings are set to On. The Dynamic Vol
indicator lights.
About Audyssey Dynamic EQ®
Audyssey Dynamic EQ® solves the problem of
deteriorating sound quality as volume is decreased
by taking into account human perception and room
acoustics.
Dynamic EQ® selects the correct frequency
response and surround levels moment-by-moment
at any user selected volume setting. The result is
bass response, tonal balance, and surround
impression that remain constant despite changes in
volume. Dynamic EQ® combines information from
incoming source levels with actual output sound
levels in the room, a prerequisite for delivering a
loudness correction solution.
Audyssey Dynamic EQ® works in tandem with
Audyssey 2EQ to provide well-balanced sound for
every listener at any volume level.
About Audyssey Dynamic Volume®
Audyssey Dynamic Volume® solves the problem of
large variations in volume level between television
programs, commercials, and between the soft and
loud passages of movies. Audyssey Dynamic
Volume® looks at the preferred volume setting by
the user and then monitors how the volume of
program material is being perceived by listeners in
real time to decide whether an adjustment is
needed. Whenever necessary, Audyssey Dynamic
Volume® makes the necessary rapid or gradual
adjustments to maintain the desired playback
volume level while optimizing the dynamic range.
Audyssey Dynamic EQ® is integrated into Audyssey
Dynamic Volume® so that as the playback volume is
adjusted automatically, the perceived bass
response, tonal balance, surround impression, and
dialog clarity remain the same whether watching
movies, flipping between television channels, or
changing from stereo to surround sound content.
Adjusting the Theater-Dimensional setting (Listening Angle submenu)
This setting lets you optimize the
Theater-Dimensional listening mode by specifying
the angle of the front left and right speakers relative
to the listening position. Ideally, the front left and
right speakers should be equidistant from the
listening position and at an angle close to one of
the two available settings.
20°/40°
Submenu Options
Listening Angle
Naming inputs (Name Edit menu)
You can enter a preset name for each individual
input selector for easy identification. When entered,
the preset name appears on the display.
Before selecting a name, press the input selector to
select the input source to name.
Submenu Options
Name Edit
Notes
Setting up HDMI (HDMI Setup menu)
Submenu Configuration
Audio TV OUT
LipSync
CEC Function
Audio Return Ch (ARC)
Wide (default)–The listening angle is 40 degrees.
Narrow–The listening angle is 20 degrees.
- - -, Blu-ray, DVD, HD DVD, VCR, DVR, Tivo,
CableSTB, SAT STB, PS3, Wii, Xbox, PC, TV, CD,
TAPE , and iPod.
To reset to the default, selec t - - -.
• Two different inputs cannot have the same
name.
• This menu cannot be used for the TUNER input
selector.
Off (default)–HDMI audio is not output.
On–HDMI audio is output.
Disable (default)–HDMI lip sync disabled.
Enable–HDMI lip sync enabled.
Off (default)–CEC disabled.
On–CEC enabled.
Off–Select if you don’t want to use audio return
channel (ARC) function.
Auto (default)–The audio signal from your TV tuner
can be sent digitally to the HDMI OUT of the receiver.
24
www.insigniaproducts.com
Page 29

Insignia NS-R5101AHD-A AV Home Theater Receiver
Submenu Configuration
Power Control
TV Control
Off–Power Control disabled.
On (default)–Power Control enabled.
Off–TV Control disabled.
On (default)–TV Control enabled.
Audio TV OUT (Audio TV Out submenu)
This setting determines whether audio received by
HDMI IN is output by the HDMI OUT. You may want
to turn this preference on if your TV is connected to
the HDMI OUT and you want to listen to the audio
from a component that’s connected to an HDMI IN,
through your TV’s speakers. Normally, this should
be set to Off.
Notes
•If On is selec ted and the signal can be output by
the TV, the receiver outputs no sound through
its speakers.
•If On is selected, TV Sp On appears on the
display when you press DISPLAY.
• When TV Control is set to On, this setting
default is Auto.
• With some TVs and input signals, no sound may
be output, even when this setting is On.
• When the Audio TV OUT or TV Control are set
to On, and you are listening through your TV’s
speakers, if you turn up the receiver’s volume
control, the sound is output by the receiver’s
front left and right speakers. To stop the
receiver’s speakers from producing sound,
change the settings, change your TV’s settings,
or turn down the receiver’s volume.
LipSync (LipSync submenu)
Lets you set the receiver to automatically correct
any delay between the video and the audio, based
on the data from the connected monitor.
Notes
• This function only works if your
HDMI-compatible TV supports HDMI Lip Sync.
• You can check the amount of delay being
applied by the HDMI Lip Sync function on the
A/V Sync screen.
CEC Function (HDMI Control submenu)
This function lets CEC-compatible components
connected via HDMI to be controlled by the
receiver.
Notes
• When set to On, the name of connected
CEC-compatible components and CEC On are
displayed on the receiver when the menu is
closed.
• When set to Off, CEC Off is displayed on the
receiver when the menu is closed.
• When a CEC-compatible component is
connected to the receiver via HDMI cable, the
name of the connected component is displayed
on the receiver. For example, when you are
watching TV, if you turn on a Blu-ray Disc/DVD
player by the receiver’s remote control, the
name of the Blu-ray Disc/DVD player is
displayed on the receiver.
•Set to Off when a connected piece of
equipment is not compatible or it is unclear
whether the equipment is compatible or not.
• If movement is unnatural when set to On,
change the setting to Off.
• Refer to the connected component ’s instruction
manual for details.
Audio Return Ch (ARC)(Audio Return Ch submenu)
The audio return channel (ARC) function enables an
HDMI 1.4-capable TV to send the audio stream to
the HDMI OUT jack of the receiver. To use this
function, you must select the TV/CD input and your
TV must support the ARC function.
Notes
•The Audio Return Ch setting can only be set
when HDMI Control is On.
• This setting is set to Auto automatically when
HDMI Control is set to On first time.
Power Control (Power Control submenu)
To link the power functions of CEC-compatible
components connected via HDMI, select On. This is
set to On automatically when HDMI Control is set
to On first time.
Notes
•The Power Control can only be set when the
HDMI Control setting is On.
• HDMI power control only works with
CEC-compatible components that support it
and may not work with some components.
• When set to On, power consumption increases.
• When set to On, regardless of whether the
receiver is On or in Standby, both audio and
video stream from an HDMI input is output to
the TV or other components via HDMI
connection (HDMI pass-through function).
When the HDMI pass-through func tion activates
in standby mode, the HDMI THRU indicator
lights.
• The power consumption during standby mode
increases during the HDMI pass-through,
however when the TV is in standby mode or you
are watching a TV program, power
consumption can be improved.
• Refer to the connected component ’s instruction
manual for details.
www.insigniaproducts.com
25
Page 30

Insignia NS-R5101AHD-A AV Home Theater Receiver
TV Control (TV Control submenu)
Set to On when you want to control the receiver
from a CEC-compatible TV that is connected to
HDMI.
Notes
• Do not assign the component connected with
the HDMI input to the TV/CD selector when you
set TV Control to On. Otherwise, appropriate
CEC (Consumer Electronics Control) operation is
not guaranteed.
•Set to Off when the TV is not compatible or
when it is unclear whether the TV is compatible
or not.
• TV Control can be set only when HDMI Control
and Power Control are both set to On.
• Refer to the connected component’s instruction
manual for details.
• After changing the HDMI Control, Power
Control, or TV Control settings, turn off the
power to all connected pieces of equipment
and then turn them on again. Refer to the user’s
manuals for all connected pieces of equipment.
Changing audio settings
You can change various audio settings by pressing
AUDIO on the remote control.
Note
When Audio TV OUT is set to On, the AUDI O button
is disabled.
To change audio settings:
1 Press RECEIVER on the remote control, then
press AUDIO.
2 Press or to select an option, then press
or to change the setting. Repeat this step
to change additional settings.
Changing tone control settings
You can adjust the bass and treble for the front
speakers, except when the Direct listening mode is
selected. Options include:
• Bass–You can boost or cut low-frequency
sounds output by the front speakers. 10 dB to
0 dB to +10 dB, in 2 dB steps
• Tre ble –You can boost or cut high-frequency
sounds output by the front speakers. 10 dB to
0 dB to +10 dB, in 2 dB steps
Notes
• To bypass the bass and treble tone circuits,
select the Direct listening mode.
• This procedure can also be performed on the
receiver by pressing the TONE–/ + buttons.
Note
Changing the speaker levels
You can adjust the volume of each speaker while
listening to an input source. These temporary
adjustments are cancelled when the receiver is set
to Standby. To save the setting you made here, go
to “Setting the level calibration (Level Cal menu)”
on page 22, before returning the receiver to
Standby. Options include:
• Subwoofer–15 dB to 0 dB to +12 dB, in 1 dB
steps.
• Center–12 dB to 0 dB to +12 dB, in 1 dB
steps.
Notes
• You cannot use this function while the receiver
is muted.
• Speakers that are set to No or None in the Sp
Config (Speaker Configuration) submenu
cannot be adjusted.
Note
Changing Audyssey settings
See “Adjusting the audio (Audio Adjust menu)” on
page 22. Options include:
•Dynamic EQ®
•Dynamic Volume®
Setting the Late Night function
The Late Night function lets you reduce the
dynamic range of Dolby Digital material so that you
can still hear quiet parts even when listening at low
volume levels. This makes it ideal for watching
movies late at night when you do not want to
disturb anyone. Options are:
• For Dolby Digital and Dolby Digital Plus sources,
the options are Off, Low, and High.
• For Dolby TrueHD sources, the options are Auto,
Off, and On.
Notes
• The effect of the Late Night function depends
on the material that you are playing and the
intention of the original sound designer. With
some material there is little or no effect when
you select the different options.
• The Late Night function can only be used when
the input source is Dolby Digital, Dolby Digital
Plus, or Dolby TrueHD.
• The Late Night function is set to Off when the
receiver is set to Standby. For Dolby TrueHD
sources, it is set to Auto.
Setting the Music Optimizer
The Music Optimizer function enhances the sound
quality of compressed music files. Use it with music
files that use “lossy” compression, such as MP3.
Options are Off and On.
Notes
• The Music Optimizer function only works with
PCM digital audio input signals with a sampling
rate below 48 kHz and analog audio input
signals. The Music Optimizer is disabled when
the Direct listening mode is selected.
• The setting is stored individually for each input
selector.
• When the Music Optimizer is on, the M.OPT
indicator lights.
Setting the CinemaFILTER
The CinemaFILTER lets you soften overly bright
movie soundtracks, which are typically mixed for
reproduction in a movie theater.
CinemaFILTER can be turned On or Off for the
following listening modes:
•Dolby Digital
•Dolby Digital Plus
•Dolby TrueHD
• Dolby Pro Logic II Movie
•Multichannel
26
www.insigniaproducts.com
Page 31

Insignia NS-R5101AHD-A AV Home Theater Receiver
•DTS
•DTS Neo:6 Cinema
•DTS 96/24
•DTS-HD High Resolution
•DTS-HD Master
•DTS Express.
Notes
The CinemaFILTER may not work with some input
sources.
Setting the Audio Selector
You can set priorities of audio output when there
are both digital and analog inputs. Options include:
• ARC–The audio signal from your TV tuner can
be sent digitally to the HDMI OUT of the
receiver. With this selection, the TV’s audio can
automatically be selected as a priority.
• HDMI–This can be selected when HDMI IN
has been assigned as an input source. If both
HDMI (HDMI IN) and digital audio inputs
(COAXIAL IN or OPTICAL IN) have been
assigned, HDMI input is automatically
selected.
• COAX–This can be selected when COAXIAL IN
has been assigned as an input source. If both
coaxial and optical inputs have been assigned,
coaxial input is automatically selected.
• OPT–This can be selected when OPTICAL IN
has been assigned as an input source.
• Analog–The receiver always outputs analog
signals.
Notes
• The setting is stored individually for each input
selector.
• This setting can be made only for the input
source that is assigned as HDMI IN, COAXIAL IN,
or OPTICAL IN. If both HDMI (HDMI IN) and
digital audio inputs (COAXIAL IN or OPTICAL IN)
are assigned, HDMI input is selected as a priority
by setting to ARC. To select the digital audio
input, see “Setting up Digital Audio (Digital
Audio menu)” on page 21.
•You can select ARC if you select the T V/CD input
selector. But you cannot select it if you have
selected Off in the Audio Return Ch setting.
Notes
• If the beginnings of tracks from a PCM source
are cut off, try setting the format to PCM.
• If noise is produced when fast forwarding or
reversing a DTS CD, try setting the format to
DTS.
• The setting is stored individually for each input
selector.
• The setting is reset to Auto when you change
the setting in the Audio Selector.
To select a digital input signal format:
1 Press RECEIVER, then press and hold AUDIO for
about eight seconds. Auto appears on the
display.
2 Press
or to select one of the following
options:
• Auto–The format is detected automatically. If
no digital input signal is present, the
corresponding analog input is used instead.
• PCM–Only 2-channel PCM format input
signals are heard. If the input signal is not
PCM, the PCM indicator flashes and noise may
also be produced.
• DTS–Only DTS (but not DTS-HD) format input
signals is heard. If the input signal is not DTS,
the DTS indicator flashes and there is no
sound.
Setting the A/V Sync
When using progressive scanning on your Blu-ray
Disc/DVD player, you may find that the picture and
sound are out of sync. With this setting, you can
correct this by delaying the audio signals. Option
settings are from 0 ms to 100 ms, in 10 ms steps.
Notes
• A/V Sync is disabled when the Direct listening
mode is used with an analog input source.
• The setting is stored individually for each input
selector.
Selecting a digital input signal format
The digital input signal formats are available only
for the input sources that you have assigned a
digital input jack.
Normally, the receiver detects the signal format
automatically. However, if you experience any
issues when playing PCM or DTS material, you can
manually set the signal format to PCM or DTS.
www.insigniaproducts.com
27
Page 32

Insignia NS-R5101AHD-A AV Home Theater Receiver
Controlling other components
You can use your receiver’s remote control to
control your other AV components. This section
explains how to enter the remote control code for a
component that you want to control, such as a DVD
player, a TV, or a CD player. See “Remote control
codes” on page 29.
Preprogrammed remote control codes
Remote control codes for Insignia Blu-ray disc
players and Insignia TVs are preprogrammed into
the remote control. You do not need to enter a
remote control code to control these components.
To enter remote control codes:
1 While holding down the REMOTE MODE button
to which you want to enter a code, press and
hold down the DISPLAY button until the
Remote indicator lights up (about three
seconds).
2 Within 30 seconds, press the number buttons to
enter the 5-digit remote control code. The
Remote indicator flashes twice.
To reset a REMOTE MODE button:
1 While holding down the REMOTE MODE button
that you want to reset, press and hold AUDIO
until the remote indicator lights (about three
seconds).
2 Within 30 seconds, press the REMOTE MODE
button again.
The remote indicator flashes twice, indicating
that the button has been reset.
Each REMOTE MODE button is preprogrammed
with a remote control code. When a button is
reset, its preprogrammed code is restored.
To reset the remote control:
1 While holding down the RECEIVER button,
press and hold AUDIO until the remote
indicator lights (about three seconds).
2 Within 30 seconds, press the RECEIVER button
again.
3 The remote indicator blinks twice, indicating
that the remote control has been reset.
To control other components:
• Press the REMOTE MODE button that you have
programmed with the remote control code for
your component.
Using the remote control to control other components
Press the REMOTE MODE button for the
component you want to control first.
Button/
#
Component
1
|/ ON/STANDBY
2 Input selec tor X
3 These buttons can control the TV, regardless of the mode selected.
4 TOP MENU X
5 ENTER
//
/
6 SOURCE/SETUP
7 SEARCH X* X X* X*
REPEAT X* X X* X*
RANDOM X* X X* X*
PLAY MODE X* X X* X*
8Numbers X X X X
9 DISPLAY X X X X
10 MUTING XX X X
11 MENU X
12 RETURN XX X X
13 AUDIO X X X
14
/// /
//
15 CLR X X X X
DVD
TV
player/
recorder
XX X X
XX X X
XX X X
Blu-ray
disc player
VCR/
PVR
Satellite/
Cable
receiver
28
Note
www.insigniaproducts.com
Certain buttons may not work as expected with some
components, and some may not work at all.
Page 33

Insignia NS-R5101AHD-A AV Home Theater Receiver
Remote control codes
Insignia Receiver
Default 62472
Zone 2 62545
Tuner 52472
Cable Set Top Box
Bright House 01376, 01877
Cable One 01376, 01877
Cablevision 01006, 01376, 01877
Charter 01376, 01877
Cisco 01877, 01982
Comcast 01376, 01877, 01982
Cox 01376, 01877
Digeo 01187
Insight 01376, 01877
Knology 01877
Mediacom 01376, 01877
Motorola 01187, 01376, 01982
Pace 01376, 01877, 01982
Panasonic 01982
Pioneer 01877
Rogers 01877
Scientific Atlanta 01877
Shaw 01376
Sony 01006
Suddenlink 01376, 01877
Time Warner 01376, 01877
WideOpenWest 01877
Cable/PVR Combination
Bright House 01376, 01877
Cable One 01376, 01877
Cablevision 01006, 01376, 01877
Charter 01376, 01877, 02187
Cisco 01877, 01982
Comcast 01376, 01877, 01982, 02576
Cox 01376, 01877
Digeo 01187, 02187
Insight 01376, 01877
Knology 01877
Mediacom 01376, 01877
Motorola 01376, 01187
Pace 01877
Panasonic 01982
Pioneer 01877
Rogers 01877
Scientific Atlanta 01877
Shaw 01376
Sony 01006
Suddenlink 01376, 01877
Time Warner 01376, 01877, 02187
Cable/PVR Combination
Tivo 02576
WideOpenWest 01877
CD
Denon 72222
DKK 70000
Insignia 72585
Miro 70000
Optimus 70000, 70468
Pioneer 70468
RCA 70468
Sony 70000
Yamaha 70036
CD-R
Sony 70000
Accessory
Insignia 82587
AT&T 00858
Cisco 02345
Motorola 00858, 02378
Scientific Atlanta 00858, 02345
Verizon 02378
Satellite Set Top Box
Bell ExpressVu 00775
DirecTV 00247, 00566, 00639, 00749, 01142,
01377, 01442, 01609, 01749
Dish Network 00775, 01775
Dishpro 00775, 01775
Echostar 00775, 01775
Expressvu 00775, 01775
GE 00566
General Instrument 00869
GOI 00775, 01775
HTS 00775, 01775
Hughes Network Systems 00749, 01142, 01442, 01749
Jerrold 00869
JVC 00775, 01775
Mitsubishi 00749
Motorola 00869
Next Level 00869
Panasonic 00247
Philips 00749, 01142, 01442, 01749
Proscan 00566
RadioShack 00869
RCA 00566
Samsung 01377, 01442, 01609
Sony 00639
Star Choice 00869
www.insigniaproducts.com
29
Page 34

Insignia NS-R5101AHD-A AV Home Theater Receiver
Satellite Set Top Box
Tivo 01142, 01442
Toshiba 00749, 01749
Voom 00869
SAT/PVR Combination
Bell ExpressVu 00775
DirecTV 00639, 01142, 01377, 01442
Dish Network 00775
Dishpro 00775
Echostar 00775
Expressvu 00775
Hughes Network Systems 01142, 01442
Motorola 00869
Philips 01142, 01442
Samsung 01442
Sony 00639
Star Choice 00869
Tivo 01142, 01442
Tel ev isi on
Akai 10812, 11675
Dynex 11780, 12049, 12184
Electrograph 11755
Emerson 11394, 11864, 11963
ESA 10812, 11963
Funai 11963
Gateway 11755
GFM 11963
Hisense 11660
Hitachi 11643
Insignia 11204, 11423, 11517, 11564, 11660,
11780, 11892, 11963, 12002, 12049,
12417
JVC 11601
LG 11423, 12358
Magnavox 11454, 11866, 11963
Marantz 11454
Maxent 11755
Memorex 11892
Mitsubishi 11250
NEC 11797
NetTV 11755
Olevia 11610
Panasonic 11457, 11480
Petters 11523
Philco 11394, 11963
Philips 11454, 11744
Pioneer 11457
Polaroid 11523, 12002
RCA 11781, 12002, 12187, 12247, 12434
Sampo 11755
Samsung 10812
Sansui 11892
Sanyo 11142
Tel evi sio n
Sharp 10818
Sony 10810
SVA 11963
Sylvania 11394, 11864, 11963
Syntax 11610
Toshiba 11524, 12006
Viewsonic 10857, 11627, 11755
Vizio 11758
Westinghouse 10889, 11712
Zenith 11423
VCR
DirecTV 20739
Humax 20739
Philips 20739
Tivo 20739
PVR
DirecTV 20739
Humax 20739
Philips 20739
Tivo 20739
DVD
Accurian 33002
California Audio Labs 30490
Denon 30490, 31634, 33010
Disney 33002
Emerson 33002
Funai 33002
GE 30522
GFM 33002
Go Video 33003
GoldStar 33003
Grundig 30539
Hitachi 30573
Insignia 32095, 33002, 33014, 33025
Integra 31634, 32900
JVC 32365
Kenwood 30490
LG 33003
Magnavox 30503, 30539, 33002
Marantz 30539, 33013
Microsoft 30522
NAD 33003
Onkyo 30503, 32900, 32910
Panasonic 30490, 30503, 33005
Philco 33002
Philips 30503, 30539, 32056, 33002, 33007,
33016
Pioneer 30631, 33000, 33017
Polk Audio 30539
Presidian 33002
30
www.insigniaproducts.com
Page 35

Insignia NS-R5101AHD-A AV Home Theater Receiver
DVD
Proscan 30522
RCA 30522
Samsung 30490, 30573, 33001, 32329, 32489,
32556
Sharp 33002
Sony 30864, 31033, 31633, 33004
Sylvania 33002
Symphonic 33002
Technics 30490
Toshiba 30503, 32277
Urban Concepts 30503
Xbox 30522
Yamaha 30490, 30539, 30817, 33011
Zenith 30503, 33003
DVD High Definition (Blu-Ray)
Denon 33010
Insignia 33002, 33014, 33025
Integra 32900
JVC 32365
LG 33003
Magnavox 33002
Marantz 33013, 33015
NAD 33024
Olevia 33012
Onkyo 32900, 32910
Oppo 33021
Panasonic 33005
Philips 33007, 33016
Pioneer 33000, 33017
Samsung 33001
Sharp 33009
Sony 33004, 33026, 33008
Sylvania 33002
Viore 33022
Vizio 33023
Yamaha 33011
DVD-R
Zenith 33003
TV/DVD Combination
Akai 11675
Dynex 12049, 12184
Emerson 11394, 11864, 11963, 33002
ESA 11963
Funai 11963
GFM 11963
Insignia 11963, 12002, 12049, 12417
LG 11423
Magnavox 11963
Polaroid 11523, 12002
RCA 12002, 12187
Sharp 10818
Sylvania 11394, 11864, 11963, 33002
Toshiba 11524, 12006
DVD-R
Accurian 33002
Funai 33002
Go Video 33003
LG 33003
Magnavox 33002
Panasonic 30490
Pioneer 30631
RCA 30522
Samsung 30490
Sharp 33002
Sony 31033
Sylvania 33002
Toshiba 32277
www.insigniaproducts.com
31
Page 36

Insignia NS-R5101AHD-A AV Home Theater Receiver
Maintaining
To clean this receiver, wipe with a soft, dry cloth. If
the surfaces are extremely dirty, use a soft cloth
dipped in a soap and water solution or a weak
detergent solution.
• Never use alcohol, paint thinner, or benzine to
clean this receiver.
• Before using a chemically treated cloth, read the
instructions that came with the cloth carefully.
Troubleshooting
If a problem occurs, run through the following table
before contacting Insignia.
If the problem persists, attempt to solve it by
switching the receiver off and on again. If this fails
to resolve the problem, contact Insignia. Under no
circumstances should you attempt to repair the
receiver yourself as this could void the warranty.
To reset the receiver to its factory defaults, turn it on
and, while holding down VCR/DVR, press ON/
STANDBY. Clear appears on the display and the
receiver enters Standby mode.
On the receiver
Note that resetting the receiver will delete your radio presets and custom settings.
To reset the remote control to its factory defaults,
while holding down RECEIVER, press and hold
down AUDIO until the remote indicator lights
(about three seconds). Within 30 seconds, press
RECEIVER again.
Remote
indicator
RECEIVER
button
AUDIO
button
Notes
• The receiver contains a microcomputer for
signal processing and control functions. In rare
situations, severe interference, noise from an
external source, or static electricity may cause it
to lockup. If this happens, unplug the power
cord from the wall outlet, wait at least five
seconds, and then plug it back in again.
• Insignia is not responsible for damages (such as
CD rental fees) due to unsuccessful recordings
caused by the unit’s malfunction.
• Before disconnecting the power cord from the
wall outlet, set the receiver to Standby.
Category Problem/Possible Solution
AUDIO P roblems
No power
The STANDBY
indicator flashes red
No sound
Only the front
speakers produce
sound
Only the center
speaker produces
sound
The surround
speakers produce
no sound
The center speaker
produces no sound
The subwoofer
produces no sound
• Connect the cord securely.
• Check the outlet using a lamp or another appliance.
• Remove the power cord from the wall outlet immediately.
Disconnect all speaker cables and input sources, and then
leave the receiver with its power cord disconnected for one
hour. After that, reconnect the power cord and set the
volume to maximum. If the receiver stays on, set then the
volume to minimum, disconnect the power cord, and
reconnect your speakers and input sources. If the receiver
turns off when you set the volume to maximum, disconnect
the power cord, and contact your Insignia dealer.
• Make sure that the digital input source is selected properly.
• Make sure that all audio connecting plugs are pushed in all
the way.
• Make sure that the inputs and outputs of all components are
connected properly.
• Make sure that the polarity of the speaker cables is correct,
and that the bare wires are in contact with the metal part of
each speaker terminal.
• Make sure that the input source is properly selected.
• Make sure that the speaker cables are not shorting.
• Check the volume. The receiver is designed for home theater
enjoyment. It has a wide volume range, allowing precise
adjustment.
•If the MUTING indicator is flashing on the display, press the
remote control MUTING button to unmute the receiver.
• While a pair of headphones is connected to the PHONES
jack, no sound is output by the speakers.
• If there is no sound from a DVD player connected to HDMI
IN jack, check the DVD player’s output settings, and be sure
to select a supported audio format.
• Check the digital audio output setting on the connected
device. On some game consoles, such as those that support
DVD, the default setting is off.
• With some DVD-Video discs, you need to select an audio
output format from a menu.
• If your turntable uses an MC cartridge, you must connect an
MC head amp, or an MC transformer.
• Make sure that none of the connecting cables are bent,
twisted, or damaged.
• Not all listening modes use all speakers.
• Specify the speaker distances and adjust the individual
speaker levels.
• The input signal format is set to PCM or DTS. Set it to Auto.
• When the Stereo or Mono listening mode is selected, only
the front speakers and subwoofer produce sound.
• Check the Speaker Configuration.
• If you use the Dolby Pro Logic II Movi e, Dolby Pro Logic II
Music, or Dolby Pro Logic II Game listening mode with a
mono source, such as an AM radio station or mono TV
program, the sound is concentrated in the center speaker.
• Make sure the speakers are configured correctly.
• When the T-D (Theater-Dimensional), Stereo, or Mono
listening mode is selected, the surround speakers produce
no sound.
• Depending on the source and current listening mode, not
much sound may be produced by the surround speakers. Tr y
selecting another listening mode.
• Make sure the speakers are configured correctly.
• When the Stereo or Mono listening mode is selected, the
center speaker produces no sound.
• Make sure the speakers are configured correctly.
• When you play source material that contains no information
in the LFE channel, the subwoofer produces no sound.
• Make sure the speakers are configured correctly.
• If you are using Rocketboost™ to send audio to the
subwoofer, make sure that the NS-RB1 power is ON
32
www.insigniaproducts.com
Page 37

Insignia NS-R5101AHD-A AV Home Theater Receiver
Category Problem/Possible Solution
There’s no sound
with a certain signal
format
No 5.1 playback
The volume cannot
be set to 79
Noise can be heard
The Late Night
function does not
work
DTS sig nal problems
The beginning of
audio received by
an HDMI IN can not
be heard
No picture
There is no picture
from a source
connected to an
HDMI IN
The on-screen
menus do not
appear
• Check the digital audio output setting on the connected
device. On some game consoles, such as those that support
DVD, the default setting is off.
• With some DVD-Video discs, you need to select an audio
output format from a menu.
• Depending on the input signal, some listening modes
cannot be selected.
• You can not always select all of the listening modes,
depending on the number of the speakers connected.
• Check to see if a maximum volume has been set.
• After the volume level of each individual speaker has been
adjusted, the maximum volume may be reduced.
• When the levels of each speaker have been adjusted, the
maximum possible volume may be reduced.
• Using cable ties to bundle audio cables with power cords,
speaker cables, and so on may degrade the audio
performance, so don’t do it.
• An audio cable may be picking up interference. Try
repositioning your cables.
• Make sure that the source material is Dolby Digital, Dolby
Digital Plus, and Dolby TrueHD.
• When DTS program material ends and the DTS bitstream
stops, the receiver remains in DTS listening mode and the
DTS indicator remains on. This is to prevent noise when you
use the pause, fast forward, or fast reverse function on your
player. If you switch your player from DTS to PCM, because
the receiver does not switch formats immediately, you may
not hear any sound, in which case you should stop your
player for about three seconds, and then resume playback.
• With some CD and LD players, you won’t be able to playback
DTS material properly even though your player is con nected
to a digital input on the receiver. This is usually because the
DTS bitstream has been processed (for example, output
level, sampling rate, or frequency response changed) and
the receiver does not recognize it as a genuine DTS signal. In
such cases, you may hear noise.
• When playing DTS program material, using the pause, fast
forward, or fast reverse function on your player may
produce a short audible noise. This is not a malfunction.
• Sin ce it ta kes lon ger to identi fy the format of an H DMI si gnal
than it does for other digital audio signals, audio output
may not start immediately.
VIDEO Problems
• Make sure that all video connecting plugs are pushed in all
the way.
• Make sure that each video component is properly
connected.
• If the video source is connected to a component vi deo input,
you must assign that input to an input selector, and your TV
must be connected to COMPONENT VIDEO MONITOR OUT.
• If the video source is connected to a composite video input,
your TV must be connec ted to the corresponding composite
video output.
• If the video source is connected to an HDMI input, you must
assign that input to an input selector, and your TV must be
connected to the HDMI OUT.
• On your TV, make sure that the video input to which the
receiver is connected is selected.
• Reliable operation with an HDMI-to-DVI adapter is not
guaranteed. In addition, video signals from a PC are not
guaranteed.
• On your TV, make sure that the video input to which the
receiver is connected is selected.
• When the receiver doesn’t connect TV with HDMI, onscreen
menus are not displayed.
Category Problem/Possible Solution
TUNER Problems
Reception is noisy,
FM stereo reception
is noisy, or the FM
STEREO indicator
does not light
No communication
between the
NS-RB1 and your
receiver
Cannot connect a
source device
The remote control
does not work
Cannot control
other components
Cannot record
The sound changes
when I connect my
headphones
• Relocate your antenna.
• Move the receiver away from your TV or computer.
• Listen to the station in mono.
• When listening to an AM station, operating the remote
control may cause noise.
• Passing cars and airplanes can cause interference.
• Concrete walls weaken radio signals.
• If nothing improves the reception, install an outdoor
antenna.
WIRELESS Problems
• Make sure that Hub Status switch on the NS-RB1 is set
correctly.
• Make sure that the power LEDs on NS-RB1 and other devices
light solid blue/green. If the power LEDs blink slowly, try to
establish the link again. For more information, see
"Establishing communications" on page 13.
• If your network is already full with transmitters when
joining is attempted, the source LED will blink three times
and then turn off. Remove (power down) a transmitting
device and try again.
• When you try to join a device to a network that has too
many nodes, the device will stay in joining mode until it
times out (30 second timeout). Upon timeout the unit
should be on and flash the power ring LED in a slow blink
indicating it is not connected to the network.
REMOTE CONTROL Problems
• Before operating this unit, be sure to press RECEIVER.
• Make sure that the batteries are installed with the correct
polarity.
• Install new batteries. Don’t mix different types of batteries,
or old and new batteries.
• Make sure that the remote control is not too far away from
the receiver, and that there’s no obstruction between the
remote control an d the receiver ’s re mote control se nsor.
• Make sure that the A receiver is not subjected to direct
sunshine or inverter-type fluorescent lights. Relocate if
necessary.
• If the receiver is installed in a rack or cabinet with
colored -glass door s, the remote control may not work
reliably when the doors are closed.
• Make sure you’ve selected the correct remote control mode.
• Make sure you’ve entered the correct remote control co de.
• Make sure to set the same ID on both the receiver and
remote control.
• Make sure that you have selected the correct remote control
mode.
• If you cannot operate it, you need to enter the appropriate
remote control code.
RECORDING Problems
• On your recorder, make sure the correct input is selected.
• To prevent signal loops and damage to the receiver, input
signals are not fed through to outputs with the same name
(for example, VCR/DVR IN to VCR/ DVR OUT).
MISCELLANEOUS Problems
• When a pair of headphones is connected, the listening
mode is set to Stereo, unless it’s already set to Stereo, Mono,
or Direct.
www.insigniaproducts.com
33
Page 38

Insignia NS-R5101AHD-A AV Home Theater Receiver
Category Problem/Possible Solution
How do I change
the language of a
multiplex source
The following
settings can be
made for the
composite video
inputs
•Use the Multiplex setting on the Audio Adjust menu to
select Main or Sub.
You must use the buttons on the unit to make these settings.
1. While holding down the input selector button for the input
source that you want to set, press SETUP.
2. Use / to change the setting.
3. Press the input selector button for the input source that you
want to set when you have finished.
Video Attenuation
This setting can be made for the BD/DVD, VCR/DVR, CBL/SAT,
GAME, or AUX input.
If you have a games console connected to the composite video
input, and the picture is not very clear, you can attenuate the
gain.
• Video ATT–0: (default).
• Video ATT–2: Gain is reduced by 2 dB.
Specifications
Note
Design and specifications are subject to change
without notice.
Amplifier section
Element Specification
Rated output power
All channels
THD (Total Harmonic
Distortion)
Input sensitivity and
impedance
Output level and
impedance
Frequency response
Tone control
Signal to Noise ratio
Speaker impedance
Video section
Element Specification
Input sensitivity/
Output level and
impedance
Component video
frequency response
90 watts per channel, 8 ohms, at 1 kHz with a maximum
total harmonic distortion of 1%.
0.08% (1 kHz, 1 W)
200 mV/47 kohms (LINE)
200 mV/2.2 kohms (REC OUT)
20 Hz - 50 kHz/+1 dB - 3 dB (DSP bypass)
±10 dB, 50 Hz (BASS)
±10 dB, 20 kHz (TREBLE)
90 dB (LINE, IHF-A)
6 ohms - 16 ohms
1 Vp-p/75 ohms (Component)
0.7 Vp-p/75 ohms (Component PB/CB, PR/CR)
1 Vp-p/75 ohms (Composite)
5 Hz - 100 MHz/±0 dB, - 3 dB
Tuner section
Element Specification
FM tuning frequency
87.5 MHz - 107.9 MHz
range
AM tuning frequency
530 kHz - 1710 kHz
range
Preset channels
40
General section
Element Specification
Power supply
Power consumption
Standby power
consumption
Dimensions
(W x H x D)
Weig ht
HDMI
Input
Output
Video Resolution
Audio Format
Supported
VIDEO INPUTS
Component
Composite
VIDEO OUTPUTS
Component
Composite
AUDIO INPUTS
Digital
Analog
AUDIO OUTPUTS
Analog
Subwoofer Pre Output
Speaker Outputs
Phones
AC 120 V, 60 Hz
3.3 A
0.2 W
17-1/8" x 5-15/16" x 13-3/8"
435 mm x 150.5 mm x 339 mm
17.6 lbs (8 kg)
IN1, IN2, IN3
OUT
1080p
Dolby TrueHD, DTS Master Audio, DVD-Audio, DSD
CEC, 3D, ARC, Deep Color, x.v.Color, LipSync
IN 1, IN 2
BD/DVD, VCR/DVR, CBL/SAT, GAME, AUX
OUT
MONITOR OUT, VCR/DVR
Optical: 2 Coaxial: 1
BD/DVD, VCR/DVR, CBL/SAT, GAME, TV/CD, AUX
VCR/DVR,
1
Front (L, R), C, SL, SR
1 (6.3 ø)
34
Wireless
Element Specification
Signal to Noise ratio
www.insigniaproducts.com
90 dB (LINE, IHF-A)
Page 39

Insignia NS-R5101AHD-A AV Home Theater Receiver
Legal notices
FCC Part 15
This system contains a NS-RB1 wireless audio sender/receiver,
and has been certified under FCC ID: ATMUPT1W and
IC: 6547A-UPT1WL.
This device complies with Part 15 of the FCC Rules. Operation of
this product is subject to the following two conditions: (1) this
device may not cause harmful interference, and (2) this device
must accept any interference received, including interference
that may cause undesired operation.
This equipment has been tested and found to comply within the
limits for a class B digital device, pursuant to Part 15 of the FCC
Rules. These limits are designed to provide reasonable
protection against harmful interference in a residential
installation. This equipment generates, uses, and can radiate
radio frequency energy and, if not installed and used in
accordance with the instructions, may cause harmful
interference to radio communications. However, there is no
guarantee that interference will not occur in a particular
installation. If this equipment does cause harmful interference to
radio or television reception, which can be determined by
turning the equipment off and on, the user is encouraged to try
to correct the interference by one or more of the following
measures:
• Reorient or relocate the receiving antenna.
• Increase the separation between the equipment and
receiver.
• Connect the equipment into an outlet on a circuit different
from that to which the receiver is connected.
• Consult the dealer or an experienced technician for help.
FCC warning
Per FCC regulation 47 CFR 15.21: Changes or modifications not
expressly approved by the party responsible for compliance with
the FCC Rules could void the user’s authority to operate this
equipment.
Canada ICES-003 statement
This Class B digital apparatus complies with Canadian ICES-003.
Dolby TrueHD
Manufactured under license from Dolby Laboratories. “Dolby”,
“Pro Logic” and the double-D symbol are trademarks of Dolby
Laboratories.
DTS HD™
Manufactured under license under U.S. Patent #’s: 5,451,942;
5,956,674; 5,974,380; 5,978,762; 6,226,616; 6,487,535; 7,212,872;
7,333,929; 7,392,195; 7,272,567 & other U.S. and worldwide
patents issued & pending. DTS is a registered trademark and the
DTS logos, Symbol are trademarks of DTS, Inc.
©1996-2008 DTS, Inc. All Rights Reserved.
HDMI®
“HDMI, the HDMI Logo, and High-Definition Multimedia
Interface are trademarks or registered trademarks of HDMI
Licensing LLC in the United States and other countries.”
Audyssey 2EQ®
Manufactured under license from Audyssey Laboratories™. U.S.
and foreign patents pending. Audyssey 2EQ®, Audyssey
Dynamic Volume®, and Audyssey Dynamic EQ® are registered
trademarks of Audyssey Laboratories.
www.insigniaproducts.com
35
Page 40

Insignia NS-R5101AHD-A AV Home Theater Receiver
36
www.insigniaproducts.com
Page 41

Insignia NS-R5101AHD-A AV Home Theater Receiver
One-year limited warranty
Insignia Products (“Insignia”) warrants to you, the original
purchaser of this new NS-R5101AHD-A (“Product”), that the
Product shall be free of defects in the original manufacture of the
material or workmanship for a period of one (1) year from the
date of your purchase of the Product (“Warranty Period”). This
Product must be purchased from an authorized dealer of
Insignia brand products and packaged with this warranty
statement. This warranty does not cover refurbished Product. If
you notify Insignia during the Warranty Period of a defect
covered by this warranty that requires service, terms of this
warranty apply.
How long does the coverage last?
The Warranty Period lasts for 1 year (365 days) from the date you
purchased the Product. The purchase date is printed on the
receipt you received with the Product.
What does this warranty cover?
During the Warranty Period, if the original manufacture of the
material or workmanship of the Product is determined to be
defective by an authorized Insignia repair center or store
personnel, Insignia will (at its sole option): (1) repair the Product
with new or rebuilt parts; or (2) replace the Product at no charge
with new or rebuilt comparable products or parts. Products and
parts replaced under this warranty become the property of
Insignia and are not returned to you. If service of Products or
parts are required after the Warranty Period expires, you must
pay all labor and parts charges. This warranty lasts as long as you
own your Insignia Product during the Warranty Period. Warranty
coverage terminates if you sell or otherwise transfer the Product.
How to obtain warranty service?
If you purchased the Product at a retail store location, take your
original receipt and the Product to the store you purchased it
from. Make sure that you place the Product in its original
packaging or packaging that provides the same amount of
protection as the original packaging. If you purchased the
Product from an online web site, mail your original receipt and
the Product to the address listed on the web site. Make sure that
you put the Product in its original packaging or packaging that
provides the same amount of protection as the original
packaging.
To obtain in-home warranty service for a television with a screen
25 inches or larger, call 1-888-BESTBUY. Call agents will diagnose
and correct the issue over the phone or will have an
Insignia-approved repair person dispatched to your home.
Where is the warranty valid?
This warranty is valid only to the original purchaser of the
product in the United States, Canada, and Mexico.
What does the warranty not cover?
This warranty does not cover:
• Customer instruction
• Installation
•Set up adjustments
•Cosmetic damage
• Damage due to acts of God, such as lightning strikes
• Accident
• Misuse
•Abuse
•Negligence
• Commercial use
• Modification of any part of the Product, including the
antenna
• Plasma display panel damaged by static (non-moving)
images applied for lengthy periods (burn-in).
This warranty also does not cover:
• Damage due to incorrect operation or maintenance
• Connection to an incorrect voltage supply
• Attempted repair by anyone other than a facility
authorized by Insignia to service the Product
• Products sold as is or with all faults
• Consumables, such as fuses or batteries
• Products where the factory applied serial number has been
altered or removed
REPAIR REPLACEMENT AS PROVIDED UNDER THIS WARRANTY IS
YOUR EXCLUSIVE REMEDY. INSIGNIA SHALL NOT BE LIABLE FOR
ANY INCIDENTAL OR CONSEQUENTIAL DAMAGES FOR THE
BREACH OF ANY EXPRESS OR IMPLIED WARRANTY ON THIS
PRODUCT, INCLUDING, BUT NOT LIMITED TO, LOST DATA, LOSS
OF USE OF YOUR PRODUCT, LOST BUSINESS OR LOST PROFITS.
INSIGNIA PRODUCTS MAKES NO OTHER EXPRESS WARRANTIES
WITH RESPECT TO THE PRODUCT, ALL EXPRESS AND IMPLIED
WARRANTIES FOR THE PRODUCT, INCLUDING, BUT NOT LIMITED
TO, ANY IMPLIED WARRANTIES OF AND CONDITIONS OF
MERCHANTABILITY AND FITNESS FOR A PARTICULAR PURPOSE,
ARE LIMITED IN DURATION TO THE WARRANTY PERIOD SET
FORTH ABOVE AND NO WARRANTIES, WHETHER EXPRESS OR
IMPLIED, WILL APPLY AFTER THE WARRANTY PERIOD. SOME
STATES, PROVINCES AND JURISDICTIONS DO NOT ALLOW
LIMITATIONS ON HOW LONG AN IMPLIED WARRANTY LASTS, SO
THE ABOVE LIMITATION MAY NOT APPLY TO YOU. THIS
WARRANTY GIVES YOU SPECIFIC LEGAL RIGHTS, AND YOU MAY
ALSO HAVE OTHER RIGHTS, WHICH VARY FROM STATE TO STATE
OR PROVINCE TO PROVINCE.
Contact Insignia:
For customer service please call 1-877-467-4289
www.insigniaproducts.com
Distributed by Best Buy Purchasing, LLC
7601 Penn Avenue South, Richfield, Minnesota, U.S.A.
55423-3645
© 2010 BBY Solutions, Inc.
All rights reserved. INSIGNIA is a trademark of BBY Solutions, Inc.
Registered in some countries. All other products and brand
names are trademarks of their respective owners.
www.insigniaproducts.com
37
Page 42

SN 29400379
www.insigniaproducts.com (877) 467-4289
Distributed by Best Buy Purchasing, LLC
7601 Penn Avenue South, Richfield, MN USA 55423-3645
© 2010 BBY Solutions, Inc.
All rights reserved. INSIGNIA is a trademark of BBY Solutions, Inc. Registered in some countries.
All other products and brand names are trademarks of their respective owners.
ENGLISH
10-0487
 Loading...