


Desktop/Dual Desktop
Monitor Mount
NS-PGSMM6120-C/NS-PGSMM6220-C
USER GUIDE
Before using your new product, please read these instructions to prevent any damage.

Introduction . . . . . . . . . . . . . . . . . . . . . . . . . . . . . . . . . . . . . . . . . . . . . . . . . . . . .2
Important Safety Instructions . . . . . . . . . . . . . . . . . . . . . . . . . . . . . . . . . . . . 2
Features . . . . . . . . . . . . . . . . . . . . . . . . . . . . . . . . . . . . . . . . . . . . . . . . . . . . . . . . .3
Compatibility . . . . . . . . . . . . . . . . . . . . . . . . . . . . . . . . . . . . . . . . . . . . . . 3
Package contents . . . . . . . . . . . . . . . . . . . . . . . . . . . . . . . . . . . . . . . . . . 4
Installing your monitor mount . . . . . . . . . . . . . . . . . . . . . . . . . . . . . . . . . . . 6
Step 1 - Selecting a mounting option . . . . . . . . . . . . . . . . . . . . . . . 6
Step 2 - Option A: Assembling the mounting clamp . . . . . . . . .6
Step 2 - Option B: Assembling the grommet assembly . . . . . . . 8
Step 3 - Attaching the monitor to the mount . . . . . . . . . . . . . . . . 9
Step 4 - Option A: Attaching to the edge of your desk . . . . . . .10
Step 4 - Option B: Attaching to a desk grommet . . . . . . . . . . . .10
Step 5 - Adjusting the mount tension . . . . . . . . . . . . . . . . . . . . . .11
Step 6 - Managing cables . . . . . . . . . . . . . . . . . . . . . . . . . . . . . . . . . .13
Specifications . . . . . . . . . . . . . . . . . . . . . . . . . . . . . . . . . . . . . . . . . . . . . . . . . .14
ONE-YEAR LIMITED WARRANTY - INSIGNIA . . . . . . . . . . . . . . . . . . . . . .15
Introduction
Congratulations on your purchase of a high-quality Insignia product. Your
NS-PGSMM6120-C/NS-PGSMM6220-C represents the state of the art in
monitor mount design and is designed for reliable and trouble-free
performance.
NS-PGSMM6120-C/NS-PGSMM6220-C
Contents
Important Safety Instructions
1 Read these instructions.
2 Keep these instructions.
3 Heed all warnings.
4 Follow all instructions.
5 Clean only with a damp cloth.
6 This product contains small items that could be a choking hazard if
swallowed. Keep these items away from young children.
7 Make sure that these instructions are read and completely understood
before attempting installation. If you are unsure of any part of this
installation, contact a professional installer for assistance.
8 Make sure that this product is installed correctly. We are not
responsible for any damage caused by an incorrect installation.
9 Keep away from high frequency or power equipment to avoid
disturbance.
2
www.insigniaproducts.com

Desktop/Dual Desktop Monitor Mount
Features
• Gas spring function offers tilt, swivel, and height adjustments
• Cable management helps keep your desk clean
• Clamp base or grommet base options provided
Compatibility
Single-Arm Mount
Supports most monitors that are:
•10-30 in.
• 4.4-19.8 lbs. (2-9 kg)
• VESA mount pattern: 75 × 75 or 100 × 100
Dual-Arm Mount
Supports most monitors that are:
•10-30 in.
• 4.4-19.8 lbs. (2-9 kg)
• VESA mount pattern: 75 × 75 or 100 × 100
www.insigniaproducts.com
3
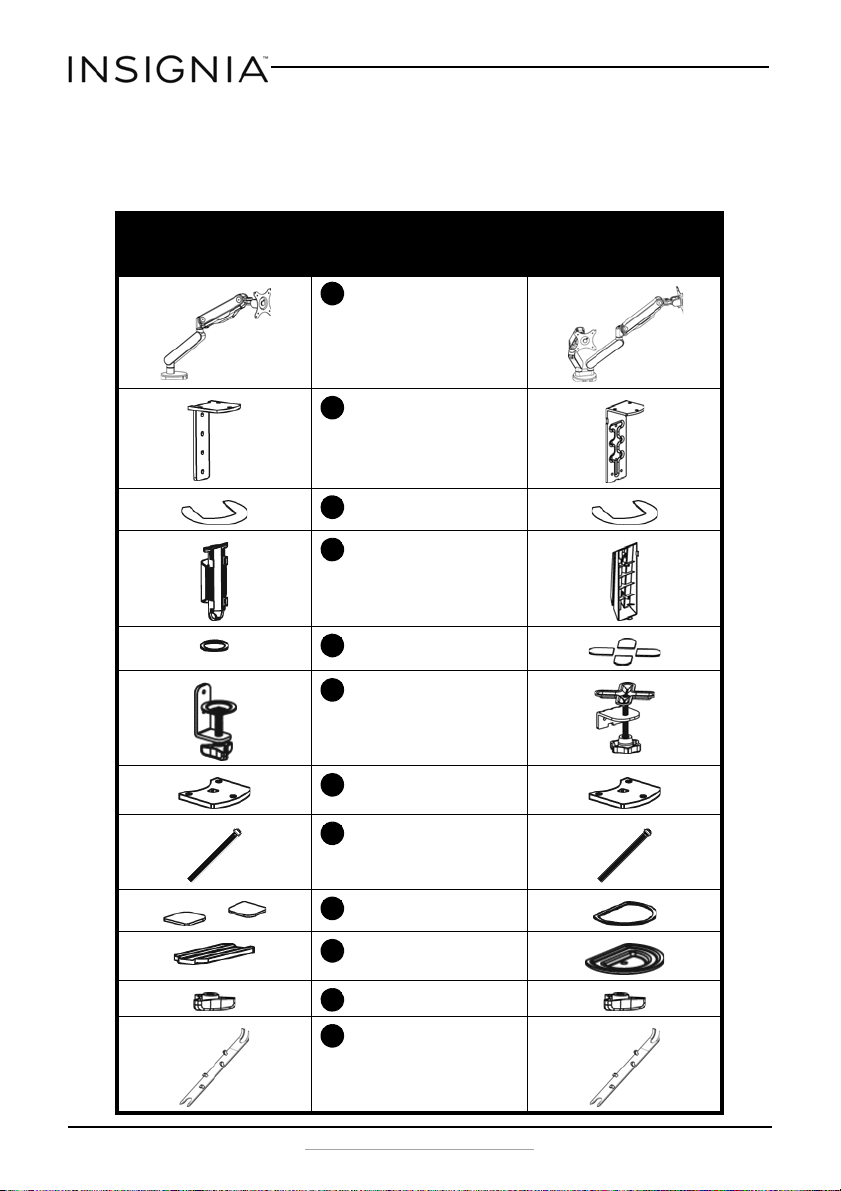
Package contents
1
2345678
9
10
11
12
Note: You will not use all parts or hardware to set up your monitor mount.
Parts
NS-PGSMM6120-C/NS-PGSMM6220-C
Single-Arm Mount
(NS-PGSMM6120-C)
Item
Monitor arm
Clamp base support
Grommet pad
Cable guide
Clamp pad(s)
Clamp
Grommet base support
Dual-Arm Mount
(NS-PGSMM6220-C)
Bolt
Pressure plate pad(s)
Pressure plate
Knob
Cable cover
4
www.insigniaproducts.com
Desktop/Dual Desktop Monitor Mount
A
B
CDF
G
H
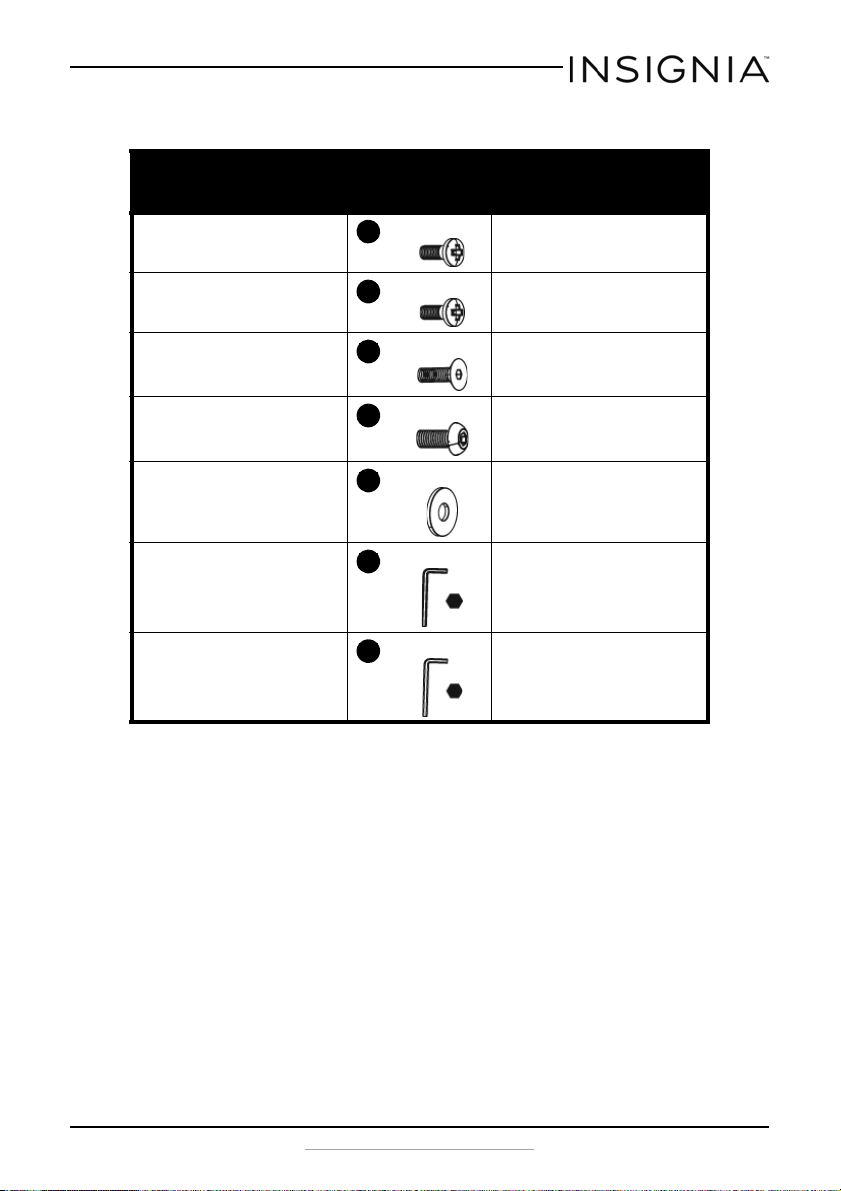
Hardware
Single-Arm Mount
(NS-PGSMM6120-C)
M4 × 12 mm screws (4 pcs.) M4 × 12 mm screws (8 pcs.)
M5 × 12 mm screws (4 pcs.) M5 × 12 mm screws (8 pcs.)
M6 × 12 mm screws (3 pcs.) M6 × 12 mm screws (3 pcs.)
M6 × 10 mm screws (2 pcs.) M6 × 14 mm screws (2 pcs.)
Washers (8 pcs.) Washers (16 pcs.)
4 mm hex wrench 4 mm hex wrench
5 mm hex wrench 5 mm hex wrench
Item
Dual-Arm Mount
(NS-PGSMM6220-C)
www.insigniaproducts.com
5
NS-PGSMM6120-C/NS-PGSMM6220-C
Single-Arm Mount
Dual-Arm Mount
1
1
2
C
G
2
C
G
Single-Arm Mount
Dual-Arm Mount
3
3
Installing your monitor mount
Note: Make sure that your monitor is compatible with your mount before
installation. See "Compatibility" on page 3.
Step 1 - Selecting a mounting option
• Option A: Attaching the mount to the edge of your desk. See page 6.
• Option B: Attaching the monitor mount to a desk grommet hole. See page
8.
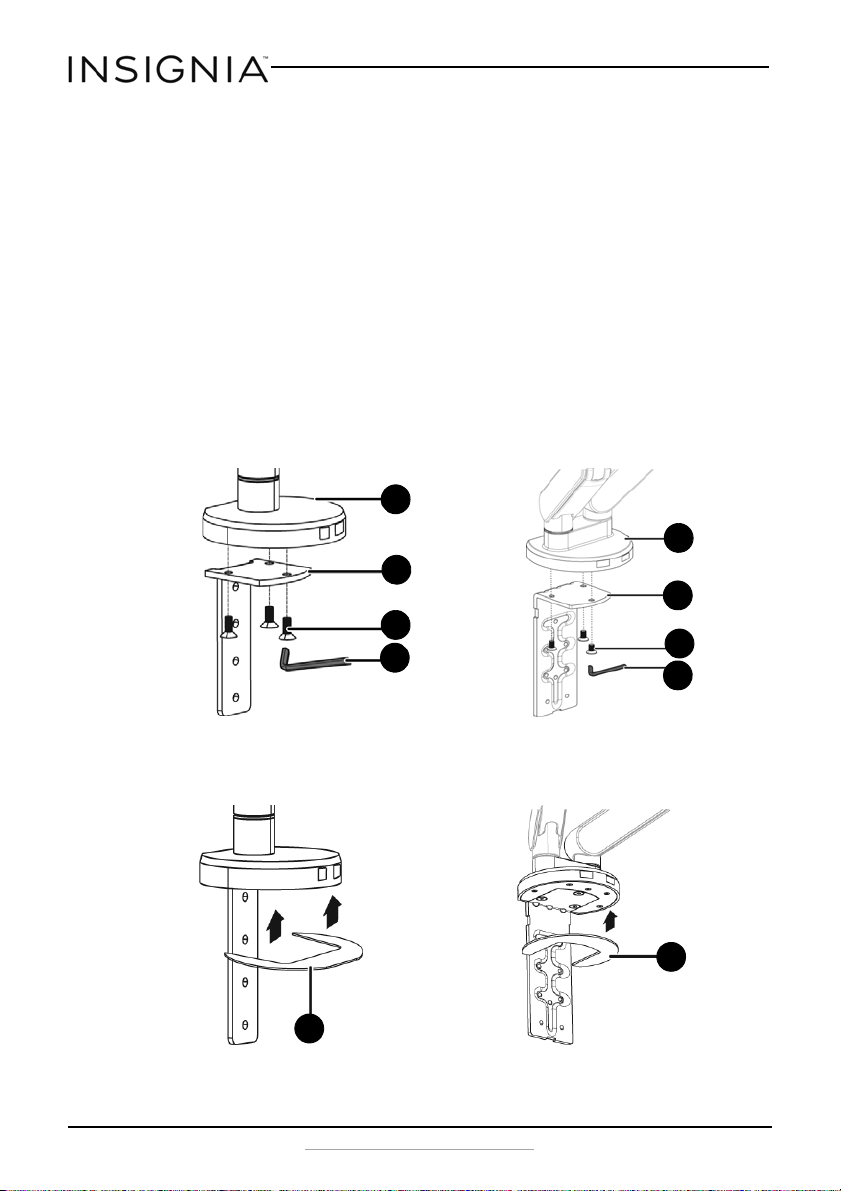
Step 2 - Option A: Assembling the mounting clamp
1 Align the clamp base support (2) with the bottom of the monitor arm
(1), then secure it in place with three screws (
Note: Make sure that the screws are flush with the clamp base
support.
C) using a (G) hex wrench.
2 Remove the backing from the grommet pad (3), then press it onto the
clamp base support (2).
6
www.insigniaproducts.com

Desktop/Dual Desktop Monitor Mount
Single-Arm Mount
Dual-Arm Mount
5
6
5
6
Single-Arm Mount
Dual-Arm Mount
G
D
6
D
G
3 Remove the backing from the clamp pad(s) (5) then press onto the
clamp (6).
4 Use two screws (D) and a hex wrench (G) to attach the clamp (6) to the
clamp base support (2). Select the two holes that will hold the mount
to your desk securely. The mount supports desks that are 0.8-4.7 in.
(20-120 mm) thick.
5 Continue to "Step 3 - Attaching the monitor to the mount" on page 9.
www.insigniaproducts.com
7

NS-PGSMM6120-C/NS-PGSMM6220-C
8
7
C
G
3
Step 2 - Option B: Assembling the grommet assembly
Select the position on the desk where you want your monitor mount
installed. Make sure that there is enough room for the monitor. The desk
should between 1.0-4.7 in. (25-120 mm) thick and strong enough to bear
the weight of your monitor. The grommet hole should be 0.3-2.8 in.
(8.5-70 mm) in diameter.
1 Insert the bolt (8) through the square hole on the grommet base
support (7).
2 Secure the grommet base support (7) to the monitor arm (1) with
three screws (C) and a hex wrench (G).
Note: If the screws are not flush, the base support is upside down.
Remove the screws and bolt, then turn over the base support.
3 Remove the backing from the grommet pad (3), then press it onto the
grommet base support (7).
8
www.insigniaproducts.com

Desktop/Dual Desktop Monitor Mount
Single-Arm Mount
Dual-Arm Mount
9
10
9
10
F
A
B
OR
4 Remove the backing from the pressure plate pad(s) (9), then press it
onto the pressure plate (10).
5 Continue to "Step 3 - Attaching the monitor to the mount" on page 9.
Step 3 - Attaching the monitor to the mount
1 Lay your monitor face-down on a soft, flat surface.
2 Center the monitor plate on the back of your monitor and align the
mounting holes.
Note: Your mount is compatible with monitors with 75 × 75 mm and
100 × 100 mm VESA mounting patterns.
3 Secure the monitor to the mounting plate with four screws (A, B, or the
screws that came with your monitor) and washers (F).
4 If you are attaching your mount to:
• The edge of your desk, see "Step 4 - Option A: Attaching to the
edge of your desk" on page 10.
OR
• A desk grommet hole, see "Step 4 - Option B: Attaching to a
desk grommet" on page 10.
www.insigniaproducts.com
9

NS-PGSMM6120-C/NS-PGSMM6220-C
Single-Arm Mount
Dual-Arm Mount
Desk
Desk
Desk
Single-Arm Mount
Dual-Arm Mount
11
11
Desk Desk
Step 4 - Option A: Attaching to the edge of your desk
1 Align the clamp with your desk, then tighten the knob until the mount
is secure.
Note: If the clamp will not tighten fully, repeat step 4 to move the
clamp to a higher position on the base support.
Step 4 - Option B: Attaching to a desk grommet
1 Thread the bolt (8) through the grommet hole in your desk.
10
2 Thread the pressure plate (10) through the bolt (8), then secure with
the knob (11).
www.insigniaproducts.com

Desktop/Dual Desktop Monitor Mount
H
H
H
Step 5 - Adjusting the mount tension
Note: If you have a dual-arm monitor (NS-PGSMM6220-C), repeat these
steps for both arms. Single-arm monitor graphics shown.
Vertical tension
• If the mount arm is rising up, use a hex wrench (H) to turn the screw
clockwise.
OR
If the mount arm is sinking down, use a hex wrench (H) to turn the
screw counterclockwise.
Tilt tension
• If your monitor is falling forward, use a hex wrench (H) to turn the
screw clockwise.
OR
If your monitor is hard to tilt forward and back, use a hex wrench (H) to
turn the screw counterclockwise.
Pan tension
• If your monitor is hard to turn left and right, use a hex wrench (H) to
turn the screw counterclockwise.
OR
If your monitor is moves left and right too easily, use a hex wrench (H)
to turn the screw clockwise.
www.insigniaproducts.com
11

NS-PGSMM6120-C/NS-PGSMM6220-C
G
G
Arm tension
• If it is hard to move your mount arm, use a hex wrench (G) to turn the
screw counterclockwise.
OR
If your mount arm moves too easily, use a hex wrench (G) to turn the
screw clockwise..
Mount head tension
• If it is hard to move the entire mount head assembly, use a hex wrench
(G) to turn the screw counterclockwise.
OR
If the entire head mount assembly is falling forward, use a hex wrench
(G) to turn the screw clockwise..
12
www.insigniaproducts.com

Desktop/Dual Desktop Monitor Mount
12
4
2
Step 6 - Managing cables
1 Connect your cables to your monitor, then raise it to its highest
postion.
2 Guide the cables under your mount arm, then clip on the cable cover
(4).
3 If you used the mounting clamp assembly (Step 2, Option A), clip the
cable guide (4) to the clamp base support (2), then secure your cables
in its clips.
4 Make sure that the mount arm is able to move freely without pulling
on the cables.
www.insigniaproducts.com
13

Specifications
NS-PGSMM6120-C/NS-PGSMM6220-C
Item
Monitor size 10 to 30 inch monitor 10 to 30 inch monitors
Max load capacity 4.4-19.8 lbs. (2-9 kg) 4.4-19.8 lbs. (2-9 kg) for each
Tilt angle -85° ~ 15° -85° ~ 15°
Integrated cable management Yes Yes
Single-Arm Mount
(NS-PGSMM6120-C)
Dual-Arm Mount
(NS-PGSMM6220-C)
monitor plate
Copyright
Insignia is a trademark of Best Buy and its affiliated companies.
Distributed by Best Buy Purchasing, LLC
© 2016 Best Buy. All rights reserved.
Made in China.
For service and support call 1-877-467-4289.
14
www.insigniaproducts.com

Desktop/Dual Desktop Monitor Mount
ONE-YEAR LIMITED WARRANTY - INSIGNIA
Definitions:
The Distributor* of Insignia branded products warrants to you, the original purchaser of this new
Insignia-branded product (“Product”), that the Product shall be free of defects in the original
manufacturer of the material or workmanship for a period of one (1) year from the date of your purchase
of the Product (“Warranty Period”).
For this warranty to apply, your Product must be purchased in the United States or Canada from a Best
Buy branded retail store or online at www.bestbuy.com or www.bestbuy.ca and is packaged with this
warranty statement.
How long does the coverage last?
The Warranty Period lasts for 1 year (365 days) from the date you purchased the Product. Your purchase
date is printed on the receipt you received with the Product.
What does this warranty cover?
During the Warranty Period, if the original manufacture of the material or workmanship of the Product is
determined to be defective by an authorized Insignia repair center or store personnel, Insignia will (at its
sole option): (1) repair the Product with new or rebuilt parts; or (2) replace the Product at no charge with
new or rebuilt comparable products or parts. Products and parts replaced under this warranty become
the property of Insignia and are not returned to you. If service of Products or parts are required after the
Warranty Period expires, you must pay all labor and parts charges. This warranty lasts as long as you own
your Insignia Product during the Warranty Period. Warranty coverage terminates if you sell or otherwise
transfer the Product.
How to obtain warranty service?
If you purchased the Product at a Best Buy retail store location, please take your original receipt and the
Product to any Best Buy store. Make sure that you place the Product in its original packaging or packaging
that provides the same amount of protection as the original packaging. If you purchased the Product
from a Best Buy online web site (www.bestbuy.com or www.bestbuy.ca), mail your original receipt and the
Product to the address listed on the web site. Make sure that you put the Product in its original packaging
or packaging that provides the same amount of protection as the original packaging.
To obtain warranty service, in the United States call 1-888-BESTBUY, Canada call 1-866-BESTBUY. Call
agents may diagnose and correct the issue over the phone.
Where is the warranty valid?
This warranty is valid only in the United States and Canada at Best Buy branded retail stores or websites to
the original purchaser of the product in the county where the original purchase was made.
What does the warranty not cover?
This warranty does not cover:
• Food loss/spoilage due to failure of refrigerator or freezer
• Customer instruction/education
•Installation
•Set up adjustments
• Cosmetic damage
• Damage due to weather, lightning, and other acts of God, such as power surges
• Accidental damage
•Misuse
•Abuse
•Negligence
www.insigniaproducts.com
15

NS-PGSMM6120-C/NS-PGSMM6220-C
• Commercial purposes/use, including but not limited to use in a place of business or in communal areas
of a multiple dwelling condominium or apartment complex, or otherwise used in a place of other than
a private home.
• Modification of any part of the Product, including the antenna
• Display panel damaged by static (non-moving) images applied for lengthy periods (burn-in).
• Damage due to incorrect operation or maintenance
• Connection to an incorrect voltage or power supply
• Attempted repair by any person not authorized by Insignia to service the Product
• Products sold “as is” or “with all faults”
• Consumables, including but not limited to batteries (i.e. AA, AAA, C etc.)
• Products where the factory applied serial number has been altered or removed
• Loss or Theft of this product or any part of the product
• Display panels containing up to three (3) pixel failures (dots that are dark or incorrectly illuminated)
grouped in an area smaller than one tenth (1/10) of the display size or up to five (5) pixel failures
throughout the display. (Pixel based displays may contain a limited number of pixels that may not
function normally.)
• Failures or Damage caused by any contact including but not limited to liquids, gels or pastes.
REPAIR REPLACEMENT AS PROVIDED UNDER THIS WARRANTY IS YOUR EXCLUSIVE REMEDY FOR BREACH
OF WARRANTY. INSIGNIA SHALL NOT BE LIABLE FOR ANY INCIDENTAL OR CONSEQUENTIAL DAMAGES
FOR THE BREACH OF ANY EXPRESS OR IMPLIED WARRANTY ON THIS PRODUCT, INCLUDING, BUT NOT
LIMITED TO, LOST DATA, LOSS OF USE OF YOUR PRODUCT, LOST BUSINESS OR LOST PROFITS. INSIGNIA
PRODUCTS MAKES NO OTHER EXPRESS WARRANTIES WITH RESPECT TO THE PRODUCT, ALL EXPRESS AND
IMPLIED WARRANTIES FOR THE PRODUCT, INCLUDING, BUT NOT LIMITED TO, ANY IMPLIED WARRANTIES
OF AND CONDITIONS OF MERCHANTABILITY AND FITNESS FOR A PARTICULAR PURPOSE, ARE LIMITED IN
DURATION TO THE WARRANTY PERIOD SET FORTH ABOVE AND NO WARRANTIES, WHETHER EXPRESS OR
IMPLIED, WILL APPLY AFTER THE WARRANTY PERIOD. SOME STATES, PROVINCES AND JURISDICTIONS DO
NOT ALLOW LIMITATIONS ON HOW LONG AN IMPLIED WARRANTY LASTS, SO THE ABOVE LIMITATION MAY
NOT APPLY TO YOU. THIS WARRANTY GIVES YOU SPECIFIC LEGAL RIGHTS, AND YOU MAY ALSO HAVE
OTHER RIGHTS, WHICH VARY FROM STATE TO STATE OR PROVINCE TO PROVINCE.
Contact Insignia:
For customer service please call 1-877-467-4289
www.insigniaproducts.com
INSIGNIA is a trademark of Best Buy and its affiliated companies.
Distributed by Best Buy Purchasing, LLC
©2016 Best Buy. All rights reserved.
Made in China
16
www.insigniaproducts.com

www.insigniaproducts.com
1-877-467-4289 (U.S. and Canada) or 01-800-926-3000 (Mexico)
INSIGNIA is a trademark of Best Buy and its affiliated companies.
Distributed by Best Buy Purchasing, LLC
©2016 Best Buy. All rights reserved.
Made in China.
V1 ENGLISH
16-0168
 Loading...