

Page 1
10" Portable
DVD Player
NS-P10DVD20
USER GUIDE
Before using your new product, please read these instructions to prevent any damage.
Page 2

Contents
Introduction . . . . . . . . . . . . . . . . . . . . . . . . . . . . . . . . . . . . . . . . . . . . . . . . . . . . . . . . . . . .3
IMPORTANT SAFEGUARDS . . . . . . . . . . . . . . . . . . . . . . . . . . . . . . . . . . . . . . . . . . . . . . .3
WARNINGS. . . . . . . . . . . . . . . . . . . . . . . . . . . . . . . . . . . . . . . . . . . . . . . . . . . . . . . . . .3
Safety precautions . . . . . . . . . . . . . . . . . . . . . . . . . . . . . . . . . . . . . . . . . . . . . . . . . . 4
Features . . . . . . . . . . . . . . . . . . . . . . . . . . . . . . . . . . . . . . . . . . . . . . . . . . . . . . . . . . . . . . . .5
Package contents . . . . . . . . . . . . . . . . . . . . . . . . . . . . . . . . . . . . . . . . . . . . . . . . . . .5
About discs . . . . . . . . . . . . . . . . . . . . . . . . . . . . . . . . . . . . . . . . . . . . . . . . . . . . . . . . .5
DVD Player. . . . . . . . . . . . . . . . . . . . . . . . . . . . . . . . . . . . . . . . . . . . . . . . . . . . . . . . . . 6
Remote control . . . . . . . . . . . . . . . . . . . . . . . . . . . . . . . . . . . . . . . . . . . . . . . . . . . . . 8
Setting up your DVD player . . . . . . . . . . . . . . . . . . . . . . . . . . . . . . . . . . . . . . . . . . . . .10
Preparing the remote control . . . . . . . . . . . . . . . . . . . . . . . . . . . . . . . . . . . . . . .10
Charging your player. . . . . . . . . . . . . . . . . . . . . . . . . . . . . . . . . . . . . . . . . . . . . . .10
Connecting headphones . . . . . . . . . . . . . . . . . . . . . . . . . . . . . . . . . . . . . . . . . . .12
Connecting to a TV or monitor. . . . . . . . . . . . . . . . . . . . . . . . . . . . . . . . . . . . . .12
Using your DVD player. . . . . . . . . . . . . . . . . . . . . . . . . . . . . . . . . . . . . . . . . . . . . . . . . .13
Turning your player on . . . . . . . . . . . . . . . . . . . . . . . . . . . . . . . . . . . . . . . . . . . . .13
Playing a DVD/VCD or Audio CD . . . . . . . . . . . . . . . . . . . . . . . . . . . . . . . . . . . .13
Controlling DVD/VCD or Audio CD playback . . . . . . . . . . . . . . . . . . . . . . . .13
Selecting a chapter or track. . . . . . . . . . . . . . . . . . . . . . . . . . . . . . . . . . . . . . . . .13
Viewing photos . . . . . . . . . . . . . . . . . . . . . . . . . . . . . . . . . . . . . . . . . . . . . . . . . . . .14
Setting up a playback program . . . . . . . . . . . . . . . . . . . . . . . . . . . . . . . . . . . . .14
Using zoom mode . . . . . . . . . . . . . . . . . . . . . . . . . . . . . . . . . . . . . . . . . . . . . . . . .14
Using the menus . . . . . . . . . . . . . . . . . . . . . . . . . . . . . . . . . . . . . . . . . . . . . . . . . . . . . . .15
Adjusting general setup options. . . . . . . . . . . . . . . . . . . . . . . . . . . . . . . . . . . .15
Selecting the audio mode . . . . . . . . . . . . . . . . . . . . . . . . . . . . . . . . . . . . . . . . . .16
Adjusting video options. . . . . . . . . . . . . . . . . . . . . . . . . . . . . . . . . . . . . . . . . . . .16
Setting video and audio preferences . . . . . . . . . . . . . . . . . . . . . . . . . . . . . . . .17
Using parental controls. . . . . . . . . . . . . . . . . . . . . . . . . . . . . . . . . . . . . . . . . . . . . . . . .18
Turning parental controls on or off. . . . . . . . . . . . . . . . . . . . . . . . . . . . . . . . . .18
Setting up or changing a parental control password. . . . . . . . . . . . . . . . .19
Maintaining your player . . . . . . . . . . . . . . . . . . . . . . . . . . . . . . . . . . . . . . . . . . . . . . . .20
Cleaning your player . . . . . . . . . . . . . . . . . . . . . . . . . . . . . . . . . . . . . . . . . . . . . . .20
Cleaning discs . . . . . . . . . . . . . . . . . . . . . . . . . . . . . . . . . . . . . . . . . . . . . . . . . . . . .20
Troubleshooting . . . . . . . . . . . . . . . . . . . . . . . . . . . . . . . . . . . . . . . . . . . . . . . . . . . . . . .21
Specifications . . . . . . . . . . . . . . . . . . . . . . . . . . . . . . . . . . . . . . . . . . . . . . . . . . . . . . . . . .22
Legal notices . . . . . . . . . . . . . . . . . . . . . . . . . . . . . . . . . . . . . . . . . . . . . . . . . . . . . . . . . . .22
ONE-YEAR LIMITED WARRANTY . . . . . . . . . . . . . . . . . . . . . . . . . . . . . . . . . . . . . . . . .23
2
www.insigniaproducts.com
Page 3

10" Portable DVD Player
Introduction
Congratulations on your purchase of a high-quality Insignia product. Your
NS-P10DVD20 represents the state of the art in DVD player design and is designed
for reliable and trouble-free performance.
IMPORTANT SAFEGUARDS
1 Read these instructions.
2 Keep these instructions.
3 Heed all warnings.
4 Follow all instructions.
5 Do not use your DVD player near water.
6 Clean only with a dry cloth.
7 Do not block any ventilation openings. Install in accordance with the
manufacturer's instructions. The openings should never be blocked by placing
your DVD player on a cushion, sofa, or other similar surface.
8 Do not install near any heat sources such as radiators, heat registers, stoves, or
other apparatus (including amplifiers) that produce heat.
9 The AC adapter and vehicle charger are the disconnecting devices. The plugs
must remain readily operable.
10 Protect the power cord from being walked on or pinched particularly at plugs,
outlets, and the point where they exit from your DVD player.
11 Only use attachments/accessories specified by the manufacturer.
12 Do not place your DVD player on an unstable cart, stand, tripod,
bracket, or table. It may fall, resulting in possible damage or injury.
13 Never place heavy or sharp objects on the LCD panel or frame.
14 Unplug your DVD player during lightning storms or when unused
for long periods of time.
15 Refer all servicing to qualified service personnel. Servicing is required when
your DVD player has been damaged in any way, such as when the
power-supply cord or plug is damaged, liquid has been spilled or objects have
fallen into your player, your player has been exposed to rain or moisture, does
not operate normally, or has been dropped.
16 Remote control batteries should not be exposed to excessive heat such as
sunshine, fire, or the like.
17 Your DVD player should not be exposed to dripping or splashing, and no
objects filled with liquids, such as vases, should be placed on your player.
18 WAR NIN G: Excessive sound pressure from earphones or headphones can
cause hearing loss.
WAR NIN GS
Electric shock hazard
To reduce the risk of fire or electric shock, do not remove the cover or back. Do not
expose your DVD player to rain or moisture. There are no user-serviceable parts
inside. Refer servicing to qualified service technicians.
www.insigniaproducts.com
3
Page 4

NS-P10DVD20
Handling the LCD panel
• Never place heavy or sharp objects on the LCD panel or frame.
• Your DVD player’s screen is made of glass. Do not drop your player or hit, jolt,
or press hard against the LCD panel. If the screen breaks, be careful of broken
glass.
• If the LCD panel is broken, make absolutely sure that you do not touch the
liquid in the panel. This may cause skin inflammation.
• If the liquid gets in your mouth, immediately gargle, rinse, and consult with
your doctor. Also, if the liquid gets in your eyes or touches your skin, consult
with your doctor after rinsing for at least 15 minutes or longer in clean water.
Replacement parts
When replacement parts are required, make sure that the service technician uses
replacement parts specified by the manufacturer that have the same
characteristics as the original part. Unauthorized substitutions may result in fire,
electric shock, personal injury, or other hazards.
Safety check
After completing any service or repair to your DVD player, ask the service
technician to perform routine safety checks to determine that your player is in
correct operating condition.
Servicing
These servicing instructions are for use by qualified service personnel only. To
reduce the risk of electric shock, do not perform any servicing other than that
contained in the operating instructions unless you are qualified to do so.
End of life directives
Your DVD player may contain materials that are regulated for environmental
reasons. Your player also contains materials that can be recycled and reused. To
help protect the environment, contact your local authorities for information about
disposal or recycling and about finding a recycler in your area before you dispose
of your player.
SAVE THESE INSTRUCTIONS
Safety precautions
WAR NIN G: Your DVD player uses a low-level laser system. Use of controls,
adjustments, or performance of procedures other than those specified in this User
Guide may result in hazardous radiation exposure.
WAR NIN G: To prevent direct exposure to the laser beam, do not open the
enclosure. Visible laser radiation is present when open.
WAR NIN G: Never stare directly into the laser beam.
WAR NIN G: Class 1 laser product.
CAUTION: Do not install your player in a confined space such as a book case or
similar unit.
4
www.insigniaproducts.com
Page 5

10" Portable DVD Player
WARNING: Chemical Burn Hazard. Do not ingest the battery.
• The remote control supplied with your DVD player contains a coin/button cell
battery. If the battery is swallowed, it can cause severe internal burns in just
two hours and can lead to death.
• If you think batteries might have been swallowed or placed inside any part of
the body, seek immediate medical attention.
• Keep new and used batteries away from children.
• If the battery compartment does not close securely, stop using your DVD
player and keep it away from children.
Features
• 10-inch LCD screen
• Headphone jack for private listening
• Connect to a larger screen with an RCA cable (not included) to 3.5 mm adapter
(included)
• Powered through your vehicle charger or a wall outlet
• Works with DVDs, VCDs, DVD+R/RWs, CDs, JPEGs, and MP3s
Package contents
•10" Portable DVD Player
• Remote control
• AC adapter
• 12 Volt DC vehicle power adapter
• 3.5 mm to RCA cable adapter
About discs
• Your DVD player can play DVDs, VCDs, and Audio CDs (including CD-R and
CD-RW).
• Your player is designed and manufactured to respond to the Region
Management Information that is encoded on DVDs. If the region number
printed on the DVD does not correspond to the region number of your player,
it cannot play that disc. The region number of your player is 1.
• If the DVD is a region 1 disc, it may have the logo on the packaging.
• Do not use irregularly shaped discs, such as heart-shaped or star-shaped discs,
because they may cause your player to malfunction.
• Do not stick paper, tape, or glue on a disc.
• Do not expose a disc to direct sunlight or heat sources.
• Do not touch the surface of a disc. Handle a disc by its edge.
• Clean a disc by wiping the disc from the center out with a cleaning cloth.
• Remove a disc from your player and store it in its case after playing.
Some playback operations may be intentionally limited by software producers.
Because your player plays discs according to the disc contents the software
producers designed, some playback features may not be available. Refer to the
instructions supplied with the discs.
www.insigniaproducts.com
5
Page 6
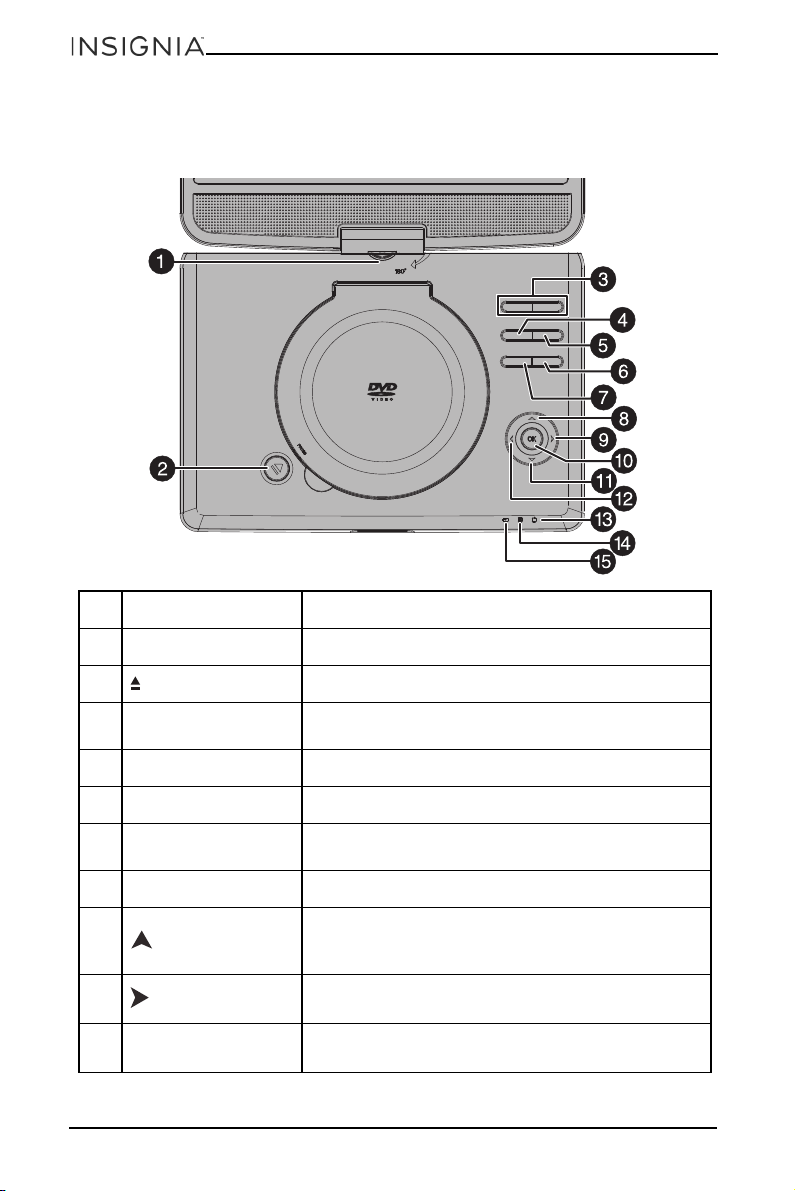
DVD Player
To p
#BUTTON DESCRIPTION
NS-P10DVD20
1 Screen swivel You can swivel the screen up to 180° clockwise
2 (open) Press to open the DVD compartment.
3 VOL-/VOL+
4 PLAY/PAUSE Press to pause a DVD. Press again to resume playback.
5 STOP Press to stop playback.
6 MENU
7 SETUP Press to access or exit the SETUP menu.
8 Up/Prev
9 Right/Fast forward
10 OK
6
Press to decrease (-) or increase (+) the volume. Press
and hold to quickly decrease or increase the volume.
Press to return to the DVD root menu (DVD) or PBC
menu on/off switch (VCD)
In Menu mode, press to move up in a list or menu.
In playback mode, press to go to the previous title,
chapter, or track.
In Menu mode, press to move right.
In playback mode, press to fast forward the playback.
In menu mode, press to confirm a selection.
In playback mode, press to confirm a selection.
www.insigniaproducts.com
Page 7
10" Portable DVD Player
#BUTTON DESCRIPTION
11 Down/Next
12 Left/Fast reverse
13 Power indicator
14 Remote control sensor Point the remote control at this sensor.
15 Charging indicator
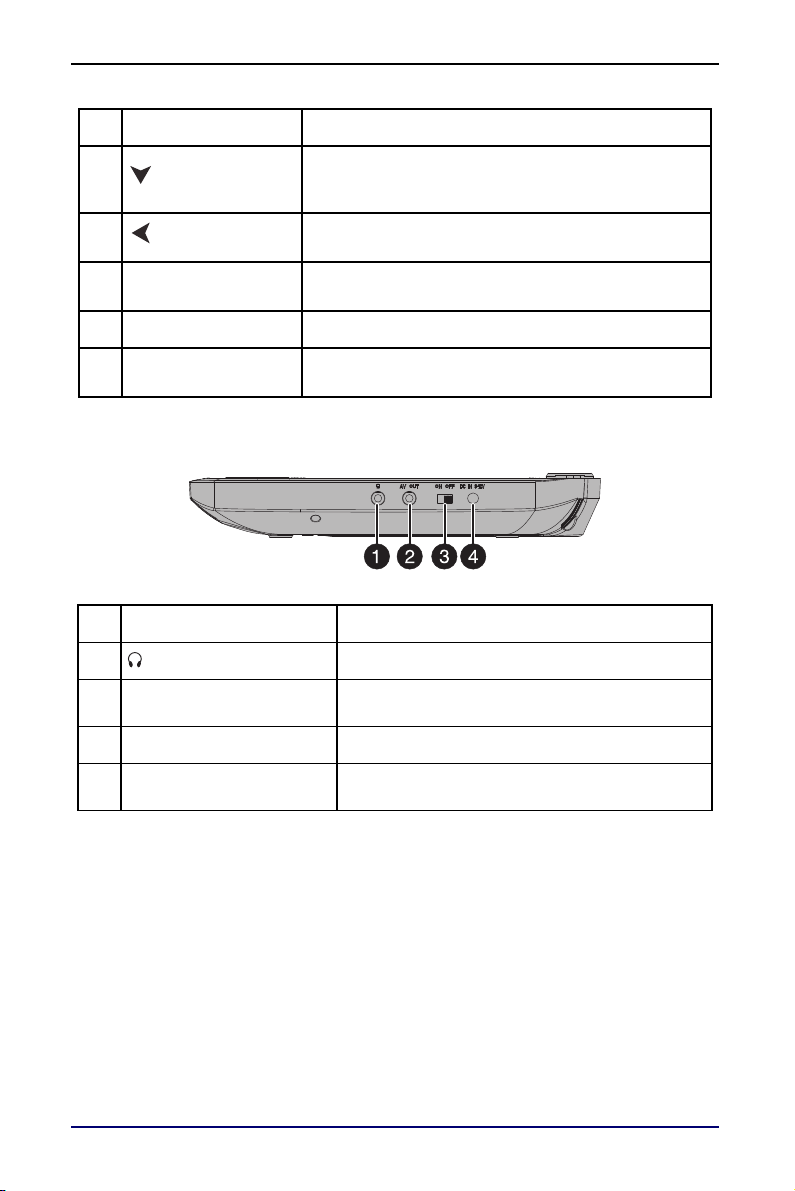
Side
#ITEM DESCRIPTION
In Menu mode, press to move down in a list or menu.
In playback mode, press to go to the next title,
chapter, or track.
In Menu mode, press to move left.
In playback mode, press to fast reverse the playback.
Red light - power on
Light off - power off
Blinks green when the unit is charging.
Lights solid green when the unit is charged.
1 Headphone jack Plug your headphones into this jack.
2 AV O UT ja ck
3 ON/OFF switch Slide to turn your player on or off.
4 DC IN 9-12V jack
Plug a 3.5 mm to RCA cable adapter into this jack
to view playback on a TV or monitor.
Plug the AC adapter or 12 V car adapter into this
jack.
www.insigniaproducts.com
7
Page 8
Remote control
12
3
4
5
678
90
10+
REPEAT
T
ITLE
E
N
TER
M
ODE
SUBTITLE
AUDIO
M
U
T
E
BACKLI
GHT
STEP
DISPLAY
MENU
V
OL+
VOL-
SL
O
W
ZOOM
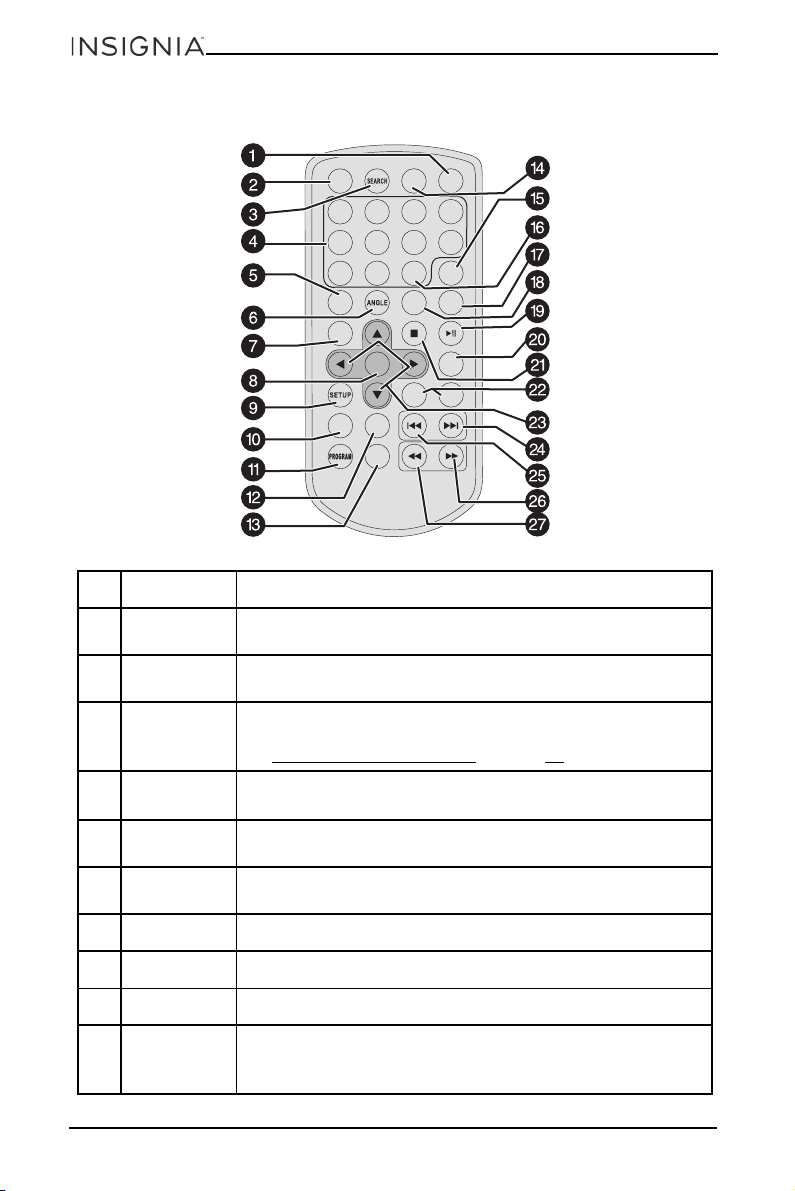
#BUTTON DESCRIPTION
1 BACKLIGHT
2 STEP
3 SEARCH
4 Numbers
5 SUBTITLE
6 ANGLE
7 TITLE Returns to the title menu on a DVD.
8 ENTER Confirms selections.
9 SETUP Opens or closes the menu.
10 REPEAT
Press to turn on the remote control backlight. Press again to
turn it off.
Pauses playback and advances the DVD/VCD picture one frame
at a time.
DVD/VCD: Goes to a specific time, title, or chapter/track.
Audio CD: Goes to a specific track.
See Selecting a chapter or track
Playback mode: Selects a title, chapter, or track number.
Menus: Selects a numbered menu item.
During DVD playback, selects a subtitle language, if available
on the DVD.
During DVD playback, selects a viewing angle, if available on
the DVD.
During playback, selects the repeat mode.
DVD: You can selec t CHAPTER, TITLE, ALL, or OFF.
Audio CD/VCD: You can se l e c t TRACK, ALL, or OFF.
NS-P10DVD20
on page 13.
8
www.insigniaproducts.com
Page 9

#BUTTON DESCRIPTION
11 PROGRAM
12 SLOW
13 ZOOM
14 MUTE
15 DISPLAY
16 10+
17 MENU
18 AUDIO
19
(play/pause)
20 MODE
21 (stop)
22 VOL–/VOL+ Increases or decreases the volume.
Opens the PROGRAM menu, where you can specify the
playback order of titles, chapters, or tracks. See Setting up a
playback program on page 14.
Enters slow playback. Each time you press this button, the
speed changes (1/2 to 1/4 to 1/8 to 1/16 to normal playback).
When playing a DVD/VCD or viewing a JPEG, enlarges or
shrinks the picture. See Using zoom mode
Turns off the sound. Press this button again to unmute the
sound.
DVD: Displays the DVD playtime and status information.
Audio CD/VCD: Displays the elapsed and remaining time for
the playing track and for the entire CD/VCD.
Selects a double-digit chapter or track number. For example, to
select 12, press this button, then press the 2 button.
Press to return to the DVD root menu (DVD) or PBC menu
on/off switch (VCD).
DVD: Selects a different audio language or audio track, if
available.
Audio CD/VCD: Selects an audio channel (Left, Right, Mix, or
Stereo).
Starts or pauses playback.
Opens the VIDEO SETUP PAGE where you can adjust picture
settings. See Adjusting video options
Stops playback. If you press this button once, then press ,
playback resumes where it stopped. If you press this button
twice, then press , playback begins at the beginning of the
disc.
10" Portable DVD Player
on page 14.
on page 16.
23
Navigates in menus.
(skip
24
forward)
25
26 (forward)
27 (reverse)
(skip
reverse)
Goes to the next chapter or track.
Goes to the previous chapter or track.
Press to fast-forward on a disc. Each time you press this button,
the speed changes (2x to 4x to 8x to 16x to 32x to normal
playback). You can also press to exit fast-forward mode.
Press to fast-reverse on a disc. Each time you press this button,
the speed changes (2x to 4x to 8x to 16x to 32x to normal
playback). You can also press to exit fast-reverse mode.
www.insigniaproducts.com
9
Page 10
NS-P10DVD20
Setting up your DVD player
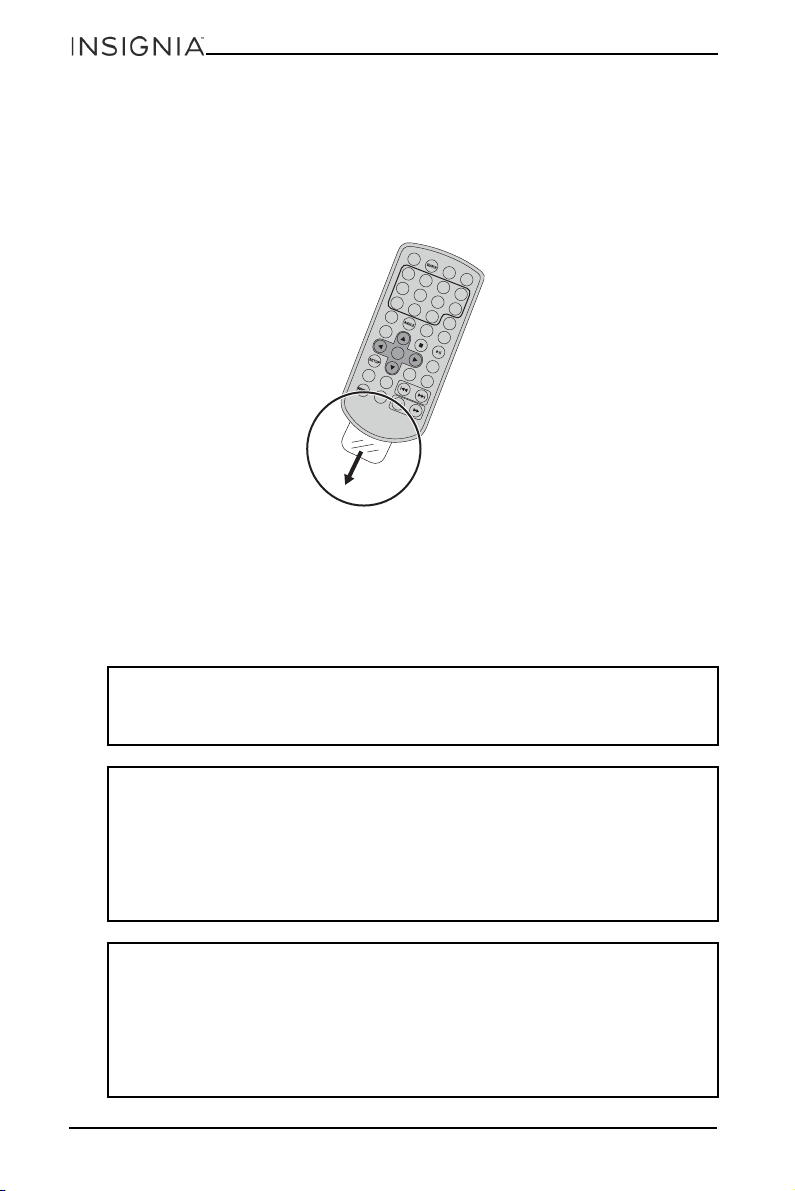
Preparing the remote control
The battery comes pre-installed in the remote control. Before you can use the
remote control:
• Pull the plastic tab out of the battery compartment.
S
TE
P
M
U
T
E
1
B
A
C
KLI
GH
T
2
3
5
4
6
78
9
0
SUBTI
10+
T
LE
D
I
S
P
LA
Y
A
U
T
DIO
I
TL
E
M
E
N
U
E
N
T
E
R
MOD
E
VOL-
RE
PE
AT
VO
SLO
L+
W
ZOO
M
Charging your player
Your player has a built-in, rechargeable (lithium-polymer) battery. You must
charge the battery before using your player for the first time.
During playback, when “LOW BATTERY” appears on the screen, your player
automatically switches to standby mode. When this happens, your player should
be connected to a power source to recharge the battery.
WARNINGS:
• Mishandling or mistreating the built-in battery in your player may present a
risk of fire or chemical burn.
• Do not disassemble, heat above 100° C (212° F), or incinerate the battery.
CAUTIONS:
• When the AC adapter is plugged into a power outlet, your player is not
completely disconnected from power, even when the power is turned off.
• Make sure that the AC adapter is easily accessible during use.
• Your player should not be exposed to excessive heat, such as direct sunlight,
fire, or heat outlets.
• While using the built-in battery, the environmental temperature should be
between 41° F (5° C) and 95° F (35° C).
Important:
• To get the longest service life from the built-in battery, charge it indoors.
• Do not use the included AC adapter with any other equipment.
• When you do not plan to use your player for an extended period of time,
unplug the AC adapter from the wall outlet.
• When discarding the unit, environmental issues must be considered and
local rules or laws governing the disposal of such products must be strictly
followed.
10
www.insigniaproducts.com
Page 11

10" Portable DVD Player
12V power outlet
Charging the battery with the AC power adapter
1 Plug the included AC adapter into the DC IN 9-12 V jack on your player, then
into an AC power outlet. The battery charging indicator blinks green.
Notes:
• When the power switch is OFF while charging, the built-in battery is in
fast-charge mode. In fast-charge mode, your player takes about three hours
to fully charge.
• When the power switch is ON while charging, the built-in battery is in
slow-charge mode. In slow-charge mode, your player takes about six hours
to fully charge. You can use your player while it charges.
2 The battery charging indicator turns solid green when the battery is fully
charged. Unplug the AC power adapter to use your player with the built-in
battery.
Charging the battery with the 12 V DC vehicle power adapter
1 Plug the included 12 V DC vehicle power adapter into the DC IN 9-12 V jack on
your player and then into a 12 V power outlet or vehicle cigarette lighter
socket. The battery charging indicator blinks green.
Notes:
• When the power switch is OFF while charging, the built-in battery is in
fast-charge mode. In fast-charge mode, your player takes about three hours
to fully charge.
• When the power switch is ON while charging, the built-in battery is in
slow-charge mode. In slow-charge mode, your player takes about six hours
to fully charge. You can use your player while it charges in this mode.
2 The battery charging indicator turns solid green when the battery is fully
charged. Unplug the 12 V DC vehicle power adapter to use your player with
the built-in battery.
www.insigniaproducts.com
11
Page 12
NS-P10DVD20
White=left au dio
Red=right audio
Yel lo w= vi d eo
3.5 mm to RCA cable
adapter (included)
TV or monitor
RCA cable (not included)
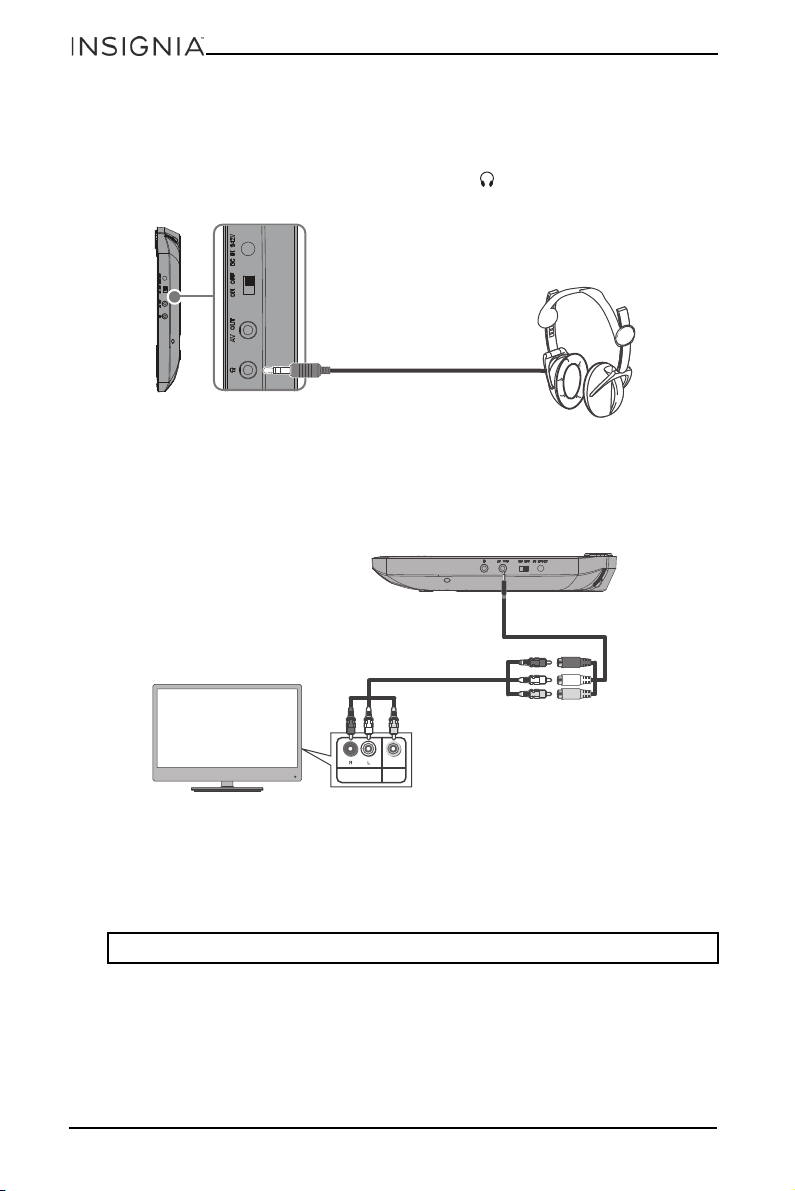
Connecting headphones
When headphones are plugged into the headphone jack, sound from the built-in
speakers is muted.
• Plug your headphones (not included) into the (headphone) jack on the side
your DVD player.
Connecting to a TV or monitor
You can connect your player to a TV or monitor so you can watch DVDs or view
photos on the TV or monitor.
1 Plug the 3.5 mm to RCA cable adapter (included) into the AV OU T jack on your
DVD player.
VIDEO
AUDIO
In
In
2 Plug an RCA cable (not included) into the other end of the 3.5 mm to RCA
cable adapter. Make sure that the colors on the connectors match.
3 Plug the other end of the RCA cable into the AV jacks on the TV or monitor,
making sure to match the colors on the connectors with the jacks.
4 Turn on the TV or monitor.
Note: You may need to select the correct input on the TV or monitor.
12
www.insigniaproducts.com
Page 13

10" Portable DVD Player
Using your DVD player
Turning your player on
1 Slide the ON/OFF switch on the side of your player to the ON position.
2 After use, slide the ON/OFF switch to the OFF position.
Playing a DVD/VCD or Audio CD
Notes:
• Most DVDs and your player have region codes that help control illegal
distribution of DVDs. The region code for your player is 1. You can only play
DVDs with a region code of 1 or ALL. The region code for a DVD is usually
printed on the DVD or the DVD packaging.
•This User Guide explains the basic instructions for operating your player.
Depending on how a DVD is produced, the DVD may have specific or limited
playback features and may not respond to all your commands. THIS IS NOT
A DEFECT. Refer to the instructions accompanying a specific DVD for more
information about the options available on that DVD.
1 Make sure that your player is connected to power or the battery is charged.
2 Slide the ON/OFF switch to the ON position.
3 Press the (open) button. The disc tray opens.
4 Place a disc, label side up, in the disc tray, then close the tray. The disc starts
playing automatically.
5 Use the player navigation controls and buttons on the DVD player to control
playback.
Controlling DVD/VCD or Audio CD playback
• Press (stop) to stop playback. If you press this button once, then press ,
playback resumes playing where it stopped. If you press this button twice,
then press , playback begins at the beginning of the disc.
• Press (play/pause) to pause playback. Press this button again to resume
playback.
• Press (skip forward) or (skip back) to go to the next or previous chapter
or track.
• Press (forward) or (reverse) to fast-forward or fast-reverse on a disc.
Each time you press this button, the speed changes (2x to 4x to 8x to 16x to
32x to normal playback). You can also press to exit fast-forward mode.
Selecting a chapter or track
You can select a DVD title or chapter or an audio CD/VCD track that you want to
play.
1 Press SEARCH, then press or to select an option. You can select:
• For DVDs:
• TIME—Goes to a selected time.
• CHAPTER—Goes to a selected chapter.
• TITLE—Goes to a selected title.
• For Audio CDs/VCDs:
• DISC GOTO—Goes to a selected time on a disc.
• TRACK GOTO—Goes to a selected time within a track.
• SELECT TRACK—Goes to a selected track.
www.insigniaproducts.com
13
Page 14

NS-P10DVD20
2 Use your remote control to enter a time, chapter, title, or track number. The list
closes and your player goes to the time, chapter, title, or track you selected.
Viewing photos
You can view photos copied as JPEG files to a CD or DVD on your DVD player.
1 Insert the CD containing the photos into the disc tray. Your DVD player reads
the CD and displays a list of the photos on the CD.
2 Press or to select a photo, then press ENTER. The photo you selected is
displayed first, then your player displays the other photos in a slideshow.
3 To control playback:
• Press (skip forward) or (skip back) to select a photo.
• Press
or to rotate the photo.
to flip the photo horizontally or to flip the photo vertically.
• Press
Setting up a playback program
You can set up a playback program to play DVD titles or chapters or Audio CD
tracks in a specific order.
1 Press PROGRAM. The PROGRAM menu opens.
2 Use the number keys to enter title, chapter, or track numbers in the order you
want them to play.
3 Select the START option. The titles, chapters, or tracks play in the order you
specified.
4 To resume normal playback, press PROGRAM, then select the STOP.
5 Press PROGRAM again to close the PROGRAM menu.
Using zoom mode
You can enlarge or shrink the picture displayed on the screen.
• For a DVD/VCD, press ZOOM during playback or still playback to activate the
Zoom function. A square frame appears briefly in the right bottom of the
picture.
Each press of the ZOOM button changes the picture size in the following
sequence: 2x to 3x to 4x to 1/2 to 1/3 to 1/4 to normal size.
• For a JPEG, each press of the ZOOM button changes the picture size in the
following sequence: 100% to 125% to 150% to 200% to 75% to 50%, then back
to normal size.
Use or to navigate around the picture.
14
www.insigniaproducts.com
Page 15

10" Portable DVD Player
Using the menus
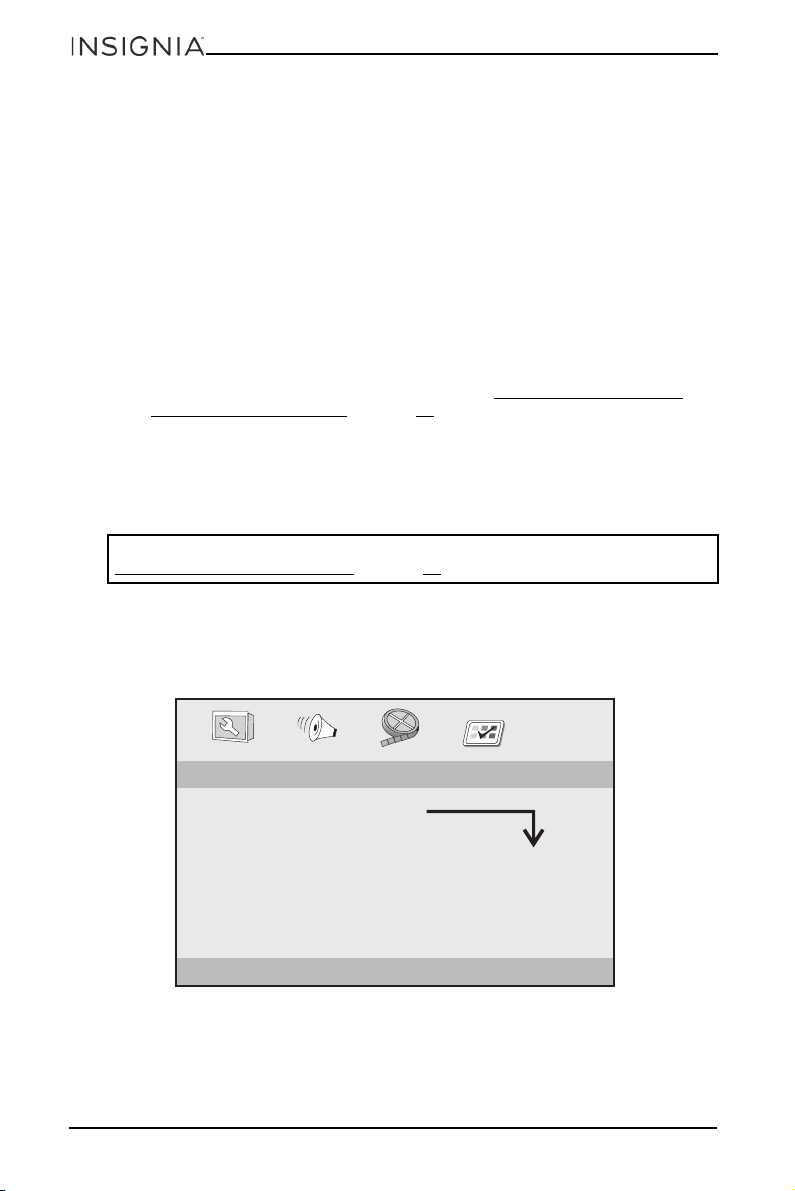
Adjusting general setup options
1 Press SETUP. The main setup menu opens.
2 Use or to select the general setup icon . GENERAL SETUP PAGE
appears on the selection band below the icons.
- - GENERALSETUP PAGE - -
TV DISPLAY WIDE
ANGLE MARK ON
OSD LANGUAGE ENG
SCREEN SAVER ON
TEXT TO SPEECH OFF
LAST MEMORY ON
GOTO GENERAL SETUP PAGE
ON
OFF
ON
OFF
ON
OFF
ENGLISH
SPANISH
FRENCH
3 Press or to select an option, then press ENTER to select that option. In
each sub-menu, press or to select an option, then press ENTER to select
that option. You can select:
• TV DISPLAY—Selects the aspect ratio of the picture. You can select:
• 4:3 PANSCAN: When you play wide-screen video, this mode crops the
right and left sides of the image so you can view the image on a
conventional screen.
Some wide-screen DVDs do not permit playback in PanScan mode, and
the video automatically plays in letterbox mode (black bands on the top
and bottom of the screen).
• 4:3 LETTERBOX: When you play wide-screen video in this mode on a
conventional screen, black bands appear on the top and bottom of the
screen.
• 16:9: wide screen display: Select this option to play wide-screen videos
on a wide-screen TV.
Notes:
• The visible picture size is preset on a DVD. Therefore the playback picture of
some DVDs may not conform to the picture size you select.
• When you play DVDs recorded in the 4:3 aspect ratio, the playback picture
always appears in the 4:3 aspect ratio regardless of the TV DISPLAY option
setting.
ON
OFF
4:3 PANSCAN
4:3 LETTERBOX
16:9
• ANGLE MARK—If this option is turned on and the DVD you are watching
has multiple viewing angles, an icon appears in scenes that have multiple
viewing angles. You can select ON or OFF.
• OSD LANGUAGE—Selects the menu language. You can select ENGLISH,
ESPAÑOL, or FRANÇAIS.
• SCREEN SAVER—When this option is turned on, your player displays a
screen saver when the same image stays on the screen for five minutes. You
can select ON or OFF.
www.insigniaproducts.com
15
Page 16

NS-P10DVD20
• TEXT TO SPEECH—Your DVD player provides audio descriptions of menus
and some remote control functions. You can select ON or OFF.
• LAST MEMORY—When this option is turned on and you open the disc tray,
your player remembers where you stopped. If you close the tray with the
same disc loaded, your player resumes playing where you stopped. You can
select ON or OFF.
4 Use or to select a setting, then press ENTER.
5 Press SETUP to close the menu.
Selecting the audio mode
1 Press SETUP. The main setup menu opens.
2 Use or to select the audio setup icon . AUDIO SETUP PAGE appears
on the selection band below the icons.
-- --
- - - -
AUDIO SETUP PAGE
DOWNMIX
GO TO AUDIO SETUP PAGE
3 Press or to select DOWNMIX, then press ENTER.
4 Press or to select a stereo analog audio mode. You can select:
STR
LT/RT
STEREO
• LT / R T —Select this option if your DVD Player is connected to external
speakers or a sound system with a Dolby Pro Logic decoder.
• STEREO—Select this option when using the two built-in speakers.
5 Press ENTER to save your setting, then press SETUP to close the menu.
Adjusting video options
1 Press SETUP. The main setup menu opens.
2 Use or to select the video setup icon . VIDEO SETUP PAGE appears
on the selection band below the icons.
16
- - VIDEO SETUP PAGE - -
BRIGHTNESS 00
CONTRAST 00
HUE 00
SATURATION 00
GOTO VIDEO SETUP PAGE
www.insigniaproducts.com
Page 17

10" Portable DVD Player
3 Press or to select an option, then press or to adjust the setting. You
can select:
• BRIGHTNESS—Increases the brightness to add more light to dark areas of
the picture or decreases the brightness to add more dark to light areas of
the picture.
• CONT RAST—Increases the contrast level to adjust the white areas of the
picture or decreases the contrast level to adjust the black areas of the
picture.
• HUE—Increases the color level to add more green to skin tones or decreases
the color level to add more purple to skin tones.
• SATURATION—A high saturation level makes vivid colors brighter.
4 Press ENTER to save your setting, then press SETUP to close the menu.
Setting video and audio preferences
Note: You can only access the PREFERENCE PAGE when there is no disc in the disc
tray.
1 Press SETUP. The main setup menu opens.
2 Use or to select the preference setup icon . PREFERENCE SETUP
PAG E appears on the selection band below the icons.
- - PREFERENCE SETUP PAGE - -
TV TYPE NTSC
AUDIO ENG
SUBTITLE ENG
DISC MENU ENG
PARENTAL
PASSWORD
DEFAULT
GOTO PREFERENCE PAGE
RESET
1 KID SAF
2 G
3 PG
4 PG-13
5 PG-R
6 R
7 NC-17
8 ADULT
ENGLISH
SPANISH
FRENCH
ENGLISH
SPANISH
FRENCH
OFF
ENGLISH
SPANISH
FRENCH
PAL
AUTO
NTSC
3 Press or to select an option, then press ENTER to select that option. In
each sub-menu, press or to select an option, then press ENTER to select
that option. You can select:
• TV TYPE—Selects the color system your TV uses. You can select:
• PAL —Select this option if the connected TV uses the PAL system. Your
player changes the video signal from a NTSC disc and outputs the signal
in the PAL format. This type of color system is typically used in Europe.
• AUTO—Select this option if you want your player to automatically
change the video signal based on the type of disc you are playing.
• NTSC—Select this option if the connected TV uses the NTSC system.
Your player changes the video signal from a PAL disc and outputs the
signal in the NTSC format. This type of color system is typically used in
the U.S.
• AUDI O—Selects the audio language. If the language you select is not
recorded on the DVD, your player plays the default audio language. You can
select ENGLISH, ESPAÑOL, or FRANÇAIS,
www.insigniaproducts.com
17
Page 18
NS-P10DVD20
• SUBTITLE—Selects a language for subtitles (if subtitles are available on the
DVD). If the language you select is not available on the DVD, your player
displays subtitles in the default language. You can select ENGLISH,
ESPAÑOL, FRANÇAIS, or OFF.
• DISC MENU—Selects a language for a disc menu (if multiple languages are
available on the DVD). If the language you select is not available on the DVD,
your player displays the default language. You can select ENGLISH,
ESPAÑOL, or FRANÇAIS.
• PAR EN TAL—Some DVDs may have parental levels assigned to the complete
DVD or to certain scenes on the DVD. This feature lets you set a playback
limitation level. The rating levels are 1 KID SAF, 2 G, 3 PG, 4 PG-13, 5 PG-R, 6
R, 7 NC-17, and 8 ADULT. Ratings are country dependent. You can block
entire DVDs that are not suitable for your children. Also, some DVDs
automatically display alternate scenes based on the rating you select.
• PASSWORD—Lets you create or change a parental control password, or lets
you turn the password feature on and off. See Setting up or changing a
parental control password on page 19.
• DEFAULT—Resets all options to the default settings.
4 Press ENTER to save your setting, then press SETUP to close the menu.
Using parental controls
Note: The parental control LEVEL is set from the PREFERENCES SETUP PAGE. See
Setting a parental control rating
Turning parental controls on or off
1 Press SETUP. The main setup menu opens.
2 Use or to select the preferences setup page, then select PASSWORD.
PASSWORD SETUP PAGE appears on the selection band below the icons.
on page 20.
18
- - PASSWORD SETUP PAGE - -
PASSWORD MODE ON
PASSWORD
GOTO PASSWORD SETUP PAGE
www.insigniaproducts.com
ON
OFF
Page 19

10" Portable DVD Player
3 Press or to select PASS WORD MO DE, then press or to select ON or
OFF.
Notes:
•If the PASSWORD MODE option is set to ON, you must enter the password
when you select the PAR EN TAL option to set a rating level.
•If the PASSWORD MODE option is set to OFF, you do not need to enter the
password.
• After you turn on the PASSWORD MODE option and set a rating level, you
are prompted for your password when watching content with a higher
rating.
4 Press ENTER to save your setting, then press SETUP to close the menu.
Setting up or changing a parental control password
1 Make sure that the PASSWORD MODE option is set to ON.
2 Press SETUP. The main setup menu opens.
3 Use or to select the preferences setup page. PASSWORD SETUP PAGE
appears on the selection band below the icons.
4 Press or to select PA SSW OR D, then press ENTER. The password change
page opens.
OLD PASSWORD
NEW PASSWORD
CONFIRM PWD
OK
5 Use your remote control to enter a four-digit password, then enter the
password again.
Note: The master password is 1369. If you forget your password, you can enter
the master password.
6 Press ENTER to save your password, then press SETUP to close the menu.
www.insigniaproducts.com
19
Page 20

NS-P10DVD20
- - PREFERENCE SETUP PAGE - -
GOTO PREFERENCE PAGE
TV TYPE NTSC
AUDIO ENG
SUBTITLE ENG
DISC MENU ENG
PARENTAL
PASSWORD
DEFAULT
PAL
AUTO
NTSC
ENGLISH
FRENCH
SPANISH
FRENCH
SPANISH
FRENCH
SPANISH
1 KID SAF
2 G
3 PG
4 PG-13
5 PG-R
6 R
7 NC-17
8 ADULT
RESET
ENGLISH
ENGLISH
OFF
Setting a parental control rating
1 Press SETUP. The main setup menu opens.
2 Use or to select the preference setup icon . PREFERENCE SETUP
PAG E appears on the selection band below the icons.
3 Press or to select PA REN TAL , then press ENTER.
4 Press or to select a parental control rating. You can select 1 KID SAF, 2 G,
3 PG, 4 PG-13, 5 PGR, 6 R, 7 NC17, or 8 ADULT.
5 Use the remote control to enter your four-digit password.
6 Press ENTER to save your selection, then press SETUP to close the menu.
Maintaining your player
Cleaning your player
Clean the outside of your player with a clean cloth, slightly dampened with water.
CAUTION: Do not use liquid cleaners or aerosol cleaners because they may
damage your player.
Cleaning discs
• Before playback, wipe the disc outwards from the center with a clean cloth.
20
www.insigniaproducts.com
Page 21

Troubleshooting
PROBLEM SOLUTION
No power
No sound or distorted
sound
Cannot fast-forward or
fast-reverse through a
movie
The icon appears on the
screen
Picture is distorted
Disc does not play
The player gets warm while
charging
• Make sure that the AC adapter is plugged in and
connected.
• Make sure that your player is turned on.
• Adjust the volume.
• Make sure that all cables are inserted correctly into
the appropriate jacks.
• Make sure that your player is not paused.
• Make sure that your player is not in fast forward or
fast reverse mode.
• Make sure that your player is not too hot. Let it cool
for 30 minutes, then try it again.
• Make sure that the headphones are not plugged in.
• You cannot fast-forward through opening credits
and warning information at the beginning of a
movie.
• Some DVDs do not allow rapid scanning or
skipping of titles or chapters.
The action you tried cannot be done because:
• The DVD software does not allow it.
• The DVD does not support the feature (for example
the Subtitle feature).
• The feature is not available at the current point on
the DVD.
• You entered a title or chapter number that is out of
range.
• During fast-forwarding or fast-reversing, distortion
is normal.
• The DVD may be damaged. Try another DVD.
• Make sure that the disc is inserted with the label
side up.
• Make sure that the disc is compatible with your
player. Your player can play DVDs, VCDs, and audio
CDs.
• It is normal for the player to get warm while
charging.
• Make sure that your player is not exposed to
excessive heat, such as direct sunlight, fire, or heat
outlets.
• Make sure that your player is between 41° F (5° C)
and 95° F (35° C) while charging.
10" Portable DVD Player
www.insigniaproducts.com
21
Page 22

NS-P10DVD20
Specifications
Specifications subject to change without notice.
Compatible discs DVDs (Region 1 for U.S.), VCDs, Audio CDs, and MP3 discs
Signal system PAL or NTSC
LCD 10 in (25.4 cm)
Frequency response 20 Hz to 20 kHz
Audio S/N > 80 dB
Dynamic range > 85 dB
Laser Semiconductor
Wave length 650 nm
Power requirements AC 100-240 V, 50/60 Hz
Operating
temperature
Weight 1.9 lbs. (.86 kg)
Dimensions
(H×W ×D)
32° to 113° F (0° to 45° C)
9.7 × 7.5 x 1.6 in. (246 x190 x 42 mm)
Legal notices
Macrovision
This product features the copy protection function developed by Macrovision.
Copy protection signals are recorded on some discs. When recording and playing
the pictures of these discs picture noise will appear. This product incorporates
copyright protection technology that is protected by method claims of certain
U.S. Patents and other intellectual property rights owned by Macrovision
Corporation and other rights owners. Use of this copyright protection technology
must be authorized by Macrovision Corporation, and is intended for home and
other limited viewing uses only unless otherwise authorized by Macrovision
Corporation. Reverse engineering or disassembly is prohibited.
22
www.insigniaproducts.com
Page 23

10" Portable DVD Player
ONE-YEAR LIMITED WARRANTY
Definitions:
The Distributor* of Insignia branded products warrants to you, the original purchaser of this
new Insignia-branded product (“Product”), that the Product shall be free of defects in the
original manufacturer of the material or workmanship for a period of one (1) year from the
date of your purchase of the Product (“Warranty Period”).
For this warranty to apply, your Product must be purchased in the United States or Canada
from a Best Buy branded retail store or online at www.bestbuy.com or www.bestbuy.ca and
is packaged with this warranty statement.
How long does the coverage last?
The Warranty Period lasts for 1 year (365 days) from the date you purchased the Product.
Your purchase date is printed on the receipt you received with the Product.
What does this warranty cover?
During the Warranty Period, if the original manufacture of the material or workmanship of
the Product is determined to be defective by an authorized Insignia repair center or store
personnel, Insignia will (at its sole option): (1) repair the Product with new or rebuilt parts; or
(2) replace the Product at no charge with new or rebuilt comparable products or parts.
Products and parts replaced under this warranty become the property of Insignia and are
not returned to you. If service of Products or parts are required after the Warranty Period
expires, you must pay all labor and parts charges. This warranty lasts as long as you own your
Insignia Product during the Warranty Period. Warranty coverage terminates if you sell or
otherwise transfer the Product.
How to obtain warranty service?
If you purchased the Product at a Best Buy retail store location or from a Best Buy online
website (www.bestbuy.com or www.bestbuy.ca), please take your original receipt and the
Product to any Best Buy store. Make sure that you place the Product in its original packaging
or packaging that provides the same amount of protection as the original packaging.
To obtain warranty service, in the United States and Canada call 1-877-467-4289. Call agents
may diagnose and correct the issue over the phone.
Where is the warranty valid?
This warranty is valid only in the United States and Canada at Best Buy branded retail stores
or websites to the original purchaser of the product in the country where the original
purchase was made.
What does the warranty not cover?
This warranty does not cover:
• Customer instruction/education
• Installation
• Set up adjustments
• Cosmetic damage
• Damage due to weather, lightning, and other acts of God, such as power surges
• Accidental damage
•Misuse
•Abuse
•Negligence
• Commercial purposes/use, including but not limited to use in a place of business or in
communal areas of a multiple dwelling condominium or apartment complex, or
otherwise used in a place of other than a private home.
• Modification of any part of the Product, including the antenna
• Display panel damaged by static (non-moving) images applied for lengthy periods
(burn-in).
• Damage due to incorrect operation or maintenance
www.insigniaproducts.com
23
Page 24

NS-P10DVD20
• Connection to an incorrect voltage or power supply
• Attempted repair by any person not authorized by Insignia to service the Product
• Products sold “as is” or “with all faults”
• Consumables, including but not limited to batteries (i.e. AA, AAA, C etc.)
• Products where the factory applied serial number has been altered or removed
• Loss or Theft of this product or any part of the product
• Display panels containing up to three (3) pixel failures (dots that are dark or incorrectly
illuminated) grouped in an area smaller than one tenth (1/10) of the display size or up to
five (5) pixel failures throughout the display. (Pixel based displays may contain a limited
number of pixels that may not function normally.)
• Failures or Damage caused by any contact including but not limited to liquids, gels or
pastes.
REPAIR REPLACEMENT AS PROVIDED UNDER THIS WARRANTY IS YOUR EXCLUSIVE REMEDY
FOR BREACH OF WARRANTY. INSIGNIA SHALL NOT BE LIABLE FOR ANY INCIDENTAL OR
CONSEQUENTIAL DAMAGES FOR THE BREACH OF ANY EXPRESS OR IMPLIED WARRANTY ON
THIS PRODUCT, INCLUDING, BUT NOT LIMITED TO, LOST DATA, LOSS OF USE OF YOUR
PRODUCT, LOST BUSINESS OR LOST PROFITS. INSIGNIA PRODUCTS MAKES NO OTHER
EXPRESS WARRANTIES WITH RESPECT TO THE PRODUCT, ALL EXPRESS AND IMPLIED
WARRANTIES FOR THE PRODUCT, INCLUDING BUT NOT LIMITED TO ANY IMPLIED
WARRANTIES OF AND CONDITIONS OF MERCHANTABILITY AND FITNESS FOR A PARTICULAR
PURPOSE, ARE LIMITED IN DURATION TO THE WARRANTY PERIOD SET FORTH ABOVE AND
NO WARRANTIES, WHETHER EXPRESS OR IMPLIED, WILL APPLY AFTER THE WARRANTY
PERIOD. SOME STATES, PROVINCES AND JURISDICTIONS DO NOT ALLOW LIMITATIONS ON
HOW LONG AN IMPLIED WARRANTY LASTS, SO THE ABOVE LIMITATION MAY NOT APPLY TO
YOU. THIS WARRANTY GIVES YOU SPECIFIC LEGAL RIGHTS, AND YOU MAY ALSO HAVE OTHER
RI GHTS, W HICH VAR Y FROM STATE T O STATE OR PR OVINCE T O PROVIN CE.
Contact Insignia:
1-877-467-4289
www.insigniaproducts.com
INSIGNIA is a trademark of Best Buy and its affiliated companies.
*Distributed by Best Buy Purchasing, LLC
7601 Penn Ave South, Richfield, MN 55423 U.S.A.
©2019 Best Buy. All rights reserved.
24
www.insigniaproducts.com
Page 25

www.insigniaproducts.com
1-877-467-4289 (U.S. and Canada) or 01-800-926-3000 (Mexico)
INSIGNIA is a trademark of Best Buy and its affiliated companies.
Distributed by Best Buy Purchasing, LLC
7601 Penn Ave South, Richfield, MN 55423 U.S.A.
©2019 Best Buy. All rights reserved.
V3 ENGLISH
19-0738
 Loading...