

Page 1
Quick Setup Guide
10" Portable DVD Player I NS-P10DVD11
Congratulations on your purchase of a
high-quality Insignia product. Your
10" Portable DVD Player is designed
for reliable and trouble-free
performance. Use this guide for initial
setup. See your User Guide for more
information.
Package contents
• 10" DVD player
• Remote control with battery
• AC to DC adapter (for wall outlet)
• Car adapter
• A/V cable
• Quick Setup Guide
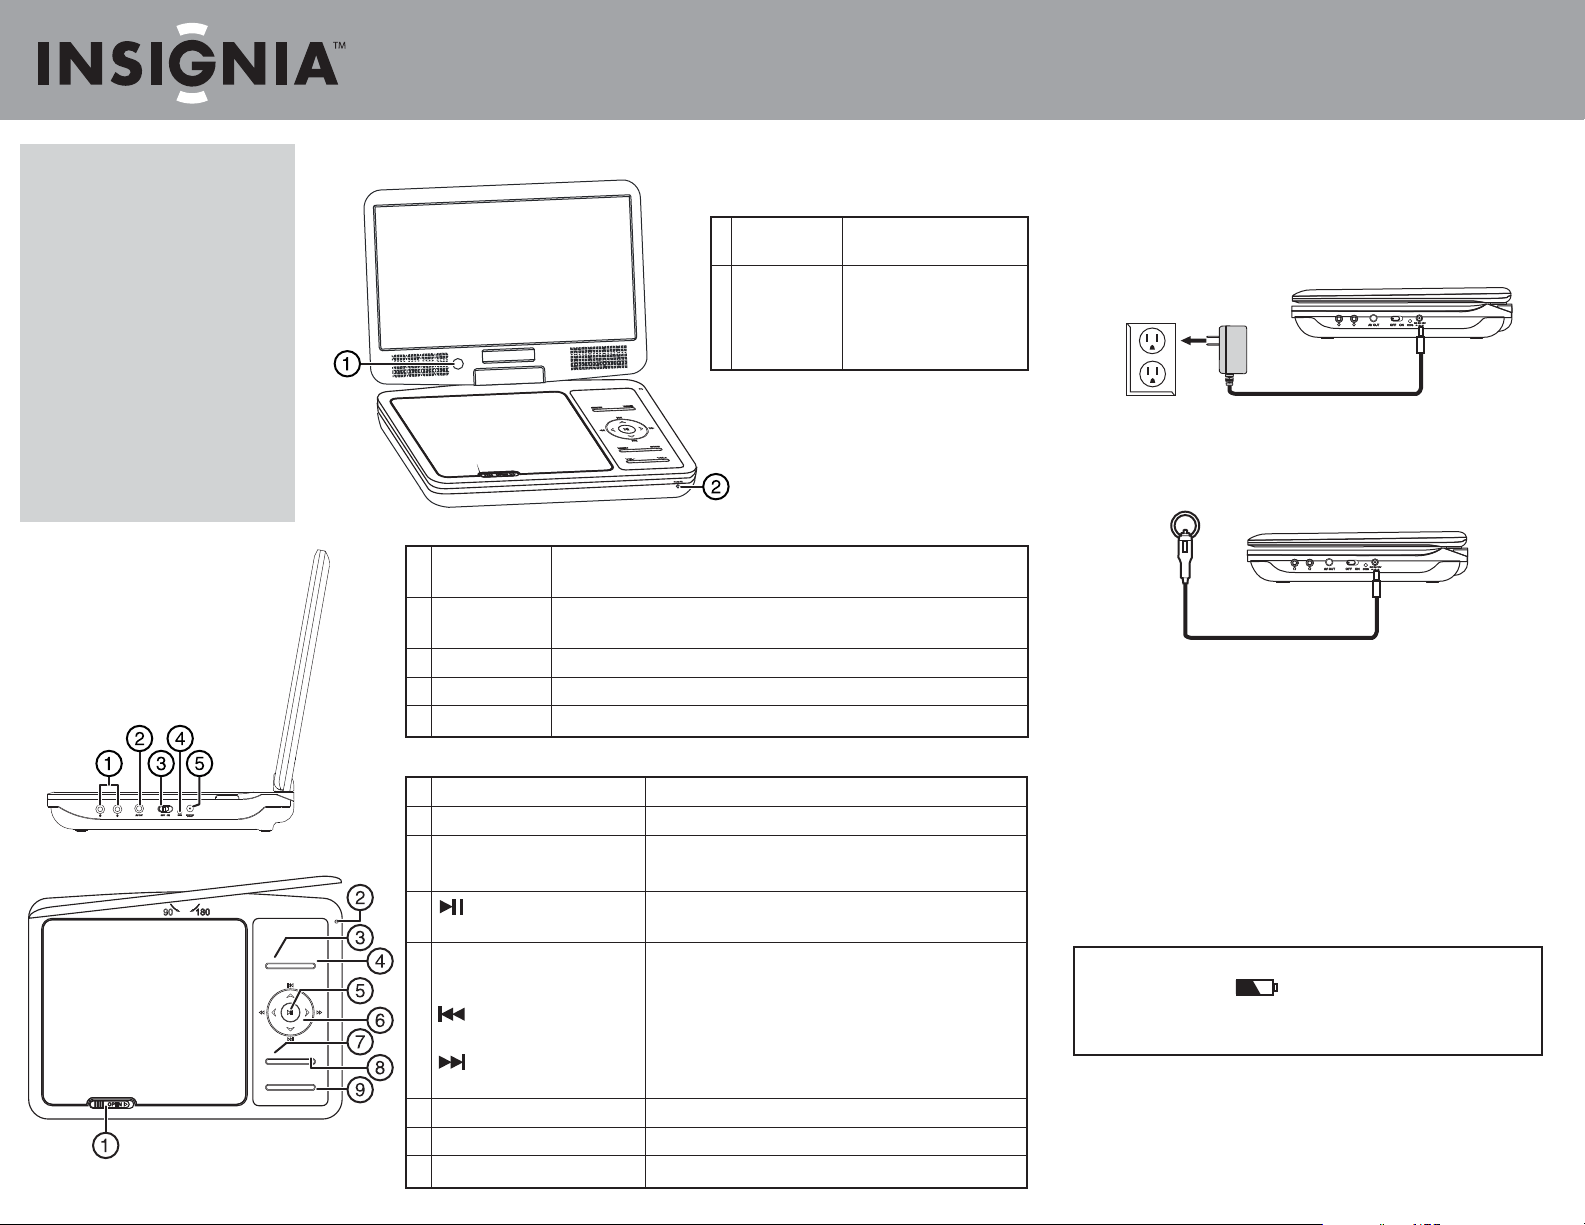
Side
Top
SE TUP
ME NU STO P
VO L- VO L+
Features
Front
WID E
1 IR sensor Receives signals from the
remote control. Do not block.
2 POWER indicator Lights green when your
player is turned on. Blinks
green when the battery
needs charging.
1 Headphone jacks Plug headphones into either jack. Note: When headphones are plugged in
the internal speakers are muted.
2 AV OUT jack Connect a remote monitor, TV, or amplier to this jack using the supplied
A/V cable and an RCA cable (not supplied).
3 On/Off switch Slide to turn your DVD player on or off.
4 Charge indicator Lights red when the battery is charging. Turns off when the battery is charged.
5 DC IN jack Connect the AC to DC adapter or car adapter to this jack.
1 OPEN switch Slide to the right to open the disc tray.
2 LCD screen switch Press to turn LCD screen o.
3 SETUP button Press to open or close the Setup menu.
4 WIDE button Press to switch between a 16:9 and 4:3 picture size (aspect ratio).
5 (play/pause) button In menu mode, press to conrm a selection.
In playback mode, press to play or pause a disc.
6 ◄◄ (fast rev)/◄ (left) button Press to fast reverse or move left on a menu.
►►(fast fwd)/ ►(right) button Press to fast forward or move right on a menu.
(prev)/ ▲(up) button Press to go to the previous chapter, track, or scene during
playback, or to navigate up on a menu.
(next)/ ▼(down) button Press to go to the next chapter, track, or scene during playback,
or to navigate down on a menu.
7 MENU button Press to open the root or title menu on a disc.
8 STOP button Press to stop disc playback.
9 VOL–/+ button Press to adjust the volume.
Setting up your player
Connecting to AC power
To connect to AC power:
• Plug one end of the AC to DC power adapter into the DC IN jack on the side of
your player, and the other end into an AC outlet.
Connecting to a 12V car power outlet
To connect to a 12V car power outlet:
1 Plug one end of the car power adapter into the DC IN jack on the side of your
player.
2 Plug the other end of the adapter into a 12V car power outlet or car cigarette
lighter socket.
Charging and using the built-in battery
To charge and use the built-in battery:
1 Connect the supplied AC power adapter or car power adapter to the DC input
jack on the player, then plug the adapter into an AC power outlet or car
power outlet. When the battery is charging, the charge indicator LED turns
red. When the battery is fully charged, the indicator turns o.
2 Unplug the power adapter when the battery is fully charged, then you can
use your player by using the built-in battery.
Note
During playback, an icon appears on the screen, and the power
indicator LED ashes green, which means the battery has low power and
you should recharge the built-in battery now.
Page 2
Quick Setup Guide
10" Portable DVD Player I NS-P10DVD11
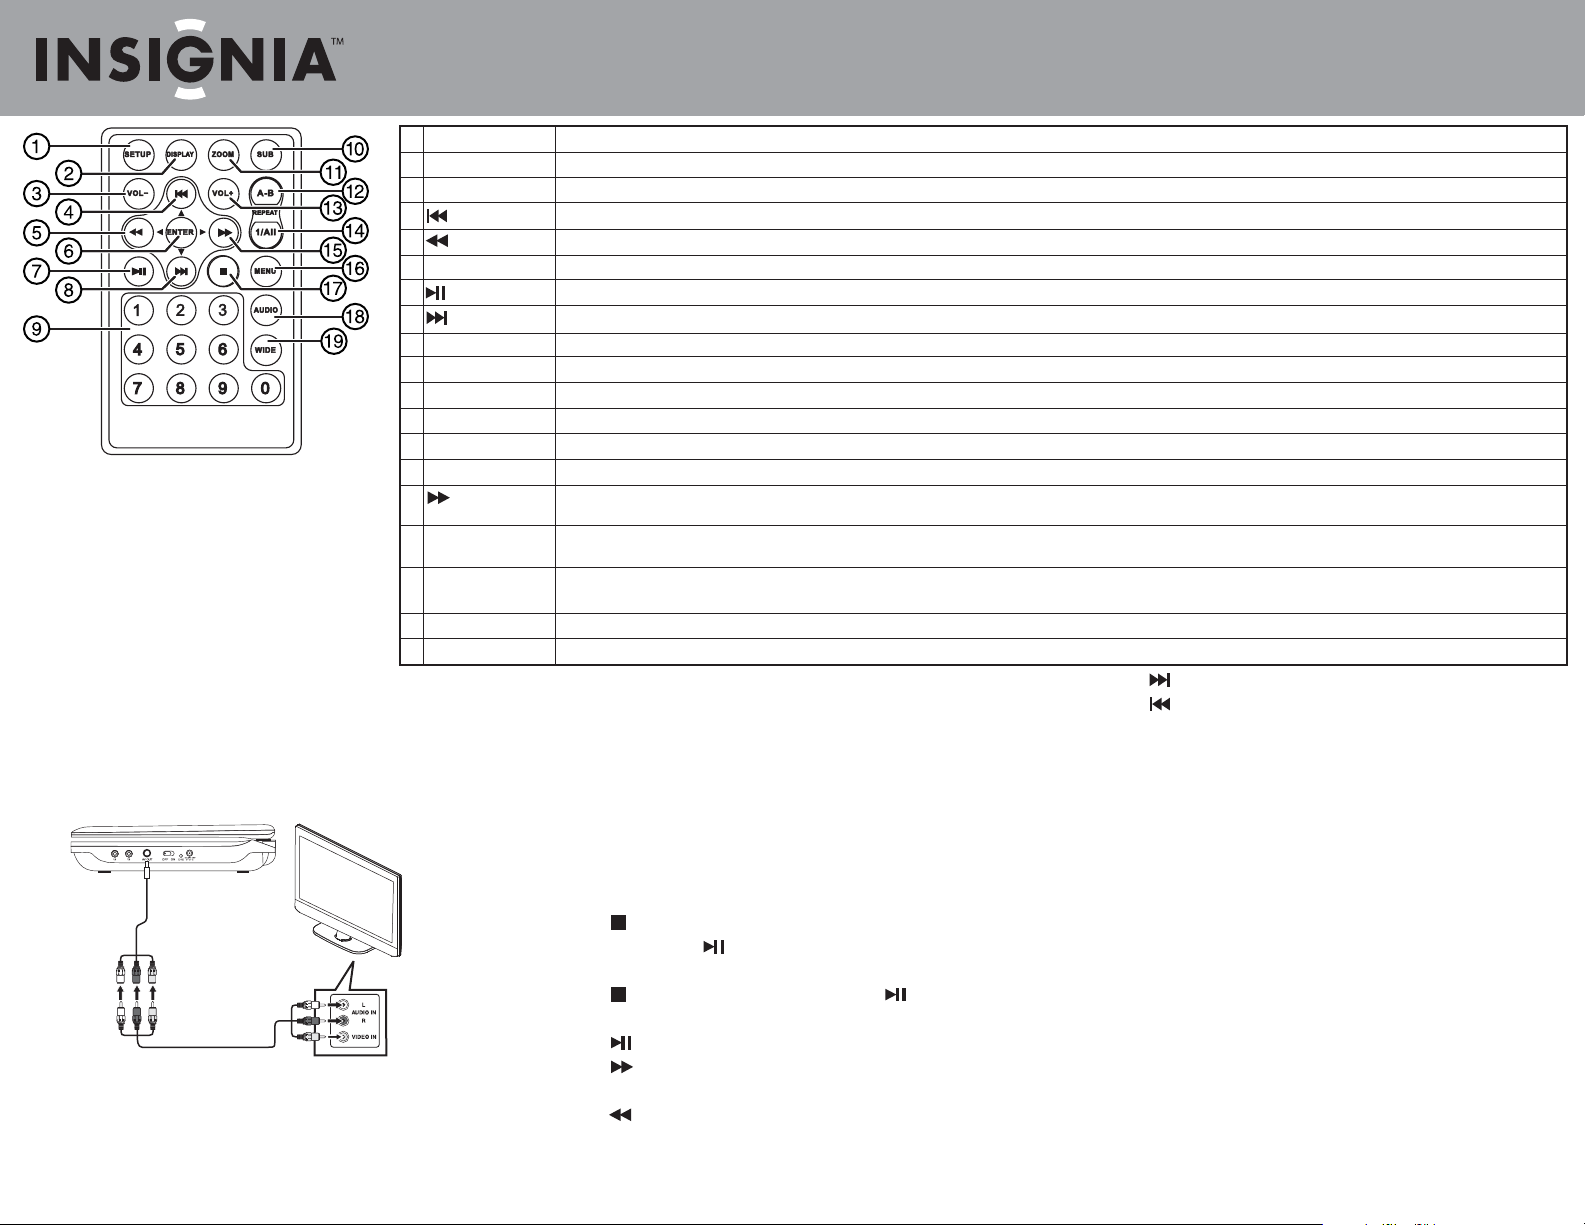
1 SETUP
2 DISPLAY
3 VOL–
4 (previous)/ ▲(up)
5 (reverse) / ◄(left)
6 ENTER
7 (play/pause)
8 (next)/ ▼(down)
9 Numbers
10 SUB (Subtitle)
11 ZOOM
12 A-B (repeat)
13 VOL+
14 1/ALL REPEAT
Note:
The rst time you use the remote control, you
must remove the lm between the battery and the
compartment cover to activate the remote control.
15 (fast forward)/
►(right)
16 MENU
17 STOP
18 AUDIO
19 WIDE
Connecting a TV or monitor
You can connect your player to a TV or monitor so you can watch DVDs or view
photos on the TV or monitor.
To connect a TV or monitor:
1 Plug the end of the supplied AV cable that has one black connector into the
AV jack on your player.
White=left audio
Red=right audio
Yellow=video
2 Plug the connectors on an RCA cable (not included) into the connectors on the
other end of the supplied AV cable. Make sure that the colors on the
connectors match.
3 Plug the other end of the RCA cable into the AV jacks on the TV or monitor.
Match the white connector to the left audio jack, the red connector to the right
audio jack, and the yellow connector to the video jack.
Press to open or close the Setup menu.
Press to display information about the disc, such as title, chapter number, track number, and time.
Press to decrease the volume.
Press to go to the previous chapter or scene on a DVD, or track on a CD. Press to navigate up in a menu.
Press to scan backward on the disc. Each time you press this button, the fast-reverse speed increases from 2, to 4, to 8, to 16, to 32 times the normal speed. In menu mode, press to navigate left on a menu.
Press to execute or conrm a selection.
Press to start playback. When a disc is playing, press to pause playback. Press again to resume playback.
Press to skip forward to the next chapter or scene on a DVD, or track on a CD. Press to navigate down in a menu.
Press to select menu items or to enter the password.
Press to turn subtitles on and off, or press to select the subtitle language. This option works only if the DVD has subtitles.
Press to enlarge the display image. You can enlarge the image 2, 3, or 4 times the normal size.
Press to repeat a specic portion (from point A to point B) of a disc.
Press to increase the volume.
Press to repeat the current title, chapter, or track.
Press to fast-forward on the disc. Each time you press this button, the fast-forward speed increases from 2, to 4, to 8, to 16, to 32 times the normal speed. In menu mode, press to
navigate right on a menu.
Press once to open the main DVD menu. This option works only if the DVD has a main menu. Press twice to open the DVD title menu or hold the button down for three seconds. This
option works only if the DVD has a title menu.
Press once to stop playback. Your player remembers where you stopped. If you press (play/pause), your player starts playing at the point where you stopped. Press twice to stop playback. If you
press (play/pause), your player starts playing at the beginning of the disc. Note: When playing an audio CD, press STOP once to stop playback and return the player to the beginning of the CD.
Press to select the DVD audio language. This option works only if the DVD has multiple audio languages.
Press to switch between a 16:9 and 4:3 picture size (aspect ratio).
Using your player
Playing a DVD or audio CD
To play a disc:
1 Make sure that your player is connected to power.
2 Slide the POWER switch to the ON position.
3 Slide the OPEN switch to the right. The disc tray opens.
4 Place a disc, label side up, in the disc tray, then close the tray. The disc starts
playing automatically.
Controlling DVD or audio CD playback
To control disc playback:
• Press (STOP) once to stop playback. Your player remembers where you
stopped. If you press , your player starts playing at the point where you
stopped.
• Press (NEXT) to go to the next title, chapter, or track.
• Press (PREV) to go to the previous title, chapter, or track.
Note
Most DVDs and your player have region codes that help control illegal
distribution of DVDs. The region code for your player is 1.
You can only play DVDs with a region code of 1 or ALL. The region code for a
DVD is printed on the DVD or the DVD packaging.
Note
When playing an audio CD, press STOP once to stop playback and return the
player to the beginning of the CD.
Adjusting the volume
To adjust the volume:
• Press the VOL+ or VOL – button on the top of your player.
• Press (STOP) twice to stop playback. If you press , your player starts
playing at the beginning of the disc.
• Press to pause playback. Press this button again to resume playback.
• Press to fast-forward on the disc. Each time you press this button, the
1-year limited warranty. Visit www.insigniaproducts.com for details.
For customer service, call: 877-467-4289 (U.S./Canada markets).
We’re here for you at www.insigniaproducts.com
fast-forward speed changes from 2 to 4 to 8 to 16 to 32 times the normal speed.
• Press to fast-reverse on the disc. Each time you press this button, the
fast-reverse speed changes from 2 to 4 to 8 to 16 to 32 times the normal speed.
© 2011 BBY Solutions, Inc., Inc. All rights reserved. INSIGNIA is a trademark of BBY Solutions, Inc.
Registered in some countries. All other products and brand names are trademarks of their
respective owners.
ENGLISH 11-0663
 Loading...