

Page 1
42"/46" LED-LCD TV
QUICK SETUP
GUIDE
NS-42E570A11/NS-46E570A11
Thank You
for purchasing this ne Insignia television.
We hope you enjoy the quality and reliability
of this product for years to come.
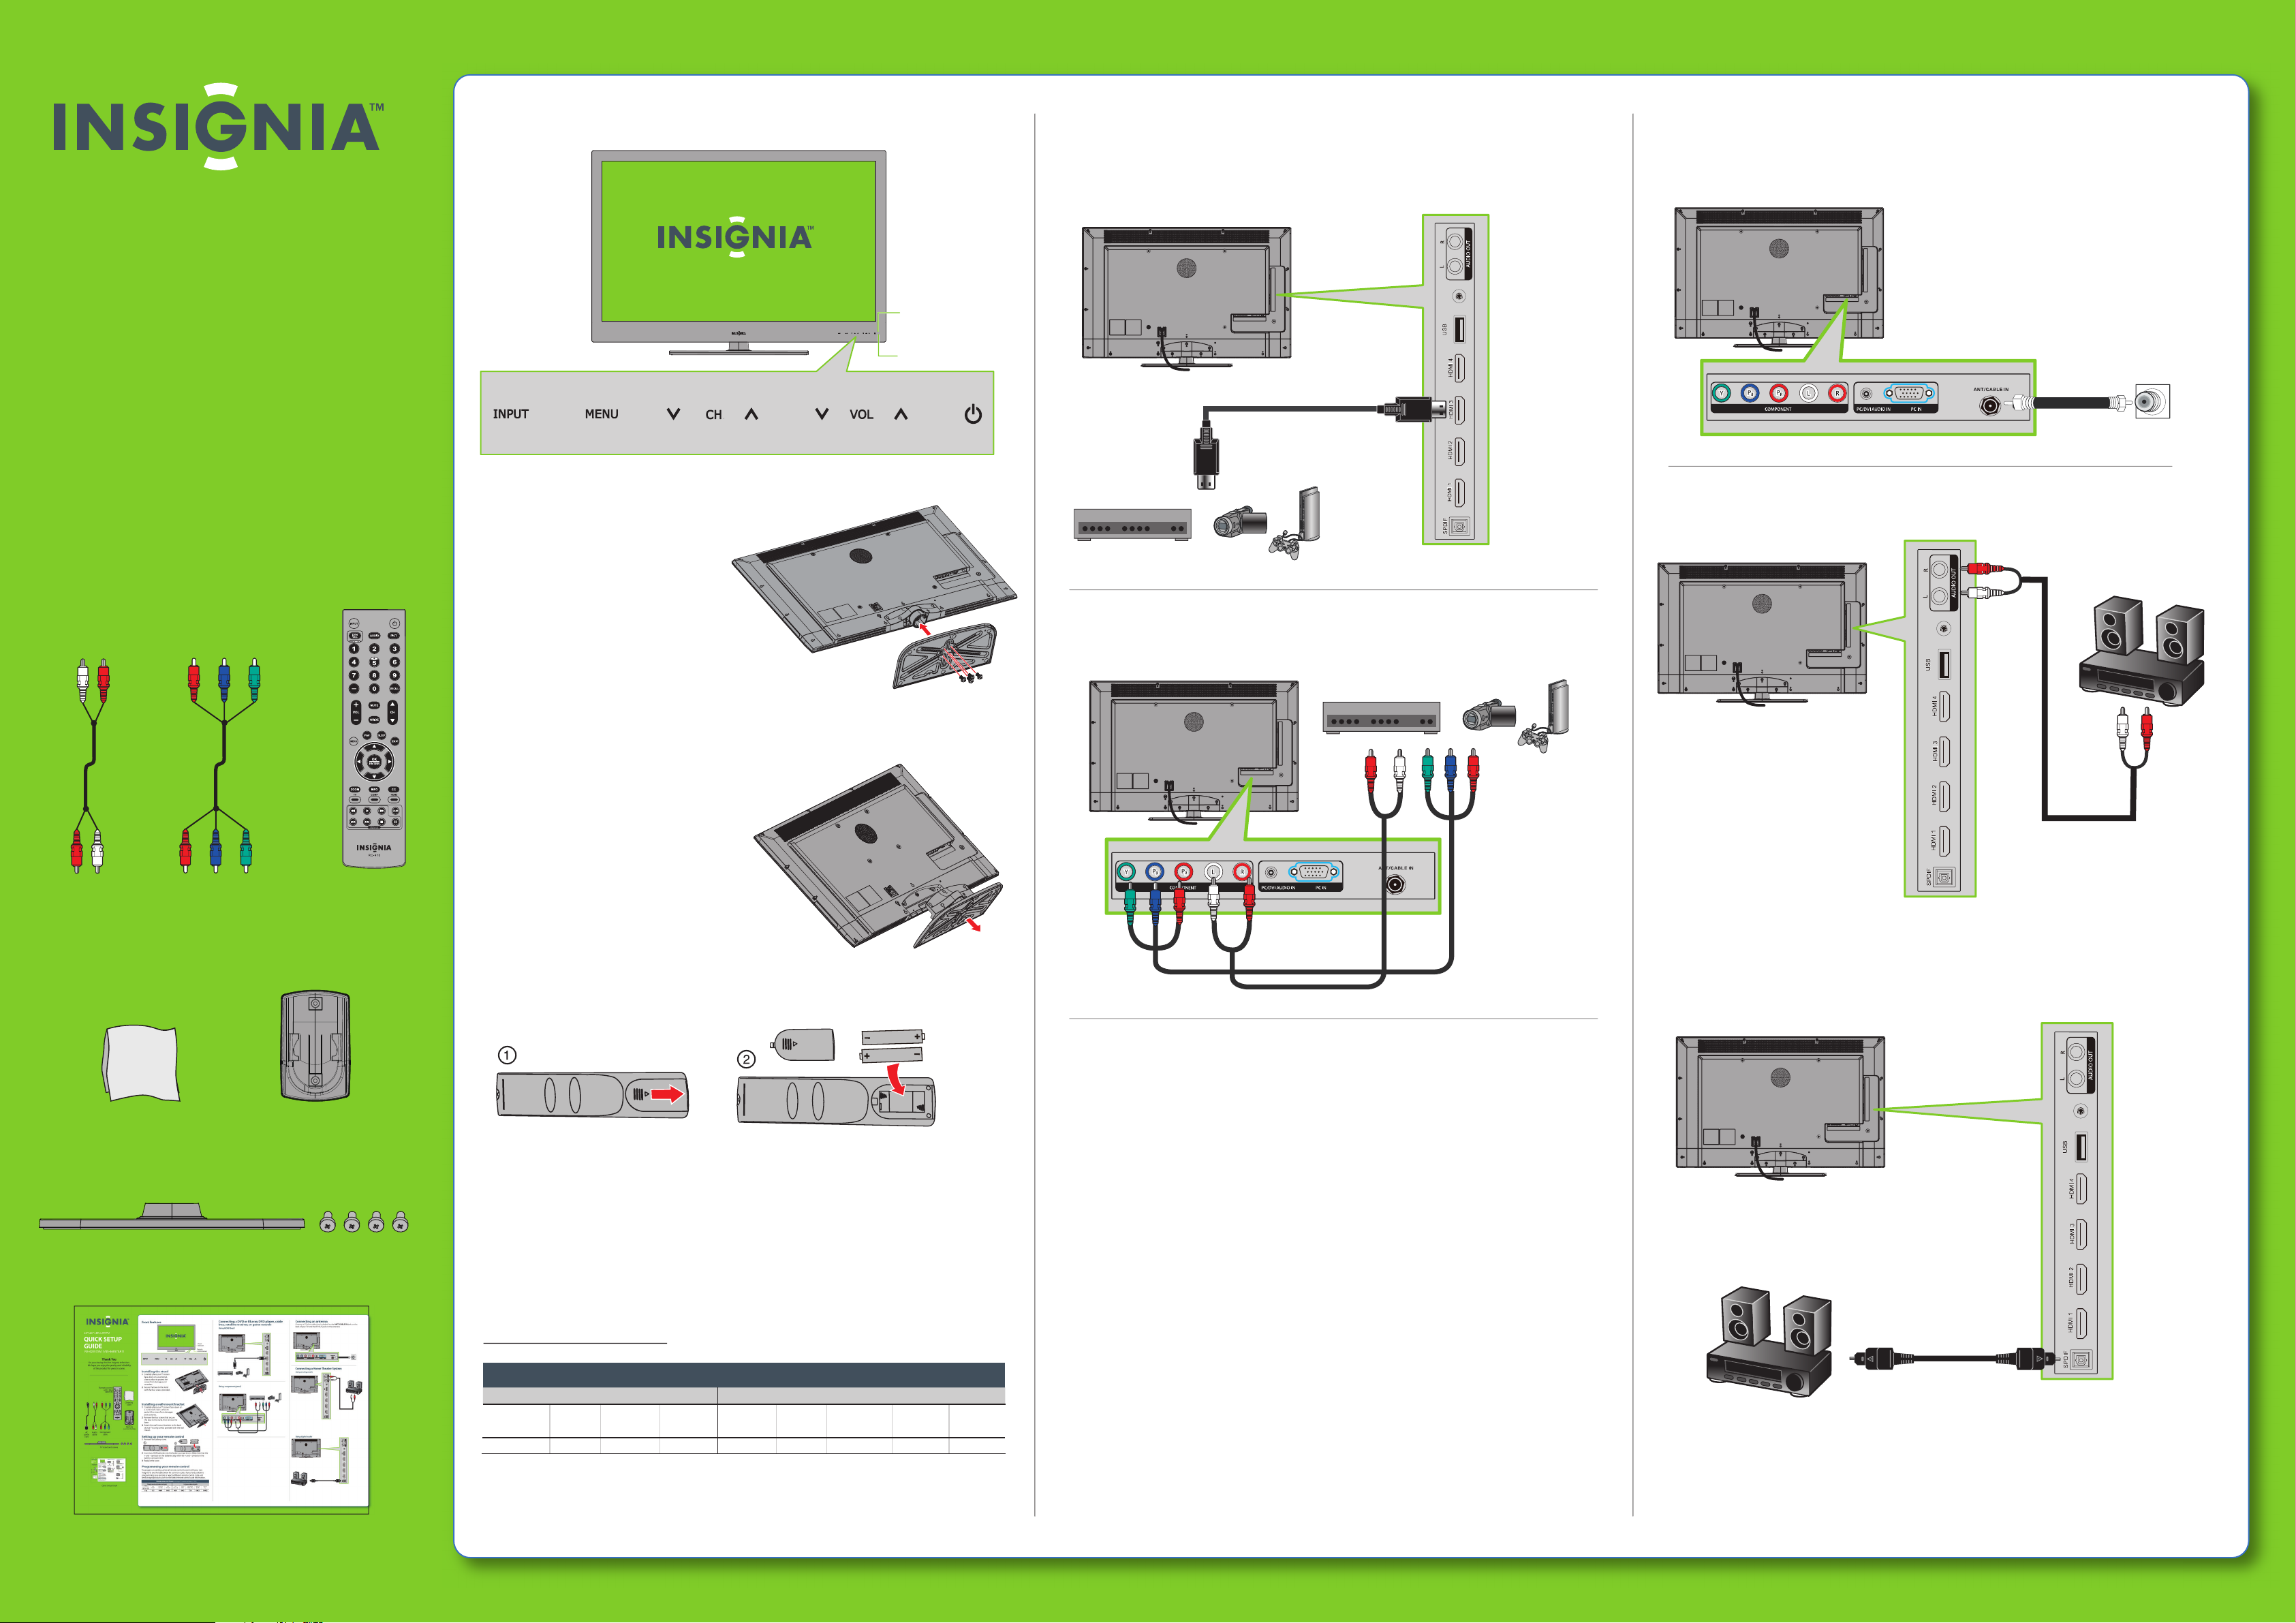
Front features
Power
indicator
Remote
control sensor
Connecting a DVD or Blu-ray DVD player, cable
box, satellite receiver, or game console
Using HDMI (best)
Connecting an antenna
Connect a 75 ohm cable (not included) to the ANT/CABLE IN jack on the
back of your TV and the RF OUT jack on the antenna.
_______________________________
Audio
cable
Component
cable
Remote control
and 2 AAA
batteries
Installing the stand
1 Carefully place your TV screen
face-down on a cushioned, clean
surface to protect the screen from
damages and scratches.
2 Secure the base to the stand
with the four screws provided.
Installing a wall-mount bracket
1 Carefully place your TV screen face-down on a
cushioned, clean surface to protect the
screen from damages and
scratches.
2 Remove the four screws that
secure the base to the stand, then
remove the base.
3 Attach the wall-mount brackets to the
back of your TV using screws provided with
the wall mount.
Connecting a Home Theater System
Using analog audio
Using component (good)
Cleaning
cloth
TV stand and screws
Remote
control holder
Setting up your remote control
1 Remove the battery cover.
2 Insert two AAA batteries into the battery compartment. Make sure that the
+ and – symbols on the batteries align with the + and – symbols in the
battery compartment.
3 Replace the cover.
Programming your remote control
To program an existing universal remote control to work with your new
Insignia TV, see the table below for common codes. If you have problems
programming your remote or need a dierent remote control code, visit
www.insigniaproducts.com for the latest remote control code information.
Universal remote control TV codes (for all Insignia TVs manufactured after Jan. 1, 2007)
Universal remote control makers and models Set-top box makers and models
Philips
PHDVD5, PH5DSS,
PMDVR8, PDVR8
115
RCA
RCU807
135
One for All
URC-6690
0464
Sony
RM-VL600
8043
TIVO
Series 3, HD
0091
Comcast
M1057
0463
Dish Network
VIP508, VIP622
720
Motorola
DRC800
0463
DirectTV
RC23
10463
Using digital audio
Quick Setup Guide
Page 2
42"/46" LED-LCD TV I QUICK SETUP GUIDE I NS-42E570A11/NS-46E570A11
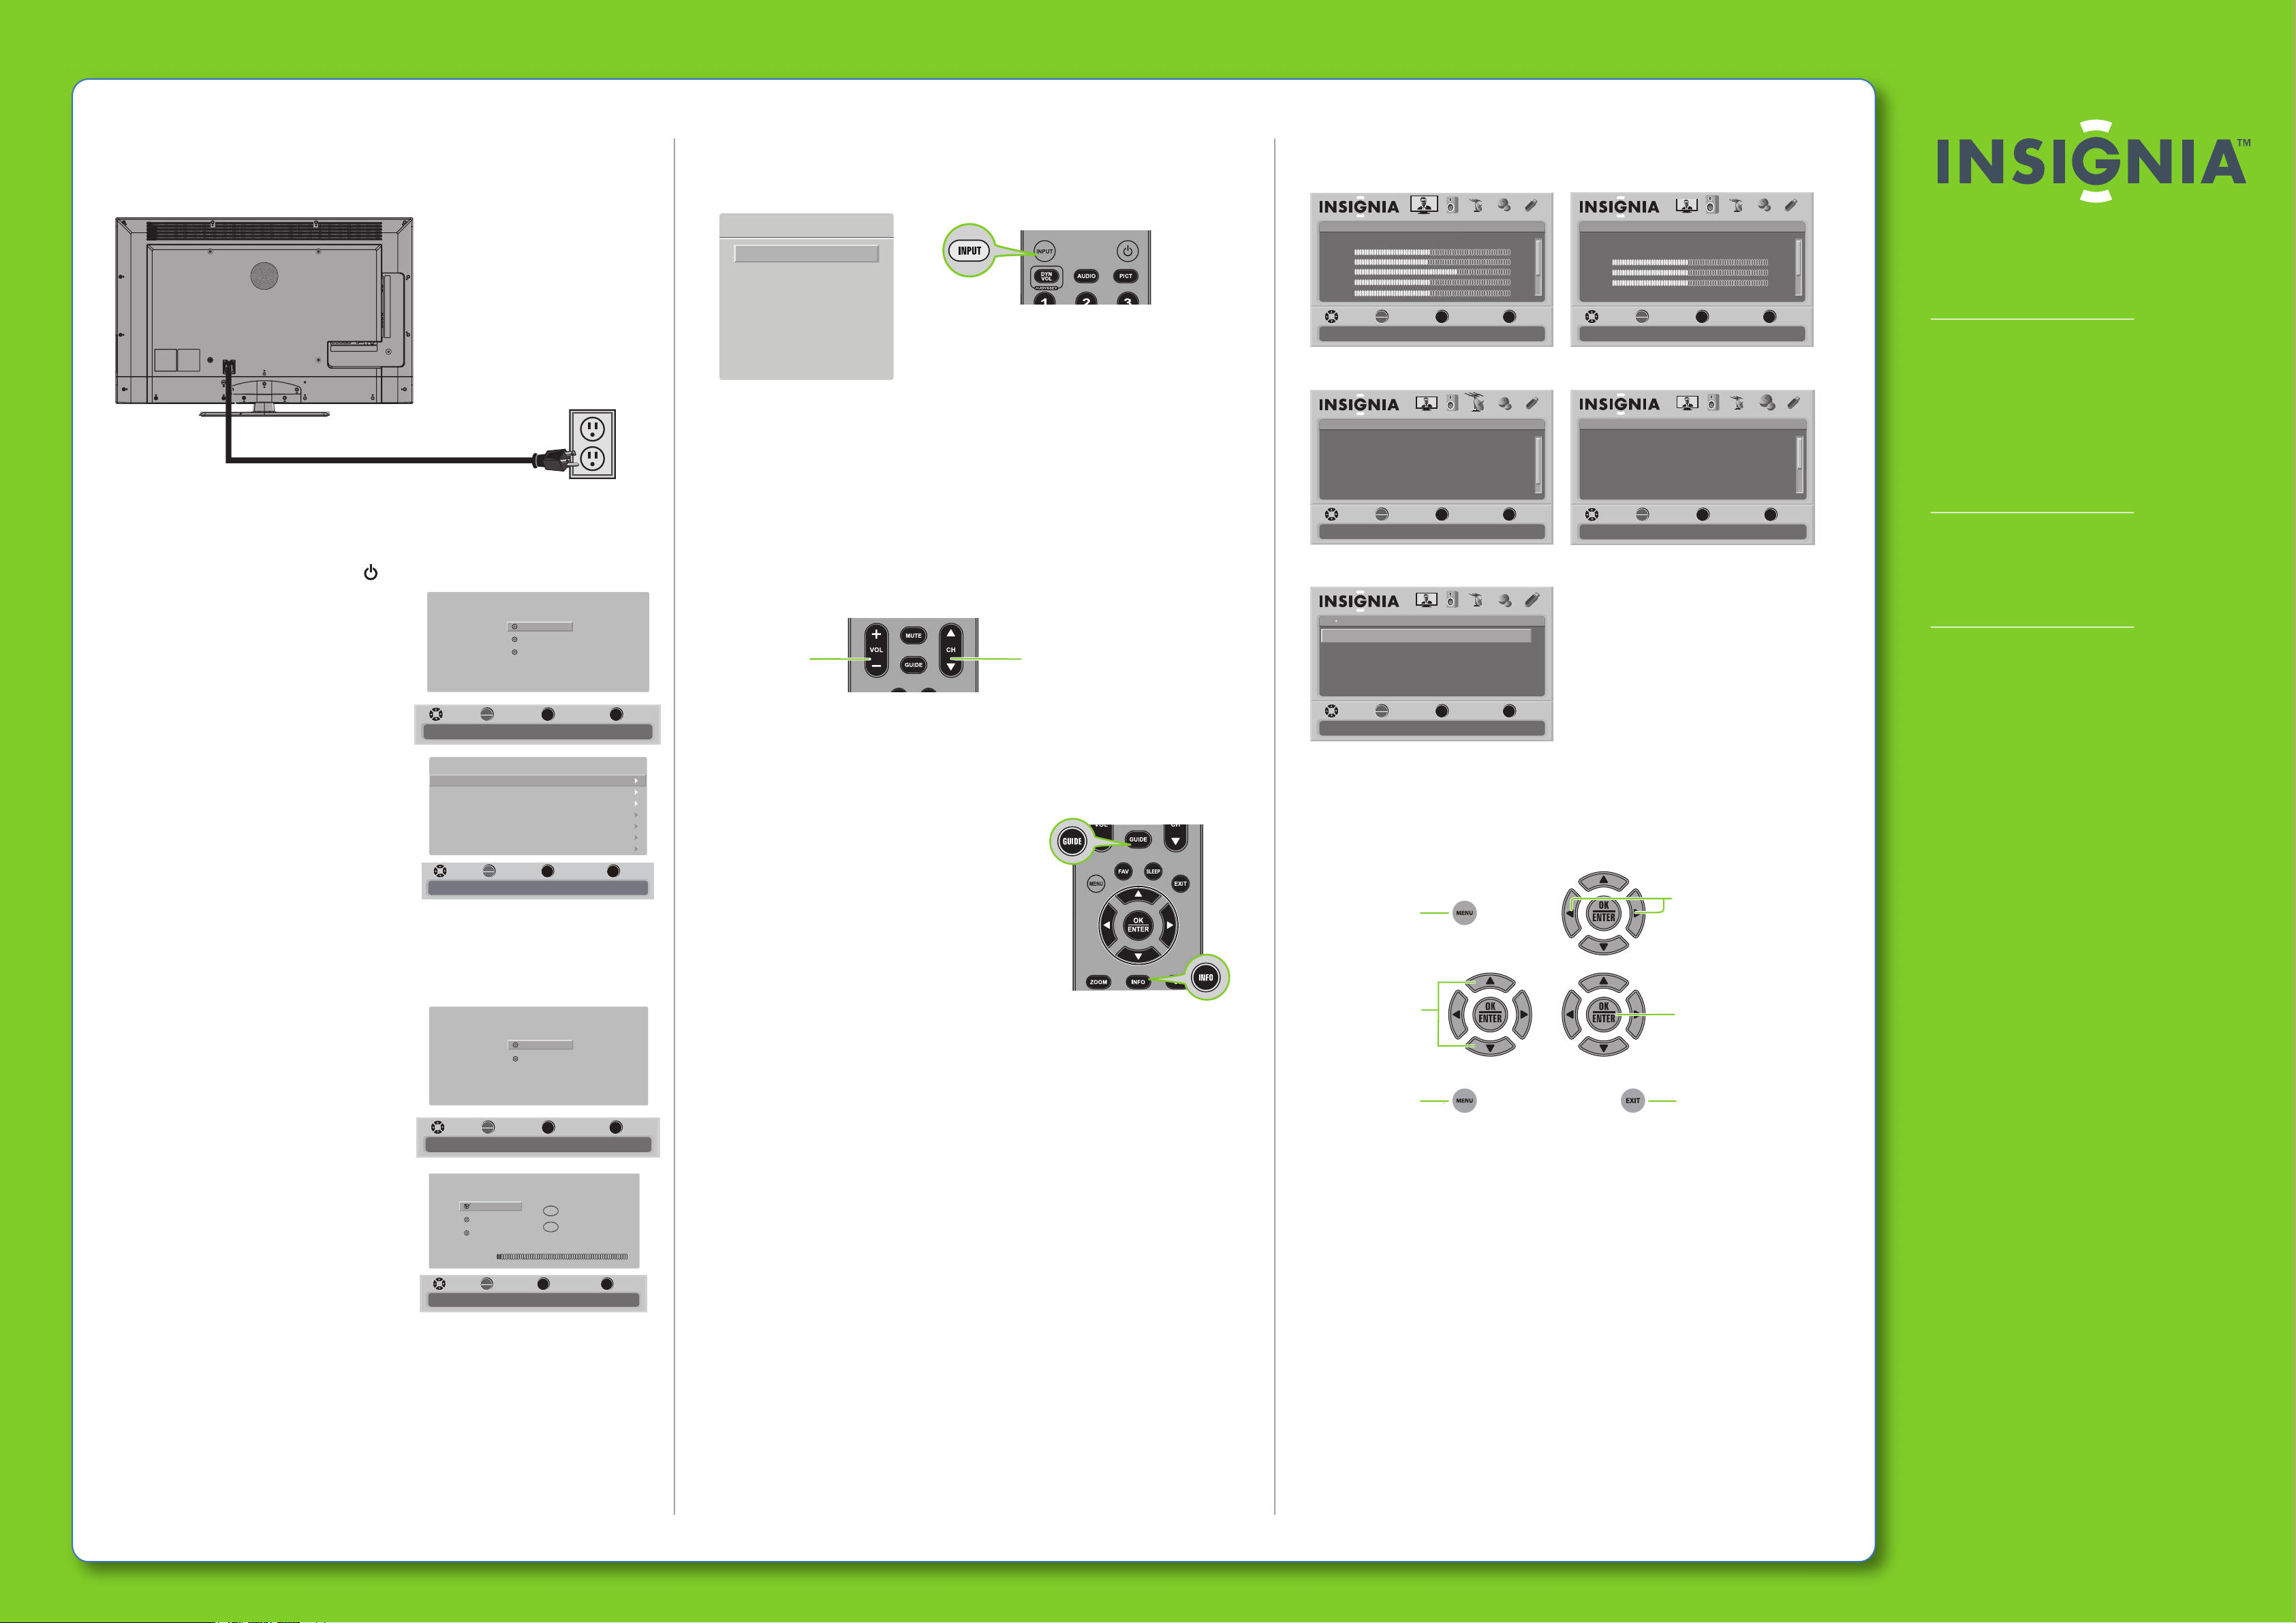
Connecting power
Plug the power cord into a power outlet.
Turning on your TV for the rst time
1 Connect the power cord, then press (power) to turn on your TV.
2 The Choose your menu language screen
opens. Press▲or▼to highlight the
language you want, then press OK/ENTER.
3 The Time screen opens. Press◄ or ► to
select Auto or Manual, then press
OK/ENTER.
4 Press▲or▼to highlight Time Zone, then
press◄ or ►to select your time zone.
MOVE SELECT PREVIOUS EXIT
Set menu language to English, Français, or Español
5 Press▲or▼to highlight Daylight
Savings, then press◄ or ►to select On (if
your viewing area observes Daylight
Savings Time) or O (if your viewing area
does not observe Daylight Savings Time).
6 If you selected Manual for Mode, set the
date by pressing▲or▼to highlight Year,
Time Zone
Daylight Savings
Year
Month
Day
Time
MOVE SELECT PREVIOUS EXIT
If Automatic, options are automatically set by TV source
Month, or Day, then press◄ or ►to
adjust the setting.
7 If you selected Manual for Mode, set the time by pressing ▲or▼to highlight
Time, then pressing ◄ or ►to select the hour, minute, or AM/PM eld. Press
or▼to adjust the setting. Press OK/ENTER.
8 The Choose your Picture Mode screen opens.
Press▲or▼to highlight Home Mode
(default) or Retail Mode, then press
OK/ENTER. If you selected Retail Mode, a
message appears “Are you sure you want
Retail Mode? Since Energy saving is not
realized.” Select Yes to continue, or select
No to change your selection.
MOVE SELECT PREVIOUS EXIT
Reduces total power consumption
9 The Choose your TV source screen opens.
Press▲or▼to highlight Antenna, Cable,
or Cable/Satellite Box (if your cable TV
uses a box, select Cable/Satellite Box),
then press OK/ENTER. If you chose
Antenna or Cable, your TV automatically
starts scanning for channels available in
your viewing area. If you chose
MOVE SELECT PREVIOUS EXIT
Channel scan may take 20+ minutes
Cable/Satellite box, your TV does not
need to scan for channels.
Choose your menu Language
English
Français
Español
OK
ENTER
OK
ENTER
Choose your Picture Mode
OK
ENTER
Choose your TV source
Antenna
Cable
Cable/Satellite box
OK
ENTER
MENU
Time
MENU
Home Mode
Retail Mode
MENU
MENU
Newfoundland
12 : 01 AM
Digital Channels
0
Analog Channels
0
Scanning for digital channels
EXIT
EXIT
EXIT
▲
EXIT
2010
Selecting the video input source
• Press INPUT, press▲or▼to highlight a source, then press OK/ENTER. You can
On-screen menu overview
Picture menu Audio menu
also press any of the video source buttons directly.
Source List
TV
Component
VGA
HDMI 1
HDMI 2
HDMI 3
HDMI 4
USB
Adjusting the volume
• Press VOL+ or VOL- to change the volume.
• Press MUTE to turn o the sound.
Selecting a channel
• To move to a dierent channel in the channel list, press CH▲or CH ▼.
Picture
Mode
Brightness
Contrast
Color
Tint
MOVE SELECT PREVIOUS EXIT
Adjust settings to affect picture quality
PICTURE AUDIO CHANNELS SETTINGS USB
OK
ENTER
MENU EXIT
Energy Savings
Audio
50
48
70
0
0ssenprahS
Audyssey Dynamic Volume
SRS TruSurround HD
Treble
Bass
Balance
Digital Audio/SPDIF
OK
MOVE SELECT PREVIOUS EXIT
Adjust settings to affect sound quality
ENTER
Channels menu Settings menu
Channels
Auto Channel Search
Add/Skip Channels
Favorites
Channel Labels
Channel Strength
MOVE SELECT PREVIOUS EXIT
Adjust channel options
PICTURE AUDIO CHANNELS SETTINGS
OK
ENTER
MENU EXIT
USB
ffOylnO oiduA
Settings
Parental Controls
Closed Caption
Time
Menu Settings
Auto Input Sensing
Input Labels
OK
MOVE SELECT PREVIOUS EXIT
Set various TV options
ENTER
PICTURE AUDIO CHANNELS SETTINGS
MENU EXIT
PICTURE AUDIO CHANNELS SETTINGS
MENU
Medium
PCM
EXIT
USB
Off
32
32
0
Two-year limited warranty
See your User Guide or visit
www.insigniaproducts.com for details.
Need additional help?
USB
On
See your User Guide! This comprehensive
guide includes everything from basic
how-to steps to more advanced features.
Check out our online community forum at
www.insigniaproducts.com for helpful
information from other Insignia TV owners.
OR
• Enter the channel number directly using the number buttons.
USB menu
We’re here for you
PICTURE AUDIO CHANNELS SETTINGS
OK
ENTER
MENU
Press to
change the
volume
Press to
change the
channel
Photos
USB
Browse Photos
Favorite Photos
View Slideshow
Settings
MOVE SELECT PREVIOUS EXIT
Find photos that are on the USB device
otuAedoM
On
Jan
1
Viewing additional information
• Pres
s INFO to see status information such as
Navigating menus with your remote control
channel number, channel name (if available),
signal source, program desription, and DTV
signal strength.
Press
GUIDE to show the digital program guide,
which may show current channel name, program
Press to open the
on-screen menu
name, time, rating, and summaries, depending on
information provided by the broadcaster.
Press to select
menu options
Press to return to the
previous menu
USB
www.insigniaproducts.com
For customer service, call:
877-467-4289 (U.S./Canada markets)
EXIT
Press to move the cursor
on the screen or
to adjust a selected item
Press to conrm
a selection or to enter
a sub-menu
Press to close the menu
01 800-926-3000 (Mexico market)
Distributed by Best Buy Purchasing, LLC
7601 Penn Avenue South, Richeld, MN USA
55423-3645
Best Buy Imports, S. de R.L. de C.V. Av. Santa Fe 485,
Segundo Piso, Colonia Cruz Manca, Programa Parcial de
Desarrollo Santa Fe, Delegación Cuajimalpa, Distrito
Federal, México 05349
RFC#BBI0802114Q2
© 2010 BBY Solutions, Inc.
All rights reserved. INSIGNIA is a trademark of BBY
Solutions, Inc. Registered in some countries. All other
products and brand names are trademarks of their
respective owners.
ENGLISH 10-0460
 Loading...