

Page 1

User Guide | Guide de l’utilisateur | Guía del Usuario
42" LCD TV | Téléviseur ACL de 42 | Televisor con Pantalla LCD de 42"
NS-42LCD
Page 2

Page 3
Insignia NS-42LCD
42-inch LCD TV
Contents
Introduction . . . . . . . . . . . . . . . . . . . . . . . . . . . . . .3
Important safety information . . . . . . . . . . . . . . . . .3
Features. . . . . . . . . . . . . . . . . . . . . . . . . . . . . . . . .5
Setting up your TV . . . . . . . . . . . . . . . . . . . . . . . . .8
Using your TV . . . . . . . . . . . . . . . . . . . . . . . . . . .22
Maintaining. . . . . . . . . . . . . . . . . . . . . . . . . . . . . .37
Troubleshooting . . . . . . . . . . . . . . . . . . . . . . . . . .38
Specifications. . . . . . . . . . . . . . . . . . . . . . . . . . . .38
Warranty. . . . . . . . . . . . . . . . . . . . . . . . . . . . . . . .39
Français. . . . . . . . . . . . . . . . . . . . . . . . 41
Español . . . . . . . . . . . . . . . . . . . . . . . . 83
Introduction
Congratulations on your purchase of a
high-quality Insignia product. Your NS-42LCD
represents the state of the art in LCD TVs and is
designed for reliable and trouble-free
performance.
Important safety information
Warning
To reduce the risk of electric shock, do not remove the cover or
back. No user serviceable parts inside. Refer servicing to
qualified service personnel.
To reduce the risk of fire or electric shock, do not expose your
TV to rain or moisture.
Caution
To prevent electric shock, match the wide blade on the power
cord plug to the wide slot on an electric outlet. If the plug does
not fit, consult a licensed electrician to replace the obsolete
outlet. Do not modify the power cord plug, or you will defeat
this safety feature.
This symbol indicates that dangerous voltage
constituting a risk of electric shock is present
within your TV. This label is located on the back
of your TV.
Follow warnings and instructions
Follow all warnings on your TV and in the
operating instructions. Follow all operating and
use instructions.
Water and moisture
Do not use your TV near water. For example, do
not use it near a bath tub, wash bowl, kitchen
sink, or laundry tub, in a wet basement, or near a
swimming pool.
Cleaning
Unplug your TV before cleaning. Do not use
liquid or aerosol cleaners. Use only a damp cloth
to clean the exterior of your TV.
Ventilation
Slots and openings in the cabinet and the back
or bottom are provided for ventilation, reliable
operation, and protection from overheating.
These openings must not be blocked or covered.
Do not block the openings by placing your TV on
a bed, sofa, rug, or other similar surface. Do not
place your TV near or over a radiator or heat
register. Do not place your TV in a built-in
installation, such as a bookcase or rack, unless
you provide correct ventilation or follow the
manufacturer’s instructions.
Heat
Make sure that your TV is located away from
heat sources such as radiators, heat registers,
stoves, or other products (including amplifiers)
that produce heat.
Grounding or polarization
Do not defeat the safety purpose of the polarized
or grounding-type plug. A polarized plug has two
blades with one wider than the other. A
grounding type plug has two blades and a
grounding prong. The wide blade or grounding
prong are provided for your safety. If the plug
does not fit, contact an electrician to replace the
obsolete outlet.
Power cord protection
Route power cords so that they are not likely to
be walked on or pinched by items placed on or
against them. Pay particular attention to cords at
plugs, convenience receptacles, and the point
where they exit from your TV.
This symbol indicates that there are important
operating and maintenance instructions in the
literature accompanying your TV.
Warning
Your TV contains tin-lead solder and a fluorescent lamp
containing a small amount of mercury. Disposal of these
materials may be regulated for environmental reasons. For
disposal or recycling information, contact your local authorities
or the Electronic Industries Alliance at www.eia.org.
Read instructions
Read all of the safety and operating instructions
before you use your TV.
Retain instructions
Retain safety and operating instructions for
future reference.
www.insignia-products.com
Attachments
Do not use attachments not recommended by
Insignia because they may cause hazards.
Stand
Do not place your TV on an unstable cart, stand,
tripod, bracket, or table. Your TV may fall,
causing serious personal injury and serious
damage to your TV. Use only with a cart, stand,
tripod, bracket, or table recommended by the
manufacturer, or sold with your TV. If you mount
your TV to the wall, follow the manufacturer’s
instructions and use a mounting accessory
recommended by the manufacturer. Your TV and
cart combination should be moved with care.
Quick stops, excessive force, and uneven
surfaces may cause your TV and cart
combination to overturn.
3
Page 4
Insignia NS-42LCD 42-inch LCD TV
Lightning
For added protection for your TV’s receiver
during a lightning storm, or when it is left
unattended and unused for long periods of time,
unplug it from the power outlet and disconnect
the antenna or cable system. This helps prevent
damage to your TV from lightning and power line
surges.
Servicing
Do not attempt to service your TV yourself
because opening or removing covers may
expose you to dangerous voltage or other
hazards. Refer all servicing to qualified service
personnel.
Replacement parts
When replacement parts are required, make
sure that the service technician uses
replacement parts specified by the manufacturer
that have the same characteristics as the
original part. Unauthorized substitutions may
result in fire, electric shock, personal injury, or
other hazards.
Overloading
Do not overload power outlets and extension
cords because this can result in a risk of fire or
electric shock.
Object and liquid entry
Never push objects of any kind into your TV
through openings because objects may touch
dangerous voltage points or short out parts that
could result in a fire or electric shock. Never spill
liquid of any kind on your TV.
Damage requiring service
Unplug this TV from the power outlet and refer
servicing to qualified service personnel under
the following conditions:
• When the power supply cord or plug is
damaged or frayed.
• If liquid has been spilled or objects have
fallen into your TV.
• If your TV has been exposed to rain or water.
• If your TV does not operate normally by
following the operating instructions. Adjust
only those controls that are covered by the
operating instructions because incorrect
adjustment of other controls may result in
damage and will often require extensive work
by a qualified technician to restore your TV to
its normal operation.
• If your TV has been dropped or damaged in
any way.
• When your TV exhibits a distinct change in
performance.
Replacement parts
When replacement parts are required, make
sure that the service technician uses
replacement parts specified by the manufacturer
that have the same characteristics as the
original part. Unauthorized substitutions may
result in fire, electric shock, personal injury, or
other hazards.
Safety check
After completing any service or repair to this TV,
ask the service technician to perform routine
safety checks to determine that your TV combo
is in correct operating condition.
Power source
Operated your TV only from the type of power
source indicated on the marking label. If you are
not sure of the type power supplied to your
home, consult your TV dealer or local power
company.
Lightning
For added protection for your TV’s receiver
during a lightning storm, or when it is left
unattended and unused for long periods of time,
unplug it from the power outlet and disconnect
the antenna or cable system. This helps prevent
damage to your TV from lightning and power line
surges.
Screen protection
Your TV’s screen is made of glass. Do not drop
your TV or hit the glass screen. If the screen
breaks, be careful of broken glass.
Pixel defect
Your TV’s screen is designed to display finely
detailed pictures. Occasionally, a few non-active
pixels may appear on the screen as fixed points
of blue, green, or red. This is not a defect and
does not affect your TV’s performance.
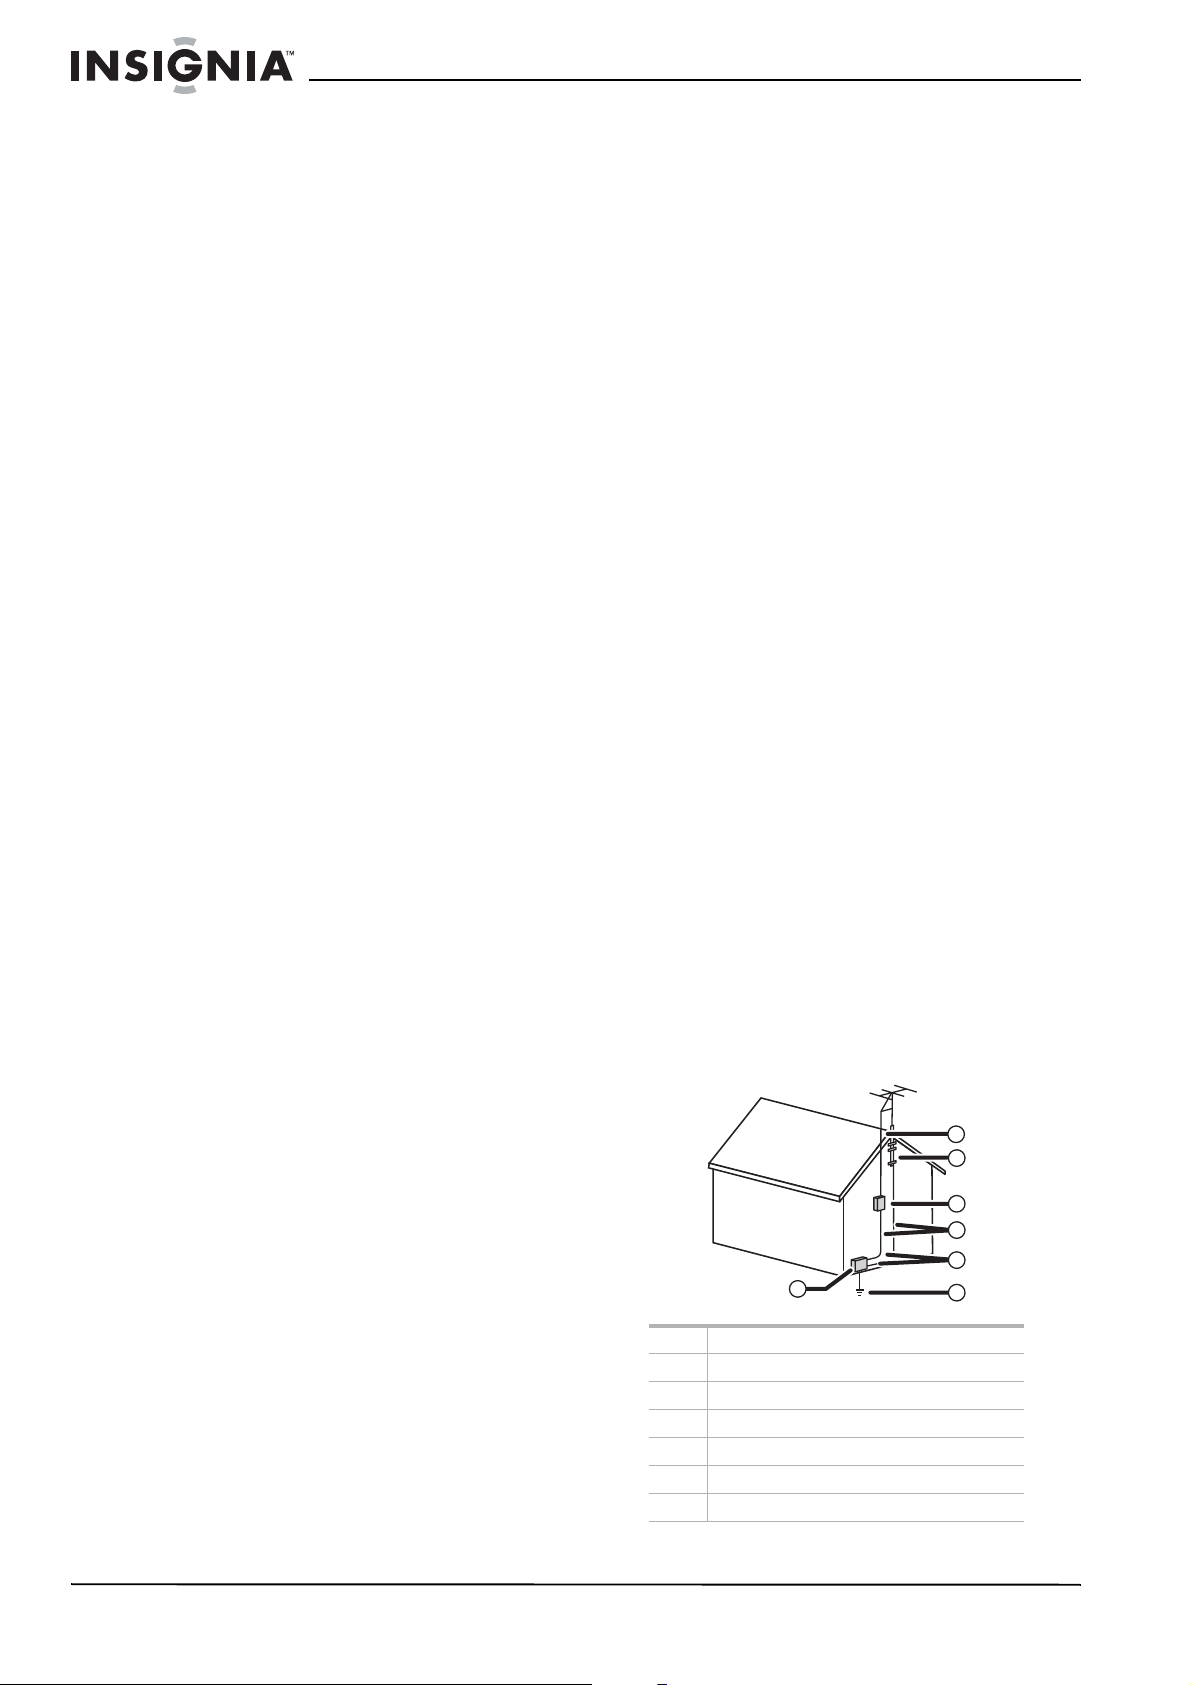
Outdoor antenna grounding
If an outside antenna or cable system is
connected to your TV, make sure that the
antenna or cable system is grounded to provide
some protection against voltage surges and
built-up static charges. Article 810 of the
National Electrical Code, ANSI/NFPA No. 70,
provides information with respect to correct
grounding of the mast and supporting structure,
grounding of the lead-in wire to an antenna
discharge unit, size of grounding conductors,
location of the antenna-discharge unit,
connection to grounding electrodes, and
requirements for the grounding electrode.
7
6
5
4
3
1
1 Electric service equipment
2 Power service grounding electrode system
3 Ground clamps
4 Grounding conductors
5 Antenna discharge unit
6 Grounding clamp
7 Antenna lead-in wire
2
4
www.insignia-products.com
Page 5
Insignia NS-42LCD 42-inch LCD TV
Note to CATV system installer
This reminder is provided to call the CATV
system installer’s attention to Article 820-40 of
the NEC that provides guidelines for correct
grounding and in particular, specifies that the
cable ground must be connected to the
grounding system of the building as close to the
point of cable entry as practical.
Features
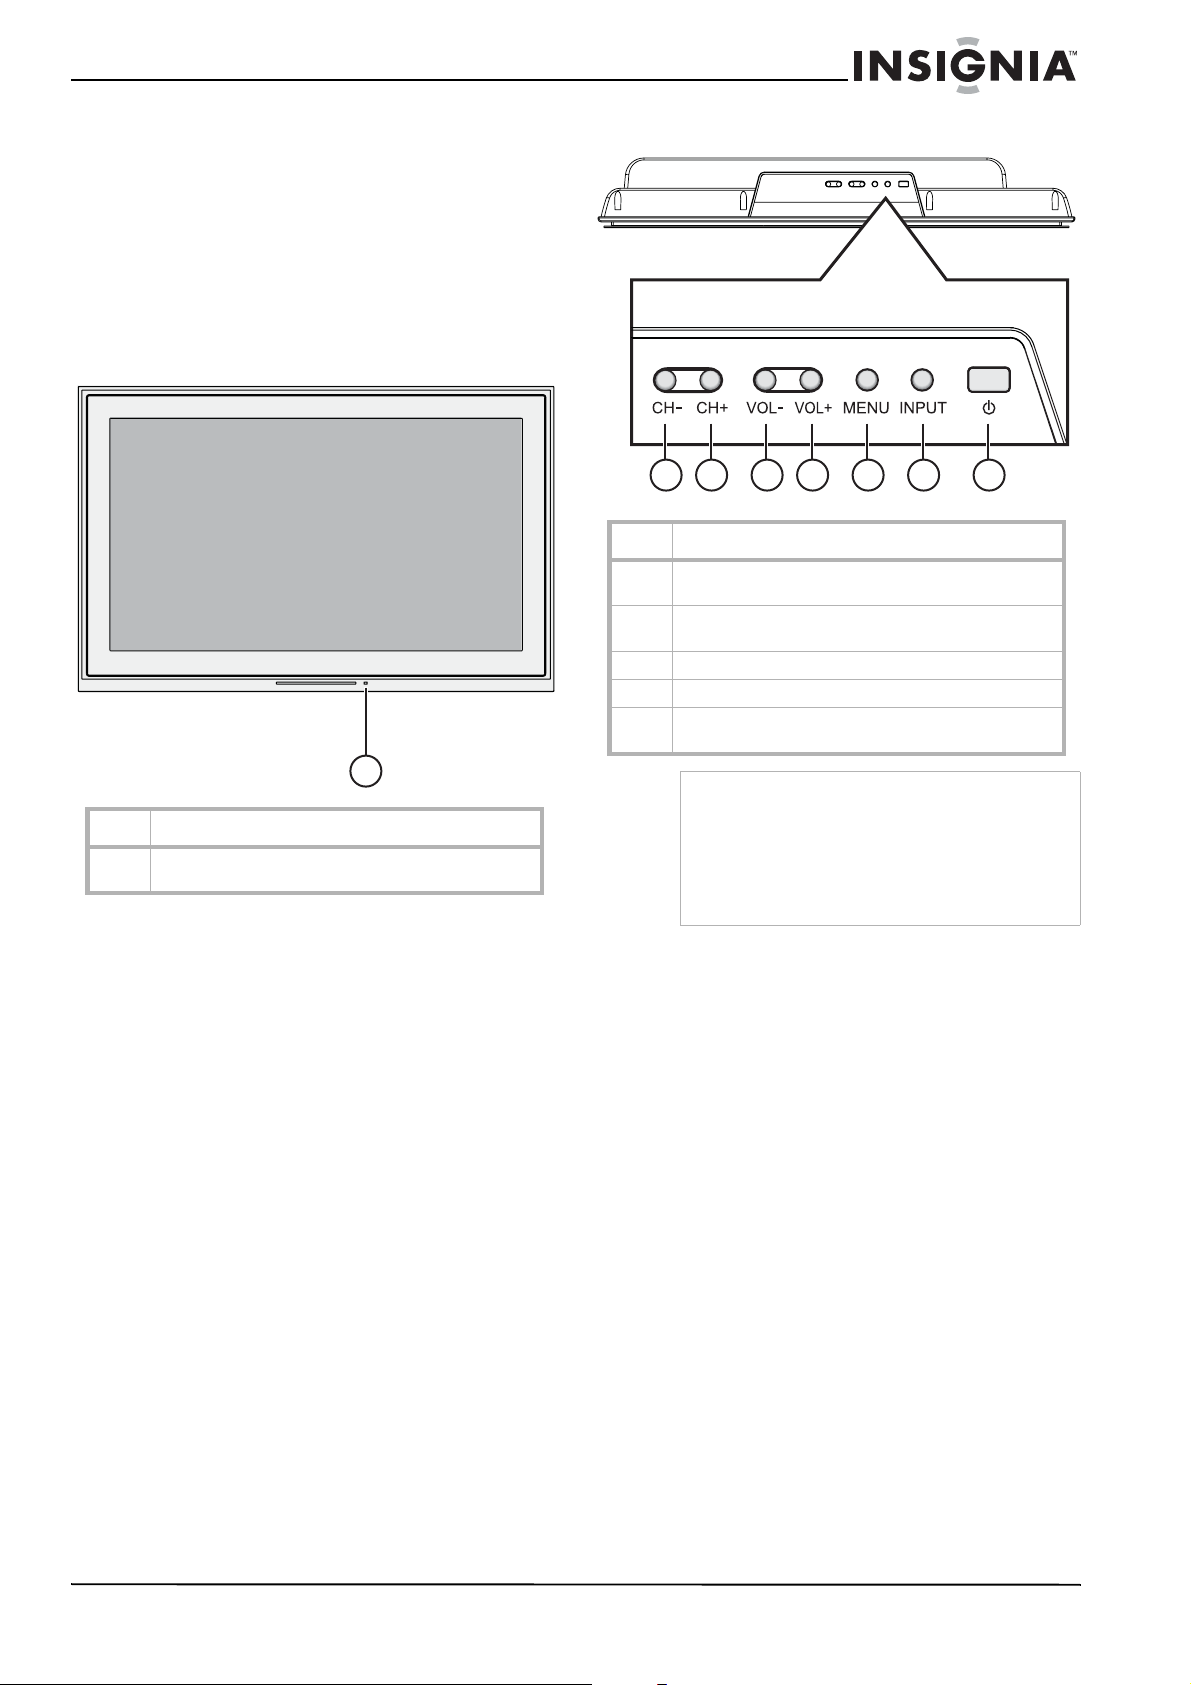
TV front
TV top
1 2 3 4 5 6 7
Item Description
1-2 CH-/CH+—Press to change channels. While in an
OSD menu, press to highlight options.
3-4 VOL-/VOL+—Press to change the volume. While in an
OSD menu, press to adjust the value of an option.
5 MENU—Press to access the OSD menu’s main page.
6 INPUT—Press to select the input signal source.
7 POWER—Press to turn the TV ON (from Standby
mode) or to activate Standby (from On mode).
1
Item Description
1 Remote control sensor—Point the remote control at
this sensor while pressing the remote’s buttons.
Notes
• POWER, CH+/-, VOL+/-, INPUT, and MENU
buttons on the TV have the same functions as
the corresponding buttons on the remote
control.
• This user guide describes procedures based
on using the remote control, not the TV
controls.
www.insignia-products.com
5
Page 6
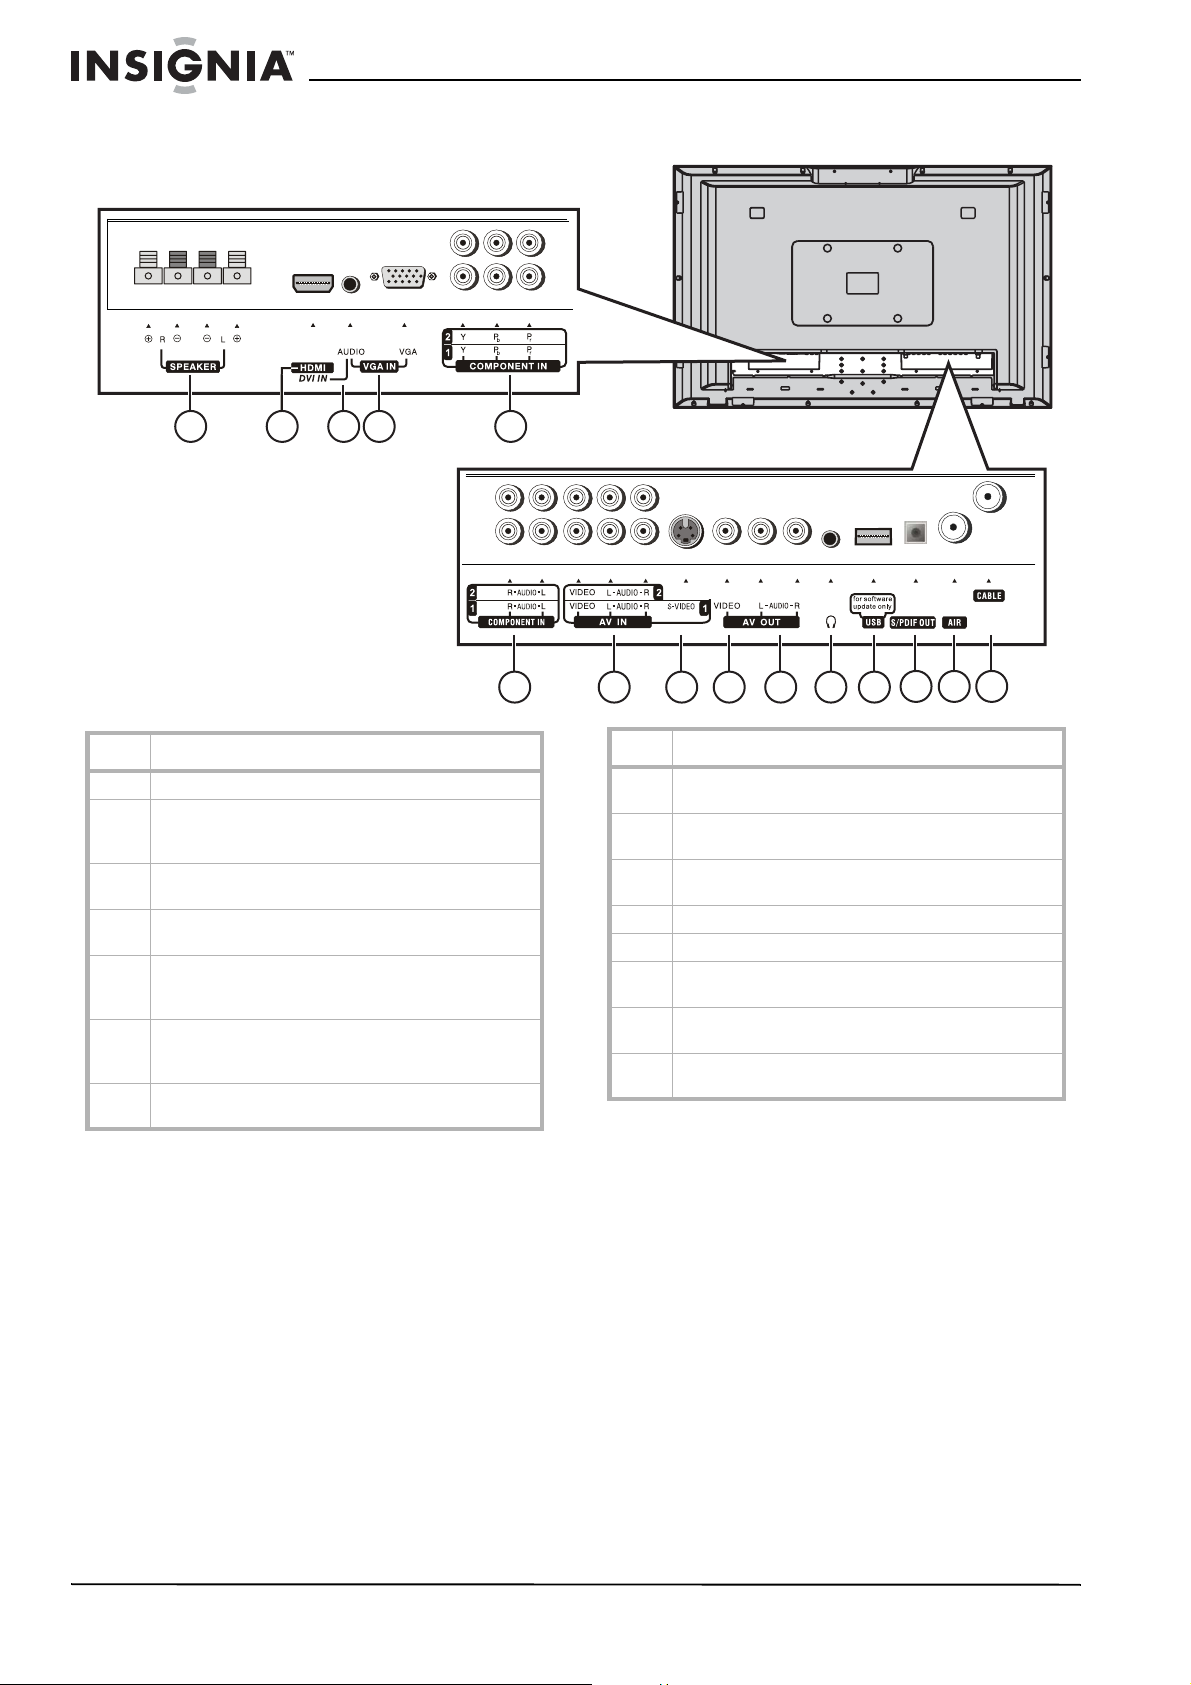
TV back
Insignia NS-42LCD 42-inch LCD TV
1 2 3 4 5
6 7 8 9 10 11 12
Item Description
1 Speaker output jacks
2 HDMI input jack—Connect devices with an HDMI
interface (for example, a set-top box or DVD player)
to this connector.
3 Audio in jack—Connect audio input (such as from a
computer) to this jack.
4 VGA port—Connect devices with a VGA interface (for
example, a computer) to this port.
5 Component video 1 and 2 jacks—Connect the
component video output jacks of a DVD player or
set-top box to these jacks.
6 Component audio 1 and 2 jacks—Connect the audio
output jacks of a DVD player or set-top box to these
jacks.
7 AV 1 and 2 jacks—Connect the AV output jacks of a
VCR or DVD player to these jacks.
13 14 15
Item Description
8 S-VIDEO jack—Connect the S-Video output jack of a
VCR or DVD player to this jack.
9 VIDEO out jacks—Connect to a VCR’s or DVR’s video
input jacks to record programs.
10 AUDIO out jacks—Connect to a VCR’s or DVR’s audio
input jacks to record audio for programs.
11 Headphone jack—Connect headphones to this jack.
12 USB port—For software (firmware) updates only.
13 S/PDIF optical digital audio out jack—Connect an
optical digital audio device to this jack.
14 AIR antenna jack—Connect an indoor or outdoor
antenna to this jack.
15 CABLE jack—Connect a cable TV system to this
connector.
6
www.insignia-products.com
Page 7
Insignia NS-42LCD 42-inch LCD TV
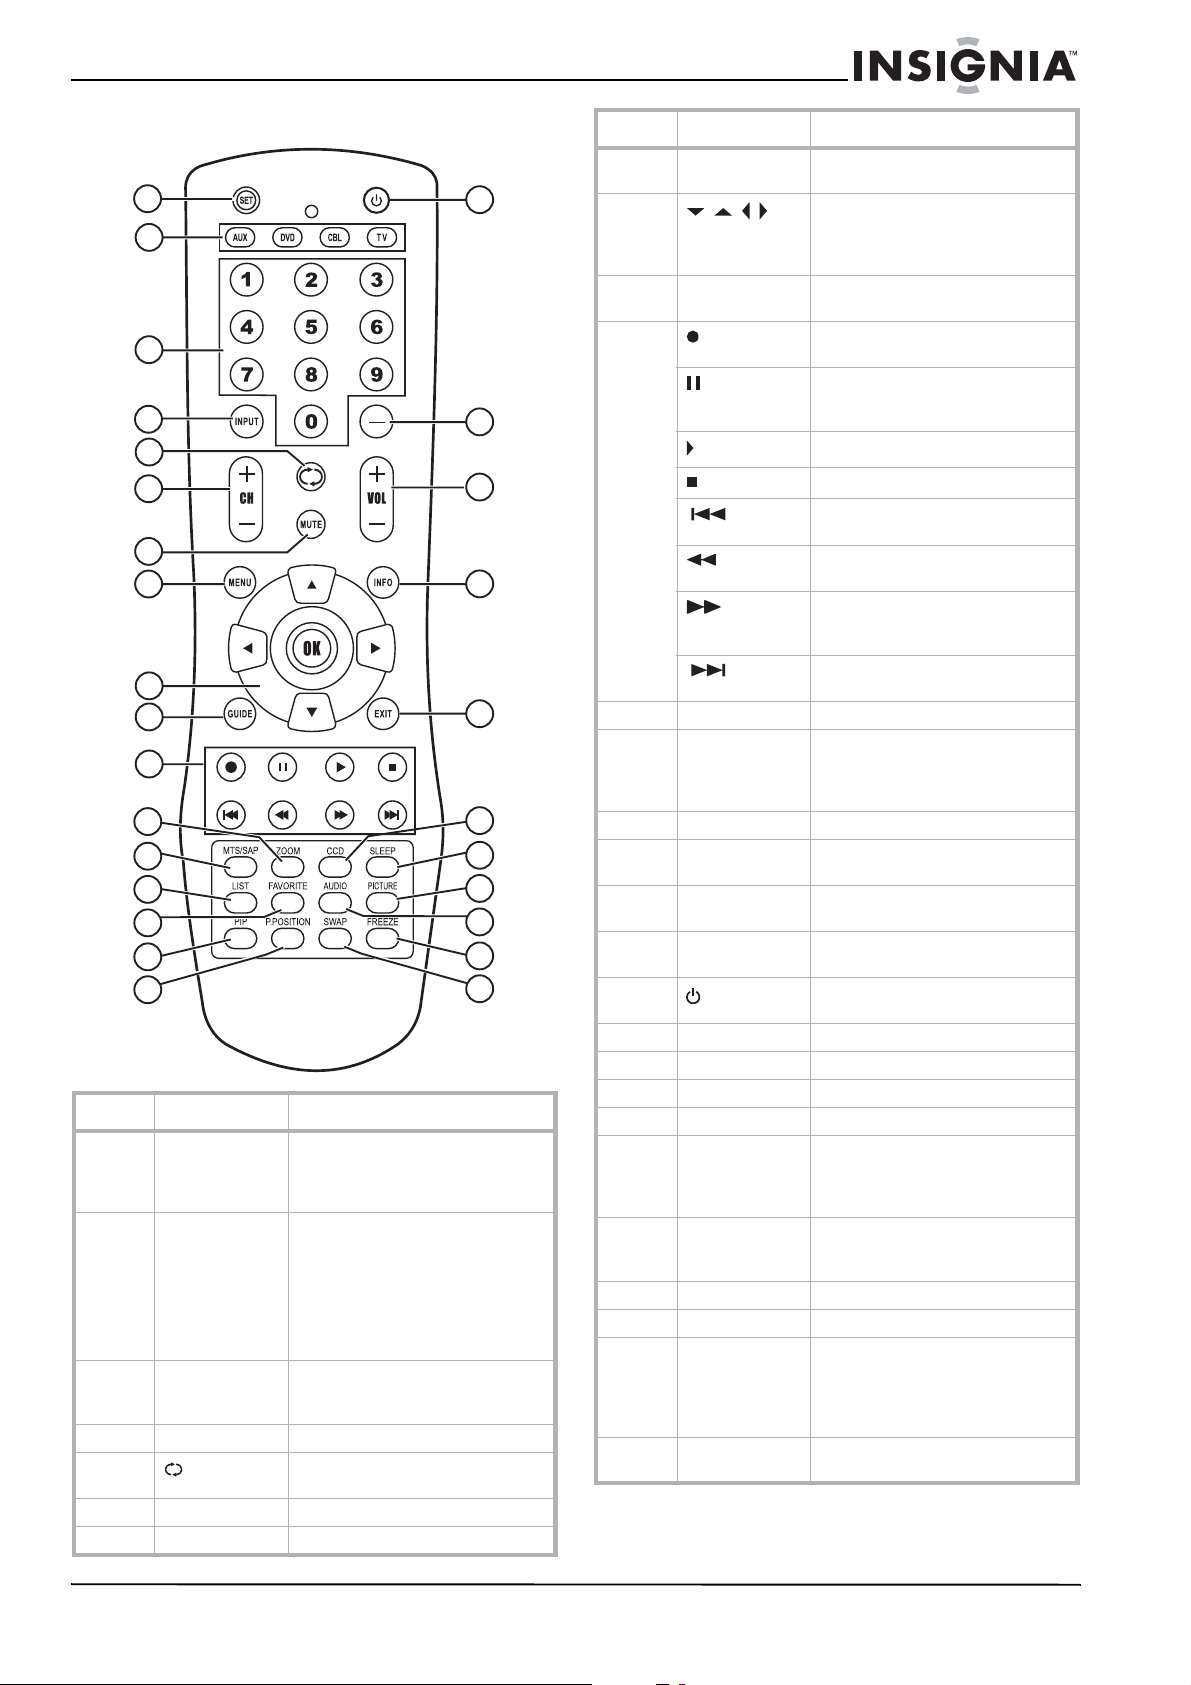
Remote control
1
2
3
4
5
6
7
8
9
10
11
12
13
14
15
16
17
Number Button Description
1 SET Press to program the remote
control. For more information, see
“Programming your remote
control” on page 16.
2 Device TV–Press to select the TV.
DVD–Press to select a connected
DVD player.
CBL–Press to select cable or
satellite TV.
AUX–Press to select a device
assigned to this button.
3 Numbers Press to enter channel numbers. In
an OSD menu, press to enter your
parental controls password.
4 INPUT Press to select the video source.
5 Press to go to the last viewed
channel.
6 CH +/– Press to change TV channels.
7 MUTE Press to mute the sound.
18
19
20
21
22
23
24
25
26
27
28
Number Button Description
8 MENU Press to open the on-screen menu
9
10 GUIDE Press to display the on-screen
11 Press to start a recording on a
12 ZOOM Press to select the aspect ratio.
13 MTS/SAP In analog TV mode, press to select
14 LIST Press to display a program list.
15 FAVORITE Press to display a Favorite program
16 PIP Press to select PIP/PBP/POP/full
17 P.POSITION Press to select the PIP sub-picture
18 Press to turn on your TV or put it
19 — Press to select a sub-channel.
20 VOL+/– Press to adjust the volume.
21 INFO Press to display status information.
22 EXIT Press to close the OSD.
23 CCD Press to turn Closed Captions on
24 SLEEP Press to set the sleep timer. For
25 PICTURE Press to select the picture mode.
26 AUDIO Press to select the sound mode.
27 FREEZE Press to freeze the video image.
28 SWAP Press to swap the main and sub
OK
(OSD).
Press the arrows to move around in
the OSD. Press OK to confirm
changes or to toggle options in the
OSD.
Electronic Program Guide (EPG).
connected device, such as a VCR.
When playing a DVD, press to
freeze the screen image. Press
again to unfreeze the image.
Press to start DVD or CD playback.
Press to stop DVD or CD playback.
Press to skip the previous chapter
on a DVD or previous track on a CD.
Press to fast-reverse on a DVD
or CD.
Press to fast-forward on a DVD or
CD if a DVD or CD player is
connected.
Press to skip the next chapter on a
DVD or next track on a CD.
MONO, STEREO, or SAP. In DTV
mode, press to select the audio
track.
list.
screen modes.
position.
into Standby mode.
and off. For more information, see
“Viewing Closed Captions” on page
31.
more information, see “Setting the
Sleep timer” on page 30.
Press again to unfreeze the image.
Do not freeze the video image for
long periods of time. You may
damage the TV screen.
pictures while in PIP or PBP mode.
www.insignia-products.com
7
Page 8
Insignia NS-42LCD 42-inch LCD TV
Setting up your TV
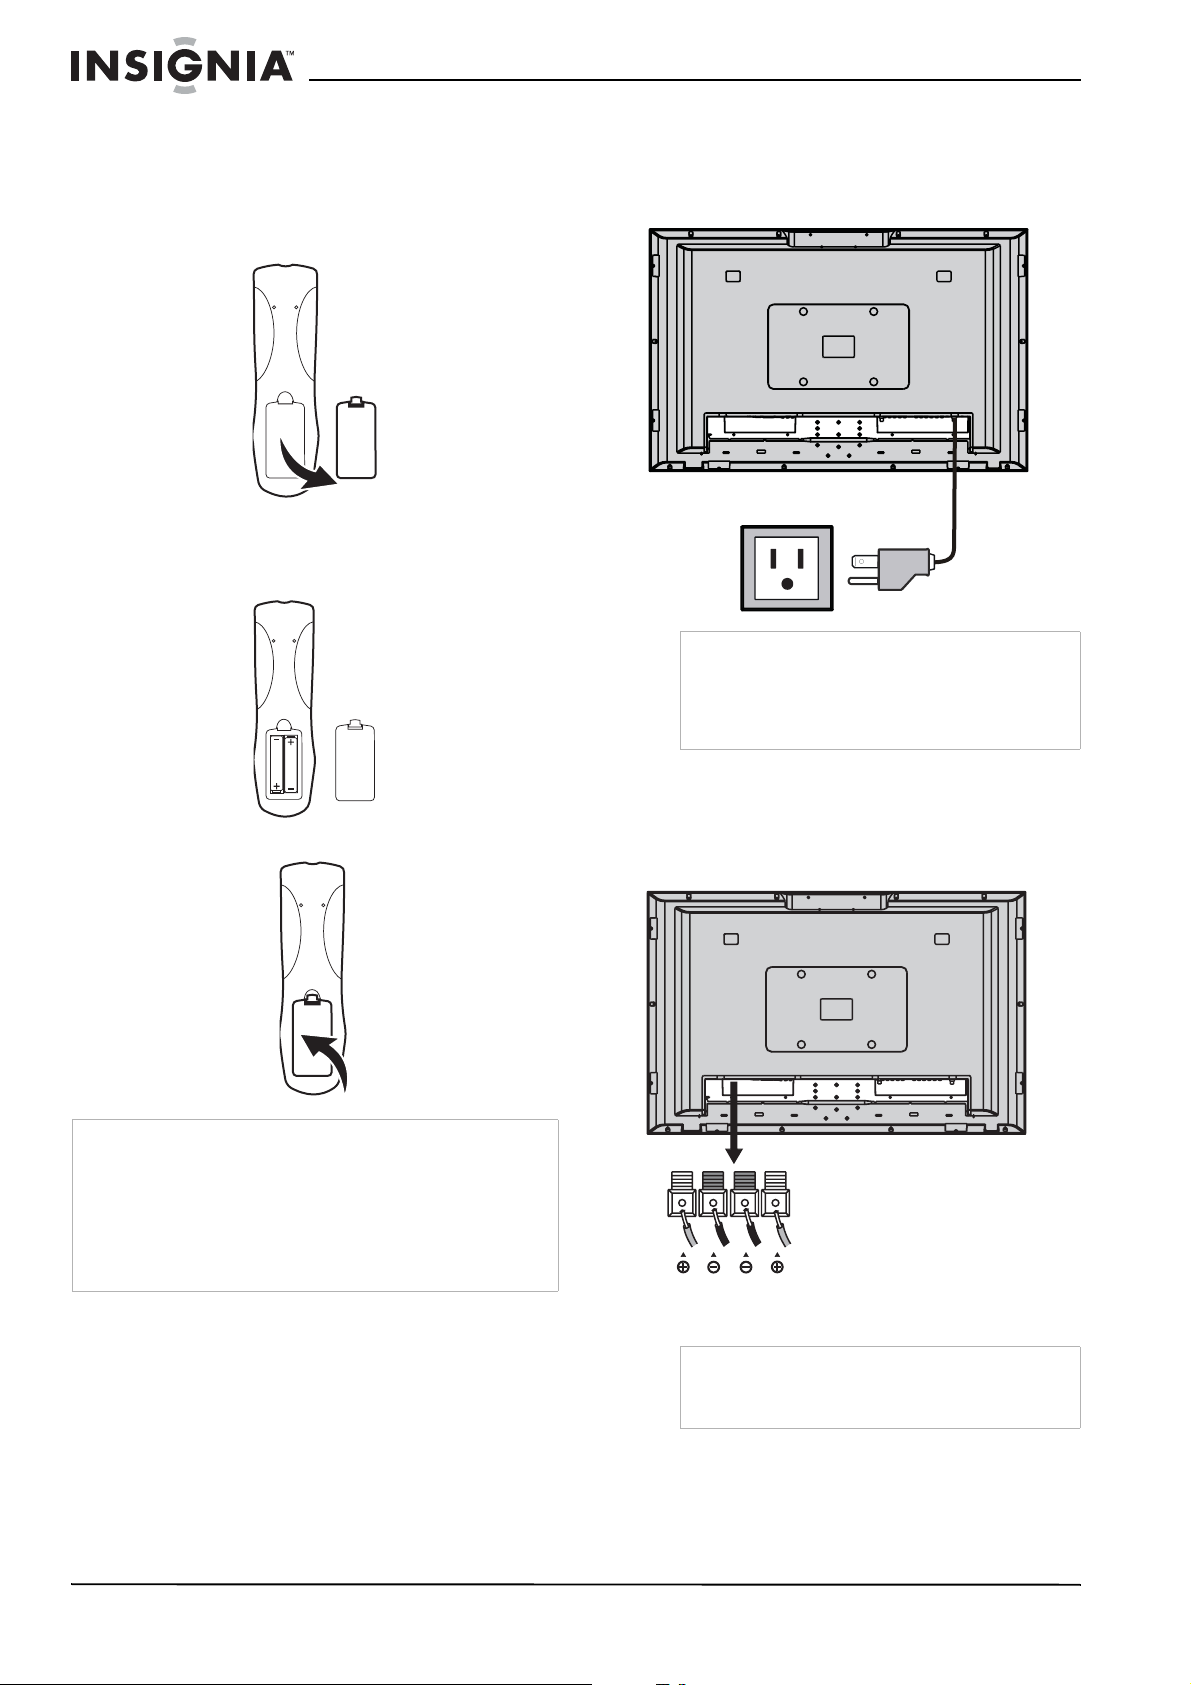
Installing batteries into the remote control
To install the remote control batteries:
1 Remove the battery cover.
2 Insert two AA batteries into the battery
compartment. Make sure that you match the
+ and – symbols on the batteries with the
+ and – symbols in the battery compartment.
Connecting power
To connect your TV to a power outlet:
• Plug the power cord into a standard
AC power outlet.
Notes
• Make sure that you use the correct type of
power. See the label on your TV.
• If you do not intend to use your TV for an
extended period of time, unplug the power cord
from the electrical outlet.
3 Replace the cover.
Notes
• Do not mix batteries of different types.
• Do not mix old and new batteries.
• Remove batteries when the charge is depleted.
• Battery chemicals can cause a rash. If the batteries leak,
clean the battery compartment with a cloth. If chemicals
touch your skin, wash immediately.
• If the remote control is not going to be used for an extended
period of time, remove the batteries.
Connecting external speakers
1 Connect the speaker audio cables to the
external speaker output jacks on the TV
matching the + and - ends of the cables with
the color on the jacks.
(Red)
(Black)
(Black)
(Red)
Notes
• Unplug the TV set and all connected
components before connecting the speakers.
• The illustration may differ from your model.
8
www.insignia-products.com
Page 9

Insignia NS-42LCD 42-inch LCD TV
Attaching the included speakers
Caution
Do not lift or move the TV while holding the
speaker.
Installing the speakers
1 Unplug the TV and all connected
components.
2 Place the TV face-down on a stable, soft,
non-marring surface.
3 Carefully remove the screw covers (1), then
remove the four screws (2) from under the
covers.
1
2
4 Attach the speakers to the TV through the
speaker-fixed connectors using the above
screws (from Step 3), then securely tighten
them.
5 Install the two Speaker Connecting Covers to
the corresponding places on the TV.
6 Connect the speaker audio cables to the
external speaker output jacks on the TV
matching the + and - ends of the cables with
the color on the jacks.
www.insignia-products.com
9
Page 10

Connecting an antenna
Insignia NS-42LCD 42-inch LCD TV
VHF antenna
About antenna connections
For acceptable reception of VHF and UHF
channels, an external antenna is required. For
best reception, we recommend an outdoor
antenna.
Antenna cables come in two types: 75 ohm and
300 ohm.
75 ohm cable
300-ohm cable
UHF antenna
Mixer
75 Ohm coaxial cable
Connect to
Cable TV box
To connect an antenna:
1 If you watch broadcast stations without using
a set-top box, connect the antenna to the AIR
connector on the back of the TV.
- OR If you use cable TV, connect the cable box’s
cable to the CABLE connector on the back of
the TV.
2 Select the TV Source (AIR or CABLE) in the
CHANNEL SETUP menu, then perform an
auto channel search. For more information,
see “Memorizing channels” on page 24.
If your antenna cable has a 75 ohm connector,
connect the cable to the coaxial jack on the back
of your TV.
If your antenna cable has a 300 ohm connector,
connect the cable to a 300-75 ohm adapter (not
included), connect the adapter to a 75 ohm
cable, then connect the other end of the 75 ohm
connector to the coaxial jack on the back of your
TV.
Precautions
• Carefully check the terminals for position and
type before making any connections.
• Loose connectors can result in image or color
problems. Make sure that all connectors are
securely inserted into their terminals.
• When connecting an external device, turn it
off before trying to connect it.
Note
• A local television service center or dealer may
be able to help you get the correct antenna
system (and accessories) for your particular
area.
• Anything related to installing an antenna,
installing accessories, or upgrading your
current system is your responsibility.
10
www.insignia-products.com
Page 11

Insignia NS-42LCD 42-inch LCD TV
Connecting digital optical audio
Receiver Stereo
For a full home theater sound experience, you
should connect your stereo or audio processor
to the S/PDIF OUT (Optical) jack on the TV.
Note
The S/PDIF OUT jack can output digital audio
from TV programs only.
To connect optical audio
1 Connect an optical audio cable to the S/PDIF
OUT jack on the back of the TV.
2 Connect the cable to the S/PDIF IN jack on
your stereo or audio receiver.
Connecting a VCR
To connect a VCR:
1 Connect the audio/video cables to the Audio
(L/R)/Video jacks on the unit and VCR.
Note
For better video, you can connect to the S-VIDEO
jack if your source device supports it. S-VIDEO
input uses the same circuit as Video1, and if both
standard A/V inputs and S-VIDEO inputs are
connected, S-VIDEO has priority. Use one or the
other.
OR
S/PDIF IN
(optical)
3 Press or to select AV1/SVideo, then
press OK to confirm.
4 Turn on your VCR, insert a videotape, then
press Play on the VCR.
YRW
A/V cables and
S-Video cable
Y=Yellow (Video)
W=White (Audio L)
R=Red (Audio R)
Y
W
R
To play video from your VCR:
2 Turn on your TV, then press INPUT. The
INPUT SELECT menu opens.
www.insignia-products.com
VCR
11
Page 12
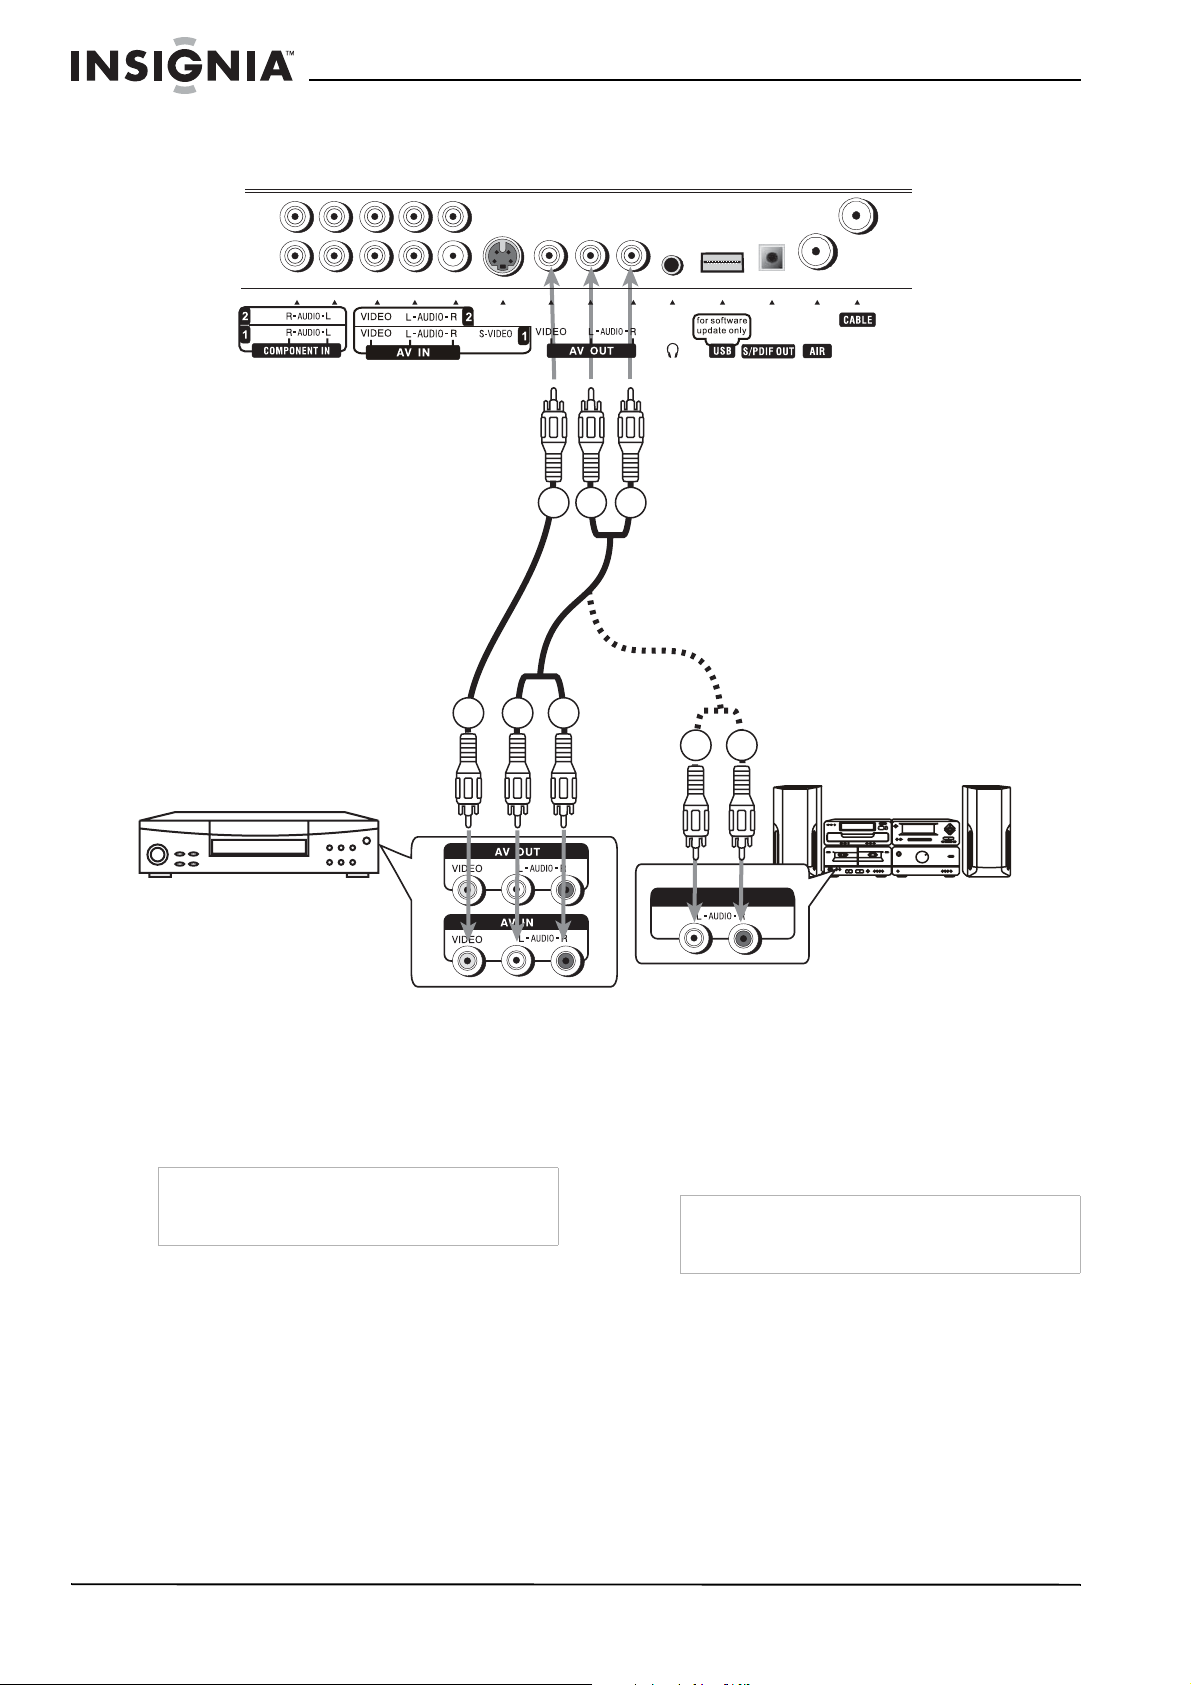
Connecting a VCR (for recording) or
external amplifier
Insignia NS-42LCD 42-inch LCD TV
W
Y
R
Video
cable
W
Y
VCR
To connect a VCR or amplifier:
1 Connect the video cables to the Video jacks
on the TV and VCR.
2 Connect the audio cables to the TV, then
connect them to the Audio (L/R) jacks on
either the VCR or an external amplifier.
Note
Only analog TV programs and AV1/AV2 input
sources can be output through the AV output
jacks.
Audio
cable
R
Y=Yellow (Video)
W=White (Audio L)
R=Red (Audio R)
R
W
Monitor - Record
External
amplifier
To record a program:
1 Turn on your TV, then select a program you
want to record.
2 Turn on your VCR, then insert a videotape for
recording.
3 Press the Record button on the VCR to
begin recording.
Note
The operations of the amplifier may be different
depending on your model. Read the amplifier’s
user guide to confirm correct operation.
12
www.insignia-products.com
Page 13

Insignia NS-42LCD 42-inch LCD TV
Connecting a camcorder
Y
R
W
Y=Yellow (Video)
W=White (Audio L)
R=Red (Audio R)
Video
cable
Audio
cable
Y
R
W
Connecting an HDMI device
HDMI cable
HDMI OUT
Device with
HDMI port
To connect a camcorder:
1 Connect the Audio/Video cables to the back
of the TV.
2 Connect the audio/video cables to the
camcorder.
To play from a camcorder:
1 Turn on your TV, then press INPUT. The
INPUT SELECT menu opens.
2 Press or to select AV 2, then press OK
to confirm.
3 Turn on your camcorder, then set it to output
mode.
4 Insert a tape into the camcorder, then press
the camcorder’s Play button.
Note
The operations of the camcorder may be different
and is dependant on your model. Please read the
user manual of your camcorder to confirm
operation.
To connect a DVD player or set-top box
using HDMI:
• Connect the HDMI cable between the HDMI
interface on the unit and HDMI output on the
DVD player (or STB).
1 Connect the HDMI cable to the HDMI port on
the back of the TV.
2 Connect the HDMI cable to the HDMI OUT
port on the DVD player or set-top box.
To play from a DVD player or set-top box
using HDMI:
1 Turn on your TV, then press INPUT. The
INPUT SELECT menu opens.
2 Press or to select HDMI, then press
OK to confirm.
3 Turn on your DVD player or set-top box, and
set them to the correct mode. See the
device’s user guide for more information.
Note
If the device has only DVI output, use a
DVI-to-HDMI adapter cable to connect to the
HDMI port. Then connect the audio cable to the
AUDIO jack next to VGA IN on the back of the TV.
www.insignia-products.com
13
Page 14

Connecting component video
Insignia NS-42LCD 42-inch LCD TV
GRB
Video
cable
W=White (Audio L)
R=Red (Audio R or Pr component video)
G=Green (Y component video)
B=Blue (Pb component video)
RG
B
Component color provides the luminance and
color signals over separate channels, which
provides the clearest, sharpest video available
for your TV.
To connect a device using component video:
1 Connect the component video cable to the Y,
Pb, and Pr input jacks on the TV.
2 Connect the cable to the Y, Pb, and Pr output
jacks on the device.
3 Connect the audio cable to the AUDIO input
jacks on the TV and the AUDIO output jacks
on the external device.
R
W
W
L-Audio-R
Audio
cable
R
Device with component video
To play component video from an external
device:
1 Turn on your TV, then press INPUT. The
INPUT SELECT menu opens.
2 Press or to select Component1 or
Component2, then press OK to confirm.
3 Turn on your external device, and set it to the
correct mode. See the device’s user guide for
more information.
14
www.insignia-products.com
Page 15
Insignia NS-42LCD 42-inch LCD TV
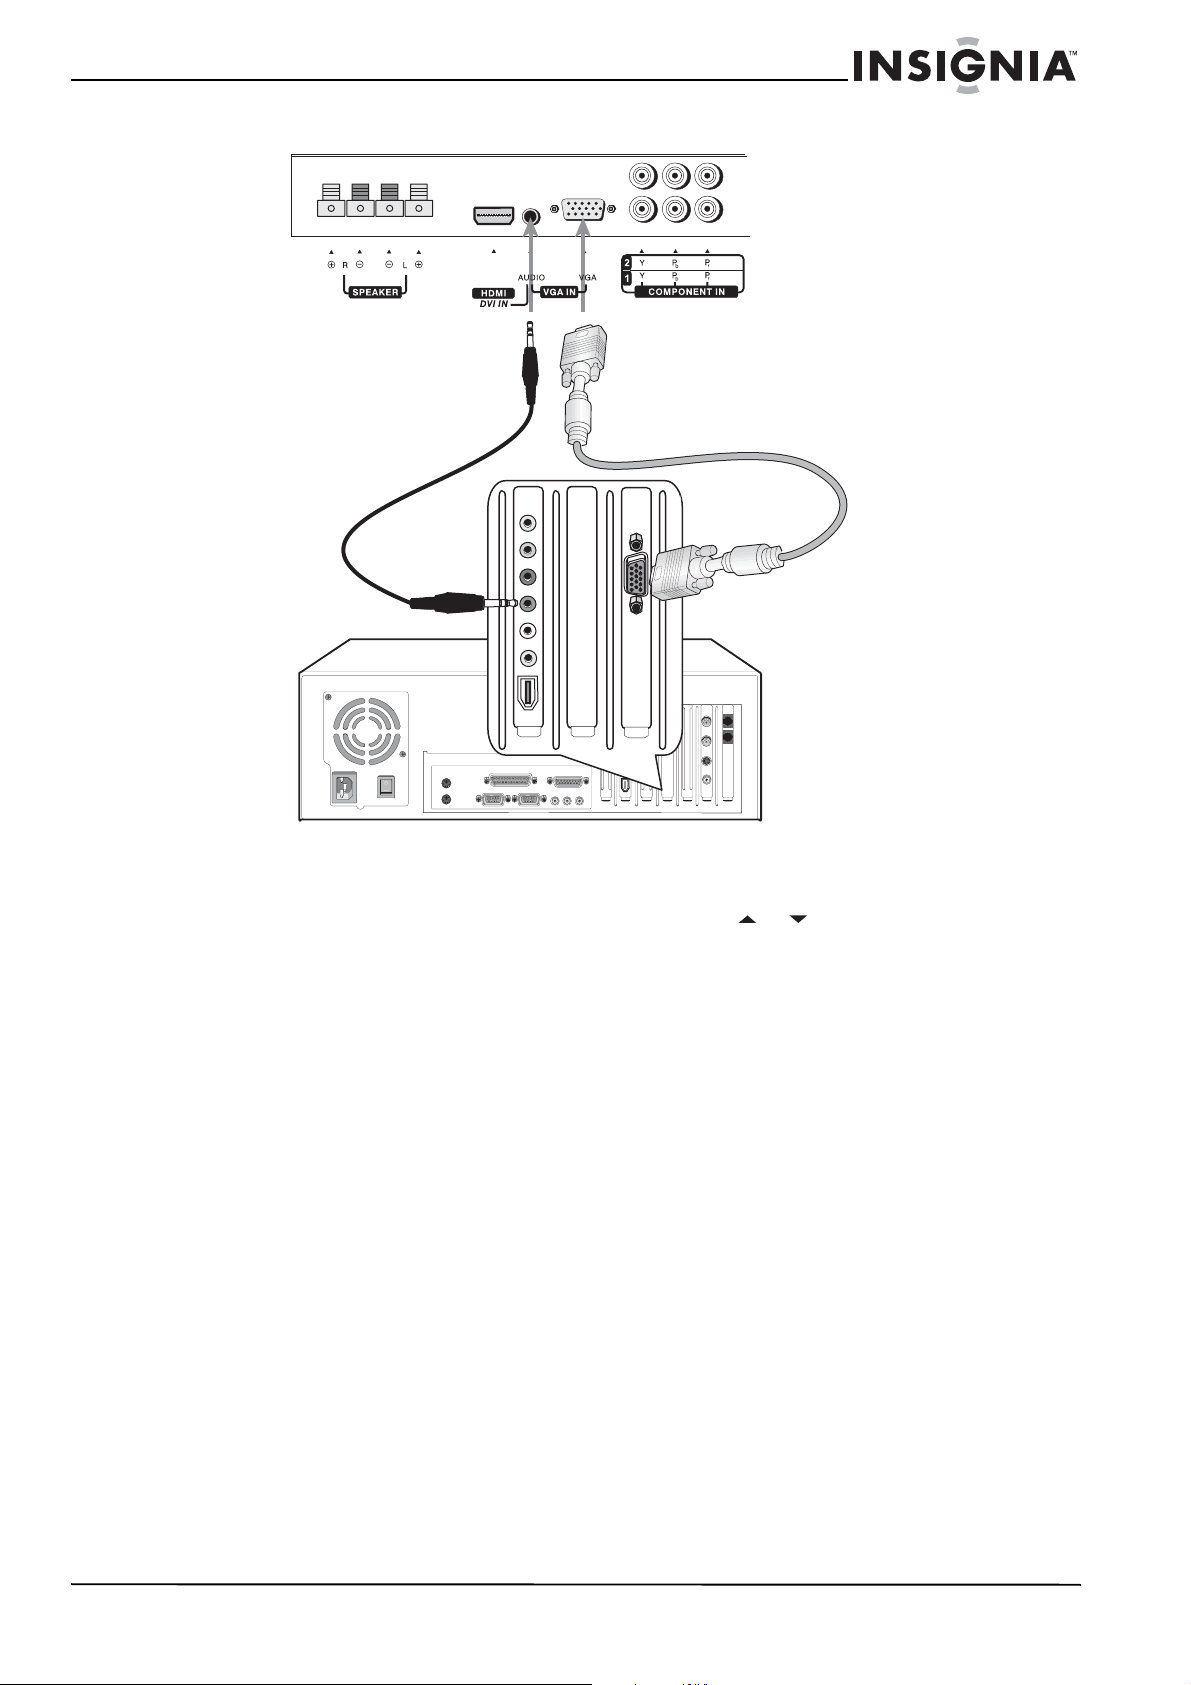
Connecting a computer
Audio
cable
VGA
cable
To connect a computer:
1 Connect a VGA cable to the VGA port on the
computer and the VGA port on the TV.
2 Connect an audio cable to the LINE OUT or
HEADPHONE jack on the computer and
AUDIO input jack on the TV.
To play video from a computer:
1 Turn on your TV, then press INPUT. The
INPUT SELECT menu opens.
2 Press or to select Analog RGB, then
press OK to confirm.
3 Turn on your computer, and adjust the display
properties as required.
www.insignia-products.com
15
Page 16
Insignia NS-42LCD 42-inch LCD TV
Changing the on-screen menu language
You can change the language that the on-screen
menu displays.
To change the on-screen menu language:
1 Press MENU, then press or to display the
SYSTEM SETUP menu page.
2 Press to enter the System Setup menu.
3 Press or to select Language, then
press or to select the language you want.
4 Press EXIT to return to TV viewing.
Programming your remote control
The remote control can control four devices,
such as a VCR, DVD player, cable or satellite
receiver, amplifier or tuner, or similar device.
To program the remote control:
1 Find the code for the device you want to
program. (See “Device codes” on page 17.) If
more than one code is listed for a device,
write down all of the codes.
2 Turn on the device you want to program, and
load any media if required (for example, a
DVD).
3 Press a device key on the remote control.
•Use DVD for DVD players or VCRs.
•Use CBL for cable or satellite set-top
boxes.
•Use AUX for any other device.
4 Press and hold the SET button on the remote
control until the LED blinks twice, then
release the button.
5 Enter the first five-digit code for your device.
The LED blinks once as each digit is entered.
If the code is correct, the LED blinks twice.
Note
If the LED does not blink twice, repeat Steps 3
through 5 using a different code.
6 Aim the remote control at the device, then
press the button.The device should turn
off.
Note
If the device does not turn off, repeat steps 4
through 6 using a different code. If you cannot find
a code that works, see “Searching for your code”
on page 16.
• AUX Code:___________________
• CBL Code: ___________________
• CD Code: ____________________
• DVD Code:___________________
• SAT Code: ___________________
• TNR Code:___________________
• VCR Code:___________________
8 Press the SET button to save the code and
exit.
Searching for your code
If your device does not respond to the remote
after trying all codes listed for your brand, or if
your brand is not listed, try searching for your
code.
To search for a code:
1 Press a device key.
2 Press and hold the SET button until the LED
blinks twice, the release the button.
3 Enter 991, then the device group number
(0=cable, 1=TV, 2=VCR, 3=audio). The LED
blinks twice.
4 Aim the remote control at the device, then
press the button. The remote sends codes
from its library to the selected device, starting
with the most common code first. If the
device responds, go to Step 7.
5 If the device does not respond, press the
CH+ button. Your remote control will try the
next code. Keep pressing the CH+ button
until the device responds. You can press the
CH– button to try a previous code. Continue
until the device responds.
6 To search for a code for another device,
repeat steps 1 through 5.
7 Press the SET button to save the code and
exit.
Checking the codes
If you programmed a device by searching for a
code, you may want to know what four-digit code
the remote is using.
To check the code:
1 Press the device button on the remote
control.
2 Press and hold the SET button until the LED
blinks twice, then release the button.
3 Enter 990. The LED blinks twice.
4 Press 1 and count the LED blinks. This is the
first digit of the code. For example, if the LED
blinks twice, the first digit is 2. If the LED
does not blink, the first digit is 0.
5 Repeat step 4 using 2 for the second digit, 3
for the third digit, 4 for the fourth digit, and 5
for the fifth digit.
6 Press the SET button to exit.
16
7 Repeat Steps 1 through 6 to program
additional devices. For future reference, write
down each working device code below:
www.insignia-products.com
Page 17
Insignia NS-42LCD 42-inch LCD TV
Programming the volume lock
The remote control comes preset to let you
control the volume of each connected device.
You can change the volume lock so that one
device’s volume controls volume in all modes.
After you lock the volume control, you can unlock
the volume control for a specific device so you
can control the volume for that device
independently.
To lock the volume control:
1 Press and hold the SET button until the LED
blinks twice, then release the button.
2 Enter 993, then press the device button for
the device you want to control the volume.
The LED blinks twice. When you press the
VOL+, VOL–, or MUTE button on the remote
control, the device you selected controls the
volume regardless of which device you are
using.
To unlock the volume control:
1 Press and hold the SET button until the LED
blinks twice, then release the button.
2 Enter 993, then press VOL+ button. The LED
blinks four times. The volume control is
unlocked.
To unlock a single device’s volume control:
1 Press the device key.
2 Press and hold the SET button until the LED
blinks twice, then release the button.
3 Enter 993, then press VOL– button. The LED
blinks four times. The volume control for the
device you selected is unlocked.
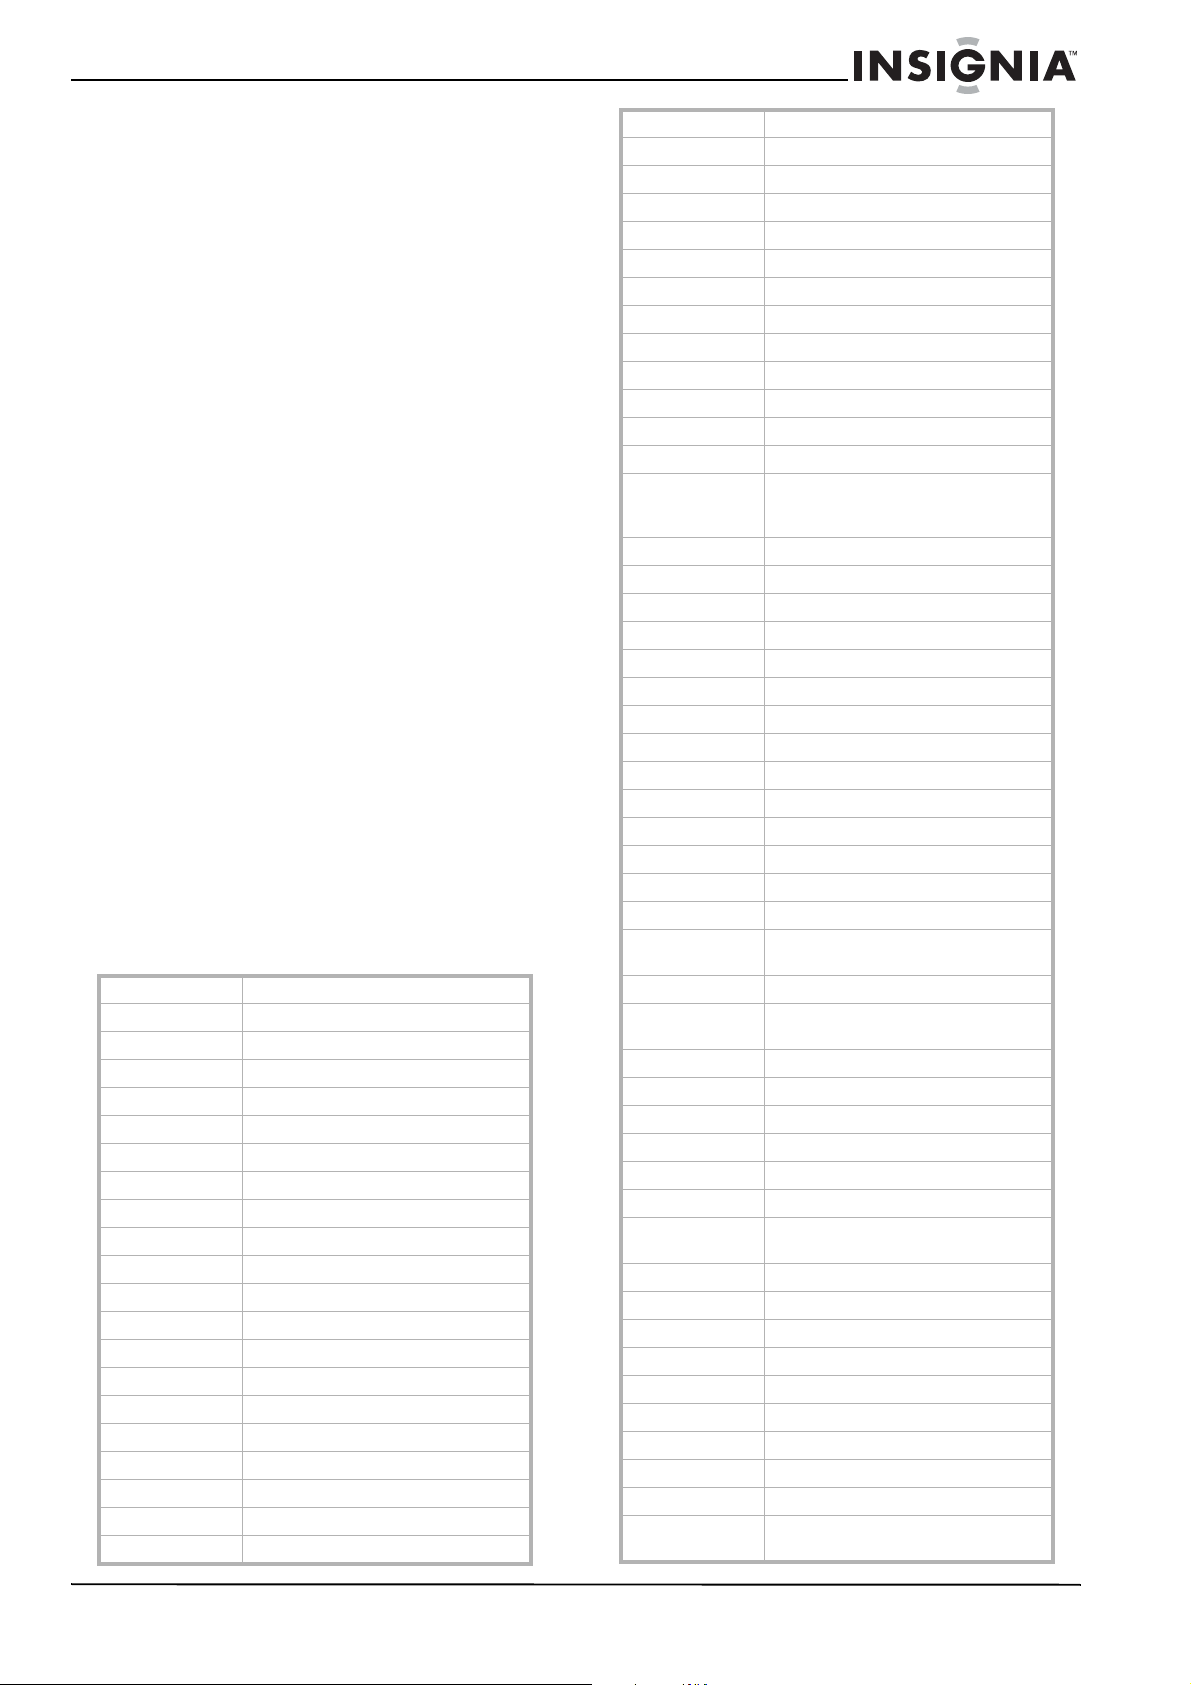
Device codes
VCR codes
ABS 21972
Admiral 20048, 20209
Aiko 20278
Aiwa 20037, 20479
Alienware 21972
America Action 20278
American High 20035
Amoisonic 20479
Anam 20162, 20037, 20240, 20278
Anam National 20162
Asha 20240
Audiovox 20037, 20278
Beaumark 20240
Bell & Howell 20104
Broksonic 20184, 20121, 20209, 20002,20479
Calix 20037
Canon 20035
Carver 20081
CCE 20072, 20278
Changhong 20048, 20081
Citizen 20037, 20278
Colt 20072
Craig 20037, 20047, 20240, 20072
Curtis Mathes 20060, 20035, 20162
Cybernex 20240
CyberPower 21972
Daewoo 20045, 20104, 20278
Dell 21972
Denon 20042
DirecTV 20739
Durabrand 20039, 20038
Electrohome 20037
Electrophonic 20037
Emerex 20032
Emerson 20035, 20037, 20184, 20240,20045,
Fisher 20047, 20104
Fuji 20035, 20033
Fujitsu 20045
Gateway 21972
GE 20060, 20035, 20240
General 20045
Go Video 20432
GoldStar 20037, 20209, 20038, 20225
Haojie 20240
Harman/Kardon 20081, 20038
Harwood 20072
Hewlett Packard 21972
HI-Q 20047
Hitachi 20037, 20042, 20055
Howard
Computers
HP 21972
Hughes Network
Systems
iBUYPOWER 21972
JVC 20045, 20067
KEC 20037, 20278
Kenwood 20067, 20038
KLH 20072
Kodak 20035, 20037
Kolin 20043 LG 20037, 20045, 20042,
Logik 20072
LXI 20037
Magnavox 20035, 20039, 20081
Magnin 20240
Marantz 20035, 20081
Marta 20037
Matsushita 20035, 20162
Media Center PC 21972
MEI 20035
Memorex 20035, 20162, 20037, 20048,20039,
20121, 20043, 20209, 20002, 20278,
20479
21972
20042, 20739
20209,20038
20047, 20240, 20104, 20209, 20479
www.insignia-products.com
17
Page 18
Insignia NS-42LCD 42-inch LCD TV
MGA 20240, 20043
MGN Technology 20240
Microsoft 21972
Mind 21972
Minolta 20042
Mitsubishi 20067, 20043
Motorola 20035, 20048
MTC 20240
Multitech 20072
NEC 20035, 20037, 20048, 20104,20067,
20038
Newave 20037
Nikko 20037
Noblex 20240
Northgate 21972
Olympus 20035
Optimus 21062, 20162, 20037, 20048,20104,
20432
Orion 20184, 20209, 20002, 20479
Panasonic 21062, 20035, 20162, 20616,20225
Penney 20035, 20037, 20240, 20042,20038
Pentax 20042
Philco 20035, 20479
Philips 20035, 20081, 20739, 20618
Pilot 20037
Pioneer 20042, 20067
Polk Audio 20081
Profitronic 20240
Proscan 20060
Protec 20072
Pulsar 20039
Qisheng 20060
Quasar 20035, 20162
Radix 20037
Randex 20037
RCA 20060, 20035, 20240, 20042,20880
Realistic 20035, 20037, 20048, 20047,20104
ReplayTV 20616
Runco 20039
Sampo 20037, 20048
Samsung 20240, 20045, 20432
Sanky 20048, 20039
Sansui 20067, 20209, 20479
Sanyo 20047, 20240, 20104
Scott 20184, 20045, 20121, 20043
Sears 20035, 20037, 20047, 20042,20104
Sharp 20048, 20209
Shintom 20072
Shogun 20240
Singer 20072
Sonic Blue 20616
Sony 20035, 20032, 20033, 20636,21972
STS 20042
Sylvania 20035, 20081, 20043
Systemax 21972
Tagar Systems 21972
Tashiko 20037
Tatung 20045, 20067
Technics 20035, 20162
Teco 20035, 20037, 20048, 20038
Teknika 20035, 20037
Tivo 20636, 20618, 21503, 20739
TMK 20240
Toshiba 20045, 20042, 20067, 20043,21503,
Totevision 20037, 20240
Touch 21972
Unitech 20240
Vector 20045
Vector Research 20038
Victor 20067
Video Concepts 20045
Videomagic 20037
Videosonic 20240
Viewsonic 21972
Wards 20060, 20035, 20048, 20047,20081,
White
Westinghouse
XR-1000 20035, 20072
Yamaha 20038
Zenith 20039, 20033, 20209, 20479
ZT Group 21972
21008, 21972
20240, 20042, 20072
20209, 20072
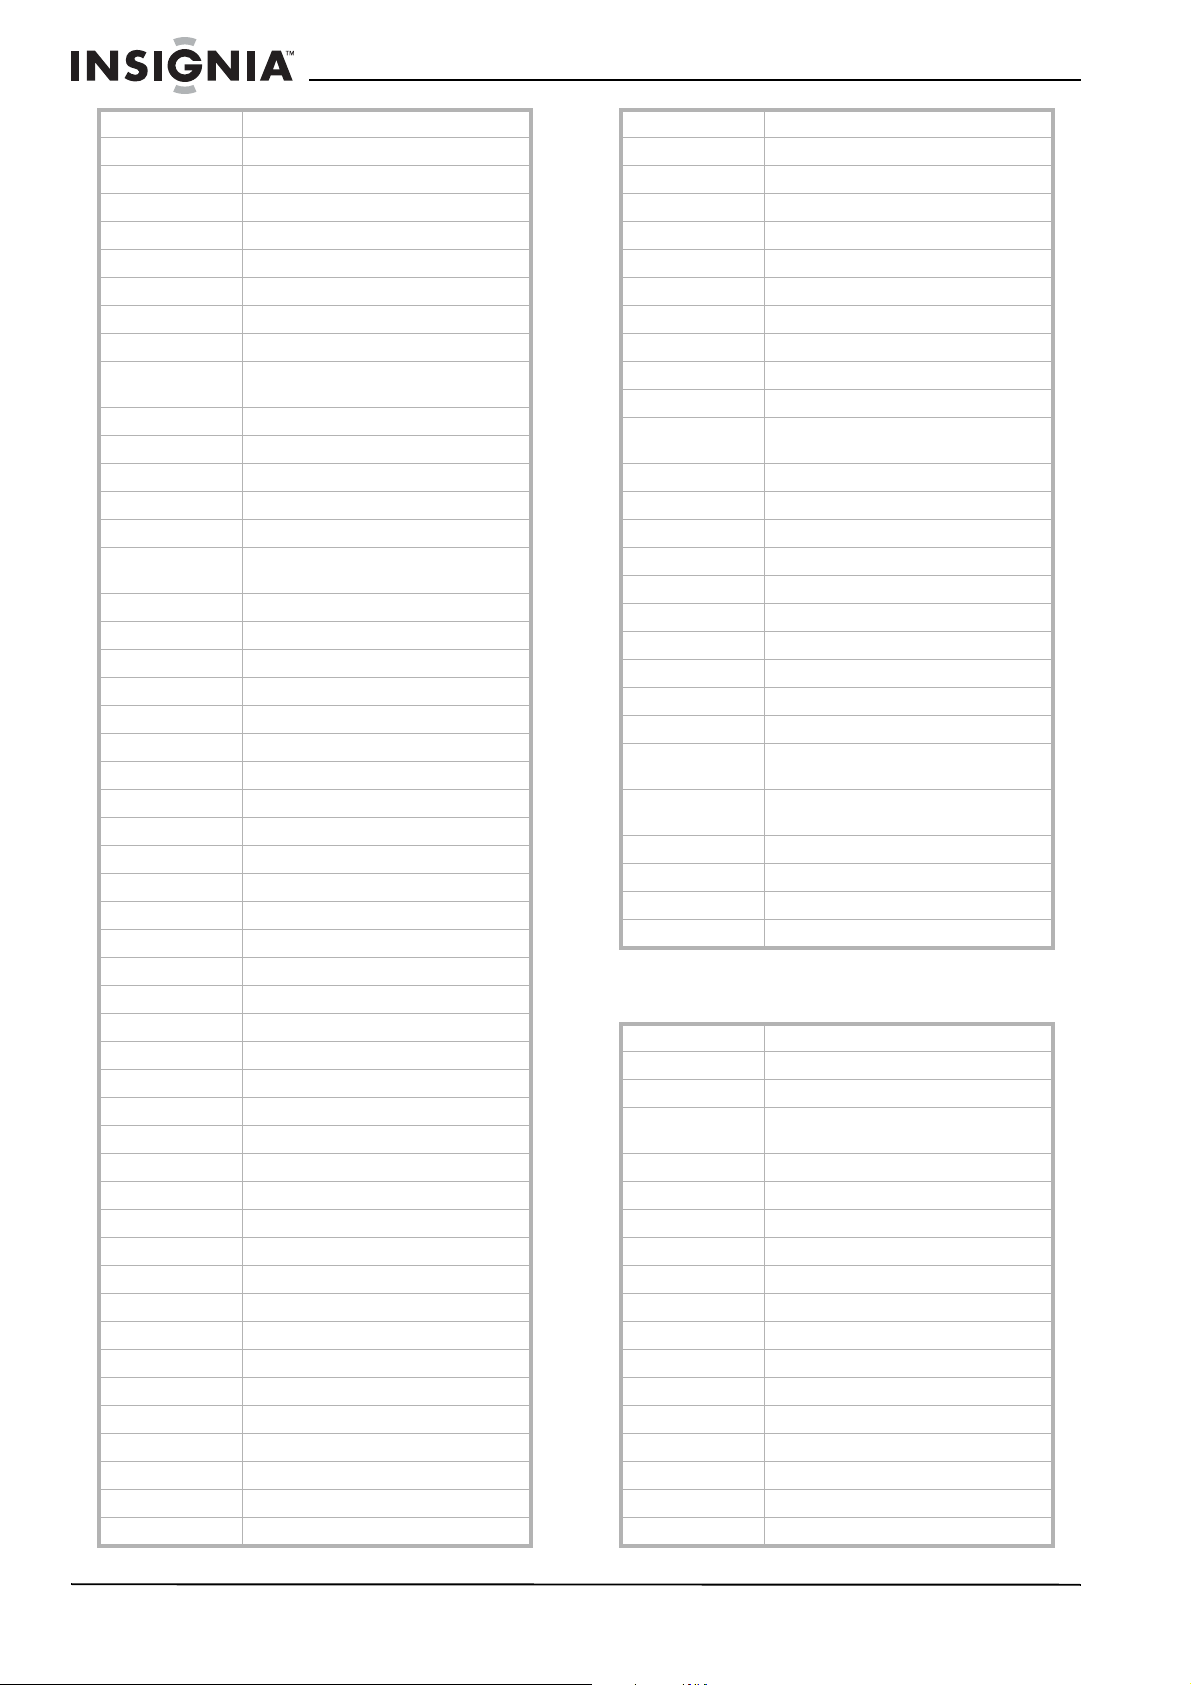
DVD player codes
Aiwa 20641, 21912
Akai 20770
Allegro 20869
Apex Digital 20672, 20717, 20797, 21061,20796,
Blaupunkt 20717
Blue Parade 20571
Broksonic 20695
Changhong 20627, 21061
CineVision 20869
Coby 21086
Curtis Mathes 21087
CyberHome 21024, 21023, 21129, 20816, 21117
Daewoo 20833, 21172, 20869
Denon 20490
DVD2000 20521
Emerson 20591, 20675
Enterprise 20591
Fisher 21919
21056, 21937, 20794, 21020, 21915
18
www.insignia-products.com
Page 19

Insignia NS-42LCD 42-inch LCD TV
Funai 20675
Gateway 21158, 21073
GE 20522, 20717
Go Video 20744, 20833, 21099, 20783,21075,
20869, 21730
Greenhill 20717
Harman/Kardon 20582, 20702
Hitachi 20573, 20664, 21919
Hiteker 20672
Initial 20717
Integra 20627, 21924
JBL 20702
JVC 20558, 20623, 20867
Kenwood 20490, 20534
KLH 20717, 21020, 21149
Koss 20651, 21980
Lasonic 20798
LG 20591, 20869, 20801
Liquid Video 21980
Lite-On 21158, 21058
Loewe 20511
Magnavox 20503, 20539, 21976, 21914, 20675
Marantz 20539
Memorex 20695
Microsoft 20522
Mintek 20717
Mitsubishi 21521, 20521
Nesa 20717
Norcent 21003
Onkyo 20503, 20627, 21924, 20792
Oritron 20651, 21980
Panasonic 20490, 21762, 21990
Philips 20503, 20539, 20646, 21914
Pioneer 20525, 20571
Polaroid 21086, 21061
Polk Audio 20539
Portland 20770
Proscan 20522
Qwestar 20651
RCA 20522, 20571, 20717, 20822
Rio 20869
Rotel 20623
Sampo 20752, 20698
Samsung 20490, 20573, 21932, 21075, 20820
Sansui 20695
Sanyo 20695
Sharp 20630, 20752
Sharper Image 21117
Sherwood 20770
Shinco 20717
Shinsonic 20533
Sonic Blue 20869, 21099
Sony 20533, 20864, 21033, 21904, 21903
SVA 20717
Sylvania 20675
Symphonic 20675
Teac 20717, 21984, 20809
Technics 20490
Theta Digital 20571
Toshiba 20503, 20695
Urban Concepts 20503
Xbox 20522
Yamaha 20490, 20539, 20545
Zenith 20503, 20591, 20869
Cable converter codes
ABC 00003, 00008, 00014
Americast 00899
Bell & Howell 00014
Bell South 00899
Clearmaster 00883
ClearMax 00883
Coolmax 00883
Daeryung 01877, 00877, 00477, 00008
Digi 00637
Director 00476
Dumont 00637
Gehua 00476
General
Instrument
GoldStar 00144
Hamlin 00009, 00273
Hitachi 00014
Jerrold 00476, 00810, 00276, 00003,00012,
KNC 00008
LG 00144
Memorex 00000
Motorola 00476, 00810, 00276, 01254,01376
MultiVision 00012
Pace 01877, 00237
Panasonic 00000, 00008, 00107
Panther 00637
Paragon 00000
Philips 00317, 01305
Pioneer 01877, 00877, 00144, 00533
Pulsar 00000
Quasar 00000
RadioShack 00883
Regal 00279, 00273
Runco 00000
Samsung 00000, 00144
Scientific Atlanta 01877, 00877, 00477, 00008
00476, 00810, 00276, 00003,00014
00014
www.insignia-products.com
19
Page 20

Insignia NS-42LCD 42-inch LCD TV
Sony 01006
Starcom 00003, 00014
Supercable 00276
Supermax 00883
Tocom 00012
Torx 00003
Toshiba 00000
Trans PX 00276
Tristar 00883
TS 00003
V2 00883
Viewmaster 00883
Vision 00883
Vortex View 00883
Zenith 00000, 00525, 00899
Audio amplifier codes
Bose 30674
GE 30078
JVC 30331
Marantz 30321
Nakamichi 30321
NEC 30264
Optimus 30395
Realistic 30395
Sansui 30321
Shure 30264
Sony 30689
Soundesign 30078
Victor 30331
Wards 30078
Yamaha 30354, 30133
Audio amplifier/tuner codes
ADC 30531
Aiwa 31405, 31243, 30121
A n a m 3 1 6 0 9 , 3 1 0 7 4
A u d i o t r o n i c 3 1 1 8 9
B os e 3 12 2 9
C a p e t r o n i c 3 0 5 3 1
C a r v e r 3 1 1 8 9
C o b y 3 1 2 6 3
D e n o n 3 1 3 6 0 , 3 1 1 4 2 , 3 0 9 0 4
F o n m i x 3 1 3 6 0
G l o r y H o r s e 3 1 26 3
H a r m a n / K a r d o n 3 0 1 1 0
H i t a c h i 3 1 2 7 3
I n k el 3 00 2 7
I n t e g r a 3 0 1 3 5
J B L 3 0 1 1 0
J V C 3 0 0 7 4 , 3 1 2 6 3
K e n w o o d 3 1 3 1 3 , 3 1 5 7 0 , 3 0 0 2 7
K L H 3 1 42 8
M a g n a v o x 3 1 1 8 9 , 3 1 2 6 9 , 3 0 5 3 1
M a r a n t z 3 1 1 8 9 , 3 1 2 6 9 , 3 0 0 3 9
MCS 30039
Onkyo 30842, 30135
O p t i m u s 3 1 0 2 3 , 3 0 6 7 0 , 3 0 5 3 1 , 3 1 0 7 4
P a n a s o n i c 3 1 5 1 8 , 3 0 0 3 9
P h i l i p s 3 1 1 8 9 , 3 1 2 6 9
P i o n e e r 3 1 0 2 3 , 3 0 1 5 0 , 3 0 0 1 4 , 3 0 6 3 0 , 3 0 5 3 1
P r o s c a n 3 1 2 5 4
Q i s h e n g 3 1 6 0 9
Quasar 30039
R a d i o S ha c k 3 1 2 6 3
R CA 3 1 02 3 , 3 1 60 9 , 3 1 25 4 , 3 05 3 1 , 3 10 7 4
S h a r p e r I m a g e 3 1 2 6 3
S i l s o n i c 3 0 1 7 6
S o n y 3 1 2 5 8 , 3 1 7 5 9
S o u n d e s i g n 3 0 6 7 0
S t e r e o p h o n i c s 3 1 0 2 3
S u n f i r e 3 1 3 1 3
Te a c 3 1 0 74 , 3 1 2 67
T e c h n i c s 3 1 3 0 8 , 3 1 5 1 8 , 3 0 0 3 9
T h o r e n s 3 1 1 8 9
V ic t o r 3 0 07 4
W a r d s 3 0 0 1 4
Y a m a h a 3 0 1 7 6 , 3 1 2 7 6 , 3 1 1 7 6
CD player codes
Aiwa 30157
B ur me st er 3 042 0
C a l i f o r n i a A u d i o L a b s 3 0 0 2 9
Ca rver 3015 7, 30179
De non 3087 3
DK K 30 000
D MX El ec tr o ni cs 30 15 7
D yn a mi c B as s 30 1 7 9
Fi she r 30 179
Ga rra rd 30 420
Genexxa 30032
Harman/Kardon 30157, 30173
Hi tac hi 30 032
In teg ra 3 010 1
JVC 30072
Kenwood 30826, 30626, 30028, 30037, 30036,
30190
Krell 30157
Linn 30157
Ma gna vox 3 015 7
Ma ran tz 306 26, 30 029 , 3 0157
MCS 30029
20
www.insignia-products.com
Page 21

Insignia NS-42LCD 42-inch LCD TV
Miro 30000
Mi ss io n 3 015 7
MT C 30420
NS M 3015 7
Onkyo 30868, 30101
Optimus 31063, 30000, 30032, 30037, 30420,
30179, 31075, 30145
Pan as on ic 3 00 29
Par as ou nd 30420
Philips 30626, 301 57
Pioneer 31063, 31062, 30032
Polk Audio 30157
Pr oto n 30 157
QED 30157
Qu ad 30 157
Quasar 30029
RadioShack 31075
RCA 31062, 30032, 30420, 30179, 30053
Realistic 30420, 30179
Rotel 30157, 30420
SAE 30157
Sansui 30157
Sa nyo 3017 9
SAST 30157
Sh arp 30861, 30 037
Si lso nic 3 088 8, 300 36
S o n ic F r o n t i er s 3 0 1 5 7
So ny 3049 0, 3 000 0, 301 00
Soundesign 30145
TA G Mc L a re n 3 01 5 7
Tascam 30420
Teac 30420
Technics 30029
Victor 30072
Wards 3015 7, 300 53
Ya mah a 3 08 88, 300 36
Zonda 30157
Satellite receiver codes
General
Instrument
GOI 00 77 5
G o o d m a n s 0 1 2 4 6
Hisense 01535
H it a c hi 0 0 81 9 , 0 0 22 2 , 0 12 5 0
H TS 0 077 5
Hughes Network
Systems
I -L o 0 15 35
JV C 0077 5
LG 01 41 4, 0 12 2 6
M a g n a v o x 0 0 7 2 4 , 0 0 7 2 2
M e m o r e x 0 0 7 2 4
M i t s u b i s h i 0 0 7 4 9
M o t o r o l a 0 0 8 6 9
N EC 01 2 70
N e x t L e v e l 0 0 8 6 9
P a n a s o n i c 0 0 2 4 7 , 0 0 7 0 1
Paysat 00724
Philips 01142, 00749, 01749, 00724, 01076,
P r o s c a n 0 0 3 9 2 , 0 0 5 6 6
P ro t on 0 1 53 5
R a d i o S h a c k 0 0 8 6 9
RCA 00392, 00566, 00855, 00143, 01392
S a m s u n g 01 2 7 6 , 0 1 1 0 9 , 0 1 1 0 8
S an y o 01 2 1 9
SK Y 0 08 56
S on y 0 0 63 9 , 0 16 4 0
S t a r C h o i c e 0 0 8 6 9
Ti vo 0 11 42 , 014 42
To s h i b a 00 7 4 9 , 0 17 4 9 , 0 0 7 90 , 0 1 2 85
UltimateTV 01640, 01392
U ni d en 0 0 72 4 , 0 07 2 2
U S D ig i ta l 0 1 53 5
U SD TV 01 53 5
Vo om 0 086 9
Ze nit h 0085 6, 018 56
00869
01142, 00749, 01749, 01442
00722, 00099, 01442
A lp h aS t a r 0 0 77 2
C h a pa r r a l 0 0 2 1 6
C r o ss d i g i t al 0 1 1 0 9
DirecTV 00392, 00566, 00639, 01142, 00247,
Dish Network
System
D i sh p r o 0 1 0 0 5 , 0 0 7 7 5 , 0 1 5 0 5
E c h os t a r 0 10 0 5 , 0 07 7 5 , 0 1 50 5
E x p r e s s v u 0 0 7 7 5
GE 00 56 6
00749, 01749, 00724, 00819, 01856,
01076, 01109, 00099, 01392, 01640,
01442, 01414, 01108
01005, 00775, 01505
www.insignia-products.com
21
Page 22

Using your TV
Turning the TV on and off
To turn on your TV:
1 Make sure that the power cord is connected
to your TV and a power outlet.
2 Press the button to turn on your TV.
3 Press the button again to turn off your TV.
You should wait at least three seconds before
turning the TV on again.
Using the remote control
To use the remote control:
• Point the remote control towards the remote
sensor on the front of your TV.
Insignia NS-42LCD 42-inch LCD TV
Notes
• This remote control is an universal remote
control. If your remote control does not work
correctly when you operate the unit, please try
to press TV button.
• Objects between the remote control and sensor
window may prevent proper operation.
Cautions
• Do not expose the remote control to shock or
liquids.
• Do not use the remote control in an area with
high humidity.
• Do not place the remote control in direct
sunlight.
• Do not place objects, such as furniture,
between the remote control and the remote
sensor.
• The remote control may not work if direct
sunlight or bright light shines on the remote
sensor. Either move your TV or change the
angle at which you use the remote control.
22
www.insignia-products.com
Page 23

Insignia NS-42LCD 42-inch LCD TV
Navigating the menus
This TV has a simple, easy-to-use on-screen
menu (OSD) for accessing and adjusting TV
features. You can also display the status of TV
features while watching a program.
(Items marked with * do not appear in all modes)
Main Menu Overview (TV Mode)
PICTURE IMAGE ADJUST AUDIO SYSTEM SETUP
Brightness
Contrast
Sharpness
Color
Tint
Backlight
Color Temp
User Color Temp*
Image size
H position*
V position*
Freeze Image
Headphone volume
Tre bl e
Bass
Balance
Focus window out*
AVC
Language
Screen Saver
Transparency
OSD Time Out
Clock Setup
Source Name Edit
Closed Caption Setup
Menu navigation
To navigate through the OSD:
1 Press MENU to display the Main Menu.
2 Press or to select the menu page you
want, then press to enter that menu.
3 Within the menu, press or to select a
setting, and press or to adjust the setting
or enter a sub-menu. For some settings, you
Displaying the information banner
must press OK to confirm or toggle the
setting.
4 Press MENU to return to the previous menu,
and press EXIT to exit the OSD and return to
TV viewing.
Note
To simplify the procedures in this user guide, it’s
assumed that you use the remote control for
navigating the menus, although some button
actions can be duplicated using buttons on the TV.
Selecting the input source signal
1 Press the INPUT button to display INPUT
SELECT menu.
CHANNEL
SETUP
TV Source
Current Channel
Channel Label
Channel Skip
Favorite Channel
Auto Search
Input Select
Signal Strength*
CONTENT
Content Password*
Set Password
Password Confirm
Parental Control
Movie Block
Canadian English
Canadian French
TV Blocking
3 Press INPUT to clear the screen.
Note
• You can also use the CHANNEL SETUP menu
to select the input source.
• To edit the source name (for example, to
change “Analog RGB” to “VGA”), see “Editing
the video source names” on page 29.
The information banner displays status
information such as channel number and signal
source. Depending on the mode, different
information is displayed.
To display the information banner:
• Press INFO. The information banner
appears. In DTV mode, it displays:
• Channel number and name
•Air or Cable
• Resolution
• Current time
• Caption icon (if closed caption is offered),
Clock icon (if timer has been setup) and
Lock icon (if blocking scheme is enabled)
• Current program broadcast progress
• Current program start and end play times
2 Press or to select the input source you
want, then press OK to confirm.
(Analog RGB=VGA)
www.insignia-products.com
Note
Information banner content varies, depending on
the broadcaster and your settings.
23
Page 24

Insignia NS-42LCD 42-inch LCD TV
Memorizing channels
When you turn on the TV for the first time, you
should perform an auto channel search to set up
stations on your TV. Before you perform an auto
search, you should select the correct TV source.
Selecting the TV source
Before your TV can memorize the available
channels, you must specify the type of signal
source that is connected to the TV. (For
example, an antenna or cable system.)
To select a source:
1 In single window status (with no
picture-in-picture setting active), press MENU
to display the Main Menu.
Note
If a picture-in-picture mode is active, your TV
cannot do an auto search.
2 Press or to display the CHANNEL
SETUP menu page, then press to enter
the menu.
If TV Source is set to CABLE, highlight Auto
Search, then press or . The Channel
Scan Source window opens.Press or to
select STD (the most common type of
Cable TV), HRC, or IRC, then press OK to
begin the auto channel search. The TV
begins searching for all available CATV or
CADTV channels.
Note
If you want to stop the auto search, press MENU.
Skipping channels
After saving channels into memory, you can skip
unnecessary channels so that only the channels
you want to watch are selected with the CH+/buttons.
To skip channels:
1 Open the CHANNEL SETUP menu.
3 Press or to select TV Source, then
press or to select AIR or CABLE.
•Select AIR if using an antenna.
•Select CABLE if using Cable TV.
Auto channel search
You should perform an auto search to search for
available broadcast and cable/set-top box
channels. After the TV finishes searching for
channels, the TV stores the valid channels in
memory.
• If TV Source is set to AIR, highlight Auto
Search, then press or . The TV begins
searching for all available TV or DTV
channels.
2 Highlight Current Channel, then press or
to select an unwanted channel.
3 Highlight Channel Skip, then press or to
change the setting to ON.
4 If you want to skip other unwanted channels,
repeat Steps 2-3.
5 Press EXIT to exit. The channels you
specified will be skipped the next time you
press the CH+/- buttons.
24
- OR -
www.insignia-products.com
Page 25

Insignia NS-42LCD 42-inch LCD TV
Checking the DTV signal strength
You can check the DTV signal strength bar to
check the strength of your DTV signal and to
determine whether you need to adjust your
antenna or digital cable input. The stronger the
signal strength, the less likely you are to
experience picture degradation.
To check DTV signal strength:
• Open the CHANNEL SETUP menu. At the
bottom of the screen, the Signal Strength bar
is displayed, indicating the strength and
quality of signal for the current DTV channel.
Adding a channel label
You can assign a name to analog channels.
To add a label to a channel:
1 Navigate to the CHANNEL SETUP menu,
then highlight Channel Label.
2 Press OK to enter into channel label editing
mode.
To create a Favorite channel list:
1 Open the CHANNEL SETUP menu.
2 Highlight Current Channel, then press
or to select your favorite channel.
3 Highlight Favorite Channel, then press
or to select ON.
4 Repeat the above steps to set more favorite
channels (up to ten).
5 To access your favorite channels, press
FAVOR ITE, press or to select the
channel, then press OK to tune to that
channel.
Selecting channels
Information about USA channel numbering
• ATSC/PSIP channels have two-part channel
numbers:
• Major channel number (the “5” in
channel 5-1”)
• Minor channel number (the “1” in
channel “5-1”)
• In the United States, the major channel
number is usually the same for both analog
and digital channels. (It is equal to the NTSC
channel number for existing broadcasters.)
A minor channel number of 0 is used for a
broadcaster’s analog channel.
3 Press or to move the cursor, and
press or to select the character.
4 Press MENU to exit the editing mode.
5 Press EXIT button to return to TV viewing.
Note
The names of digital broadcasting channels are
automatically assigned, so cannot be assigned by
users.
Favorite channel setup
You can create a favorite channel list, so you can
quickly and easily tune to your favorite channels.
You can program up to ten channels.
Example:
• Original NTSC channels for Des Moines,
Iowa:
5, 8, 11, 13, 17
• Possible NTSC + ATSC Channels for
Des Moines:
5-0, 8-0, 11-0, 13-0, 17-0 (channel numbers
for existing analog channels)
• 5-1, 5-2, 8-1, 8-2, 8-3, 8-4, 13-1 (channel
numbers for digital channels)
Using the CH+/- buttons
To use the CH+/- buttons:
• Press CH+ or CH-. The TV cycles among all
available channels found (but skipping the
channels that are set to be skipped).
Using the number pad
• Press the number buttons (0-9) and the dash
(-) button to go directly to that channel.
www.insignia-products.com
25
Page 26
Insignia NS-42LCD 42-inch LCD TV
For example, if you want to select channel
8-3, press 8-3 on the remote control. (Make
sure that you press the buttons within three
seconds of each other, or the channel won’t
be entered correctly.)
Note
In some situations, virtual channel numbers do not
correspond to physical frequencies.
• To select an analog channel, you can directly
input its major channel number without
entering the minor channel number (0).
Switching between two channels
To switch between two channels:
• Press
(Last). The TV tunes to the last
channel you viewed. Press again to switch
back to the original channel.
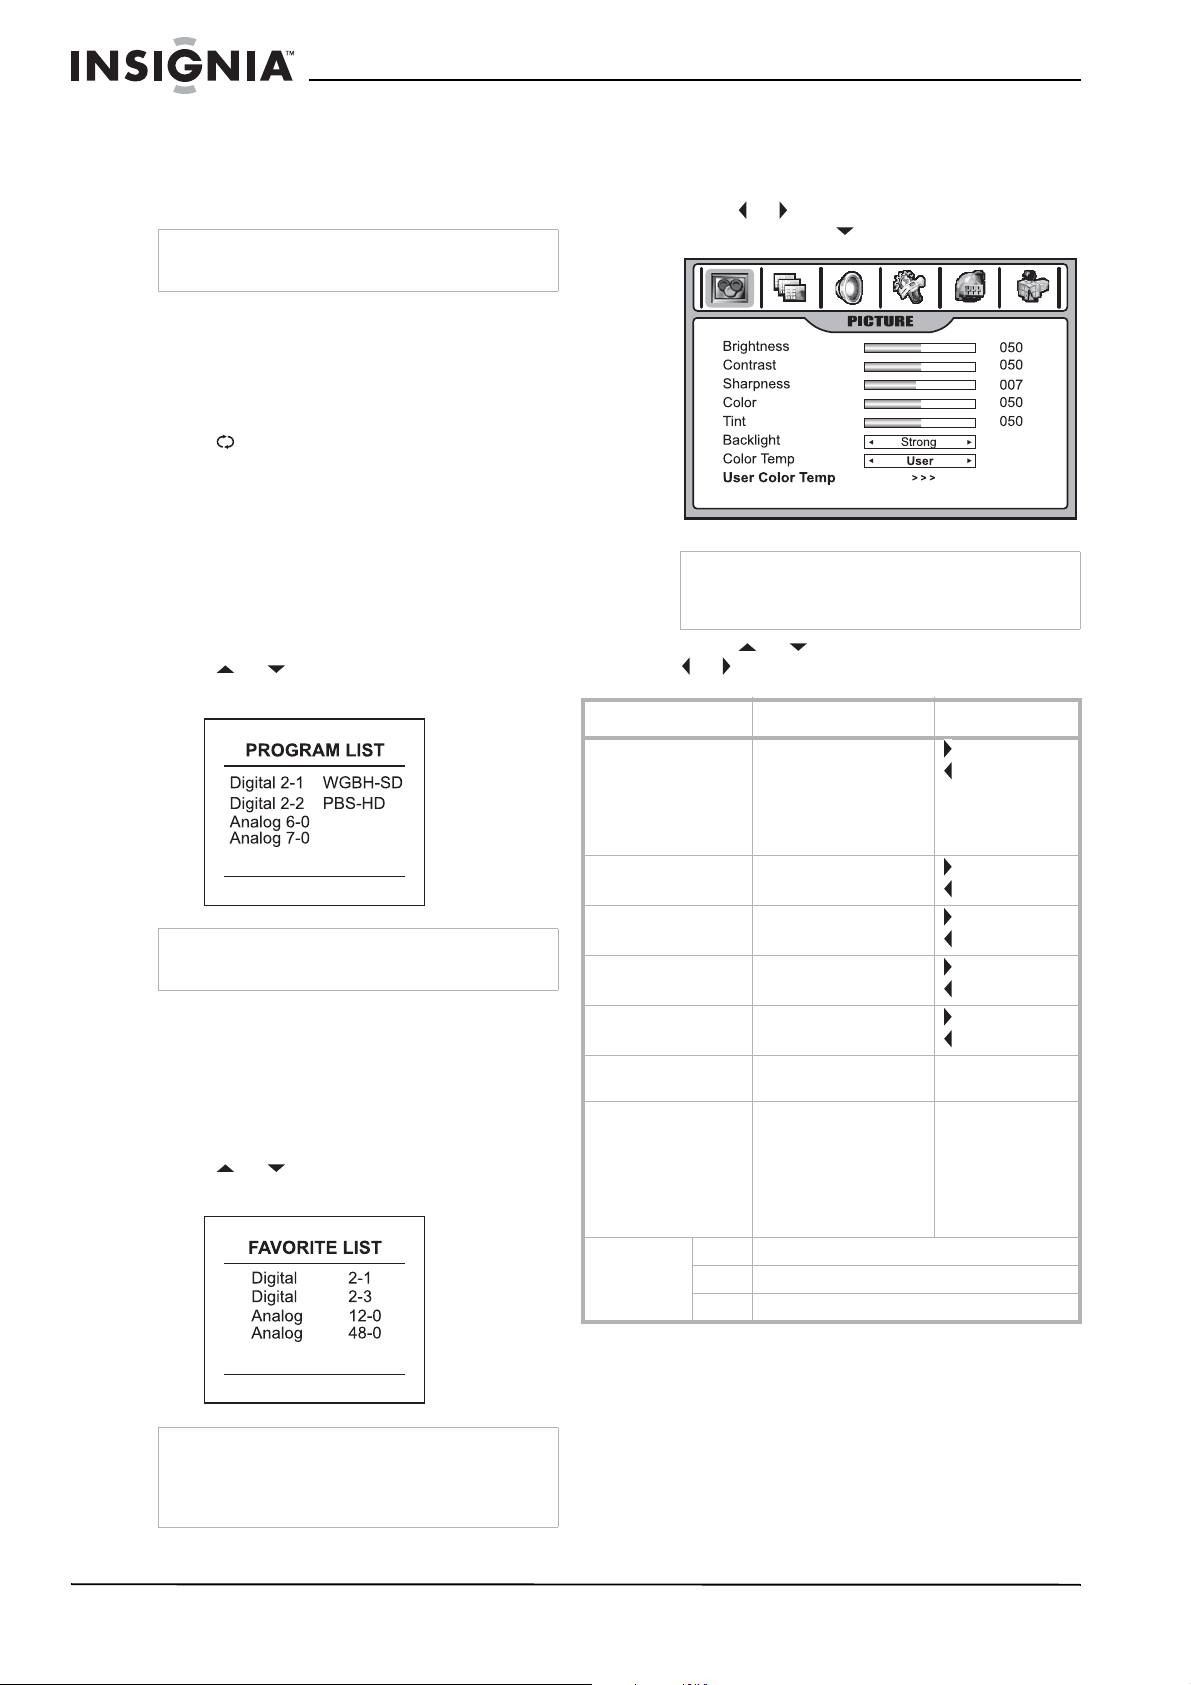
Selecting a channel using the Program list
After auto-search, a program (channel) list is
created. You can select channels from the
program list.
To select a channel using the Program list:
1 Press LIST. The PROGRAM LIST opens.
2 Press or to highlight the channel, then
press OK to select.
Note
The above illustration is only an example. Your
screen may vary.
Selecting a channel using the Favorite list
If you have created your Favorite channel list,
you can use the list to tune to your favorite
stations.
To select a channel using the Favorite list:
1 Press FAVORITE. The Favorite list opens.
2 Press or to highlight the channel, then
press OK to select.
Adjusting picture quality
Customizing the picture
1 Press MENU to display the Main Menu.
2 Press or to display the PICTURE menu
page, then press to enter the menu.
Note
The OSD illustrations shown are as the menu
appears in TV mode. The menu items may appear
different when the TV is in a different mode.
3 Press or to select a setting, then press
or to adjust the setting’s value.
Option Function Controls
Brightness Adjusts screen
Contrast Adjusts image contrast. stronger
Sharpness Adjusts and improves
Color Adjusts color
Tint Adjusts tint.
Backlight Adjusts panel backlight
Color Temperature Adjusts the color
User Color
Temp er atur e
Red Adjusts the red of the image.
Green Adjusts the green of the image.
Blue Adjusts the blue of the image.
brightness for easier
viewing of a dark
picture, such as night
scenes and dark
objects.
image sharpness.
saturation.
brightness.
temperature of the
image. Set to Warm (to
enhance “hotter” colors
such as red), or set to
Cool to see less intense
colors with more blue.
lighter
darker
weaker
sharper
softer
stronger
weaker
greenish
purplish
Strong/Weak/
Medium
Cool/Warm/User
26
Note
• Information displayed in this list is only for the
channel being viewed in the main window.
• The above illustration is only an example. Your
screen may vary.
www.insignia-products.com
Page 27

Insignia NS-42LCD 42-inch LCD TV
4 When Color Temp is set to User, you can
enter into a User Color Temp sub-menu to
customize the color temperature.
5 Press EXIT to return to TV viewing.
Selecting the picture mode
You can select the picture quality instantly
among three preset modes and one user-set
mode.
To select the picture quality:
• Press the PICTURE button repeatedly to
select a picture setting. You can select:
• NATURE: Select for a normal picture.
• SOFT: Select for a finely detailed picture.
• BRIGHT: Select for a bright picture.
• USER: The picture quality you set.
Adjusting the image
Adjusting image aspect ratio
You can choose the aspect ratio (display
proportions) according to your video signal type
or personal preference.
To adjust the image aspect ratio:
1 Press the ZOOM button repeatedly to select
the desired aspect ratio. You can also adjust
Image size in the IMAGE ADJUST menu.
• FILL ALL
Displays a full-screen picture.
Adjusting screen position
To adjust the screen position:
1 Navigate to the IMAGE ADJUST menu.
2 Highlight H Position or V Position, then
press or to adjust the settings.
Note
You can adjust screen position only for analog
channels. It’s unnecessary to adjust screen
position for digital channels.
Freezing the picture
You can freeze the picture on the screen.
Although a non-moving picture remains on the
screen, the video source will still be playing in
the background (unless you pause playback).
To freeze the picture:
1 Press the FREEZE button. The image
freezes on the screen. Press FREEZE again
to resume viewing the video playback.
2 You can also set Freeze Image to ON in the
IMAGE ADJUST menu to freeze the picture.
To restore, set it to OFF.
Note
If a fixed image is displayed on the screen for a
long time, that fixed image may become imprinted
on the screen and remain visible.
You can select:
• NORMAL
Selects the correct aspect ratio to match
the source’s image. (4:3 to 4:3,
16:9 to 16:9)
• WIDE
Stretches the picture horizontally at the
edges, while maintaining a good aspect
ratio at the center of the screen.
• ZOOM
Magnifies the picture while maintaining
correct screen proportions.
www.insignia-products.com
Adjusting sound
Adjusting the volume
To adjust the volume:
• Press the VOL+ or VOL- buttons.
To mute the volume:
• Press the MUTE button to temporarily turn off
all sound. Press the MUTE button again to
restore sound.
27
Page 28
Insignia NS-42LCD 42-inch LCD TV
Customizing the sound
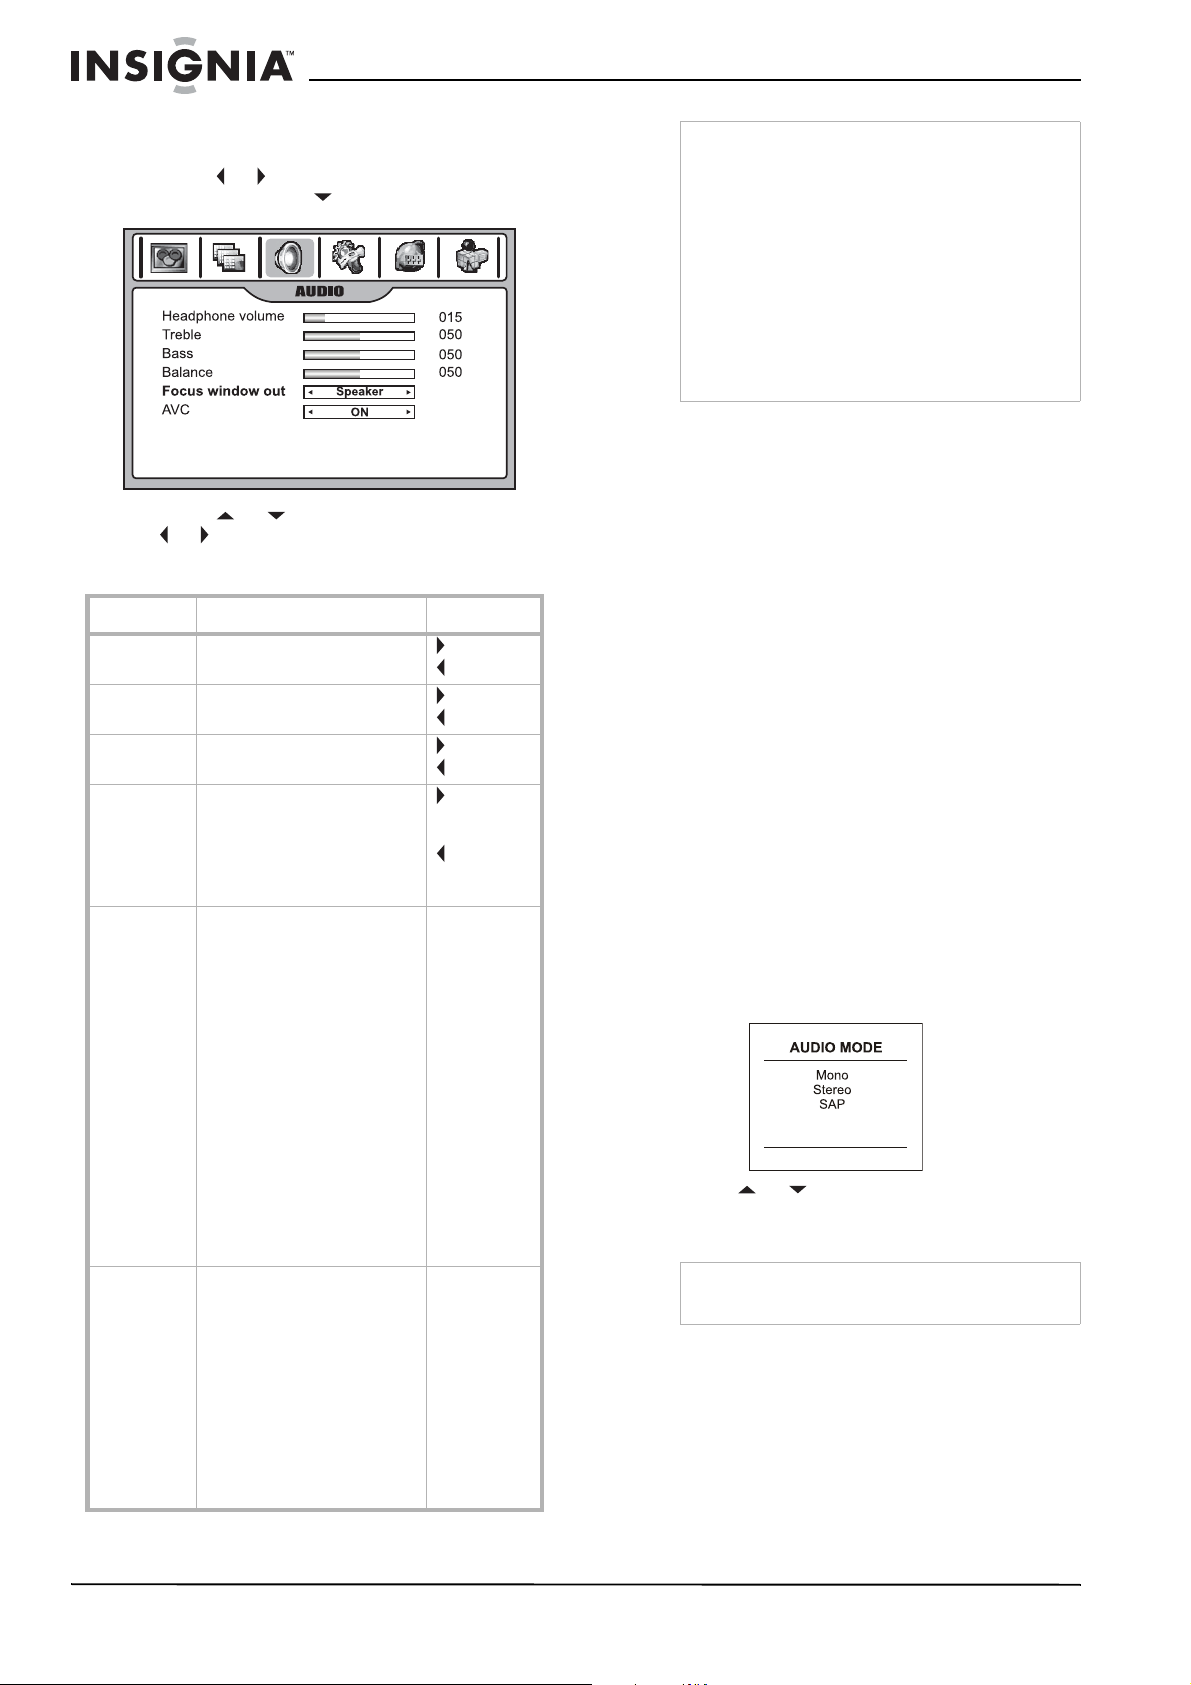
1 Press MENU to display the main menu.
2 Press or to display the AUDIO menu
page, then press to enter the menu.
3 Press or to select a setting, then press
or to adjust the setting.
4 Press EXIT to return to TV viewing.
Option Function Controls
Headphone
volume
Treble Adjusts treble (high sounds).
Bass Adjusts bass (low sounds)
Balance Adjusts volume balance (left
Focus
window out
(PIP or PBP
mode only)
AVC (auto
volume
control)
Adjusts headphone volume. stronger
and right volumes).
In twin window mode (PIP or
PBP), if Speaker is selected
(default), the focus window’s
sound is output from speakers
while the other window’s
sound is output from the
headphones jack.
If Headphone is selected, then
the focus window’s sound is
output from the headphones
jack, while the other window’s
sound is output from
speakers.
If Both is selected, then the
focus window’s sound is
output from speakers and the
headphone jack. (The other
window’s sound is
automatically set to None).
Each broadcasting station has
its own signal conditions,
which can make it necessary
to adjust the volume every
time the channel is changed.
Turning AVC On lets you
automatically adjust the
volume of the channel you
want by lowering the sound
output when the modulation
signal is high or by raising the
sound output when the
modulation signal is low.
volume from
right speaker.
volume from
left speaker.
Speaker/
Headphone/
Both
ON/OFF
weaker
stronger
weaker
stronger
weaker
Higher
Higher
Note
• The menu items differ, depending on the
current TV mode.
• The Focus Window Out menu is available only
in a twin-window mode (PIP or PBP) and either
window program is not in Rating Blocked mode.
If Both is selected and, later, either window
program enters a Rating Blocked mode, the
sound mutes. To cancel mute, exit the Rating
Blocked state for the program, then change this
setting to a different value.
• The main picture is the default focus window.
You can select the sub-picture as the focus
window by pressing OK. A green border
appears around the focus window.
Selecting the sound mode
You can quickly select the sound quality from
three preset modes and one user-set mode.
To select a sound mode:
• Press the AUDIO button repeatedly to select
the sound quality you want. You can select:
• NEWS: Select for a speech or
conversation program.
• MOVIE: Select for a movie program.
• MUSIC: Select for a music program.
• USER: The sound quality you set.
Setting up Stereo/SAP broadcasts
This TV can receive MTS stereo programs and
any SAP (Secondary Audio Program) that may
accompany the stereo program. This type of
signal is available only from analog channels.
You can select Stereo or SAP only when the TV
station transmits these signals. Mono sound is
automatically received if the broadcast is only in
monophonic. You can also select Mono if you
are having difficulty receiving a stereo signal.
To select the MTS/SAP audio mode:
1 When viewing an analog channel, press the
MTS/SAP button. The AUDIO MODE menu
opens.
2 Press or to select MTS mode you want
(Mono, Stereo or SAP), then press OK to
confirm.
Note
In a multi-window mode, Stereo or SAP can be
selected only for the main picture.
28
www.insignia-products.com
Page 29
Insignia NS-42LCD 42-inch LCD TV
Selecting the digital audio mode
DTV can simultaneously transmit many audio
tracks (for example, simultaneous translations of
the program into foreign languages). The
availability of these optional audio tracks
depends upon the program. A digital audio mode
is only available while the TV is in DTV mode.
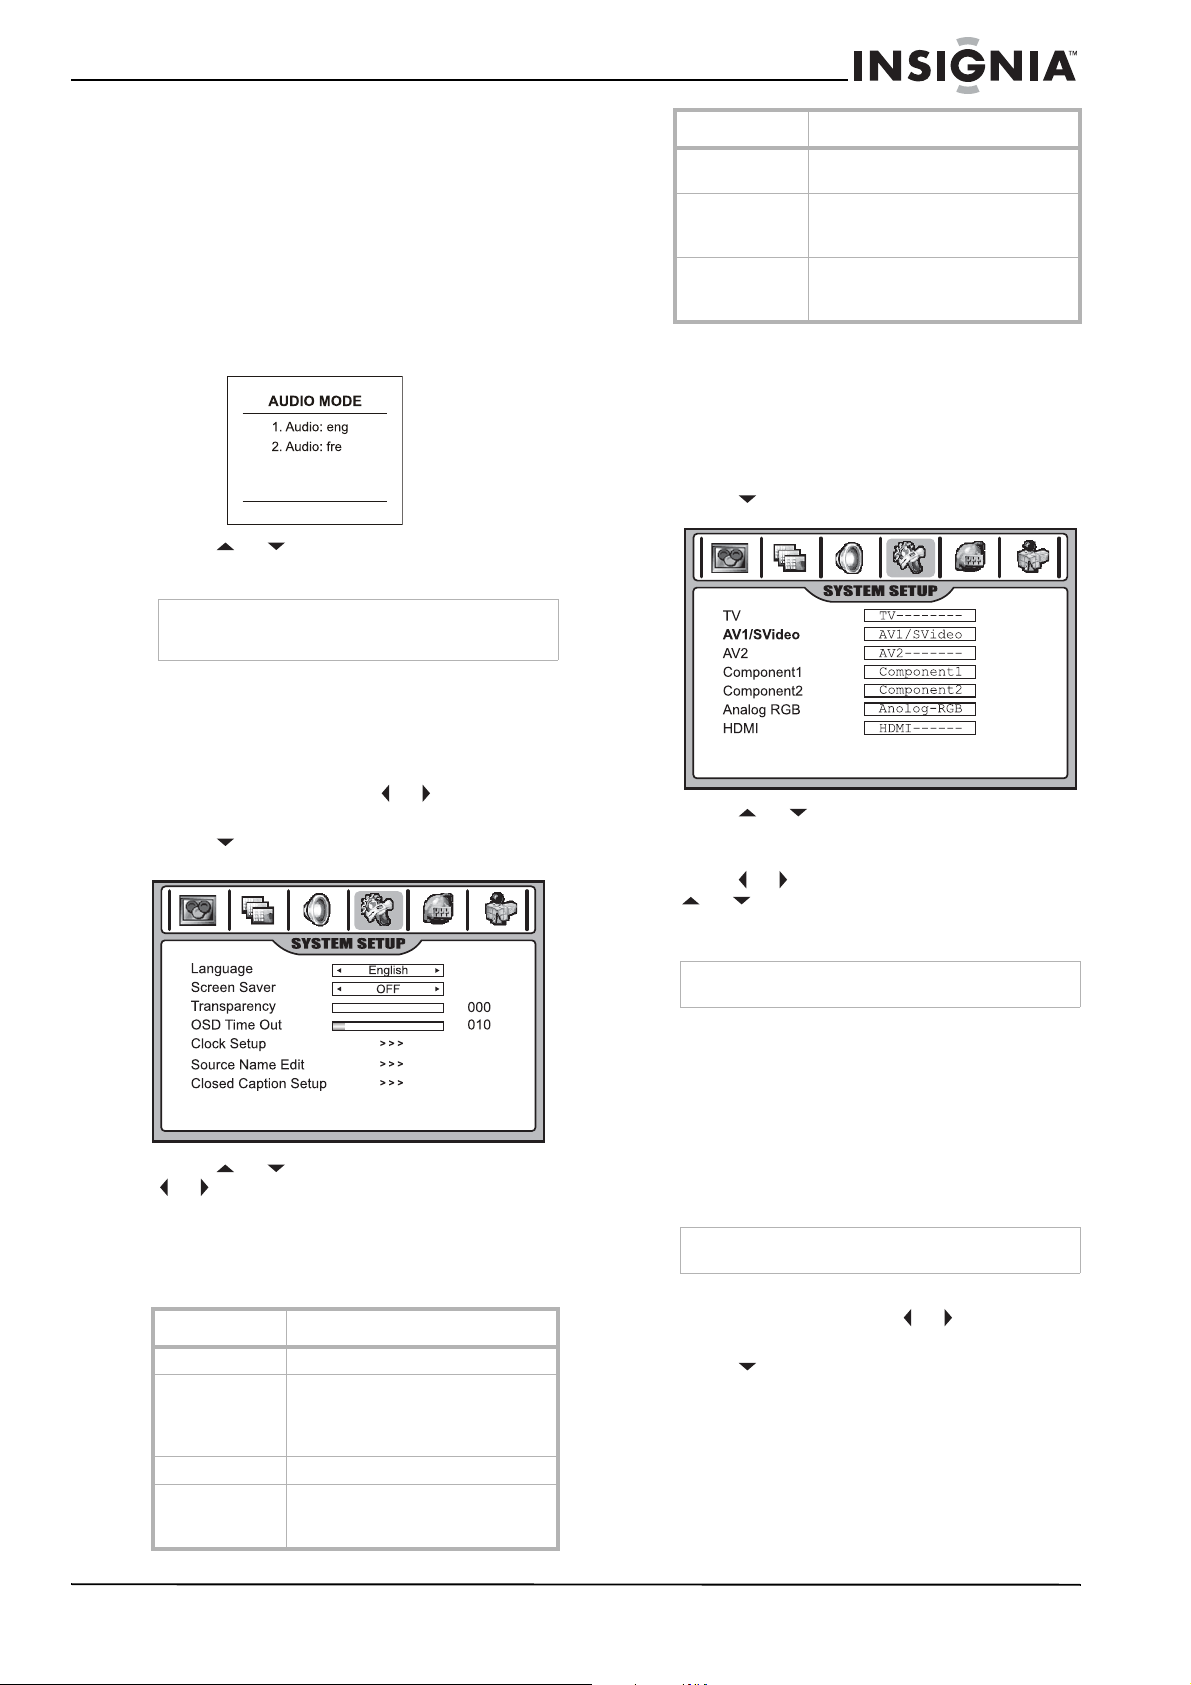
To select the digital audio mode:
1 When viewing a digital channel, press the
MTS/SAP button. The AUDIO MODE menu
opens.
2 Press or to select the audio mode you
want, then press OK to confirm.
Note
In a multi-window mode, the MTS/SAP button can
only be used for the main picture.
Changing system settings
You may change systems such as OSD
language, screen saver, and menu transparency.
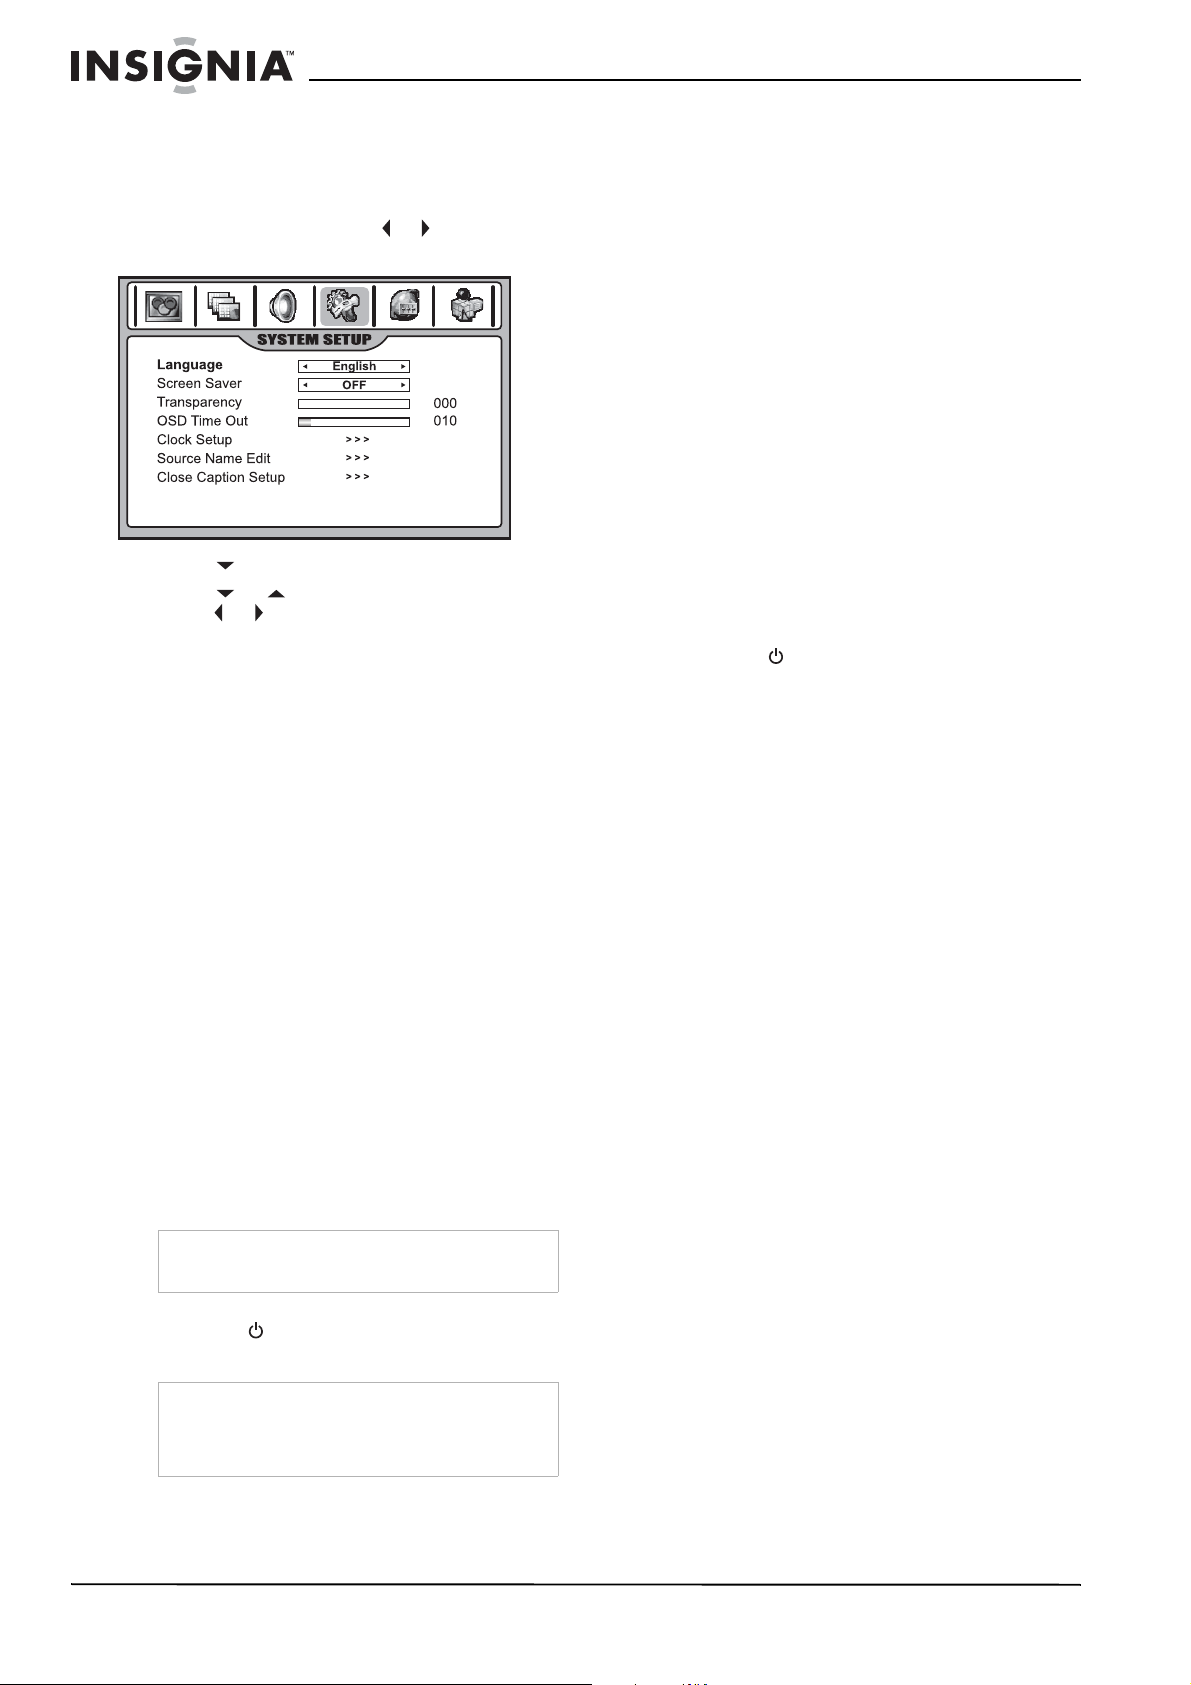
Option Function
Clock Setup Sets the auto clock, manual clock,
Source Name
Edit
Closed Caption
Setup
and On/Off timer.
Lets you edit the source name of
channels for your personal
preference.
Select Closed Caption mode. Also
lets you customize the format of
captions from DTV programs
Editing the video source names
You can name the video sources to make your
input source selection easier.
To edit video source names:
1 Navigate to the SYSTEM SETUP menu, then
highlight Source Name Edit.
2 Press to enter the menu.
To change system settings:
1 Press MENU, then press or to display the
SYSTEM SETUP menu page.
2 Press to enter the menu.
3 Press or to select a setting, then press
or to adjust the setting or enter a
sub-menu. In some settings and menus, you
must also press OK to confirm or toggle a
setting.
4 Press EXIT to return to TV viewing.
Option Function
Language Selects the OSD menu language.
Screen Saver While the Screen Saver is on, the TV
displays the message “No Signal”
when no signal has been received
for several seconds.
Transparency Adjusts menu transparency.
OSD Time Out Selects the length of time the OSD
displays without any input before
turning off.
3 Press or to select the source you want
to edit, then press OK to enter into source
name editing mode.
4 Press or to move the cursor, and press
or to select a character.
5 Press MENU to exit the editing mode.
Note
TV source can’t be edited.
Setting the clock and timers
Setting Auto Clock
Auto Clock sets the current time automatically
from a digital channel signal. The digital channel
signal includes information for the current time
provided by the broadcasting station.
If the current time is set incorrectly by Auto
Clock, set the clock manually.
Note
If the TV loses power, the time is reset.
To set Auto Clock:
1 Press MENU, then press or to display the
SYSTEM SETUP menu page.
2 Press to enter the menu.
www.insignia-products.com
29
Page 30

Insignia NS-42LCD 42-inch LCD TV
3 Highlight Clock Setup, then press or to
enter the menu.
4 Highlight Auto Clock, then press or to
turn Auto Clock ON.
5 Highlight Set Time Zone, then press or
to select your viewing area time zone:
Atlantic, New Foundland, Samoa, Hawaii,
Alaska, Pacific, Mountain, Central, or
Eastern.
6 If your viewing area observes Daylight Saving
Time, set Observe Daylight Time to ON in
the menu
Setting the clock manually
If the current time setting is wrong, reset the
clock manually. If the TV loses power, the clock
is reset.
To manually set the clock:
1 Navigate to the SYSTEM SETUP menu, then
to the Clock Setup sub-menu.
2 Highlight Auto Clock, then press or to
select OFF.
3 Press or to highlight Current Time,
then press or to select either the year,
date, or time option.
4 Press the number buttons to set the year,
date, and time. To select AM or PM, move the
cursor to the appropriate position, then press
OK to toggle.
5 If your area observes Daylight Saving Time,
set Observe Daylight Time to ON in the
menu.
Setting the Auto On/Off timer
Auto Power On or Off only works if the current
time has been set. The TV must be in Standby
mode for Auto Power On to work.
Note
If the TV loses power, the time settings are
cleared.
To set the Auto On/Off timer:
1 Navigate to the SYSTEM SETUP menu, then
to the Clock Setup sub-menu.
2 Highlight Auto Power On or Auto Power
Off.
3 Press or to select either the hour or
minute.
4 Press the number buttons to change the
time. To select AM or PM, move the cursor to
the appropriate position, then press OK to
toggle.
• If you want the timer to work only today,
highlight Today, then press OK to activate
it (displayed in purple).
• If you want the timer to work every day,
select Everyday, then press OK to
activate it (displayed in purple).
• To cancel the timer, select Disable, then
press OK to activate it (displayed in
purple).
5 Press EXIT to return to TV viewing, or press
MENU to return to the previous menu.
Setting the Sleep timer
The Sleep timer lets you select the amount of
time before your TV turns off automatically. This
setting is cleared when the TV is turned off.
To set the Sleep timer:
1 Press the SLEEP button repeatedly to cycle
through the available times.
2 To cancel the timer, press SLEEP repeatedly
until OFF is selected.
30
www.insignia-products.com
Page 31

Insignia NS-42LCD 42-inch LCD TV
Viewing Closed Captions
This TV can display the closed captions that are
broadcast with many TV programs. These
captions are usually subtitles for the hearing
impaired or are foreign language translations. All
VCRs record the closed caption signal from
television programs, so home-recorded
videotapes can also provide closed captions.
Also, most pre-recorded commercial videotapes
provide closed captions. Check for the closed
caption symbol in your television schedule and
on the tape packaging:
Note
• Closed Captioning works only in TV and AV
modes.
• Not all programs and videos offer Closed
Captioning. Look for the Closed Captioning
symbol to ensure that captions are available.
Setting up Closed Captioning
To set up Closed Captioning:
1 Press CCD repeatedly to select Caption ON,
MUTE ON, or OFF.
2 Press to enter the menu.
3 Highlight Analog CC Mode, or Digital CC
Mode. then press or to select the mode.
Customizing Closed Captioning
You can customize the digital closed captions
that appear on your screen.
To customize digital Closed Captions:
1 Navigate to the SYSTEM SETUP menu, then
highlight Closed Caption Setup.
2 Press to enter the menu.
3 Highlight Closed Caption Option, then
press or to enter the sub-menu.
• MUTE ON shows the captions (if available
on program) when the TV sound is muted.
• You can also navigate to the SYSTEM
SETUP men, then to the Closed Caption
Setup sub-menu, and select Closed
Caption Control. Next, press or to
select Caption ON, MUTE ON, or OFF.
Selecting analog or digital modes
Captions and text, if provided by the
broadcaster, are available for both digital and
analog channels.
Select a caption mode for displaying captioning
information. Analog captions display information
on the screen (usually the program dialog). Text
from digital modes displays information, usually
at the bottom of the screen, and is used for a
data service (generally not program related).
To select digital or analog modes:
1 Navigate to the SYSTEM SETUP menu, then
highlight Closed Caption Setup.
4 Press or to select the item you want to
change, then press or to customize the
setting to your preference. A preview sample
at the bottom of the screen lets you see the
effect your change will have on the captions’
appearance.
You can change the following settings:
• Font Size: Sets the size of the words.
• Style: Sets a style for the words.
• Foreground: Sets a color for the text.
• Background: Sets a background color.
• Background Opacity: Sets the opacity of
the background color. A low opacity
means a high transparency (the screen
image shows through the background).
• Edge Effect: Sets an edge effect.
Setting parental controls
Parental controls allow TV programs and movies
to be restricted and TV usage to be controlled
based on ratings data. It prevents children from
watching violent or sexual scenes that may be
harmful.
www.insignia-products.com
31
Page 32

Restriction of TV programs includes two ratings
that contain information about the program: the
MPAA rating and the TV Parental Guidelines.
MPAA ratings are based on age
appropriateness. TV Parental Guidelines are
based on age and content.
Since a TV program may use either the MPAA
rating or the TV Parental Guidelines, both should
be adjusted for complete control.
Understanding movie ratings (MPAA)
Rating Description
G GENERAL AUDIENCES. All ages admitted.
PG PARENTAL GUIDANCE SUGGESTED. Some material
may not be suitable for children.
PG-13 PARENTS STRONGLY CAUTIONED. Some material
may be inappropriate for children under 13.
R RESTRICTED. Under 17 requires accompanying
parent or adult guardian.
NC NO ONE 17 AND UNDER ADMITTED.
X X Rating is an older rating, similar to NC-17, but may
be encoded in the data of older movies.
NR NOT RATED.
For example, if you block PG-13 in the MPAA
ratings, the higher ratings of R, NC, X, and NR
are automatically blocked.
Insignia NS-42LCD 42-inch LCD TV
Content-based
Rating
DLSVFV
Y (All children) ЧЧЧЧЧ
Y7 (Direct to Older Children) ×××ו
G (General Audience) ××××
PG (Parental Guidance
Suggested)
Age-based
14 (Parents Strongly Cautioned)••••
MA (Mature Audience Only) • • •
× = Content rating can be set, but this rating is not normally
broadcast by TV stations.
• = Content rating can be set.
Note
• Age-based ratings can be modified by the
content-based ratings, but only in the
combinations indicated by a “•” in the table
above.
• Choosing lower age-based rating blocks the
higher age-based ratings regardless of content
ratings settings.
For example, when Y7 in the age-based rating
is set to BLOCK, the higher ratings of G, PG,
14, and MA are automatically blocked. In
addition, D, L, S, V, and FV-content programs
are automatically blocked.
••••
Understanding TV ratings
TV ratings include two components: a general
criteria (age-based) and a detailed criteria
(content-based). The content-based ratings
include the following:
• D: Sexually suggestive dialog
• L: Adult language
• S: Sexual situations
•V: Violence
• FV: Fantasy violence
Setting up the Parental Control password
To use Parental Controls, you must first set your
password.
To set your password:
1 Press MENU, then press or to open the
CONTENT menu.
2 Press to enter the menu.
32
www.insignia-products.com
Page 33

Insignia NS-42LCD 42-inch LCD TV
3 Enter the four-digit password as requested
(the factory preset password is 1111). The
entire CONTENT menu appears.
4 Highlight Set Password, enter a new
password, then enter it again to confirm. Your
new password has been created.
Enabling Parental Controls
1 Use the password to access the CONTENT
menu.
Setting up TV ratings
1 Use the password to access the CONTENT
menu.
2 Highlight TV Blocking, then press or to
enter the menu.
3 Within the menu, press , , , or to
select, then press OK to either block (a lock
icon appears) or unblock (no lock icon).
For example, when Y7 in the age-based
rating is set to BLOCK, this automatically
blocks the higher ratings: G, PG, 14, and MA.
Also, D, L, S, V, and FV in Content are
automatically blocked.
4 Press EXIT to return to TV viewing, or press
MENU to return to the previous menu.
Setting up Canadian English ratings
1 Use the password to access the CONTENT
menu.
2 Highlight Parental Control, then press or
to select Enable. The blocking scheme you
set up is enabled. If you want to disable the
blocking scheme, select Disable.
Setting up MPAA ratings
1 Use the password to access the CONTENT
menu.
2 Highlight Movie Block, press or to select
the rating you want, then press OK to either
block the rating (a lock icon appears) or
unblock (no lock icon).
For example, when PG13 in the age-based
rating is blocked, this automatically blocks the
higher ratings R, NC, X, and NR.
2 Highlight Canadian English, press or to
select the rating you want, then press OK to
either block the rating (a lock icon appears)
or unblock (no lock icon).
3 Press EXIT to return to TV viewing, or press
MENU to return to the previous menu.
Canadian English Ratings
E Exempt—Exempt programming includes news,
sports, documentaries and other informational
programming, talk shows, music videos, and
variety programming.
C Programming intended for children under age 8.
No offensive language, nudity, or sexual content.
C8+ Programming generally considered acceptable for
children 8 years and over. No profanity, nudity, or
sexual content.
G General programming, suitable for all audiences.
www.insignia-products.com
33
Page 34

Insignia NS-42LCD 42-inch LCD TV
Canadian English Ratings
PG Parental Guidance suggested. Some material may
not be suitable for children.
14+ Programming contains themes or content which
may not be suitable for viewers under the age
of 14. Parents are strongly cautioned to exercise
discretion in permitting viewing by pre-teens and
early teens.
18+ Intended for viewers 18 years and older and
might contain depictions of violence.
Setting up Canadian French ratings
1 Use the password to access the CONTENT
menu.
2 Highlight Canadian French, press or to
select the rating you want, then press OK to
either block the rating (a lock icon appears)
or unblock (no lock icon).
3 Press EXIT to return to TV viewing, or press
MENU to return to the previous menu.
2 Highlight the rating choice at the last line of
the menu screen, then press or to enter
the menu. Ratings and additional options
appear on the screen.
3 Within the menu, press , , , or to
select a rating’s submenu, or highlight
RESET to reset all ratings. (After resetting,
the rating will still appear if it continues to be
broadcast by the TV station.)
4 Press OK to either block (a lock icon
appears) or unblock (no lock icon) a rating.
5 Press EXIT to return to TV viewing, or press
MENU to return to the previous menu.
Note
The actual menu options of this rating vary,
depending on the broadcaster.
Using picture-in-picture
To select multi-window modes:
• Press the PIP button repeatedly (within three
seconds of each press) to select the
multi-window mode you want. You can
choose PIP, PBP, POP, and Full Screen
modes.
Note
If you wait longer than three seconds between PIP
button presses, and when the current view is a
multi-window mode, press PIP again, and the
screen changes to full screen mode.
Full screen
In Full Screen mode, only one window appears.
Canadian French Ratings
E Exempt—Exempt programming.
G General—Programming intended for audiences of
all ages. Contains no violence, or the violence
content is minimal or is depicted appropriately.
8+ 8+ General—Not recommended for young
children. Programming intended for a broad
audience but contains light or occasional
violence. Adult supervision recommended.
13+ Programming may not be suitable for children
under the age of 13. Contains either a few violent
scenes or one or more sufficiently violent scenes
to affect them. Adult supervision strongly
suggested.
16+ Programming may not be suitable for children
under the age of 16. Contains frequent scenes of
violence or intense violence.
18+ Only for adult viewing—Could contain frequent
violent scenes and extreme violence.
Setting up RRT5 criteria ratings
If the broadcasting program uses RRT5 (Rating
Region Table-Region5) criteria rating in
accordance with the FCC Rules, its rating can be
downloaded to this TV and can be used for
parental controls.
To set up RRT5 ratings:
1 Use the password to access the CONTENT
menu.
PIP (picture-in-picture)
PIP lets you view two different pictures on your
TV screen at the same time. One picture will be
large, and the other picture will show a smaller
image.
Note
The main picture source can be any video type
except HDMI, but the sub-window can display only
analog TV channels or A/V programs.
34
www.insignia-products.com
Page 35

Insignia NS-42LCD 42-inch LCD TV
PBP (picture-by-picture)
PBP mode splits the screen into two, allowing
two pictures to be shown on the TV screen at the
same time. Each picture is given half the screen.
Note
The main picture source can be any video type
except HDMI, but the sub-window can display only
analog TV channels or A/V programs.
POP (picture-out-of-picture)
You can use POP to scan the programs of all
memorized channels on the three mini-windows,
while the main window displays the current
program.
Swapping the PIP/PBP picture
To swap the PIP/PBP picture:
1 Press the SWAP button.
Note
The main picture source can be any video type
except HDMI, but the sub-window can display only
analog TV channels
Note
The SWAP button works only when the main
picture displays an analog TV channel or A/V
program.
Selecting the PIP sub-picture position
To select the PIP sub-picture position:
1 In PIP mode, press the P. P OS I TI ON button
to cycle through the available sub-picture
positions.
Selecting the focus window
While in a multi-window mode, you can select
any of the windows to make changes on the
window.
To change the focus window:
1 Press OK. The focus changes from the main
picture to any of the sub-pictures.
www.insignia-products.com
35
Page 36

Insignia NS-42LCD 42-inch LCD TV
2 While a picture is the focus window, you can
apply many operations to it such as channel
select, volume control, and input source
select.
3 In POP mode, you can press OK to select the
three mini windows as a focus window.
“1,2,3” appears on the screen. Before the
on-screen message disappears, press 1, 2,
or 3 on the remote control to choose the
program to be displayed on the main window.
Note
Normally the main picture is the default focus
window. Many (but not all) operations can be
applied to the focus window.
Using the electronic program guide
Your TV has an electronic program guide to help
you navigate through viewing options. The
electronic program guide (EPG) supplies
program information, such as program lists for
channels and times for available programs.
Sometimes detailed program information is also
available on the EPG. (The availability and the
amount of program details vary. depending on
the broadcaster.)
Notes
• The EPG works only with digital channels.
• To enable the EPG to work correctly, you must
set the Auto Clock to ON.
To display the electronic program guide:
1 Press the GUIDE button. The EPG appears.
(Example shown below.)
E
3 Press OK to move the focus to different
windows. After a window is active, a green
border appears around it and you can apply
operations to it.
4 If the bottom half of the EPG is active, press
or to select the channel you want. (After
the channel is selected, its relevant program
information is displayed).
5 Press or to select a different program
at this channel. (After the program is
selected, the top left window displays
detailed program information, if available.)
6 If additional and detailed information about
the selected program appears in the top left
window, you can press OK to highlight it (a
green border appears around it), then press
or to scroll the page (if required) to
view more information.
7 All available sub channels within an ATSC
channel will be displayed.
Adjusting the image
Adjusting the image for PC/Component mode
Before adjusting the image, make sure that you
select the correct source (Analog RGB or
Component).
To adjust the image for PC/Component
mode:
1 Press MENU, then press or to display the
IMAGE ADJUST menu page.
2 Press to enter the menu.
Menu in Component mode
A
B
C
D
Item Description
A Shows current time, date, current program’s
station and rating, and more.
B Displays additional and detailed information
about a particular program. (The availability
of additional details depends on the
broadcaster.)
C Displays all available sub-channels within an
ATSC channel.
D Displays the currently selected sub-channel’s
information, such as the program list, and
start and end times of all available programs.
E Displays a preview of the currently selected
sub-channel.
2 To exit, press GUIDE again.
Menu in PC mode
36
www.insignia-products.com
Page 37

Insignia NS-42LCD 42-inch LCD TV
3 Within the menu, press or to select an
option, then press or to adjust the setting.
Setting Description
Image size Selects a desired image size (aspect ratio).
The choice may be different in different
mode. (see “Adjusting the image” on
page 27 for more information.)
You can press ZOOM on the remote control
to select the aspect ratio.
H position Moves the image on the screen left/right.
V position Moves the image on the screen up/down.
Frequency Adjusts the sample frequency.
Phase Improves the focusing of a stable image.
Freeze Image Select ON to freeze the image on the
H width
(component
mode only)
V width
(component
mode only)
Auto Adjust
(PC mode only)
screen. Select OFF to reactivate the image.
You can press FREEZE on the remote
control to freeze the image, and press
again to restore.
Adjusts the horizontal width of the image.
Adjusts the vertical width of the image.
Highlight Auto Adjust, then press or to
start auto adjustment. The TV automatically
adjusts the image settings, such as
frequency and position.
4 Press EXIT to exit.
Adjusting the image for HDMI mode
Select the HDMI source before adjusting the
image.
To adjust the image for HDMI mode:
1 Press MENU, then press or to display the
IMAGE ADJUST menu page.
2 Press to enter the menu.
3 Within the menu, press or to select an
option, then press or to adjust the setting.
Setting Description
Image size Selects a desired image size (aspect ratio).
(See “Adjusting the image” on page 27 for
more information.)
You can press ZOOM on the remote control
to select. When a 1080i or 1080p signal is
received, this cannot be adjusted.
Setting Description
Freeze Image Select ON to freeze the image on the
screen. Select OFF to reactivate the image.
You can press FREEZE on the remote
control to freeze the image, and press
again to restore.
Colorspace When the TV converts a DVI signal to a
HDMI signal, sometimes abnormal color
appears. If this situation occurs, you can
try to adjust this item.
4 Press EXIT to exit.
Maintaining
LCD display panel information
Markings or a retained image on the LCD panel,
resulting from a fixed image being displayed for
long periods of time, is not an operating defect
and as such is not covered by the warranty. This
product is not designed to display fixed-image
patterns for extended periods of time.
Important information regarding the use of video
games, computers, captions, or other fixed-image
displays
The extended use of fixed-image program
material can cause a permanent “shadow
image” on the LCD panel.
This background image is viewable on normal
programs in the form of a stationary fixed image.
This type of irreversible LCD panel deterioration
can be limited by observing the following steps:
• Reduce the brightness/contrast setting to a
minimum viewing level.
• Do not display the fixed image for extended
periods of time.
• Turn the power off when not in actual use.
Cleaning and maintenance
To clean this TV, wipe with a soft, dry cloth.
If the surfaces are extremely dirty, use a soft
cloth dipped in a soap and water solution or a
weak detergent solution.
• Use eyeglass cleaner to remove stubborn dirt
from the LCD.
• Never use alcohol, paint thinner, or benzine
to clean this TV.
• Before using a chemically treated cloth, read
the instructions that came with the cloth
carefully.
Care of remote control
• Keep the remote dry. If it gets wet, wipe it dry
immediately.
• Use and store the remote control only in
normal temperature environments.
• Handle the remote control gently and
carefully. Don’t drop it.
• Wipe the remote control with a damp cloth to
keep it looking like new.
www.insignia-products.com
37
Page 38

Insignia NS-42LCD 42-inch LCD TV
Troubleshooting
Before calling for repair service, check the
following items for possible remedies to an
encountered symptom.
Symptoms Possible solution
No power • Make sure that the AC power cord is
No picture • Check video connections at the back of
Good picture but
no sound
Good sound but
poor color
Poor picture • Sometimes, poor picture quality
Horizontal dotted
line
Remote operation
fails
Snowy picture
and noise
No stable or not
synchronized VGA
picture
No output from
one of the
speakers
Control buttons
do not work
plugged into a power outlet.
• Unplug the power cord, wait for 60
seconds, re-insert the plug into the
power outlet, and turn on the TV again.
the TV to see if they are correctly
connected.
• Adjust the contrast and brightness
settings.
• Select a correct input.
• Make sure that a non-compatible
signal is not being input.
• Increase the volume.
• Make sure that the TV is not muted.
• Adjust the contrast, color and
brightness settings.
occurs when an activated S-VHS
camera or camcorder is connected
while another activated peripheral is
connected. In this case, turn off one of
the peripherals.
• make sure the room isn’t too bright.
• This may be caused by electrical
interference (such as a hair dryer, or
nearby neon lights).
• Turn off the equipment.
• This remote control is a universal
remote control. If the remote control
does not work correctly when
operating the TV, try pressing the TV
button.
• Make sure the batteries have a full
charge. Replace if necessary.
• Clean the remote control sensor lens
on the TV.
• Do not use the remote control under
strong or fluorescent lighting.
• The batteries should be inserted with
polarity (+, -) aligned according to the
diagram in the battery compartment.
• Check the A/V connections.
• Make sure that you have selected the
correct VGA mode in your PC.
• Adjust balance in the AUDIO (SOUND)
menu.
• Method 1: Press POWER on the TV
and wait for three seconds, then the TV
turns off. Continue to wait for several
seconds, then turn on the TV again.
(Recommended because all of the
settings you have made will not be
cleared.)
• Method 2: Unplug the power cord, wait
for a few seconds, then plug the power
cord back in and turn on the TV again.
(All of the settings you have made will
be cleared.)
Symptoms Possible solution
The picture leaves
“trails” or appears
slightly delayed
When the TV is used in rooms (locations) with
low temperature, the picture may leave trails
or appear slightly delayed. This is not a
malfunction, and the TV will recover when the
temperature returns to normal.
Note
If your problem is not solved, turn your TV off and
then on again.
Warning
Never attempt to repair a defective TV yourself.
Troubleshooting the remote control
Symptom Possible solution
LED does not blink when
a button is pressed
LED blinks when a
button is pressed, but
device does not respond
LED blinks one long
blink
Remote control does not
control a device or only
controls some features
of the device
No volume on a device See “Programming the volume lock”
Replace the batteries.
Make sure that you are at less than
15 feet (4.6 meters) from the device,
and that you point the remote control
at the remote sensor on the device.
You pressed an incorrect button. Start
the procedure over again.
Make sure that the device has a remote
sensor, then try another code.
on page 17.
Specifications
Power supply AC 100-240V 50/60 Hz
Power consumption 250 W (maximum)
Screen 42"
Weight 80.3 lbs. (36.5 kg)
Dimensions 42.4 × 33.9 × 13.6"
Channel coverage VHF: 2-13
TV system NTSC-M, ATSC
Accessories User guide
Temperature Storage: 32 ~ 122°F
(107.7 × 86.106 ×
34.544 cm)
UHF: 14-69
CATV: 1-125
CADTV: 1-135
DTV: 2-69
Remote control
(0 ~ 50°C)
Working: 41 ~ 104°F
temperature: 5°C to 40°C)
38
www.insignia-products.com
Page 39

Insignia NS-42LCD 42-inch LCD TV
Warranty
1-year limited warranty
Insignia Products (“Insignia”) warrants to you, the original
purchaser of this new NS-42LCD (“Product”), that the
Product shall be free of defects in the original manufacture of
the material or workmanship for a period of one (1) year from
the date of your purchase of the Product (“Warranty Period”).
This Product must be purchased from an authorized dealer
of Insignia brand products and packaged with this warranty
statement. This warranty does not cover refurbished
Product. If you notify Insignia during the Warranty Period of a
defect covered by this warranty that requires service, terms
of this warranty apply.
How long does the coverage last?
The Warranty Period lasts for 1 year (365 days) from the date
you purchased the Product. The purchase date is printed on
the receipt you received with the Product.
What does this warranty cover?
During the Warranty Period, if the original manufacture of the
material or workmanship of the Product is determined to be
defective by an authorized Insignia repair center or store
personnel, Insignia will (at its sole option): (1) repair the
Product with new or rebuilt parts; or (2) replace the Product
at no charge with new or rebuilt comparable products or
parts. Products and parts replaced under this warranty
become the property of Insignia and are not returned to you.
If service of Products or parts are required after the Warranty
Period expires, you must pay all labor and parts charges.
This warranty lasts as long as you own your Insignia Product
during the Warranty Period. Warranty coverage terminates if
you sell or otherwise transfer the Product.
How to obtain warranty service?
If you purchased the Product at a retail store location, take
your original receipt and the Product to the store you
purchased it from. Make sure that you place the Product in
its original packaging or packaging that provides the same
amount of protection as the original packaging. If you
purchased the Product from an online web site, mail your
original receipt and the Product to the address listed on the
web site. Make sure that you put the Product in its original
packaging or packaging that provides the same amount of
protection as the original packaging.
Where is the warranty valid?
This warranty is valid only to the original purchaser of the
product in the United States and Canada.
What does the warranty not cover?
This warranty does not cover:
• Customer instruction
• Installation
• Set up adjustments
• Cosmetic damage
• Damage due to acts of God, such as lightning strikes
• Accident
•Misuse
•Abuse
• Negligence
• Commercial use
• Modification of any part of the Product, including the
antenna
This warranty also does not cover:
• Damage due to incorrect operation or maintenance
• Connection to an incorrect voltage supply
• Attempted repair by anyone other than a facility
authorized by Insignia to service the Product
• Products sold as is or with all faults
• Consumables, such as fuses or batteries
• Products where the factory applied serial number has
been altered or removed
REPAIR REPLACEMENT AS PROVIDED UNDER THIS
WARRANTY IS YOUR EXCLUSIVE REMEDY. INSIGNIA
SHALL NOT BE LIABLE FOR ANY INCIDENTAL OR
CONSEQUENTIAL DAMAGES FOR THE BREACH OF ANY
EXPRESS OR IMPLIED WARRANTY ON THIS PRODUCT,
INCLUDING, BUT NOT LIMITED TO, LOST DATA, LOSS OF
USE OF YOUR PRODUCT, LOST BUSINESS OR LOST
PROFITS. INSIGNIA PRODUCTS MAKES NO OTHER
EXPRESS WARRANTIES WITH RESPECT TO THE
PRODUCT, ALL EXPRESS AND IMPLIED WARRANTIES
FOR THE PRODUCT, INCLUDING, BUT NOT LIMITED TO,
ANY IMPLIED WARRANTIES OF AND CONDITIONS OF
MERCHANTABILITY AND FITNESS FOR A PARTICULAR
PURPOSE, ARE LIMITED IN DURATION TO THE
WARRANTY PERIOD SET FORTH ABOVE AND NO
WARRANTIES, WHETHER EXPRESS OR IMPLIED, WILL
APPLY AFTER THE WARRANTY PERIOD. SOME STATES,
PROVINCES AND JURISDICTIONS DO NOT ALLOW
LIMITATIONS ON HOW LONG AN IMPLIED WARRANTY
LASTS, SO THE ABOVE LIMITATION MAY NOT APPLY TO
YOU. THIS WARRANTY GIVES YOU SPECIFIC LEGAL
RIGHTS, AND YOU MAY ALSO HAVE OTHER RIGHTS,
WHICH VARY FROM STATE TO STATE OR PROVINCE TO
PROVINCE.
Copyright
© 2006 Insignia. Insignia and the Insignia logo are
trademarks of Best Buy Enterprise Services, Inc. Other
brands and product names are trademarks or registered
trademarks of their respective holders. Specifications and
features are subject to change without notice or obligation.
For service and support call (877) 467-4289.
www.insignia-products.com
39
Page 40

40
www.insignia-products.com
Page 41

Téléviseur ACL de 42 po Insignia NS-42LCD
Téléviseur ACL de 42
po Insignia
NS-42LCD
Table des matières
Introduction . . . . . . . . . . . . . . . . . . . . . . . . . . . . .41
Instructions de sécurité importantes . . . . . . . . . .41
Fonctionnalités. . . . . . . . . . . . . . . . . . . . . . . . . . .43
Installation du téléviseur . . . . . . . . . . . . . . . . . . .47
Fonctionnement du téléviseur . . . . . . . . . . . . . . .61
Entretien. . . . . . . . . . . . . . . . . . . . . . . . . . . . . . . .79
Problèmes et solutions. . . . . . . . . . . . . . . . . . . . .79
Spécifications. . . . . . . . . . . . . . . . . . . . . . . . . . . .80
Garantie . . . . . . . . . . . . . . . . . . . . . . . . . . . . . . . .81
Introduction
Félicitations d’avoir acheté ce produit Insignia de
haute qualité. Le modèle NS-42LCD représente
la dernière avancée technologique dans la
conception de téléviseurs ACL et a été conçu
pour des performances et une fiabilité
exceptionnelles.
Instructions de sécurité
importantes
Avertissement
Afin de réduire le risque de choc électrique, ne pas enlever le
couvercle (ou le panneau arrière). Ne contient aucune pièce
réparable par l'utilisateur. Confier l’entretien à du personnel
qualifié.
Afin de réduire le risque d’incendie et de choc électrique, ne
pas exposer ce téléviseur à la pluie ou l’humidité.
Lire les instructions
Lire toutes les instructions de sécurité et
d’utilisation avant d’utiliser cet appareil.
Conserver les instructions
Conserver les instructions de sécurité et de
fonctionnement pour toute référence ultérieure.
Respecter les avertissements et les
instructions
Respecter tous les avertissements sur cet
appareil ainsi que dans les instructions
d’utilisation. Toutes les instructions d’utilisation
et de fonctionnement doivent être observées.
Eau et humidité
Ne pas utiliser cet appareil près de l’eau. Par
exemple près d’une baignoire, un lavabo, un
évier ou un baquet à linge, dans un sous-sol
humide ou près d’une piscine.
Nettoyage
Débrancher l'appareil avant tout nettoyage. Ne
pas utiliser de nettoyant liquide ou en aérosol.
Utiliser un chiffon à poussière pour nettoyer
l’extérieur de l’appareil.
Ventilation
Les fentes et ouvertures au dos et au bas du
boîtier sont prévues pour la ventilation, pour
assurer un fonctionnement fiable de l'appareil et
le protéger contre toute surchauffe. Ces
ouvertures ne doivent être ni bloquées ni
obstruées. Elles ne doivent jamais être bloquées
en installant l’appareil sur un lit, un sofa, un tapis
ou toute autre surface semblable. Ne pas placer
l’appareil à proximité ou au-dessus d’un
radiateur ou d’une source de chaleur. Ne pas
installer l’appareil dans un meuble encastré tel
qu’une bibliothèque ou sur une étagère, sauf si
une ventilation adéquate a été prévue ou si les
instructions du fabricant ont été respectées.
Précautions
Pour éviter les chocs électriques, introduire la lame la plus
large de la prise du cordon d’alimentation dans la fente
correspondante de la prise secteur. Si la prise ne s'adapte
pas, contacter un électricien afin qu’il remplace la prise
secteur inadéquate. Ne pas modifier la prise du cordon
d’alimentation, sinon ce dispositif de sécurité serait inopérant.
Ce symbole indique qu'une tension
dangereuse, constituant un risque de choc
électrique, est présente dans cet appareil. Cette
étiquette est située au dos de l’appareil.
Ce symbole indique que d'importantes
instructions concernant le fonctionnement et la
maintenance figurent dans la documentation
qui accompagne cet appareil.
Avertissement
Cet appareil utilise de la soudure étain-plomb et une lampe
fluorescente contenant une petite quantité de mercure. La
mise au rebut de ces matériels peut faire l'objet d'une
réglementation relative à l’environnement. Pour des
informations de mise au rebut ou de recyclage, contacter les
autorités locales ou l’Electronic Industries Alliance sur le site
www.eia.org.
Chaleur
S’assurer que l’appareil est installé à l’écart de
sources de chaleur, telles que radiateurs,
bouches de chaleur, fours ou autres appareils (y
compris les amplificateurs) qui produisent de la
chaleur.
Mise à la terre ou polarisation
Ne pas chercher à modifier le dispositif de
sécurité de la prise polarisée ou de type mise à
la terre. Une prise polarisée comporte deux
plots, un plus large que l'autre. Une prise de
type mise à la terre est composée de deux plots
et d’un troisième de mise à la terre. Ce troisième
plot, large ou rond a été prévu pour la sécurité
de l’utilisateur. Si la fiche ne s'adapte toujours
pas à la prise secteur, contacter un électricien
afin qu’il remplace la prise inadéquate.
Protection du cordon d’alimentation
Les cordons d’alimentation électrique doivent
être acheminés afin que personne ne puisse
marcher dessus et qu’aucun objet posé dessus
ne vienne les entraver. Prêter particulièrement
attention aux points de branchement du cordon
à la prise secteur et à l’endroit d’où le cordon
sort de l’appareil.
www.insignia-products.com
41
Page 42

Téléviseur ACL de 42 po Insignia NS-42LCD
Périphériques
Ne pas utiliser de périphériques non
recommandés par Insignia, car ils pourraient
être source de dangers.
Support
Ne pas placer cet appareil sur une table
roulante, un pied, un trépied, un support ou une
table instables. L’appareil pourrait tomber et
provoquer dans sa chute des blessures et subir
de graves dommages. N’utiliser qu’avec la table
roulante, le pied, le trépied, le support ou la table
recommandés par le fabricant ou vendus avec le
téléviseur. Pour installer l’appareil sur un support
mural, observer les instructions du fabricant et
utiliser un accessoire de montage recommandé
par celui-ci. Si l’appareil est installé sur un
meuble à roulettes, déplacer l’ensemble avec
précaution. Un arrêt brusque, l’utilisation d’une
force excessive et des surfaces irrégulières
risquent de déstabiliser l’ensemble et de le
renverser.
Foudre
Pour protéger l’appareil pendant un orage ou s’il
se trouve inutilisé et sans surveillance pendant
une période prolongée, le débrancher de la prise
secteur et débrancher l'antenne ou la connexion
au réseau câblé. Ceci évitera d’endommager
l’appareil en cas de foudre et de variations de
tension du secteur.
Entretien
L’utilisateur ne doit pas essayer de réparer cet
appareil lui-même ; en effet, son ouverture ou le
démontage des couvercles peut l’exposer à des
tensions dangereuses et à d'autres dangers.
Toutes les réparations doivent être réalisées par
du personnel qualifié.
Pièces de rechange
Si des pièces doivent être remplacées, s’assurer
que le technicien a utilisé des pièces de
rechange spécifiées par le fabricant qui ont les
mêmes caractéristiques que les pièces d’origine.
Toute substitution par des pièces non autorisées
risque de provoquer un incendie, un choc
électrique, des blessures ou d'autres dangers.
Surcharge
Les prises secteur et les rallonges ne doivent
pas être surchargées, cela pourrait provoquer
des risques d'incendie ou de choc électrique.
Pénétration d’objets ou de liquides
N’enfoncer en aucun cas un objet dans les
ouvertures de l’appareil car il pourrait entrer en
contact avec des tensions dangereuses ou
provoquer un court-circuit à l'origine d'un
incendie ou d'un choc électrique. Ne jamais
répandre un liquide sur le téléviseur.
Dégâts nécessitant un entretien
Débrancher l’appareil de la prise secteur et
utiliser les services d’un technicien qualifié dans
les conditions suivantes :
• Lorsque le cordon d’alimentation est effiloché
ou la prise endommagée.
• Si un liquide a été répandu ou des objets
sont tombés dans l’appareil.
• Si l’appareil a été exposé à la pluie ou à
l’eau.
• Si l’appareil fonctionne anormalement en
appliquant les instructions d’utilisation. Ne
régler que les commandes décrites dans les
instructions d’utilisation ; en effet, le réglage
incorrect d’autres commandes pourrait
provoquer des dégâts, entraînant souvent
d'importantes réparations par un technicien
qualifié pour rétablir le fonctionnement
normal de l’appareil.
• Si le téléviseur est tombé ou s’il est
endommagé de quelque façon que ce soit.
• Si l'appareil présente une détérioration
marquée de ses performances.
Pièces de rechange
Si des pièces doivent être remplacées, s’assurer
que le technicien a utilisé des pièces de
rechange spécifiées par le fabricant qui ont les
mêmes caractéristiques que les pièces d’origine.
Toute substitution par des pièces non autorisées
risque de provoquer un incendie, un choc
électrique, des blessures ou d'autres dangers.
Contrôle de sécurité
Après toute opération d’entretien ou réparation
de cet appareil, demander au technicien
d’effectuer les contrôles de sécurité de routine
pour vérifier qu’il fonctionne correctement.
Source d’alimentation
Cet appareil doit fonctionner conformément à la
source d’alimentation indiquée sur les
étiquettes. En cas d’incertitude sur la tension
d'alimentation électrique de la maison, consulter
le revendeur du téléviseur ou la compagnie
d'électricité.
Foudre
Pour protéger l’appareil pendant un orage ou s’il
se trouve inutilisé et sans surveillance pendant
une période prolongée, le débrancher de la prise
secteur et débrancher l'antenne ou la connexion
au réseau câblé. Ceci évitera d’endommager
l’appareil en cas de foudre et de variations de
tension du secteur.
Protection de l’écran
L’écran du téléviseur est en verre. Ne pas laisser
tomber l’appareil ou heurter l’écran en verre. Si
l’écran se brise, prendre garde à ne pas se
blesser avec les morceaux de verre.
Pixels défectueux
L’écran de cet appareil est conçu pour afficher
des images fines détaillées. Il peut arriver que
certains pixels non actifs apparaissent sur
l’écran sous forme de points fixes bleus, verts ou
rouge. Ceci est normal et n’affecte pas la
performance de l’appareil.
42
www.insignia-products.com
Page 43

Téléviseur ACL de 42 po Insignia NS-42LCD
Mise à la terre d’une antenne externe
Si cet appareil est connecté à une antenne
extérieure ou à un réseau câblé, vérifier que
l'antenne ou la connexion au réseau câblé est
mis à la terre afin de bénéficier d'une certaine
protection contre les sautes de tension et les
charges électrostatiques. L'article 810 du Code
national de l’électricité (CNE), ANSI/NFPA Nº
70, fournit des informations relatives à la mise à
la terre correcte du mât et du support, la mise à
la terre du fil conducteur de l’antenne à l’unité de
décharge de l’antenne, la taille des conducteurs
de mise à la terre, l’emplacement de l’unité de
décharge de l’antenne, la connexion aux
conducteurs de terre ainsi que les normes en
matière de prise de terre.
7
6
5
4
3
1
1 Équipement de la compagnie d'électricité
2 Système de mise à la terre des électrodes
de la compagnie d’électricité
3 Serre-fils de mise à la terre
4 Conducteurs de mise à la terre
5 Unité de décharge de l’antenne
6 Serre-fil de mise à la terre
7 Fil conducteur de l’antenne
2
Fonctionnalités
Arrière du téléviseur
1
Élément Description
1 Capteur de la télécommande — Pointer la
télécommande vers le capteur de télécommande en
utilisant les touches.
Avis à l'installateur de TV câblée
Le présent avis a pour objet de rappeler à
l'installateur de systèmes de télévision par câble
que l'article 820-40 du Code national de
l'électricité contient des recommandations
relatives à la mise à la masse de l'appareil et, en
particulier, stipule que la terre du câble doit être
connectée au système de mise à la terre de
l'immeuble, aussi prêt que possible du point
d'entrée du câble.
www.insignia-products.com
43
Page 44

Dessus du téléviseur
1 2 3 4 5 6 7
Élément Description
1-2 CH-/CH+ — Permettent de changer de canal. Dans le
menu OSD, permettent de mettre les options en
surbrillance.
3-4 VOL-/VOL+ — Permettent de modifier le volume
sonore. Dans le menu OSD, permettent de régler la
valeur d’une option.
5 MENU — Permet d’accéder à la page principale du
menu OSD.
6 ENTRÉE — Permet de sélectionner la source d’entrée
du signal.
7 MARCHE/ARRÊT — Permet de mettre le téléviseur en
marche (sortie du mode veille) ou pour le mettre en
mode veille (sortie du mode marche).
Téléviseur ACL de 42 po Insignia NS-42LCD
Remarques
• Les touches POWER (Marche/Arrêt), CH+/-,
VOL+/-, INPUT (Entrée) et MENU sur le
téléviseur ont les mêmes fonctions que les
touches correspondantes sur la
télécommandes.
• Ce guide de l’utilisateur décrit les procédures
sur la base de l’utilisation de la télécommande
et non des commandes du téléviseur.
44
www.insignia-products.com
Page 45

Téléviseur ACL de 42 po Insignia NS-42LCD
Arrière du téléviseur
1 2 3 4 5
6 7 8 9 10 11 12
Élément Description
1 Prises de sortie pour haut-parleurs
2 Prise d’entrée HDMI — Pour connecter les
périphériques à interface HDMI (par exemple, un
décodeur ou un lecteur DVD).
3 Prise d’entrée audio — Pour connecter une entrée
audio (telle que celle d’un ordinateur).
4 Port VGA — Pour connecter des périphériques à
interface VGA (par exemple un ordinateur).
5 Prises pour la vidéo à composantes 1 et 2 — Pour
connecter les sorties vidéo à composantes d’un
lecteur de DVD ou d’un décodeur.
6 Prises pour composantes audio 1 et 2 — Pour
connecter les sorties audio d’un lecteur de DVD ou
d’un décodeur.
7 Prises AV 1 et 2 — Pour connecter les sorties AV d’un
magnétoscope ou d’un lecteur de DVD.
13 14 15
Élément Description
8 Prise S-VIDÉO — Pour connecter la sortie S-Vidéo
d’un magnétoscope ou d’un lecteur de DVD.
9 Prises de sortie VIDÉO — Connecter aux prises
d’entrée vidéo d’un magnétoscope ou d’un DVR pour
enregistrer des émissions.
10 Prises de sortie AUDIO — Connecter aux prises
d’entrée audio d’un magnétoscope ou d’un DVR pour
enregistrer des émissions audio.
11 Prise pour casque d’écoute — Pour connecter des
casques d’écoute.
12 Port USB — Réservé à la mise à jour des logiciels
(microprogrammes).
13 Prise de sortie audio numérique optique S/PDIF —
Pour connecter un périphérique audio numérique
optique.
14 Prise pour antenne hertzienne — Pour connecter une
antenne intérieure ou extérieure.
15 Prise CÂBLE — Pour connecter la TV câblée.
www.insignia-products.com
45
Page 46

Téléviseur ACL de 42 po Insignia NS-42LCD
Télécommande
1
2
3
4
5
6
7
8
9
10
11
12
13
14
15
16
17
Numéro Touche Description
1 CONFIGURER Permet de programmer la
télécommande. Pour plus
d’informations, consulter «
Programming your remote control
», page 55.
2 Périphérique TV – Permet de choisir le mode TV.
DVD – Permet de sélectionner un
lecteur de DVD connecté.
CBL – Permet de choisir le mode TV
câblé ou satellite.
AUX – Permet de choisir un
périphérique affecté à cette touche.
3 Pavé numérique Permet de saisir les numéros de
canal. Dans le menu OSD, permet
de saisir le mot de passe du
contrôle parental.
4 ENTRÉE Permet de sélectionner la source
d’entrée vidéo.
5 Permet de revenir au dernier canal
visionné.
18
19
20
21
22
23
24
25
26
27
28
Numéro Touche Description
6 CH +/– Permet de changer les canaux de
7 SOURDINE Permet de mettre le son en
8 MENU Permet d’accéder aux menus
9
10 GUIDE Permet d’afficher le Guide de
11 Permet de lancer l’enregistrement
12 ZOOM Permet de modifier le format
13 MTS/SAP En mode TV analogique, permet de
14 LISTE Permet d’afficher une liste de
15 FAVORIS Permet d’afficher la liste des
16 PIP Permet de sélectionner les modes
17 P.POSITION Permet de sélectionner la position
18 Permet de mettre le téléviseur en
19 — Permet de sélectionner un canal
20 VOL +/– Permet de régler le volume.
21 INFO Permet d’afficher l’information
22 QUITTER Permet de fermer l’OSD.
23 CCD Permet d’activer ou de désactiver
OK
télévision.
sourdine.
d’écran (OSD).
Utiliser les touches fléchées pour se
déplacer parmi les options de
l’OSD. Appuyer sur OK pour
confirmer les modifications ou faire
basculer les options de l’OSD.
programmation électronique (GPE).
sur un périphérique connecté, tel
qu’un magnétoscope.
Pendant la lecture d'un DVD,
permet d’effectuer un arrêt sur
image. Appuyer de nouveau pour
reprendre la lecture.
Cette touche permet de lire un DVD
ou un CD
Permet d’arrêter la lecture du DVD
ou du CD.
Permet de retourner au chapitre
précédent d’un DVD ou à la piste
précédente d’un CD.
Permet le retour rapide sur un DVD
ou un CD.
Permet une avance rapide sur un
DVD ou CD si un lecteur de DVD ou
de CD est branché.
Permet d’aller au chapitre suivant
d’un DVD ou à la piste suivante d’un
CD.
d’écran.
sélectionner MONO, STEREO
(Stéréo) ou SAP. En mode TVN,
permet de sélectionner la piste
audio.
programmes.
programmes favoris.
PIP (image dans l’image)/PBP
(image par image)/POP (image hors
l’image)/plein écran.
de l’image secondaire en mode PIP.
marche ou en mode veille.
secondaire.
d’état.
les sous-titres codés. Pour plus
d’informations, consulter « Viewing
Closed Captions », page 71.
46
www.insignia-products.com
Page 47

Téléviseur ACL de 42 po Insignia NS-42LCD
Numéro Touche Description
24 ARRÊT DIFFÉRÉ Permet de configurer l’arrêt différé
25 IMAGE Permet de sélectionner le mode
26 AUDIO Permet de sélectionner le mode
27 ARRÊT SUR
IMAGE
28 PERMUTER Permet de permuter les images
de l’appareil. Pour plus
d’informations, consulter « Setting
the Sleep timer », page 71.
d’image.
audio.
Permet d’effectuer un arrêt sur
l’image vidéo. Appuyer de nouveau
pour reprendre la lecture. Ne pas
effectuer un arrêt sur l’image vidéo
pendant une durée prolongée.
L’écran du téléviseur pourrait être
endommagé.
principales et secondaires en mode
PIP ou PBP.
Installation du téléviseur
Installation des piles dans la
télécommande
Pour installer les piles de la télécommande :
1 Retirer le couvercle du compartiment des
piles.
2 Insérer deux piles AA dans le compartiment.
Veiller à ce que les pôles + et – des piles
coïncident avec les repères + et – figurant à
l'intérieur du compartiment.
3 Remettre le couvercle en place.
Remarques
• Ne pas mélanger différents types de piles.
• Ne pas mélanger des piles neuves et usagées.
• Retirer les piles quand elles sont déchargées.
• Les produits chimiques des piles peuvent provoquer des
démangeaisons. Si les piles fuient, nettoyer le
compartiment avec un chiffon. Si les produits chimiques
sont au contact de la peau, nettoyer immédiatement.
• Retirer les piles si la télécommande n’est pas utilisée
pendant une période prolongée.
www.insignia-products.com
47
Page 48

Téléviseur ACL de 42 po Insignia NS-42LCD
Connexion de l’alimentation
Pour connecter le téléviseur à une prise
secteur :
• Brancher le cordon d'alimentation sur une
prise secteur CA standard.
Remarques
• Vérifier que la tension est correcte. Voir
l’étiquette au dos du téléviseur.
• Débrancher le téléviseur de la prise secteur
lorsqu'il ne doit pas être utilisé pendant une
durée prolongée.
Fixation des haut-parleurs inclus
Précautions
Ne pas lever ou déplacer le téléviseur à l’aide des
haut-parleurs.
Installation des haut-parleurs
1 Débrancher le téléviseur et tous les
composants connectés.
2 Positionner le téléviseur avec la face avant
vers le sol, sur une surface stable, au toucher
doux, non-abrasive.
3 Retirer délicatement les caches des vis (1),
puis retirer les quatre vis (2) situées sous les
caches.
1
2
Connexion de haut-parleurs externes
1 Connecter les câbles audio du haut-parleur
aux prises de sortie du haut-parleur externe
sur le téléviseur, en faisant correspondre les
extrémités + et - des câbles avec les couleurs
des prises.
(Noir)
(Rouge)
(Noir)
(Rouge)
4 Fixer les haut-parleurs au téléviseur par les
connecteurs en utilisant les vis retirées lors
de l’étape 3, puis serrer celles-ci fermement.
5 Installer les deux caches de la connexion des
haut-parleurs dans leur emplacement sur le
téléviseur.
6 Connecter les câbles audio du haut-parleur
aux prises de sortie du haut-parleur externe
sur le téléviseur, en faisant correspondre les
extrémités + et - des câbles avec les couleurs
des prises.
48
Remarques
• Débrancher le téléviseur et tous les
composants connectés avant de connecter les
haut-parleurs.
• L’illustration peut être différente par rapport au
modèle de référence.
www.insignia-products.com
Page 49

Téléviseur ACL de 42 po Insignia NS-42LCD
Connexion d’une antenne
Antenne VHF
À propos des connexions d’antennes
Pour une réception acceptable des canaux VHF
et UHF, une antenne externe est requise. Pour
une réception optimale, il est recommandé
d’utiliser une antenne extérieure.
Les câbles d’antenne sont de deux types :
75 ohms et 300 ohms.
Câble de 75 ohms
Antenne UHF
Console de mixage
Câble coaxial de 75 ohms
décodeur de la TV câblée
Connecter au
• Lors de la connexion d’un périphérique, le
mettre hors tension avant de le connecter.
Remarque
• Faire appel de préférence à un installateur ou
un revendeur local pour obtenir le système
d’antenne et les accessoires adaptés au lieu
d’installation.
• Tout ce qui concerne l’installation de l’antenne,
des accessoires ou la mise à niveau de
l’alimentation électrique ressort de la seule
responsabilité de l’acquéreur.
Câble de 300 ohms
Si le câble d’antenne utilisé a un connecteur de
75 ohms, le brancher sur la prise coaxiale située
au dos de l’appareil.
Si le câble d’antenne utilisé a un connecteur de
300 ohms, le brancher sur un adaptateur de 300
à 75 ohms (non fourni), connecter l’adaptateur à
un câble de 75 ohms, puis brancher l’autre
extrémité du connecteur de 75 ohms sur la prise
coaxiale située au dos de l’appareil.
Précautions d’utilisation
• Vérifier attentivement la position et le type
des bornes avant d'effectuer des connexions.
• Des connecteurs desserrés peuvent être à
l’origine de problèmes d’image ou de
colorimétrie. Vérifier que les connecteurs
sont bien insérés dans les prises
appropriées.
Pour connecter une antenne :
1 Pour la visualisation de stations de diffusion
sans utiliser un décodeur, brancher l’antenne
au connecteurAIR (Hertzien) à l’arrière du
téléviseur.
- OU Si la TV câblée est utilisée, brancher le câble
du décodeur au connecteur CABLE à
l’arrière du téléviseur.
2 Sélectionner TV Source (Source du signal
TV) (AIR ou CABLE) dans le menu
CHANNEL SETUP (Configuration des
canaux), puis effectuer une recherche
automatique des canaux. Pour plus
d’informations, consulter « Memorizing
channels », page 63.
www.insignia-products.com
49
Page 50

Connexion d’une audio numérique optique
Téléviseur ACL de 42 po Insignia NS-42LCD
Récepteur Stéréo
Pour obtenir une sonorité de cinéma maison, il
faut connecter le système stéréo ou audio au
connecteur S/PDIF OUT [Sortie S/PDIF]
(optique) du téléviseur.
Remarque
Le connecteur S/PDIF OUT ne peut émettre de
l’audio numérique qu'en provenance d’émissions
de télévision.
Pour connecter de l’audio optique
1 Connecter un câble audio optique au
connecteur S/PDIF OUT à l’arrière du
téléviseur.
2 Connecter le câble au connecteur S/PDIF IN
(Entrée S/PDIF) du récepteur stéréo ou
audio.
Connexion d’un magnétoscope
Pour connecter un magnétoscope :
1 Connecter les câbles audio/vidéo aux prises
audio (droite/gauche)/vidéo de l’appareil et
du magnétoscope.
Remarque
Pour obtenir une meilleure vidéo, il est possible
d’utiliser la prise S-Vidéo si le périphérique source
en est dotée. La sortie S-VIDÉO utilise le même
circuit que Video1 et si les entrées A/V standard
inputs et S-VIDÉO inputs sont connectées,
S-VIDEO est prioritaire. Utiliser l’un ou l’autre.
OU
Entrée S/PDIF
(optique)
3 Appuyer sur ou pour sélectionner
AV1/SVideo (AV1/S-Vidéo) puis appuyer sur
OK pour confirmer.
4 Mettre le magnétoscope sous tension, y
insérer une bande vidéo et appuyer sur Play
(Lecture).
YRW
Câbles A/V et
câble S-Vidéo
Y = Jaune (vidéo)
W = Blanc (Audio gauche)
R = Red (Audio droite)
W
Y
R
Pour reproduire une vidéo à partir du
magnétoscope :
2 Mettre le téléviseur sous tension, puis
appuyer sur INPUT (Entrée). Le menu INPUT
SELECT (Sélection de l’entrée) s’affiche.
50
Magnétoscope
www.insignia-products.com
Page 51

Téléviseur ACL de 42 po Insignia NS-42LCD
Connexion d’un magnétoscope (pour un
enregistrement) ou un amplificateur
externe
W
Y
R
Câble
vidéo
Y
W
Magnétoscope
Pour connecter un magnétoscope ou un
amplificateur :
1 Connecter les câbles vidéo aux prises vidéo
du téléviseur et du magnétoscope.
2 Connecter les câbles audio au téléviseur,
puis les connecter aux prises Audio (G/D) du
magnétoscope ou de l’amplificateur externe.
Remarque
Uniquement des émissions télévisées
analogiques et des sources d’entrée AV1/AV2
peuvent être émises à travers des prises de sortie
AV.
Câble
audio
R
Y = Jaune (vidéo)
W = Blanc (Audio gauche)
R = Red (Audio droite)
W
R
Monitor - Record
Amplificateur
externe
Pour enregistrer une émission télévisée :
1 Mettre le téléviseur sous tension, puis
sélectionner l’émission à enregistrer.
2 Mettre le magnétoscope sous tension et y
insérer une cassette pour l’enregistrement.
3 Appuyer sur la touche Record du
magnétoscope pour commencer
l’enregistrement.
Remarque
Le fonctionnement de l’amplificateur peut varier
en fonction du modèle. Se reporter au guide de
l’utilisateur de l’amplificateur pour vérifier le
fonctionnement correct.
www.insignia-products.com
51
Page 52
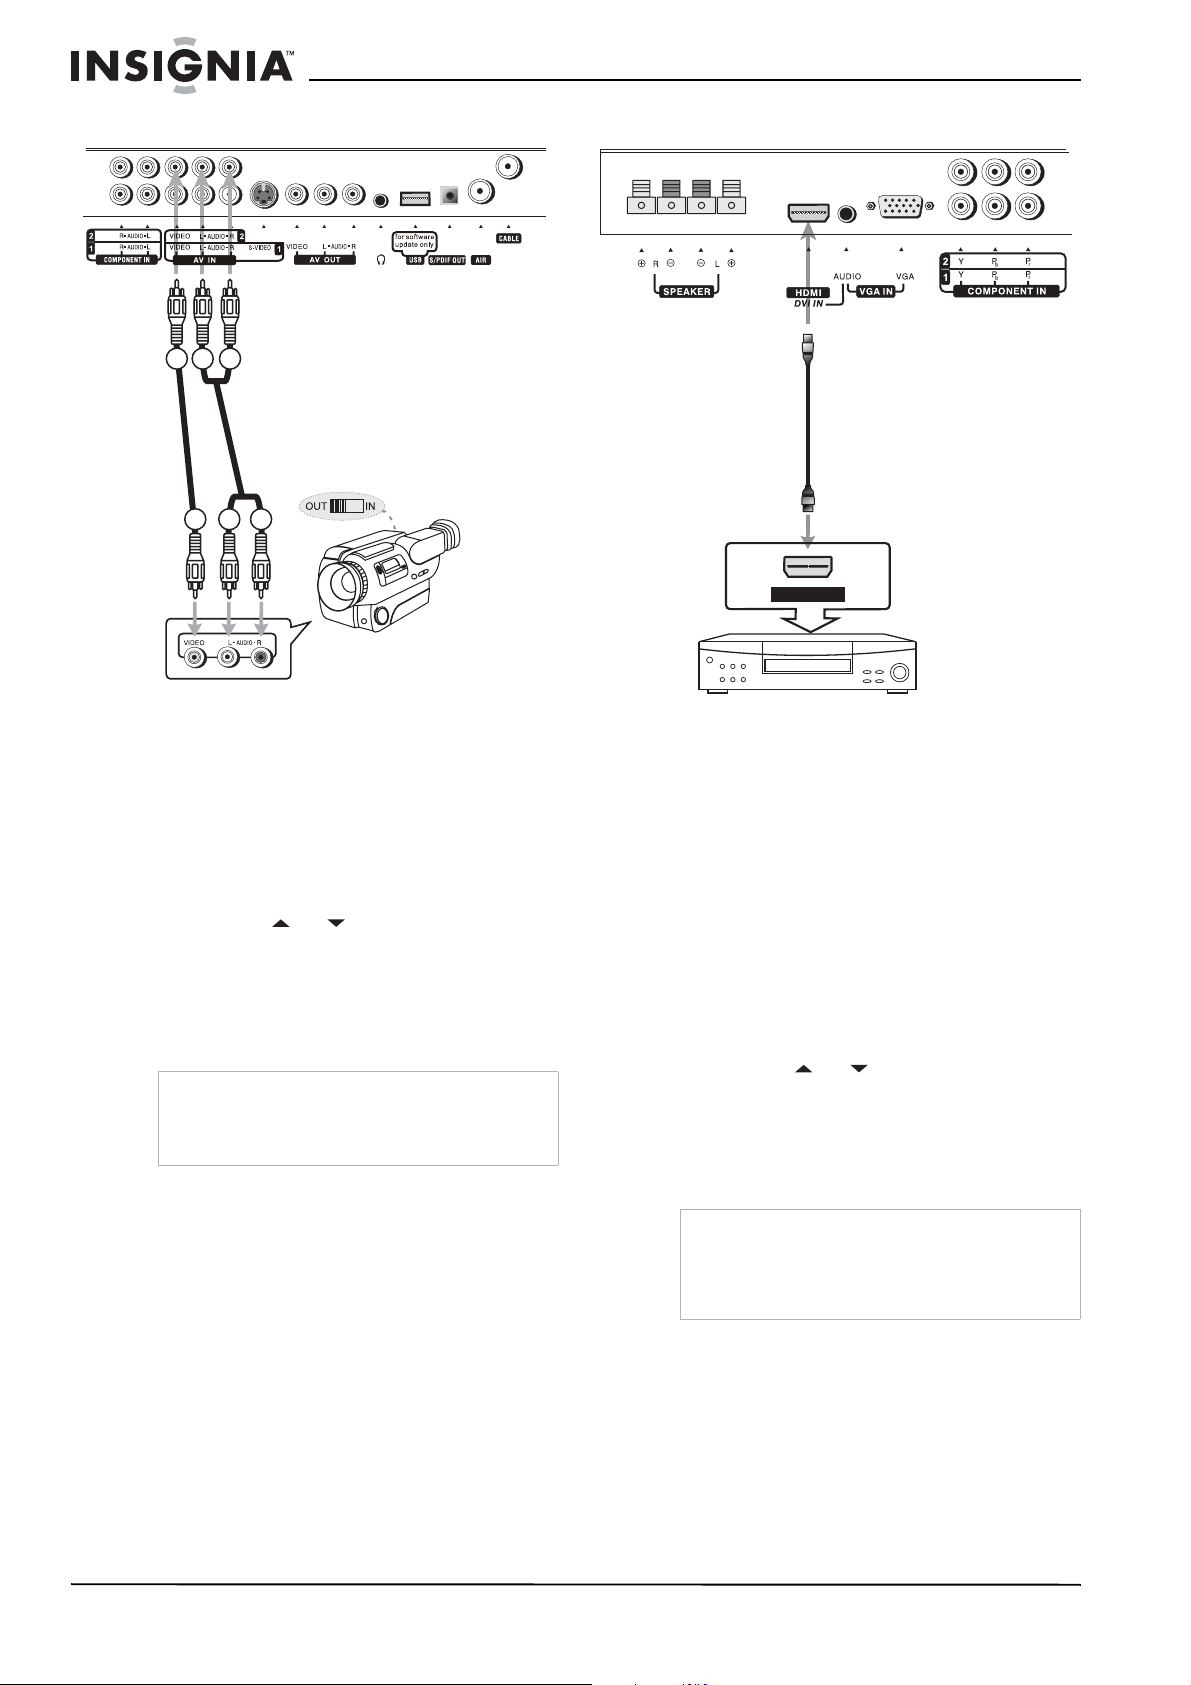
Téléviseur ACL de 42 po Insignia NS-42LCD
Connexion d’un caméscope
Y
R
W
Y = Jaune (vidéo)
W = Blanc (Audio gauche)
R = Red (Audio droite)
Câble
vidéo
Câble
audio
Y
R
W
Connexion d’un périphérique HDMI
Câble HDMI
HDMI OUT
Périphérique avec
port HDMI
Pour la connexion d’un caméscope :
1 Connecter les câbles Audio/Vidéo à l’arrière
du téléviseur.
2 Connecter les câbles Audio/Vidéo au
caméscope.
Lecture à partir d’un caméscope :
1 Mettre le téléviseur sous tension, puis
appuyer sur INPUT (Entrée). Le menu INPUT
SELECT (Sélection de l’entrée) s’affiche.
2 Appuyer sur ou pour sélectionner AV2,
puis appuyer sur OK pour confirmer.
3 Mettre le caméscope sous tension et le régler
sur le mode sortie.
4 Insérer une bande vidéo dans le caméscope
et appuyer sur Play (Lecture).
Remarque
Le fonctionnement du caméscope peut être
différent et dépend du modèle. Lire le manuel de
l’utilisateur du caméscope pour vérifier le
fonctionnement.
Pour connecter un lecteur de DVD ou un
décodeur en utilisant le port HDMI :
• Connecter le câble HDMI entre l’interface
HDMI de l’appareil et la sortie HDMI du
lecteur de DVD (ou décodeur).
1 Connecter le câble HDMI au port HDMI à
l’arrière du téléviseur.
2 Connecter le câble HDMI au port HDMI OUT
(Sortie HDMI) du lecteur de DVD ou du
décodeur.
Pour lire à partir d’un lecteur de DVD ou d’un
décodeur en utilisant le port HDMI :
1 Mettre le téléviseur sous tension, puis
appuyer sur INPUT (Entrée). Le menu INPUT
SELECT (Sélection de l’entrée) s’affiche.
2 Appuyer sur ou pour sélectionner
HDMI, puis appuyer sur OK pour confirmer.
3 Mettre le lecteur de DVD ou le décodeur sous
tension et les régler sur le mode correct. Voir
le guide de l’utilisateur du périphérique pour
plus d’informations.
Remarque
Si le périphérique a seulement une sortie DVI,
utiliser un adaptateur DVI vers HDMI pour la
connexion au port HDMI. Puis connecter le câble
audio à la prise AUDIO à côté de VGA IN (Entrée
VGA) à l’arrière du téléviseur.
52
www.insignia-products.com
Page 53

Téléviseur ACL de 42 po Insignia NS-42LCD
Connexion d’une vidéo à composantes
GRB
Câble
vidéo
W = Blanc (Audio gauche)
R = Rouge (Audio D ou vidéo à
composante Pr)
G = Vert (Vidéo à composantes Y)
B = Bleu (Vidéo à composantes Pb) R G
B
La couleur des composantes fournit les signaux
de la luminance et de la couleur sur des canaux
séparés, ce qui donne la vidéo la plus claire et
nette disponible pour le téléviseur.
Pour connecter un périphérique en utilisant
la vidéo à composantes :
1 Connecter le câble de la vidéo à
composantes aux prises d’entrée Y, Pb et Pr
du téléviseur.
2 Connecter le câble aux prises de sortie Y, Pb
et Pr du périphérique.
3 Connecter le câble audio aux prises d’entrée
AUDIO du téléviseur et aux prises de sortie
AUDIO du périphérique.
R
W
W
L-Audio-R
Câble
audio
R
Périphérique avec vidéo à
composantes
Pour utiliser la vidéo à composantes d’un
périphérique :
1 Mettre le téléviseur sous tension, puis
appuyer sur INPUT (Entrée). Le menu INPUT
SELECT (Sélection de l’entrée) s’affiche.
2 Appuyer sur ou pour sélectionner
Component1 ou Component2, puis
appuyer sur OK pour confirmer.
3 Mettre le périphérique sous tension et le
régler sur le mode correct. Voir le guide de
l’utilisateur du périphérique pour plus
d’informations.
www.insignia-products.com
53
Page 54

Connexion d’un ordinateur
Câble
audio
Téléviseur ACL de 42 po Insignia NS-42LCD
Câble
VGA
Pour connecter un ordinateur :
1 Connecter un câble VGA au port VGA de
l’ordinateur et à celui du téléviseur.
2 Connecter un câble audio à la prise LINE
OUT (Sortie ligne) ou HEADPHONE
(Casque d’écoute) de l’ordinateur et la prise
d’entrée AUDIO du téléviseur.
Pour reproduire une vidéo à partir de
l’ordinateur :
1 Mettre le téléviseur sous tension, puis
appuyer sur INPUT (Entrée). Le menu INPUT
SELECT (Sélection de l’entrée) s’affiche.
2 Appuyer sur ou pour sélectionner
Analog RGB (RVB analogique), puis
appuyer sur OK pour confirmer.
3 Mettre l’ordinateur sous tension et régler les
propriétés de l’affichage si nécessaire.
54
www.insignia-products.com
Page 55

Téléviseur ACL de 42 po Insignia NS-42LCD
Modification de la langue des menus
d'écran
Il est possible de modifier la langue des menus
d’écran (OSD).
Pour modifier la langue des menus d’écran :
1 Appuyer sur MENU, puis sur ou pour
afficher la fenêtre SYSTEM SETUP
(Paramètres système).
2 Appuyer sur pour accéder au menu
System Setup (Configuration système).
3 Appuyer sur ou pour sélectionner
Language (Langue), puis appuyer sur ou
pour sélectionner la langue souhaitée.
4 Appuyer sur EXIT (Quitter) pour revenir au
mode de visualisation normal.
Programmation de la télécommande
La télécommande peut contrôler quatre
périphériques, tels qu’un magnétoscope, un
lecteur de DVD, un récepteur câble ou satellite,
un amplificateur ou syntoniseur, ainsi que
d’autres périphériques similaires.
Pour programmer la télécommande :
1 Trouver le code pour le périphérique à
programmer. (Voir « Device codes » à la
page 56.) S’il existe plus d’un code pour un
périphérique, noter tous les codes.
2 Mettre le périphérique à programmer sous
tension et charger le support si nécessaire,
un disque DVD par exemple.
3 Sur la télécommande, appuyer sur une
touche du périphérique.
•Utiliser DVD pour des lecteurs de DVD ou
des magnétoscopes.
•Utiliser CBL pour les décodeurs câble ou
satellite.
•Utiliser AUX pout tout autre périphérique.
4 Appuyer sans relâcher sur SET (Réglage) de
la télécommande jusqu’à ce que le témoin à
DEL clignote deux fois, puis relâcher.
5 Saisir le code à cinq chiffres du périphérique.
Le témoin à DEL clignote chaque fois qu’un
chiffre est saisi. Si le code est correct, le
témoin à DEL clignote deux fois.
6 Pointer la télécommande vers le
périphérique, puis appuyer sur . Le
périphérique devrait s’éteindre.
Remarque
Si le périphérique ne s’éteint pas, répéter les
étapes 4 à 6 en essayant un code différent. Si
aucun des codes dans la liste ne fonctionne, voir «
Searching for your code » à la page 55.
7 Répéter les étapes 1 à 6 pour programmer
d’autres périphériques. Noter ci-après tous
les codes qui fonctionnent pour référence
ultérieure :
• Code AUX : __________________
• Code CBL : __________________
• Code CD : ___________________
• Code DVD : __________________
• Code SAT :___________________
• Code TNR : __________________
• Code Magnétoscope : __________
8 Appuyer sur SET (Réglage) pour enregistrer
le code et quitter le menu.
Recherche d’un code
Si le périphérique ne répond pas à la
télécommande après avoir essayé tous les
codes listé pour la marque de l’appareil, ou si
cette marque n’est pas listée, essayer la
recherche du code.
Pour rechercher un code :
1 Appuyer sur la touche du périphérique.
2 Appuyer sans relâcher sur SET (Réglage)
jusqu’à ce que le témoin à DEL clignote deux
fois, puis relâcher.
3 Saisir 991, puis le chiffre du groupe de
périphérique (0 = câble, 1 = téléviseur, 2 =
magnétoscope, 3 = audio). Le témoin à DEL
clignote deux fois.
4 Pointer la télécommande vers le
périphérique, puis appuyer sur . La
télécommande émet des codes à partir de sa
bibliothèque interne vers le périphérique
sélectionné, en partant du code le plus
courant. Si le périphérique répond, aller à
l'étape 7.
5 Si le périphérique ne répond pas, appuyer
sur CH+. La télécommande essayera le
prochain code. Maintenir CH+ appuyé
jusqu’à ce que le périphérique réponde. Il est
possible d’appuyer sur CH– pour essayer un
code précédent. Continuer jusqu’à ce que le
périphérique réponde.
6 Pour chercher le code d’un autre
périphérique, répéter les étapes 1 à 5.
7 Appuyer sur SET (Réglage) pour enregistrer
le code et quitter le menu.
Remarque
Si le témoin à DEL ne clignote pas deux fois,
répéter les étapes 3 à 5 en essayant un code
différent.
www.insignia-products.com
55
Page 56

Téléviseur ACL de 42 po Insignia NS-42LCD
Vérification des codes
Si lors de la recherche d’un code, un
périphérique a été programmé, il est
recommandé de vérifier quel code à quatre
chiffres est utilisé par la télécommande.
Pour vérifier le code :
1 Appuyer sur la touche du périphérique de la
télécommande.
2 Appuyer sans relâcher sur SET (Réglage)
jusqu’à ce que le témoin à DEL clignote deux
fois, puis relâcher.
3 Saisir 990. Le témoin à DEL clignote deux
fois.
4 Appuyer sur 1 et compter les clignotements
du témoin à DEL. Ceci est le premier chiffre
du code. Par exemple, si le témoin DEL
clignote deux fois, le premier chiffre est 2. Si
le témoin DEL ne clignote pas, le premier
chiffre est 0.
5 Répéter l’étape 4 en utilisant 2 pour le
second chiffre, 3 pour le troisième chiffre, 4
pour le quatrième chiffre et 5 pour le
cinquième chiffre.
6 Appuyer sur SET (Réglage) pour quitter.
Programmation du verrouillage de volume
La télécommande est préréglée pour permettre
le contrôle du volume de chaque périphérique
connecté. Il est possible de changer le
verrouillage de volume afin que le volume d’un
périphérique contrôle le volume dans tous les
modes.
Après avoir verrouillé le contrôle de volume, il
est possible de déverrouiller la commande du
volume d’un périphérique spécifique afin de
contrôler le volume de ce dernier
indépendamment.
Pour verrouiller la commande du volume :
1 Appuyer sans relâcher sur SET (Réglage)
jusqu’à ce que le témoin à DEL clignote deux
fois, puis relâcher.
2 Saisir 993, puis appuyer sur la touche du
périphérique dont le contrôle de volume est
nécessaire. Le témoin à DEL clignote deux
fois. Quand les touches VOL+, VOL– ou
MUTE (Sourdine) de la télécommande sont
appuyées, le périphérique sélectionné
commande le volume quel que soit le
périphérique qui est utilisé.
Pour déverrouiller la commande du volume :
1 Appuyer sans relâcher sur SET (Réglage)
jusqu’à ce que le témoin à DEL clignote deux
fois, puis relâcher.
2 Saisir 993, puis appuyer sur VOL+. Le
témoin à DEL clignote quatre fois. Le
contrôle du volume est déverrouillé.
Pour déverrouiller le contrôle du volume d’un
seul périphérique :
1 Appuyer sur la touche du périphérique.
2 Appuyer sans relâcher sur SET (Réglage)
jusqu’à ce que le témoin à DEL clignote deux
fois, puis relâcher.
3 Saisir 993, puis appuyer sur VOL–. Le témoin
à DEL clignote quatre fois. La commande du
volume pour le périphérique sélectionné est
déverrouillée.
Codes du périphérique
Codes du magnétoscope
ABS 21972
Admiral 20048, 20209
Aiko 20278
Aiwa 20037, 20479
Alienware 21972
America Action 20278
American High 20035
Amoisonic 20479
Anam 20162, 20037, 20240, 20278
Anam National 20162
Asha 20240
Audiovox 20037, 20278
Beaumark 20240
Bell & Howell 20104
Broksonic 20184, 20121, 20209, 20002,20479
Calix 20037
Canon 20035
Carver 20081
CCE 20072, 20278
Changhong 20048, 20081
Citizen 20037, 20278
Colt 20072
Craig 20037, 20047, 20240, 20072
Curtis Mathes 20060, 20035, 20162
Cybernex 20240
CyberPower 21972
Daewoo 20045, 20104, 20278
Dell 21972
Denon 20042
DirecTV 20739
Durabrand 20039, 20038
Electrohome 20037
Electrophonic 20037
Emerex 20032
Emerson 20035, 20037, 20184, 20240,20045,
20121, 20043, 20209, 20002, 20278,
20479
Fisher 20047, 20104
Fuji 20035, 20033
Fujitsu 20045
Gateway 21972
GE 20060, 20035, 20240
General 20045
Go Video 20432
GoldStar 20037, 20209, 20038, 20225
Haojie 20240
56
www.insignia-products.com
Page 57

Téléviseur ACL de 42 po Insignia NS-42LCD
Harman/Kardon 20081, 20038
Harwood 20072
Hewlett Packard 21972
HI-Q 20047
Hitachi 20037, 20042, 20055
Howard
Computers
HP 21972
Hughes Network
Systems
iBUYPOWER 21972
JVC 20045, 20067
KEC 20037, 20278
Kenwood 20067, 20038
KLH 20072
Kodak 20035, 20037
Kolin 20043 LG 20037, 20045, 20042,
Logik 20072
LXI 20037
Magnavox 20035, 20039, 20081
Magnin 20240
Marantz 20035, 20081
Marta 20037
Matsushita 20035, 20162
Media Center PC 21972
MEI 20035
Memorex 20035, 20162, 20037, 20048,20039,
MGA 20240, 20043
MGN Technology 20240
Microsoft 21972
Mind 21972
Minolta 20042
Mitsubishi 20067, 20043
Motorola 20035, 20048
MTC 20240
Multitech 20072
NEC 20035, 20037, 20048, 20104,20067,
Newave 20037
Nikko 20037
Noblex 20240
Northgate 21972
Olympus 20035
Optimus 21062, 20162, 20037, 20048,20104,
Orion 20184, 20209, 20002, 20479
Panasonic 21062, 20035, 20162, 20616,20225
Penney 20035, 20037, 20240, 20042,20038
Pentax 20042
Philco 20035, 20479
Philips 20035, 20081, 20739, 20618
Pilote 20037
21972
20042, 20739
20209, 20038
20047, 20240, 20104, 20209, 20479
20038
20432
Pioneer 20042, 20067
Polk Audio 20081
Profitronic 20240
Proscan 20060
Protec 20072
Pulsar 20039
Qisheng 20060
Quasar 20035, 20162
Radix 20037
Randex 20037
RCA 20060, 20035, 20240, 20042,20880
Realistic 20035, 20037, 20048, 20047,20104
ReplayTV 20616
Runco 20039
Sampo 20037, 20048
Samsung 20240, 20045, 20432
Sanky 20048, 20039
Sansui 20067, 20209, 20479
Sanyo 20047, 20240, 20104
Scott 20184, 20045, 20121, 20043
Sears 20035, 20037, 20047, 20042,20104
Sharp 20048, 20209
Shintom 20072
Shogun 20240
Singer 20072
Sonic Blue 20616
Sony 20035, 20032, 20033, 20636,21972
STS 20042
Sylvania 20035, 20081, 20043
Systemax 21972
Tagar Systems 21972
Tashiko 20037
Tatung 20045, 20067
Technics 20035, 20162
Teco 20035, 20037, 20048, 20038
Teknika 20035, 20037
Tivo 20636, 20618, 21503, 20739
TMK 20240
Toshiba 20045, 20042, 20067, 20043,21503,
21008, 21972
Totevision 20037, 20240
Touch 21972
Unitech 20240
Vector 20045
Vector Research 20038
Victor 20067
Video Concepts 20045
Videomagic 20037
Videosonic 20240
Viewsonic 21972
Wards 20060, 20035, 20048, 20047,20081,
20240, 20042, 20072
www.insignia-products.com
57
Page 58

Téléviseur ACL de 42 po Insignia NS-42LCD
White
Westinghouse
XR-1000 20035, 20072
Yamaha 20038
Zenith 20039, 20033, 20209, 20479
ZT Group 21972
20209, 20072
Codes du lecteur de DVD
Aiwa 20641, 21912
Akai 20770
Allegro 20869
Apex Digital 20672, 20717, 20797, 21061,20796,
Blaupunkt 20717
Blue Parade 20571
Broksonic 20695
Changhong 20627, 21061
CineVision 20869
Coby 21086
Curtis Mathes 21087
CyberHome 21024, 21023, 21129, 20816, 21117
Daewoo 20833, 21172, 20869
Denon 20490
DVD2000 20521
Emerson 20591, 20675
Entreprise 20591
Fisher 21919
Funai 20675
Gateway 21158, 21073
GE 20522, 20717
Go Video 20744, 20833, 21099, 20783,21075,
Greenhill 20717
Harman/Kardon 20582, 20702
Hitachi 20573, 20664, 21919
Hiteker 20672
Initial 20717
Integra 20627, 21924
JBL 20702
JVC 20558, 20623, 20867
Kenwood 20490, 20534
KLH 20717, 21020, 21149
Koss 20651, 21980
Lasonic 20798
LG 20591, 20869, 20801
Liquid Video 21980
Lite-On 21158, 21058
Loewe 20511
Magnavox 20503, 20539, 21976, 21914, 20675
Marantz 20539
Memorex 20695
Microsoft 20522
21056, 21937, 20794, 21020, 21915
20869, 21730
Mintek 20717
Mitsubishi 21521, 20521
Nesa 20717
Norcent 21003
Onkyo 20503, 20627, 21924, 20792
Oritron 20651, 21980
Panasonic 20490, 21762, 21990
Philips 20503, 20539, 20646, 21914
Pioneer 20525, 20571
Polaroid 21086, 21061
Polk Audio 20539
Portland 20770
Proscan 20522
Qwestar 20651
RCA 20522, 20571, 20717, 20822
Rio 20869
Rotel 20623
Sampo 20752, 20698
Samsung 20490, 20573, 21932, 21075, 20820
Sansui 20695
Sanyo 20695
Sharp 20630, 20752
Sharper Image 21117
Sherwood 20770
Shinco 20717
Shinsonic 20533
Sonic Blue 20869, 21099
Sony 20533, 20864, 21033, 21904, 21903
SVA 20717
Sylvania 20675
Symphonic 20675
Teac 20717, 21984, 20809
Technics 20490
Theta Digital 20571
Toshiba 20503, 20695
Urban Concepts 20503
Xbox 20522
Yamaha 20490, 20539, 20545
Zenith 20503, 20591, 20869
Codes du décodeur câble
ABC 00003, 00008, 00014
Americast 00899
Bell & Howell 00014
Bell South 00899
Clearmaster 00883
ClearMax 00883
Coolmax 00883
Daeryung 01877, 00877, 00477, 00008
Digi 00637
Director 00476
58
www.insignia-products.com
Page 59

Téléviseur ACL de 42 po Insignia NS-42LCD
Dumont 00637
Gehua 00476
General
Instrument
GoldStar 00144
Hamlin 00009, 00273
Hitachi 00014
Jerrold 00476, 00810, 00276, 00003,00012,
KNC 00008
LG 00144
Memorex 00000
Motorola 00476, 00810, 00276, 01254,01376
MultiVision 00012
Pace 01877, 00237
Panasonic 00000, 00008, 00107
Panther 00637
Paragon 00000
Philips 00317, 01305
Pioneer 01877, 00877, 00144, 00533
Pulsar 00000
Quasar 00000
RadioShack 00883
Regal 00279, 00273
Runco 00000
Samsung 00000, 00144
Scientific Atlanta 01877, 00877, 00477, 00008
Sony 01006
Starcom 00003, 00014
Supercable 00276
Supermax 00883
Tocom 00012
Torx 00003
Toshiba 00000
Trans PX 00276
Tristar 00883
TS 00003
V2 00883
Viewmaster 00883
Vision 00883
Vortex View 00883
Zenith 00000, 00525, 00899
00476, 00810, 00276, 00003,00014
00014
Codes de l’amplificateur audio
Bose 30674
GE 30078
JVC 30331
Marantz 30321
Nakamichi 30321
NEC 30264
Optimus 30395
Realistic 30395
Sansui 30321
Shure 30264
Sony 30689
Soundesign 30078
Victor 30331
Wards 30078
Yamaha 30354, 30133
Codes de l’amplificateur/syntoniseur audio
ADC 30531
Aiwa 31405, 31243, 30121
A n a m 3 1 6 0 9 , 3 1 0 7 4
A u d i o t r o n i c 3 1 1 8 9
B os e 3 12 2 9
C a p e t r o n i c 3 0 5 3 1
C a r v e r 3 1 1 8 9
C o b y 3 1 2 6 3
D e n o n 3 1 3 6 0 , 3 1 1 4 2 , 3 0 9 0 4
F o n m i x 3 1 3 6 0
G l o r y H o r s e 3 1 26 3
H a r m a n / K a r d o n 3 0 1 1 0
H i t a c h i 3 1 2 7 3
I n k el 3 00 2 7
I n t e g r a 3 0 1 3 5
J B L 3 0 1 1 0
J V C 3 0 0 7 4 , 3 1 2 6 3
K e n w o o d 3 1 3 1 3 , 3 1 5 7 0 , 3 0 0 2 7
K L H 3 1 42 8
M a g n a v o x 3 1 1 8 9 , 3 1 2 6 9 , 3 0 5 3 1
M a r a n t z 3 1 1 8 9 , 3 1 2 6 9 , 3 0 0 3 9
MCS 30039
Onkyo 30842, 30135
O p t i m u s 3 1 0 2 3 , 3 0 6 7 0 , 3 0 5 3 1 , 3 1 0 7 4
P a n a s o n i c 3 1 5 1 8 , 3 0 0 3 9
P h i l i p s 3 1 1 8 9 , 3 1 2 6 9
P i o n e e r 3 1 0 2 3 , 3 0 1 5 0 , 3 0 0 1 4 , 3 0 6 3 0 , 3 0 5 3 1
P r o s c a n 3 1 2 5 4
Q i s h e n g 3 1 6 0 9
Quasar 30039
R a d i o S ha c k 3 1 2 6 3
R CA 3 1 02 3 , 3 1 60 9 , 3 1 25 4 , 3 05 3 1 , 3 10 7 4
S h a r p e r I m a g e 3 1 2 6 3
S i l s o n i c 3 0 1 7 6
S o n y 3 1 2 5 8 , 3 1 7 5 9
S o u n d e s i g n 3 0 6 7 0
S t e r e o p h o n i c s 3 1 0 2 3
S u n f i r e 3 1 3 1 3
Te a c 3 1 0 74 , 3 1 2 67
T e c h n i c s 3 1 3 0 8 , 3 1 5 1 8 , 3 0 0 3 9
T h o r e n s 3 1 1 8 9
V ic t o r 3 0 07 4
www.insignia-products.com
59
Page 60

Téléviseur ACL de 42 po Insignia NS-42LCD
W a r d s 3 0 0 1 4
Y a m a h a 3 0 1 7 6 , 3 1 2 7 6 , 3 1 1 7 6
Codes du lecteur de CD
Aiwa 30157
B ur me st er 3 042 0
California Audi o Labs 30029
Ca rver 3015 7, 301 79
De non 3087 3
DK K 30 000
D MX El ec tr o ni cs 30 15 7
D yn a mi c B as s 30 1 7 9
Fi she r 30 179
Ga rra rd 30 420
Genexxa 30032
Harman/Kardon 30157, 30173
Hi tac hi 30 032
In teg ra 3 010 1
JVC 30072
Kenwood 30826, 30626, 30028, 30037, 30036,
30190
Krell 30157
Linn 30157
Ma gna vox 3 015 7
Ma ran tz 306 26, 30 029 , 3 0157
MCS 30029
Miro 30000
Mi ss io n 3 015 7
MT C 30420
NS M 3015 7
Onkyo 30868, 30101
Optimus 31063, 30000, 30032, 30037, 30420,
30179, 31075, 30145
Pan as on ic 3 00 29
Par as ou nd 30420
Philips 30626, 301 57
Pioneer 31063, 31062, 30032
Polk Audio 30157
Pr oto n 30 157
QED 30157
Qu ad 30 157
Quasar 30029
RadioShack 31075
RCA 31062, 30032, 30420, 30179, 30053
Realistic 30420, 30179
Rotel 30157, 30420
SAE 30157
Sansui 30157
Sa nyo 3017 9
SAST 30157
Sh arp 30861, 30 037
Si lso nic 3 088 8, 3003 6
S o n ic F r o n t i er s 3 0 1 5 7
So ny 3049 0, 3 000 0, 301 00
Soundesign 30145
TA G Mc L a re n 3 01 5 7
Tascam 30420
Teac 30420
Technics 30029
Vict or 30072
Wards 3015 7, 30053
Ya mah a 3 08 88, 3003 6
Zonda 30157
Codes du récepteur satellite
A lp h aS t a r 0 0 77 2
C h a pa r r a l 0 0 2 1 6
C r o ss d i g i t a l 0 1 1 0 9
DirecTV 00392, 00566, 00639, 01142, 00247,
Dish Network
System
D i sh p r o 0 1 0 0 5 , 0 0 7 7 5 , 0 1 5 0 5
E c h os t a r 0 10 0 5 , 0 07 7 5 , 0 1 5 05
E x p r e s s v u 0 0 7 7 5
G E 00 56 6
General
Instrument
GOI 00 77 5
G o o d m a n s 0 1 2 4 6
Hisense 01535
H it a c hi 0 0 81 9 , 0 0 22 2 , 0 12 5 0
H TS 0 077 5
Hughes Network
Systems
I -L o 0 15 35
JV C 0077 5
LG 01 41 4, 0 12 2 6
M a g n a v o x 0 0 7 2 4 , 0 0 7 2 2
M e m o r e x 0 0 7 2 4
M i t s u b i s h i 0 0 7 4 9
M o t o r o l a 0 0 8 6 9
N EC 01 2 70
N e x t L e v e l 0 0 8 6 9
P a n a s o n i c 0 0 2 4 7 , 0 0 7 0 1
Paysat 00724
Philips 01142, 00749, 01749, 00724, 01076,
P r o s c a n 0 0 3 9 2 , 0 0 5 6 6
P ro t on 0 1 53 5
R a d i o S h a c k 0 0 8 6 9
RCA 00392, 00566, 00855, 00143, 01392
00749, 01749, 00724, 00819, 01856,
01076, 01109, 00099, 01392, 01640,
01442, 01414, 01108
01005, 00775, 01505
00869
01142, 00749, 01749, 01442
00722, 00099, 01442
60
www.insignia-products.com
Page 61

Téléviseur ACL de 42 po Insignia NS-42LCD
S a m s u n g 01 2 7 6 , 0 1 1 0 9 , 0 1 1 0 8
S an y o 01 2 1 9
SK Y 0 08 56
S on y 0 0 63 9 , 0 16 4 0
S t a r C h o i c e 0 0 8 6 9
Ti vo 0 11 42 , 0 14 42
To s h i b a 00 7 4 9 , 0 17 4 9 , 0 0 79 0 , 0 1 2 85
UltimateTV 01640, 01392
U ni d en 0 0 72 4 , 0 07 2 2
U S D ig i ta l 0 1 53 5
US DT V 0 153 5
Vo om 0 086 9
Ze nit h 0085 6, 018 56
Fonctionnement du
téléviseur
Mise en Marche/Arrêt du téléviseur
Pour mettre le téléviseur en marche :
1 Vérifier que le cordon d’alimentation est
connecté au téléviseur et à une prise secteur.
2 Appuyer sur la touche pour mettre le
téléviseur en marche.
3 Appuyer de nouveau sur la touche pour
éteindre le téléviseur. Un délai minimum de
trois seconde est nécessaire avant de
remettre le téléviseur en marche.
Utilisation de la télécommande
Pour utiliser la télécommande :
• Pointer la télécommande vers le capteur
situé sur la face avant du téléviseur.
Remarques
• Cette télécommande est universelle. Si la
télécommande ne fonctionne pas correctement
avec le téléviseur, appuyer sur la touche TV.
• Des objets entre la télécommande et le capteur
peuvent empêcher le bon fonctionnement de
cette dernière.
Avertissements
• La télécommande ne doit pas recevoir de
chocs ou être exposée à des liquides.
• Ne pas utiliser la télécommande dans des
endroits à forte humidité.
• Ne pas placer la télécommande sous la
lumière solaire directe.
• Ne pas placer d’objets, tels que des meubles,
entre la télécommande et le capteur de
télécommande.
• La télécommande peut ne pas fonctionner
correctement si le capteur de l’unité principale
reçoit directement la lumière du soleil ou un
éclairage important. Déplacer le téléviseur ou
modifier l’angle d’utilisation de la
télécommande.
www.insignia-products.com
61
Page 62

Navigation parmi les menus
Ce téléviseur possède un menu d’écran (OSD)
simple et facile d'utilisation permettant d'accéder
et de régler les divers paramètres. L'utilisateur
pourra aussi afficher l'état des caractéristiques
du téléviseur tout en regardant une émission.
Présentation du Menu principal (Main Menu) en mode TV
(les éléments marqués avec un * n'apparaissent pas dans tous les modes)
Téléviseur ACL de 42 po Insignia NS-42LCD
PICTURE (Image)
Brightness
(Luminosité)
Contrast (Contraste)
Sharpness (Netteté)
Color (Couleur)
Tint (Teinte)
Backlight
(Rétroéclairage)
Color Temp
(Température de
couleur)
User Color Temp*
(Température de
couleur par
l'utilisateur)
(Réglage de
Image size
(Dimensions de
l'image)
H position* (Position
horizontale)
V position* (Position
verticale)
Freeze Image (Gel de
l'image)
Navigation dans le menu
Pour naviguer dans l'OSD :
1 Appuyer sur MENU pour afficher le menu
principal.
2 Appuyer sur ou pour sélectionner la page
de menu souhaitée et ensuite sur pour
entrer dans ce menu.
3 Dans le menu, appuyer sur ou sur
pour sélectionner un réglage et ensuite sur
ou pour régler le paramètre ou pour entrer
dans un sous-menu. Pour certains réglages,
l'utilisateur devra appuyer sur OK pour
confirmer ou pour basculer d’un réglage à
l’autre.
4 Appuyer sur MENU pour revenir au menu
précédent et sur EXIT (quitter) pour quitter
l'OSD et revenir à l'écran normal.
IMAGE ADJUST
l'image)
AUDIO
Headphone volume
(Volume du casque)
Treble (Aigus)
Bass (Graves)
Balance
Focus window out*
(Sortie fenêtre active)
AVC (Commande
automatique de
volume)
SYSTEM SETUP
(Configuration du
système)
Language (langue)
Screen Saver
(Économiseur
d’écran)
Transparency
(Transparence)
OSD Time Out (Durée
d'affichage de l’OSD)
Clock Setup
(Configuration de
l'horloge)
Source Name Edit
(Modification du nom
de la source)
Closed Caption Setup
(Réglage des
sous-titres codés)
CHANNEL (Canal)
SETUP
(Configuration des
canaux)
TV Source (Source
TV)
Current Channel
(Canal en cours)
Channel Label
(Étiquette des
canaux)
Channel Skip
(Suppression d'un
canal)
Favorite Channel
(Canaux favoris)
Auto Search
(Recherche
automatique)
Input Select
(Sélection de
l'entrée)
Signal Strength*
(Force du signal)
CONTENT
(Contenu)
Content Password*
(Mot de passe pour le
contenu)
Set Password
(Définition du mot de
passe)
Password Confirm
(Confirmation du mot
de passe)
Parental Control
(Contrôle parental)
Movie Block
(Interdiction de films)
Canadian English
(Canada anglophone)
Canadian French
(Canada
francophone)
TV Blocking
(Interdiction
d’émissions TV)
Sélection du signal source d'entrée.
1 Appuyer sur INPUT (Entrée) pour afficher le
menu INPUT SELECT (Sélection entrée).
62
Remarque
Pour simplifier les procédures dans ce guide de
l'utilisateur, on considérera que l'utilisateur se sert
de la télécommande pour naviguer parmi les
menus, même si certaines touches peuvent être
redondantes avec celles sur le téléviseur.
www.insignia-products.com
2 Appuyer sur ou pour sélectionner la
source d'entrée souhaitée et ensuite sur OK
pour confirmer. (Analogique RVB = VGA)
Page 63

Téléviseur ACL de 42 po Insignia NS-42LCD
3 Appuyer sur INPUT pour effacer l'écran.
Remarque
• Il est aussi possible d'utiliser le menu
CHANNEL SETUP (Configuration des canaux)
pour sélectionner la source d'entrée.
• Pour modifier le nom de la source (par
exemple, pour modifier « Analogique RVB » en
« VGA »), se reporter à «Editing the video
source names » à la page 69.
Affichage de la bannière d'information
La bannière d'information affiche des
informations d'état comme le numéro du canal et
la source du signal. Différentes informations
sont affichées en fonction du mode.
Pour afficher la bannière d'information :
• Appuyer sur INFO. La bannière d'information
apparaît. En mode TVN, elle affiche :
• Le numéro et le nom du canal
• Air (hertzien) ou Cable (câble).
• La résolution
• L’heure actuelle
• L’icône de sous-titre codé (si les
sous-titres codés sont disponibles),
l’icône de l'horloge (si le temporisateur a
été configuré) et l’icône de verrouillage (si
le contrôle parental a été activé)
• L’avancement de l’émission diffusée en
cours
• L’heure de début et de fin de l’émission en
cours
Remarque
Le contenu de la bannière d'informations varie en
fonction du télédiffuseur et des réglages par
l'utilisateur.
Mémorisation des canaux
Lors de la première mise sous tension du
téléviseur, une recherche automatique des
canaux doit être réalisée pour déterminer les
stations reçues par le téléviseur. Avant de
réaliser une recherche automatique, la source
TV correcte devra être sélectionnée.
Sélection de la source du signal TV
Pour que le téléviseur puisse mémoriser les
canaux disponibles, spécifier tout d'abord le type
de source de signal qui lui est raccordé (par
exemple, une antenne ou un système câblé).
Pour sélectionner une source :
1 Dans une fenêtre d'état unique (sans
paramètre actif d'image dans l'image),
appuyer sur MENU pour afficher le menu
principal.
2 Appuyer sur ou pour afficher la page du
menu CHANNEL SETUP (Configuration des
canaux), puis sur pour entrer dans le
menu.
3 Appuyer sur ou pour sélectionner TV
Source (Source TV) et sur ou pour
sélectionner AIR (Hertzien) ou CABLE (TV
câblée).
• Sélectionner Air (Hertzien) si une
antenne est utilisée.
• Sélectionner CABLE si la
câblodistribution est utilisée.
Recherche automatique des canaux
Une recherche automatique doit être réalisée
afin de trouver les canaux hertziens et les
canaux câblés issus du décodeur. Le téléviseur
ayant terminé sa recherche des canaux, celui-ci
stocke dans sa mémoire les canaux valides.
•Si TV Source est réglé sur AIR, mettre en
surbrillance Auto Search (Recherche
automatique), puis appuyer sur ou . Le
téléviseur commence sa recherche des
canaux TV ou TVN disponibles.
- OU -
Remarque
Si le mode d'image dans l'image est actif, le
téléviseur ne peut pas réaliser de recherche
automatique.
www.insignia-products.com
63
Page 64

Téléviseur ACL de 42 po Insignia NS-42LCD
Si TV Source est réglé sur CABLE, mettre
en surbrillance Auto Search (Recherche
automatique), puis appuyer sur ou . La
fenêtre Channel Scan Source (Source de
balayage des canaux) s'ouvre. Appuyer sur
ou pour sélectionner STD (le type de
TV câblée le plus répandu), sur HRC ou IRC
et ensuite sur OK pour commencer la
recherche automatique des canaux. Le
téléviseur commence la recherche des
canaux CATV ou CADTV disponibles.
Remarque
Pour arrêter la recherche automatique, appuyer
sur MENU.
Canaux sautés
Après avoir enregistré les canaux dans la
mémoire, il est possible de sauter ceux qui ne
sont pas nécessaires pour que seuls les canaux
retenus puissent être sélectionnés avec les
touches CH+/-.
Pour sauter les canaux :
1 Ouvrir le menu CHANNEL SETUP
(Configuration des canaux).
Vérification de la force du signal TVN
La force du signal TVN pourra être vérifiée avec
la barre de niveau reçu du signal de télévision
numérique permettant de déterminer s'il s'avère
nécessaire de régler l'antenne ou le système
d'entrée du câble numérique. Plus puissant sera
le signal et moins l'image sera dégradée.
Pour vérifier la force du signal TVN :
•Ouvrir le menu CHANNEL SETUP
(Configuration des canaux). Sur la partie
inférieure de l'écran, la barre « Signal
Strength » (Force du signal) s'affiche,
indiquant la force et la qualité du signal reçu
sur le canal TVN en cours.
Ajout d’une étiquette à un canal
Il est possible d’attribuer un nom aux canaux
analogiques.
Pour ajouter une étiquette à un canal :
1 Naviguer vers le menu CHANNEL SETUP et
mettre en surbrillance Channel Canal
(Étiquette de canal).
2 Appuyer sur OK pour entrer dans le mode de
modification des étiquettes des canaux.
64
2 Mettre en surbrillance Current Channel
(Canal en cours) et appuyer sur ou pour
sélectionner un canal non retenu.
3 Mettre en surbrillance Channel Skip (Sauter
un canal) et appuyer sur ou pour modifier
le paramètre sur ON (Activé).
4 Répéter les étapes 2 et 3 pour sauter
d’autres canaux non retenus.
5 Appuyer sur EXIT pour quitter. Les canaux
spécifiés seront sautés la prochaine fois que
les touches CH+/- seront sollicitées.
www.insignia-products.com
3 Appuyer sur ou pour déplacer le curseur
et ensuite sur ou pour sélectionner le
caractère.
4 Appuyer sur MENU pour quitter le mode
d'édition.
5 Appuyer sur EXIT (Quitter) pour revenir au
mode de visualisation normal.
Remarque
Les noms des canaux transmis en numérique sont
automatiquement attribués et ne peuvent donc pas
être désignés par l'utilisateur.
Page 65

Téléviseur ACL de 42 po Insignia NS-42LCD
Configuration des canaux favoris
Les utilisateurs peuvent créer une liste de
canaux favoris afin de pouvoir rapidement et
efficacement retrouver leurs canaux préférés. Il
est possible de programmer jusqu’à 10 canaux.
Pour créer une liste de canaux favoris :
1 Ouvrir le menu CHANNEL SETUP
(Configuration des canaux).
2 Mettre en surbrillance Current Channel
(Canal en cours) et appuyer sur ou pour
sélectionner un canal favori.
3 Mettre en surbrillance Favorite Channel
(Canaux favoris), puis appuyer sur ou
pour sélectionnerON (activé).
Utilisations des touches CH+/-
Pour utiliser les touches CH+/- :
• Appuyer sur CH+ ou CH-. Le téléviseur opère
sa recherche parmi tous les canaux
disponibles qu'il peut trouver (mais en
sautant les canaux devant être ignorés).
Utilisation du pavé numérique
• Appuyer sur les touches numériques (0 à 9)
et sur la touche (-) pour se rendre
directement à ce canal.
Par exemple, pour sélectionner le canal 8-3,
appuyer sur 8-3 de la télécommande
(s'assurer d'appuyer sur les touches sans
que l'intervalle dépasse trois secondes sinon
le canal ne sera pas correctement entré).
Remarque
Dans certaines situations, les numéros virtuels
des canaux ne correspondent pas à des
fréquences réellement utilisées.
• Pour sélectionner un canal analogique,
l'utilisateur devra directement entrer le
numéro du canal principal sans entrer de
numéro pour le canal mineur (0).
Basculement entre deux canaux
4 Répéter les étapes ci-dessus afin de
configurer plusieurs canaux favoris (jusqu'à
10).
5 Pour accéder aux canaux favoris, appuyer
sur FAVO RITE et ensuite sur ou pour
sélectionner le canal et sur OK pour le
syntoniser.
Sélection des canaux
Informations sur la numérotation des canaux aux
États-Unis
• Les canaux ATSC/PSIP détiennent une
numérotation en deux parties :
• Numéro d'un canal principal (le 5 du
canal 5-1)
• Numéro d'un canal mineur (le 1 du canal
5-1)
• Aux États-Unis, le numéro d'un canal
principal est généralement le même, qu'il soit
analogique ou numérique (il est le même que
celui du canal NTSC des télédiffuseurs
existants). Le chiffre 0 d'un canal mineur est
utilisé pour le canal analogique des
télédiffuseurs.
Pour basculer entre deux canaux :
• Appuyer sur
(Last) [dernier]. Le téléviseur
revient au dernier canal visionné. Appuyer de
nouveau sur cette touche pour revenir au
canal antérieur.
Sélection d'un canal en utilisant la liste
Programmes
Après la recherche automatique, une liste de
programmes (canaux) est créée. L'utilisateur
pourra sélectionner des canaux à partir de la
Liste des programmes.
Pour sélectionner le canal en utilisant la
Liste des programmes :
1 Appuyer sur LIST. PROGRAM LIST (Liste
des programmes) s'ouvre.
2 Appuyer sur ou pour mettre en
surbrillance le canal et ensuite sur OK pour
sélectionner.
Exemple :
• Les canaux NTSC d'origine pour Des
Moines, Iowa, sont les suivants :
5, 8, 11, 13, 17
• Les canaux NTSC + ATSC possibles pour
Des Moines sont les suivants :
5-0, 8-0, 11-0, 13-0, 17-0 (numéro de canal
des canaux analogiques existants)
• 5-1, 5-2, 8-1, 8-2, 8-3, 8-4, 13-1 (numéro de
canal des canaux numériques)
www.insignia-products.com
Remarque
L'illustration ci-dessus n'est qu'un exemple.
L'écran peut être différent.
Sélection d'un canal en utilisant la liste des favoris
Si l'utilisateur a créé une liste des canaux
favoris, il lui est possible de l'utiliser pour
regarder ses stations favorites.
65
Page 66

Téléviseur ACL de 42 po Insignia NS-42LCD
Pour sélectionner un canal en utilisant la
liste des favoris :
1 Appuyer sur FAVORITE. La liste des favoris
s'ouvre.
2 Appuyer sur ou pour mettre en
surbrillance le canal et ensuite sur OK pour
sélectionner.
Remarque
• Les informations affichées dans cette liste ne
concernent que le canal en cours de
visualisation dans la fenêtre principale.
• L'illustration ci-dessus n'est qu'un exemple.
L'écran peut être différent.
Réglage de la qualité de l'image
Personnalisation de l’image
1 Appuyer sur MENU pour afficher le menu
principal.
2 Appuyer sur ou pour afficher la page du
menu PICTURE (image) et ensuite sur
pour entrer dans le menu.
Option Fonction Commandes
Sharpness (Netteté) Règle et améliore la
Color (Couleur) Règle la saturation
Tint (Teinte) Règle les tons de
Backlight
(Rétroéclairage)
Température de couleur Permet le réglage de
Température
de couleur
par
l'utilisateur
Red
(Rouge)
Green
(Vert)
Blue
(Bleu)
netteté de l'image.
des couleurs.
l'image.
Règle la luminosité
du rétroéclairage.
la température de
couleur de l'image.
Régler sur Warm
(Chaud) [pour
améliorer les
couleurs chaudes
comme le rouge] ou
sur Cool (Froid) pour
bénéficier de
couleurs moins
intenses avec plus de
bleu.
Permet le réglage du rouge dans
l'image.
Permet le réglage du vert dans l'image.
Permet le réglage du bleu dans l'image.
sharper (plus
accentuée)
softer
(plus douce)
stronger
(plus fort)
weaker
(plus faible)
greenish
(verdâtre)
purplish
(rougeâtre)
Strong/Weak/
Medium
(Fort/Faible/
Moyen)
Cool/Warm/User
(Froid/Chaud/
Utilisateur)
4 Lorsque Color Temp (Température de
couleur) est défini sur User (Utilisateur), il est
possible d'entrer dans un sous-menu User
Color Temp (Température de couleur par
l'utilisateur) afin de personnaliser la
température de couleur.
Remarque
Les illustrations OSD ici présentées concernent le
menu tel qu'il apparaît en mode TV. Les articles du
menu peuvent apparaître différemment lorsque le
téléviseur se trouve dans un autre mode.
3 Appuyer sur ou pour sélectionner un
réglage et ensuite sur ou pour procéder
au réglage lui-même.
Option Fonction Commandes
Brightness (Luminosité) Règle la luminosité
de l’écran pour mieux
lire les images
sombres comme des
scènes nocturnes et
des objets dans
l'obscurité.
Contrast (Contraste) Règle le contraste de
l’image.
66
lighter
(plus clair)
darker
(plus sombre)
stronger
(plus fort)
weaker
(plus faible)
www.insignia-products.com
5 Appuyer sur EXIT (Quitter) pour revenir au
mode TV.
Sélection du mode de l’image.
Il est possible de sélectionner instantanément la
qualité de l’image parmi trois modes préréglés et
un mode personnalisé.
Pour sélectionner la qualité d’image :
• Appuyer plusieurs fois sur le touche
PICTURE (Image) pour sélectionner le
réglage d'une image. Il est possible de
sélectionner :
Page 67

Téléviseur ACL de 42 po Insignia NS-42LCD
• NATURE: Sélection d’une image normale.
• SOFT (Doux) : Sélection d’une image
finement détaillée.
• BRIGHT (Luminosité) : Sélection pour
obtenir une image lumineuse.
• USER (Utilisateur) : Affiche une image
dont la qualité est réglée par l’utilisateur
Réglage de l'image
Réglage du format de l'image
Il est possible de choisir le format (proportions
affichées) en fonction du type de signal vidéo ou
des préférences personnelles.
Pour régler le format de l'image :
1 Appuyer plusieurs fois sur la touche ZOOM
pour sélectionner le format souhaité de
l'image. Il est aussi possible de régler les
dimensions de l'image dans le menu IMAGE
ADJUST (Réglage de l'image).
2 Mettre en surbrillance H Position ouV
Position (Position verticale ou horizontale) et
appuyer sur ou pour procéder au
réglage.
Remarque
L'utilisateur ne pourra régler la position de l'écran
que pour les canaux analogiques. Il n'est pas
nécessaire de régler la position de l'écran pour les
canaux numériques.
Arrêt sur image
Il est possible de geler l'image sur l'écran. Même
si une image gelée reste sur l'écran, la source
vidéo continuera son déroulement en
arrière-plan (sauf si la lecture est en pause).
Pour geler l’image :
1 Appuyer sur FREEZE (Gel de l'image).
L'image est gelée sur l'écran. Appuyer à
nouveau sur FREEZE pour reprendre la
lecture normale de la vidéo.
2 On pourra aussi régler Freeze Image sur ON
(Activé) dans le menu IMAGE ADJUST
(Réglage de l'image) pour geler l'image. Pour
la restaurer, elle doit être définie sur OFF
(Désactivé)
Remarque
Si une image fixe reste affichée à l'écran pendant
unbe durée prolongée, celle-ci peut s'y incruster et
rester visible.
Il est possible de sélectionner :
• NORMAL
Sélectionne le rapport correct qui
correspondra à l'image de la source.
(4:3 à 4:3, 16:9 à 16:9)
• WIDE (Panoramique)
Étire horizontalement l'image selon ses
bords tout en maintenant un rapport
d'aspect correct au centre de l'écran.
• ZOOM
Agrandit l'image tout en maintenant des
proportions correctes de l'écran.
• FILL ALL (Remplissage complet)
Affiche l'image sur tout l'écran.
Réglage de la position de l'écran
Pour régler la position de l'écran :
1 Naviguer dans le menu IMAGE ADJUST
(Réglage de l'image).
Réglage du son
Réglage du volume
Pour régler le volume :
• Appuyer sur les touches VOL+ ou VOL-.
Pour mettre le son en sourdine :
• Appuyer sur la touche MUTE (Sourdine) pour
mettre temporairement le son hors service.
Appuyer à nouveau sur MUTE pour rétablir le
son.
Personnalisation du son
1 Appuyer sur MENU pour accéder au menu
principal.
2 Appuyer sur ou pour afficher la page du
menu AUDIO et ensuite sur pour entrer
dans le menu.
3 Appuyer sur ou pour sélectionner un
réglage, puis sur ou pour procéder à son
ajustement.
4 Appuyer sur EXIT (Quitter) pour revenir au
mode TV.
www.insignia-products.com
67
Page 68

Téléviseur ACL de 42 po Insignia NS-42LCD
Option Fonction Commandes
Commande
de volume du
casque
Tre bl e
(Aigus)
Permet de régler le volume du
casque d'écoute.
Règle les aigus (tonalités
élevées).
stronger
(plus fort)
weaker
(plus faible)
stronger
(plus fort)
weaker
(plus faible)
Bass
(Graves)
Règle les graves (tonalités
basses)
stronger
(plus fort)
weaker
(plus faible)
Balance Règle la balance des volumes
Focus
window out
[Sortie
fenêtre
active]
(seulement
en mode PIP
ou PBP)
AVC
(Contrôle
automatique
du volume)
(gauche et droite).
En mode fenêtre double (PIP
ou PBP), si Speaker
(Haut-parleur) est sélectionné
(défaut), le son de la fenêtre
principale sera transmis par
les haut-parleurs alors que le
son de l'autre fenêtre le sera
sur la prise du casque.
Si Headphone (Casque) est
sélectionné, le son de la
fenêtre principale sera
transmis sur la prise du
casque alors que le son de
l'autre fenêtre le sera sur les
haut-parleurs.
Si Both (Les deux) est
sélectionné, le son de la
fenêtre principale sera
transmis sur les haut-parleurs
et sur la prise du casque (le
son de l'autre fenêtre est
automatiquement réglé sur
None(Aucun)).
Chaque station de télévision
détient des caractéristiques de
signaux qui lui sont propres et
qui peuvent nécessiter de
régler le volume à chaque
changement de canal. La
fonction AVC sur On (Activé)
permet de régler
automatiquement le volume du
canal en diminuant la sortie
sonore lorsque le signal de
modulation est fort ou en
l’augmentant lorsque ce même
signal est faible.
Volume plus
élevé pour le
haut-parleur
droit.
Volume plus
élevé pour le
haut-parleur
gauche.
Speaker/
Headphone/
Both
(Haut-parleur/
Casque/Les
deux)
ON/OFF
(Marche-Arrêt)
Remarque
• Les options du menu peuvent être différentes
en fonction du mode TV en cours.
• Le menu Focus Window Out (Sortie fenêtre
active) n'est disponible qu'en mode double
fenêtre (PIP ou PBP) et seulement si le
programme de l'une et l'autre fenêtre n'est pas
en mode Classification interdite. Si Both (Les
deux) est sélectionné, et si ultérieurement les
programmes des deux fenêtres entrent en
mode Rating Blocked (Classification interdite),
le son sera coupé. Pour annuler la coupure
audio, l'utilisateur devra quitter l'état Rating
Blocked (Classification interdite) du programme
et modifier ensuite ce réglage sur une valeur
différente.
• L'image principale correspond à la fenêtre
active par défaut. On pourra sélectionner la
sous-image en tant que fenêtre principale en
appuyant sur OK. Une bordure verte apparaît
autour de la fenêtre principale.
Sélection du mode son
Il est possible de sélectionner rapidement la
qualité du son parmi trois modes préréglés et un
mode personnalisé.
Pour sélectionner un mode son :
• Appuyer plusieurs fois sur la touche AUDIO
pour sélectionner la qualité audio souhaitée.
Il est possible de sélectionner :
• NEWS (Journaux télévisés) : Sélection
valable pour un programme contenant
des paroles et de la conversation.
• MOVIE (Film) : Sélection valable pour un
programme cinématographique.
• MUSIC (Musique) : Sélection valable pour
un programme musical.
• USER (Utilisateur) : La qualité du son est
déterminée par l'utilisateur
Configuration des émissions en stéréo/SAP
Ce téléviseur peut recevoir des programmes
stéréo MTS et n'importe quel SAP (Secondary
Audio Program ou programme audio
secondaire) pouvant accompagner le
programme stéréo. Ce type de signal est
uniquement disponible sur les canaux
analogiques.
L'utilisateur pourra sélectionner Stereo (Stéréo)
ou SAP uniquement lorsque la station de
télévision transmet ces signaux. Le son Mono
est automatiquement reçu si l'émission est
transmise en monophonie. Il est aussi possible
de sélectionner Mono en cas de difficultés de
réception du signal stéréo.
Pour sélectionner le mode audio MTS/SAP :
1 En regardant un canal analogique, appuyer
sur la touche MTS/SAP. Le menu AUDIO
MODE (Mode audio) s'ouvre.
68
www.insignia-products.com
Page 69

Téléviseur ACL de 42 po Insignia NS-42LCD
2 Appuyer sur ou pour sélectionner le
mode MTS retenu (Mono, Stereo ou SAP) et
ensuite sur OK pour confirmer.
Remarque
En mode de fenêtres multiples, Stéréo ou SAP
peuvent uniquement être sélectionnés pour
l'image principale.
Sélection du mode audio numérique
La TVN peut transmettre simultanément de
nombreuses pistes audio (par exemple des
traductions simultanées du programme en
plusieurs langues étrangères). La disponibilité
de ces pistes audio optionnelles dépend du
programme. Le mode audio numérique ne peut
être disponible que si le téléviseur se trouve en
mode TVN.
Pour sélectionner le mode audio numérique :
1 En regardant un canal numérique, appuyer
sur la touche MTS/SAP. Le menu AUDIO
MODE (Mode audio) s'ouvre.
2 Appuyer sur ou pour sélectionner la
source d'entrée souhaitée et ensuite sur OK
pour confirmer.
Remarque
En mode de fenêtres multiples, la touche
MTS/SAP ne peut être utilisée que pour l'image
principale.
Modifications des paramètres du système
L'utilisateur peut modifier des systèmes tels que
la langue OSD, l'économiseur d'écran et la
transparence des menus.
Pour modifier les paramètres du système :
1 Appuyer sur MENU, puis sur ou pour
afficher la page du menu SYSTEM SETUP
(Configuration du système).
2 Appuyer sur pour accéder au menu.
3 Appuyer sur ou pour sélectionner un
réglage et ensuite sur ou pour procéder
au réglage ou passer dans un sous-menu.
Pour certains réglages et menus, l'utilisateur
devra appuyer sur OK pour confirmer ou
pour basculer d’un réglage à l’autre.
4 Appuyer sur EXIT (Quitter) pour revenir au
mode TV.
Option Fonction
Language
(langue)
Screen Saver
(Économiseur
d’écran)
Transparency
(Transparence)
OSD Time Out
(Durée
d'affichage de
l’OSD)
Clock Setup
(Configuration
de l'horloge)
Source Name
Edit
(Modification du
nom de la
source)
Closed Caption
Setup (Réglage
des sous-titres
codés)
Sélectionne la langue du menu OSD.
Pendant que l'économiseur d'écran
est activé, le téléviseur affiche le
message « No Signal » (pas de
signal) si aucun signal n'a été reçu
pendant plusieurs secondes.
Permet de régler la transparence du
menu.
Sélectionne la durée d'affichage de
l'OSD sans aucune entrée avant de
passer à l'arrêt.
Configure l'horloge automatique,
l'horloge manuelle et le
temporisateur Arrêt/Marche.
Permet de modifier le nom de la
source des canaux selon la
préférence de l'utilisateur.
Sélectionne le mode Sous-titres
codés. Il permet aussi de
personnaliser le format des
sous-titres codés provenant des
programmes de TVN
Modification du nom des sources vidéo
Il est possible de donner un nom aux sources
vidéo afin de faciliter la sélection de la source
d'entrée.
Pour modifier le nom des sources vidéo :
1 Naviguer jusqu'au menu SYSTEM SETUP
(Configuration du système) et de mettre en
surbrillance Source Name Edit (Modification
du nom de la source).
2 Appuyer sur pour accéder au menu.
3 Appuyer sur ou pour sélectionner la
source devant être modifié et ensuite sur OK
pour accéder au mode de modification du
nom des sources.
4 Appuyer sur ou pour déplacer le curseur
et ensuite sur ou pour sélectionner un
caractère.
www.insignia-products.com
69
Page 70

Téléviseur ACL de 42 po Insignia NS-42LCD
5 Appuyer sur MENU pour quitter le mode
d'édition.
Remarque
La source TV ne peut pas être modifiée.
Configuration de l'horloge et des
temporisateurs
Configuration automatique de l'horloge
La configuration automatique de l'horloge définit
automatiquement l'heure à partir d'un signal
provenant d'un canal numérique. Le signal du
canal numérique comprend des informations sur
l'heure en cours fournie par la station émettrice.
Si l'heure en cours n'est pas correctement
définie par Auto Clock (horloge automatique),
elle devra l'être manuellement.
Remarque
Si le téléviseur n'est plus alimenté, l'heure est
réinitialisée.
Pour définir le réglage automatique de
l’horloge :
1 Appuyer sur MENU, puis sur ou pour
afficher la page du menu SYSTEM SETUP
(Configuration du système).
2 Appuyer sur pour accéder au menu.
3 Mettre en surbrillance Clock Setup
(Configuration de l'horloge) et appuyer sur
ou pour accéder au menu.
Pour régler l’horloge manuellement :
1 Naviguer vers le menu SYSTEM SETUP et
ensuite vers le sous-menu Clock Setup
(Configuration horloge).
2 Mettre en surbrillance Auto Clock (Horloge
automatique) et appuyer sur ou pour
sélectionner OFF (Désactivé).
3 Appuyer sur ou pour mettre en
surbrillance Current Time (Heure actuelle)
et ensuite sur ou pour sélectionner les
options d'année, de jour ou d'heure.
4 Appuyer sur les touches numériques pour
définir l'année, la date et l'heure. Pour
sélectionner AM ou PM, déplacer le curseur
sur la position appropriée et appuyer ensuite
sur OK pour basculer de l’un à l’autre.
5 Si la zone de localisation observe l'heure
d'été, régler Observe Daylight Time
(Observation de l'heure d'été) sur ON
(Activé) dans le menu
Réglage de la temporisation Arrêt/Marche
automatique
La mise sous/hors tension automatique ne
fonctionne que si l'heure actuelle a été réglée.
Le téléviseur doit être en mode veille pour que le
démarrage automatique puisse fonctionner.
4 Mettre en surbrillance Auto Clock (Horloge
automatique) et appuyer sur ou pour
mettre l'horloge automatique sur ON (Activé).
5 Mettre en surbrillance Set Time Zone
(Définir le fuseau horaire) et appuyer
sur ou pour sélectionner le fuseau
horaire souhaité : Atlantic (Heure de
l’Atlantique), New Foundland HAA
(Terre-Neuve), Samoa, Hawaii (Heure de
Hawaï), Alaska (Heure de l’Alaska), Pacific
(HNP), Mountain (HNR), Central (HNC) ou
Eastern (HNE),.
6 Si la zone de localisation observe l'heure
d'été, régler Observe Daylight Time
(Observation de l'heure d'été) sur ON
(Activé) dans le menu
Réglage manuel de l’horloge
Si le réglage de l'heure en cours n'est pas bon,
réinitialiser manuellement l'horloge. Si le
téléviseur n'est plus alimenté, l'horloge est
réinitialisée.
Remarque
Si le téléviseur n'est plus alimenté, les réglages de
l'heure sont effacés.
Pour régler la temporisation Arrêt/Marche
automatique :
1 Naviguer vers le menu SYSTEM SETUP et
ensuite vers le sous-menu Clock Setup
(Configuration horloge).
2 Mettre en surbrillance Auto Power On (Mise
sous tension automatique) ou Auto Power
Off (Mise hors tension automatique).
3 Appuyer sur ou pour sélectionner l'heure
ou les minutes.
70
www.insignia-products.com
Page 71

Téléviseur ACL de 42 po Insignia NS-42LCD
4 Appuyer sur les touches numériques pour
modifier l’heure. Pour sélectionner AM ou
PM, déplacer le curseur sur la position
appropriée et appuyer ensuite sur OK pour
basculer de l’un à l’autre.
• Si l'utilisateur souhaite que la
temporisation ne fonctionne
qu'aujourd'hui, mettre en surbrillance
Today (Aujourd'hui) et appuyer sur OK
pour son activation (affichage en violet).
• Si l'utilisateur désire que la temporisation
fonctionne tous les jours, sélectionner
Everyday (Tous les jours) et appuyer sur
OK pour son activation (affichage en
violet).
• Pour annuler la temporisation,
sélectionner Disable (Désactiver) et
appuyer sur OK pour son activation
(affichage en violet).
5 Appuyer sur EXIT (Quitter) pour revenir en
mode TV ou sur MENU pour revenir au menu
précédent.
Réglage de l'Arrêt différé
L’arrêt différé permet de sélectionner la durée
avant que l’appareil se mette automatiquement
hors tension. Ce réglage est effacé lorsque le
téléviseur est mis hors tension.
Pour régler l'arrêt différé :
1 Appuyer plusieurs fois sur la touche SLEEP
(Arrêt différé) pour naviguer parmi les durées
disponibles.
2 Pour annuler l’arrêt différé, appuyer plusieurs
fois sur SLEEP jusqu'à ce que OFF (Arrêt)
s’affiche.
Visualisation des sous-titres codés
Ce téléviseur peut afficher les sous-titres codés
qui sont émis en même temps que de nombreux
programmes de télévision. Ces sous-titres
codés sont habituellement des sous-titres pour
les malentendants ou des traductions de
langues étrangères. Tous les magnétoscopes
enregistrent le signal des sous-titres codés des
programmes télévisés de sorte que les
cassettes vidéo enregistrées à domicile
présentent aussi des sous-titres codés. En
outre, la grande majorité des cassettes vidéo
commerciales préenregistrées fournit des
sous-titres codés. Rechercher le symbole des
sous-titres codés dans le programme télévisé et
sur l'emballage de la cassette vidéo :
Remarque
• Les sous-titres codés ne fonctionnent qu'avec
les modes TV et AV.
• Tous les programmes et toutes les vidéos
n'offrent pas de sous-titres codés. Rechercher
le symbole les sous-titres codés afin de
s'assurer de leur disponibilité.
Réglage des Sous-titres codés
Pour configurer les Sous-titres codés :
1 Appuyer plusieurs fois sur CCD (Sous-titres
codés) pour sélectionner Caption ON
(Sous-titres activés), MUTE ON (Sourdine
activée) ou OFF (Arrêt).
• MUTE ON affiche les sous-titres codés,
s'ils sont disponibles avec l’émission,
lorsque le son du téléviseur est en
sourdine.
• Il est aussi possible de naviguer vers le
menu SYSTEM SETUP (Configuration
système), de passer au sous-menu
Closed Caption Setup (Configuration des
sous-titres codés) et de sélectionner
Closed Caption Control (Commande
des sous-titres codés). Ensuite, appuyer
sur ou pour sélectionner Caption ON,
MUTE ON ou sur OFF.
Sélection des modes analogiques ou numériques
Le texte et les sous-titres, s'ils sont fournis par
l'émetteur, sont disponibles à la fois pour les
canaux numériques et analogiques.
Sélectionner un mode de sous-titre codé
permettant d'afficher les informations de
sous-titres codés. Les sous-titres codés
analogique affichent des informations à l'écran
(généralement le dialogue de l’émission). Le
texte des modes numériques affiche des
informations, généralement en partie inférieure
de l'écran, qui sont utilisées pour un service de
données (généralement sans rapport avec
l’émission).
Pour sélectionner les modes numériques ou
analogiques :
1 Naviguer jusqu'au menu SYSTEM SETUP
(Configuration du système) et mettre en
surbrillanceClosed Caption Setup
(Configuration des sous-titres codés)
www.insignia-products.com
71
Page 72

Téléviseur ACL de 42 po Insignia NS-42LCD
2 Appuyer sur pour accéder au menu.
3 Mettre en surbrillance le mode Analog CC
Mode (Mode sous-titres codés analogique)
ou Digital CC (Mode sous-titres codés
numérique), puis appuyer sur ou pour
sélectionner le mode.
Personnalisation des sous-titres codés
Il est possible de personnaliser les sous-titres
codés numériques qui apparaissent à l'écran.
Pour personnaliser des sous-titres codés
numériques :
1 Naviguer jusqu'au menu SYSTEM SETUP
(Configuration du système), puis mettre en
surbrillanceClosed Caption Setup
(Configuration des sous-titres codés)
2 Appuyer sur pour accéder au menu.
3 Mettre en surbrillance Closed Caption
Option (Option des sous-titres codés) et
appuyer sur ou pour accéder au
sous-menu.
4 Appuyer sur ou pour sélectionner
l'article devant être modifié et ensuite sur
ou pour personnaliser le réglage retenu.
Un aperçu dans la partie inférieure de l'écran
permet de mesurer l'effet des modifications
sur l'apparence des sous-titres codés.
Il est possible de modifier les réglages
suivants :
• Font Size (Taille des polices) : Permet de
régler la taille des mots.
• Style : Permet de définir le style des
mots.
• Foreground (Premier plan) : Permet de
définir la couleur du texte.
• Background (Arrière-plan) : Permet de
définir la couleur de l'arrière-plan.
• Background Opacity (Opacité de
l'arrière-plan) : Permet de définir l'opacité
de la couleur de l'arrière-plan. Une faible
opacité signifie une grande transparence
(l'image à l'écran apparaît à travers
l'arrière-plan).
• Edge Effect (Effet de bordure) : Permet
de définir un effet de bordure.
Configuration du contrôle parental
Cette fonction permet d’interdire certaines
émissions de télévision et des films par un
contrôle se basant sur des données de
classification. Il interdit aux enfants de regarder
des programmes au contenu violent ou à
caractère sexuel pouvant être dangereux à leur
égard.
Les restrictions sur les programmes TV
comprennent deux niveaux qui contiennent des
informations à propos du programme : le niveau
MPAA et les directives parentales TV. La
classification MPAA se base sur l’âge. Les
directives parentales TV s’appuient sur l’âge et
sur le contenu.
Une émission TV pouvant utiliser la classification
MPAA aussi bien que les directives parentales
TV, les deux doivent être réglés pour obtenir un
contrôle total.
Compréhensions de la classification des films
(MPAA)
Classifica
tion
G TOUS PUBLICS. Tous les âges sont admissibles.
PG SURVEILLANCE PARENTALE SUGGÉRÉE. Certains
PG -13 MISE EN GARDE SÉRIEUSE DES PARENTS. Certains
R RESTREINT Les enfants de moins de 17 ans doivent
NC ADMISSION REFUSÉE AUX MOINS DE 17 ANS.
X La classification X correspond à l’ancienne version de
NR NON CLASSÉ
Description
aspects peuvent ne pas convenir à des enfants.
aspects peuvent être totalement inappropriés pour
des enfants de moins de 13 ans.
être accompagnés par un parent ou un responsable
adulte
la classification NC-17 mais pouvant être codée dans
des données appartenant à un film ancien.
Par exemple, en bloquant PG-13 avec la
classification MPAA, les classifications plus
élevées R, NC, X et NR sont automatiquement
interdites.
72
www.insignia-products.com
Page 73

Téléviseur ACL de 42 po Insignia NS-42LCD
Compréhension de la classification TV
La classification TV se compose de deux
parties : des critères généraux (basés sur l'âge)
et des critères détaillés (basés sur le contenu).
Les classifications basées sur le contenu
comprennent ce qui suit :
• D : Dialogues à caractère sexuel.
• L : Vulgarités
• S : Situations à caractère sexuel
•V: Violence
• FV : Violence fictive
Basée sur le contenu
Classification
DLSVFV
Y (tous les enfants) ЧЧЧЧЧ
Y7 (pour des enfants plus âgés)×××ו
G (tous publics) ××××
PG (surveillance parentale
suggérée)
TV14 (mise en garde sérieuse
Basée sur l’âge
des parents)
MA (adultes seulement) • • •
La classification par contenu peut être réglée, mais
normalement elle n'est pas transmise par les stations de
télévision.
• = La classification par contenu peut être définie.
Remarque
• Les classifications à partir de l'âge peuvent être
modifiées par des classifications relatives au
contenu, mais seulement avec la combinaison
indiquée par le signe «
• Le choix d'une classification inférieure basée
sur l’âge interdit des classifications
supérieures basées sur l’âge sans tenir compte
des paramètres relatifs au contenu.
Par exemple, si Y7 dans la classification se
fondant sur l'âge est réglée sur BLOCK
(Interdit), les classifications supérieures G, PG,
14 et MA sont automatiquement interdites. De
plus, les émissions au contenu D, L, S, V et FV,
seront automatiquement interdites.
••••
••••
2 Appuyer sur pour accéder au menu.
3 Entrer les quatre chiffres du mot de passe
requis (le mot de passe défini en usine est
1111). Le menu CONTENT apparaît dans
son entier.
4 Mettre en surbrillance Set Password (Définir
le mot de passe), entrer un nouveau mot de
passe, puis l'entrer une deuxième fois pour
confirmation. Le nouveau mot de passe a été
créé.
Activation des contrôles parentaux
1 Utiliser le mot de passe pour accéder au
menu CONTENT.
Définition du mot de passe de contrôle parental
Pour utiliser la fonction de Contrôle parental, le
mot de passe doit d'abord être défini.
Pour définir le mot de passe :
1 Appuyer sur MENU, puis sur ou pour
ouvrir le menu CONTENT (Contenu).
www.insignia-products.com
2 Mettre en surbrillance Parental Control
(Contrôle parental), puis appuyer sur ou
pour sélectionner Enable (Activer). Le
schéma d’interdiction ayant été défini est
activé. Si l'utilisateur désire désactiver
l’interdiction, sélectionner Disable
(Désactiver).
73
Page 74

Téléviseur ACL de 42 po Insignia NS-42LCD
Définition des classifications MPAA
1 Utiliser le mot de passe pour accéder au
menu CONTENT.
2 Mettre en surbrillance Movie Block
(Interdiction du film), appuyer sur ou pour
sélectionner la classification retenue et
ensuite sur OK pour interdire la classification
(une icône de cadenas apparaît) ou
l’autoriser (pas d'icône de cadenas).
Par exemple, si PG13 avec la classification
se basant sur l'âge est interdit, les
classifications supérieures R, NC, X et NR
seront automatiquement interdites.
Configuration des classifications TV
1 Utiliser le mot de passe pour accéder au
menu CONTENT.
2 Mettre en surbrillance TV Blocking
(Interdiction TV) et appuyer sur ou pour
accéder au menu.
3 Dans le menu, appuyer sur , , ou
pour la sélection et ensuite sur OK pour
l’interdiction (une icône de cadenas apparaît)
ou pour l’autorisation (pas d'icône de
cadenas).
Par exemple, si TV-Y7 avec la classification
basée sur l’âge est défini sur BLOCK
(Interdit), ceci interdira automatiquement les
classifications supérieures : G, PG, 14 et MA.
En outre, D, L, S, V et FV dans Contenu
seront automatiquement interdits.
4 Appuyer sur EXIT (Quitter) pour revenir en
mode TV ou sur MENU pour revenir au menu
précédent.
Configuration des classifications pour le Canada
anglophone
1 Utiliser le mot de passe pour accéder au
menu CONTENT.
2 Mettre en surbrillance Canadian English
(Canada anglophone), appuyer sur ou
pour sélectionner la classification retenue et
ensuite sur OK pour interdire la classification
(une icône de cadenas apparaît) ou
l’autoriser (pas d'icône de cadenas).
3 Appuyer sur EXIT (Quitter) pour revenir en
mode TV ou sur MENU pour revenir au menu
précédent.
Classifications du Canada anglophone
E Exemptions : les nouvelles, le sport, les
documentaires et autres émissions informatives,
les débats, les vidéos musicales et les émissions
de variétés.
C Émissions destinées aux enfants de moins de huit
ans. absence de langage injurieux, de nudité ou
de contenu sexuel.
C8+ Programmation généralement considérée comme
acceptable pour des enfants de huit ans et plus.
Pas de vulgarités, de nudité ou de contenu sexuel.
G Programmation générale destinée à tous les
publics.
PG Surveillance parentale suggérée Certains aspects
peuvent ne pas convenir à des enfants.
14+ L’émission contient des thèmes ou des sujets qui
peuvent ne pas convenir à des spectateurs de
moins de 14 ans. Il est donc fortement suggéré
aux parents de vérifier s'ils peuvent donner
l'autorisation de regarder ces émissions à des
enfants de moins de 14 ans.
18+ Destinés à des spectateurs de 18 ans et plus,
pouvant contenir des actes violents.
74
www.insignia-products.com
Page 75

Téléviseur ACL de 42 po Insignia NS-42LCD
Configuration des classifications du Canada
francophone
1 Utiliser le mot de passe pour accéder au
menu CONTENT.
2 Mettre en surbrillance Canadian French
(Canada francophone), appuyer sur ou
pour sélectionner la classification retenue et
ensuite sur OK pour interdire la classification
(une icône de cadenas apparaît) ou
l’autoriser (pas d'icône de cadenas).
3 Appuyer sur EXIT (Quitter) pour revenir en
mode TV ou sur MENU pour revenir au menu
précédent.
Classifications du Canada francophone
E Exemptions - Émissions avec exemptions.
G Général - Émissions destinées à des spectateurs
de tous les âges. Ne contient aucune violence, ou
cette violence est minime, ou est exprimée de
façon appropriée.
8+ 8+ Général - N’est pas recommandé pour les
jeunes enfants. Programmation destinée à une
large audience, mais contenant
occasionnellement quelque violence. Supervision
par un adulte recommandée.
13+ Émissions pouvant ne pas convenir à des enfants
de moins de 13 ans. Contient quelques scènes
violentes, ou une ou plusieurs scènes
suffisamment violentes pour les affecter.
Supervision par un adulte fortement
recommandée.
16+ Émissions pouvant ne pas convenir à des enfants
de moins de 16 ans. Contient de fréquentes
scènes violentes, voire très violentes.
18+ Réservé uniquement aux adultes - Peut contenir
fréquemment des scènes violentes et
extrêmement violentes.
Configuration des classifications sur les critères
RRT5
Si l’émission émise utilise la classification selon
les critères RRT5 (Rating Region
Table-Region5) conformément aux règles
édictées par le FCC, cette classification peut
être téléchargée sur ce téléviseur et utilisée pour
les contrôles parentaux.
2 Mettre en surbrillance le choix de
classification sur la dernière ligne de l'écran
du menu et appuyer sur ou pour accéder
au menu. Les classifications et des options
complémentaires s’affichent à l'écran.
3 Dans le menu, appuyer sur , , ou
pour sélectionner un sous-menu de sélection
ou mettre en surbrillance RESET pour
réinitialiser toutes les classifications (après
réinitialisation, la classification continuera
d'apparaître si elle reste émise par la station
de télévision).
4 Appuyer sur OK pour interdire (une icône de
cadenas apparaît) ou autoriser (pas d'icône
de cadenas) une classification.
5 Appuyer sur EXIT (Quitter) pour revenir en
mode TV ou sur MENU pour revenir au menu
précédent.
Remarque
Les options du menu en cours de cette
classification varient en fonction du télédiffuseur.
Utilisation de l'image dans l'image
Pour sélectionner les modes à fenêtres
multiples :
• Appuyer plusieurs fois sur la touche PIP
(avec des intervalles de moins de trois
secondes) pour sélectionner le mode
souhaité de fenêtres multiples. Il est possible
de choisir parmi les modes PIP, PBP (Image
par image), POP (Image hors l’image) et Full
Screen (Plein écran).
Remarque
Si l'intervalle est supérieur à trois secondes en
appuyant sur la touche PIP et si la visualisation en
cours est en mode multi-fenêtres, appuyer de
nouveau sur PIP et l'affichage passera en mode
plein écran.
Plein écran
En mode plein écran, une seule fenêtre
apparaît.
Pour configurer les classifications RRT5 :
1 Utiliser le mot de passe pour accéder au
menu CONTENT.
www.insignia-products.com
75
Page 76

Téléviseur ACL de 42 po Insignia NS-42LCD
PIP (image dans l'image)
Le mode PIP permet de visualiser
simultanément deux images différentes sur
l'écran du téléviseur. Une image sera plus
grande et l'autre image sera plus petite.
Remarque
La source de l'image principale peut être
n'importe quel type de source vidéo à l'exclusion
de HDMI, mais la sous-fenêtre ne peut afficher
que des canaux en TV analogique ou des
programmes A/V.
PBP (image par image)
Le mode PBP divise l'écran en deux, permettant
à deux images d'être simultanément présentes
sur l'écran du téléviseur. Chaque image
représente la moitié de l'écran.
Permutation entre les images PIP/PBP
Pour permuter entre les images PIP/PBP :
1 Appuyer sur SWAP (Permuter).
Remarque
La source de l'image principale peut être
n'importe quel type de source vidéo à l'exclusion
de HDMI, mais la sous-fenêtre ne peut afficher
que des canaux en TV analogique ou des
programmes A/V.
POP (image hors l'image)
Il est possible d'utiliser le mode POP pour
effectuer un balayage des émissions de tous les
canaux mémorisés sur les trois fenêtres réduites
pendant que la fenêtre principale affiche
l’émission en cours.
Remarque
La source de l'image principale peut être
n'importe quel type de source vidéo à l'exclusion
de HDMI, mais la sous-fenêtre ne peut afficher
que des canaux en TV analogique.
Remarque
La touche SWAP ne fonctionne que lorsque
l'image principale affiche un canal TV analogique
ou un programme A/V.
Sélection de la position de la sous-image PIP
Pour sélectionner la position de la
sous-image PIP :
1 En mode PIP, appuyer sur la touche
P.POSITION pour naviguer parmi les
positions disponibles de la sous-image.
Sélection de la fenêtre active
Tout en étant en mode fenêtres multiples,
l'utilisateur peut sélectionner n'importe quelle
fenêtre pour y apporter des modifications.
Pour modifier la fenêtre active :
1 Appuyer sur OK. N'importe quelle autre
image parmi les sous-images peut devenir
l'image principale.
76
www.insignia-products.com
Page 77

Téléviseur ACL de 42 po Insignia NS-42LCD
2 Lorsqu'une image est une fenêtre active, il
est possible de lui appliquer de nombreux
processus comme la sélection d'un canal, le
contrôle du volume et la sélection de la
source d'entrée.
3 En mode POP, l'utilisateur peut appuyer sur
OK pour sélectionner les trois fenêtres
réduites en tant que fenêtre active. 1, 2 et 3
s'affichent à l'écran. Avant la disparition du
message à l'écran, appuyer sur 1, 2 ou 3 de
la télécommande pour choisir le programme
devant être affiché sur la fenêtre principale.
Remarque
Normalement, l'image principale correspond à la
fenêtre active par défaut. De nombreuses
opérations, mais pas toutes, peuvent être
appliquées à la fenêtre active.
Utilisation du guide électronique des
programmes
Le téléviseur comprend un guide électronique
des programmes pour aider l'utilisateur à
naviguer parmi les différentes options de
visualisation. Le guide électronique des
programmes (EPG) fournit des informations
telles que la liste des programmes suivant les
canaux ainsi que leurs heures de disponibilité.
Parfois, des informations de programme
détaillées sont aussi disponibles avec l'EPG (la
disponibilité et les détails des émissions peuvent
varier suivant les télediffuseurs).
Remarques
• L'EPG ne fonctionne qu'avec les canaux
numériques.
• Pour permettre à l'EPG de fonctionner
correctement, l'utilisateur devra définir l'horloge
automatique sur ON (Activé).
Pour afficher le guide électronique de
programme :
1 Appuyer sur la touche GUIDE. L'EPG
s’affiche (exemple présenté ci-dessous).
E
Élément Description
A Affiche l'heure et la date en cours, la station du
programme actuel, la classification, etc.
B Affiche des informations complémentaires et détaillées
sur une émission particulière (la disponibilité des
détails complémentaires dépend du télédiffuseur).
C Affiche tous les sous-canaux disponibles dans un
canal ATSC.
D Affiche toutes les informations des sous-canaux
actuellement sélectionnés comme la liste des
programmes et les heures de début et de fin de tous
les programmes disponibles.
E Affiche un aperçu de tous les sous-canaux
actuellement sélectionnés.
2 Pour quitter, appuyer de nouveau sur GUIDE.
3 Appuyer sur OK pour activer des fenêtres
différentes. Quand une fenêtre est active,
une bordure verte apparaît autour de celle-ci
et tous les processus lui deviennent
applicables.
4 Si la moitié inférieure de l'EPG est active,
appuyer sur ou pour sélectionner le canal
retenu (quand le canal a été sélectionné, les
informations relatives aux programmes
s'affichent).
5 Appuyer sur ou pour sélectionner un
programme différent sur ce canal (quand le
programme est sélectionné, la fenêtre
supérieure gauche affiche des informations
détaillées sur l’émission, si elles sont
disponibles).
6 Si des informations complémentaires et
détaillées sur le programme sélectionné
apparaissent dans la fenêtre supérieure
gauche, l'utilisateur pourra appuyer sur OK
pour le mettre en surbrillance (une bordure
verte s'inscrit autour) et ensuite sur ou
sur pour faire défiler la page, le cas
échéant, pour visualiser encore plus
d'informations.
7 Tous les sous-canaux disponibles dans un
canal ATSC seront affichés.
A
Réglage de l'image
Réglage de l'image en mode PC/Composantes
B
Avant de régler l'image, s'assurer d'avoir
sélectionné la bonne source (RVB analogique
ou composantes).
C
D
Pour régler l'image en mode
PC/Composantes
1 Appuyer sur MENU, puis sur ou pour
afficher la page du menu IMAGE ADJUST
(Réglage de l'image).
www.insignia-products.com
77
Page 78

Téléviseur ACL de 42 po Insignia NS-42LCD
2 Appuyer sur pour accéder au menu.
Menu en mode Composantes
Menu en mode PC
Paramètre Description
V width (Largeur
verticale)
(en mode
composantes
seulement)
Auto Adjust
(Réglage
automatique)
(mode PC
uniquement)
Permet le réglage de la largeur verticale de
l'image.
Mettre en surbrillance Auto Adjust, puis
appuyer sur ou pour démarrer le
réglage automatique. Le téléviseur règle
automatiquement les paramètres de
l'image, comme la fréquence et la position.
4 Appuyer sur EXIT pour quitter.
Réglage de l'image en mode HDMI
Sélectionner la source HDMI avant de régler
l'image.
Pour régler l'image en mode HDMI :
1 Appuyer sur MENU, puis sur ou pour
afficher la page du menu IMAGE ADJUST
(Réglage de l'image).
2 Appuyer sur pour accéder au menu.
3 Dans le menu, appuyer sur ou pour
sélectionner une option et ensuite sur ou
pour procéder au réglage.
Paramètre Description
Image size
(Dimensions de
l'image)
H position
(Position
horizontale)
V position
(Position
verticale)
Frequency
(Fréquence)
Phase Améliore la netteté d’une image fixe.
Freeze Image
(Gel de l'image)
H width (Largeur
horizontale)
(en mode
composantes
seulement)
Sélectionne la dimension de l'image
souhaitée (format d’image).
Le choix peut être différent selon le mode
(voir « Adjusting the image » à la page 67
pour de plus amples informations).
L'utilisateur pourra appuyer sur ZOOM de
la télécommande pour sélectionner le
format d’image.
Déplace l'image sur la droite ou la gauche
de l'écran.
Déplace l'image vers le haut ou le bas de
l'écran.
Règle la fréquence d'échantillonnage.
Sélectionner ON (Activé) pour geler l'image
à l'écran. Sélectionner OFF (Désactivé)
pour réactiver l'image.
L'utilisateur peut appuyer sur FREEZE de la
télécommande pour geler l'image et la
restaurer en appuyant dessus de nouveau.
Permet le réglage de la largeur horizontale
de l'image.
3 Dans le menu, appuyer sur ou pour
sélectionner une option, puis sur ou pour
procéder au réglage.
Paramètre Description
Image size
(Dimensions de
l'image)
Freeze Image
(Gel de l'image)
Colorspace
(Espace
colorimétrique)
Sélectionne la dimension de l'image
souhaitée (format d’image)
(voir « Adjusting the image » à la page 67
pour de plus amples informations).
Il est possible d’appuyer sur ZOOM de la
télécommande pour opérer la sélection.
Lors de la réception d'un signal 1080i ou
1080p, ceci ne peut pas être réglé.
Sélectionner ON pour geler l'image à
l'écran. Sélectionner OFF pour réactiver
l'image.
L'utilisateur peut appuyer sur FREEZE de la
télécommande pour geler l'image et la
restaurer en appuyant dessus de nouveau.
Lorsque le téléviseur convertit un signal
DVI en un signal HDMI, des couleurs
anormales peuvent parfois apparaître. Si
cette situation se produit, il est possible
d'essayer de régler cette option.
4 Appuyer sur EXIT pour quitter.
78
www.insignia-products.com
Page 79

Téléviseur ACL de 42 po Insignia NS-42LCD
Entretien
Information relative à l’écran ACL
Des marques ou une image rémanente sur
l’écran ACL, provenant d’une image fixe qui a
été affiché pendant une durée prolongée, ne
sont pas le résultat d’un défaut de
fonctionnement ; ils ne sont donc pas couverts
par la garantie. Ce produit n’est pas conçu pour
afficher des images fixes pendant une période
prolongée.
Information importante relative à l’utilisation de
jeux vidéo, d’ordinateurs, de sous-titres codés ou à
l’affichage d’autres images fixes
L’utilisation intensive de programmes avec des
images fixes peut provoquer l’incrustation d’une
image « rémanente » sur l’écran ACL.
Cette image en arrière plan est visible sur des
programmes normaux sous la forme d’une
image fixe. Ce type de détérioration de l’écran
ACL est irréversible et peut être limité en
observant les règles suivantes :
• Réduire la luminosité/le contraste au
minimum nécessaire.
• Ne pas afficher d’images fixes pendant des
périodes prolongées.
• Mettre l’unité hors tension quand elle n'est
pas réellement utilisée.
Nettoyage et maintenance
Pour nettoyer ce téléviseur, l’essuyer avec un
chiffon sec et doux.
Si les surfaces sont très sales, utiliser un chiffon
doux trempé dans une solution savonneuse ou
dans une solution détergente douce.
• Utiliser un produit de nettoyage pour lunettes
afin d’éliminer les saletés récalcitrantes sur
l'écran ACL.
• Ne jamais utiliser d’alcool, de diluant ou de
benzène pour nettoyer le téléviseur.
• Avant d’utiliser un chiffon traité
chimiquement, lire les instructions qui
l’accompagnent avec soin.
Entretien de la télécommande
• Maintenir la télécommande sèche. Si elle est
mouillée, l'essuyer immédiatement.
• Utiliser et ranger la télécommande
uniquement dans des environnements à
température normale.
• Manipuler la télécommande délicatement et
avec soin. Ne pas la laisser tomber.
• Essuyer de temps en temps la
télécommande avec un chiffon humide pour
préserver son aspect neuf.
Problèmes et solutions
Avant de contacter le service de réparation,
vérifier les éléments suivants qui pourraient
remédier aux symptômes rencontrés.
Symptômes Solution possible
Pas
d’alimentation.
Absence d’image. • Vérifier que les connexions vidéo à
Bonne image
mais pas de son
Bonne qualité du
son, mais les
couleurs sont
médiocres
Image de
mauvaise qualité
Ligne pointillée
horizontale
La télécommande
ne fonctionne pas
Image neigeuse et
parasitée
Image VGA
instable et non
synchronisée
Pas de sortie
sonore sur l’un
des haut-parleurs
• Vérifier que le cordon d’alimentation
CA est branché sur la prise secteur.
• Débrancher le cordon d’alimentation,
attendre 60 secondes, rebrancher le
cordon sur la prise secteur et mettre le
téléviseur de nouveau sous tension.
l’arrière du téléviseur sont
correctement connectées.
• Régler le contraste et la luminosité.
• Sélectionner une entrée correcte.
• Vérifier que le signal à l’entrée est
compatible.
• Augmenter le volume.
• Vérifier que le téléviseur n’est pas mis
en sourdine.
• Régler le contraste, la couleur et la
luminosité.
• Parfois, une qualité médiocre de
l’image se produit si une caméra
S-VHS ou un caméscope est connecté
simultanément avec un autre
périphérique. Dans ce cas, mettre hors
tension un des autres périphériques.
• Vérifier que la luminosité de la pièce
n’est pas trop forte.
• Cela peut résulter d’une interférence
électrique (par exemple un
sèche-cheveux ou des lumières au
néon dans le voisinage).
• Mettre l’équipement hors tension.
• Cette télécommande est universelle. Si
la télécommande ne fonctionne pas
correctement avec le téléviseur,
essayer d’appuyer sur la touche TV.
• Vérifier que les piles sont en bon état.
Les remplacer si nécessaire.
• Nettoyer le capteur de télécommande
sur le téléviseur.
• Ne pas utiliser la télécommande avec
un éclairage puissant ou au néon.
• Les piles doivent être insérées avec la
polarité (+, -) alignée conformément
au schéma à l’intérieur du
compartiment des piles.
• Vérifier les connexions A/V.
• Vérifier que le mode VGA de
l’ordinateur est correct.
• Régler la Balance dans le menu AUDIO
(SOUND) [SON].
www.insignia-products.com
79
Page 80

Téléviseur ACL de 42 po Insignia NS-42LCD
Symptômes Solution possible
Les touches de
commande ne
fonctionnent pas
L’image peut
présenter du «
traînage » ou
sembler
légèrement en
retard
Remarque
Avertissement
• Méthode 1 : Appuyer sur POWER
(Marche/Arrêt) sur le téléviseur et
attendre trois secondes, puis éteindre
le téléviseur. Attendre de nouveau
quelques secondes, puis rallumer le
téléviseur (cela est recommandé afin
de réinitialiser les réglages effectués).
• Méthode 2 : Débrancher le cordon
d’alimentation, attendre quelque
secondes puis rebrancher le cordon et
rallumer le téléviseur (tous les
réglages effectués seront alors
effacés).
Lorsque le téléviseur est utilisé dans des
pièces (emplacements) très froides, l'image
peut présenter du traînage ou sembler
légèrement en retard. Il ne s’agit pas d’un
mauvais fonctionnement et le téléviseur
réagira correctement quand la température
redeviendra normale.
Si le problème n’est pas résolu, éteindre le
téléviseur et le rallumer.
L’utilisateur ne doit jamais essayer de réparer un
téléviseur défectueux.
Problèmes de la télécommande et
solutions
Spécifications
Alimentation 100 - 240 V CA, 50/60 Hz
Consommation électrique 250 W (maximum)
Écran 42 po
Poids 80,3 lb (36,5 kg)
Dimensions 42,4 × 33,9 × 13,6 po
(107,7 × 86,106 × 34,544 cm)
Canaux accessibles VHF : 2-13
UHF : 14-69
TV câblée : 1-125
CADTV : 1-135
TVN : 2-69
Standard TV NTSC-M, ATSC
Accessoires Guide de l’utilisateur
Tél éc omman de
Température Entreposage : 32 à 122 °F
(0 à 50 °C)
Fonctionnement : 41 à 104 °F
(5 à 40 °C)
Anomalie Solution possible
Le témoin à DEL ne
clignote pas quand une
touche est appuyée
Le témoin à DEL clignote
quand une touche est
appuyée mais le
périphérique ne répond
pas
Le témoin DEL clignote
longuement
La télécommande ne
contrôle pas un
périphérique ou ne
commande que
certaines fonctionnalités
de celui-ci
Pas de volume sur le
périphérique
Remplacer les piles.
S’assurer d’être à moins de 15 pi (4,6
mètres) du périphérique et de pointer
la télécommande vers le capteur de
télécommande du périphérique.
Une touche a été incorrectement
appuyée. Recommencer de nouveau la
procédure.
Vérifier que le périphérique est doté
d'un capteur de télécommande, puis
essayer un autre code.
Voir « Programming the volume lock »
à la page 56.
80
www.insignia-products.com
Page 81

Téléviseur ACL de 42 po Insignia NS-42LCD
Garantie
Garantie limitée d’un an
Insignia Products (« Insignia ») garantit au premier acheteur
de ce NS-42LCD neuf (« Produit »), qu’il est exempt de
défauts de fabrication et de main-d’œuvre à l’origine, pour
une période d’un (1) an à partir de la date d’achat du Produit
(« Période de garantie »). Ce produit doit avoir été acheté
chez un revendeur agréé des produits de la marque Insignia
et emballé avec cette déclaration de garantie. Cette garantie
ne couvre pas les Produits remis à neuf. Les conditions de la
présente garantie s’appliquent à tout Produit pour lequel
Insignia est notifié, pendant la Période de garantie, d’un vice
couvert par cette garantie qui nécessite une réparation.
Quelle est la durée de la couverture ?
La Période de garantie dure 1 an (365 jours) à compter de la
date d’achat de ce Produit. La date d’achat est imprimée sur
le reçu fourni avec le Produit.
Que couvre cette garantie ?
Pendant la Période de garantie, si un vice de matériau ou de
main-d’œuvre d'origine est détecté sur le Produit par un
service de réparation agréé par Insignia ou le personnel du
magasin, Insignia (à sa seule discrétion) : (1) réparera le
Produit en utilisant des pièces détachées neuves ou remises
à neuf ; ou (2) remplacera le Produit par un produit ou des
pièces neuves ou remises à neuf de qualité comparable. Les
produits et pièces remplacés au titre de cette garantie
deviennent la propriété d’Insignia et ne sont pas retournés à
l’acheteur. Si les Produits ou pièces nécessitent une
réparation après l’expiration de la Période de garantie,
l’acheteur devra payer tous les frais de main-d’œuvre et les
pièces. Cette garantie reste en vigueur tant que l’acheteur
reste propriétaire du Produit Insignia pendant la Période de
garantie. La garantie prend fin si le Produit est revendu ou
transféré d’une quelconque façon que ce soit à tout autre
propriétaire.
Comment obtenir une réparation sous garantie ?
Si le Produit a été acheté chez un détaillant, le rapporter
accompagné du reçu original chez ce détaillant. S’assurer
de remettre le Produit dans son emballage d’origine ou dans
un emballage qui procure la même qualité de protection que
celui d’origine. Si le Produit a été acheté en ligne, l’expédier
accompagné du reçu original à l’adresse indiquée sur le site
Web. S’assurer de remettre le Produit dans son emballage
d’origine ou dans un emballage qui procure la même qualité
de protection que celui d’origine.
Où cette garantie s’applique-t-elle ?
Cette garantie ne s’applique qu’à l’acheteur original du
Produit aux États-Unis et au Canada.
Ce qui n’est pas couvert par cette garantie limitée
La présente garantie ne couvre pas :
• la formation du client ;
• l'installation ;
• les réglages de configuration ;
• les dommages esthétiques ;
• les dommages résultants de catastrophes naturelles
telles que la foudre ;
• les accidents ;
• une utilisation inadaptée ;
• une manipulation abusive ;
• la négligence ;
• une utilisation commerciale ;
• la modification de tout ou partie du Produit, y compris
l’antenne.
La présente garantie ne couvre pas non plus :
• les dommages ayant pour origine une utilisation ou une
maintenance défectueuse ;
• la connexion à une source électrique dont la tension est
inadéquate ;
• toute réparation effectuée par quiconque autre qu’un
service de réparation agréé par Insignia pour la
réparation du Produit
• les Produits vendus en l’état ou hors service ;
• les consommables tels que les fusibles ou les piles ;
• les Produits dont le numéro de série usine a été altéré
ou enlevé.
LA RÉPARATION OU LE REMPLACEMENT, TELS
QU’OFFERTS PAR LA PRÉSENTE GARANTIE,
CONSTITUENT LE SEUL RECOURS DE L’ACHETEUR.
INSIGNIA NE SAURAIT ÊTRE TENU POUR
RESPONSABLE DE DOMMAGES ACCESSOIRES OU
CONSÉCUTIFS, RÉSULTANT DE L’INEXÉCUTION D'UNE
GARANTIE EXPRESSE OU IMPLICITE SUR CE PRODUIT,
Y COMPRIS , SANS S’Y LIMITER, LA PERTE DE
DONNÉES, L’IMPOSSIBILITÉ D’UTILISER LE PRODUIT,
L’INTERRUPTION D’ACTIVITÉ OU LA PERTE DE
PROFITS. INSIGNIA PRODUCTS N’OCTROIE AUCUNE
AUTRE GARANTIE EXPRESSE RELATIVE À CE
PRODUIT ; TOUTES LES GARANTIES EXPRESSES OU
IMPLICITES POUR CE PRODUIT, Y COMPRIS MAIS SANS
LIMITATION, TOUTE GARANTIE DE QUALITÉ
MARCHANDE, D'ADÉQUATION À UN BUT PARTICULIER,
SONT LIMITÉES À LA PÉRIODE DE GARANTIE
APPLICABLE TELLE QUE DÉCRITE CI-DESSUS ET
AUCUNE GARANTIE EXPRESSE OU IMPLICITE, NE
S’APPLIQUERONT APRÈS LA PÉRIODE DE GARANTIE.
CERTAINS ÉTATS ET PROVINCES NE RECONNAISSENT
PAS LES LIMITATIONS DE LA DURÉE DE VALIDITÉ DES
GARANTIES IMPLICITES. PAR CONSÉQUENT, LES
LIMITATIONS SUSMENTIONNÉES PEUVENT NE PAS
S'APPLIQUER À L’ACHETEUR ORIGINAL. LA PRÉSENTE
GARANTIE DONNE À L'ACHETEUR DES GARANTIES
JURIDIQUES SPÉCIFIQUES ; IL PEUT AUSSI
BÉNÉFICIER D'AUTRES GARANTIES QUI VARIENT D'UN
ÉTAT OU D'UNE PROVINCE À L'AUTRE.
Droits d’auteurs
© 2006 Insignia. Insignia et le logo Insignia sont des
marques de commerce de Best Buy Enterprise Services,
Inc. Les autres noms de marques et de produits mentionnés
sont des marques de commerce ou des marques déposées
de leurs propriétaires respectifs. Les spécifications et
caractéristiques sont susceptibles d’être modifiées sans
préavis.
Pour assistance technique, appeler le (877) 467-4289.
www.insignia-products.com
81
Page 82

82
www.insignia-products.com
Page 83

Televisor con Pantalla LCD de 42" Insignia NS-42LCD
Televisor con
Pantalla LCD de 42"
Insignia NS-42LCD
Contenido
Introducción . . . . . . . . . . . . . . . . . . . . . . . . . . . . .83
Información de seguridad importante . . . . . . . . .83
Características . . . . . . . . . . . . . . . . . . . . . . . . . . .85
Preparación de su televisor . . . . . . . . . . . . . . . . .89
Uso de su televisor . . . . . . . . . . . . . . . . . . . . . .103
Mantenimiento . . . . . . . . . . . . . . . . . . . . . . . . . .120
Localización y corrección de fallas . . . . . . . . . .121
Especificaciones . . . . . . . . . . . . . . . . . . . . . . . .122
Garantía. . . . . . . . . . . . . . . . . . . . . . . . . . . . . . .123
Introducción
Felicitaciones por su compra de un producto de
alta calidad de Insignia. Su NS-24LCD
representa el más moderno diseño de
televisores con pantalla LCD, y está concebido
para brindar un rendimiento confiable y sin
problemas.
Información de seguridad
importante
Advertencia
Para reducir el riesgo de choque eléctrico, no retire la cubierta
o la parte posterior. No hay partes reparables por el usuario en
el interior. Para realizar reparaciones, acuda al personal de
servicio calificado.
Para reducir el riesgo de incendio o choque eléctrico, no
exponga su TV a la lluvia o la humedad.
Cuidado
Para evitar un choque eléctrico, introduzca la clavija ancha del
enchufe del cable de alimentación en la ranura ancha de un
tomacorriente. Si el enchufe no entra, solicite a un electricista
calificado con licencia que cambie el tomacorriente obsoleto.
No modifique el enchufe del cable de alimentación ya que se
anulará esta característica de seguridad.
Este símbolo indica que voltaje peligroso que
puede constituir un riesgo de choque eléctrico
se encuentra presente dentro de su televisor.
Esta etiqueta se encuentra ubicada en la parte
posterior de su televisor.
Lea las instrucciones
Lea todas las instrucciones de seguridad y
operación antes de usar su TV.
Guarde las instrucciones
Conserve las instrucciones de seguridad y
operación para referencia futura.
Siga las advertencias y las instrucciones
Preste atención a todas las advertencias sobre
su televisor y las instrucciones de operación.
Siga todas las instrucciones de operación y uso.
Agua y humedad
No use su televisor cerca del agua. Por ejemplo,
no lo use cerca de una bañera, lavabo,
fregadero de cocina o lavadero, en un sótano
mojado o cerca de una piscina.
Limpieza
Desconecte su televisor antes de limpiarlo. No
use productos de limpieza líquidos o en aerosol.
Use solamente un paño húmedo para limpiar el
exterior de su televisor.
Ventilación
Las ranuras y aberturas en el gabinete y en la
parte posterior o en la base se proporcionan con
fines de ventilación, operación confiable y
protección contra sobrecalentamiento. Estas
aberturas no se deben bloquear ni cubrir. No
cubra las aberturas al colocar su televisor sobre
una cama, sofá, alfombra, o cualquier otra
superficie parecida. No coloque su televisor
cerca o sobre un radiador o calefactor. No
coloque su televisor en una instalación
integrada, tal cómo un librero o estante, a
menos que se provea una ventilación adecuada
o siga las instrucciones del fabricante.
Calor
Asegúrese de que su televisor se encuentre
alejado de fuentes de calor tal cómo radiadores,
calefactores, estufas u otros productos
(incluyendo amplificadores) que produzcan
calor.
Conexión a tierra o polarización
No anule el propósito de seguridad del enchufe
con polarización o con conexión a tierra. Un
enchufe polarizado tiene dos espigas una más
ancha que la otra. Un enchufe del tipo de
conexión a tierra tiene dos espigas y una clavija
de tierra. La espiga ancha y la clavija de tierra se
proveen para su seguridad. Si el enchufe no
cabe, póngase en contacto con un electricista
para reemplazar el tomacorriente obsoleto.
Este símbolo indica que hay instrucciones
importantes de operación y mantenimiento en
la literatura que acompaña a su televisor.
Advertencia
Su televisor utiliza soldadura de estaño y plomo y una lámpara
fluorescente que contiene una pequeña cantidad de mercurio.
El deshecho de estos materiales pede ser regulado por
razones ambientales. Para obtener información sobre el
deshecho o reciclaje, póngase en contacto con sus
autoridades locales o la Alianza de Industrias Electrónicas en
el sitio web www.eia.org.
www.insignia-products.com
Protección del cable de alimentación
Los cables de alimentación deben colocarse de
manera que no se pisen o sean aplastados por
artículos colocados sobre ellos o contra ellos.
Preste atención especial a los cables en los
enchufes, en los receptáculos auxiliares y en el
punto en el que salen de su televisor.
Aditamentos
No use aditamentos que no hayan sido
recomendados por Insignia ya que podrían
causar peligros.
83
Page 84

Televisor con Pantalla LCD de 42" Insignia NS-42LCD
Soporte
No coloque su televisor en un carro, base,
trípode, soporte o mesa inestable. Su televisor
se podría caer y sufrir daños importantes,
además de causar serias lesiones personales.
Usar solamente con carros, bases, trípodes,
soportes, o mesas especificadas por el
fabricante o que se vendan con el televisor. Si
monta su televisor en la pared, siga las
instrucciones del fabricante y use un accesorio
de montaje recomendado por el fabricante. La
combinación del TV y un carro debe moverse
con cuidado. Las paradas repentinas, la fuerza
excesiva y las superficies irregulares pueden
causar que su TV y el carro se volteen de lado.
Rayos
Para protección adicional del receptor de TV
durante una tormenta eléctrica, o cuando se
deje sin supervisión o sin usar por largos
periodos de tiempo, desconéctelo del
tomacorriente y desconecte la antena o el
sistema de cable. Esto ayudará a evitar daños a
su televisor debido a relámpagos o
sobretensiones en las líneas de alimentación.
Reparación
No trate de reparar este televisor usted mismo,
ya que abrir o quitar las cubiertas puede
exponerlo a voltajes peligrosos u otros peligros.
Encomiende todas las reparaciones al personal
de servicio calificado.
Piezas de repuesto
Cuando se necesitan repuestos, asegúrese de
que el técnico de reparación use repuestos
especificados por el fabricante o que tengan las
mismas características que la pieza original. Las
substituciones no autorizadas pueden resultar
en incendio, choque eléctrico, lesiones
personales u otros peligros.
Sobrecarga
No sobrecargue los tomacorrientes y los cables
de extensión ya que esto resultará en riesgo de
incendio o choque eléctrico.
Ingreso de objetos y líquidos
Nunca inserte objetos de ningún tipo en su
televisor a través de las ranuras, ya que estos
pueden tocar puntos de voltaje peligrosos o
hacer cortocircuito con otros componentes, lo
cual puede causar un incendio o choque
eléctrico. Nunca derrame líquidos de ninguna
clase sobre su televisor.
Daños que requieren reparación
Desconecte este televisor del tomacorriente y
encomiende su reparación a personal calificado
bajo las siguientes condiciones:
• Cuando el cable de alimentación o el enchufe
se dañe o se pele.
• Si se ha derramado líquido u objetos han
caído dentro de su televisor.
• Si el televisor ha sido expuesto a la lluvia o al
agua.
• Si su televisor no funciona normalmente aún
siguiendo las instrucciones de operación.
Ajuste únicamente los controles que están
cubiertos en las instrucciones de operación,
ya que el ajuste incorrecto de otros controles
puede resultar en daño y frecuentemente
requerirá trabajo intensivo de un técnico
calificado para restaurar la operación normal
del televisor.
• Si su televisor se ha caído o dañado de
cualquier forma.
• Cuando su televisor exhiba un cambio
significativo en el rendimiento.
Piezas de repuesto
Cuando se necesitan repuestos, asegúrese de
que el técnico de reparación use repuestos
especificados por el fabricante o que tengan las
mismas características que la pieza original. Las
substituciones no autorizadas pueden resultar
en incendio, choque eléctrico, lesiones
personales u otros peligros.
Verificación de seguridad
Después de completar la revisión o reparación
de este televisor, pídale al técnico de servicio
que realice verificaciones de seguridad para
determinar que el televisor se encuentra en
perfecto estado de funcionamiento.
Fuente de alimentación
Su televisor debe funcionar únicamente con el
tipo de fuente de alimentación indicada en la
etiqueta de marca. Si no está seguro del tipo de
fuente de alimentación que hay en su casa,
consulte con el vendedor de su televisor o la
compañía de energía local.
Rayos
Para protección adicional del receptor de TV
durante una tormenta eléctrica, o cuando se
deje sin supervisión o sin usar por largos
periodos de tiempo, desconéctelo del
tomacorriente y desconecte la antena o el
sistema de cable. Esto ayudará a evitar daños a
su televisor debido a relámpagos o
sobretensiones en las líneas de alimentación.
Protección de la pantalla
La pantalla de su televisor está hecha de vidrio.
No deje caer su televisor ni golpee la pantalla de
vidrio. Si la pantalla se quiebra, tenga cuidado al
recoger el vidrio.
Defecto de píxel
La pantalla de su televisor está diseñada para
mostrar imágenes finamente detalladas.
Ocasionalmente unos cuantos píxeles inactivos
pueden aparecer en la pantalla como puntos
fijos de color azul, verde o rojo. Este no es un
defecto y no afecta el rendimiento de su
televisor.
84
www.insignia-products.com
Page 85

Televisor con Pantalla LCD de 42" Insignia NS-42LCD
Conexión a tierra de la antena exterior
Sí una antena externa o un sistema de cable
esta conectado al televisor, asegúrese de que la
antena o el sistema de cable esta conectado a
tierra, para proveer una protección contra sobre
voltajes y la acumulación de cargas estáticas. El
artículo 810 del código nacional eléctrico,
ANSI/NFPA No. 70-1984 proporciona
información con respecto a la correcta conexión
a tierra del poste y la estructura de soporte, la
conexión a tierra del alambre principal de una
unidad de descarga de antena, el tamaño de los
conductores de la conexión a tierra, la ubicación
de la unidad de descarga de antena, la conexión
a los electrodos de conexión a tierra y los
requisitos para el electrodo de conexión a tierra.
7
6
5
4
3
1
1 Equipo de servicio eléctrico
2 Sistemas de electrodos de tierra para el
servicio de alimentación eléctrica
3 Abrazaderas de tierra
4 Conductores de conexión a tierra
5 Unidad de descarga de antena
6 Abrazadera de tierra
7 Cable conductor de entrada de antena
2
Características
Frente del televisor
1
Elemento Descripción
1 Sensor del control remoto — Apunte el control
remoto a este sensor mientras presiona los botones
del control remoto.
Nota para el instalador del sistema CATV
Este recordatorio se proporciona para que el
instalador del sistema CATV preste atención al
Artículo 820-40 del NEC el cual proporciona
pautas para una correcta conexión a tierra y, en
particular, especifica que la conexión a tierra del
cable debe estar conectada al sistema de tierra
de la edificación, tan cerca al punto de entrada
del cable como sea práctico.
www.insignia-products.com
85
Page 86

Parte superior del televisor
1 2 3 4 5 6 7
Elemento Descripción
1-2 CH-/CH+ — Permiten cambiar de canal. Mientras se
encuentra en un menú de pantalla, permiten resaltar
las opciones.
3-4 VOL-/VOL+ — Permiten cambiar el volumen.
Mientras se encuentra en un menú de pantalla,
permiten ajustar el valor de una opción.
5 MENÚ — Permiten acceder a la página principal del
menú de pantalla.
6 ENTRADA — Permite seleccionar la fuente de la señal
de entrada.
7 ENCENDIDO — Permite encender el televisor
(cuando se encuentra en suspensión) o activar el
modo de suspensión (cuando se encuentra
encendido).
Televisor con Pantalla LCD de 42" Insignia NS-42LCD
Notas
• Los botones POWER, CH+/-, VOL+/-, INPUT, y
MENU en el televisor tienen las mismas
funciones que los mismos botones en el
control remoto.
• Esta guía del usuario describe los
procedimientos basándose en usar el control
remoto no los controles del televisor.
86
www.insignia-products.com
Page 87

Televisor con Pantalla LCD de 42" Insignia NS-42LCD
Panel posterior del televisor
1 2 3 4 5
6 7 8 9 10 11 12
Elemento Descripción
1 Conectores de salida de altavoces
2 Conector de entrada HDMI — Conecte equipos con
una interfaz HDMI a este conector (por ejemplo, un
decodificador o un reproductor de DVD).
3 Conector de entrada de audio — Conecte una entrada
de audio a este conector (tal cómo el de una
computadora).
4 Puerto VGA — Conecte equipos con una interfaz VGA
a este puerto (por ejemplo, una computadora).
5 Conectores de video de componentes 1 y 2 —
Conecte los conectores de salida de video de
componentes de un reproductor de DVD o
decodificador a estos conectores.
6 Conectores de audio de componentes 1 y 2 —
Conecte los conectores de salida de un reproductor
de DVD o decodificador a estos conectores.
7 Conectores de AV 1 y 2 — Conecte los conectores de
salida de AV de un VCR o reproductor de DVD a estos
conectores.
13 14 15
Elemento Descripción
8 Conector S-VIDEO — Conecte el conector de salida
S-Video de un VCR o reproductor de DVD a este
conector.
9 Conectores de salida de VIDEO — Conéctelos a los
conectores de entrada de video de un VCR o DVR
para grabar programas.
10 Conectores de salida de AUDIO — Conéctelos a los
conectores de entrada de audio de un VCR o DVR
para grabar el audio de los programas.
11 Conector de auriculares — Conecte auriculares a este
conector.
12 Puerto USB — Solamente para actualizaciones de
software (firmware).
13 Conector óptico de salida de audio digital S/PDIF —
Conecte un equipo de audio digital óptico a este
conector.
14 Conector de la antena de AIRE — Conecte una antena
de interior o exterior a este conector.
15 Conector de CABLE — Conecte un sistema de TV por
cable a este conector.
www.insignia-products.com
87
Page 88

Televisor con Pantalla LCD de 42" Insignia NS-42LCD
Control remoto
1
2
3
4
5
6
7
8
9
10
11
12
13
14
15
16
17
Número Botón Descripción
1 CONFIGURAR Permite programar el control
remoto. Para obtener más
información, refiérase a
“Programming your remote
control” en la página 97.
2 Equipo TV – Permite seleccionar el
televisor.
DVD – Permite seleccionar un
reproductor de DVD conectado.
CBL – Permite seleccionar TV por
cable o satélite.
AUX – Permite seleccionar el
dispositivo asignado a este botón.
3 Números Permiten ingresar los números de
canal. En el menú de pantalla,
permiten ingresar la contraseña del
control de los padres.
4 ENTRADA Presione para seleccionar la fuente
de video.
5 Permite ir al último canal visto.
18
19
20
21
22
23
24
25
26
27
28
Número Botón Descripción
6 CH +/– Permite cambiar los canales de TV.
7 SILENCIAR Permite silenciar el sonido.
8 MENÚ Permiten acceder al menú de
9
10 GUÍA Permite mostrar la guía de
11 Permite comenzar a grabar en un
12 ZOOM Permite seleccionar la relación de
13 MTS/SAP En el modo de TV analógica,
14 LISTA Permite mostrar una lista de
15 FAVORITOS Permite mostrar una lista de
16 PIP (Imagen en
17 POSICIÓN DE
18 Permite encender su televisor o
19 — Permite seleccionar un sub-canal.
20 VOL+/– Permite ajustar el volumen.
21 INFO Permite mostrar información de
22 SALIR Presione para cerrar el menú de
23 CCD Permite activar o desactivar los
ACEPTAR
Imagen)
IMAGEN
pantalla (OSD).
Presione las flechas para moverse
en el menú de pantalla. Presione OK
(Aceptar) para confirmar los
cambios o cambiar las opciones en
el menú de pantalla.
programación electrónica (EPG) en
pantalla.
equipo conectado, tal cómo un
VCR.
Cuando se reproduce un DVD,
permite congelar la imagen en la
pantalla. Presione el botón
nuevamente para descongelar la
imagen.
Permite comenzar a reproducir el
DVD o CD.
Permite detener la reproducción del
DVD o CD.
Permite saltar al capítulo anterior en
un DVD o a la pista anterior en
un CD.
Permite retroceder rápidamente un
DVD o CD.
Permite avanzar rápidamente en un
DVD o CD si un reproductor de DVD
o de CD está conectado.
Permite saltar al siguiente capítulo
en un DVD o a la siguiente pista en
un CD.
aspecto.
permite seleccionar el modo MONO,
ESTÉREO, o SAP. En el modo de TV
digital, presione para seleccionar la
pista de audio.
programas.
programas favoritos.
Permite seleccionar los modos
PIP/PBP/POP/Pantalla Completa.
Permite seleccionar la posición de
la sub-imagen de PIP.
ponerlo en el modo de suspensión.
estado.
pantalla.
subtítulos optativos. Para obtener
más información, refiérase a
“Viewing Closed Captions” en la
página 113.
88
www.insignia-products.com
Page 89

Televisor con Pantalla LCD de 42" Insignia NS-42LCD
Número Botón Descripción
24 APAGADO
AUTOMÁTICO
25 IMAGEN Permite seleccionar el modo de
26 AUDIO Permite seleccionar el modo de
27 CONGELAR Permite congelar la imagen de
28 INTERCAMBIAR Permite intercambiar la imagen
Permite configurar el temporizador
de apagado automático. Para
obtener más información, refiérase
a “Setting the Sleep timer” en la
página 112.
imagen.
sonido.
video. Presiónelo nuevamente para
descongelar la imagen. No congele
la imagen de video por periodos de
tiempo extendidos. Esto puede
dañar la pantalla del televisor.
principal y la sub-imagen mientras
se encuentra en el modo PIP o PBP.
Preparación de su televisor
Instalación de pilas en el control remoto
Para instalar las pilas del control remoto:
1 Quite la cubierta de la pilas.
3 Vuelva a colocar la cubierta.
Notas
• No combine pilas de tipos diferentes.
• No combine pilas viejas y nuevas.
• Saque las pilas cuando se les acabe la carga.
• Los químicos de las pilas pueden causar sarpullido. Si las
pilas se derraman, limpie el compartimiento de pilas con un
paño. Si los químicos tocan su piel, lávese inmediatamente.
• Saque las pilas si el control remoto no se va a usar por un
período de tiempo extendido.
Conexión de la alimentación
Para conectar su televisor a un
tomacorriente eléctrico:
• Enchufe el cable de alimentación en un
tomacorriente de alimentación CA.
2 Inserte dos pilas AA en el compartimiento de
pilas. Verifique que los símbolos + y – en las
pilas correspondan con los símbolos + y – en
el compartimiento de las pilas.
Notas
• Verifique que se está usando el tipo de
alimentación correcta. Refiérase a la etiqueta
en su televisor.
• Si no piensa usar su TV por un período de
tiempo extendido, desenchufe el cable de
alimentación del tomacorriente eléctrico.
www.insignia-products.com
89
Page 90

Televisor con Pantalla LCD de 42" Insignia NS-42LCD
Conexión de altavoces externos
1 Conecte los cables de audio de los altavoces
a los conectores de salida de altavoces en el
televisor, asegurándose de que los extremos
+ y - de los cables correspondan con el color
de los conectores.
(Rojo)
(Negro)
Notas
• Desenchufe el televisor y todos los
• La ilustración puede ser distinta que su
(Rojo)
(Negro)
componentes conectados antes de conectar
los altavoces.
modelo.
Conexión de los altavoces incluidos
3 Cuidadosamente quite las cubiertas de los
tornillos (1) y los cuatro tornillos (2) que
cubrían las cubiertas.
1
2
4 Conecte los altavoces al televisor por medio
de los conectores en los altavoces usando
los tornillos mencionados (en el paso 3) y
apriételos firmemente.
5 Instale las dos cubiertas para la conexión de
los altavoces en sus lugares
correspondientes en el televisor.
6 Conecte los cables de audio de los altavoces
a los conectores de salida de altavoces en el
televisor, asegurándose de que los extremos
+ y - de los cables correspondan con el color
de los conectores.
Cuidado
No levante o mueva el televisor mientras sostiene
el altavoz.
Instalación de los altavoces
1 Desconecte el televisor y todos los
componentes conectados.
2 Coloque el televisor boca abajo sobre una
superficie estable, suave y que no raye.
90
www.insignia-products.com
Page 91

Televisor con Pantalla LCD de 42" Insignia NS-42LCD
Conexión de una antena
Antena de VHF
Acerca de las conexiones de antena
Para una recepción aceptable de los canales de
VHF y UHF, se requiere una antena externa.
Para la mejor recepción, le recomendamos una
antena de exterior.
Hay dos tipos de cables de antena: 75 ohmios y
300 ohmios.
Cable de 75 ohmios
Antena de UHF
Mezclador
Cable coaxial de 75 ohmios
Conecte a
Caja de TV por cable
• Cuando conecte un equipo externo,
enciéndalo antes de tratar de conectarlo.
Nota
• Un centro de servicio de televisión o un
distribuidor local lo puede ayudar a obtener el
sistema de antena correcto (y los accesorios)
para su área.
• Cualquier cosa relacionada con instalar una
antena, instalar los accesorios, o actualización
de su sistema actual es su responsabilidad.
Cable de 300 ohmios
Si su cable de antena tiene un conector de
75 ohmios, conéctelo al conector coaxial en la
parte posterior de su televisor.
Si su cable de antena tiene un conector de
300 ohmios, conéctelo a un adaptador de
300-75 ohmios (no incluido), conecte el
adaptador a un cable de 75 ohmios, luego
conecte el otro extremo del conector de
75 ohmios al toma coaxial en la parte posterior
de su televisor.
Precauciones
• Revise cuidadosamente los terminales para
determinar la posición y tipo antes de hacer
las conexiones.
• Los conectores flojos pueden resultar en
problemas de imagen o de color. Asegúrese
de que todos los conectores estén
firmemente insertados en sus terminales.
Para conectar una antena:
1 Si ve estaciones de transmisión sin un
decodificador, conecte la antena al conector
AIR en la parte posterior del televisor.
- O Si tiene TV por cable, conecte el cable de la
caja de cable al conector CABLE en la parte
posterior del televisor.
2 Seleccione la opción TV Source [Fuente de
TV] (AIR [Aire] o CABLE) en el menú
CHANNEL SETUP (Configuración de
canales) y realice una búsqueda automática
de canales. Para obtener más información,
refiérase a “Memorizing channels” en la
página 105.
www.insignia-products.com
91
Page 92

Conexión de audio digital óptico
Televisor con Pantalla LCD de 42" Insignia NS-42LCD
O
Receptor Estéreo
Para tener la experiencia completa de sonido de
teatro en casa, deberá conectar su estéreo o
procesador de audio al conector S/PDIF OUT
(Óptico) en la parte posterior del televisor.
Nota
El conector S/PDIF OUT provee audio digital sólo
de programas de TV.
Para conectar el audio óptico
1 Conecte un cable óptico de audio digital al
conector S/PDIF OUT en la parte posterior
del televisor.
2 Conecte el cable al conector S/PDIF IN en su
estéreo o receptor de audio.
Conexión de un VCR
Para conectar un VCR:
1 Conecte los cables de audio/video entre los
conectores Audio (L/R)/Video en la unidad y
en el VCR.
Nota
Para obtener un mejor video, puede conectar el
cable al conector S-VIDEO si su equipo fuente lo
soporta. La entrada S-VIDEO usa el mismo
circuito que Video1, y si se conectan las entradas
A/V y S-VIDEO al mismo tiempo, S-VIDEO tiene
la prioridad. Use una o la otra.
ENTRADA S/PDIF
(óptica)
3 Presione o para seleccionar
AV1/SVideo y luego presione OK (Aceptar)
para confirmar
4 Encienda su VCR, inserte una cinta de video
y presione Play (Reproducir) en el VCR.
ARB
Cables A/V y
Cable S-Video
A=Amarillo (Video)
B=Blanco (Audio Izq.)
R=Rojo (Audio Der.)
B
A
R
Para reproducir video desde su VCR:
2 Encienda su televisor y presione INPUT
(Entrada). Se abrirá el menú INPUT SELECT
(Selección de Entrada).
92
VCR
www.insignia-products.com
Page 93

Televisor con Pantalla LCD de 42" Insignia NS-42LCD
Conexión de un VCR (para grabar) o un
amplificador externo
B
A
R
Cable de
Video
A
B
VCR
Para conectar un VCR o un amplificador:
1 Conecte los cables de video a los conectores
de Video del televisor y del VCR.
2 Conecte los cables de audio al televisor y
conéctelos a los conectores de Audio (L/R)
en el VCR o en un amplificador externo.
Nota
Sólo programas de TV analógica y las fuentes de
las entradas AV1/AV2 están disponibles en los
conectores de salida AV.
Cable de
Audio
R
A=Amarillo (Video)
B=Blanco (Audio Izq.)
R=Rojo (Audio Der.)
B
R
Monitor - Record
Amplificador
externo
Para grabar un programa:
1 Encienda su televisor y seleccione un
programa que desee grabar.
2 Encienda su VCR, inserte una cinta de video
para grabar.
3 Presione Record (Grabar) en el VCR para
comenzar a grabar.
Nota
Las operaciones del amplificador pueden ser
distintas dependiendo de su modelo. Lea la guía
del usuario del amplificador para confirmar la
operación correcta.
www.insignia-products.com
93
Page 94

Televisor con Pantalla LCD de 42" Insignia NS-42LCD
Conexión de una cámara de video
A
R
B
A=Amarillo (Video)
B=Blanco (Audio Izq.)
R=Rojo (Audio Der.)
Cable de
Video
Cable de
Audio
A
R
B
Conexión de un equipo HDMI
Cable HDMI
HDMI OUT
Equipo con
puerto HDMI
Para conectar una cámara de video:
1 Conecte los cables de Audio/Video a la parte
posterior del televisor.
2 Conecte los cables de Audio/Video a la
cámara de video.
Para reproducir desde una cámara de video:
1 Encienda su televisor y presione INPUT
(Entrada). Se abrirá el menú INPUT SELECT
(Selección de Entrada).
2 Presione o para seleccionar AV 2 y
luego presione OK (Aceptar) para confirmar
3 Encienda su cámara de video y póngala en
el modo de salida.
4 Inserte una cinta en la cámara de video y
presione el botón Play (Reproducir) de la
cámara.
Nota
Las operaciones de la cámara de video pueden
ser diferentes y dependen de su modelo. Favor lea
el manual del usuario de su cámara de video para
confirmar la operación.
Para conectar un reproductor de DVD o
decodificador usando HDMI:
• Conecte el cable HDMI entre la interfaz
HDMI de la unidad y la salida HDMI del
reproductor de DVD (o decodificador).
1 Conecte el cable HDMI al puerto HDMI en la
parte posterior del televisor.
2 Conecte el cable HDMI al puerto HDMI OUT
(Salida HDMI) en el reproductor de DVD o
decodificador.
Para reproducir desde un reproductor de
DVD o decodificador usando HDMI:
1 Encienda su televisor y presione INPUT
(Entrada). Se abrirá el menú INPUT SELECT
(Selección de Entrada).
2 Presione o para seleccionar HDMI y
luego presione OK (Aceptar) para confirmar
3 Encienda su reproductor de DVD o
decodificador y póngalo en el modo correcto.
Refiérase a la guía del usuario del equipo
para obtener más información.
Nota
Si el equipo sólo tiene una salida DVI, utilice un
cable adaptador de DVI a HDMI para conectarse
al puerto HDMI. Luego conecte el cable de audio
al conector AUDIO junto a la entrada VGA en la
parte posterior de su televisor.
94
www.insignia-products.com
Page 95

Televisor con Pantalla LCD de 42" Insignia NS-42LCD
Conexión de video de componentes
VRA
Cable de
video
B=Blanco (Audio Izq.)
R=Rojo (Audio Der. o Componente de video Pr)
V=Verde (Componente de video Y)
A=Azul (Componente de video Pb)
RV
A
El color en componentes provee las señales de
luminancia y color por canales separados, lo
que provee el video más claro y nítido disponible
para su televisor.
Para conectar un equipo usando video de
componentes:
1 Conecte el cable de video de componentes a
los conectores de entrada Y, Pb y Pr en el
televisor.
2 Conecte el cable a los conectores de salida
Y, Pb y Pr en el equipo.
3 Conecte el cable de audio a los conectores
de entrada de AUDIO en el televisor y a los
conectores de salida de AUDIO del equipo
externo.
R
B
Cable de
B
L-Audio-R
audio
R
Equipo con video de
componentes
Para reproducir video de componentes
desde un equipo externo:
1 Encienda su televisor y presione INPUT
(Entrada). Se abrirá el menú INPUT SELECT
(Selección de Entrada).
2 Presione o para seleccionar
Component1 o Component2 y luego
presione OK (Aceptar) para confirmar
3 Encienda su equipo externo y póngalo en el
modo correcto. Refiérase a la guía del
usuario del equipo para obtener más
información.
www.insignia-products.com
95
Page 96

Conexión de una computadora
Cable de
audio
Televisor con Pantalla LCD de 42" Insignia NS-42LCD
Cable
VGA
Para conectar una computadora:
1 Conecte un cable VGA al puerto VGA en la
computadora y al puerto VGA en el televisor.
2 Conecte un cable de audio al conector LINE
OUT (Línea de salida) o HEADPHONE
(Auricular) en la computadora y al conector
de la entrada de AUDIO en el televisor.
Para reproducir video desde una
computadora:
1 Encienda su televisor y presione INPUT
(Entrada). Se abrirá el menú INPUT SELECT
(Selección de Entrada).
2 Presione o para seleccionar Analog
RGB (RGB Analógico) y presione OK
(Aceptar) para confirmar.
3 Encienda su computadora y ajuste las
propiedades de pantalla según sea
necesario.
96
www.insignia-products.com
Page 97

Televisor con Pantalla LCD de 42" Insignia NS-42LCD
Cómo cambiar el idioma del menú de
pantalla
Puede cambiar el idioma que se muestra en el
menú de pantalla.
Para cambiar el idioma del menú de pantalla:
1 Presione MENU (Menú) y luego o para
mostrar la página del menú SYSTEM SETUP
(Configuración del sistema).
2 Presione el botón para ingresar al menú
Búsqueda de su código
System Setup (Configuración del sistema).
3 o para seleccionar Language
(Idioma) y luego presione o para
seleccionar el idioma que guste.
4 Presione EXIT (Salir) para regresar a ver TV.
Programación de su control remoto
El control remoto puede controlar cuatro
dispositivos, tal cómo un VCR, un reproductor
de DVD, un receptor de cable o satélite, un
amplificador o sintonizador, o un equipo similar.
Para programar el control remoto:
1 Encuentre el código para el dispositivo que
desea programar. (Refiérase a “Device
codes” en la página 98.) Si hay más de un
código listado para un equipo, escriba todos
los códigos.
2 Encienda el equipo que desea programar, y
cargue medios si es necesario (por ejemplo
un DVD).
3 Presione el botón del equipo en el control
remoto.
•Use DVD para reproductores de DVD o
VCRs.
•Use CBL para cable o decodificadores de
satélite.
•Use AUX cualquier otro equipo.
4 Mantenga presionado SET (Establecer) en el
control remoto hasta que el indicador LED
parpadee dos veces, luego suelte el botón.
5 Ingrese el primer código de cinco dígitos
para su equipo. El indicador LED parpadeará
una vez cada vez que se ingresa un dígito. Si
el código es el correcto, el indicador LED
parpadeará dos veces.
Nota
Si el indicador LED no parpadea dos veces, repita
los pasos 3 al 5 usando un código diferente.
3 Ingrese 990. El indicador LED parpadeará dos veces.
Verificación de los códigos
6 Apunte el control remoto al equipo, luego
presione el botón . El equipo se deberá
apagar.
Nota
Si el equipo no se apaga, repita los pasos 4 al 6
usando un código diferente. Si no puede
encontrar un código que funcione, refiérase a
“Searching for your code” en la página 97.
7 Repita los pasos 1 al 6 para programar
equipos adicionales. Para referencia futura,
escriba cada código que funciona en el
espacio a continuación:
• Código para AUX: _____________
• Código para CBL: _____________
• Código para CD: ______________
• Código para DVD: _____________
• Código para SAT:______________
• Código para TNR: _____________
• Código para VCR: _____________
8 Presione SET (Establecer) para guardar el
código y salir.
Si su equipo no responde al control remoto
después de probar todos los códigos listados
para su marca, o si su marca no aparece en la
lista, trate buscar su código.
Para buscar un código:
1 Presione el botón de un equipo.
2 Mantenga presionado SET (Establecer)
hasta que el indicador LED parpadee dos
veces, luego suelte el botón.
3 Ingrese 991, luego el número de grupo del
equipo (0=cable, 1=TV, 2=VCR, 3=audio). El
indicador LED parpadeará dos veces.
4 Apunte el control remoto al equipo y presione
. El control remoto enviará los códigos
desde su biblioteca al equipo seleccionado,
comenzando por el código más común
primero. Si el equipo responde, vaya al paso
7.
5 Si el equipo no responde, presione CH+. Su
control remoto probará el siguiente código.
Siga presionado CH+ hasta que el equipo
responda. Puede presionar CH– para probar
un código anterior. Continúe hasta que el
equipo responda.
6 Para buscar un código para otro equipo,
repita los pasos 1 al 5.
7 Presione SET (Establecer) para guardar el
código y salir.
Si programó un equipo buscando el código, le
podría gustar saber que código de 4 dígitos está
usando el control remoto.
Para verificar el código:
1 Presione el botón del equipo en el control
remoto.
2 Mantenga presionado SET (Establecer)
hasta que el indicador LED parpadee dos
veces, luego suelte el botón.
www.insignia-products.com
97
Page 98

Televisor con Pantalla LCD de 42" Insignia NS-42LCD
4 Presione 1 y cuente las veces que parpadee
el indicador LED. Este es el primer dígito del
código. Por ejemplo, si el indicador LED
parpadea dos veces, el primer dígito es 2. Si
el indicador LED no parpadea, el primer
dígito es 0.
5 Repita el paso 4 usando 2 para el segundo
dígito, 3 para el tercer dígito, 4 para el cuarto
dígito, y 5 para el quinto dígito.
6 Presione SET (Establecer) para salir.
Programación del bloqueo de volumen
El control remoto viene preconfigurado para
dejarle controlar el volumen de cada equipo
conectado. Puede cambiar el bloqueo de
volumen para que el volumen de un equipo
controle el volumen en todos los modos.
Después de bloquear el control de volumen,
puede desbloquearlo para un equipo específico
para que pueda controlar el volumen de ese
equipo independientemente.
Para bloquear el control de volumen:
1 Mantenga presionado SET (Establecer)
hasta que el indicador LED parpadee dos
veces, luego suelte el botón.
2 Ingrese 993, luego presione el botón del
equipo del cual quiere controlar el volumen.
El indicador LED parpadeará dos veces.
Cuando presione VOL+, VOL–, o MUTE
(Silenciar) en el control remoto, el equipo
seleccionado controlará el volumen sin
importar que equipo esté usando.
Para desbloquear el control de volumen:
1 Mantenga presionado SET (Establecer)
hasta que el indicador LED parpadee dos
veces, luego suelte el botón.
2 Ingrese 993, luego presione el botón VOL+.
El indicador LED parpadeará cuatro veces.
El control de volumen se desbloqueará.
Para desbloquear el control de volumen de
un solo equipo:
1 Presione el botón del equipo.
2 Mantenga presionado SET (Establecer)
hasta que el indicador LED parpadee dos
veces, luego suelte el botón.
3 Ingrese 993, luego presione el botón VOL–.
El indicador LED parpadeará cuatro veces.
El control de volumen para el equipo que ha
seleccionado estará desbloqueado.
Códigos de equipos
Códigos de VCR
ABS 21972
Admiral 20048, 20209
Aiko 20278
Aiwa 20037, 20479
Alienware 21972
America Action 20278
American High 20035
Amoisonic 20479
Anam 20162, 20037, 20240, 20278
Anam National 20162
Asha 20240
Audiovox 20037, 20278
Beaumark 20240
Bell & Howell 20104
Broksonic 20184, 20121, 20209, 20002,20479
Calix 20037
Canon 20035
Carver 20081
CCE 20072, 20278
Changhong 20048, 20081
Citizen 20037, 20278
Colt 20072
Craig 20037, 20047, 20240, 20072
Curtis Mathes 20060, 20035, 20162
Cybernex 20240
CyberPower 21972
Daewoo 20045, 20104, 20278
Dell 21972
Denon 20042
DirecTV 20739
Durabrand 20039, 20038
Electrohome 20037
Electrophonic 20037
Emerex 20032
Emerson 20035, 20037, 20184, 20240,20045,
Fisher 20047, 20104
Fuji 20035, 20033
Fujitsu 20045
Gateway 21972
GE 20060, 20035, 20240
General 20045
Go Video 20432
GoldStar 20037, 20209, 20038, 20225
Haojie 20240
Harman/Kardon 20081, 20038
Harwood 20072
Hewlett Packard 21972
HI-Q 20047
Hitachi 20037, 20042, 20055
Howard
Computers
HP 21972
Hughes Network
Systems
iBUYPOWER 21972
JVC 20045, 20067
KEC 20037, 20278
Kenwood 20067, 20038
KLH 20072
20121, 20043, 20209, 20002, 20278,
20479
21972
20042, 20739
98
www.insignia-products.com
Page 99

Televisor con Pantalla LCD de 42" Insignia NS-42LCD
Kodak 20035, 20037
Kolin 20043 LG 20037, 20045, 20042,
20209,20038
Logik 20072
LXI 20037
Magnavox 20035, 20039, 20081
Magnin 20240
Marantz 20035, 20081
Marta 20037
Matsushita 20035, 20162
Media Center PC 21972
MEI 20035
Memorex 20035, 20162, 20037, 20048,20039,
20047, 20240, 20104, 20209, 20479
MGA 20240, 20043
MGN Technology 20240
Microsoft 21972
Mind 21972
Minolta 20042
Mitsubishi 20067, 20043
Motorola 20035, 20048
MTC 20240
Multitech 20072
NEC 20035, 20037, 20048, 20104,20067,
20038
Newave 20037
Nikko 20037
Noblex 20240
Northgate 21972
Olympus 20035
Optimus 21062, 20162, 20037, 20048,20104,
20432
Orion 20184, 20209, 20002, 20479
Panasonic 21062, 20035, 20162, 20616,20225
Penney 20035, 20037, 20240, 20042,20038
Pentax 20042
Philco 20035, 20479
Philips 20035, 20081, 20739, 20618
Pilot 20037
Pioneer 20042, 20067
Polk Audio 20081
Profitronic 20240
Proscan 20060
Protec 20072
Pulsar 20039
Qisheng 20060
Quasar 20035, 20162
Radix 20037
Randex 20037
RCA 20060, 20035, 20240, 20042,20880
Realistic 20035, 20037, 20048, 20047,20104
ReplayTV 20616
Runco 20039
Sampo 20037, 20048
Samsung 20240, 20045, 20432
Sanky 20048, 20039
Sansui 20067, 20209, 20479
Sanyo 20047, 20240, 20104
Scott 20184, 20045, 20121, 20043
Sears 20035, 20037, 20047, 20042,20104
Sharp 20048, 20209
Shintom 20072
Shogun 20240
Singer 20072
Sonic Blue 20616
Sony 20035, 20032, 20033, 20636,21972
STS 20042
Sylvania 20035, 20081, 20043
Systemax 21972
Tagar Systems 21972
Tashiko 20037
Tatung 20045, 20067
Technics 20035, 20162
Teco 20035, 20037, 20048, 20038
Teknika 20035, 20037
Tivo 20636, 20618, 21503, 20739
TMK 20240
Toshiba 20045, 20042, 20067, 20043,21503,
Totevision 20037, 20240
Touch 21972
Unitech 20240
Vector 20045
Vector Research 20038
Victor 20067
Video Concepts 20045
Videomagic 20037
Videosonic 20240
Viewsonic 21972
Wards 20060, 20035, 20048, 20047,20081,
White
Westinghouse
XR-1000 20035, 20072
Yamaha 20038
Zenith 20039, 20033, 20209, 20479
ZT Group 21972
21008, 21972
20240, 20042, 20072
20209, 20072
Códigos de reproductores de DVD
Aiwa 20641, 21912
Akai 20770
Allegro 20869
Apex Digital 20672, 20717, 20797, 21061,20796,
Blaupunkt 20717
21056, 21937, 20794, 21020, 21915
www.insignia-products.com
99
Page 100

Televisor con Pantalla LCD de 42" Insignia NS-42LCD
Blue Parade 20571
Broksonic 20695
Changhong 20627, 21061
CineVision 20869
Coby 21086
Curtis Mathes 21087
CyberHome 21024, 21023, 21129, 20816, 21117
Daewoo 20833, 21172, 20869
Denon 20490
DVD2000 20521
Emerson 20591, 20675
Enterprise 20591
Fisher 21919
Funai 20675
Gateway 21158, 21073
GE 20522, 20717
Go Video 20744, 20833, 21099, 20783,21075,
20869, 21730
Greenhill 20717
Harman/Kardon 20582, 20702
Hitachi 20573, 20664, 21919
Hiteker 20672
Initial 20717
Integra 20627, 21924
JBL 20702
JVC 20558, 20623, 20867
Kenwood 20490, 20534
KLH 20717, 21020, 21149
Koss 20651, 21980
Lasonic 20798
LG 20591, 20869, 20801
Liquid Video 21980
Lite-On 21158, 21058
Loewe 20511
Magnavox 20503, 20539, 21976, 21914, 20675
Marantz 20539
Memorex 20695
Microsoft 20522
Mintek 20717
Mitsubishi 21521, 20521
Nesa 20717
Norcent 21003
Onkyo 20503, 20627, 21924, 20792
Oritron 20651, 21980
Panasonic 20490, 21762, 21990
Philips 20503, 20539, 20646, 21914
Pioneer 20525, 20571
Polaroid 21086, 21061
Polk Audio 20539
Portland 20770
Proscan 20522
Qwestar 20651
RCA 20522, 20571, 20717, 20822
Rio 20869
Rotel 20623
Sampo 20752, 20698
Samsung 20490, 20573, 21932, 21075, 20820
Sansui 20695
Sanyo 20695
Sharp 20630, 20752
Sharper Image 21117
Sherwood 20770
Shinco 20717
Shinsonic 20533
Sonic Blue 20869, 21099
Sony 20533, 20864, 21033, 21904, 21903
SVA 20717
Sylvania 20675
Symphonic 20675
Teac 20717, 21984, 20809
Technics 20490
Theta Digital 20571
Toshiba 20503, 20695
Urban Concepts 20503
Xbox 20522
Yamaha 20490, 20539, 20545
Zenith 20503, 20591, 20869
Códigos de convertidores de cable
ABC 00003, 00008, 00014
Americast 00899
Bell & Howell 00014
Bell South 00899
Clearmaster 00883
ClearMax 00883
Coolmax 00883
Daeryung 01877, 00877, 00477, 00008
Digi 00637
Director 00476
Dumont 00637
Gehua 00476
General
Instrument
GoldStar 00144
Hamlin 00009, 00273
Hitachi 00014
Jerrold 00476, 00810, 00276, 00003,00012,
KNC 00008
LG 00144
Memorex 00000
Motorola 00476, 00810, 00276, 01254,01376
MultiVision 00012
00476, 00810, 00276, 00003,00014
00014
100
www.insignia-products.com
 Loading...