

Page 1
Important Safeguards
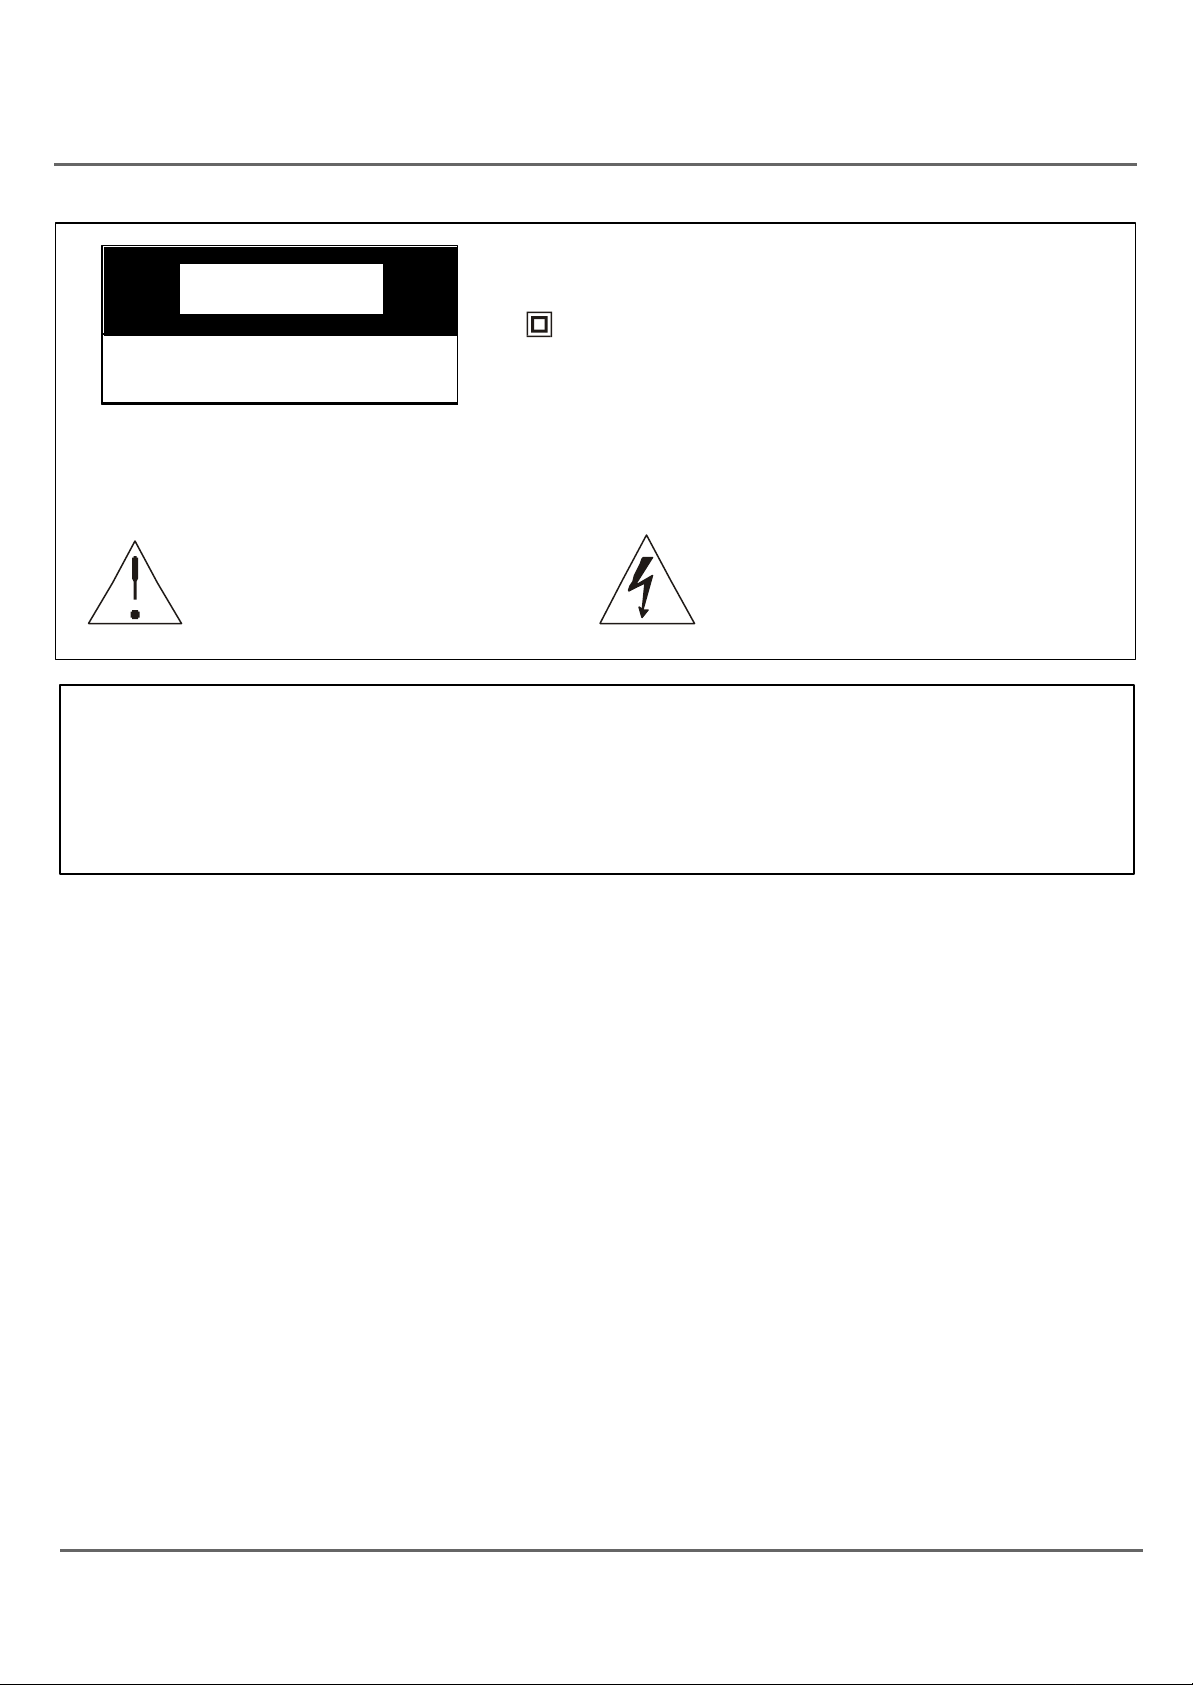
CAUT ION
RI SK OF ELECTRIC SHOCK
DO NOT OPEN
Cauti on: To reduce the risk of electric shock, do not remove cover (or back). No user serviceable parts
inside. Refer servicing to qualified service personnel.
This symbol indicates important
i nstructions accompanying the
product.
WARNI NG
To reduce the risk of fire or electric shock, do not expose this product to rain or moisture.
The apparatus must not be exposed to dripping or splashing. Objects filled with liquids, such as vases or
drinking glasses, must never be placed on the apparatus.
This symbol indicates that this product incorporates
double insulati on between hazardous main voltage
and user accessible parts. When servicing use only
identical replacement parts.
This symbol indicates “dangerous
voltage” i nside the product that presents a risk of electric shock or
personal injury.
IMP ORTANT SAFETY INSTRUCTIONS
1. Read these instructions.
2. Keep these instructions.
3. Heed all warnings.
4. Follow all instructions.
5. Do not use this apparatus near water.
6. Clean only with dry cloth.
7. Do not block any ventilation openings. I nstall in accordance with the manufacturer’s instructions.
8. Do not install near any heat sources such as radiators, heat registers, stoves, or other apparatus (including
amplifiers) that produce heat.
9. Do not defeat the safety purpose of the polarized or grounding-type plug. A polarized plug has two
blades with one wider than the other. A grounding type plug has two blades and a third grounding prong.
The wide blade or the third prong is provided for your safety. I f the provided plug does not fit into your
outlet, consult an electrician for replacement of the obsolete outlet.
10.Protect the power cord from being walked on or pinched particularly at plugs, convenience recept acles,
and the point where they exit from the apparatus.
11.Only use attachments/accessories specified by the manufacturer.
1
Page 2
Important Safeguards
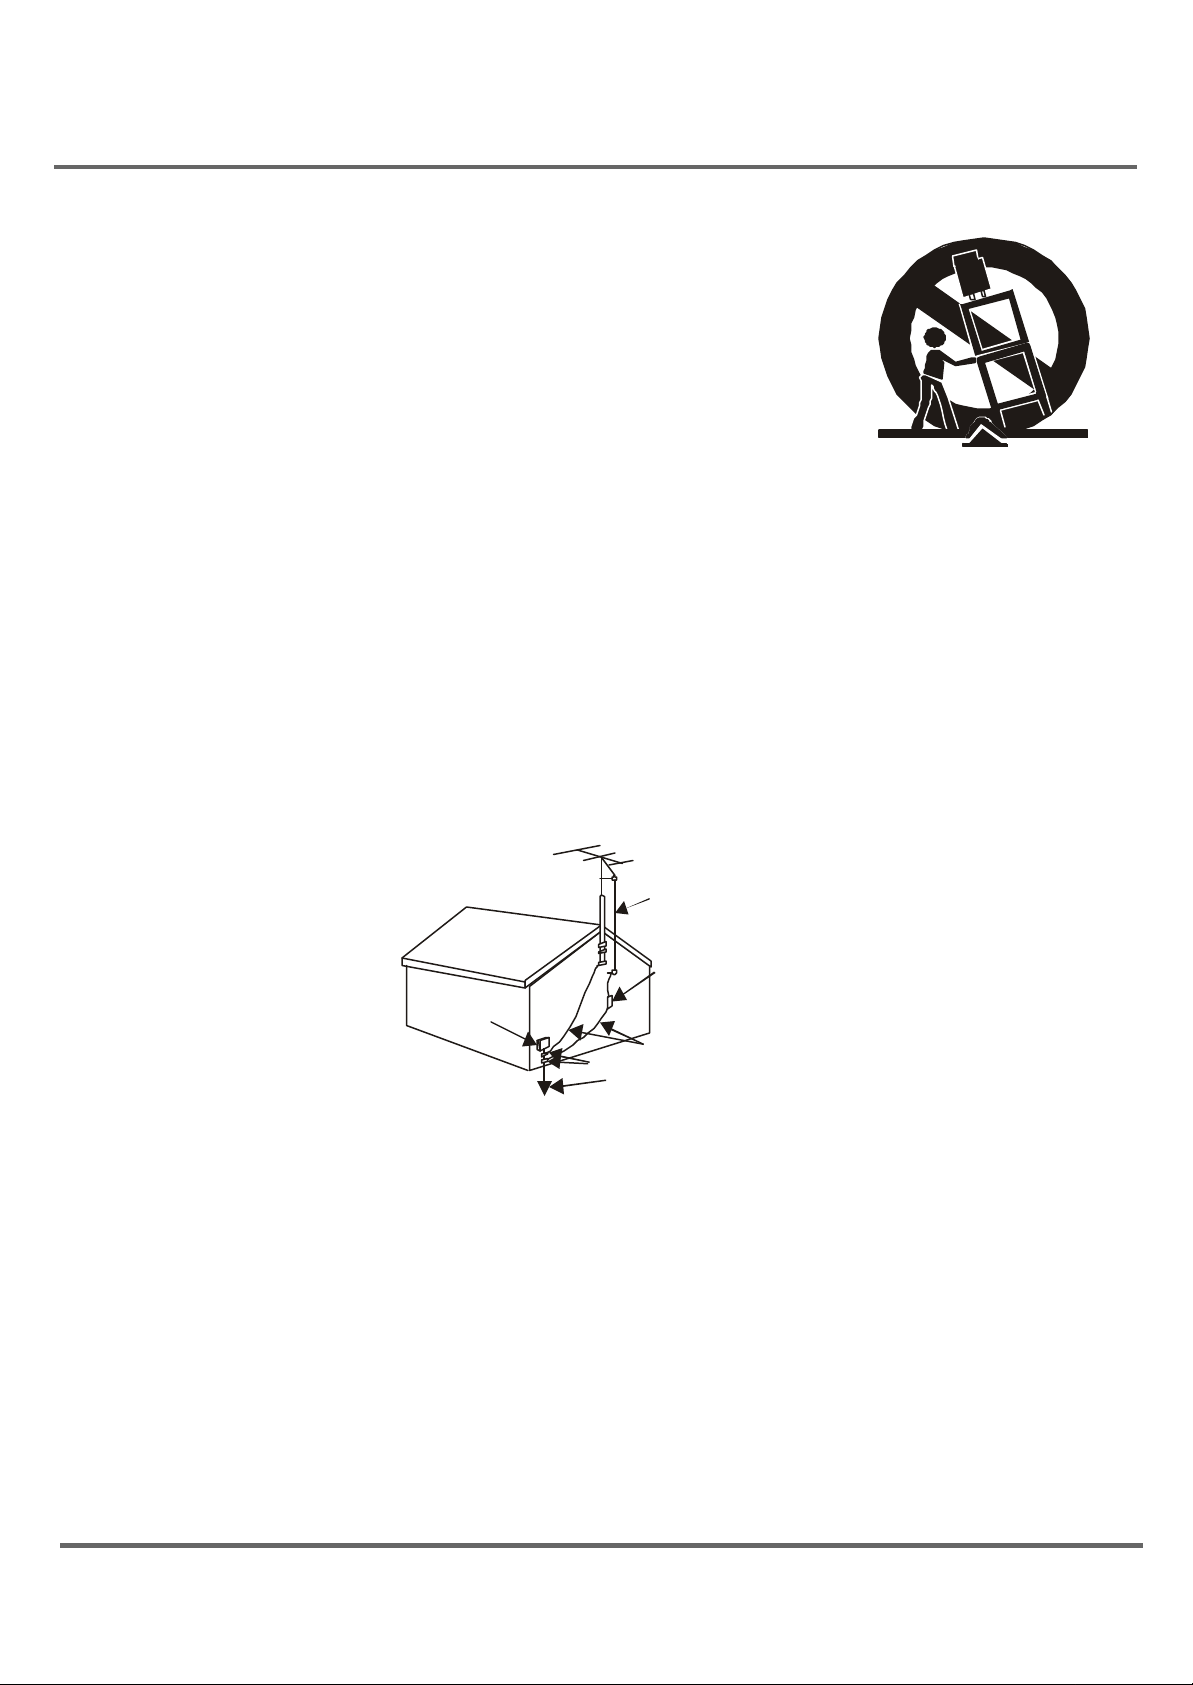
12. Use only with the cart, stand, tripod, bracket, or table
specified by the manufacturer, or sold with the apparatus.
When a cart is used, use cauti on when moving the cart/
apparatus combination to avoid injury from tip-over.
13. Unplug this apparatus during lightning storms or when left unused for a long
period of time.
14. Refer all servicing to qualified service personnel.Service is required when the
apparatus has been damaged in any way, such as a damaged power supply
cord or plug; liquid has spilled on or foreign objects have fallen into;the apparatus has been exposed to direct rain or moisture; the apparatus does not
operate normally or has been dropped.
15. I f an outside antenna or cable system is connected to the product, be sure
the antenna or cable system is grounded so as to provide some protection
against voltage surges and built-up static charges. Section 810 of the National Electrical Code, ANSI/NFPA No. 70-1984 (Section 54 of Canadian
Electrical Code, Part 1) provi des information with respect to proper grounding of the mast and supporting structure, grounding of the lead-in wire to an
antenna-discharge unit, size of grounding conductors, location of antennadischarge unit, connection to grounding electrode. See the illustration below
for details.
ANTENNA
LEAD IN
WIRE
ELECTRIC
SERVICE
EQUIPMENT
NEC-NATIONAL ELECTRICALCODE
ANTENNA
DISCHARGE UNINT
(NEC SECTION 810-21)
GROUNDING CONDUCTORS
(NEC SECTION 810-21)
GROUND CLAMPS
POWER SERVICE GROUNDING
ELECTRODE SYSTEM
(NEC ART 250 PART H)
2
Page 3

Content
Contents
Overview 4
Using the Remote C ontrol 5
Basic operation 7
External connection 8
General description 9
Using the Menu System 10
TV Function Menu 10
Menu basic operation 10
Using the PI CTURE menu 10
Using the SOUND menu 10
Using the TI MER menu 11
Using the FUNCTI ON menu 11
Import ant safeguards
Using the TUNI NG menu 12
Accessing the PARENTAL CONTROL menu 12
How to use PARENTAL CONTROL menu 13
Blocking (or Viewing) TV Ratings 14
Blocking (or Viewing) Specific Content Themes 14
Blocking (or Viewing) MPAA RATI NG 15
DVD Menu System 16
DVD Menu Basic Operation 16
LANGUAGE SETUP 16
SCREEN SETUP 18
CUSTOM SETUP 20
DVD Operations 22
Picture defects and countermeasures(VHF/UHF reception) 23
Troubleshooting 24
Specification and accessories 26
3
Page 4
Overview
indicator
Menu
Volume
Volume
Channel
Channel
Frontvideoinput
Frontaudioinput
Headphone socket
Overview of the Function Key
Power
Play/Pause
Videoinput
VHF/UHF Antenna
Audio input ()
Power
Input
Down
Up
Down
Up
Stop
Re
verse
Forward
Open
Close
/
Remote
sensor
L
4
Audio input ()
R
Page 5
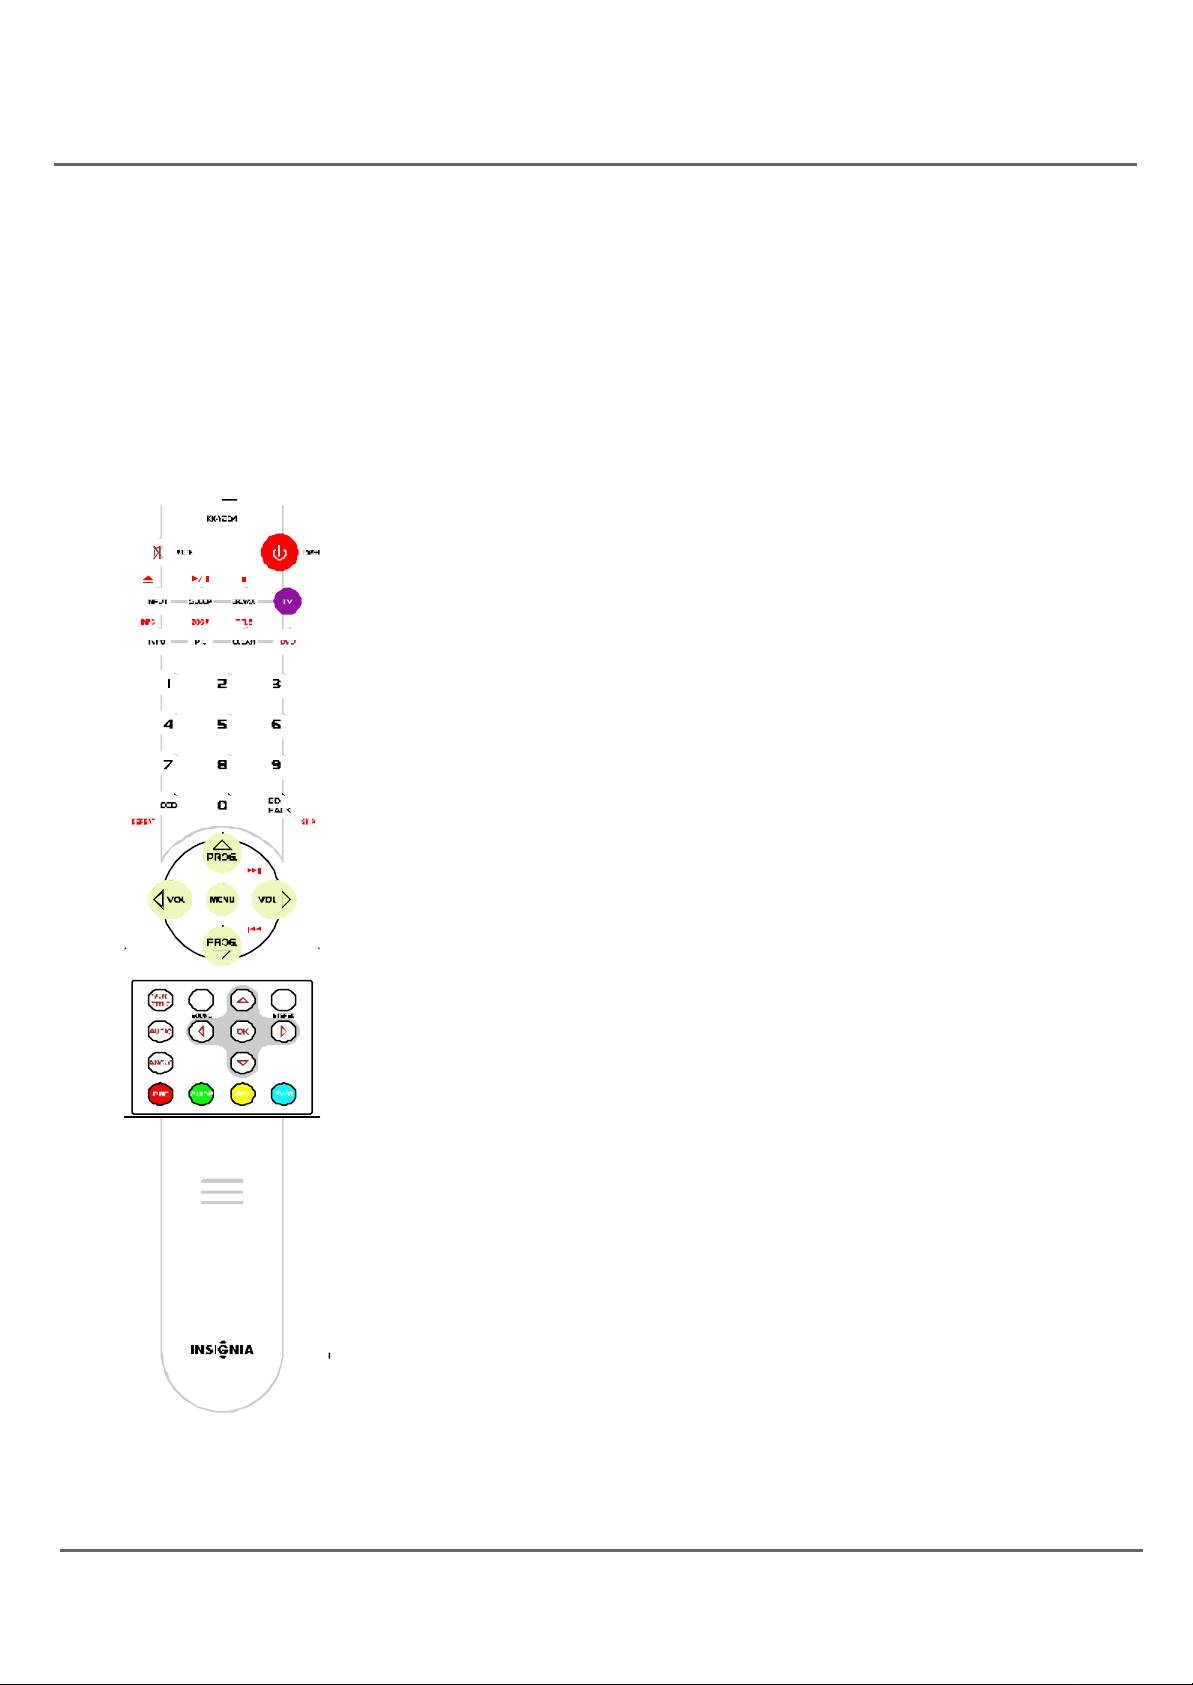
Using the Remote Control
Inserting batteries: Remove the cover, insert 2 R03/AAA size batteries with the polarities as marked
inside the battery compartment and then replace the lid.
Note:
1. One set of batteries will last for approximately one year under normal use.
2. I f the remote control is not to be used for a long period of time, remove the batteres or it may result in
battery acid leakage.
T he Buttons On the Remote control
T V Function Buttons
INPUT Press the button to switch between AV input and RF (antenna)
input.
TV Press the button to select the remote control in the TV mode.
Mute Press the button to minimize the volume level. Press again to
restore the original volume level.
BROWSE "Browse" feature. Press the button twice to start the channel
scanning. Press again to stop at the current scanned channel.
INFO Press the button to display the channel information
PIC. Press the button to display the picture preset.
SLEEP Press the button to set the sleep timer.
CCD Press the button to turn on and off the closed caption.
Go Back Press the button to return to the previous channel. If the unit is
in menu mode, press the Go Back button to return to the previous menu
screen.
POWER Press the button to turn on and turn off the TV.
VOL. (left and right) buttons Press the button to increase or decrease
the TV volume.
PROG. (up and down) buttons Press the button to scan up or down
the current channel list. Press once to select the channel up or down, press
and hold to select your desired channel.
CLEAR Press the button to hide menu or display from the screen and
return to original TV screen. For the menu with digit input, press the CLEAR
button to clear the last number entered.
0-9 (Number buttons) Press the buttons to select directly the channel
numbers and the time setting by using the remote control.
To enter a two-digit channel, press the two digit buttons. To enter a threedigit channel, press and hold the first digit for two seconds . (Press and
hold 1 for two seconds until “1--”appears for the first digit and then enter
the other two digits).
Example:To tune in channel 123.
Please and hold No 1, press No 2, then No 3.
Other buttons: The buttons on the remote control other than listed above
are not available for TV function.
5
Page 6

Using the Remote Control
DVD Function Buttons
DVD Press the DVD button to select DVD mode.
POWER Press the button to switch on and switch off the power.
VOL. (left and right) buttons Press the buttons to increase or decrease the TV volume.
MUTE Press the button to minimize the volume level. Press again to restore the original volume level.
OPEN/CLOSE Press the button to open or close the DVD disc tray.
PLAY/PAUSE Press the button to start or pause the disc playback. Press the button again to resume
playback.
STOP Press the button to stop the disc playback.
INFO Press the button to display the title, chapter and elapsed time information during disc playback.
Press again to hide the display information.
ZOOM Press the button to zoom in or zoom out the picture during DVD disc playback.
TITLE Press the TI TLE button to display TITLE menu during DVD disc playback.
REPEAT Press the button to repeat a chapter or title on DVD or a track on Audio CDs.
SKIP Press the button to skip to the specified chapter/track or time. See page 16 for details.
REV Press the button to search backward through the disc during disc playback. Press repeatedly to
increase the searching speed.
FWD Press the button to search forward through the disc during disc playback. Press and hold the button
to increase the searching speed.
MENU Press the button to display the menu and other options on the current disc.
(only if the information is available on the loaded disc)
SUBTITLE Press the button to select a subtitle language. (only if the loaded disc is encoded with
multiple Subtitle languages)
AUDIO Press the button to select audio soundtrack language. (only if the loaded disc is encoded with
multiple languages)
ANGLE Press the button to select the camera angle of multiple screen shots. (only if the loaded disc is
encoded with multiple camera angles)
PBC Press the button to turn the navigation OFF and t he disc playback starts directly without entering
the menu. Press again to turn the navigation ON.
GUIDE Press the button to display the DVD setup menu when the DVD player is in stop mode.
Arrow buttons(up, down, left, right) Press the buttons to move through the on-screen menu system.
OK button Press the button to select and highlight the desired item on the screen display.
Other buttons The buttons on the remote control other than listed above are not available for DVD function.
6
Page 7

Basic Operation
Connect to power
Connect the power supply cord to a 120V AC convenience outlet. Disconnect the power if the unit is not to
be used for a long period of time.
Power on/off
Turn on/off the unit by pressing the POWER button on the main unit (or the POWER button on the remote
control).
Energy saving feature
The TV will automatically switch to standby mode if no any signal received after 15 minutes. Press the
POWER button on the main unit (or on the remote control) to turn on the power.
Change channels
Change the TV channel by pressing the CH/ button on the main unit (or the PROG/ button on the remote
control). When the ANTENNA is in "AIR" mode, enter two digits by using the remote control to select the
desired TV channel.
For example,press No.0 and No.2 to select channel 2. When the ANTENNA is in "CABLE" mode, enter
three digits to select the desired TV channel. For example, press and hold No.1 for two seconds to display
"1--", then enter the other two digits.
7
Page 8
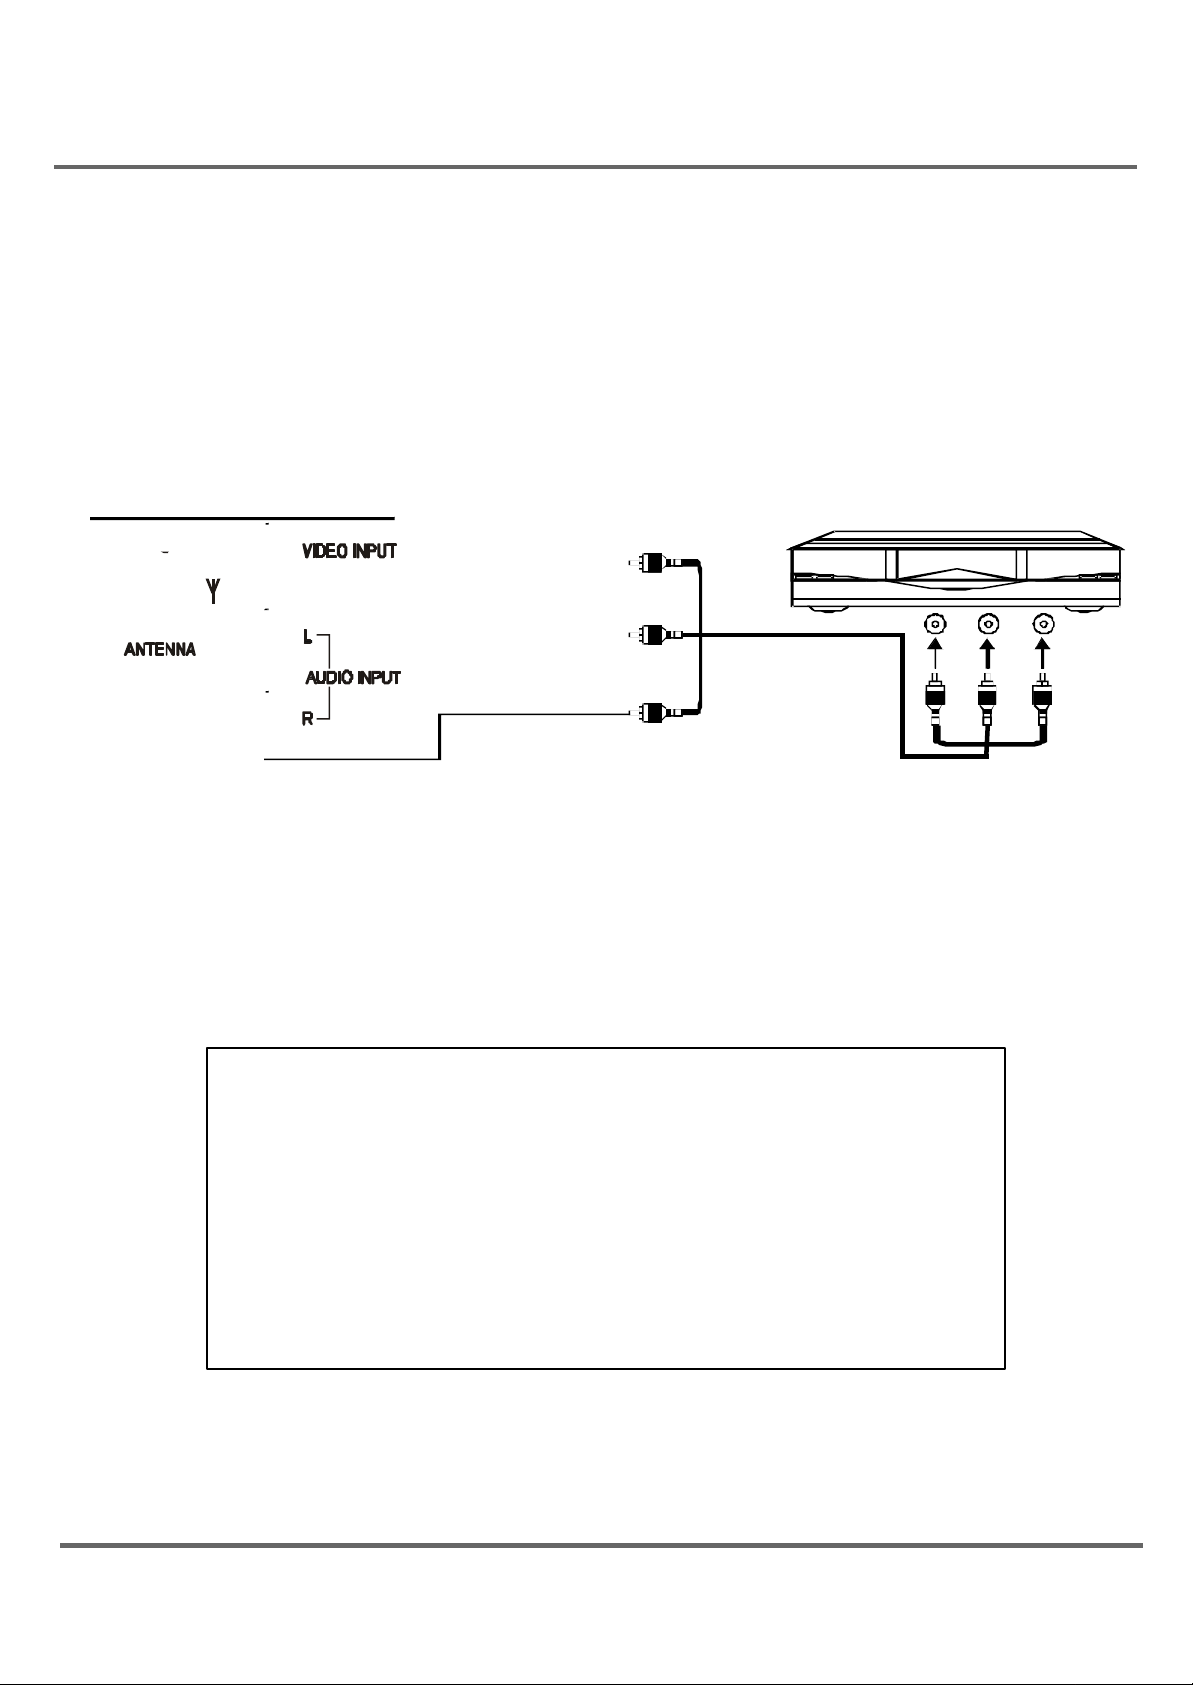
External connection
The unit can be simultaneously connected to a VCR, LD player, VCD player, video camera and other audiovideo equipment for the better quality picture.
For the monaural devices, connect audio lead to Audio (L) jack.
xternal connection
1. Under AV1 connection, connect the external equipment to the back panel of the unit as shown in the
figure below:
Video Output (VCR)
Audio Output (L Mono) (VCR)
Audio Output (R) (VCR)
2. Under AV3 mode, connect the external equipment to the side panel of the unit as shown in the figure
below:
8
Page 9

General description
DVD Player Basics
If you turn on the DVD player for the first time, press the GUIDE button to set up the DVD menu system when
the unit is in the stop mode.
Regional coding
Both the DVD player and the discs are coded by region. These regional codes must be matched accordingly for the loaded disc or it may fail to play back. The regional code for this unit is Region 1.
Loading and Playing Discs
DVD disc, audio CD disc and recorded CD-R/CD-RW discs are playable for this DVD player.
Before the playback, make sure the discs are compatible with this DVD player. To load and play a disc:
1. Press the DVD button on the remote control or INPUT button on the main unit (or on the remote control)
to turn on the DVD player.
2. Press the OPEN/CLOSE button on the main unit (or on the remote control) to open the disc tray.
3. Place a disc gently into the tray with the disc’s label facing up.
4. Press the OPEN/CLOSE button on the main unit (or on the remote control) to close the disc tray.
5. Press the PLAY button on the main unit (or on the remote control) to start the disc playback and display
the disc menu. When the disc menu appears, select your desired option and press the OK button on
the remote control to start playback.
The DVD player reads the disc’s table of contents, and then one of two things happens depending on
how the disc was programmed:
. The disc starts playing.
. The disc menu appears on the screen. One of the options will start disc play. Highlight that option
and press OK on the remote control.
9
Page 10

Using the Menu System
COLOR 50
PRESET USER
BASS 50
T V Function Menu
Menu basic operation
1. Press the MENU button on the main unit (or on the remote control) to enter menu mode. Press the VOL
/ button on the main unit ( or / button on the remote control) to select the icon.
2. Press CH / button on the main uni t (or / button on the remote control to select your desired
mode.
3. Press the VOL / button on the main unit (or / button on the remote control) to change the setting.
4. Press the MENU button on the main unit or the OK button on the remote control to return to the original
screen. To exit the menu operation directly, press the MENU button on the remote control.
Note: Make sure that the remote control is in the TV mode.
Using the PICTURE menu
The PI CTURE menu is used to make an adjustment to the picture settings and customize the picture
mode based on the current channel type.
PICTURE
CONTRAST 1
BRIGHTNESS 18
SHARPNESS 50
TINT 0
COLOR TEMP NORMAL
CONTRAST To adjust the CONTRAST of the picture
BRI GHTNESS To adjust the BRI GHTNESS of the picture.
COLOR To adjust the COLOR intensity or saturation of the picture.
SHARPNESS To adjust the SHARPNESS of the picture.
TI NT To adjust the TINT balance of the picture.
COLOR TEMP Three default color adjustment: Cold(more on blue picture color);Normal;Warm (more on
red picture color).
Using the SOUND menu
The SOUND menu enhances sound effect, for example, listening to second audio program (SAP).
SOUND
10
TREBLE 50
BALANCE 0
SURROUND OFF
Page 11

Using the Menu System
SLEEP TIMER 120
LANGUAGE
PRESET Four preset audio setting.(USER/ SPEECH/THEATER/MUSI C)
BASS To adjust the BASS effect of the sound.
TREBLE To adjust the TREBLE effect of the sound.
BALANCE To adjust the sound balance of the speaker sound.
SURROUND To turn on or turn off the surround effect of the sound.
Using the TIMER menu
The TI MER menu is used to set the sleep timer.
TIMER
SLEEP TI MER To turn off the unit automatically for your desired time.
press the right arrow to add 10 minutes to the clock(up to two hours).
Using the FUNCTION menu
The FUNCTION menu is used to set up the TV function.
FUNCTION
ENGLISH
BACKGROUND ON
NOISE REDUCE OFF
BLACK STRETCH OFF
CLOSE
CC ON MUTE
LANGUAGE To select the menu display language. (Three languages available:English, French
and Spanish)
BACK GROUND To turn on or turn off the background function when no any signal received.
NOI SE REDUCE To turn on or turn off the noise reduce function.
BLACK STRETCH To turn on or turn off the black stretch function.
CLOSE CAPI ON Eight closed caption modes, including four text modes.
CC ON MUTE To display close caption automatically when the MUTE button is pressed with the unit
turned on.
Note: The BACK GROUND function is not available when the unit is in RF input mode.
CAPTION CC1
11
Page 12

Using the Menu System
Using the TUNING menu
The TUNING menu is used to tune the channel.
SOURCE To select AIR source to receive radio broadcast frequency. To select CABLE source to
receive CATV channel.
CHANNEL To press the VOL / button on the main unit (or the / button on the remote control) to
select the TV channel.
DELETE CH To select YES to skip the channel above. To select NO to enter the channel above.
FI NE TUNE To fine tune the scanned channel.
AUTO SEARCH To search the TV channel automatically and the scanned channels are stored.
Using the PARENTAL CONTROL menu
The PARENTAL CONTROL menu is used to lock and limit the children from viewing certain channels and
using the control buttons on the main unit.
PASSWORD
PASSWORD
12
Page 13

Using the Menu System
PARENTAL GUIDE
CHILD LOCK OFF
PARENTAL GUIDE
PARENTAL GUIDE ON
CHILD LOCK OFF
TV RATING
RATING
PASSWORD The correct password is needed to enter the PARENTAL CONTROL menu.
The initial password is "1234" and you should change the password to avoid the children
from using the menu. If you happen to forget the password, enter the super password,
"5898" to create a new password.
How to use PARENTAL CONTROL menu
When you enter a correct password, the PARENTAL GUIDE menu displays as shown in the figure below.
PARENTAL GUIDE OFF
CHANGE PASSWORD
PARENTAL GUIDE Select "ON" and "OFF" to activate or deactivate the V-CHIP function (see the figure
below).
TV RATING
MPAA RATING
CHANGE PASSWORD
TV RATING Select it to display the submenu (see the figure below).
FV D L S V
TV-Y >U
TV-Y7 U U
TV-G U
TV-PG U U U U U
TV-14
U U U UU
U U UUTV-MA
Tip: view(V), block(B),”>”(selection indicator)
The TV ratings and content themes you can block are listed in the following two tables:
13
Page 14

Using the Menu System
MPAA RATING
G
TV-Y
TV-Y7
TV-G
TV-PG
TV-14
TV-MA
Hierarchy of Age-Based Ratings
All Children
Directed to Children 7 years and older
General Audience
Parental Guidance Suggested
Parents Strongly Cautioned
Mature Audience Only
D
L
S
V
FV
TV-Y
Content Themes
Sexually explicit dialogue
Adult language
Sexual situations
Violence
Fantasy Violence
All Children
Blocking(or Viewing)TV Ratings
You can block and view the program to your desired TV rating level.
1.Press the CH / button on the main unit (or / on the remote control) to select and highlight your
desired level rating.
2.Press the VOL / button on the main unit ( or / button on the remote control) to switch between V and
B. Your selected level rating automatically changes to B or V.
3.Press the MENU button on the main unit (or OK button on the remote control) to return the previous menu.
Blocking(or Viewing) Specific Content Themes
You can block or view the program to your specific Content Themes level.
1. Press the CH / button on the main unit ( or / button on the remote control) to select and highlight
your desired content theme level rating.
2. Press the VOL / button on the main unit (or / button on the remote control) to switch between status
B or V. Your selected level rating changes automatically to B or V.
3. Press the MENU button on the main unit (or OK button on the remote control) to return the previous menu.
MPAA RATING Select to set the Movie ratings as shown in the figure below.
B
PG B
PG-13 B
R B
NC-17 B
X B
The movie ratings you can block are listed in the following table:
14
Page 15

G
CHANGE PASSWORD
NEW PASSWORD ----
CONFIRM ----
PG
PG-13
Using the Menu System
Hierarchy of MPAA RATINGS
All Children
Directed to old Children
General Audience
R
NC-17
X
Parental Guidance Suggested
No one under17 admitted
No one under 17 admitted
Blocking(or Viewing) M PAA RAT ING
You can block or view the movie to your desired MPAA rating level.
1.Press the CH / button on the main unit ( or / button on the remote control ) to select and highlight your
desired rating level.
2.Press the VOL / button on the main unit ( or / button on the remote control) to switch between status
B or V. Your desired rating level changes automatically to B or V.
3. Press the MENU button on the main unit ( or OK button on the remote control) to return the previous menu.
NOTE: Background displays on the picture in the mute mode if the movie viewing exceeds the preset rating
level or you may reset the rating level to view your movie.
CHILD LOCK Select "ON" to block all the control buttons on the main unit and all TV channels in
mute mode. The CHILD LOCK setting takes effect after your turn on the TV again.
CHANGE PASSWORD Select to change the password of the PARENTAL CONTROL menu as shown in
the following screen.
NEW PASSWORD Enter a new password. You can use number buttons to input a new password.
CONFI RM Enter the same number to confirm the new password.
15
Page 16

DVD Menu System
DVD M enu System
The DVD player setup system sets up the features of the DVD player in stop mode.
DVD M enu Basic Operation
1. Press the button to stop the DVD playback and make sure that the remote control is in the DVD
mode.
2. Press the GUI DE button on the remote control, the SETUP MENU (main) displays.
3. Press the / button to highlight your desired item, select the OK button to enter submenu.
4. Press the / button to move the pointer. Select the / button to your desired option and press the OK
button to complete the setup.
5. Press the SKI P button to locate a specific chapter/ track or time during DVD playback.
Press the / buttons (or digit buttons) to select your desired chapter or track and then press the OK
button to start the disc playback.
Press the SKIP button twice, the playback time displays. Take note your desired playback time setting
cannot exceed the total playback ti me of the chapter. During VCD/AUDIO CD playback, press the
SKI P button to select a specific time. (Only the PBC is off during VCD playback.)
6. To end the setup, press the GUIDE button.
I n the SETUP MENU, you may choose any of the following options :
LANGUAGE SET UP
The LANGUAGE SETUP is used to set the DVD language for OSD, MENU, AUDIO AND SUBTITLE.
Language Setup
1 OSD(On Screen Display)
Select to display the language for OSD.
ENGLISH: On-screen di splay (OSD) text appears in English.
SPANISH: OSD text appears in SPANISH.
FRENCH: OSD text appears in FRENCH.
16
Page 17

DVD Menu System
LanguageSetup
LanguageSetup
LanguageSetup
2 MENU
Select to display the language for DVD menu.This DVD player provides E NGLI SH, FRENCH, SPANI SH
etc. as the film’s menu language options. For example, if you normally want to see
disc menus in English, select English.
3 AUDIO
To select the language for audio. If multiple languages are programed on the disc, the setting you choose
here determines the language you hear.
This DVD provides ENGLI SH, FRENCH, SPANISH etc. as the built-in disc dubbing language options.
4 SUBTITLE
To select the subtitling language.This DVD player provides ENGLISH, FRENCH, SPANISH etc. as the
built-in subti tle language. When a DVD is played, the user may hide the subtitle or choose any of them as
the preset subtitle language.
17
Page 18

SCREEN SET UP
ScreenSetup
This option is used to setup the DVD video output function.
ScreenSetup
1 TV TYPE
To select the playback picture size to the TV aspect ratio.
DVD Menu System
4:3 PS: To display 16:9 source on normal 4:3 aspect ratio TV display as pan and scan (PS). The edges
are cut off in this mode.
4:3 LB : To display 16:9 source on normal 4:3 TV display as letter box (LB). When a DVD providing
multiple angles is used, the user may select a particular angle.
WIDE: To display 16:9 source on special 16:9 wide screen TV.
18
Page 19

DVD Menu System
ScreenSetup
ScreenSetup
2 SCREEN SAVER
The screen saver appears after the DVD player is turned on or in the stop mode.
ON:screen saver is on.
OFF:screen saver is off.
3 BRIGHTNESS
To select the BRIGHTNESS setting for DVD video output.
4 CONTRAST
To select the CONTRAST setting for DVD video output.
19
Page 20

DVD Menu System
C USTOM SETUP
Custom setup include parental control, password, angle mark and default. Preset values are essential to
a DVD player. The user may change these items as desired.
Custom Setup
1 PARE NTAL CONTROL
I n the United States, categories go from 1G (very restrictive content) to adult categories. However, different
geographic locations abide by different categories of program material. Accordingly, Parental control and
Locale go together. Consult your local television and DVD authorities for what the ratings mean in your
area. I f the level set here is below the rating of a disc, the DVD will request a password.
Custom Setup
2 P ASSWORD
The default super password is 8888. The user may change it using this option.
You must enter a valid password here to gain access to Parental controls. Do not forget the password you
enter here, otherwise, you have to set the DVD back to the factory settings (default menu) and reset all your
setup options.
Custom Setup
20
Page 21

DVD Menu System
3 ANGLE MARK
Select to setup the angle mark function.
C ustom Setu p
ON: Angle mark appears on the screen.
OFF:Angle mark disappears on the screen.
4 DE FAULTS
Defaults set all the selectable options in all the menus to factory settings and should only be used as a last
resort.
Cus tom Setup
CAUTION: I f you choose Defaults option, Parental controls must be reset along with all the other selections you have made in the Setup menus. Before you use this option, ensure this is the only way you can get
the DVD to operate again. You may wish to review and record your present settings before choosing to
reset all your options back to factory settings.
EXIT
Press to exit the setup menu. You can press the guide button to exit the setup menu directly.
21
Page 22

DVD Operations
Playing Discs
Note: Before disc playback, select the remote control in DVD mode.
Playing DVDs
For basic information about disc playback, see page 9 for details on DVD disc menu.
Using a Disc Menu
Some discs have an on-screen menu that is separate from the DVD player’s menus. The disc menu might
only contain a list of the titles and chapters or it may allow you to change features such as language and
playback settings. The content and the operation of disc menu varies from disc to disc.
1. While the disc is playing, press MENU button on the remote control. The disc menu appears.
2. Press the / and the / button to highlight the desired section or item. Select the OK button on the
remote control to confirm the selection.
3. Press MENU button on the remote control to resume playback.
Tip and Note: Many discs skip the disc menu and start playing automatically. Press the MENU button on
the remote control during the disc playback to access the disc menu. Any settings you change on the disc
menu only override the settings in the DVD player’s menu temporarily. Default settings are set up in the
DVD player’s menu system. To change the default settings, go to DVD MENU System.
Playing Audio CDs
This DVD player can be used as an audio CD player.This section explains how to play audio CDs in your
DVD player and how to use the player’s features.
Scan Disc
To scan through the disc during disc playback.
1. Press the REVERSE or the FORWARD button on the remote control during disc playback.
2. Press the button again to scan at a faster speed.
3. Press the PLAY button to return normal playback.
Track Advance or Reverse
1. Press the or buttons on the remote control during disc playback.
2. Each time you press the button, the CD advances (or reverses) one track.
Pause
1. Press the PAUSE button to pause the disc playback.
2. Press the PLAY button to resume playback.
22
Page 23

Picture defects and countermeasoures(VHF/UHF reception)
The most common types of television interference are as follows:
SNOWY PICTURE
Snowy picture is usually due to weak signal. Adjust antenna or install an antenna amplifier.
DOUBLE IMAGE OR GHOSTS
Double images are usually caused by the blocking of tall buildings. Adjust the direction of antenna or lift it
higher.
RADIO WAVE INTERFERENCE
Wavy patterns are movi ng on the screen, which are usually caused by nearby radio transmitters or shortwave receiving equipment.
HIGH TEMPERATURE ELECTROTHERMAL INTERFERENCE
Diagonal or herringbone patterns of picture distortion appears on the screen, which is probably caused by
high temperature electrothermal equipment used in a nearby hospital.
NOTE:I f one of these symptoms appears on the screen when the cable from a company is connected, this
may be due to the local cable company broadcast.
23
Page 24

Trouble shooting
Do a simple check to the encountered problem as shown in the Troubleshooting list below.
I f the problem still persists, contact the service center.
For TV
Troubleshooting
24
Page 25

Troubleshooting
For DVD Player
Disc does not play
Check if the disc is loaded properly on the disc tray. (label side facing up)
Check if the disc is clean from dirt, dust, finger prints and smudge.
Check if the loaded disc complies with the recommended guides.
Check if the parental lock function is on.
Check if the loaded disc is to be used in region 1.
Picture distortion
Make sure the disc is clean and not any scratches on it.
Since the player is controlled by a micro-computer, some problems can be solved by turning off and on the
unit.
DISC PROT ECTION
Protection
Always hold the disc by the center and the edge.
Do not apply paper or write anything on the disc surface.
Do protect the disc from any fingerprints.
Cleaning
Wipe the disc in a straight motion from the center to the edge with a soft cloth
Storage
Do not warp the disc.
When left unused for a long period of time, keep the disc properly in the case.
Do not expose the disc to extreme temperature (cold or hot) and high humidity or it may cause damage to
the disc.
Do not expose the disc to direct sunlight.
25
Page 26

Specification and accessories
Specification
Supplied accessories.
1. User’s Manual
2. Remote control
3. 2 R03/AAA size batteries
Page 27

39015147
Page 28

 Loading...