

Page 1

1
POS Tablet
Model: Moby/M120
Page 2
2
Directions
Meanings of icons:
Forbidding: forbid improper operations to avoid damaging
the POS Tablet.
Caution: cautions for operators to avoid potential damages.
Please note and remember.
Importance: important information, common notes,
definitions, general knowledge and references, etc.
Other trademarks and trade name may be used in this manual to refer
to either the entities claiming the marks and names or their products.
The manufacture disclaims any proprietary interest in trademarks and
trade names other than its own.
Information in this manual is subject to change without notice.
Reproduction in any manner whatsoever without the written
permission from the manufacture is strictly forbidden.
Product images in this manual are for your reference only.
Page 3

3
Contents
Directions ......................................................................... 2
Safety Precautions .......................................................... 6
1 Know Your Tablet PC .................................................. 8
2 Connect the Power Adapter ...................................... 10
3 Turn on the Tablet PC ............................................... 11
4 Get to Know Your System ......................................... 12
4-1 Add screen shortcuts ............................................. 14
4-2 Delete screen shortcuts/widgets ........................... 15
4-3 On-screen Keyboard .............................................. 15
5 Settings ....................................................................... 16
5-1 Network & Internet .................................................. 16
5-2 Connected Devices ................................................ 18
5-3 Apps & Notifications ............................................... 20
Page 4

4
5-4 Battery ..................................................................... 20
5-5 Display ..................................................................... 20
5-6 Sound ...................................................................... 20
5-7 Storage .................................................................... 20
5-8 DuraSpeed .............................................................. 21
5-9 Security & location.................................................. 21
5-10 Users & accounts ................................................. 21
5-11 Accessibility .......................................................... 21
5-12 Google ................................................................... 21
5-13 System ................................................................... 21
6 Chrome ........................................................................ 23
7 Function ...................................................................... 24
7-1 Camera .................................................................... 24
7-2 Music ....................................................................... 25
8 Appendix ..................................................................... 26
Page 5

5
8-1 Troubleshooting ...................................................... 26
8-2 Specifications .......................................................... 28
9 FCC Statements: ........................................................ 29
Page 6

6
Safety Precautions
1. DO NOT press the LCD Screen. DO NOT place the Tablet PC with
small items, they may scratch LCD Screen.
2. DO NOT expose the Tablet PC to dirty or dusty environment. Keep
the environment clean and dry.
3. DO NOT place the Tablet PC on uneven or unstable work surface.
4. DO NOT place or drop objects on the top of the Tablet PC. DO NOT
shove any foreign objects into the Tablet PC. DO NOT cover the LCD
Screen strongly.
5. DO NOT expose the Tablet PC to strong magnetic or electrical
fields; DO NOT place the floppy disk near or on the Tablet PC, that
may loss the data of the floppy disk.
6. DO NOT leave the Tablet PC facing the sun as it can damage the
LCD Screen, especially in the car.
7. SAFE TEMP: This Tablet PC should only be used in environments
with ambient temperatures between 5℃ (41℉) and 35℃ (95℉).
8. DO NOT expose the Tablet PC to or use near liquids, rain, or
moisture.
Caution: Risk of explosion if battery is replaced by an incorrect type.
Dispose of used batteries according to the instructions.
9. DO NOT throw the Tablet in municipal waste. Check local
regulations for disposal of electronic products.
10. The Tablet and the Adapter may occur some heat during
operating or charging. DO NOT leave the Tablet on your lap or any
part of the body in order to prevent discomfort or injury from heat
exposure.
Page 7
7
11. INPUT RATING: Refer to the rating label on the Tablet and be
sure that the Power Adapter complies with the rating. Only use
attachments or accessories specified by the manufacturer.
12. Checking the connections between the main unit and attachments
before turning on the Tablet PC.
13. DO NOT use the Tablet PC during eating food avoid dirtying the
Tablet PC.
14. DO NOT insert anything into the Tablet PC that may result in short
circuit or damage the circuit.
15. Power off the Tablet PC, if you want install or remove some
external devices which are not support hot-plug.
16. Disconnect the Tablet PC from the electrical outlet and remove
any installed batteries before cleaning. And Keep it away from
children.
17. DO NOT disassemble the Tablet, only a certified service
technician should perform repairs on your computer. Otherwise,
problem may result and the manufacturer should not hold
responsibility for the damage.
18. The Tablet has some little metal flake to disperse heat. DO NOT
place the Tablet on soft objects (e.g.: bed, sofa, your lap), or else the
Tablet may become hot and halt the system operation.
19. The socket-outlet shall be installed near the equipment and shall be
easily accessible.
20. To prevent possible hearing damage, do not listen at high
volume levels for long periods.
21. If an equipment is provided with a replaceable battery, and
if replacement by an incorrect type could result in an explosion (for
example, with some lithium batteries).
Page 8
8
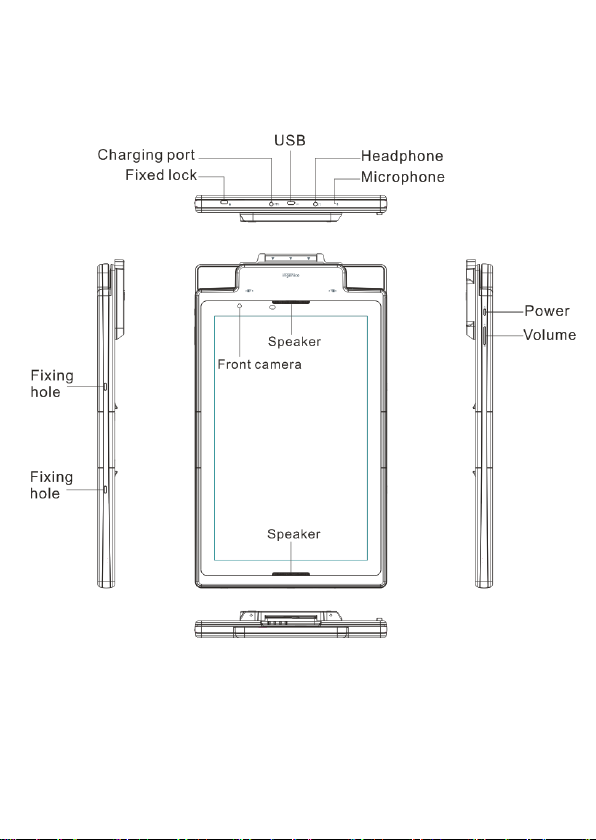
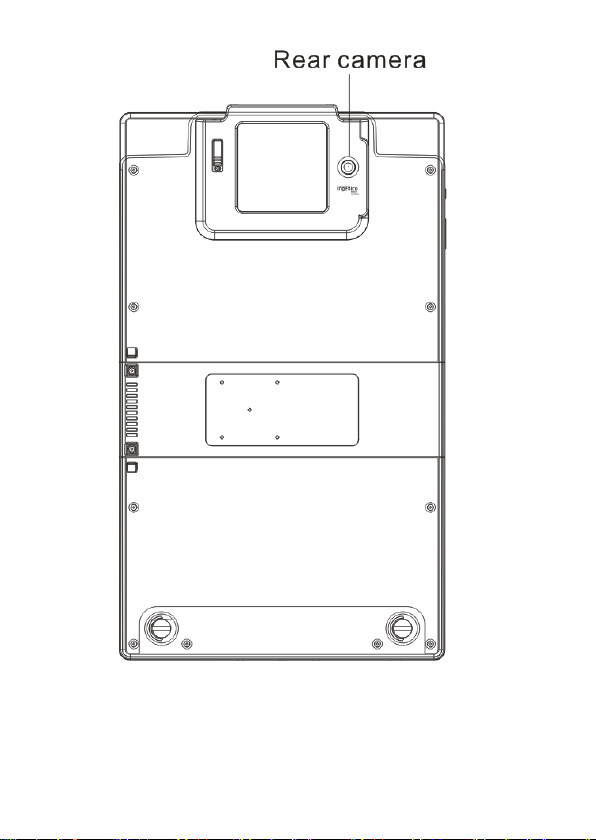
1 Know Your Tablet
Front Panel
Back Panel
Page 9
9
Page 10

10
2 Connect the Power Adapter
The tablet comes with a universal AC-DC adapter and the allowable
input voltage of adapter is from 100V to 240V.
The connection between Tablet and AC adapter is illustrated in below
picture:
Your tablet and the accessories may differ from the pictures
shown above.
The socket-outlet shall be installed near the equipment and
shall be easily accessible.
Use only the AC adapters, power cords and batteries that are
approved for use with this device. Use of another type of
battery or AC adapter may cause fire or explosion.
Page 11

11
3 Turn on the Tablet
Press and hold the power button for seconds to turn on the device:
Press the power button once to access standby mode and press
again to wake it up;
Press and hold the power button, and then tap Power off to power off
the tablet.
If the system halts, press and hold the Power button for about 8
seconds to turn off the device forcedly.
Page 12

12
4 Get to Know Your System
Press the Power button for seconds to turn on the tablet and then it
display locked screen as shown below, you need to swipe up the
screen to unlock.
Press the Power button for seconds to turn on the tablet and then it
display locked screen as shown below, you need to swipe up the
screen to unlock.
If it’s your first time to use the tablet, the system will enter the guide
menu. Please finish the initial setting following the instructions.
Home page
Status Bar: Slide down to open quick
settings menu and notification.
Page 13

13
: tap to enter Home screen.
: tap to return to the previous page.
: tap to open recent APPs list menu.
: tap to enter APPs Menu.
Touch for web
Information search
and so on
Shortcuts: touch to open; touch & hold to move.
Page 14

14
4-1 Add screen shortcuts
On the home page, touch and hold the blank area to popup menu to
change wallpaper; Slide in the same direction as on the home
page to access APPS menu; touch and hold an APPS icon to add it to
the home screen.
Page 15

15
4-2 Delete screen shortcuts/widgets
On the home screen, touch and hold the shortcut or widget to be
deleted until the “× Remove” appears. Drag the shortcuts to the remove
icon to delete.
4-3 On-screen Keyboard
Toggle letters & numbers
Space
Caps lock
Backspace
Go
Expression
Page 16

16
5 Settings
5-1 Network & Internet
5-1-1 Wi-Fi
Touch the Wi-Fi swtich behind of the Wi-Fi item to turn on the Wi-Fi
function and then the system will auto-scan the available networks to
display as shown below picture.
Select one network and input password if necessary to connect.
Search settings here
Page 17

17
5-1-2 Data usage
Touch to see the data usage information, including wifi data usage
and network restrictions.
5-1-3 Tethering
Touch to turn on the USB tethering or Bluetooth tethering to provide
internet to other devices through your mobile data connection.
5-1-4 VPN
Add a VPN connection in this menu.
5-1-5 Airplane mode
Touch to turn on or turn off the airplane mode.
Page 18

18
5-2 Connected Devices
5-2-1 Bluetooth
The Bluetooth function enables you to exchange files between the
tablet and other Bluetooth devices.
Before this step, please activate the Bluetooth function of
other device (mobile phone, Bluetooth earphone etc.)
and make sure the device is in range.
Touch the Bluetooth switch behind of the Bluetooth item to turn on the
Bluetooth function and then the system will auto-scan the visible
Bluetooth device nearby and display if you touch Pair new device to
find Available device as shown below:
Page 19

19
Touch the desired Bluetooth device to start pairing. Then according to
the indications on both side, users can complete the connection
successfully in seconds. After pairing, you can share files between
the unit and the Bluetooth device.
5-2-2 Cast
Connect to a nearby device in this menu for casting.
5-2-3 Printing
Search connected printer to print some files.
5-2-3 USB
Touch to select the function of USB if there are issues connecting to
USB devices. Options including Charging this device, Transfer files,
Transfer photos(PTP), or Use device as MIDI.
Page 20

20
5-3 Apps & Notifications
5-3-1 Recently opened apps
Touch to check the current Apps information.
5-3-2 Notifications
Touch to select which app can show the notification. You can also
decide whether to show the notifications on the lock screen or not.
5-3-3 Apps permissions
Touch to set apps permissions in this menu.
5-3-4 Advanced
Touch to set apps in this menu, including Default apps and Special
app access.
5-4 Battery
Touch to check the battery information, manage your power by
turning off some functions to save power.
5-5 Display
Touch to open display settings, including MiraVision, Brightness level,
Adaptive brightness, Wallpaper, Sleep, Auto-rotate screen, Front
size,Display size and Screen saver.
5-6 Sound
Touch to do the sound general settings.
5-7 Storage
Touch to check the usage of internal storage and possible SD card.
Page 21

21
5-8 DuraSpeed
Choose whether to open duraSpeed or not. DuraSpeed helps boost
the foreground APP by restricting background APPs; some
notifications may be postponed or not received. DuraSpeed does not
restrict background activities of APPs switched on in the list
5-9 Security & location
Checking the security status and set up device for security in this
section.
5-10 Users & accounts
5-10-1 Users
Touch to set the owner’s information, or add a new user.
5-10-2 Accounts
To add email accounts or google account.
5-11 Accessibility
Look at what other accessibility in the system or add some.
5-12 Google
Enjoy your services and set up your preferences in this section.
5-13 System
5-13-1 Language & input
To choose the system language. You can also set the keyboard &
inputs methods.
5-13-2 Gestures
Page 22

22
Touch to set to quickly open the camera, press the power button
twice.
5-13-3 Date & time
You can set the date and time, and their format of the tablet.
5-13-4 Backup
Choose to back up to Google Drive or to your account.
5-13-5 Developer options
5-13-6 Reset options
Reset DRM, WI-FI, mobile, Bluetooth, app preferences or factory
reset in this menu.
5-13-7 About tablet
The detailed information about the unit, including wireless update,
Status of the battery,network and other information, Legal information,
Model, Android version, Android security patch level,Baseband
version, Build number and Custom build version.
Page 23

23
6 Chrome
Open:
After the network connection completed, touch the chrome icon to
access the network browsing.
Designing wed may slow the speed to browse the web.
More
Bookmark this page
Add a new tab
Tabs
Back,
Forward,
Refresh
Page 24

24
7 Function
7-1 Camera
Open:
Take Pictures: 1. Aim the object.
2. Press to take a picture.
Notice: 1. Select video mode if you want to record videos.
2. All photos or videos taken are both stored in the photos and gallery.
Settings
HDR capture
Normal mode
Face beauty mode
Panorama mode
Switch for front
camera or rear
camera
Exposure\color effect\white
balance\scene mode
Page 25

25
7-2 Music
Open:
Choose any song you like to start playback. During music playback,
touch to pause and touch to resume playback; touch / to
play the previous/next track. Touch. to find more functions.
Search Google
Play Music
Page 26

26
8 Appendix
8-1 Troubleshooting
Q1:How to do with the tablet when the halted system occurs?
A: Press and hold the power button for about 8 seconds to reboot it
forcedly.
Q2:How to check the tablet if the tablet cannot be turned on?
A:
1. If the power is low, connect to the electric outlets.
2. Make sure the indicator of the adapter turns on and the adapter
works well.
3. Remove the external device.
Q3:If the water come into the tablet
A:
1. DO NOT turn on the tablet.
2. Disconnect the outlet cable in order to turn off the tablet, instead
of pressing the power button to turn off it. Disconnect all external
devices, and then send to the service center for advice.
3. DO NOT place the tablet into the dirty carrying case to again.
Q4:How to recover the factory status?
A:
Page 27

27
Touch Settings --- Backup & reset --- Factory data reset --- RESET
TABLET --- ERASE EVERYTHING to recover the system to the
default status on APPS Menu.
Q5:How to prolong the usage time of the Battery?
A
1. Adjust the brightness of the LCD Screen to proper level on
Settings --- Display --- Brightness level menu.
2. Turn down the volume.
3. Set the time amount to proper level on Settings --- Display ---
Sleep menu.
Q6: The image isn’t clear.
A: Check that the lens is clear or not, if not, clean with the soft cloth.
Q7:How to do with the problem like “some problems happens in
pairing the Bluetooth”?
A: Be sure whether the time is too long to input the password.
(Overtime)
Q8: Why is Bluetooth disabled?
A:Check if the “Airplane mode” is enabled, if so, the Bluetooth
function can’t be activate d.
Page 28

28
8-2 Specifications
Processor
MT8167A/A
RAM(#)
2 GB
Storage capacity(#)
16 GB
Screen size
12.2"
Resolution
1920*1200
Interfaces
Micro USB, 3.5 mm standard
headphone jack
Descriptions
Front: 2.0M pixel;
Back: 5.0M pixel
Communications
802.11a/b/g/n/ac (MT6630),
Bluetooth(BT4.2)
Operating temperature
5-35℃
Operating humidity
35%-85%
Storage temperature
-20-55℃
Storage humidity
20%-93%
Adapter
AC 100~240V; 5V/3A DC adapter
with 1.5m cable and US plug
Output power (max)
≤15W
Battery
7000mAh/3.8V Li-polymer
Weight
1130g (tablet without POS)
Dimension
350 x 207 x 18.5 mm
Page 29

29
9 FCC Statements:
This equipment has been tested and found to comply with the limits for
a Class B digital device, pursuant to Part 15 of the FCC Rules. These
limits are designed to provide reasonable protection against harmful
interference in a residential installation.
This equipment generates, uses and can radiate radio frequency
energy. However, there is no guarantee that interference will not occur
in a particular installation. If this equipment does cause harmful
interference to radio or reception, which can be determined by turning
the equipment off and on, the user is encouraged to try to correct the
interference by one or more of the following measures:
• Reorient or relocate the receiving antenna.
• Increase the separati on between the equipment and receiver.
• Connect the equipment into an outlet on a circuit different from that to
which the receiver is connected.
• Consult the dealer or an experienced technician for help.
Page 30

30
This device complies with part 15 of the FCC Rules. Operation is
subject to the following two conditions:
1) This device may not cause harmful interference, and
2) This device must accept any interference received, including
interference that my cause undesired operation.
MODIFICATION: Any changes or modifications not expressly approved
by the grantee of this device could void the user ’s authority to operate
the device.
 Loading...