

Infinity Primus P152, Primus P162, Primus P252, Primus P362, Primus PG250 Owner's Manual
...
~Inflnit¥
INFINITY
PRIMUS®
SPEAKERS
Owner's
Guide
P142
P152
P162
P252
P362
PG250
PG350
INFINITY
PRIMUS®
SERIES
The
Primus
seriesofloudspeakers
continues
Infinity's
longstanding
commitmenttoaccurate
sound
reproduction.
Our
proprietary
Metal
Matrix
Diaphragm™
(MMD®)
drivers,
precision
dividing
networks,
and
rigid,
well-braced
enclosures
combinetodeliver
uncompromised
performanceinany
stereoormultichannel
home
theater
system.
In
addition,
Primus
series
speakers
are
magnetically
shielded
for
safe
placement
adjacenttoa
television.
UNPACKING
THE
SPEAKERS
If
you
suspect
damage
from
transit,
reportitimmediatelytoyour
dealer.
Keep
the
shippingcarton
and
packing
materials
for
future
use.
Home
Theater
For
front-channel
use,
place
one
speakeronthe
left
and
anotheronthe
right,
along
either
sideofthe
television
monitor.
Since
the
speakers
are
magnetically
shielded,
you
can
place
them
without
worrying
about
the
field
distorting
theTVpicture.
For
surround
use,
place
speakers
alongside
the
listening
position.
Final
placement
dependsonroom
acoustics,
availabilityofspace,
and
your
listening
preference
(Figures2and
3).
The
center
channel
speaker
shouldbeplacedontopofor
directly
below
the
television
and
aimed
toward
the
listening
area.
NOTE:
An
Infinity
powered
subwoofer
will
add
impact
and
realismtoboth
music
and
film
soundtracks.
Contact
your
Infinity
dealer
for
recommenda-
tionsonsubwoofer
models
for
your
application.
0
~
eote
h
~
0
Left
Right
Surround
Surround
Channel
Channel
PLACEMENT
Stereo
Before
deciding
wheretoplace
your
Primus
speakers,
survey
your
room
and
think
about
placement,
keeping
the
following
pointsinmind,
using
Figure1asaguide:
•
For
best
results,
place
the
speakers
6'-8'apart.
•
Position
each
speakersothat
the
tweeterisapproximatelyatear
level.
•
Generally,
bass
output
will
increaseasthe
speakerismoved
closertoa
wallorcorner.
•
Refertothe
"Home
Theater"
sectionifyou
also
plantouse
the
speak-
ers
for
home
theater
reproduction.
F~Oen~
0
Channel
Center
Channel
InfinitySubwoofer
(optional)
o
O
Right
Front
Channel
o
left
Channel
o
Right
Channel
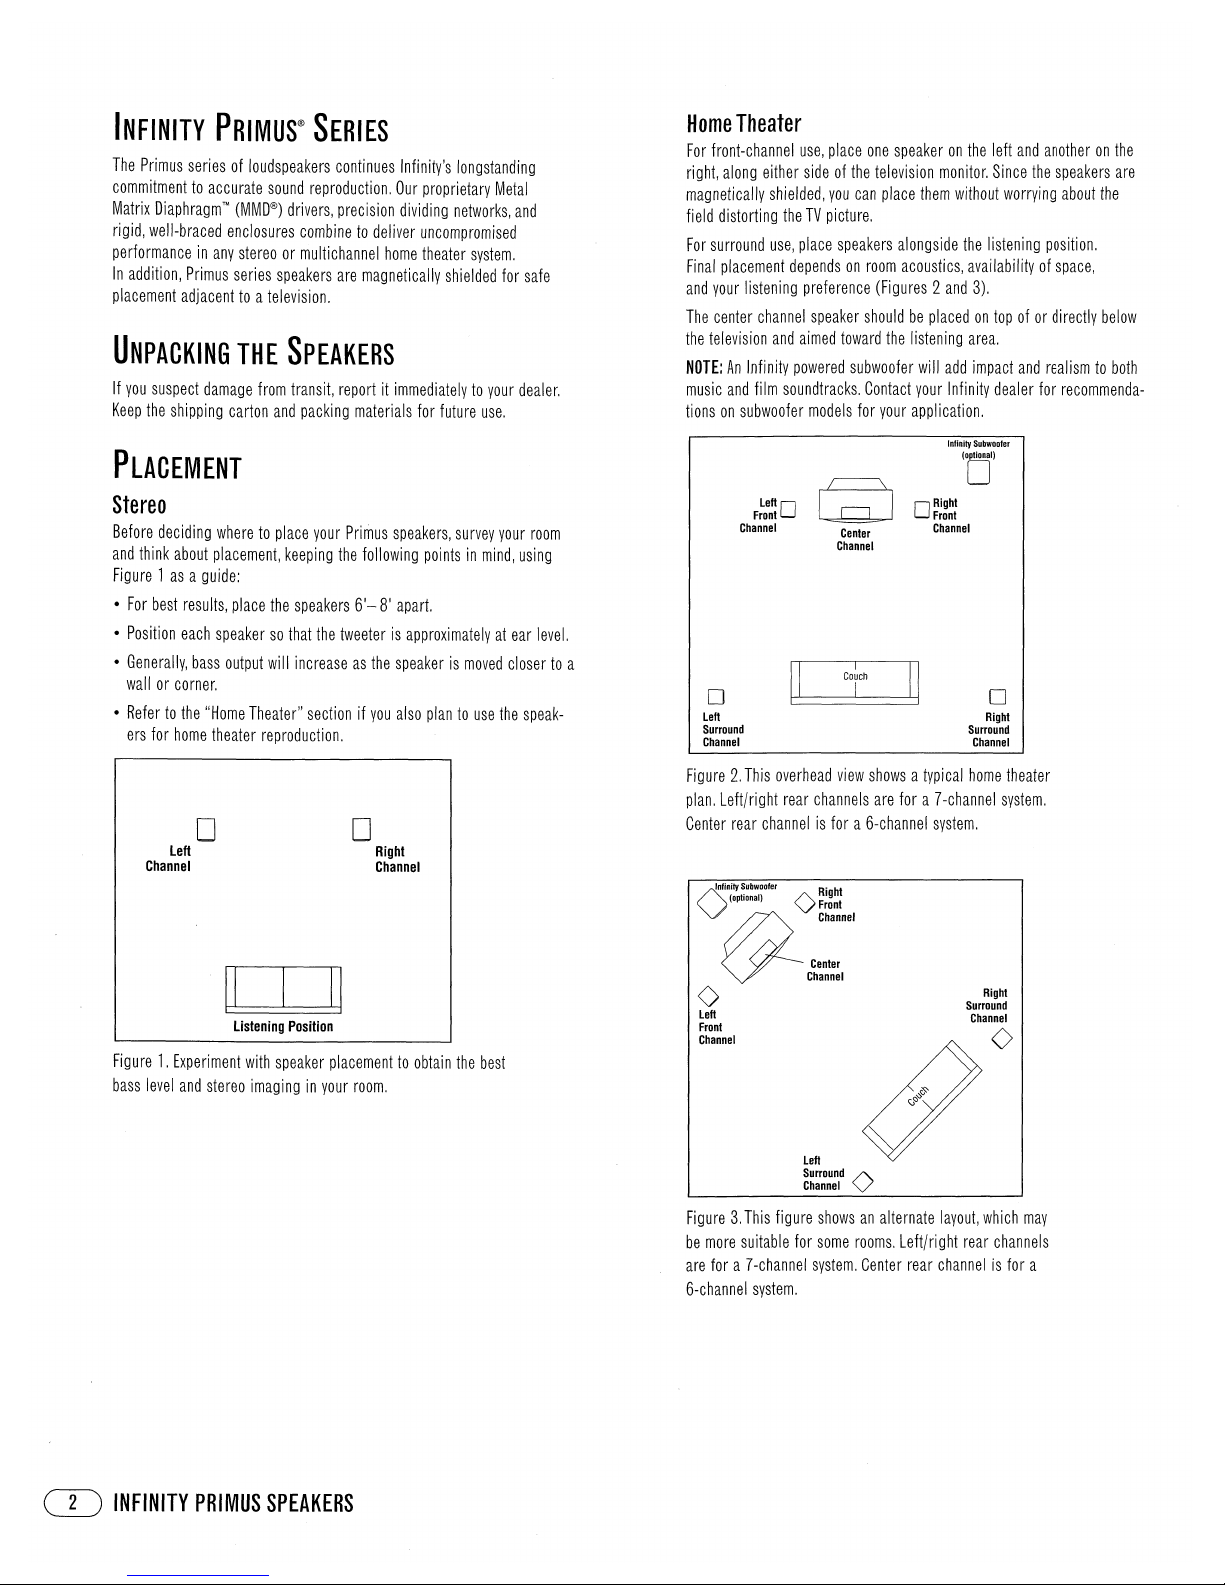
Figure2.This
overhead
view
showsatypical
home
theater
plan.
Left/right
rear
channels
are
fora7-channel
system.
Center
rear
channelisfora6-channel
system.
listening
Position
Figure1.Experiment
with
speaker
placementtoobtain
the
best
bass
level
and
stereo
imaginginyour
room.
0
Jnfinity~ubwoofer
Right
(optional)
0
Front
W
Channel
Center
Channel
o
Left
Front
Channel
Left
Surround
<>
Channel
Right
Surround
Channel
<>
CD
INFINITY
PRIMUS
SPEAKERS
Figure3.This
figure
showsanalternate
layout,
which
may
be
more
suitable
for
some
rooms.
Left/right
rear
channels
are
fora7-channel
system.
Center
rear
channelisfor
a
6-channel
system.
WALL-MOUNTING
THE
P142,
P152
AND
PG250
The
P142,
P152
and
PC250
are
designedtomount
directlytoa
wall.
Each
speaker
has
two
keyholesonthe
back,
and
will
require
(2)
1-1/2,11
#10
wood
screws
fastenedtoa
wall
stud.Ifa
wall
studisunavailable,
installananchor
appropriate
fora1-1/2,11
#10
screw.
NOTE:
The
customerisresponsible
for
the
correct
selection
and
use
of
mounting
hardware
(available
through
hardware
stores)
that
will
ensure
the
proper
and
safe
wall-mountingofthe
speakers.
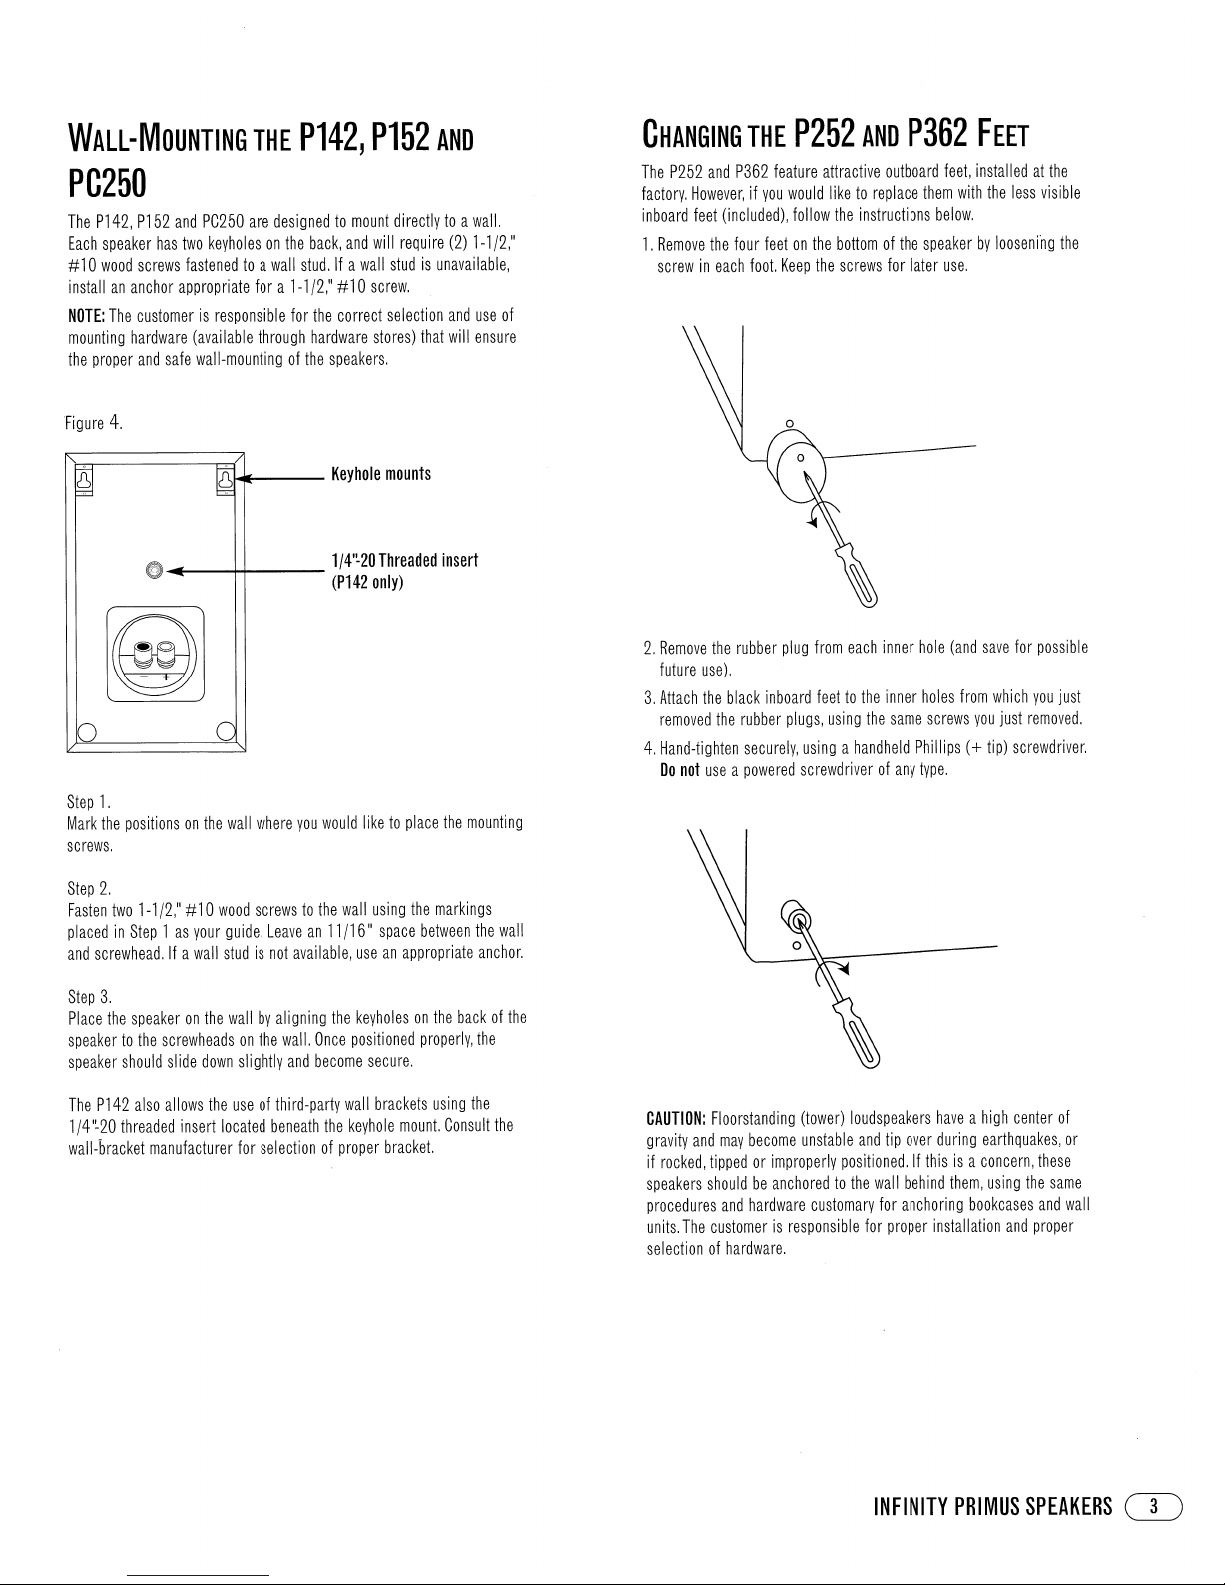
Figure
4.
~
Keyhole
mounts
\\\S()@)~
......
---+..-----
1/4'~20Threaded
insert
(P142
only)
o
Step
1.
Mark
the
positionsonthe
wall
where
you
would
liketoplace
the
mounting
screws.
Step
2.
Fasten
two
1-1/2,11
#10
wood
screwstothe
wall
using
the
markings
placedinStep1as
your
guide.
Leavean11/1611space
between
the
wall
and
screwhead.Ifa
wall
studisnot
avai
lable,
useanappropriate
anchor.
Step
3.
Place
the
speakeronthe
wallbyaligning
the
keyholesonthe
backofthe
speakertothe
screwheadsonthe
wall.
Once
positioned
properly,
the
speaker
should
slide
down
slightly
and
become
secure.
The
P142
also
allows
the
useofthi
rd-party
wall
brackets
usingthe
1/41~20
threaded
insert
located
beneath
the
keyhole
mount.
Consult
the
wall-bracket
manufacturer
for
selectionofproper
bracket.
CHANGING
THE
P252
AND
P362
FEET
The
P252
and
P362
feature
attractive
outboard
feet,
installedatthe
factory.
However,ifyou
would
liketoreplace
them
with
the
less
visible
inboard
feet
(included),
follow
the
instructions
below.
1.
Remove
the
four
feetonthe
bottomofthe
speakerbylooseni'ng
the
screwineach
foot.
Keep
the
screws
for
later
use.
o
2.
Remove
the
rubber
plug
from
each
inner
hole
(and
save
for
possible
future
use).
3.
Attach
the
black
inboard
feettothe
inner
holes
from
which
you
just
removed
the
rubber
plugs,
using
the
same
screws
you
just
removed.
4.
Hand-tighten
securely,
usingahandheld
Phillips(+tip)
screwdriver.
Do
not
useapowered
screwdriverofany
type.
CAUTION:
Floorstanding
(tower)
loudspeakers
haveahigh
center
of
gravity
and
may
become
unstable
and
tip
over
during
earthquakes,
or
if
rocked,
tippedorimproperly
positioned.Ifthisisa
concern,
these
speakers
shouldbeanchoredtothe
wall
behind
them,
using
the
same
procedures
and
hardware
customary
for
anchoring
bookcases
and
wall
units.
The
customerisresponsible
for
proper
installation
and
proper
selectionofhardware.
INFINITY
PRIMUS
SPEAKERS
CD
 Loading...